Embed Size (px)
Citation preview

FUN-damentals of WEAVING
___________________________________________________________________________________________________American Textile History Museum
Traveling Textiles Program TEACHER’S GUIDE

Copyright 2001, American Textile History Museum, Lowell, Massachusetts 01854

Table of Contents
Page
1. Introduction 1
- How to Use this Guide 1 - Objective 1 - Program Description 1
2. Lesson Plans 3 - Pre-Lessons
- Collections and Museums 5 - A Day in Your Life 6
- Post-Lessons - Textile Traditions Research Project 7 - Class Critique 10
3. Related Follow-up Activities 13
- Create Your Own Textile Tradition 15 - Shoebox Loom 16 - Paper Weaving 17 - Salt Dough Basket 19 - Weaving Twigs 21 - Create a HUMAN Loom 22 - Make Your Own Simple Rigid Heddle Loom 23
4. Additional Information 25
- Background Information 27 - Vocabulary 29 - Bibliography/Suggested Readings 30 - Connections to Massachusetts Frameworks 32


Introduction
The American Textile History Museum in Lowell, Massachusetts, recreates the
“museum experience” in school classrooms through the Traveling Textiles program. Our Museum Educator-led outreach programs and/or program kit rentals include all lesson plans and materials needed.* Our educational programs and Museum exhibitions aim to provide enjoyable opportunities for both personal growth and discovery through exposure to America’s diverse textile history and its impact on today. We provide the information and artifacts for students to make this connection. Along the way, we showcase the creativity and problem solving skills shown by earlier American textile producers, both at home and in business, and encourage students to appreciate these skills and, most importantly, to develop their own.
How to Use this Guide
This guide is intended to provide the main educational lesson as well as before and after support materials. Included are the main lesson plan, optional pre- and post-lesson plans for those who wish to teach an entire unit on the subject, descriptions of related follow-up activities (without lesson plans), as well as background information, vocabulary, an annotated suggested readings list, bibliography, and connections to the Massachusetts Curriculum Frameworks. The pre-lessons are intended to give students a context for the arrival of the Museum teacher, one exploring the concept of a museum as someone’s collection, and another exploring useful background context information for the main lesson. The post-lessons relate to and reinforce the main lesson subject matter.
Kit renters should make sure they have received everything intended by checking off the kit inventory list when the kit arrives. Please do the same when sending it back.
We ask everyone to complete and return the enclosed evaluation form to help us monitor and improve our offerings. Objective The objective of the FUN-damentals of Weaving program is to introduce students to hand weaving, the vocabulary associated with the process, and its historical significance. It also introduces students to museums and collections. Program Description Optional pre and post lessons are included for program reinforcement. ______________________________________________ Created by the American Textile History Museum - 1


Lesson Plans
______________________________________________ Created by the American Textile History Museum - 3


Pre-Lesson Plan Title: Collections and Museums Program: Traveling Textiles – FUN-damentals of Weaving Grade Level(s): 4-6 Length of time for Lesson: 45 minutes Lesson Prior: Objective(s): • Students will recognize elements involved in collecting items. • Students will understand what a museum is. • Students will understand the role of a museum in a community. Materials: blackboard/chalk Steps: 1. Ask: Does anyone here have a collection? - Make a web diagram of responses on board, with "Collections" in the center 2. Ask: What makes these "collections"?
- Define collection: a group of objects having something of importance in common - Identify the common element in each collection on the board (i.e. similar
objects, from the same time period, all related to pets, etc.) 3. Ask: Why did you start your collection? - Make a list on the board. Possible responses: - objects are interesting
- possible future value and historical importance - curiosity (educational interest for self) - interest in objects' common thread (time period, topic, etc.)
4. Ask: Have you ever wanted to show your collection to others? - Discuss 5. Ask: How would you show your collection? - Discuss
- Define "museum" as a place to display a collection, where - people can see and admire art and artifacts
- people can learn about art and history - people can learn about other cultures
6. Ask: Has anyone ever visited a museum? - Name some local museums
- Ask if the following are museums: a zoo, aquarium, botanical garden, planetarium, children's museum (they all are in their own way)
7. Tell the class that you will present a lesson from the American Textile History Museum which teaches about and gets us involved in weaving and making cloth (this museum's common thread).
______________________________________________ Created by the American Textile History Museum - 5 Pre-Lesson Plan

Title: “A Day in Your Life” Program: Traveling Textiles – FUN-damentals of Weaving Grade Level(s): 4-6 Length of time for Lesson: 45 min. Lesson Prior: Collecting and Museums (optional) Objective: • Students will understand and appreciate the role of cloth in their daily lives Materials: paper/pen (each student uses their own) Steps: 1. Tell students to get out a piece of paper and pen or pencil 2. Tell students that you are going to “dictate” (verbally describe) a day in their life to
them. They are to close their eyes and listen carefully. When they hear you describe a situation where they would come in contact with something made of cloth, they should open their eyes and write the item down, making a list. They should immediately close their eyes again until the next time they have to add to the list
3. Starting with waking up in the morning, describe step-by-step and in detail a typical school day, and if time, a typical non-school day (waking up in a bed, showering, dressing, putting on shoes, eating breakfast, grabbing coat and school bag…). Allow time for students to list all the cloth they come in contact with. Finish with describing going to bed
4. Have students open their eyes and consider their lists 5. Have students write 1 paragraph on how their life would be different if weaving (cloth
making) had never been invented 6. Ask for volunteers to read their paragraphs aloud 7. Discuss students’ reactions to the question, closing the discussion with a
conversation about how we can take things for granted 8. Mention that you will teach a lesson about cloth’s impact on people’s lives. ______________________________________________ Created by the American Textile History Museum - 6 Post-Lesson Plan

Title: Textile Traditions Research Project on the Role of Cloth in Countries Outside of the United States
Program: Traveling Textiles – FUN-damentals of Weaving Grade Level(s): 4-6 Length of time for Lesson: 45 min. Lesson Prior: FUN-damentals of Weaving or Class Critique Objective: • Students will understand and appreciate various individual countries’ textile traditions • Students will understand that making textiles is a universal craft • Students will practice writing skills Materials: “Textile Traditions by Country” list
chalk/blackboard Steps: 1. Tell class that they will be doing a research project focused on traditional textiles
from countries around the world as part of your lesson unit on weaving. (Adapt project specifics to your individual class situation.)
2. Give project specifics (write on chalkboard if desired): - students will choose a country, fabric, or clothing item that interests them from
a prepared list, or they may request approval from you for a similar but non-list item that they wish to research
- students will have class time to do topic research in your computer center or library, and may do research outside of school (some recommended web sites are listed at end of lesson plan)
- students will produce a 2 page report (teacher may vary assignment by length or assign alternative finished projects such as posters, traditionally dressed cutout figures, or other show and tell)
- students will present their project to the class, and the class will do a class critique on their project (see class critique lesson)
3. (Optional) Explain report format to the class, stating how many paragraphs you require (this is a format that can be used for any writing assignment). (Write format on board or permanently display on a poster.) :
______________________________________________ Created by the American Textile History Museum -7 Report Format

• 1st paragraph: Introduce main topic • 2nd paragraph-on: One paragraph for each major point • Final paragraph: Summary of major points of main topic
Paragraph Format
• 1st sentence: State main topic • 2nd sentence-on: Supporting sentences for main topic • Final sentence: Summary of paragraph points
Example: 1st Paragraph: introduces topic The kimono is a traditional dress in Japan but kimono styles have changed over time. They varied with climate, customs, and laws at each time period. Learning about kimonos can teach us also about traditional Japan. 2nd Paragraph: about influence of climate on kimono style 3rd Paragraph: about influence of customs on kimono style 4th Paragraph: about influence of laws on kimono style Last Paragraph: summary of main points . Recommended web sites for textile traditions research (if a site struggles to open,
shorten the address by leaving off the last segment or two): The Costume Page - has long list of links to wide variety of specific costume web sites
– EXCELLENT http://members.aol.com/nebula5/costume.html The Costume Site - find subheading of Costume Designs, Art, Exhibits, Museums &
Images: Ethnic http://www.milieux.com/costume Textiles Through Time http://www.interlog.com/~gwhite/ttt/tttintro.html Hmong Textiles http://www.lib.uci.edu/rrsc/sasian.html Adire African Textiles http://www.adire.clara.net/afgallery.htm QuiltEthnic.com http://www.quiltethnic.com ______________________________________________ Created by the American Textile History Museum - 8

Textile Traditions by Country
Continent/Country Textile Description Africa
Ghana (Asante peoples) Kente Cloth woven silk strip cloth for ceremonial occasions Zaire (Kuba peoples) Kuba Cloth embroidered tie-dyed raffia cloth of palm leaf fiber East Africa Kanga rectangle of pure cotton cloth, bordered, printed Nigeria (Yoruba peoples) Yoruba Egungun mask/costume of multicolored & textured fabric Ghana/Ivory Coast Adinkra Cloth hand printed & embroidered "good-bye" cloth Nigeria (Yoruba peoples) Adire indigo resist-dyed cloth Mali (Bogolan) Bogolanfini hand-printed mud cloth Sahara Desert (Tuareg) Eseber large straw/leather mats with abstract graphics S. Africa Dashiki loose fitting long robe of brightly colored cotton
Asia Central Asia Carpets heavy woven wool floor coverings India Madras fine textured, brightly colored cotton or silk cloth India Rilli cotton applique & reverse applique India Sari long cloth used as a garment; significant draping styles Tibet Wangden meditation weaving unique carpet weaving style, used for meditation mats Tibet Thangkas silk applique hangings China Sleeve bands elaborately embroidered sleeves China Cheongsam (Qipao) long dress Japan Kimono long, loose, wide-sleeved robe worn with a broad sash Korea Wrapping cloths traditional dress S. China (Hmong) Paj Ntaub flower cloth, symbolic designs & patterns Cambodia Krama cotton scarf worn around head or hips Indonesia Batik (used on sarongs) intricate wax dyeing method for cloth Malay Baju Kurung loose tunic worn over long skirt Malay Kebaya 2 piece costume, tight blouse & batik skirt Polynesia Tapa (bark cloth) various traditional textiles made from bark Tonga Tupenu wrap around skirt-like cloth Tonga Ta'ovala or kie kie decorative wrap worn around waist Hawaii Featherwork cloaks, leis, helmets, etc. made of feathers Hawaii Hula skirt grass skirt
South America Andes Arpillera 3-D art quilts Maya/Mexico Huipil handwoven brocade rectangular outer garment Aztec/Mexico Feather weaving use of fluffy chicken feathers on huipils, etc. Peru Feather textiles an ancient art form, symbolic designs Andes (Peru/Bolivia) Manta rectangular fabric shawl with distinctive weave
North America Haiti Voudou flags (drapo) sequined, artistic flags USA Quilts layered fabric bed covering decoratively stitched together USA Samplers cloth embroidered with alphabet, designs, poems, etc. USA Coverlets bedspreads Navajo Nation Baskets containers made from interlaced plant or tree materials Navajo Nation Blankets handwoven wool, meaningful designs
Europe Scotland Kilt - plaid/tartan belted plaid short cloak Spain Flamenco dress low necked dress with frilled skirt Russia Shawl cloth worn as head/neck/shoulder covering Belgium Lace delicate thread fabric made in open weblike pattern Scandinavia Tablet weaving weaving technique using cards to make narrow textiles Scandinavia Sprang stretchy intertwined braid for stockings, hammocks,etc. Europe - various Tapestry heavy woven cloth wall hanging showing scenes Created by the American Textile History Museum

Post-Lesson Plan Title: Class Critique Program: Traveling Textiles – FUN-damentals of Weaving Grade Level(s): 4-6 Length of time for Lesson: 1 Hour Lesson Prior: FUN-damentals of WEAVING (or any follow-up activity) Objective(s): • Students will review the information they learned during their Traveling Textiles program • Students will learn how to present their ideas and give and receive constructive criticism • Students will think critically about how they met assignment goals and present this to the class Materials: student projects blackboard/chalk Steps: 1. Explain to the class that you will be having a “class critique.” Each student will get
the chance to present their work to the class, focusing on how each of us did what we were asked to do for the assignment; then we’ll listen to comments from classmates. While explaining, write the following steps on the board:
• Presenters: 1. Show work for class to see 2. Discuss specifics about the piece (theme, color use, subject, etc) 3. Explain something about your experience making the piece –
difficulties, what went well, what you liked about making it 4. Explain how your finished work fulfilled what you were asked to do 5. Explain if your work shows something learned from the lesson
2. Discuss the meaning of “constructive criticism” by going over these core concepts: • Ask the class what “constructive criticism” means • Verify what “constructive criticism” means. It:
• does not have to be negative • is helpful in learning when done the right way • focuses on what we do well • may suggest how we can improve
• Technique: • Point out positive aspects of work • Suggest ways to improve – the point is not to criticize, but to help
someone improve. With every project, we all have room for improvement, as well as many positive things we do well
• Point out to the class that being able to accept feedback from others is a great way to learn to grow and develop our work
______________________________________________ Created by the American Textile History Museum - 10

3. Add to the information already on the board:
• Constructive Critics 1. Say what you liked the most about the project 2. Give one suggestion – something they could have added, done
differently, etc. 4. Begin critique:
• Have students present their work to the group one at a time • After each presentation, have the class take turns giving feedback
(Depending on time constraints, decide how to do this. You could have all students make a comment one at a time, or ask those interested in commenting to raise hands, and choose just three per presenter.)
***Please Note: Students can feel sensitive toward class critiques, or self-conscious in front of a group. Be flexible in how you format your critique according to the needs of individuals in the class and try to reinforce students with positive feedback. In order to avoid awkward situations, make sure you set clear expecta-tions so that students are ready to comment on EVERYONE’S work. Let them know that you will call on as many as possible as time permits. ______________________________________________ Created by the American Textile History Museum - 11


Related Follow-up Activities
______________________________________________ Created by the American Textile History Museum - 13


Create Your Own Textile Tradition
Most textile traditions arose from the need, imagination, and creativity of peoples from the past. Recently, though, to represent their new identity in freedom, South Africa held a contest to design a new national costume for their entrant in the Miss Universe competition.
Imagine what the people who submitted designs for this contest had to consider in making up a new textile tradition. As a class project, create a design that could be put on a textile, such as a flag, a wall hanging, or a costume, that would represent some group of people (i.e. your class, your club, your sports team, your country, etc.) Think about what qualities of your design would make people want to continue to use it to make it a “tradition.” South Africa’s 2001 Miss Universe Contest Entrant Jo-Ann Strauss In National Costume ______________________________________________ Created by the American Textile History Museum - 15

Shoebox Loom
Each student will need: shoebox (cover is not needed) scissors strong thread yarn Instructions: 1. Use the scissors to cut ½” slits ½” apart along the two short sides of the shoebox. 2. Wind the strong string in and out of the slits across the front of the box, creating the
warp. Tie each end onto the string next to it. 3. Cut a piece of yarn about 1 ½” long. Starting in the center of the box, begin weaving
the yarn over and under the warp strings. When you get to the end, turn back and start a second row. Make sure that you go over the strings that you went under the last time, and vice versa. These horizontal strings are called the weft.
4. When you finish the piece of yarn, start a new one the same way. You don’t need to tie the two pieces together.
5. Every couple of rows, gently push them down to tighten the weaving. 6. When you get to the top, it’s time to remove your weaving. Carefully slip it off the
notches. Cut the warp strings, two at a time, and tie them together. This will hold the weaving together and it makes fringe.
______________________________________________ Created by the American Textile History Museum - 16

Paper Weaving
Each student will need: one sheet of 12” x 9” construction paper ten 1” x 9” strips of construction paper scissors rulers Place mat: clear adhesive contact paper (optional) Wall hanging: dowel rod (stick, straw) yarn Instructions: Place Mat 1. Fold the construction paper in half. 2. Cut slits in the paper from the folded edge almost to the open edge, approximately
one inch apart as shown. 3. Unfold the paper. This will be your loom. 4. Weave the paper strips through the construction paper loom by alternating the strip
above and below the slats in the paper. If the first strip begins under, over, under, then the second strip will begin over, under, over, the third under, over, under, and so on.
______________________________________________ Created by the American Textile History Museum - 17
5. Continue weaving the strips until the place mat has been completed 6. (Optional) Cover place mat with clear adhesive contact paper to make it
waterproof. Wall Hanging 1. Fold the construction paper in half. 2. Cut slits, approximately 1” apart, in the paper from the folded edge, stopping 2” from
the open edge. 3. Unfold the paper. This will be your loom. 4. Fold 1” of the top edge over. Glue or staple the edge to the back of the loom,
allowing space for a dowel rod to pass through. 5. Cut a 1 ½”fringe on the bottom edge. 6. Weave paper strips through as described for the place mat. 7. Push a dowel through the opening left for it and tie the ends of a piece of yarn to
either dowel end so you can hang it up. ______________________________________________ Created by the American Textile History Museum - 18

Salt Dough Basket
Materials: salt dough (one recipe makes 2 baskets) cardboard box (cereal, etc.) waxed paper rolling pin ruler knife (optional) varnish or fixative Salt Dough Recipe: Mix in bowl: 2 cups flour, 1 cup salt Slowly add 1 cup water and mix well Knead dough 5-7 min. until it’s not sticky to touch. Keep in sealed baggie or bowl up to 5 days. Method: 1. Prepare dough and have it ready. 2. Lie cardboard box flat and place 2 sheets of waxed paper over it,
overlapping to cover all sides but the bottom. 3. Four your work surface and roll out dough ¼” thick. 4. Cut ¾” strips out of your dough with a knife or ruler edge. 5. Lay several strips across the width and hanging down the sides of the
papered box, and touching the work surface. 6. Lay 2-3 strips lengthwise, weaving them through the widthwise strips. 7. Weave 2 strips completely around the sides.
NOTE: Wet the dough lightly when 2 strips cross or meet to make them bond together, then press the seal gently. Splice strips that are too short together the same way. ______________________________________________ Created by the American Textile History Museum - 19

8. Trim off strip ends that lap onto the work surface. 9. Make a rope of dough long enough to wrap around the box to form the
basket’s lip. 10. Let dry at room temperature for 3 days. 11. Varnish or spray with artist’s fixative to seal dough (which will
preserve it for many years). ______________________________________________ Created by the American Textile History Museum - 20

Weaving Twigs
Materials: twigs with interesting branching or shapes yarn other natural found items (leaves, feathers, dry flowers) Method: 1. Have students bring in items for construction, choosing their twig
carefully for weavable shaping and thickness. Choose twigs already broken off the tree.
2. Using the twig as your loom, weave the yarn around the branches to form a pattern of your choice.
3. Insert other collected items. 4. Hang on or lean against a wall, or suspend from the ceiling as a mobile. ______________________________________________ Created by the American Textile History Museum - 21

Create a HUMAN Loom!
By standing in as parts of the loom themselves, students can weave wonderful creations, and really get a feel for weaving. Materials: crepe paper or thick yarn (or any material in long strands) Cut 8 (or more) equal length strips (try 6 ft. long) Cut 1 long length to weave with, cut more as needed Method: 1. Select 8 or more pairs of students to stand in a row facing each other and
holding the ends of equal length crepe paper strips (or yarn, etc.) Hold these taut. These create the “warp” threads of the weaving.
2. Select 1 other student to weave a strand of material (crepe paper, yarn, etc) over and under across the warp threads. To make weaving easier, have the warp thread holders on one side raise or lower their strands and have the weaver pull his strand through the “shed” opening they form. Press this cross thread (weft) down toward the students who didn’t raise/lower their warp ends - do this each time you weave across to form a tighter weave.
3. Keep weaving back and forth. Vary which warp strands you weave over or under with each pass across.
4. Try to create weave patterns. Try different colors and strand materials. Try to duplicate one of the patterns shown below.
5. Hang your weaving for display. ______________________________________________ Created by the American Textile History Museum - 22

Make Your Own Simple Rigid Heddle Loom
This easily made loom can be used to weave narrow fabrics, belts, bracelets, etc. MATERIALS:
craft (popsicle) sticks a drill to make holes in the sticks wood glue (i.e. Elmer’s) heavy thread yarn METHOD: 1. Drill holes through the center of 8 craft sticks, assemble the loom with
glue as above, and let dry. Tie where sticks cross for greater strength. 2. Cut the heavy thread (or yarn) into 15 3-yd. long pieces. Thread 1
thread through each stick hole AND 1 through each space between the sticks.
3. Hold one end of each thread together in a bunch and tie them in a knot; with the heddle loom threaded in between the knots, do the same with the other set of ends. Then, tie each knot end to something stationary, like opposing chair backs, pulling taut to place the threads somewhat under tension. These are the warp threads.
4. Raise and lower the loom about 3 in. to see how it separates the warp threads into two groups, forming an opening (or shed) between them. Place a stick lengthwise into this opening and press it down toward the knot. Raise the loom to recross the warp threads and do the same with another stick. Lower the loom to cross the warp threads again and begin to weave (see #5).
5. Tie a long piece of yarn to a craft stick (which you will use like a shuttle) and push it through this “shed” opening and out the other side. Press this crossing (weft) thread down toward the knot with another stick to form a tighter weave (then remove that stick). Raise or lower the loom to cross the warp threads and pass the shuttle back through, pressing this weft thread down toward the knot as well. Continue raising and lowering the loom and weaving back and forth until you reach the desired length of weaving.
6. Finish your weaving by cutting and tying together the warp ends at either edge of your piece.
______________________________________________ Created by the American Textile History Museum - 23

Additional Information
______________________________________________ Created by the American Textile History Museum - 25

Background Information
I. The Origins of Weaving A. The discovery of fibers and the methods used to spin them into yarn and
weave the yarns into cloth evolved over many thousands of years B. Weaving most likely began when early man first learned to interlace plant
materials to form mats and baskets C. The evolution of cloth
1. Early nomadic people probably relied on animal skins for clothing 2. Early sedentary/agricultural people learned to spin plant fibers to make
cloth 3. First evidence of fibers made into cloth
a. Flax (linen) 9,000 BC 1. considered the oldest natural textile fiber 2. used to make burial shrouds for Egyptian pharaohs
b. Cotton 3,000-5,000 BC c. Wool 3,000 BC
1. sheep hair changed to wool only after sheep were domesticated (wild sheep don’t bear wool)
d. Silk 2,700 BC II. Weaving is a part of the History of all Cultures
A. Each of the great civilizations is associated with at least one fiber 1. Egypt – flax 2. India and Peru – cotton 3. China – silk 4. Mesopotamia - wool
B. Egyptians and Peruvians were among the first highly skilled weavers C. In Peru, hunter-gatherers were spinning wild cotton by 10,000 B.C. D. Silk originated in China. They kept the process of cultivation and making silk
fabric a secret for about 3,000 years E. Some Native Americans, such as the Navajo people, also became expert
weavers. They believe that weaving is a great gift III. Weaving on Looms
A. What is a loom? 1. A loom is a frame on which thread or yarn is woven to make cloth 2. A loom holds yarns parallel and under tension 3. On a loom, two or more sets of yarns are interlaced to form cloth:
a. Yarn set up on the loom is called “warp” yarn b. The weaver interlaces “weft” yarn through the warp yarn by passing the weft over and under the warp
4. Design concepts common to all looms: a frame, warp, weft, tools to control the warp (harnesses or hand-manipulated sticks), tools to interlace the weft through the warp (shuttles)
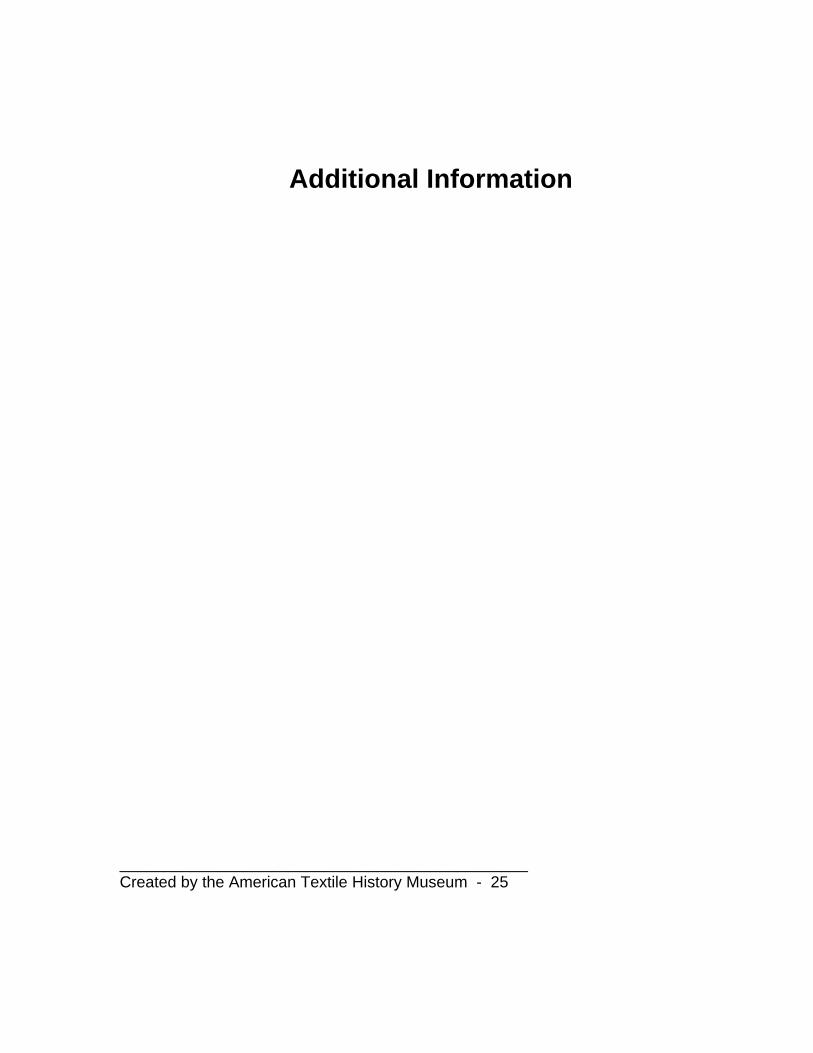
B. Types of looms – there are may different kinds 1. Vertical Looms
a. Used by weavers in Ancient Egypt (see cover illustration) _______________________________ Created by the American Textile History Museum - 27
b. Used today by traditional Navajo weavers

2. Backstrap loom – found in many countries. The warp yarns are wrapped between 2 sticks, then one end of the loom is attached to a stationary object (a tree, a wall hook, etc.) and the other end is attached to the weaver, who becomes part of the loom. The weaver provides tension by leaning back against a belt worn around the waist or hips. A long stick is used to separate warp yarns to create the “shed” or space into which the weft yarns can be inserted. Select warp threads can be tied to a stick with strings called “heddles,” making it easier to create a shed. Weft threads are wrapped on stick shuttles to ease passage through the shed.
3. Floor loom – warp threads are stretched on it and the weaver sits or stands while working. Harness frames with heddles
control the warp threads. These frames are raised and lowered by foot pedals
called treadles. Weft threads are interlaced with the help of a shuttle, which can be a stick
that is flat or can hold a bobbin wrapped with yarn. IV. Factory Production of Textiles
A. The first power loom was developed and patented in 1785 by Edward Cartwright of Marnham, England. It was originally powered by oxen on a treadmill
B. Jacquard looms were developed in 1805 by Joseph Marie Jacquard. The loom was equipped with an overhead mechanism which allowed the raising and lowering of only a few warp strings at a time, therefore it was capable of producing complex patterns
C. The first textile mills in America were spinning mills, established in 1790 by Samuel Slater in Pawtucket, R.I.
D. A Massachusetts colonist, Francis Cabot Lowell, traveled to England in 1810 to research the new power looms. It was against the law to leave the country with loom plans or parts, so Lowell memorized the machine. The first American power looms were built by Lowell and his friend, Paul Moody, a machinist, in Waltham, MA, in 1814. Mr.Lowell and his partners built the first fully integrated cotton mills
E. After the loom was perfected, a large textile mill district was established in Lowell, MA in 1822. The area was chosen for its location along the Merrimack River at the Pawtucket Waterfall and was named in honor of Mr. Lowell
F. Eventually, textile mills were established in other areas of New England G. Cotton mills were established in the South, beginning in the late 1800’s H. Since the Industrial Revolution, the looms have advanced to weave cloth
more quickly and efficiently. Today, many looms are shuttleless, using jets of water or air to propel the weft threads through the warp threads
_____________________________________________ Created by the American Textile History Museum - 28

Vocabulary
FABRIC a textile structure produced by interlacing yarns or fibers (see TEXTILE)
FIBER a unit of natural or manufactured matter that can be spun into a
yarn. The most common natural fibers are flax, cotton, silk, and wool
HARNESS a frame supporting the heddles on a loom HEDDLES a set of parallel wires or strings, each with a loop or eye near its
center and held in a harness. These are used to control individual warp threads threaded through them on a loom and to make a path for the shuttle
LOOM Any equipment that is used to weave yarns; a frame that holds a set
of parallel yarns under tension so that other yarns may be woven through them
SHED A path between warp threads on a loom formed by raising some
threads and not others. The shuttle passes through the shed, pulling the weft thread with it.
SHUTTLE a tool for carrying the weft yarns back and forth to interlace them with
the warp yarns in weaving TEXTILE cloth or fabric made from fibers that are spun into yarns and woven or
knitted into fabric (see FABRIC) WARP yarns that run lengthwise and are kept under tension on a loom WEAVE to make cloth by interlacing warp and weft yarns on a loom WEFT yarns that are interlaced with the warp yarns during weaving ____________________________________________ Created by the American Textile History Museum - 29

Bibliography
Gallinger, Osma Couch. The Joy of Hand Weaving. Scranton, PA: International Textbook Company, 1950.
Merrimack Valley Textile Museum. Homespun to Factory Made: Woolen Textiles in
American, 1776-1876. North Andover, MA; Merrimack Valley Textile Museum, 1977.
Perry, R. Gordon and Jean Marie Perry. From Bobbins, Spindles, and Shuttles: A Brief
Guide to Textile History and Old Mill Memorabilia. Saylorsburg, PA: R. Gordon Perry and Jean Marie Perry, 1993.
Suggested Readings
Buehr, Walter. Clothes, From Fiber to Fabric. New York: William Morrow and Co.,
1965. [Out of print, but available in libraries] Castaneda, Omar S. Abuela’s Weave. New York: Lee and Low Books, Inc., 1993. In
Guatemala Esperanza and her grandmother (abuela) weave and sell traditional textiles. Because the abuela is afraid her facial birthmark will provoke a superstitious fear and hurt sales, the two pretend not to know each other. Appreciation for their fine work leads to rapid sales, and the two return home proudly and together on the bus. Recommended age: 4-8
Chetkowski, Emily. Amasa Walker’s Splendid Garment. Farmington, Maine: Heritage
Pub., 1996. Created from a work written by Amasa Walker around 1850, recalling the processes from fleece to fabric in order to have a surtout (coat) made for himself in 1811. Recommended age: 7-12
Fisher, Leonard Everett. The Weavers (Colonial Craftsmen). New York: Marshall
Cavendish, 1998. An abbreviated history describing the weavers’ craft as practiced in colonial America, including information on cloth making and the techniques involved. Illustrated with scratchboard drawings. Glossary included. 45 pages. Recommended age: 9-12
______________________________________________ Created by the American Textile History Museum - 30

Graimes, Nikki. Aneesa Lee and the Weaver’s Gift. New York: HarperCollins Children’s Publisher, 1999. Thirteen interrelated poems celebrate a girl’s love of weaving. The young weaver is herself a tapestry of black, white, and Japanese heritage. The poems describe the art and craft of weaving, gathering the natural materials for making dyes, spinning yarn, warping the board, and completing the tapestry. The poems also express her shifting emotions. The themes are family, community, artistic vision, and dedication to craft and love. A glossary of weaving terms and a picture of a fully labeled loom precede the poems. Recommended age: 7-10
Lasky, Kathryn. The Weaver’s Gift. New York: Fredrick Warne, 1980. Explains the
process of creating a soft blanket from its beginning as a sheep’s fleece. Illustrated. 64 pages [Out of print, but available in libraries]
Oughton, Jerrie, Lisa Desimini, and Jerrie Cughten. The Magic Weaver of Rugs: A Tale
of the Navajo. Boston: Houghton Mifflin Co., 1994. When two Navajo women pray for help for their cold and hungry people, Spider Woman teaches them how to build looms, dye wool, and weave with their very souls. Daunted by fear and lack of trust, the women weave an imperfect rug and are banished; however, the gift - knowledge of weaving - distracts the women from their suffering and later saves their people. Lush dark illustrations evoke an otherworldliness and mythical wonder. Recommended age: 5-10
Ziefert, Harriet. A New Coat For Anna. New York: Alfred A. Knopf, 1986. A mother
struggles to provide a new winter coat for her daughter Anna during the difficult times following World War II. She must engage a spinner, weaver, and tailor in the process, with all celebrating when the coat is done.
______________________________________________ Created by the American Textile History Museum - 31
FUN-damentals of WEAVING

Connections to Massachusetts Curriculum Frameworks
History and Social Science Curriculum Frameworks Core knowledge: The United States
4. Expansion, Reform, and Economic Growth (1800-1861) The World
1. Human Beginnings and Early Civilizations (Prehistory to 1000 B.C.)
2. Classical Civilizations of the Ancient World (1000 B.C. to c. 500 A.D.)
3. Growth of Agricultural and Commercial Civilizations (500 to 1500 A.D.)
Science and Technology Strand 3: Understanding and Using Technology Mathematics Strand 2: Patterns, Relations, and Functions Arts Creating and Performing Strand, Learning Standard 1: Students will use the arts to express ideas. Thinking and Responding Strand, Learning Standard 3: Students will use imaginative and reflective thinking during all phases of creating and performing. ______________________________________________ Created by the American Textile History Museum - 32