Embed Size (px)
Citation preview

8/2/2019 196v3lab_00_dfu_aen
http://slidepdf.com/reader/full/196v3lab00dfuaen 1/38
www.philips.com/welcome
196V3L
EN User manual 1
Customer care and warranty 27
Troubleshooting & FAQs 32

8/2/2019 196v3lab_00_dfu_aen
http://slidepdf.com/reader/full/196v3lab00dfuaen 2/38
Table of Contents
1. Important ................................................11.1 Safety precautions and maintenance...11.2 Notational Descriptions .............................21.3 Disposal of product and packing
material ............................................. ...................3
2. Setting up the monitor .........................42.1 Installation ................................................. ..........42.2 Operating the monitor ...............................52.3 Remove Base Stand and Base .................7
3. Image Optimization...............................9
3.1 SmartContrast .................................................93.2 Philips SmartControl Lite ..........................9
4. Technical Specifications ......................164.1 Resolution & Preset Modes...................19
5. Power Management ............................20
6. Regulatory Information ......................21
7. Customer care and warrant .............277.1 Philips’ Flat Panel Monitors Pixel
Defect Policy ............................................. .....277.2 Customer Care & Warranty .................29
8. Troubleshooting & FAQs ...................328.1 Troubleshooting ...........................................328.2 General FAQs ......................................... ......33

8/2/2019 196v3lab_00_dfu_aen
http://slidepdf.com/reader/full/196v3lab00dfuaen 3/38
1
1. Important
This electronic user’s guide is intended for anyone who uses the Philips monitor. Take time to read this user manual before you use your monitor. It contains important information and
notes regarding operating your monitor.
The Philips guarantee applies provided theproduct is handled properly for its intended use,in accordance with its operating instructions andupon presentation of the original invoice or cashreceipt, indicating the date of purchase, dealer’sname and model and production number of theproduct.
1.1 Safety precautions and mainte-nance
Warnings
Use of controls, adjustments or proceduresother than those specified in this documentationmay result in exposure to shock, electricalhazards and/or mechanical hazards.
Read and follow these instructions whenconnecting and using your computer monitor.
Operation
• Please Keep the monitor out of directsunlight, very strong bright lights andaway from any other heat source. Lengthy exposure to this type of environment may result in discoloration and damage to themonitor.
• Remove any object that could fall intoventilation holes or prevent proper coolingof the monitor’s electronics.
• Do not block the ventilation holes on thecabinet.
• When positioning the monitor, make sure the power plug and outlet are easily ac-cessible.
• If turning off the monitor by detaching the
power cable or DC power cord, wait for 6seconds before attaching the power cableor DC power cord for normal operation.
• Please use approved power cord providedby Philips all the time. If your power cordis missing, please contact with your localservice center. (Please refer to Customer Care Consumer Information Center)
• Do not subject the monitor to severe
vibration or high impact conditions duringoperation.
• Do not knock or drop the monitor duringoperation or transportation.
Maintenance
• To protect your monitor from possibledamage, do not put excessive pressure on the LCD panel. When moving your moni- tor, grasp the frame to lif t; do not lift themonitor by placing your hand or fingers on the LCD panel.
• Unplug the monitor if you are not going touse it for an extensive period of time.
• Unplug the monitor if you need to clean itwith a slightly damp cloth. The screen may be wiped with a dry cloth when the power is off. However, never use organic solvent,such as, alcohol, or ammonia-based liquids
to clean your monitor.• To avoid the risk of shock or permanent
damage to the set, do not expose themonitor to dust, rain, water, or excessivemoisture environment.
• If your monitor gets wet, wipe it with dry cloth as soon as possible.
• If foreign substance or water gets in your monitor, please turn the power off immedi-ately and disconnect the power cord. Then,remove the foreign substance or water, andsend it to the maintenance center.
• Do not store or use the monitor in loca- tions exposed to heat, direct sunlight or extreme cold.
• In order to maintain the best performanceof your monitor and use it for a longer life- time, please use the monitor in a location
that falls within the following temperatureand humidity ranges.

8/2/2019 196v3lab_00_dfu_aen
http://slidepdf.com/reader/full/196v3lab00dfuaen 4/38
2
• Temperature: 0-40°C 32-95°F
• Humidity: 20-80% RH
• IMPORTANT: Always activate a movingscreen saver program when you leaveyour monitor unattended. Always activatea periodic screen refresh applicationif your monitor will display unchangingstatic content. Uninterrupted display of still or static images over an extendedperiod may cause “burn in”, also known as“after-imaging” or “ghost imaging”, on your screen."Burn-in", "after-imaging", or "ghost imag-ing" is a well-known phenomenon in LCDpanel technology. In most cases, the
“burned in” or “after-imaging” or “ghostimaging” will disappear gradually over aperiod of time after the power has beenswitched off.
Warning
Severe” burn-in” or “after-image” or “ghostimage” symptoms will not disappear and cannotbe repaired. The damage mentioned above isnot covered under your warranty.
Service
• The casing cover should be opened only by qualified service personnel.
• If there is any need for any document for repair or integration, please contact withyour local service center. (please refer to the chapter of "Consumer InformationCenter")
• For transportation information, pleaserefer to "Technical Specifications".
• Do not leave your monitor in a car/trunk under direct sun light.
Note
Consult a service technician if the monitor does not operate normally, or you are not surewhat procedure to take when the operatinginstructions given in this manual have beenfollowed.
1.2 Notational Descriptions
The following subsections describe notationalconventions used in this document.
Notes, Cautions and Warnings
Throughout this guide, blocks of text may beaccompanied by an icon and printed in bold or italic type. These blocks contain notes, cautionsor warnings. They are used as follows:
Note
This icon indicates important information and tips that help you make better use of your computer system.
CautionThis icon indicates information that tells youhow to avoid either potential damage tohardware or loss of data.
Warning
This icon indicates the potential for bodily harmand tells you how to avoid the problem.
Some warnings may appear in alternate formatsand may not be accompanied by an icon. In such
cases, the specific presentation of the warning ismandated by the relevant regulatory authority.

8/2/2019 196v3lab_00_dfu_aen
http://slidepdf.com/reader/full/196v3lab00dfuaen 5/38
3
1.3 Disposal of product and packingmaterial
Waste Electrical and Electronic Equipment-
WEEE
This marking on the product or on itspackaging illustrates that, under EuropeanDirective 2002/96/EC governing used electricaland electronic appliances, this product may not be disposed of with normal householdwaste. You are responsible for disposal of this equipment through a designated wasteelectrical and electronic equipment collection.To determine the locations for dropping off such waste electrical and electronic, contactyour local government office, the waste disposalorganization that serves your household or thestore at which you purchased the product.
Your new monitor contains materials that canbe recycled and reused. Specialized companiescan recycle your product to increase theamount of reusable materials and to minimize the amount to be disposed of.
All redundant packing material has beenomitted. We have done our utmost to make thepackaging easily separable into mono materials.
Please find out about the local regulations onhow to dispose of your old monitor and packingfrom your sales representative.
Recycling Information for Customers
Your display is manufactured with high quality materials and components which can berecycled and reused.
To learn more about our recycling program
please visit www.philips.com/about/sustainability/recycling.

8/2/2019 196v3lab_00_dfu_aen
http://slidepdf.com/reader/full/196v3lab00dfuaen 6/38
4
2. Setting up the monitor
2.1 Installation
Package contents
VGA (optional) DVI (optional)
Audio cable (optional)
Register your product andgetsupport at
www.philips.com/welcome196V3LA
Quick
Start
Install base stand
1. Place the monitor face down on softand smooth surface taking care to avoidscratching or damaging the screen.
2. Attach the base column with the monitor until it clicks into position.
3. Hold the monitor base stand with bothhands and firmly insert the base stand into the base column.

8/2/2019 196v3lab_00_dfu_aen
http://slidepdf.com/reader/full/196v3lab00dfuaen 7/38
5
Connecting to your PC
5
AC power inputVGA inputDVI-D input (available for selected models)Audio input (available for selected models)Kensington anti-theft lock
Connect to PC
1. Connect the power cord to the back of the monitor firmly.
2. Turn off your computer and unplug itspower cable.
3. Connect the monitor signal cable to thevideo connector on the back of your computer.
4. Plug the power cord of your computer andyour monitor into a nearby outlet.
5. Turn on your computer and monitor. If themonitor displays an image, installation iscomplete.
2.2 Operating the monitor
Front view product description
Model 196V3LA:
5
6 2347
Model 196V3L:
5
6 2347
Switch monitor’s power ON andOFF.
Access the OSD menu.
Confirm the OSD adjustment.
Return to previous OSD level.
Adjust the brightness level.
Adjust the OSD menu.
Adjust the speaker volume.
Change display format.
Automatically adjust the monitor.
8/2/2019 196v3lab_00_dfu_aen
http://slidepdf.com/reader/full/196v3lab00dfuaen 8/38
6
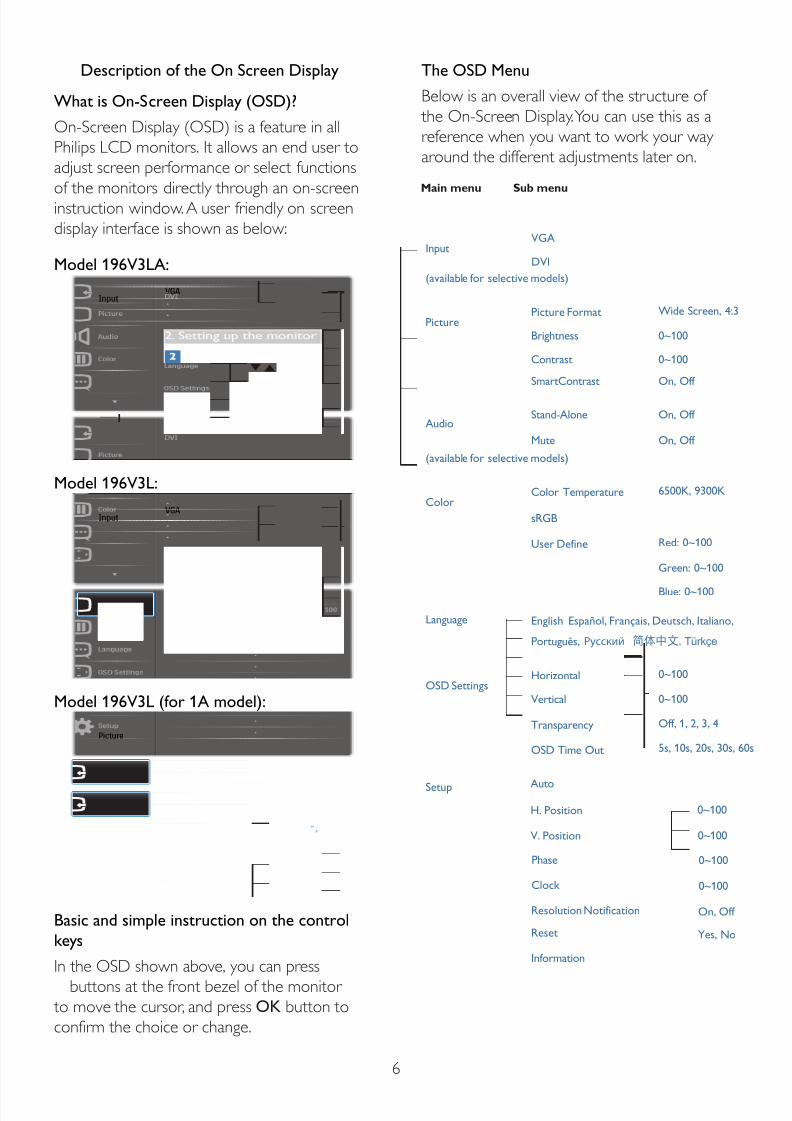
Description of the On Screen Display
What is On-Screen Display (OSD)?
On-Screen Display (OSD) is a feature in allPhilips LCD monitors. It allows an end user toadjust screen performance or select functions
of the monitors directly through an on-screeninstruction window. A user friendly on screendisplay interface is shown as below:
Model 196V3LA:
Model 196V3L:
Model 196V3L (for 1A model):
Basic and simple instruction on the controlkeys
In the OSD shown above, you can press
buttons at the front bezel of the monitor to move the cursor, and press OK button toconfirm the choice or change.
The OSD Menu
Below is an overall view of the structure of the On-Screen Display. You can use this as areference when you want to work your way around the different adjustments later on.
Main menu Sub menu
PictureWide Screen, 4:3
0~100
0~100
Picture Format
Brightness
Contrast
OSD Settings0~100
0~100
Off, 1, 2, 3, 4
5s, 10s, 20s, 30s, 60s
Horizontal
Vertical
Transparency
OSD Time Out
Setup
0~100
On, Off
Yes, No
0~100
0~100
0~100
H. Position
Auto
V. Position
Phase
Clock
Resolution Notification
Reset
Information
Language English Español, Français, Deutsch, Italiano,
Português, Русский 简体中文, Türkçe
Color6500K, 9300K
Red: 0~100
Green: 0~100
Blue: 0~100
Color Temperature
sRGB
User Define
AudioOn, Off
On, Off
Stand-Alone
Mute
(available for selective models)
(available for selective models)
VGA
DVIInput
On, Off SmartContrast

8/2/2019 196v3lab_00_dfu_aen
http://slidepdf.com/reader/full/196v3lab00dfuaen 9/38
7
Resolution notification
This monitor is designed for optimalperformance at its native resolution, 1366 ×768 @ 60 Hz. When the monitor is poweredon at a different resolution, an alert is displayedon screen: Use 1366 × 768 @ 60 Hz for best
results.Display of the native resolution alert can beswitched off from Setup in the OSD (OnScreen Display) menu.
Physical Function
Tilt
2.3 Remove Base Stand and Base
Remove the Base Stand
Before you start disassembling the monitor base, please follow the instructions below toavoid any possible damage or injury.
1. Place the monitor face down on a smoothsurface, taking care to avoid scratching or damaging the screen.
2. Press the locking clips to detach the basestand away from the base column.
1
3. Press the release button to detach the basecolumn.
2

8/2/2019 196v3lab_00_dfu_aen
http://slidepdf.com/reader/full/196v3lab00dfuaen 10/38
8
Remove the base
1. You may use a flathead screwdriver to stick into two release hols on the hinge cover,and gently pry the hinge cover to have itremoved.
2. Remove 4 screws and then remove thebase from the monitor.

8/2/2019 196v3lab_00_dfu_aen
http://slidepdf.com/reader/full/196v3lab00dfuaen 11/38
9
3. Image Optimization
3.1 SmartContrast
What is it?
A unique technology that dynamically analyzesdisplayed content and automatically optimizesan LCD monitor's contrast ratio for maximumvisual clarity and viewing enjoyment, steppingup backlighting for clearer, crisper and brighter images or dimming backlighting for clear display of images on dark backgrounds.
Why do I need it?
You want the very best visual clarity andviewing comfort for every type of content.SmartContrast dynamically controls contrastand adjusts backlighting for clear, crisp, brightgaming and video images or displays clear,readable text for office work. By reducing your monitor's power consumption, you save onenergy costs and extend the lifetime of your monitor.
How does it work?When you activate SmartContrast, it will analyse the content you are displaying in real time toadjust colors and control backlight intensity. Thisfunction will dynamically enhance contrast for agreat entertainment experience when viewingvideos or playing games.
3.2 Philips SmartControl Lite
The new SmartControl Lite software by Phillipsallows you to control your monitor via an easy to use on-screen graphic interface. Complicatedadjustments are a thing of the past as this user friendly software guides you through fine- tuning resolution, Color calibration, Clock/Phaseadjustments, RGB White point adjustment, etc.
Equipped with latest technology in core
algorithm for fast processing and response, thisWindows 7 compliant eye catching animated
Icon based software is ready to enhance your experience with Philips monitors!
Installation
• Follow the instruction and complete theinstallation.
• You can launch after installation iscompleted.
• If you want to launch later, you can either click the shortcut on desktop or toolbar.
First launch -Wizard
• The first time after installation of SmartControl Lite, it will automatically go to Wizard for first time launch.
• The wizard will guide you through adjustingyour monitor performance step by step.
• You can go to Plug-in menu to launchwizard later on as well.
• You can adjust more options withoutwizard by Standard pane.

8/2/2019 196v3lab_00_dfu_aen
http://slidepdf.com/reader/full/196v3lab00dfuaen 12/38
10
Start with Standard pane:
Adjust menu:
• Adjust Menu allow you to adjust Brightness,Contrast, Focus, Position and Resolution.
• You can follow the instruction and do theadjustment.
• Cancel prompts user if you want to cancelinstallation.

8/2/2019 196v3lab_00_dfu_aen
http://slidepdf.com/reader/full/196v3lab00dfuaen 13/38
11
Color menu:
• Color Menu allow you to adjust RGB, Black Level, White Point, and Color Calibration.
• You can follow the instruction and do theadjustment.
• Refer to below table for sub-menu itembase on your input.
• Example for Color Calibration:

8/2/2019 196v3lab_00_dfu_aen
http://slidepdf.com/reader/full/196v3lab00dfuaen 14/38
12
1. "Show Me" starts color calibration tutorial.
2. Start - starts the 6-step color calibrationsequence.
3. Quick View loads the before/after images.
4. To return to Color home pane, click the
Cancel button.5. Enable color calibration - by default is on.If unchecked, does not allow for color calibration to happen, dimes out start andquick view buttons.
6. Must have patent info in calibration screen.
First color Calibration Screen:
• Previous button is disabled until the second
color screen.• Next goes to the succeeding target
(6-targets).
• Final next goes File>Presets pane.
• Cancel closes the UI and returns to theplug in page.
Options>Preferences - Will only be activewhen selecting Preferences from the drop-down Options menu. On a non-supporteddisplay capable of DDC/CI, only the Help andOptions tabs are available.
• Displays current preference settings.
• A checked box enables the feature. Thecheck box is a toggle.
• Enable Context Menu on desktop ischecked (On) by default. Enable Contextmenu displays SmartControl Lite selectionsfor Select Preset and Tune Display in thedesktop right-click context menu. Disabledremoves SmartControl Lite from the rightclick context menu.
• Enable Task Tray icon is checked (On) by default. Enable context menu shows the task tray menu for Smar tControl Lite. A
right click on the task tray icon displays themenu options for Help, Technical Support,Check for Upgrade, About, and Exit. WhenEnable task tray menu is disabled, the task tray icon will only display EXIT.
• Run at Startup is checked (On) by default.When disabled, SmartControl Lite will notlaunch at star t or be in the task tray. Theonly way to launch SmartControl Lite iseither from the desktop short cut or from the program file. Any preset set to run

8/2/2019 196v3lab_00_dfu_aen
http://slidepdf.com/reader/full/196v3lab00dfuaen 15/38
13
at startup will not load when this box isunchecked (Disabled).
• Enable transparency mode (Windows 7,Vista, XP). Default is 0% Opaque.
Options>Input - Will only be active whenselecting Input from the drop-down Options
menu. On a non-supported display capable of DDC/CI, only the Help and Options tabs areavailable. All other SmartControl Lite tabs arenot available.
• Display the Source instruction pane andcurrent input source setting.
• On single input displays, this pane will notbe visible.
Options>Audio - Will only be active whenselecting Audio from the drop-down Optionsmenu.
On a non-supported display capable of DDC/CI, only the Help and Options tabs are available.
Help>User Manual - Will only be active whenselecting User Manual from the drop-downHelp menu. On a non-supported display capable of DDC/CI, only the Help and Options tabs are available.

8/2/2019 196v3lab_00_dfu_aen
http://slidepdf.com/reader/full/196v3lab00dfuaen 16/38
14
Help>Version - Will only be active whenselecting Version from the drop- down Helpmenu. On a non-supported display capable of DDC/CI, only the Help and Options tabs areavailable.
Context Sensitive menu
The Context Sensitive menu is Enabled by default. If Enable Context Menu has beenchecked in the Options>Preferences pane, then the menu will be visible.
The Context Menu has three entries:• SmartControl Lite - When selected the
About Screen is displayed.
• Select Preset - Provides a hierarchicalmenu of saved presets for immediate use.A check mark shows the currently selectedpreset. Factory Preset can also be calledfrom the drop down menu.
• Tune Display - Opens the SmartControl
Lite control panel.
Task Tray Menu Enabled
The task tray menu can be displayed by right-clicking on the SmartControl Lite icon from the task tray. Left Click will launch the application.
The task tray has five entries:
• Help - Access to User Manual file: OpenUser Manual file using the default browser window.
• Technical Support - displays the techsupport page.
• Check for Update - takes the user to PDILanding and checks the user’s versionagainst the most current available.
• About - Displays detailed reference
information: product version, releaseinformation, and product name.
• Exit - Close SmartControl Lite.
To run SmartControl Lite again either selectSmartControl Lite from Program menu, double-click the desktop PC icon or restart the system.

8/2/2019 196v3lab_00_dfu_aen
http://slidepdf.com/reader/full/196v3lab00dfuaen 17/38
15
Task Tray Menu Disabled
When the Task Tray is disabled in the preferencefolder, only the EXIT selection is available.To completely remove SmartControl Litefrom the task tray, disable Run at Startup inOptions>Preferences.

8/2/2019 196v3lab_00_dfu_aen
http://slidepdf.com/reader/full/196v3lab00dfuaen 18/38
16
4. Technical Specifications
Picture/Display
Monitor Panel Type TFT-LCDBacklight LED
Panel Size 18.5" W (47.01cm)Aspect Ratio 16:9Pixel Pitch 0.3 x 0.3 mmBrightness 250 cd/m²SmartContrast 10,000,000:1Contrast Ratio (typ.) 1000:1Response Time (typ.) 5msOptimum Resolution 1366 x 768 @ 60HzViewing Angle 170° (H) / 160° (V) @ C/R > 10
Display Colors 16.7MVertical Refresh Rate 56Hz - 76HzHorizontal Frequency 30kHz - 83kHzsRGB YESConnectivity
Signal Input DVI (digital), VGA (Analog)Input Signal Separate Sync, Sync on GreenConvenience
User Convenience196V3LA:
196V3L:OSD Languages
English, French, German, Spanish, Italian, Russian,Simplified Chinese, Portuguese, Turkish
Other Convenience Kensington Lock Plug & Play Compatibility DDC/CI, sRGB, Windows 7/Vista/XP, Mac OSX, LinuxStand
Tilt -5 / +20
196V3LA:
PowerOn Mode 17.91W (typ.), 23.26W (max.)
Energy Consumption(EnergyStar 5.0 test method)
AC Input Voltage at100VAC +/-5VAC,50Hz +/-3Hz
AC Input Voltage at115VAC +/-5VAC,60Hz +/-3Hz
AC Input Voltage at230VAC +/-5VAC,50Hz +/-3Hz
Normal Operation (typ.) 13.42W 13.32W 13.30WSleep (Standby) 0.5W 0.5W 0.5WOff 0.5W 0.5W 0.5W
Heat Dissipation*AC Input Voltage at100VAC +/-5VAC,50Hz +/-3Hz
AC Input Voltage at115VAC +/-5VAC,60Hz +/-3Hz
AC Input Voltage at230VAC +/-5VAC,50Hz +/-3Hz
Normal Operation 45.8 BTU/hr 45.46 BTU/hr 45.39 BTU/hr

8/2/2019 196v3lab_00_dfu_aen
http://slidepdf.com/reader/full/196v3lab00dfuaen 19/38
17
Sleep (Standby) 1.706 BTU/hr 1.706 BTU/hr 1.706 BTU/hr Off 1.706 BTU/hr 1.706 BTU/hr 1.706 BTU/hr Power LED indicator On mode: White, Standby/Sleep mode: White (blinking)Power Supply Built-in, 100-240VAC, 50-60Hz
196V3L:
PowerOn Mode 17.6W (typ.), 19.0W (max.)
Energy Consumption(EnergyStar 5.0 test method)
AC Input Voltage at100VAC +/-5VAC,50Hz +/-3Hz
AC Input Voltage at115VAC +/-5VAC,60Hz +/-3Hz
AC Input Voltage at230VAC +/-5VAC,50Hz +/-3Hz
Normal Operation (typ.) 14.15W 14.10W 14.10WSleep (Standby) 0.5W 0.5W 0.5WOff 0.5W 0.5W 0.5W
Heat Dissipation*
AC Input Voltage at
100VAC +/-5VAC,50Hz +/-3Hz
AC Input Voltage at
115VAC +/-5VAC,60Hz +/-3Hz
AC Input Voltage at
230VAC +/-5VAC,50Hz +/-3Hz
Normal Operation 48.29 BTU/hr 48.12 BTU/hr 48.12 BTU/hr Sleep (Standby) 1.706 BTU/hr 1.706 BTU/hr 1.706 BTU/hr Off 1.706 BTU/hr 1.706 BTU/hr 1.706 BTU/hr Power LED indicator On mode: White, Standby/Sleep mode: White (blinking)Power Supply Built-in, 100-240VAC, 50-60Hz
Dimension
Product with stand (WxHxD) 463 x 358 x 204 mmProduct without stand(WxHxD)
463 x 284 x 44 mm
Weight
Product with stand 2.39kgProduct without stand 2.09kgProduct with packaging 3.38kg
Operating Condition
Temperature range (operation) 0°C to 40 °C
Temperature range(Non-operation)
-20°C to 60°C
Relative humidity 20% to 80%
AltitudeOperation: + 12,000ft (3,658m)Non-operation: + 40,000ft (12,192m)
MTBF 30,000hrs
Environmental
ROHS YESEPEAT Silver (www.epeat.net)Packaging 100% recyclable

8/2/2019 196v3lab_00_dfu_aen
http://slidepdf.com/reader/full/196v3lab00dfuaen 20/38
18
Compliance and standards
Regulatory ApprovalsCE Mark, FCC Class B, GOST, SEMKO, TCO Certified(Only for selective models), UL/cUL, BSMI, ISO9241-307
Cabinet
Color Black Finish Glossy/Texture
Note
1. EPEAT Gold or Silver is valid only where Philips registers the product. Please visit www.epeat.netfor registration status in your country.
2. This data is subject to change without notice. Go to www.philips.com/support to download thelatest version of leaflet.

8/2/2019 196v3lab_00_dfu_aen
http://slidepdf.com/reader/full/196v3lab00dfuaen 21/38
19
4.1 Resolution & Preset Modes
Maximum Resolution1366 x 768 @ 60 Hz (analog input)1366 x 768 @ 60 Hz (digital input)
Recommended Resolution
1366 x 768 @ 60 Hz (digital input)
H. freq (kHz) Resolution V. freq (Hz)
31.47 720 x 400 70.09
31.47 640 x 480 59.94
37.50 640 x 480 75.00
37.88 800 x 600 60.32
46.88 800 x 600 75.0048.36 1024 x 768 60.00
60.02 1024 x 768 75.03
47.71 1366 x 768 59.79
Note Please notice that your display works best atnative resolution of 1366 x 768 @ 60Hz. For best display quality,please follow this resolution
recommendation.

8/2/2019 196v3lab_00_dfu_aen
http://slidepdf.com/reader/full/196v3lab00dfuaen 22/38
20
5. Power Management
If you have VESA DPM compliance display cardor software installed in your PC, the monitor can automatically reduce its power consumptionwhen not in use. If an input from a keyboard,
mouse or other input device is detected, the monitor will 'wake up' automatically. Thefollowing table shows the power consumptionand signaling of this automatic power savingfeature:
196V3LA:
Power Management DefinitionVESAMode
Video H-sync V-sync Power Used LED Color
Active ON Yes Yes17.91W (typ.)
White
Sleep(Standby)
OFF No No < 0.5W (typ.)White(blink)
Switch Off OFF - - < 0.5W (typ.) OFF
196V3L:
Power Management DefinitionVESA
Mode
Video H-sync V-sync Power Used LED Color
Active ON Yes Yes17.6W (typ.)
White
Sleep(Standby)
OFF No No < 0.5W (typ.)White(blink)
Switch Off OFF - - < 0.5W (typ.) OFF
The following setup is used to measure power consumption on this monitor.
• Native resolution: 1366 x 768
• Contrast: 50%• Brightness: 250 nits
• Color temperature: 6500k with full whitepattern
Note
This data is subject to change without notice.

8/2/2019 196v3lab_00_dfu_aen
http://slidepdf.com/reader/full/196v3lab00dfuaen 23/38
21
6. Regulatory Information
Lead-free Product
Lead free display promotesenvironmentally sound recovery
and disposal of waste from electricaland electronic equipment. Toxicsubstances like Lead has been eliminatedand compliance with European community’sstringent RoHs directive mandating restrictionson hazardous substances in electrical andelectronic equipment have been adhered toin order to make Philips monitors safe to use throughout its life cycle.
Congratulations!This display is designed for both you and theplanet
The display you have just purchasedcarries the TCO Certified label.This ensures that your display is
designed, manufactured and tested according tosome of the strictest quality and environmentalrequirements in the world. This makes for a high
performance product, designed with the user in focus that also minimizes the impact on theclimate and our natural environment.
TCO Certified is a third party verified program,where every product model is tested by anaccredited impartial test laboratory. TCOCertified represents one of the toughestcertifications for displays worldwide.
Some of the Usability features of the TCOCertified for displays:
• Visual ergonomics for good image quality is tested to ensure top performance andreduce sight and strain problems. Importantparameters are luminance, contrast,resolution, black level, gamma curve, colour and luminance uniformity and colour rendering.
• Products are tested according to rigoroussafety standards at impartial laboratories.
• Electric and magnetic fields emissions aslow as normal household backgroundlevels.
• Low acoustic noise emissions (whenapplicable).
Some of the Environmental features of theTCO Certified for displays:
• The brand owner demonstrates corporatesocial responsibility and has a certifiedenvironmental management system (EMASor ISO 14001).
• Very low energy consumption both in on-and standby mode minimize climate impact.
• Restrictions on chlorinated and brominated
flame retardants, plasticizers, plastics andheavy metals such as cadmium, mercury and lead (RoHS compliance).
• Both product and product packaging isprepared for recycling.
• The brand owner offers take-back options.
The requirements can be downloaded from our web site. The requirements included in this labelhave been developed by TCO Development in
co-operation with scientists, experts, users aswell as manufacturers all over the world. Since the end of the 1980s TCO has been involvedin influencing the development of IT equipmentin a more user-friendly direction. Our labelingsystem started with displays in 1992 and isnow requested by users and IT-manufacturersall over the world. About 50% of all displaysworldwide are TCO certified.
For more information, please visit:www.tcodevelopment.com
TCOF1058 TCO Document, Ver. 2.1
Technology for you and the planet
(Only for selective models)

8/2/2019 196v3lab_00_dfu_aen
http://slidepdf.com/reader/full/196v3lab00dfuaen 24/38
22
EPEAT
(www.epeat.net)
The EPEAT (ElectronicProduct EnvironmentalAssessment Tool) program
evaluates computer desktops, laptops, and monitors based on 51environmental criteria developed throughan extensive stakeholder consensus processsupported by US EPA.
EPEAT system helps purchasers in the publicand private sectors evaluate, compare andselect desktop computers, notebooks andmonitors based on their environmental
attributes. EPEAT also provides a clear andconsistent set of performance criteria for thedesign of products, and provides an opportunity for manufacturers to secure market recognitionfor efforts to reduce the environmental impactof its products.
Benefits of EPEAT
Reduce use of primary materialsReduce use of toxic materials
Avoid the disposal of hazardous waste EPEAT’Srequirement that all registered products meetENERGY STAR’s energy efficiency specifications,means that these products will consume lessenergy throughout their life.
CE Declaration of Conformity
This product is in conformity with the followingstandards
• EN60950-1:2006 (Safety requirement of Information Technology Equipment).
• EN55022:2006 (Radio Disturbancerequirement of Information Technology Equipment).
• EN55024:1998+A1:2001+A2:2003(Immunity requirement of InformationTechnology Equipment).
• 2006/95/EC (Low Voltage Directive).
• 2004/108/EC (EMC Directive).
• 2005/32/EC (EuP Directive, EC No.1275/2008 mplementing Directivefor Standby and Off mode power consumption) and is produced by a
manufacturing organization on ISO9000level.
The product also comply with the followingstandards
• ISO9241-307:2008 (Ergonomicrequirement, Analysis and compliance testmethods for electronic visual displays).
• GS EK1-2000:2009 (GS mark requirement).
• prEN50279:1998 (Low Frequency Electricand Magnetic fields for Visual Display).
• MPR-II (MPR:1990:8/1990:10 LowFrequency Electric and Magnetic fields).
• TCO CERTIFIED (Requirement for Environment Labeling of Ergonomics,Energy, Ecology and Emission, TCO: SwedishConfederation of Professional Employees)for TCO versions.
• EN61000-3-2:2006+A1:2009+A2:2009
(Limits for Harmonic Current Emission).
• EN61000-3-3:2008 (Limitation of Voltage
Fluctuation and Flicker) following provisionsof directives applicable.

8/2/2019 196v3lab_00_dfu_aen
http://slidepdf.com/reader/full/196v3lab00dfuaen 25/38
23
Energy Star Declaration
(www.energystar.gov)
As an ENERGY STAR ® Partner, wehave determined that this productmeets the ENERGY STAR ®
guidelines for energy efficiency.
NoteWe recommend you switch off the monitor when it is not in use for a long time.
Federal Communications Commission (FCC)Notice (U.S. Only)
This equipment has been tested and found to comply with the limits for a Class B digital
device, pursuant to Part 15 of the FCCRules. These limits are designed to providereasonable protection against harmfulinterference in a residential installation.This equipment generates, uses and canradiate radio frequency energy and, if notinstalled and used in accordance with theinstructions, may cause harmful interference to radio communications.
However, there is no guarantee thatinterference will not occur in a particular installation. If this equipment does causeharmful interference to radio or televisionreception, which can be determined by turning the equipment off and on, theuser is encouraged to try to correct the interference by one or more of thefollowing measures:
• Reorient or relocate the receiving antenna.
• Increase the separation between theequipment and receiver.
• Connect the equipment into an outlet ona circuit different from that to which thereceiver is connected.
• Consult the dealer or an experiencedradio/TV technician for help.
Changes or modifications not expressly approved by the party responsible for compliance could void the user's authority to operate the equipment.
Use only RF shielded cable that was suppliedwith the monitor when connecting this monitor to a computer device.
To prevent damage which may result in fire or shock hazard, do not expose this appliance torain or excessive moisture.
THIS CLASS B DIGITAL APPARATUS MEETSALL REQUIREMENTS OF THE CANADIANINTERFERENCE-CAUSING EQUIPMENTREGULATIONS.
FCC Declaration of Conformity
Declaration of Conformity for Products Markedwith FCC Logo,
United States Only
This device complies with Part 15 of the FCC
Rules. Operation is subject to the following twoconditions: (1) this device may not cause harmfulinterference, and (2) this device must accept any interference received, including interference thatmay cause undesired operation.
Commission Federale de la Communication(FCC Declaration)
Cet équipement a été testé et déclaréconforme auxlimites des appareilsnumériques de class B,aux termes del'article 15 Des règles de la FCC. Ceslimites sont conçues de façon à fourir une protection raisonnable contre lesinterférences nuisibles dans le cadre d'uneinstallation résidentielle.
CET appareil produit, utilise et peut émettredes hyperfréquences qui, si l'appareil n'est
pas installé et utilisé selon les consignesdonnées, peuvent causer des interférencesnuisibles aux communications radio.

8/2/2019 196v3lab_00_dfu_aen
http://slidepdf.com/reader/full/196v3lab00dfuaen 26/38
24
Cependant, rien ne peut garantir l'absenced'interférences dans le cadre d'uneinstallation particulière. Si cet appareil estla cause d'interférences nuisibles pour la réception des signaux de radio ou de télévision, ce qui peut être décelé en
fermant l'équipement, puis en le remettanten fonction, l'utilisateur pourrait essayer decorriger la situation en prenant les mesuressuivantes:
• Réorienter ou déplacer l’antenne deréception.
• Augmenter la distance entre l’équipementet le récepteur.
• Brancher l’équipement sur un autre circuit
que celui utilisé par le récepteur.• Demander l’aide du marchand ou d’un
technicien chevronné en radio/télévision.
Toutes modifications n'ayant pas reçul'approbation des services compétentsen matière de conformité est susceptibled'interdire à l'utilisateur l'usage du présentéquipement.
N'utiliser que des câbles RF armés pour les connections avec des ordinateurs oupériphériques.
CET APPAREIL NUMERIQUE DE LA CLASSEB RESPECTE TOUTES LES EXIGENCES DUREGLEMENT SUR LE MATERIEL BROUILLEUR DU CANADA.
EN 55022 Compliance (Czech Republic Only)
Polish Center for Testing and CertificationNotice
The equipment should draw power from asocket with an attached protection circuit (a three-prong socket). All equipment that works together (computer, monitor, printer, and so on)should have the same power supply source.
The phasing conductor of the room's electricalinstallation should have a reserve short-circuitprotection device in the form of a fuse with anominal value no larger than 16 amperes (A).
To completely switch off the equipment, thepower supply cable must be removed from thepower supply socket, which should be locatednear the equipment and easily accessible.
A protection mark "B" confirms that the
equipment is in compliance with the protectionusage requirements of standards PN-93/T-42107and PN-89/E-06251.

8/2/2019 196v3lab_00_dfu_aen
http://slidepdf.com/reader/full/196v3lab00dfuaen 27/38
25
North Europe (Nordic Countries) Information
Placering/VentilationVARNING:
FÖRSÄKRA DIG OM ATT HUVUDBRYTAREOCH UTTAG ÄR LÄTÅTKOMLIGA, NÄR DU STÄLLER DIN UTRUSTNING PÅPLATS.
Placering/VentilationADVARSEL:
SØRG VED PLACERINGEN FOR, ATNETLEDNINGENS STIK OG STIKKONTAKTER NEMT TILGÆNGELIGE.
Paikka/IlmankiertoVAROITUS:
SIJOITA LAITE SITEN, ETTÄ VERKKOJOHTOVOIDAAN TARVITTAESSA HELPOSTIIRROTTAA PISTORASIASTA.
Plassering/VentilasjonADVARSEL: NÅR DETTE UTSTYRET PLASSERES, MÅDU PASSE PÅ AT KONTAKTENE FOR STØMTILFØRSEL ER LETTE Å NÅ.
BSMI Notice (Taiwan Only)
Ergonomie Hinweis (nur Deutschland)
Der von uns gelieferte Farbmonitor entsprichtden in der "Verordnung über den Schutz vor Schäden durch Röntgenstrahlen" festgelegtenVorschriften.
Auf der Rückwand des Gerätes befindet sichein Aufkleber, der auf die Unbedenklichkeit der Inbetriebnahme hinweist, da die Vorschriftenüber die Bauart von Störstrahlern nach AnlageIII¤5Abs.4derRöntgenverordnungerfülltsind.
Damit Ihr Monitor immer den in der Zulassunggeforderten Werten entspricht, ist darauf zuachten, daß
1. Reparaturen nur durch Fachpersonal
durchgeführt werden.2. nur original-Ersatzteile verwendet werden.
3. bei Ersatz der Bildröhre nur einebauartgleiche eingebaut wird.
Aus ergonomischen Gründen wird empfohlen,die Grundfarben Blau und Rot nicht auf dunklem Untergrund zu verwenden (schlechteLesbarkeit und erhöhte Augenbelastung bei zugeringem Zeichenkontrast wären die Folge).
Der arbeitsplatzbezogene Schalldruckpegelnach DIN 45 635 beträgt 70dB (A) oder weniger.
ACHTUNG: BEIM AUFSTELLENDIESES GERÄTES DARAUFACHTEN, DAß NETZSTECKER UNDNETZKABELANSCHLUß LEICHTZUGÄNGLICH SIND.

8/2/2019 196v3lab_00_dfu_aen
http://slidepdf.com/reader/full/196v3lab00dfuaen 28/38
26
China RoHS
The People's Republic of China released aregulation called "Management Methods for Controlling Pollution by Electronic InformationProducts" or commonly referred to as ChinaRoHS. All products including CRT and Monitor
which are produced and sold for China markethave to meet China RoHS request.
环保使用期限
此标识指期限(十年),电子信息产品中含有的有毒有害物质或元素在正常使用的条件下不会发生外泄或突变, 电子信息产品用户使用该电子信息产品不会对环境造成严重污染或对其人身、 财产造成严重损害的期限.
《废弃电器电子产品回收处理管理条例》提示性说明
为了更好地关爱及保护地球,当用户不再需要此 产品或产品寿命终止时,请遵守国家废弃电器电子产品回收处理相关法律法规,将其交给当地具有国家认可的回收处理资质的厂商进行回收处理。

8/2/2019 196v3lab_00_dfu_aen
http://slidepdf.com/reader/full/196v3lab00dfuaen 29/38
27
7. Customer care andwarrant
7.1 Philips’ Flat Panel Monitors Pixel
Defect PolicyPhilips strives to deliver the highest quality products. We use some of the industry's mostadvanced manufacturing processes and practicestringent quality control. However, pixel or sub pixel defects on the TFT Monitor panelsused in flat panel monitors are sometimesunavoidable. No manufacturer can guarantee that all panels will be free from pixel defects,
but Philips guarantees that any monitor with anunacceptable number of defects will be repairedor replaced under warranty. This notice explains the different types of pixel defects and definesacceptable defect levels for each type. In order to qualify for repair or replacement under warranty, the number of pixel defects on a TFTMonitor panel must exceed these acceptablelevels. For example, no more than 0.0004% of the sub pixels on a monitor may be defective.
Furthermore, Philips sets even higher quality standards for certain types or combinationsof pixel defects that are more noticeable thanothers. This policy is valid worldwide.
Pixels and Sub pixels
A pixel, or picture element, is composed of three sub pixels in the primary colors of red,green and blue. Many pixels together form animage. When all sub pixels of a pixel are lit, the
three colored sub pixels together appear as asingle white pixel. When all are dark, the threecolored sub pixels together appear as a single
black pixel. Other combinations of lit and dark sub pixels appear as single pixels of other colors.
Types of Pixel Defects
Pixel and sub pixel defects appear on the screenin different ways. There are two categories of
pixel defects and several types of sub pixeldefects within each category.
Bright Dot Defects
Bright dot defects appear as pixels or sub pixels that are always lit or 'on'. That is, a bright dot isa sub-pixel that stands out on the screen when the monitor displays a dark pattern. There are the types of bright dot defects.
One lit red, green or blue sub pixel.
Two adjacent lit sub pixels:- Red + Blue = Purple
- Red + Green = Yellow- Green + Blue = Cyan (Light Blue)
Three adjacent lit sub pixels (one white pixel).

8/2/2019 196v3lab_00_dfu_aen
http://slidepdf.com/reader/full/196v3lab00dfuaen 30/38
28
NoteA red or blue bright dot must be more than 50percent brighter than neighboring dots whilea green bright dot is 30 percent brighter thanneighboring dots.
Black Dot DefectsBlack dot defects appear as pixels or sub pixels that are always dark or 'off'. That is, a dark dot isa sub-pixel that stands out on the screen when the monitor displays a light pattern. These are the types of black dot defects.
Proximity of Pixel Defects
Because pixel and sub pixels defects of thesame type that are near to one another may bemore noticeable, Philips also specifies tolerancesfor the proximity of pixel defects.
Pixel Defect Tolerances
In order to qualify for repair or replacementdue to pixel defects during the warranty period,a TFT Monitor panel in a Philips flat panelmonitor must have pixel or sub pixel defectsexceeding the tolerances listed in the following tables.
BRIGHT DOT DEFECTS ACCEPTABLE LEVEL
1 lit subpixel 32 adjacent lit subpixels 13 adjacent lit subpixels (one white pixel) 0Distance between two bright dot defects* >15mmTotal bright dot defects of all types 3
BLACK DOT DEFECTS ACCEPTABLE LEVEL
1 dark subpixel 5 or fewer
2 adjacent dark subpixels 2 or fewer 3 adjacent dark subpixels 0Distance between two black dot defects* >15mmTotal black dot defects of all types 5 or fewer
TOTAL DOT DEFECTS ACCEPTABLE LEVEL
Total bright or black dot defects of all types 5 or fewer
Note
1. 1 or 2 adjacent sub pixel defects = 1 dot defect
2. This monitor is ISO9241-307 compliant (ISO9241-307: Ergonomic requirement,analysis andcompliance test methods for electronic visual displays)

8/2/2019 196v3lab_00_dfu_aen
http://slidepdf.com/reader/full/196v3lab00dfuaen 31/38
29
7.2 Customer Care & Warranty
For warranty coverage information and additional support requirement valid for your region, please visitwww.philips.com/support website for details. You may also contact your local Philips Customer CareCenter number listed below.
Contact Information for WESTERN EUROPE region:
Country ASC Consumer care number Price
Germany Siemens I&S +49 01803 386 853 € 0.09
United Kingdom Invec Scotland +44 0207 949 0069 Local call tariff
Ireland Invec Scotland +353 01 601 1161 Local call tariff
Spain Eatsa Spain +34 902 888 785 € 0.10
Finland A-novo +358 09 2290 1908 Local call tariff
France A-novo +33 082161 1658 € 0.09
Greece Allman Hellas +30 00800 3122 1223 Free of charge
Italy A-novo +39 840 320 041 € 0.08
Netherlands E Care +31 0900 0400 063 € 0.10
Denmark A-novo +45 3525 8761 Local call tariff
Norway A-novo +47 2270 8250 Local call tariff
Sweden A-novo +46 08 632 0016 Local call tariff
Poland Zolter +48 0223491505 Local call tariff
Austria Siemens I&S +43 0810 000206 € 0.07
Belgium E Care +32 078 250851 € 0.06
Luxembourg E Care +352 26 84 30 00 Local call tariff
Portugal Eatsa Spain +351 2 1359 1440 Local call tariff
Switzerland A-novo +41 02 2310 2116 Local call tariff

8/2/2019 196v3lab_00_dfu_aen
http://slidepdf.com/reader/full/196v3lab00dfuaen 32/38
30
Contact Information for CENTRAL AND EASTERN EUROPE region:
Country Call center ASC Consumer care number
Belarus NA IBA +375 17 217 3386
Bulgaria NA LAN Service +359 2 960 2360
Croatia NA Renoprom +385 1 333 0974
Estonia NA FUJITSU +372 6519900
Latvia NA “ServiceNet LV” Ltd. +371 7460399
Lithuania NA UAB "Servicenet" +370 7400088
Romania NA Blue Ridge Intl. +40 21 2101969
Serbia &Montenegro
NA Kim Tec d.o.o. +381 11 20 70 684
Slovenia NA PC H.and +386 1 530 08 24
UkraineNA Comel +380 562320045NA Topaz-Service Company +38 044 245 73 31
RussiaNA CPS +7 (495) 645 6746 (for repair)
NA CEEE Partners +7 (495) 645 3010 (for sales)
Slovakia NA Datalan Service +421 2 49207155
Turkey NA Techpro +90 212 444 4 832
Czech Rep. NA Asupport 800 100 697
Hungary NA Serware +36 1 2426331NA Profi Service +36 1 814 8080
Contact Information for LATIN AMERICA region:
Country Call center Consumer care number
BrazilVermont
0800-7254101
Argentina 0800 3330 856
Contact Information for China:ChinaConsumer care number : 4008 800 008
Contact Information for NORTH AMERICA :
Country Call center ASC Consumer care number
U.S.A. TOS Teleplan (877) 835-1838
Canada Supercom Supercom (800)479-6696

8/2/2019 196v3lab_00_dfu_aen
http://slidepdf.com/reader/full/196v3lab00dfuaen 33/38
31
Contact Information for APMEA region:
Country Call center ASC Consumer care number
Australia NA AGOS NETWORK PTY LTD 1300 360 386
New Zealand NA Visual Group Ltd. 0800 657447
Hong Kong /
Macau NA Smart Pixels Technology Ltd.
Hong Kong:Tel: +852 2619 9639
Macau:Tel: (853)-0800-987
India NA REDINGTON INDIA LTDTel: 1 800 425 6396SMS: PHILIPS to 56677
Indonesia NA PT. Gadingsari elektronika PrimaTel: 62 21 75909053, 75909056,7511530
South Korea NA PCS One Korea Ltd. 080-600-6600
Malaysia NAAfter Market Solutions (CE)Sdn Bhd
603 7953 3370
Pakistan NA Philips Consumer Service (9221) 2737411-16
Singapore NAPhilips Electronics SingaporePte Ltd (Philips Consumer CareCenter)
(65) 6882 3999
TaiwanPCCWTeleservicesTaiwan
FETEC.CO 0800-231-099
Thailand NA Axis Computer System Co., Ltd. (662) 934-5498
South Africa NA Sylvara Technologies Pty Ltd 086 0000 888
United ArabEmirates
NA AL SHAHD COMPUTER L.L.C 00971 4 2276525
Israel NA Eastronics LTD 1-800-567000
Vietnam NAFPT Service InformaticCompany Ltd.
+84 8 38248007 Ho Chi Minh City +84 5113.562666 Danang City +84 5113.562666 Can tho Province
Philippines NA Glee Electronics, Inc.(02) 633-4533 to 34,(02) 637-6559 to 60
Sri Lanka NA no distributor and/or serviceprovider currently
Bangladesh NADistributor: Computer SourceLtd (warranty buy-out)
880-2-9141747, 9127592880-2-8128848 / 52
Nepal NADistributor : Syakar Co. Ltd(warranty buy-out)
977-1-4222395
Cambodia NADistributor : Neat Technology Pte Ltd (Singapore) (warranty buy-out)
855-023-999992

8/2/2019 196v3lab_00_dfu_aen
http://slidepdf.com/reader/full/196v3lab00dfuaen 34/38
32
8. Troubleshooting & FAQs
8.1 Troubleshooting
This page deals with problems that can be
corrected by a user. If the problem still persistsafter you have tried these solutions, contactPhilips customer service representative.
Common Problems
No Picture (Power LED not lit)
• Make sure the power cord is plugged into the power outlet and into the back of themonitor.
• First, ensure that the power button on thefront of the monitor is in the OFF position, then press it to the ON position.
No Picture (Power LED is White)
• Make sure the computer is turned on.
• Make sure the signal cable is properly connected to your computer.
• Make sure the monitor cable has no bent
pins on the connect side. If yes, repair or replace the cable.
• The Energy Saving feature may be activated
Screen says
Attention
Check cable connection
• Make sure the monitor cable is properly connected to your computer. (Also refer to the Quick Start Guide).
• Check to see if the monitor cable has bentpins.
• Make sure the computer is turned on.
AUTO button doesn't function
• The auto function is applicable only inVGA-Analog mode. If the result is not
satisfactory, you can do manual adjustmentsvia the OSD menu.
Note
The Auto Function is not applicable in DVI-Digital mode as it is not necessary.
Visible signs of smoke or sparks
• Do not perform any troubleshooting steps
• Disconnect the monitor from mains power source immediately for safety
• Contact with Philips customer servicerepresentative immediately.
Imaging Problems
Image is not centered
• Adjust the image position using the “Auto”function in OSD Main Controls.
• Adjust the image position using the Phase/Clock of Setup in OSD Main Controls. It isvalid only in VGA mode.
Image vibrates on the screen
• Check that the signal cable is properly securely connected to the graphics board
or PC.Vertical flicker appears
• Adjust the image using the “Auto” functionin OSD Main Controls.
• Eliminate the vertical bars using the Phase/
Clock of Setup in OSD Main Controls. It isvalid only in VGA mode.
Horizontal flicker appears
• Adjust the image using the “Auto” functionin OSD Main Controls.

8/2/2019 196v3lab_00_dfu_aen
http://slidepdf.com/reader/full/196v3lab00dfuaen 35/38
33
• Eliminate the vertical bars using the Phase/Clock of Setup in OSD Main Controls. It isvalid only in VGA mode.
Image appears blurred, indistinct or too dark
• Adjust the contrast and brightness on
On-Screen Display.An "after-image", "burn-in" or "ghost image"remains after the power has been turned off.
• Uninterrupted display of still or staticimages over an extended period may cause"burn in", also known as "after-imaging "or "ghost imaging", on your screen. "Burn-in", "after-imaging", or "ghost imaging" is awell-known phenomenon in LCD panel
technology. In most cases, the "burned in"or "after-imaging" or "ghost imaging" willdisappear gradually over a period of timeafter the power has been switched off.
• Always activate a moving screen saver program when you leave your monitor unattended.
• Always activate a periodic screen refreshapplication if your LCD monitor will display unchanging static content.
• Severe” burn-in” or “after-image” or “ghostimage” symptoms will not disappear andcannot be repaired. The damage mentionedabove is not covered under your warranty.
Image appears distorted. Text is fuzzy orblurred.
• Set the PC’s display resolution to the samemode as monitor’s recommended screen
native resolution.Green, red, blue, dark, and white dots appearson the screen
• The remaining dots are normalcharacteristic of the liquid crystal used in today’s technology, Please refer the pixelpolicy for more detail.
The "power on" light is too strong and isdisturbing
• You can adjust “power on” light using thepower LED Setup in OSD main Controls.
For further assistance, refer to the Consumer Information Centers list and contact Philipscustomer service representative.
8.2 General FAQs
Q1: When I install my monitor what shouldI do if the screen shows 'Cannot displaythis video mode'?
Ans.: Recommended resolution for thismonitor: 1366 x 768 @ 60 Hz.
• Unplug all cables, then connect your PC to the monitor that you used previously.
• In the Windows Star t Menu, select Settings/Control Panel. In the Control PanelWindow, select the Display icon. Inside theDisplay Control Panel, select the 'Settings' tab. Under the setting tab, in box labelled'desktop area', move the sidebar to 1366 x768 pixels.
• Open 'Advanced Properties' and set theRefresh Rate to 60 Hz, then click OK.
• Restart your computer and repeat step 2and 3 to verify that your PC is set at 1366
x 768 @ 60 Hz.• Shut down your computer, disconnect your
old monitor and reconnect your PhilipsLCD monitor.
• Turn on your monitor and then turn onyour PC.
Q2: What is the recommended refresh ratefor LCD monitor?
Ans.: Recommended refresh rate in LCDmonitors is 60 Hz, In case of any disturbance on screen, you can set itup to 75 Hz to see if that removes thedisturbance.
Q3: What are the .inf and .icm files on theCD-ROM? How do I install the drivers(.inf and .icm)?
Ans.: These are the driver files for your monitor. Follow the instructions in your user manual to install the drivers. Your computer may ask you for monitor

8/2/2019 196v3lab_00_dfu_aen
http://slidepdf.com/reader/full/196v3lab00dfuaen 36/38
34
drivers (.inf and .icm files) or a driver disk when you first install your monitor. Follow the instructions to insert the ( companionCD-ROM) included in this package.Monitor drivers (.inf and .icm files) will beinstalled automatically.
Q4: How do I adjust the resolution?Ans.: Your video card/graphic driver and
monitor together determine the availableresolutions. You can select the desiredresolution under Windows® ControlPanel with the "Display properties".
Q5: What if I get lost when I am makingmonitor adjustments via OSD?
Ans.: Simply press the OK button, then select'Reset' to recall all of the original factory settings.
Q6: Is the LCD screen resistant to scratches?Ans.: In general it is recommended that the
panel surface is not subjected to excessiveshocks and is protected from sharp or blunt objects. When handling the monitor,make sure that there is no pressure or force applied to the panel surface side.This may affect your warranty conditions.
Q7: How should I clean the LCD surface?
Ans.: For normal cleaning, use a clean, softcloth. For extensive cleaning, please useisopropyl alcohol. Do not use other solvents such as ethyl alcohol, ethanol,acetone, hexane, etc.
Q8: Can I change the color setting of my
monitor?
Ans.: Yes, you can change your color setting through OSD control as the followingprocedures,
• Press "OK" to show the OSD (On ScreenDisplay) menu
• Press "Down Arrow" to select the option"Color" then press "OK" to enter color setting, there are three settings as below.
1. Color Temperature; The two settingsare 6500K and 9300K. With settingsin the 6500K range the panel appears
"warm, with a red-white color tone",while a 9300K temperature yields "cool,bluewhite toning".
2. sRGB; this is a standard setting for ensuring correct exchange of colorsbetween different device (e.g. digitalcameras, monitors, printers, scanners,etc)
3. User Define; the user can choose his/her preference color setting by adjustingred, green blue color.
Note
A measurement of the color of light radiatedby an object while it is being heated. This
measurement is expressed in terms of absolute scale, (degrees Kelvin). Lower Kevin temperatures such as 2004K are red; higher temperatures such as 9300K are blue. Neutral temperature is white, at 6504K.
Q9: Can I connect my LCD monitor to anyPC, workstation or Mac?
Ans.: Yes. All Philips LCD monitors are fully compatible with standard PCs, Macs
and workstations. You may need a cableadapter to connect the monitor to your Mac system. Please contact your Philipssales representative for more information.
Q10: Are Philips LCD monitors Plug-and-Play?
Ans.: Yes, the monitors are Plug-and-Play compatible with Windows 7/Vista/XP/NT,Mac OSX, Linux
Q11: What is Image Sticking, or Image Burn-in,or After Image, or Ghost Image in LCDpanels?
Ans.: Uninterrupted display of still or staticimages over an extended period may cause "burn in", also known as "after-imaging" or "ghost imaging", on your screen. "Burn-in", "after-imaging", or "ghostimaging" is a well-known phenomenon in
LCD panel technology. In most cases, the"burned in" or "atter-imaging" or "ghost

8/2/2019 196v3lab_00_dfu_aen
http://slidepdf.com/reader/full/196v3lab00dfuaen 37/38
35
imaging" will disappear gradually over aperiod of time after the power has beenswitched off.Always activate a moving screen saver program when you leave your monitor unattended.
Always activate a periodic screen refreshapplication if your LCD monitor willdisplay unchanging static content.
Warning
Severe"burn-in" or "after-image" or "ghost image"symptoms will not disappear and cannot berepaired. The damage mentioned above is notcovered under your warranty.
Q12: Why is my Display not showing sharptext, and is displaying jagged characters?
Ans.: Your LCD monitor works best at itsnative resolution of 1366 x 768 @ 60 Hz.For best display, please use this resolution.

8/2/2019 196v3lab_00_dfu_aen
http://slidepdf.com/reader/full/196v3lab00dfuaen 38/38
2011 © Koninkli jke Philips Electronics N.V. All rights reserved.
Philips and the Philips Shield Emblem are registered trademarks of
Koninklijke Philips Electronics N.V. and are used under license from
Koninklijke Philips Electronics N.V.


