Embed Size (px)
DESCRIPTION
AOS Training. Alcatel-Lucent - Enterprise Solutions Division. Agenda. Part 1 : Switch 기본 설정 Part 2 : Switch Booting Part 3 : Alcatel operating system Part 4 : Hardware 정보 확인 Part 5 : AOS Upgrade Part 6 : Switch 보안 Part 7 : VLAN Part 8 : 802.1q Part 9 : Spanning Tree - PowerPoint PPT Presentation
Citation preview

AOS Training
Alcatel-Lucent - Enterprise Solutions Division

All Rights Reserved © Alcatel-Lucent 2007, #####Alcatel-Lucent - Enterprise Solutions Division 2
Agenda
Part 1 : Switch 기본 설정 Part 2 : Switch Booting Part 3 : Alcatel operating system Part 4 : Hardware 정보 확인Part 5 : AOS UpgradePart 6 : Switch 보안Part 7 : VLANPart 8 : 802.1qPart 9 : Spanning TreePart 10 : Link AggregationPart 11 : VRRPPart 12 : Routing ProtocolPart 13 : Access Control ListPart 14 : QoSPart 15 : SNMP ConfigurationPart 16 : Network SecurityPart 17 : Switch CheckPart 18 : LAB
All Rights Reserved © Alcatel-Lucent 2007, #####Alcatel-Lucent - Enterprise Solutions Division 3
Part 1 : Switch 기본 설정
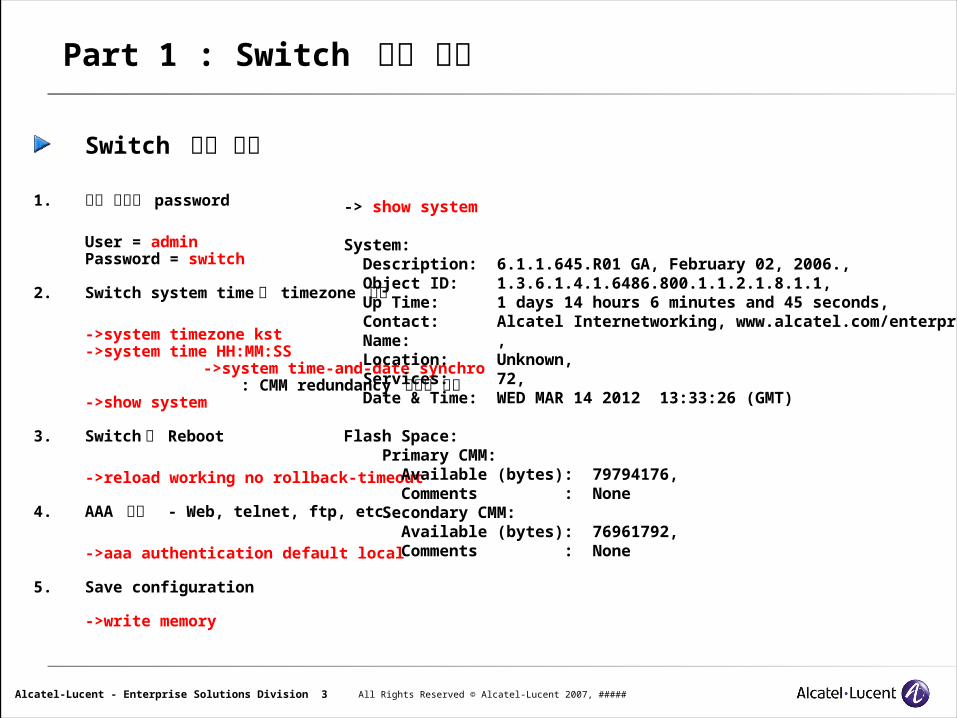
Switch 기본 설정
1. 기본 계정과 password
User = adminPassword = switch
2. Switch system time 과 timezone 설정
->system timezone kst->system time HH:MM:SS
->system time-and-date synchro : CMM redundancy 구성인 경우
->show system
3. Switch 의 Reboot
->reload working no rollback-timeout
4. AAA 설정 - Web, telnet, ftp, etc.
->aaa authentication default local
5. Save configuration
->write memory
-> show system System: Description: 6.1.1.645.R01 GA, February 02, 2006., Object ID: 1.3.6.1.4.1.6486.800.1.1.2.1.8.1.1, Up Time: 1 days 14 hours 6 minutes and 45 seconds, Contact: Alcatel Internetworking, www.alcatel.com/enterprise/en, Name: , Location: Unknown, Services: 72, Date & Time: WED MAR 14 2012 13:33:26 (GMT)
Flash Space: Primary CMM: Available (bytes): 79794176, Comments : None Secondary CMM: Available (bytes): 76961792, Comments : None
All Rights Reserved © Alcatel-Lucent 2007, #####Alcatel-Lucent - Enterprise Solutions Division 4
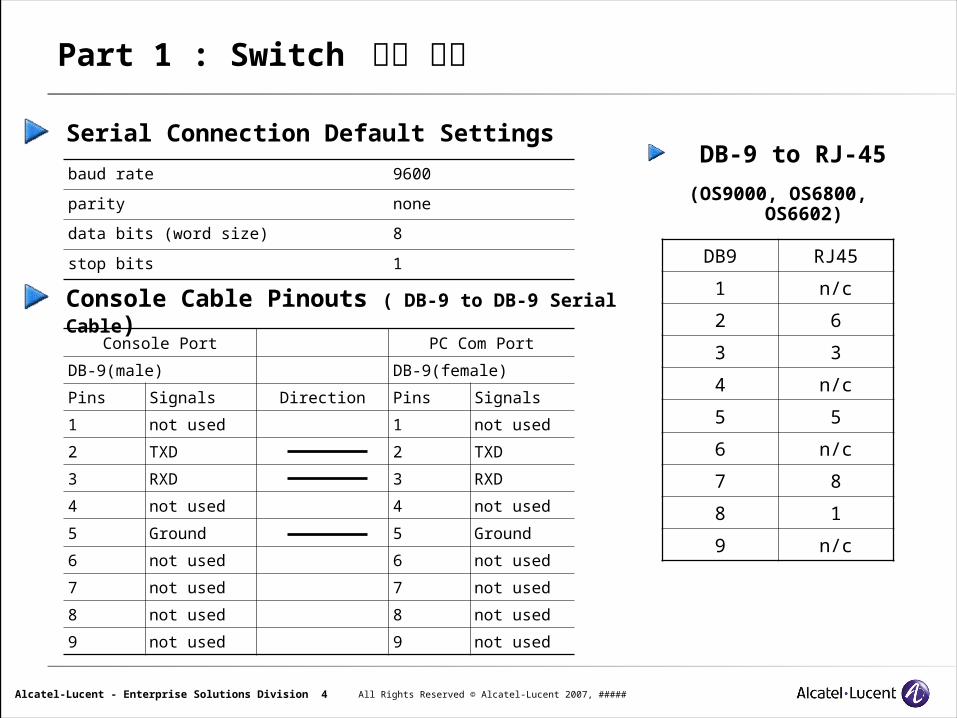
Serial Connection Default Settings
Console Cable Pinouts ( DB-9 to DB-9 Serial Cable)
Part 1 : Switch 기본 설정
baud rate 9600
parity none
data bits (word size) 8
stop bits 1
Console Port PC Com Port
DB-9(male) DB-9(female)
Pins Signals Direction Pins Signals
1 not used 1 not used
2 TXD 2 TXD
3 RXD 3 RXD
4 not used 4 not used
5 Ground 5 Ground
6 not used 6 not used
7 not used 7 not used
8 not used 8 not used
9 not used 9 not used
DB9 RJ45
1 n/c
2 6
3 3
4 n/c
5 5
6 n/c
7 8
8 1
9 n/c
DB-9 to RJ-45
(OS9000, OS6800, OS6602)
All Rights Reserved © Alcatel-Lucent 2007, #####Alcatel-Lucent - Enterprise Solutions Division 5
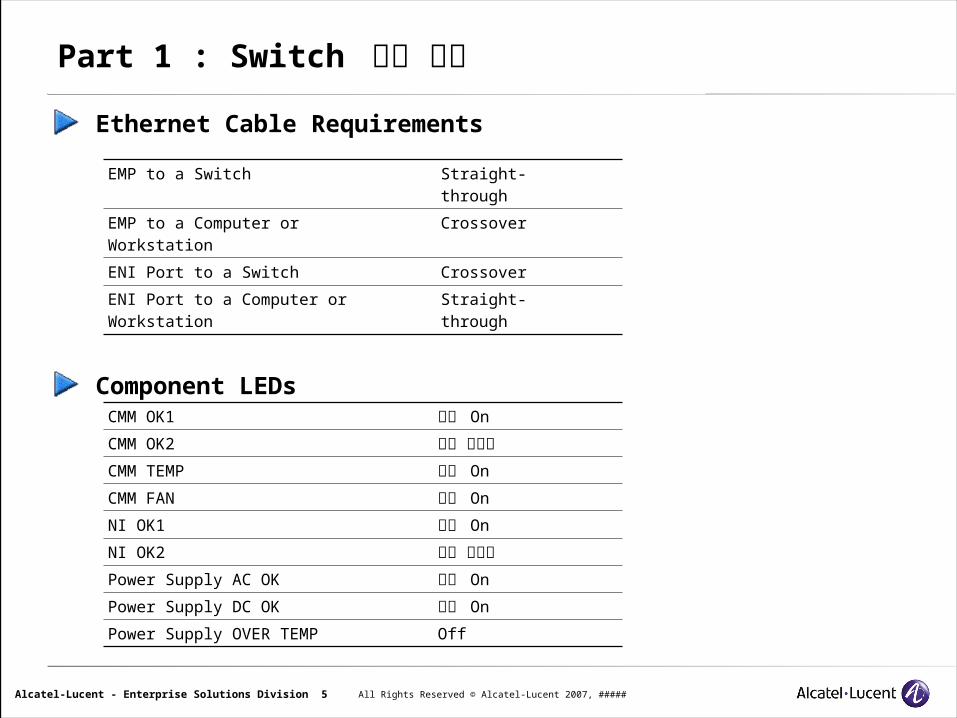
Ethernet Cable Requirements
Component LEDs
Part 1 : Switch 기본 설정
EMP to a Switch Straight-through
EMP to a Computer orWorkstation
Crossover
ENI Port to a Switch Crossover
ENI Port to a Computer orWorkstation
Straight-through
CMM OK1 녹색 On
CMM OK2 녹색 깜박임
CMM TEMP 녹색 On
CMM FAN 녹색 On
NI OK1 녹색 On
NI OK2 녹색 깜박임
Power Supply AC OK 녹색 On
Power Supply DC OK 녹색 On
Power Supply OVER TEMP Off
All Rights Reserved © Alcatel-Lucent 2007, #####Alcatel-Lucent - Enterprise Solutions Division 6
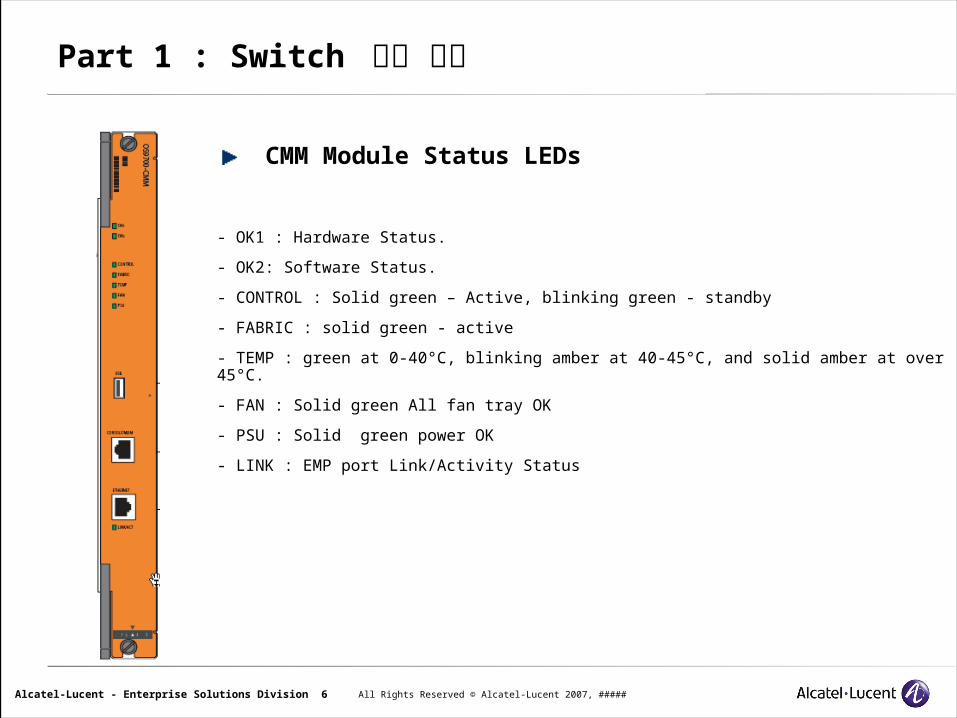
CMM Module Status LEDs
- OK1 : Hardware Status.
- OK2: Software Status.
- CONTROL : Solid green – Active, blinking green - standby
- FABRIC : solid green - active
- TEMP : green at 0-40°C, blinking amber at 40-45°C, and solid amber at over 45°C.
- FAN : Solid green All fan tray OK
- PSU : Solid green power OK
- LINK : EMP port Link/Activity Status
Part 1 : Switch 기본 설정
All Rights Reserved © Alcatel-Lucent 2007, #####Alcatel-Lucent - Enterprise Solutions Division 7
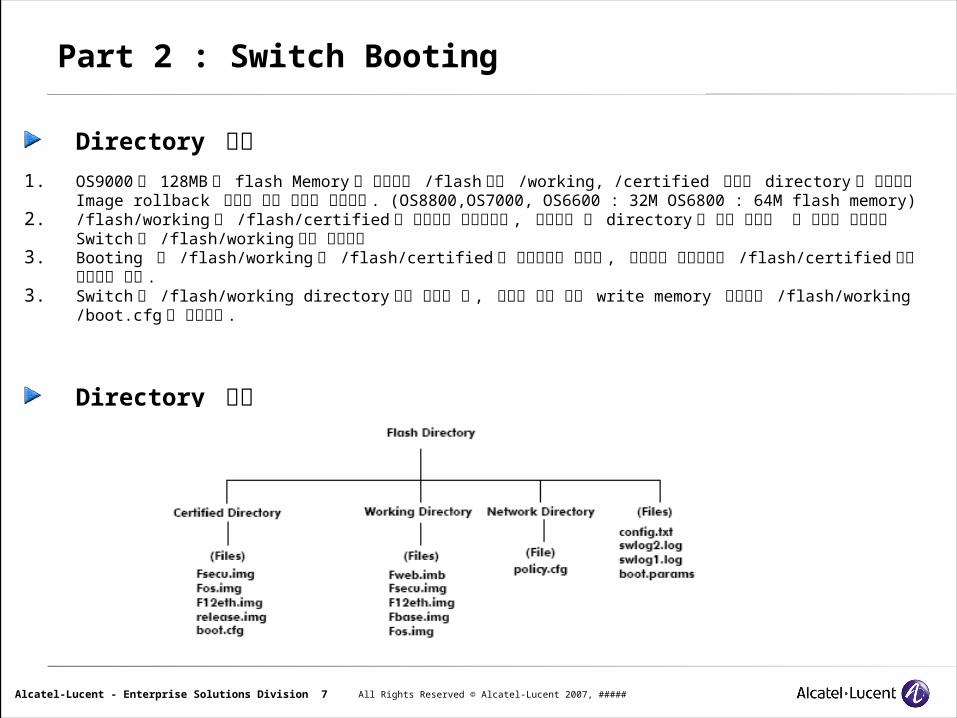
Directory 구성1. OS9000 은 128MB 의 flash Memory 를 지원하며 / flash 에는 / working, /certified 두개의 directory 를 포함하고
Image rollback 기능을 위해 동시에 작동한다 . (OS8800,OS7000, OS6600 : 32M OS6800 : 64M flash memory)
2. / flash/working 과 / flash/certified 가 완전하게 동일하다면 , 스위치는 두 directory 를 모두 신뢰할 수 있다고 판단하고 Switch 는 / flash/working 에서 작동한다
3. Booting 시 /flash/working 와 / flash/certified 가 조금이라도 다르면 , 스위치는 자동적으로 / flash/certified 에서 작동하게 된다 .
3. Switch 가 / flash/working directory 에서 작동할 때 , 변경된 설정 값은 write memory 명령으로 / flash/working/boot.cfg 에 저장한다 .
Directory 구조
Part 2 : Switch Booting
All Rights Reserved © Alcatel-Lucent 2007, #####Alcatel-Lucent - Enterprise Solutions Division 8
Part 2 : Switch Booting
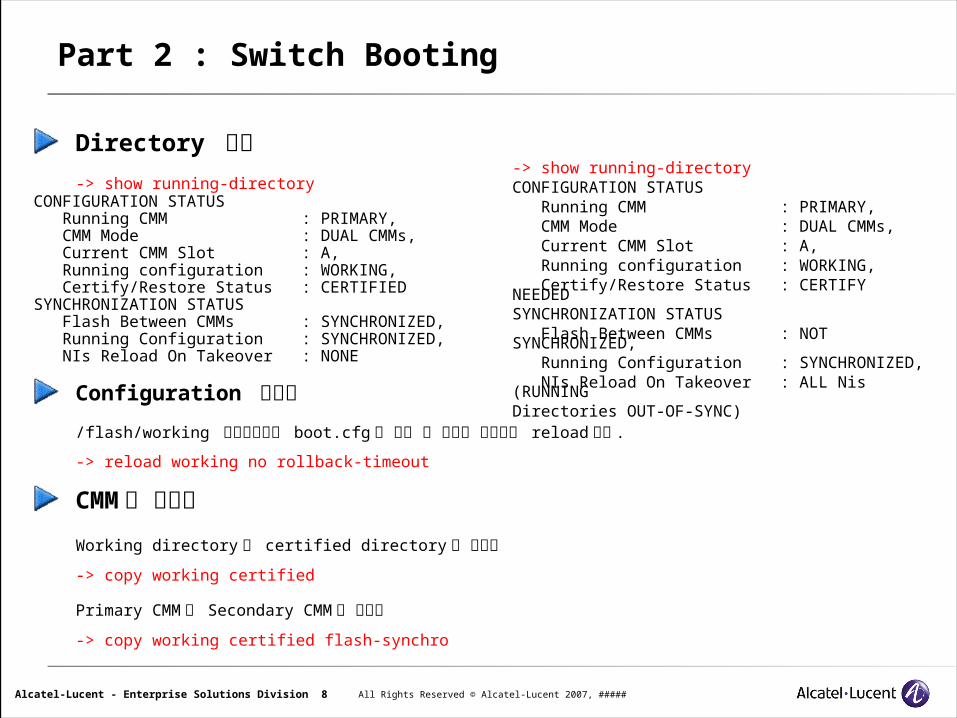
Directory 확인
-> show running-directory CONFIGURATION STATUS Running CMM : PRIMARY, CMM Mode : DUAL CMMs, Current CMM Slot : A, Running configuration : WORKING, Certify/Restore Status : CERTIFIEDSYNCHRONIZATION STATUS Flash Between CMMs : SYNCHRONIZED, Running Configuration : SYNCHRONIZED, NIs Reload On Takeover : NONE
Configuration 초기화
/ flash/working 디렉토리에서 boot.cfg 를 삭제 후 아래의 명령어로 reload 한다 .
-> reload working no rollback-timeout
CMM 의 동기화
Working directory 와 certified directory 의 동기화
-> copy working certified
Primary CMM 과 Secondary CMM 의 동기화
-> copy working certified flash-synchro
-> show running-directory CONFIGURATION STATUS Running CMM : PRIMARY, CMM Mode : DUAL CMMs, Current CMM Slot : A, Running configuration : WORKING, Certify/Restore Status : CERTIFY NEEDEDSYNCHRONIZATION STATUS Flash Between CMMs : NOT SYNCHRONIZED, Running Configuration : SYNCHRONIZED, NIs Reload On Takeover : ALL Nis (RUNNING Directories OUT-OF-SYNC)
All Rights Reserved © Alcatel-Lucent 2007, #####Alcatel-Lucent - Enterprise Solutions Division 9
Part 3 : Alcatel operating system
- Switch 를 설정하는 방법은 SNMP, CLI, Webview 의 3 가지 방법이 있고 그 중에서 CLI 에 관하여 알아본다 .
CLI help
- ‘ ? ’ 를 이용하면 사용 가능한 명령어가 표시된다 .- ‘ vlan ? ’ 와 같이 입력하면 다음에 사용 가능한 명령어가 표시된다 . - ‘ po? ’ 와 같이 입력하면 po 로 시작하는 모든 명령어를 표시한다 .- <TAB> 를 이용하면 중복되는 명령어가 없다면 자동으로 명령어를 채운다 .
CLI Line Editor & History
- ‘ !! ’ 의 명령어는 마지막에 사용한 명령어를 표시 해준다 .- 여러 개의 명령어는 편집해서 한꺼번에 적용 가능하다 .- ‘ show history ’ 로 전에 사용한 명령어의 List 를 출력한다 .- ‘ !# ’ (‘#’ = command number) 로 전에 사용한 명령어를 선택할 수 있다 .
Directory Structure
- Switch 는 Unix 의 기본 command 가 사용 가능하다 .
pwd – show current directory.
cd – change directory.
mkdir – create a new directory.
ls – list contents of a directory.
mv – move a file.
cp – copy a file.
rm – remove a file.
rls /flash – SecCMM 의 list 확인
rcp /flash/file name /flash/file name
– SecCMM 의 file 을 PriCMM 으로 copy
All Rights Reserved © Alcatel-Lucent 2007, #####Alcatel-Lucent - Enterprise Solutions Division 10
Part 3 : Alcatel operating system
Configuration Basic
- Omniswitch 의 Configuration 은 3 개의 다른 version 이 있다 . 그것은 Working, Certified, 그리고 Running version 이다 . - Switch 가 boot parameter 에 의해 부팅할 때 그것은 working 혹은 certified directory 로부터 부팅 할 것이다 .- 일단 Directory 로 중 한가지로 부팅하면 Configuration 은 Running Configuration 이 된다 .
Running Configuration
- ‘ vlan 2 ’, ‘ vlan 3 ’, ‘ vlan 4 ’ 등 몇 개의 vlan 을 생성하면 그 것은 Running Configuration 에 만들어 진 것이다 . - 변경된 설정은 바로 적용된다 . 그러나 완전히 저장된 것은 아니다 .- ‘ reload working no rollback-timeout ’ 으로 reboot 한 후에 ‘ show vlan ’ 으로 확인 해보면 vlan 은 생성되지 않았다 . 왜냐하면 Running Configuration 에서 변경된 설정 flash memory 에 저장되지 않았기 때문이다 .
Working Directory
- ‘ vlan 2 ’, ‘ vlan 3 ’, ‘ vlan 4 ’ 를 생성하고 ‘ configuration snapshot all snap1 ’ 을 이용해서 Running Configuration 전체를 snap1 이라는 ascii file 로 저장할 수 있다 .
- ‘ write memory ’ 를 이용해서 Running Configuration 을 Working Directory 의 boot.cfg 에 저장한다 . 같은 명령어로 ‘ copy running-config working ’ 사용 가능하다 .- ‘ cp snap1 /flash/working/boot.cfg ’ 의 명령어로 미리 저장한 Running Configuration file 을 boot.cfg 에 저장 할 수 있다 .
All Rights Reserved © Alcatel-Lucent 2007, #####Alcatel-Lucent - Enterprise Solutions Division 11
Part 3 : Alcatel operating system
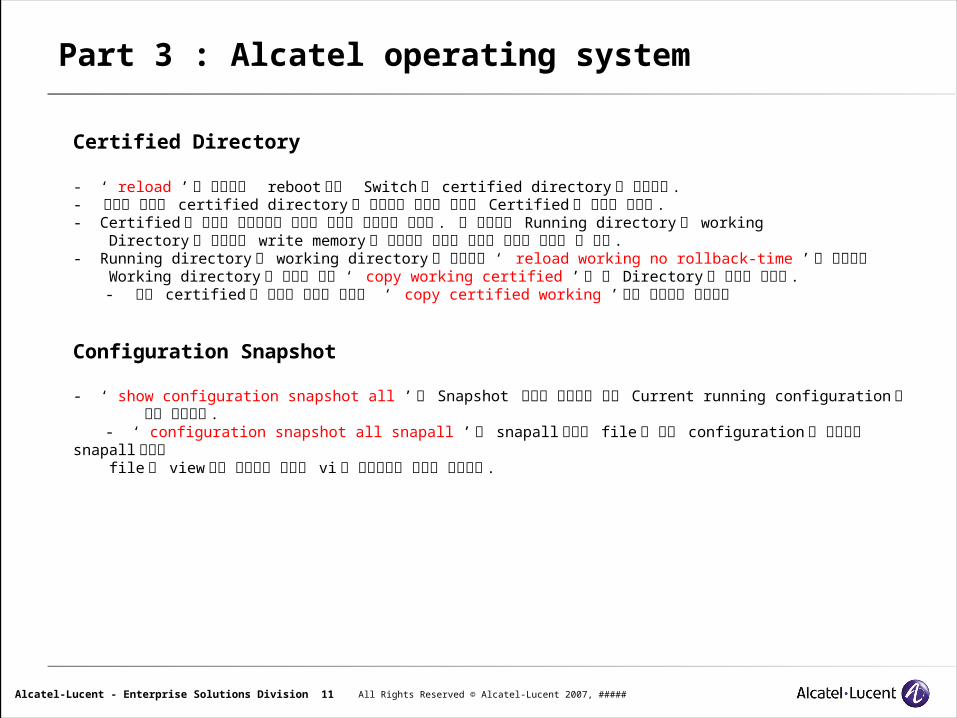
Certified Directory
- ‘ reload ’ 의 명령어로 reboot 하면 Switch 는 certified directory 로 부팅한다 .- 변화된 설정을 certified directory 로 저장하지 않았기 때문에 Certified 로 부팅한 것이다 .- Certified 로 부팅한 상태에서는 설정한 내용이 저장되지 않는다 . 이 경우에는 Running directory 를 working
Directory 로 만들어야 write memory 의 명령어로 통해서 변경된 설정을 저장할 수 있다 .- Running directory 를 working directory 로 만들려면 ‘ reload working no rollback-time ’ 를 이용해서 Working directory 로 부팅한 다음 ‘ copy working certified ’ 로 두 Directory 를 동기화 시킨다 .
- 만약 certified 의 설정이 문제가 없다면 ‘ copy certified working ’ 으로 동기화도 가능하다
Configuration Snapshot
- ‘ show configuration snapshot all ’ 의 Snapshot 기능을 이용해서 전체 Current running configuration 을 확인 가능하다 . - ‘ configuration snapshot all snapall ’ 로 snapall 이라는 file 로 전체 configuration 을 저장하고 snapall
이라는 file 을 view 에서 확인하고 그리고 vi 를 이용해서는 편집이 가능하다 .
All Rights Reserved © Alcatel-Lucent 2007, #####Alcatel-Lucent - Enterprise Solutions Division 12
Part 4 : Hardware 정보 확인
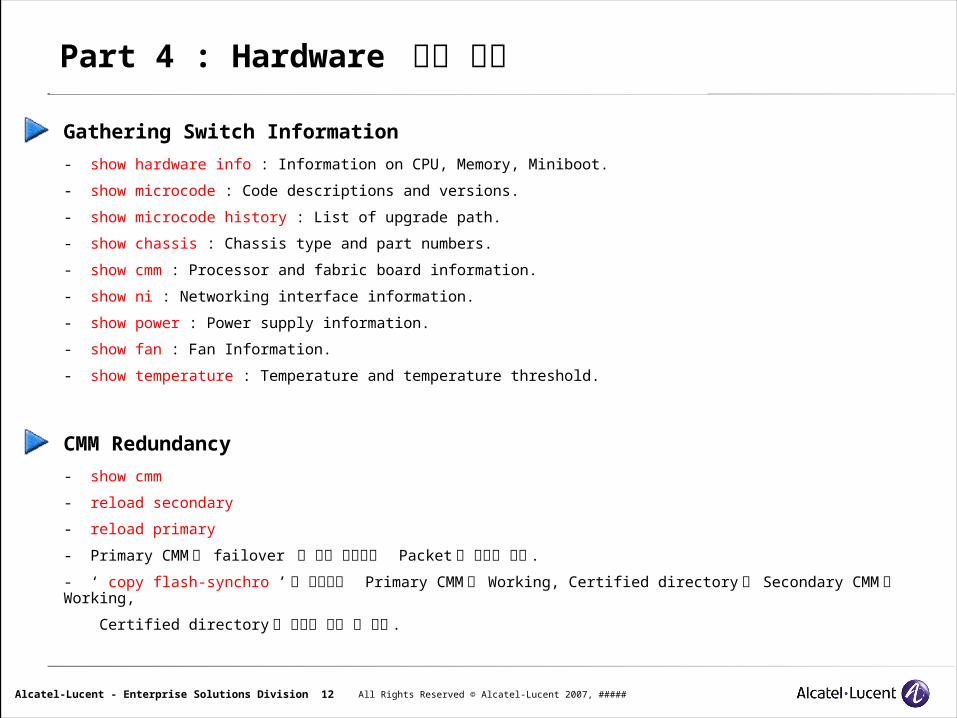
Gathering Switch Information
- show hardware info : Information on CPU, Memory, Miniboot.
- show microcode : Code descriptions and versions.
- show microcode history : List of upgrade path.
- show chassis : Chassis type and part numbers.
- show cmm : Processor and fabric board information.
- show ni : Networking interface information.
- show power : Power supply information.
- show fan : Fan Information.
- show temperature : Temperature and temperature threshold.
CMM Redundancy
- show cmm
- reload secondary
- reload primary
- Primary CMM 의 failover 시 실제 사용중인 Packet 에 영향은 없다 .
- ‘ copy flash-synchro ’ 의 명령어로 Primary CMM 의 Working, Certified directory 를 Secondary CMM 의 Working,
Certified directory 로 동기화 시킬 수 있다 .
All Rights Reserved © Alcatel-Lucent 2007, #####Alcatel-Lucent - Enterprise Solutions Division 13
Part 4 : Hardware 정보 확인
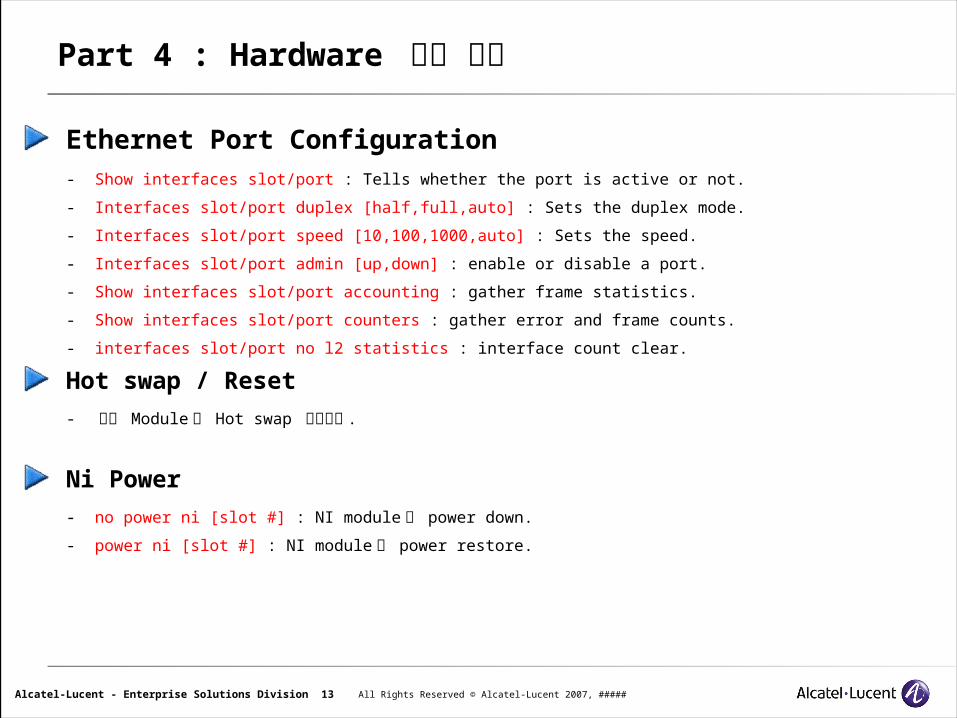
Ethernet Port Configuration
- Show interfaces slot/port : Tells whether the port is active or not.
- Interfaces slot/port duplex [half,full,auto] : Sets the duplex mode.
- Interfaces slot/port speed [10,100,1000,auto] : Sets the speed.
- Interfaces slot/port admin [up,down] : enable or disable a port.
- Show interfaces slot/port accounting : gather frame statistics.
- Show interfaces slot/port counters : gather error and frame counts.
- interfaces slot/port no l2 statistics : interface count clear.
Hot swap / Reset
- 전체 Module 은 Hot swap 가능하다 .
Ni Power
- no power ni [slot #] : NI module 의 power down.
- power ni [slot #] : NI module 의 power restore.
All Rights Reserved © Alcatel-Lucent 2007, #####Alcatel-Lucent - Enterprise Solutions Division 14
Part 5 : AOS Upgrade
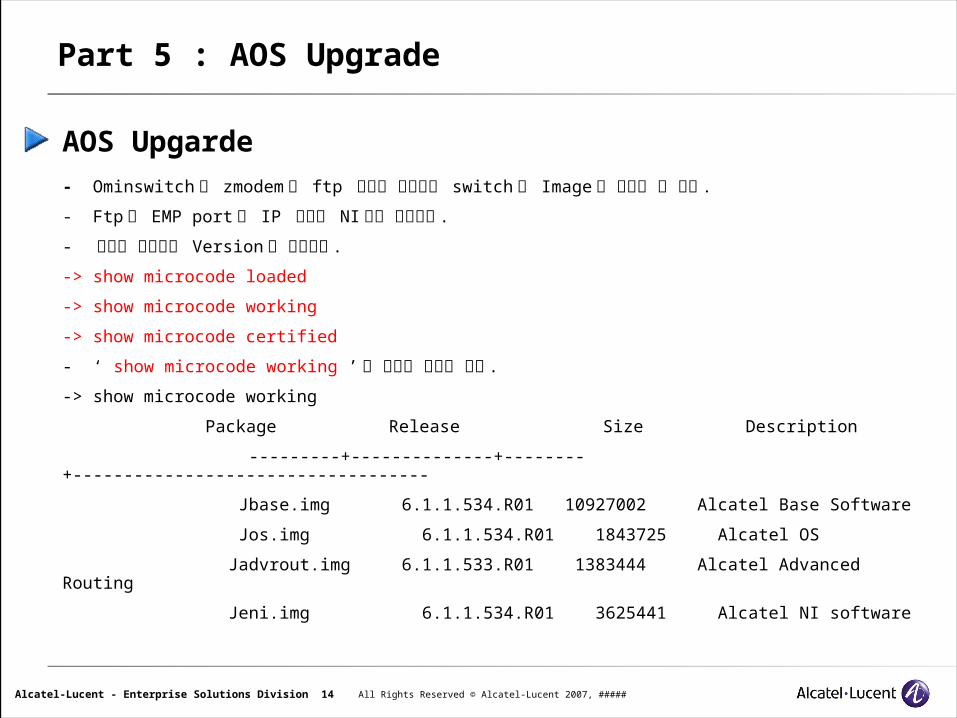
AOS Upgarde - Ominswitch 는 zmodem 과 ftp 두가지 방법으로 switch 로 Image 를 복사할 수 있다 .
- Ftp 는 EMP port 와 IP 설정한 NI 에서 가능하다 .
- 다음의 명령어로 Version 을 확인한다 .
-> show microcode loaded
-> show microcode working
-> show microcode certified
- ‘ show microcode working ’ 의 출력은 아래와 같다 .
-> show microcode working
Package Release Size Description
---------+--------------+--------+-----------------------------------
Jbase.img 6.1.1.534.R01 10927002 Alcatel Base Software
Jos.img 6.1.1.534.R01 1843725 Alcatel OS
Jadvrout.img 6.1.1.533.R01 1383444 Alcatel Advanced Routing
Jeni.img 6.1.1.534.R01 3625441 Alcatel NI software

All Rights Reserved © Alcatel-Lucent 2007, #####Alcatel-Lucent - Enterprise Solutions Division 15
Part 5 : AOS Upgrade
아래는 Omniswitch OS9000 에 대한 image 목록이다 .- OS9000(Fuji) 은 Jos.img 로 OS8800(Eagle) 은 Eos.Img, OS7000(Falcon) 은 Fos.img
OS6600(Hawk) 은 Hos.img, OS6800(Kite) 은 Kos.img 로 시작한다
All Rights Reserved © Alcatel-Lucent 2007, #####Alcatel-Lucent - Enterprise Solutions Division 16
Part 5 : AOS Upgrade
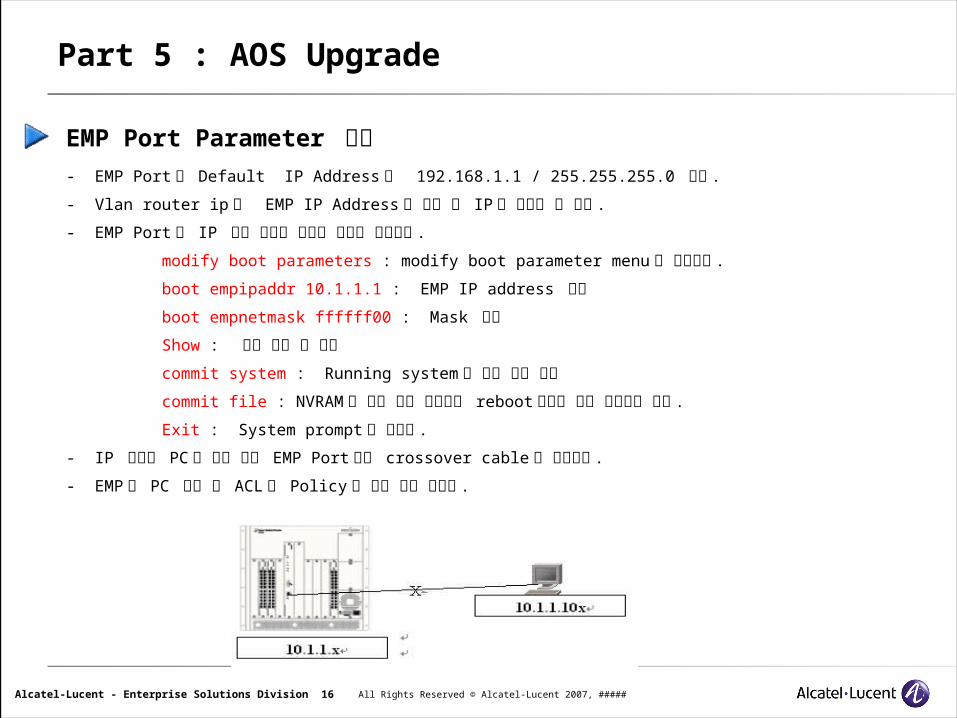
EMP Port Parameter 변경- EMP Port 의 Default IP Address 는 192.168.1.1 / 255.255.255.0 이다 .
- Vlan router ip 는 EMP IP Address 와 동일 한 IP 를 설정할 수 없다 .
- EMP Port 의 IP 변경 시에는 아래의 순서로 진행한다 .
modify boot parameters : modify boot parameter menu 로 들어간다 .
boot empipaddr 10.1.1.1 : EMP IP address 설정
boot empnetmask ffffff00 : Mask 설정
Show : 현재 설정 값 확인
commit system : Running system 에 설정 값을 저장
commit file : NVRAM 에 설정 값을 저장해서 reboot 시에도 저장 가능하게 한다 .
Exit : System prompt 로 나간다 .
- IP 설정을 PC 와 맞춘 다음 EMP Port 와는 crossover cable 로 연결한다 .
- EMP 로 PC 연결 시 ACL 의 Policy 에 영향 받지 않는다 .
All Rights Reserved © Alcatel-Lucent 2007, #####Alcatel-Lucent - Enterprise Solutions Division 17
Part 5 : AOS Upgrade
Console / zmodem
- Switch 의 Console 에 PC 를 연결 후 ‘ cd ’ 를 이용해서 원하는 Directory 로 이동한다 .
- Prompt 에서 ‘ rz ’ 입력 후 PC 의 Terminal Program 에서 zmodem 을 이용해서 file 을 전송한다 .
- zmodem 을 이용 하는 것 보다는 FTP 를 이용하는 것이 보다 빠르게 Image 를 전송할 수 있다 .
AOS upgrade
- FTP 를 이용한 upgrade 방식 (EMP 사용가능 )- 아래의 순서로 upgrade 진행
-> show system : version 확인-> cd working : working directory 로 이동-> ls : file 확인-> rm *.img : 전체 image 삭제 , boot.cfg 는 삭제하지 않음
PC 에서 switch 로 ftp 접속 , binary 로 / flash/ working 로 전송
-> install *.img : 새로운 image install-> reload working no rollback-timeout : working directory 로 reload-> copy working certified : version 및 정상동작 확인 후 동기화
-> copy flash-synchro : CMM 간의 동기화

All Rights Reserved © Alcatel-Lucent 2007, #####Alcatel-Lucent - Enterprise Solutions Division 18
Part 6 : Switch 보안
Switch Login 계정의 확인 및 생성
- ‘ show user ’ 로 Switch 에 생성된 계정을 확인 할 수 있다 .- 기본적으로 admin, default 두 개의 계정이 생성되어 있고 그 중에 default 계정은 기본적으로는
Switch 에 접속할 수 없는 Permission 이다 .
-> show userUser name = admin Read right = 0xffffffff 0xffffffff, Write right = 0xffffffff 0xffffffff, Read for domains = All , Write for domains = All , Snmp not allowed
User name = default Read right = 0x00000000 0x00000000,
Write right = 0x00000000 0x00000000, Read for domains = None , Write for domains = None , Snmp authentication = NONE, Snmp encryption = NONE
Full Read/Write Permission
No Read/Write Permission
All Rights Reserved © Alcatel-Lucent 2007, #####Alcatel-Lucent - Enterprise Solutions Division 19
Part 6 : Switch 보안
- 다음과 같이 사용자 계정을 추가할 수 있다 .-> user userread password 123456 read-only all : Read 권한만 가진 User ‘userread’ 생성-> user userwrite password 123456 read-write all : Read-write 권한을 가진 User ‘userwrite’
생성
Partition Management
- Partition Management User 별로 Access 할 수 있는 기능을 제한 할 수 있다 .
-> user userread read-only domain-layer2 : User ‘userread’ 는 Layer2 기능만 Read 할 수 있다 .
-> user userwrite read-write vlan : User ‘userwrite’ 는 Vlan 에 대해서만 Read-write 할 수 있다 .
-> user userwrite read-write ? : Option 을 ? 로 확인하면 많은 Option 을 확인 가능하다 .
Authenticated Switch Access
- ASA 가 Switch 를 설정 가능한 사용자들을 제한할 수 있는 능력을 제공한다 .
- Switch Longin 인 시도는 RADIUS, LDAP, 또는 ACE- 서버와 같은 Local database 또는 remote database 를
경유하여 인증 받을 수 있습니다 .
- ASA 는 Telnet, FTP, SNMP, SSH, HTTP, 그리고 console 과 modem port 들에 적용됩니다 .
- ‘ show aaa authentication ’ : Switch internal database authentication 확인- ‘ no aaa authentication telnet ’ : Telnet access 의 disable

All Rights Reserved © Alcatel-Lucent 2007, #####Alcatel-Lucent - Enterprise Solutions Division 20
Part 7 : VLAN
Vlan Configuration
- 처음에는 Default vlan1 만 존재하며 모든 port 는 vlan1 에
할당되어 있음
- ' show vlan ' : Vlan basic information
-> show vlan
vlan admin oper stree auth ip ipx name
----+-----+----+-----+----+--+---+-----
1 on on on off off off VLAN 1
- ' show vlan 1 ' : Vlan 1 의 information
-> show vlan 1
Name : VLAN 1,
Administrative State: enabled,
Operational State : enabled,
Spanning Tree State : enabled,
Authentication : disabled,
IP Router Port : none,
IPX Router Port : none
- ' show vlan port ' : Vlan 에 assign 된 port list
-> show vlan port
vlan port type status
----+-----+----+-------
1 2/1 default forwarding
1 2/2 default inactive
1 2/3 default inactive
:
:
1 2/24 default inactive
- 새로운 vlan 생성
-> vlan 2
- vlan 에 port assign (untag frame)
-> vlan 2 port default slot/port
All Rights Reserved © Alcatel-Lucent 2007, #####Alcatel-Lucent - Enterprise Solutions Division 21
Vlan IP Configuration
- Multi-netting 기능 지원
- 한 개의 vlan 에 여러 개의 ip interface 를 적용가능 ( 최대 8 개 )
- vlan 생성
-> vlan 10
- vlan 에 ip 할당
-> ip interface vlan-10 address 10.10.10.1/24 vlan 10
: vlan10 이라는 name 으로 해당 ip 를 지정하고 vlan10 에 할당
- vlan 에 다른 ip 할당
-> ip interface vlan-11 address 10.10.11.1/24 vlan 10 -> ip interface vlan-12 address 10.10.12.1/24 vlan 10
- vlan 에 할당된 ip 확인
-> show ip interface Total 9 interfaces Name IP Address Subnet Mask Status Forward Device-----------+-------------+-------- ---+-----+------+--------EMP 192.168.1.1 255.255.255.0 DOWN NO EMP Loopback 127.0.0.1 255.0.0.0 UP NO Loopbackvlan-10 10.10.10.1 255.255.255.0 DOWN NO vlan 10 vlan-11 10.10.11.1 255.255.255.0 DOWN NO vlan 10 vlan-12 10.10.12.1 255.255.255.0 DOWN NO vlan 10
- vlan 에 port assign
-> vlan 10 port default slot/port
Part 7 : VLAN
All Rights Reserved © Alcatel-Lucent 2007, #####Alcatel-Lucent - Enterprise Solutions Division 22
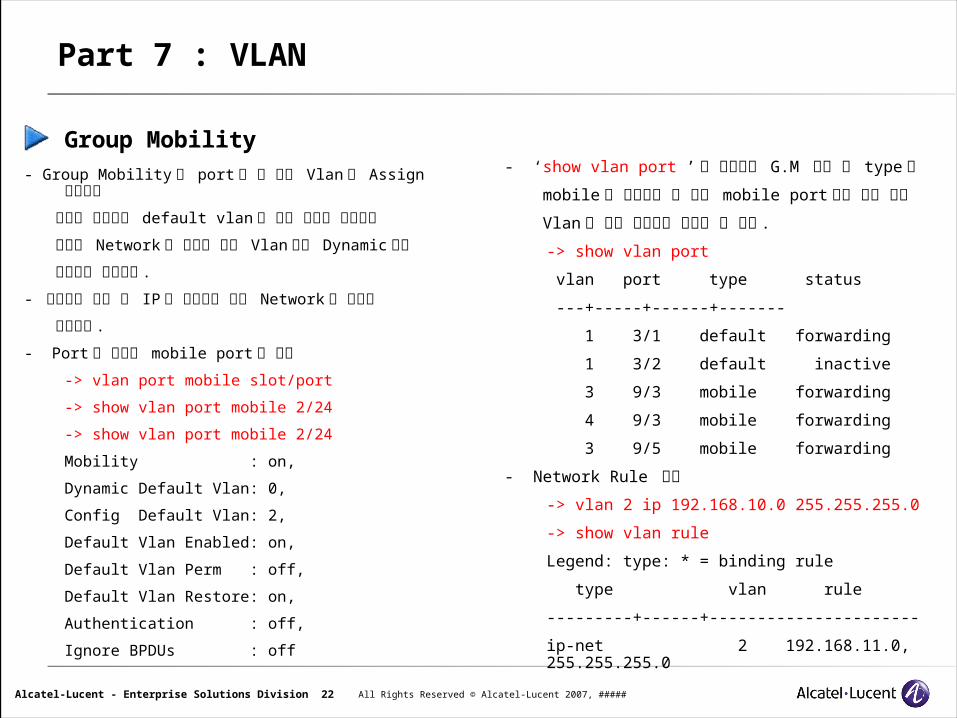
Group Mobility
- Group Mobility 란 port 가 한 개의 Vlan 에 Assign되는것이
아니라 처음에는 default vlan 에 속해 있다가 사용자가
설정한 Network 에 의해서 해당 Vlan 으로 Dynamic 하게
이동하는 기술이다 .
- 사용자는 이동 시 IP 를 변경하지 않고 Network 이 사용이
가능하다 .
- Port 에 대해서 mobile port 로 설정
-> vlan port mobile slot/port
-> show vlan port mobile 2/24
-> show vlan port mobile 2/24
Mobility : on,
Dynamic Default Vlan: 0,
Config Default Vlan: 2,
Default Vlan Enabled: on,
Default Vlan Perm : off,
Default Vlan Restore: on,
Authentication : off,
Ignore BPDUs : off
- ‘show vlan port ’ 로 확인하면 G.M 사용 시 type 이
mobile 로 표시되고 한 개의 mobile port 에서 여러 개의
Vlan 이 올라 오는것을 확인할 수 있다 .
-> show vlan port
vlan port type status
---+-----+------+-------
1 3/1 default forwarding
1 3/2 default inactive
3 9/3 mobile forwarding
4 9/3 mobile forwarding
3 9/5 mobile forwarding
- Network Rule 설정
-> vlan 2 ip 192.168.10.0 255.255.255.0
-> show vlan rule
Legend: type: * = binding rule
type vlan rule
---------+------+----------------------
ip-net 2 192.168.11.0, 255.255.255.0
Part 7 : VLAN
All Rights Reserved © Alcatel-Lucent 2007, #####Alcatel-Lucent - Enterprise Solutions Division 23
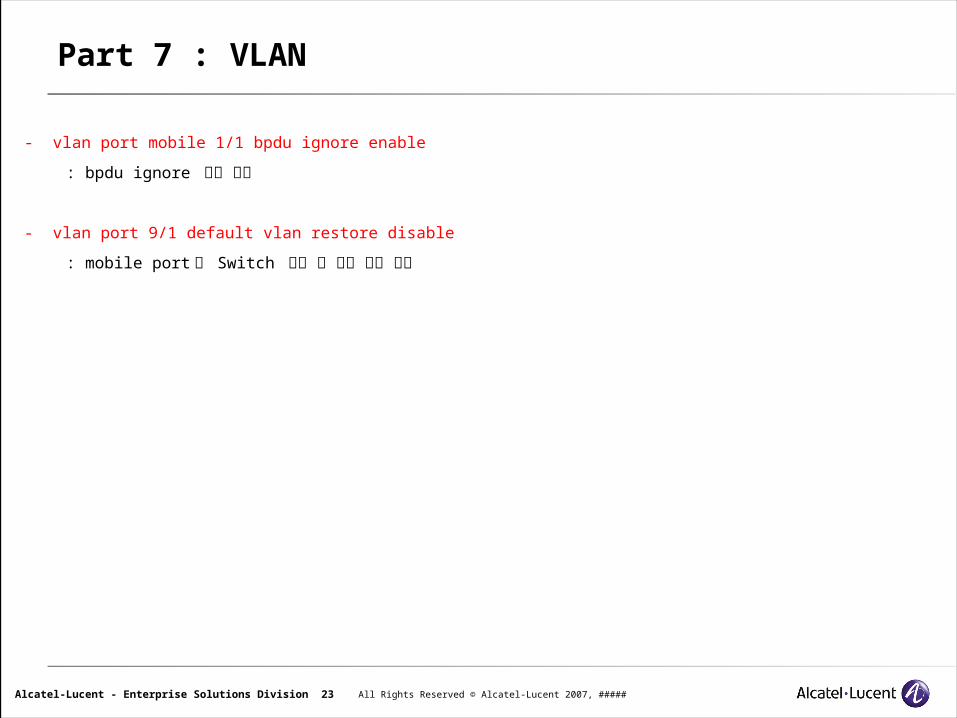
- vlan port mobile 1/1 bpdu ignore enable
: bpdu ignore 설정 필요
- vlan port 9/1 default vlan restore disable
: mobile port 에 Switch 연결 시 위의 설정 필요
Part 7 : VLAN
All Rights Reserved © Alcatel-Lucent 2007, #####Alcatel-Lucent - Enterprise Solutions Division 24
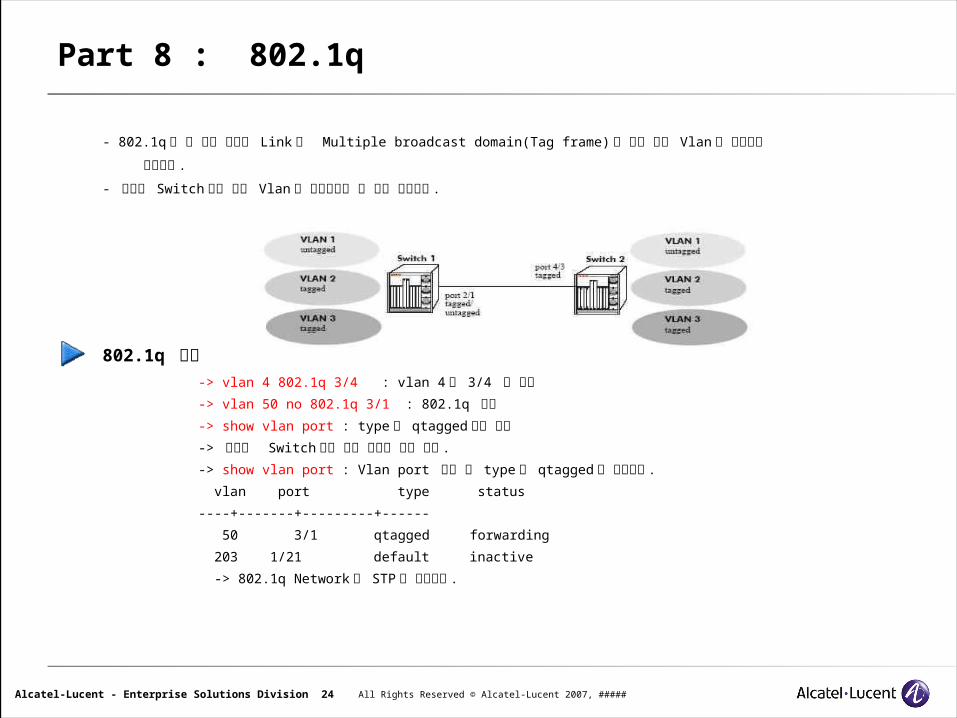
Part 8 : 802.1q
- 802.1q 란 한 개의 물리적 Link 에 Multiple broadcast domain(Tag frame) 을 실어 여러 Vlan 을 사용하는
기능이다 .
- 각각의 Switch 에서 같은 Vlan 을 사용하고자 할 경우 사용한다 .
802.1q 설정-> vlan 4 802.1q 3/4 : vlan 4 를 3/4 에 설정
-> vlan 50 no 802.1q 3/1 : 802.1q 삭제
-> show vlan port : type 이 qtagged 인지 확인
-> 반대쪽 Switch 에도 같은 설정을 해야 한다 .
-> show vlan port : Vlan port 확인 시 type 이 qtagged 로 표시된다 .
vlan port type status
----+-------+---------+------
50 3/1 qtagged forwarding
203 1/21 default inactive
-> 802.1q Network 도 STP 에 포함된다 .
All Rights Reserved © Alcatel-Lucent 2007, #####Alcatel-Lucent - Enterprise Solutions Division 25
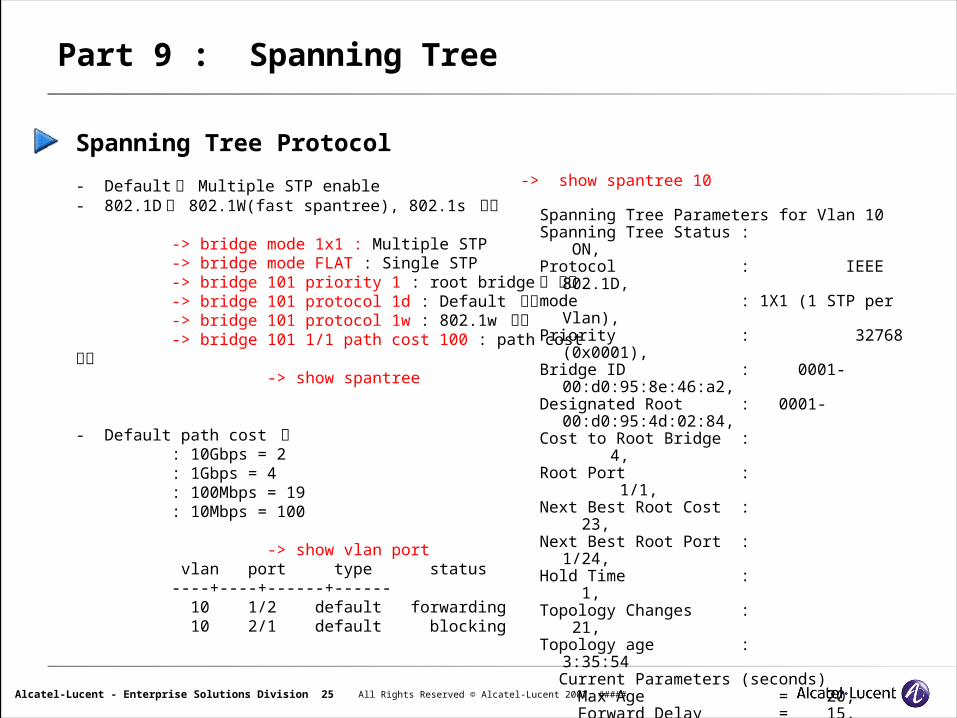
Part 9 : Spanning Tree
Spanning Tree Protocol
- Default 로 Multiple STP enable- 802.1D 와 802.1W(fast spantree), 802.1s 지원
-> bridge mode 1x1 : Multiple STP-> bridge mode FLAT : Single STP-> bridge 101 priority 1 : root bridge 로 지정-> bridge 101 protocol 1d : Default 상태-> bridge 101 protocol 1w : 802.1w 설정-> bridge 101 1/1 path cost 100 : path cost 수정
-> show spantree
- Default path cost 값: 10Gbps = 2: 1Gbps = 4: 100Mbps = 19: 10Mbps = 100
-> show vlan port vlan port type status----+----+------+------
10 1/2 default forwarding 10 2/1 default blocking
-> show spantree 10
Spanning Tree Parameters for Vlan 10 Spanning Tree Status : ON, Protocol : IEEE 802.1D, mode : 1X1 (1 STP per Vlan), Priority : 32768 (0x0001), Bridge ID : 0001-00:d0:95:8e:46:a2, Designated Root : 0001-00:d0:95:4d:02:84, Cost to Root Bridge : 4, Root Port : 1/1, Next Best Root Cost : 23, Next Best Root Port : 1/24, Hold Time : 1, Topology Changes : 21, Topology age : 3:35:54 Current Parameters (seconds) Max Age = 20, Forward Delay = 15, Hello Time = 2 Parameters system uses when attempting to
become root System Max Age = 20, System Forward Delay = 15, System Hello Time = 2
All Rights Reserved © Alcatel-Lucent 2007, #####Alcatel-Lucent - Enterprise Solutions Division 26
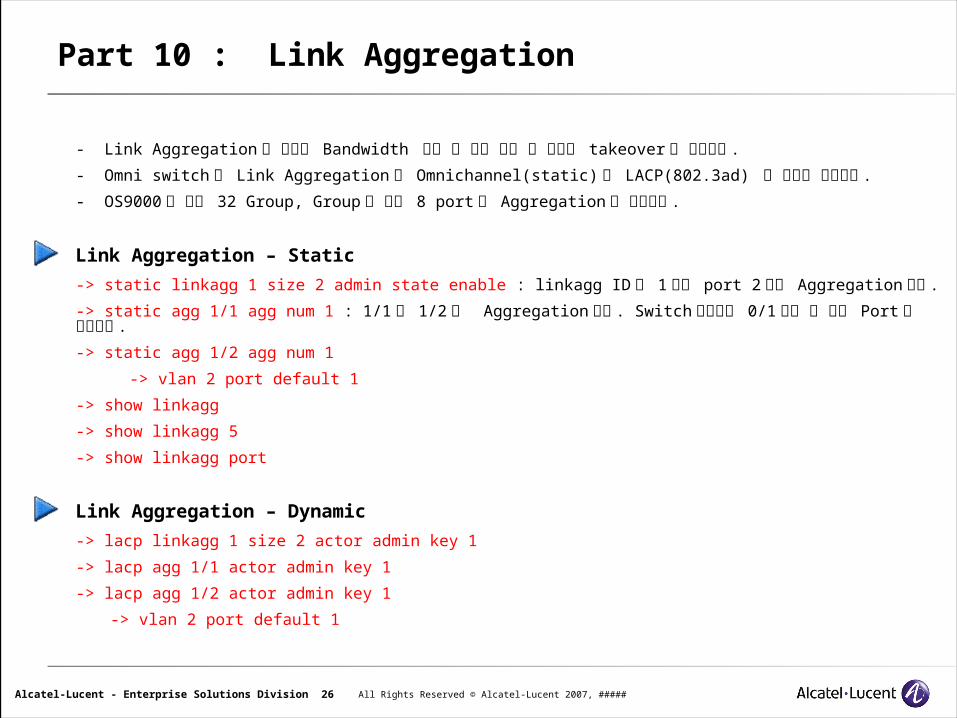
Part 10 : Link Aggregation
- Link Aggregation 은 회선의 Bandwidth 확장 및 회선 장애 시 신속한 takeover 가 가능하다 .
- Omni switch 의 Link Aggregation 은 Omnichannel(static) 과 LACP(802.3ad) 두 가지를 지원한다 .
- OS9000 은 최대 32 Group, Group 당 최대 8 port 의 Aggregation 은 지원한다 .
Link Aggregation – Static
-> static linkagg 1 size 2 admin state enable : linkagg ID 는 1 이고 port 2 개를 Aggregation 한다 .
-> static agg 1/1 agg num 1 : 1/1 과 1/2 를 Aggregation 한다 . Switch 상에서는 0/1 으로 한 개의 Port 로 인식한다 .
-> static agg 1/2 agg num 1
-> vlan 2 port default 1
-> show linkagg
-> show linkagg 5
-> show linkagg port
Link Aggregation – Dynamic
-> lacp linkagg 1 size 2 actor admin key 1
-> lacp agg 1/1 actor admin key 1
-> lacp agg 1/2 actor admin key 1
-> vlan 2 port default 1
All Rights Reserved © Alcatel-Lucent 2007, #####Alcatel-Lucent - Enterprise Solutions Division 27
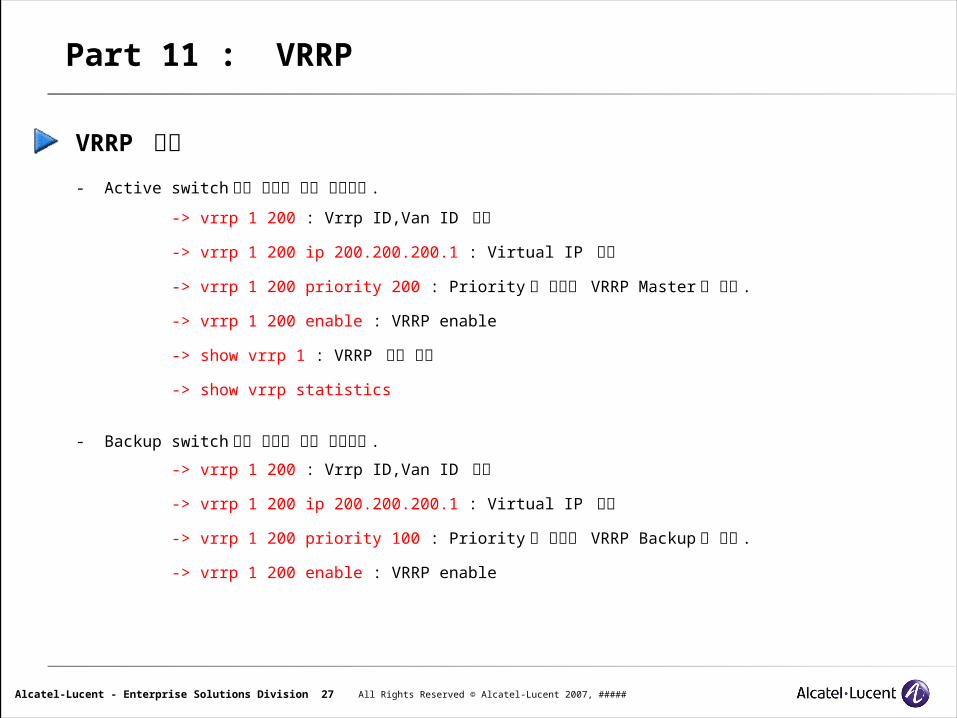
Part 11 : VRRP
VRRP 설정
- Active switch 에서 다음과 같이 설정한다 .
-> vrrp 1 200 : Vrrp ID,Van ID 설정
-> vrrp 1 200 ip 200.200.200.1 : Virtual IP 설정
-> vrrp 1 200 priority 200 : Priority 가 높으면 VRRP Master 가 된다 .
-> vrrp 1 200 enable : VRRP enable
-> show vrrp 1 : VRRP 상태 확인
-> show vrrp statistics
- Backup switch 에서 다음과 같이 설정한다 .
-> vrrp 1 200 : Vrrp ID,Van ID 설정
-> vrrp 1 200 ip 200.200.200.1 : Virtual IP 설정
-> vrrp 1 200 priority 100 : Priority 가 낮으면 VRRP Backup 이 된다 .
-> vrrp 1 200 enable : VRRP enable
All Rights Reserved © Alcatel-Lucent 2007, #####Alcatel-Lucent - Enterprise Solutions Division 28
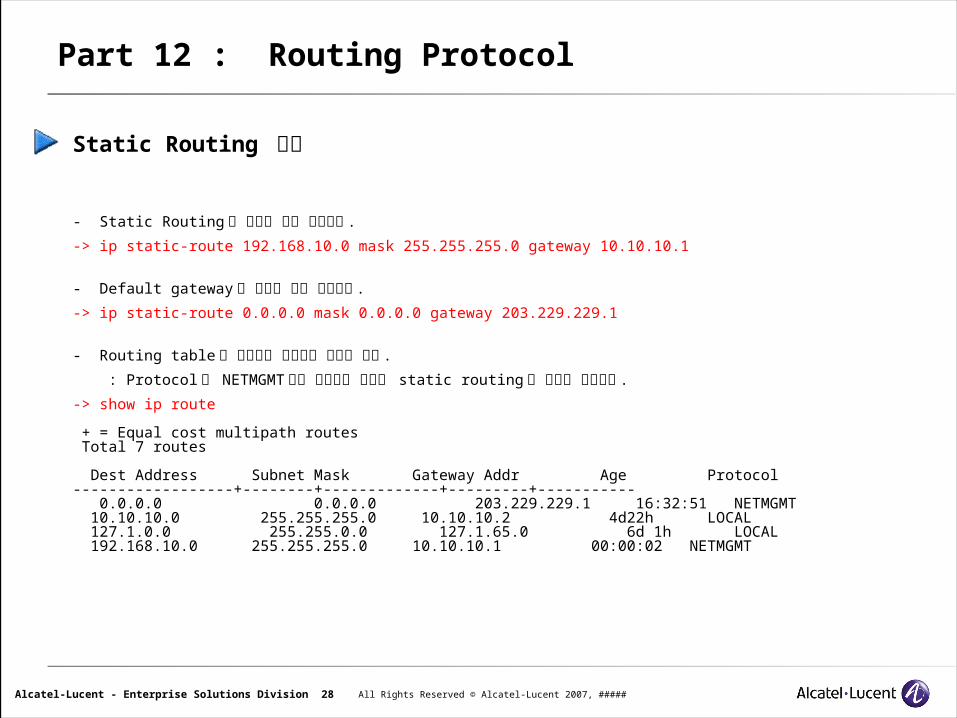
Part 12 : Routing Protocol
Static Routing 설정
- Static Routing 은 다음과 같이 설정한다 .
-> ip static-route 192.168.10.0 mask 255.255.255.0 gateway 10.10.10.1
- Default gateway 은 다음과 같이 설정한다 .
-> ip static-route 0.0.0.0 mask 0.0.0.0 gateway 203.229.229.1
- Routing table 을 확인하는 명령어는 다음과 같다 .
: Protocol 이 NETMGMT 라고 표시되는 경우가 static routing 을 설정한 경우이다 .
-> show ip route
+ = Equal cost multipath routes Total 7 routes
Dest Address Subnet Mask Gateway Addr Age Protocol ------------------+--------+-------------+---------+-----------
0.0.0.0 0.0.0.0 203.229.229.1 16:32:51 NETMGMT 10.10.10.0 255.255.255.0 10.10.10.2 4d22h LOCAL 127.1.0.0 255.255.0.0 127.1.65.0 6d 1h LOCAL 192.168.10.0 255.255.255.0 10.10.10.1 00:00:02 NETMGMT

All Rights Reserved © Alcatel-Lucent 2007, #####Alcatel-Lucent - Enterprise Solutions Division 29
Dynamic Routing – RIP 설정- Omniswitch 는 RIP V1 과 RIP V2 를 지원한다 .
-> ip load rip : RIP Demon 을 load 한다 .
-> ip rip interface 104.2.71.4 : RIP Interface 설정
-> ip rip interface 104.2.71.4 status enable : RIP Interface Status enable
-> ip rip interface 10.10.10.1 send-version v1(v2) : RIP Send Version 설정
-> ip rip interface 10.10.10.1 recv-version v1(v2) : RIP Receive Version 설정
-> ip rip redist LOCAL : Local Network 에 대한 Redist 설정
-> ip rip redist STATIC : Static Network 에 대한 Redist 설정
-> ip rip redist-filter LOCAL 0.0.0.0 0.0.0.0 : Local Network 전체를 Redist 으로 설정
-> ip rip redist-filter STATIC 0.0.0.0 0.0.0.0 : Static Network 전체를 Redist 으로 설정
-> ip rip status enable : RIP Status enable
-> ip rip redist status enable : RIP Redist Status enable
Part 12 : Routing Protocol

All Rights Reserved © Alcatel-Lucent 2007, #####Alcatel-Lucent - Enterprise Solutions Division 30
-> show ip route : Protocol 이 Rip 으로 올라 오는지 확인
+ = Equal cost multipath routes
Total 70 routes
Dest Address Subnet Mask Gateway Addr Age Protocol
-------------+---------------+-----------------+--------+-----------
0.0.0.0 0.0.0.0 166.104.192.254 00:14:15 NETMGMT
127.0.0.1 255.255.255.255 127.0.0.1 00:15:50 LOCAL
166.104.0.6 255.255.255.255 166.104.192.252 00:14:10 RIP
166.104.184.0 255.255.255.0 166.104.192.8 00:12:10 RIP
-> show ip rip interface : RIP Interface 확인
-> show ip rip route : RIP Route 확인
Part 12 : Routing Protocol
All Rights Reserved © Alcatel-Lucent 2007, #####Alcatel-Lucent - Enterprise Solutions Division 31
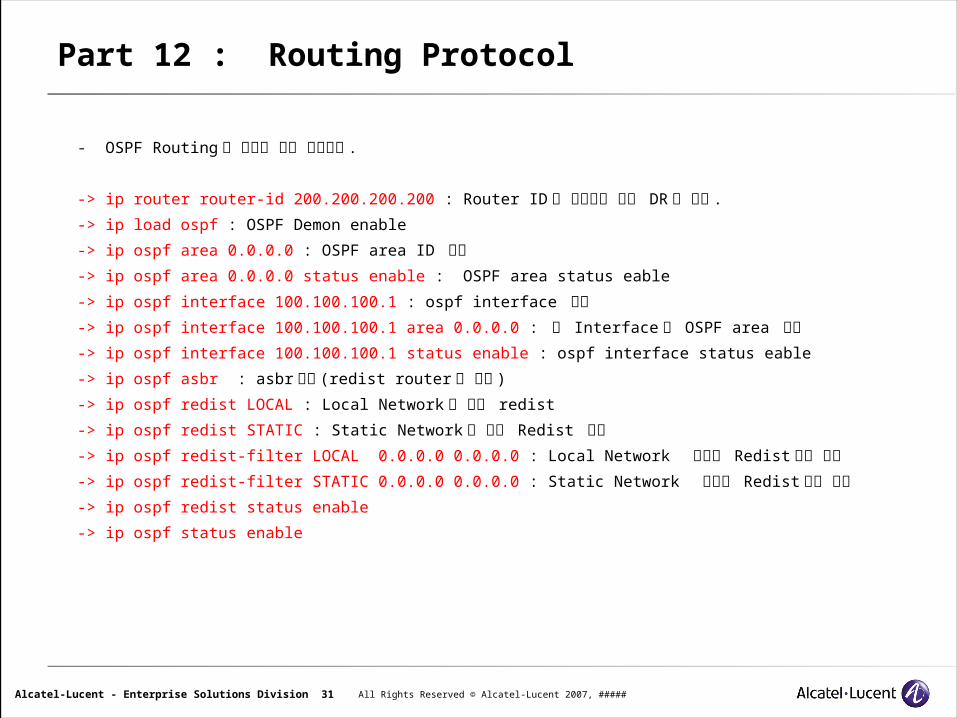
- OSPF Routing 은 다음과 같이 설정한다 .
-> ip router router-id 200.200.200.200 : Router ID 가 가장높은 것이 DR 이 된다 .
-> ip load ospf : OSPF Demon enable
-> ip ospf area 0.0.0.0 : OSPF area ID 설정
-> ip ospf area 0.0.0.0 status enable : OSPF area status eable
-> ip ospf interface 100.100.100.1 : ospf interface 생성
-> ip ospf interface 100.100.100.1 area 0.0.0.0 : 각 Interface 에 OSPF area 설정
-> ip ospf interface 100.100.100.1 status enable : ospf interface status eable
-> ip ospf asbr : asbr 설정 (redist router 에 설정 )
-> ip ospf redist LOCAL : Local Network 에 대한 redist
-> ip ospf redist STATIC : Static Network 에 대한 Redist 설정
-> ip ospf redist-filter LOCAL 0.0.0.0 0.0.0.0 : Local Network 전체를 Redist 으로 설정
-> ip ospf redist-filter STATIC 0.0.0.0 0.0.0.0 : Static Network 전체를 Redist 으로 설정
-> ip ospf redist status enable
-> ip ospf status enable
Part 12 : Routing Protocol
All Rights Reserved © Alcatel-Lucent 2007, #####Alcatel-Lucent - Enterprise Solutions Division 32
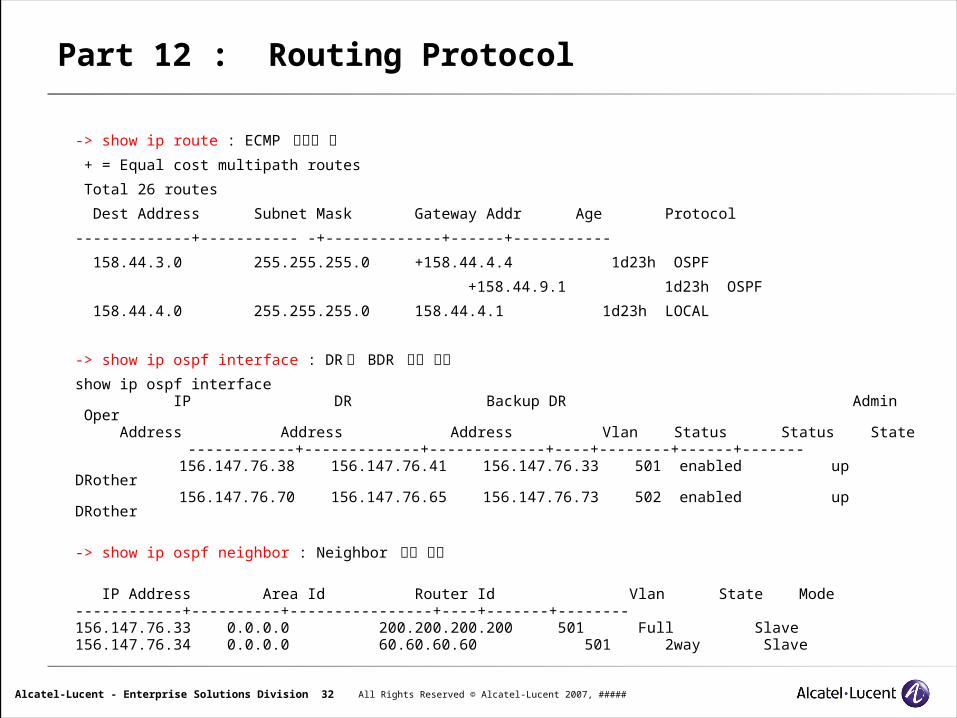
-> show ip route : ECMP 생성의 예
+ = Equal cost multipath routes
Total 26 routes
Dest Address Subnet Mask Gateway Addr Age Protocol
-------------+----------- -+-------------+------+-----------
158.44.3.0 255.255.255.0 +158.44.4.4 1d23h OSPF
+158.44.9.1 1d23h OSPF
158.44.4.0 255.255.255.0 158.44.4.1 1d23h LOCAL
-> show ip ospf interface : DR 과 BDR 선정 확인
show ip ospf interface IP DR Backup DR Admin Oper
Address Address Address Vlan Status Status State ------------+-------------+-------------+----+--------+------+------- 156.147.76.38 156.147.76.41 156.147.76.33 501 enabled up DRother 156.147.76.70 156.147.76.65 156.147.76.73 502 enabled up DRother
-> show ip ospf neighbor : Neighbor 상태 확인
IP Address Area Id Router Id Vlan State Mode
------------+----------+----------------+----+-------+--------156.147.76.33 0.0.0.0 200.200.200.200 501 Full Slave 156.147.76.34 0.0.0.0 60.60.60.60 501 2way Slave
Part 12 : Routing Protocol

All Rights Reserved © Alcatel-Lucent 2007, #####Alcatel-Lucent - Enterprise Solutions Division 33
Part 13 : Access Control List
- ACL 의 삭제는 rule, action condition 의 순서로 삭제한다 . 그리고 반드시 마지막에 qos apply 해 주어야 적용된다 .
- 전체 qos config 삭제시는 qos flush 후 qos apply Layer2 ACLpolicy condition toMAC3 destination mac 00:00:00:00:00:03
policy action deny disposition drop
policy rule r1 condition toMAC3 action deny
qos apply
Layer3 ACLpolicy condition fromIP1toIP3 source ip 10.0.0.100 destination ip 192.0.0.0 mask 255.0.0.0
policy action deny disposition deny
policy rule r1 condition fromIP1toIP3 action deny
qos apply
Layer4 ACLpolicy service t445 destination tcp port 445
policy service t135 destination tcp port 135
policy service group tcp_group t445 t135
policy condition c1 service group tcp_group
policy action deny disposition deny
policy rule r1 condition c1 action deny
qos apply
All Rights Reserved © Alcatel-Lucent 2007, #####Alcatel-Lucent - Enterprise Solutions Division 34
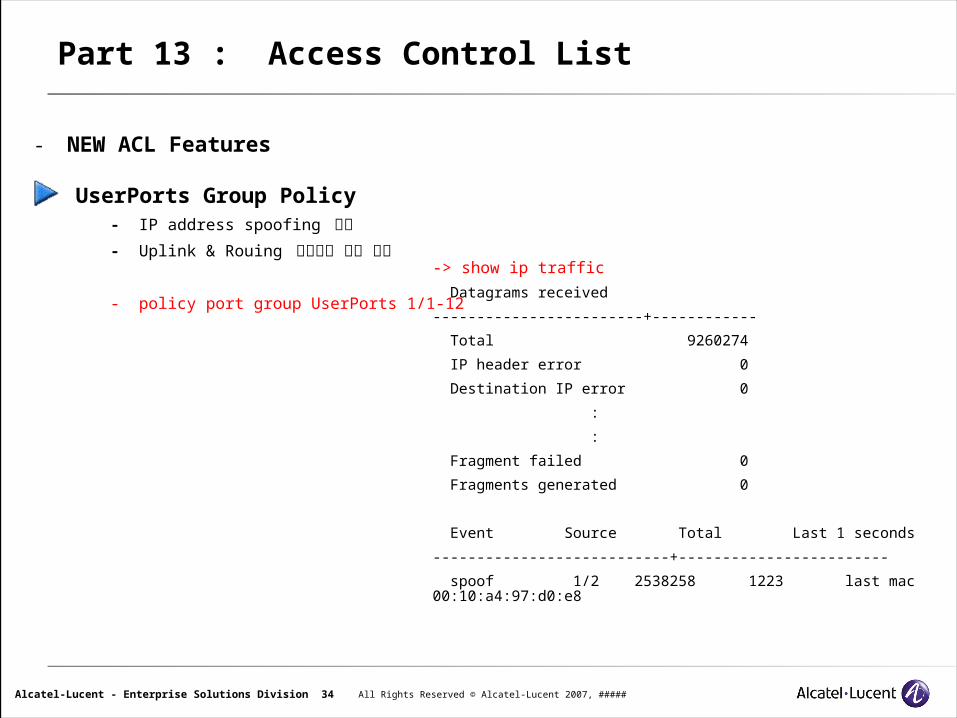
- NEW ACL Features
UserPorts Group Policy
- IP address spoofing 방지
- Uplink & Rouing 구간에는 적용 불가
- policy port group UserPorts 1/1-12
-> show ip traffic
Datagrams received
------------------------+------------
Total 9260274
IP header error 0
Destination IP error 0
:
:
Fragment failed 0
Fragments generated 0
Event Source Total Last 1 seconds
---------------------------+------------------------
spoof 1/2 2538258 1223 last mac 00:10:a4:97:d0:e8
Part 13 : Access Control List
All Rights Reserved © Alcatel-Lucent 2007, #####Alcatel-Lucent - Enterprise Solutions Division 35
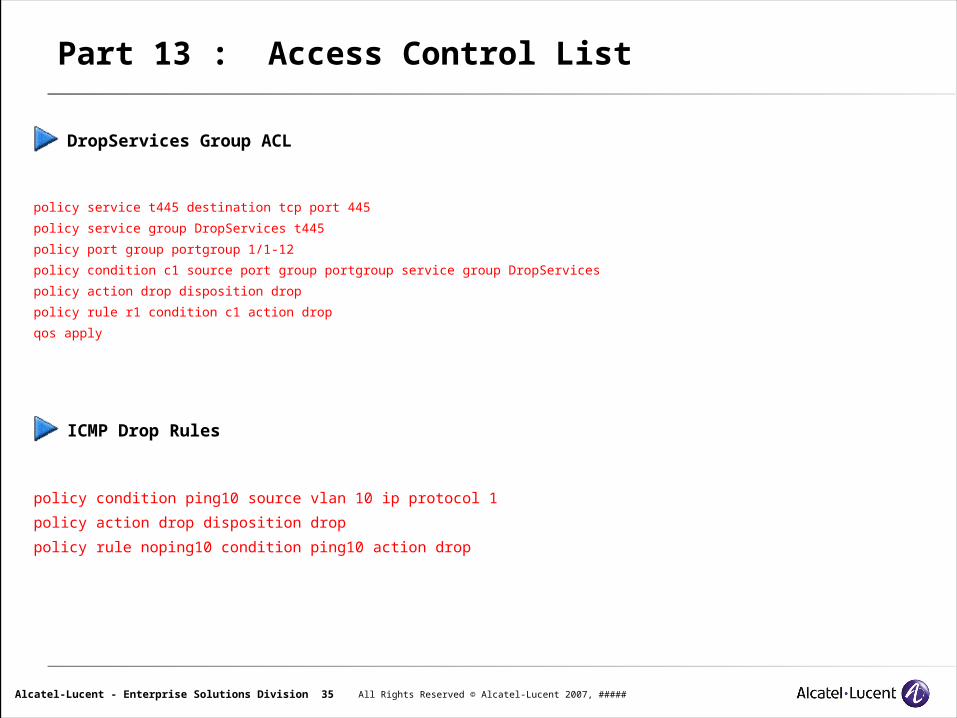
DropServices Group ACL
policy service t445 destination tcp port 445
policy service group DropServices t445
policy port group portgroup 1/1-12
policy condition c1 source port group portgroup service group DropServices
policy action drop disposition drop
policy rule r1 condition c1 action drop
qos apply
ICMP Drop Rules
policy condition ping10 source vlan 10 ip protocol 1
policy action drop disposition drop
policy rule noping10 condition ping10 action drop
Part 13 : Access Control List
All Rights Reserved © Alcatel-Lucent 2007, #####Alcatel-Lucent - Enterprise Solutions Division 36
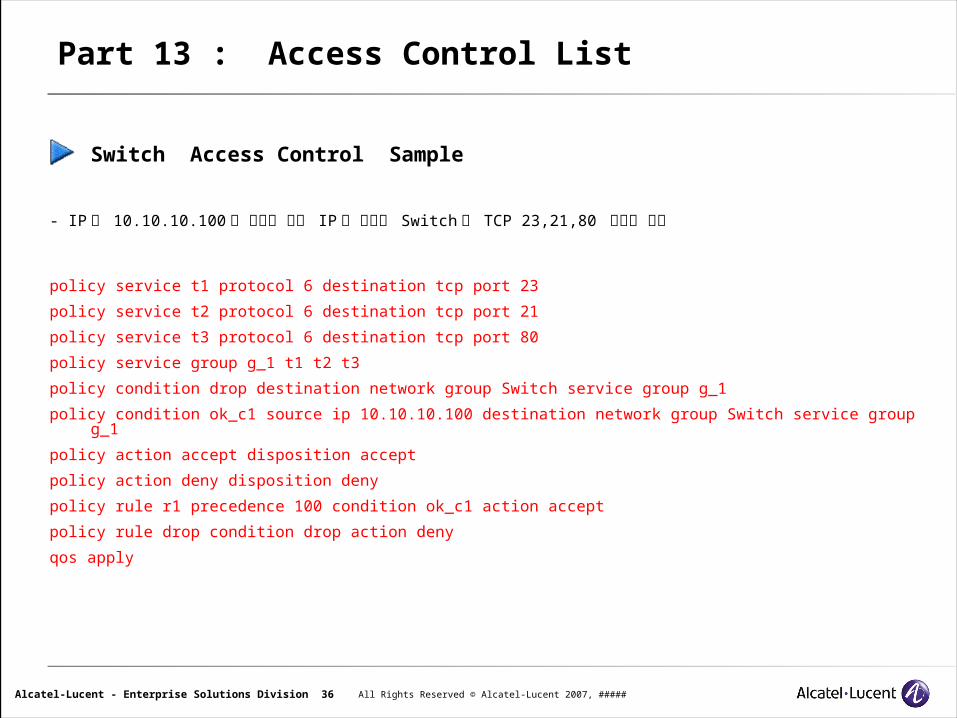
Switch Access Control Sample
- IP 가 10.10.10.100 을 제외한 모든 IP 에 대해서 Switch 로 TCP 23,21,80 접속을 차단
policy service t1 protocol 6 destination tcp port 23
policy service t2 protocol 6 destination tcp port 21
policy service t3 protocol 6 destination tcp port 80
policy service group g_1 t1 t2 t3
policy condition drop destination network group Switch service group g_1
policy condition ok_c1 source ip 10.10.10.100 destination network group Switch service group g_1
policy action accept disposition accept
policy action deny disposition deny
policy rule r1 precedence 100 condition ok_c1 action accept
policy rule drop condition drop action deny
qos apply
Part 13 : Access Control List
All Rights Reserved © Alcatel-Lucent 2007, #####Alcatel-Lucent - Enterprise Solutions Division 37
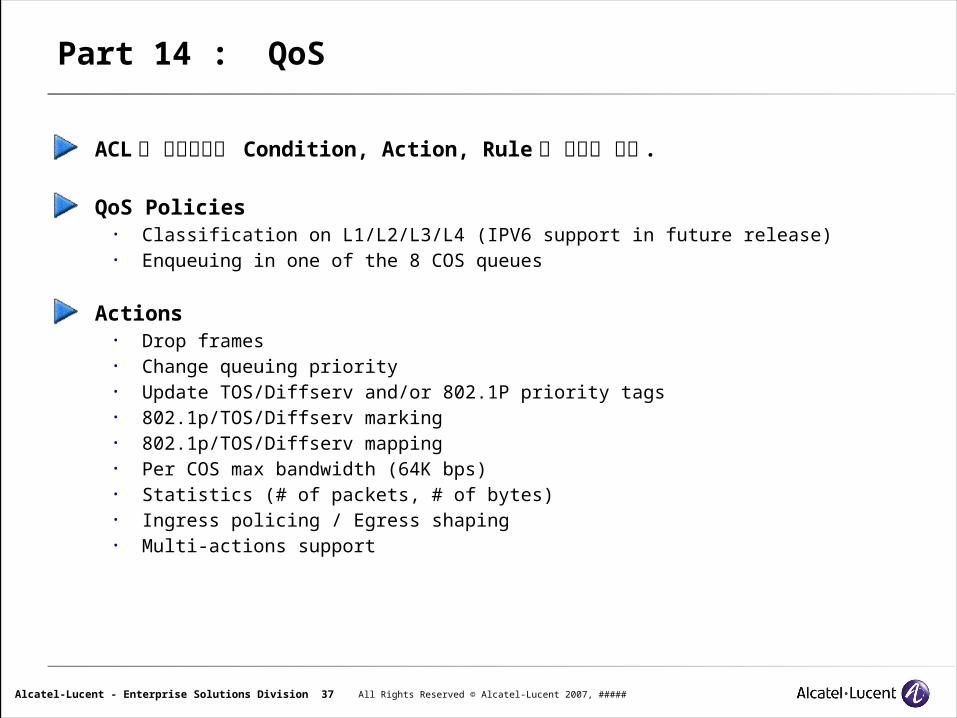
ACL 과 마찬가지로 Condition, Action, Rule 로 구성이 된다 .
QoS Policies• Classification on L1/L2/L3/L4 (IPV6 support in future release)• Enqueuing in one of the 8 COS queues
Actions• Drop frames• Change queuing priority• Update TOS/Diffserv and/or 802.1P priority tags• 802.1p/TOS/Diffserv marking• 802.1p/TOS/Diffserv mapping• Per COS max bandwidth (64K bps)• Statistics (# of packets, # of bytes)• Ingress policing / Egress shaping• Multi-actions support
Part 14 : QoS
All Rights Reserved © Alcatel-Lucent 2007, #####Alcatel-Lucent - Enterprise Solutions Division 38
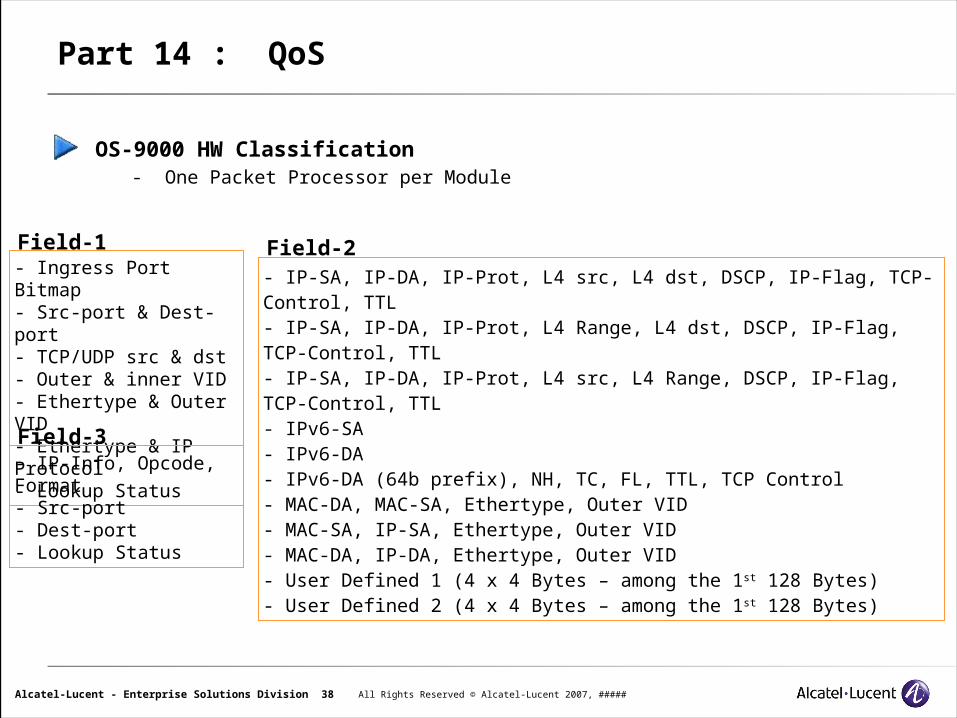
OS-9000 HW Classification - One Packet Processor per Module
- Ingress Port Bitmap- Src-port & Dest-port- TCP/UDP src & dst- Outer & inner VID- Ethertype & Outer VID- Ethertype & IP Protocol- Lookup Status
- IP-SA, IP-DA, IP-Prot, L4 src, L4 dst, DSCP, IP-Flag, TCP-Control, TTL- IP-SA, IP-DA, IP-Prot, L4 Range, L4 dst, DSCP, IP-Flag, TCP-Control, TTL- IP-SA, IP-DA, IP-Prot, L4 src, L4 Range, DSCP, IP-Flag, TCP-Control, TTL- IPv6-SA- IPv6-DA- IPv6-DA (64b prefix), NH, TC, FL, TTL, TCP Control- MAC-DA, MAC-SA, Ethertype, Outer VID- MAC-SA, IP-SA, Ethertype, Outer VID- MAC-DA, IP-DA, Ethertype, Outer VID- User Defined 1 (4 x 4 Bytes – among the 1st 128 Bytes)- User Defined 2 (4 x 4 Bytes – among the 1st 128 Bytes)
- IP-Info, Opcode, Format- Src-port- Dest-port- Lookup Status
Field-1
Field-3
Field-2
Part 14 : QoS
All Rights Reserved © Alcatel-Lucent 2007, #####Alcatel-Lucent - Enterprise Solutions Division 39
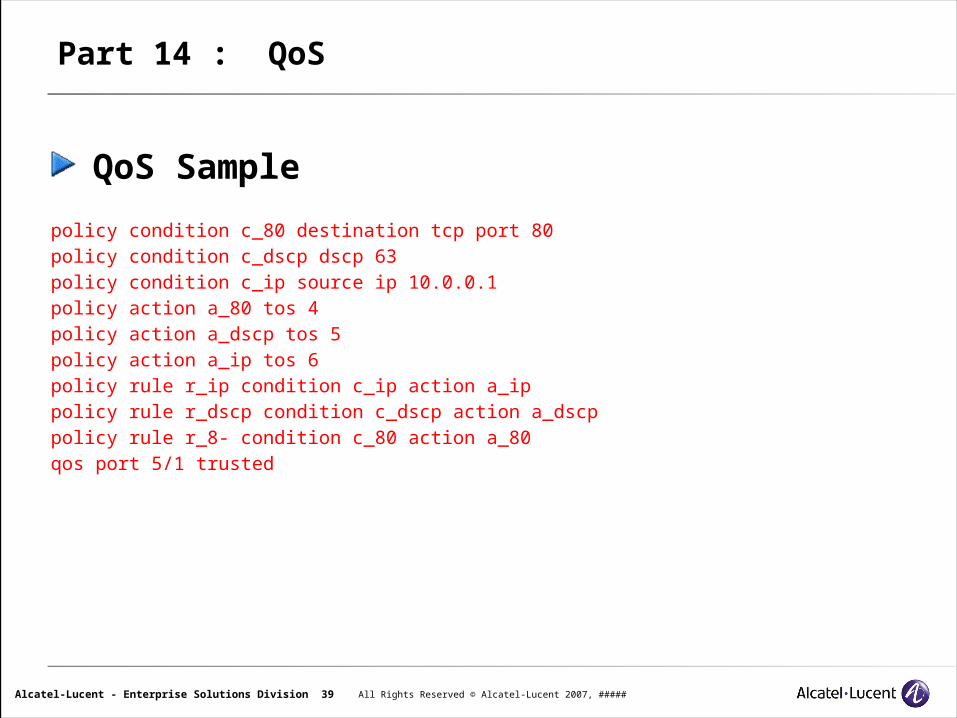
QoS Sample
policy condition c_80 destination tcp port 80 policy condition c_dscp dscp 63 policy condition c_ip source ip 10.0.0.1 policy action a_80 tos 4 policy action a_dscp tos 5 policy action a_ip tos 6 policy rule r_ip condition c_ip action a_ip policy rule r_dscp condition c_dscp action a_dscp policy rule r_8- condition c_80 action a_80 qos port 5/1 trusted
Part 14 : QoS
All Rights Reserved © Alcatel-Lucent 2007, #####Alcatel-Lucent - Enterprise Solutions Division 40
Part 15 : SNMP Configuration
SNMP Configuration
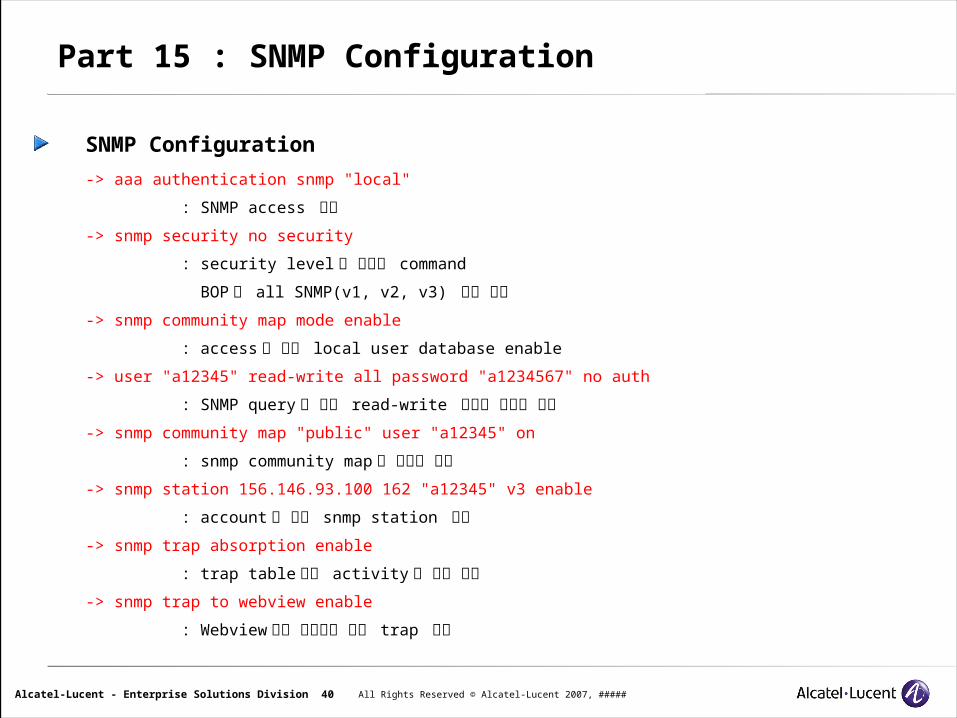
-> aaa authentication snmp "local"
: SNMP access 허용
-> snmp security no security
: security level 을 정하는 command
BOP 는 all SNMP(v1, v2, v3) 사용 가능
-> snmp community map mode enable
: access 을 위한 local user database enable
-> user "a12345" read-write all password "a1234567" no auth
: SNMP query 를 위한 read-write 권한의 사용자 생성
-> snmp community map "public" user "a12345" on
: snmp community map 과 사용자 설정
-> snmp station 156.146.93.100 162 "a12345" v3 enable
: account 에 대한 snmp station 설정
-> snmp trap absorption enable
: trap table 들의 activity 을 위한 설정
-> snmp trap to webview enable
: Webview 에서 참조하기 위해 trap 설정
All Rights Reserved © Alcatel-Lucent 2007, #####Alcatel-Lucent - Enterprise Solutions Division 41
Part 16 : Network Security
AVLAN 인증방식- Telnet 인증 : Telnet program 에서 ‘ telnet 192.168.12.253 259 ’ 으로 요청하면 login 절차를 진행한다 .
- HTTP 인증 : Web brower 에서 URL 을 다음과 같이 입력하면 " https://192.168.12.253 " 요청하면 login 절차를
진행한다 .
- Software 인증 : Alcatel Avlan client S/W 를 이용한 login 절차를 진행한다 .
802.1x
- Port 기반의 Authentication Network
Binding Rule
- Network 사용자에게 Rule 을 적용해서 요건이 충족 할 시에만 Network 사용 가능하다 .
- Rule 의 종류 : PORT-PROTOCOL, MAC-PORT-PROTOCOL, MAC-PORT, MAC-IP-PORT,
MAC-IP ,IP-PORT
- 마찬가지로 G.M 기반의 기술이다 .
- 설정방법은 아래와 같다 .
-> vlan 2 binding ip-port 192.168.11.200 slot/port : ip-port rule 적용하여 rule 에 만족할 시 사용 가능
-> show vlan rule : rule 설정확인
-> vlan 2 no binding ip-port 192.168.11.200 : binding rule 의 삭제
All Rights Reserved © Alcatel-Lucent 2007, #####Alcatel-Lucent - Enterprise Solutions Division 42
- Omniswitch 에서는 Network Security 를 위하여 802.1x 와 AVLAN, Binding rule 을 지원한다 .
Authentication VLAN
- Authentication Sever 에서 인증된 사용자에 한해서 Network 자원 접근이 가능하다 .
- Group Mobility 기술을 근간으로 처음에 사용자들은 Default Vlan 에 속해 있다가 인증절차를 거치게 되면
해당 Vlan 으로 이동하고 Network 접속이 가능하다 .
- 설정 순서는 아래와 같다 .
-> vlan 99 : Vlan 생성
-> vlan 99 router ip 192.168.11.1 : Vlan 99 IP 설정
-> VLAN 99 에 RADIUS server 를 연결
-> vlan 2 : authentication 을 위한 VLAN 생성
-> vlan 2 router ip 192.168.12.1 : Vlan 2 IP 설정
-> vlan port mobile slot/port : Avlan 사용자들 port 를 mobile port 로 enable
-> vlan port slot/port authenticate enable : Avlan 사용자들 port 를 Authenticated port 로 enable
-> vlan 2 authentication enable : Vlan 2 를 authenticated Vlan 으로 enable
-> aaa radius-server "rserver" host 200.5.1.100 key 43b85916020505fe retransmit 4 timeout 2
auth-port 1812 acct-port 1813 : Switch 에서 Radius server 에 대한 설정
-> aaa authentication vlan single-mode rad1 : Single mode 로 Avlan 설정
-> aaa accounting vlan rad1 : Accounting 설정
-> Vlan 2 사용자는 인증 절차를 거친 후에 Network 에 접속가능
Part 16 : Network Security
All Rights Reserved © Alcatel-Lucent 2007, #####Alcatel-Lucent - Enterprise Solutions Division 43
Part 17 : Switch Check
Switch 의 점검 순서1) Switch 의 H/W 상태를 점검한다 .
- show module, show cmm, show fan, show fabric(OS8800), show power
- Switch 외관상 LED 상태 점검 ( 황색 LED 점등 여부 )
2) Switch 의 S/W 상태를 점검한다 .- show system : switch uptime, code version 확인- ls 로 / flash 에 dump file 생성여부 (PMD, Error)- show running-directory 로 CMM 의 동기화 여부 및 Running configuration 이 working 인지 확인- show health, show health [slot#], show health all cpu 등으로 Switch 의 health 상태를 점검한다 .
3) show log swlog 를 이용해서 log 를 확인한다 .
4) show configuration snapshot 으로 전체 config 의 변화 유무를 확인한다 .
5) 하위 Layer 에서 상위 Layer 로의 순서로 장애 원인을 찾는다 .- show interfaces slot/port 로 해당 port 에서 inbound/outbound packet 이 증가하는지 또는
broadcast, unicast, multicast 등의 증가 여부 등을 점검한다 .- show interfaces status 로 Interface autonego/duplex 등을 확인한다 .- show interfaces counters errors 를 이용해서 Interface 의 error 등이 발생하는지 확인한다 .
6) STP 의 상태를 확인한다 . - show vlan port/show spantree port 등을 통해서 정상적으로 blocking port 가 생겼는지- show spantree [num] 을 이용해서 topology change, topology age 등을 점검한다 .

All Rights Reserved © Alcatel-Lucent 2007, #####Alcatel-Lucent - Enterprise Solutions Division 44
7) Routing table 을 확인한다 .
- Static routing : routing path 설정 확인
- RIP : rip version, rip router table 확인
- OSPF : DR, BDR 선정여부 , Neighbor, LSDB 등을 확인한다 .
Switch 에서 Packet Debug(Part 19 참조 ) 을 이용해서 Hello packet 들의 상태를 점검한다 .
8) 만약 S/W 문제라면 Up/downgrade 를 신속하게 실시한다 .
- 먼저 working directory 에만 Up/downgrade 를 실시해서 상태를 확인 후 정상적이면
working 에서 certified 로 복사하고 같은 증상이면 다시 원상 복귀 시킨다 .
9) Virus 의 영향인지 확인한다
Part 17 : Switch Check
All Rights Reserved © Alcatel-Lucent 2007, #####Alcatel-Lucent - Enterprise Solutions Division 45
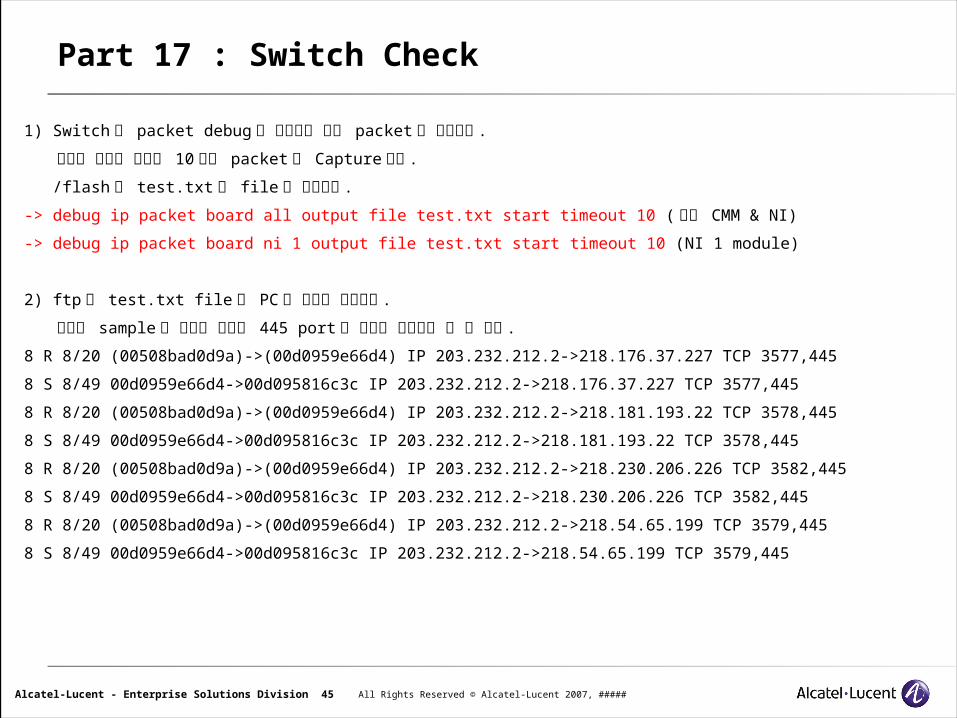
1) Switch 의 packet debug 을 이용해서 해당 packet 을 확인한다 .
아래의 명령에 의해서 10 초간 packet 을 Capture 한다 .
/ flash 에 test.txt 란 file 은 생성된다 .
-> debug ip packet board all output file test.txt start timeout 10 ( 전체 CMM & NI)
-> debug ip packet board ni 1 output file test.txt start timeout 10 (NI 1 module)
2) ftp 로 test.txt file 을 PC 로 가져와 확인한다 .
아래에 sample 을 보시면 실제로 445 port 를 이용한 패턴임을 알 수 있다 .
8 R 8/20 (00508bad0d9a)->(00d0959e66d4) IP 203.232.212.2->218.176.37.227 TCP 3577,445
8 S 8/49 00d0959e66d4->00d095816c3c IP 203.232.212.2->218.176.37.227 TCP 3577,445
8 R 8/20 (00508bad0d9a)->(00d0959e66d4) IP 203.232.212.2->218.181.193.22 TCP 3578,445
8 S 8/49 00d0959e66d4->00d095816c3c IP 203.232.212.2->218.181.193.22 TCP 3578,445
8 R 8/20 (00508bad0d9a)->(00d0959e66d4) IP 203.232.212.2->218.230.206.226 TCP 3582,445
8 S 8/49 00d0959e66d4->00d095816c3c IP 203.232.212.2->218.230.206.226 TCP 3582,445
8 R 8/20 (00508bad0d9a)->(00d0959e66d4) IP 203.232.212.2->218.54.65.199 TCP 3579,445
8 S 8/49 00d0959e66d4->00d095816c3c IP 203.232.212.2->218.54.65.199 TCP 3579,445
Part 17 : Switch Check
All Rights Reserved © Alcatel-Lucent 2007, #####Alcatel-Lucent - Enterprise Solutions Division 46
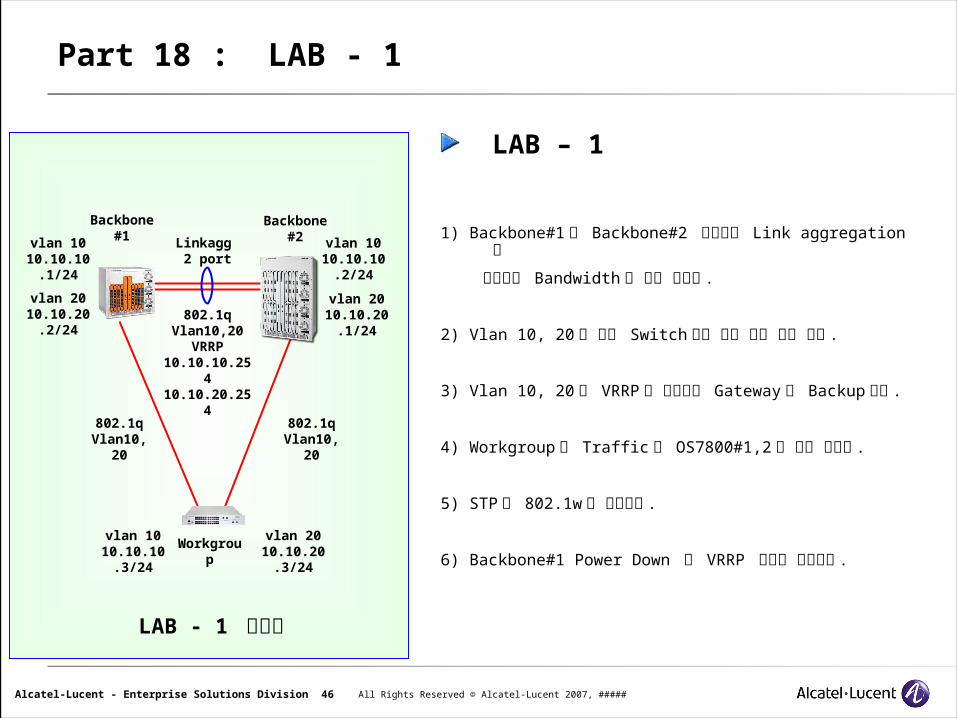
Part 18 : LAB - 1
Backbone#1
802.1qVlan10,20
VRRP10.10.10.25
410.10.20.25
4
Workgroup
Backbone#2vlan 10
10.10.10.1/24
Linkagg 2 port
vlan 1010.10.10
.2/24
vlan 2010.10.20
.2/24
vlan 2010.10.20
.1/24
802.1qVlan10,
20
802.1qVlan10,
20
LAB - 1 구성도
vlan 1010.10.10
.3/24
vlan 2010.10.20
.3/24
LAB – 1
1) Backbone#1 과 Backbone#2 사이에는 Link aggregation을
구성하여 Bandwidth 를 확장 시킨다 .
2) Vlan 10, 20 을 전체 Switch 에서 사용 가능 해야 한다 .
3) Vlan 10, 20 은 VRRP 로 구성하여 Gateway 를 Backup 한다.
4) Workgroup 의 Traffic 은 OS7800#1,2 로 분산 시킨다 .
5) STP 는 802.1w 로 구성한다 .
6) Backbone#1 Power Down 후 VRRP 상태를 확인한다 .
All Rights Reserved © Alcatel-Lucent 2007, #####Alcatel-Lucent - Enterprise Solutions Division 47
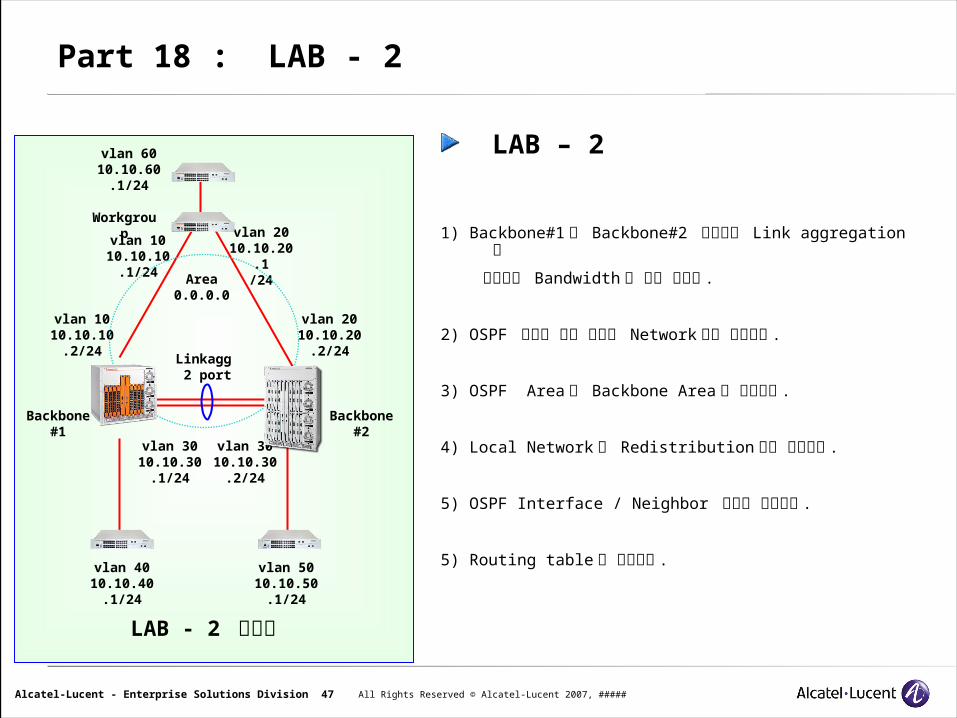
Part 18 : LAB - 2
Workgroupvlan 10
10.10.10.1/24
Linkagg 2 port
vlan 1010.10.10
.2/24
vlan 2010.10.20
.2/24
vlan 3010.10.30
.2/24
LAB - 2 구성도
vlan 3010.10.30
.1/24
vlan 2010.10.20
.1/24
LAB – 2
1) Backbone#1 과 Backbone#2 사이에는 Link aggregation을
구성하여 Bandwidth 를 확장 시킨다 .
2) OSPF 구간은 각각 별도의 Network 으로 구성한다 .
3) OSPF Area 는 Backbone Area 로 구성한다 .
4) Local Network 은 Redistribution 으로 구성한다 .
5) OSPF Interface / Neighbor 상태를 확인한다 .
5) Routing table 을 확인한다 .
Area 0.0.0.0
vlan 4010.10.40
.1/24
vlan 5010.10.50
.1/24
vlan 6010.10.60
.1/24
Backbone#1
Backbone#2

www.alcatel-lucent.com


![ASIA OSS Training Program [Training the Trainers ]](https://img.pdfslide.tips/doc/110x75/547ce50cb47959ac508b4795/asia-oss-training-program-training-the-trainers-.jpg)