Embed Size (px)
Citation preview

www.inspirefitness.com
RECORD SERIAL NUMBER HERE
by Health In Motion LLC Feb. 2015
ASSEMBLY & OPERATION MANUAL
TABLE OF CONTENTS Section Description……………………………………………………. Page Important Safety Instructions………………………………………. 1 Parts List…………………………………………………………………………. 2 Exploded Diagram…………………………………………………………. 3
Assembly Instructions……………………………………………………. 4
Decal Reference……………………………………………………………… 9 Decal Placement……………………………………………………………… 10 General Maintenance Information…….…………………………… 11 Maintenance Schedule……………………………………………………. 12
Limited Warranty…………………………………………………………….. 13

IMPORTANT SAFETY INSTRUCTIONS Please read this entire manual and familiarize yourself with all decals and
warnings before using this squat rack. • WARNING! It is necessary to inspect this squat rack regularly to maintain safety and proper function. Please use the maintenance schedule included towards the back of this manual. Immediately replace any and all defective or worn parts. See General Maintenance section for complete details. • Use this squat rack for its intended purpose as described in this Operation Manual.
• Make sure bystanders are at least 5 feet away from the squat rack while it is in use.
• Keep children away from the squat rack at all times. • Keep the squat rack away from walls and clear of any obstructions and furniture. • Stop immediately if you experience shortness of breath, pain, or dizziness during your workout. Inspire Fitness strongly recommends consulting your
doctor before starting an exercise program.
TOOLS REQUIRED FOR ASSEMBLY 17 mm wrench 13 mm wrench
Page 1
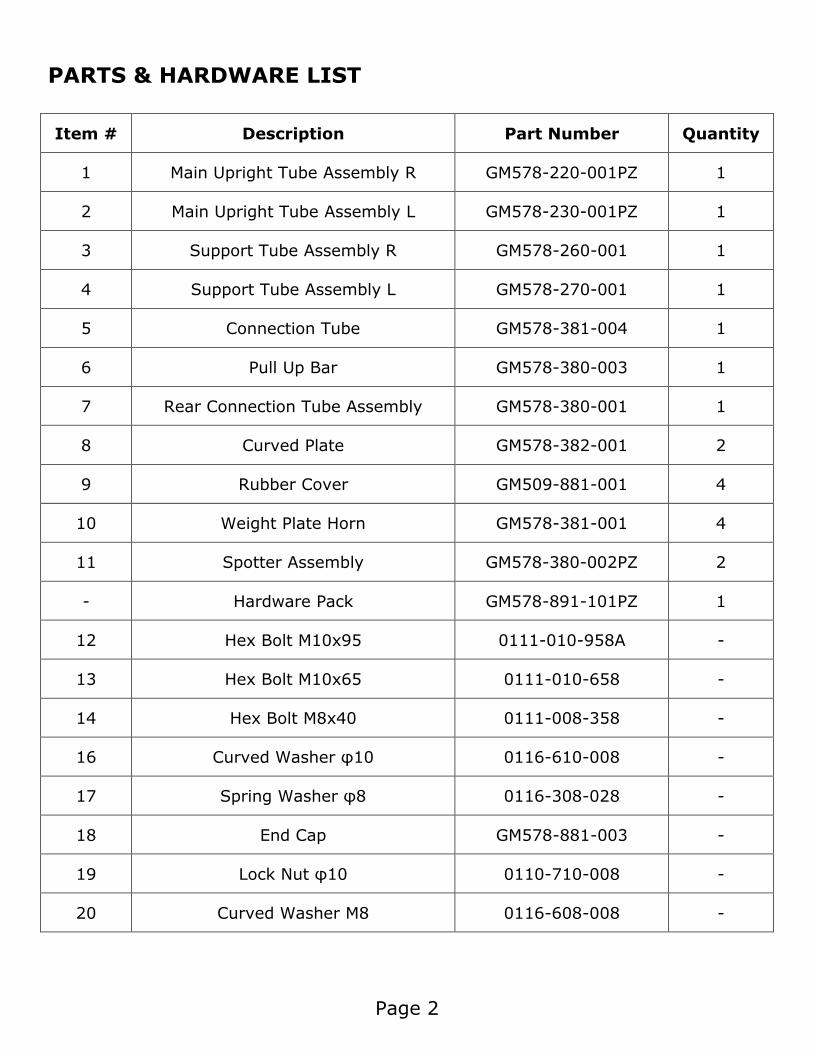
PARTS & HARDWARE LIST
Item # Description Part Number Quantity
1 Main Upright Tube Assembly R GM578-220-001PZ 1
2 Main Upright Tube Assembly L GM578-230-001PZ 1
3 Support Tube Assembly R GM578-260-001 1
4 Support Tube Assembly L GM578-270-001 1
5 Connection Tube GM578-381-004 1
6 Pull Up Bar GM578-380-003 1
7 Rear Connection Tube Assembly GM578-380-001 1
8 Curved Plate GM578-382-001 2
9 Rubber Cover GM509-881-001 4
10 Weight Plate Horn GM578-381-001 4
11 Spotter Assembly GM578-380-002PZ 2
- Hardware Pack GM578-891-101PZ 1
12 Hex Bolt M10x95 0111-010-958A -
13 Hex Bolt M10x65 0111-010-658 -
14 Hex Bolt M8x40 0111-008-358 -
16 Curved Washer φ10 0116-610-008 -
17 Spring Washer φ8 0116-308-028 -
18 End Cap GM578-881-003 -
19 Lock Nut φ10 0110-710-008 -
20 Curved Washer M8 0116-608-008 -
Page 2
18
121616
12
6
19
16
16
19
19
16
18
19
16 16 121216
11
1212 16161616 1919
14 1710
910
9
17
14
7
119
16
13
1612 16
13
1010
17
5
14
99 14 17
8
16
1212
16
19
16
1916
131316
19
16
19
2
161212
16
11
16
16
19
12 1616
1916
19
16 19
1616
19
16
8
4
5
3
2020
20
20
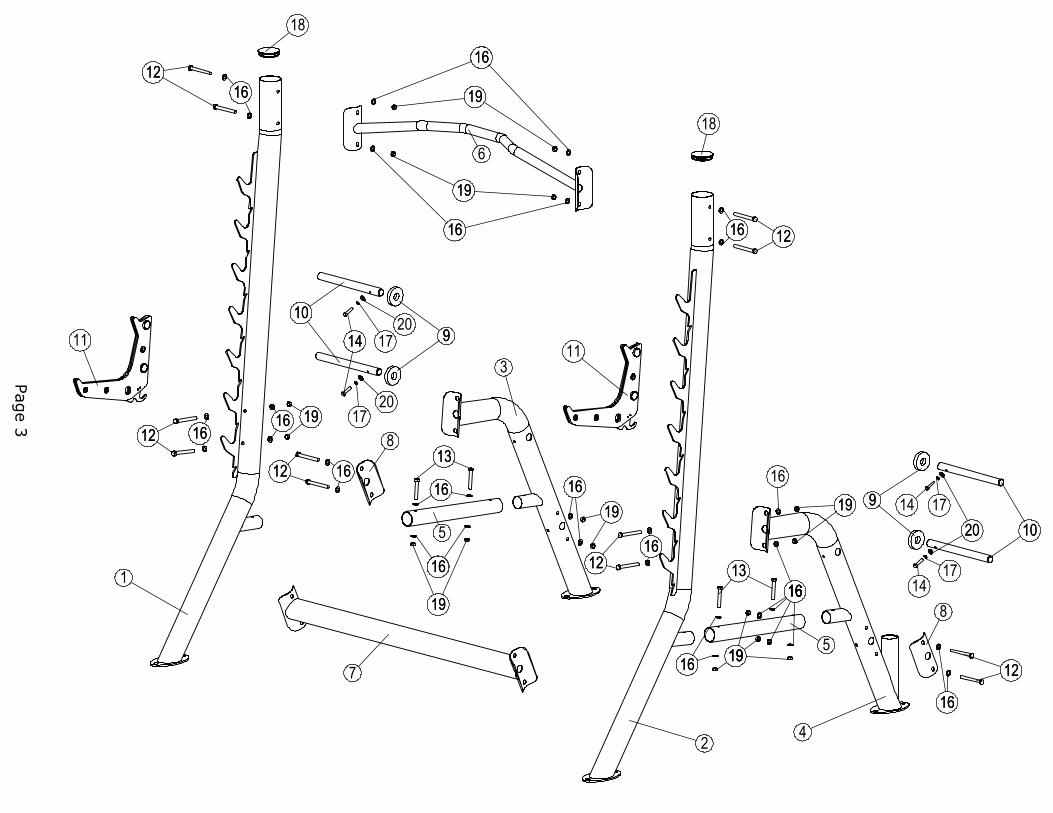
Page 3
3
5
5
4
13
13
1616
1616
19
19
PAGE 4
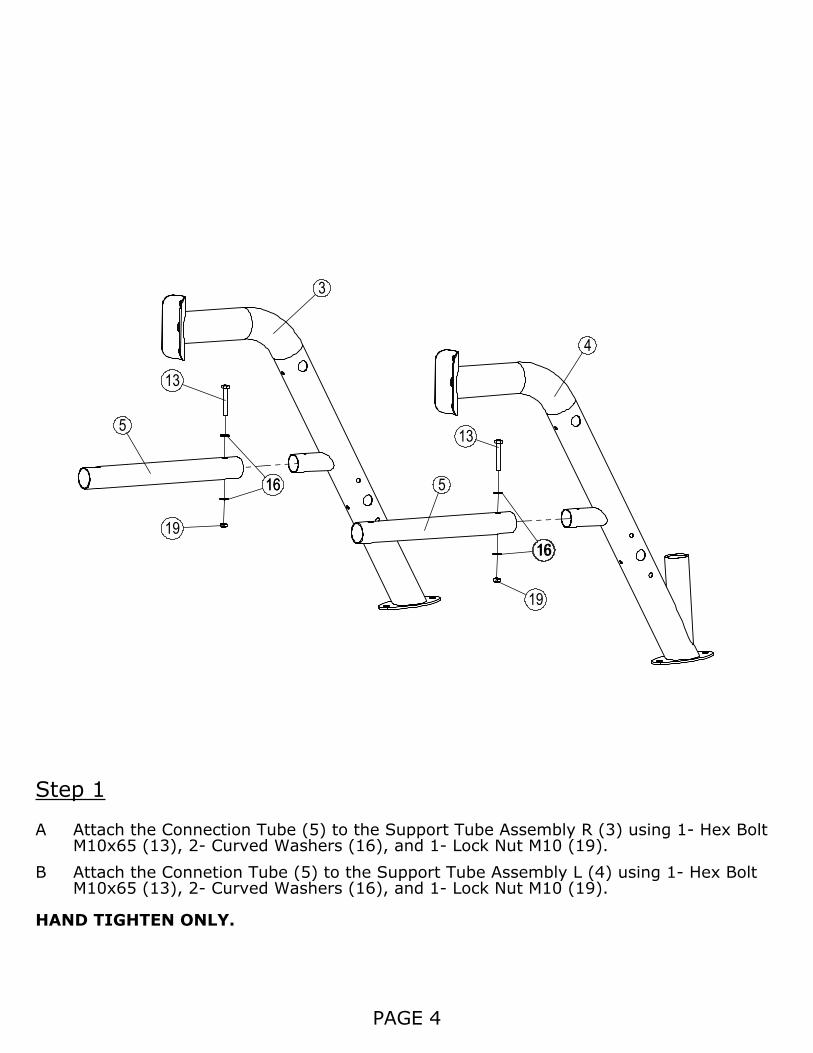
Step 1
Attach the Connection Tube (5) to the Support Tube Assembly R (3) using 1- Hex Bolt AM10x65 (13), 2- Curved Washers (16), and 1- Lock Nut M10 (19).
Attach the Connetion Tube (5) to the Support Tube Assembly L (4) using 1- Hex Bolt BM10x65 (13), 2- Curved Washers (16), and 1- Lock Nut M10 (19).
HAND TIGHTEN ONLY.
2
1
43
5
5
1212
1212
16
1616
16
16 1919
19
19
191916
16
13
13
PAGE 5
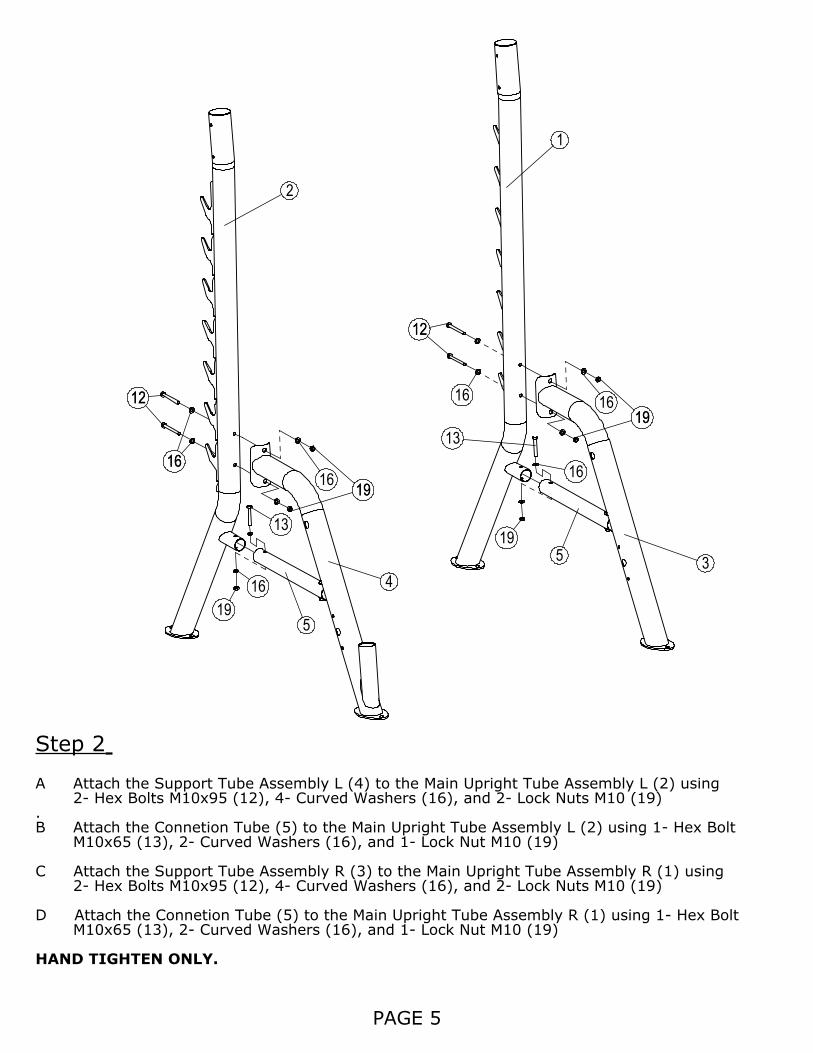
Step 2
Attach the Support Tube Assembly L (4) to the Main Upright Tube Assembly L (2) using A2- Hex Bolts M10x95 (12), 4- Curved Washers (16), and 2- Lock Nuts M10 (19)
.Attach the Connetion Tube (5) to the Main Upright Tube Assembly L (2) using 1- Hex Bolt BM10x65 (13), 2- Curved Washers (16), and 1- Lock Nut M10 (19)
Attach the Support Tube Assembly R (3) to the Main Upright Tube Assembly R (1) using C2- Hex Bolts M10x95 (12), 4- Curved Washers (16), and 2- Lock Nuts M10 (19)
Attach the Connetion Tube (5) to the Main Upright Tube Assembly R (1) using 1- Hex Bolt DM10x65 (13), 2- Curved Washers (16), and 1- Lock Nut M10 (19)
HAND TIGHTEN ONLY.
16161212
1212
1616
16
16
1919
191916
16
1616
1616
1212
12124
3
2
1
6
7
PAGE 6
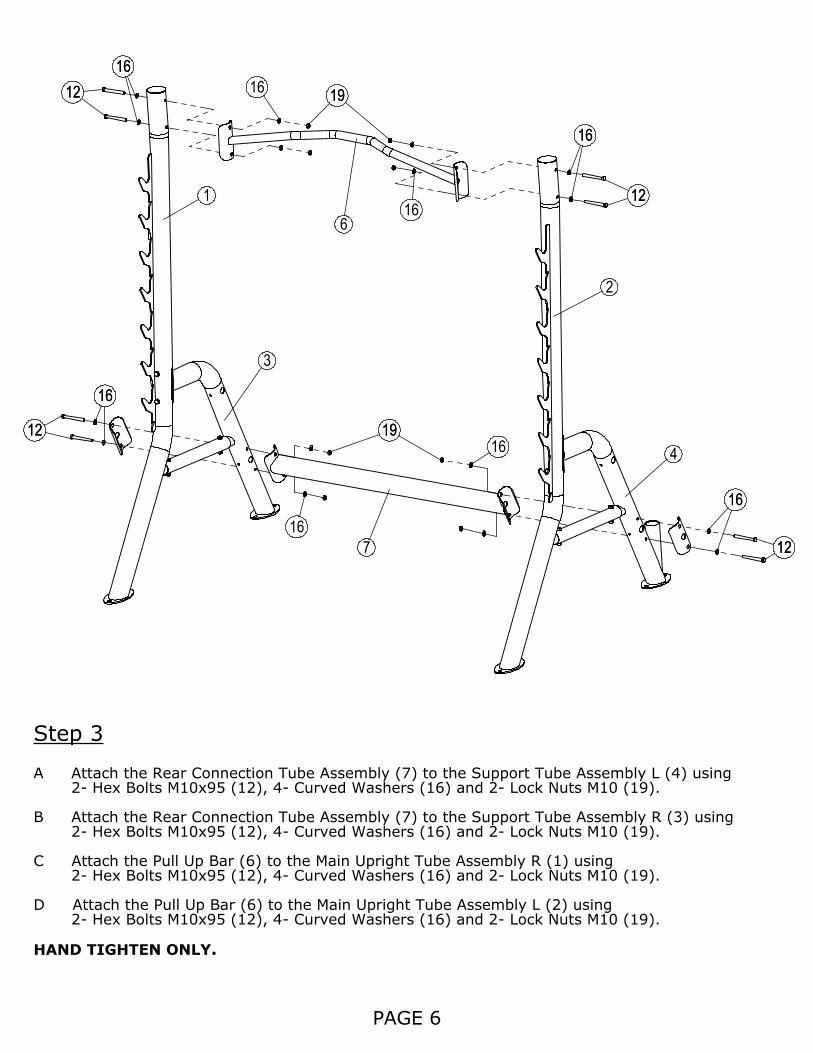
Step 3
Attach the Rear Connection Tube Assembly (7) to the Support Tube Assembly L (4) using A2- Hex Bolts M10x95 (12), 4- Curved Washers (16) and 2- Lock Nuts M10 (19).
Attach the Rear Connection Tube Assembly (7) to the Support Tube Assembly R (3) using B2- Hex Bolts M10x95 (12), 4- Curved Washers (16) and 2- Lock Nuts M10 (19).
Attach the Pull Up Bar (6) to the Main Upright Tube Assembly R (1) using C2- Hex Bolts M10x95 (12), 4- Curved Washers (16) and 2- Lock Nuts M10 (19).
Attach the Pull Up Bar (6) to the Main Upright Tube Assembly L (2) using D2- Hex Bolts M10x95 (12), 4- Curved Washers (16) and 2- Lock Nuts M10 (19).
HAND TIGHTEN ONLY.
1010
1010 99
99
14
14 1720
2017
34
PAGE 7
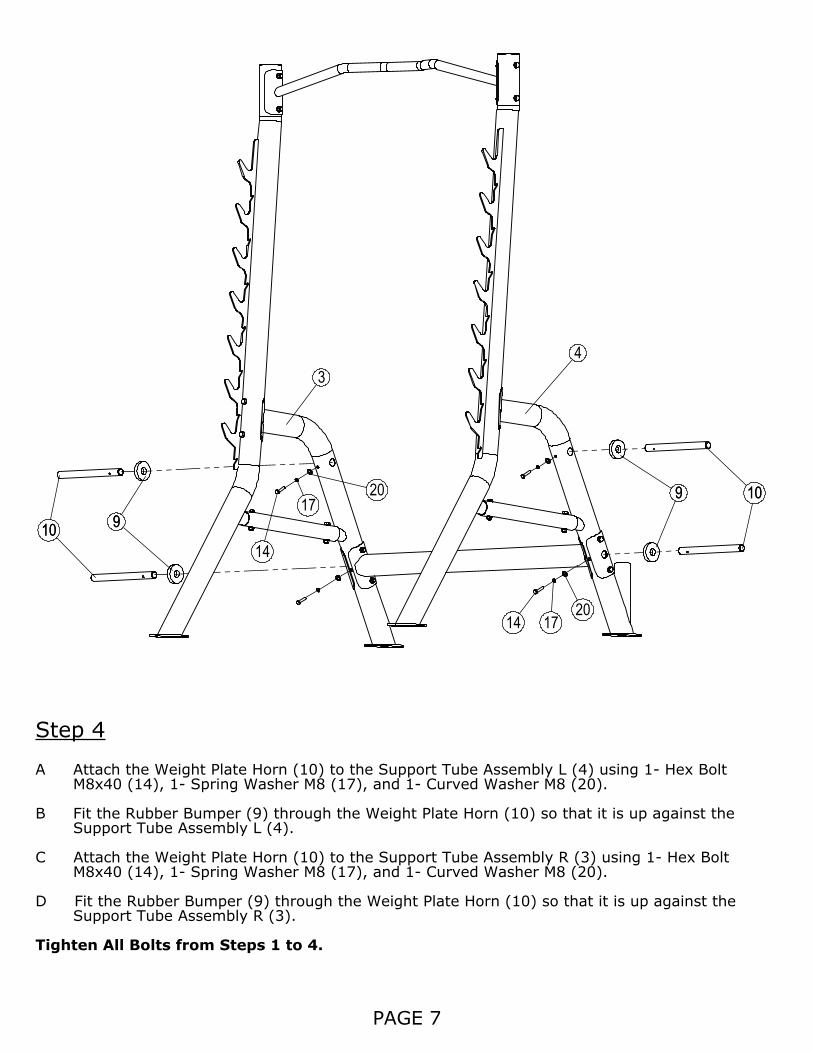
Step 4
Attach the Weight Plate Horn (10) to the Support Tube Assembly L (4) using 1- Hex Bolt AM8x40 (14), 1- Spring Washer M8 (17), and 1- Curved Washer M8 (20).
Fit the Rubber Bumper (9) through the Weight Plate Horn (10) so that it is up against the BSupport Tube Assembly L (4).
Attach the Weight Plate Horn (10) to the Support Tube Assembly R (3) using 1- Hex Bolt CM8x40 (14), 1- Spring Washer M8 (17), and 1- Curved Washer M8 (20).
Fit the Rubber Bumper (9) through the Weight Plate Horn (10) so that it is up against the DSupport Tube Assembly R (3).
Tighten All Bolts from Steps 1 to 4.
1111
PAGE 8
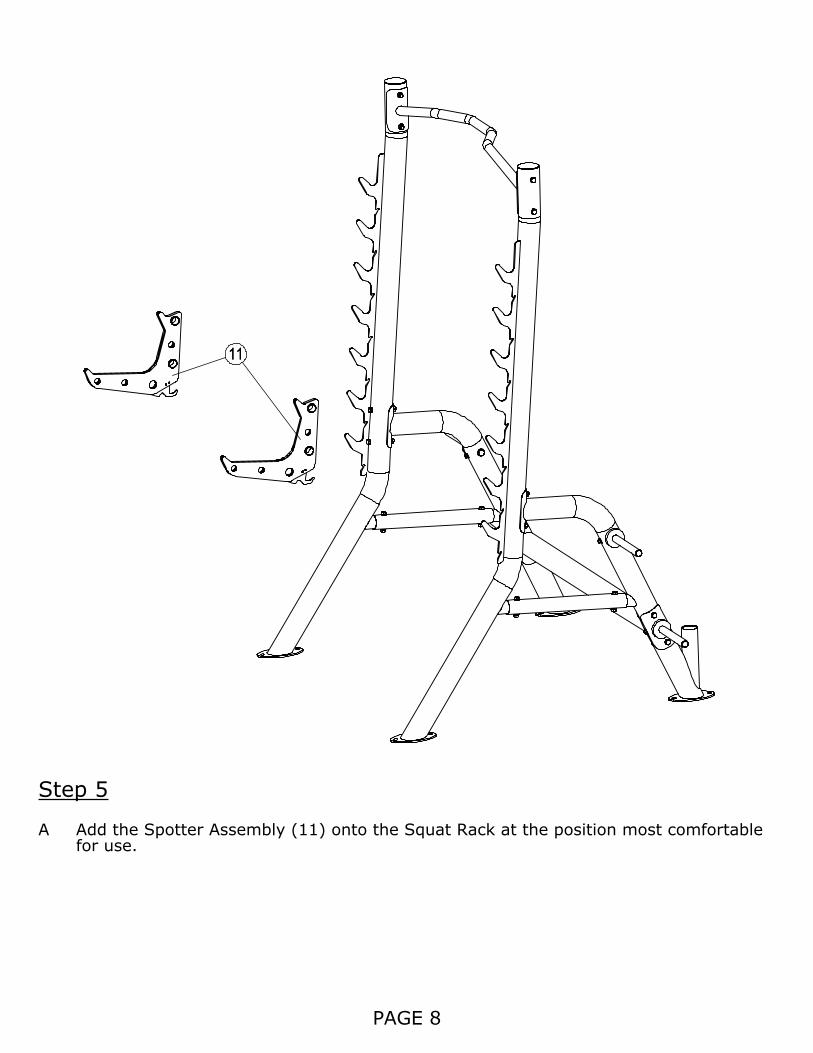
Step 5
Add the Spotter Assembly (11) onto the Squat Rack at the position most comfortable Afor use.

DECAL REFERENCE
Page 9
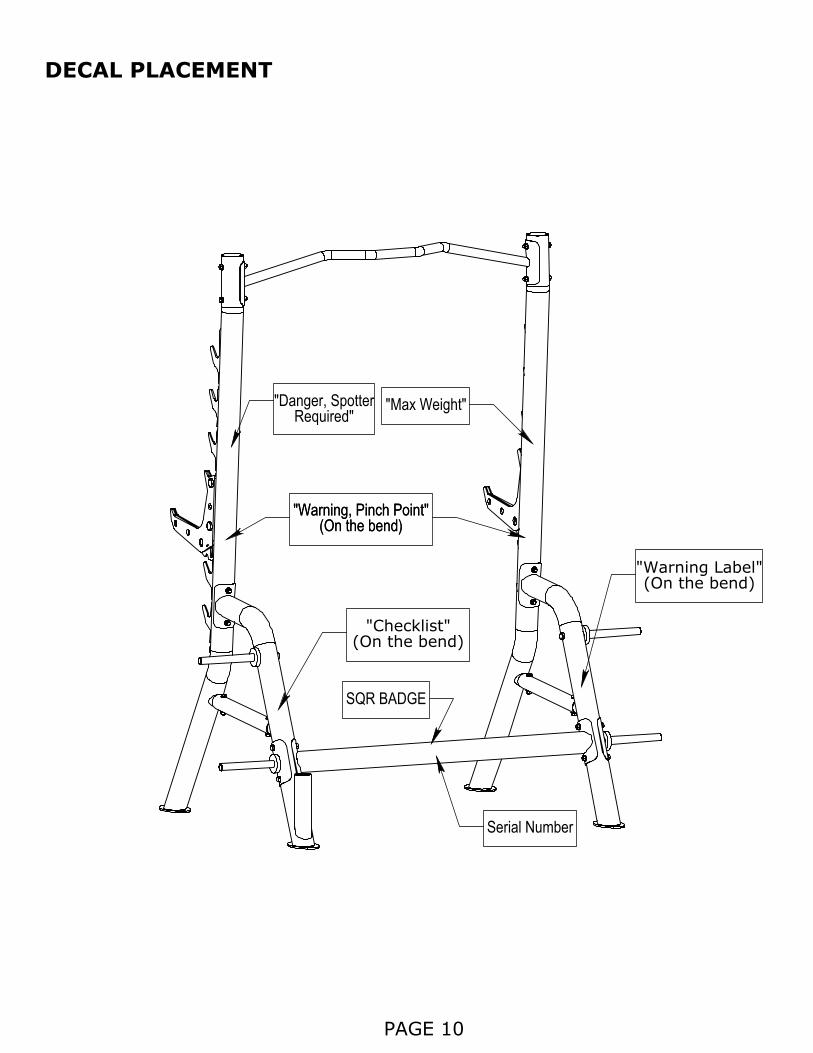
"Checklist"
(On the bend)
"Warning Label" (On the bend)
"Warning, Pinch Point"
(On the bend)
"Warning, Pinch Point"
(On the bend)
"Max Weight"
SQR BADGE
Serial Number
"Danger, Spotter
Required"
PAGE 10
DECAL PLACEMENT
GENERAL MAINTENANCE INFORMATION
• Regularly inspect product for loose hardware. • Do not use or store equipment outdoors. • Locate and familiarize yourself with all warning decals on the squat rack • Replace damaged or worn upholstery immediately.
Page 11

MAINTENANCE SCHEDULE
ROUTINE HOME
MAINTENANCE ENTRY DATE
Inspect: Links, Pull Pins,
Spring Clips, Swivels, Weight Stack Pins
WEEKLY
Inspect: Accessory Bars and Handles
3 MONTHS
Inspect: All Decals 3 MONTHS
Inspect: All Nuts and Bolts. Tighten if Needed
3 MONTHS
Inspect: Anti-Skid
surfaces 3 MONTHS
Clean and Wax: All Glossy Finishes
YEARLY
Page 12
Warranty. This Warranty applies to Inspire Strength products manufactured or distributed by Health In Motion LLC.
CONSUMER USE: LIGHT-COMMERCIAL USE:
LIMITED LIFETIME FRAME: LIMITED LIFETIME FRAME: Includes Frame and Welds Includes Frame and Welds LIMITED LIFETIME PARTS: 10 YEAR PARTS: Includes Upholstery, Hardware, etc. Includes Upholstery, Hardware, etc. LIMITED LIFETIME MOVING PARTS: 10 YEAR MOVING PARTS: Includes Pulleys, Cables, etc. Includes Pulleys, Cables, etc.
PLEASE NOTE THAT NOT ALL INSPIRE PRODUCTS ARE MADE FOR LIGHT-COMMERCIAL USE
Refer to your Owner’s Manual or consult with you fitness product dealer to establish if a Product is made for light-commercial use or not. Using a non-commercial product in a commercial setting can result in serious injury or death! Health In Motion warrants that the Product you have purchased for light-commercial, personal, family or household use from Health In Motion LLC or from an authorized Health In Motion reseller is free from defects in materials or
workmanship under normal use during the warranty period. Your sales receipt, showing the date of purchase of the Product, is your proof of the date of purchase. This warranty extends only to you, the original purchaser. It is not
transferable to anyone who subsequently purchases the Product from you. It excludes expendable parts such as paint and finish. This Warranty becomes VALID ONLY if the Product is assembled / installed according to the instructions / directions included with the Product.
Replacement and repair of parts.
During the warranty period Health In Motion will, at no additional charge, repair or replace the Product if it becomes defective, malfunctions, or otherwise fails to conform with this Warranty under normal light-commercial, personal, family, or household use. In repairing the product Health In Motion may replace defective parts with, at the option of
Health In Motion, serviceable used parts that are equivalent to new parts in performance, or new parts. All exchanged parts and Products replaced under this warranty will become the property of Health In Motion. Health In Motion reserves the right to change manufacturers and or specification of any part to cover any existing warranty.
Service procedures. To obtain warranty parts, you must return the parts to Health In Motion or an authorized Health In Motion retailer in its original container (or equivalent). You must pre-pay any shipping charges, taxes, or any other charges associated
with transportation of the Product. In addition, you are responsible for insuring any Product shipped or returned. You assume the risk of loss during shipment. You must present Health In Motion with proof-of-purchase documents (including the date of purchase, Model, and Serial Number). Any evidence of alteration, erasing or forgery of proof -of-purchase documents will be cause to void this Warranty. Register your warranty online visit www.inspirefitness.com
Conditions and Exceptions.
This Warranty does not extend to any Product not purchased from Health In Motion LLC or from an authorized Health In Motion reseller. This Warranty does not extend to any Product that has been damaged or rendered defective; (a) as a result of accident, misuse, or abuse; (b) by the use of parts not manufactured or sold by Health In Motion; (c) by modification of the Product; (d) as a result of service by anyone other than Health In Motion, or an authorized Health In Motion warranty service provider; (e) product that has not been properly maintained (follow maintenance schedule found on product). Should any product submitted for Warranty service be found to be ineligible, an estimate of repair cost will be furnished and the repair will be made if requested by you upon Health In Motion receipt of payment or acceptable arrangement of payment.
Disclaimer
EXCEPT AS EXPRESSLY SET FORTH IN THIS WARRANTY HEALTH IN MOTION MAKES NO OTHER WARRANTIES; EXPRESSED OR IMPLIED INCLUDING ANY IMPLIED WARRANTIES OF MERCHANTABILITY AND FITNESS FOR A PARTICULAR PURPOSE. HEALTH IN MOTION EXPRESSLY DISCLAIMS ALL WARRANTIES NOT STATED IN THIS WARRANTY. ANY IMPLIED WARRANTIES THAT MAY BE IMPOSED BY LAW ARE LIMITED TO THE TERMS OF THIS WARRANTY. NEITHER HEALTH IN MOTION NOR ANY OF ITS AFFILIATES SHALL BE RESPONSIBLE FOR INCIDENTAL OR CONSEQUENTIAL DAMAGES. HEALTH IN MOTION IS NOT RESPONSIBLE FOR THE REPAIR OR REPLACEMENT OF
ANY PARTS THAT HEALTH IN MOTION DETERMINES HAVE BEEN SUBJECTED AFTER THE DATE OF MANUFACTURE TO ALTERATION, NEGLECT, ABUSE, MISUSE, NORMAL WEAR & TEAR, ACCIDENT, DAMAGE DURING TRANSIT OR INSTALLATION, FIRE, FLOOD, OR ANY ACT OF GOD. SOME STATES DO NOT ALLOW LIMITATIONS ON HOW LONG AN IMPLIED WARRANTY LASTS OR THE EXCLUSION OR LIMITATION OF INCIDENTAL OR CONSEQUENTIAL DAMAGES, SO THE ABOVE LIMITATIONS OR EXCLUSION MAY NOT APPLY TO YOU. This Warranty gives you specific legal rights and you may also have other rights that may vary from state to state. This is the only express warranty applicable to Health In Motion’s “Inspire” branded strength products. Health In Motion neither assumes nor authorizes anyone to assume for it any other express warranty.
PAGE 13