Embed Size (px)
Citation preview
Blackbaud Student Information System™
Installation Guide

080714
2014 Blackbaud, Inc. This publication, or any part thereof, may not be reproduced or transmitted in any form or by any means, electronic, or mechanical, including photocopying, recording, storage in an information retrieval system, or otherwise, without the prior written permission of Blackbaud, Inc.
The information in this manual has been carefully checked and is believed to be accurate. Blackbaud, Inc., assumes no responsibility for any inaccuracies, errors, or omissions in this manual. In no event will Blackbaud, Inc., be liable for direct, indirect, special, incidental, or consequential damages resulting from any defect or omission in this manual, even if advised of the possibility of damages.
In the interest of continuing product development, Blackbaud, Inc., reserves the right to make improvements in this manual and the products it describes at any time, without notice or obligation.
All Blackbaud product names appearing herein are trademarks or registered trademarks of Blackbaud, Inc.
All other products and company names mentioned herein are trademarks of their respective holder.
SIS‐InstallationGuide‐080714
Contents
WELCOME . . . . . . . . . . . . . . . . . . . . . . . . . . . . . . . . . . . . . . . . . . . . . . . . . . . . . . . . . 1
Blackbaud Solutions and Services . . . . . . . . . . . . . . . . . . . . . . . . . . . . . . . . . . . . . . . . . . . . . . . . . . . . . . . 2
INSTALLING BLACKBAUD STUDENT INFORMATION SYSTEM. . . . . . . . . . . . . . . . . . . . . . . . 7
Pre‐installation Considerations . . . . . . . . . . . . . . . . . . . . . . . . . . . . . . . . . . . . . . . . . . . . . . . . . . . . . . . . . 8Requirements for Installing Blackbaud Student Information System . . . . . . . . . . . . . . . . . . . . . . . . . . . 8Installing a Standalone Version of Blackbaud Student Information System . . . . . . . . . . . . . . . . . . . . . 11Installing a Network Version of Blackbaud Student Information System . . . . . . . . . . . . . . . . . . . . . . . 17Install Instructions for Existing Financial Edge Users . . . . . . . . . . . . . . . . . . . . . . . . . . . . . . . . . . . . . . . 23Update Instructions for Blackbaud Student Information System . . . . . . . . . . . . . . . . . . . . . . . . . . . . . 23Creating a New Blackbaud Student Information System Database . . . . . . . . . . . . . . . . . . . . . . . . . . . . 27Logging into a New Database . . . . . . . . . . . . . . . . . . . . . . . . . . . . . . . . . . . . . . . . . . . . . . . . . . . . . . . . . . 31Working with Sample Data in Blackbaud Student Information System . . . . . . . . . . . . . . . . . . . . . . . . 35Unlocking Optional Modules . . . . . . . . . . . . . . . . . . . . . . . . . . . . . . . . . . . . . . . . . . . . . . . . . . . . . . . . . . 35Activating Ad Hoc Remote Querying for School Store Manager . . . . . . . . . . . . . . . . . . . . . . . . . . . . . . 36
TEMPLATE ACCOUNT CODES . . . . . . . . . . . . . . . . . . . . . . . . . . . . . . . . . . . . . . . . . . . 39
Standard Nonprofit Template Account Codes . . . . . . . . . . . . . . . . . . . . . . . . . . . . . . . . . . . . . . . . . . . . . 40Standard School Template Account Codes . . . . . . . . . . . . . . . . . . . . . . . . . . . . . . . . . . . . . . . . . . . . . . . 43Standard Community Foundation Template Account Codes . . . . . . . . . . . . . . . . . . . . . . . . . . . . . . . . . 47Standard Museum Template Account Codes . . . . . . . . . . . . . . . . . . . . . . . . . . . . . . . . . . . . . . . . . . . . . 51Standard Museum Template Account Codes 53
1chapter
Welcome
Blackbaud Solutions and Services. . . . . . . . . . . . . . . . . . . . . . . . . . . . . . . . . . . . . . . . . . . . . . . . . . . . . . . . . . . . . . . . 2Data Services . . . . . . . . . . . . . . . . . . . . . . . . . . . . . . . . . . . . . . . . . . . . . . . . . . . . . . . . . . . . . . . . . . . . . . . . . . . . . . . . . . . 2School System Consulting. . . . . . . . . . . . . . . . . . . . . . . . . . . . . . . . . . . . . . . . . . . . . . . . . . . . . . . . . . . . . . . . . . . . . . . . . 3
How We Can Help . . . . . . . . . . . . . . . . . . . . . . . . . . . . . . . . . . . . . . . . . . . . . . . . . . . . . . . . . . . . . . . . . . . . . . . . . . . . 3Technical Consulting . . . . . . . . . . . . . . . . . . . . . . . . . . . . . . . . . . . . . . . . . . . . . . . . . . . . . . . . . . . . . . . . . . . . . . . . . . . . . 3Training Solutions . . . . . . . . . . . . . . . . . . . . . . . . . . . . . . . . . . . . . . . . . . . . . . . . . . . . . . . . . . . . . . . . . . . . . . . . . . . . . . . 4Software Maintenance Services. . . . . . . . . . . . . . . . . . . . . . . . . . . . . . . . . . . . . . . . . . . . . . . . . . . . . . . . . . . . . . . . . . . . 4Customer Support . . . . . . . . . . . . . . . . . . . . . . . . . . . . . . . . . . . . . . . . . . . . . . . . . . . . . . . . . . . . . . . . . . . . . . . . . . . . . . . 4
Contacting Support . . . . . . . . . . . . . . . . . . . . . . . . . . . . . . . . . . . . . . . . . . . . . . . . . . . . . . . . . . . . . . . . . . . . . . . . . . . 4Blackbaud Forms. . . . . . . . . . . . . . . . . . . . . . . . . . . . . . . . . . . . . . . . . . . . . . . . . . . . . . . . . . . . . . . . . . . . . . . . . . . . . . . . 4
2 CHAPTER
Welcome to the Installation Guide for Blackbaud Student Information System. This guide provides step‐by‐step procedures to help new users successfully install Blackbaud Student Information System. To prepare for installation, you should have already read the Installation Planning Guide for Blackbaud Student Information System.
The information in this guide is organized into three chapters and an appendix.
Chapter 1: Welcome. This chapter is an introduction to the Installation Guide for Blackbaud Student Information System and includes a section detailing the various Blackbaud services and solutions we offer.
Chapter 2: Installing Blackbaud Student Information System. This chapter provides detailed procedures for installing Blackbaud Student Information System, creating a new Blackbaud Student Information System database, and logging in to the database.
Appendix: Template Account Codes. This appendix lists the standard account codes associated with nonprofits, schools, museums and community foundations. If you are installing General Ledger, you can use this appendix as a reference.
The benefits of using Blackbaud Student Information System are tremendous, and you can take full advantage of these benefits if you take time to prepare for the installation. We recommend you read the Installation Planning Guide for Blackbaud Student Information System before installing and follow the pre‐installation suggestions we provide.
Blackbaud Solutions and Services
For more than two decades, Blackbaud has provided world‐class technology solutions to the nonprofit community, helping organizations of all sizes and types.
Software plays an important role in the Blackbaud equation for success. Indeed, our products set the standards by which others are measured. However, there is another essential part of the Blackbaud solution — services. As the largest and most experienced provider of services to the nonprofit community, we understand the unique challenges nonprofits face and help them overcome those challenges.
This section provides an overview of the services and training solutions we offer to help you successfully install, implement, and use Blackbaud Student Information System.
Data Services
We offer a wide range of data services. From database conversion to database consolidation, our staff of programmers and analysts have the experience, technology, and expertise to meet your organization’s needs.
You can find more information about data service solutions by accessing our website at www.blackbaud.com.
Note: Information in this guide is subject to change. Please visit our website at www.blackbaud.com to view the most current information. To access our system requirements, select System Requirements from the resources menu on our website.
Note: To download the most current system requirements, select System Requirements from the resources menu on our website at www.blackbaud.com.
Note: We recommend you read the Installation Planning Guide for Blackbaud Student Information System before installing and follow the pre‐installation suggestions we provide.
WELCOME 3
School System Consulting
School System Consulting services help you get the most out of your Blackbaud Student Information System software by aligning your school’s systems with its processes and objectives. We partner with you to learn about your school, identify issues, and plan a solution tailored to your needs.
Our consultants have in‐depth software knowledge and exposure to a wide variety of scholastic methodologies. Blackbaud consultants have held high‐level positions within Blackbaud’s Support and Development teams and often have a background in teaching. They also have worked with hundreds of Blackbaud clients to implement or improve the functionality of their Blackbaud software.
To learn how your school can benefit from our Consulting services, email [email protected] or call 800‐443‐9441.
How We Can Help
• Assist with installing software.
• Evaluate and define historical data to convert to Blackbaud Student Information System.
• Assess your school’s unique reporting requirements.
• Establish system security.
• Evaluate job responsibilities to ensure optimal workflow.
• Review data entry methods and make recommendations on data entry practices to increase productivity in your office.
• Assess whether you need to set up multiple schools.
• Review your application and enrollment steps and build your progression of applicant and student statuses.
• Streamline your admissions process by implementing applicant checklist and tracks, establishing actions for maintaining interviews, assessing your mailing practices, and developing reporting procedures.
• Configure the basis of your scheduling system and assist you through the scheduling process of entering course requests, creating a master schedule, and enrolling students.
• Configure the basis of your grading system and assist you through the grading process, including setting up GPA, course average, rank, and performance calculations.
• Set up your standard transcripts.
• Build course catalogs.
• Set up and maximize your use of optional modules, such as Faculty Access for the Web.
Technical Consulting
Let our knowledgeable consultants bring their technical expertise to your site and manage the implementation of your Blackbaud products. By entrusting the nuts and bolts of implementation to one of our consultants, you ensure optimal setup of your system while keeping your time and energy focused on fostering your organization’s mission.
Whether it is software installation or a detailed assessment of your current IT capabilities and needs, our team of Microsoft‐, Cisco‐, and Oracle‐certified engineers can help you meet your technical challenges head on.
4 CHAPTER
Training Solutions
Because we understand how important training is, we offer a variety of options to meet your different needs. Training is a vital part of realizing the full potential of your software. It not only increases efficiency, accuracy, and saves time, but you’ll also see a boost in your staff’s job satisfaction as they become more confident and valuable in their roles.
For information about the best training option for your organization, check out our Training page on Blackbaud.com.
Software Maintenance Services
Our maintenance programs supplement your software purchase by providing you with tools, resources, and support so you can use the software to its fullest potential. To meet your organization’s needs, we have several plans from which to choose. Visit our website at maintenance.blackbaud.com for more information about maintenance plans.
Customer Support
Our Customer Support department endeavors to provide the industry’s best customer service. Through education and support, we focus on empowering clients to use Blackbaud software in a manner that achieves the maximum benefit to their organizations, thereby advancing each client’s individual mission. We continually strive to meet our commitment to “help you make the world a better place” through friendly, swift, and knowledgeable assistance to each client upon every contact with any member of Customer Support.
Our customer support department is staffed by dedicated analysts who take seriously their mission to provide the very best in ongoing support. Support analysts are available to assist you from 8:30 a.m. ‐ 8:00 p.m. EST, Monday through Friday.
Contacting Support
For the fastest response, access our website at www.blackbaud.com and create a case in “Case Central”. From “Case Central” you can also view analysts’ notes on your organization’s cases, add notes to your open cases to communicate with the support analyst who is assisting you, or request that we reopen a closed case. Your organization’s cases are confidential.
If you prefer, you can send us an email at [email protected] Blackbaud Student Information System. Please include your name, your organization’s name, site ID, and as much information as possible in your email so we will be prepared to assist you quickly. If you would like to speak with a Customer Support analyst, you can call 1‐800‐468‐8996. You can also contact Customer Support via fax at 1‐843‐216‐6100.
Blackbaud Forms
Blackbaud Forms provides custom checks, student bills, statements, invoices, purchase orders, tax forms, envelopes, and other computer forms, including high‐quality, customized report card and transcript forms that are specifically designed for use with Blackbaud Student Information System. Our report card and transcript forms feature state‐of‐the‐art, tamper‐proof backgrounds.
Blackbaud forms are guaranteed to align correctly and can be customized to your organization’s specifications, using your logo, special inks, and print styles. Pre‐printed forms from other suppliers are not guaranteed to align properly.
For more information, you can visit the forms section of our website at forms.blackbaud.com or send an email with questions to [email protected]. You can also call us toll‐free at 866‐4‐BB‐FORMS (866‐422‐3676).

WELCOME 5

6 CHAPTER
2chapter
Installing Blackbaud Student Information System
Pre‐installation Considerations. . . . . . . . . . . . . . . . . . . . . . . . . . . . . . . . . . . . . . . . . . . . . . . . . . . . . . . . . . . . . . . . . . 8Requirements for Installing Blackbaud Student Information System . . . . . . . . . . . . . . . . . . . . . . . . . . . . . . . . . . . 8SQL Server 2005 Requirements . . . . . . . . . . . . . . . . . . . . . . . . . . . . . . . . . . . . . . . . . . . . . . . . . . . . . . . . . . . . . . . . . . . . 9SQL Server 2008 Requirements . . . . . . . . . . . . . . . . . . . . . . . . . . . . . . . . . . . . . . . . . . . . . . . . . . . . . . . . . . . . . . . . . . . 10Required NTFS Rights . . . . . . . . . . . . . . . . . . . . . . . . . . . . . . . . . . . . . . . . . . . . . . . . . . . . . . . . . . . . . . . . . . . . . . . . . . . 10Integrating with The Raiser’s Edge. . . . . . . . . . . . . . . . . . . . . . . . . . . . . . . . . . . . . . . . . . . . . . . . . . . . . . . . . . . . . . . . . 11Installing a Standalone Version of Blackbaud Student Information System . . . . . . . . . . . . . . . . . . . . . . . . . . . . . 11Installing a Network Version of Blackbaud Student Information System . . . . . . . . . . . . . . . . . . . . . . . . . . . . . . . 17Installing Blackbaud Student Information System on Workstations . . . . . . . . . . . . . . . . . . . . . . . . . . . . . . . . . . . . . . 22Install Instructions for Existing Financial Edge Users. . . . . . . . . . . . . . . . . . . . . . . . . . . . . . . . . . . . . . . . . . . . . . . . 23Update Instructions for Blackbaud Student Information System . . . . . . . . . . . . . . . . . . . . . . . . . . . . . . . . . . . . . 23Important Notes Before Updating . . . . . . . . . . . . . . . . . . . . . . . . . . . . . . . . . . . . . . . . . . . . . . . . . . . . . . . . . . . . . . . . . 23Backing Up Your Database . . . . . . . . . . . . . . . . . . . . . . . . . . . . . . . . . . . . . . . . . . . . . . . . . . . . . . . . . . . . . . . . . . . . . . . 24Update Procedures . . . . . . . . . . . . . . . . . . . . . . . . . . . . . . . . . . . . . . . . . . . . . . . . . . . . . . . . . . . . . . . . . . . . . . . . . . . . . 26Creating a New Blackbaud Student Information System Database . . . . . . . . . . . . . . . . . . . . . . . . . . . . . . . . . . . . 27Logging into a New Database . . . . . . . . . . . . . . . . . . . . . . . . . . . . . . . . . . . . . . . . . . . . . . . . . . . . . . . . . . . . . . . . . . 31Logging into a New Blackbaud Student Information System Database . . . . . . . . . . . . . . . . . . . . . . . . . . . . . . . . . . . 31Logging into a New Blackbaud Student Information System Database That Has General Ledger . . . . . . . . . . . . . . 33Working with Sample Data in Blackbaud Student Information System . . . . . . . . . . . . . . . . . . . . . . . . . . . . . . . . 35Unlocking Optional Modules. . . . . . . . . . . . . . . . . . . . . . . . . . . . . . . . . . . . . . . . . . . . . . . . . . . . . . . . . . . . . . . . . . . 35Activating Ad Hoc Remote Querying for School Store Manager . . . . . . . . . . . . . . . . . . . . . . . . . . . . . . . . . . . . . . 36
8 CHAPTER
Before you install Blackbaud Student Information System, we strongly recommend you familiarize yourself with system requirements for the program and read the Installation Planning Guide for Blackbaud Student Information System. To download the most current system requirements, select System Requirements from the Products menu on our website at www.blackbaud.com.
Blackbaud Student Information System includes Microsoft’s SQL Server 2008 Express Edition.
Once you install Blackbaud Student Information System, you must create a new database using the Blackbaud Management Console before logging into the program. For information about creating a new database, see “Creating a New Blackbaud Student Information System Database” on page 27. For information about logging into a new database, see “Logging into a New Database” on page 31.
If you are currently running a version of The Financial Edge, see “Install Instructions for Existing Financial Edge Users” on page 23.
Pre-installation ConsiderationsTo ensure the installation goes smoothly, you must consider the following items before you begin installing the program:
You must fully understand Blackbaud Student Information System system requirements and make sure your system meets them. To download the most current system requirements, select System Requirements from the Resources menu on our website at www.blackbaud.com.
We recommend you have a complete backup of each server and workstation before running the installation.
We recommend you have a CD‐ROM drive at the server that will host the Blackbaud Student Information System database or on a workstation with network access. You can copy files to a network drive and run them from there if the workstation does not have a CD‐ROM drive.
We recommend you close the Microsoft Office toolbar if it is running. It may interfere with the installation of some files.
We recommend you temporarily disable any automatic backup software that may attempt to back up your database while you run the installation.
Due to the integration between Blackbaud Student Information System and Microsoft Outlook, if your workstation users are running Outlook, they must exit and log out of Outlook before installing Blackbaud Student Information System on their computers. If they fail to exit and log out of Outlook, the update may not install properly.
Windows NT 4.0, Novell Servers, Peer‐to‐peer networks, Unix, and Domain Controllers are not supported.
Blackbaud Student Information System is compatible with Microsoft’s SQL Server 2014.
Blackbaud Student Information System is compatible with Windows OS 8.1 and Windows 2012 Server R2.
Blackbaud Student Information System is compatible with Internet Explorer 11.
Requirements for Installing Blackbaud Student Information System
Warning: You must have local administrative rights to install Blackbaud Student Information System.
Warning: Blackbaud does not support Microsoft SQL Server Express or Blackbaud Student Information System on Domain controllers, Small Business Servers, NT 4.0 Server, or peer‐to‐peer networks.
INSTALL ING BLACKBAUD STUDENT INFORMAT ION SYSTEM 9
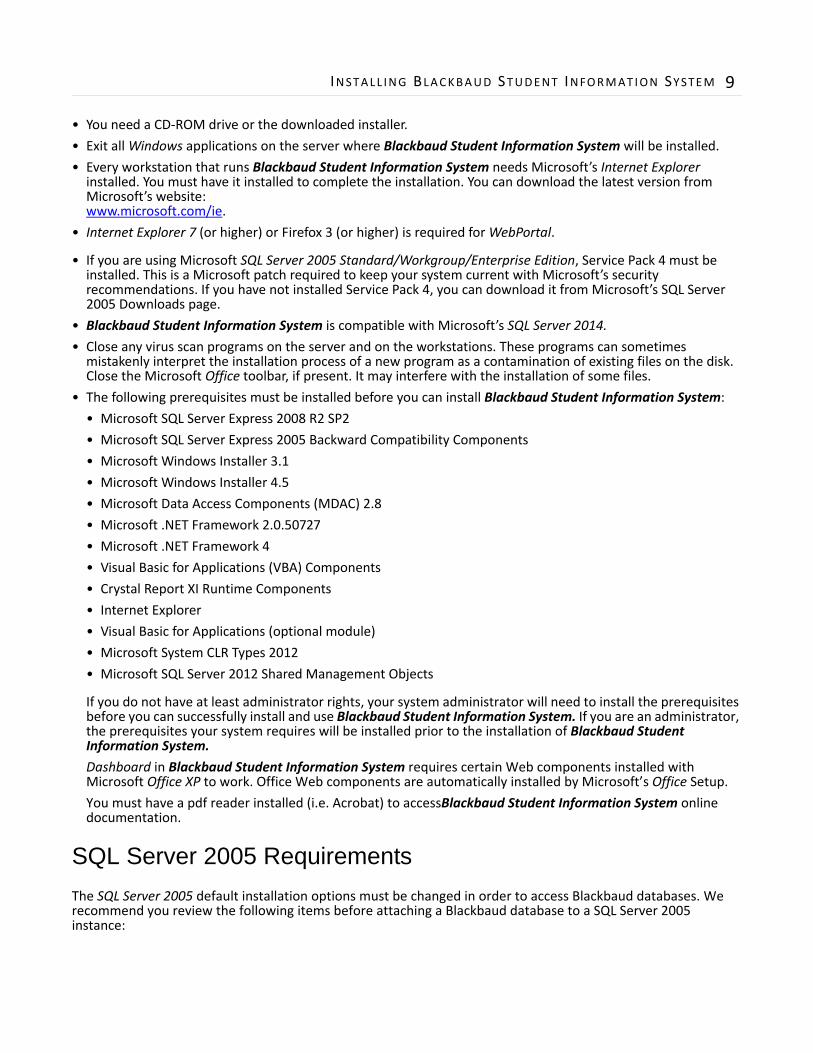
• You need a CD‐ROM drive or the downloaded installer.
• Exit all Windows applications on the server where Blackbaud Student Information System will be installed.
• Every workstation that runs Blackbaud Student Information System needs Microsoft’s Internet Explorer installed. You must have it installed to complete the installation. You can download the latest version from Microsoft’s website:www.microsoft.com/ie.
• Internet Explorer 7 (or higher) or Firefox 3 (or higher) is required for WebPortal.
• If you are using Microsoft SQL Server 2005 Standard/Workgroup/Enterprise Edition, Service Pack 4 must be installed. This is a Microsoft patch required to keep your system current with Microsoft’s security recommendations. If you have not installed Service Pack 4, you can download it from Microsoft’s SQL Server 2005 Downloads page.
• Blackbaud Student Information System is compatible with Microsoft’s SQL Server 2014.
• Close any virus scan programs on the server and on the workstations. These programs can sometimes mistakenly interpret the installation process of a new program as a contamination of existing files on the disk. Close the Microsoft Office toolbar, if present. It may interfere with the installation of some files.
• The following prerequisites must be installed before you can install Blackbaud Student Information System:
• Microsoft SQL Server Express 2008 R2 SP2
• Microsoft SQL Server Express 2005 Backward Compatibility Components
• Microsoft Windows Installer 3.1
• Microsoft Windows Installer 4.5
• Microsoft Data Access Components (MDAC) 2.8
• Microsoft .NET Framework 2.0.50727
• Microsoft .NET Framework 4
• Visual Basic for Applications (VBA) Components
• Crystal Report XI Runtime Components
• Internet Explorer
• Visual Basic for Applications (optional module)
• Microsoft System CLR Types 2012
• Microsoft SQL Server 2012 Shared Management Objects
If you do not have at least administrator rights, your system administrator will need to install the prerequisites before you can successfully install and use Blackbaud Student Information System. If you are an administrator, the prerequisites your system requires will be installed prior to the installation of Blackbaud Student Information System.
Dashboard in Blackbaud Student Information System requires certain Web components installed with Microsoft Office XP to work. Office Web components are automatically installed by Microsoft’s Office Setup.
You must have a pdf reader installed (i.e. Acrobat) to accessBlackbaud Student Information System online documentation.
SQL Server 2005 Requirements
The SQL Server 2005 default installation options must be changed in order to access Blackbaud databases. We recommend you review the following items before attaching a Blackbaud database to a SQL Server 2005 instance:
10 CHAPTER
• SQL Server 2005 administrators using Windows Only Authentication must apply the “View Server State” permission to each Microsoft Windows user or user group that accesses Blackbaud Student Information System. Users also need public roll access to the database.
• If the Blackbaud Management Console (Blackbaud Management Console) is installed on a separate server from SQL Server 2005, then you must also install the Microsoft SQL Server 2005 Backwards Compatibility components on the Blackbaud Management Console machine.
• Enable the TCP/IP and Named Pipes protocols for your SQL Server 2005 instance.
• Enable xp_cmdshell.
• SQL Server 2005 requires Service Pack 4. If you have not installed Service Pack 4, you can download it from Microsoft’s SQL Server 2005 Downloads page.
For more information about preparing SQL Server 2005 for use with Blackbaud databases, see Knowledgebase solution BB245576.
SQL Server 2008 Requirements
The SQL Server 2008 default installation options must be changed in order to access Blackbaud databases. We recommend you review the following items before attaching a Blackbaud database to a SQL Server 2008 instance:
• SQL Server 2008 requires Service Pack 1.
• Enable the TCP/IP and Named Pipes protocols for your SQL Server 2008 instance.
• Enable xp_cmdshell.
• If you are using Windows only authentication, users must have public role access to the Blackbaud database and have “View Server State” permission.
• If the Blackbaud Management Console (Blackbaud Management Console) is installed on a separate server from SQL Server 2008, then you must also install the Microsoft SQL Server 2005 Backward Compatibility Components on the SQL Server.
• SQL Server Standard or Enterprise Edition databases must still be attached via the Blackbaud Management Console (Blackbaud Management Console).
For more information about preparing SQL Server 2008 for use with Blackbaud databases, see Knowledgebase solution BB541928 .
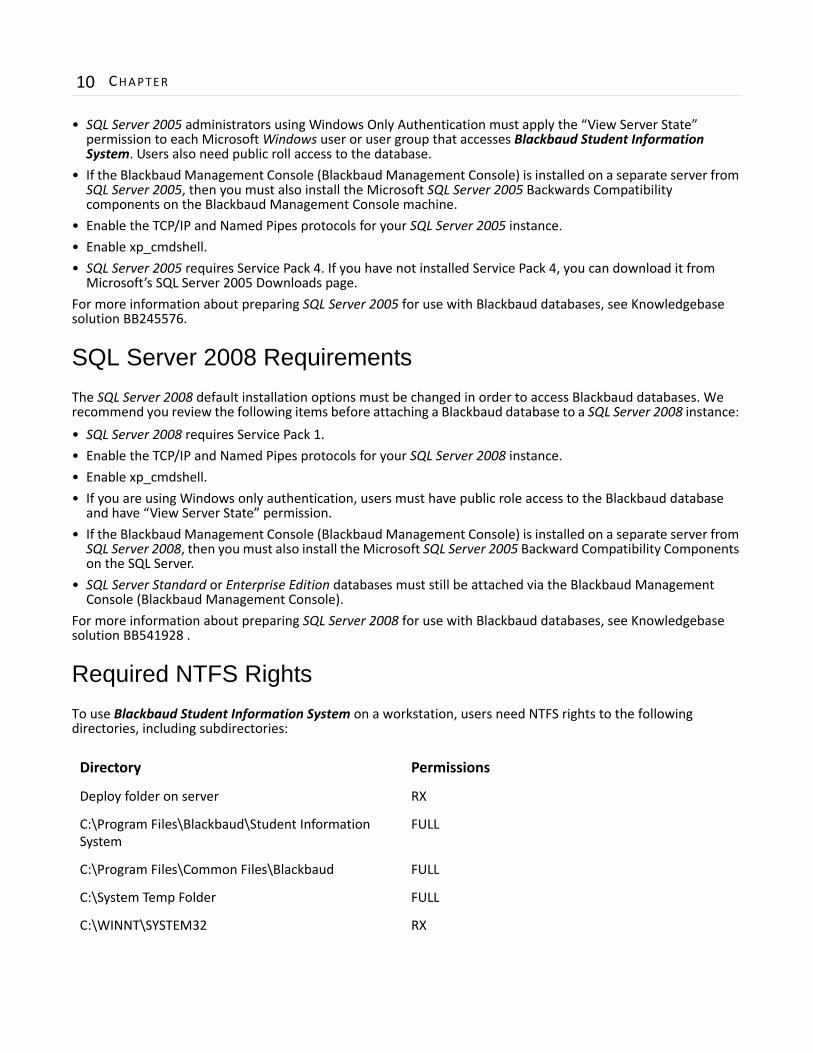
Required NTFS Rights
To use Blackbaud Student Information System on a workstation, users need NTFS rights to the following directories, including subdirectories:
Directory Permissions
Deploy folder on server RX
C:\Program Files\Blackbaud\Student Information System
FULL
C:\Program Files\Common Files\Blackbaud FULL
C:\System Temp Folder FULL
C:\WINNT\SYSTEM32 RX
INSTALL ING BLACKBAUD STUDENT INFORMAT ION SYSTEM 11
• When adding these NTFS folder permissions, click the Advanced button on the NTFS Properties tab and mark the Reset permissions on all child objects and enable propagation of inheritable permissions checkbox. This step propagates the permissions to all files and folders within the parent folder.
• For information regarding how to edit NTFS permissions, see Blackbaud Knowledgebase Solution BB3124.
• If these rights prove to be insufficient, we recommend using ProcessMonitor to determine where additional rights are needed. ProcessMonitor is a third‐party utility and is a useful tool for troubleshooting permission issues. For more information about ProcessMonitor, see Blackbaud Knowledgebase Solution BB50451.
Integrating with The Raiser’s Edge
To integrate Blackbaud Student Information System with The Raiser’s Edge, you must be on Raiser’s Edge version 7.92 or higher. Please note you must be on the latest Raiser’s Edge patch before integrating the systems.
To use integration, both programs must be installed on the same workstation so they can communicate in the background, but you do not have to be logged into both. We recommend you dedicate a workstation for the integration process of automatically synchronizing data. Visit www.blackbaud.com for the latest system requirements.
Installing a Standalone Version of Blackbaud Student Information SystemA standalone machine, or single workstation, is set up for one user and data is accessed from only that workstation. If your organization plans to use a standalone system, you should follow these installation instructions. If your organization will install Blackbaud Student Information System on a network, see “Installing a Network Version of Blackbaud Student Information System” on page 17.
Blackbaud Student Information System includes Microsoft’s SQL Server 2005 Express Edition with Service Pack 4. This version of SQL Server works for databases smaller than 3.7 GB. If your database exceeds this limit, you must purchase Microsoft’s SQL Server Standard, Enterprise or Workgroup Edition.
After you install Blackbaud Student Information System and its components, you must reboot your machine. Do not interrupt the process. After the reboot, you can open Blackbaud Student Information System using the sample database included with the program or by creating your own database using the Blackbaud Management Console. For information about creating a new database, see “Creating a New Blackbaud Student Information System Database” on page 27. For information about logging into a new database, see “Logging into a New Database” on page 31.
Installing a standalone version of Blackbaud Student Information System
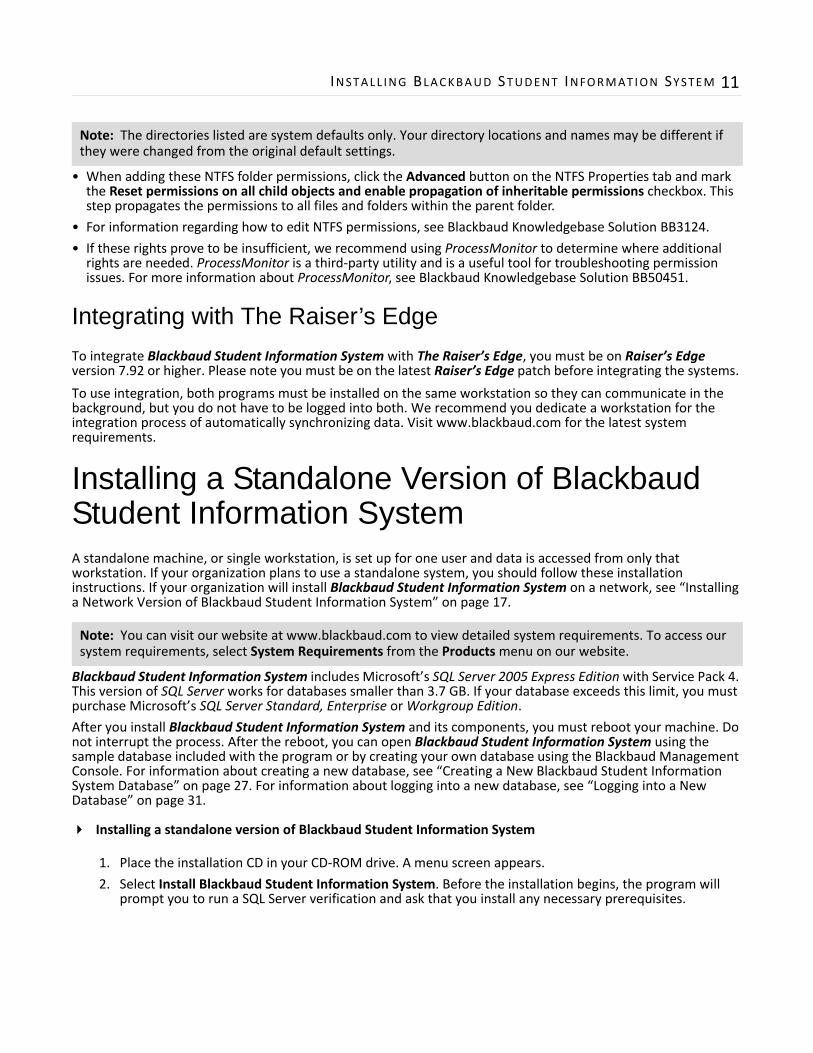
1. Place the installation CD in your CD‐ROM drive. A menu screen appears.
2. Select Install Blackbaud Student Information System. Before the installation begins, the program will prompt you to run a SQL Server verification and ask that you install any necessary prerequisites.
Note: The directories listed are system defaults only. Your directory locations and names may be different if they were changed from the original default settings.
Note: You can visit our website at www.blackbaud.com to view detailed system requirements. To access our system requirements, select System Requirements from the Products menu on our website.
12 CHAPTER
For a complete list of the prerequisites that must be installed, see “Requirements for Installing Blackbaud Student Information System” on page 8.
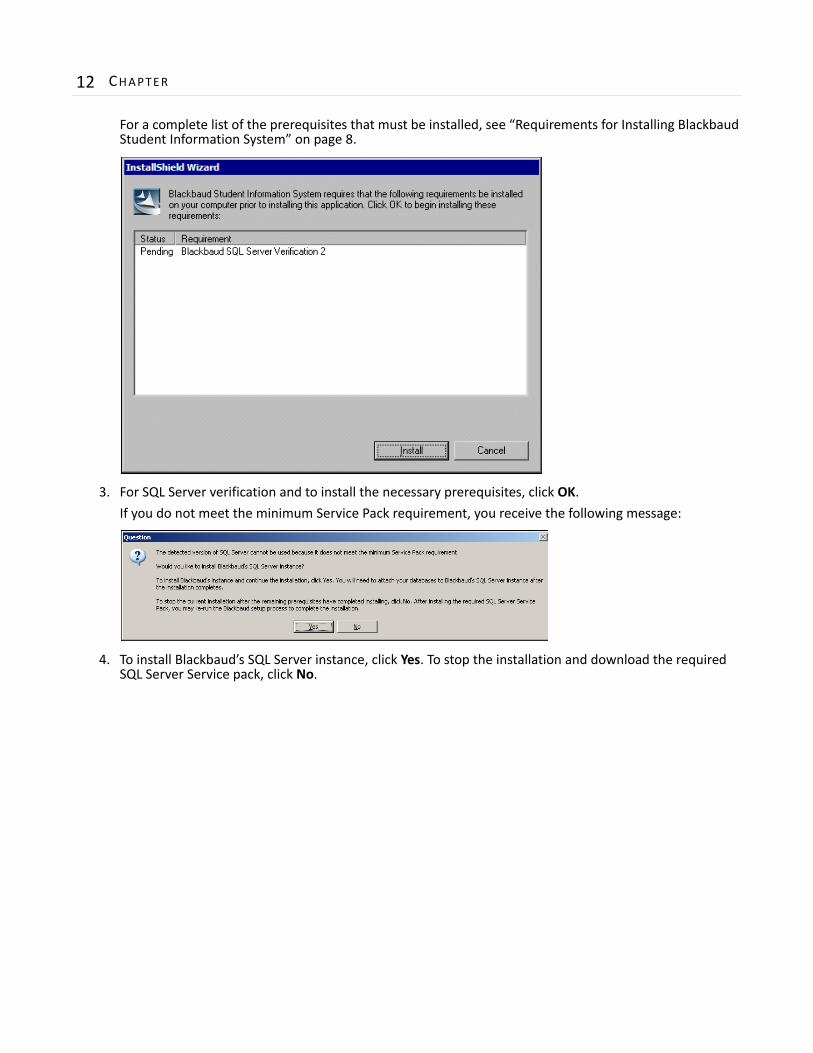
3. For SQL Server verification and to install the necessary prerequisites, click OK.
If you do not meet the minimum Service Pack requirement, you receive the following message:
4. To install Blackbaud’s SQL Server instance, click Yes. To stop the installation and download the required SQL Server Service pack, click No.
INSTALL ING BLACKBAUD STUDENT INFORMAT ION SYSTEM 13
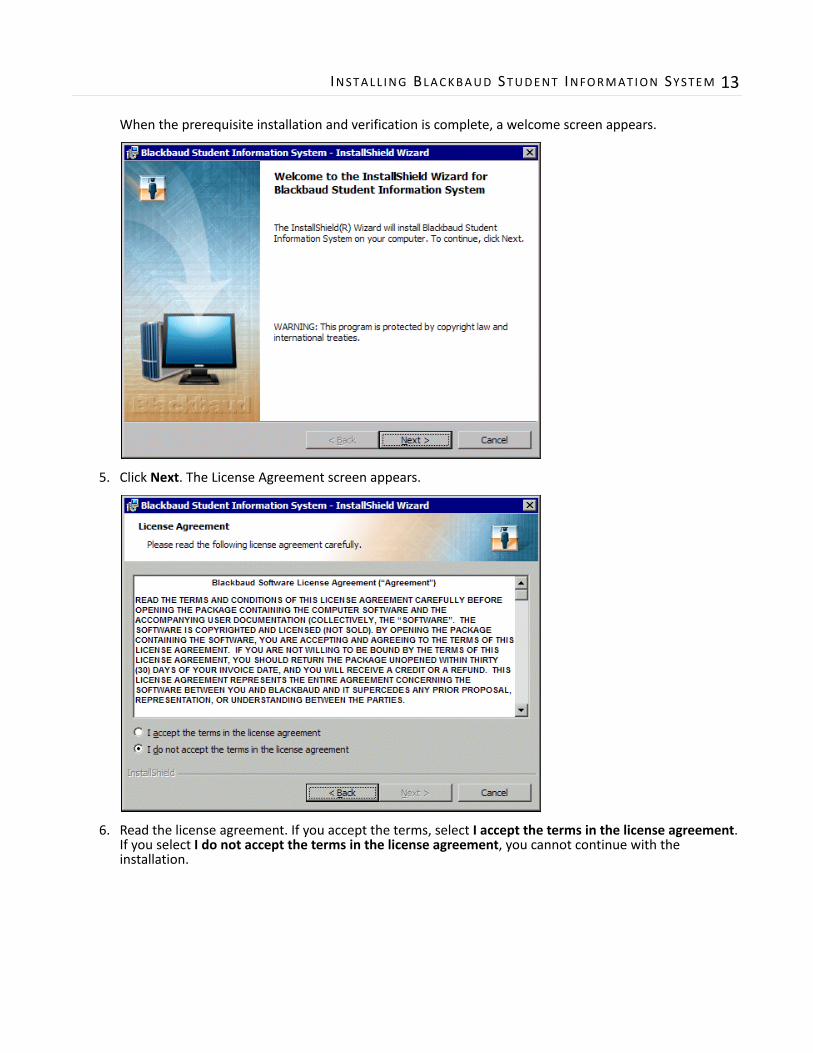
When the prerequisite installation and verification is complete, a welcome screen appears.
5. Click Next. The License Agreement screen appears.
6. Read the license agreement. If you accept the terms, select I accept the terms in the license agreement. If you select I do not accept the terms in the license agreement, you cannot continue with the installation.
14 CHAPTER
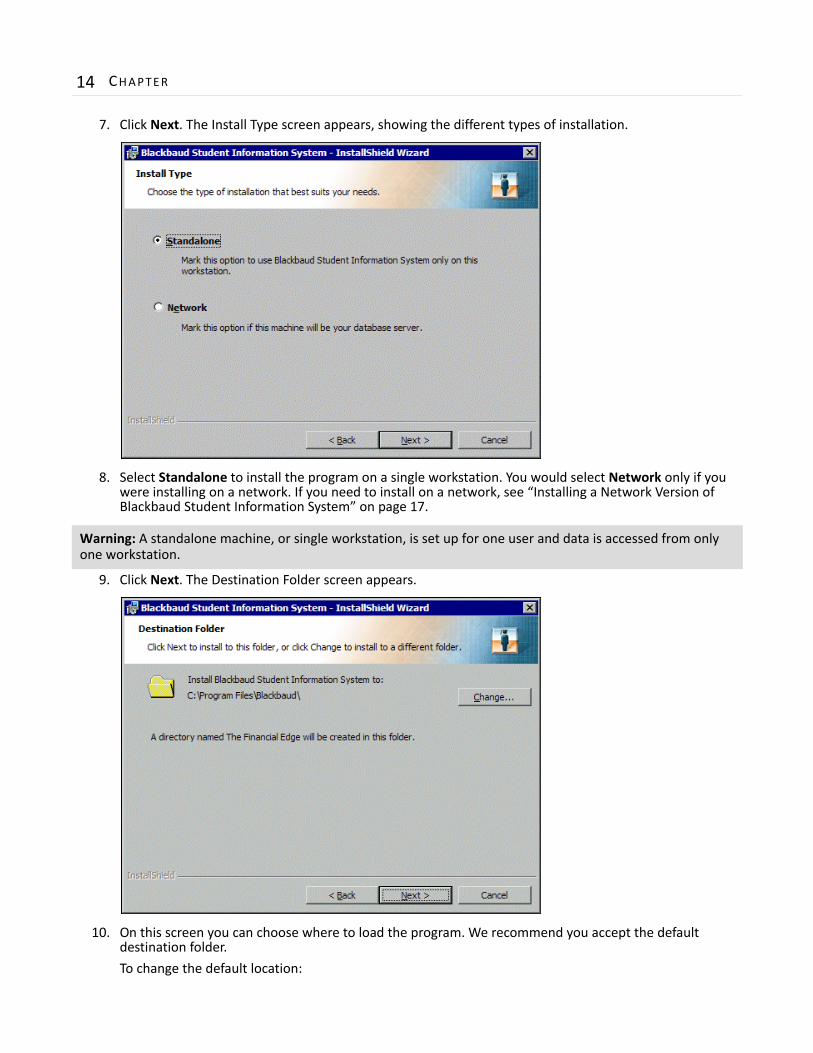
7. Click Next. The Install Type screen appears, showing the different types of installation.
8. Select Standalone to install the program on a single workstation. You would select Network only if you were installing on a network. If you need to install on a network, see “Installing a Network Version of Blackbaud Student Information System” on page 17.
9. Click Next. The Destination Folder screen appears.
10. On this screen you can choose where to load the program. We recommend you accept the default destination folder.
To change the default location:
Warning: A standalone machine, or single workstation, is set up for one user and data is accessed from only one workstation.
INSTALL ING BLACKBAUD STUDENT INFORMAT ION SYSTEM 15
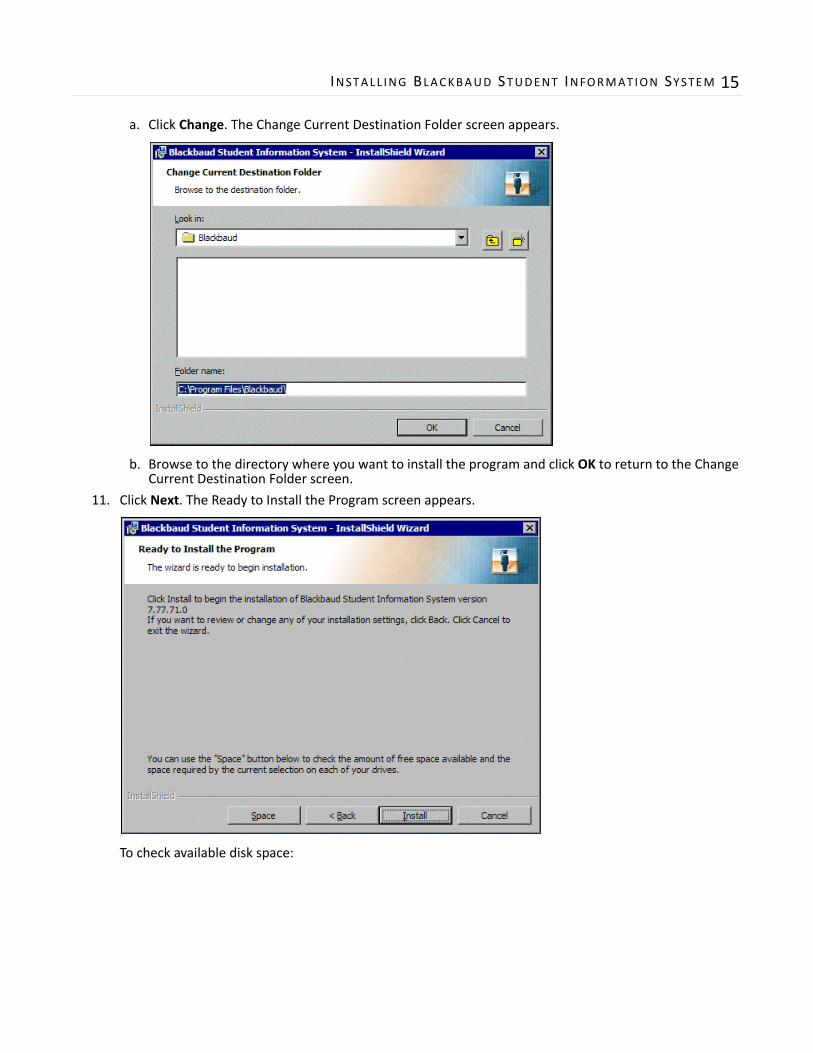
a. Click Change. The Change Current Destination Folder screen appears.
b. Browse to the directory where you want to install the program and click OK to return to the Change Current Destination Folder screen.
11. Click Next. The Ready to Install the Program screen appears.
To check available disk space:
16 CHAPTER
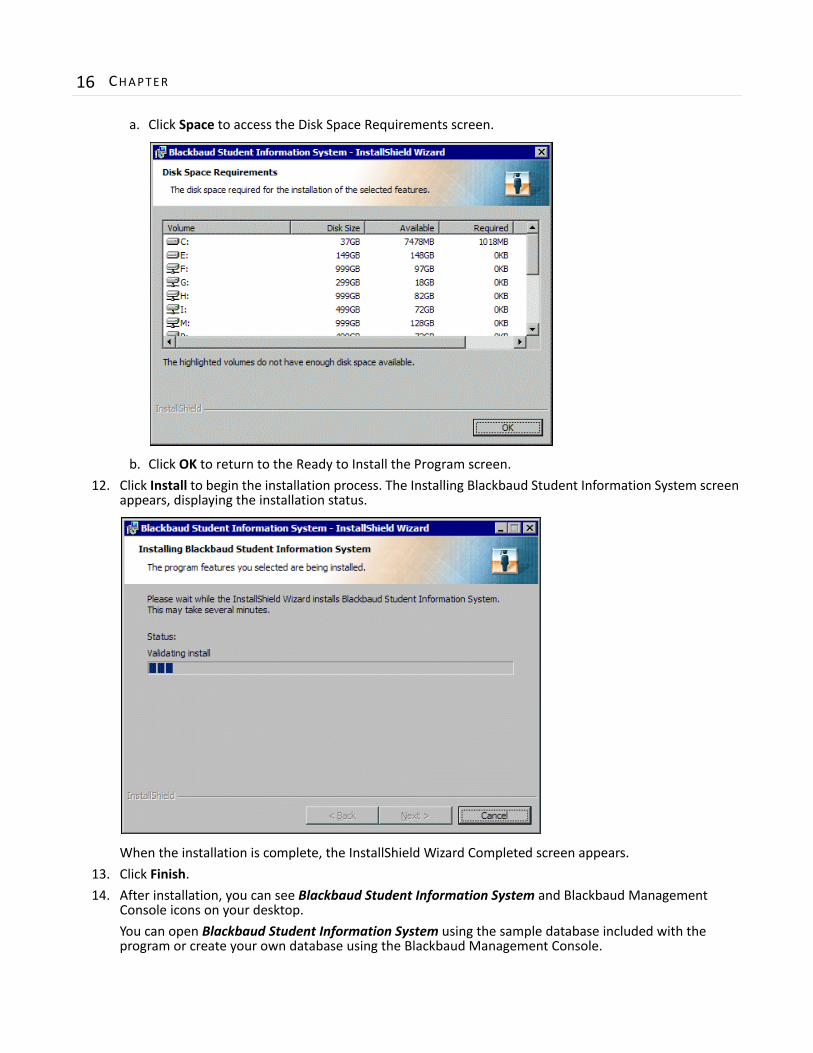
a. Click Space to access the Disk Space Requirements screen.
b. Click OK to return to the Ready to Install the Program screen.
12. Click Install to begin the installation process. The Installing Blackbaud Student Information System screen appears, displaying the installation status.
When the installation is complete, the InstallShield Wizard Completed screen appears.
13. Click Finish.
14. After installation, you can see Blackbaud Student Information System and Blackbaud Management Console icons on your desktop.
You can open Blackbaud Student Information System using the sample database included with the program or create your own database using the Blackbaud Management Console.
INSTALL ING BLACKBAUD STUDENT INFORMAT ION SYSTEM 17
For information about creating a new database, see “Creating a New Blackbaud Student Information System Database” on page 27. For information about logging into a new database, see “Logging into a New Database” on page 31.
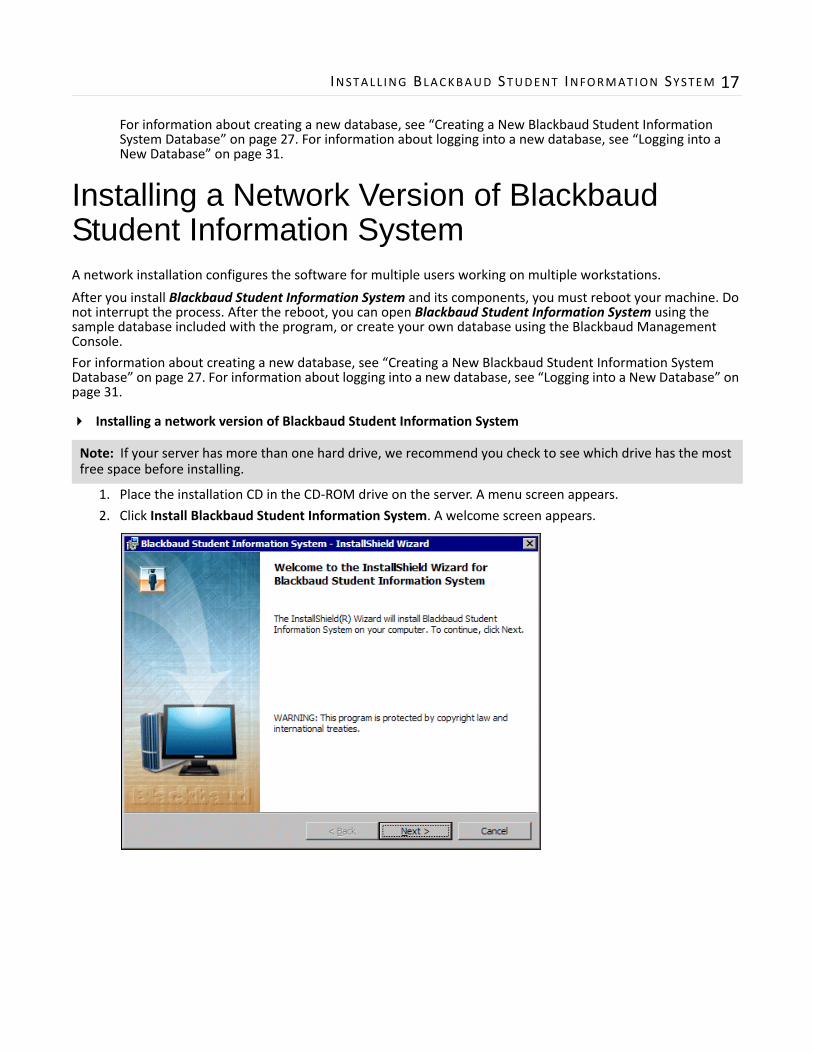
Installing a Network Version of Blackbaud Student Information SystemA network installation configures the software for multiple users working on multiple workstations.
After you install Blackbaud Student Information System and its components, you must reboot your machine. Do not interrupt the process. After the reboot, you can open Blackbaud Student Information System using the sample database included with the program, or create your own database using the Blackbaud Management Console.
For information about creating a new database, see “Creating a New Blackbaud Student Information System Database” on page 27. For information about logging into a new database, see “Logging into a New Database” on page 31.
Installing a network version of Blackbaud Student Information System
1. Place the installation CD in the CD‐ROM drive on the server. A menu screen appears.
2. Click Install Blackbaud Student Information System. A welcome screen appears.
Note: If your server has more than one hard drive, we recommend you check to see which drive has the most free space before installing.
18 CHAPTER
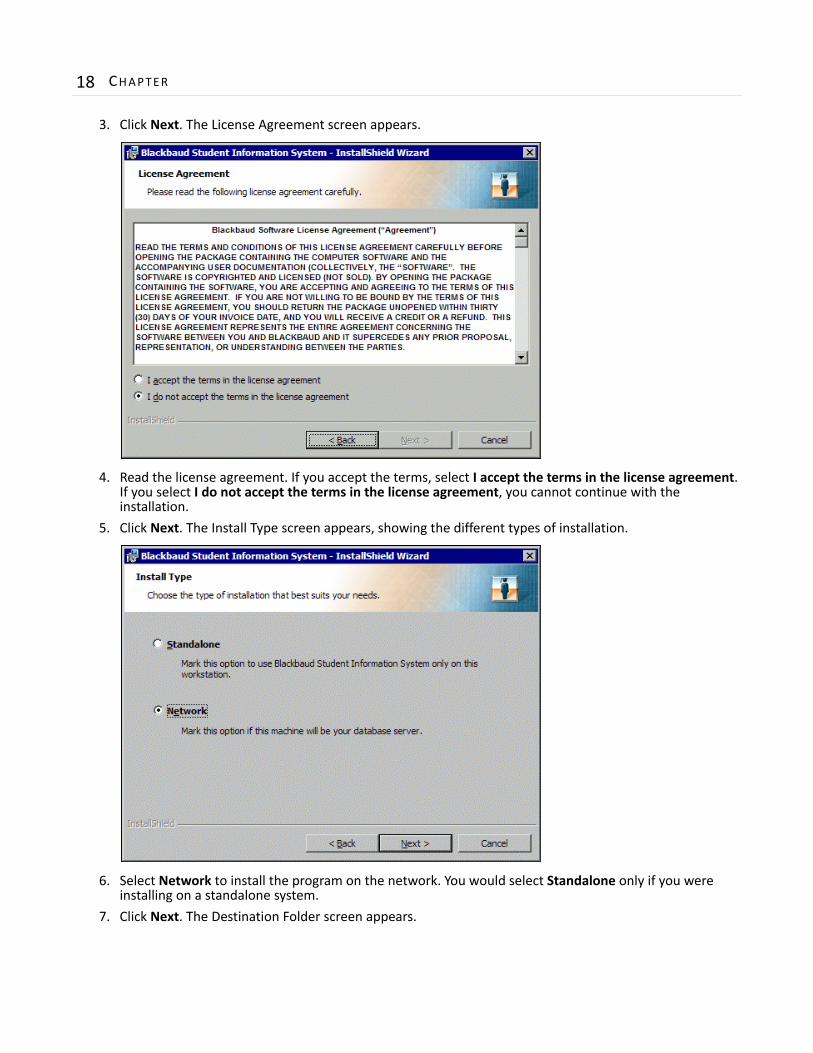
3. Click Next. The License Agreement screen appears.
4. Read the license agreement. If you accept the terms, select I accept the terms in the license agreement. If you select I do not accept the terms in the license agreement, you cannot continue with the installation.
5. Click Next. The Install Type screen appears, showing the different types of installation.
6. Select Network to install the program on the network. You would select Standalone only if you were installing on a standalone system.
7. Click Next. The Destination Folder screen appears.
INSTALL ING BLACKBAUD STUDENT INFORMAT ION SYSTEM 19
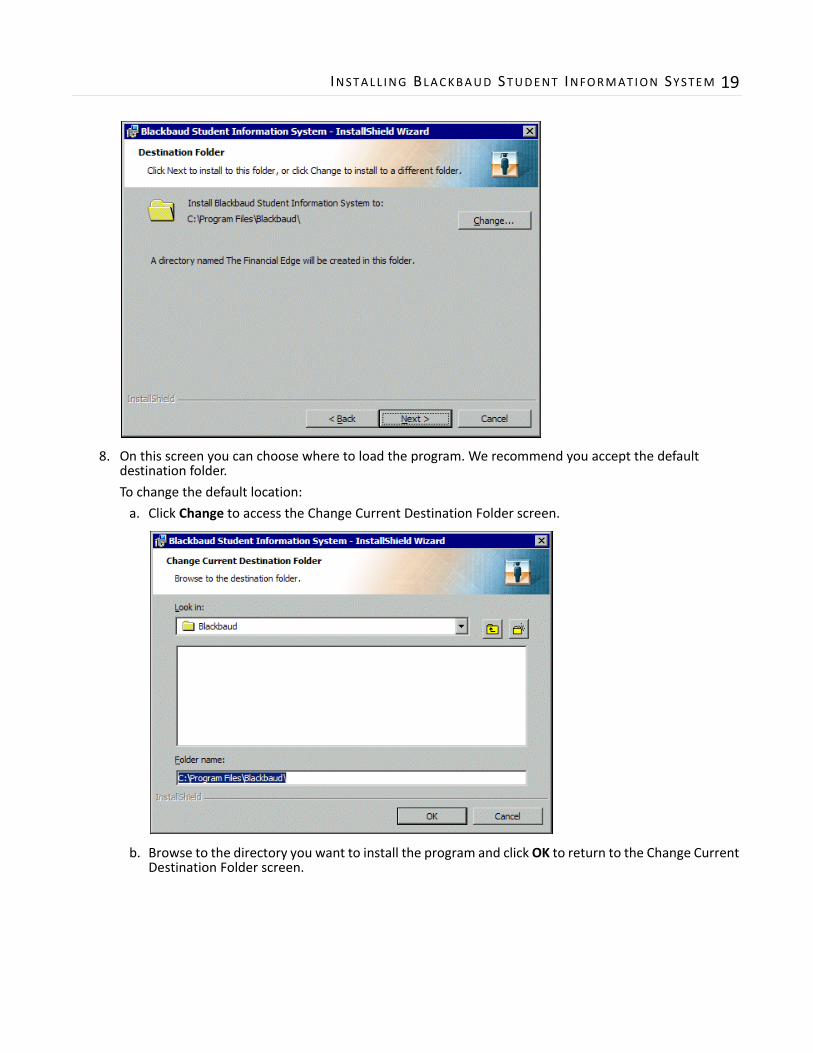
8. On this screen you can choose where to load the program. We recommend you accept the default destination folder.
To change the default location:
a. Click Change to access the Change Current Destination Folder screen.
b. Browse to the directory you want to install the program and click OK to return to the Change Current Destination Folder screen.
20 CHAPTER
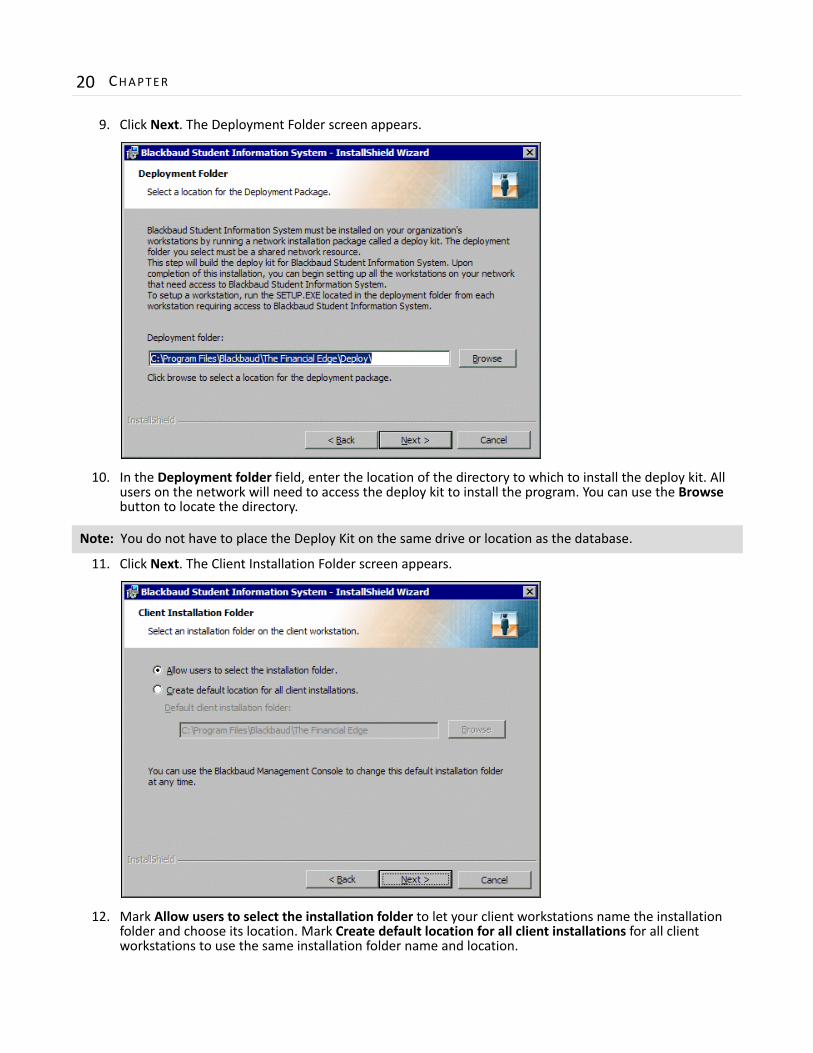
9. Click Next. The Deployment Folder screen appears.
10. In the Deployment folder field, enter the location of the directory to which to install the deploy kit. All users on the network will need to access the deploy kit to install the program. You can use the Browse button to locate the directory.
11. Click Next. The Client Installation Folder screen appears.
12. Mark Allow users to select the installation folder to let your client workstations name the installation folder and choose its location. Mark Create default location for all client installations for all client workstations to use the same installation folder name and location.
Note: You do not have to place the Deploy Kit on the same drive or location as the database.
INSTALL ING BLACKBAUD STUDENT INFORMAT ION SYSTEM 21
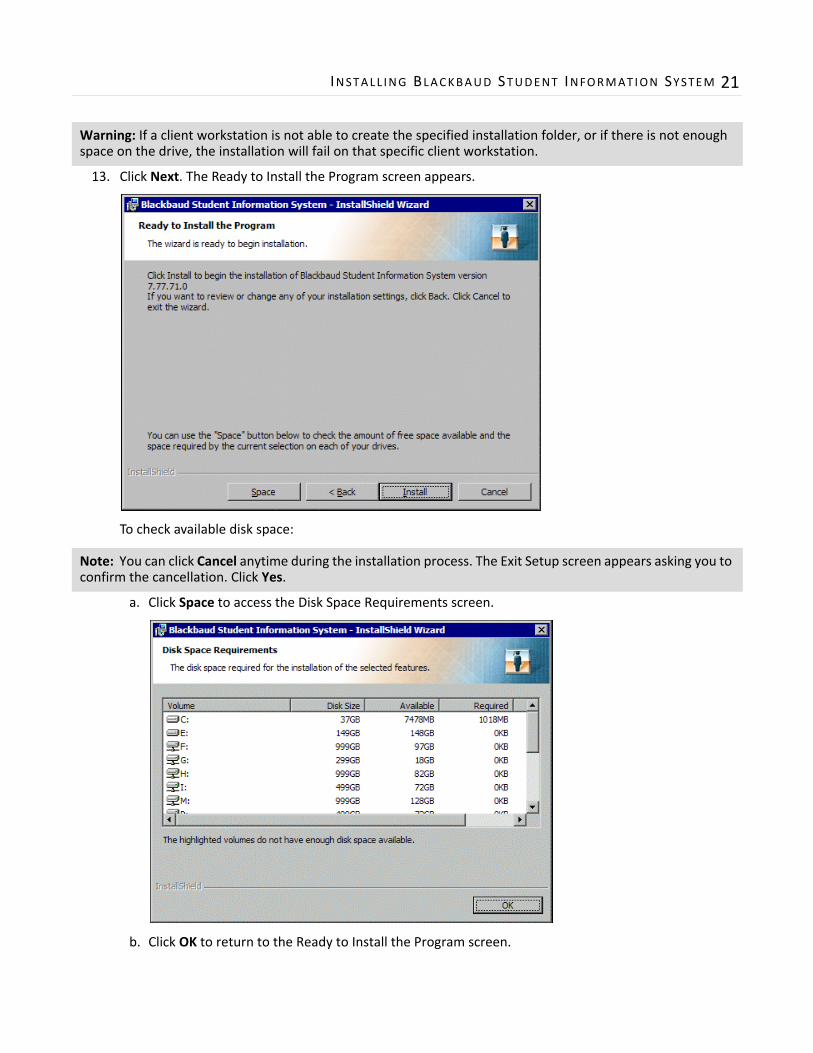
13. Click Next. The Ready to Install the Program screen appears.
To check available disk space:
a. Click Space to access the Disk Space Requirements screen.
b. Click OK to return to the Ready to Install the Program screen.
Warning: If a client workstation is not able to create the specified installation folder, or if there is not enough space on the drive, the installation will fail on that specific client workstation.
Note: You can click Cancel anytime during the installation process. The Exit Setup screen appears asking you to confirm the cancellation. Click Yes.
22 CHAPTER
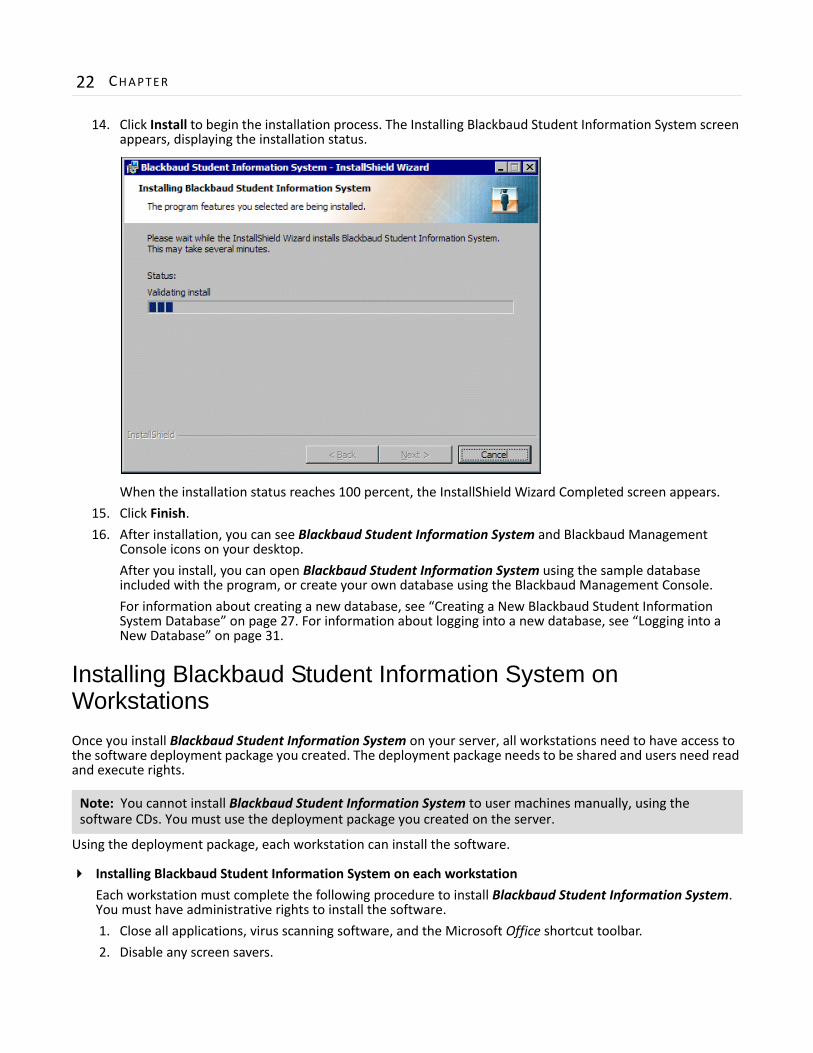
14. Click Install to begin the installation process. The Installing Blackbaud Student Information System screen appears, displaying the installation status.
When the installation status reaches 100 percent, the InstallShield Wizard Completed screen appears.
15. Click Finish.
16. After installation, you can see Blackbaud Student Information System and Blackbaud Management Console icons on your desktop.
After you install, you can open Blackbaud Student Information System using the sample database included with the program, or create your own database using the Blackbaud Management Console.
For information about creating a new database, see “Creating a New Blackbaud Student Information System Database” on page 27. For information about logging into a new database, see “Logging into a New Database” on page 31.
Installing Blackbaud Student Information System on Workstations
Once you install Blackbaud Student Information System on your server, all workstations need to have access to the software deployment package you created. The deployment package needs to be shared and users need read and execute rights.
Using the deployment package, each workstation can install the software.
Installing Blackbaud Student Information System on each workstation
Each workstation must complete the following procedure to install Blackbaud Student Information System. You must have administrative rights to install the software.
1. Close all applications, virus scanning software, and the Microsoft Office shortcut toolbar.
2. Disable any screen savers.
Note: You cannot install Blackbaud Student Information System to user machines manually, using the software CDs. You must use the deployment package you created on the server.
INSTALL ING BLACKBAUD STUDENT INFORMAT ION SYSTEM 23
3. Select Run from your Windows Start menu.
4. Browse to the shared deploy directory and select the “setup.exe”.
5. Click OK. A screen asking for the destination location appears.
6. If you selected a default installation directory when you established the deployment package, the location defaults. If not, the workstation user must enter a location in the Destination Folder frame by clicking the Browse button or accept the program default.
7. Click Next to begin the installation process.
8. Once the installation is complete, click Finish.
Install Instructions for Existing Financial Edge UsersIf you currently have The Financial Edge installed you will receive an update CD to update the program to the latest build and change the name to Blackbaud Student Information System. Once you have updated the program you can use the unlock codes to turn on Admissions Office and Registrar’s Office.
For more information about updating, see “Update Instructions for Blackbaud Student Information System” on page 23.
For more information about using unlock codes, see “Unlocking Optional Modules” on page 35.
Update Instructions for Blackbaud Student Information SystemThese update instructions are for clients who are updating to a new version of Blackbaud Student Information System. Before installing this update, read the information in “Important Notes Before Updating” on page 23, which includes vital tasks and recommendations to prepare for successfully updating. Once you have read the “Important Notes Before Updating” section and prepared accordingly, use the update procedures provided in this document to update Blackbaud Student Information System on a standalone computer or a network server.
Important Notes Before Updating
• You should have a complete backup of your current Blackbaud Student Information System database before running the update. See “Back Up Your Database” on page 24 for instructions. For additional information about creating and restoring backups, see the Database Administration Guide.
• Before updating, make sure all users are logged out of Blackbaud Student Information System.
• Ensure your equipment meets all system and free space requirements for the update. To download the most current system requirements, select System Requirements from the Products menu on our website at www.blackbaud.com.
• Exit all Windows applications on the server and the workstations where Blackbaud Student Information System will be updated.
• Close any virus scanning programs or services on the server and on the workstations. These programs can sometimes mistakenly interpret the setup/update process of a new program as a contamination of existing files on the disk. If present, we recommend you close the Microsoft Office toolbar because it may interfere with the installation of some files.

24 CHAPTER
• A new set of sample data is installed automatically during the update. For network installations, the sample data is installed only on the server and is shared by client machines. To save your current sample data, make a backup copy before updating Blackbaud Student Information System. We recommend you use the new sample data as a training tool because it contains examples of the new features available in the updated version of Blackbaud Student Information System.
• To update a workstation from the deploy folder, you must have Local Administrator rights to update Blackbaud Student Information System. For information about NTFS rights, see “Required NTFS Rights” on page 10.
• If you are using Faculty Access for the Web, before updating, you must manually stop IIS. When you complete the update, restart the website in IIS.
Back Up Your Database
We recommend making a backup of your current database before installing the update. You can run a full or compressed backup of your database while users continue working in the program. The full backup saves a complete copy of your database in a directory you specify. The compressed backup option copies your data files, then compresses the copies into a single WinZip file and deletes the copies.
Back up your Blackbaud Student Information System database
This section provides a procedure for backing up your database using the Blackbaud Management Console. For more information about backing up and restoring databases, see the Database Administration Guide.
1. Double‐click the Blackbaud Management Console icon on your desktop. The Blackbaud Management Console opens.
INSTALL ING BLACKBAUD STUDENT INFORMAT ION SYSTEM 25
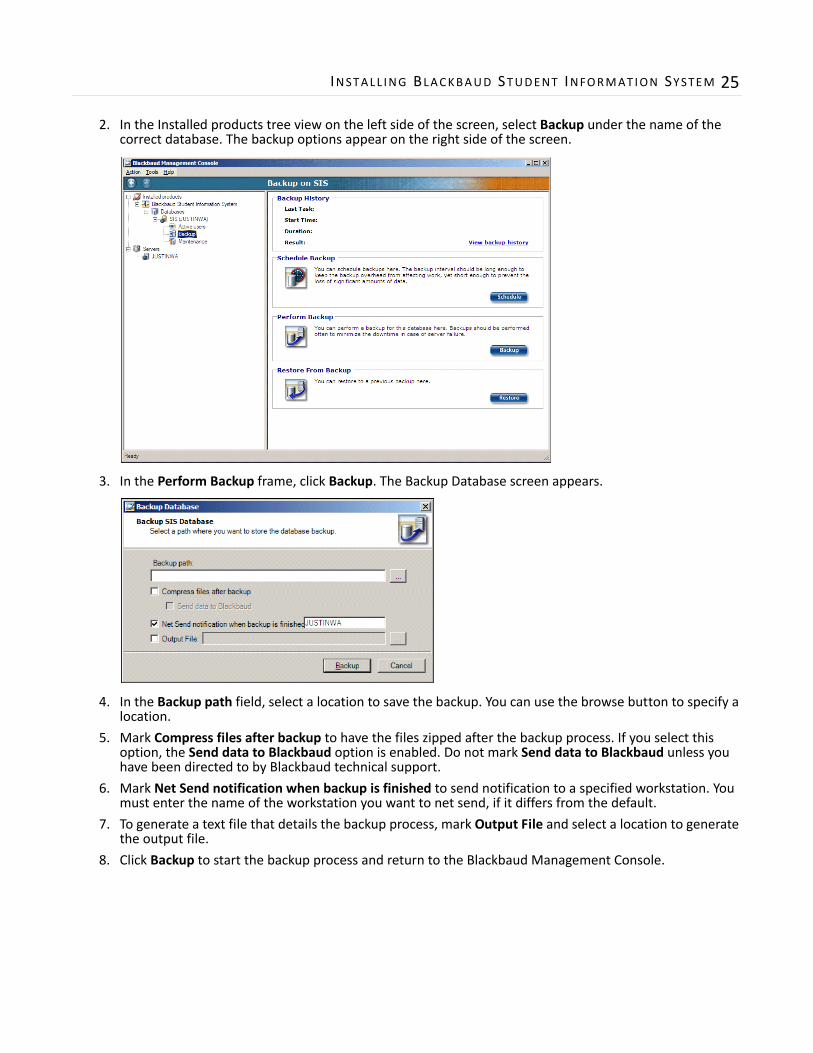
2. In the Installed products tree view on the left side of the screen, select Backup under the name of the correct database. The backup options appear on the right side of the screen.
3. In the Perform Backup frame, click Backup. The Backup Database screen appears.
4. In the Backup path field, select a location to save the backup. You can use the browse button to specify a location.
5. Mark Compress files after backup to have the files zipped after the backup process. If you select this option, the Send data to Blackbaud option is enabled. Do not mark Send data to Blackbaud unless you have been directed to by Blackbaud technical support.
6. Mark Net Send notification when backup is finished to send notification to a specified workstation. You must enter the name of the workstation you want to net send, if it differs from the default.
7. To generate a text file that details the backup process, mark Output File and select a location to generate the output file.
8. Click Backup to start the backup process and return to the Blackbaud Management Console.
26 CHAPTER
Update Procedures
Use the following procedures to update Blackbaud Student Information System. This section includes procedures for updating both a standalone version and a network version. Before beginning, make sure you have read “Important Notes Before Updating” on page 23 and performed the recommended tasks to prepare for the update.
Updating a standalone version
1. Insert the update CD into your CD‐ROM drive. The AutoPlay Menu screen appears.
2. Click Install Blackbaud Student Information System. The InstallShield Wizard screen for upgrading Blackbaud Student Information System appears.
3. Click Next. The Installing Blackbaud Student Information System screen appears displaying the status of the update.
4. Once the installation is complete, the InstallShield Wizard Completed screen appears.
5. Click Finish. A screen appears prompting you to restart your computer, which is required to complete the installation.
6. Click Yes to restart now or No to restart on your own. After restarting, the Blackbaud Student Information System Setup screen may appear briefly while final configuration takes place. At this point, Blackbaud Student Information System is updated.
Updating a network version
Follow these instructions to update a server, deployment package, and workstations. For more detailed information about updating user workstations and the deployment package, see the Database Administration Guide.
1. Insert the update CD into your CD‐ROM drive. The AutoPlay Menu screen appears.
2. Click Install Blackbaud Student Information System. The InstallShield Wizard screen for upgrading Blackbaud Student Information System appears.
3. Click Next. The Installing Blackbaud Student Information System screen appears displaying the status of the update.
4. Once the installation is complete, the InstallShield Wizard Completed screen appears.
5. Click Finish. A screen appears prompting you to restart your computer, which is required to complete the installation.
6. Click Yes to restart now or No to restart on your own. After restarting, the Blackbaud Student Information System Setup screen may appear briefly while final configuration takes place. At this point, Blackbaud Student Information System is updated.
Note: After clicking Install Software, you may see additional processing screens and/or a prompt to restart your computer. If prompted, restart your computer and continue with the procedure.
Note: If there are files in use that the installation process needs to update, a screen appears notifying you. Close the requested files and click Retry to continue.
Note: After clicking Install Software, you may see additional processing screens and a prompt to restart your computer. If prompted, restart your computer and continue with the procedure.
Note: If there are files in use that the installation process needs to update, a screen appears notifying you. Close the requested files and click Retry to continue.
INSTALL ING BLACKBAUD STUDENT INFORMAT ION SYSTEM 27
7. Once the update installation process is complete, users can update their workstations. Because the deployment package is updated automatically, users with rights to add software are notified that an update is available the next time they open Blackbaud Student Information System. To update workstations, users must click OK when prompted.
Creating a New Blackbaud Student Information System DatabaseIf you are a new Blackbaud Student Information System user, or if you purchase additional databases, you must create a new database using the Blackbaud Management Console. The first time you open the Blackbaud Management Console, you will be prompted to create a new database.
The Create New Database Wizard guides you through the process step by step.
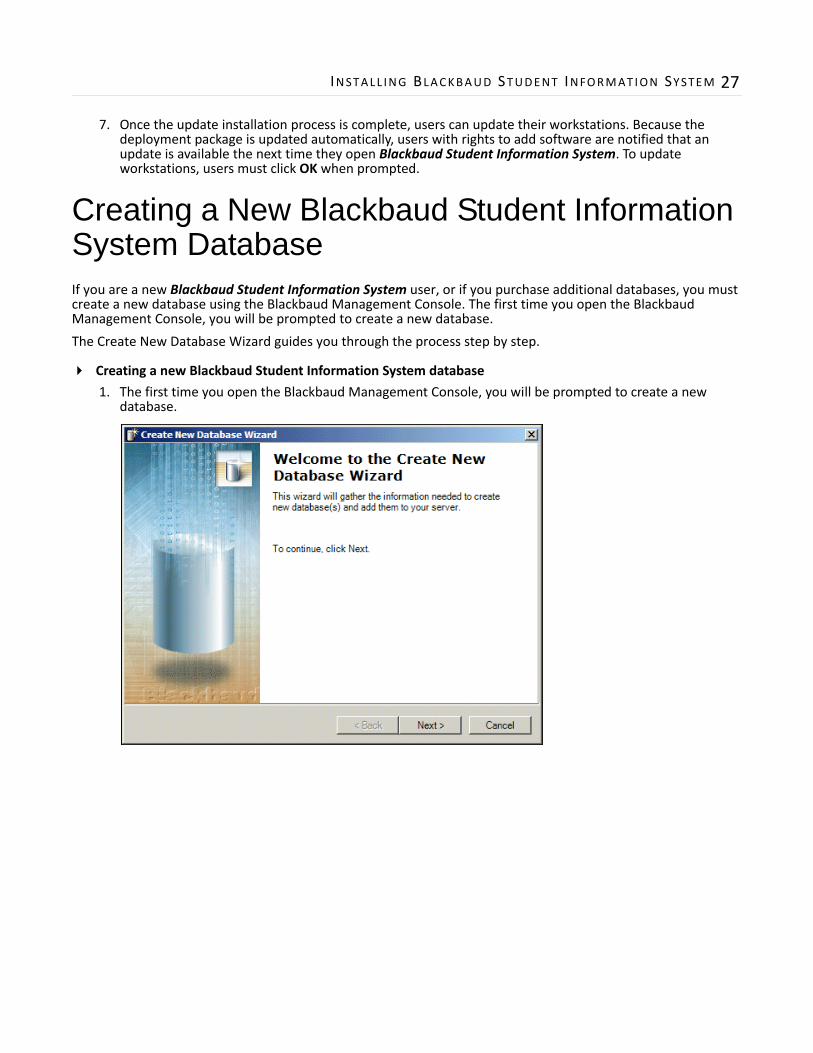
Creating a new Blackbaud Student Information System database
1. The first time you open the Blackbaud Management Console, you will be prompted to create a new database.
28 CHAPTER
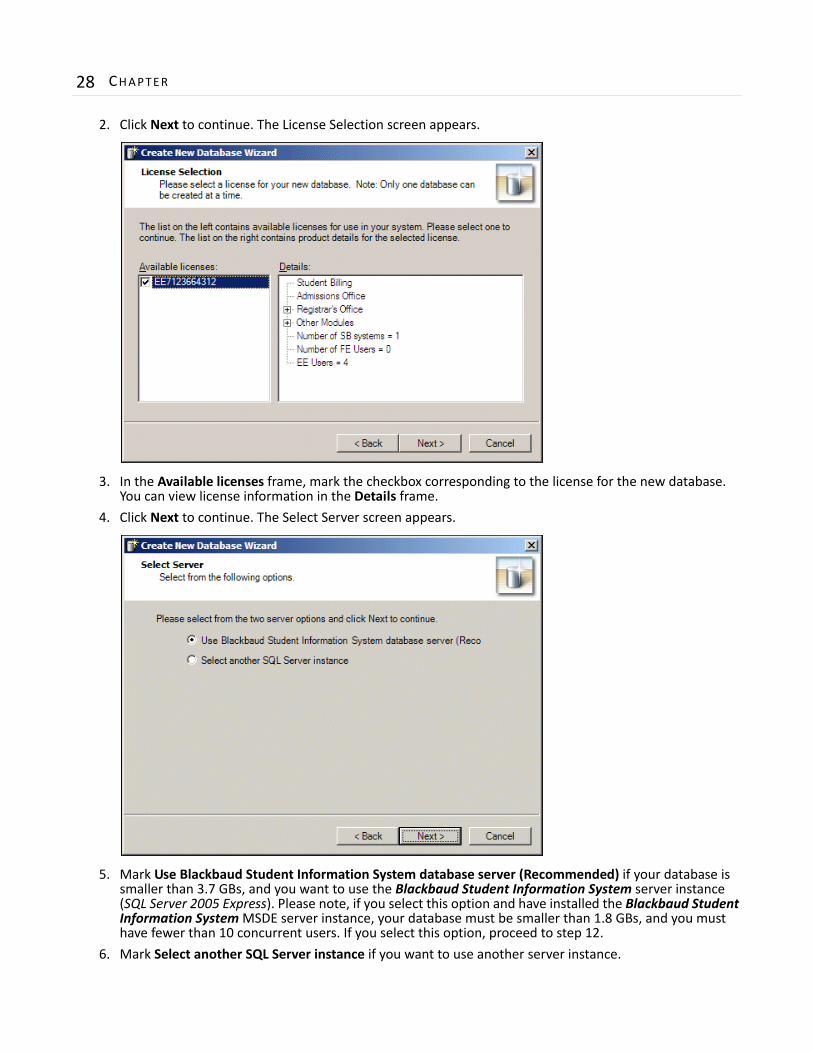
2. Click Next to continue. The License Selection screen appears.
3. In the Available licenses frame, mark the checkbox corresponding to the license for the new database. You can view license information in the Details frame.
4. Click Next to continue. The Select Server screen appears.
5. Mark Use Blackbaud Student Information System database server (Recommended) if your database is smaller than 3.7 GBs, and you want to use the Blackbaud Student Information System server instance (SQL Server 2005 Express). Please note, if you select this option and have installed the Blackbaud Student Information System MSDE server instance, your database must be smaller than 1.8 GBs, and you must have fewer than 10 concurrent users. If you select this option, proceed to step 12.
6. Mark Select another SQL Server instance if you want to use another server instance.
INSTALL ING BLACKBAUD STUDENT INFORMAT ION SYSTEM 29
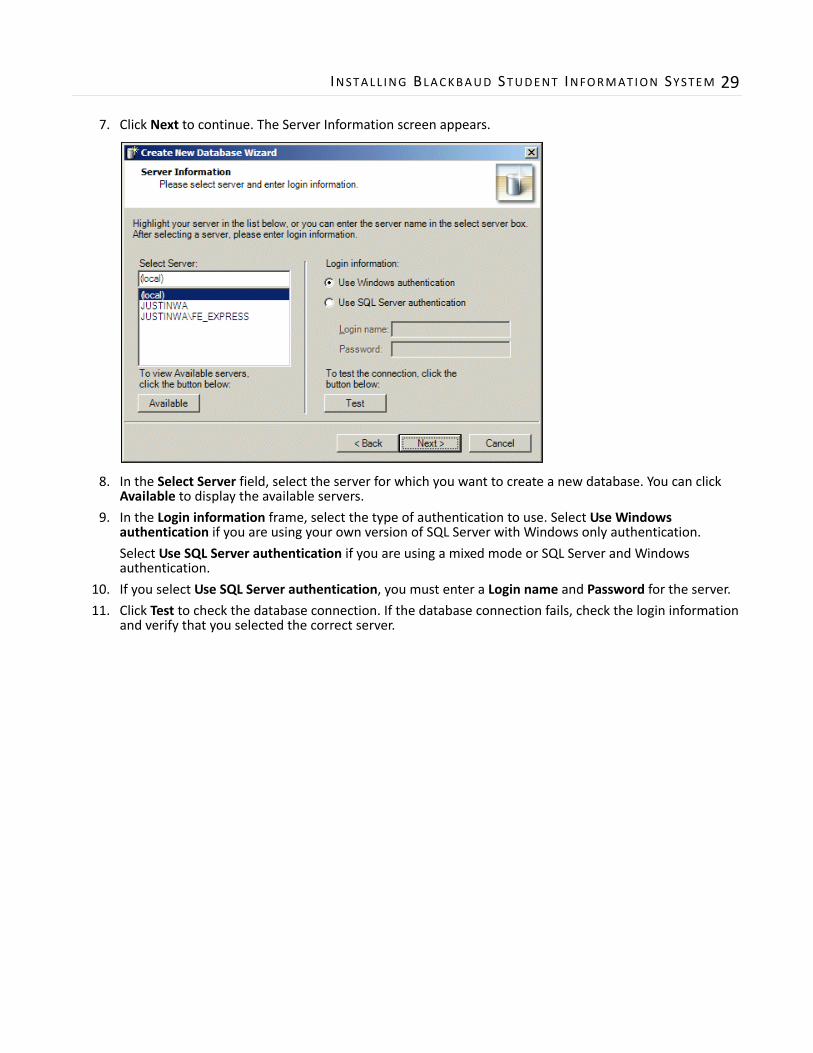
7. Click Next to continue. The Server Information screen appears.
8. In the Select Server field, select the server for which you want to create a new database. You can click Available to display the available servers.
9. In the Login information frame, select the type of authentication to use. Select Use Windows authentication if you are using your own version of SQL Server with Windows only authentication.
Select Use SQL Server authentication if you are using a mixed mode or SQL Server and Windows authentication.
10. If you select Use SQL Server authentication, you must enter a Login name and Password for the server.
11. Click Test to check the database connection. If the database connection fails, check the login information and verify that you selected the correct server.
30 CHAPTER
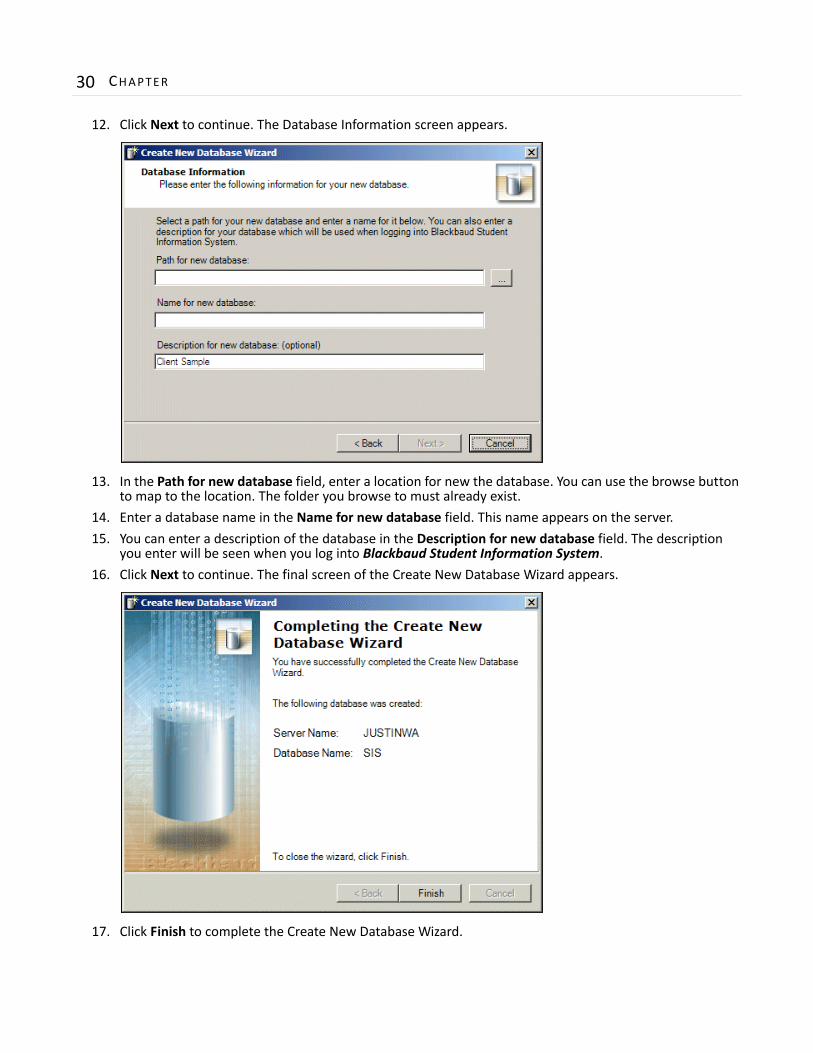
12. Click Next to continue. The Database Information screen appears.
13. In the Path for new database field, enter a location for new the database. You can use the browse button to map to the location. The folder you browse to must already exist.
14. Enter a database name in the Name for new database field. This name appears on the server.
15. You can enter a description of the database in the Description for new database field. The description you enter will be seen when you log into Blackbaud Student Information System.
16. Click Next to continue. The final screen of the Create New Database Wizard appears.
17. Click Finish to complete the Create New Database Wizard.
INSTALL ING BLACKBAUD STUDENT INFORMAT ION SYSTEM 31
Logging into a New DatabaseIf you are a new Blackbaud Student Information System user, you must create a new database using the Blackbaud Management Console. The first time you log into the database, you will be prompted to enter your school’s name.
If you purchased Blackbaud’s General Ledger, you will be prompted to configure general ledger options for you school. For more information about configuring general ledger options, see “Logging into a New Blackbaud Student Information System Database That Has General Ledger” on page 33.
Logging into a New Blackbaud Student Information System Database
If you are a new Blackbaud Student Information System user, you must create a new database using the Blackbaud Management Console. The first time you log into the database, you will be prompted to enter your school’s name.
If you have multiple databases, we recommend you use different names for your additional databases.
Logging into a new Blackbaud Student Information System database
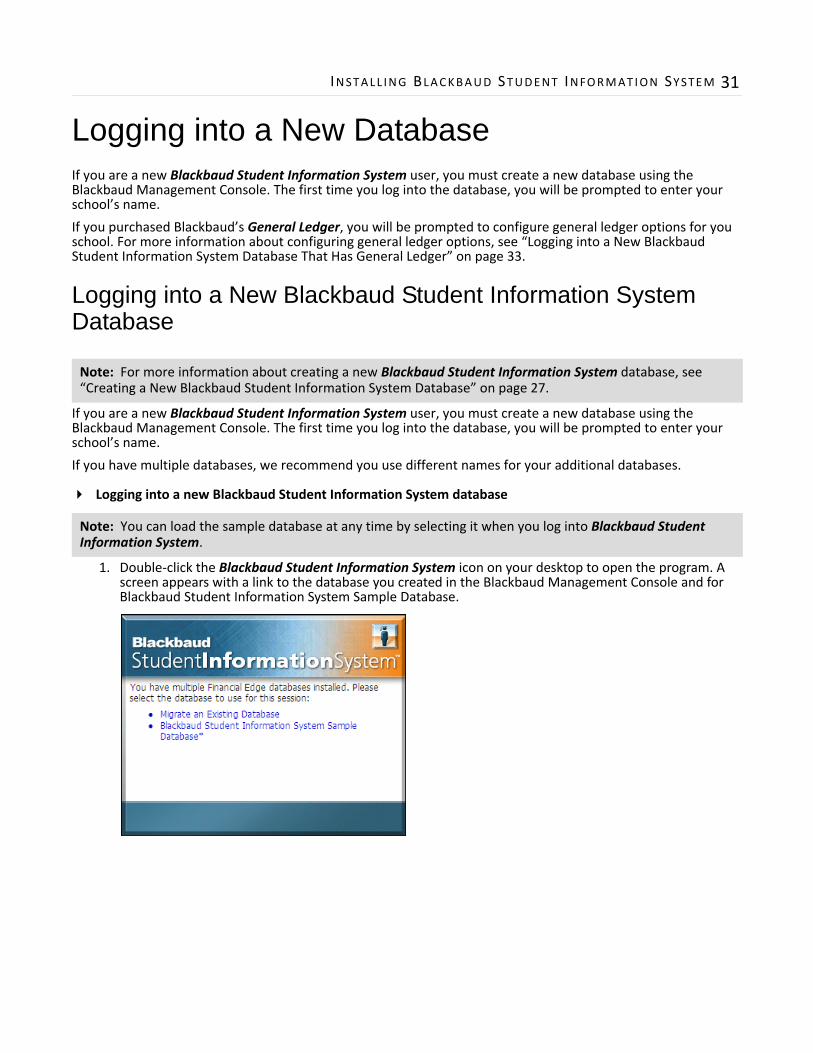
1. Double‐click the Blackbaud Student Information System icon on your desktop to open the program. A screen appears with a link to the database you created in the Blackbaud Management Console and for Blackbaud Student Information System Sample Database.
Note: For more information about creating a new Blackbaud Student Information System database, see “Creating a New Blackbaud Student Information System Database” on page 27.
Note: You can load the sample database at any time by selecting it when you log into Blackbaud Student Information System.
32 CHAPTER
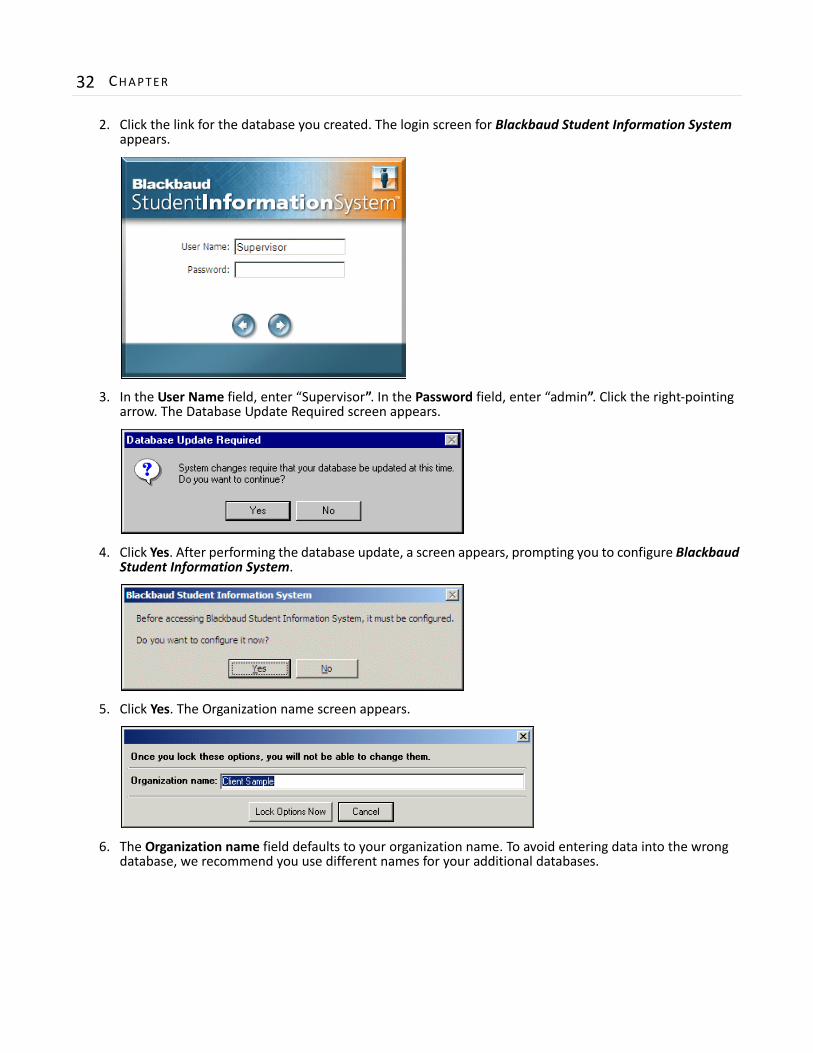
2. Click the link for the database you created. The login screen for Blackbaud Student Information System appears.
3. In the User Name field, enter “Supervisor”. In the Password field, enter “admin”. Click the right‐pointing arrow. The Database Update Required screen appears.
4. Click Yes. After performing the database update, a screen appears, prompting you to configure Blackbaud Student Information System.
5. Click Yes. The Organization name screen appears.
6. The Organization name field defaults to your organization name. To avoid entering data into the wrong database, we recommend you use different names for your additional databases.
INSTALL ING BLACKBAUD STUDENT INFORMAT ION SYSTEM 33
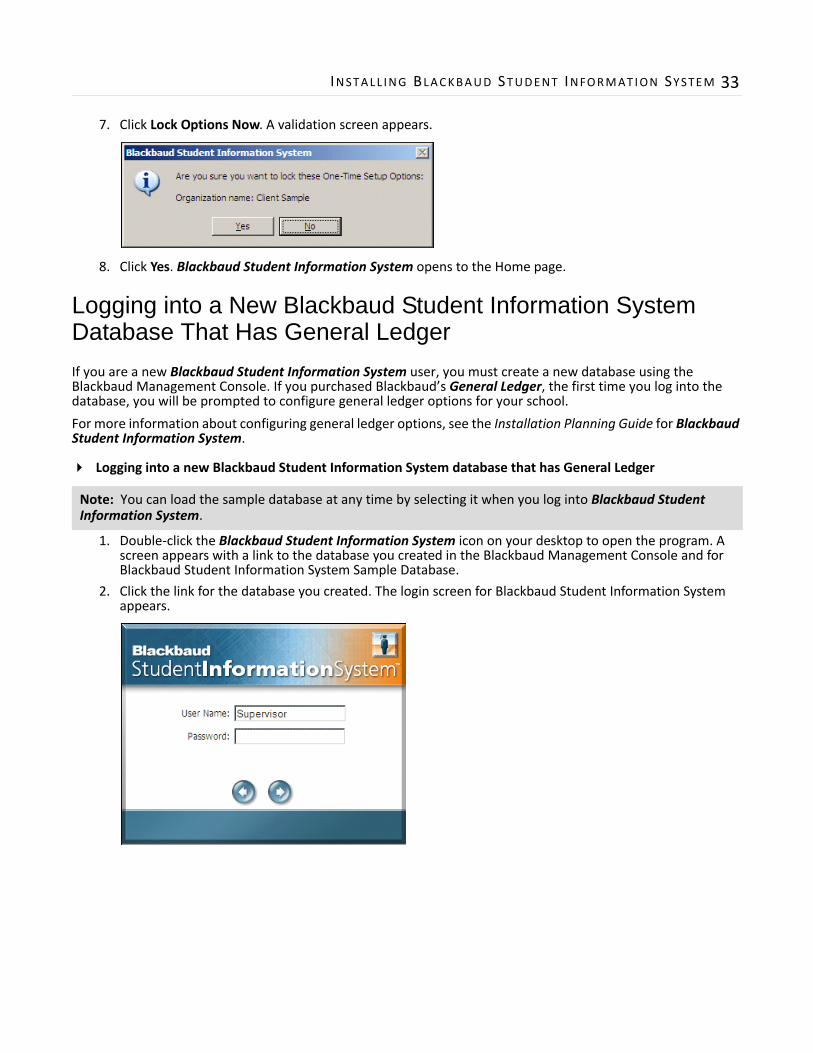
7. Click Lock Options Now. A validation screen appears.
8. Click Yes. Blackbaud Student Information System opens to the Home page.
Logging into a New Blackbaud Student Information System Database That Has General Ledger
If you are a new Blackbaud Student Information System user, you must create a new database using the Blackbaud Management Console. If you purchased Blackbaud’s General Ledger, the first time you log into the database, you will be prompted to configure general ledger options for your school.
For more information about configuring general ledger options, see the Installation Planning Guide for Blackbaud Student Information System.
Logging into a new Blackbaud Student Information System database that has General Ledger
1. Double‐click the Blackbaud Student Information System icon on your desktop to open the program. A screen appears with a link to the database you created in the Blackbaud Management Console and for Blackbaud Student Information System Sample Database.
2. Click the link for the database you created. The login screen for Blackbaud Student Information System appears.
Note: You can load the sample database at any time by selecting it when you log into Blackbaud Student Information System.
34 CHAPTER
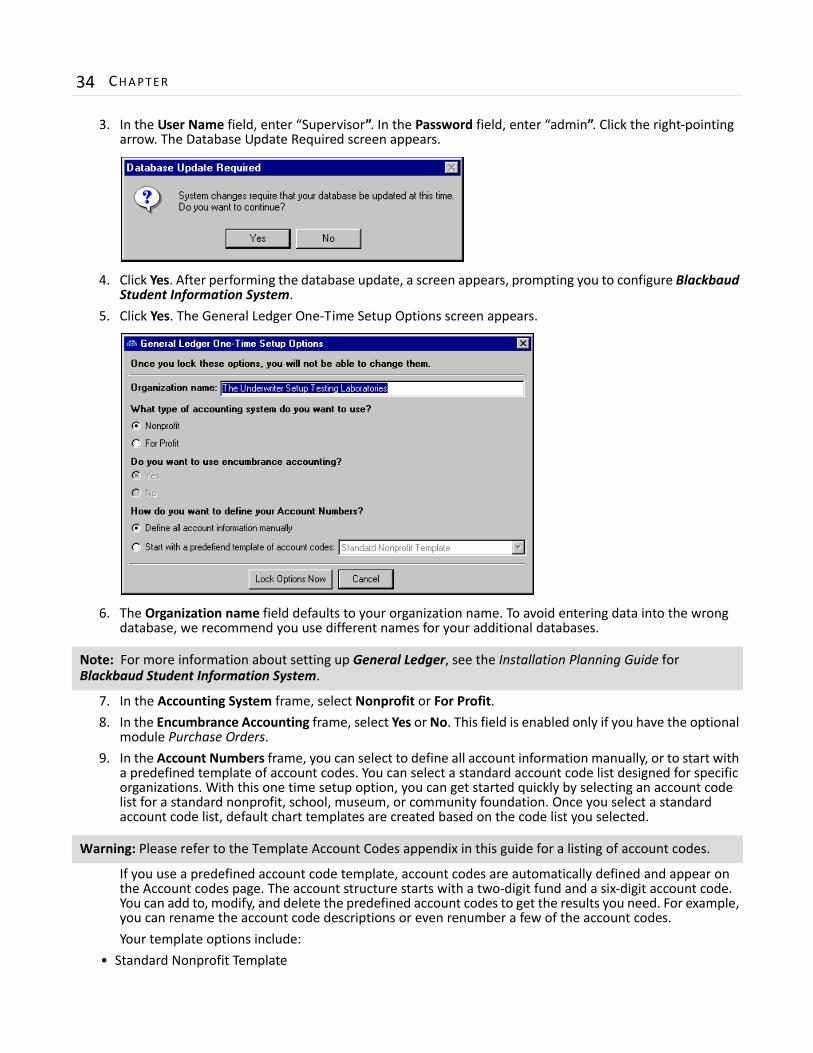
3. In the User Name field, enter “Supervisor”. In the Password field, enter “admin”. Click the right‐pointing arrow. The Database Update Required screen appears.
4. Click Yes. After performing the database update, a screen appears, prompting you to configure Blackbaud Student Information System.
5. Click Yes. The General Ledger One‐Time Setup Options screen appears.
6. The Organization name field defaults to your organization name. To avoid entering data into the wrong database, we recommend you use different names for your additional databases.
7. In the Accounting System frame, select Nonprofit or For Profit.
8. In the Encumbrance Accounting frame, select Yes or No. This field is enabled only if you have the optional module Purchase Orders.
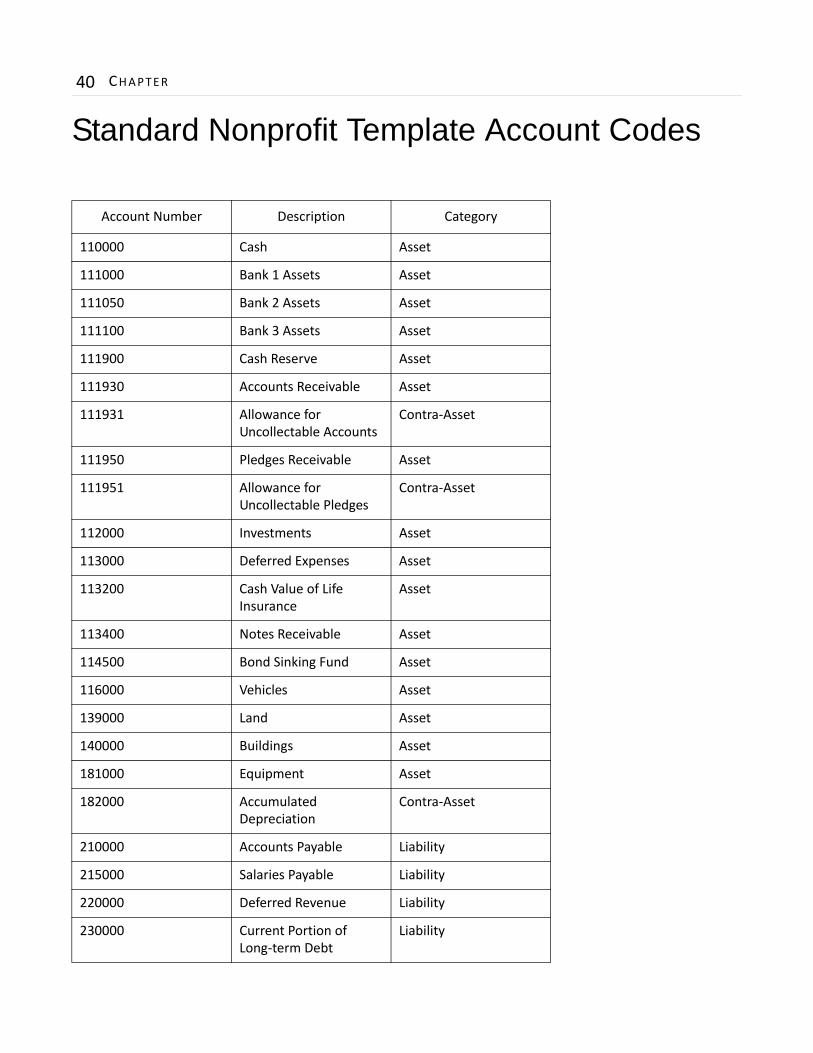
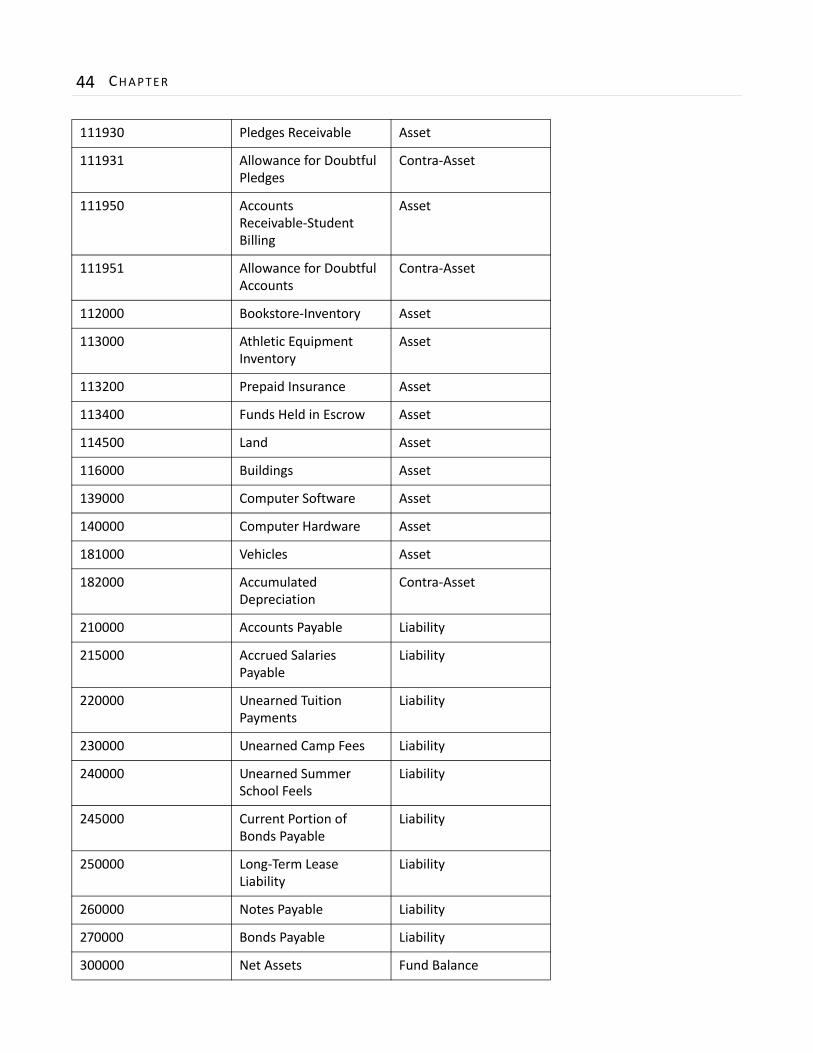
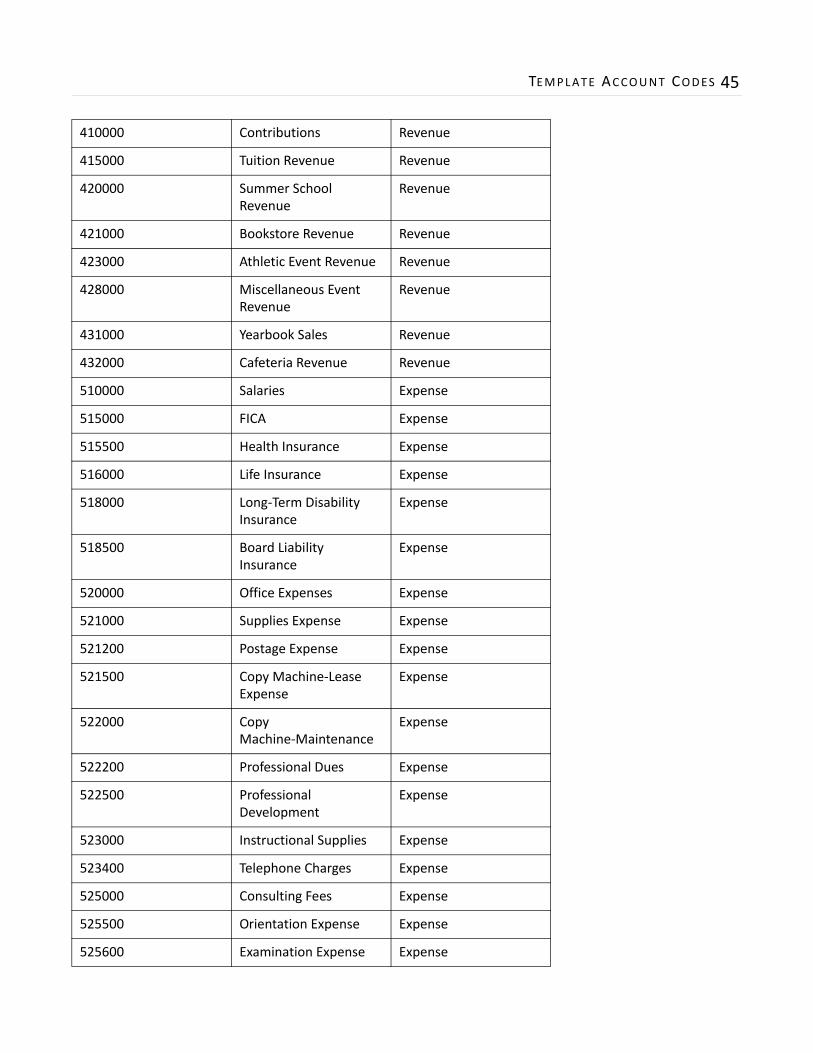
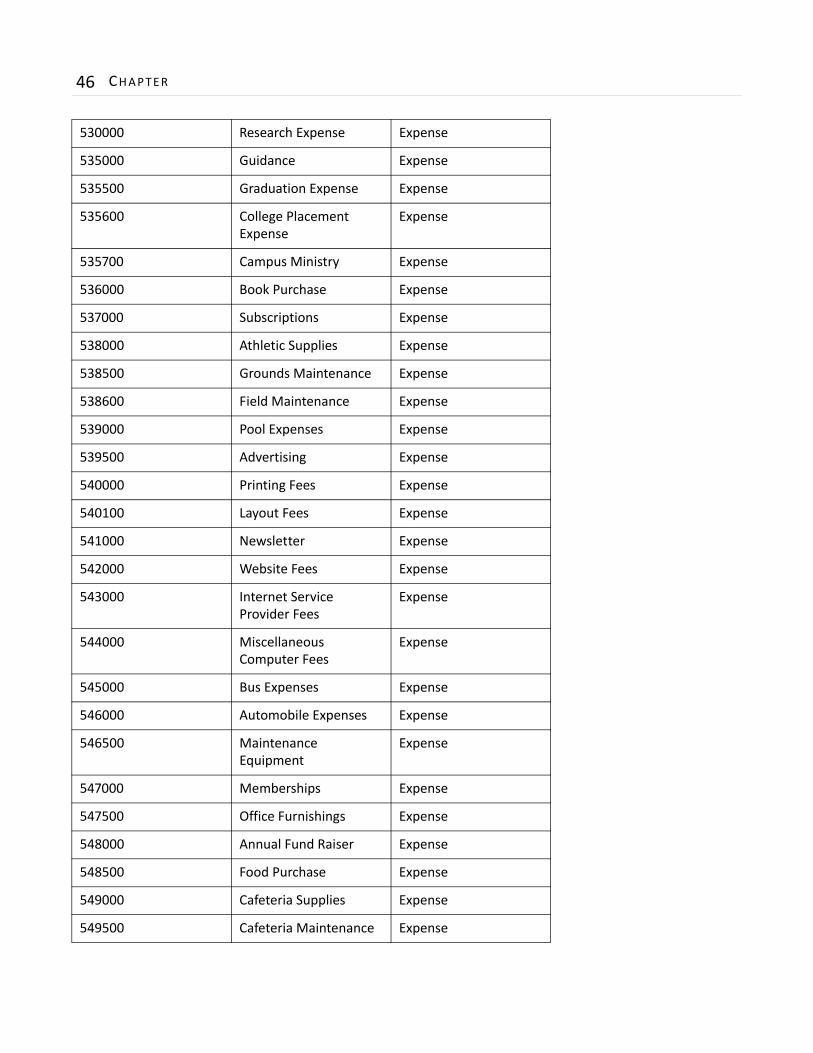
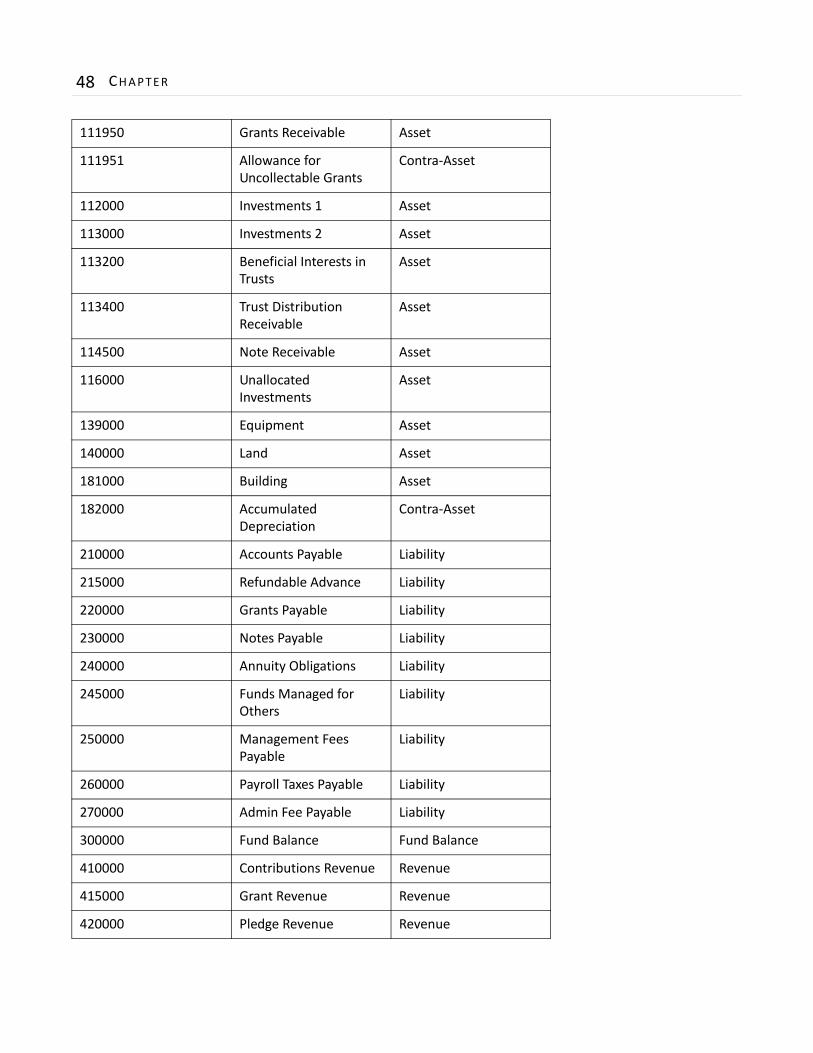
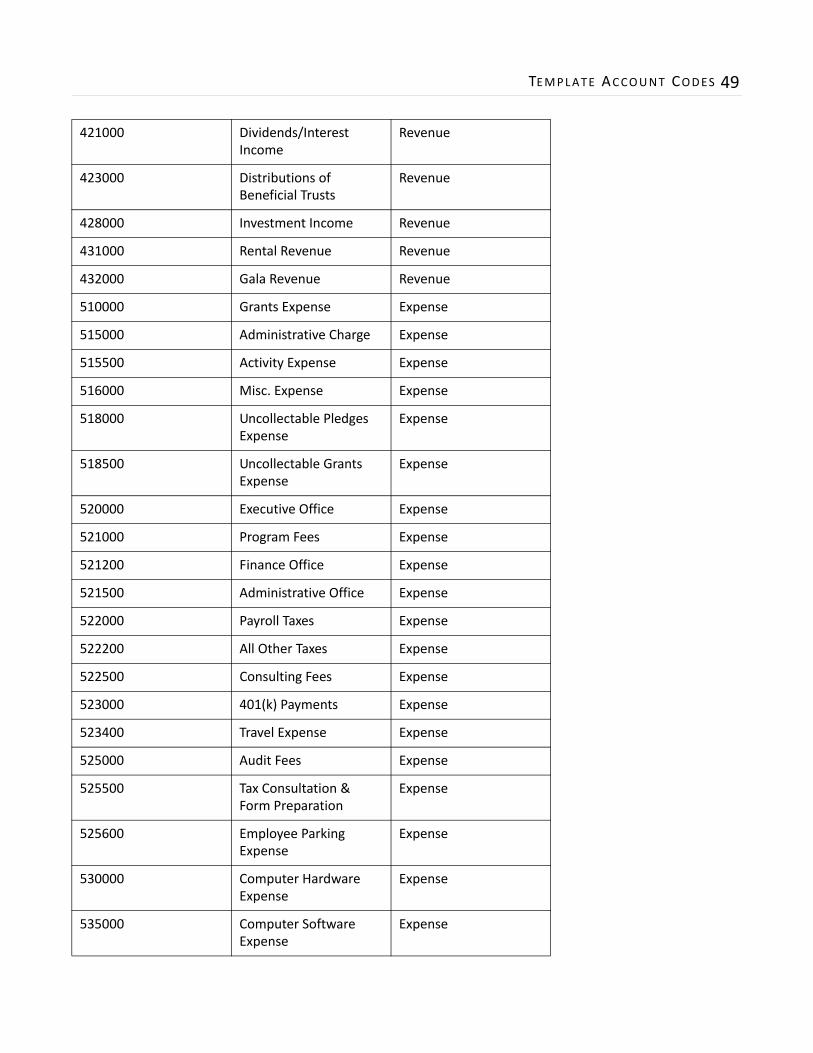
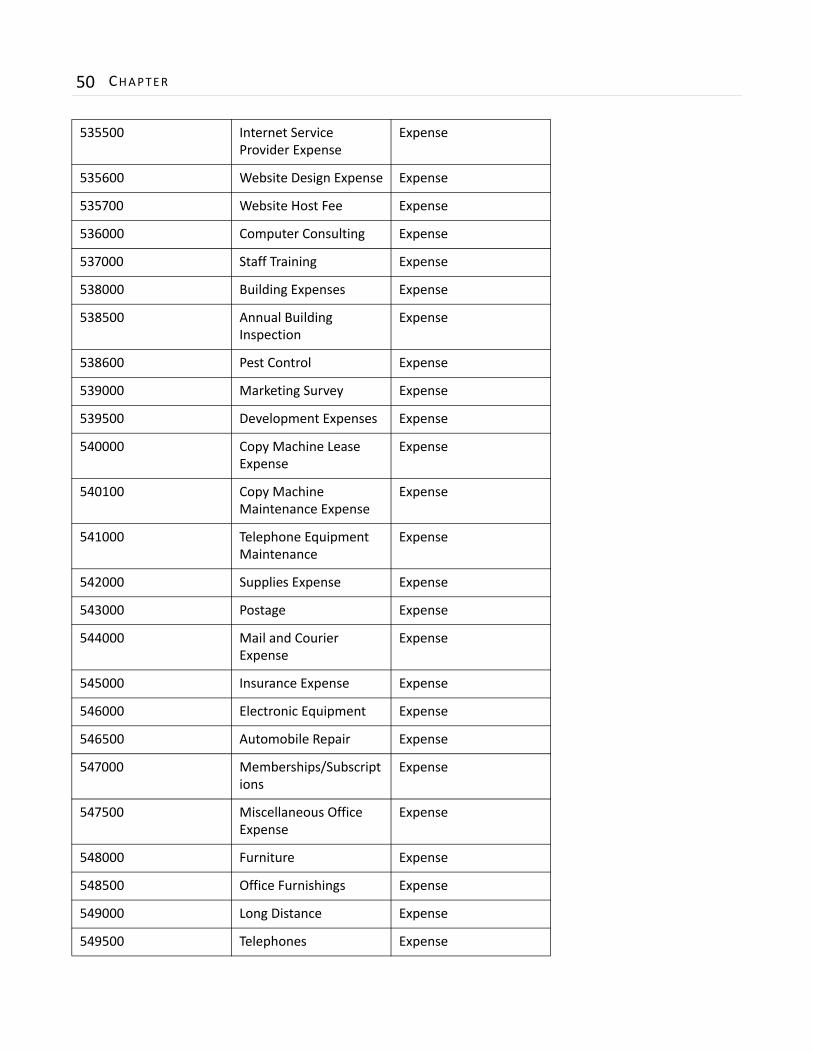
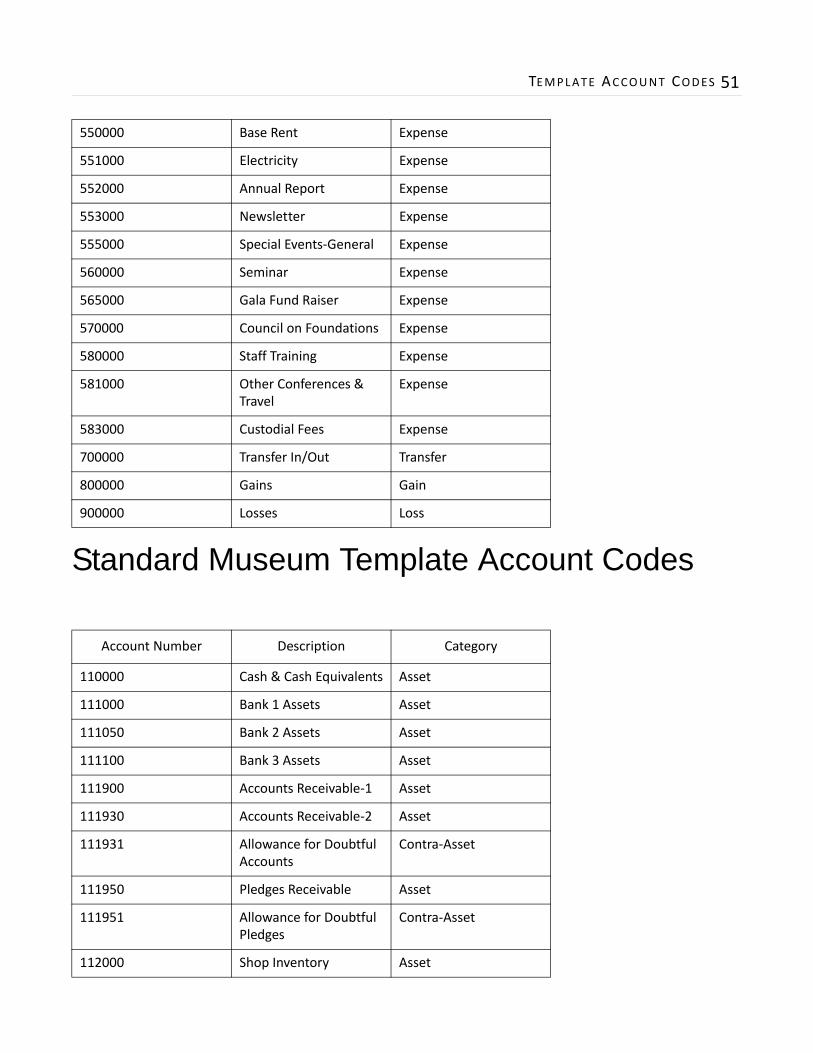
9. In the Account Numbers frame, you can select to define all account information manually, or to start with a predefined template of account codes. You can select a standard account code list designed for specific organizations. With this one time setup option, you can get started quickly by selecting an account code list for a standard nonprofit, school, museum, or community foundation. Once you select a standard account code list, default chart templates are created based on the code list you selected.
If you use a predefined account code template, account codes are automatically defined and appear on the Account codes page. The account structure starts with a two‐digit fund and a six‐digit account code. You can add to, modify, and delete the predefined account codes to get the results you need. For example, you can rename the account code descriptions or even renumber a few of the account codes.
Your template options include:
• Standard Nonprofit Template
Note: For more information about setting up General Ledger, see the Installation Planning Guide for Blackbaud Student Information System.
Warning: Please refer to the Template Account Codes appendix in this guide for a listing of account codes.
INSTALL ING BLACKBAUD STUDENT INFORMAT ION SYSTEM 35
• Standard School Template
• Standard Museum Template
• Standard Community Foundation Template
10. Click Lock Options Now. A validation screen appears.
11. Click Yes. Blackbaud Student Information System opens to the Home page.
Working with Sample Data in Blackbaud Student Information SystemSample data is provided with Blackbaud Student Information System when you install the program. We recommend you use this sample data as a training tool because you can try out the many features available in the program without fear of introducing bad data into the database you use for your school’s data.
You can use the sample database at any time by selecting it when you log into Blackbaud Student Information System. For more information about creating, migrating, and attaching databases through the Blackbaud Management Console, see the Database Administration Guide.
Unlocking Optional Modules
When you purchase an optional module or additional user license from Blackbaud, you are given a code. You must enter this code to “unlock” or activate the optional module or user license.
If you did not receive your unlock code, or the code does not work, you can create a case in Case Central on Blackbaud’s website. Please include the database serial number when you request this information. You can locate the database serial number by clicking Help, About Blackbaud Student Information System on the menu bar.
Unlocking an optional module or additional user licenses
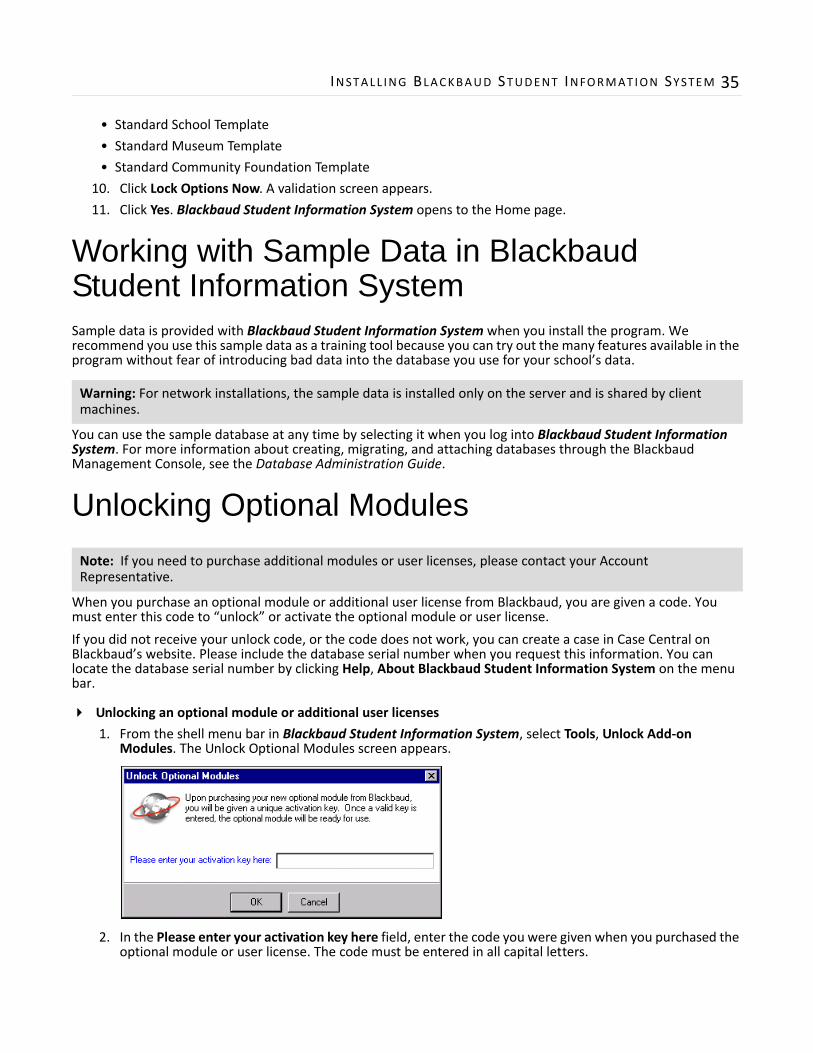
1. From the shell menu bar in Blackbaud Student Information System, select Tools, Unlock Add‐on Modules. The Unlock Optional Modules screen appears.
2. In the Please enter your activation key here field, enter the code you were given when you purchased the optional module or user license. The code must be entered in all capital letters.
Warning: For network installations, the sample data is installed only on the server and is shared by client machines.
Note: If you need to purchase additional modules or user licenses, please contact your Account Representative.
36 CHAPTER
3. Click OK. A confirmation message appears.
If you enter the code incorrectly, a message appears.
Click OK and enter the activation key again. After you enter the key correctly the confirmation message appears.
4. Once you have entered the correct activation key, click OK. Before you can use the optional module or user licenses, you must log off and log back into Blackbaud Student Information System.
Activating Ad Hoc Remote Querying for School Store ManagerIf you use the optional module School Store Manager and are currently on or upgrading to SQL Server 2005 or 2008, after you install Blackbaud Student Information System, your database administrator needs to activate ad hoc remote querying before you access School Store Manager. If you attempt to use School Store Manager before activating ad hoc remote querying, you will receive an error message.
Activating ad hoc remote querying for School Store Manager
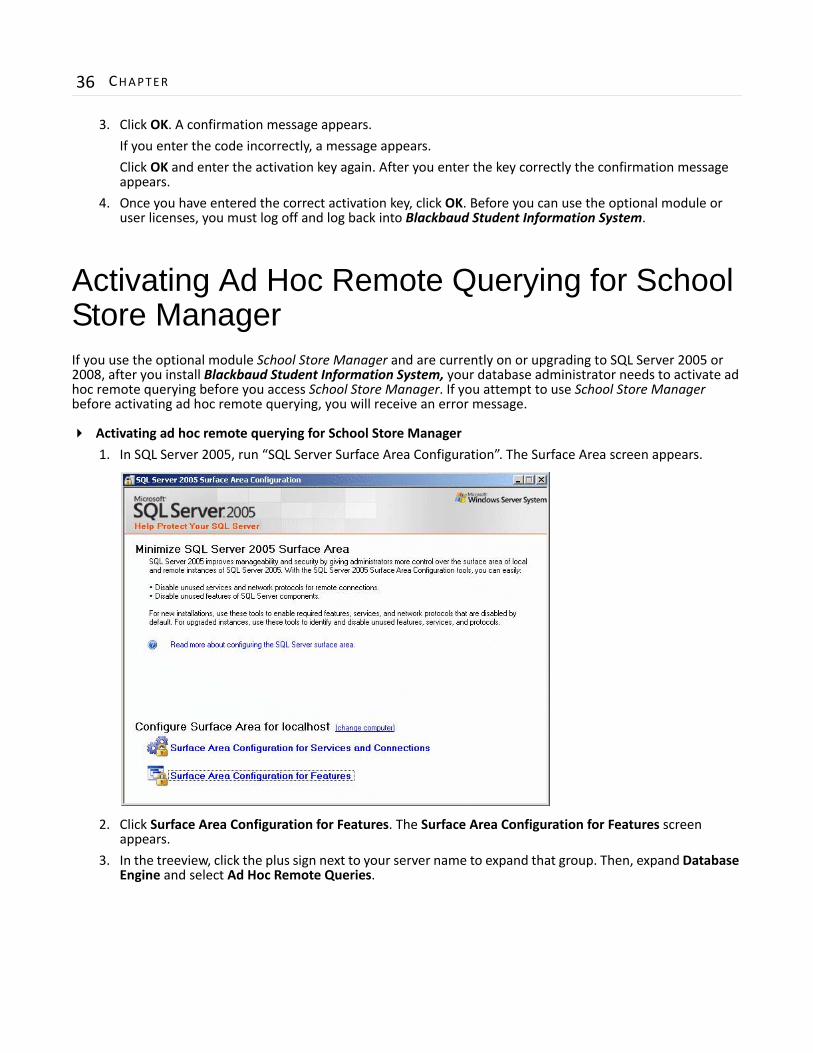
1. In SQL Server 2005, run “SQL Server Surface Area Configuration”. The Surface Area screen appears.
2. Click Surface Area Configuration for Features. The Surface Area Configuration for Features screen appears.
3. In the treeview, click the plus sign next to your server name to expand that group. Then, expand Database Engine and select Ad Hoc Remote Queries.
INSTALL ING BLACKBAUD STUDENT INFORMAT ION SYSTEM 37
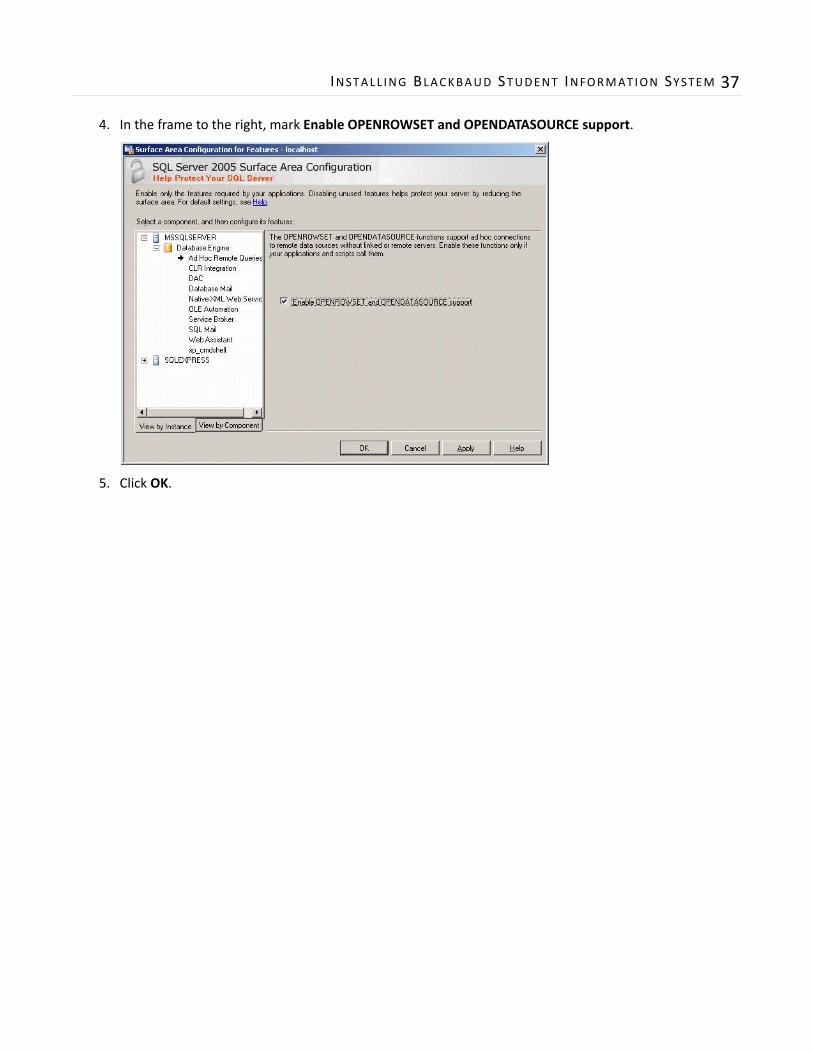
4. In the frame to the right, mark Enable OPENROWSET and OPENDATASOURCE support.
5. Click OK.

38 CHAPTER

Achapter
Template Account Codes
Standard Nonprofit Template Account Codes . . . . . . . . . . . . . . . . . . . . . . . . . . . . . . . . . . . . . . . . . . . . . . . . . . . . 40Standard School Template Account Codes . . . . . . . . . . . . . . . . . . . . . . . . . . . . . . . . . . . . . . . . . . . . . . . . . . . . . . . 43Standard Community Foundation Template Account Codes . . . . . . . . . . . . . . . . . . . . . . . . . . . . . . . . . . . . . . . . . 47Standard Museum Template Account Codes . . . . . . . . . . . . . . . . . . . . . . . . . . . . . . . . . . . . . . . . . . . . . . . . . . . . . . . 51
40 CHAPTER
Standard Nonprofit Template Account Codes
Account Number Description Category
110000 Cash Asset
111000 Bank 1 Assets Asset
111050 Bank 2 Assets Asset
111100 Bank 3 Assets Asset
111900 Cash Reserve Asset
111930 Accounts Receivable Asset
111931 Allowance for Uncollectable Accounts
Contra‐Asset
111950 Pledges Receivable Asset
111951 Allowance for Uncollectable Pledges
Contra‐Asset
112000 Investments Asset
113000 Deferred Expenses Asset
113200 Cash Value of Life Insurance
Asset
113400 Notes Receivable Asset
114500 Bond Sinking Fund Asset
116000 Vehicles Asset
139000 Land Asset
140000 Buildings Asset
181000 Equipment Asset
182000 Accumulated Depreciation
Contra‐Asset
210000 Accounts Payable Liability
215000 Salaries Payable Liability
220000 Deferred Revenue Liability
230000 Current Portion of Long‐term Debt
Liability
TEMPLATE ACCOUNT CODES 41
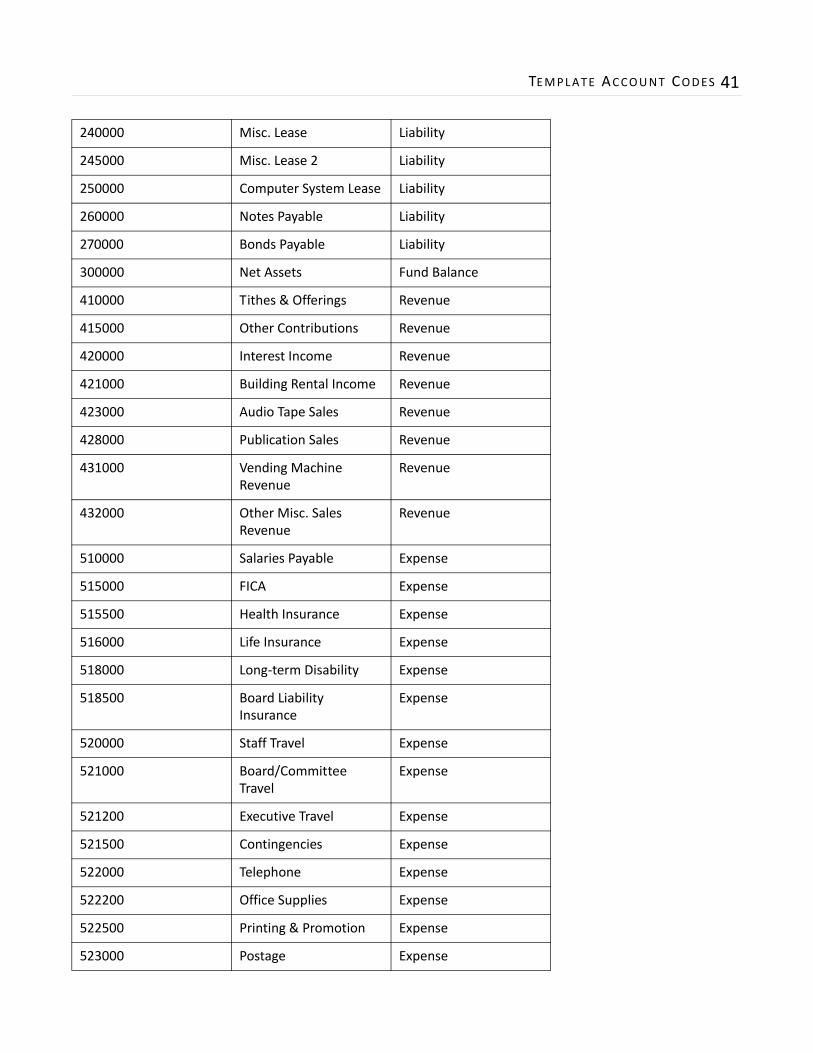
240000 Misc. Lease Liability
245000 Misc. Lease 2 Liability
250000 Computer System Lease Liability
260000 Notes Payable Liability
270000 Bonds Payable Liability
300000 Net Assets Fund Balance
410000 Tithes & Offerings Revenue
415000 Other Contributions Revenue
420000 Interest Income Revenue
421000 Building Rental Income Revenue
423000 Audio Tape Sales Revenue
428000 Publication Sales Revenue
431000 Vending Machine Revenue
Revenue
432000 Other Misc. Sales Revenue
Revenue
510000 Salaries Payable Expense
515000 FICA Expense
515500 Health Insurance Expense
516000 Life Insurance Expense
518000 Long‐term Disability Expense
518500 Board Liability Insurance
Expense
520000 Staff Travel Expense
521000 Board/Committee Travel
Expense
521200 Executive Travel Expense
521500 Contingencies Expense
522000 Telephone Expense
522200 Office Supplies Expense
522500 Printing & Promotion Expense
523000 Postage Expense
42 CHAPTER
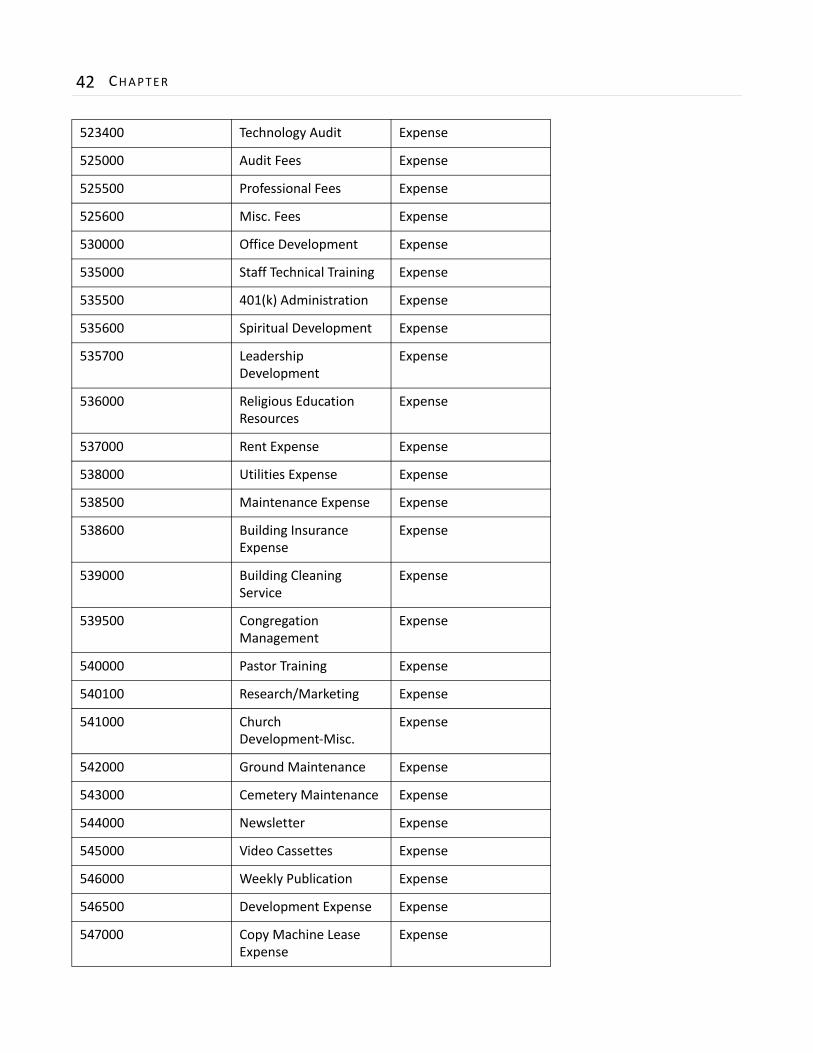
523400 Technology Audit Expense
525000 Audit Fees Expense
525500 Professional Fees Expense
525600 Misc. Fees Expense
530000 Office Development Expense
535000 Staff Technical Training Expense
535500 401(k) Administration Expense
535600 Spiritual Development Expense
535700 Leadership Development
Expense
536000 Religious Education Resources
Expense
537000 Rent Expense Expense
538000 Utilities Expense Expense
538500 Maintenance Expense Expense
538600 Building Insurance Expense
Expense
539000 Building Cleaning Service
Expense
539500 Congregation Management
Expense
540000 Pastor Training Expense
540100 Research/Marketing Expense
541000 Church Development‐Misc.
Expense
542000 Ground Maintenance Expense
543000 Cemetery Maintenance Expense
544000 Newsletter Expense
545000 Video Cassettes Expense
546000 Weekly Publication Expense
546500 Development Expense Expense
547000 Copy Machine Lease Expense
Expense
TEMPLATE ACCOUNT CODES 43
Standard School Template Account Codes
547500 Copy Machine Maintenance Expense
Expense
548000 Telephone Maintenance Expense
Expense
548500 Electronic Maintenance Expense
Expense
549000 Bus Repairs Expense
549500 Vehicle Repairs Expense
550000 Memberships Expense
551000 Subscriptions Expense
552000 Office Furnishings Expense
553000 Annual Fundraiser Expense
555000 Youth Group Activities Expense
560000 Teen Activities Expense
565000 Singles Activities Expense
570000 Couples Activities Expense
580000 Singe Parent Activities Expense
581000 Mission Expense
583000 Annual Trip Expense
700000 Interfund Transfer
800000 Gain on Sale Gain
900000 Loss of Sale Loss
Account Number Description Category
110000 Cash & Cash Equivalents Asset
111000 Bank 1 Assets Asset
111050 Bank 2 Assets Asset
111100 Bank 3 Assets Asset
111900 Trust Assets Asset
44 CHAPTER
111930 Pledges Receivable Asset
111931 Allowance for Doubtful Pledges
Contra‐Asset
111950 Accounts Receivable‐Student Billing
Asset
111951 Allowance for Doubtful Accounts
Contra‐Asset
112000 Bookstore‐Inventory Asset
113000 Athletic Equipment Inventory
Asset
113200 Prepaid Insurance Asset
113400 Funds Held in Escrow Asset
114500 Land Asset
116000 Buildings Asset
139000 Computer Software Asset
140000 Computer Hardware Asset
181000 Vehicles Asset
182000 Accumulated Depreciation
Contra‐Asset
210000 Accounts Payable Liability
215000 Accrued Salaries Payable
Liability
220000 Unearned Tuition Payments
Liability
230000 Unearned Camp Fees Liability
240000 Unearned Summer School Feels
Liability
245000 Current Portion of Bonds Payable
Liability
250000 Long‐Term Lease Liability
Liability
260000 Notes Payable Liability
270000 Bonds Payable Liability
300000 Net Assets Fund Balance
TEMPLATE ACCOUNT CODES 45
410000 Contributions Revenue
415000 Tuition Revenue Revenue
420000 Summer School Revenue
Revenue
421000 Bookstore Revenue Revenue
423000 Athletic Event Revenue Revenue
428000 Miscellaneous Event Revenue
Revenue
431000 Yearbook Sales Revenue
432000 Cafeteria Revenue Revenue
510000 Salaries Expense
515000 FICA Expense
515500 Health Insurance Expense
516000 Life Insurance Expense
518000 Long‐Term Disability Insurance
Expense
518500 Board Liability Insurance
Expense
520000 Office Expenses Expense
521000 Supplies Expense Expense
521200 Postage Expense Expense
521500 Copy Machine‐Lease Expense
Expense
522000 Copy Machine‐Maintenance
Expense
522200 Professional Dues Expense
522500 Professional Development
Expense
523000 Instructional Supplies Expense
523400 Telephone Charges Expense
525000 Consulting Fees Expense
525500 Orientation Expense Expense
525600 Examination Expense Expense
46 CHAPTER
530000 Research Expense Expense
535000 Guidance Expense
535500 Graduation Expense Expense
535600 College Placement Expense
Expense
535700 Campus Ministry Expense
536000 Book Purchase Expense
537000 Subscriptions Expense
538000 Athletic Supplies Expense
538500 Grounds Maintenance Expense
538600 Field Maintenance Expense
539000 Pool Expenses Expense
539500 Advertising Expense
540000 Printing Fees Expense
540100 Layout Fees Expense
541000 Newsletter Expense
542000 Website Fees Expense
543000 Internet Service Provider Fees
Expense
544000 Miscellaneous Computer Fees
Expense
545000 Bus Expenses Expense
546000 Automobile Expenses Expense
546500 Maintenance Equipment
Expense
547000 Memberships Expense
547500 Office Furnishings Expense
548000 Annual Fund Raiser Expense
548500 Food Purchase Expense
549000 Cafeteria Supplies Expense
549500 Cafeteria Maintenance Expense
TEMPLATE ACCOUNT CODES 47
Standard Community Foundation Template Account Codes
550000 Cafeteria Office Supplies Expense
Expense
551000 Roads Expense
552000 Lawns Expense
553000 Gardens Expense
555000 Trees Expense
560000 Refuse Expense
565000 Lighting Equipment Expense
Expense
570000 Depreciation Expense Expense
580000 Annual Report Expense
581000 Audit Fees Expense
583000 Audit Adjustment Expense
700000 Interfund Transfer
800000 Gain on Sale Gain
900000 Loss on Sale Loss
Account Number Description Category
110000 Cash and cash equivalents
Asset
111000 Bank 1 Assets Asset
111050 Bank 2 Assets Asset
111100 Bank 3 Assets Asset
111900 Contributions Receivable
Asset
111930 Pledges Receivable Asset
111931 Allowance for Uncollectable Pledges
Contra‐Asset
48 CHAPTER
111950 Grants Receivable Asset
111951 Allowance for Uncollectable Grants
Contra‐Asset
112000 Investments 1 Asset
113000 Investments 2 Asset
113200 Beneficial Interests in Trusts
Asset
113400 Trust Distribution Receivable
Asset
114500 Note Receivable Asset
116000 Unallocated Investments
Asset
139000 Equipment Asset
140000 Land Asset
181000 Building Asset
182000 Accumulated Depreciation
Contra‐Asset
210000 Accounts Payable Liability
215000 Refundable Advance Liability
220000 Grants Payable Liability
230000 Notes Payable Liability
240000 Annuity Obligations Liability
245000 Funds Managed for Others
Liability
250000 Management Fees Payable
Liability
260000 Payroll Taxes Payable Liability
270000 Admin Fee Payable Liability
300000 Fund Balance Fund Balance
410000 Contributions Revenue Revenue
415000 Grant Revenue Revenue
420000 Pledge Revenue Revenue
TEMPLATE ACCOUNT CODES 49
421000 Dividends/Interest Income
Revenue
423000 Distributions of Beneficial Trusts
Revenue
428000 Investment Income Revenue
431000 Rental Revenue Revenue
432000 Gala Revenue Revenue
510000 Grants Expense Expense
515000 Administrative Charge Expense
515500 Activity Expense Expense
516000 Misc. Expense Expense
518000 Uncollectable Pledges Expense
Expense
518500 Uncollectable Grants Expense
Expense
520000 Executive Office Expense
521000 Program Fees Expense
521200 Finance Office Expense
521500 Administrative Office Expense
522000 Payroll Taxes Expense
522200 All Other Taxes Expense
522500 Consulting Fees Expense
523000 401(k) Payments Expense
523400 Travel Expense Expense
525000 Audit Fees Expense
525500 Tax Consultation & Form Preparation
Expense
525600 Employee Parking Expense
Expense
530000 Computer Hardware Expense
Expense
535000 Computer Software Expense
Expense
50 CHAPTER
535500 Internet Service Provider Expense
Expense
535600 Website Design Expense Expense
535700 Website Host Fee Expense
536000 Computer Consulting Expense
537000 Staff Training Expense
538000 Building Expenses Expense
538500 Annual Building Inspection
Expense
538600 Pest Control Expense
539000 Marketing Survey Expense
539500 Development Expenses Expense
540000 Copy Machine Lease Expense
Expense
540100 Copy Machine Maintenance Expense
Expense
541000 Telephone Equipment Maintenance
Expense
542000 Supplies Expense Expense
543000 Postage Expense
544000 Mail and Courier Expense
Expense
545000 Insurance Expense Expense
546000 Electronic Equipment Expense
546500 Automobile Repair Expense
547000 Memberships/Subscriptions
Expense
547500 Miscellaneous Office Expense
Expense
548000 Furniture Expense
548500 Office Furnishings Expense
549000 Long Distance Expense
549500 Telephones Expense
TEMPLATE ACCOUNT CODES 51
Standard Museum Template Account Codes
550000 Base Rent Expense
551000 Electricity Expense
552000 Annual Report Expense
553000 Newsletter Expense
555000 Special Events‐General Expense
560000 Seminar Expense
565000 Gala Fund Raiser Expense
570000 Council on Foundations Expense
580000 Staff Training Expense
581000 Other Conferences & Travel
Expense
583000 Custodial Fees Expense
700000 Transfer In/Out Transfer
800000 Gains Gain
900000 Losses Loss
Account Number Description Category
110000 Cash & Cash Equivalents Asset
111000 Bank 1 Assets Asset
111050 Bank 2 Assets Asset
111100 Bank 3 Assets Asset
111900 Accounts Receivable‐1 Asset
111930 Accounts Receivable‐2 Asset
111931 Allowance for Doubtful Accounts
Contra‐Asset
111950 Pledges Receivable Asset
111951 Allowance for Doubtful Pledges
Contra‐Asset
112000 Shop Inventory Asset

52 CHAPTER
113000 Prepaid Exhibit Expense Asset
113200 Investments Asset
113400 Land Asset
114500 Facilities Asset
116000 Historic Homes Asset
139000 Furniture & Fixtures Asset
140000 Computers Asset
181000 Vehicles Asset
182000 Accumulated Depreciation
Contra‐Asset
210000 Accounts Payable Liability
215000 Sales Tax Payable Liability
220000 Gift Certificates Outstanding
Liability
230000 Accrued Salaries Payable
Liability
240000 Accrued Liabilities‐Other
Liability
245000 Current Portion of Annuity Obligation
Liability
250000 Notes Payable Liability
260000 Annuity Obligations Liability
270000 Long‐Term Lease Liability
Liability
300000 Net Assets Fund Balance
410000 Contributions Revenue
415000 Membership Revenue Revenue
420000 Grant Revenue Revenue
421000 Admission Revenue‐1 Revenue
423000 Admission Revenue‐2 Revenue
428000 Museum Shop Revenue Revenue
431000 Summer Program Revenue
Revenue
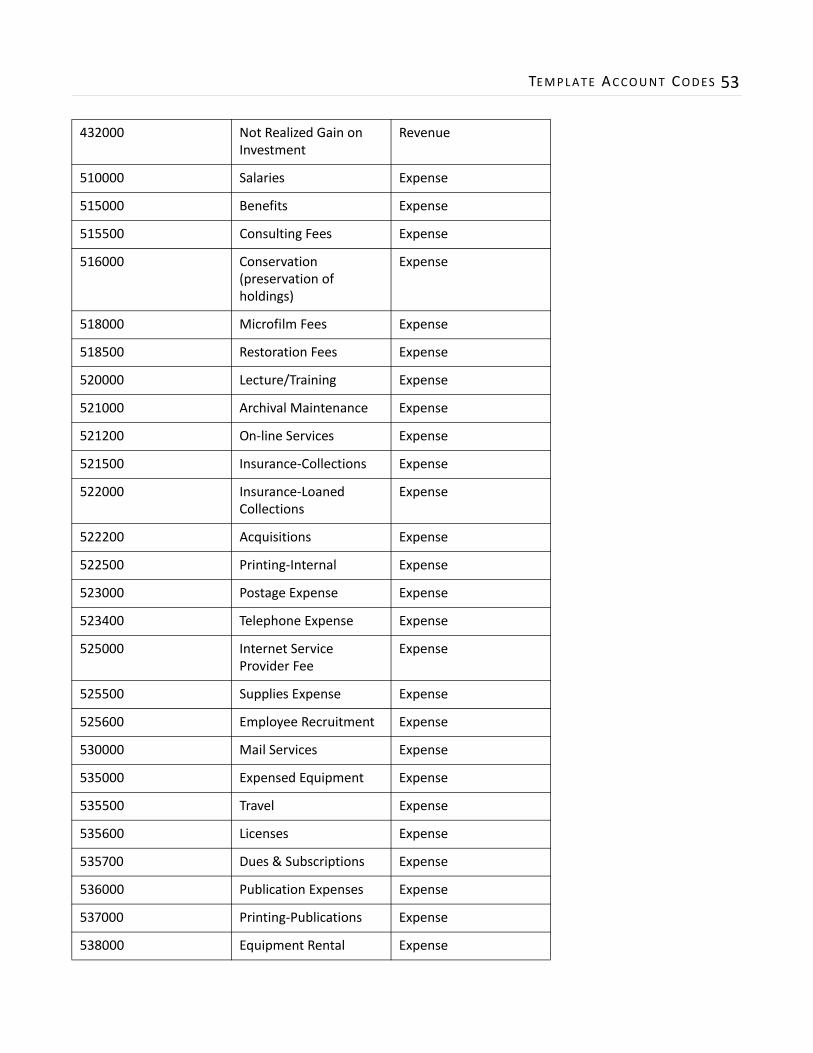
TEMPLATE ACCOUNT CODES 53
432000 Not Realized Gain on Investment
Revenue
510000 Salaries Expense
515000 Benefits Expense
515500 Consulting Fees Expense
516000 Conservation (preservation of holdings)
Expense
518000 Microfilm Fees Expense
518500 Restoration Fees Expense
520000 Lecture/Training Expense
521000 Archival Maintenance Expense
521200 On‐line Services Expense
521500 Insurance‐Collections Expense
522000 Insurance‐Loaned Collections
Expense
522200 Acquisitions Expense
522500 Printing‐Internal Expense
523000 Postage Expense Expense
523400 Telephone Expense Expense
525000 Internet Service Provider Fee
Expense
525500 Supplies Expense Expense
525600 Employee Recruitment Expense
530000 Mail Services Expense
535000 Expensed Equipment Expense
535500 Travel Expense
535600 Licenses Expense
535700 Dues & Subscriptions Expense
536000 Publication Expenses Expense
537000 Printing‐Publications Expense
538000 Equipment Rental Expense
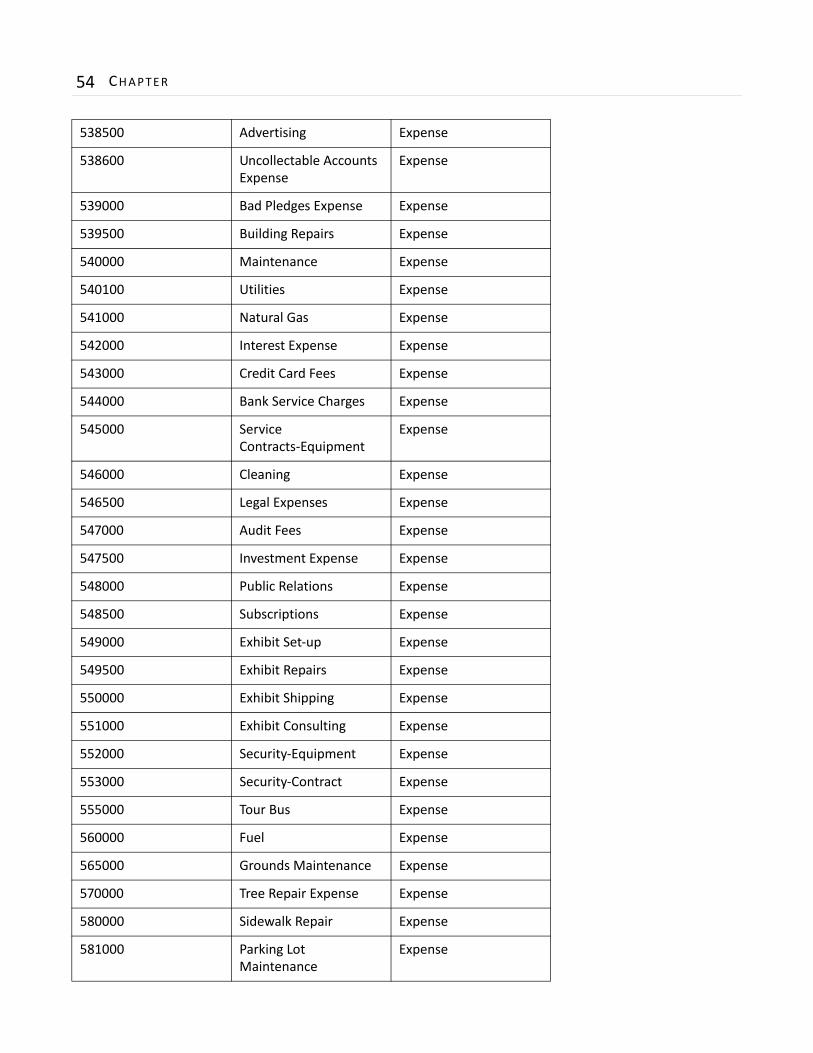
54 CHAPTER
538500 Advertising Expense
538600 Uncollectable Accounts Expense
Expense
539000 Bad Pledges Expense Expense
539500 Building Repairs Expense
540000 Maintenance Expense
540100 Utilities Expense
541000 Natural Gas Expense
542000 Interest Expense Expense
543000 Credit Card Fees Expense
544000 Bank Service Charges Expense
545000 Service Contracts‐Equipment
Expense
546000 Cleaning Expense
546500 Legal Expenses Expense
547000 Audit Fees Expense
547500 Investment Expense Expense
548000 Public Relations Expense
548500 Subscriptions Expense
549000 Exhibit Set‐up Expense
549500 Exhibit Repairs Expense
550000 Exhibit Shipping Expense
551000 Exhibit Consulting Expense
552000 Security‐Equipment Expense
553000 Security‐Contract Expense
555000 Tour Bus Expense
560000 Fuel Expense
565000 Grounds Maintenance Expense
570000 Tree Repair Expense Expense
580000 Sidewalk Repair Expense
581000 Parking Lot Maintenance
Expense

TEMPLATE ACCOUNT CODES 55
583000 Fencing Repair Fees Expense
700000 Interfund Transfer
800000 Gain on Sale of Assets Gain
900000 Loss on Sale of Assets Loss

56 CHAPTER
![BIMx Step by Step Guide [-] - applicadthai.com · 1 สร้างไฟล์ BIMx : Step by Step ขันตอนการส่งออกไฟล์ ArchiCAD ออกไปเป็นรูปแบบนามสกุลไฟล์](https://img.pdfslide.tips/doc/110x75/5ad32d907f8b9afa798d9395/bimx-step-by-step-guide-bimx-step-by-step-.jpg)