Embed Size (px)
Citation preview

Circular Saw手提電動圓鋸เลื่อยวงเดือน
C 6UY • C 6BUY • C 7UY • C 7BUYHandling instructions使用說明書คูมือการใชงาน
Read through carefully and understand these instructions before use.使用前務請詳加閱讀
โปรดอานโดยละเอียดและทําความเขาใจกอนใชงาน
C7UY
000Book_C6UY_Tha.indb 1000Book_C6UY_Tha.indb 1 2018/03/06 16:54:262018/03/06 16:54:26

2
1 2
3 4(A)
4(B) 5
6 7
Max. 5 mmMas. 5 mm
Max. 5 mmMas. 5 mm
1 2
3 4
5
6&
2
7
89
2
0
2
! !
@
6
!#
000Book_C6UY_Tha.indb 2000Book_C6UY_Tha.indb 2 2018/03/06 16:54:262018/03/06 16:54:26

3
8 9
10 11
12(A) 12(B)
13 14
$%
^
&*
*
(
))
q
we
r
4
)q
w
q
e
)
0
t
y
y
000Book_C6UY_Tha.indb 3000Book_C6UY_Tha.indb 3 2018/03/06 16:54:262018/03/06 16:54:26

4
15 16
17 18
19 20
u i
!
op a
a
d4 s f
j k 2g
hC6UYC7UY
C6UBYC7UBY
h 43 56
17 mm6 mm
000Book_C6UY_Tha.indb 4000Book_C6UY_Tha.indb 4 2018/03/06 16:54:272018/03/06 16:54:27

5
English 中國語 ไทย1 Lumber 鋸木 ไม
2 Base 底座 ฐาน
3 Workbench 工作臺 โตะงาน
4 Saw blade 鋸片 ใบเลื่อย
5 Handle 把手 มือจับ
6 Knob 旋鈕 ปุมปรับ
7 Riving knife 劈刀 มีดไรว่ิง
8 Flange bolt 凸緣螺栓 ขอบโบลต
9 Lever 桿 คันงาง
0 Wing-bolt 蝶形螺栓 น็อตปกผีเสื้อ
! Clamp lever 夾緊桿 คันบังคับ
@ Guide rail adapter 導片軌接合器 อะแดปเตอรรางนํา
# Guide 引導器 ราง
$ Mounting screw 安裝螺絲 สกรูยึด
% Saw cover hinge 電鋸護蓋絞鏈 บานพับครอบใบเล่ือย
^ Lower guard 下罩 กําบังลาง
& Saw cover 鋸罩 ครอบใบเลื่อย
* Wood chip 木屑 ข้ีเลื่อยไม
( Parallelism adjustment screw 平行度調整螺絲 สกรูปรับระยะขนาน
) Premarked line 預先標示線 แนวเสนกอนทําเคร่ืองหมาย
q Guide piece 導桿 ไกดพีส
w Front scale when not inclined 不傾斜時的前刻度盤 เม่ือไมเอียงบรรทัดหนา
e Front scale at 45˚ incline 傾斜 45 度時的前刻度盤 เม่ือเอียงบรรทัดไปทางหนา 45 องศา
r M4 Screw M4螺絲 สกูร M4
t Rail bar 軌桿 กานราง
y Guide rail 導片軌 รางนํา
u Dust collector 鋸屑收集器 ชุดเก็บฝุน
i Head of bolt 螺栓頭 หัวโบลต
o Lock lever 鎖緊桿 คันบังคับล็อก
p Box wrench 套筒扳手 ประแจบ็อกซ
a Hexagonal-head bolt 六角頭螺栓 หัวโบลตหกเหล่ียม
s Washer (A) 襯墊(A) แหวนสกรู (A)
d Washer (B) 襯墊(B) แหวนสกรู (B)
f Spindle 心軸 เพลา
g Wear limit 磨損極限 ขอบเขตระยะสึกหรอ
h No. of carbon brush 碳刷號 เบอรแปรงถาน
j Square 直角尺 ฉาก
k Slotted set screw 槽頭螺絲 สกรูตั้งคลองเลื่อย
000Book_C6UY_Tha.indb 5000Book_C6UY_Tha.indb 5 2018/03/06 16:54:272018/03/06 16:54:27

6
English
GENERAL SAFETY RULESWARNING!Read all instructionsFailure to follow all instructions listed below may result in electric shock, fi re and/or serious injury.The term “power tool” in all of the warnings listed below refers to your mains operated (corded) power tool or battery operated (cordless) power tool.SAVE THESE INSTRUCTIONS1) Work area
a) Keep work area clean and well lit. Cluttered and dark areas invite accidents.b) Do not operate power tools in explosive
atmospheres, such as in the presence of fl ammable liquids, gases or dust.
Power tools create sparks which may ignite the dust of fumes.
c) Keep children and bystanders away while operating a power tool.
Distractions can cause you to lose control.2) Electrical safety
a) Power tool plugs must match the outlet. Never modify the plug in any way. Do not use any adapter plugs with earthed
(grounded) power tools. Unmodifi ed plugs and matching outlets will reduce
risk of electric shock.b) Avoid body contact with earthed or grounded
surfaces such as pipes, radiators, ranges and refrigerators.
There is an increased risk of electric shock if your body is earthed or grounded.
c) Do not expose power tools to rain or wet conditions.
Water entering a power tool will increase the risk of electric shock.
d) Do not abuse the cord. Never use the cord for carrying, pulling or unplugging the power tool.
Keep cord away from heat, oil, sharp edges or moving parts.
Damaged or entangled cords increase the risk of electric shock.
e) When operating a power tool outdoors, use an extension cord suitable for outdoor use.
Use of a cord suitable for outdoor use reduces the risk of electric shock.
3) Personal safetya) Stay alert, watch what you are doing and use
common sense when operating a power tool. Do not use a power tool while you are tired
or under the infl uence of drugs, alcohol or medication.
A moment of inattention while operating power tools may result in serious personal injury.
b) Use safety equipment. Always wear eye protection.
Safety equipment such as dust mask, non-skid safety shoes, hard hat, or hearing protection used for appropriate conditions will reduce personal injuries.
c) Avoid accidental starting. Ensure the switch is in the off position before plugging in.
Carrying power tools with your fi nger on the switch or plugging in power tools that have the switch on invites accidents.
d) Remove any adjusting key or wrench before turning the power tool on.
A wrench or a key left attached to a rotating part of the power tool may result in personal injury.
e) Do not overreach. Keep proper footing and balance at all times.
This enables better control of the power tool in unexpected situations.
f) Dress properly. Do not wear loose clothing or jewellery. Keep your hair, clothing and gloves away from moving parts.
Loose clothes, jewellery or long hair can be caught in moving parts.
g) If devices are provided for the connection of dust extraction and collection facilities, ensure these are connected and properly used.
Use of these devices can reduce dust related hazards.
4) Power tool use and carea) Do not force the power tool. Use the correct
power tool for your application. The correct power tool will do the job better and
safer at the rate for which it was designed.b) Do not use the power tool if the switch does not
turn it on and off . Any power tool that cannot be controlled with the
switch is dangerous and must be repaired.c) Disconnect the plug from the power source
before making any adjustments, changing accessories, or storing power tools.
Such preventive safety measures reduce the risk of starting the power tool accidentally.
d) Store idle power tools out of the reach of children and do not allow persons unfamiliar with the power tool or these instructions to operate the power tool.
Power tools are dangerous in the hands of untrained users.
e) Maintain power tools. Check for misalignment or binding of moving parts, breakage of parts and any other condition that may aff ect the power tools’ operation.
If damaged, have the power tool repaired before use.
Many accidents are caused by poorly maintained power tools.
f) Keep cutting tools sharp and clean. Properly maintained cutting tools with sharp cutting
edges are less likely to bind and are easier to control.
g) Use the power tool, accessories and tool bits etc., in accordance with these instructions and in the manner intended for the particular type of power tool, taking into account the working conditions and the work to be performed.
Use of the power tool for operations diff erent from intended could result in a hazardous situation.
5) Servicea) Have your power tool serviced by a qualifi ed
repair person using only identical replacement parts.
This will ensure that the safety of the power tool is maintained.
PRECAUTIONKeep children and infi rm persons away.When not in use, tools should be stored out of reach of children and infi rm persons.
000Book_C6UY_Tha.indb 6000Book_C6UY_Tha.indb 6 2018/03/06 16:54:272018/03/06 16:54:27
7
English
SAFETY INSTRUCTIONS FOR ALL SAWSa) DANGER: Keep hands away from cutting area
and the blade. Keep your second hand on auxiliary handle, or motor housing.
If both hands are holding the saw, they cannot be cut by the blade.
b) Do not reach underneath the workpiece. The guard cannot protect you from the blade below the
workpiece.c) Adjust the cutting depth to the thickness of the
workpiece. Less than a full tooth of the blade teeth should be visible
below the workpiece.d) Never hold piece being cut in your hands or
across your leg. Secure the workpiece to a stable platform.
It is important to support the work properly to minimize body exposure, blade binding, or loss of control.
e) Hold power tool by insulated gripping surfaces when performing an operation where the cutting tool may contact hidden wiring or its own cord.
Contact with a “live” wire will also make exposed metal parts of the power tool “live” and shock the operator.
f) When ripping always use a rip fence or straight edge guide.
This improves the accuracy of cut and reduces the chance of blade binding.
g) Always use blades with correct size and shape (diamond versus round) of arbour holes.
Blades that do not match the mounting hardware of the saw will run eccentrically, causing loss of control.
h) Never use damaged or incorrect blade washers or bolt.
The blade washers and bolt were specially designed for your saw, for optimum performance and safety of operation.
FURTHER SAFETY INSTRUCTIONS FOR ALL SAWSCauses and operator prevention of kickback:– kickback is a sudden reaction to a pinched, bound or
misaligned saw blade, causing an uncontrolled saw to lift up and out of the workpiece toward the operator;
– when the blade is pinched or bound tightly by the kerf closing down, the blade stalls and the motor reaction drives the unit rapidly back toward the operator;
– if the blade becomes twisted or misaligned in the cut, the teeth at the back edge of the blade can dig into the top surface of the wood causing the blade to climb out of the kerf and jump back toward the operator.
Kickback is the result of saw misuse and/or incorrect operating procedures or conditions and can be avoided by taking proper precautions as given below.a) Maintain a fi rm grip with both hands on the saw
and position your arms to resist kickback forces. Position your body to either side of the blade, but
not in line with the blade. Kickback could cause the saw to jump backwards, but
kickback forces can be controlled by the operator, if proper precautions are taken.
b) When blade is binding, or when interrupting a cut for any reason, release the trigger and hold the saw motionless in the material until the blade comes to a complete stop.
Never attempt to remove the saw from the work or pull the saw backward while the blade is in motion or kickback may occur.
Investigate and take corrective actions to eliminate the cause of blade binding.
c) When restarting a saw in the workpiece, centre the saw blade in the kerf and check that saw teeth are not engaged into the material.
If saw blade is binding, it may walk up or kickback from the workpiece as the saw is restarted.
d) Support large panels to minimise the risk of blade pinching and kickback.
Large panels tend to sag under their own weight. Supports must be placed under the panel on both sides,
near the line of cut and near the edge of the panel. e) Do not use dull or damaged blades. Unsharpened or improperly set blades produce narrow
kerf causing excessive friction, blade binding and kickback.
f) Blade depth and bevel adjusting locking levers must be tight and secure before making cut.
If blade adjustment shifts while cutting, it may cause binding and kickback.
g) Use extra caution when making a “plunge cut” into existing walls or other blind areas.
The protruding blade may cut objects that can cause kickback.
SAFETY INSTRUCTIONS FOR SAWS WITH PENDULUM GUARD OR TOW GUARDa) Check lower guard for proper closing before each
use. Do not operate the saw if lower guard does not move freely and close instantly. Never clamp or tie the lower guard into the open position.
If saw is accidentally dropped, lower guard may be bent.
Raise the lower guard with the retracting handle and make sure it moves freely and does not touch the blade or any other part, in all angles and depths of cut.
b) Check the operation of the lower guard spring. If the guard and the spring are not operating properly, they must be serviced before use.
Lower guard may operate sluggishly due to damaged parts, gummy deposits, or a build-up of debris.
c) Lower guard should be retracted manually only for special cuts such as “plunge cuts” and “compound cuts”. Raise lower guard by retracting handle and as soon as blade enters the material, the lower guard must be released.
For all other sawing, the lower guard should operate automatically.
d) Always observe that the lower guard is covering the blade before placing saw down on bench or fl oor.
An unprotected, coasting blade will cause the saw to walk backwards, cutting whatever is in its path.
Be aware of the time it takes for the blade to stop after switch is released.
ADDITIONAL SAFETY INSTRUCTIONS FOR ALL SAWS WITH RIVING KNIFEa) Use the appropriate riving knife for the blade being
used. For the riving knife to work, it must be thicker than the
body of the blade but thinner than the tooth set of the blade.
b) Adjust the riving knife as described in this instruction manual.
Incorrect spacing, positioning and alignment can make the riving knife ineff ective in preventing kickback.
000Book_C6UY_Tha.indb 7000Book_C6UY_Tha.indb 7 2018/03/06 16:54:272018/03/06 16:54:27

8
English
c) Always use the riving knife except when plunge cutting.
Riving knife must be replaced after plunge cutting. Riving knife causes interference during plunge cutting and can create kickback.
d) For the riving knife to work, it must be engaged in the workpiece.
The riving knife is ineff ective in preventing kickback during short cuts.
e) Do not operate the saw if riving knife is bent. Even a light interference can slow the closing rate of a
guard.
PRECAUTIONS ON USING CIRCULAR SAW 1. Do not use saw blades which are deformed or cracked. 2. Do not use saw blades made of high speed steel. 3. Do not use saw blades which do not comply with the
characteristics specifi ed in these instructions. 4. Do not stop the saw blades by lateral pressure on the
disc. 5. Always keep the saw blades sharp. 6. Ensure that the lower guard smoothly and freely. 7. Never use the circular saw with its lower guard fi xed in
the open position. 8. Ensure that the retraction mechanism of the guard
system operates correctly. 9. The saw blades body must be thinner than the riving
knife and the width of cut, or kerf (with teeth set) must be greater than the thickness of the riving knife.
10. Never operate the circular saw with the saw blade turned upward or to the side.
11. Ensure that the material is free of foreign matters such as nails.
12. The riving knife should always be used except when plunging in the middle of the workpiece.
13. For models C6UY and C6BUY, the saw blades range should be from 165 mm to 162 mm.
For models C7UY and C7BUY, the saw blades range should be from 190 mm to 185 mm.
14. For models C6BUY and C7BUY, be careful of brake kickback.
C6BUY and C7BUY models features an electric brake that functions when the switch is released. As there is some kickback when the brake functions, be sure to hold the main body securely.
15. Sparks can sometimes appear caused by braking operation when the switch is turned off since C6BUY and C7BUY models employ electric brakes. Be informed, however, that this phenomenon is not a machine trouble.
16. For models C6BUY and C7BUY, when the brake becomes ineff ective, replace the carbon brushes with new ones.
17. Disconnect the plug from the receptacle before carrying out any adjustment, servicing or maintenance.
SPECIFICATIONS
Model C6UY C6BUY C7UY C7BUYVoltage (by areas)* (110 V, 220 V, 230 V, 240 V)
Cutting Depth90° 66 mm 78 mm45° 46 mm 55 mm
Power Input* 1300 W (110 V, 240 V: 1200 W)No-Load Speed 5500/minWeight (without cord) 3.8 kg 4.2 kg
* Be sure to check the nameplate on product as it is subject to change by areas.
STANDARD ACCESSORIES(1) Saw blade (mounted on tool) .......................................1
( Dia. 165 mm ................................C6UY, C6BUY )Dia. 190 mm ................................C7UY, C7BUY(2) Hex. bar wrench ...........................................................1(3) Guide ............................................................................1(4) Box wrench ...................................................................1(5) M4 screw ......................................................................1Standard accessories are subject to change without notice.
OPTIONAL ACCESSORIES (sold separately)(1) Dust collector (See Fig. 15)(2) Guide rail adapter (See Fig. 5)Optional accessories are subject to change without notice.
APPLICATIONCutting various types of wood.
PRIOR TO OPERATION1. Power source Ensure that the power source to be utilized conforms
to the power requirements specifi ed on the product nameplate.
2. Power switch Ensure that the power switch is in the OFF position. If
the plug is connected to a receptacle while the power switch is in the ON position, the power tool will start operating immediately, which could cause a serious accident.
3. Extension cord When the work area is removed from the power source,
use an extension cord of suffi cient thickness and rated capacity. The extension cord should be kept as short as practicable.
4. Prepare a wooden workbench (Fig. 1) Since the saw blade will extend beyond the lower surface
of the lumber, place the lumber on a workbench when cutting. If a square block is utilized as a workbench, select level ground to ensure it is properly stabilized. An unstable workbench will result in hazardous operation.
000Book_C6UY_Tha.indb 8000Book_C6UY_Tha.indb 8 2018/03/06 16:54:272018/03/06 16:54:27

9
English
CAUTION To avoid possible accident, always ensure that the
portion of lumber remaining after cutting is securely anchored or held in position.
ADJUSTING THE SAW PRIOR TO USE1. Adjusting the cutting depth As shown in Fig. 2, hold the handle with one hand while
loosening the knob with the other. The cutting depth can be adjusted by moving the base
to the desired position. In such manner adjust the cutting depth and then securely retighten the knob.
2. Adjusting the riving knife First tighten the knob and fi rmly secure the saw cover.
(Fig. 2) Loosen the fl ange bolt (2 pcs.) used to clamp the riving
knife, adjust the riving knife so that the distance between the riving knife and the rim of the blade is not more than 5 mm, and the rim of the blade does not extend more than 5 mm beyond the lowest edge of the riving knife (Fig. 3) and securely retighten the fl ange bolt (2 pcs.).
3. Adjusting the angle of inclination As shown in Fig. 4 (A), Fig. 4 (B) by loosening the lever
on the incline gauge and the wing-bolt on the base, the saw blade may be inclined to a maximum angle of 45° in relation to the base. After having completed the adjustment, reconfi rm that the lever and the wing-bolt are fi rmly tightened.
4. Regulating the guide (optional accessory) Loosen the clamp lever at the front and back of the base
and detach the guide rail adapter from the main unit. (Fig. 5)
NOTE Be informed that for some products the knob and
the guide rail adapter can collide when the guide rail adapter is removed. Under such a circumstance, remove the guide rail adapter after slightly reducing the cutting depth of the body. (Fig. 6)
The cutting position can be regulated by moving the guide to the left or right after loosening its clamp lever. The guide may be mounted on either the right or left side of the tool. (Fig. 7)
5. Fine tuning of parallelism It is possible to fi ne-tune the parallelism of the saw blade
to the base using the parallelism adjustment screw. Adjustment has already been made at the time of
shipment from the factory. However, in the unlikely event of parallelism being faulty, adjust as follows.(1) Unfasten only the mounting screws of the saw cover
hinge portion (Fig. 8).(2) Retract the lower guard into the saw cover.(3) Insert wood chip in the rear side of the saw blade
base, and mark the position on the base (Fig. 9).(4) Move the marked wood chip to the front of the base,
and turn the parallelism adjustment screw so that the marking corresponds to the base side (Fig. 10).
(5) After adjustment, fasten the mounting screws tightly in place.
NOTE Parallelism may be slightly faulty if the cutting depth is
adjusted after parallelism adjustment. 6. Adjusting the guide piece On the circular saw, it is possible to make fi ne adjustment
of the fi xing position of the guide piece, where the saw blade and the premarked line are to be aligned.
When the saw is shipped from the factory, the linear portion of a front scale on the guide piece is aligned with the central position of the saw blade (Fig. 11).
Loosen the fi xed M4 screw on the guide piece, should the fi xing position be wrong, and make necessary adjustment of the position.
7. Using the guide rail (optional accessory) Pass the guide rail adapter through the base square
socket, and clamp the clamp lever at the position where the guide rail adapter and the surface of the base side come in contact. (Fig. 5)
NOTE Be informed that for some products the knob and
the guide rail adapter can collide when the guide rail adapter is installed. Under such a circumstance, install the guide rail adapter after slightly reducing the cutting depth of the body. (Fig. 6)
(1) Loosen the wing bolt. Adjust the position of the rail bar according to the guide rail to be used, and fi x it with the wing bolt. (Fig. 13)
(2) Place the body on the guide rail so that the protrusion of the guide rail can fi t into the groove of the guide rail adapter. (Fig. 14)
(3) Loosen the clamp lever, adjust the position of the saw blade, and then clamp the clamp lever again.
(4) In this condition, you can start off cutting operation.NOTE○ When performing cutting operation using the guide
rail, remember that the cutting depth decreases as the thickness of the guide rail increases.
○ This guide rail adapter can be used for the guide rails of BOSCH, FESTO, and MAKITA.
○ When the guide rail is used at a 45 degree inclination, the position of the saw blade does not agree with the notch provided on the tip of the base.
8. Using the dust collector (optional accessory) To use the vacuum cleaner to gather up saw dust, attach
the suction hose to the dust collector which is attached to the main unit by M4 screw. (Fig. 15)
9. Adjusting the position of the clamp lever Depressing the clamp lever disengages it from the bolt
head, leaving it free to rotate. After securely fi xing the guide and the guide rail,
depress the clamp lever and rotate it to a position in which it will not interfere with cutting operation. (Fig. 16)
CUTTING PROCEDURES1. Place the base on the material, then align the premarked
line and the sawblade with the guide piece front scale section at the front of the base (Fig. 11).
When the base is not slanted, use the large cutout as the guide (Fig. 11, Fig. 12 (A)).
If the base is slanted (45 degrees), use the small front scale as the guide (Fig. 11, Fig. 12 (B)).
2. Ensure that the switch is turned to the ON position before the saw blade comes in contact with the lumber. The switch is turned ON when the trigger is squeezed; and OFF when the trigger is released.
3. Moving the saw straight at a constant speed will produce optimum cutting.
CAUTIONPrior to cutting operation, make sure the material you are going to cut. If the material to be cut is expected to generate harmful / toxic dusts, make sure the dust bag or appropriate dust extraction system is connected with dust outlet tightly.Wear the dust mask additionally, if available. A coating of PFTE is applied to the bases. Be careful not to press too hard on the unit body since this tends to place a heavy load on the motor. Using a gentle pressure will make the piece slide easier and allow cutting with less
000Book_C6UY_Tha.indb 9000Book_C6UY_Tha.indb 9 2018/03/06 16:54:272018/03/06 16:54:27

10
English
force. Trying to cut wood that is covered with hard particle material such as sand or metal chips tends to easily scratch damage the surface coating so use caution.○ Before starting to saw, confi rm that the saw blade has
attained full-speed revolution.○ Should the saw blade be stopped or made an abnormal
noise during operation, turn off the switch immediately.○ Always take care in preventing the power cord from
coming near the revolving saw blade.○ Using the circular saw with the saw blade facing upwards
or sideways is very hazardous. Such uncommon applications should be avoided.
○ When cutting materials, always wear protective glasses.
○ When fi nished with a job, pull out the plug from the receptacle.
MOUNTING AND DISMOUNTING THE SAW BLADECAUTIONTo avoid serious accident, ensure the switch is in the OFF position, and the power source is disconnected.1. Dismounting the saw blade(1) Loosen the knob and slightly reduce the cutting depth
from maximum. (Fig. 2)(2) Place the Circular Saw as shown in Fig. 17.(3) Depress the lock lever, lock the spindle, and remove the
hexagonal-head bolt with the box wrench.(4) While holding the lower guard lever to keep the lower
guard fully retracted into the saw cover, remove the saw blade.
2. Mounting the saw blade(1) Loosen the knob and slightly reduce the cutting depth
from maximum. (Fig. 2)(2) Thoroughly remove any sawdust which has accumulated
on the spindle, bolt and washers.(3) As shown in Fig. 18, the side of Washer (A) with a
projected center the same diameter as the inner diameter of the saw blade and the concave side of Washer (B) must be fi tted to the saw blade sides.
(4) To assure proper rotation direction of the saw blade, the arrow direction on the saw blade must coincide with the arrow direction on the saw cover.
(5) Using the fi ngers, tighten the hexagonal-head bolt retaining the saw blade as much as possible. Then depress the lock lever, lock the spindle, and thoroughly tighten the bolt.
CAUTIONAfter having attached the saw blade, reconfi rm that the lock lever is fi rmly secured in the prescribed position.
MAINTENANCE AND INSPECTION1. Inspecting the saw blade Since use of a dull saw blade will degrade effi ciency and
cause possible motor malfunction, sharpen or replace the saw blade as soon as abrasion is noted.
2. Inspecting the mounting screws Regularly inspect all mounting screws and ensure that
they are properly tightened. Should any of the screws be loose, retighten them immediately. Failure to do so could result in serious hazard.
3. Inspecting the carbon brushes (Fig. 19) The motor employs carbon brushes which are
consumable parts. Since an excessively worn carbon brush can result in motor trouble, replace the carbon brushes with new ones having the same carbon brush No. shown in the fi gure when it becomes worn to or near the “wear limit”. In addition, always keep carbon
brushes clean and ensue that they slide freely within the brush holders.
CAUTION○ When replacing the new carbon brushes, always use
genuine HiKOKI carbon brushes with the number specifi ed in the drawing.
○ For models C6BUY and C7BUY, the brake may not work if other than the specifi ed carbon brushes are used.
When the brake becomes ineff ective, replace the carbon brushes with new ones.
4. Replacing carbon brushes Disassemble the brush caps with a slotted-head
screwdriver. The carbon brushes can then be easily removed.
5. Maintenance of the motor The motor unit winding is the very “heart” of the power
tool. Exercise due care to ensure the winding does not
become damaged and/or wet with oil or water.6. Adjusting the base and saw blade to maintain
perpendicularity The angle between the base and the saw blade has been
adjusted to 90°, however should this perpendicularity be lost for some reason, adjust in the following manner:
(1) Turn the base face up (Fig. 20) and loosen the lever and wing-bolt. (Fig. 4 (A), Fig. 4 (B))
(2) Apply a square to the base and the saw blade and turning the slotted set screw with a slotted-head screwdriver, shift the position of the base to produce the desired right angle.
7. Service parts listCAUTION Repair, modifi cation and inspection of HiKOKI Power
Tools must be carried out by a HiKOKI Authorized Service Center.
This Parts List will be helpful if presented with the tool to the HiKOKI Authorized Service Center when requesting repair or other maintenance.
In the operation and maintenance of power tools, the safety regulations and standards prescribed in each country must be observed.
MODIFICATIONS HiKOKI Power Tools are constantly being improved
and modifi ed to incorporate the latest technological advancements.
Accordingly, some parts may be changed without prior notice.
NOTEDue HiKOKI’s continuing program of research and development, the specifi cations herein are subject to change without prior notice.
000Book_C6UY_Tha.indb 10000Book_C6UY_Tha.indb 10 2018/03/06 16:54:272018/03/06 16:54:27

11
中國語
一般安全規則
警告!閱讀所有說明,未遵守下列之說明可能導致電擊、火災及/或嚴重傷害。「電動工具」一詞在下列警告中,關係到電源操作(有線)之電動工具或電池操作(無線)之電動工具。
記住這些說明1) 工作場所a) 保持工作場所清潔及明亮。 雜亂及昏暗區域易發生意外。b) 勿在易產生爆炸之環境中操作,譬如有易燃液體、瓦斯或粉塵存在之處。
電動工具產生火花會引燃粉塵或煙氣。c) 當操作電動工具時,保持兒童及過往人員遠離。
分神會讓你失去控制。
2) 電氣安全a) 電動工具插頭必須與插座配合,絕不可以任何方法修改插頭,且不得使用任何轉接插頭於有接地之電動工具。
不修改插頭及所結合之插座可減少電擊。b) 避免身體接觸到接地面諸如管子、散熱器、爐灶及冰箱。
如果你的身體接地或搭地,會增加電擊的危險。
c) 勿讓電動工具淋雨或曝露在潮濕的環境下。 電動工具進水會增加電繫的危險。d) 勿濫用電源線。絕勿使用電源線去纏繞、拖拉電動工具或拔插頭,保持電源線遠離熱氣、油氣、尖角或可動零件。
損壞或纏繞的電源線會增加電繫之危險。e) 電動工具在室外操作時要使用一適合室外用的延長線。
使用合適之室外用延長線會減少電擊的危險。
3) 人員安全a) 保持機警,注意你正在做什麼,並運用普通常識操作電動工具。
當你感到疲勞或受藥品、酒精或醫療影響時,勿操作電動工具。
操作中瞬間的不注意可能造成人員嚴重的傷害。
b) 使用安全裝備,常時佩戴安全眼鏡。 安全裝備有防塵口罩、防滑安全鞋、硬帽,或在適當情況下使用聽覺防護,可減少人員傷害。
c) 避免意外地啟動。在插電前確認開關是在“off”的位置。
以手指放在開關握持電動工具,或在電動工具的開關於“on”的狀況下插上插頭,都會導致意外發生。
d) 在將電動工具啟動前,先卸下任何調整用鑰匙或扳手。
扳手或鑰匙遺留在電動工具的轉動部位時,可能導致人員傷害。
e) 身體勿過度伸張,任何時間要保持站穩及平衡。
以便在不預期的狀態下,能對電動工具有較好的控制。
f) 衣著要合宜,別穿太鬆的衣服或戴首飾。 保持你的頭髮、衣服及手套遠離轉動部位。 寬鬆的衣服、手飾及長髮會被捲入轉動部位。g) 如果裝置要用於粉塵抽取及集塵設施,要確保其連接及正當使用。
使用此類裝置能減少與粉塵有關之危害。
4) 電動工具之使用及注意事項a) 勿強力使用電動工具,使用正確之電動工具為你所需。
正確使用電動工具會依其設計條件使工作做得更好更安全。
b) 如果開關不能轉至開及關的位置,勿使用電動工具。
任何電動工具不能被開關所控制是危險的,必須要修理。
c) 在做任何調整、更換配件或收存電動工具時,要將插頭與電源分開,且/或將電池從電動工具中取出。
此種預防安全措施可減少意外開啟電動機之危險。
d) 收存停用之電動工具,遠離兒童,且不容許不熟悉電動工具或未瞭解操作電動工具說明書的人操作電動工具。
在未受過訓練的人手裡,電動工具極為危險。e) 保養電動工具,檢核是否有可動零件錯誤的結合或卡住、零件破裂及可能影響電動工具操作的任何其他情形。
電動工具如果損壞,在使用前要修好。 許多意外皆肇因於不良的保養。f) 保持切割工具銳利清潔。 適當的保養切割工具,保持銳利之切削鋒口,可減少卡住並容易控制。
g) 按照說明書使用電動工具、配件及刀具等,使用特殊型式之電動工具時要考量工作條件及所執行之工作。
使用電動工具未如預期用途之操作時,會導致危害。
000Book_C6UY_Tha.indb 11000Book_C6UY_Tha.indb 11 2018/03/06 16:54:272018/03/06 16:54:27

12
中國語
5) 維修a) 讓你的電動工具由合格修理人員僅使用相同的維修零件更換。
如此可確保電動工具的安全得以維持。
注意事項不可讓孩童和體弱人士靠近工作場所。應將不使用的工具存放在孩童和體弱人士伸手不及的地方。
所有圓鋸機之安全說明
a) 危險:手部必須遠離鋸片與切割區域。另一手須握持 輔助把手或馬達外殼。
如果雙手皆握住圓鋸機,雙手便可免於鋸片所 傷。
b) 不可碰觸下方的工件。 否則保護罩無法保護您免於鋸片所傷。c) 調整工件厚度的相對鋸切深度。 在工件下方應可看到小於鋸片全齒深之深度。d) 不可使用手按住或腿壓住正在鋸切的工件。必 須將工件固定於平穩的工作台。
減少身體的暴露、鋸片卡住或失控,是正確的 完成工作的重要憑藉。
e) 在鋸切工具可能接觸到隱藏線路或其本身的線 路之情況下進行操作時,須握持鋸切工具的絕 緣握持面。
否則接觸到「有電」的線路與置身在電動工具 的金屬部位時,將會造成操作員觸電的危險。
f) 進行鋸切時應使用鋸切護罩或直線導向器。 此舉可改善鋸切的精確度並減少發生鋸片卡住的機會。
g) 使用正確的軸孔尺寸與形狀(菱形端或圓端)的鋸片。
鋸片安裝不正確將有導致鋸切失控的危險。h) 不可使用已損壞或不正確的鋸片墊圈或螺栓。 鋸片墊圈與螺栓是特別專為圓鋸機所設計以提 供最佳的性能表現與最安全的操作。
所有圓鋸機之詳細安全說明
反衝作用之發生原因與防止:– 反衝作用是因鋸片受夾住、卡住或不對準 而導致鋸片失控舉起或脫離工件而朝向操 作員的作用力;
– 當鋸片緊固地夾住、卡住於切口時,此時 馬達會有反向作用力朝向操作員;
– 鋸切時鋸片扭曲或不正,鋸片後緣的齒部 便會戳入木材的上表面而造成鋸片脫離切 口並回彈朝向操作員。
反衝作用是圓鋸機誤用與/或操作程序或條件不正確所造成的結果,以下所列的正確防範措施可以避免此類問題的發生。a) 兩手保持緊握圓鋸機並且將手臂置於適當的位置以抵抗反衝作用力。
身體須位於鋸片的任一側,身體與鋸片不可成一直線。
反衝作用力會導致圓鋸向後彈跳,但如果有採取適當的預防措施,反衝作用力是可以被操作者所控制。
b) 當鋸片被夾住時或者由於某些原因中斷時,請鬆開扳機並且保持圓鋸機不動,直到鋸片作動完全停止。
當鋸片在運行中或者有可能發生反衝作用力時,決不可試圖從工件上移開圓鋸機或者將圓鋸機向後拉。
須進行研究並且採取矯正措施以消除鋸片夾住的原因。
c) 重新啟動鋸切工件時,須將鋸片定位在切口中央並檢查鋸片是否未夾入材料中。
如果鋸片有夾入,則重新啟動鋸片時可能會造成工件的移動或產生反衝作用力。
d) 採用大面板支撐座,使鋸片受夾住或產生反衝作用力的風險降到最低。
由於其自身重力,大面板支撐座趨於下陷。 支撐座必須置於面板兩側的下方,靠近鋸切路徑與面板邊緣。
e) 不要使用不鋒利或已損壞的鋸片。 裝設不鋒利或不正確的鋸片會產生狹窄切口而造成過大的磨擦力、鋸片夾住以致產生反衝作用力。
f) 在進行鋸切之前,鋸片深度與斜度調整鎖定控制桿必須安全固定。
如果鋸片調整裝置在鋸切時移動,可能會造成夾住並產生反衝作用力。
g) 在進行牆壁或其他隱蔽區域之鋸切時請格外小心。鋸片可能會鋸切到足以產生反衝作用力的物體。
安裝有擺鋸罩或牽引罩電鋸的安全說明書
a) 在每次使用之前,先檢查下罩是否能正確的關閉。如果下罩無法自由移動與立即關閉,決不可操作圓鋸機。不可將下罩夾入或拴入開啟位置。
如果圓鋸機不慎掉落,其下罩可能會折彎。 使用縮回操作以升起下罩,並確定它可自由移動而且在各種角度和深度之鋸切皆不會接觸到鋸片或者任何其他部位。
000Book_C6UY_Tha.indb 12000Book_C6UY_Tha.indb 12 2018/03/06 16:54:272018/03/06 16:54:27

13
中國語
b) 檢查下罩彈簧之作動狀況。如果下罩與彈簧皆無法正確的作動,請在使用之前必須先行將它們修復。
下罩可能由於零件損壞、黏膠沉澱,殘屑生成而造成作動遲滯。
c) 僅在使用「切入式鋸切(plunge cuts)」與 「複合式鋸切(compound cuts)」之類的特殊鋸切方式時才須使用手動縮回下罩。利用縮回把手可將下罩舉起,當鋸片開始鋸切工件材料時,必須釋放下罩。
所有圓鋸機的下罩皆應可自動的作動。d) 在將圓鋸機置於工作台或地板上之前,先檢查下罩是否有覆蓋於鋸片上。
一個未受保護、限制的鋸片將會導致圓鋸機反向行進而產生任意鋸切的情形。請務必明瞭在鬆開開關後至鋸片完全停止時所需的時間。
所有裝有劈刀之電鋸的額外安全注意事項
a) 依使用的鋸片,選用適宜的劈刀。 可正常運作的劈刀,厚度必須大於鋸片本體,但小於鋸片鋸齒組。
b) 依本說明手冊內所述步驟調整劈刀。 不正確的間隔、定位及對正將無法有效防止劈刀回彈。
c) 除了直進鋸切外,請務必使用劈刀。 應在使用直進鋸切後,更換劈刀,因為劈刀在直進鋸切時,會引起干擾且可能會產生回彈。
d) 為使劈刀能正常運作,應將其介入工件內。 於短鋸切時,無法有效防止劈刀回彈。e) 若劈刀彎曲,請勿操作電鋸。 即使是微小的干擾,也會減緩護套的閉合速度。
使用手提電動圓鋸時應注意事項
1. 不要使用變形或斷裂的鋸片。2. 不要使用由高速鋼所做成的鋸片。3. 不要使用未依照規定的鋸片。4. 不要在圓盤上施加橫向壓力使鋸片停止。5. 隨時保持鋸片鋒利。6. 確定下罩可平順且自由的移動。7. 決不可將圓鋸機的下罩固定在開啟位置。8. 確定護罩系統的縮回機構能正確的作動。9. 鋸片本體的厚度必須小於劈刀及鋸切的寬度,或鋸口(含鋸齒組)的寬度必須大於劈刀的厚度。
10. 決不以向上或移動至側邊的操作方式進行操作圓鋸機。
11. 確保工件材料沒有鐵釘之類的異物。12. 除了直進鋸切工件的中央外,請務必使用劈刀。13. C6UY及C6BUY款式的鋸片範圍,應為165 mm至162 mm。
C7UY及C7BUY款式的鋸片範圍,應為190 mm至185 mm。
14. C6BUY 及 C7BUY款式應小心制動回彈。 C6BUY及C7BUY款式,在放開開關時會啟動電動制動,因此,請務必握緊電鋸的主體部分。
15. 由於C6BUY及C7BUY款式係使用電動制動,因此在關閉開關時,可能會因制動運作而產生火花,但該現象並非表示機器故障。
16. 當C6BUY及C7BUY款式的電動制動變得無效時,請更換新的碳刷。
17. 在進行任何調整、保養或維修之前,須先拔下插座上的插頭。
規 格
型 式 C6UY C6BUY C7UY C7BUY
電壓(按地區)* (110 V, 220 V, 230 V, 240 V)
切削深度90 度 66 mm 78 mm
45 度 46 mm 55 mm
輸入功率* 1300 W (110 V, 240 V: 1200 W)
額定輸出功率 950 W
無負荷速度 5500 轉/分
重量(不含線纜) 3.8 kg 4.2 kg
* 當須改變地區時應檢查產品上的銘牌。
000Book_C6UY_Tha.indb 13000Book_C6UY_Tha.indb 13 2018/03/06 16:54:282018/03/06 16:54:28

14
中國語
標 準 附 件
(1) 鋸片(安裝於工具上) ......................................1
( 直徑 165 mm ....................... C6UY,C6BUY )直徑 190 mm ....................... C7UY,C7BUY
(2) 六角頭棒形扳手 .................................................1(3) 導片 ...................................................................1(4) 套筒扳手 ............................................................1(5) M4螺絲...............................................................1標準附件可能不預先通告而徑予更改。
選購附件(分開銷售)
(1) 鋸屑收集器(見圖 15)(2) 導片軌接合器(見圖 5)選購附件可能不預先通告而徑予更改。
用 途
鋸割各種木材。
作 業 之 前
1. 電源 確認所使用的電源與工具銘牌上標示的規格是否相符。
2. 電源開關 確認電源開關是否切斷。若電源開關接通,則插頭插入電源插座時電動工具將出其不意地立刻轉動,從而招致嚴重事故。
3. 延伸線纜 若作業場所移到離開電源的地點,應使用容量足夠、鎧裝合適的延伸線纜,並且要盡可能地短些。
4. 制備木質工作薹(圖 1) 鋸片將露出踞木下面,所以鋸割時,應將鋸木放在工作薹上。若用方木塊作為工作薹,則應選擇平坦地面,以保持穩定。使用不穩定的工作薹,工作時非常危險。
注意為避免可能發生的意外事故,請隨時確保在鋸切後,將剩餘的部分工件拴固妥當。
使用前調整電鋸
1. 調整鋸切的深度 如圖2所示,一手握住把手,另一隻手放鬆旋鈕。 可將底座移動至所需的位置以調整鋸切的深度,以此方式調整鋸切深度後,再將旋鈕扭緊。
2. 調整劈刀 先扭緊旋鈕並固定電鋸護蓋(圖 2)。 鬆開用於夾緊劈刀的凸緣螺栓(2支),然後調整劈刀,使劈刀與鋸片邊緣之間的距離不超過5 mm,且鋸片邊緣應比劈刀的最低邊緣突出不超過 5 mm(圖 3),最後將凸緣螺栓(2支) 鎖緊。
3. 調整傾斜角度 如圖 4(A)及4(B)所示,鬆開傾斜量規上的柄及底座上的碟型螺栓,調整鋸片的傾斜角度,最大可與底座承45度角相同。在完成調整後,再次確認柄及碟型螺栓已鎖緊。
4. 調節導片(選購配件) 鬆開底座前方及後方的夾緊桿,並從主體上拆離導片軌接合器(圖 5)。
註請注意,部分電鋸在拆下導片軌接合器之後,會使旋鈕與導片軌接合器發生撞擊現象。在此情況下,只要先稍微降低本體的鋸切深度,再拆下導片軌接合器即可(圖 6)。
鬆開夾緊桿後,可將導片向左或向右移動以調整鋸切的位置。
導片可安裝於工具的右側或左側(圖 7)。5. 微調鋸片的平行度 可利用平行度調整螺絲微調鋸片與底座的平行度。
電鋸在工廠出貨前已經過調整,如果在不太可能但平行度卻發生問題的情況下,請依以下步驟進行調整。(1) 只鬆開電鋸護蓋絞鏈部分的安裝螺絲(圖8)。
(2) 將低護套部分縮入電鋸護蓋內。(3) 在鋸片底座後側插入木屑,並在底座上標示位置(圖 9)。
(4) 將已標示的木屑移至底座的前方,並轉動平行度調整螺絲,使標示點與底座側邊對應(圖 10)
(5) 調整後,將安裝螺絲鎖緊定位。
註若在調整平行度之後,調整鋸切深度,則平行度可能會產生些微誤差。
000Book_C6UY_Tha.indb 14000Book_C6UY_Tha.indb 14 2018/03/06 16:54:282018/03/06 16:54:28

15
中國語
6. 調整導件 在圓形電鋸上,可微調導件的固定位置,使鋸片對正預先標示的線。電鋸在從工廠出貨時,已將導件上的前刻度盤的直線部分對正鋸片的中心位置(圖 11)。
若固定位置錯誤,可鬆開導件上的固定螺絲M4,進行必要的位置調整。
7. 使用導片軌(選購配件) 將導片軌接合器通過底座的方形承座,並在導片軌接合器與底座側邊表面接觸的位置上夾緊桿夾緊(圖 5)。
註部分電鋸在安裝導片軌接合器時,會使導片軌接合器與旋鈕發生撞擊現象,在此情況下,只要稍微降低電鋸本體的鋸切深度,再安裝導片軌接合器即可(圖6)。
(1) 鬆開碟型螺栓,依使用的導片軌,調整軌桿的位置,再使用碟型螺栓固定(圖 13)。
(2) 將電鋸本體置於導片軌上,使導片軌的突出部分可裝入導片軌接合器的凹槽內(圖 14)。
(3) 鬆開夾緊桿,調整鋸片的位置,然後再次夾緊夾緊桿。
(4) 之後即可開始進行鋸切作業。
註○ 使用導片軌進行鋸切作業時,請切記當導片軌厚度增加時,就必須降低鋸切的深度。
○ 本導片軌接合器適用於BOSCH、FESTO及MAKITA導片軌。
○ 當導片軌以45度傾斜角使用時,鋸片的位置將無法對應底座尖端所提供的凹痕。
8. 使用鋸屑收集器(選購配件) 使用吸塵器收集鋸屑時,請將吸管連接於鋸屑收集器上,以M4螺絲將該收集器連接於電鋸主體上(圖 15)。
9. 調整夾緊桿的位置 按下夾緊桿即可從螺栓頭鬆脫,並可自由轉動。 將導片及導片軌固定後,按下夾緊桿並將其轉至不會干擾到鋸切作業的位置上(圖 16)。
鋸 割 步 驟
1. 將底座置於材料上,然後將預先標示的線及鋸片,對正底座前方的導件前刻度盤部分(圖 11)。
當底座不傾斜時,可使用較大的切口作為導片(圖 11、圖 12(A))。
若底座傾斜時(45度角),則可使用較小的前刻度盤作為導片(圖 11、圖 12(B))。
2. 在鋸片與鋸木接觸前,請確定開關已置於ON上,然後擠壓觸發器以開啟開關,鬆開觸發器則可關閉開關。
3. 以定速直線移動電鋸時,可獲得最佳的鋸切結果。
注意進行鋸切操作之前,請確認材料是否適當。如果鋸切材料時會產生有害物質,請務必使用集塵袋或接上適當的粉塵抽取設備將粉塵排出。必要時請戴上防塵罩。底座上有一層PFTE塗層。請注意,不要對電鋸本體施力過大,以免會對馬達造成過大的負荷。事實上輕輕用力反而更容易移動電鋸,且鋸切也更省力。請注意,若使用電鋸鋸切覆蓋有如細沙或金屬屑等硬質微粒的木材,很容易刮損表面的塗層。○ 在開始鋸割之前,先確認鋸片已達到全速轉速。
○ 若鋸片在鋸切作業時停止,或發出異常的噪音,請立即關閉開關。
○ 隨時注意不要讓電源線靠近轉動的鋸片。 ○ 鋸片朝上或朝側面使用手提電動圓鋸是非常危險的,這種不正常的用途應予避免。
○ 踞割材料時,務請戴上護眼鏡。○ 完成作業時,應將插頭從電源座拔出。
鋸 片 的 裝 卸
注意為了避免發生嚴重事故,務必將開關於 OFF(斷開)位置,並把電源切斷。
1. 拆卸鋸片(1) 鬆開旋鈕並稍微降低最大鋸切深度(圖 2)。(2) 如圖17所示,放置圓型電鋸。(3) 按下鎖緊桿,鎖緊心軸,並使用套筒扳手拆下六角頭螺栓。
(4) 握著下罩旋鈕,將下罩縮回至鋸蓋內,然後拆下鋸片。
2. 安裝鋸片(1) 鬆開旋鈕並稍微降低最大鋸切深度(圖 2)。(2) 將轉軸、螺栓、墊圈上的鋸屑灰塵完全清除。(3) 如圖 18所示,將襯墊(A)之突出中心的直徑以及與鋸片內徑相同的一側,和襯墊(B)的凹面側,安裝於鋸片的側邊。
(4) 欲確保鋸片能依照正確方向轉動時,鋸片的箭頭方向必須與鋸蓋的箭頭方向一致。
000Book_C6UY_Tha.indb 15000Book_C6UY_Tha.indb 15 2018/03/06 16:54:282018/03/06 16:54:28

16
中國語
(5) 利用手指儘可能地鎖緊六角頭螺栓,以使鋸片保持定位,然後按下鎖緊桿,鎖住心軸,並徹底鎖緊六角承座螺栓。
注意裝上鋸片之後,再確認鎖緊桿有被緊固的鎖在適當的位置上。
維 護 和 檢 查
1. 檢查鋸片 使用鈍的鋸片會降低鋸切效率並造成馬達故障,故須將鋸片磨利或換新。
2. 檢查安裝螺釘 要經常檢查安裝螺釘是否緊固妥善。若發現螺釘鬆了,應立即重新扭緊,否則會導致嚴重的事故。
3. 檢查碳刷(圖 19) 馬達使用碳刷,它是消耗部品,因為使用過久的碳刷將會導致馬達故障,用具有相同碳刷號的新碳刷去更換舊的,碳刷編號用數字表示碳刷何時用舊或接近於磨損極限此之外,要經常保持碳刷清潔以及保証它在刺握裡能自由滑動。
注意○ 更換新碳刷時,請務必使用圖面上所標示之號碼的原廠HiKOKI碳刷。
○ C6BUY及C7BUY款式,若使用非指定的碳刷,可能無法運作電動制動。當電動制動無效時,請更換新的碳刷。
4. 更換碳刷 用無頭螺絲刀卸下碳刷蓋,然後可以很容易地取下碳刷。
5. 電動機的維護 電動機繞線是電動工具的心臟部。應仔細檢查有無損傷,是否被油液或水沾濕。
6. 調整底座及鋸片,以保持其垂直位置 雖然鋸片與底座之夾角已調整至90°,然而在某些狀況時其夾角可能無法互為垂直,需使用下列方法調整之:
(1) 將底座面朝上(圖 20)並鬆開柄及蝶形螺栓(圖 4(A)、圖 4(B))。
(2) 使用槽頭螺絲起子轉動槽頭螺絲,利用直角尺將底座與鋸片調整至互為垂直。
7. 維修部件目錄
注意HiKOKI電動工具的修理維護和檢查必須由HiKOKI所認可的維修中心進行。當尋求修理或其他維護時,將本部件目錄與工具一起提交給HiKOKI所認可的維修中心會對您有所幫助。在操作和維護電動工具中,必須遵守各國的安全規則和標准規定。
改進HiKOKI電動工具隨時都在進行改進以適應最新的技術進步。因此,有些部件可能未預先通知而進行改進。
註為求改進,本手冊所載規格可能不預先通告徑予更改。
000Book_C6UY_Tha.indb 16000Book_C6UY_Tha.indb 16 2018/03/06 16:54:282018/03/06 16:54:28

กฎความปลอดภัยโดยท่ัวไป
คําเตือน!โปรดอานคําแนะนําท้ังหมดถาไมปฏิบัติตามคําแนะนําท้ังหมด อาจถูกไฟฟาดูด เกิดไฟไหม และ/หรือบาดเจ็บสาหัสก็ไดคําวา “เครื่องมือไฟฟา” ในคําเตือนตอไปน้ีท้ังหมดหมายถึงเครื่องมือท่ีคุณใชงานกับปล๊ักไฟฟา (มีสายไฟ) หรือใชงานกับแบตเตอร่ี (ไรสาย)
โปรดปฏิบัติตามคําแนะนําตอไปน้ี1) พื้นที่ทํางาน
a) รักษาพ้ืนที่ทํางานใหสะอาดและมีแสงสวางเพียงพอ สิ่งที่เกะกะและความมืดทําใหเกิดอุบัติเหตุไดb) อยาใชเครื่องมือไฟฟาในบรรยากาศท่ีอาจระเบิด เชน มี
ของเหลวไวไฟ แกสหรือฝุน เครื่องมือไฟฟาอาจเกิดประกายไฟท่ีอาจทําใหฝุนและไอติดไฟไดc) ใชงานเครื่องมือไฟฟาใหไกลจากเด็กและคนเฝาชม คนที่วอกแวกทําใหคุณขาดสมาธิในการทํางานได
2) ความปลอดภัยทางไฟฟาa) ปลั๊กของเครื่องมือไฟฟาตองเหมาะกับเตาเสียบ อยาดัดแปลงปลั๊ก อยาใชปลั๊กของตัวปรับแรงดันไฟฟากับเคร่ืองมือไฟฟาชนิดท่ีตอ
ลงดิน ปล๊ักกับเตาเสียบท่ีไมพอดีกันอาจทําใหคุณถูกไฟฟาดูดb) อยาใหตัวคุณสัมผัสกับพ้ืนผิวท่ีตอลงดิน เชนทอโลหะ
เครื่องทําความรอน เตาอบ ตูเย็น เปนตน อาจถูกไฟฟาดูดถารางกายของคุณตอวงจรลงดินc) อยาใหเครื่องมือไฟฟาถูกกับนํ้าฝนหรือความเปยกช้ืน นํ้าท่ีเขาไปในเครื่องมือไฟฟาจะเพ่ิมความเส่ียงท่ีจะถูกไฟฟาดูดd) อยาใชสายไฟฟาในงานอื่น อยาใชสายเพ่ือห้ิว ดึงหรือ เสียบ
เครื่องมือไฟฟา ใหสายไฟอยูหางจากความรอน นํ้ามันขอบแหลมคมหรือช้ินสวนที่เคลื่อนไหว
สายท่ีชํารุดหรือตึงอาจทําใหคุณถูกไฟฟาดูดไดงายe) เม่ือใชงานเครื่องมือไฟฟานอกอาคาร ใชสายพวงชนิดท่ีใชกับนอกอาคารเม่ือใชสายท่ีเหมาะสมจะลด
ความเส่ียงท่ีจะถูกไฟฟาดูด
3) ความปลอดภัยสวนบุคคลa) ระวังตัว ดูสิ่งที่คุณกําลังทํา ใชสามัญสํานึกเมื่อใชเคร่ืองมือ
ไฟฟา อยาใชเครื่องมือไฟฟาเม่ือคุณออนเพลียหรือกินยา สุรา หรือยาเสพติด
การขาดสติช่ัวขณะเม่ือใชเครื่องมือไฟฟาอาจทําใหคุณบาดเจ็บสาหัส
b) ใชอุปกรณนิรภัย สวมแวนตาปองกันเสมอ อุปกรณปองกันเชนหนากากกันฝุน รองเทากันลื่น หมวกนิรภัย
หรือจุกอุดหูท่ีเหมาะสมจะเล่ียงการบาดเจ็บของรางกายไดc) ระวังเครื่องทํางานโดยไมตั้งใจ ใหสวิทซอยูในตําแหนงปด
กอนเสียบปล๊ัก เม่ือจับเคร่ืองมือไฟฟาเม่ือนิ้วอยูท่ีตัวสวิทซ หรือเม่ือเสียบปล๊ัก
ขณะเปดสวิทซไวอาจทําใหเกิดอุบัติเหตุ
d) เอาสลักปรับแตงหรือประแจออกกอนเปดสวิทซไฟฟา สลักหรือประแจท่ีติดกับสวนหมุนของเครื่องมือไฟฟาอาจทําให
คุณบาดเจ็บไดe) อยาเอ้ือมตัว ยืนใหม่ันและสมดุลตลอดเวลา ทําใหควบคุมเครื่องมือไฟฟาไดดีข้ึนเมื่อมีเหตุท่ีไมคาดฝนf) แตงตัวใหรัดกุม อยาสวมเสื้อผาหลวมหรือใชเครื่องประดับ ให
ผม เสื้อผาและถุงมืออยูหางจากชิ้นสวนที่เคลื่อนท่ี เสื้อผาหลวม เครื่องประดับหรือผมยาวอาจถูกชิ้นสวนหมุนรั้ง
เขาไปg) ถาออกแบบเคร่ืองมือไฟฟาไวใหตอกับชุดดูดฝุนหรือเศษวัสดุ
ใหเช่ือมตอและใชงานอยางถูกตอง เม่ือใชกับชุดอุปกรณเหลานี้ จะลดอันตรายจากฝุน
4) การใชละบํารุงรักษาเคร่ืองมือไฟฟาa) อยาใชเครื่องมือไฟฟาโดยฝนกําลัง ใชเครื่องมือท่ีถูกตองกับ
งานของคุณ เครื่องมือไฟฟาท่ีถูกตองจะทํางานไดดีกวาและปลอดภัยกวา ใน
อัตราตามท่ีออกแบบไวแลวb) อยาใชเครื่องมือไฟฟาถาสวิทซปดเปดไมได เครื่องมือไฟฟาท่ีควบคุมดวยสวิทซไมไดจะมีอันตรายและตอง
ซอมเสียc) ถอดปลั๊กจากแหลงไฟฟากอนปรับแตง เปล่ียนอะไหล หรือเก็บ
รักษา มาตรการปองกันเชนนี้จะลดความเสี่ยงของอุบัติเหตุท่ี
เครื่องมือไฟฟาจะเร่ิมทํางานโดยไมไดตั้งใจd) เก็บเคร่ืองมือไฟฟาใหหางจากเด็ก และอยายอมใหผูท่ีไมเคยชิน
กับเคร่ืองมือไฟฟาหรือคําแนะนําเหลานี้ใหใชเครื่องมือไฟฟา เครื่องมือไฟฟาเปนสิ่งที่มีอันตรายมากเม่ืออยูในมือของคนท่ี
ไมชํานาญe) บํารุงรักษาเคร่ืองมือไฟฟา ตรวจดูศูนยเคลื่อน สวนบิดงอ ชํารุด
หรือสภาพอื่นๆ ท่ีมีผลตอการทํางานของเครื่องมือไฟฟา หากชํารุด ใหซอมแซมเสียกอนใชงาน อุบัติเหตุจํานวนมากเกิดจากเครื่องมือไฟฟาท่ีบํารุงรักษาไมดีพอf) ใหเครื่องมือตัดมีความคมและสะอาด เครื่องมือตัดท่ีบํารุงรักษาอยางถูกตองและมีขอบคมจะไมคอย
บิดงอ และควบคุมไดงายกวาg) ใชเครื่องมือไฟฟา สวนประกอบและปลายเคร่ืองมือตัดตาม
คําแนะนําเหลานี้ และตามท่ีออกแบบไว โดยพิจารณาสภาพงานและสิ่งที่จะใชงาน
ถาใชเครื่องมือไฟฟากับงานท่ีไมไดออกแบบไวอาจเกิดความเสียหายได
5) การซอมบํารุงa) ใหชางซอมท่ีชํานาญเปนผูซอม และเปลี่ยนอะไหลท่ีเปนของแท ทําใหเครื่องมือไฟฟามีความปลอดภัย
คําเตือนเก็บใหพนมือเด็กและผูไมชํานาญหากไมไดใช ควรเก็บใหพนมือเด็กและผูไมชํานาญ
17
ไทย
000Book_C6UY_Tha.indb 17000Book_C6UY_Tha.indb 17 2018/03/06 16:54:282018/03/06 16:54:28
คําแนะนําความปลอดภัยสําหรับเล่ือยไฟฟา
a) อันตราย: อยาใหมือถูกกับคลองเลื่อยและใบเลื่อย ใชอีกมือหน่ึง จับคันจับ หรือตัวมอเตอร
ถาจับเล่ือยดวยมือท้ังสอง จะใชใบเลื่อยตัดไมไดb) อยาเขาไปใตช้ินงาน แผนกั้นปองกันคุณจากใบเลื่อยใตช้ินงานไมไดc) ปรับแตงความลึกของคลองเลื่อยไปตามความหนาของช้ินงาน ควรเห็นคลองเลื่อยนอยกวาความยาวของฟนเลื่อยท่ีอยูใตช้ินงานd) อยาจับช้ินงานที่จะเลื่อยไวในมือหรือครอมเทา ใหจับช้ินงานกับ
แทนงานที่แนนหนา ตองจับช้ินงานใหแนนเพื่อลดความเส่ียงท่ีรางกายจะกระทบ
ใบเล่ือยงอ หรือขาดการควบคุมe) จับเคร่ืองมือไฟฟาท่ีผิวจับซ่ึงเปนฉนวนเมื่อใชงานโดยที่เคร่ืองมือ
ไฟฟาอาจแตะกับสายไฟฟาหรือลวดที่มองไมเห็น เม่ือแตะกับสายท่ีมีไฟฟา ทําใหช้ินสวนโลหะของเครื่องมือไฟฟามี
กระแสและคุณอาจถูกไฟฟาดูดf) เม่ือตัดหรือเซาะรอง ใหใชแผนเซาะหรือรางขอบตรง เพ่ิมความแมนยําของงานตัดและลดโอกาสที่ใบเลื่อยจะบิดงอg) ใชใบเลื่อยท่ีถูกขนาดและมีรูความคม (แบบกลมหรือเหล่ียม) ใบเลื่อยท่ีไมตรงกับแทนยึดของเครื่องเลื่อยจะหมุนไมตรงศูนย ทําให
สูญเสียการควบคุมh) อยาใชแหวนหรือสกรูยึดใบเลื่อยท่ีไมชํารุดหรือผิดขนาด เราไดออกแบบแหวนหรือสกรูยึดท่ีตรงกับเล่ือยไฟฟาของคุณ เพ่ือให
เกิดสมรรถนะและความปลอดภัยสูงสุด
คําแนะนําเพ่ิมเติมเพ่ือความปลอดภัยของเล่ือยไฟฟาทุกชนิด
สาเหตุและการปองกันผูใชงานจากการกระดอน– การกระดอนเปนปฏิกิริยาทันทีจากใบเลื่อยท่ีฝด สะทอนหรือ ไมได
ศูนย ทําใหเลื่อยไฟฟาท่ีควบคุมไมไดยกตัวข้ึนออกจากชิ้นงาน และเขาหาผูใชงาน
– เม่ือใบเลื่อยฝดหรือกระดอนเพราะผาคลองเลื่อยเสร็จ ใบเลื่อยจะหยุดและมอเตอรขับเล่ือยไฟฟากลับเขาหาตัวผูใชงานโดยทันที
– ถาใบเลื่อยบิดหรือไมไดศูนยขณะตัด ฟนเลื่อยท่ีขอบหลังจะฝงเขาท่ี ผิวบนของแทงไม ทําใหใบเลื่อยไตออกจากคลองเลื่อย และกระโดด กลับมายังผูใชงาน
การกระดอนเปนปฏิกิริยาจากการใชเลื่อยและ/หรือข้ันตอนและสภาพการ ใชงานที่ไมถูกตอง และอาจเลี่ยงไดโดยใชความระมัดระวังดังตอไปน้ีa) ใชมือท้ังสองจับเล่ือยใหแนน และวางตําแหนงมือใหตานแรง
กระดอนกลับ วางตําแหนงลําตัวไปทางดานใดดานหนึ่งของใบเลื่อย แตไมให ตรง
กับใบเล่ือย การกระดอนอาจทําใหเลื่อยไฟฟากระโดดกลับ แตผูใชงานอาจ
ควบคุมแรงกระดอนได หากใชความระมัดระวังตามสมควรb) เม่ือบิดใบเลื่อย หรือหยุดตัดเพราะความจําเปนบางอยาง ใหปลอย
สวิทซ และจับจนเลื่อยหยุดนิ่งในเนือ้ไม อยาพยายามเอาเล่ือยออกจากช้ินงานหรือดึงเลื่อยกลับเม่ือใบเลื่อย
กําลังหมุน เพราะอาจกระดอนกลับได ตรวจสอบและหาทางแกไขเพ่ือไมใหใบเลื่อยบิดงอ
c) เม่ือหมุนเลื่อยในช้ินงานอีกครั้ง ใหใบเลื่อยอยูในคลองเลื่อย และ ไมใหฟนเลื่อยขบเน้ือไม
ถาใบเลื่อยบิดตัว อาจกระดอนหรือกระโจนออกจากชิ้นงานเมื่อคุณ เปดสวิทซ
d) ยึดแทงไมใหญใหแนนเพื่อไมใหใบเลื่อยฝดและกระดอนกลับ ช้ินไมใหญมักแอนเพราะน้ําหนักของตัวเอง ตองรองรับใตช้ินไมหรือท้ังสองขาง ใกลคลองเลื่อยและใกลขอบไม e) อยาใชใบเลื่อยท่ีท่ือหรือชํารุด ใบเลื่อยท่ีท่ือหรือไมไดดดัอยางถูกตองทําใหเกิดคลองเลื่อยแคบๆ
เกิดแรงฝด ใบเลื่อยบิดงอและกระดอนกลับไดf) ตองขันคันล็อกความลึกและปรับแตงมุมของใบเลื่อยใหแนนกอน
ใชงาน ถาตําแหนงใบเลื่อยเปล่ียนไปขณะตัด ทําใหใบเลื่อยบิดและ
กระดอนกลับไดg) ใชความระมัดระวังเปนพิเศษเม่ือบากเขาไปในผนังหรือสวนอื่นๆ
ท่ีมองไมเห็น ใบเลื่อยท่ีย่ืนออกมาอาจตัดช้ินสวนอื่นจนกระดอนกลับได
คําแนะนําความปลอดภัยของเล่ือยท่ีมีแผนกั้นแกวงหรือแผนกั้นฉุด
a) ตรวจดูใหแผนกั้นลางปดสนิทกอนใชงาน อยาเปดสวิทซเม่ือแผนกั้นลางไมเลื่อนอยางคลองตัวและปดโดยทันที อยาร้ังหรือมัดแผนกั้นลางใหอยูในตําแหนงเปด
ถาเลื่อยตกกระแทกโดยบังเอิญ แผนกั้นลางอาจบิดงอ ยกแผนกั้นลางท่ีมือจับร้ัง และตรวจดูใหเลื่อนโดยอิสระและไมแตะกับ
ใบเลื่อยหรือสวนอื่นๆ ในทุกทิศทางและทุกความลึกที่ตัดb) ตรวจดูการทํางานของสปริงกดแผนกั้นลาง ถาแผนกั้นและสปรงิ
ไมทํางานอยางถูกตอง จะตองซอมกอนใชงาน แผนกั้นลางอาจทํางานไมคลองตัว จนชิ้นสวนชํารุด มีข้ีเลื่อยติด
หรืออุดตันc) ควรรั้งแผนกั้นลางเองเม่ือใชในงานตัดพิเศษ เชนเซาะลาก หรือตัด
แบบซับซอน ยกแผนกั้นลางท่ีตัวจับร้ัง และเม่ือใบเลื่อยตัดไมแลว ตองเลิกรั้งแผนกั้นลางทันที
ในงานตัดอื่นๆ นั้น แผนกั้นลางควรทํางานโดยอัตโนมัติd) ตรวจดูใหแผนกั้นลางปดใบเลื่อยกอนวางเลื่อยไฟฟาลงบนแทน
งานหรือพ้ืน ใบเลื่อยท่ีไมมีแผนกั้นและกําลังหมุนทําใหเลื่อยไฟฟาถลากลับ และ
ตัดอะไรตอมิอะไรท่ีอยูใกลๆ ใหสังเกตระยะเวลาท่ีใบเลื่อยหยุดหลังจากปดสวิทซ
คําแนะนําเพ่ิมเติมเพ่ือความปลอดภัยสําหรับการเล่ือยดวยมีดไรวิ่ง
a) ใชใบมีดไรวิ่งที่เหมาะสมสําหรับงาน สําหรับใบมีดไรวิ่งที่ใชในการทํางาน จะตองหนากวาตัวเลื่อยแตบาง
กวาฟนใบเลื่อยb) ปรับใบมีดไรวิ่งตามท่ีอธิบายในคูมือการใชงาน การวางผิดท่ี ผิดตําแหนง หรือ แถว จะทําใหใบมีดไรวิ่งทํางาน
ไรประสิทธิภาพในการปองกันการเดงกลับ
18
ไทย
000Book_C6UY_Tha.indb 18000Book_C6UY_Tha.indb 18 2018/03/06 16:54:282018/03/06 16:54:28

c) ใชใบมีดไรวิ่งเสมอ ยกเวน ขณะผา ใบมีดไรวิ่งตองถูกเปลี่ยนหลังจากใชผา ใบมีดไรวิ่งเปนสาเหตุรบกวน
ระหวางการผาและสามารถทําใหเกิดการเดงกลับไดd) เพ่ือใหใบมีดไรวิ่งทํางาน ใบมีดตองประสานกับช้ินงาน มีดไรวิ่งจะไรประสิทธิภาพในการปองกันการเดงกลับในระหวางการ
ตัดระยะส้ันe) ไมใชเลื่อยหากมีดไรวิ่งเบ้ียว แมการรบกวนเพียงเล็กนอยก็สามารถทําใหระดับการปดของอุปกรณ ปองกันชาลง
ขอควรระวังในการใชเลื่อยวงเดือน
1. อยาใชใบเลื่อยวงเดือนท่ีบิดงอหรือราว2. อยาใชใบเลื่อยวงเดือนท่ีทําจากเหล็กกลารอบหมุนสูง3. อยาใชใบเลื่อยวงเดือนท่ีไมตรงกับสมรรถนะในคูมือการใช4. อยาหยุดใบเลื่อยดวยแรงกดทางดานขางของใบเลื่อย5. รักษาใบเล่ือยใหคมอยูเสมอ6. ตรวจดูใหแผนกั้นลางเลื่อนไดอยางอิสระและคลองตัว7. อยาใชเลื่อยวงเดือนท่ีล็อกแผนกั้นลางไวในตําแหนงเปด8. ตรวจดูใหกลไกรั้งกลับของแผนกั้นทํางานอยางถูกตอง
9. ตัวใบเลื่อยตองบางกวาใบมีดไรวิ่ง และความกวางของการตัด หรือ เลื่อย (โดยชุดฟนเลื่อย) ตองใหญกวาความหนาของใบมีดไรวิ่ง
10. อยาใชงานเลื่อยวงเดือนเม่ือใบเลื่อยหมุนขึ้นหรือหมุนไปทางดานขาง11. ตรวจดูไมใหช้ินงานมีสิ่งแปลกปลอม เชนตอกตะปูไวบนไม12. ใบมีดไรวิ่งควรจะถูกใชเสมอยกเวนขณะผาอยูตรงกลางของชิ้นงาน13. สําหรับแบบ C6UY และ C6BUY แนวใบเลื่อย ควรจะอยูระหวาง
165 มม. ถึง 162 มม. สําหรับแบบ C7UY และ C7BUY แนวใบเลื่อยควรจะอยูระหวาง
190 มม. ถึง 185 มม.14. สําหรับแบบ C6BUY และ C7BUY ตองระวังการหยุดและเดงกลับ แบบ C6BUY และ C7BUY มีลักษณะเฉพาะของเบรคไฟฟาซ่ึงทํางาน
เม่ือสวิทชถูกปลอย ขณะท่ีมีการเดงกลับขณะเบรคทํางาน ตองแนใจวาควบคุมอุปกรณหลักอยางมั่นคงปลอดภัย
15. ในบางครั้ง แสงไฟอาจเกิดไดโดยการหยุดการทํางานเม่ือสวิทชถูกปดเนื่องจากแบบ C6BUY และ C7BUY ใชเบรคไฟฟา อยางไรก็ตามเหตุการณท่ีเกิดข้ึนไมใชปญหาของเคร่ืองจักร
16. สําหรับแบบ C6BUY และ C7BUY เม่ือเบรคไรประสิทธิภาพ ใหเปล่ียนแปรงถานใหม
17. ใหถอดปลั๊กออกจากเตาเสียบกอนปรับแตง ซอมหรือ บํารุงรักษา เลื่อยวงเดือน
อุปกรณมาตรฐาน
(1) ใบเลื่อย (ยึดกับเล่ือยไฟฟา) ...........................................................1 เสนผานศูนยกลาง 165 มม. ........................ C6UY, C6BUY (เสนผานศูนยกลาง 190 มม. .........................C7UY, C7BUY)(2) ประแจหกเหล่ียม ..........................................................................1(3) ราง ..............................................................................................1(4) ประแจบอกซ ................................................................................1(5) สกูร M4 .......................................................................................1อาจเปล่ียนแปลงอุปกรณมาตรฐานไดโดยไมตองแจงลวงหนา
อุปกรณประกอบ (แยกจําหนาย)
(1) ชุดเก็บฝุน (ดูรูปท่ี 15)(2) อะแดปเตอรรางนํา (ดูรูปท่ี 5)อาจเปล่ียนแปลงอุปกรณประกอบไดโดยไมตองแจงลวงหนา
การใชงาน
ใชตัดไมชนิดตางๆ
รุน C6UY C6BUY C7UY C7BUY
แรงดันไฟฟา (ตามทองท่ีใชงาน)* (110 โวลท, 220 โวลท, 230 โวลท, 240 โวลท)
ความลึกของคลองเลื่อย90 องศา 66 มม. 78 มม.
45 องศา 46 มม. 55 มม.
กําลังไฟฟา* 1300 วัตต (110 โวลท, 240 โวลท: 1200 วัตต)
ความเร็วอิสระ 5500/นาที
นํ้าหนัก (ไมรวมสายไฟฟา) 3.8 กก. 4.2 กก.
* โปรดตรวจดูปายท่ีตัวเลื่อยไฟฟา เพราะแตกตางไปตามทองท่ีใชงาน
รายละเอียดจําเพาะ
19
ไทย
000Book_C6UY_Tha.indb 19000Book_C6UY_Tha.indb 19 2018/03/06 16:54:282018/03/06 16:54:28
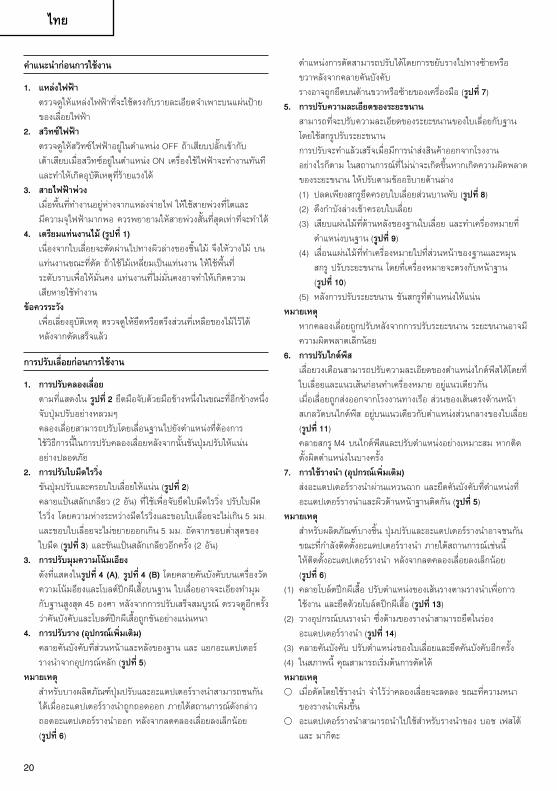
คําแนะนํากอนการใชงาน
1. แหลงไฟฟา ตรวจดูใหแหลงไฟฟาท่ีจะใชตรงกับรายละเอียดจําเพาะบนแผนปาย
ของเลื่อยไฟฟา2. สวิทซไฟฟา ตรวจดูใหสวิทซไฟฟาอยูในตําแหนง OFF ถาเสียบปล๊ักเขากับ
เตาเสียบเม่ือสวิทซอยูในตําแหนง ON เครื่องใชไฟฟาจะทํางานทันที และทําใหเกิดอุบัติเหตุท่ีรายแรงได
3. สายไฟฟาพวง เม่ือพ้ืนที่ทํางานอยูหางจากแหลงจายไฟ ใหใชสายพวงที่โตและ
มีความจุไฟฟามากพอ ควรพยายามใหสายพวงสั้นที่สุดเทาท่ีจะทําได4. เตรียมแทนงานไม (รูปท่ี 1) เนื่องจากใบเลื่อยจะตัดผานไปทางผิวลางของช้ินไม จึงใหวางไม บน
แทนงานขณะที่ตัด ถาใชไมเหล่ียมเปนแทนงาน ใหใชพื้นที่ระดับราบเพ่ือใหม่ันคง แทนงานที่ไมม่ันคงอาจทําใหเกิดความเสียหายใชทํางาน
ขอควรระวัง เพ่ือเลี่ยงอุบัติเหตุ ตรวจดูใหยึดหรือตรึงสวนที่เหลือของไมไวได
หลังจากตัดเสร็จแลว
การปรับเล่ือยกอนการใชงาน
1. การปรับคลองเลื่อย ตามท่ีแสดงใน รูปท่ี 2 ยึดมือจับดวยมือขางหนึ่งในขณะที่อีกขางหนึ่ง
จับปุมปรับอยางหลวมๆ คลองเลื่อยสามารถปรับโดยเลื่อนฐานไปยังตําแหนงที่ตองการ
ใชวิธีการนี้ในการปรับคลองเลื่อยหลังจากนั้นขันปุมปรับใหแนนอยางปลอดภัย
2. การปรับใบมีดไรวิ่ง ขันปุมปรับและครอบใบเล่ือยใหแนน (รูปท่ี 2) คลายแปนสลักเกลียว (2 อัน) ท่ีใชเพ่ือจับยึดใบมีดไรวิ่ง ปรับใบมีด
ไรวิ่ง โดยความหางระหวางมีดไรวิ่งและขอบใบเลื่อยจะไมเกิน 5 มม.และขอบใบเล่ือยจะไมขยายออกเกิน 5 มม. ถัดจากขอบต่ําสุดของใบมีด (รูปท่ี 3) และขันแปนสลักเกลียวอีกครั้ง (2 อัน)
3. การปรับมุมความโนมเอียง ดังที่แสดงในรูปท่ี 4 (A), รูปท่ี 4 (B) โดยคลายคันบังคับบนเคร่ืองวัด
ความโนมอียงและโบลตปกผีเสื้อบนฐาน ใบเลื่อยอาจจะเอียงทํามุม กับฐานสูงสุด 45 องศา หลังจากการปรับเสร็จสมบูรณ ตรวจดูอีกครั้งวาคันบังคับและโบลตปกผีเสื้อถูกขันอยางแนนหนา
4. การปรับราง (อุปกรณเพ่ิมเติม) คลายคันบังคับท่ีสวนหนาและหลังของฐาน และ แยกอะแดปเตอร
รางนําจากอุปกรณหลัก (รูปท่ี 5) หมายเหตุ สําหรับบางผลิตภัณฑปุมปรับและอะแดปเตอรรางนําสามารถชนกัน
ไดเม่ืออะแดปเตอรรางนําถูกถอดออก ภายใตสถานการณดังกลาว ถอดอะแดปเตอรรางนําออก หลังจากลดคลองเลื่อยลงเล็กนอย(รูปท่ี 6)
ตําแหนงการตัดสามารถปรับไดโดยการขยับรางไปทางซายหรือขวาหลังจากคลายคนับังคับ
รางอาจถูกยึดบนดานขวาหรือซายของเคร่ืองมือ (รูปท่ี 7) 5. การปรับความละเอียดของระยะขนาน สามารถท่ีจะปรับความละเอียดของระยะขนานของใบเล่ือยกับฐาน
โดยใชสกรูปรับระยะขนาน การปรับจะทําแลวเสร็จเม่ือมีการนําสงสินคาออกจากโรงงาน
อยางไรก็ตาม ในสถานการณท่ีไมนาจะเกิดขึ้นหากเกิดความผิดพลาด ของระยะขนาน ใหปรับตามขออธิบายดานลาง(1) ปลดเพียงสกรูยึดครอบใบเล่ือยสวนบานพับ (รูปท่ี 8)(2) ดึงกําบังลางเขาครอบใบเล่ือย(3) เสียบแผนไมท่ีดานหลังของฐานใบเลื่อย และทําเคร่ืองหมายท่ี
ตําแหนงบนฐาน (รูปท่ี 9)(4) เลื่อนแผนไมท่ีทําเคร่ืองหมายไปท่ีสวนหนาของฐานและหมุน
สกรู ปรับระยะขนาน โดยท่ีเครื่องหมายจะตรงกับหนาฐาน (รูปท่ี 10)
(5) หลังการปรับระยะขนาน ขันสกรูท่ีตําแหนงใหแนนหมายเหตุ หากคลองเลื่อยถูกปรับหลังจากการปรับระยะขนาน ระยะขนานอาจมี
ความผิดพลาดเล็กนอย6. การปรับไกดพีส เลื่อยวงเดือนสามารถปรับความละเอียดของตําแหนงไกดพีสไดโดยท่ี
ใบเลื่อยและแนวเสนกอนทําเคร่ืองหมาย อยูแนวเดียวกัน เม่ือเลื่อยถูกสงออกจากโรงงานทางเรือ สวนของเสนตรงดานหนา
สเกลวัดบนไกดพีส อยูบนแนวเดียวกับตําแหนงสวนกลางของใบเลื่อย (รูปท่ี 11)
คลายสกรู M4 บนไกดพีสและปรับตําแหนงอยางเหมาะสม หากติดตั้งผิดตําแหนงในบางครั้ง
7. การใชรางนํา (อุปกรณเพ่ิมเติม) สงอะแดปเตอรรางนําผานแหวนฉาก และยึดคันบังคับท่ีตําแหนงที่
อะแดปเตอรรางนําและผิวดานหนาฐานติดกัน (รูปท่ี 5)หมายเหตุ สําหรับผลิตภัณฑบางช้ิน ปุมปรับและอะแดปเตอรรางนําอาจชนกัน
ขณะท่ีกําลังติดตั้งอะแดปเตอรรางนํา ภายใตสถานการณเชนนี้ ใหติดตั้งอะแดปเตอรรางนํา หลังจากลดคลองเลื่อยลงเล็กนอย(รูปท่ี 6)
(1) คลายโบลตปกผีเสื้อ ปรับตําแหนงของเสนรางตามรางนําเพ่ือการ ใชงาน และยึดดวยโบลตปกผีเสื้อ (รูปท่ี 13)
(2) วางอุปกรณบนรางนํา ซ่ึงดามของรางนําสามารถยึดในรอง อะแดปเตอรรางนํา (รูปท่ี 14)
(3) คลายคันบังคับ ปรับตําแหนงของใบเลื่อยและยึดคันบังคับอีกครั้ง(4) ในสภาพนี้ คุณสามารถเริ่มตนการตัดไดหมายเหตุ○ เม่ือตัดโดยใชรางนํา จําไววาคลองเลื่อยจะลดลง ขณะท่ีความหนา
ของรางนําเพ่ิมข้ึน○ อะแดปเตอรรางนําสามารถนําไปใชสําหรับรางนําของ บอช เฟสโต
และ มากิตะ
20
ไทย
000Book_C6UY_Tha.indb 20000Book_C6UY_Tha.indb 20 2018/03/06 16:54:282018/03/06 16:54:28

○ ขณะท่ีรางนําถูกใชอยูท่ีความโนมเอียง 45 องศา ตําแหนงของใบเลื่อยจะไมสอดคลองกับรองบากท่ีปลายฐาน
8. การใชชุดเก็บฝุน (อุปกรณเพ่ิมเติม) การใชเครื่องดูดฝุนเก็บข้ีเลื่อย ตอทอสูบกับชุดเก็บฝุนซึ่งตอเขากับ
อุปกรณหลักโดยสกูร M4 (รูปท่ี 15) 9. การปรับตําแหนงของคันบังคับ กดคันบังคับยึด ใหหลุดออกจากหัวโบลตใหเปนอิสระจากการหมุน หลังจากยึดรางและรางนําอยางม่ันคงแลว กดคันบังคับและหมุนไปท่ี
ตําแหนงซึ่งจะไมรบกวนการตัด (รูปท่ี 16)
ลําดับการตัด
1 วางฐานบนวัตถุ แลวทําใหแนวเสนกอนทําเคร่ืองหมายและใบเล่ือยเปนแนวเดียวกันโดยใชไกดพีสสวนบรรทัดหนาของฐานท่ีดานหนาฐาน (รูปท่ี 11)
เม่ือฐานไมเอียง ใชคัดเอาทใหญเสมือนราง (รูปท่ี 11, รูปท่ี 12 (A)) หากฐานเอียง (45 องศา) ใชบรรทัดหนาเล็กเสมือนราง (รูปท่ี 11,
รูปท่ี 12 (B))2. แนใจวาสวิทชอยูท่ีตําแหนงเปด กอนใบเลื่อยสัมผัสกับไม สวิทชอยูท่ีตําแหนงเปดขณะท่ีไกถูกกดและปดขณะท่ีไกถูกปลอย3. เลื่อนเลื่อยตรงไปท่ีความเร็วสมํ่าเสมอจะทําใหเกิดการตัดท่ีไดผลดี
ท่ีสุดขอควรระวังกอนจะตัด ใหตรวจดูช้ินงานที่จะตัดเสียกอน ถาเน้ือไมอาจเปนอันตราย/มีฝุนพิษ ใหเช่ือมตอชุดดักฝุนหรือถุงดักฝุนกับชองระบายฝุนที่เหมาะสมไวอยางแนนหนาสวมหนากากกันฝุน ถามีหากมีช้ันเคลือบของ PFTE ท่ีฐาน โปรดระมัดระวังไมกดแรงๆ บนวัตถุเพราะวาจะทําใหนํ้าหนักกดไปท่ีมอเตอร การกดอยางเบาจะทําใหเลื่อนงายข้ึนและตัดโดยใชแรงนอย การตัดไมซ่ึงถูกเคลือบโดยวัตถุเล็กๆ ท่ีแข็ง เชน ทราย หรือ แผนโลหะ มักเปนรอยไดงายและทําลายผิวหนาช้ันเคลือบ ดังนั้นตองใชดวยความระมัดระวัง○ กอนจะใชตัดดวยเล่ือยไฟฟา ตรวจดูใหมีรอบหมุนสูงสุดเสียกอน○ บางคร้ังเมื่อใบเลื่อยหยุดทํางานหรือสงเสียงผิดปกติระหวางปฎิบัติงาน
ตองปดสวิทชทันที○ ระวังอยูเสมอ ไมใหสายไฟฟาเขาไปใกลใบเลื่อยท่ีกําลังหมุน○ การใชเลื่อยวงเดือนท่ีใบเลื่อยหันขึ้นหรือหันไปดานขางจะมีอันตราย
มาก ควรเลี่ยงการทํางานในทาทางท่ีไมปกติเชนนั้น○ เม่ือตัดวัสดุ ใชแวนตาปองกันเสมอ○ เม่ือทํางานเสร็จแลว ใหถอดปลั๊กออกจากเตาเสียบ
การติดและถอดใบเลื่อย
ขอควรระวังเพ่ือเลี่ยงอุบัติเหตุรายแรง กดสวิทซไปท่ีตําแหนง OFF และถอดจาก แหลงจายไฟเสมอ1. การถอดใบเลื่อย(1) คลายปุมปรับและลดคลองเลื่อยลงเล็กนอยจากคาสูงสุด (รูปท่ี 2)(2) วางเลื่อยวงเดือนตามท่ีแสดงใน รูปท่ี 17
(3) กดคันบังคับล็อก ล็อกแกนหมุน และ เปล่ียนหัวบอลตหกเหล่ียม ดวยประแจบอกซ
(4) ถอดใบเลื่อยออกเม่ือกดแผนครอบลางลงใหรนเขาในฝาใบเลื่อยจนเต็มท่ี
2. การติดตั้งใบเลื่อย(1) คลายปุมปรับและลดคลองเลื่อยลงเล็กนอยจากคาสูงสุด (รูปท่ี 2)(2) เอาข้ีเลื่อยท่ีตกคางบนเพลา สกรูและแหวนรองออกไป(3) ตาม รูปท่ี 18 เล็งศูนยดานขางของแหวนรอง (A) ท่ีมีขนาดเดียวกับ
เสนผานศูนยกลางใหเขาภายในของใบเลื่อย และทาบดานเวาของแหวนรอง (B) เขากับดานขางของใบเลื่อย
(4) เพ่ือใหใบเลื่อยหมุนในทิศทางท่ีถูกตอง ทิศทางของลูกศรบนใบเลื่อย ตองตรงกับทิศทางของลูกศรบนฝาครอบใบเลื่อย
(5) ใชนิ้วขันหัวโบลตหกเหล่ียมเพ่ือยึดใบเลื่อยใหมากท่ีสุด กดคันล็อกลงล็อกเพลา และขันโบลตหกเหล่ียมใหแนนพอ
ขอควรระวังเม่ือติดใบเลื่อยแลว ตรวจดูอีกครั้งใหคันล็อกกลับเขาท่ีเดิม
การบํารุงรักษาและการตรวจสอบ
1. การตรวจสอบใบเลื่อย เนื่องจากการใชใบเลื่อยท่ีท่ือจะลดประสิทธิภาพงานและมอเตอรอาจ
ทํางานผิดปกติได ใหลับหรือเปล่ียนใบเลื่อยทันทีเม่ือพบวาท่ือ2. การตรวจสอบสกรูยึด ใหตรวจสอบสกรูยึดเสมอ และใหขันไวอยางถูกตอง ถาสกรูหลวม ให
ขันเสียใหมโดยทันที มิฉะน้ันอาจเกิดอันตรายมาก3. การตรวจสอบแปรงถาน (รูปท่ี 19) มอเตอรมีแปรงถาน ซ่ึงเปนชิ้นสวนที่สิ้นเปลือง เนื่องจากแปรงถานท่ี
สึกหรอมากจะทําใหมอเตอรขัดของได โปรดเปลี่ยนแปรงถานเสียใหมดวยชนิดท่ีมีหมายเลขเดียวกับตามรูป เม่ือแปรงถานสึกหรอจนถึง หรือใกลระดับ “ขอบเขตระยะสึกหรอ” นอกจากนี้ รักษาแปรงถานใหสะอาดเสมอ และตรวจดูใหเลื่อนไดโดยอิสระในปลอกแปรง
ขอควรระวัง○ เม่ือเปล่ียนแปรงถานใหม ควรใช แปรงถาน HiKOKI จีเนียส ท่ีมี
หมายเลขกําหนดไวในภาพ○ สําหรับแบบ C6BUY และ C7BUY เบรกอาจจะไมทํางานหากใช
แปรงถานอ่ืนที่ไมไดระบุไว เม่ือเบรกไรประสิทธิภาพ ใหเปล่ียนแปรง ถานใหม
4. การเปลี่ยนแปรงถาน ถอดฝาแปรงถานดวยไขควงปากแบน ตอมาจะถอดแปรงถาน ออก
ไดโดยงายดาย5. การบํารุงรักษามอเตอร การขดลวดของมอเตอรเปนหัวใจสําคัญของเคร่ืองมือไฟฟา ใหใช
ความระมัดระวังเพื่อไมใหขดลวดของมอเตอรชํารุดและ/หรือเปยกนํ้า หรือนํ้ามัน
6. การปรับแตงฐานและใบเลื่อยเพ่ือรักษามุมฉาก มุมระหวางฐานกับใบเล่ือยอยูในตําแหนง 90 องศา หากมุมฉาก
เปล่ียนไปเน่ืองจากสาเหตุใดๆ ใหปรับแตงดังตอไปน้ี
21
ไทย
000Book_C6UY_Tha.indb 21000Book_C6UY_Tha.indb 21 2018/03/06 16:54:282018/03/06 16:54:28

(1) หันแทนขึ้นบน (รูปท่ี 20) และคลายน็อตปกผีเสื้อ (รูปท่ี 4 (A),รูปท่ี 4 (B))
(2) ทาบฉากกับฐานและใบเลื่อย หมุนสกรูหัวจมดวยไขควงหัวจม เลื่อนตําแหนงของฐานจนไดมุมฉากท่ีตองการ
7. รายการอะไหลซอมขอควรระวัง ศูนยบริการท่ีไดรับอนุญาตของ HiKOKI เทานั้นเปนผูซอม ดัดแปลง
และตรวจสอบเครื่องมือไฟฟาของ HiKOKI รายการอะไหลซอมนี้จะเปนประโยชนเม่ือสงใหศูนยบริการท่ีไดรับ
อนุญาตของ HiKOKI เทานั้นเพื่อแจงซอมหรือบํารุงรักษา ตองปฏิบัติตามระเบียบและมาตรฐานความปลอดภัยของแตละ
ประเทศในการใชงานและบํารุงรักษาเคร่ืองมือไฟฟาการแกไข มีการปรับปรุงและแกไขเคร่ืองมือไฟฟาของ HiKOKI เสมอ เพ่ือให
สอดคลองกับความกาวหนาลาสุดทางเทคโนโลยี ดังนั้น จึงอาจเปล่ียนแปลงชิ้นสวนบางอยางไดโดยไมตองแจง
ลวงหนา
หมายเหตุ เนื่องจาก HiKOKI มีแผนงานวิจัยและพัฒนาอยางตอเน่ือง รายละเอียดจาํเพาะน้ีจึงอาจเปล่ียนแปลงไดโดยไมตองแจงลวงหนา
22
ไทย
000Book_C6UY_Tha.indb 22000Book_C6UY_Tha.indb 22 2018/03/06 16:54:282018/03/06 16:54:28

23
C6U
YIte
mN
o.Pa
rt N
ame
Q’T
Y1
WAS
HER
12
RET
AIN
ING
RIN
G F
OR
D11
SHAF
T1
3FI
RST
GEA
R1
4O
-RIN
G
15
FEAT
HER
KEY
4×4
×10
16
BEAR
ING
HO
LDER
ASS
’Y1
7M
ACHI
NE S
CREW
(W/S
P. W
ASHE
R) M
43
8LO
WER
GUA
RD
19
RET
UR
N S
PRIN
G (A
)1
10BU
SHIN
G1
11R
ETAI
NIN
G R
ING
FO
R D
22 S
HAF
T1
12W
ASH
ER (A
)1
13TC
T SA
W B
LAD
E 16
5 M
M1
14W
ASH
ER (B
)1
15BO
LT (W
/WAS
HER
) M7×
17.5
116
MAC
HIN
E SC
REW
M3
317
NEE
DLE
RO
LLER
118
LEVE
R1
19M
ACHI
NE S
CREW
(W/S
P. W
ASHE
R) M
4×8
120
SID
E H
AND
LE1
21H
EX. S
OC
KET
SET
SCR
EW M
5×6
122
GEA
R C
OVE
R1
23C
USH
ION
124
FLAT
HD.
SC
REW
M6×
201
25BR
AND
PLAT
E1
26M
ACHI
NE S
CREW
(W/W
ASHE
RS) M
4×12
127
DU
ST C
OLL
ECTO
R1
28R
UBB
ER B
USH
ING
129
BEAR
ING
BU
SHIN
G1
30BA
LL B
EAR
ING
608
VVC
2PS2
L1
31D
UST
SEA
L1
32BR
USH
TER
MIN
AL2
33ST
ATO
R AS
S’Y
134
HEX
. HD.
TAP
PIN
G S
CR
EW D
5×55
235
FAN
GU
IDE
136
ARM
ATU
RE
137
LOC
K LE
VER
138
MAC
HINE
SCR
EW (W
/WAS
HERS
) M5×
163
39SP
RIN
G (A
)1
40BA
LL B
EAR
ING
600
0VVC
MPS
2L1
41KN
OB
142
O-R
ING
143
SLEE
VE1
44SW
ITC
H1
45H
AND
LE C
OVE
R1
46TE
RM
INAL
M4.
01
47N
OIS
E SU
PPR
ESSO
R1
48TU
BE (D
)2
49TU
BE (D
)2
50C
OR
D C
LIP
1
Item
No.
Part
Nam
eQ
’TY
51TA
PPIN
G S
CR
EW (W
/FLA
NG
E) D
4×16
252
CO
RD
ARM
OR
153
CO
RD
154
NAM
E PL
ATE
155
TAPP
ING
SC
REW
(W/F
LAN
GE)
D4×
204
56H
OU
SIN
G A
SS’Y
157
MAC
HINE
SCR
EW (W
/WAS
HERS
) M5×
403
58H
EX. S
OC
KET
SET
SCR
EW M
5×8
259
BRU
SH H
OLD
ER2
60C
ARBO
N B
RU
SH2
61BR
USH
CAP
262
SEAL
LOCK
SCR
EW (W
/SP.
WAS
HERS
) M6×
141
63LE
VER
(A)
164
LOC
K N
UT
165
WAS
HER
166
U-N
UT
M5
167
MAC
HINE
SCR
EW (W
/SP.
WAS
HER)
M4
168
GU
IDE
PIEC
E1
69SE
AL LO
CK H
EX. S
OCKE
T SET
SCR
EW M
5×6
170
BEVE
L PL
ATE
171
STEP
PIN
D6×
131
72BO
LT (S
QUA
RE)
M6×
201
73AD
JUST
ING
SC
REW
(A)
174
SPEC
IAL
SCR
EW M
61
75D
IAG
ON
AL B
OLT
M8
176
BOLT
WAS
HER
M6
277
BOLT
(W/F
LAN
GE)
M6
278
RIV
ING
KN
IFE
179
BOLT
M6×
101
80C
LAM
P LE
VER
181
SPR
ING
(B)
182
WIN
G B
OLT
M6×
122
83M
ACHI
NE S
CREW
(W/S
P. W
ASHE
R) M
5×12
284
GU
IDE
RAI
L AD
APTE
R1
85G
UID
E R
AIL
PLAT
E1
86G
UID
E BA
R1
87SL
OTTE
D HD
. SET
SCR
EW (S
EAL L
OCK)
M6×
61
88G
UID
E BA
R1
89BA
SE A
SS’Y
190
WAS
HER
M6
191
WIN
G B
OLT
M6×
171
92BO
LT M
6×10
193
CLA
MP
LEVE
R1
94SP
RIN
G (B
)1
95G
UID
E R
AIL
ASS’
Y1
96TE
RM
INAL
297
MAC
HINE
SCR
EW (W
/WAS
HER)
M3.
5×6
450
1H
EX. B
AR W
REN
CH
2.5
MM
150
2BO
X W
REN
CH
10M
M1
503
GU
IDE
1
000Book_C6UY_Tha.indb 23000Book_C6UY_Tha.indb 23 2018/03/06 16:54:282018/03/06 16:54:28

24
C6B
UY
Item
No.
Part
Nam
eQ
’TY
1W
ASHE
R1
2R
ETAI
NIN
G R
ING
FO
R D1
1 SH
AFT
13
FIR
ST G
EAR
14
O-R
ING
1
5FE
ATH
ER K
EY 4
×4×1
01
6BE
ARIN
G H
OLD
ER A
SS’Y
17
MAC
HINE
SCR
EW (W
/SP.
WAS
HER)
M4
38
LOW
ER G
UAR
D1
9R
ETU
RN
SPR
ING
(A)
110
BUSH
ING
111
RET
AIN
ING
RIN
G F
OR
D22
SH
AFT
112
WAS
HER
(A)
113
TCT
SAW
BLA
DE
165
MM
114
WAS
HER
(B)
115
BOLT
(W/W
ASH
ER) M
7×17
.51
16M
ACH
INE
SCR
EW M
33
17N
EED
LE R
OLL
ER1
18LE
VER
119
MAC
HINE
SCR
EW (W
/SP.
WAS
HER)
M4×
81
20SI
DE
HAN
DLE
121
HEX
. SO
CKE
T SE
T SC
REW
M5×
61
22G
EAR
CO
VER
123
CU
SHIO
N1
24FL
AT H
D. S
CR
EW M
6×20
125
BRAN
D PL
ATE
126
MAC
HINE
SCR
EW (W
/WAS
HERS
) M4×
121
27D
UST
CO
LLEC
TOR
128
NAM
E PL
ATE
(BR
AKE)
129
RU
BBER
BU
SHIN
G1
30BE
ARIN
G B
USH
ING
131
BALL
BEA
RIN
G 6
08VV
C2P
S2L
132
DU
ST S
EAL
133
BRU
SH T
ERM
INAL
234
STAT
OR
ASS’
Y1
35H
EX. H
D. T
APPI
NG
SC
REW
D5×
552
36FA
N G
UID
E1
37AR
MAT
UR
E1
38LO
CK L
EVER
139
MAC
HINE
SCR
EW (W
/WAS
HERS
) M5×
163
40SP
RIN
G (A
)1
41BA
LL B
EAR
ING
600
0VVC
MPS
2L1
42KN
OB
143
O-R
ING
144
SLEE
VE1
45SW
ITC
H (B
)1
46H
AND
LE C
OVE
R1
47TE
RM
INAL
M4.
01
48N
OIS
E SU
PPR
ESSO
R1
49TU
BE (D
)2
50PI
LLAR
TER
MIN
AL1
51C
ON
NEC
TOR
5009
21
52R
ESIS
TOR
153
TUBE
(D)
154
TUBE
(D)
2
Item
No.
Part
Nam
eQ
’TY
55C
OR
D C
LIP
156
TAPP
ING
SC
REW
(W/F
LAN
GE)
D4×
162
57IN
TERN
AL W
IRE
158
WIR
E C
LAM
P1
59IN
TER
NAL
WIR
E1
60TU
BE (D
)1
61C
OR
D AR
MO
R1
62C
OR
D1
63N
AME
PLAT
E1
64TA
PPIN
G S
CR
EW (W
/FLA
NG
E) D
4×20
465
HO
USI
NG
ASS
’Y1
66M
ACHI
NE S
CREW
(W/W
ASHE
RS) M
5×40
367
HEX.
SO
CKET
SET
SCR
EW M
5×8
268
BRU
SH H
OLD
ER2
69C
ARBO
N B
RU
SH2
70BR
USH
CAP
271
SEAL
LOCK
SCR
EW (W
/SP.
WAS
HERS
) M6×
141
72LE
VER
(A)
173
LOC
K N
UT
174
WAS
HER
175
U-N
UT
M5
176
MAC
HINE
SCR
EW (W
/SP.
WAS
HER)
M4
177
GU
IDE
PIEC
E1
78SE
AL LO
CK H
EX. S
OCKE
T SET
SCR
EW M
5×6
179
BEVE
L PL
ATE
180
STEP
PIN
D6×
131
81BO
LT (S
QUA
RE)
M6×
201
82AD
JUST
ING
SC
REW
(A)
183
SPEC
IAL S
CREW
M6
184
DIA
GO
NAL
BO
LT M
81
85BO
LT W
ASH
ER M
62
86BO
LT (W
/FLA
NG
E) M
62
87R
IVIN
G K
NIF
E1
88BO
LT M
6×10
189
CLA
MP
LEVE
R1
90SP
RIN
G (B
)1
91W
ING
BO
LT M
6×12
292
MAC
HINE
SCR
EW (W
/SP.
WAS
HER)
M5×
122
93G
UID
E R
AIL
ADAP
TER
194
GU
IDE
RAI
L PL
ATE
195
GU
IDE
BAR
196
SLOT
TED
HD. S
ET S
CREW
(SEA
L LOC
K) M
6×6
197
GUID
E BA
R1
98BA
SE A
SS’Y
199
WAS
HER
M6
110
0W
ING
BO
LT M
6×17
110
1BO
LT M
6×10
110
2C
LAM
P LE
VER
110
3SP
RIN
G (B
)1
104
GU
IDE
RAI
L AS
S’Y
150
1H
EX. B
AR W
REN
CH
2.5
MM
150
2BO
X W
REN
CH
10M
M1
503
GU
IDE
1
000Book_C6UY_Tha.indb 24000Book_C6UY_Tha.indb 24 2018/03/06 16:54:282018/03/06 16:54:28

25
C7U
YIte
mN
o.Pa
rt N
ame
Q’T
Y1
WAS
HER
12
RET
AIN
ING
RIN
G F
OR
D11
SHAF
T1
3FI
RST
GEA
R1
4O
-RIN
G
15
FEAT
HER
KEY
4×4
×10
16
BEAR
ING
HO
LDER
ASS
’Y1
7M
ACHI
NE S
CREW
(W/S
P. W
ASHE
R) M
43
8LO
WER
GUA
RD
19
RET
UR
N S
PRIN
G (A
)1
10BU
SHIN
G1
11R
ETAI
NIN
G R
ING
FO
R D
22 S
HAF
T1
12W
ASH
ER (A
)1
13TC
T SA
W B
LAD
E 19
0 M
M1
14W
ASH
ER (B
)1
15BO
LT (W
/WAS
HER
) M7×
17.5
116
MAC
HIN
E SC
REW
M3
317
NEE
DLE
RO
LLER
118
LEVE
R1
19M
ACHI
NE S
CREW
(W/S
P. W
ASHE
R) M
4×8
120
SID
E H
AND
LE1
21H
EX. S
OC
KET
SET
SCR
EW M
5×6
122
GEA
R C
OVE
R1
23C
USH
ION
124
FLAT
HD.
SC
REW
M6×
201
25BR
AND
PLAT
E1
26M
ACHI
NE S
CREW
(W/W
ASHE
RS) M
4×12
127
DU
ST C
OLL
ECTO
R1
28R
UBB
ER B
USH
ING
129
BEAR
ING
BU
SHIN
G1
30BA
LL B
EAR
ING
608
VVC
2PS2
L1
31D
UST
SEA
L1
32BR
USH
TER
MIN
AL2
33ST
ATO
R AS
S’Y
134
HEX
. HD.
TAP
PIN
G S
CR
EW D
5×55
235
FAN
GU
IDE
136
ARM
ATU
RE
137
LOC
K LE
VER
138
MAC
HINE
SCR
EW (W
/WAS
HERS
) M5×
163
39SP
RIN
G (A
)1
40BA
LL B
EAR
ING
600
0VVC
MPS
2L1
41KN
OB
142
O-R
ING
143
SLEE
VE1
44SW
ITC
H1
45H
AND
LE C
OVE
R1
46TE
RM
INAL
M4.
01
47N
OIS
E SU
PPR
ESSO
R1
48TU
BE (D
)2
49TU
BE (D
)2
50C
OR
D C
LIP
151
TAPP
ING
SC
REW
(W/F
LAN
GE)
D4×
162
Item
No.
Part
Nam
eQ
’TY
52C
OR
D AR
MO
R1
53C
OR
D1
54N
AME
PLAT
E1
55TA
PPIN
G S
CR
EW (W
/FLA
NG
E) D
4×20
456
HO
USI
NG
ASS
’Y1
57M
ACHI
NE S
CREW
(W/W
ASHE
RS) M
5×40
358
HEX
. SO
CKE
T SE
T SC
REW
M5×
82
59BR
USH
HO
LDER
260
CAR
BON
BR
USH
261
BRU
SH C
AP2
62SE
AL LO
CK S
CREW
(W/S
P. W
ASHE
RS) M
6×14
163
LEVE
R (A
)1
64LO
CK
NU
T1
65W
ASH
ER1
66U
-NU
T M
51
67M
ACHI
NE S
CREW
(W/S
P. W
ASHE
R) M
41
68G
UID
E PI
ECE
169
SEAL
LO
CK
HEX
. SO
CKE
T SE
T SC
REW
M5×
6 1
70BE
VEL
PLAT
E1
71ST
EP P
IN D
6×13
172
BOLT
(SQ
UAR
E) M
6×20
173
ADJU
STIN
G S
CR
EW (A
)1
74SP
ECIA
L SC
REW
M6
175
DIA
GO
NAL
BO
LT M
81
76BO
LT W
ASH
ER M
62
77BO
LT (W
/FLA
NG
E) M
62
78R
IVIN
G K
NIF
E1
79BO
LT M
6×10
180
CLA
MP
LEVE
R1
81SP
RIN
G (B
)1
82W
ING
BO
LT M
6×12
283
MAC
HINE
SCR
EW (W
/SP.
WAS
HER)
M5×
122
84G
UID
E R
AIL
ADAP
TER
185
GU
IDE
RAI
L PL
ATE
186
GU
IDE
BAR
187
SLOT
TED
HD. S
ET S
CREW
(SEA
L LOC
K) M
6×6
188
GU
IDE
BAR
189
BASE
ASS
’Y1
90W
ASH
ER M
61
91W
ING
BO
LT M
6×17
192
BOLT
M6×
101
93C
LAM
P LE
VER
194
SPR
ING
(B)
195
GU
IDE
RAI
L AS
S’Y
196
TER
MIN
AL2
97M
ACHI
NE S
CREW
(W/W
ASHE
R) M
3.5×
64
501
HEX
. BAR
WR
ENC
H 2
.5M
M1
502
BOX
WR
ENC
H 1
0MM
150
3G
UID
E1
000Book_C6UY_Tha.indb 25000Book_C6UY_Tha.indb 25 2018/03/06 16:54:292018/03/06 16:54:29

26
C7BU
YIte
mN
o.Pa
rt N
ame
Q’T
Y1
WAS
HER
12
RET
AIN
ING
RIN
G F
OR
D11
SHAF
T1
3FI
RST
GEA
R1
4O
-RIN
G
15
FEAT
HER
KEY
4×4
×10
16
BEAR
ING
HO
LDER
ASS
’Y1
7M
ACHI
NE S
CREW
(W/S
P. W
ASHE
R) M
43
8LO
WER
GUA
RD
19
RET
UR
N S
PRIN
G (A
)1
10BU
SHIN
G1
11R
ETAI
NIN
G R
ING
FO
R D
22 S
HAF
T1
12W
ASH
ER (A
)1
13TC
T SA
W B
LAD
E 19
0 M
M1
14W
ASH
ER (B
)1
15BO
LT (W
/WAS
HER
) M7×
17.5
116
MAC
HIN
E SC
REW
M3
317
NEE
DLE
RO
LLER
118
LEVE
R1
19M
ACHI
NE S
CREW
(W/S
P. W
ASHE
R) M
4×8
120
SID
E H
AND
LE1
21H
EX. S
OC
KET
SET
SCR
EW M
5×6
122
GEA
R C
OVE
R1
23C
USH
ION
124
FLAT
HD.
SC
REW
M6×
201
25BR
AND
PLAT
E1
26M
ACHI
NE S
CREW
(W/W
ASHE
RS) M
4×12
127
DU
ST C
OLL
ECTO
R1
28N
AME
PLAT
E (B
RAK
E)1
29R
UBB
ER B
USH
ING
130
BEAR
ING
BU
SHIN
G1
31BA
LL B
EAR
ING
608
VVC
2PS2
L1
32D
UST
SEA
L1
33BR
USH
TER
MIN
AL2
34ST
ATO
R AS
S’Y
135
HEX
. HD.
TAP
PIN
G S
CR
EW D
5×55
236
FAN
GU
IDE
137
ARM
ATU
RE
138
LOCK
LEV
ER1
39M
ACHI
NE S
CREW
(W/W
ASHE
RS) M
5×16
340
SPR
ING
(A)
141
BALL
BEA
RIN
G 6
000V
VCM
PS2L
142
KNO
B1
43O
-RIN
G1
44SL
EEVE
145
SWIT
CH
(B)
146
HAN
DLE
CO
VER
147
TER
MIN
AL M
4.0
148
NO
ISE
SUPP
RES
SOR
149
TUBE
(D)
250
PILL
AR T
ERM
INAL
151
CO
NN
ECTO
R 50
092
152
RES
ISTO
R1
53TU
BE (D
)1
54TU
BE (D
)2
Item
No.
Part
Nam
eQ
’TY
55C
OR
D C
LIP
156
TAPP
ING
SC
REW
(W/F
LAN
GE)
D4×
162
57IN
TERN
AL W
IRE
158
WIR
E C
LAM
P1
59IN
TER
NAL
WIR
E1
60TU
BE (D
)1
61C
OR
D AR
MO
R1
62C
OR
D1
63N
AME
PLAT
E1
64TA
PPIN
G S
CR
EW (W
/FLA
NG
E) D
4×20
465
HO
USI
NG
ASS
’Y1
66M
ACHI
NE S
CREW
(W/W
ASHE
RS) M
5×40
367
HEX.
SO
CKET
SET
SCR
EW M
5×8
268
BRU
SH H
OLD
ER2
69C
ARBO
N B
RU
SH2
70BR
USH
CAP
271
SEAL
LOCK
SCR
EW (W
/SP.
WAS
HERS
) M6×
141
72LE
VER
(A)
173
LOC
K N
UT
174
WAS
HER
175
U-N
UT
M5
176
MAC
HINE
SCR
EW (W
/SP.
WAS
HER)
M4
177
GU
IDE
PIEC
E1
78SE
AL L
OC
K H
EX. S
OC
KET
SET
SCR
EW M
5×6
179
BEVE
L PL
ATE
180
STEP
PIN
D6×
131
81BO
LT (S
QUA
RE)
M6×
201
82AD
JUST
ING
SC
REW
(A)
183
SPEC
IAL S
CREW
M6
184
DIA
GO
NAL
BO
LT M
81
85BO
LT W
ASH
ER M
62
86BO
LT (W
/FLA
NG
E) M
62
87R
IVIN
G K
NIF
E1
88BO
LT M
6×10
189
CLA
MP
LEVE
R1
90SP
RIN
G (B
)1
91W
ING
BO
LT M
6×12
292
MAC
HINE
SCR
EW (W
/SP.
WAS
HER)
M5×
122
93G
UID
E R
AIL
ADAP
TER
194
GU
IDE
RAI
L PL
ATE
195
GU
IDE
BAR
196
SLOT
TED
HD. S
ET S
CREW
(SEA
L LOC
K) M
6×6
197
GUID
E BA
R1
98BA
SE A
SS’Y
199
WAS
HER
M6
110
0W
ING
BO
LT M
6×17
110
1BO
LT M
6×10
110
2C
LAM
P LE
VER
110
3SP
RIN
G (B
)1
104
GU
IDE
RAI
L AS
S’Y
150
1H
EX. B
AR W
REN
CH
2.5
MM
150
2BO
X W
REN
CH
10M
M1
503
GU
IDE
1
000Book_C6UY_Tha.indb 26000Book_C6UY_Tha.indb 26 2018/03/06 16:54:292018/03/06 16:54:29

27
000Book_C6UY_Tha.indb 27000Book_C6UY_Tha.indb 27 2018/03/06 16:54:292018/03/06 16:54:29

806Code No. C99179031 FPrinted in China
000Book_C6UY_Tha.indb 28000Book_C6UY_Tha.indb 28 2018/03/06 16:54:292018/03/06 16:54:29


![日本最值 - SuperBookCity飲生啤單杯432日圓、大瓶648日圓;燒酒單杯540日圓起;葡萄酒375ml 1620日圓; 清酒300ml 648日圓起/其他 [晚] 蟹肉沙拉大盤(かにサラダ大盛り)1620日圓、](https://img.pdfslide.tips/doc/110x75/5fdbff8a1de05627546817df/oeoe-ec432oec648oeice540oeeieee375ml.jpg)