Embed Size (px)
Citation preview
3. Preparare il condotto con la fresa corrispondente al perno EXACTO selezionato (fig. 3). EXACTO 0,5 - Fresa 0,5 (lilla) / EXACTO 1 - Fresa 1 (bianca) / EXACTO 2 - Fresa 2 (gialla) / EXACTO 3 - Fresa 3 (azzurra).
4. Fare una radiografia periapicale pera verificare la preparazione del canale e la condizione d’otturazione. Una rimozione eccessiva di guttaperca può portare a un insuccesso (fig. 4).
B. PREPARAZIONE DELL’EXACTO PER LA CEMENTAZIONE
1. Posizionare il perno nel condotto per verificare il suo adattamento e la sua completa inserzione. Fare scorrere il cursore del perno fino alla zona di taglio (a una distanza minima di 2 mm dal dente antagonista) (fig. 5).
2. EXACTO deve venire tagliato solo con frese diamantate ad alta rotazione sotto irrigazione d’acqua (fig. 6 e 7).
3. Pulire il perno con alcool e asciugarlo (fig. 8). E applicare uno strato di silano (SILANO ANGELUS®) e lasciarlo asciugare per 1 minuto (fig. 9).
4. Applicare l’adesivo chimico FUSION-DURALINK® CATALYST ANGELUS® secondo le istruzioni d’uso (fig. 10).
C. CEMENTAZIONE
1. Lavare il condotto con getto d’acqua e asciugarlo con getto d’aria e punte di carta assorbente (fig. 11).
2. Condizionare il condotto con ACIDO FOSFORICO 37% ANGELUS® per 15 secondi (fig. 12).
3. Lavare il condotto con acqua e asciugarlo con aria e punte di carta assorbente (fig. 13 e 14). Applicare il primer FUSION-DURALINK® ANGELUS® e attendere 1 minuto.
4. Applicare il FUSION-DURALINK® CATALYST ANGELUS®, in conformità con le istruzioni d’uso. I componenti dell’adesivo non devono essere mescolati prima dell’applicazione, quindi, vengono polimerizzati chimicamente, senza la necessità di fotoattivazione (fig.15).
5. Spatolare il cemento resinoso selezionato* e riempire il condotto (fig. 16).6. Mettere il perno nel condotto, rimuovere gli eccessi di cemento e attendere
la sua polimerizzazione. Caso il cemento sia del tipo doppiamente attivato (duale), fotopolimerizzarlo (fig. 17).
L Cementi di fosfato di zinco e di vetro-ionomero (convenzionale e modificato da resina) possono anche venire utilizzati, però le loro proprietà meccaniche sono inferiori a quelle dei cementi resinosi per cementazione. I cementi autoadesivi dispensano i passi di condizionamento acido e l’applicazione di adesivo.
D. REALIZZAZIONE DELLA PARTE CORONARIA DEL NUCLEO
1. Costruire la parte coronaria del nucleo con resina composita o con REFORCORE® ANGELUS®. REFORCORE® è un nucleo di riempimento prefabbricato con fibre di vetro, specialmente sviluppato per la tecnica dei nuclei diretti (fig. 18 e 19).
AVVERTENZE | PRECAUZIONI
y L’uso dei nuclei diretti con perni di fibra non è indicata nelle riabilitazioni orali ampie ed in pazienti con abitudini parafunzionali.
y La tecnica dei perni prefabbricati di fibra deve venire applicata soltanto ai denti con un minimo di 2 mm di altezza della dentina coronaria.
y I perni in fibra devono venire tagliati solo con fresa diamantata ad alta rotazione e sotto raffreddamento. Non usare forbici o pinza. Usare occhiali di protezione e mascherina per evitare l’inalazione di particelle prodotte durante il taglio.
y I perni di fibra devono venire coperti totalmente dall’agente cementante o dalla resina composita. Le fibre esposte assorbono l’acqua e alterano le proprietà meccaniche del perno.
DEUTSCH
DEFINITION
Intraradikulärer lichtdurchlässiger Kegelstift aus Glasfaser.
INDIKATIONEN
Zur Unterstützung von Restaurationen und Prothetikkronen.
ZUSAMMENSTELLUNG
Stiften (% Gewicht): Fibra de vidro...............................................................80% Epoxidharz..................................................................20%Bohrern........................................................................................EdelstahlBohrerkursoren............................................Silikon für KrankenhausgebrauchStiftkursoren...................................................................................LatexSchablone zur Röntgen-Abmessung...............................................Plastik
ANWENDUNGSTECHNIK
A. VORBEREITUNG DES WURZELKANALS
1. Stift je nach Durchmesser und Tiefe des Kanals wählen. Schablone und periapikale Röntgenaufnahme des Zahns anwenden (Bild 1).
2. Füllung des Kanals teilweise bis zur vorgegebenen Tiefe mit erhitzten Instrumenten entfernen. Mindestens 3 bis 5 mm Füllung in der Wurzelspitze belassen, aufgrund der Anwesenheit von Nebenkanälen (Bild 2).
3. Durchführung mit dem Bohrer vorbereiten, der dem gewählten EXACTO-Stift entspricht (Bild 3). EXACTO 0,5 - Bohrer 0,5 (Lila) / EXACTO 1 - Bohrer 1 (Weiß) / EXACTO 2 - Bohrer 2 (Gelb) / EXACTO 3 - Bohrer 3 (Blau).
4. Periapikale Röntgenaufnahme machen, um die Kanalvorbereitung und den Zustand der Füllung zu prüfen. Eine übermäßige Entfernung des Guttapercha kann zu Misserfolg führen (Bild 4).
B. VORBEREITUNG DES EXACTO FÜR DIE ZEMENTIERUNG
1. Stift in die Durchführung positionieren, um dessen Anpassung und gänzliche Einfügung zu prüfen. Stiftkursor bis zur Schnittfläche schieben (der Mindestabstand zum Antagonistenzahn ist 2 mm) (Bild 5).
2. EXACTO-Stifte dürfen nur mit Diamantbohrern in hoher Geschwindigkeit unter Wasser geschnitten werden (Bild 6 und 7).
3. Stift mit Alkohol reinigen und trocknen (Bild 8). Eine Schicht Silan (SILANO ANGELUS®) auftragen und 1 Minute lang trocknen lassen (Bild 9).
4. Chemischen Klebstoff FUSION-DURALINK® ANGELUS®-KATALISATOR entsprechend der Anweisungen auftragen (Bild 10).
C. ZEMENTIERUNG
1. Durchführung mit Wasserstrahlen waschen und mit Luft und Absaugpapier trocknen (Bild 11).
2. Durchführung mit ANGELUS®-PHOSPHORSÄURE zu 37% 15 Sek lang konditionieren (Bild 12).
3. Durchführung mit Wasser waschen und mit Luft und Absaugpapier trocknen (Bild 13 und 14). FUSION-DURALINK® ANGELUS®-Primer auftragen und 1 Min lang abwarten.
4. In die Durchführung und am Stift das chemische Adhäsiv FUSION-DURALINK® CATALISADOR ANGELUS® laut den Gebrauchsanweisungen auftragen. Dieses Adhäsiv braucht nicht gemischt zu werden, da es chemisch, ohne Lichtaktivierung, aushärtet (Bild 15).
5. Chemisch oder doppelt* aktivierten Harzzement spachteln und die Durchführung füllen (Bild 16).
6. Stift in die Durchführung einfügen, Zementüberschuss entfernen und Aushärtung abwarten. Falls der Zement doppelt aktiviert ist, lichthärten (Bild 17).
L Zemente aus Zinkphosphat und Glasionomer (herkömmlich und durch Harz verändert) können ebenfalls verwendet werden, doch ihre mechanischen Eigenschaften liegen unter denen des Harzzements. Bei selbstklebendem Zement ist kein Konditionieren mit Säure noch Auftragen von Klebstoff nötig.
EXACTO PORTUGUÊS
DEFINIÇÃO
Pino translúcido intrarradicular cônico em fibra de vidro.
INDICAÇÕES
Para apoio de restaurações e coroas protéticas.
COMPOSIÇÃO
Pinos (% em peso): Fibra de vidro...............................................................80% Resina epóxi.................................................................20%Brocas........................................................................................Aço inoxidávelCursores das brocas....................................................Silicone grau-hospitalarCursores dos pinos...................................................................................LátexGabarito para mensuração radiográfica...............................................Plástico
TÉCNICA DE USO
A. PREPARO DO CANAL RADICULAR
1. Selecione o pino de acordo com o diâmetro e a profundidade do canal. Utilize o gabarito e a radiografia periapical do dente (fig. 1).
2. Remova parte da obturação do canal com instrumentos aquecidos até a profundidade pré-determinada. Deixe no mínimo 3 a 5 mm de obturação no ápice radicular devido à presença de canais acessórios (fig. 2).
3. Prepare o conduto com a broca correspondente ao pino EXACTO selecionado (fig. 3). EXACTO 0,5 - Broca 0,5 (lilás) / EXACTO 1 - Broca 1 (branca) / EXACTO 2 - Broca 2 (amarela) / EXACTO 3 - Broca 3 (azul).
4. Faça uma radiografia periapical para verificar o preparo do canal e a condição da obturação. A remoção excessiva de guta-percha pode levar a um insucesso (fig. 4).
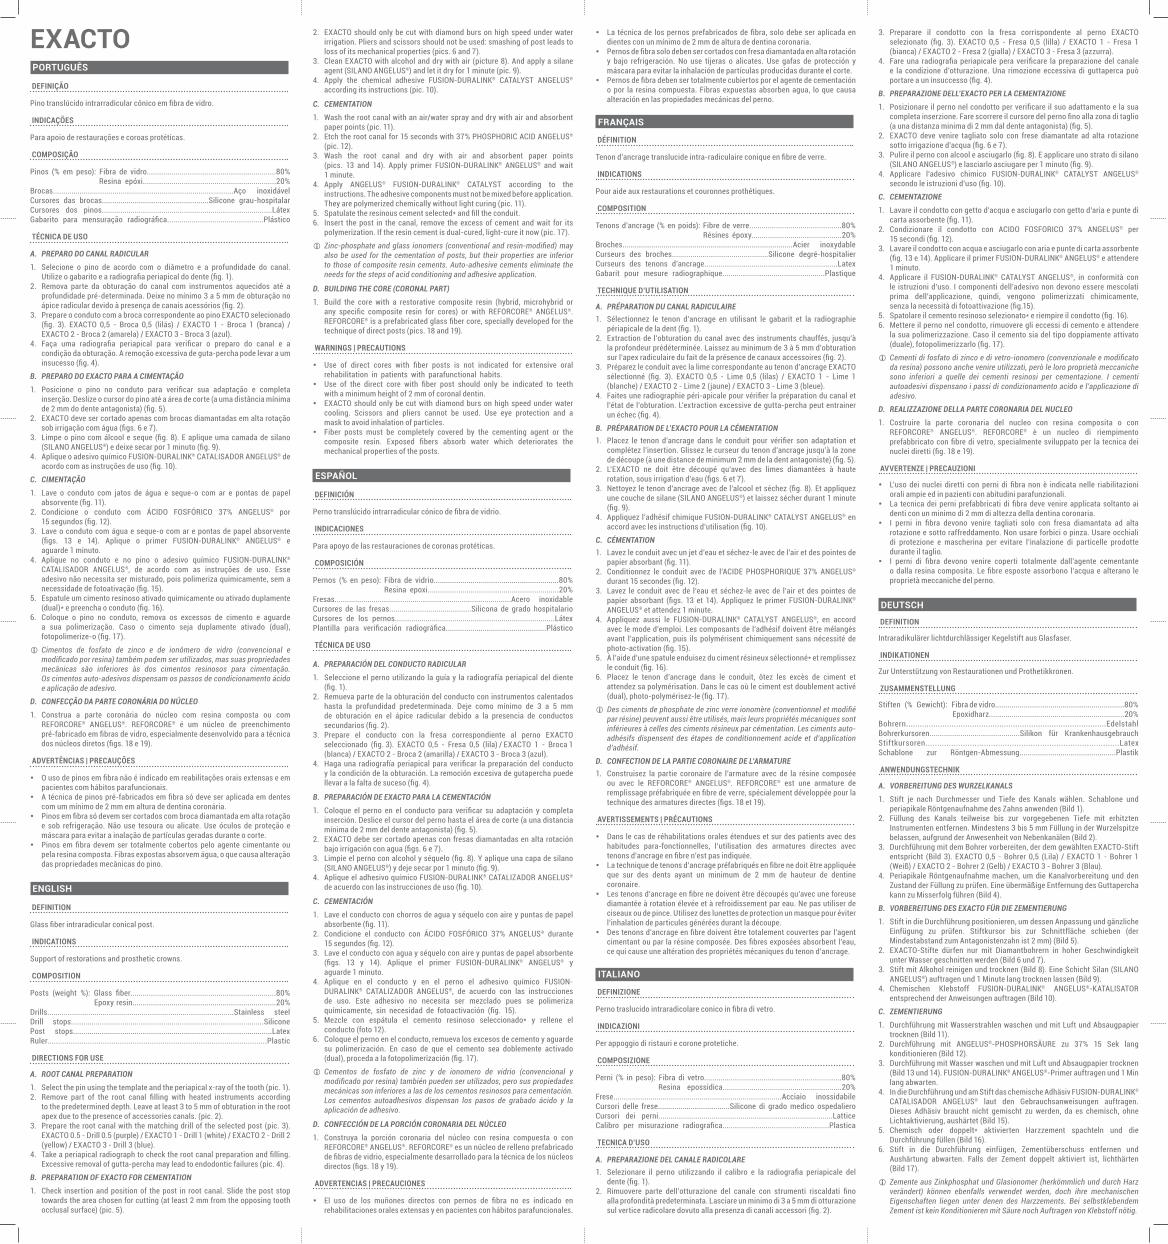
B. PREPARO DO EXACTO PARA A CIMENTAÇÃO
1. Posicione o pino no conduto para verificar sua adaptação e completa inserção. Deslize o cursor do pino até a área de corte (a uma distância mínima de 2 mm do dente antagonista) (fig. 5).
2. EXACTO deve ser cortado apenas com brocas diamantadas em alta rotação sob irrigação com água (figs. 6 e 7).
3. Limpe o pino com álcool e seque (fig. 8). E aplique uma camada de silano (SILANO ANGELUS®) e deixe secar por 1 minuto (fig. 9).
4. Aplique o adesivo químico FUSION-DURALINK® CATALISADOR ANGELUS® de acordo com as instruções de uso (fig. 10).
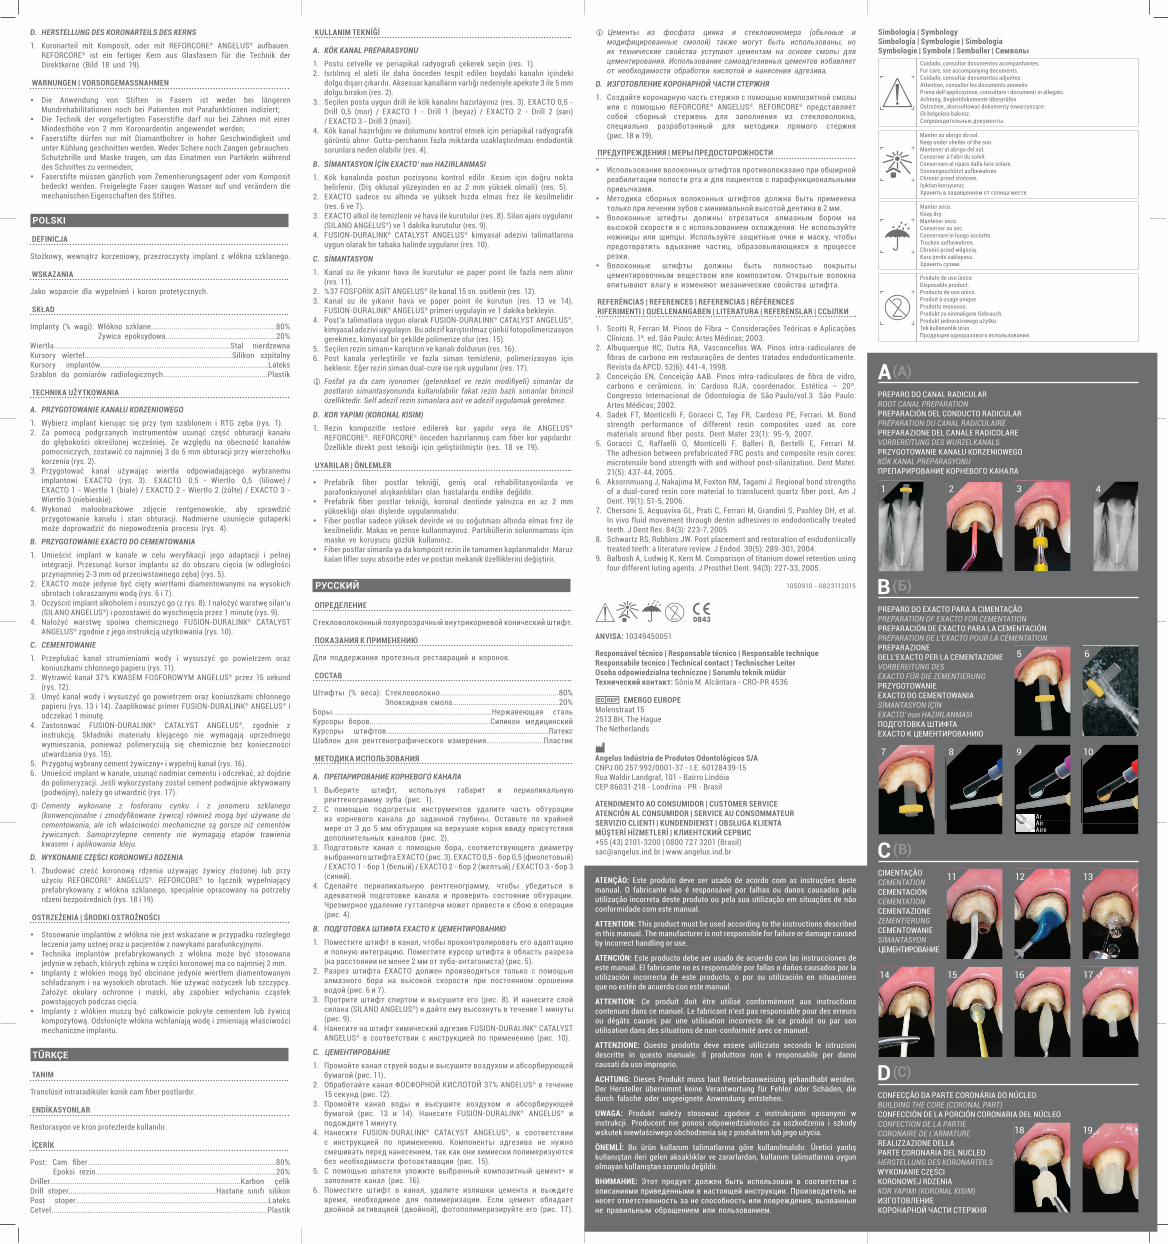
C. CIMENTAÇÃO
1. Lave o conduto com jatos de água e seque-o com ar e pontas de papel absorvente (fig. 11).
2. Condicione o conduto com ÁCIDO FOSFÓRICO 37% ANGELUS® por 15 segundos (fig. 12).
3. Lave o conduto com água e seque-o com ar e pontas de papel absorvente (figs. 13 e 14). Aplique o primer FUSION-DURALINK® ANGELUS® e aguarde 1 minuto.
4. Aplique no conduto e no pino o adesivo químico FUSION-DURALINK® CATALISADOR ANGELUS®, de acordo com as instruções de uso. Esse adesivo não necessita ser misturado, pois polimeriza quimicamente, sem a necessidade de fotoativação (fig. 15).
5. Espatule um cimento resinoso ativado quimicamente ou ativado duplamente (dual)* e preencha o conduto (fig. 16).
6. Coloque o pino no conduto, remova os excessos de cimento e aguarde a sua polimerização. Caso o cimento seja duplamente ativado (dual), fotopolimerize-o (fig. 17).
L Cimentos de fosfato de zinco e de ionômero de vidro (convencional e modificado por resina) também podem ser utilizados, mas suas propriedades mecânicas são inferiores às dos cimentos resinosos para cimentação. Os cimentos auto-adesivos dispensam os passos de condicionamento ácido e aplicação de adesivo.
D. CONFECÇÃO DA PARTE CORONÁRIA DO NÚCLEO
1. Construa a parte coronária do núcleo com resina composta ou com REFORCORE® ANGELUS®. REFORCORE® é um núcleo de preenchimento pré-fabricado em fibras de vidro, especialmente desenvolvido para a técnica dos núcleos diretos (figs. 18 e 19).
ADVERTÊNCIAS | PRECAUÇÕES
y O uso de pinos em fibra não é indicado em reabilitações orais extensas e em pacientes com hábitos parafuncionais.
y A técnica de pinos pré-fabricados em fibra só deve ser aplicada em dentes com um mínimo de 2 mm em altura de dentina coronária.
y Pinos em fibra só devem ser cortados com broca diamantada em alta rotação e sob refrigeração. Não use tesoura ou alicate. Use óculos de proteção e máscara para evitar a inalação de partículas geradas durante o corte.
y Pinos em fibra devem ser totalmente cobertos pelo agente cimentante ou pela resina composta. Fibras expostas absorvem água, o que causa alteração das propriedades mecânicas do pino.
ENGLISH
DEFINITION
Glass fiber intraradicular conical post.
INDICATIONS
Support of restorations and prosthetic crowns.
COMPOSITION
Posts (weight %): Glass fiber.......................................................................80% Epoxy resin......................................................................20%Drills...........................................................................................Stainless steelDrill stops..............................................................................................SiliconePost stops.................................................................................................LatexRuler.......................................................................................................Plastic
DIRECTIONS FOR USE
A. ROOT CANAL PREPARATION
1. Select the pin using the template and the periapical x-ray of the tooth (pic. 1).2. Remove part of the root canal filling with heated instruments according
to the predetermined depth. Leave at least 3 to 5 mm of obturation in the root apex due to the presence of accessories canals. (pic. 2).
3. Prepare the root canal with the matching drill of the selected post (pic. 3). EXACTO 0.5 - Drill 0.5 (purple) / EXACTO 1 - Drill 1 (white) / EXACTO 2 - Drill 2 (yellow) / EXACTO 3 - Drill 3 (blue).
4. Take a periapical radiograph to check the root canal preparation and filling. Excessive removal of gutta-percha may lead to endodontic failures (pic. 4).
B. PREPARATION OF EXACTO FOR CEMENTATION
1. Check insertion and position of the post in root canal. Slide the post stop towards the area chosen for cutting (at least 2 mm from the opposing tooth occlusal surface) (pic. 5).
2. EXACTO should only be cut with diamond burs on high speed under water irrigation. Pliers and scissors should not be used: smashing of post leads to loss of its mechanical properties (pics. 6 and 7).
3. Clean EXACTO with alcohol and dry with air (picture 8). And apply a silane agent (SILANO ANGELUS®) and let it dry for 1 minute (pic. 9).
4. Apply the chemical adhesive FUSION-DURALINK® CATALYST ANGELUS® according its instructions (pic. 10).
C. CEMENTATION
1. Wash the root canal with an air/water spray and dry with air and absorbent paper points (pic. 11).
2. Etch the root canal for 15 seconds with 37% PHOSPHORIC ACID ANGELUS® (pic. 12).
3. Wash the root canal and dry with air and absorbent paper points (pics. 13 and 14). Apply primer FUSION-DURALINK® ANGELUS® and wait 1 minute.
4. Apply ANGELUS® FUSION-DURALINK® CATALYST according to the instructions. The adhesive components must not be mixed before application. They are polymerized chemically without light curing (pic. 11).
5. Spatulate the resinous cement selected* and fill the conduit.6. Insert the post in the canal, remove the excess of cement and wait for its
polymerization. If the resin cement is dual-cured, light-cure it now (pic. 17).
L Zinc-phosphate and glass ionomers (conventional and resin-modified) may also be used for the cementation of posts, but their properties are inferior to those of composite resin cements. Auto-adhesive cements eliminate the needs for the steps of acid conditioning and adhesive application.
D. BUILDING THE CORE (CORONAL PART)
1. Build the core with a restorative composite resin (hybrid, microhybrid or any specific composite resin for cores) or with REFORCORE® ANGELUS®. REFORCORE® is a prefabricated glass fiber core, specially developed for the technique of direct posts (pics. 18 and 19).
WARNINGS | PRECAUTIONS
y Use of direct cores with fiber posts is not indicated for extensive oral rehabilitation in patients with parafunctional habits.
y Use of the direct core with fiber post should only be indicated to teeth with a minimum height of 2 mm of coronal dentin.
y EXACTO should only be cut with diamond burs on high speed under water cooling. Scissors and pliers cannot be used. Use eye protection and a mask to avoid inhalation of particles.
y Fiber posts must be completely covered by the cementing agent or the composite resin. Exposed fibers absorb water which deteriorates the mechanical properties of the posts.
ESPAÑOL
DEFINICIÓN
Perno translúcido intrarradicular cónico de fibra de vidrio.
INDICACIONES
Para apoyo de las restauraciones de coronas protéticas.
COMPOSICIÓN
Pernos (% en peso): Fibra de vidrio.............................................................80% Resina epoxi................................................................20%Fresas......................................................................................Acero inoxidableCursores de las fresas........................................Silicona de grado hospitalarioCursores de los pernos..............................................................................LátexPlantilla para verificación radiográfica.................................................Plástico
TÉCNICA DE USO
A. PREPARACIÓN DEL CONDUCTO RADICULAR
1. Seleccione el perno utilizando la guía y la radiografía periapical del diente (fig. 1).
2. Remueva parte de la obturación del conducto con instrumentos calentados hasta la profundidad predeterminada. Deje como mínimo de 3 a 5 mm de obturación en el ápice radicular debido a la presencia de conductos secundarios (fig. 2).
3. Prepare el conducto con la fresa correspondiente al perno EXACTO seleccionado (fig. 3). EXACTO 0,5 - Fresa 0,5 (lila) / EXACTO 1 - Broca 1 (blanca) / EXACTO 2 - Broca 2 (amarilla) / EXACTO 3 - Broca 3 (azul).
4. Haga una radiografía periapical para verificar la preparación del conducto y la condición de la obturación. La remoción excesiva de gutapercha puede llevar a la falta de suceso (fig. 4).
B. PREPARACIÓN DE EXACTO PARA LA CEMENTACIÓN
1. Coloque el perno en el conducto para verificar su adaptación y completa inserción. Deslice el cursor del perno hasta el área de corte (a una distancia mínima de 2 mm del dente antagonista) (fig. 5).
2. EXACTO debe ser cortado apenas con fresas diamantadas en alta rotación bajo irrigación con agua (figs. 6 e 7).
3. Limpie el perno con alcohol y séquelo (fig. 8). Y aplique una capa de silano (SILANO ANGELUS®) y deje secar por 1 minuto (fig. 9).
4. Aplique el adhesivo químico FUSION-DURALINK® CATALIZADOR ANGELUS® de acuerdo con las instrucciones de uso (fig. 10).
C. CEMENTACIÓN
1. Lave el conducto con chorros de agua y séquelo con aire y puntas de papel absorbente (fig. 11).
2. Condicione el conducto con ÁCIDO FOSFÓRICO 37% ANGELUS® durante 15 segundos (fig. 12).
3. Lave el conducto con agua y séquelo con aire y puntas de papel absorbente (figs. 13 y 14). Aplique el primer FUSION-DURALINK® ANGELUS® y aguarde 1 minuto.
4. Aplique en el conducto y en el perno el adhesivo químico FUSION-DURALINK® CATALIZADOR ANGELUS®, de acuerdo con las instrucciones de uso. Este adhesivo no necesita ser mezclado pues se polimeriza químicamente, sin necesidad de fotoactivación (fig. 15).
5. Mezcle con espátula el cemento resinoso seleccionado* y rellene el conducto (foto 12).
6. Coloque el perno en el conducto, remueva los excesos de cemento y aguarde su polimerización. En caso de que el cemento sea doblemente activado (dual), proceda a la fotopolimerización (fig. 17).
L Cementos de fosfato de zinc y de ionomero de vidrio (convencional y modificado por resina) también pueden ser utilizados, pero sus propiedades mecánicas son inferiores a las de los cementos resinosos para cementación. Los cementos autoadhesivos dispensan los pasos de grabado ácido y la aplicación de adhesivo.
D. CONFECCIÓN DE LA PORCIÓN CORONARIA DEL NÚCLEO
1. Construya la porción coronaria del núcleo con resina compuesta o con REFORCORE® ANGELUS®. REFORCORE® es un núcleo de relleno prefabricado de fibras de vidrio, especialmente desarrollado para la técnica de los núcleos directos (figs. 18 y 19).
ADVERTENCIAS | PRECAUCIONES
y El uso de los muñones directos con pernos de fibra no es indicado en rehabilitaciones orales extensas y en pacientes con hábitos parafuncionales.
y La técnica de los pernos prefabricados de fibra, solo debe ser aplicada en dientes con un mínimo de 2 mm de altura de dentina coronaria.
y Pernos de fibra solo deben ser cortados con fresa diamantada en alta rotación y bajo refrigeración. No use tijeras o alicates. Use gafas de protección y máscara para evitar la inhalación de partículas producidas durante el corte.
y Pernos de fibra deben ser totalmente cubiertos por el agente de cementación o por la resina compuesta. Fibras expuestas absorben agua, lo que causa alteración en las propiedades mecánicas del perno.
FRANÇAIS
DÉFINITION
Tenon d’ancrage translucide intra-radiculaire conique en fibre de verre.
INDICATIONS
Pour aide aux restaurations et couronnes prothétiques.
COMPOSITION
Tenons d’ancrage (% en poids): Fibre de verre.............................................80% Résines époxy............................................20%Broches...................................................................................Acier inoxydableCurseurs des broches...............................................Silicone degré-hospitalierCurseurs des tenons d’ancrage.................................................................LatexGabarit pour mesure radiographique..................................................Plastique
TECHNIQUE D’UTILISATION
A. PRÉPARATION DU CANAL RADICULAIRE1. Sélectionnez le tenon d’ancrage en utilisant le gabarit et la radiographie
périapicale de la dent (fig. 1).2. Extraction de l’obturation du canal avec des instruments chauffés, jusqu’à
la profondeur prédéterminée. Laissez au minimum de 3 à 5 mm d’obturation sur l’apex radiculaire du fait de la présence de canaux accessoires (fig. 2).
3. Préparez le conduit avec la lime correspondante au tenon d’ancrage EXACTO sélectionné (fig. 3). EXACTO 0,5 - Lime 0,5 (lilas) / EXACTO 1 - Lime 1 (blanche) / EXACTO 2 - Lime 2 (jaune) / EXACTO 3 - Lime 3 (bleue).
4. Faites une radiographie péri-apicale pour vérifier la préparation du canal et l’état de l’obturation. L’extraction excessive de gutta-percha peut entrainer un échec (fig. 4).
B. PRÉPARATION DE L’EXACTO POUR LA CÉMENTATION1. Placez le tenon d’ancrage dans le conduit pour vérifier son adaptation et
complétez l’insertion. Glissez le curseur du tenon d’ancrage jusqu’à la zone de découpe (à une distance de minimum 2 mm de la dent antagoniste) (fig. 5).
2. L’EXACTO ne doit être découpé qu’avec des limes diamantées à haute rotation, sous irrigation d’eau (figs. 6 et 7).
3. Nettoyez le tenon d’ancrage avec de l’alcool et séchez (fig. 8). Et appliquez une couche de silane (SILANO ANGELUS®) et laissez sécher durant 1 minute (fig. 9).
4. Appliquez l’adhésif chimique FUSION-DURALINK® CATALYST ANGELUS® en accord avec les instructions d’utilisation (fig. 10).
C. CÉMENTATION1. Lavez le conduit avec un jet d’eau et séchez-le avec de l’air et des pointes de
papier absorbant (fig. 11).2. Conditionnez le conduit avec de l’ACIDE PHOSPHORIQUE 37% ANGELUS®
durant 15 secondes (fig. 12).3. Lavez le conduit avec de l’eau et séchez-le avec de l’air et des pointes de
papier absorbant (figs. 13 et 14). Appliquez le primer FUSION-DURALINK® ANGELUS® et attendez 1 minute.
4. Appliquez aussi le FUSION-DURALINK® CATALYST ANGELUS®, en accord avec le mode d’emploi. Les composants de l’adhésif doivent être mélangés avant l’application, puis ils polymérisent chimiquement sans nécessité de photo-activation (fig. 15).
5. À l’aide d’une spatule enduisez du ciment résineux sélectionné* et remplissez le conduit (fig. 16).
6. Placez le tenon d’ancrage dans le conduit, ôtez les excès de ciment et attendez sa polymérisation. Dans le cas où le ciment est doublement activé (dual), photo-polymérisez-le (fig. 17).
L Des ciments de phosphate de zinc verre ionomère (conventionnel et modifié par résine) peuvent aussi être utilisés, mais leurs propriétés mécaniques sont inférieures à celles des ciments résineux par cémentation. Les ciments auto-adhésifs dispensent des étapes de conditionnement acide et d’application d’adhésif.
D. CONFECTION DE LA PARTIE CORONAIRE DE L’ARMATURE1. Construisez la partie coronaire de l’armature avec de la résine composée
ou avec le REFORCORE® ANGELUS®. REFORCORE® est une armature de remplissage préfabriquée en fibre de verre, spécialement développée pour la technique des armatures directes (figs. 18 et 19).
AVERTISSEMENTS | PRÉCAUTIONS
y Dans le cas de réhabilitations orales étendues et sur des patients avec des habitudes para-fonctionnelles, l‘utilisation des armatures directes avec tenons d’ancrage en fibre n’est pas indiquée.
y La technique de tenons d’ancrage préfabriqués en fibre ne doit être appliquée que sur des dents ayant un minimum de 2 mm de hauteur de dentine coronaire.
y Les tenons d’ancrage en fibre ne doivent être découpés qu’avec une foreuse diamantée à rotation élevée et à refroidissement par eau. Ne pas utiliser de ciseaux ou de pince. Utilisez des lunettes de protection un masque pour éviter l’inhalation de particules générées durant la découpe.
y Des tenons d’ancrage en fibre doivent être totalement couvertes par l’agent cimentant ou par la résine composée. Des fibres exposées absorbent l’eau, ce qui cause une altération des propriétés mécaniques du tenon d’ancrage.
ITALIANO
DEFINIZIONE
Perno traslucido intraradicolare conico in fibra di vetro.
INDICAZIONI
Per appoggio di ristauri e corone protetiche.
COMPOSIZIONE
Perni (% in peso): Fibra di vetro...................................................................80% Resina epossidica..........................................................20%Frese..................................................................................Acciaio inossidabileCursori delle frese...................................Silicone di grado medico ospedalieroCursori dei perni.....................................................................................LatticeCalibro per misurazione radiografica....................................................Plastica
TECNICA D’USO
A. PREPARAZIONE DEL CANALE RADICOLARE1. Selezionare il perno utilizzando il calibro e la radiografia periapicale del
dente (fig. 1).2. Rimuovere parte dell’otturazione del canale con strumenti riscaldati fino
alla profondità predeterminata. Lasciare un minimo di 3 a 5 mm di otturazione sul vertice radicolare dovuto alla presenza di canali accessori (fig. 2).
L Цементы из фосфата цинка и стеклоиономера (обычные и модифицированные смолой) также могут быть использованы, но их технические свойства уступают цементам на основе смолы для цементирования. Использование самоадгезивных цементов избавляет от необходимости обработки кислотой и нанесения адгезива.
D. ИЗГОТОВЛЕНИЕКОРОНАРНОЙЧАСТИСТЕРЖНЯ
1. Создайте коронарную часть стержня с помощью композитной смолы или с помощью REFORCORE® ANGELUS®. REFORCORE® представляет собой сборный стержень для заполнения из стекловолокна, специально разработанный для методики прямого стержня (рис. 18 и 19).
ПРЕДУПРЕЖДЕНИЯ | МЕРЫ ПРЕДОСТОРОЖНОСТИ
y Использование волоконных штифтов противопоказано при обширной реабилитации полости рта и для пациентов с парафункциональными привычками.
y Методика сборных волоконных штифтов должна быть применена только при лечении зубов с минимальной высотой дентина в 2 мм.
y Волоконные штифты должны отрезаться алмазным бором на высокой скорости и с использованием охлаждения. Не используйте ножницы или щипцы. Используйте защитные очки и маску, чтобы предотвратить вдыхание частиц, образовывающихся в процессе резки.
y Волоконные штифты должны быть полностью покрыты цементировочным веществом или композитом. Открытые волокна впитывают влагу и изменяют мезанические свойства штифта.
REFERÊNCIAS | REFERENCES | REFERENCIAS | RÉFÉRENCES RIFERIMENTI | QUELLENANGABEN | LITERATURA | REFERENSLAR | ССЫЛКИ
1. Scotti R, Ferrari M. Pinos de Fibra – Considerações Teóricas e Aplicações Clínicas. 1ª. ed. São Paulo: Artes Médicas; 2003.
2. Albuquerque RC, Dutra RA, Vasconcellos WA. Pinos intra-radiculares de fibras de carbono em restaurações de dentes tratados endodonticamente. Revista da APCD. 52(6): 441-4, 1998.
3. Conceição EN, Conceição AAB. Pinos intra-radiculares de fibra de vidro, carbono e cerâmicos. In: Cardoso RJA, coordenador. Estética – 20º. Congresso Internacional de Odontologia de São Paulo/vol.3. São Paulo: Artes Médicas; 2002.
4. Sadek FT, Monticelli F, Goracci C, Tay FR, Cardoso PE, Ferrari. M. Bond strength performance of different resin composites used as core materials around fiber posts. Dent Mater 23(1): 95-9, 2007.
5. Goracci C, Raffaelli O, Monticelli F, Balleri B, Bertelli E, Ferrari M. The adhesion between prefabricated FRC posts and composite resin cores: microtensile bond strength with and without post-silanization. Dent Mater. 21(5): 437-44, 2005.
6. Aksornmuang J, Nakajima M, Foxton RM, Tagami J. Regional bond strengths of a dual-cured resin core material to translucent quartz fiber post. Am J Dent. 19(1): 51-5, 2006.
7. Chersoni S, Acquaviva GL, Prati C, Ferrari M, Grandini S, Pashley DH, et al. In vivo fluid movement through dentin adhesives in endodontically treated teeth. J Dent Res. 84(3): 223-7, 2005.
8. Schwartz RS, Robbins JW. Post placement and restoration of endodontically treated teeth: a literature review. J Endod. 30(5): 289-301, 2004.
9. Balbosh A, Ludwig K, Kern M. Comparison of titanium dowel retention using four different luting agents. J Prosthet Dent. 94(3): 227-33, 2005.
1050910 - 0823112015
KULLANIM TEKNİĞİ
A. KÖK KANAL PREPARASYONU
1. Postu cetvelle ve periapikal radyografi çekerek seçin (res. 1). 2. Isıtılmış el aleti ile daha önceden tespit edilen boydaki kanalın içindeki
dolgu dışarı çıkarılır. Aksesuar kanalların varlığı nedeniyle apekste 3 ile 5 mm dolgu bırakın (res. 2).
3. Seçilen posta uygun drill ile kök kanalını hazırlayınız (res. 3). EXACTO 0,5 - Drill 0,5 (mor) / EXACTO 1 - Drill 1 (beyaz) / EXACTO 2 - Drill 2 (sarı) / EXACTO 3 - Drill 3 (mavi).
4. Kök kanal hazırlığını ve dolumunu kontrol etmek için periapikal radyografik görüntü alınır. Gutta-perchanın fazla miktarda uzaklaştırılması endodontik sorunlara neden olabilir (res. 4).
B. SİMANTASYONİÇİNEXACTO’nunHAZIRLANMASI
1. Kök kanalında postun pozisyonu kontrol edilir. Kesim için doğru nokta belirlenir. (Diş oklusal yüzeyinden en az 2 mm yüksek olmali) (res. 5).
2. EXACTO sadece su altında ve yüksek hızda elmas frez ile kesilmelidir (res. 6 ve 7).
3. EXACTO alkol ile temizlenir ve hava ile kurutulur (res. 8). Silan ajanı uygulanır (SILANO ANGELUS®) ve 1 dakika kurutulur (res. 9).
4. FUSION-DURALINK® CATALYST ANGELUS® kimyasal adezivi talimatlarına uygun olarak bir tabaka halinde uygulanır (res. 10).
C. SİMANTASYON
1. Kanal su ile yıkanır hava ile kurutulur ve paper point ile fazla nem alınır (res. 11).
2. %37 FOSFORİK ASİT ANGELUS® ile kanal 15 sn. asitlenir (res. 12).3. Kanal su ile yıkanır hava ve paper point ile kurutun (res. 13 ve 14).
FUSION-DURALINK® ANGELUS® primeri uygulayin ve 1 dakika bekleyin.4. Post’a talimatlara uygun olarak FUSION-DURALINK® CATALYST ANGELUS®,
kimyasal adezivi uygulayın. Bu adezif karıştırılmaz çünkü fotopolimerizasyon gerekmez, kimyasal bir şekilde polimerize olur (res. 15).
5. Seçilen rezin simanı* karıştırın ve kanalı doldurun (res. 16).6. Post kanala yerleştirilir ve fazla siman temizlenir, polimerizasyon için
beklenir. Eğer rezin siman dual-cure ise ışık uygulanır (res. 17).
L Fosfat ya da cam iyonomer (geleneksel ve rezin modifiyeli) simanlar da postların simantasyonunda kullanılabilir fakat rezin bazlı simanlar birincil özelliktedir. Self adezif rezin simanlara asit ve adezif uygulamak gerekmez.
D. KOR YAPIMI (KORONAL KISIM)
1. Rezin kompozitle restore edilerek kor yapılır veya ile ANGELUS® REFORCORE®. REFORCORE® önceden hazırlanmış cam fiber kor yapılardır. Özellikle direkt post tekniği için geliştirilmiştir (res. 18 ve 19).
UYARILAR | ÖNLEMLER
y Prefabrik fiber postlar tekniği, geniş oral rehabilitasyonlarda ve parafonksiyonel alışkanlıkları olan hastalarda endike değildir.
y Prefabrik fiber postlar tekniği, koronal dentinde yalnızca en az 2 mm yüksekliği olan dişlerde uygulanmalıdır.
y Fiber postlar sadece yüksek devirde ve su soğutması altında elmas frez ile kesilmelidir. Makas ve pense kullanmayınız. Partiküllerin solunmaması için maske ve koruyucu gözlük kullanınız.
y Fiber postlar simanla ya da kompozit rezin ile tamamen kaplanmalıdır. Maruz kalan lifler suyu absorbe eder ve postun mekanik özelliklerini değiştirir.
РУССКИЙ
ОПРЕДЕЛЕНИЕ
Стекловолоконный полупрозрачный внутрикорневой конический штифт.
ПОКАЗАНИЯ К ПРИМЕНЕНИЮ
Для поддержания протезных реставраций и коронок.
СОСТАВ
Штифты (% веса): Стекловолокно..........................................................80% Эпоксидная смола....................................................20%Боры..............................................................................Нержавеющая стальКурсоры боров...........................................................Силикон медицинский Курсоры штифтов...............................................................................ЛатексШаблон для рентгенографического измерения............................Пластик
МЕТОДИКА ИСПОЛЬЗОВАНИЯ
A. ПРЕПАРИРОВАНИЕКОРНЕВОГОКАНАЛА
1. Выберите штифт, используя габарит и периапикальную рентгенограмму зуба (рис. 1).
2. С помощью подогретых инструментов удалите часть обтурации из корневого канала до заданной глубины. Оставьте по крайней мере от 3 до 5 мм обтурации на верхушке корня ввиду присутствия дополнительных каналов (рис. 2).
3. Подготовьте канал с помощью бора, соответствующего диаметру выбранного штифта EXACTO (рис. 3). EXACTO 0,5 - бор 0,5 (фиолетовый) / EXACTO 1 - бор 1 (белый) / EXACTO 2 - бор 2 (желтый) / EXACTO 3 - бор 3 (синий).
4. Сделайте периапикальную рентгенограмму, чтобы убедиться в адекватной подготовке канала и проверить состояние обтурации.Чрезмерное удаление гуттаперчи может привести к сбою в операции (рис. 4).
B. ПОДГОТОВКАШТИФТАEXACTOКЦЕМЕНТИРОВАНИЮ
1. Поместите штифт в канал, чтобы проконтролировать его адаптацию и полную интеграцию. Поместите курсор штифта в область разреза (на расстоянии не менее 2 мм от зуба-антагониста) (рис. 5).
2. Разрез штифта EXACTO должен производиться только с помощью алмазного бора на высокой скорости при постоянном орошении водой (рис. 6 и 7).
3. Протрите штифт спиртом и высушите его (рис. 8). И нанесите слой силана (SILANO ANGELUS®) и дайте ему высохнуть в течение 1 минуты (рис. 9).
4. Нанесите на штифт химический адгезив FUSION-DURALINK® CATALYST ANGELUS® в соответствии с инструкцией по применению (рис. 10).
C. ЦЕМЕНТИРОВАНИЕ
1. Промойте канал струей воды и высушите воздухом и абсорбирующей бумагой (рис. 11).
2. Обработайте канал ФОСФОРНОЙ КИСЛОТОЙ 37% ANGELUS® в течение 15 секунд (рис. 12).
3. Промойте канал воды и высушите воздухом и абсорбирующей бумагой (рис. 13 и 14). Нанесите FUSION-DURALINK® ANGELUS® и подождите 1 минуту.
4. Нанесите FUSION-DURALINK® CATALYST ANGELUS®, в соответствии с инструкцией по применению. Компоненты адгезива не нужно смешивать перед нанесением, так как они химиески полимеризуются без необходимости фотоактивации (рис. 15).
5. С помощью шпателя уложите выбранный композитный цемент* и заполните канал (рис. 16).
6. Поместите штифт в канал, удалите излишки цемента и выждите время, необходимое для полимеризации. Если цемент обладает двойной активацией (двойной), фотополимеризируйте его (рис. 17).
D. HERSTELLUNG DES KORONARTEILS DES KERNS
1. Koronarteil mit Komposit, oder mit REFORCORE® ANGELUS® aufbauen. REFORCORE® ist ein fertiger Kern aus Glasfasern für die Technik der Direktkerne (Bild 18 und 19).
WARNUNGEN | VORSORGEMASSNAHMEN
y Die Anwendung von Stiften in Fasern ist weder bei längeren Mundrehabilitationen noch bei Patienten mit Parafunktionen indiziert;
y Die Technik der vorgefertigten Faserstifte darf nur bei Zähnen mit einer Mindesthöhe von 2 mm Koronardentin angewendet werden;
y Faserstifte dürfen nur mit Diamantbohrer in hoher Geschwindigkeit und unter Kühlung geschnitten werden. Weder Schere noch Zangen gebrauchen. Schutzbrille und Maske tragen, um das Einatmen von Partikeln während des Schnittes zu vermeiden;
y Faserstifte müssen gänzlich vom Zementierungsagent oder vom Komposit bedeckt werden. Freigelegte Faser saugen Wasser auf und verändern die mechanischen Eigenschaften des Stiftes.
POLSKI
DEFINICJA
Stożkowy, wewnątrz korzeniowy, przezroczysty implant z włókna szklanego.
WSKAZANIA
Jako wsparcie dla wypełnień i koron protetycznych.
SKŁAD
Implanty (% wagi): Włókno szklane.............................................................80% Żywica epoksydowa......................................................20%Wiertła......................................................................................Stal nierdzewnaKursory wierteł........................................................................Silikon szpitalnyKursory implantów..................................................................................LateksSzablon do pomiarów radiologicznych...................................................Plastik
TECHNIKA UŻYTKOWANIA
A. PRZYGOTOWANIEKANAŁUKORZENIOWEGO
1. Wybierz implant kierując się przy tym szablonem i RTG zęba (rys. 1).2. Za pomocą podgrzanych instrumentów usunąć część obturacji kanału
do głębokości określonej wcześniej. Ze względu na obecność kanałów pomocniczych, zostawić co najmniej 3 do 5 mm obturacji przy wierzchołku korzenia (rys. 2).
3. Przygotować kanał używając wiertła odpowiadającego wybranemu implantowi EXACTO (rys. 3). EXACTO 0,5 - Wiertło 0,5 (liliowe) / EXACTO 1 - Wiertło 1 (białe) / EXACTO 2 - Wiertło 2 (żółte) / EXACTO 3 - Wiertło 3 (niebieskie).
4. Wykonać małoobrazkowe zdjęcie rentgenowskie, aby sprawdzić przygotowanie kanału i stan obturacji. Nadmierne usunięcie gutaperki może doprowadzić do niepowodzenia procesu (rys. 4).
B. PRZYGOTOWANIE EXACTO DO CEMENTOWANIA
1. Umieścić implant w kanale w celu weryfikacji jego adaptacji i pełnej integracji. Przesunąć kursor implantu aż do obszaru cięcia (w odległości przynajmniej 2-3 mm od przeciwstawnego zęba) (rys. 5).
2. EXACTO może jedynie być cięty wiertłami diamentowanymi na wysokich obrotach i okraszanymi wodą (rys. 6 i 7).
3. Oczyścić implant alkoholem i osuszyć go (z rys. 8). I nałożyć warstwę silan’u (SILANO ANGELUS®) i pozostawić do wyschnięcia przez 1 minutę (rys. 9).
4. Nałożyć warstwę spoiwa chemicznego FUSION-DURALINK® CATALYST ANGELUS® zgodnie z jego instrukcją użytkowania (rys. 10).
C. CEMENTOWANIE
1. Przepłukać kanał strumieniami wody i wysuszyć go powietrzem oraz koniuszkami chłonnego papieru (rys. 11).
2. Wytrawić kanał 37% KWASEM FOSFOROWYM ANGELUS® przez 15 sekund (rys. 12).
3. Umyć kanał wody i wysuszyć go powietrzem oraz koniuszkami chłonnego papieru (rys. 13 i 14). Zaaplikować primer FUSION-DURALINK® ANGELUS® i odczekać 1 minutę.
4. Zastosować FUSION-DURALINK® CATALYST ANGELUS®, zgodnie z instrukcją. Składniki materiału klejącego nie wymagają uprzedniego wymieszania, ponieważ polimeryzują się chemicznie bez konieczności utwardzania (rys. 15).
5. Przygotuj wybrany cement żywiczny* i wypełnij kanał (rys. 16).6. Umieścić implant w kanale, usunąć nadmiar cementu i odczekać, aż dojdzie
do polimeryzacji. Jeśli wykorzystany został cement podwójnie aktywowany (podwójny), należy go utwardzić (rys. 17).
L Cementy wykonane z fosforanu cynku i z jonomeru szklanego (konwencjonalne i zmodyfikowane żywicą) również mogą być używane do cementowania, ale ich właściwości mechaniczne są gorsze niż cementów żywicznych. Samoprzylepne cementy nie wymagają etapów trawienia kwasem i aplikowania kleju.
D. WYKONANIECZĘŚCIKORONOWEJRDZENIA
1. Zbudować cześć koronową rdzenia używając żywicy złożonej lub przy użyciu REFORCORE® ANGELUS®. REFORCORE® to łącznik wypełniający prefabrykowany z włókna szklanego, specjalnie opracowany na potrzeby rdzeni bezpośrednich (rys. 18 i 19).
OSTRZEŻENIA | ŚRODKI OSTROŻNOŚCI
y Stosowanie implantów z włókna nie jest wskazane w przypadku rozległego leczenia jamy ustnej oraz u pacjentów z nawykami parafunkcyjnymi.
y Technika implantów prefabrykowanych z włókna może być stosowana jedynie w zębach, których zębina w części koronowej ma co najmniej 2 mm.
y Implanty z włókien mogą być obcinane jedynie wiertłem diamentowanym schładzanym i na wysokich obrotach. Nie używać nożyczek lub szczypcy. Założyć okulary ochronne i maski, aby zapobiec wdychaniu cząstek powstających podczas cięcia.
y Implanty z włókien muszą być całkowicie pokryte cementem lub żywicą kompozytową. Odsłonięte włókna wchłaniają wodę i zmieniają właściwości mechaniczne implantu.
TÜRKÇE
TANIM
Translüsit intraradiküler konik cam fiber postlardır.
ENDİKASYONLAR
Restorasyon ve kron protezlerde kullanılır.
İÇERİK
Post: Cam fiber............................................................................................80% Epoksi rezin........................................................................................20%Driller.............................................................................................Karbon çelikDrill stoper........................................................................Hastane sınıfı silikonPost stoper..............................................................................................LateksCetvel.....................................................................................................Plastik
18
11
5
19
12
6
13
7
14
8
15
ArAirAire
9
16
10
17
PREPARO DO EXACTO PARA A CIMENTAÇÃOPREPARATION OF EXACTO FOR CEMENTATIONPREPARACIÓN DE EXACTO PARA LA CEMENTACIÓNPRÉPARATION DE L’EXACTO POUR LA CÉMENTATIONPREPARAZIONEDELL’EXACTO PER LA CEMENTAZIONEVORBEREITUNG DESEXACTO FÜR DIE ZEMENTIERUNGPRZYGOTOWANIEEXACTO DO CEMENTOWANIASİMANTASYON İÇİNEXACTO’ nun HAZIRLANMASIПОДГОТОВКА ШТИФТАEXACTO К ЦЕМЕНТИРОВАНИЮ
CIMENTAÇÃOCEMENTATIONCEMENTACIÓNCÉMENTATIONCEMENTAZIONEZEMENTIERUNGCEMENTOWANIESİMANTASYONЦЕМЕНТИРОВАНИЕ
C
CONFECÇÃO DA PARTE CORONÁRIA DO NÚCLEOBUILDING THE CORE (CORONAL PART)CONFECCIÓN DE LA PORCIÓN CORONARIA DEL NÚCLEOCONFECTION DE LA PARTIECORONAIRE DE L’ARMATUREREALIZZAZIONE DELLAPARTE CORONARIA DEL NUCLEOHERSTELLUNG DES KORONARTEILSWYKONANIE CZĘŚCIKORONOWEJ RDZENIAKOR YAPIMI (KORONAL KISIM)ИЗГОТОВЛЕНИЕКОРОНАРНОЙ ЧАСТИ СТЕРЖНЯ
D
1 2 3 4
PREPARO DO CANAL RADICULARROOT CANAL PREPARATIONPREPARACIÓN DEL CONDUCTO RADICULARPRÉPARATION DU CANAL RADICULAIREPREPARAZIONE DEL CANALE RADICOLAREVORBEREITUNG DES WURZELKANALSPRZYGOTOWANIE KANAŁU KORZENIOWEGOKÖK KANAL PREPARASYONUПРЕПАРИРОВАНИЕ КОРНЕВОГО КАНАЛА
A
B
Manter seco.Keep dry.Mantener seco.Conserver au sec.Conservare in luogo asciutto.Trocken aufbewahren.Chronić przed wilgocią.Kuru yerde saklayınız.Хранить сухим.
Cuidado, consultar documentos acompanhantes.For care, see accompanying documents.Cuidado, consultar documentos adjuntos.Attention, consulter les documents annexés.Prima dell’applicazione, consultare i documenti in allegato.Achtung, Begleitdokumente überprüfen.Ostrożnie, skonsultować dokumenty towarzyszące.Ek belgelere bakınız.Сопроводительные документы.
Manter ao abrigo do sol.Keep under shelter of the sun.Mantener al abrigo del sol.Conserver à l’abri du soleil.Conservare al riparo dalla luce solare.Sonnengeschützt aufbewahren.Chronić przed słońcem.Işıktan koruyunuz.Хранить в защищенном от солнца месте.
Simbologia | SymbologySimbología | Symbologie | SimbologiaSymbologie | Symbole | Semboller | Символы
Produto de uso único.Disposable product.Producto de uso único.Produit à usage unique.Prodotto monouso.Produkt zu einmaligem Gebrauch.Produkt jednorazowego użytku.Tek kullanımlık ürün.Продукция одноразового использования.
Responsável técnico | Responsable técnico | Responsable techniqueResponsabile tecnico | Technical contact | Technischer LeiterOsoba odpowiedzialna techniczne | Sorumlu teknik müdürТехнический контакт: Sônia M. Alcântara - CRO-PR 4536
ANVISA: 10349450051
Angelus Indústria de Produtos Odontológicos S/ACNPJ 00.257.992/0001-37 - I.E. 60128439-15Rua Waldir Landgraf, 101 - Bairro LindóiaCEP 86031-218 - Londrina - PR - Brasil
ATENDIMENTO AO CONSUMIDOR | CUSTOMER SERVICEATENCIÓN AL CONSUMIDOR | SERVICE AU CONSOMMATEURSERVIZIO CLIENTI | KUNDENDIENST | OBSŁUGA KLIENTAMÜŞTERİ HİZMETLERİ | КЛИЕНТСКИЙ СЕРВИС+55 (43) 2101-3200 | 0800 727 3201 (Brasil)[email protected] | www.angelus.ind.br
EMERGO EUROPEMolenstraat 152513 BH, The HagueThe Netherlands
ATENÇÃO: Este produto deve ser usado de acordo com as instruções deste manual. O fabricante não é responsável por falhas ou danos causados pela utilização incorreta deste produto ou pela sua utilização em situações de não conformidade com este manual.
ATTENTION: This product must be used according to the instructions described in this manual. The manufacturer is not responsible for failure or damage caused by incorrect handling or use.
ATENCIÓN: Este producto debe ser usado de acuerdo con las instrucciones de este manual. El fabricante no es responsable por fallas o daños causados por la utilización incorrecta de este producto, o por su utilización en situaciones que no estén de acuerdo con este manual.
ATTENTION: Ce produit doit être utilisé conformément aux instructions contenues dans ce manuel. Le fabricant n’est pas responsable pour des erreurs ou dégâts causés par une utilisation incorrecte de ce produit ou par son utilisation dans des situations de non-conformité avec ce manuel.
ATTENZIONE: Questo prodotto deve essere utilizzato secondo le istruzioni descritte in questo manuale. Il produttore non è responsabile per danni causati da uso improprio.
ACHTUNG: Dieses Produkt muss laut Betriebsanweisung gehandhabt werden. Der Hersteller übernimmt keine Verantwortung für Fehler oder Schäden, die durch falsche oder ungeeignete Anwendung entstehen.
UWAGA: Produkt należy stosować zgodnie z instrukcjami opisanymi w instrukcji. Producent nie ponosi odpowiedzialności za uszkodzenia i szkody wskutek niewłaściwego obchodzenia się z produktem lub jego użycia.
ÖNEMLİ: Bu ürün kullanım talimatlarına göre kullanılmalıdır. Üretici yanlış kullanıştan ileri gelen aksaklıklar ve zararlardan, kullanım talimatlarına uygun olmayan kullanıştan sorumlu değildir.
ВНИМАНИЕ: Этот продукт должен быть использован в соответстви с описаниями приведенными в настоящей инструкции. Производитель не несет ответственность за не способность или повреждения, вызванные не правильным обращением или пользованием.
(A)
(Б)
(B)
(C)