Embed Size (px)
Citation preview
يبرع AR
تعليمات التشغيلماكينة غسل األطباق - المحتويات
تعليمات التشغيل, 1احتياطات ونصائح، 4-3
المساعدة، 4التركيب، 19-18
التوصيالت الكهربائية, 20 وصف الجهاز، 21
ملح التكرير ومادة الشطف المساعدة، 22تحميل الرفوف، 24-23
مواد التنظيف واستخدام ماكينة غسل األطباق، 25دورات الغسيل، 26
العناية والصيانة، 27استكشاف المشاكل وحلها، 28
DFG 15B1
GB English
Operating instructionsDISHWASHER - Contents Operating instructions,1 Precautions and advice, 2-3Assistance, 4 Product Data, 5Installation, 6-7 Electrical Connection,8Description of the appliance, 9Refined salt and rinse aid, 10Loading the racks, 11-12Detergent and dishwasher use, 13Wash cycles, 14Care and maintenance, 15Troubleshooting, 16 Product Guarantee and Repair Information,17

2
GB Precautions and adviceThis appliance was designed and
manufactured in compliance with international safety standards. The following information has been provided for safety reasons and should be read carefully. Keep this instruction manual in a safe place for future reference. If the appliance is sold, given away or moved, make sure the manual is kept with the machine.Read the instructions carefully, as they include important information on safe installation, use and maintenance.This appliance was designed for domestic use or similar applications, for example:- use by guests in hotels, motels and other residential settings;- bed & breakfasts. Remove the appliance from all packaging and make sure it was not damaged during transportation. If it was damaged, contact the retailer and do not proceed any further with the installation process.General safety• This appliance should not be operated
by children younger than 8 years, people with reduced physical, sensory or mental capacities, or inexperienced people who are not familiar with the product, unless they are given close supervision or instructions on how to use it safely and are made aware by a responsible person of the dangers its use might entail.
• Children must not play with the appliance.• It is the user's responsibility to clean and
maintain the appliance. Children should never clean or maintain it unless they are given supervision.
• The appliance was designed for domestic use inside the home and is not intended for commercial or industrial use.
• The appliance must be used to wash domestic crockery in accordance with the instructions in this manual.
• The appliance must not be installed outdoors, even in covered areas. It is extremely dangerous to leave the machine exposed to rain and storms.
• Do not touch the appliance when barefoot.• When unplugging the appliance always
pull the plug from the mains socket. Do not pull on the cable.
• The water supply tap must be shut off and the plug should be removed from the electrical socket at the end of every cycle and before cleaning the appliance or carrying out any maintenance work.
• The maximum number of place settings is shown in the product sheet.
• If the appliance breaks down, do not under any circumstances touch the internal parts in an attempt to perform the repair work yourself.
• Do not lean or sit on the open door: this may cause the appliance to overturn.
• The door should not be left open as it may create a dangerous obstacle.
• Keep detergent and rinse aid out of reach of children.
• The packaging material should not be used as a toy.
• Knives and other utensils with sharp edges must be placed either with the points/blades facing downwards in the cutlery basket or horizontally on the tip-up compartments or in the tray/third basket, if available.
• Connect the appliance to the water mains using the new supply hose provided with the appliance. Do not re-use the old hose. Install the back side of a free-standing dishwasher against a wall.
Disposal• To dispose of any packaging materials,
follow local legislation so that the packagings may be reused.
• The European Directive 2012/19/EU relating to Waste Electrical and Electronic Equipment (WEEE) states that household appliances should not be disposed of using the normal solid urban waste cycle. Exhausted appliances should be collected separately in order to optimise the cost of reusing and recycling the materials inside the machine, while preventing potential damage to the atmosphere and public health. The crossed-out dustbin symbol shown on all products reminds the owners of their obligations regarding separated waste collection.
For further information relating to the correct disposal of household appliances, owners may contact the relevant public authority or the local appliance dealer.

3
العامة بالخدمات االتصال للمالكين يمكن التالفة، البيتية المزودة أو بتاجرهم المحلي.
توفير الطاقة واحترام البيئةتوفير الماء والطاقة
ابدأ دورة غسل عندما تكون ماكينة غسل األطباق ممتلئة. •أثناء اتنظار ماكينة غسل األطباق حتى تمتلئ، تحاشى الروائح الكريهة باستخدام دورة النقع )أنظر دورات الغسل إذا كانت
متاحة(.أختر دورة غسل مالئمة لنوع األواني باستخدام جدول دورات •
الغسل:- لألطباق ذات مستوى االتساخ العادي، استخدم دورة الغسل من منخفضة مستويات استخدام تضمن التي االقتصادية،
استهالك الطاقة والماء.استخدم خيار نصف المعتاد، أقل من الحمولة كانت إذا - الحمولة )أنظر دورات الغسيل الخاصة والخيارات، إذا كانت
متوفرة(.بالتيار الكهربائي لديك يقدم تفاصيل التزويد إذا كان تعاقد •الغسل خالل بتشغيل دورات قم الطاقة، توفير أوقات عن األوقات التي يكون فيها أسعار الكهرباء أقل. يمكن لخيار البدء المؤجل أن يساعدك في تنظيم دورات الغسل وفقا لذلك )أنظر دورات الغسيل الخاصة والخيارات إذا كانت متوفرة(.
يجب عدم تركيب الجهاز خارج المنزل، حتى وإن كان ذلك •في مناطق مغطاة. من الخطر جدا إبقاء الجهاز عرضة للشتاء
والعواصف.ال تلمس الجهاز وأنت حافي القدمين. •
من القابس دائما اسحب الكهرباء، عن الجهاز فصل عند •مقبس الشبكة الرئيسية. ال تقم بجذب الكابل.
يجب إقفال حنفية تزويد الماء ويجب إزالة القابس من المقبس •الكهربائي في نهاية كل دورة، وقبل تنظيف الجهاز أو تنفيذ
أي عمل صيانة له.يظهر العدد األقصى إلعدادات المواضع في صفحة بيانات •
المنتج.إذا تعطل الجهاز، ال تلمس بأي حال من األحوال، األجهزة •
الداخلية في محاولة لتصليحها بنفسك.ال تتكئ وال تجلس على الباب المفتوح: يمكن لذلك أن يسبب •
انقالب الجهاز.يجب عدم إبقاء الباب مفتوحا ألنه يمكن أن يسبب عقبة خطرة. •أبعد مواد التنظيف ومادة الشطف المساعدة عن متناول يد •
األوالد.يجب عدم استخدام مواد التعبئة كألعاب لألوالد. •
يجب الحادة األطراف ذات األخرى واألدوات السكاكين •رؤوسها/شفراتها تكون بحيث السكاكين سلة في وضعها متجهة إلى األسفل، أو يجب وضعها أفقيا في الحجرات القابلة
للطي أو في الدرج/السلة الثالثة، إذا كان متوفرا.• يجب توصيل الجهاز بشبكة االمداد المائي مع توصيل خرطوم خرطوم استخدام إعادة عدم ويجب الجديد بالماء التزويد
الماء القديم.
التخلصللتخلص من أية مواد التعبئة، أتبع القوانين المحلية حتى •
يمكن لمواد التعبئة أن يعاد تصنيعها.األوروبية EU/2012/19 المتعلقة التوجيهات تنص • )WEEE( التالفة واإللكترونية الكهربائية باألجهزة على أنه يجب عدم التخلص من األجهزة المنزلية عن طريق الدورة المعتادة للنفايات الحضرية الصلبة. يتوجب جمع األجهزة التالفة على انفراد بهدف تقليل كلفة إعادة استخدام المعادن الموجودة داخل الجهاز وتصنيعها، بينما يتم العامة. تحاشي األضرار الممكنة للغالف الجوي والصحة رمز صندوق القمامة المشار إليه بعالمة “إكس” على كافة المنتجات هو لتذكير المالك بوجوب الجمع المنفرد للنفايات.لمزيد من المعلومات المتعلقة بالتخلص الصحيح من األجهزة
عم يئاملا دادمالا ةكبشب زاهجلا ليصوت بجي • بجيو ديدجلا ءاملاب ديوزتلا موطرخ ليصوت.ميدقلا ءاملا موطرخ مادختسا ةداعإ مدع ،ةجمدم ريغو اهتاذب ةمئاق قابطألا ةلاسغ تناك اذإ ةلاسغل يفلخلا بناجلا عضو متي نأ بجي.طئاحل الباقم قابطألا
Saving energy and respecting the environmentSaving water and energy• Only begin a wash cycle when the
dishwasher is full. While waiting for the dishwasher to be filled, prevent unpleasant odours with the Soak cycle (if available, see Wash Cycles).
• Select a wash cycle that is suited to the type of crockery and to the soil level using the Table of Wash Cycles:
- For dishes with a normal soil level, use the Eco wash cycle, which guarantees low energy and water consumption levels.
- If the load is smaller than usual activate the Half Load option (see Special wash cycles and options, if available).
• If your electricity supply contract gives details of electricity-saving time bands, run the wash cycles when electricity prices are lower. The Delayed Start option can help you organise the wash cycles accordingly (see Special wash cycles and options, if available).
4
AR احتياطات ونصائح
األمان لمواصفات طبقا وتصنيعه الجهاز هذا تصميم تم التالية ألسباب التحذيرات المفعول. يتم تزويد العالمية سارية
وقائية ولذلك يجب قراءتها بعناية.
احتفظ بدليل التعليمات هذا في مكان آمن لمراجعته في المستقبل. إذا تم بيع الجهاز، أو منحه للغير أو نقله، الرجاء التأكد من أن
دليل التعليمات مرفق بالجهاز.
يجب قراءة التعليمات بعناية، فهي تحتوي على معلومات هامة عن التركيب واالستخدام والصيانة بشكل آمن.
للتطبيقات أو فقط، المنزلي لالستخدام الجهاز هذا تم تصميم المشابهة مثل:
أماكن من وغيرها واالستراحات الفنادق نزالء استخدام -اإلقامة؛
- دور اإلقامة الخاصة بالمبيت واإلفطار.
أخرج الجهاز من جميع مواد التعبئة الخاصة به وتأكد من أنه لم يلحق به األذى خالل عملية النقل. إذا لحق بها ضرر، اتصل
بالموزع وال تنفذ أية عملية تركيب إضافية.
الوقاية العامةيجب عدم تشغيل هذا الجهاز بواسطة األطفال األقل من 8 •سنوات، أو األشخاص ذوي القدرات الجسدية، أو الشعورية أو العقلية المحدودة، أو بواسطة أشخاص تنقصهم التجربة أو ليست له دراية بالمنتج، ما لم يتم اإلشراف، أو تتوفر لهم تعليمات حول كيفية االستخدام بأمان، أو بحضور شخص آخر يتحمل مسؤولية األخطار التي قم تنشأ عن االستخدام.
يجب أال يعبث األطفال بالجهاز. •يقع على عاتق المستخدم مسؤولية تنظيف الجهاز وصيانته. •يجب أال يقوم األطفال بتنظيف الجهاز أو صيانته ما لم كن
ذلك تحت اإلشراف.تم تصميم الجهاز لالستعمال البيتي داخل المنزل وهو غير •
معد لالستعمال التجاري أو الصناعي.يجب استخدام الجهاز لغسل األواني المنزلية وفقا للتعليمات •
المدرجة في هذا الدليل.
GB AssistanceBefore contacting Assistance:• Check whether the problem can be resolved using the
Troubleshooting guide (see Troubleshooting).• Restart the programme to check whether the problem
has ceased to exist.• If the problem persists, contact the Authorised Technical
Assistance Service.
Never use the services of unauthorised technicians.
Please have the following information to hand:• The type of malfunction.• The appliance model (Mod.).• The serial number (S/N).This information can be found on the appliance data plate (see Description of the appliance).
AR الخدمة
قبل االتصال بالمساعدة:افحص فيما إذا كان باإلمكان حل المشكلة باستخدام دليل استكشاف المشاكل •
وحلها )أنظر استكشاف المشاكل وحلها(.أعد تشغيل البرنامج للفحص فيما إذا تم حل المشكلة. •
إذا بقيت المشكلة، اتصل بخدمة المساعدة التقنية. •
ال تطلب مساعدة فني غير مؤهل أبدا.
الرجاء خذ بعين االعتبار المعلومات التالية:نوع الخلل. •
.)Mod.( طراز الجهاز •.)S/N( الرقم التسلسلي •
يمكن العثور على هذه المعلومات في لوحة بيانات الجهاز )أنظر وصف الجهاز(.
5
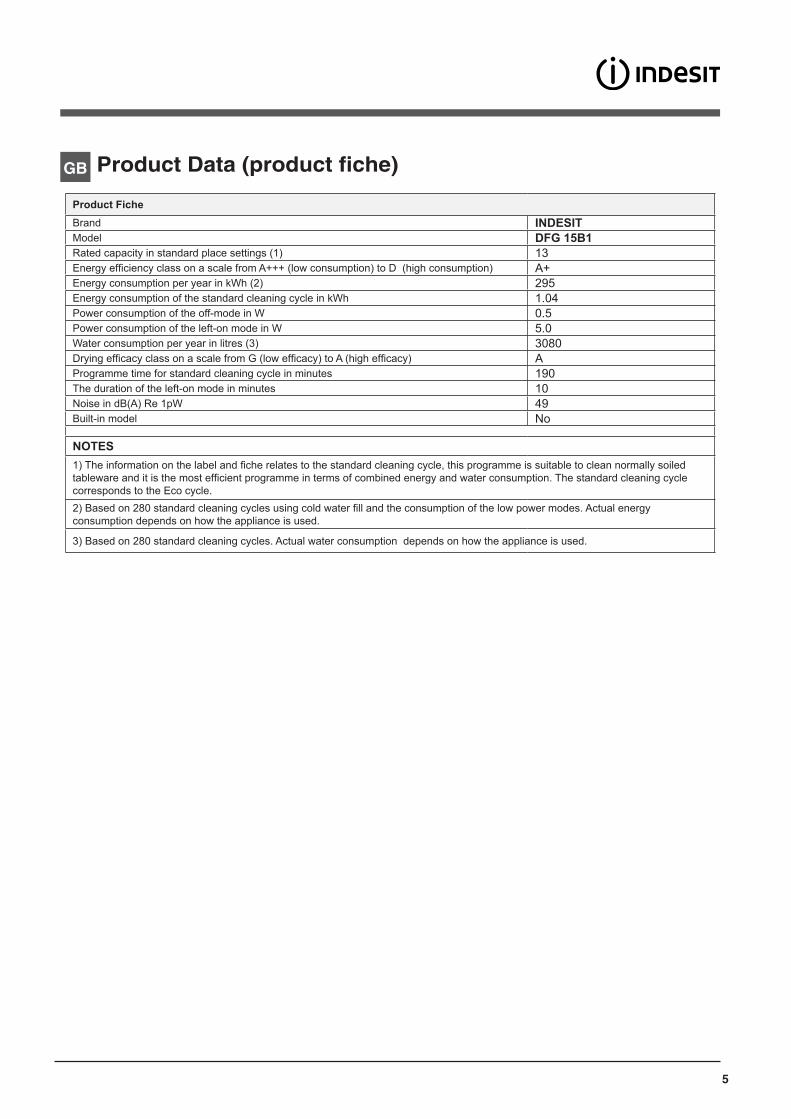
Product FicheBrand INDESITModel DFG 15B1Rated capacity in standard place settings )1( 13Energy efficiency class on a scale from A+++ )low consumption( to D )high consumption( A+Energy consumption per year in kWh )2( 295Energy consumption of the standard cleaning cycle in kWh 1.04Power consumption of the off-mode in W 0.5Power consumption of the left-on mode in W 5.0Water consumption per year in litres )3( 3080Drying efficacy class on a scale from G )low efficacy( to A )high efficacy( AProgramme time for standard cleaning cycle in minutes 190The duration of the left-on mode in minutes 10Noise in dB)A( Re 1pW 49Built-in model No
NOTES1( The information on the label and fiche relates to the standard cleaning cycle, this programme is suitable to clean normally soiled tableware and it is the most efficient programme in terms of combined energy and water consumption. The standard cleaning cycle corresponds to the Eco cycle.2( Based on 280 standard cleaning cycles using cold water fill and the consumption of the low power modes. Actual energy consumption depends on how the appliance is used.
3( Based on 280 standard cleaning cycles. Actual water consumption depends on how the appliance is used.
GB Product Data (product fiche)
GB
6
If the appliance must be moved at any time, keep it in an upright position; if absolutely necessary, it may be tilted onto its back.
Connecting the water supply
Adaptation of the water supply for installation should only be performed by a qualified technician.
The water inlet and outlet hoses may be positioned towards the right or the left in order to achieve the best possible installation. Make sure the dishwasher does not bend or squash the hoses.
Connecting the water inlet hose• To a 3/4” gas cold or hot water connection point (max.
60°C).• Run the water until it is perfectly clear. • Screw the inlet hose tightly into position and turn off the
tap.
If the inlet hose is not long enough, contact a specialist store or an authorised technician (see Assistance).
The water pressure must be within the values indicated in the Technical Data table - otherwise the dishwasher may be function properly.
Make sure the hose is not bent or compressed.
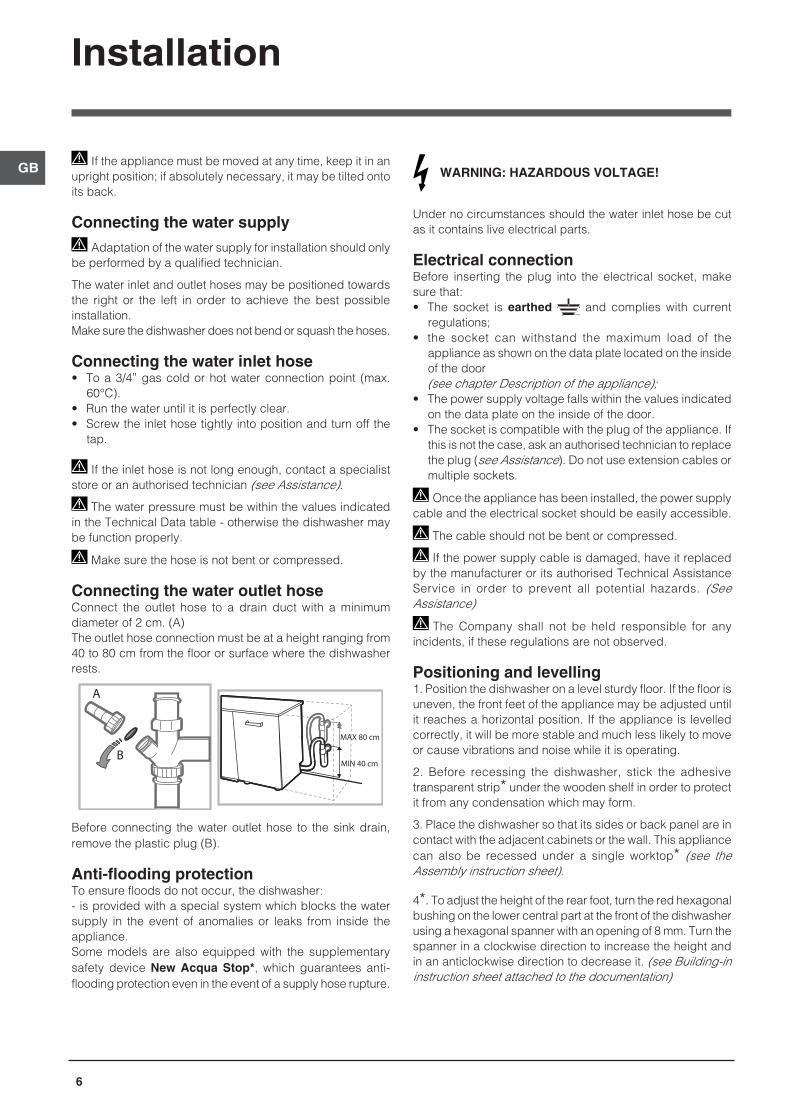
Connecting the water outlet hoseConnect the outlet hose to a drain duct with a minimum diameter of 2 cm. (A)The outlet hose connection must be at a height ranging from 40 to 80 cm from the floor or surface where the dishwasher rests.
Before connecting the water outlet hose to the sink drain, remove the plastic plug (B).
Anti-flooding protectionTo ensure floods do not occur, the dishwasher:- is provided with a special system which blocks the water supply in the event of anomalies or leaks from inside the appliance.Some models are also equipped with the supplementary safety device New Acqua Stop*, which guarantees anti-flooding protection even in the event of a supply hose rupture.
WARNING: HAZARDOUS VOLTAGE!
Under no circumstances should the water inlet hose be cut as it contains live electrical parts.
Electrical connectionBefore inserting the plug into the electrical socket, make sure that:• The socket is earthed and complies with current
regulations;• the socket can withstand the maximum load of the
appliance as shown on the data plate located on the inside of the door
(see chapter Description of the appliance);• The power supply voltage falls within the values indicated
on the data plate on the inside of the door.• The socket is compatible with the plug of the appliance. If
this is not the case, ask an authorised technician to replace the plug (see Assistance). Do not use extension cables or multiple sockets.
Once the appliance has been installed, the power supply cable and the electrical socket should be easily accessible.
The cable should not be bent or compressed.
If the power supply cable is damaged, have it replaced by the manufacturer or its authorised Technical Assistance Service in order to prevent all potential hazards. (See Assistance)
The Company shall not be held responsible for any incidents, if these regulations are not observed.
Positioning and levelling1. Position the dishwasher on a level sturdy floor. If the floor is uneven, the front feet of the appliance may be adjusted until it reaches a horizontal position. If the appliance is levelled correctly, it will be more stable and much less likely to move or cause vibrations and noise while it is operating.
2. Before recessing the dishwasher, stick the adhesive transparent strip* under the wooden shelf in order to protect it from any condensation which may form.
3. Place the dishwasher so that its sides or back panel are in contact with the adjacent cabinets or the wall. This appliance can also be recessed under a single worktop* (see the Assembly instruction sheet).
4*. To adjust the height of the rear foot, turn the red hexagonal bushing on the lower central part at the front of the dishwasher using a hexagonal spanner with an opening of 8 mm. Turn the spanner in a clockwise direction to increase the height and in an anticlockwise direction to decrease it. (see Building-in instruction sheet attached to the documentation)
Installation
MIN 40 cm
MAX 80 cm

GB
7
Advice regarding the first wash cycleAfter the installation, remove the stoppers from the racks and the retaining elastic elements from the upper rack (if any).
Water softener settingsBefore starting the first wash cycle, set the hardness lev-el of the water from the mains supply. (see chapter Rinse aid and refined salt).First load the softener tank with water, then introduce about 1 kg of salt. It is perfectly normal for water to flow out.As soon as this procedure is complete, run a wash cycle.Only use salt that has been specifically designed for dish-washers.After the salt has been poured into the machine, the LOW
SALT indicator light switches off.
If the salt container is not filled, the water softener and the heating element may be damaged as a result.
Technical data
Dimensionswidth 60 cmheight 85 cmdepth 60 cm
Capacity 13 standard place-settings
Water supply pressure 0,05 ÷ 1MPa )0.5 ÷ 10 bar(7,25 psi – 145 psi
Power supply voltage See appliance data plate
Total absorbed power See appliance data plate
Fuse See appliance data plateThis dishwasher conforms to the following European Community Directives: -2006/95/EC )Low Voltage(-2004/108/EC )Electromagnetic Compatibility( -2009/125/EC )Comm. Reg. 1016/2010( )Ecodesign(-97/17/EC )Labelling(-2012/19/ CE Waste Electrical and Electronic Equipment )WEEE(
* Only available in selected models.
The machine has a buzzer/set of tones (depending on the dishwasher model) to inform the user that a command has been implemented: power on, cycle end etc.
The symbols/indicator lights/LEDs on the control panel/display may vary in colour and may have a flashing or fixed light (depending on the dishwasher model).
GB
8
Electrical Connection
Electrical ConnectionIf your appliance is supplied with a 13 amp. fused plug it can be plugged into a 13 amp socket for immediate use. Before using the appliance please read the instruction below.
WARNING: THIS APPLIANCE MUST BE EARTHED.THE FOLLOWING OPERATIONS SHOULD BE CARRIED OUT BY A QUALIFIED ELECTRICIAN.
Replacing the fuse:When replacing a faulty fuse, a 13 amp ASTA approved fuse to BS 1362 should always be used, and the fuse cover re-fitted. If the fuse cover is lost, the plug must not be used until a replacement is obtained.
Replacemente fuse covers:If a replacement fuse cover is fitted, it must be of the correct colours as indicated by the coloured marking or the colour that is embossed in words on the base of the plug. Replacements can be obtained directly from your nearest Service Depot.
Removing the plug:Ifyour appliance has a non-rewireable moulded plug and you should wish to remove it to re-route the mains cable through partitions, units etc., please esure that either:- the plug is replaced by a fused 13 amp re-wireable plug bearing the BSI mark of approval- or:- the mains cable is wired directly into a 13 amp cable outlet, controlled by a switch, (in compliance with BS 5733) which is accessible without moving the appliance.
Disposing of the plug:Ensure that before disposing of the plug itself, you make the pins unusable so that it cannot be accidentally inserted into a socket.
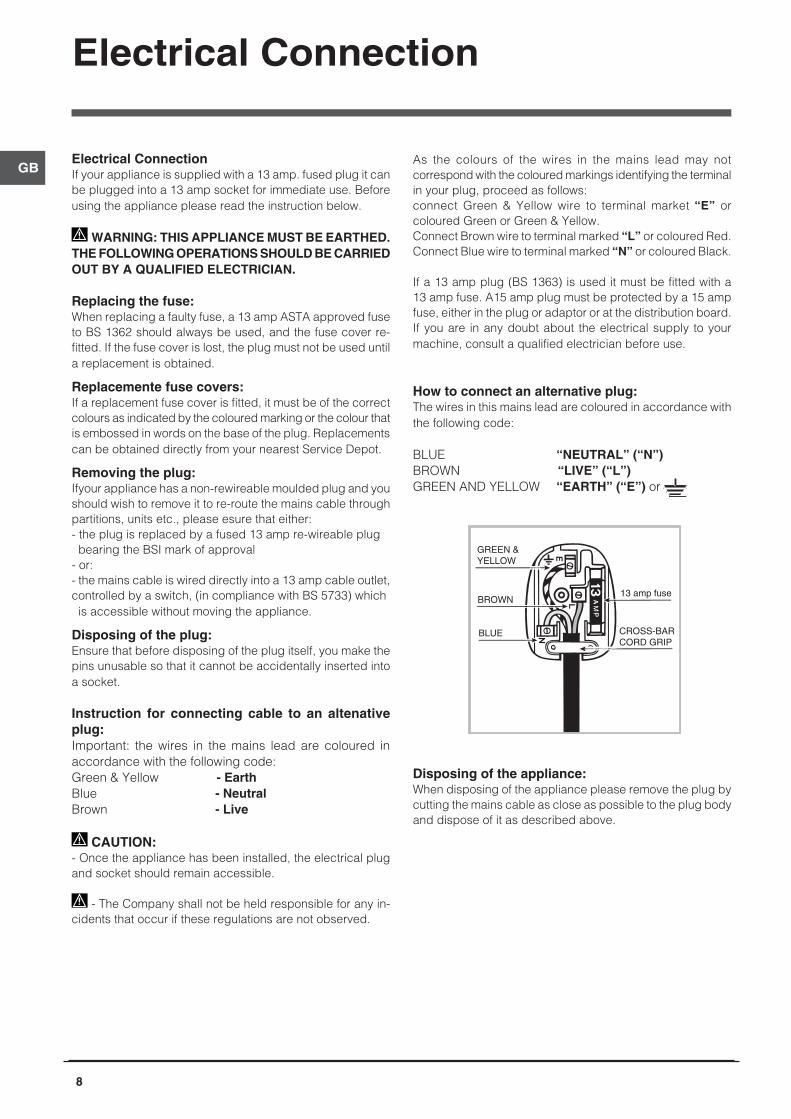
Instruction for connecting cable to an altenative plug:Important: the wires in the mains lead are coloured in accordance with the following code:Green & Yellow - EarthBlue - NeutralBrown - Live
CAUTION:- Once the appliance has been installed, the electrical plug and socket should remain accessible.
- The Company shall not be held responsible for any in-cidents that occur if these regulations are not observed.
As the colours of the wires in the mains lead may not correspond with the coloured markings identifying the terminal in your plug, proceed as follows:connect Green & Yellow wire to terminal market “E” or coloured Green or Green & Yellow.Connect Brown wire to terminal marked “L” or coloured Red.Connect Blue wire to terminal marked “N” or coloured Black.
If a 13 amp plug (BS 1363) is used it must be fitted with a 13 amp fuse. A15 amp plug must be protected by a 15 amp fuse, either in the plug or adaptor or at the distribution board.If you are in any doubt about the electrical supply to your machine, consult a qualified electrician before use.
How to connect an alternative plug:The wires in this mains lead are coloured in accordance with the following code:
BLUE “NEUTRAL” (“N”)BROWN “LIVE” (“L”)GREEN AND YELLOW “EARTH” (“E”) or
Disposing of the appliance:When disposing of the appliance please remove the plug by cutting the mains cable as close as possible to the plug body and dispose of it as described above.

GB
9
Overall view
Description of the appliance
***Only in completely built-in models.* Only available in selected models.
The number and type of wash cycles and options may vary depending on the dishwasher model.
1. Upper rack2. Upper spray arm3. Tip-up dispensers 4. Rack height adjuster 5. Lower rack6. Lower spray arm7. Washing filter8. Salt dispenser 9. Detergent and rinse-aid dispensers10. Data plate11. Control panel***
Control panel
Start/Pause button and indicator light
ON/OFF/Reset button
Cycle select knob
Low Salt indicator light
Washing indicator light
Drying indicator light
Wash Cycle End indicator light
GB
10
Refined Salt and Rinse Aid
Only use products which have been specifically designed for dishwashers. Do not use table salt or industrial salt.(Follow the instructions given on the packaging.)
If you are using a multi-function product, we recommend that you add salt in any case, especially if the water is hard or very hard. (Follow the instructions given on the packaging.)
If you do not add salt or rinse aid, the LOW SALT* and LOW RINSE AID* indicator lights will remain lit.
Measuring out the refined saltThe use of salt prevents the formation of LIMESCALE on the dishes and on the machine’s functional components. • It is important that the salt dispenser be never empty.• It is important to set the water hardness.The salt dispenser is located in the lower part of the dishwasher (see Description) and should be filled:• When the LOW RINSE AID indicator light in the control panel
is lit *;• When the green float* on the cap of the salt dispenser is no
longer visible. • See autonomy in the water hardness table.
1. Remove the lower rack and unscrew the container cap (anticlockwise).2. Only the first time you do this: fill the water dispenser up to the edge.3. Position the funnel (see figure) and fill the salt container right up to its edge (approximately 1 kg); it is not unusual for a
little water to leak out.4. Remove the funnel and wipe any salt residue away from the opening; rinse the cap under running water and then screw it on.It is advisable to perform this procedure every time you add salt to the container. Make sure the cap is screwed on tightly, so that no detergent can get into the container during the wash cycle (this could damage the water softener beyond repair).
Whenever you need to add salt, we recommend carrying out the procedure before the washing cycle is started.
Setting the water hardnessFor perfect water softener operation, it is essential that the adjustment be based on the water hardness in your house. Ask your local water supplier for this information. The factory setting is for medium water hardness. • Switch the dishwasher on using the On/Off button.
• Switch it off using the On/Off button
• Press and hold the START/PAUSE button for 5 seconds.
• Switch it on using the On/Off button
• The salt indicator light flashes (as many times as the current selection.)
• Set the knob to the desired hardness level number (see Table on water hardness.)
• Switch it off using the On/Off button
• Setting is complete!Even if using multi-functional tablets, the salt dispenser should still be filled.
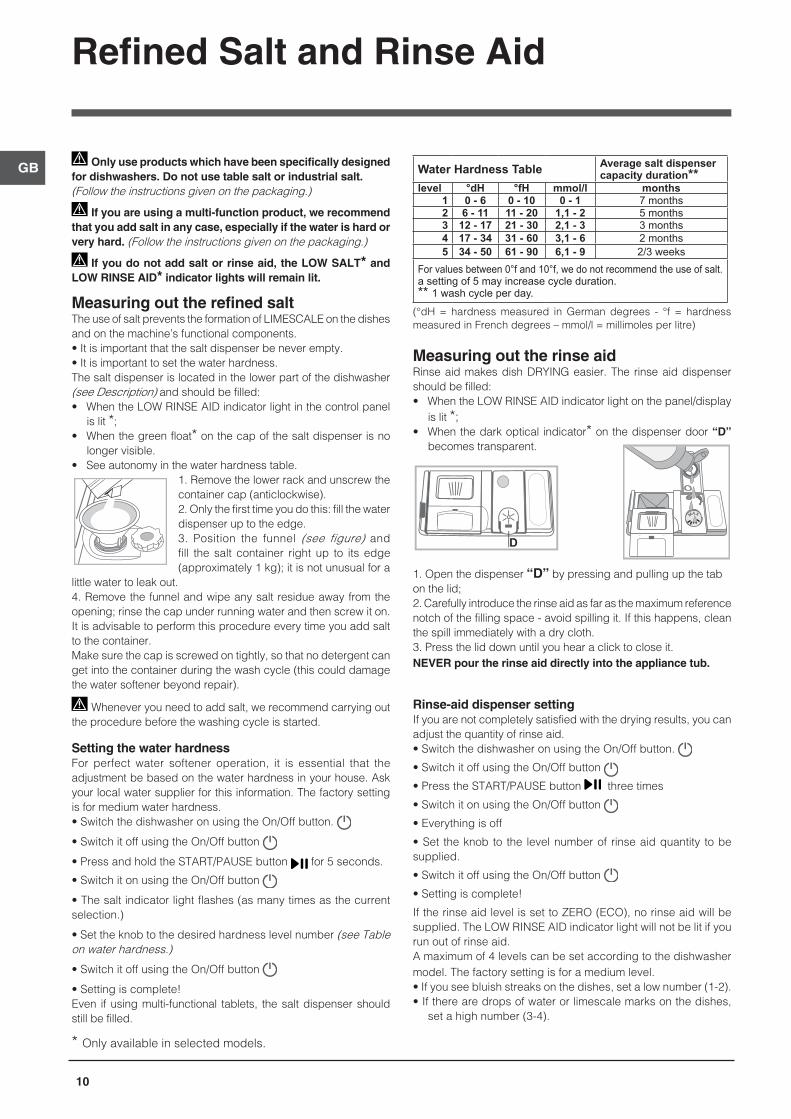
Measuring out the rinse aidRinse aid makes dish DRYING easier. The rinse aid dispenser should be filled:• When the LOW RINSE AID indicator light on the panel/display
is lit *;• When the dark optical indicator* on the dispenser door “D”
becomes transparent.
1. Open the dispenser “D” by pressing and pulling up the tabon the lid;2. Carefully introduce the rinse aid as far as the maximum reference notch of the filling space - avoid spilling it. If this happens, clean the spill immediately with a dry cloth.3. Press the lid down until you hear a click to close it.NEVER pour the rinse aid directly into the appliance tub.
Rinse-aid dispenser settingIf you are not completely satisfied with the drying results, you can adjust the quantity of rinse aid.• Switch the dishwasher on using the On/Off button.
• Switch it off using the On/Off button
• Press the START/PAUSE button three times
• Switch it on using the On/Off button
• Everything is off
• Set the knob to the level number of rinse aid quantity to be supplied.
• Switch it off using the On/Off button
• Setting is complete!
If the rinse aid level is set to ZERO (ECO), no rinse aid will be supplied. The LOW RINSE AID indicator light will not be lit if you run out of rinse aid. A maximum of 4 levels can be set according to the dishwasher model. The factory setting is for a medium level. • If you see bluish streaks on the dishes, set a low number (1-2).• If there are drops of water or limescale marks on the dishes,
set a high number (3-4).
Water Hardness Table Average salt dispenser capacity duration**
level °dH °fH mmol/l months1 0 - 6 0 - 10 0 - 1 7 months2 6 - 11 11 - 20 1,1 - 2 5 months3 12 - 17 21 - 30 2,1 - 3 3 months4 17 - 34 31 - 60 3,1 - 6 2 months5 34 - 50 61 - 90 6,1 - 9 2/3 weeks
For values between 0°f and 10°f, we do not recommend the use of salt. a setting of 5 may increase cycle duration. ** 1 wash cycle per day.
(°dH = hardness measured in German degrees - °f = hardness measured in French degrees – mmol/l = millimoles per litre)
* Only available in selected models.
MAX
GB
11
Loading the racks
Tips Before loading the racks, remove all food residues from the crockery and empty liquids from glasses and containers. No preventive rinsing is needed under running water.Arrange the crockery so that it is held in place firmly and does not tip over; and arrange the containers with the openings facing downwards and the concave/convex parts placed obliquely, thus allowing the water to reach every surface and flow freely.Make sure that the lids, handles, trays and frying pans do not prevent the spray arms from rotating. Place any small items in the cutlery basket.Since plastic dishes and non-stick frying pans usually retain more water drops, their drying will be not so good as that of ceramic or stainless-steel dishes.Lightweight items such as plastic containers should be placed in the upper rack and arranged so that they cannot move.After loading the appliance, make sure that the spray arms can rotate freely.
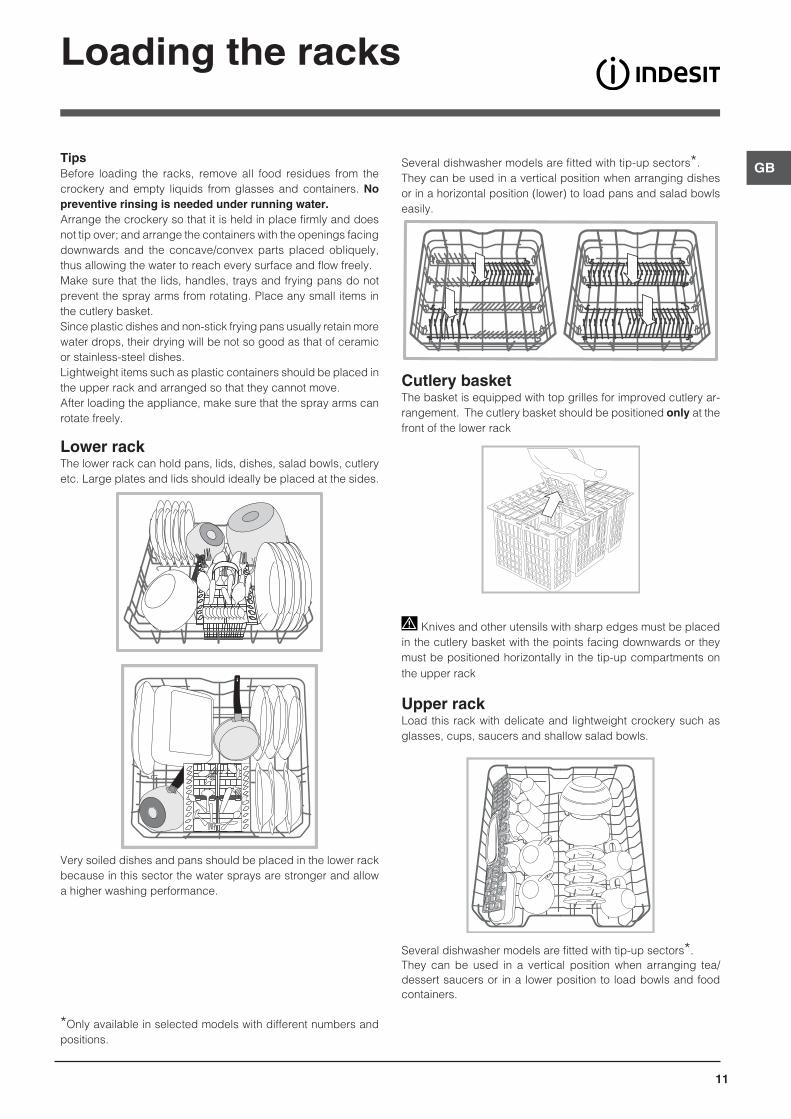
Lower rackThe lower rack can hold pans, lids, dishes, salad bowls, cutlery etc. Large plates and lids should ideally be placed at the sides.
Very soiled dishes and pans should be placed in the lower rack because in this sector the water sprays are stronger and allow a higher washing performance.
Several dishwasher models are fitted with tip-up sectors*.They can be used in a vertical position when arranging dishes or in a horizontal position (lower) to load pans and salad bowls easily.
Cutlery basketThe basket is equipped with top grilles for improved cutlery ar-rangement. The cutlery basket should be positioned only at the front of the lower rack
Knives and other utensils with sharp edges must be placed in the cutlery basket with the points facing downwards or they must be positioned horizontally in the tip-up compartments on the upper rack
Upper rackLoad this rack with delicate and lightweight crockery such as glasses, cups, saucers and shallow salad bowls.
Several dishwasher models are fitted with tip-up sectors*. They can be used in a vertical position when arranging tea/dessert saucers or in a lower position to load bowls and food containers.
*Only available in selected models with different numbers and positions.
GB
12
* Only available in selected models.
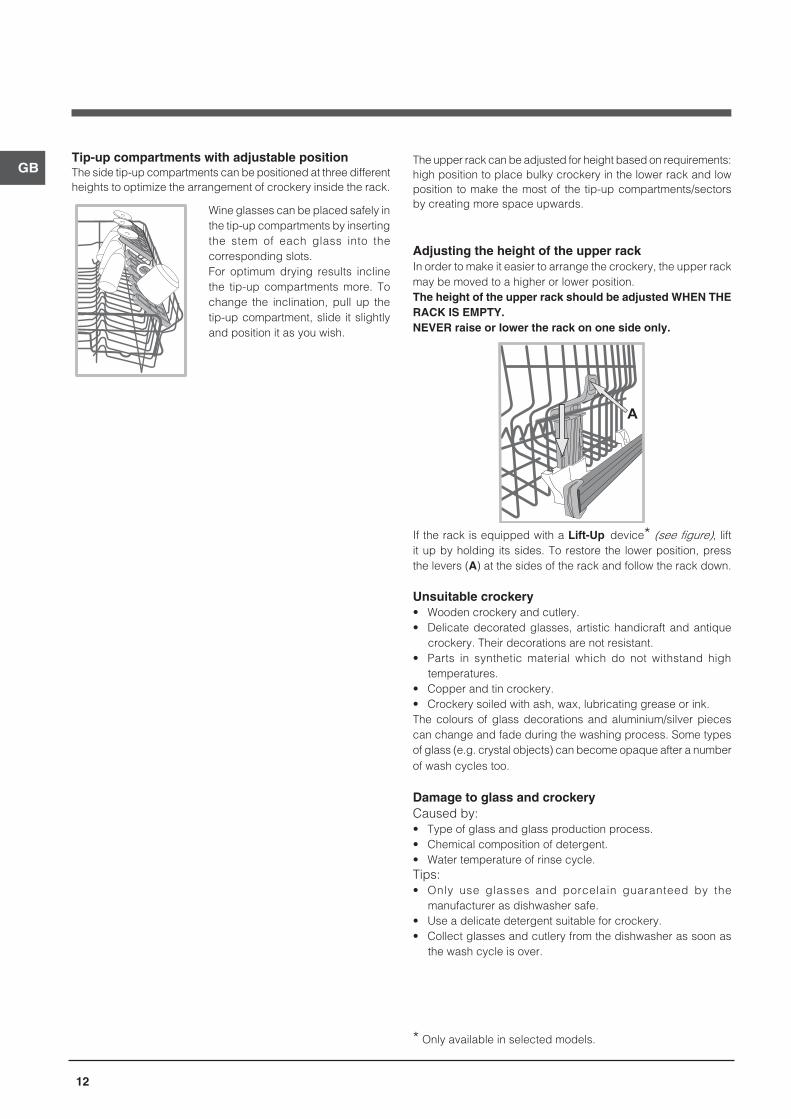
Adjusting the height of the upper rackIn order to make it easier to arrange the crockery, the upper rack may be moved to a higher or lower position.The height of the upper rack should be adjusted WHEN THE RACK IS EMPTY.NEVER raise or lower the rack on one side only.
If the rack is equipped with a Lift-Up device* (see figure), lift it up by holding its sides. To restore the lower position, press the levers (A) at the sides of the rack and follow the rack down.
Unsuitable crockery• Wooden crockery and cutlery.• Delicate decorated glasses, artistic handicraft and antique
crockery. Their decorations are not resistant.• Parts in synthetic material which do not withstand high
temperatures.• Copper and tin crockery.• Crockery soiled with ash, wax, lubricating grease or ink.The colours of glass decorations and aluminium/silver pieces can change and fade during the washing process. Some types of glass (e.g. crystal objects) can become opaque after a number of wash cycles too.
Damage to glass and crockeryCaused by:• Type of glass and glass production process.• Chemical composition of detergent.• Water temperature of rinse cycle.Tips:• Only use glasses and porcelain guaranteed by the
manufacturer as dishwasher safe.• Use a delicate detergent suitable for crockery.• Collect glasses and cutlery from the dishwasher as soon as
the wash cycle is over.
The upper rack can be adjusted for height based on requirements: high position to place bulky crockery in the lower rack and low position to make the most of the tip-up compartments/sectors by creating more space upwards.
Tip-up compartments with adjustable positionThe side tip-up compartments can be positioned at three different heights to optimize the arrangement of crockery inside the rack.
Wine glasses can be placed safely in the tip-up compartments by inserting the stem of each glass into the corresponding slots.For optimum drying results incline the tip-up compartments more. To change the inclination, pull up the tip-up compartment, slide it slightly and position it as you wish.

GB
13
* Only available in selected models.
Measuring out the detergentA good wash result also depends on the correct amount of detergent being used. Exceeding the stated amount does not result in a more effective wash and increases environmental pollution.
Based on how soiled the items are, the amount can be adjusted to individual cases using powder or liquid detergent.In the case of normally soiled items, use approximately either 35 gr (powder detergent) or 35 ml (liquid detergent). If tablets are used, one tablet will be enough.
If the crockery is only lightly soiled or if it has been rinsed with water before being placed in the dishwasher, reduce the amount of detergent used accordingly.
For good washing results also follow the instructions shown on the detergent box.
For further questions please ask the detergent producers' Advice Offices.
To open the detergent dispenser use the opening device “A”.
Introduce the detergent into the dry dispenser “B” only. Place the amount of detergent for pre-washing directly inside the tub.
1. When measuring out the detergent refer to the Table of wash cycles to add the proper quantity. Compartment B comprises a level showing the maximum quantity of liquid or powder detergent that can be added to each cycle.
2. Remove detergent residues from the edges of the dispenser and close the cover until it clicks.
3. Close the lid of the detergent dispenser by pulling it up until the closing device is secured in place.The detergent dispenser automatically opens up at the right time according to the wash cycle.
If all-in-one detergents are used, we recommend using the TABS option, because it adjusts the cycle so that the best washing and drying results are always achieved.
Only use detergent which has been specifically designed for dishwashers.
DO NOT USE washing up liquid.
Using excessive detergent may result in foam residues remaining in the machine after the cycle has ended.
To achieve the best washing and drying results, the combined use of detergent, rinse aid liquid and refined salt is required.
We recommend using detergents that do not contain phosphates or chlorine, as these products are harmful to the environment.
Starting the dishwasher1. Switch on the appliance by pressing the ON/OFF button.2. Open the door and pour in a suitable amount of detergent (see Measuring out the detergent).3. Load the racks (see Loading the racks) and shut the door.4. Select the wash cycle by turning the SELECT WASH CYCLE knob: align the notch on the knob with the number or symbol representing the desired wash cycle. The START/PAUSE indicator light will go on.5. Select the wash options* (see Options and Special Wash Cycles).6. Start the cycle by pressing the START button; the indicator light will stop flashing and stay lit (fixed light). The indicator light corresponding to the wash phase will go on, signalling that the wash cycle has begun.7. At the end of the wash cycle the END indicator light will go on (fixed light). Switch off the appliance by pressing the ON/OFF button, shut off the water tap and unplug the appliance from the electricity socket.8. Wait a few minutes before removing the crockery to avoid getting burnt. Unload the racks, beginning with the lower level.
The machine will switch off automatically during long periods of inactivity in order to minimise electricity consumption.
Changing a wash cycle in progressIf a mistake was made in the wash-cycle selection process, it is possible to change the cycle provided that it has only just begun: once the wash cycle has started, in order to change the wash cycle switch off the machine by pressing and holding the ON/OFF/Reset button. Switch it back on using the same button and select the desired wash cycle and options.
Adding extra crockeryPress the Start/Pause button and open the door, taking care to avoid the escaping steam, and place the crockery inside the dishwasher. Press the Start/Pause button: The cycle will start again after a long beep has been emitted.
If the delayed start has been set, at the end of the countdown the wash cycle will not start. It will stay in Pause mode.
Press the Start/Pause button to pause the machine; the wash cycle is stopped.At this stage the wash cycle cannot be changed.
Accidental interruptionsIf the door is opened during the wash cycle or there is a power cut, the cycle stops. It starts again from the point at which it was interrupted once the door has been shut or the electricity supply restored.
Detergent and dishwasher use
GB
14
Wash cycles
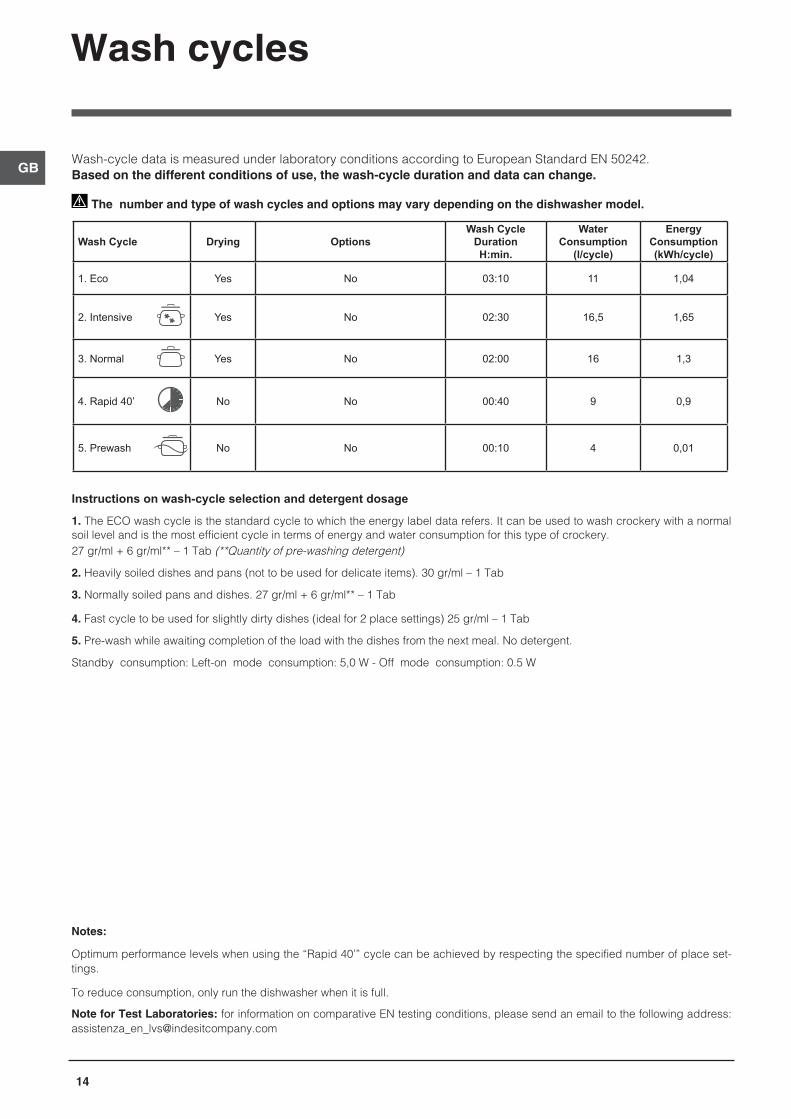
The number and type of wash cycles and options may vary depending on the dishwasher model.
Wash-cycle data is measured under laboratory conditions according to European Standard EN 50242. Based on the different conditions of use, the wash-cycle duration and data can change.
Wash Cycle Drying OptionsWash Cycle
DurationH:min.
Water Consumption
(l/cycle)
Energy Consumption (kWh/cycle)
1. Eco Yes No 03:10 11 1,04
2. Intensive Yes No 02:30 16,5 1,65
3. Normal Yes No 02:00 16 1,3
4. Rapid 40’ No No 00:40 9 0,9
5. Prewash No No 00:10 4 0,01
Instructions on wash-cycle selection and detergent dosage
1. The ECO wash cycle is the standard cycle to which the energy label data refers. It can be used to wash crockery with a normal soil level and is the most efficient cycle in terms of energy and water consumption for this type of crockery.27 gr/ml + 6 gr/ml** – 1 Tab (**Quantity of pre-washing detergent)
2. Heavily soiled dishes and pans (not to be used for delicate items). 30 gr/ml – 1 Tab
3. Normally soiled pans and dishes. 27 gr/ml + 6 gr/ml** – 1 Tab
4. Fast cycle to be used for slightly dirty dishes (ideal for 2 place settings) 25 gr/ml – 1 Tab
5. Pre-wash while awaiting completion of the load with the dishes from the next meal. No detergent.
Standby consumption: Left-on mode consumption: 5,0 W - Off mode consumption: 0.5 W
Notes:
Optimum performance levels when using the “Rapid 40’” cycle can be achieved by respecting the specified number of place set-tings.
To reduce consumption, only run the dishwasher when it is full.
Note for Test Laboratories: for information on comparative EN testing conditions, please send an email to the following address: [email protected]

GB
15
Care and maintenance
* Only available in selected models.
Shutting off the water and electricity supplies• Turn off the water tap after every wash cycle to avoid leaks.
• Always unplug the appliance when cleaning it and when performing maintenance work.
Cleaning the dishwasher• The external surfaces of the machine and the control panel
can be cleaned using a non-abrasive cloth which has been dampened with water. Do not use solvents or abrasive products.
• Any marks on the inside of the appliance may be removed using a cloth dampened with water and a little vinegar.
Preventing unpleasant odours• Always keep the door of the appliance ajar in order to avoid
moisture from forming and being trapped inside the machine.
• Clean the seals around the door and detergent dispensers regularly using a damp sponge. This will avoid food becoming trapped in the seals, which is the main cause behind the formation of unpleasant odours.
Cleaning the spray armsFood residue may become encrusted onto the spray arms and block the holes used to spray the water. It is therefore recommended that you check the arms from time to time and clean them with a small non-metallic brush.The two spray arms may both be removed.
To remove the upper spray arm, turn the plastic locking ring in an anti-clockwise direction. The upper spray arm should be replaced so that the side with the greater number of holes is facing upwards.
The lower spray arm can be removed by pressing on the side tabs and pulling it upwards.
Cleaning the water inlet hoseIf the water hoses are new or have not been used for an extended period of time, let the water run to make sure it is clear and free of impurities before performing the necessary connections. If this precaution is not taken, the water inlet could become blocked and damage the dishwasher.
Clean the water inlet filter at the tap outlet regularly. - Turn off the water tap.- Unscrew the end of the water inlet hose, remove the filter and clean it carefully under running water.- Re-place the filter and screw the water hose back into position.
Cleaning the filtersThe filter assembly consists of three filters which remove food residues from the washing water and then recirculate the water. They must be cleaned if you wish to achieve the best results in every wash.
Clean the filters regularly.
The dishwasher must not be used without filters or if the filter is loose.
• After several washes, check the filter assembly and if necessary clean it thoroughly under running water, using a non-metallic brush and following the instructions below: 1. Turn the cylindrical filter C in an anti-clockwise direction and pull it out (fig. 1).2. Remove the cup filter B by exerting a slight pressure on the side flaps (fig. 2);3. Slide out the stainless-steel plate filter A. (fig. 3).4. Inspect the trap and remove any food residues. NEVER REMOVE the wash-cycle pump protection (black detail) (fig.4).
After cleaning the filters, re-place the filter assembly and fix it in position correctly; this is essential for maintaining the efficient operation of the dishwasher.
Leaving the machine unused for extended periods • Disconnect the appliance from the electricity supply and shut
off the water tap.
• Leave the door of the appliance ajar.
• When you return, run a wash cycle when the dishwasher is empty.

GB
16
Troubleshooting
Whenever the appliance fails to work, check for a solution from the following list before calling for Assistance.
* Only available in selected models.
Problem: Possible causes / Solutions:The dishwasher does not start or cannot be controlled.
• The water supply tap is not turned on.• Switch off the appliance by pressing the ON/OFF button, switch it back on after approximately
one minute and reset the wash cycle. • The appliance has not been plugged in properly or another electricity socket should be used.• The dishwasher door has not been closed properly.
The door won’t close. • Make sure that the racks were inserted all the way.• The lock was released. Strongly push the door until a ”clacking“ noise is heard.
No water drain out of the dishwasher.
• The wash cycle has not finished yet.• The water drain hose is bent )see Installation(.• The drain duct is clogged up.• The filter is clogged up with food residues. • Check the height of the drain hose.
The dishwasher makes excessive noise.
• The dishes are rattling against each other or against the spray arms. Place the dishes properly and make sure the spray arms can rotate freely.
• Too much foam: the detergent has not been measured out correctly or it is not suitable for use in dishwashers. )See Detergent and dishwasher use.( Do not prewash the dishes by hand.
The dishes and glasses are covered in a white film or limescale deposits.
• No refined salt.• Water hardness adjustment is not suitable: increase the relevant values. )See Refined Salt
and Rinse Aid.(• The salt and rinse-aid dispenser cap has not been closed properly.• The rinse aid has been used up or the dosage is too low.
The dishes and glasses are streaked or have a bluish tinge.
• The rinse aid dosage is too high.
The crockery has not been dried properly.
• A wash cycle without a drying programme has been selected.• The rinse aid has been used up. )See Refined Salt and Rinse Aid.(• The rinse aid dispenser setting is not suitable. • The crockery is made from non-stick material or plastic; the presence of water drops is
normal.The dishes are not clean. • The crockery has not been arranged properly.
• The spray arms cannot rotate freely, being hindered by the dishes.• The wash cycle is too gentle )see Wash Cycles(.• Too much foam: the detergent has not been measured out correctly or it is not suitable for use
in dishwashers. )See Detergent and dishwasher use.( • The lid on the rinse aid compartment has not been closed correctly. • The filter is dirty or clogged up )see Care and maintenance.(• The refined salt level is low )See Refined Salt and Rinse Aid.(• Make sure that the height of the dishes is compatible with the rack adjustment. • The holes in the spray arms are clogged up. )See Care and maintenance.(
The dishwasher won’t load any water.
It is blocked with flashing lights.
• There is no water in the mains supply or the tap is shut off.• The water inlet hose is bent )see Installation(.• The filters are clogged up: they need cleaning. )See Care and maintenance.(• The drain duct is clogged up: it needs cleaning.• After checking and cleaning, switch the dishwasher on and off and start a new wash cycle.• If the problem persists, turn off the water tap, remove the plug and call the Service Centre.

GB
17
Product Guarantee and Repair Information
Guarantee 12 Months Parts and Labour Guarantee
Your appliance has the benefit of our manufacturer’s guarantee, which covers the cost of breakdown repai-rs for twelve months from the date of purchase. This gives you the reassurance that if, within that time, your appliance is proven to be defective because of either workmanship or materials, we will, at our discre-tion, either repair or replace the appliance at no cost to you: This guarantee is subject to the following conditions: - The appliance has been installed and operated cor-rectly and in accordance with our operating and main-tenance instructions. - The appliance is used only on the electricity or gas supply printed on the rating plate. - The appliance has been used for normal domestic purposes only. - The appliance has not been altered, serviced, main-tained, dismantled, or otherwise interfered with by any person not authorised by us. - Any repair work must be undertaken by us or our appointed agent. - Any parts removed during repair work or any ap-pliance that is replaced become our property. - The appliance is used in the United Kingdom or Re-public of Ireland. The guarantee does not cover: - Damage resulting from transportation, improper use, neglect or interference or as a result of improper in-stallation. - Replacement of any consumable item or accessory. These include but are not limited to: plugs, cables, batteries, light bulbs, fluorescent tubes and starters, covers and filters. - Replacement of any removable parts made of glass or plastic.
THIS GUARANTEE WILL NOT APPLY IF THE APPLIANCE HAS BEEN USED IN COMMER-CIAL OR NON-DOMESTIC PREMISES.
Recycling and Disposal Information As part of Indesit’s continued commitment to helping the environment, Indesit reserves the right to use qua-lity, recycled components to keep down customer costs and minimise material wastage. Please dispose of packaging and old appliances ca-refully. To minimise the risk of injury to children, remo-ve the door, plug, and cut the mains cable off flush with the appliance. Dispose of these parts separately to ensure that the appliance can no longer be plug-ged into mains socket, and the door cannot be locked shut.
Repairs and After Sales For product help and advice, repairs, spare parts or accessories, we’re here to help. For local repair engineers - 03448 111 606 ROI - 0818 313 413UK standard local rate applies ROI local Irish rate appliesFor Parts and Accessories visit:parts.indesit.co.uk/shopPlease remember to register your appliance at www.indesitservice.co.uk to activate your 10 year parts guarantee. How to find your model and serial number:
Indesit Company SpaViale Aristide Merloni 4760044 Fabriano (AN)Italy www.indesit.co.uk

AR
18
* متوفر في طرازات مختارة فقط.
التركيب
إذا توجب نقل الجهاز في أي وقت، احتفظ به بشكل عامودي؛ إذا كان األمر ضروريا جدا، يمكن إمالته على الجهة الخلفية منه.
توصيل مصدر التزويد بالماءللتركيب إال بواسطة التزويد بالماء يجب أال يقوم بتجهيز مصدر
المختص الفني المؤهل.
يمكن وضع خراطيم إدخال وإخراج الماء باتجاه اليمين أو اليسار بهدف الحصول على أفضل وضع تركيب ممكن.
تأكد من ماكينة غسل األطباق ال الجعل الخراطيم مثنية أو معوجة.
وصل خرطوم إدخال الماءإلى نقطة توصيل الماء البارد أو الساخن بالغاز بقطر 3/4 بوصة •
)60 درجة مئوية بحد أقصى(.اترك الماء ينساب حتى يصبح صافيا تماما. •
قم بربط خرطوم اإلدخال بإحكام داخل موضعه، وقم بغلق الصنبور. •
إذا لم يكن طول خرطوم اإلدخال كافيا، اتصل بمستودع خاص أو بفني مؤهل )أنظر المساعدة(.
يجب أن يكون ضغط الماء في نطاق القيم المشار إليها في جدول البيانات التقنية – وإال فإن ماكينة غسل األطباق لن تعمل بكفاءة.
تأكد من أن الخرطوم غير مثني أو مضغوط.
وصل خرطوم إخراج الماءقم بتوصيل خرطوم اإلخراج بأنبوب تصريف بقطر يصل إلى 2 سم
)A( .بحد أدنىيجب أن يكون توصيل خرطوم اإلخراج على ارتفاع يتراوح بين 40 وحتى 80 سم عن األرض أو السطح الذي ترتكز عليه ماكينة غسل
األطباق.قبل توصيل خرطوم إخراج الماء إلى حوض التصريف، قم بخلع الغطاء
.)B( البالستيكي
الحماية من الفيضانلتحاشي حدوث الفيضان، على ماكينة غسل األطباق أن:
- تكون مزودة بنظام خاص يقطع تزويد الماء في حال حدوث انحرافات أو تسربات من داخل الجهاز.
New Acqua بعض الطرازات مزودة أيضا بجهاز األمان اإلضافي*Stop، الذي يضمن الحماية من الفيضان حتى في حالة تمزق خرطوم
تزويد الماء.
تحذير: فولطية خطرة!
يجب عدم قطع خرطوم الماء بأي حال من األحوال ألنه يحتوي على عناصر كهربائية حية.
التوصيالت الكهربائيةقبل توصيل الفرن بمصدر التيار الرئيسي، تأكد مما يلي:
المقبس مؤرض ويتوافق مع اللوائح الحالية؛ •يمكن للمقبس أن يصمد أمام الحمل األقصى للجهاز، المشار إليه في •
لوحة البيانات الموجودة بداخل الباب)أنظر فصل وصف الجهاز(؛
الجهد الكهربائي في نطاق يتراوح بين القيم المشار إليها في لوحة •البيانات الموجودة في الجهة الداخلية من الباب.
أن المقبس متوافق مع قابس الجهاز. إذا لم يكن الوضع كذلك، اطلب •من فني مؤهل أن يقوم باستبدال القابس )أنظر المساعدة(. ال تستخدم
كبالت اإلطالة أو المقابس المتعددة.
بعد أن تم تركيب الجهاز، يجب أن يكون كبل تزويد الطاقة والمقبس الكهربائي قابلين للوصول السهل.
على الكبل أال يكون معوجا أو مضغوطا.جهة بواسطة تبديله يجب الطاقة، تزويد كبل في تلف حدث إذا أية مخاطر المعتمد بهدف تحاشي التقنية المساعدة أو مركز التصنيع
يحتمل حدوثها. )انظر المساعدة(.
يتم لم أية حوادث، في حال أية مسؤولية تجاه الشركة لن تتحمل احترام هذه اللوائح.
اختيار الموضع واالرتفاع1. قم بتركيب ماكينة غسل األطباق على أرضية مسطحة وصلبة. إذا كانت األرضية غير مسطحة، يجب معايرة أرجل الجهاز حتى يصل إلى وضعية أفقية تامة. إذا تم تحديد مستوى الجهاز بشكل صحيح، فسيكون االرتجاج يبدو ما على يسبب ولن اهتزازه احتمال ويقل ثباتا أكثر
والضجيج خالل عمله.2. قبل إيقاف ماكينة غسل األطباق، قم بلصق الشريط الشفاف الالصق*
تحت الرف الخشبي بهدف حمايته من أي تكثيف يمكن أن يتكون.3. ضع ماكينة غسل األطباق بحيث تالمس جوانبها أو اللوحة الخلفية الخزائن المجاورة أو الحائط. يمكن تركيب هذا الجهاز أيضا تحت سطح
عمل مستقل* )أنظر نشرة تعليمات التجميع(.
4*. لضبط ارتفاع الرجل الخلفية, قم بلف األداة سداسية الشكل في الجزء األوسط السفلي في واجهة ماكينة غشل األطباق مع استخدام مفتاح ربط سداسي الشكل ذي فتحة 8 ملم. قم بلف المفتاح باتجاه عقارب الساعة لزيادة االرتفاع أو عكس اتجاه عقارب الساعة لتقليل االرتفاع. )أنظر
نشرة التركيب المرفقة بأوراق المنتج(
MIN 40 cm
MAX 80 cm

AR
19
شريط مقاومة التكثيف*بعد تركيب ماكينة غسل األطباق، افتح الباب والصق الشريط الشفاف الالصق تحت
الرف الخشبي بهدف حمايته من أي تكثيف يمكن أن يتكون.
نصيحة متعلقة بدورة الغسل األولىقم بعد التركيب بخلع السدادات من األرفف، واألجزاء البالستيكية الواقية من الرف
العلوي، إن وجدت. قبل تشغيل دورة الغسيل األولى مباشرة،قم بملء درج الملح بأكمله بالماء وأضف بعد ذلك فقط حوالي 1 كجم من الملح )أنظر الفصل "مادة الشطف المساعدة وملح التكرير"(. يمكن للماء أن ينسكب: هذا أمر طبيعي وال يجب االهتمام به. اختر قيمة قساوة الماء )أنظر الفصل بعنوان مادة الشطف المساعدة وملح التكرير(. - بعد سكب
*LOW SALT الملح في الماكينة، سينطفئ مؤشر
إذا لم تتم تعبئة حاوية الملح، يمكن لمخفف الماء وعنصر التسخين أن يتلفا.
لتقنية ا لبيانات ا
األبعادالعرض 60 سماالرتفاع 85 سم
العمق 60 سم13 إعدادات موضع قياسيةالسعة
0.05 ÷ ميجا باسكال )0.5 ÷ 10 بار(ضغط مصدر الماء7.25 – 145 رطل للبوصة المربعة
راجع لوحة بيانات الجهازالجهد الكهربائي لتزويد الطاقة
راجع لوحة بيانات الجهازالطاقة الكلية المستهلكة
راجع لوحة بيانات الجهازالمصهر
تذعن ماكينة غسيل األطباق هذه للوائح السوق األوروبية المشتركة التالية:
- EC/2006/95 )فولطية منخفضة(- EC/2004/108 )تطابق المغناطيسية
الكهربائية( -EC/2009/125 )تسجيل تجاري
)Ecodesign( )2012/1016- EC/97/17 )تصنيف(
-EU/2012/19 األجهزة الكهربائية )WEEE( واإللكترونية التالفة
تحتوي الماكينة على جرس/مجموعة من األصوات )باالعتماد على موديل ماكينة غسيل األطباق( إلشعار المستخدم بأن األمر تم تنفيذه: سواء توصيل الطاقة أو
إنهاء الدورة أو غيرها.
قد تختلف الرموز ومصابيح المؤشرات والرموز على لوحة التحكم/العرض في اللون وقد يكون لها ضوء وامض أو ثابت )تبعا لموديل ماكينة غسل األطباق(.
* متوفر في طرازات مختارة فقط.
AR
20
التوصيالت الكهربائية
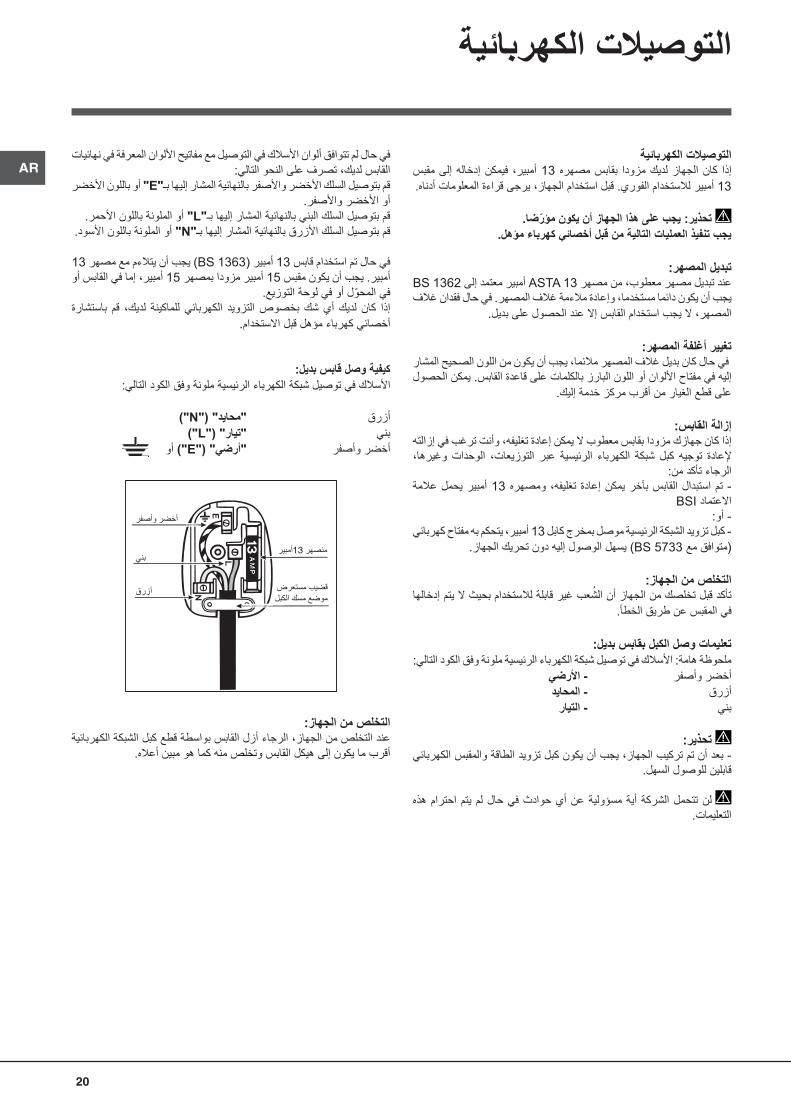
التوصيالت الكهربائيةإلى مقبس إدخاله أمبير، فيمكن 13 بقابس مصهره لديك مزودا الجهاز إذا كان 13 أمبير لالستخدام الفوري. قبل استخدام الجهاز، يرجى قراءة المعلومات أدناه.
تحذير: يجب على هذا الجهاز أن يكون مؤرضا.يجب تنفيذ العمليات التالية من قبل أخصائي كهرباء مؤهل.
تبديل المصهر: BS 1362 أمبير معتمد إلى ASTA 13 عند تبديل مصهر معطوب، من مصهريجب أن يكون دائما مستخدما، وإعادة مالءمة غالف المصهر. في حال فقدان غالف
المصهر، ال يجب استخدام القابس إال عند الحصول على بديل.
تغيير أغلفة المصهر: في حال كان بديل غالف المصهر مالئما، يجب أن يكون من اللون الصحيح المشار إليه في مفتاح األلوان أو اللون البارز بالكلمات على قاعدة القابس. يمكن الحصول
على قطع الغيار من أقرب مركز خدمة إليك.
إزالة القابس:إذا كان جهازك مزودا بقابس معطوب ال يمكن إعادة تغليفه، وأنت ترغب في إزالته وغيرها، الوحدات التوزيعات، عبر الرئيسية الكهرباء شبكة كبل توجيه إلعادة
الرجاء تأكد من:القابس بآخر يمكن إعادة تغليفه، ومصهره 13 أمبير يحمل عالمة - تم استبدال
BSI االعتماد- أو:
- كبل تزويد الشبكة الرئيسية موصل بمخرج كابل 13 أمبير، يتحكم به مفتاح كهربائي )متوافق مع BS 5733( يسهل الوصول إليه دون تحريك الجهاز.
التخلص من الجهاز:تأكد قبل تخلصك من الجهاز أن الشعب غير قابلة لالستخدام بحيث ال يتم إدخالها
في المقبس عن طريق الخطأ.
تعليمات وصل الكبل بقابس بديل:ملحوظة هامة: األسالك في توصيل شبكة الكهرباء الرئيسية ملونة وفق الكود التالي:
- األرضي أخضر وأصفر - المحايد أزرق - التيار بني
تحذير:
- بعد أن تم تركيب الجهاز، يجب أن يكون كبل تزويد الطاقة والمقبس الكهربائي قابلين للوصول السهل.
أية مسؤولية عن أي حوادث في حال لم يتم احترام هذه لن تتحمل الشركة التعليمات.
في حال لم تتوافق ألوان األسالك في التوصيل مع مفاتيح األلوان المعرفة في نهائيات القابس لديك، تصرف على النحو التالي:
قم بتوصيل السلك األخضر واألصفر بالنهائية المشار إليها بـ"E" أو باللون األخضر أو األخضر واألصفر.
قم بتوصيل السلك البني بالنهائية المشار إليها بـ"L" أو الملونة باللون األحمر.قم بتوصيل السلك األزرق بالنهائية المشار إليها بـ"N" أو الملونة باللون األسود.
في حال تم استخدام قابس 13 أمبير )BS 1363( يجب أن يتالءم مع مصهر 13 أمبير. يجب أن يكون مقبس 15 أمبير مزودا بمصهر 15 أمبير، إما في القابس أو
في المحول أو في لوحة التوزيع. باستشارة قم لديك، للماكينة الكهربائي التزويد بخصوص أي شك لديك كان إذا
أخصائي كهرباء مؤهل قبل االستخدام.
كيفية وصل قابس بديل:األسالك في توصيل شبكة الكهرباء الرئيسية ملونة وفق الكود التالي:
)"N"( "محايد" أزرق )"L"( "تيار" بني
"أرضي" )"E"( أو أخضر وأصفر
التخلص من الجهاز:عند التخلص من الجهاز، الرجاء أزل القابس بواسطة قطع كبل الشبكة الكهربائية
أقرب ما يكون إلى هيكل القابس وتخلص منه كما هو مبين أعاله.
AR
21
نظرة عامة
وصف الجهاز
***في الطرازات المبنية تماما فقط.* متوفر في طرازات مختارة فقط.
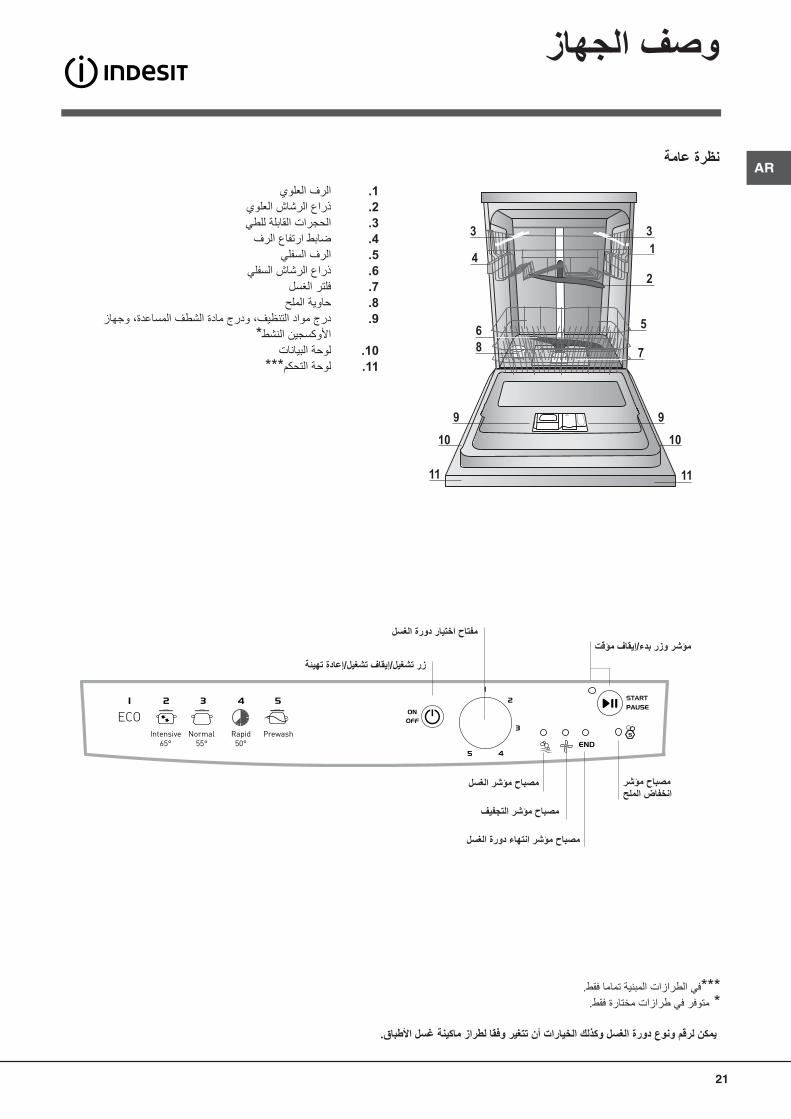
يمكن لرقم ونوع دورة الغسل وكذلك الخيارات أن تتغير وفقا لطراز ماكينة غسل األطباق.
الرف العلوي .1ذراع الرشاش العلوي .2
الحجرات القابلة للطي .3ضابط ارتفاع الرف .4
الرف السفلي .5ذراع الرشاش السفلي .6
فلتر الغسل .7حاوية الملح .8
درج مواد التنظيف، ودرج مادة الشطف المساعدة، وجهاز .9األوكسجين النشط*
لوحة البيانات .10لوحة التحكم*** .11
مؤشر وزر بدء/إيقاف مؤقت
زر تشغيل/إيقاف تشغيل/إعادة تهيئة
مفتاح اختيار دورة الغسل
مصباح مؤشرانخفاض الملح
مصباح مؤشر التجفيف
مصباح مؤشر انتهاء دورة الغسل
مصباح مؤشر الغسل
AR
22
مادة الشطف المساعدة وملح التكرير،
استخدم المنتجات المصنعة خصيصا لماكنات غسل األطباق فقط. ال تستخدم ملح السفرة أو الملح الصناعي.
اتبع التعليمات الموجودة على العبوة.
إذا تم استخدام منتج متعدد االستخدامات، فإننا نوصي بأن تضيف الملح في أية حالة، وخاصة إذا كانت المياه قاسية أو قاسية جدا. )اتبع التعليمات الموجودة
على العبوة(.
انخفاض المساعدة، ستبقى مؤشرات الشطف مادة أو الملح لم تضف إذا الملح* وانخفاض مادة الشطف المساعدة* مضاءة.
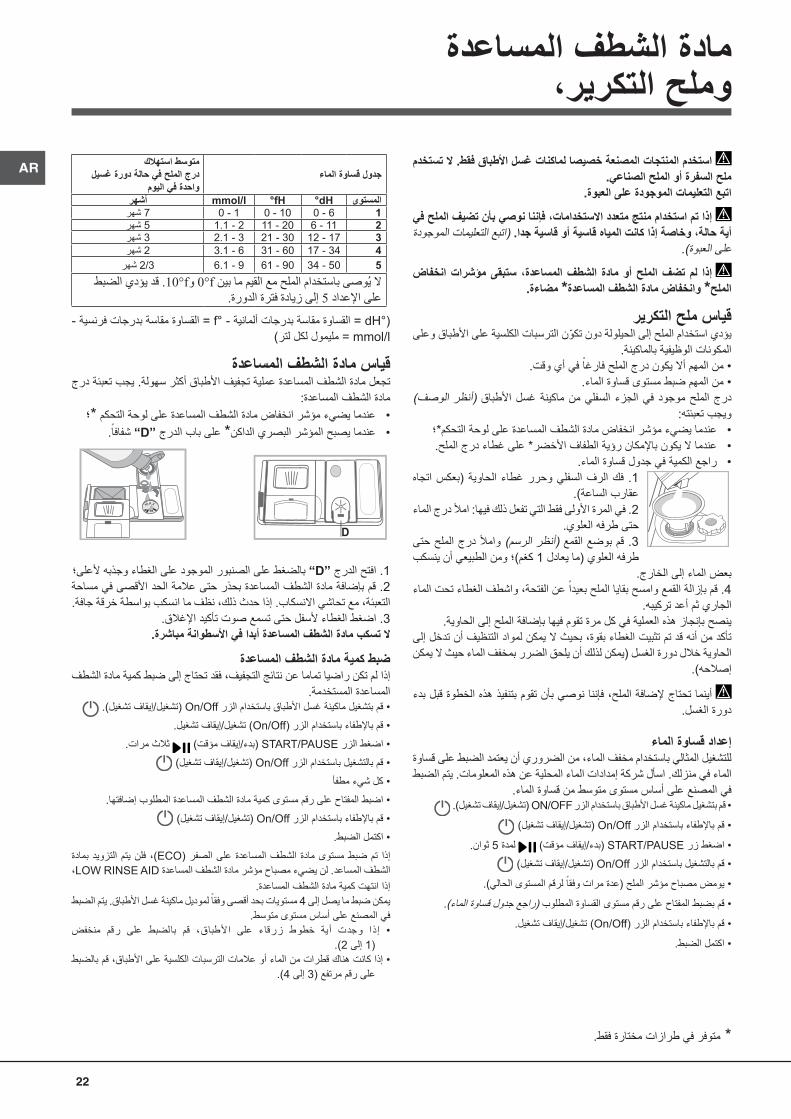
قياس ملح التكريريؤدي استخدام الملح إلى الحيلولة دون تكون الترسبات الكلسية على األطباق وعلى
المكونات الوظيفية بالماكينة. • من المهم أال يكون درج الملح فارغا في أي وقت.
• من المهم ضبط مستوى قساوة الماء.الوصف( )أنظر السفلي من ماكينة غسل األطباق الجزء الملح موجود في درج
ويجب تعبئته:عندما يضيء مؤشر انخفاض مادة الشطف المساعدة على لوحة التحكم*؛ •عندما ال يكون باإلمكان رؤية الطفاف األخضر* على غطاء درج الملح. •
راجع الكمية في جدول قساوة الماء. •اتجاه الحاوية )بعكس السفلي وحرر غطاء 1. فك الرف
عقارب الساعة(.2. في المرة األولى فقط التي تفعل ذلك فيها: امأل درج الماء
حتى طرفه العلوي.3. قم بوضع القمع )أنظر الرسم( وامأل درج الملح حتى طرفه العلوي )ما يعادل 1 كغم(؛ ومن الطبيعي أن ينسكب
بعض الماء إلى الخارج.4. قم بإزالة القمع وامسح بقايا الملح بعيدا عن الفتحة، واشطف الغطاء تحت الماء
الجاري ثم أعد تركيبه.ينصح بإنجاز هذه العملية في كل مرة تقوم فيها بإضافة الملح إلى الحاوية.
تأكد من أنه قد تم تثبيت الغطاء بقوة، بحيث ال يمكن لمواد التنظيف أن تدخل إلى الحاوية خالل دورة الغسل )يمكن لذلك أن يلحق الضرر بمخفف الماء حيث ال يمكن
إصالحه(.
أينما تحتاج إلضافة الملح، فإننا نوصي بأن تقوم بتنفيذ هذه الخطوة قبل بدء دورة الغسل.
إعداد قساوة الماءللتشغيل المثالي باستخدام مخفف الماء، من الضروري أن يعتمد الضبط على قساوة الماء في منزلك. اسأل شركة إمدادات الماء المحلية عن هذه المعلومات. يتم الضبط
في المصنع على أساس مستوى متوسط من قساوة الماء. • قم بتشغيل ماكينة غسل األطباق باستخدام الزر ON/OFF )تشغيل/إيقاف تشغيل(.
• قم باإلطفاء باستخدام الزر On/Off )تشغيل/إيقاف تشغيل(
• اضغط زر START/PAUSE )بدء/إيقاف مؤقت( لمدة 5 ثوان.• قم بالتشغيل باستخدام الزر On/Off )تشغيل/إيقاف تشغيل(
• يومض مصباح مؤشر الملح )عدة مرات وفقا لرقم المستوى الحالي(.
• قم بضبط المفتاح على رقم مستوى القساوة المطلوب )راجع جدول قساوة الماء(.
• قم باإلطفاء باستخدام الزر )On/Off( تشغيل/إيقاف تشغيل.
• اكتمل الضبط.
)°dH = القساوة مقاسة بدرجات ألمانية - °f = القساوة مقاسة بدرجات فرنسية - mmol/l = مليمول لكل لتر(
قياس مادة الشطف المساعدةتجعل مادة الشطف المساعدة عملية تجفيف األطباق أكثر سهولة. يجب تعبئة درج
مادة الشطف المساعدة:عندما يضيء مؤشر انخفاض مادة الشطف المساعدة على لوحة التحكم *؛ •
عندما يصبح المؤشر البصري الداكن* على باب الدرج “D” شفافا. •
1. افتح الدرج “D” بالضغط على الصنبور الموجود على الغطاء وجذبه ألعلى؛2. قم بإضافة مادة الشطف المساعدة بحذر حتى عالمة الحد األقصى في مساحة التعبئة، مع تحاشي االنسكاب. إذا حدث ذلك، نظف ما انسكب بواسطة خرقة جافة.
3. اضغط الغطاء ألسفل حتى تسمع صوت تأكيد اإلغالق.ال تسكب مادة الشطف المساعدة أبدا في األسطوانة مباشرة.
ضبط كمية مادة الشطف المساعدةإذا لم تكن راضيا تماما عن نتائج التجفيف، فقد تحتاج إلى ضبط كمية مادة الشطف
المساعدة المستخدمة. • قم بتشغيل ماكينة غسل األطباق باستخدام الزر On/Off )تشغيل/إيقاف تشغيل(.
• قم باإلطفاء باستخدام الزر )On/Off( تشغيل/إيقاف تشغيل.• اضغط الزر START/PAUSE )بدء/إيقاف مؤقت( ثالث مرات.
• قم بالتشغيل باستخدام الزر On/Off )تشغيل/إيقاف تشغيل( • كل شيء مطفأ
• اضبط المفتاح على رقم مستوى كمية مادة الشطف المساعدة المطلوب إضافتها.• قم باإلطفاء باستخدام الزر On/Off )تشغيل/إيقاف تشغيل(
• اكتمل الضبط.بمادة التزويد يتم المساعدة على الصفر )ECO(، فلن إذا تم ضبط مستوى مادة الشطف ،LOW RINSE AID الشطف المساعد. لن يضيء مصباح مؤشر مادة الشطف المساعدة
إذا انتهت كمية مادة الشطف المساعدة.يمكن ضبط ما يصل إلى 4 مستويات بحد أقصى وفقا لموديل ماكينة غسل األطباق. يتم الضبط
في المصنع على أساس مستوى متوسط. منخفض رقم على بالضبط قم األطباق، على زرقاء خطوط ية أ وجدت ذا إ •
)1 إلى 2(.• إذا كانت هناك قطرات من الماء أو عالمات الترسبات الكلسية على األطباق، قم بالضبط
على رقم مرتفع )3 إلى 4(.
جدول قساوة الماءمتوسط استهالك
درج الملح في حالة دورة غسيل واحدة في اليوم
أشهرdH°fHmmol/l°المستوى7 شهر1 - 100 - 60 - 105 شهر2 - 201.1 - 1111 - 263 شهر3 - 302.1 - 1721 - 3122 شهر6 - 603.1 - 3431 - 4172/3 شهر9 - 906.1 - 5061 - 534
ال يوصى باستخدام الملح مع القيم ما بين f°0 وf°10. قد يؤدي الضبط على اإلعداد 5 إلى زيادة فترة الدورة.
MAX
* متوفر في طرازات مختارة فقط.

AR
23
تحميل الرفوف
نصائح قبل تحميل الرفوف، أزل كل فضالت الطعام عن األواني وقم بتفريغ السوائل من األكواب واألواني. ليست هناك حاجة للشطف االحتياطي باستخدام الماء الجاري.قم بترتيب األواني بحيث تستقر في أماكنها بثبات وال تنقلب، وضع األوعية بحيث تكون فتحتها ألسفل، وتكون األجزاء المقعرة والمحدبة في وضع مائل، مما يسمح
للماء بالوصول إلى جميع األسطح ويتدفق بسالسة.تأكد من أن األغطية والمقابض والصواني والمقاليات ال تعوق أذرع الرشاش من
الدوران. ضع أية قطع صغيرة في سلة السكاكين.بالمزيد من البالستيكية والمقاليات غير الالصقة تحتفظ عادة نظرا ألن األطباق نقاط المياه، فإن تجفيفها لن يكون بنفس جودة األطباق الخزفية أو المصنوعة من
الفوالذ المقاوم للصدأ.العلوي، مع البالستيكية، في الرف الوزن مثل األواني القطع خفيفة يجب وضع
ترتيبها بحيث ال تتحرك من مكانها.بعد تحميل الجهاز، تأكد أنه بإمكان أذرع الرشاش الدوران بحرية.
الرف السفليالسلطات، وأطباق واألطباق، واألغطية األواني يحمل أن السفلي للرف يمكن
والسكاكين. يجب وضع األطباق واألغطية على الجوانب وهو المكان المثالي لها.
يجب وضع األطباق واألواني شديدة االتساخ في الرف السفلي، وذلك ألن رشاشات الماء في هذا الجزء تكون أكثر قوة، وتسمح بأداء أفضل للتنظيف.
العديد من موديالت ماكينات غسيل األطباق تكون مجهزة بأجزاء قابلة للطي*.ويمكن استخدامها في وضع عمودي عند ترتيب األطباق أو في وضع أفقي )سفلي(
لوضع األواني وأطباق السلطة بسهولة.
سلة السكاكينالسلة مجهزة بشبكات علوية، من أجل ترتيب أفضل للسكاكين. يجب عدم وضع سلة
السكاكين إال في مقدمة الرف السفلي
السكاكين وسائر األدوات ذات األطراف الحادة يجبوضعها في سلة السكاكين بحيث تكون رؤوسها متجهة إلى األسفل، أو يجب وضعها أفقيا في الحجرات القابلة
للطي على الرف العلوي
الرف العلويقم بملء هذا الرف باألواني الرقيقة وخفيفة الوزن مثل األكواب والكؤوس وأطباق
الفناجين وأطباق السلطة العميقة.
العديد من موديالت ماكينات غسيل األطباق تكون مجهزة بأجزاء قابلة للط*. وأطباق الشاي فناجين أطباق ترتيب عند عمودي وضع في استخدامها ويمكن
الحلويات، أو في مكان سفلي لوضع األطباق وأواني الطعام.
* متوفر في طرازات مختارة فقط.
AR
24
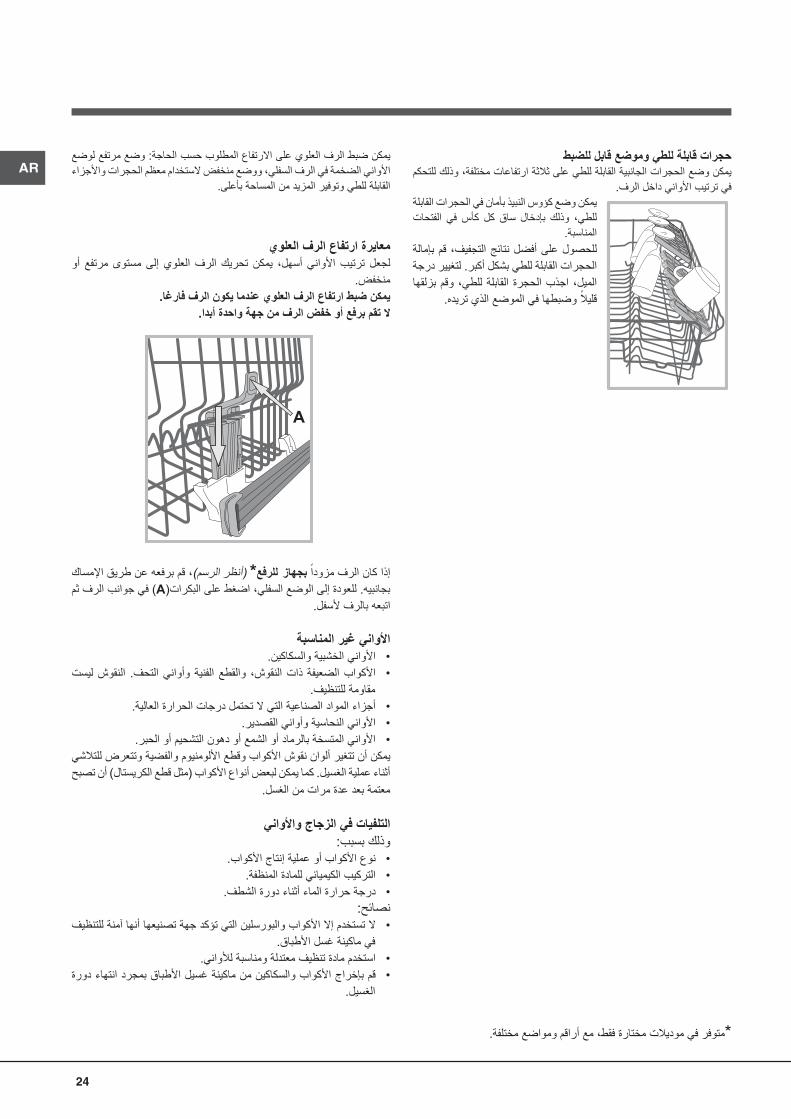
معايرة ارتفاع الرف العلويأو مرتفع مستوى إلى العلوي الرف تحريك يمكن أسهل، األواني ترتيب لجعل
منخفض.يمكن ضبط ارتفاع الرف العلوي عندما يكون الرف فارغا.
ال تقم برفع أو خفض الرف من جهة واحدة أبدا.
إذا كان الرف مزودا بجهاز للرفع* )أنظر الرسم(، قم برفعه عن طريق اإلمساك بجانبيه. للعودة إلى الوضع السفلي، اضغط على البكرات)A( في جوانب الرف ثم
اتبعه بالرف ألسفل.
األواني غير المناسبةاألواني الخشبية والسكاكين. •
ليست النقوش التحف. الفنية وأواني والقطع النقوش، ذات الضعيفة األكواب •مقاومة للتنظيف.
أجزاء المواد الصناعية التي ال تحتمل درجات الحرارة العالية. •األواني النحاسية وأواني القصدير. •
األواني المتسخة بالرماد أو الشمع أو دهون التشحيم أو الحبر. •يمكن أن تتغير ألوان نقوش األكواب وقطع األلومنيوم والفضية وتتعرض للتالشي أثناء عملية الغسيل. كما يمكن لبعض أنواع األكواب )مثل قطع الكريستال( أن تصبح
معتمة بعد عدة مرات من الغسل.
التلفيات في الزجاج واألوانيوذلك بسبب:
نوع األكواب أو عملية إنتاج األكواب. •التركيب الكيميائي للمادة المنظفة. •
درجة حرارة الماء أثناء دورة الشطف. •نصائح:
ال تستخدم إال األكواب والبورسلين التي تؤكد جهة تصنيعها أنها آمنة للتنظيف •في ماكينة غسل األطباق.
استخدم مادة تنظيف معتدلة ومناسبة لألواني. •قم بإخراج األكواب والسكاكين من ماكينة غسيل األطباق بمجرد انتهاء دورة •
الغسيل.
يمكن ضبط الرف العلوي على االرتفاع المطلوب حسب الحاجة: وضع مرتفع لوضع األواني الضخمة في الرف السفلي، ووضع منخفض الستخدام معظم الحجرات واألجزاء
القابلة للطي وتوفير المزيد من المساحة بأعلى.
حجرات قابلة للطي وموضع قابل للضبطيمكن وضع الحجرات الجانبية القابلة للطي على ثالثة ارتفاعات مختلفة، وذلك للتحكم
في ترتيب األواني داخل الرف.يمكن وضع كؤوس النبيذ بأمان في الحجرات القابلة الفتحات في كأس كل ساق بإدخال وذلك للطي،
المناسبة.للحصول على أفضل نتائج التجفيف، قم بإمالة الحجرات القابلة للطي بشكل أكبر. لتغيير درجة القابلة للطي، وقم بزلقها الميل، اجذب الحجرة
قليال وضبطها في الموضع الذي تريده.
*متوفر في موديالت مختارة فقط، مع أراقم ومواضع مختلفة.

AR
25
* متوفر في طرازات مختارة فقط.
قياس مواد التنظيفتعتمد نتائج الغسيل الجيدة أيضا على استخدام الكمية الصحيحة من مواد التنظيف. إن تجاوز الكمية المشار إليها ال يؤدي غسيل أكثر فعالية، كما أنه يزيد من التلوث
البيئي.
تبعا لدرجة اتساخ القطع، يمكن التحكم في الكمية في حاالت محددة عند استخدام المسحوق أو السائل المنظف.
)في تقريبا 35 جرام إما استخدم العادية، االتساخ درجة ذات القطع حالة في حالة المسحوق المنظف(، أو 35 مل تقريبا )في حالة السائل المنظف(. في حالة
استخدام األقراص، سيكون كافيا استخدام قرص واحد.
إذا كانت األواني متسخة قليال فقط، أو إذا تم شطفها بالماء قبل إدخالها إلى ماكينة غسل األطباق، قم بتقليل كمية مواد التنظيف المستخدمة وفقا لذلك.
عبوة على الموجودة التعليمات أيضا اتبع للغسيل، جيدة نتائج على للحصول مواد التنظيف.
في حالة وجود المزيد من األسئلة، يرجى طلب المشورة من الشركات المنتجة.
.”A“ لفتح موزع مادة التنظيف، استخدم جهاز الفتح
التنظيف التنظيف في الموزع الجاف "B" فقط. ضع كمية من مادة ضع مادة لمرحلة ما قبل الغسيل في أسطوانة الماكينة.
1. عند قياس كمية المادة المنظفة، يرجى الرجوع إلى جدول دورات الغسل، لوضع الكمية المناسبة. تحتوي الحجرة B على مستوى يشير إلى الكمية القصوى من مسحوق
التنظيف أو سائل التنظيف التي يمكن إضافتها لكل دورة غسل.
2. أزل بقايا مواد التنظيف من أطراف الموزع واغلق الغطاء حتى يسمع صوت إغالقه.
التنظيف عن طريق جذبه ألعلى حتى يستقر جهاز 3. أغلق غطاء موزع مواد اإلغالق في مكانه.
يقوم موزع مواد التنظيف أوتوماتيكيا بالفتح في الوقت الصحيح تبعا لدورة الغسيل.
،TABS في حالة استخدام المنظفات متعددة األغراض، فإننا نوصي باستخدام الخياروذلك ألنه يقوم بضبط الدورة وبذلك يتم الحصول دائما على أفضل نتائج الغسيل
والتجفيف.
استخدم مواد التنظيف المصنعة خصيصا لماكنات غسل األطباق فقط.
ال تستخدم مواد الغسل السائلة.
يؤدي استخدام كمية زائدة من مواد التنظيف إلى تكون فائض في الرغوة يبقى في الماكينة بعد انتهاء دورة الغسل.
للتوصل إلى أفضل نتائج الغسل والتجفيف، فإن يجب الجمع بين استخدام مواد التنظيف، ومادة الشطف المساعدة، والملح المكرر .
نحن نوصي باستخدام مواد التنظيف التي ال تحتوي على الفوسفات أو الكلورين، ألنها منتجات تلحق الضرر بالبيئة.
مواد التنظيف واستخدام ماكينة غسل األطباق
تشغيل ماكينة غسل األطباق1. افتح حنفية الماء.
2. قم بتشغيل الجهاز بواسطة الضغط على زر بدء/إيقاف التشغيل.مواد "قياس )انظر التنظيف مواد من المالئمة الكمية واسكب الباب افتح .3
التنظيف"(.4. قم بتحميل الرفوف )انظر تحميل الرفوف( واغلق الباب.
النتوء 5. اختر دورة الغسل بواسطة لف مفتاح اختيار دورة الغسل: قم بمحاذاة الموجود على المفتاح مع الرقم أو الرمز المالئم لدورة الغسيل المرغوب بها. سيضيء
مصباح المؤشر بدء/إيقاف مؤقت.6. اختر خيارات الغسل* )أنظر الخيارات ودورات الغسيل(.
7. قم بتشغيل دورة الغسيل بواسطة الضغط على زر البدء START؛ سيتوقف مصباح المؤشر عن الوميض ويظل مضاء )ضوء ثابت(. سيضيء مصباح المؤشر
المالئم لمرحلة الغسل ليشير إلى أن دورة الغسل قد بدأت.8. عند انتهاء دورة الغسيل سيضيء مصباح مؤشر االنتهاء END )ضوء ثابت(. قم بإطفاء الجهاز بواسطة الضغط على زر تشغيل/إيقاف تشغيل، اقفل صنبور الماء
واسحب قابس الجهاز من المقبس الكهربائي.9. انتظر بضع دقائق قليلة قبل إخراج األواني، لتحاشي الحروق. قم بتفريغ الرفوف،
ابدأ بالمستوى األسفل.
سيتم إيقاف تشغيل الماكينة أوتوماتيكيا خالل فترات عدم التشغيل الطويلة، وذلك لترشيد استهالك الكهرباء.
تغيير دورة الغسل قيد التشغيلالدورة شريطة تغيير الممكن الغسل، من اختيار دورة إذا حدث خطأ في عملية أن تكون ما زالت في بدايتها: لتغيير دورة الغسل بعد بدء دورة الغسل مباشرة، قم بإطفاء ماكينة غسل األطباق بواسطة الضغط على زر تشغيل/إيقاف التشغيل/إعادة تهيئة. قم بتشغيلها مرة أخرى بالضغط على الزر ذاته واختر دورة الغسل
والخيارات المرغوب بها.
إضافة أواني إضافيةاضغط الزر تشغيل/إيقاف مؤقت، وافتح الباب من دون إيقاف تشغيل الماكينة، مع تحاشى البخار المتصاعد، ووضع األواني داخل ماكينة غسل األطباق. اضغط زر
بدء/إيقاف مؤقت. سوف تبدأ الدورة مرة أخرى بعد إصدار صفارة طويلة.
إذا تم إعداد البدء المؤجل، فإن دورة الغسل لن تبدأ بعد انتهاء العد التنازلي. وسيظل في وضع اإليقاف المؤقت.
اضغط الزر بدء/إيقاف مؤقت إليقاف الماكينة مؤقتا؛ فتتوقف دورة الغسيل.ال يمكن في هذه المرحلة تغيير دورة الغسيل.
تعطيالت عرضية التيار الكهربائي، فستتوقف الباب خالل دورة الغسل، أو إذا انقطع فتح في حال عند عودة أو الباب إقفال عند فيها تعطلت التي النقطة من تتابع الدورة. سوف
الطاقة الكهربائية.
AR
26
دورات الغسيل
يمكن لرقم ونوع دورة الغسل وكذلك الخيارات أن تتغير وفقا لطراز ماكينة غسل األطباق.
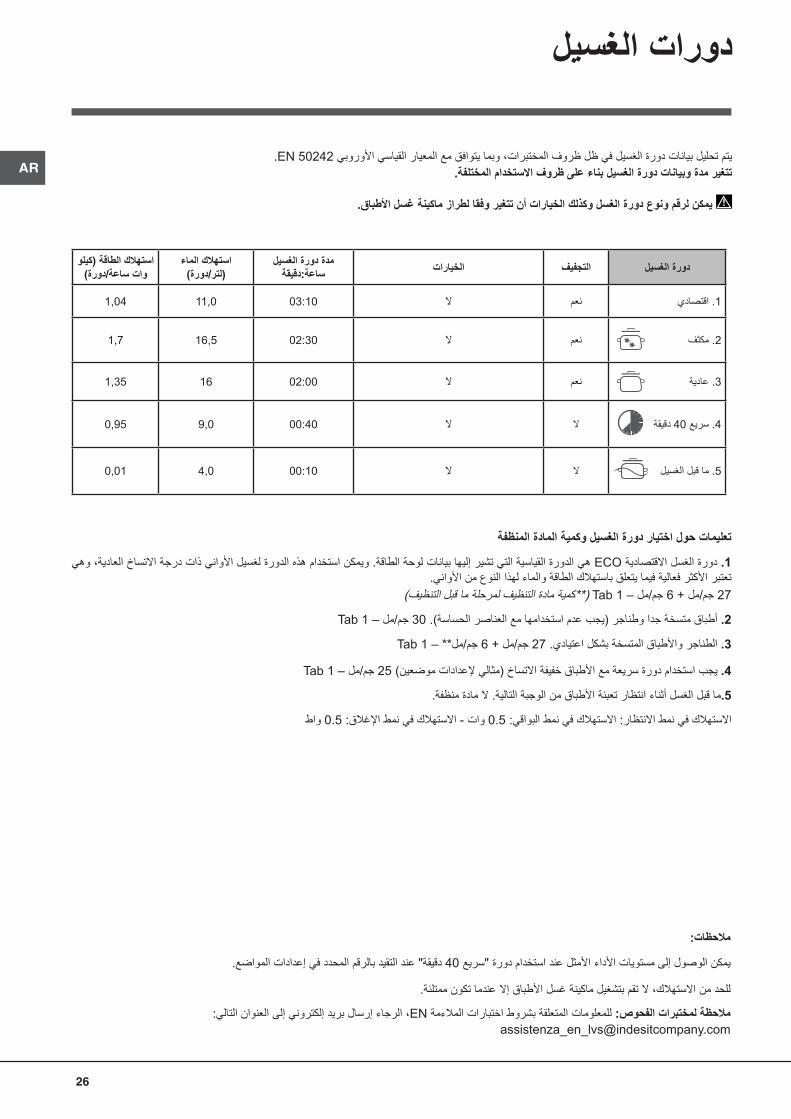
.EN 50242 يتم تحليل بيانات دورة الغسيل في ظل ظروف المختبرات، وبما يتوافق مع المعيار القياسي األوروبيتتغير مدة وبيانات دورة الغسيل بناء على ظروف االستخدام المختلفة.
مالحظات:
يمكن الوصول إلى مستويات األداء األمثل عند استخدام دورة "سريع 40 دقيقة" عند التقيد بالرقم المحدد في إعدادات المواضع.
للحد من االستهالك، ال تقم بتشغيل ماكينة غسل األطباق إال عندما تكون ممتلئة.
مالحظة لمختبرات الفحوص: للمعلومات المتعلقة بشروط اختبارات المالءمة EN، الرجاء إرسال بريد إلكتروني إلى العنوان التالي:[email protected]
مدة دورة الغسيلالخياراتالتجفيفدورة الغسيلساعة:دقيقة
استهالك الماء )لتر/دورة(
استهالك الطاقة )كيلو وات ساعة/دورة(
03:1011,01,04النعم1. اقتصادي
02:3016,51,7النعم2. مكثف
02:00161,35النعم3. عادية
00:409,00,95الال4. سريع 40 دقيقة
00:104,00,01الال5. ما قبل الغسيل
تعليمات حول اختيار دورة الغسيل وكمية المادة المنظفة
1. دورة الغسل االقتصادية ECO هي الدورة القياسية التي تشير إليها بيانات لوحة الطاقة. ويمكن استخدام هذه الدورة لغسيل األواني ذات درجة االتساخ العادية، وهي تعتبر األكثر فعالية فيما يتعلق باستهالك الطاقة والماء لهذا النوع من األواني.
27 جم/مل + 6 جم/مل – Tab 1 )**كمية مادة التنظيف لمرحلة ما قبل التنظيف(
Tab 1 – 2. أطباق متسخة جدا وطناجر )يجب عدم استخدامها مع العناصر الحساسة(. 30 جم/مل
Tab 1 – **3. الطناجر واألطباق المتسخة بشكل اعتيادي. 27 جم/مل + 6 جم/مل
Tab 1 – 4. يجب استخدام دورة سريعة مع األطباق خفيفة االتساخ )مثالي إلعدادات موضعين( 25 جم/مل
5.ما قبل الغسل أثناء انتظار تعبئة األطباق من الوجبة التالية. ال مادة منظفة.
االستهالك في نمط االنتظار: االستهالك في نمط البواقي: 0.5 وات - االستهالك في نمط اإلغالق: 0.5 واط

AR
27
العناية والصيانة
قطع إمدادات الماء والكهرباءقم بإقفال حنفية الماء بعد كل دورة غسل لتحاشي التسربات. •
افصل الجهاز عن الكهرباء دائما عند تنظيفه أو أثناء أي عمل صيانة. •
تنظيف ماكينة غسل األطباقيمكن تنظيف األسطح الخارجية في الماكينة ولوحة التحكم باستخدام خرقة غير •
كاشطة مبللة بالماء. ال تستخدم المنتجات المذيبة أو الكاشطة.
يمكن إزالة أي بقع داخل الجهاز باستخدام خرقة مبللة بالماء والقليل من الخل. •
منع الروائح الكريهةأبق باب الجهاز مفتوحا قليال دائما بهدف تحاشي تكون الرطوبة وبقائها داخل •
الماكينة.
نظف مطاط اإلحكام حول الباب وحجرات مواد التنظيف بشكل منتظم باستخدام •إسفنجة رطبة. هذا سيمنع التصاق األطعمة على مطاط اإلحكام، وهو السبب
الرئيسي لتكون الروائح الكريهة.
تنظيف أذرع الرشاشلرش المستخدمة الثقوب تسد وأن الرشاش أذرع تغطي أن الطعام لبقايا يمكن فرشاة بواسطة وتنظيفها واآلخر الحين بين األذرع بفحص يوصى لذلك الماء.
صغيرة غير معدنية.يمكن تفكيك كال ذراعي الرشاش.
حلقة بلف قم العلوي، الرشاش ذراع لتفكيك عقارب ه تجا ا بعكس لبالستيكية ا اإلقفال العلوي الرشاش ذراع إرجاع يجب الساعة. بحيث يكون الجانب ذو العدد األكبر من الثقوب
باتجاه األعلى.
بواسطة السفلي الرشاش ذراع إزالة يمكن إلى وسحبه الجانبية األلسنة على الضغط
األعلى.
تنظيف فلتر إدخال الماء* إذا كانت خراطيم الماء جديدة أو أنه لم يتم استخدامها لفترة طويلة من الوقت، دع الماء يجري فيها للتأكد من أنها نظيفة وخالية من األوساخ، قبل إنجاز التوصيالت الضرورية. إذا لم يتم توخي وسيلة الحذر هذه، فمن الممكن لمدخل الماء أن ينسد
وأن يتلف ماكينة غسل األطباق.
نظف فلتر إدخال الماء الموجود على مخرج الحنفية بشكل منتظم. - أقفل حنفية الماء.
تحت بعناية ونظفه الفلتر أزل لولبي، بشكل الماء إدخال خرطوم نهائية فك -الماء الجاري.
- أعد تركيب الفلتر وأعد خرطوم الماء في موضعه.
* متوفر في طرازات مختارة فقط.
تنظيف الفالترمجموعة الفالتر مكونة من ثالثة فالتر معدة إلزالة األطعمة المتبقية من ماء الغسل ثم تعيد تدوير الماء. يجب تنظيفها إذا أردت الحصول على أفضل النتائج في كل غسلة.
نظف الفالتر بانتظام.
الفلتر إذا كان يجب عدم استخدام ماكينة غسل األطباق من دون فالتر، أو محررا.
• بعد عدة دورات غسل، افحص مجموعة الفالتر ونظفها إذا اقتضت الضرورة بشكل تام تحت ماء جاري، باستخدام فرشاة غير معدنية واتبع التعليمات أدناه:
الخارج إلى واسحبه الساعة عقارب اتجاه بعكس C األسطواني الفلتر أدر .1)الرسم(.
2. أزل الفلتر المخروطي B بتنفيذ قوة خفيفة على األلسنة الجانبية ) الرسم 2(؛3. اسحب الفلتر المسطح المعدني المقاوم للصدأ A. ) الرسم 3(.
الغسل دورة واقي مضخة أبدا تزل ال بقايا طعام. أية وأزل اللسان افحص .4))العنصر األسود( )الرسم 4(.
األمر هذا الصحيح؛ بالوضع وثبتها الفالتر مجموعة أعد الفالتر، تنظيف بعد ضروري لألداء الناجع لماكينة غسل األطباق.
ترك الماكينة من دون استخدام لفترات طويلة قم بقطع الجهاز عن التزويد الكهربائي وأقفل حنفية الماء. •
اترك باب الجهاز مفتوحا جزئيا. •
عند عودتك الستخدام الجهاز، قم بتشغيل دورة غسل بينما تكون ماكينة غسل •األطباق فارغة.

AR
28
* متوفر في طرازات مختارة فقط.
استكشاف المشاكل وحلها
إذا لم يعمل الجهاز، وقبل استدعائك للمساعدة ابحث عن حل في القائمة التالية.
األسباب المحتملة/ الحلول:المشكلة:ماكينة غسل األطباق ال تبدأ بالعمل أو ال
يمكن التحكم فيها.• لم يتم فتح صنبور مصدر الماء.
• قم بإطفاء الجهاز بواسطة الضغط على زر التشغيل/إيقاف التشغيل )ON/OFF(، وأعد تشغيله بعد دقيقة واحدة تقريبا وأعد ضبط دورة الغسل.
• لم يتم توصيل الجهاز بالكهرباء بشكل صحيح، أو يجب استخدام مقبس كهربائي آخر.• لم يتم إغالق باب ماكينة غسل األطباق بشكل تام.
• تحقق من أن الرفوف قد تم تركيبها حتى النهاية.الباب ال يغلق.• تم تحرير القفل. اضغط على الباب بقوة حتى تسمع صوت "طقطقة".
ال يتم تصريف الماء من ماكينة غسل األطباق.
• لم تنته دورة ماكينة غسل األطباق بعد.• خرطوم تصريف الماء ملتو )أنظر التركيب(.
• أنبوب التصريف مسدود.• الفالتر مسدودة ببقايا الطعام
• تحقق من ارتفاع خرطوم التصريف.ماكينة غسل األطباق تصدر الكثير من
الضجيج.• األطباق تتصادم ببعضها البعض أو باذرع الرشاش. ضع األطباق بشكل صحيح، وتأكد أنه بإمكان أذرع الرشاش
الدوران بحرية.• لم يتم قياس مواد التنظيف بشكل صحيح أو أنها ال تالئم االستخدام في ماكينات غسل األطباق. )راجع "مواد التنظيف
واستخدام ماكينة غسل األطباق"(. ال تقومي بغسل األطباق مسبقا باليد.األطباق والكؤوس مغطاة بطبقة بيضاء
رقيقة أو طبقة كلسية.• ال يوجد ملح التكرير
• ضبط قساوة الماء غير مناسب:قم بزيادة القيم المناسبة. )راجع ملح التكرير ومادة الشطف المساعدة(.• لم يتم إغالق غطاء درج الملح ومادة الشطف المساعدة بشكل محكم.
• نفذت مادة الشطف المساعدة أو أن الكمية منخفضة جدا.يوجد على األطباق والكؤوس خطوط أو
بقع زرقاء.• مادة الشطف المساعدة أكثر مما يجب.
• تم اختيار دورة غسل من دون برنامج تجفيف.لم يتم تجفيف األواني بشكل تام.• تم استهالك مادة الشطف المساعدة. )راجع ملح التكرير ومادة الشطف المساعدة(.
• إعداد درج مادة الشطف المساعدة غير مناسب. • األواني مصنوعة من مواد غير الصقة أو بالستيكية؛ يعتبر وجود قطرات من الماء أمرا طبيعيا..
• لم يتم ترتيب األواني بشكل جيد.األطباق غير نظيفة.• ال يمكن ألذرع الرشاش أن تدور بحرية؛ ألنها محجوبة بواسطة األطباق.
• دورة الغسل ناعمة أكثر مما يجب )أنظر دورات الغسيل(.• لم يتم قياس مواد التنظيف بشكل صحيح أو أنها ال تالئم االستخدام في ماكينات غسل األطباق. )راجع "مواد التنظيف
واستخدام ماكينة غسل األطباق"(. • لم يتم إغالق غطاء حجرة مادة الشطف المساعدة بشكل صحيح.
• الفلتر متسخ أو مسدود )راجع "العناية والصيانة"(.• مستوى ملح التكرير منخفض )أنظر مادة الشطف المساعدة والملح(.
• تأكد من أن ارتفاع األطباق متوافق مع ضبط الرف. • الثقوب في أذرع الرشاش مسدودة. )راجع "العناية والصيانة"(.
ماكينة غسل األطباق ال تسحب الماء.
الماكينة مسدودة والمصابيح تومض.
• يوجد انقطاع في مصدر التزويد بالماء، أو الصنبور مغلق.• خرطوم تصريف الماء ملتو )أنظر "التركيب"(.
• الفالتر مسدودة: وتحتاج للتنظيف. )راجع "العناية والصيانة"(.• أنبوب التصريف مسدود: يحتاج للتنظيف.
• بعد الفحص والتنظيف، قم بتشغيل ماكينة غسل األطباق الجهاز وإيقاف تشغيلها، ثم ابدأ دورة غسل جديدة.• إذا استمرت المشكلة، قم بإغالق صنبور الماء، ثم افضل الكابل، واتصل بمركز الخدمة.
195115290.03 - NC04/2015 pb - Xerox Fabriano
Indesit Company SpaViale Aristide Merloni 4760044 Fabriano (AN)Italy www.indesit.co.uk


![Indesit Wg935tpf [ET]](https://img.pdfslide.tips/doc/110x75/577cc77f1a28aba711a120bd/indesit-wg935tpf-et.jpg)