Embed Size (px)
Citation preview
pg. 1
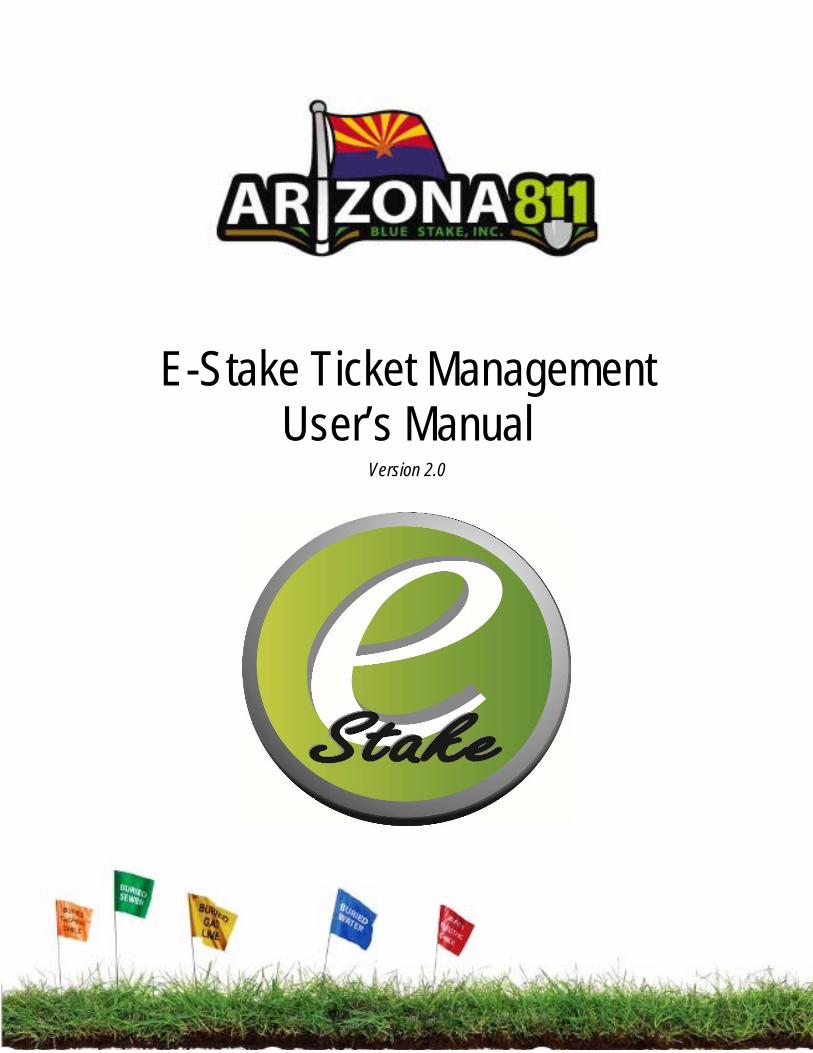
E-Stake Ticket Management User’s Manual
Version 2.0
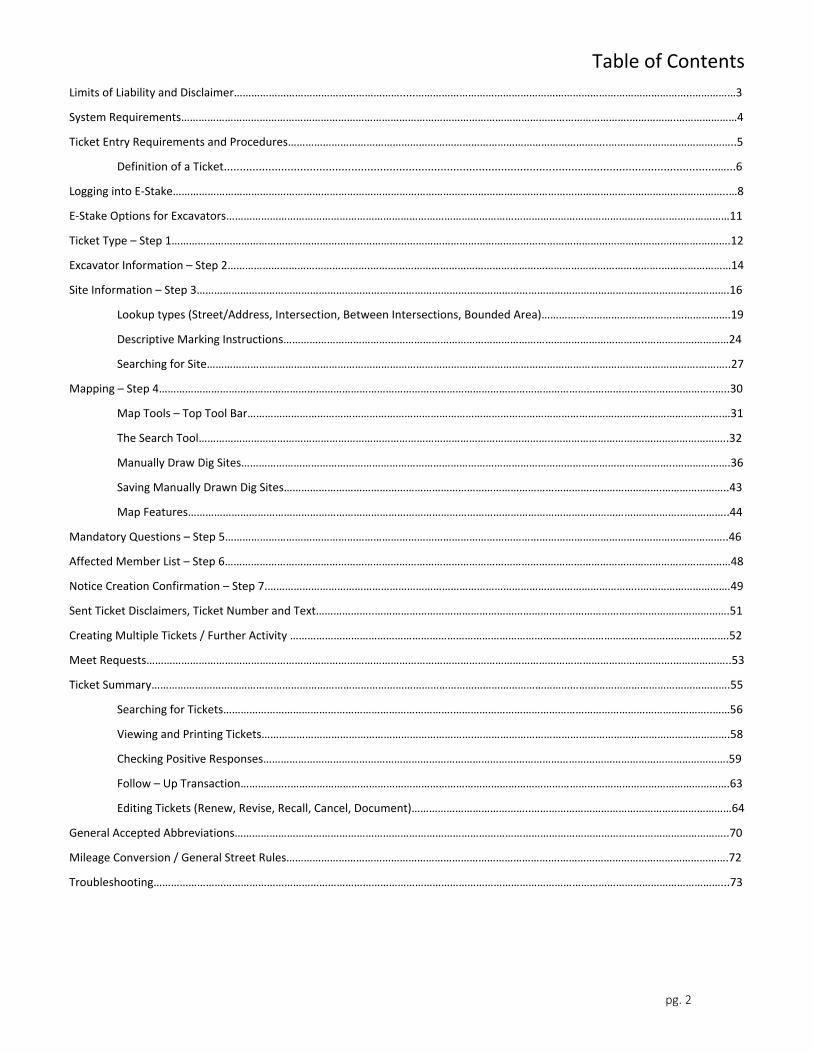
Table of Contents
pg. 2
Limits of Liability and Disclaimer………………………………………………….....…………………………………………………………………………………..……………3 System Requirements……………………………………………………………………………………………………………………………………….…………….…………………4 Ticket Entry Requirements and Procedures………………………………………………………………………………………………..……………………………………..5 Definition of a Ticket...........................................................................................................................................................…...6 Logging into E‐Stake………………………………………………………………………………………………………………………………………………………………………..…8 E‐Stake Options for Excavators……………………………………………………………………………………………………………………………………..…………………11 Ticket Type – Step 1…………………………………………………………………………………………………………………………………………………….………….……….12 Excavator Information – Step 2………………………………………….……………………………………………………………………………………….……………………14 Site Information – Step 3……………………………………………………………………………………………………………………………………………………..………….16 Lookup types (Street/Address, Intersection, Between Intersections, Bounded Area)……………………………………….……………….19 Descriptive Marking Instructions……………………………………………………………………………………………………………..……….………………24 Searching for Site…………………………………………………………………………………………………………………………………………………….………..27 Mapping – Step 4………………………………………………………………………………………………………………………………………………………………………..…..30 Map Tools – Top Tool Bar……………………………………………………………………………………………………………………………………………….…31 The Search Tool…………………………………………………………………………………………………………..……………………….…………………………..32 Manually Draw Dig Sites…………………………………………………………………………………………………………………………………..……………….36 Saving Manually Drawn Dig Sites………………………………………………………………………………………………………………….…………………..43 Map Features…………………………………………………………………………………………………………………………………………………….……………..44 Mandatory Questions – Step 5………………………………………………………………………………………………………………………………………………………..46 Affected Member List – Step 6…………………………………………………………………………………………………………………………………………………………48 Notice Creation Confirmation – Step 7.………………………………………………………………………………………………………………..………………………….49 Sent Ticket Disclaimers, Ticket Number and Text………………..…………………………………………………………………………….…………………………….51 Creating Multiple Tickets / Further Activity …………………………………………………………………………………………………………………………………….52 Meet Requests……………………………………………………………………………………………………………………………………………………………….………………..53 Ticket Summary……………………………………………………………………………………………………………………………………………………………………………….55 Searching for Tickets…………………………………………………………………….……………………………………………………………………………..……56 Viewing and Printing Tickets……………………………………………………………….…………………………………………………………………………….58 Checking Positive Responses…………………………………………………………………………………………………………………………………………….59 Follow – Up Transaction……………..…………………………………………………………………………………………………………………………………….63 Editing Tickets (Renew, Revise, Recall, Cancel, Document)…………………………………..……………………………………………………………64 General Accepted Abbreviations……………………………………………………………………………………………………………………………………………………..70 Mileage Conversion / General Street Rules………………………………………………………………………………….………………………………………………….72 Troubleshooting……………………………………………………………………………………………………………………………………………………………………………...73

Limits of Liability and Disclaimer
pg. 3
Although every precaution has been taken in the preparation of this manual, Arizona 811 (formerly, Arizona Blue
Stake, Inc.), the editors and the authors assume no responsibility for errors or omissions. Neither is any liability
assumed for damages resulting from the use or misuse of the information contained herein.
Arizona 811 does not verify the accuracy of information generated by and/or received from third parties. Arizona 811 is not responsible for information transmitted to the center. Such information may be inaccurate or misunderstood after being transmitted. Each party that uses the E‐Stake ticket entry assumes total responsibility for information provided to Arizona 811. Information provided by a third party probationary user for the purpose of generating a ticket using the E‐Stake ticket entry should be deemed pending until Arizona 811 reviews and releases that information for transmission to our member facility owners/operators.
System Requirements
pg. 4
System Requirements
Windows 7 to current and Mac
You can check your operating system by opening your “Start” menu then clicking on “My Computer”. In the window that opens, click on “View System Information”.
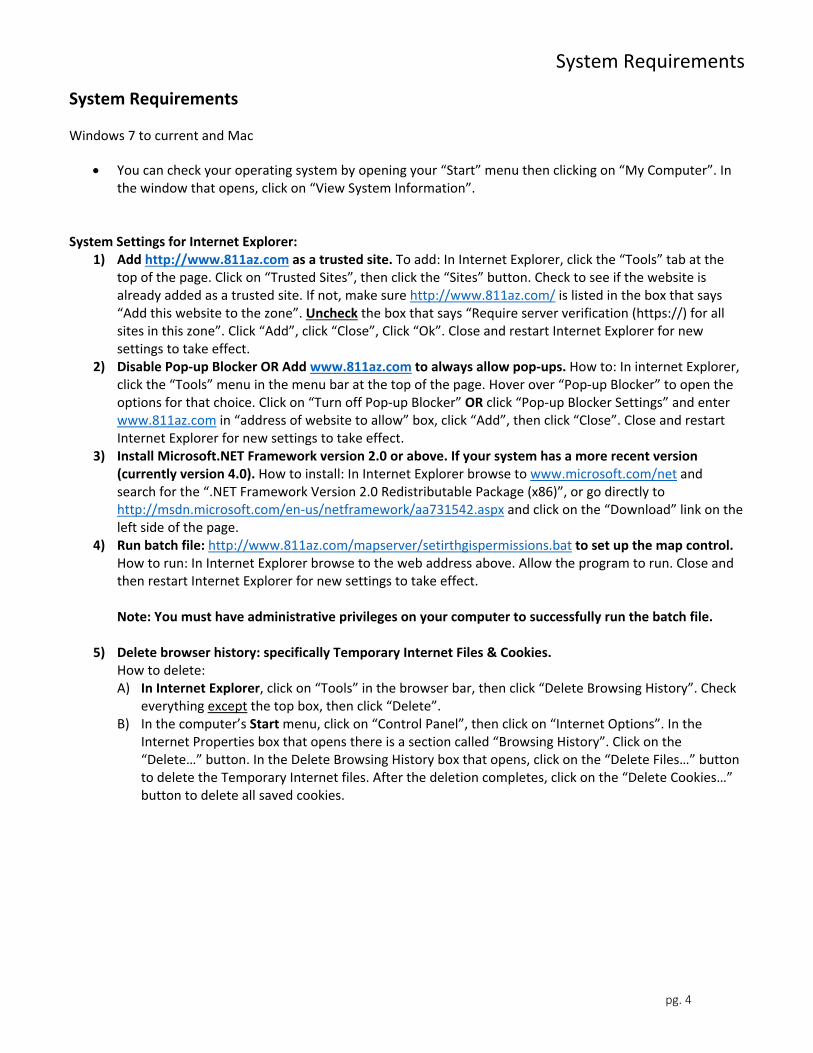
System Settings for Internet Explorer:
1) Add http://www.811az.com as a trusted site. To add: In Internet Explorer, click the “Tools” tab at the top of the page. Click on “Trusted Sites”, then click the “Sites” button. Check to see if the website is already added as a trusted site. If not, make sure http://www.811az.com/ is listed in the box that says “Add this website to the zone”. Uncheck the box that says “Require server verification (https://) for all sites in this zone”. Click “Add”, click “Close”, Click “Ok”. Close and restart Internet Explorer for new settings to take effect.
2) Disable Pop‐up Blocker OR Add www.811az.com to always allow pop‐ups. How to: In internet Explorer, click the “Tools” menu in the menu bar at the top of the page. Hover over “Pop‐up Blocker” to open the options for that choice. Click on “Turn off Pop‐up Blocker” OR click “Pop‐up Blocker Settings” and enter www.811az.com in “address of website to allow” box, click “Add”, then click “Close”. Close and restart Internet Explorer for new settings to take effect.
3) Install Microsoft.NET Framework version 2.0 or above. If your system has a more recent version (currently version 4.0). How to install: In Internet Explorer browse to www.microsoft.com/net and search for the “.NET Framework Version 2.0 Redistributable Package (x86)”, or go directly to http://msdn.microsoft.com/en‐us/netframework/aa731542.aspx and click on the “Download” link on the left side of the page.
4) Run batch file: http://www.811az.com/mapserver/setirthgispermissions.bat to set up the map control. How to run: In Internet Explorer browse to the web address above. Allow the program to run. Close and then restart Internet Explorer for new settings to take effect.
Note: You must have administrative privileges on your computer to successfully run the batch file.
5) Delete browser history: specifically Temporary Internet Files & Cookies. How to delete: A) In Internet Explorer, click on “Tools” in the browser bar, then click “Delete Browsing History”. Check
everything except the top box, then click “Delete”. B) In the computer’s Start menu, click on “Control Panel”, then click on “Internet Options”. In the
Internet Properties box that opens there is a section called “Browsing History”. Click on the “Delete…” button. In the Delete Browsing History box that opens, click on the “Delete Files…” button to delete the Temporary Internet files. After the deletion completes, click on the “Delete Cookies…” button to delete all saved cookies.
Ticket Entry Requirements and Procedures
pg. 5
Types of Requests Processed
All Arizona 811 notice types can be processed through E‐Stake. Such requests are required to be made no less than 2 full working days before beginning any excavation, except in the case of “Emergency” or “Damaged Utility” requests. The 2 full working day notice does not include the day the ticket was requested and excludes weekends and state recognized holidays. Arizona 811 accepts E‐Stake tickets 24 hours a day except during scheduled system maintenance periods. Call center hours are 6 am to 5 pm, Monday through Friday. E‐Stake requests input after call center hours are processed as the next working day’s ticket. Entering Information
When completing your ticket, clearly identify the type and limits of your proposed work area so that the locator can respond with minimum difficulty and delay. Note: Arizona 811 reserves the right to reject any ticket placed through E‐Stake that is not complete and accurate. Our Support Specialist team may attempt to contact the E‐Stake user by phone or by email to assist in making any necessary corrections or adjustments to the request.
Before submitting your ticket, you must ensure that the selected address, boundaries or grids are accurate on the map. Please do not submit a ticket with excessive, unneeded area gridded selected.
Move from one input field to another by pressing the “Tab” key.
When you complete all information and send the notice, you will receive a ticket number and confirmation that also lists those members notified by your ticket. Note: Arizona 811 does not notify Limited Basis Participant underground facility owners/operators or Landlords. The excavator is responsible for notifying those entities. Arizona 811 will provide contact information for notifying these types of facility owners/operators.
State law requires all underground facility owners/operators be a member of Arizona 811. Unfortunately, not all underground facility owners/operators have complied with this law. Arizona 811 has no knowledge of non‐member facility owners/operators and cannot provide any notification of contact information for these facility owners/operators.
Before submitting your ticket, you must view the map to ensure that the selected area is accurate.
Ticket Entry Requirements and Procedures
pg. 6
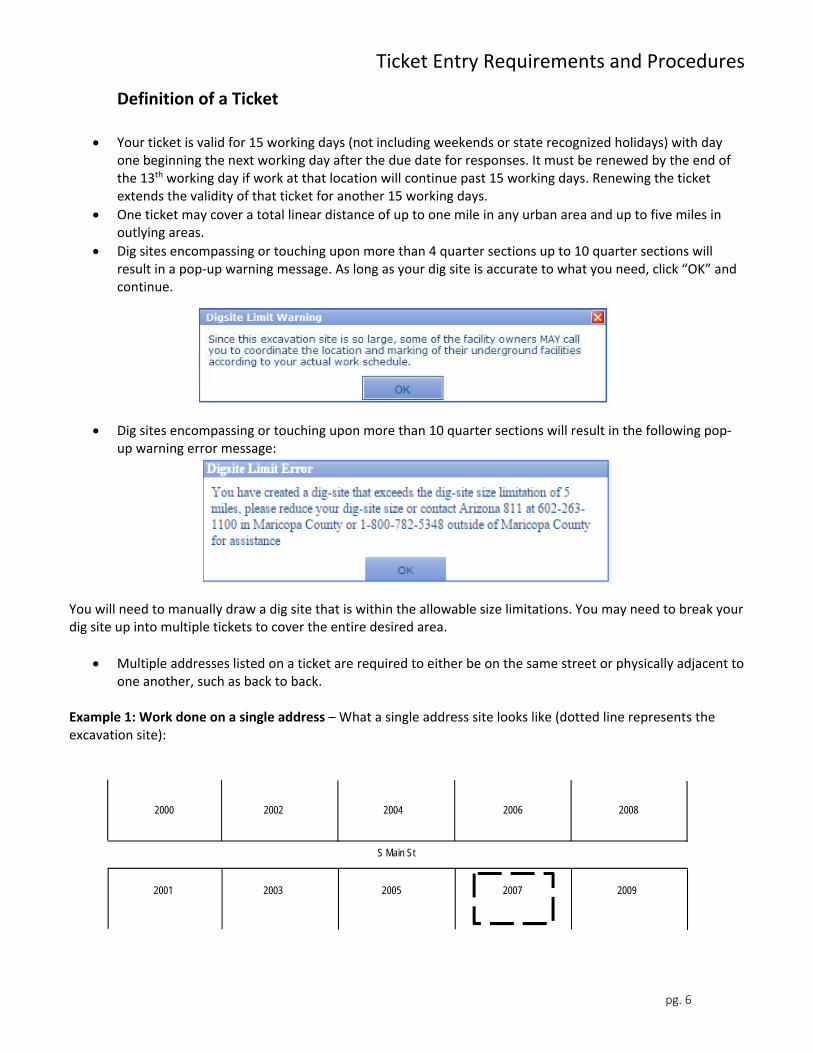
Definition of a Ticket
Your ticket is valid for 15 working days (not including weekends or state recognized holidays) with day one beginning the next working day after the due date for responses. It must be renewed by the end of the 13th working day if work at that location will continue past 15 working days. Renewing the ticket extends the validity of that ticket for another 15 working days.
One ticket may cover a total linear distance of up to one mile in any urban area and up to five miles in outlying areas.
Dig sites encompassing or touching upon more than 4 quarter sections up to 10 quarter sections will result in a pop‐up warning message. As long as your dig site is accurate to what you need, click “OK” and continue.
Dig sites encompassing or touching upon more than 10 quarter sections will result in the following pop‐up warning error message:
You will need to manually draw a dig site that is within the allowable size limitations. You may need to break your dig site up into multiple tickets to cover the entire desired area.
Multiple addresses listed on a ticket are required to either be on the same street or physically adjacent to one another, such as back to back.
Example 1: Work done on a single address – What a single address site looks like (dotted line represents the excavation site):
2000 2002 2004 2006 2008
S Main St
2001 2003 2005 2007 2009
Ticket Entry Requirements and Procedures
pg. 7
Firs
t St
Sec
ond
St
Thi
rd S
t
Fou
rth
St
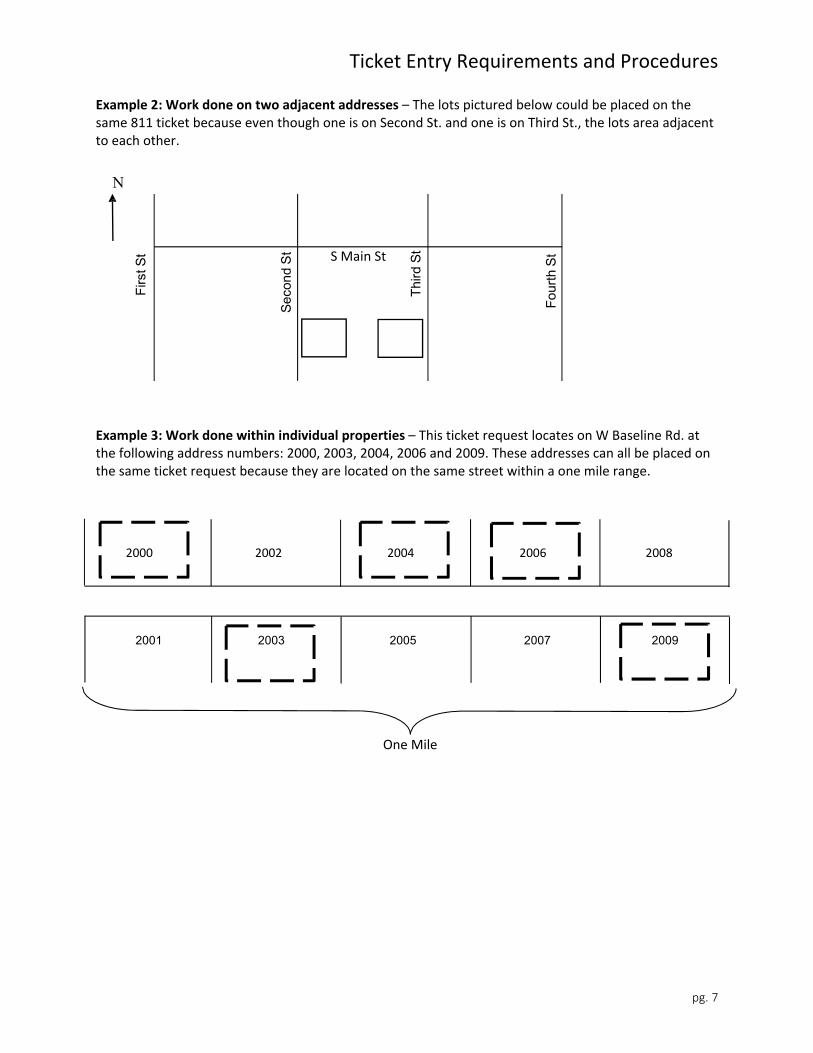
Example 2: Work done on two adjacent addresses – The lots pictured below could be placed on the same 811 ticket because even though one is on Second St. and one is on Third St., the lots area adjacent to each other.
N
Example 3: Work done within individual properties – This ticket request locates on W Baseline Rd. at the following address numbers: 2000, 2003, 2004, 2006 and 2009. These addresses can all be placed on the same ticket request because they are located on the same street within a one mile range. 2000 2002 2004 2006 2008
2001 2003 2005 2007 2009
One Mile
S Main St
Logging into E‐Stake
pg. 8
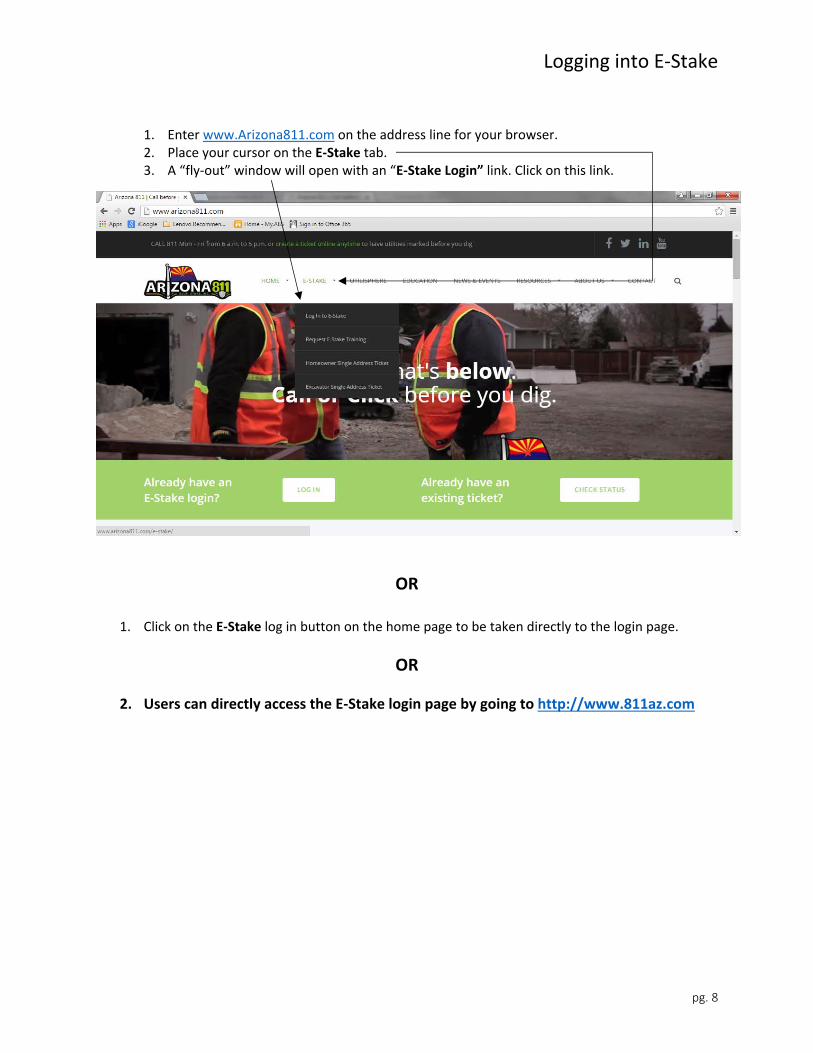
1. Enter www.Arizona811.com on the address line for your browser. 2. Place your cursor on the E‐Stake tab. 3. A “fly‐out” window will open with an “E‐Stake Login” link. Click on this link.
OR
1. Click on the E‐Stake log in button on the home page to be taken directly to the login page.
OR
2. Users can directly access the E‐Stake login page by going to http://www.811az.com
Logging into E‐Stake
pg. 9
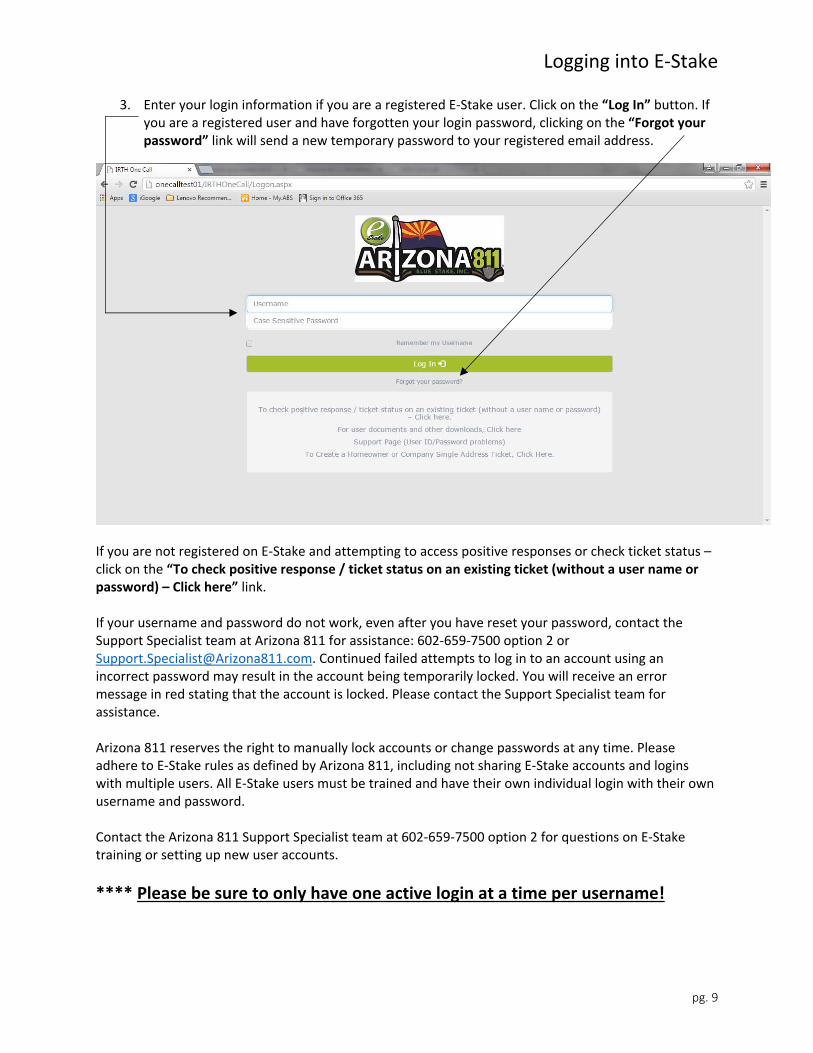
3. Enter your login information if you are a registered E‐Stake user. Click on the “Log In” button. If you are a registered user and have forgotten your login password, clicking on the “Forgot your password” link will send a new temporary password to your registered email address.
If you are not registered on E‐Stake and attempting to access positive responses or check ticket status – click on the “To check positive response / ticket status on an existing ticket (without a user name or password) – Click here” link. If your username and password do not work, even after you have reset your password, contact the Support Specialist team at Arizona 811 for assistance: 602‐659‐7500 option 2 or [email protected]. Continued failed attempts to log in to an account using an incorrect password may result in the account being temporarily locked. You will receive an error message in red stating that the account is locked. Please contact the Support Specialist team for assistance. Arizona 811 reserves the right to manually lock accounts or change passwords at any time. Please adhere to E‐Stake rules as defined by Arizona 811, including not sharing E‐Stake accounts and logins with multiple users. All E‐Stake users must be trained and have their own individual login with their own username and password. Contact the Arizona 811 Support Specialist team at 602‐659‐7500 option 2 for questions on E‐Stake training or setting up new user accounts.
**** Please be sure to only have one active login at a time per username!
Logging into E‐Stake
pg. 10
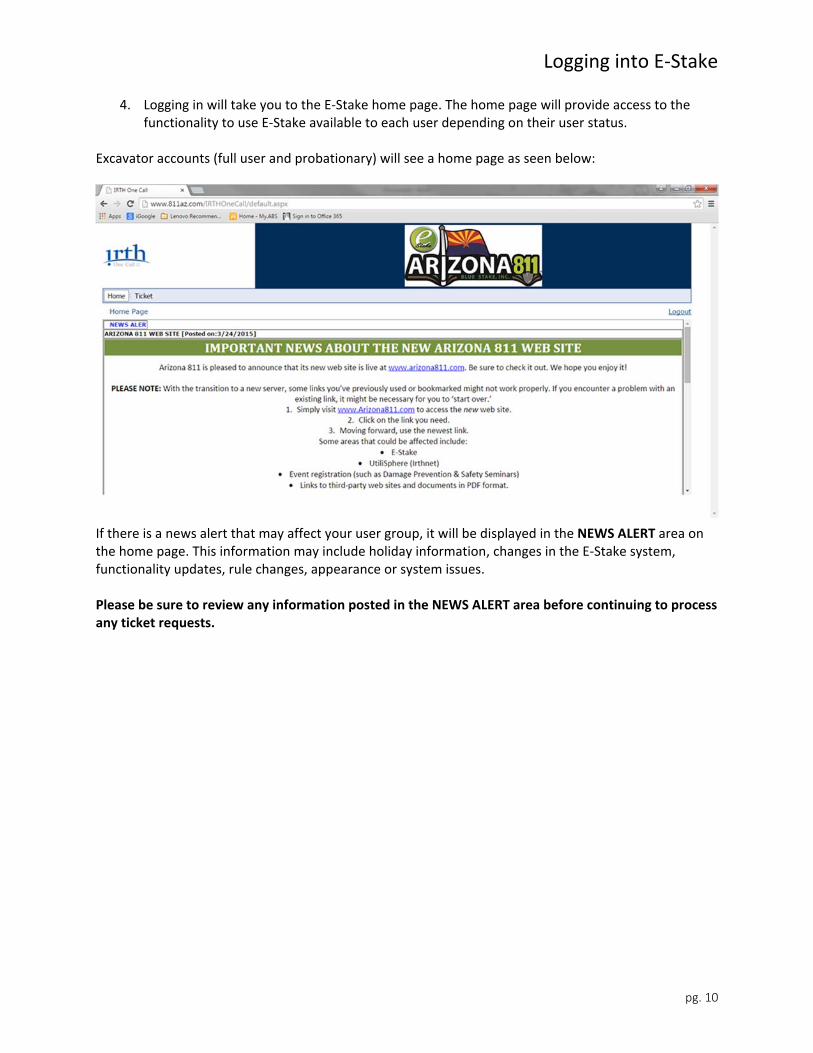
4. Logging in will take you to the E‐Stake home page. The home page will provide access to the functionality to use E‐Stake available to each user depending on their user status.
Excavator accounts (full user and probationary) will see a home page as seen below: If there is a news alert that may affect your user group, it will be displayed in the NEWS ALERT area on the home page. This information may include holiday information, changes in the E‐Stake system, functionality updates, rule changes, appearance or system issues. Please be sure to review any information posted in the NEWS ALERT area before continuing to process any ticket requests.
E‐Stake Options for Excavators
pg. 11
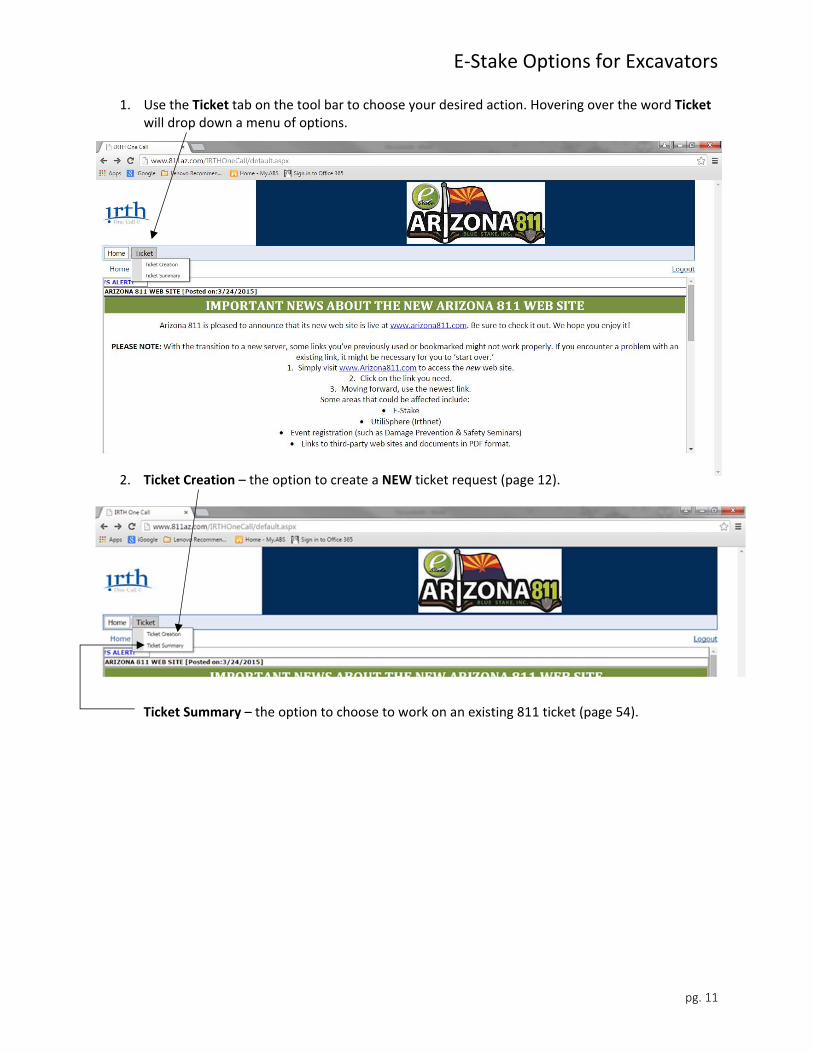
1. Use the Ticket tab on the tool bar to choose your desired action. Hovering over the word Ticket will drop down a menu of options.
2. Ticket Creation – the option to create a NEW ticket request (page 12).
Ticket Summary – the option to choose to work on an existing 811 ticket (page 54).
Ticket Type – Step 1
pg. 12
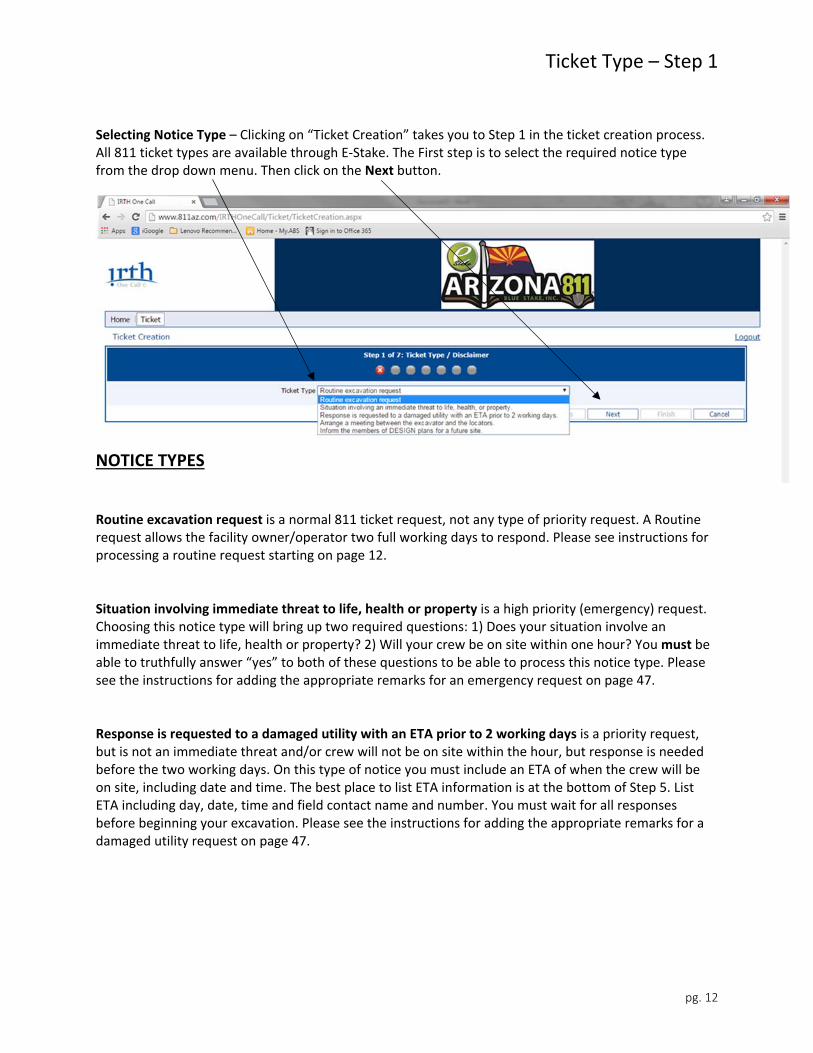
Selecting Notice Type – Clicking on “Ticket Creation” takes you to Step 1 in the ticket creation process. All 811 ticket types are available through E‐Stake. The First step is to select the required notice type from the drop down menu. Then click on the Next button.
NOTICE TYPES
Routine excavation request is a normal 811 ticket request, not any type of priority request. A Routine request allows the facility owner/operator two full working days to respond. Please see instructions for processing a routine request starting on page 12.
Situation involving immediate threat to life, health or property is a high priority (emergency) request. Choosing this notice type will bring up two required questions: 1) Does your situation involve an immediate threat to life, health or property? 2) Will your crew be on site within one hour? You must be able to truthfully answer “yes” to both of these questions to be able to process this notice type. Please see the instructions for adding the appropriate remarks for an emergency request on page 47.
Response is requested to a damaged utility with an ETA prior to 2 working days is a priority request, but is not an immediate threat and/or crew will not be on site within the hour, but response is needed before the two working days. On this type of notice you must include an ETA of when the crew will be on site, including date and time. The best place to list ETA information is at the bottom of Step 5. List ETA including day, date, time and field contact name and number. You must wait for all responses before beginning your excavation. Please see the instructions for adding the appropriate remarks for a damaged utility request on page 47.
Ticket Type – Step 1
pg. 13
Arrange a meeting between the excavator and the locators is not a request for locate markings and is not a valid dig ticket. This is a request to have locators meet a company representative on site to discuss a potential 811 ticket request, walk through the site, hand out maps or plans, etc. Locators are NOT required to place locate markings at a meeting. After the meet is complete, you must then submit a routine 811 ticket request for the same area to receive markings or response. Meetings must be scheduled at least two working days in advance. Please see the instructions for processing a meet request on page 53. A meet request is not a valid dig ticket. Inform members of DESIGN plans for a future site often referred to as a “Design Request”. This is a request for information to be transmitted, either electronically or by mail, to facility owner/operator (i.e. maps, as‐builts, etc.) to assist in the planning and design of new underground systems. Please include a mailing address of where you would like information mailed to in the “Remarks” field at the bottom of Step 5. Locators will NOT mark a site on a design request. Please see the instructions for adding the appropriate remarks for a design request on page 47. A design request is not a valid dig ticket.
Excavator Information – Step 2
pg. 14
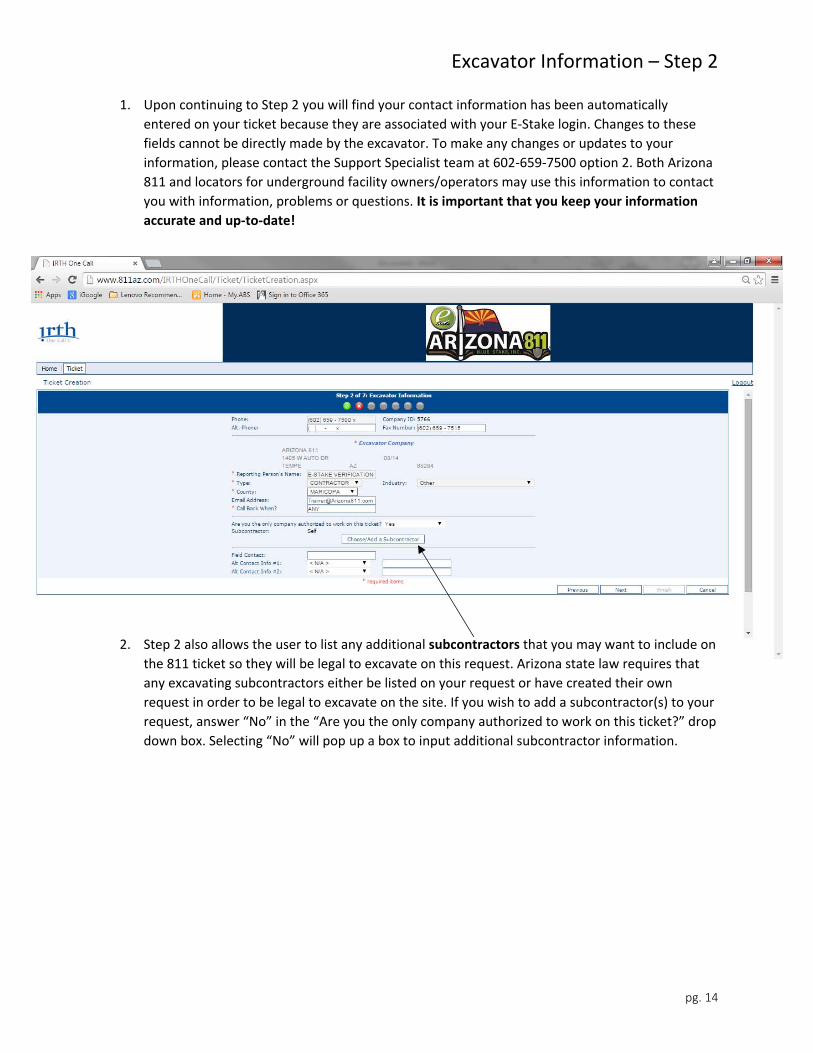
1. Upon continuing to Step 2 you will find your contact information has been automatically
entered on your ticket because they are associated with your E‐Stake login. Changes to these
fields cannot be directly made by the excavator. To make any changes or updates to your
information, please contact the Support Specialist team at 602‐659‐7500 option 2. Both Arizona
811 and locators for underground facility owners/operators may use this information to contact
you with information, problems or questions. It is important that you keep your information
accurate and up‐to‐date!
2. Step 2 also allows the user to list any additional subcontractors that you may want to include on
the 811 ticket so they will be legal to excavate on this request. Arizona state law requires that
any excavating subcontractors either be listed on your request or have created their own
request in order to be legal to excavate on the site. If you wish to add a subcontractor(s) to your
request, answer “No” in the “Are you the only company authorized to work on this ticket?” drop
down box. Selecting “No” will pop up a box to input additional subcontractor information.
Excavator Information – Step 2
pg. 15
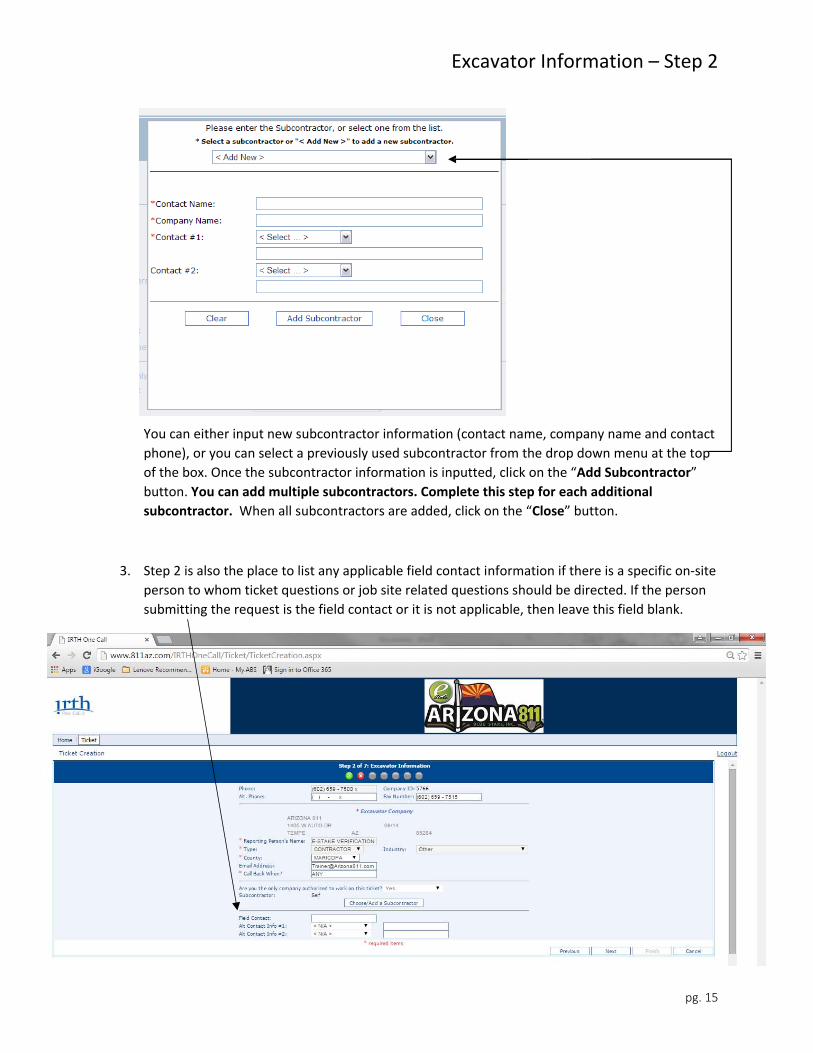
You can either input new subcontractor information (contact name, company name and contact
phone), or you can select a previously used subcontractor from the drop down menu at the top
of the box. Once the subcontractor information is inputted, click on the “Add Subcontractor”
button. You can add multiple subcontractors. Complete this step for each additional
subcontractor. When all subcontractors are added, click on the “Close” button.
3. Step 2 is also the place to list any applicable field contact information if there is a specific on‐site
person to whom ticket questions or job site related questions should be directed. If the person
submitting the request is the field contact or it is not applicable, then leave this field blank.
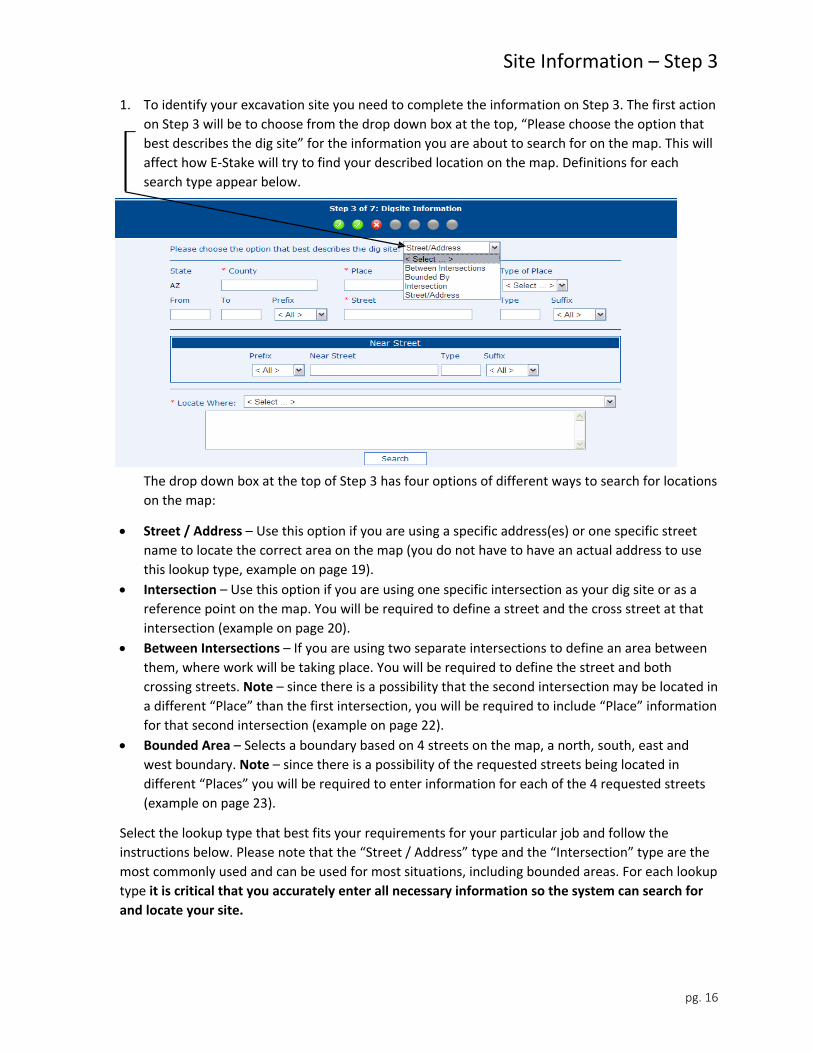
Site Information – Step 3
pg. 16
1. To identify your excavation site you need to complete the information on Step 3. The first action
on Step 3 will be to choose from the drop down box at the top, “Please choose the option that
best describes the dig site” for the information you are about to search for on the map. This will
affect how E‐Stake will try to find your described location on the map. Definitions for each
search type appear below.
The drop down box at the top of Step 3 has four options of different ways to search for locations
on the map:
Street / Address – Use this option if you are using a specific address(es) or one specific street
name to locate the correct area on the map (you do not have to have an actual address to use
this lookup type, example on page 19).
Intersection – Use this option if you are using one specific intersection as your dig site or as a
reference point on the map. You will be required to define a street and the cross street at that
intersection (example on page 20).
Between Intersections – If you are using two separate intersections to define an area between
them, where work will be taking place. You will be required to define the street and both
crossing streets. Note – since there is a possibility that the second intersection may be located in
a different “Place” than the first intersection, you will be required to include “Place” information
for that second intersection (example on page 22).
Bounded Area – Selects a boundary based on 4 streets on the map, a north, south, east and
west boundary. Note – since there is a possibility of the requested streets being located in
different “Places” you will be required to enter information for each of the 4 requested streets
(example on page 23).
Select the lookup type that best fits your requirements for your particular job and follow the
instructions below. Please note that the “Street / Address” type and the “Intersection” type are the
most commonly used and can be used for most situations, including bounded areas. For each lookup
type it is critical that you accurately enter all necessary information so the system can search for
and locate your site.
Site Information – Step 3
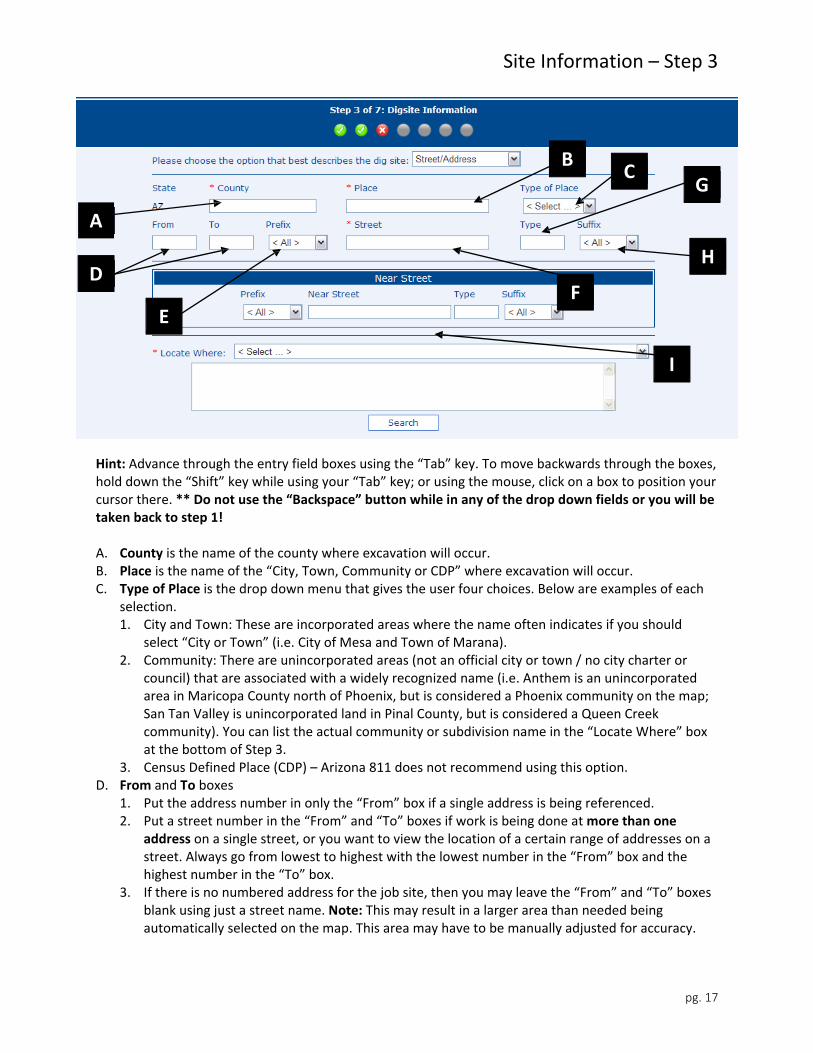
pg. 17
A
B C
D
E F
G
H
I
Hint: Advance through the entry field boxes using the “Tab” key. To move backwards through the boxes, hold down the “Shift” key while using your “Tab” key; or using the mouse, click on a box to position your cursor there. ** Do not use the “Backspace” button while in any of the drop down fields or you will be taken back to step 1! A. County is the name of the county where excavation will occur. B. Place is the name of the “City, Town, Community or CDP” where excavation will occur. C. Type of Place is the drop down menu that gives the user four choices. Below are examples of each
selection. 1. City and Town: These are incorporated areas where the name often indicates if you should
select “City or Town” (i.e. City of Mesa and Town of Marana). 2. Community: There are unincorporated areas (not an official city or town / no city charter or
council) that are associated with a widely recognized name (i.e. Anthem is an unincorporated area in Maricopa County north of Phoenix, but is considered a Phoenix community on the map; San Tan Valley is unincorporated land in Pinal County, but is considered a Queen Creek community). You can list the actual community or subdivision name in the “Locate Where” box at the bottom of Step 3.
3. Census Defined Place (CDP) – Arizona 811 does not recommend using this option. D. From and To boxes
1. Put the address number in only the “From” box if a single address is being referenced. 2. Put a street number in the “From” and “To” boxes if work is being done at more than one
address on a single street, or you want to view the location of a certain range of addresses on a street. Always go from lowest to highest with the lowest number in the “From” box and the highest number in the “To” box.
3. If there is no numbered address for the job site, then you may leave the “From” and “To” boxes blank using just a street name. Note: This may result in a larger area than needed being automatically selected on the map. This area may have to be manually adjusted for accuracy.

Site Information – Step 3
pg. 18
4. Lot numbers are not considered addresses and should not be entered in the “From” and “To” boxes. Entering lot numbers in these boxes could cause areas to be selected in other areas than the actual dig site. Lot numbers can be listed in the “Locate Where” box at the bottom of Step 3.
E. Dir Prefix 1. The “Directional Prefix” box asks for the N, S, E, W, NW, SW, NE, SE designation that falls before
the street name (i.e. enter “E” if you are working at East Baseline Rd.). If there is no “Direction Prefix” for the street, leave “Blank” in the box. Periods should not be used in this window.
F. Street 1. “Street” is the name of the street where the excavation will take place, with no direction or
street type (i.e. enter “Baseline” in the street box if you are working at East Baseline Rd.). Do not use periods in this box. The program accepts the following examples when the street name is an interstate, county road, state road or United States Highway.
G. Type
1. “Type” further identifies your street name. You must abbreviate in this field. Do not use any periods in this box (i.e. enter “Rd” if you are working at E. Baseline Road). The acceptable abbreviations for street type are:
Type Abbreviation Type Abbreviation Avenue Ave Boulevard Blvd
Circle Cir Court Ct
Drive Dr Glen Gln
Lane Ln Parkway Pkwy
Place Pl Point Pt
Road Rd Route Rt
Stravenue Strv Street St
Terrace Ter Trail Trl
Way Way
H. Dir Suffix
1. The “Directional Suffix” box asks for the directional designations N, S, E, W, NW, SW, NE, SE that follows the street name and street type (i.e. enter “N” is you are working at E Sky Harbor Cir North). If there is no “Dir Suffix”, leave “Blank” in the box. Do not use periods in this box.
Street Name Accepted Abbreviation Example Interstate I + applicable # I 17
County Road Co Rd + applicable # Co Rd 207
State Road AZ RT + applicable # AZ RT 51
United States Highway US + applicable # US 60
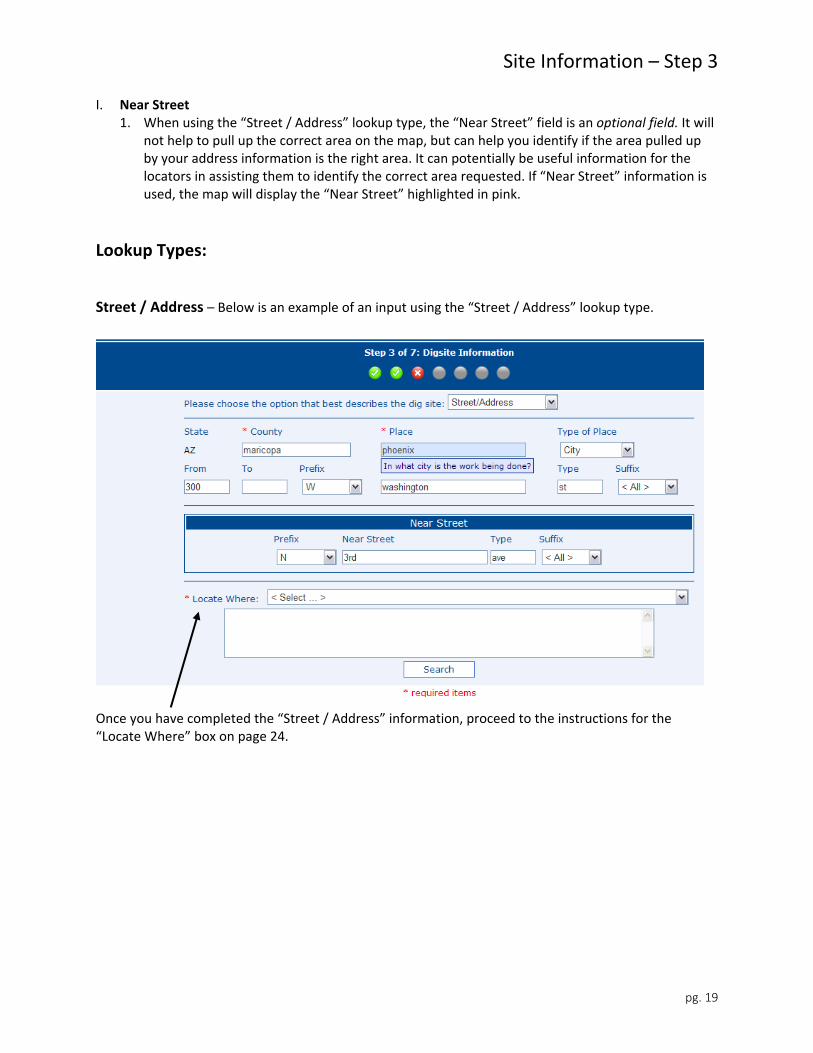
Site Information – Step 3
pg. 19
I. Near Street 1. When using the “Street / Address” lookup type, the “Near Street” field is an optional field. It will
not help to pull up the correct area on the map, but can help you identify if the area pulled up by your address information is the right area. It can potentially be useful information for the locators in assisting them to identify the correct area requested. If “Near Street” information is used, the map will display the “Near Street” highlighted in pink.
Lookup Types:
Street / Address – Below is an example of an input using the “Street / Address” lookup type. Once you have completed the “Street / Address” information, proceed to the instructions for the “Locate Where” box on page 24.
Site Information – Step 3
pg. 20
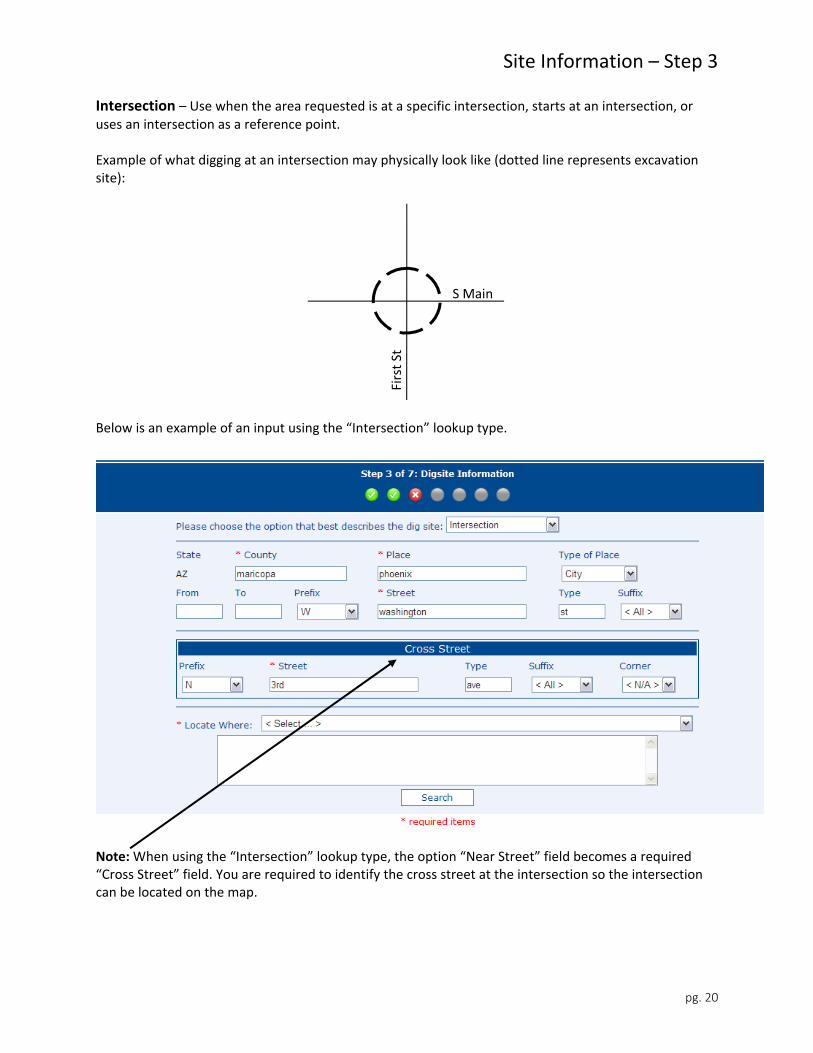
Intersection – Use when the area requested is at a specific intersection, starts at an intersection, or uses an intersection as a reference point. Example of what digging at an intersection may physically look like (dotted line represents excavation site): Below is an example of an input using the “Intersection” lookup type.
Note: When using the “Intersection” lookup type, the option “Near Street” field becomes a required “Cross Street” field. You are required to identify the cross street at the intersection so the intersection can be located on the map.
S Main
First St
Site Information – Step 3
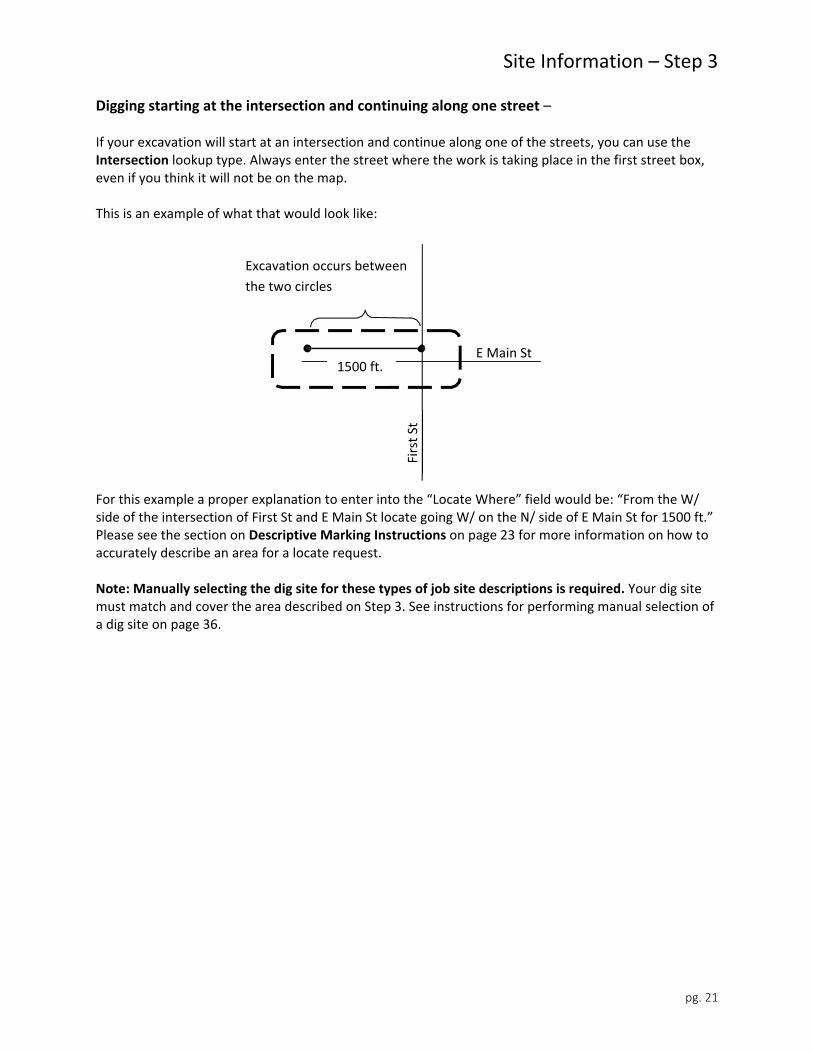
pg. 21
Digging starting at the intersection and continuing along one street – If your excavation will start at an intersection and continue along one of the streets, you can use the Intersection lookup type. Always enter the street where the work is taking place in the first street box, even if you think it will not be on the map. This is an example of what that would look like: For this example a proper explanation to enter into the “Locate Where” field would be: “From the W/ side of the intersection of First St and E Main St locate going W/ on the N/ side of E Main St for 1500 ft.” Please see the section on Descriptive Marking Instructions on page 23 for more information on how to accurately describe an area for a locate request. Note: Manually selecting the dig site for these types of job site descriptions is required. Your dig site must match and cover the area described on Step 3. See instructions for performing manual selection of a dig site on page 36.
Excavation occurs between
the two circles
1500 ft.E Main St
First St
Site Information – Step 3
pg. 22
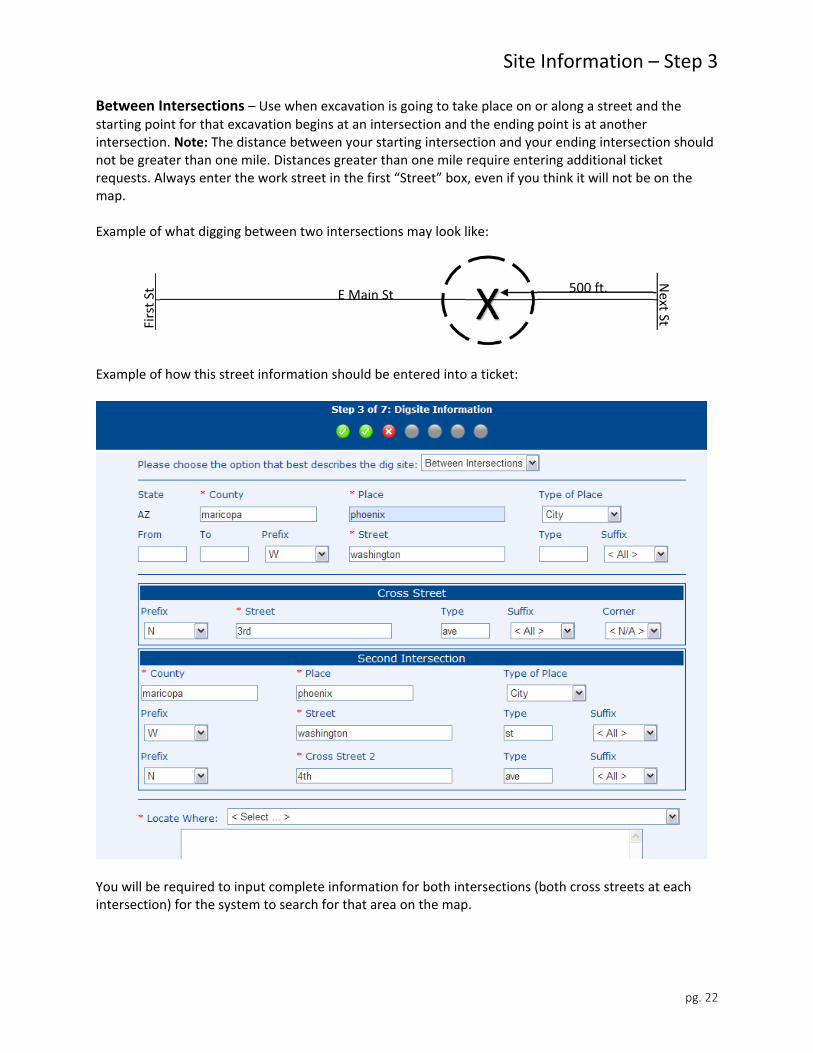
Between Intersections – Use when excavation is going to take place on or along a street and the starting point for that excavation begins at an intersection and the ending point is at another intersection. Note: The distance between your starting intersection and your ending intersection should not be greater than one mile. Distances greater than one mile require entering additional ticket requests. Always enter the work street in the first “Street” box, even if you think it will not be on the map. Example of what digging between two intersections may look like: Example of how this street information should be entered into a ticket:
You will be required to input complete information for both intersections (both cross streets at each intersection) for the system to search for that area on the map.
First St
E Main St X 500 ft.
Next St
Site Information – Step 3
pg. 23
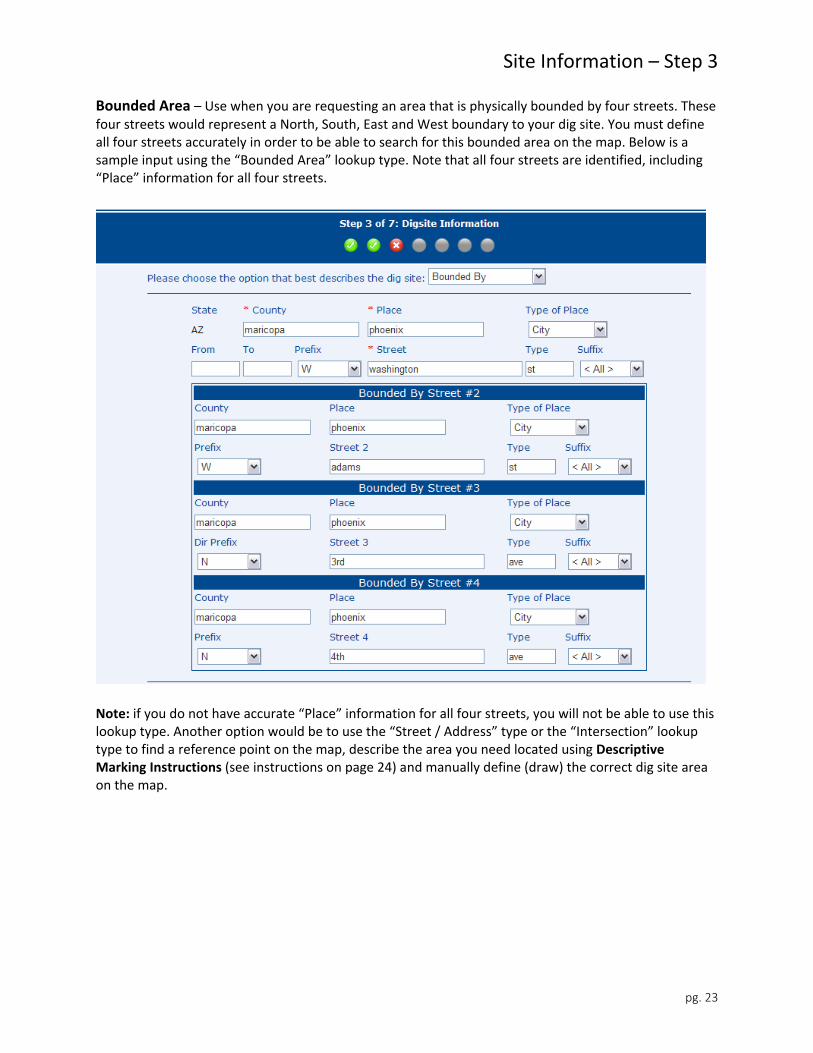
Bounded Area – Use when you are requesting an area that is physically bounded by four streets. These four streets would represent a North, South, East and West boundary to your dig site. You must define all four streets accurately in order to be able to search for this bounded area on the map. Below is a sample input using the “Bounded Area” lookup type. Note that all four streets are identified, including “Place” information for all four streets. Note: if you do not have accurate “Place” information for all four streets, you will not be able to use this lookup type. Another option would be to use the “Street / Address” type or the “Intersection” lookup type to find a reference point on the map, describe the area you need located using Descriptive Marking Instructions (see instructions on page 24) and manually define (draw) the correct dig site area on the map.
Site Information – Step 3
pg. 24
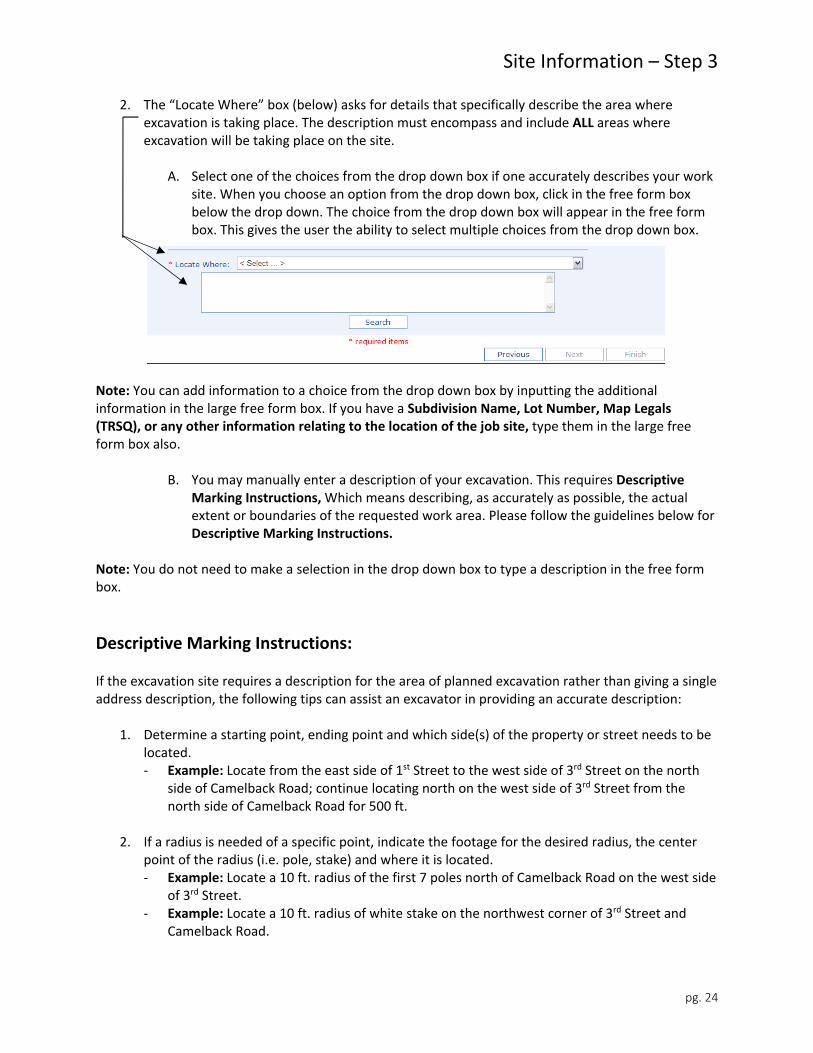
2. The “Locate Where” box (below) asks for details that specifically describe the area where excavation is taking place. The description must encompass and include ALL areas where excavation will be taking place on the site.
A. Select one of the choices from the drop down box if one accurately describes your work
site. When you choose an option from the drop down box, click in the free form box below the drop down. The choice from the drop down box will appear in the free form box. This gives the user the ability to select multiple choices from the drop down box.
Note: You can add information to a choice from the drop down box by inputting the additional information in the large free form box. If you have a Subdivision Name, Lot Number, Map Legals (TRSQ), or any other information relating to the location of the job site, type them in the large free form box also.
B. You may manually enter a description of your excavation. This requires Descriptive
Marking Instructions, Which means describing, as accurately as possible, the actual extent or boundaries of the requested work area. Please follow the guidelines below for Descriptive Marking Instructions.
Note: You do not need to make a selection in the drop down box to type a description in the free form box.
Descriptive Marking Instructions: If the excavation site requires a description for the area of planned excavation rather than giving a single address description, the following tips can assist an excavator in providing an accurate description:
1. Determine a starting point, ending point and which side(s) of the property or street needs to be located. ‐ Example: Locate from the east side of 1st Street to the west side of 3rd Street on the north
side of Camelback Road; continue locating north on the west side of 3rd Street from the north side of Camelback Road for 500 ft.
2. If a radius is needed of a specific point, indicate the footage for the desired radius, the center
point of the radius (i.e. pole, stake) and where it is located. ‐ Example: Locate a 10 ft. radius of the first 7 poles north of Camelback Road on the west side
of 3rd Street. ‐ Example: Locate a 10 ft. radius of white stake on the northwest corner of 3rd Street and
Camelback Road.
Site Information – Step 3
pg. 25
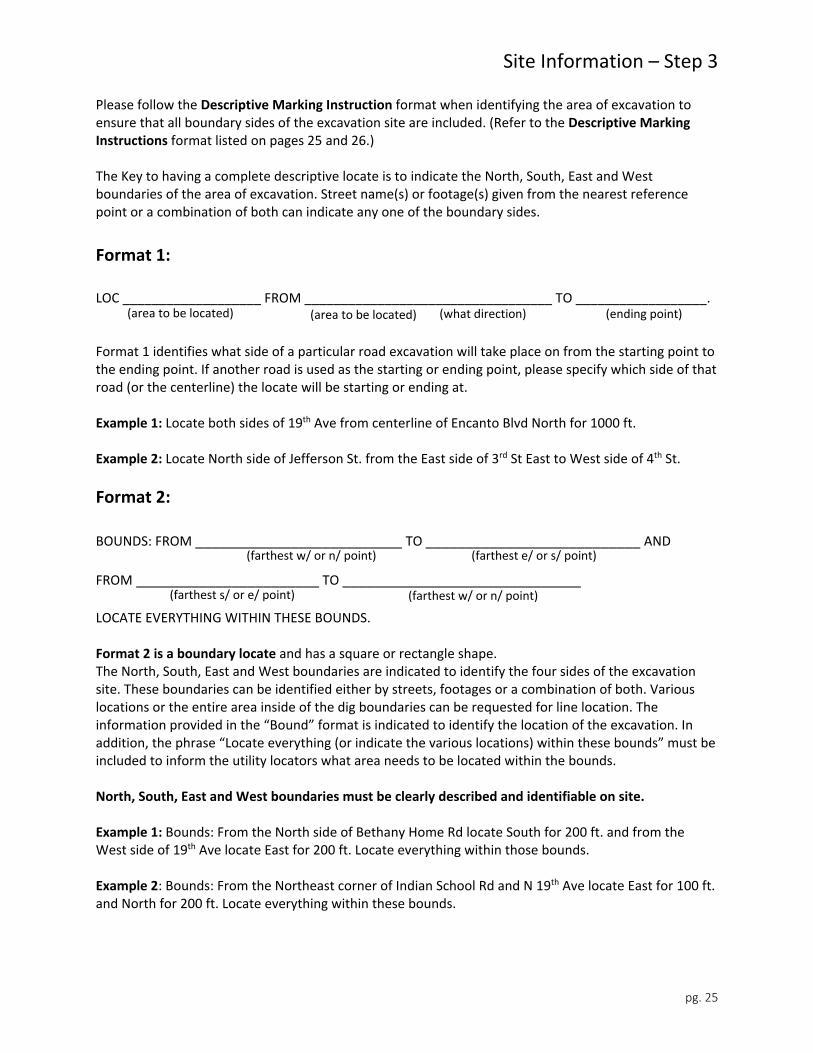
Please follow the Descriptive Marking Instruction format when identifying the area of excavation to ensure that all boundary sides of the excavation site are included. (Refer to the Descriptive Marking Instructions format listed on pages 25 and 26.) The Key to having a complete descriptive locate is to indicate the North, South, East and West boundaries of the area of excavation. Street name(s) or footage(s) given from the nearest reference point or a combination of both can indicate any one of the boundary sides.
Format 1: LOC ___________________ FROM __________________________________ TO __________________. Format 1 identifies what side of a particular road excavation will take place on from the starting point to the ending point. If another road is used as the starting or ending point, please specify which side of that road (or the centerline) the locate will be starting or ending at. Example 1: Locate both sides of 19th Ave from centerline of Encanto Blvd North for 1000 ft. Example 2: Locate North side of Jefferson St. from the East side of 3rd St East to West side of 4th St.
Format 2: BOUNDS: FROM __________________________ TO ___________________________ AND FROM _______________________ TO ______________________________ LOCATE EVERYTHING WITHIN THESE BOUNDS. Format 2 is a boundary locate and has a square or rectangle shape. The North, South, East and West boundaries are indicated to identify the four sides of the excavation site. These boundaries can be identified either by streets, footages or a combination of both. Various locations or the entire area inside of the dig boundaries can be requested for line location. The information provided in the “Bound” format is indicated to identify the location of the excavation. In addition, the phrase “Locate everything (or indicate the various locations) within these bounds” must be included to inform the utility locators what area needs to be located within the bounds. North, South, East and West boundaries must be clearly described and identifiable on site. Example 1: Bounds: From the North side of Bethany Home Rd locate South for 200 ft. and from the West side of 19th Ave locate East for 200 ft. Locate everything within those bounds. Example 2: Bounds: From the Northeast corner of Indian School Rd and N 19th Ave locate East for 100 ft. and North for 200 ft. Locate everything within these bounds.
(area to be located) (area to be located) (what direction) (ending point)
(farthest w/ or n/ point) (farthest e/ or s/ point)
(farthest s/ or e/ point) (farthest w/ or n/ point)

Site Information – Step 3
pg. 26
(footage of radius) (i.e. pole, stakes, points, transformer) (how far, distance in footage)
(in which direction i.e. N/S/E/W) (what street) (which side i.e. N/S/E/W) (what street)
Format 3: LOC _____________________________ USING _________________________________ FROM _________________________________ OR/TO ______________________________________. Format 3 is called a path. Similar to format 1 but more defined. In format 3 instead of identifying what side of the street needs to be located, you are indicating how wide your area of excavation will take place in, either public or private property. There are three points on a road, for example: if the road ran East to West, the points would be the N/edge, S/edge and centerline. When identifying your path it can run in one direction or in both directions from any of the three points of a particular street. Example 1: Locate 20 ft. wide path using centerline of 7th Street as centerline of path starting at North side of McDowell Rd locate North to South side of Thomas Rd. Example 2: Locate 20 ft. wide path using E/edge of 7th Street as W/edge of path starting at North side of McDowell Rd locate North to South side of Thomas Rd.
Format 4: LOC _______________ OF ________________________________ AT A POINT _____________________ __________________________ OF ___________ ON ____________________ OF ________________. Format 4 is a radius. If you need a specific radius located of a visual monument you should indicate the size of the radius, what the radius is of and where it is located. Example 1: Locate 15 ft. radius of fire hydrant located at NW corner of 7th Avenue & McDowell Rd. Example 2: Locate 20 ft. radius of white X located at a point 150 ft. north of the northwest corner of E Adams St. and N 3rd St. Example 3: Locate 25 ft. radius of white stake located at a point 50 ft. west of N 3rd St. on the north side of E Adams St.
Important: The most important thing about inputting accurate marking instructions is
making sure that the footage or boundaries listed will cover everywhere that you plan to excavate on that site. Be sure that you have given yourself enough room, based on your description, to work safely and be legally covered by this 811 ticket request.
(how wide of a path) (using as c/l or edge of path)
(starting point / what direction to go) (how far or to what ending point)

Site Information – Step 3
pg. 27
3. Searching for input site information on the map: After you have input all of your location information you are now ready to conduct a search to see if the system recognizes your street information.
Click “Search” at the bottom of this screen.
After clicking “Search”, one of two things will happen.
a. First result: The system recognizes all of the street information entered and returns from search without trouble indicators (red boxes). It will then activate the Next button below at the lower right corner. At this time you are ready to advance to the map. Click on the “Next” button to move to the next step. Then go to page 30, Step 4 in this manual.
b. Second result: The system returns from the search with a red box drawn around one or more of the entries. This indicates that something does not match our data recorded for that area. When this happens, follow the steps below:
1. Examine your input data for any potential problems, such as misspellings of Place or Street, or data placed in the wrong entry field, etc.
Site Information – Step 3
pg. 28
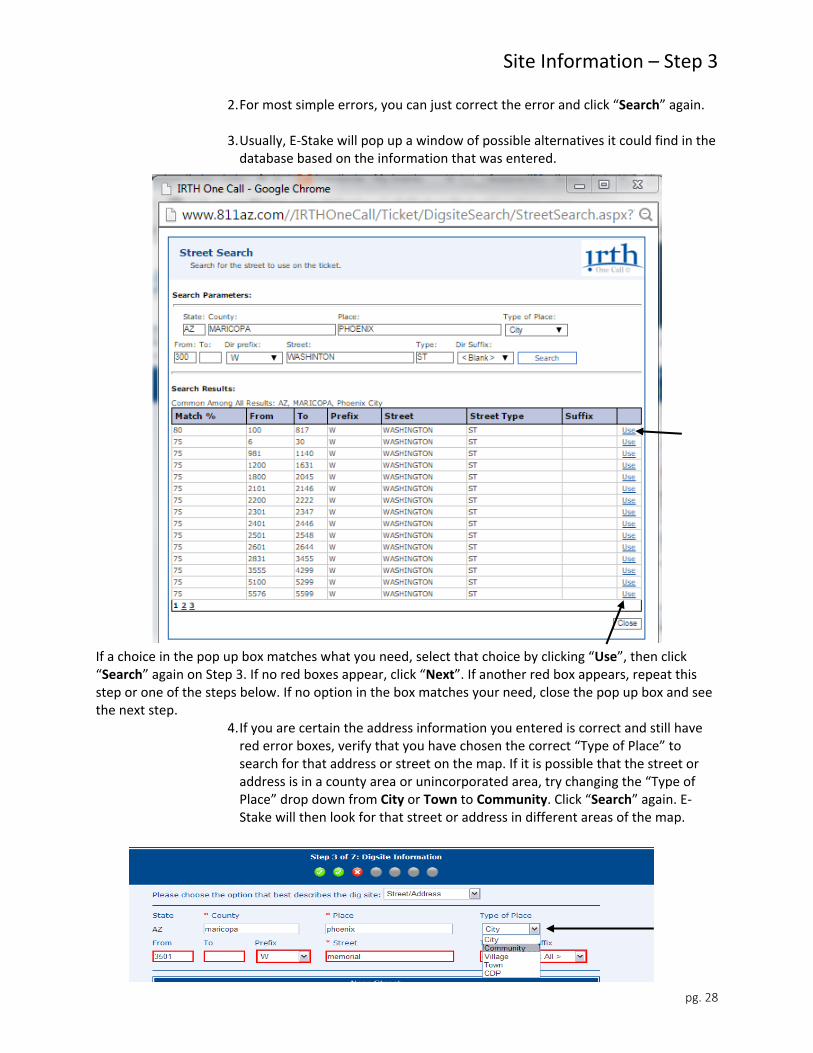
2. For most simple errors, you can just correct the error and click “Search” again.
3. Usually, E‐Stake will pop up a window of possible alternatives it could find in the database based on the information that was entered.
If a choice in the pop up box matches what you need, select that choice by clicking “Use”, then click “Search” again on Step 3. If no red boxes appear, click “Next”. If another red box appears, repeat this step or one of the steps below. If no option in the box matches your need, close the pop up box and see the next step.
4. If you are certain the address information you entered is correct and still have red error boxes, verify that you have chosen the correct “Type of Place” to search for that address or street on the map. If it is possible that the street or address is in a county area or unincorporated area, try changing the “Type of Place” drop down from City or Town to Community. Click “Search” again. E‐Stake will then look for that street or address in different areas of the map.
Site Information – Step 3
pg. 29
5. If the system recognizes and accepts the corrected entry, it will then move to the next area highlighted in red (if there are any). If so, repeat steps one through four.
6. If your corrections and adjustments have cleared all the red highlighted areas, click on the “Next” button to move to the map, Step 4.
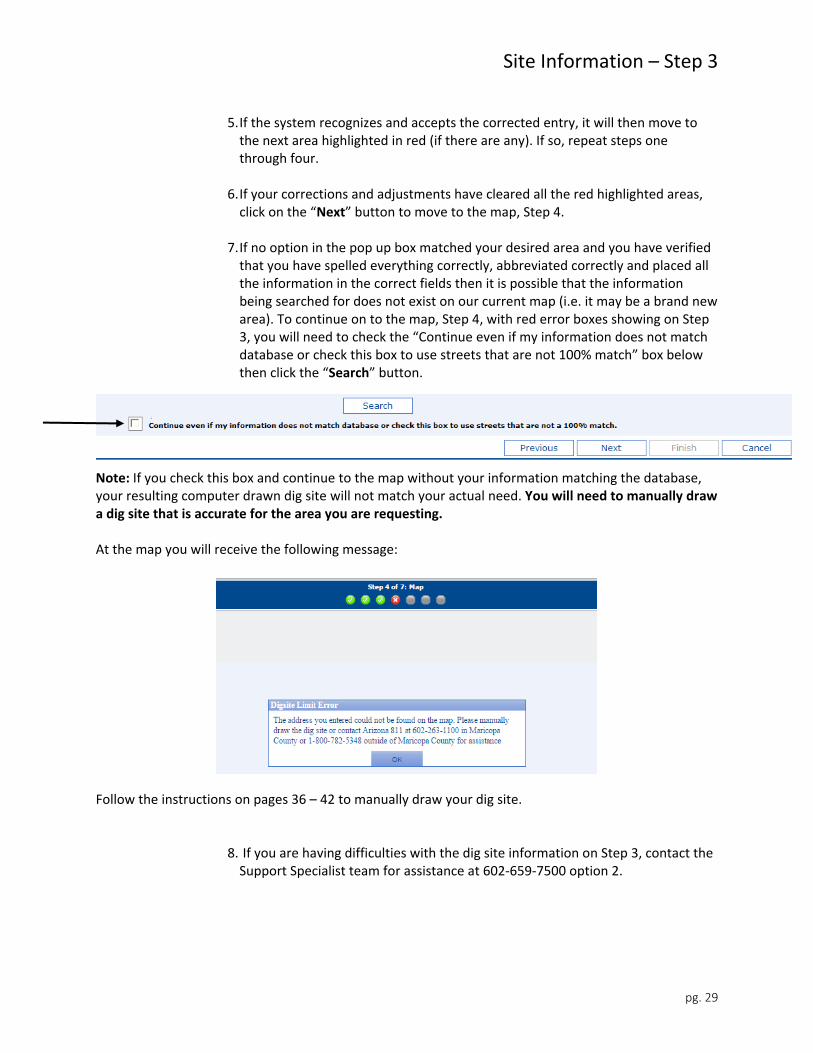
7. If no option in the pop up box matched your desired area and you have verified that you have spelled everything correctly, abbreviated correctly and placed all the information in the correct fields then it is possible that the information being searched for does not exist on our current map (i.e. it may be a brand new area). To continue on to the map, Step 4, with red error boxes showing on Step 3, you will need to check the “Continue even if my information does not match database or check this box to use streets that are not 100% match” box below then click the “Search” button.
Note: If you check this box and continue to the map without your information matching the database, your resulting computer drawn dig site will not match your actual need. You will need to manually draw a dig site that is accurate for the area you are requesting. At the map you will receive the following message: Follow the instructions on pages 36 – 42 to manually draw your dig site.
8. If you are having difficulties with the dig site information on Step 3, contact the Support Specialist team for assistance at 602‐659‐7500 option 2.

Mapping – Step 4
pg. 30
Near Street Dig Site
*** If you have any difficulties viewing the map, please see the Troubleshooting Guide on page 73. If you are unable to resolve the issue, please contact the Support Specialist team at 602‐659‐7500 option 2. After clicking “Next” on Step 3 you will be taken to the map, Step 4. On the map will be a blue cross‐hatch pattern showing the selection for your excavation site. This is your dig site.
1. Verify the area is correct. If the area is accurate, no further action is needed on step 4. Click “Next” and continue to Step 5.
2. The gridded dig site area is based on the information you entered. The dig site is what determines which facilities may be affected by your work, so it is important that it is accurate on the map to ensure correct responses for your job site. It is your responsibility to verify that this dig site is in the correct place on the map and is large enough to cover your entire excavation area but not excessive.
When using the “Street/Address” lookup type, if the “Near Street” information has been entered, the “Near Street” will be gridded on the map in red to help you verify the information. Only the blue cross‐hatch is your dig site.
Mapping – Step 4
pg. 31
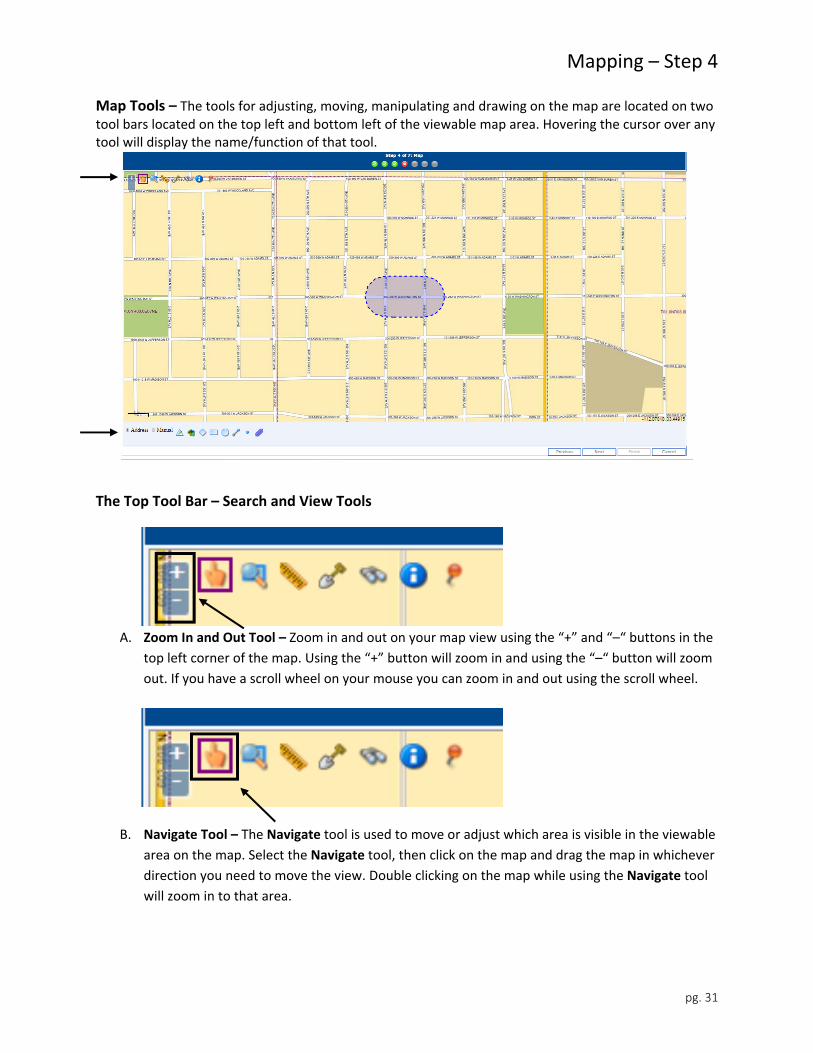
Map Tools – The tools for adjusting, moving, manipulating and drawing on the map are located on two tool bars located on the top left and bottom left of the viewable map area. Hovering the cursor over any tool will display the name/function of that tool.
The Top Tool Bar – Search and View Tools
A. Zoom In and Out Tool – Zoom in and out on your map view using the “+” and “–“ buttons in the
top left corner of the map. Using the “+” button will zoom in and using the “–“ button will zoom
out. If you have a scroll wheel on your mouse you can zoom in and out using the scroll wheel.
B. Navigate Tool – The Navigate tool is used to move or adjust which area is visible in the viewable
area on the map. Select the Navigate tool, then click on the map and drag the map in whichever
direction you need to move the view. Double clicking on the map while using the Navigate tool
will zoom in to that area.
Mapping – Step 4
pg. 32
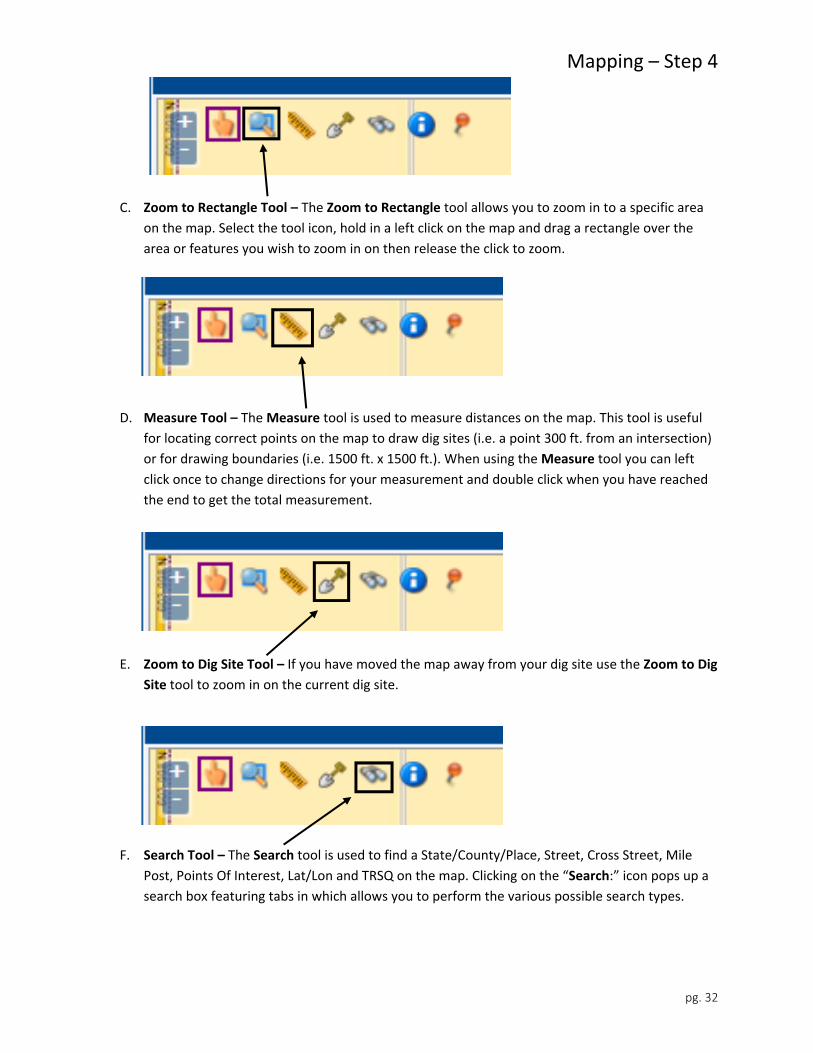
C. Zoom to Rectangle Tool – The Zoom to Rectangle tool allows you to zoom in to a specific area
on the map. Select the tool icon, hold in a left click on the map and drag a rectangle over the
area or features you wish to zoom in on then release the click to zoom.
D. Measure Tool – The Measure tool is used to measure distances on the map. This tool is useful
for locating correct points on the map to draw dig sites (i.e. a point 300 ft. from an intersection)
or for drawing boundaries (i.e. 1500 ft. x 1500 ft.). When using the Measure tool you can left
click once to change directions for your measurement and double click when you have reached
the end to get the total measurement.
E. Zoom to Dig Site Tool – If you have moved the map away from your dig site use the Zoom to Dig
Site tool to zoom in on the current dig site.
F. Search Tool – The Search tool is used to find a State/County/Place, Street, Cross Street, Mile
Post, Points Of Interest, Lat/Lon and TRSQ on the map. Clicking on the “Search:” icon pops up a
search box featuring tabs in which allows you to perform the various possible search types.
Mapping – Step 4
pg. 33
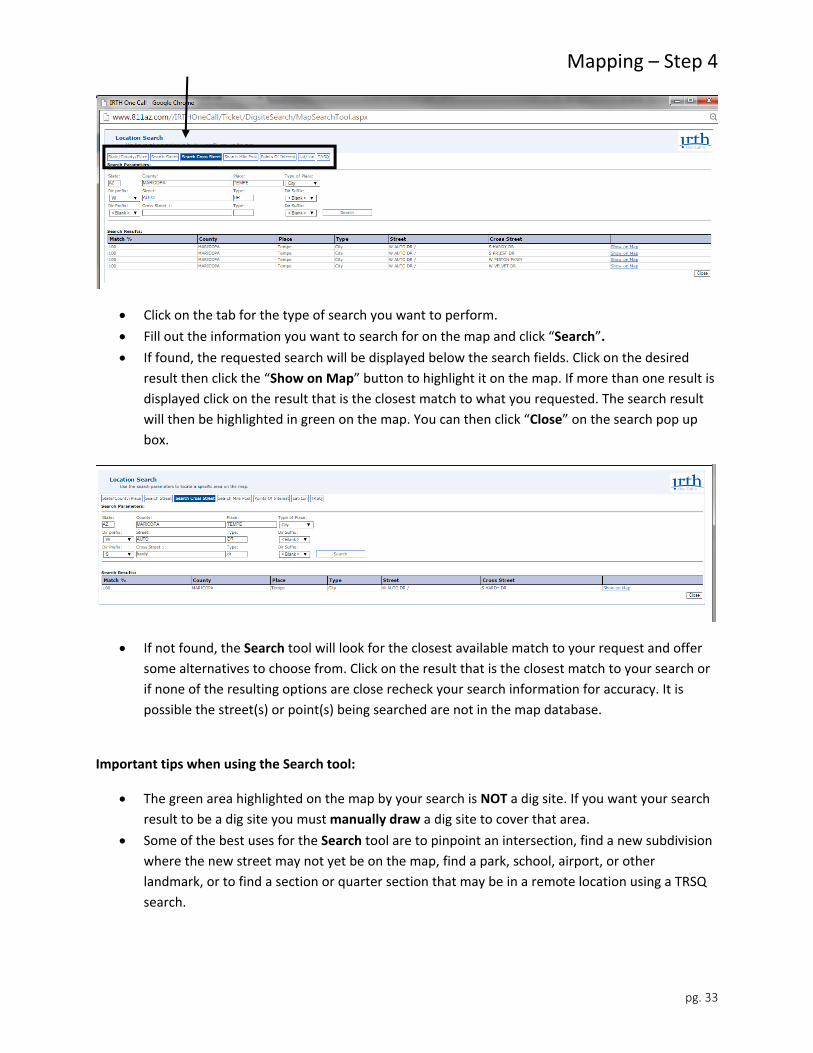
Click on the tab for the type of search you want to perform.
Fill out the information you want to search for on the map and click “Search”.
If found, the requested search will be displayed below the search fields. Click on the desired
result then click the “Show on Map” button to highlight it on the map. If more than one result is
displayed click on the result that is the closest match to what you requested. The search result
will then be highlighted in green on the map. You can then click “Close” on the search pop up
box.
If not found, the Search tool will look for the closest available match to your request and offer
some alternatives to choose from. Click on the result that is the closest match to your search or
if none of the resulting options are close recheck your search information for accuracy. It is
possible the street(s) or point(s) being searched are not in the map database.
Important tips when using the Search tool:
The green area highlighted on the map by your search is NOT a dig site. If you want your search
result to be a dig site you must manually draw a dig site to cover that area.
Some of the best uses for the Search tool are to pinpoint an intersection, find a new subdivision
where the new street may not yet be on the map, find a park, school, airport, or other
landmark, or to find a section or quarter section that may be in a remote location using a TRSQ
search.
Mapping – Step 4
pg. 34
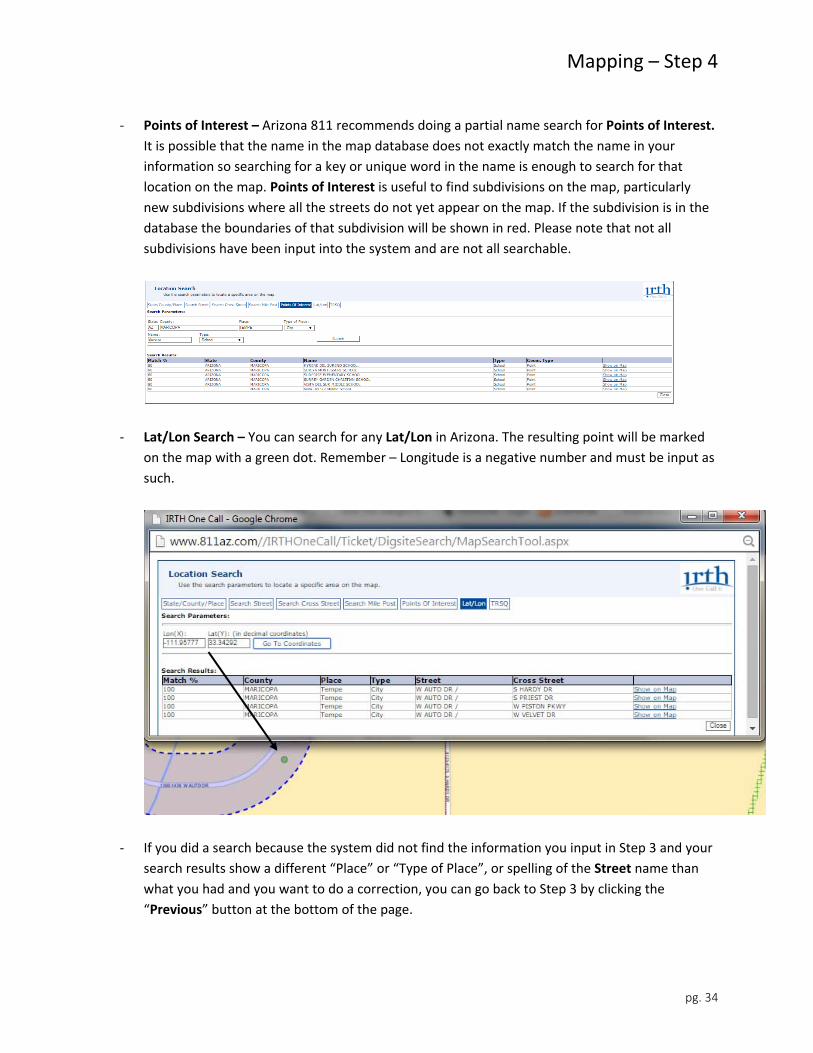
‐ Points of Interest – Arizona 811 recommends doing a partial name search for Points of Interest.
It is possible that the name in the map database does not exactly match the name in your
information so searching for a key or unique word in the name is enough to search for that
location on the map. Points of Interest is useful to find subdivisions on the map, particularly
new subdivisions where all the streets do not yet appear on the map. If the subdivision is in the
database the boundaries of that subdivision will be shown in red. Please note that not all
subdivisions have been input into the system and are not all searchable.
‐ Lat/Lon Search – You can search for any Lat/Lon in Arizona. The resulting point will be marked
on the map with a green dot. Remember – Longitude is a negative number and must be input as
such.
‐ If you did a search because the system did not find the information you input in Step 3 and your
search results show a different “Place” or “Type of Place”, or spelling of the Street name than
what you had and you want to do a correction, you can go back to Step 3 by clicking the
“Previous” button at the bottom of the page.
Mapping – Step 4
pg. 35
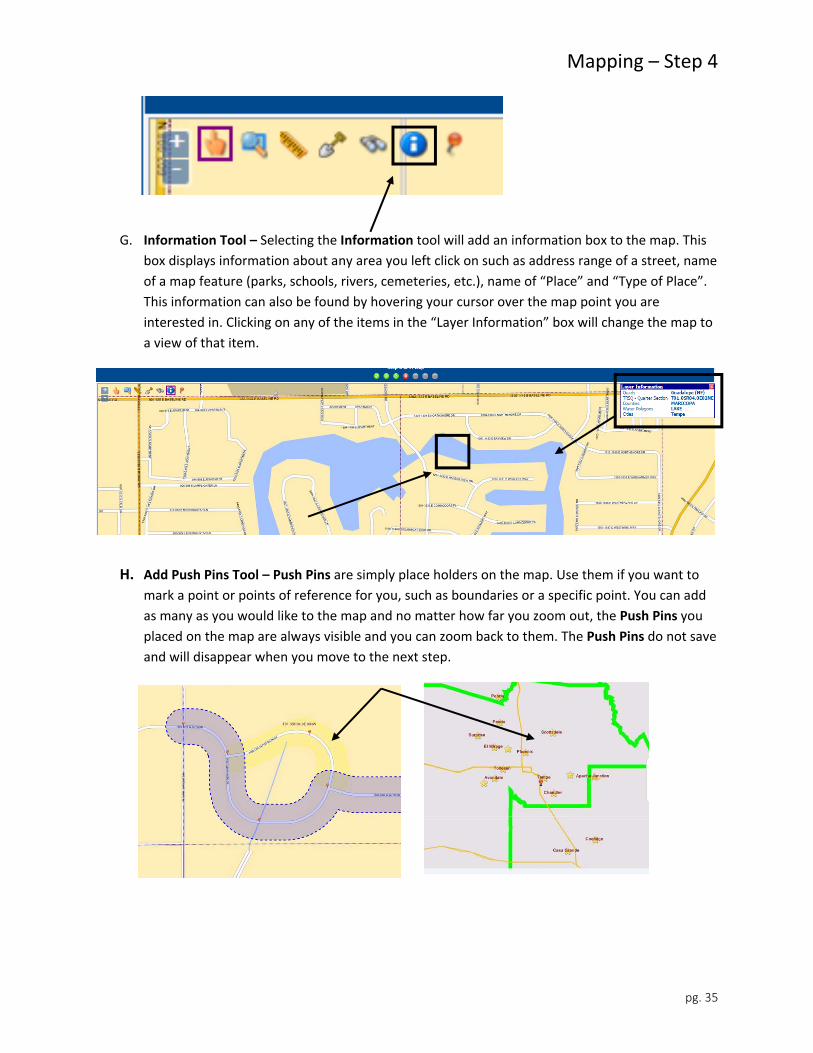
G. Information Tool – Selecting the Information tool will add an information box to the map. This
box displays information about any area you left click on such as address range of a street, name
of a map feature (parks, schools, rivers, cemeteries, etc.), name of “Place” and “Type of Place”.
This information can also be found by hovering your cursor over the map point you are
interested in. Clicking on any of the items in the “Layer Information” box will change the map to
a view of that item.
H. Add Push Pins Tool – Push Pins are simply place holders on the map. Use them if you want to
mark a point or points of reference for you, such as boundaries or a specific point. You can add
as many as you would like to the map and no matter how far you zoom out, the Push Pins you
placed on the map are always visible and you can zoom back to them. The Push Pins do not save
and will disappear when you move to the next step.

Mapping – Step 4
pg. 36
Original Dig Site After Selecting the Modify Features
Tool and Clicking on the Dig Site
Dig Site While Selected with the Modify
Featured Tool and After Moving Pivot Points
Dig Site Once All Edits Have Been Made
and Ready to Move to the Next Step
The Bottom Tool Bar – Manually Draw Dig Site Tools
A. Modify Features Tool – The Modify Features tool is used to modify an already placed dig
site. When viewing the dig site, select the Modify Features tool then right click on the light
blue dig site. You will notice the dig site will turn to a dark blue. At this point you will be able
to modify the sig site.
Modify the dig site by clicking and dragging the dark blue pivot points. Release the click to drop the pivot
point at the new desired area. Moving the pivot points allows you to adjust the size and/or shape of the
dig site. Once you have created a dig site that matches the excavation site described in the marking
instructions, click on the dark blue dig site. It will then turn back to a light blue and you will be ready to
move on to the next step.
Mapping – Step 4
pg. 37
Original Dig Site Dig Site After Clicking on W Piston
Pkwy with the Select Streets Tool
Original Dig Site Dig Site After Using the Draw Poly Tool
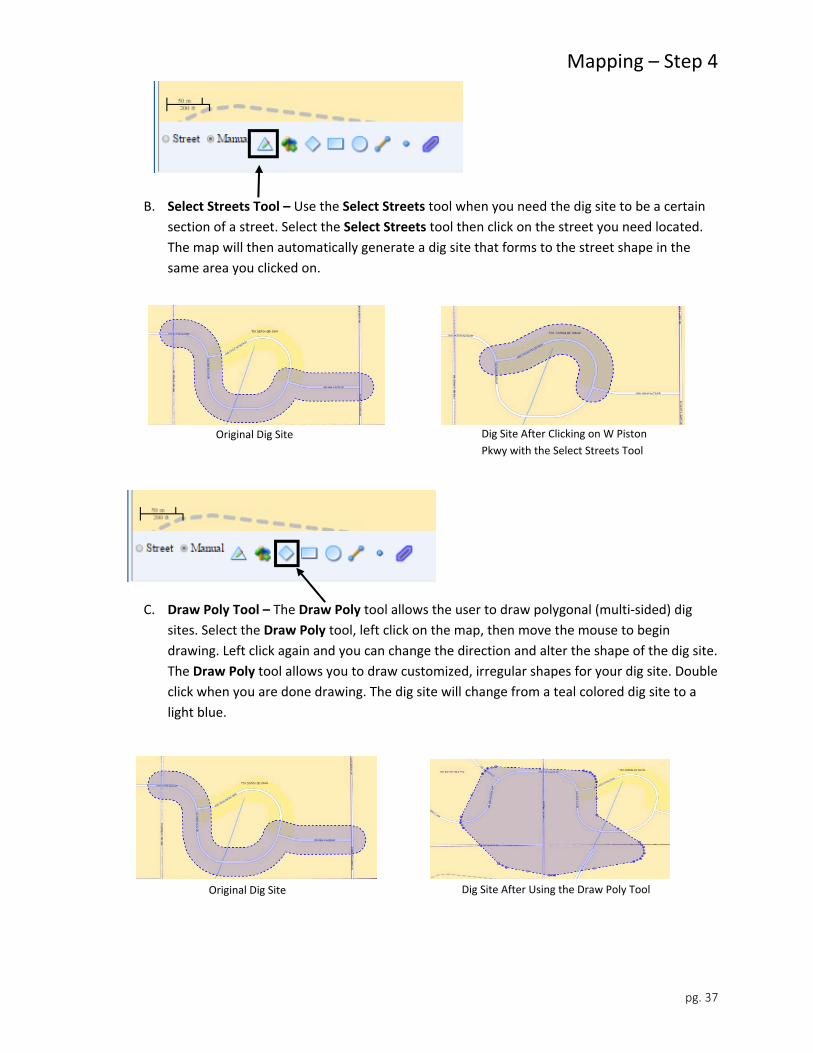
B. Select Streets Tool – Use the Select Streets tool when you need the dig site to be a certain
section of a street. Select the Select Streets tool then click on the street you need located.
The map will then automatically generate a dig site that forms to the street shape in the
same area you clicked on.
C. Draw Poly Tool – The Draw Poly tool allows the user to draw polygonal (multi‐sided) dig
sites. Select the Draw Poly tool, left click on the map, then move the mouse to begin
drawing. Left click again and you can change the direction and alter the shape of the dig site.
The Draw Poly tool allows you to draw customized, irregular shapes for your dig site. Double
click when you are done drawing. The dig site will change from a teal colored dig site to a
light blue.
Mapping – Step 4
pg. 38
Dig Site Ready to be Adjusted
with Dark Blue Pivot Points Dig Site Ready Once All Edits Have Been
Made and Ready to Move to the Next Step
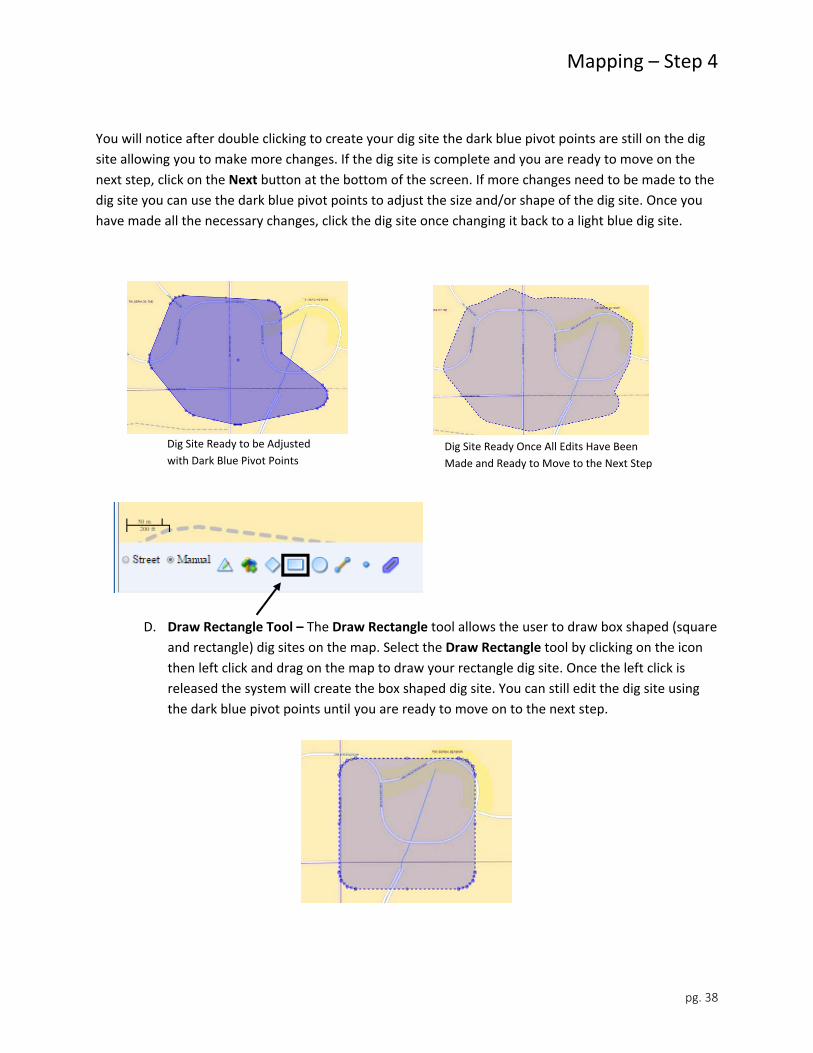
You will notice after double clicking to create your dig site the dark blue pivot points are still on the dig
site allowing you to make more changes. If the dig site is complete and you are ready to move on the
next step, click on the Next button at the bottom of the screen. If more changes need to be made to the
dig site you can use the dark blue pivot points to adjust the size and/or shape of the dig site. Once you
have made all the necessary changes, click the dig site once changing it back to a light blue dig site.
D. Draw Rectangle Tool – The Draw Rectangle tool allows the user to draw box shaped (square
and rectangle) dig sites on the map. Select the Draw Rectangle tool by clicking on the icon
then left click and drag on the map to draw your rectangle dig site. Once the left click is
released the system will create the box shaped dig site. You can still edit the dig site using
the dark blue pivot points until you are ready to move on to the next step.
Mapping – Step 4
pg. 39
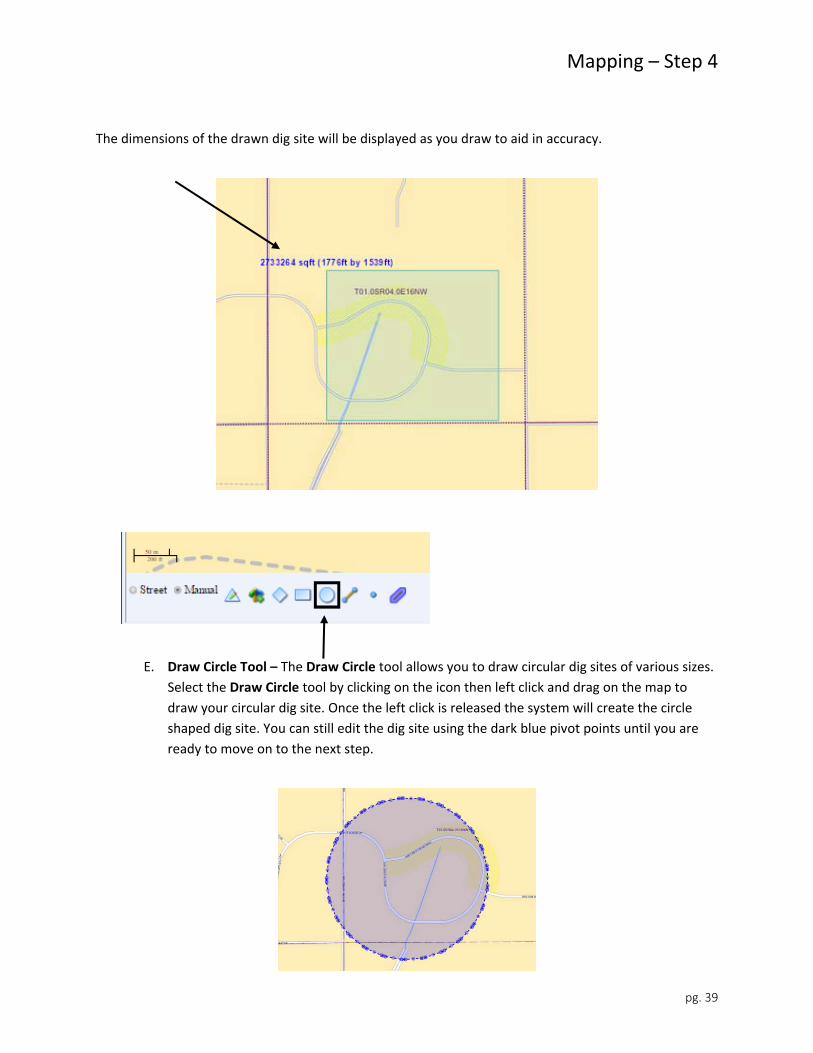
The dimensions of the drawn dig site will be displayed as you draw to aid in accuracy.
E. Draw Circle Tool – The Draw Circle tool allows you to draw circular dig sites of various sizes.
Select the Draw Circle tool by clicking on the icon then left click and drag on the map to
draw your circular dig site. Once the left click is released the system will create the circle
shaped dig site. You can still edit the dig site using the dark blue pivot points until you are
ready to move on to the next step.
Mapping – Step 4
pg. 40
Straight Line Dig Site Using
the Draw Line Tool
Dig Site Using Draw Line Tool
After Changing Directions of Path
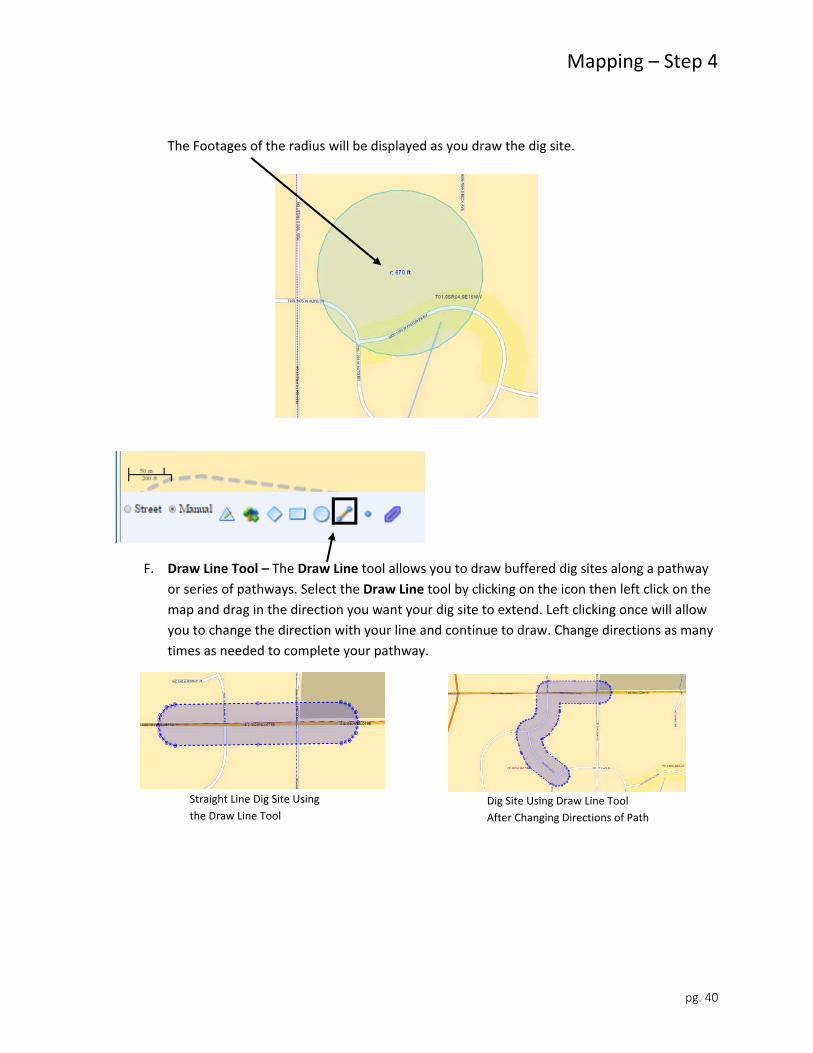
The Footages of the radius will be displayed as you draw the dig site.
F. Draw Line Tool – The Draw Line tool allows you to draw buffered dig sites along a pathway
or series of pathways. Select the Draw Line tool by clicking on the icon then left click on the
map and drag in the direction you want your dig site to extend. Left clicking once will allow
you to change the direction with your line and continue to draw. Change directions as many
times as needed to complete your pathway.
Mapping – Step 4
pg. 41
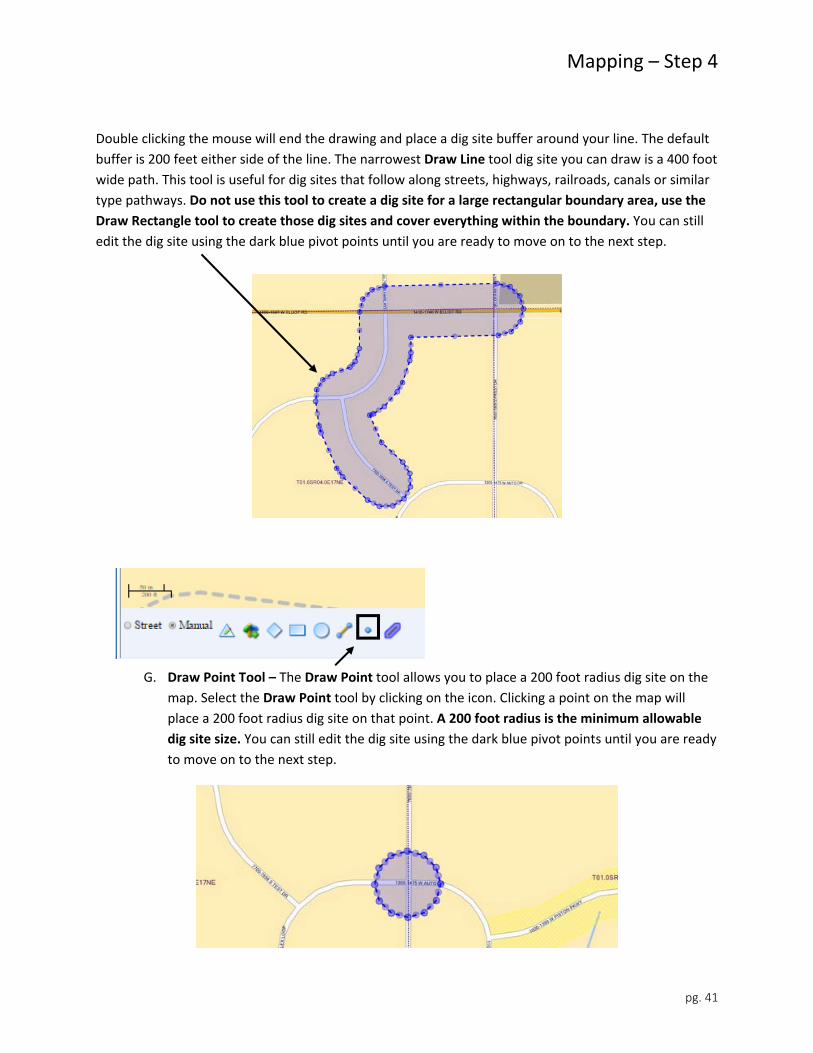
Double clicking the mouse will end the drawing and place a dig site buffer around your line. The default
buffer is 200 feet either side of the line. The narrowest Draw Line tool dig site you can draw is a 400 foot
wide path. This tool is useful for dig sites that follow along streets, highways, railroads, canals or similar
type pathways. Do not use this tool to create a dig site for a large rectangular boundary area, use the
Draw Rectangle tool to create those dig sites and cover everything within the boundary. You can still
edit the dig site using the dark blue pivot points until you are ready to move on to the next step.
G. Draw Point Tool – The Draw Point tool allows you to place a 200 foot radius dig site on the
map. Select the Draw Point tool by clicking on the icon. Clicking a point on the map will
place a 200 foot radius dig site on that point. A 200 foot radius is the minimum allowable
dig site size. You can still edit the dig site using the dark blue pivot points until you are ready
to move on to the next step.
Mapping – Step 4
pg. 42
Draw Line Tool Used with Default Buffer Settings Draw Line Tool Used After Changing Buffer
Settings to 400 ft.
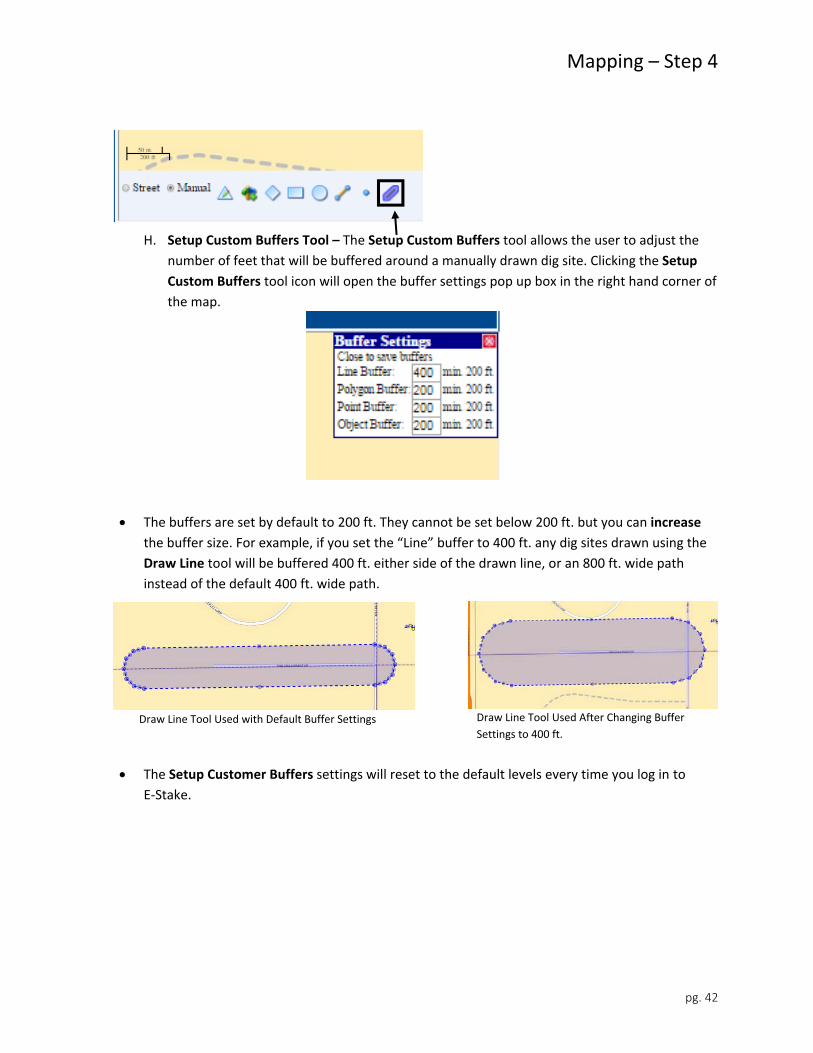
H. Setup Custom Buffers Tool – The Setup Custom Buffers tool allows the user to adjust the
number of feet that will be buffered around a manually drawn dig site. Clicking the Setup
Custom Buffers tool icon will open the buffer settings pop up box in the right hand corner of
the map.
The buffers are set by default to 200 ft. They cannot be set below 200 ft. but you can increase
the buffer size. For example, if you set the “Line” buffer to 400 ft. any dig sites drawn using the
Draw Line tool will be buffered 400 ft. either side of the drawn line, or an 800 ft. wide path
instead of the default 400 ft. wide path.
The Setup Customer Buffers settings will reset to the default levels every time you log in to
E‐Stake.
Mapping – Step 4
pg. 43
Dig Site in Edit Mode Saved Dig Site
Saving Manually Drawn Dig Sites
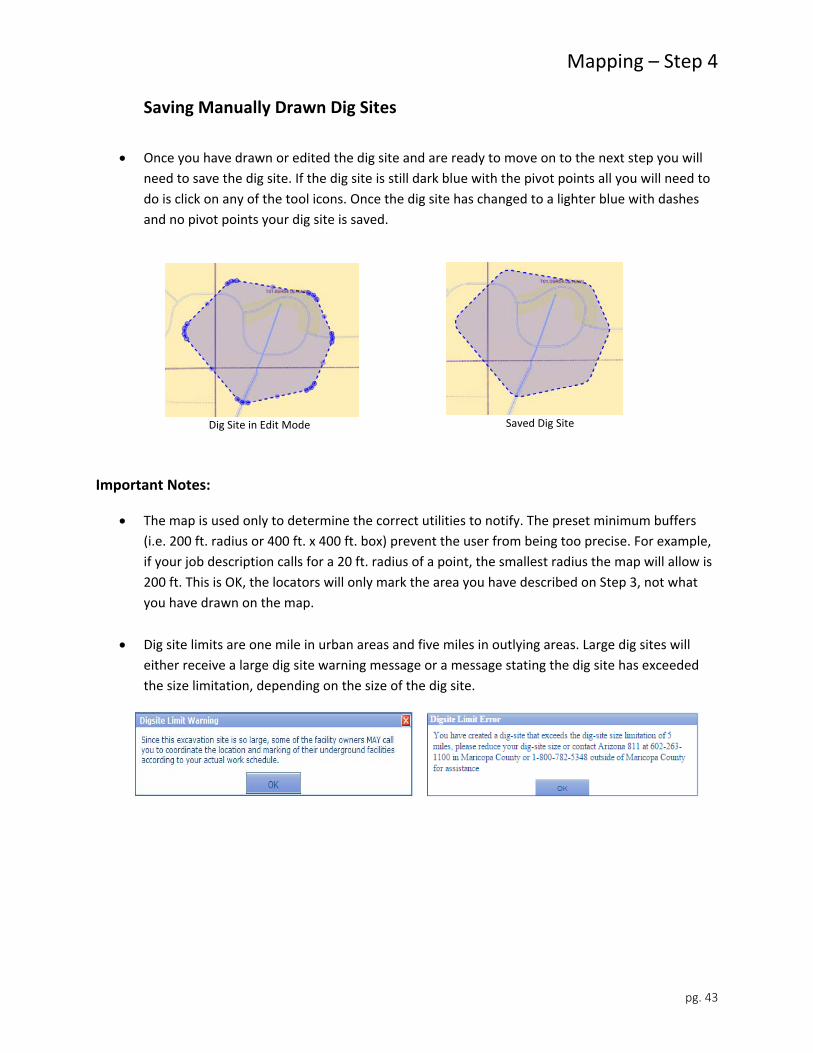
Once you have drawn or edited the dig site and are ready to move on to the next step you will
need to save the dig site. If the dig site is still dark blue with the pivot points all you will need to
do is click on any of the tool icons. Once the dig site has changed to a lighter blue with dashes
and no pivot points your dig site is saved.
Important Notes:
The map is used only to determine the correct utilities to notify. The preset minimum buffers
(i.e. 200 ft. radius or 400 ft. x 400 ft. box) prevent the user from being too precise. For example,
if your job description calls for a 20 ft. radius of a point, the smallest radius the map will allow is
200 ft. This is OK, the locators will only mark the area you have described on Step 3, not what
you have drawn on the map.
Dig site limits are one mile in urban areas and five miles in outlying areas. Large dig sites will
either receive a large dig site warning message or a message stating the dig site has exceeded
the size limitation, depending on the size of the dig site.
Mapping – Step 4
pg. 44
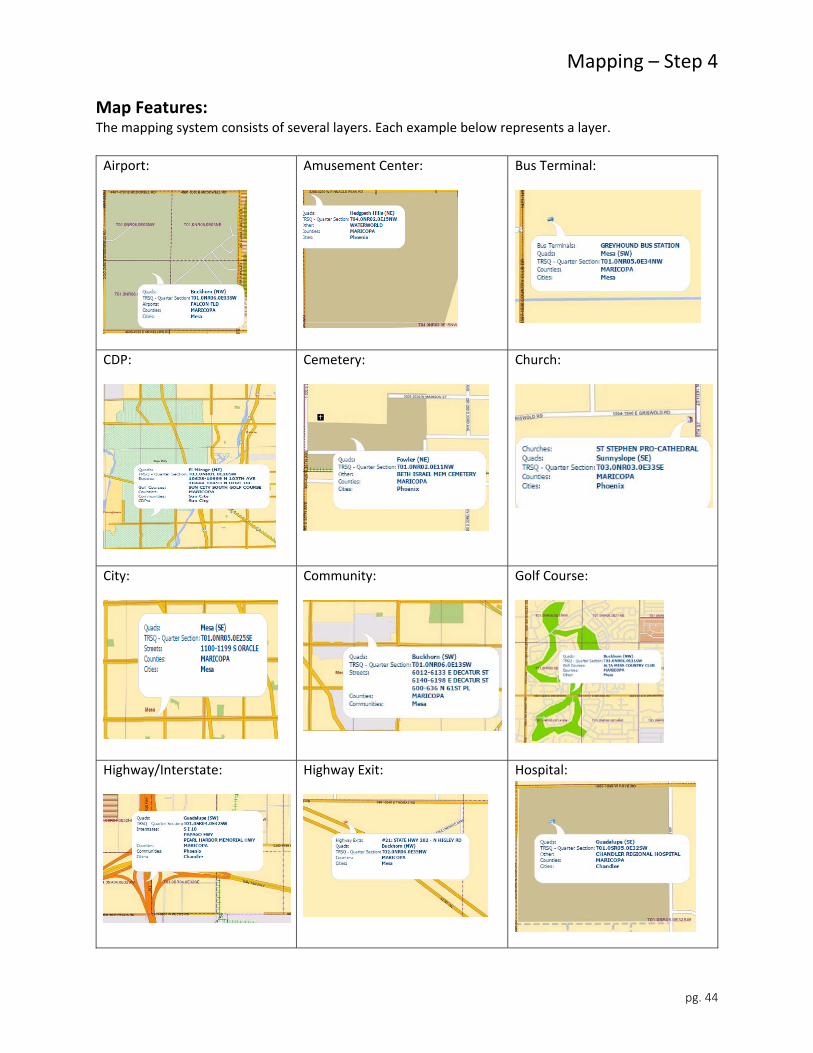
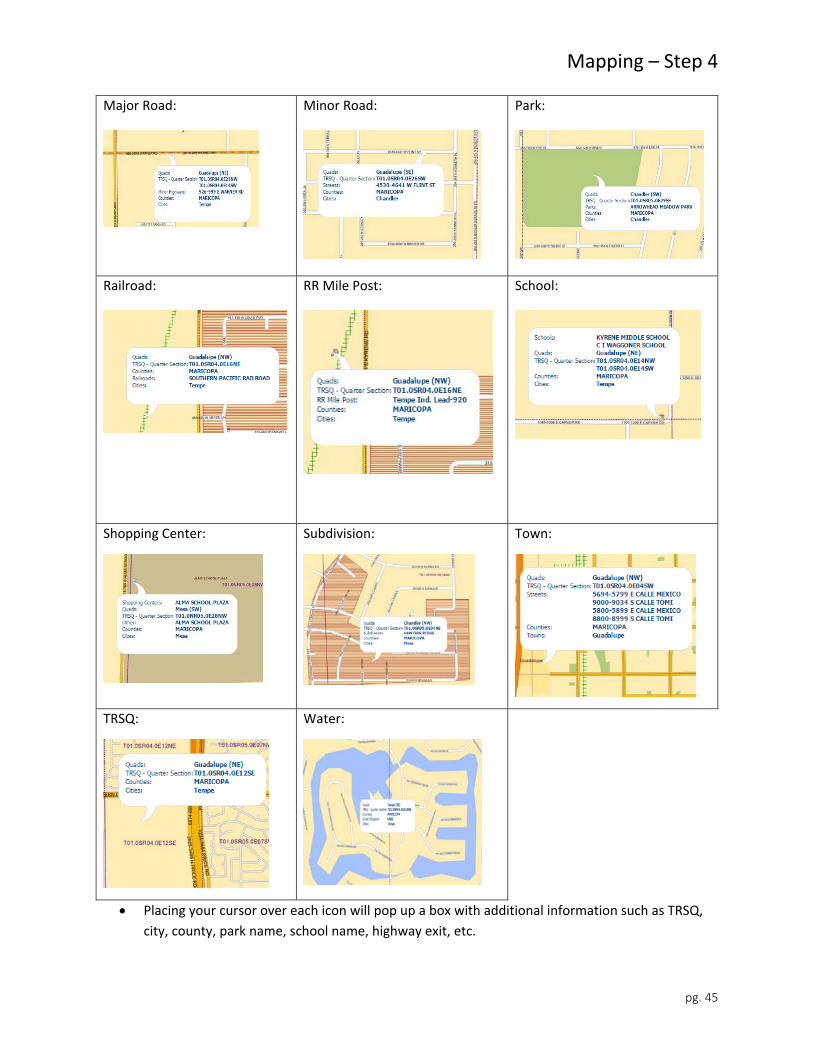
Map Features: The mapping system consists of several layers. Each example below represents a layer.
Airport:
Amusement Center:
Bus Terminal:
CDP:
Cemetery:
Church:
City:
Community: Golf Course:
Highway/Interstate:
Highway Exit:
Hospital:
Mapping – Step 4
pg. 45
Major Road:
Minor Road:
Park:
Railroad:
RR Mile Post:
School:
Shopping Center:
Subdivision:
Town:
TRSQ:
Water:
Placing your cursor over each icon will pop up a box with additional information such as TRSQ,
city, county, park name, school name, highway exit, etc.
Mandatory Questions – Step 5
pg. 46
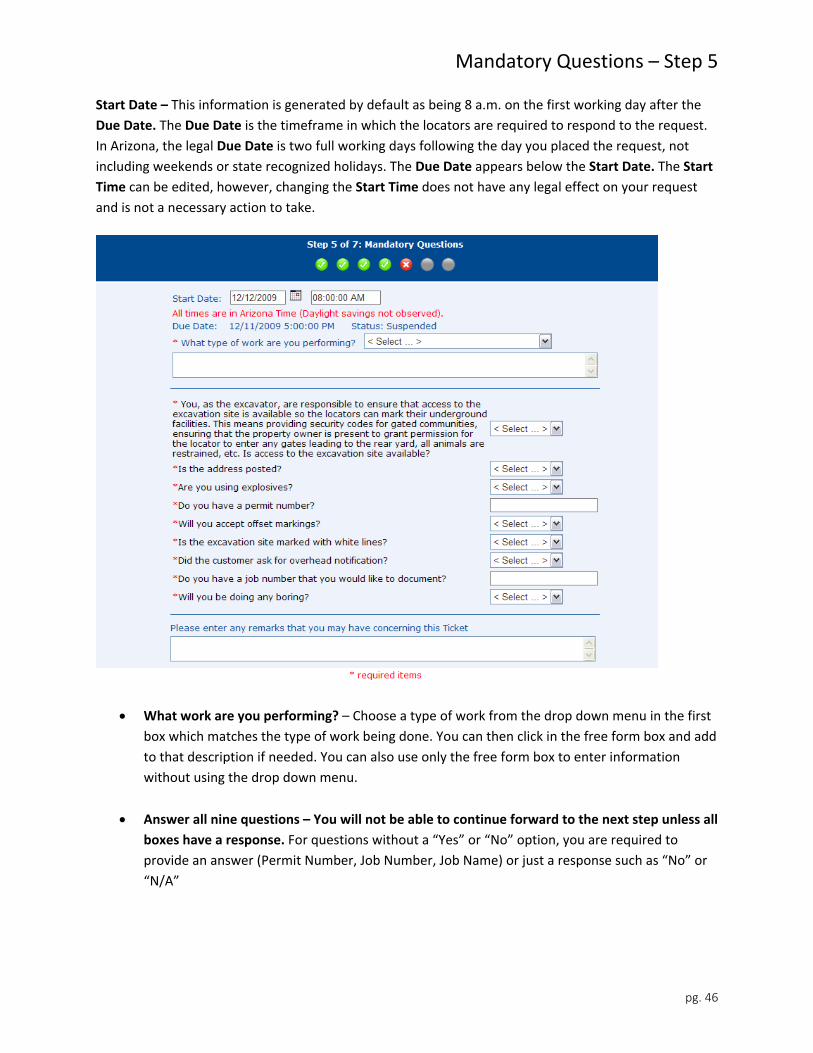
Start Date – This information is generated by default as being 8 a.m. on the first working day after the
Due Date. The Due Date is the timeframe in which the locators are required to respond to the request.
In Arizona, the legal Due Date is two full working days following the day you placed the request, not
including weekends or state recognized holidays. The Due Date appears below the Start Date. The Start
Time can be edited, however, changing the Start Time does not have any legal effect on your request
and is not a necessary action to take.
What work are you performing? – Choose a type of work from the drop down menu in the first
box which matches the type of work being done. You can then click in the free form box and add
to that description if needed. You can also use only the free form box to enter information
without using the drop down menu.
Answer all nine questions – You will not be able to continue forward to the next step unless all
boxes have a response. For questions without a “Yes” or “No” option, you are required to
provide an answer (Permit Number, Job Number, Job Name) or just a response such as “No” or
“N/A”
Mandatory Questions – Step 5
pg. 47
Remarks Box – The bottom of Step 5 has a remarks box where the user can supply additional
information.
Add any information which may be needed by the facility owner/operators / Locators
(i.e. how to gain access, gate codes, combinations, on‐site contacts), or other pertinent
information such as priority status or crew ETA.
For an Emergency Ticket – the remarks box should include “Emergency – Crew will be
on site within the hour (or crew is on site). On‐site contact is John Doe at 602‐555‐
1234”.
For a Damaged Utility Ticket – the remarks box should include “Damaged Utility – Crew
will be on site (day, date, and time). On‐site contact is John Doe at 602‐555‐1234”
For a Design Request – the remarks should include “Design Request – Please send all
maps & plans to: ABC Company, Attn: John Doe, 123 Main ST., Phoenix, AZ 85000 or e‐
mail to [email protected]”
Do not place any marking instructions or address information in the Remarks Box. That
information must be included on Step 3.
Click “Next" at the bottom of the page to move on to Step 6.
Affected Members List – Step 6
pg. 48
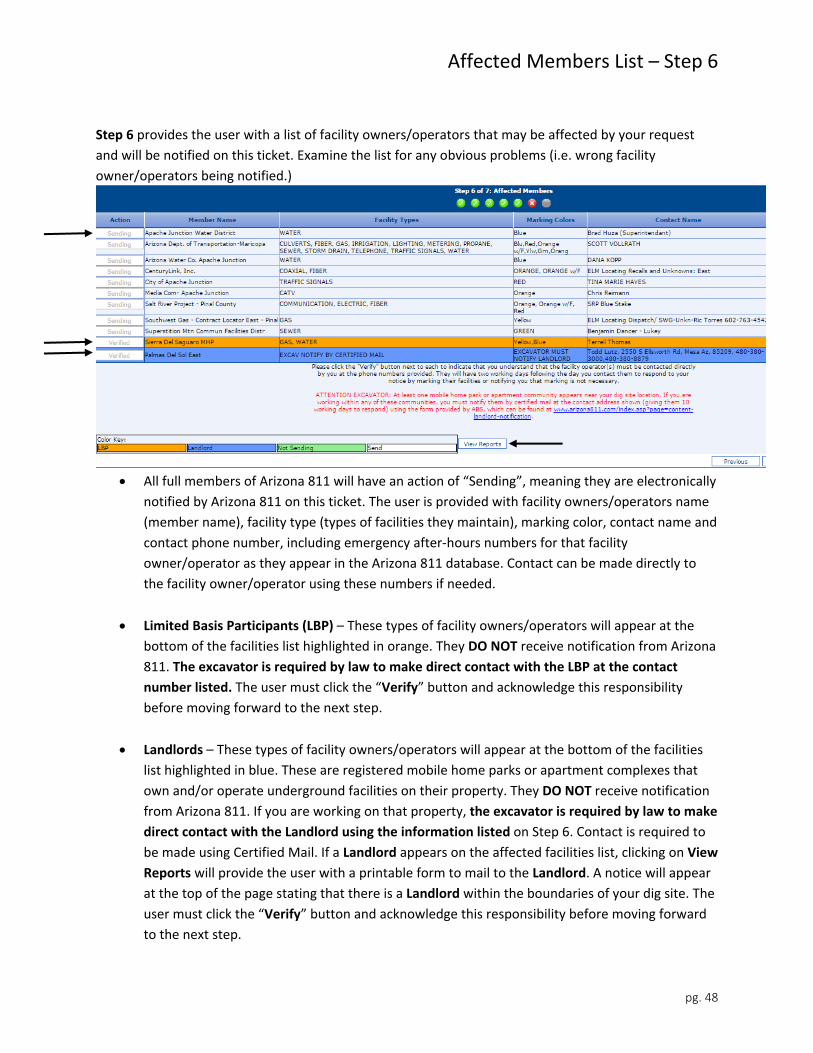
Step 6 provides the user with a list of facility owners/operators that may be affected by your request
and will be notified on this ticket. Examine the list for any obvious problems (i.e. wrong facility
owner/operators being notified.)
All full members of Arizona 811 will have an action of “Sending”, meaning they are electronically
notified by Arizona 811 on this ticket. The user is provided with facility owners/operators name
(member name), facility type (types of facilities they maintain), marking color, contact name and
contact phone number, including emergency after‐hours numbers for that facility
owner/operator as they appear in the Arizona 811 database. Contact can be made directly to
the facility owner/operator using these numbers if needed.
Limited Basis Participants (LBP) – These types of facility owners/operators will appear at the
bottom of the facilities list highlighted in orange. They DO NOT receive notification from Arizona
811. The excavator is required by law to make direct contact with the LBP at the contact
number listed. The user must click the “Verify” button and acknowledge this responsibility
before moving forward to the next step.
Landlords – These types of facility owners/operators will appear at the bottom of the facilities
list highlighted in blue. These are registered mobile home parks or apartment complexes that
own and/or operate underground facilities on their property. They DO NOT receive notification
from Arizona 811. If you are working on that property, the excavator is required by law to make
direct contact with the Landlord using the information listed on Step 6. Contact is required to
be made using Certified Mail. If a Landlord appears on the affected facilities list, clicking on View
Reports will provide the user with a printable form to mail to the Landlord. A notice will appear
at the top of the page stating that there is a Landlord within the boundaries of your dig site. The
user must click the “Verify” button and acknowledge this responsibility before moving forward
to the next step.
Notice Creation Confirmation – Step 7
pg. 49
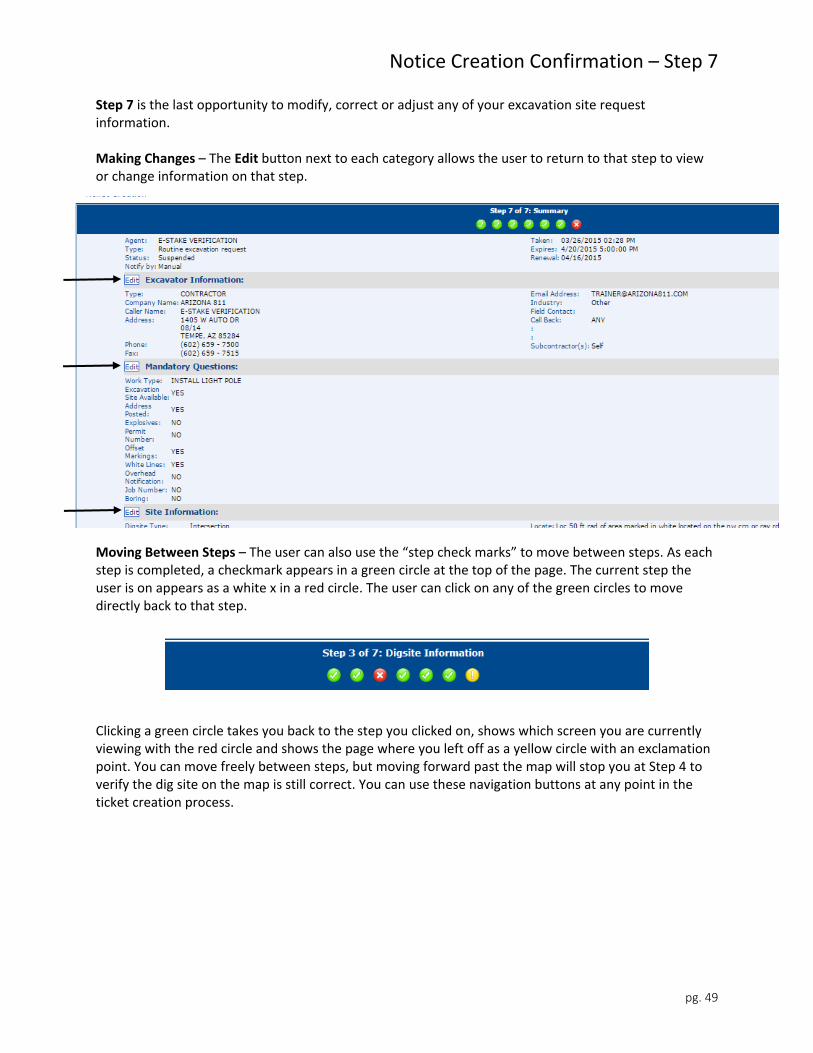
Step 7 is the last opportunity to modify, correct or adjust any of your excavation site request information. Making Changes – The Edit button next to each category allows the user to return to that step to view or change information on that step.
Moving Between Steps – The user can also use the “step check marks” to move between steps. As each step is completed, a checkmark appears in a green circle at the top of the page. The current step the user is on appears as a white x in a red circle. The user can click on any of the green circles to move directly back to that step. Clicking a green circle takes you back to the step you clicked on, shows which screen you are currently viewing with the red circle and shows the page where you left off as a yellow circle with an exclamation point. You can move freely between steps, but moving forward past the map will stop you at Step 4 to verify the dig site on the map is still correct. You can use these navigation buttons at any point in the ticket creation process.
Notice Creation Confirmation – Step 7
pg. 50
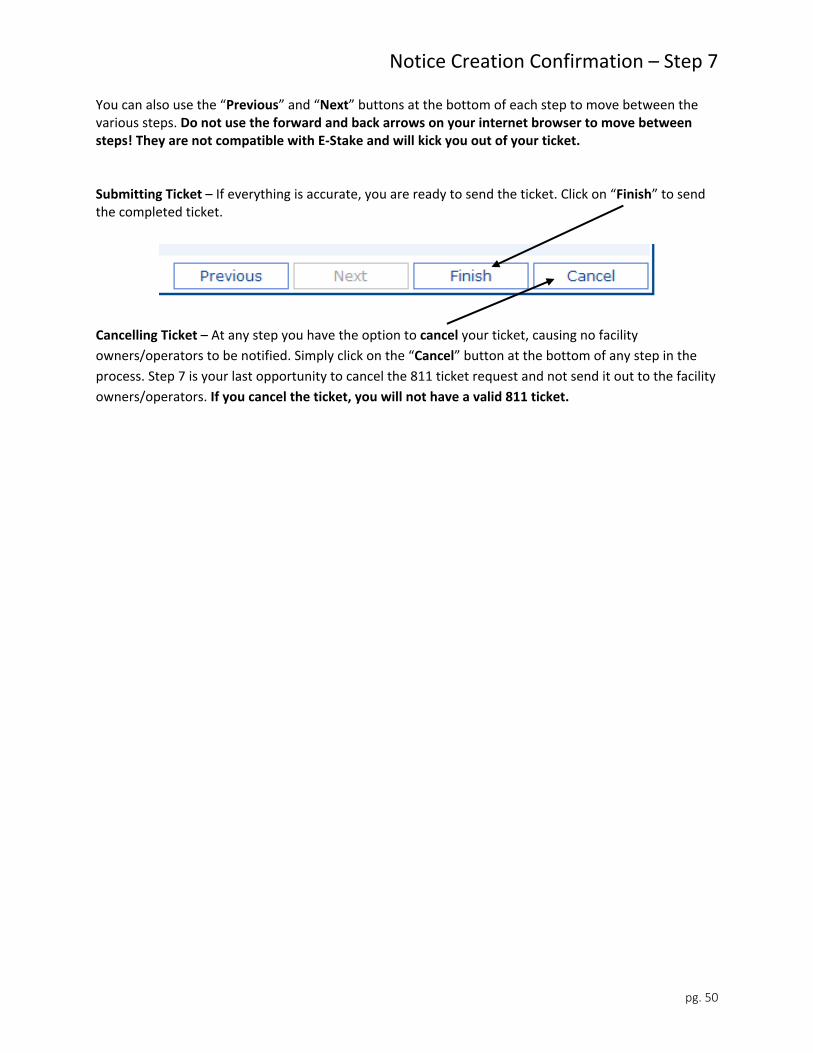
You can also use the “Previous” and “Next” buttons at the bottom of each step to move between the various steps. Do not use the forward and back arrows on your internet browser to move between steps! They are not compatible with E‐Stake and will kick you out of your ticket. Submitting Ticket – If everything is accurate, you are ready to send the ticket. Click on “Finish” to send the completed ticket.
Cancelling Ticket – At any step you have the option to cancel your ticket, causing no facility
owners/operators to be notified. Simply click on the “Cancel” button at the bottom of any step in the
process. Step 7 is your last opportunity to cancel the 811 ticket request and not send it out to the facility
owners/operators. If you cancel the ticket, you will not have a valid 811 ticket.
Sent Ticket Disclaimers, Ticket Number and Text
pg. 51
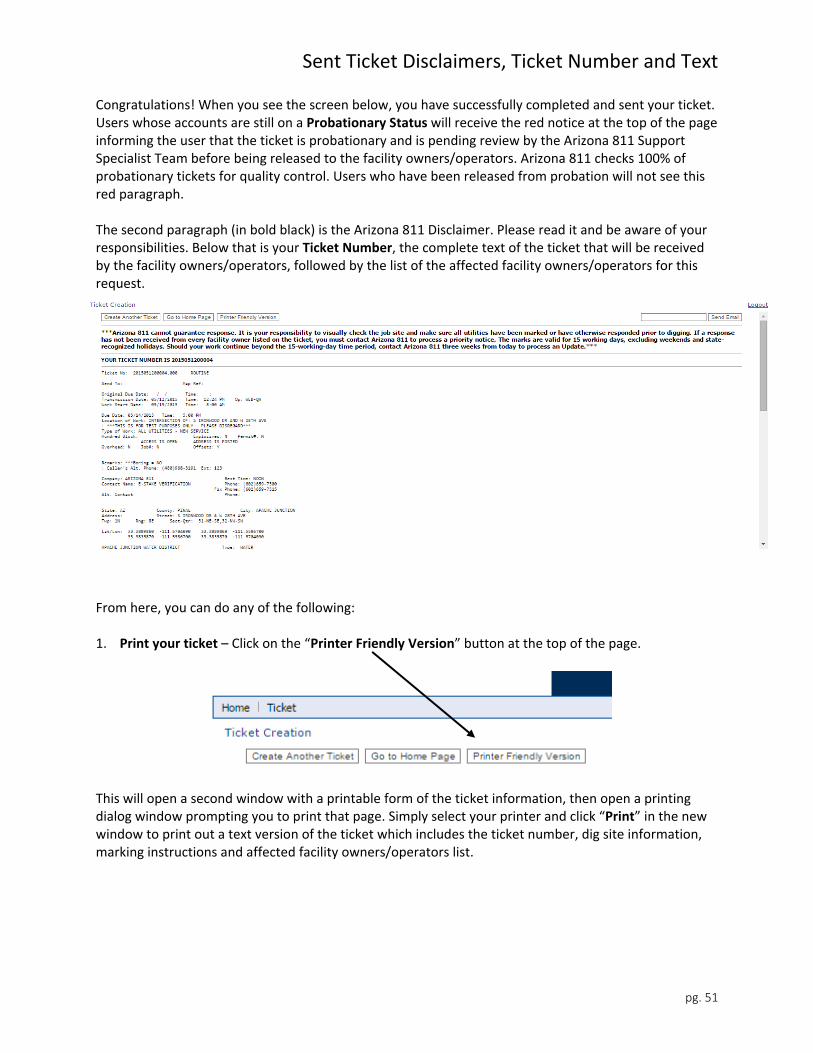
Congratulations! When you see the screen below, you have successfully completed and sent your ticket. Users whose accounts are still on a Probationary Status will receive the red notice at the top of the page informing the user that the ticket is probationary and is pending review by the Arizona 811 Support Specialist Team before being released to the facility owners/operators. Arizona 811 checks 100% of probationary tickets for quality control. Users who have been released from probation will not see this red paragraph. The second paragraph (in bold black) is the Arizona 811 Disclaimer. Please read it and be aware of your responsibilities. Below that is your Ticket Number, the complete text of the ticket that will be received by the facility owners/operators, followed by the list of the affected facility owners/operators for this request.
From here, you can do any of the following: 1. Print your ticket – Click on the “Printer Friendly Version” button at the top of the page.
This will open a second window with a printable form of the ticket information, then open a printing dialog window prompting you to print that page. Simply select your printer and click “Print” in the new window to print out a text version of the ticket which includes the ticket number, dig site information, marking instructions and affected facility owners/operators list.
Creating Multiple Tickets / Further Activity
pg. 52
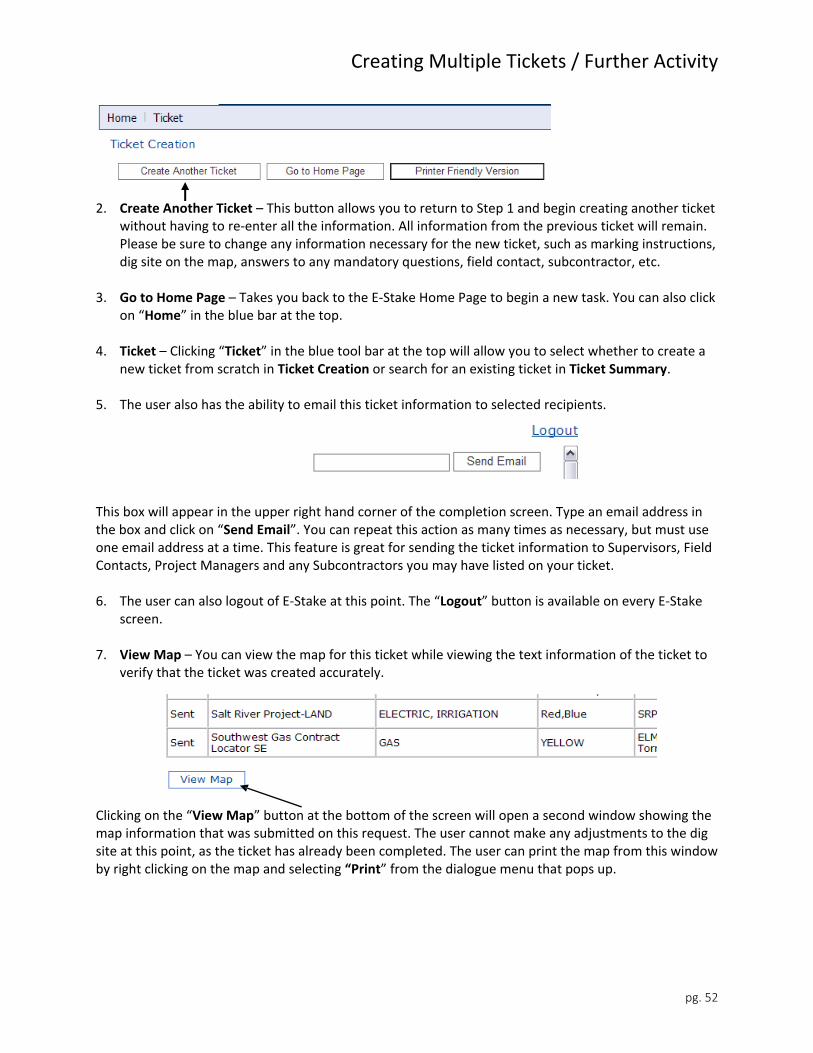
2. Create Another Ticket – This button allows you to return to Step 1 and begin creating another ticket without having to re‐enter all the information. All information from the previous ticket will remain. Please be sure to change any information necessary for the new ticket, such as marking instructions, dig site on the map, answers to any mandatory questions, field contact, subcontractor, etc.
3. Go to Home Page – Takes you back to the E‐Stake Home Page to begin a new task. You can also click
on “Home” in the blue bar at the top. 4. Ticket – Clicking “Ticket” in the blue tool bar at the top will allow you to select whether to create a
new ticket from scratch in Ticket Creation or search for an existing ticket in Ticket Summary. 5. The user also has the ability to email this ticket information to selected recipients. This box will appear in the upper right hand corner of the completion screen. Type an email address in the box and click on “Send Email”. You can repeat this action as many times as necessary, but must use one email address at a time. This feature is great for sending the ticket information to Supervisors, Field Contacts, Project Managers and any Subcontractors you may have listed on your ticket. 6. The user can also logout of E‐Stake at this point. The “Logout” button is available on every E‐Stake
screen. 7. View Map – You can view the map for this ticket while viewing the text information of the ticket to
verify that the ticket was created accurately. Clicking on the “View Map” button at the bottom of the screen will open a second window showing the map information that was submitted on this request. The user cannot make any adjustments to the dig site at this point, as the ticket has already been completed. The user can print the map from this window by right clicking on the map and selecting “Print” from the dialogue menu that pops up.
Meet Request
pg. 53
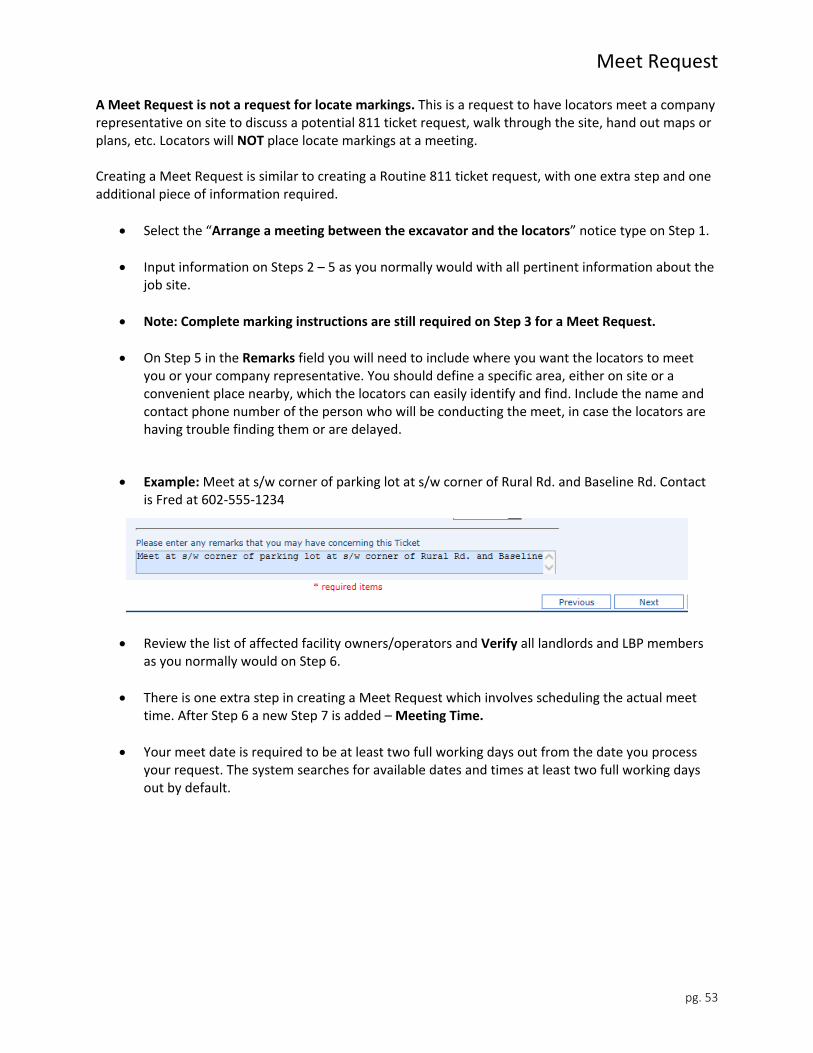
A Meet Request is not a request for locate markings. This is a request to have locators meet a company representative on site to discuss a potential 811 ticket request, walk through the site, hand out maps or plans, etc. Locators will NOT place locate markings at a meeting. Creating a Meet Request is similar to creating a Routine 811 ticket request, with one extra step and one additional piece of information required.
Select the “Arrange a meeting between the excavator and the locators” notice type on Step 1.
Input information on Steps 2 – 5 as you normally would with all pertinent information about the job site.
Note: Complete marking instructions are still required on Step 3 for a Meet Request.
On Step 5 in the Remarks field you will need to include where you want the locators to meet you or your company representative. You should define a specific area, either on site or a convenient place nearby, which the locators can easily identify and find. Include the name and contact phone number of the person who will be conducting the meet, in case the locators are having trouble finding them or are delayed.
Example: Meet at s/w corner of parking lot at s/w corner of Rural Rd. and Baseline Rd. Contact is Fred at 602‐555‐1234
Review the list of affected facility owners/operators and Verify all landlords and LBP members as you normally would on Step 6.
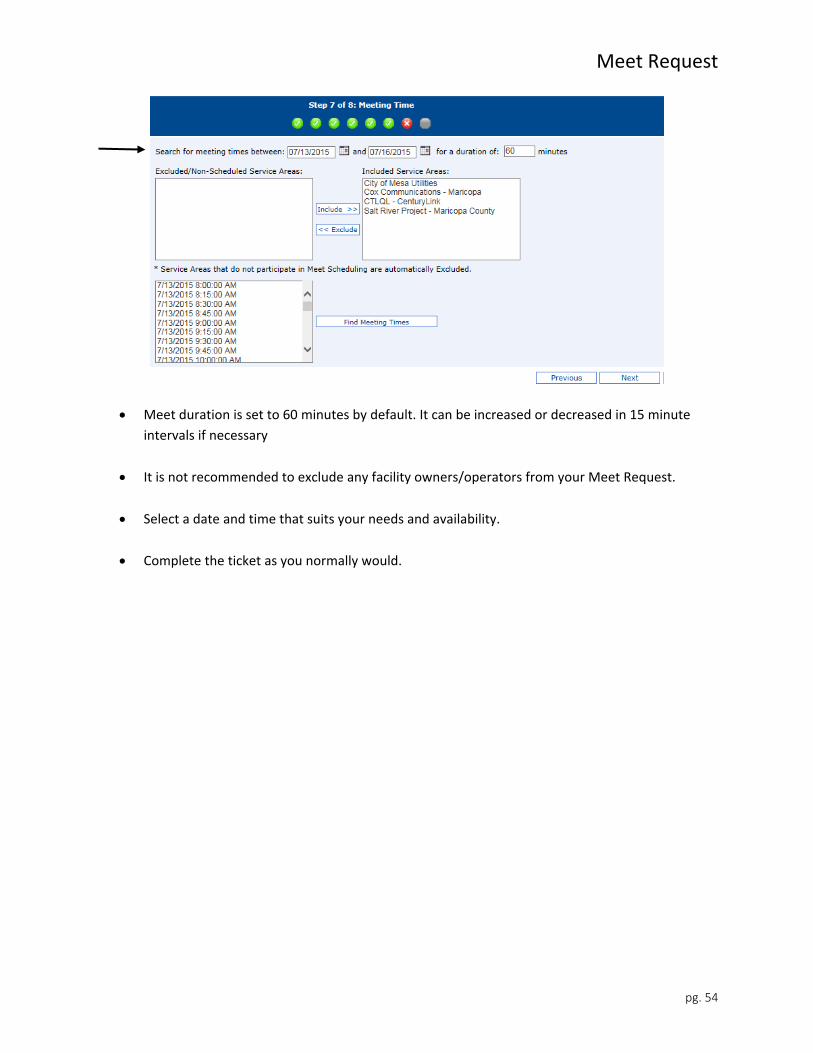
There is one extra step in creating a Meet Request which involves scheduling the actual meet time. After Step 6 a new Step 7 is added – Meeting Time.
Your meet date is required to be at least two full working days out from the date you process your request. The system searches for available dates and times at least two full working days out by default.
Meet Request
pg. 54
Meet duration is set to 60 minutes by default. It can be increased or decreased in 15 minute
intervals if necessary
It is not recommended to exclude any facility owners/operators from your Meet Request.
Select a date and time that suits your needs and availability.
Complete the ticket as you normally would.
Ticket Summary
pg. 55
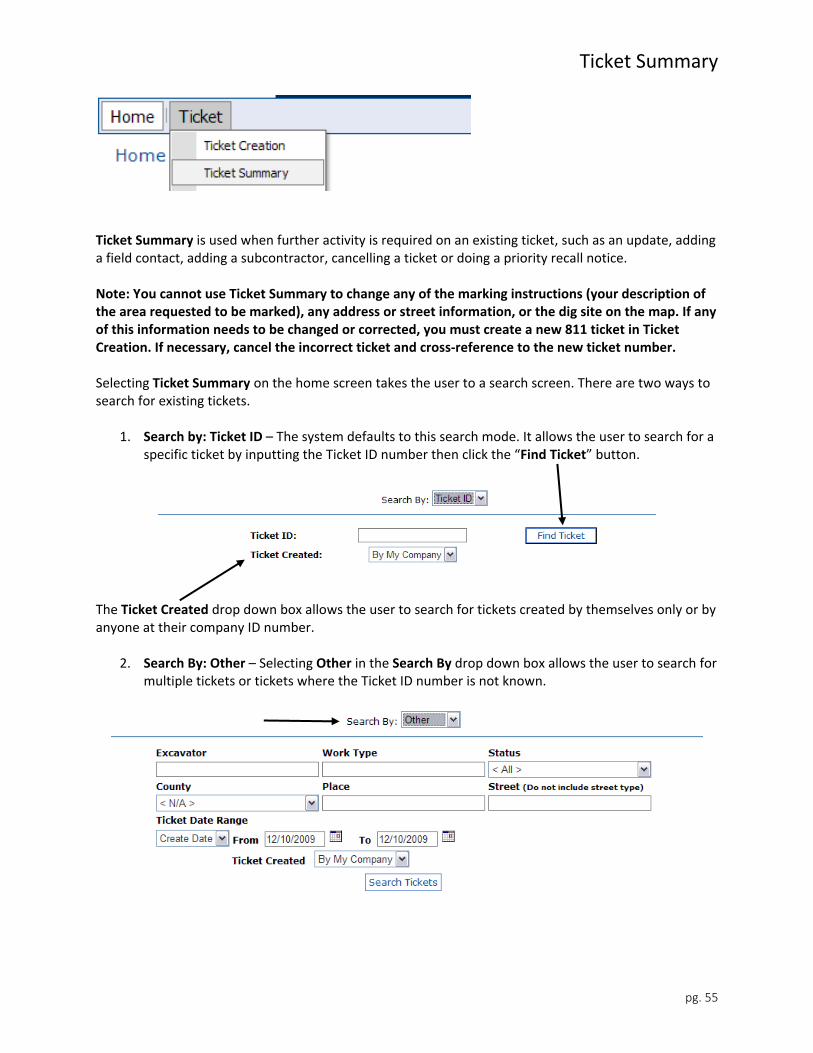
Ticket Summary is used when further activity is required on an existing ticket, such as an update, adding a field contact, adding a subcontractor, cancelling a ticket or doing a priority recall notice. Note: You cannot use Ticket Summary to change any of the marking instructions (your description of the area requested to be marked), any address or street information, or the dig site on the map. If any of this information needs to be changed or corrected, you must create a new 811 ticket in Ticket Creation. If necessary, cancel the incorrect ticket and cross‐reference to the new ticket number. Selecting Ticket Summary on the home screen takes the user to a search screen. There are two ways to search for existing tickets.
1. Search by: Ticket ID – The system defaults to this search mode. It allows the user to search for a specific ticket by inputting the Ticket ID number then click the “Find Ticket” button.
The Ticket Created drop down box allows the user to search for tickets created by themselves only or by anyone at their company ID number.
2. Search By: Other – Selecting Other in the Search By drop down box allows the user to search for multiple tickets or tickets where the Ticket ID number is not known.
Ticket Summary – Searching for Tickets
pg. 56
Searching for tickets using Other allows the user to search various parameters to help find the ticket(s). Users can search by:
Excavator name – search for a ticket processed under a particular excavator company name.
Work Type – search for a ticket based on the type of work that was listed on the ticket (i.e. pool, boring).
Status of the ticket – drop down menu has “Complete, Void and Suspended” options.
County – search for tickets by the name of the county where the job is located.
Place – search for tickets by the Place (City, Town, Community) where the work is being done.
Street Name – search for tickets by the name of the street input when the ticket was created.
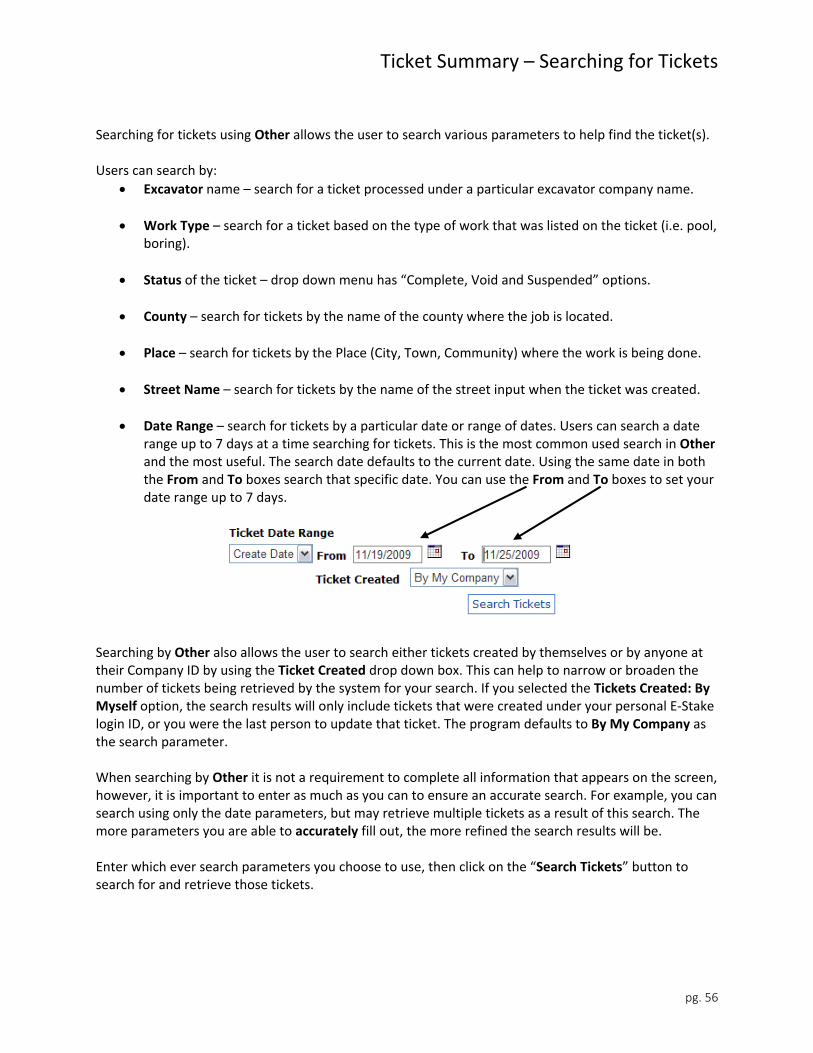
Date Range – search for tickets by a particular date or range of dates. Users can search a date range up to 7 days at a time searching for tickets. This is the most common used search in Other and the most useful. The search date defaults to the current date. Using the same date in both the From and To boxes search that specific date. You can use the From and To boxes to set your date range up to 7 days.
Searching by Other also allows the user to search either tickets created by themselves or by anyone at their Company ID by using the Ticket Created drop down box. This can help to narrow or broaden the number of tickets being retrieved by the system for your search. If you selected the Tickets Created: By Myself option, the search results will only include tickets that were created under your personal E‐Stake login ID, or you were the last person to update that ticket. The program defaults to By My Company as the search parameter. When searching by Other it is not a requirement to complete all information that appears on the screen, however, it is important to enter as much as you can to ensure an accurate search. For example, you can search using only the date parameters, but may retrieve multiple tickets as a result of this search. The more parameters you are able to accurately fill out, the more refined the search results will be. Enter which ever search parameters you choose to use, then click on the “Search Tickets” button to search for and retrieve those tickets.
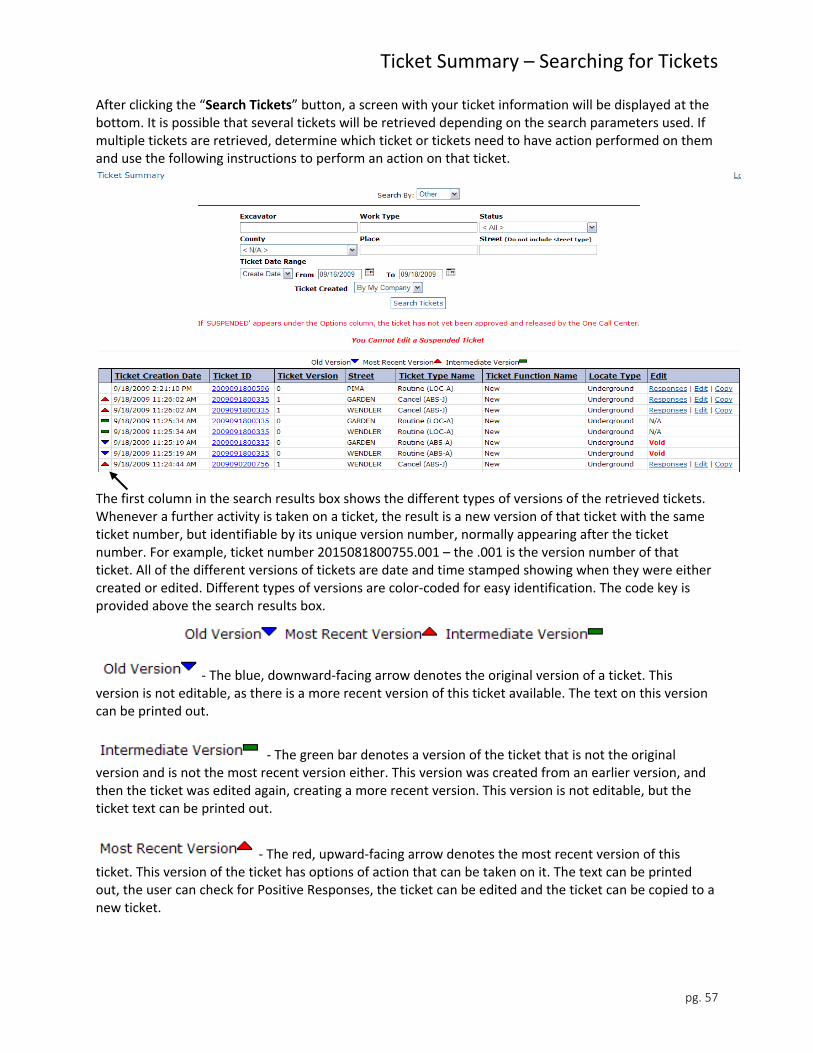
Ticket Summary – Searching for Tickets
pg. 57
After clicking the “Search Tickets” button, a screen with your ticket information will be displayed at the bottom. It is possible that several tickets will be retrieved depending on the search parameters used. If multiple tickets are retrieved, determine which ticket or tickets need to have action performed on them and use the following instructions to perform an action on that ticket.
The first column in the search results box shows the different types of versions of the retrieved tickets. Whenever a further activity is taken on a ticket, the result is a new version of that ticket with the same ticket number, but identifiable by its unique version number, normally appearing after the ticket number. For example, ticket number 2015081800755.001 – the .001 is the version number of that ticket. All of the different versions of tickets are date and time stamped showing when they were either created or edited. Different types of versions are color‐coded for easy identification. The code key is provided above the search results box.
‐ The blue, downward‐facing arrow denotes the original version of a ticket. This version is not editable, as there is a more recent version of this ticket available. The text on this version can be printed out.
‐ The green bar denotes a version of the ticket that is not the original version and is not the most recent version either. This version was created from an earlier version, and then the ticket was edited again, creating a more recent version. This version is not editable, but the ticket text can be printed out.
‐ The red, upward‐facing arrow denotes the most recent version of this ticket. This version of the ticket has options of action that can be taken on it. The text can be printed out, the user can check for Positive Responses, the ticket can be edited and the ticket can be copied to a new ticket.
Ticket Summary – Ticket Text
pg. 58
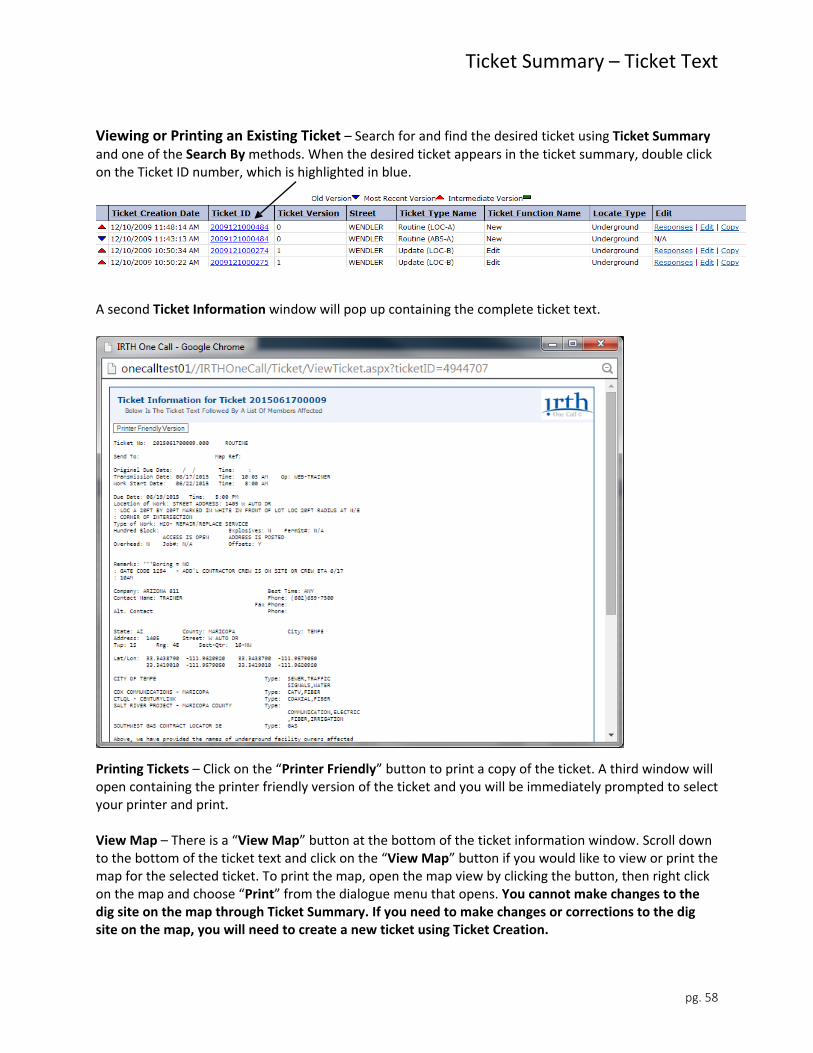
Viewing or Printing an Existing Ticket – Search for and find the desired ticket using Ticket Summary and one of the Search By methods. When the desired ticket appears in the ticket summary, double click on the Ticket ID number, which is highlighted in blue.
A second Ticket Information window will pop up containing the complete ticket text.
Printing Tickets – Click on the “Printer Friendly” button to print a copy of the ticket. A third window will open containing the printer friendly version of the ticket and you will be immediately prompted to select your printer and print. View Map – There is a “View Map” button at the bottom of the ticket information window. Scroll down to the bottom of the ticket text and click on the “View Map” button if you would like to view or print the map for the selected ticket. To print the map, open the map view by clicking the button, then right click on the map and choose “Print” from the dialogue menu that opens. You cannot make changes to the dig site on the map through Ticket Summary. If you need to make changes or corrections to the dig site on the map, you will need to create a new ticket using Ticket Creation.
Ticket Summary – Checking Positive Responses
pg. 59
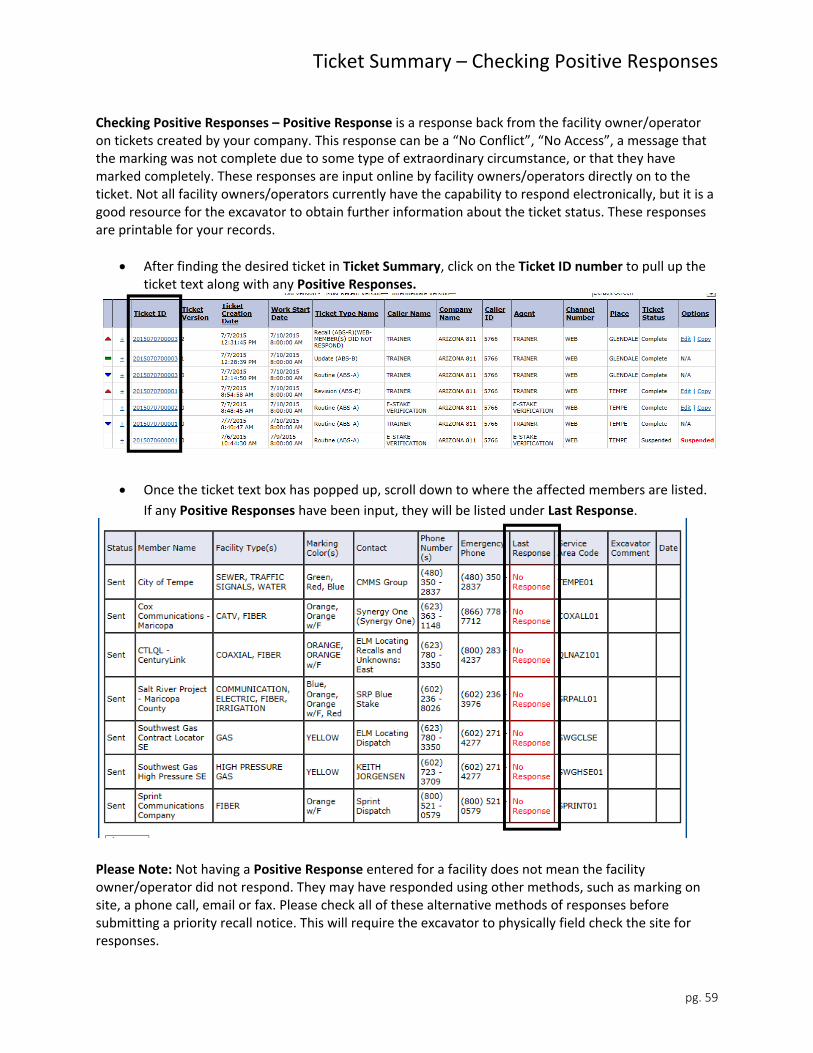
Checking Positive Responses – Positive Response is a response back from the facility owner/operator on tickets created by your company. This response can be a “No Conflict”, “No Access”, a message that the marking was not complete due to some type of extraordinary circumstance, or that they have marked completely. These responses are input online by facility owners/operators directly on to the ticket. Not all facility owners/operators currently have the capability to respond electronically, but it is a good resource for the excavator to obtain further information about the ticket status. These responses are printable for your records.
After finding the desired ticket in Ticket Summary, click on the Ticket ID number to pull up the ticket text along with any Positive Responses.
Once the ticket text box has popped up, scroll down to where the affected members are listed.
If any Positive Responses have been input, they will be listed under Last Response.
Please Note: Not having a Positive Response entered for a facility does not mean the facility owner/operator did not respond. They may have responded using other methods, such as marking on site, a phone call, email or fax. Please check all of these alternative methods of responses before submitting a priority recall notice. This will require the excavator to physically field check the site for responses.
Ticket Summary – Checking Positive Responses
pg. 60
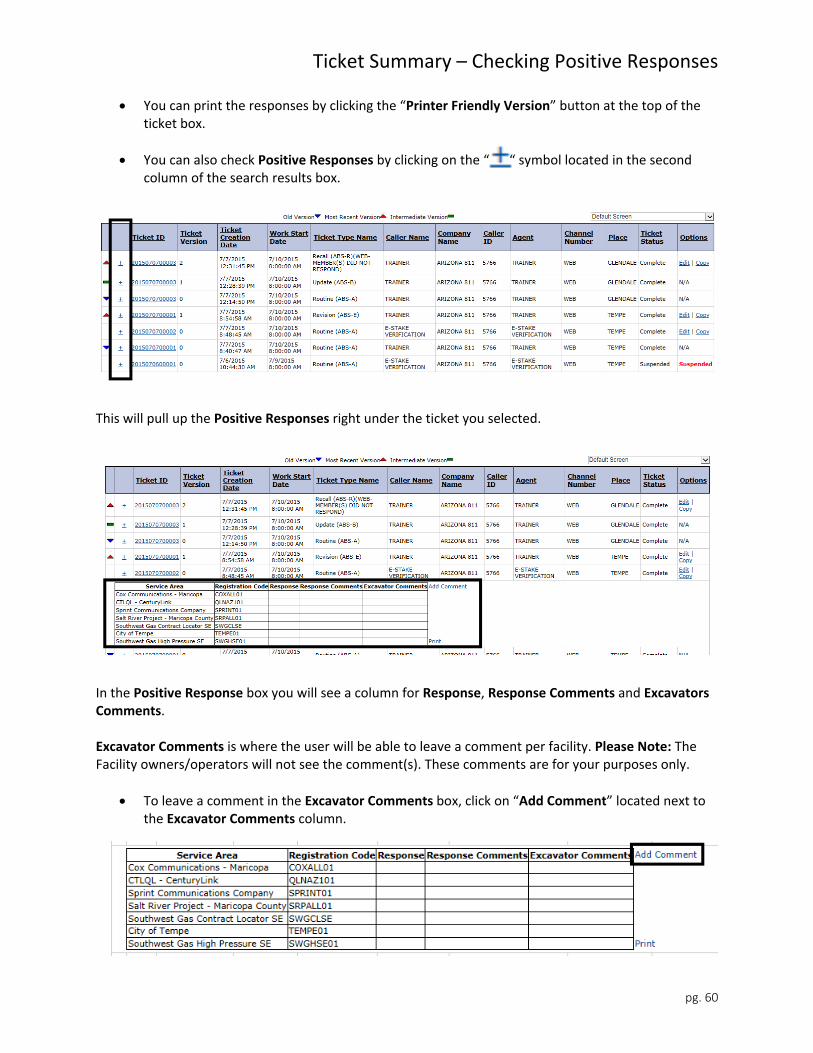
You can print the responses by clicking the “Printer Friendly Version” button at the top of the ticket box.
You can also check Positive Responses by clicking on the “ “ symbol located in the second column of the search results box.
This will pull up the Positive Responses right under the ticket you selected.
In the Positive Response box you will see a column for Response, Response Comments and Excavators Comments. Excavator Comments is where the user will be able to leave a comment per facility. Please Note: The Facility owners/operators will not see the comment(s). These comments are for your purposes only.
To leave a comment in the Excavator Comments box, click on “Add Comment” located next to the Excavator Comments column.
Ticket Summary – Checking Positive Responses
pg. 61
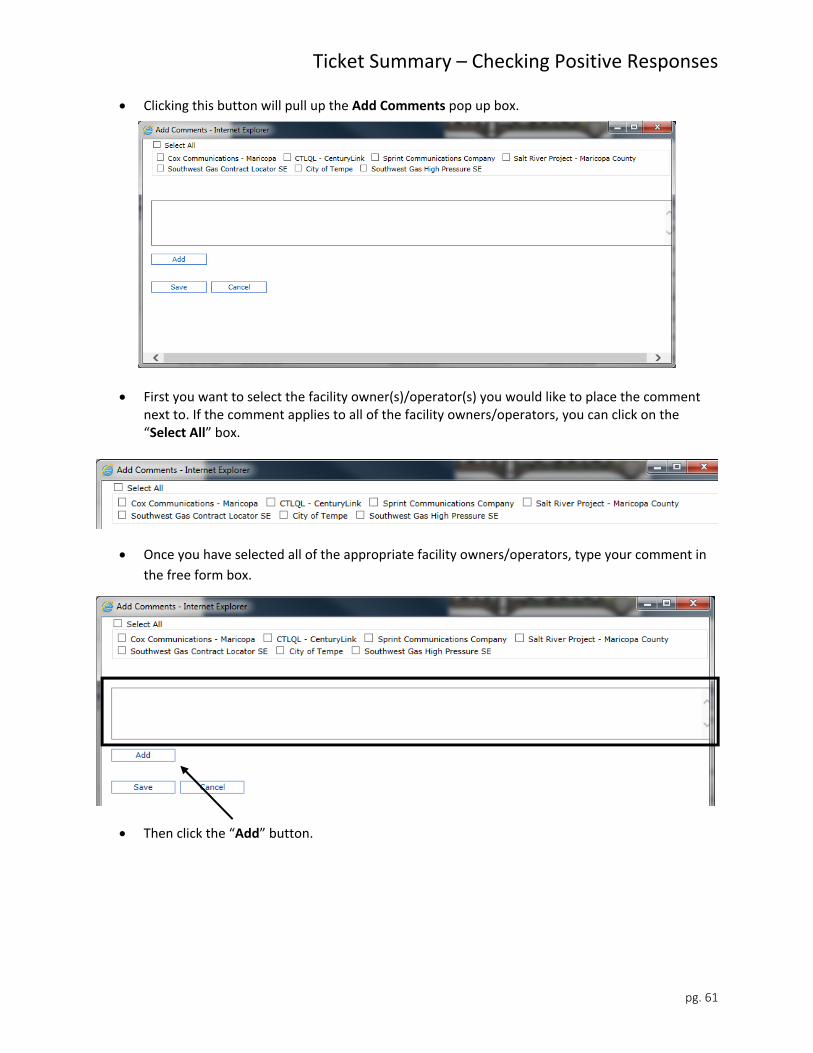
Clicking this button will pull up the Add Comments pop up box.
First you want to select the facility owner(s)/operator(s) you would like to place the comment next to. If the comment applies to all of the facility owners/operators, you can click on the “Select All” box.
Once you have selected all of the appropriate facility owners/operators, type your comment in
the free form box.
Then click the “Add” button.
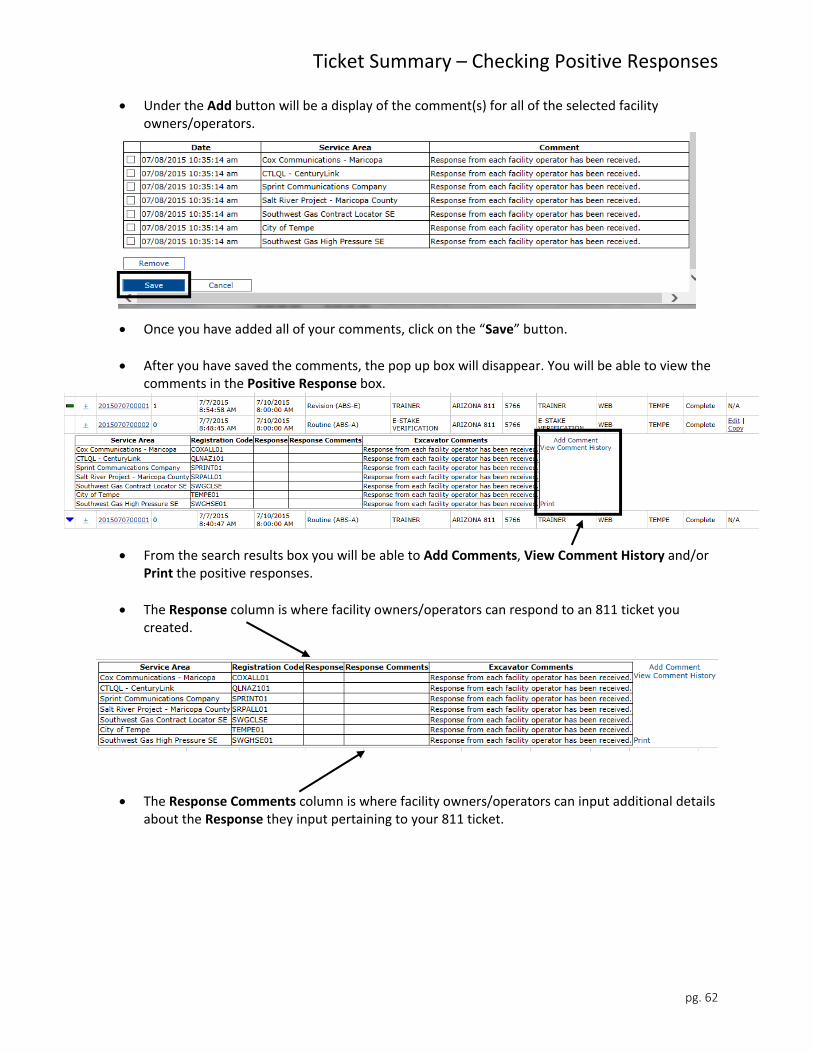
Ticket Summary – Checking Positive Responses
pg. 62
Under the Add button will be a display of the comment(s) for all of the selected facility owners/operators.
Once you have added all of your comments, click on the “Save” button.
After you have saved the comments, the pop up box will disappear. You will be able to view the comments in the Positive Response box.
From the search results box you will be able to Add Comments, View Comment History and/or Print the positive responses.
The Response column is where facility owners/operators can respond to an 811 ticket you created.
The Response Comments column is where facility owners/operators can input additional details about the Response they input pertaining to your 811 ticket.
Ticket Summary ‐ Follow‐Up Transactions
pg. 63
If you submitted a ticket and did not receive locate marks or any other type of response from one or more of the facility owner/operators by the end of the marking due date, do not dig. Instead, be sure to process a follow‐up transaction on your ticket by: 1. Using the “Edit” function in E‐Stake and selecting the appropriate description for your situation
(“Ready to dig, but one or more facility owner/operator(s) failed to respond.”) or 2. Calling 811 Also, if you received a response from one or more facility owner/operator(s) by telephone, email or electronically posted in E‐Stake which you did not agree to or did not understand you can process this type of transaction (“Ready to dig, but have questions on marks appearing on my job site or on other responses received.”) Please specify the following in the Remarks section:
Which facility owner/operator(s) are impacted?
What are the details of the issue? (Facility owner/operator failed to respond; Marks are incomplete; Do not understand the marks; Received a voice mail message, email or other notice that you did not agree to or do not understand).
When you are ready to submit this transaction, you can select (if by E‐Stake) or have the Arizona 811 Locate Specialist (if by phone) select only the facility owner/operator(s) that are impacted. This transaction will be treated as a priority and will be sent to the impacted facility owner/operator(s) immediately.
NOTE: It is important to process this follow‐up transaction to document the situation in addition to any other verbal or written communication you have with the facility owner/operator(s) to ensure proper documentation of the situation is recorded on your ticket. For assistance contact the Support Specialist (S2) Team at 602‐659‐7500 option 2, or by email at [email protected].
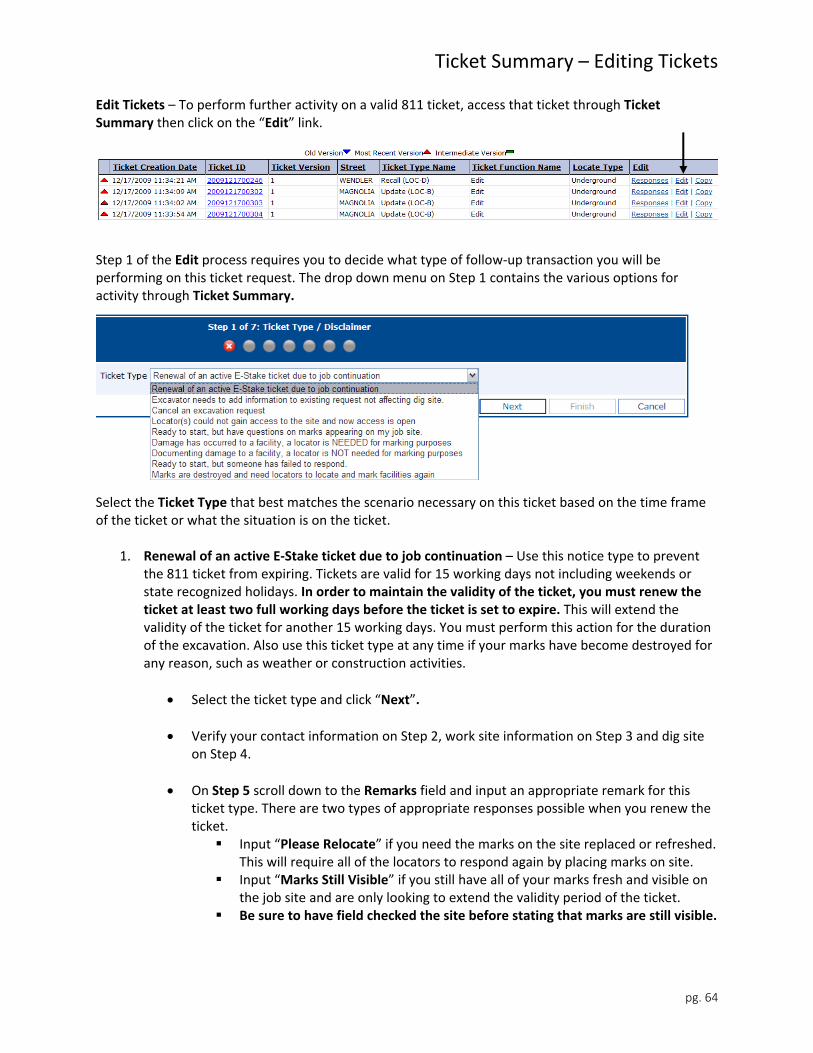
Ticket Summary – Editing Tickets
pg. 64
Edit Tickets – To perform further activity on a valid 811 ticket, access that ticket through Ticket Summary then click on the “Edit” link.
Step 1 of the Edit process requires you to decide what type of follow‐up transaction you will be performing on this ticket request. The drop down menu on Step 1 contains the various options for activity through Ticket Summary.
Select the Ticket Type that best matches the scenario necessary on this ticket based on the time frame of the ticket or what the situation is on the ticket.
1. Renewal of an active E‐Stake ticket due to job continuation – Use this notice type to prevent the 811 ticket from expiring. Tickets are valid for 15 working days not including weekends or state recognized holidays. In order to maintain the validity of the ticket, you must renew the ticket at least two full working days before the ticket is set to expire. This will extend the validity of the ticket for another 15 working days. You must perform this action for the duration of the excavation. Also use this ticket type at any time if your marks have become destroyed for any reason, such as weather or construction activities.
Select the ticket type and click “Next”.
Verify your contact information on Step 2, work site information on Step 3 and dig site on Step 4.
On Step 5 scroll down to the Remarks field and input an appropriate remark for this ticket type. There are two types of appropriate responses possible when you renew the ticket. Input “Please Relocate” if you need the marks on the site replaced or refreshed.
This will require all of the locators to respond again by placing marks on site. Input “Marks Still Visible” if you still have all of your marks fresh and visible on
the job site and are only looking to extend the validity period of the ticket. Be sure to have field checked the site before stating that marks are still visible.
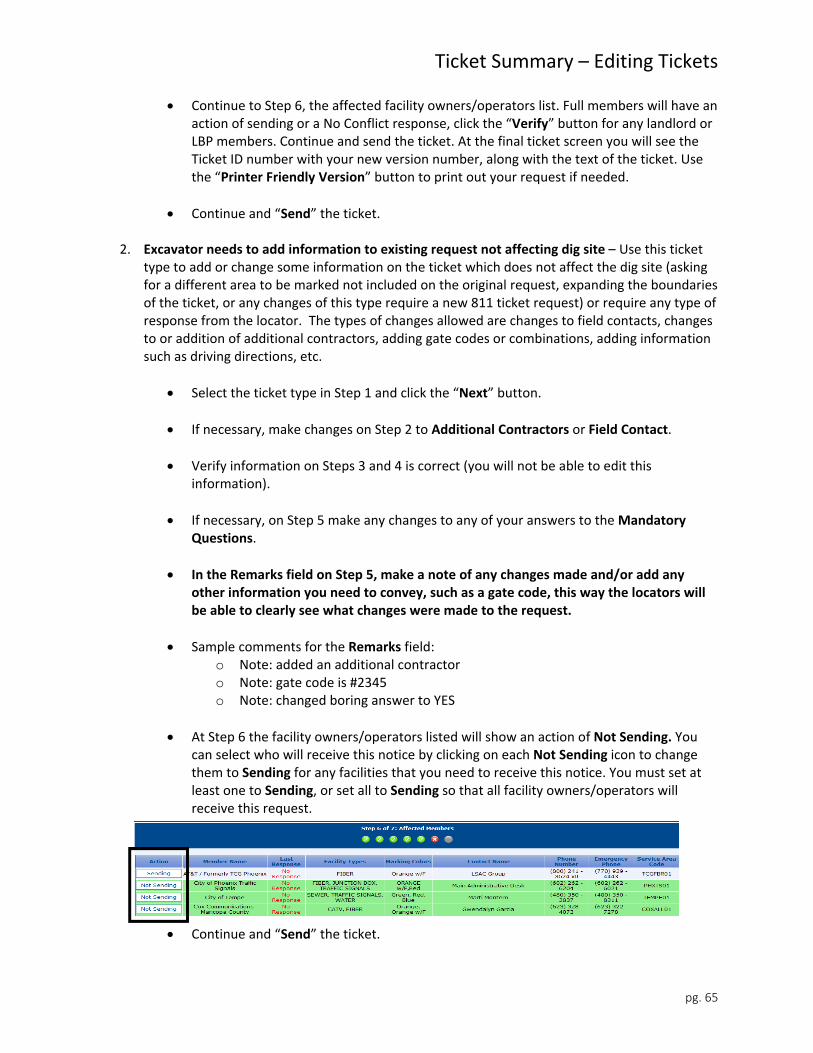
Ticket Summary – Editing Tickets
pg. 65
Continue to Step 6, the affected facility owners/operators list. Full members will have an action of sending or a No Conflict response, click the “Verify” button for any landlord or LBP members. Continue and send the ticket. At the final ticket screen you will see the Ticket ID number with your new version number, along with the text of the ticket. Use the “Printer Friendly Version” button to print out your request if needed.
Continue and “Send” the ticket. 2. Excavator needs to add information to existing request not affecting dig site – Use this ticket
type to add or change some information on the ticket which does not affect the dig site (asking for a different area to be marked not included on the original request, expanding the boundaries of the ticket, or any changes of this type require a new 811 ticket request) or require any type of response from the locator. The types of changes allowed are changes to field contacts, changes to or addition of additional contractors, adding gate codes or combinations, adding information such as driving directions, etc.
Select the ticket type in Step 1 and click the “Next” button.
If necessary, make changes on Step 2 to Additional Contractors or Field Contact.
Verify information on Steps 3 and 4 is correct (you will not be able to edit this information).
If necessary, on Step 5 make any changes to any of your answers to the Mandatory Questions.
In the Remarks field on Step 5, make a note of any changes made and/or add any other information you need to convey, such as a gate code, this way the locators will be able to clearly see what changes were made to the request.
Sample comments for the Remarks field: o Note: added an additional contractor o Note: gate code is #2345 o Note: changed boring answer to YES
At Step 6 the facility owners/operators listed will show an action of Not Sending. You can select who will receive this notice by clicking on each Not Sending icon to change them to Sending for any facilities that you need to receive this notice. You must set at least one to Sending, or set all to Sending so that all facility owners/operators will receive this request.
Continue and “Send” the ticket.
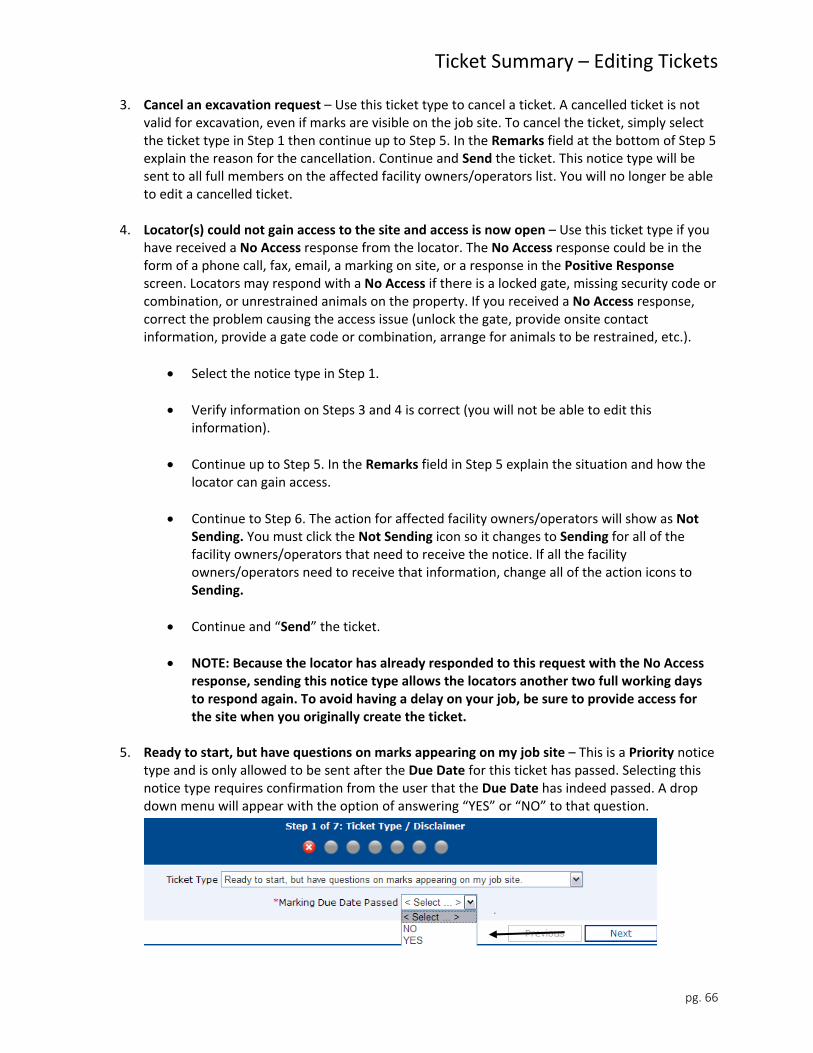
Ticket Summary – Editing Tickets
pg. 66
3. Cancel an excavation request – Use this ticket type to cancel a ticket. A cancelled ticket is not valid for excavation, even if marks are visible on the job site. To cancel the ticket, simply select the ticket type in Step 1 then continue up to Step 5. In the Remarks field at the bottom of Step 5 explain the reason for the cancellation. Continue and Send the ticket. This notice type will be sent to all full members on the affected facility owners/operators list. You will no longer be able to edit a cancelled ticket.
4. Locator(s) could not gain access to the site and access is now open – Use this ticket type if you
have received a No Access response from the locator. The No Access response could be in the form of a phone call, fax, email, a marking on site, or a response in the Positive Response screen. Locators may respond with a No Access if there is a locked gate, missing security code or combination, or unrestrained animals on the property. If you received a No Access response, correct the problem causing the access issue (unlock the gate, provide onsite contact information, provide a gate code or combination, arrange for animals to be restrained, etc.).
Select the notice type in Step 1.
Verify information on Steps 3 and 4 is correct (you will not be able to edit this information).
Continue up to Step 5. In the Remarks field in Step 5 explain the situation and how the locator can gain access.
Continue to Step 6. The action for affected facility owners/operators will show as Not Sending. You must click the Not Sending icon so it changes to Sending for all of the facility owners/operators that need to receive the notice. If all the facility owners/operators need to receive that information, change all of the action icons to Sending.
Continue and “Send” the ticket.
NOTE: Because the locator has already responded to this request with the No Access response, sending this notice type allows the locators another two full working days to respond again. To avoid having a delay on your job, be sure to provide access for the site when you originally create the ticket.
5. Ready to start, but have questions on marks appearing on my job site – This is a Priority notice
type and is only allowed to be sent after the Due Date for this ticket has passed. Selecting this notice type requires confirmation from the user that the Due Date has indeed passed. A drop down menu will appear with the option of answering “YES” or “NO” to that question.
Ticket Summary – Editing Tickets
pg. 67
The user will need to be able to honestly answer “YES” to this question in order to process this ticket type. An answer of “NO” will force the user to select another ticket type.
This ticket type is used if after field checking the site, the excavator has questions or concerns with the locate markings, such as belief that the markings are incomplete, incorrect, illegible, etc. This notice type is not to be used for markings that have been destroyed. For that situation, see number 1 above to renew the ticket.
Select the ticket type in Step 1 and truthfully answer the question in the drop down dialog box.
Verify information on Steps 3 and 4 is correct (you will not be able to edit this information).
In the Remarks field at the bottom of Step 5, place remarks that are appropriate to this priority ticket type. Remarks should include the name of the requested facility owner/operator, the issue with the markings, whether or not the crew is on site and the name of the person who is on site that has checked the actual markings.
Sample comments for the Remarks field: o Recall (Name of facility owner/operator) Marks not legible crew is on site site
checked by Tom @ 602‐555‐1234 o Recall (Name of facility owner/operator) Marks incomplete no marks near ped
site checked by Tom @ 602‐555‐1234
Continue to Step 6. For any and all facility owners/operators who will need to respond to this ticket request, you will need to click the Not Sending button to change it to an action of Sending. Do not send this request to facility owners/operators who are not addressed in your remarks and do not need to respond.
Continue and “Send” the ticket.
6. Damage has occurred to a facility, a locator is NEEDED for marking purposes – It is recommended by Arizona 811 that if damage has occurred on a job site, assess whether emergency services need to be contacted (911), and, if necessary, call these services from a safe place. If you know which facility is damaged, contact the facility owner/operator directly to notify them of the need for repair since Arizona 811 cannot facilitate repair for any damages. You can, however, contact Arizona 811 to add documentation about the damage on the ticket and request a locator for that facility owner/operator to return to the job site, if necessary. In situations where the damaged facility is unmarked, but all facility owner/operator(s) have otherwise responded to the ticket, call Arizona 811 (811, 1‐800‐STAKE‐IT or 602‐263‐1100) to process an Unknown Line to determine if the uncovered/damaged facility is active or abandoned. An Unknown Line receives priority response from the facility owners/operators.
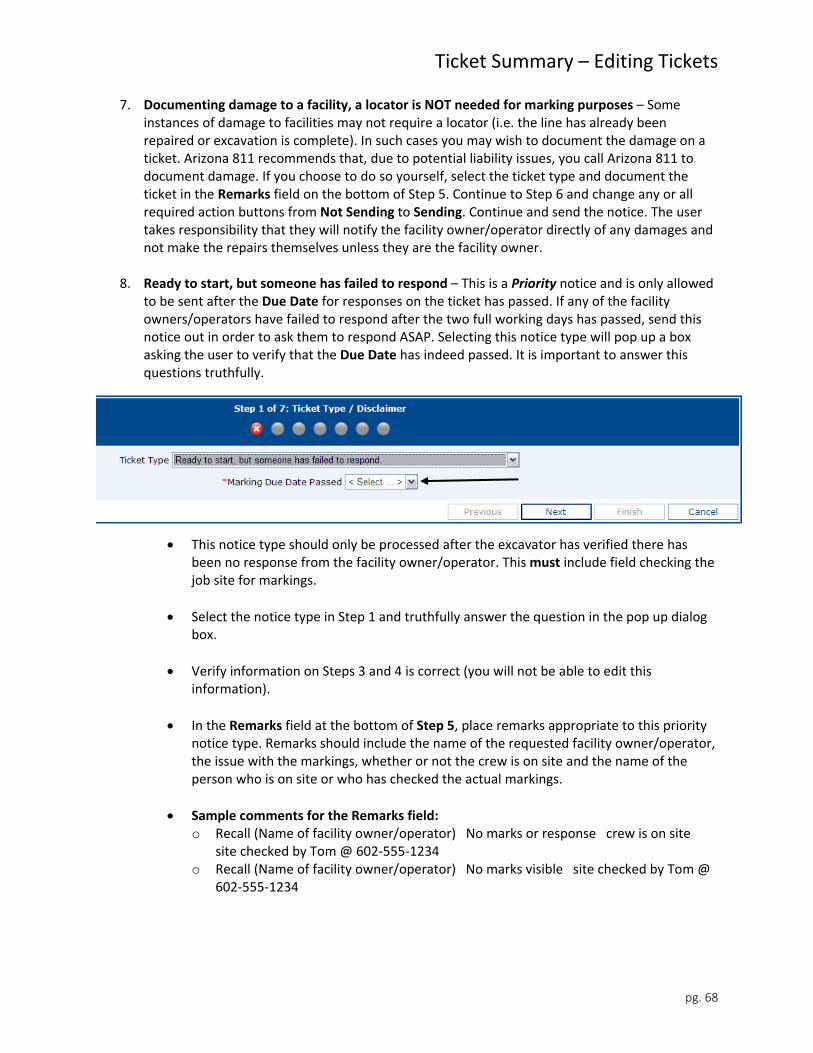
Ticket Summary – Editing Tickets
pg. 68
7. Documenting damage to a facility, a locator is NOT needed for marking purposes – Some instances of damage to facilities may not require a locator (i.e. the line has already been repaired or excavation is complete). In such cases you may wish to document the damage on a ticket. Arizona 811 recommends that, due to potential liability issues, you call Arizona 811 to document damage. If you choose to do so yourself, select the ticket type and document the ticket in the Remarks field on the bottom of Step 5. Continue to Step 6 and change any or all required action buttons from Not Sending to Sending. Continue and send the notice. The user takes responsibility that they will notify the facility owner/operator directly of any damages and not make the repairs themselves unless they are the facility owner.
8. Ready to start, but someone has failed to respond – This is a Priority notice and is only allowed
to be sent after the Due Date for responses on the ticket has passed. If any of the facility owners/operators have failed to respond after the two full working days has passed, send this notice out in order to ask them to respond ASAP. Selecting this notice type will pop up a box asking the user to verify that the Due Date has indeed passed. It is important to answer this questions truthfully.
This notice type should only be processed after the excavator has verified there has been no response from the facility owner/operator. This must include field checking the job site for markings.
Select the notice type in Step 1 and truthfully answer the question in the pop up dialog box.
Verify information on Steps 3 and 4 is correct (you will not be able to edit this information).
In the Remarks field at the bottom of Step 5, place remarks appropriate to this priority notice type. Remarks should include the name of the requested facility owner/operator, the issue with the markings, whether or not the crew is on site and the name of the person who is on site or who has checked the actual markings.
Sample comments for the Remarks field: o Recall (Name of facility owner/operator) No marks or response crew is on site
site checked by Tom @ 602‐555‐1234 o Recall (Name of facility owner/operator) No marks visible site checked by Tom @
602‐555‐1234
Ticket Summary – Editing Tickets
pg. 69
Continue to Step 6. For any and all facility owners/operators who will need to respond to this request, you will need to click the Not Sending button to change it to an action of Sending. Do not send this request to facility owners/operators who are not addressed in your remarks and do not need to respond.
Continue and “Send” the ticket.
This request can be sent to multiple facility owners/operators, as long as they are all addressed in the Remarks on Step 5 and all of the action buttons on Step 6 have been set to Sending for each desired facility owner/operator.
9. Marks are destroyed and need locators to locate and mark facilities again – Markings need to
be visible for the duration of the excavation, so if markings are destroyed for any reason (i.e. weather or construction traffic and work), submit a request to have the site re‐marked by the locators for the facility owners/operators. This notice must be sent at least 2 full working days before the expiration date. The notice is sent to all affected facility owners/operators listed on the ticket (except LBPs and Landlords), and they have two full working days to respond to the request.
In the Remarks field on Step 5 place a comment like “Marks destroyed please relocate”.
Continue and “Send” the ticket.

General Accepted Abbreviations
pg. 70
Common Abbreviations: n/, s/, e/, w/ North, South, East, West ?/sd with n/ (north), s/ (south), e/ (east), w/ (west) side of street, lot, alley, etc. Also please
use the / after a direction, same as above and between initials i.e. n/e, etc. (n/sd, s/sd, w/sd, e/sd)
a/o all others addl additional adj adjacent asap as soon as possible b/sds both sides b/si/o both sides of bdl buried drop line bldg building blk block, in terms if hundred block, block # for plat systems, block cannot be used for
measuring distance (interpretive) boc back of curb bsw buried service wire btwn between bnds bounds, boundaries catv cable television c/l center line cnty county const construction cont continue, continue to locate as requested crn corner cust customer elec electric ems marker electric connector ball for new service, electronic marker ball frm from ft feet fwy freeway h2o water hwy highway incl include incomp incomplete incorr incorrect info information inter intersection j‐box junction box loc location, locate area as requested m&s mains & services main main, trunk or primary maint maintenance m&t mains & taps mi miles

General Accepted Abbreviations
pg. 71
mns mains p/l property line pls please pottyseats electric connector for new service pte permission to enter pup pick up prints rad radius reloc relocate repl replace repr repair req request row right of way rts retransmit rr railroad r/l running line s/b should be serv service, drop sew sewer st lts street lights ts traffic signals trans transformer telco telephone xfmr transformer xing crossing (i.e. crossing street, alley, etc.) xref cross reference xst cross street, roads yds yards
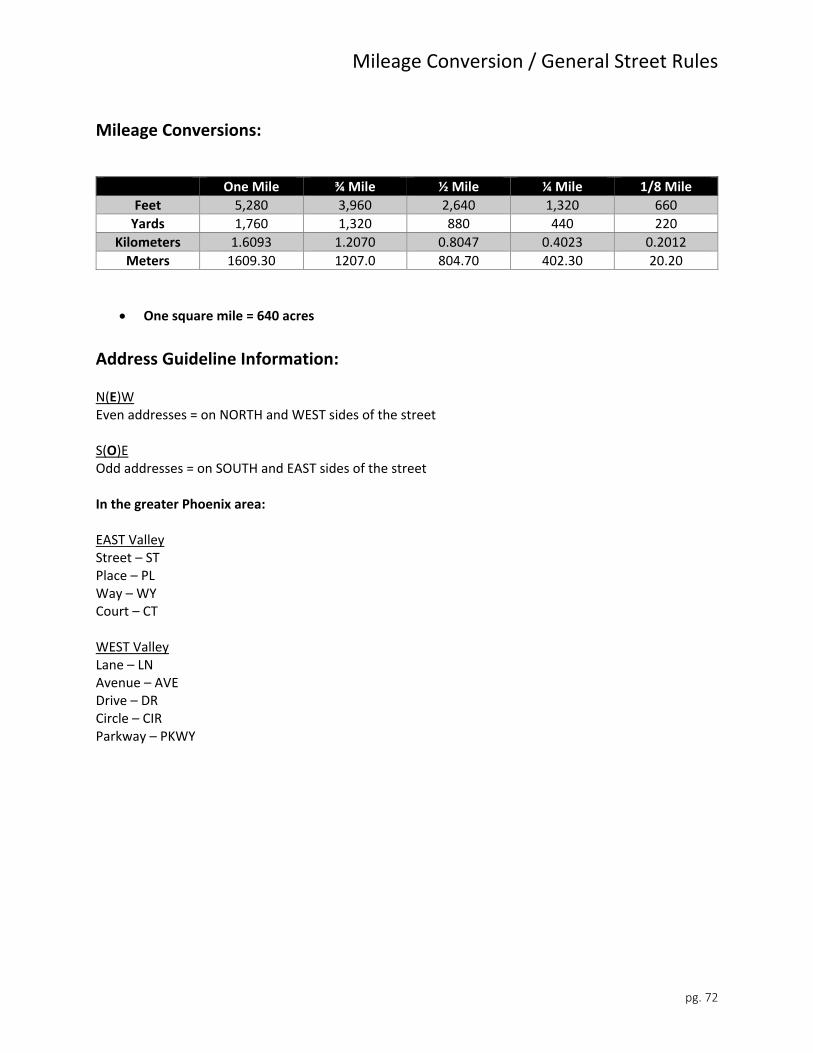
Mileage Conversion / General Street Rules
pg. 72
Mileage Conversions:
One Mile ¾ Mile ½ Mile ¼ Mile 1/8 Mile
Feet 5,280 3,960 2,640 1,320 660
Yards 1,760 1,320 880 440 220
Kilometers 1.6093 1.2070 0.8047 0.4023 0.2012
Meters 1609.30 1207.0 804.70 402.30 20.20
One square mile = 640 acres
Address Guideline Information: N(E)W Even addresses = on NORTH and WEST sides of the street S(O)E Odd addresses = on SOUTH and EAST sides of the street In the greater Phoenix area: EAST Valley Street – ST Place – PL Way – WY Court – CT WEST Valley Lane – LN Avenue – AVE Drive – DR Circle – CIR Parkway – PKWY
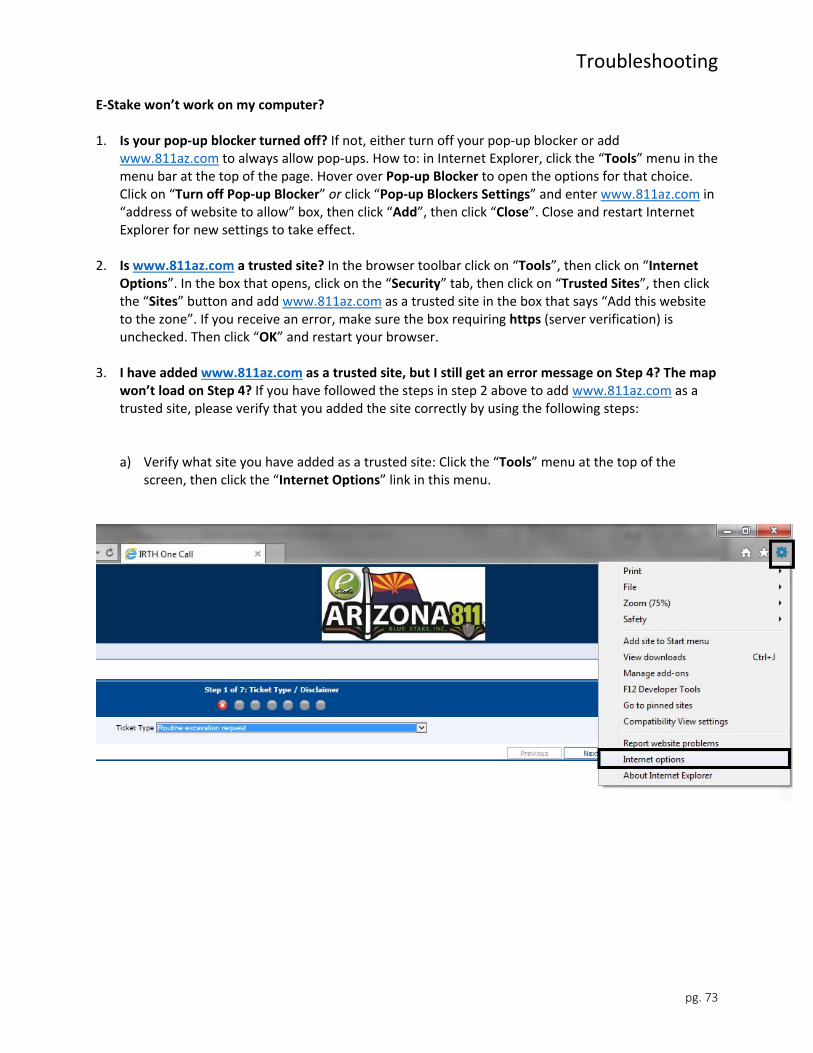
Troubleshooting
pg. 73
E‐Stake won’t work on my computer? 1. Is your pop‐up blocker turned off? If not, either turn off your pop‐up blocker or add
www.811az.com to always allow pop‐ups. How to: in Internet Explorer, click the “Tools” menu in the menu bar at the top of the page. Hover over Pop‐up Blocker to open the options for that choice. Click on “Turn off Pop‐up Blocker” or click “Pop‐up Blockers Settings” and enter www.811az.com in “address of website to allow” box, then click “Add”, then click “Close”. Close and restart Internet Explorer for new settings to take effect.
2. Is www.811az.com a trusted site? In the browser toolbar click on “Tools”, then click on “Internet
Options”. In the box that opens, click on the “Security” tab, then click on “Trusted Sites”, then click the “Sites” button and add www.811az.com as a trusted site in the box that says “Add this website to the zone”. If you receive an error, make sure the box requiring https (server verification) is unchecked. Then click “OK” and restart your browser.
3. I have added www.811az.com as a trusted site, but I still get an error message on Step 4? The map
won’t load on Step 4? If you have followed the steps in step 2 above to add www.811az.com as a trusted site, please verify that you added the site correctly by using the following steps:
a) Verify what site you have added as a trusted site: Click the “Tools” menu at the top of the screen, then click the “Internet Options” link in this menu.

Troubleshooting
pg. 74
b) In the box that pops up, click the “Security” tab at the top, then click on the “Trusted Sites” check mark, then click the “Sites” button below that, on the right side of the box.
The following box should pop up:
If there is an “s” in https://www.811az.com, there should not be. Highlight the website and click “Remove” then click “Close”.
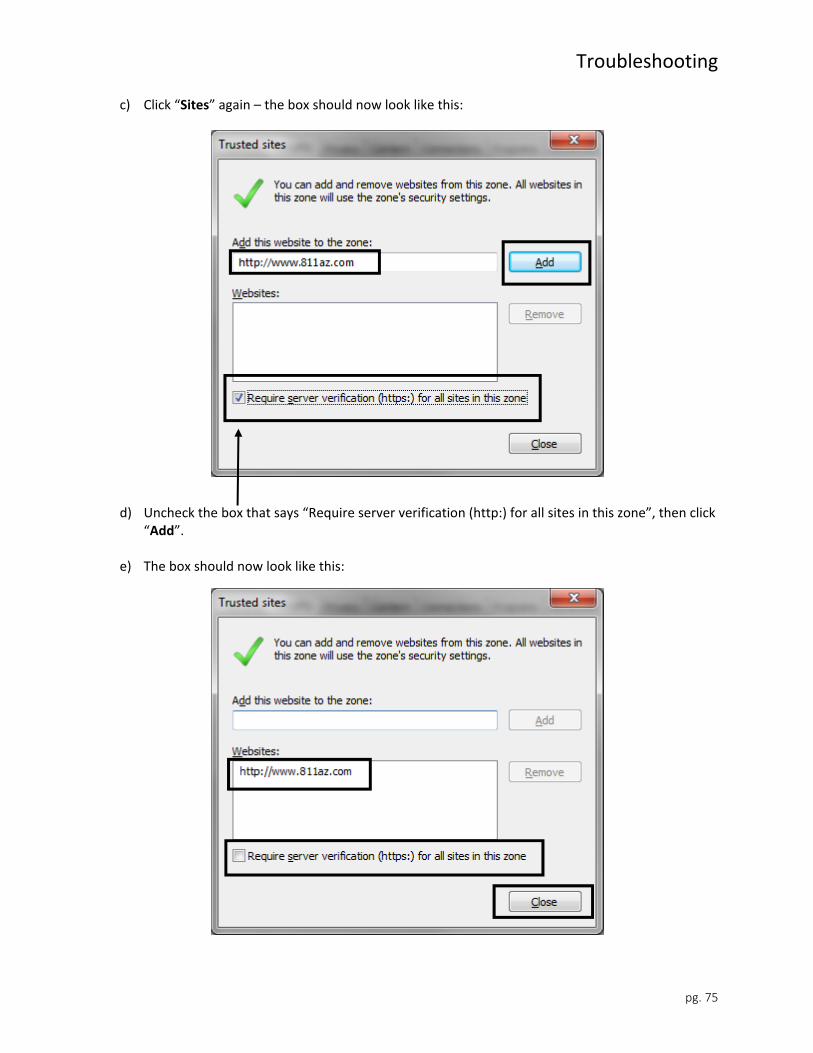
Troubleshooting
pg. 75
c) Click “Sites” again – the box should now look like this:
d) Uncheck the box that says “Require server verification (http:) for all sites in this zone”, then click “Add”.
e) The box should now look like this:

Troubleshooting
pg. 76
f) Click “Close”, then click “OK” in the Internet Options box.
g) Click “Previous” at the bottom of Step 4 (which will bring the user back to Step 3), then click “Search” then “Next” (which will bring the user back to the map – Step 4). At this point, if done correctly, the map might take a short while to load (as opposed to an error message popping up instantly). If the map loads, then you should have no further issues.
h) If this did not resolve the issue, please contact the Support Specialist (S2) Team at 602‐659‐7500
option 2, or by email at [email protected].
It is recommended that you set your display (screen) to 1024 x 768 so that you can see all of the features E‐Stake offers.