Embed Size (px)
Citation preview
Treiber- und Softwareinstallation unter Windows VistaSchalten Sie Ihren PC ein und warten Sie bis Windows Vista (min. Service Pack 1) vollständig geladen ist. Stecken Sie jetzt das USB-Kabel in die Buchse des G3 und anschließend in einen USB 2.0 Anschluss Ihres PCs. Sobald Sie den G3 mit dem PC verbunden haben, meldet Windows, dass die Trei-
bersoftware für den „TerraTec G3“ installiert werden muss. Wählen Sie “Treibersoftware Suchen und Installieren (empfohlen)” und dann “nicht online suchen.” Legen Sie nun bitte die beiliegende Installations-DVD in das DVD-Laufwerk und wählen Sie „Weiter.“ Jetzt wird der Treiber gesucht und installiert. Vista fragt Sie, ob Sie den Treiber wirklich installieren möchten, was Sie mit „Ins-tallieren“ bestätigen. Eventuell erscheint eine Meldung, dass die Treiber den Windows-Logo-Test nicht bestanden haben. Diesen Hinweis können Sie ruhigen Gewissens ignorieren und mit einem Klick auf “Installation fortsetzen” fortfahren. Nachdem die Treiberdateien kopiert wurden, beenden Sie die Installation mit “Schließen”. Wechseln Sie nun auf das DVD-Laufwerk, wählen Sie Ihre Sprache aus, dann den Punkt Software und fahren Sie mit der Installation von MAGIX Filme auf DVD TerraTec Edition fort. Folgen Sie einfach den Anweisungen auf dem Bildschirm.
Anschluss und erster StartDer TerraTec G3 kann sowohl über Scart als auch über S-Video/Composite angeschlossen werden. Bringen Sie den Schalter neben dem USB Anschluss vor dem Start der Software bitte in die entsprechende Stellung.Starten Sie nun MAGIX Filme auf DVD TerraTec Edition durch einen Doppelklick auf das dazu-gehörige Desktop- Symbol. Nach dem Anlegen eines neuen Disc-Projektes wählen Sie bitte „Aufnahme“ und dann den Punkt „analoges Video.“
HilfeEin ausführliches Online-Handbuch zu der Software erhalten Sie, wenn Sie bei geöffnetem Programm die Taste F1 drücken.
Installing drivers and software under Windows VistaSwitch on your computer and wait until Windows Vista (min. Service Pack 1) has loaded completely. Now plug the USB cable into the jack of the G3 and then into a USB 2.0 port on your computer.As soon as you have connected the G3 to your computer, Windows informs you
that the driver software for the „TerraTec G3“ must be installed. Click „Locate and install driver software (recommended)“, followed by „Don‘t search online“. Now insert the installation DVD provided into the DVD drive and select „Cancel.“ The drivers are now located and installed. Vista asks if you really want to install the driver; confirm this with „Install“. You may get a message that the driver did not pass the Windows Logo test. It is safe to ignore this information and continue the installation by clicking „Continue anyway“. Click „Close“ to complete the installation once the driver files have been copied. Switch back to the DVD drive, select your language, then the Software item and continue with the installation of MAGIX „Movies on DVD TerraTec Edition“. Simply follow the instructions provided.
Connecting and starting the first timeThe TerraTec G3 can be connected via Scart as well as via S-Video/composite. Before starting the software, push the switch next to the USB port into the correct position.Now, start MAGIX „Movies on DVD TerraTec Edition“ by double-clicking its icon on the desktop. After creating a new disc project, select „Recording“ and then the „Analog video“ item.
HelpTo access a detailed online manual for the software, press „F1“ while the program is running.
Installation des pilotes et des logiciels sous Windows VistaAllumez votre PC et attendez que Windows Vista (au moins Service Pack 1) soit entièrement chargé. Reliez le câble USB au connecteur du G3 puis à un port USB 2.0 de votre PC.Dès que le G3 est connecté au PC, Windows signale que le pilote logiciel du TerraTec
G3 doit être installé. Sélectionnez « Rechercher et installer le pilote logiciel (recommandé) », puis « Ne pas rechercher en ligne ». Insérez ensuite le DVD d‘installation fourni dans le lecteur de DVD et cliquez sur « Suivant ». Windows recherche et installe le pilote. Vista vous demande de confir-mer l‘installation du pilote : cliquez sur le bouton « Installer ». Eventuellement un message indique que le pilote n‘a pas été validé lors du test permettant d‘obtenir le logo Windows. Vous pouvez ignorer ce message et continuer en cliquant sur « Poursuivre l‘installation ». Quand les fichiers des pilotes sont copiés, terminez l‘installation en cliquant sur « Fermer ». Sélectionnez votre lec-teur de DVD, puis choisissez votre langue, ensuite le dossier Software et procédez à l‘installation du logiciel MAGIX Films sur DVD Edition TerraTec. Suivez simplement les instructions affichées.
Connexion et première utilisationLe TerraTec G3 peut être connecté via la prise Péritel aussi bien que via la prise S-vidéo/Com-posite. Avant d‘exécuter le logiciel, mettez le bouton à côté de la prise USB dans la position correspondante.Exécutez maintenant MAGIX Films sur DVD Edition TerraTec en double-cliquant sur l‘icône correspondante. Après avoir créé un nouveau projet de gravure de disque, sélectionnez « Enre-gistrement » puis « Vidéo analogique ».
Aide :Pour consulter l‘aide en ligne décrivant le logiciel en détail, appuyez sur la touche de fonction F1.
Quick Start GuideWindows Vista G3
Installazione dei driver e del software in Windows VistaAccendete il PC e attendere fino al completo caricamento di Windows Vista (minimo Service Pack 1). Innestate adesso il cavo USB nella presa del G3 e quindi in una presa USB 2.0 del PC. Non appena il G3 è collegato al PC, Windows segnala che deve essere installato il driver per il «TerraTec G3». Scegliete «Individuare e installare
il driver (scelta consigliata)» e quindi «Non cercare in linea». Inserite adesso il DVD di installazione accluso nel lettore e scegliete «Avanti». Adesso il driver viene cercato e installato. Vista chiede se intendete installare veramente il driver. Confermare con «Installa». Eventualmente compare un messaggio che segnala che i driver non hanno superato il test del logo Windows. Il messaggio può essere tranquillamente ignorato e potete continuare con «Continua installazione». Dopo che i file del driver sono stati copiati, terminare l’installazione con «Chiudi».Passate adesso al lettore di DVD, scegliete la vostra lingua, quindi il punto Software e proseguite con l’installazione di MAGIX Film su DVD edizione TerraTec. Seguite semplicemente le istruzioni sullo schermo.
Collegamento e primo avvioIl TerraTec G3 può essere collegato sia tramite Scart sia tramite S-Video/Composite. Prima di avviare il software, portate il commutatore accanto alla presa USB nella posizione desiderata.Avviate quindi MAGIX Film su DVD edizione TerraTec tramite un doppio clic sul corrispondente simbolo del desktop. Dopo aver creato un nuovo progetto Disc, scegliete «Registrazione» e quindi il punto «Video analogico».
Guida:Un dettagliato manuale in linea sul software si ottiene premendo a programma aperto il tasto F1.
Instalación de controladores y software en Windows VistaEncienda su PC y espere hasta que se cargue por completo Windows Vista (mín. Service Pack 1). Enchufe ahora el cable USB en el conector hembra del G3 y a conti-nuación en un puerto USB 2.0 de su PC.En cuanto el G3 esté conectado al PC, Windows advertirá que se tiene que instalar
el software de controlador para “TerraTec G3“. Seleccione “Buscar e instalar el software de con-trolador (recomendado)” y luego “no buscar en línea”. Inserte ahora el disco DVD de instalación adjunto en la unidad de discos DVD y seleccione “Siguiente”. Ahora se busca y se instala el con-trolador. Vista pregunta si desea instalar realmente el controlador, a lo que debe responder selec-cionando “Instalar”. Es posible que aparezca un mensaje advirtiendo de que los controladores no han superado el test de logo Windows. Puede ignorar con toda tranquilidad esta advertencia y seguir haciendo clic en “Continuar la instalación”. Una vez copiados los archivos de controlado-res, finalice la instalación con “Cerrar”. Cambie ahora a la unidad de discos DVD, seleccione su idioma, luego el punto Software y continúe después con la instalación de MAGIX Films en DVD edición TerraTec. Siga simplemente las instrucciones que aparecen en la pantalla.
Conexión y primer inicioEl TerraTec G3 se puede conectar tanto a través de scart como de S-video/Composite. Antes del inicio del software, ponga en la posición correspondiente el conmutador situado junto al puerto USB.Inicie ahora MAGIX Films en DVD edición TerraTec haciendo un doble clic en el correspondiente icono del escritorio. Tras crear un nuevo proyecto Disc, seleccione “Grabación” y a continuación el punto “Vídeo analógico”.
AyudaSi desea una manual en línea detallado para el software, pulse la tecla F1 estando abierto el programa.
Stuurprogramma- en software-installatie onder Windows VistaSchakel uw PC in en wacht tot Windows Vista (min. Service Pack 1) volledig is opgestart. Sluit nu de USB-kabel aan op de bus van de G3 en daarna in een USB 2.0 poort van uw PC.Zodra u de G3 met de PC heeft verbonden meldt Windows, dat de stuurprogamma-
software voor de “TerraTec G3” moet worden geïnstalleerd. Kies “Stuurprogramma’s zoeken en installeren (aanbevolen)” en dan “Niet online zoeken.” Plaats nu a.u.b. de meegeleverde installatie-DVD in het DVD-station en kies “Volgende”. Nu wordt het stuurprogramma gezocht en geïnstalleerd. Vista vraagt, of u het stuurprogramma echt wilt installeren, wat u met “Installeren” bevestigt. Eventueel verschijnt een melding, dat het stuurprogramma de Windows-Logo-test niet heeft doorstaan. Deze melding kunt u rustig negeren en met een klik op “Installatie vervolgen” doorgaan. Nadat de stuurprogrammabestanden zijn gekopieerd, beëindigt u de installatie met “Sluiten”. Ga nu naar het DVD-station, kies uw taal, dan het punt software en ga door met de installatie van MAGIX Filme op DVD TerraTec Edition.Volg gewoon de instructies op het beeld-scherm.
Aansluiten en eerste keer startenDe TerraTec G3 kan zowel via scart als ook via S-Video/Composite worden aangesloten. Breng de schakelaar naast de USB-poort voor het starten van de software in de betreffende stand.Start nu MAGIX Filme op DVD TerraTec Edition door een dubbelklik op het daarbij behorende desktop-symbool. Na het aanmaken van een nieuw disc-project kiest u “Opname” en dan het punt “Analoge video”.
Hulp:Een uitvoerig online-handboek bij de software krijgt u, wanneer u op de toets F1 drukt terwijl het programma is geopend.
Quick Start GuideWindows Vista
G3

Treiber- und Softwareinstallation unter Windows XPSchalten Sie Ihren PC ein und warten Sie bis Windows XP (min. Service Pack 2) voll-ständig geladen ist. Legen Sie dann die beiliegende Installations-DVD in Ihr Laufwerk und ignorieren Sie ggf. den Autostarter. Stecken Sie jetzt das USB-Kabel in die Buchse des G3 und anschließend in einen USB 2.0 Anschluss Ihres PCs.
Sobald Sie den G3 mit dem PC verbunden haben, meldet Windows in Form einer Sprechblase in der Symbolleiste, dass eine neue Hardware - der TerraTec G3 - gefunden wurde. Es startet der Windows Installations-Assistent. Wählen Sie “Nein, diesmal nicht” und dann “Software automa-tisch installieren (empfohlen)”, und “Weiter”. Jetzt wird der Treiber installiert. Eventuell erscheint eine Meldung, dass die Treiber den Windows-Logo-Test nicht bestanden haben. Diesen Hinweis können Sie ruhigen Gewissens ignorieren und mit einem Klick auf “Installation fortsetzen” fortfah-ren. Nachdem die Treiberdateien kopiert wurden, schließen Sie die Installation mit “Fertigstellen” ab. Wechseln Sie nun auf das DVD-Laufwerk, wählen Sie Ihre Sprache aus, dann den Punkt Soft-ware und fahren Sie mit der Installation von MAGIX Filme auf DVD TerraTec Edition fort. Folgen Sie einfach den Anweisungen auf dem Bildschirm.
Anschluss und erster StartDer TerraTec G3 kann sowohl über Scart als auch über S-Video/Composite angeschlossen wer-den. Bringen Sie den Schalter neben dem USB Anschluss vor dem Start der Software bitte in die entsprechende Stellung. Starten Sie nun MAGIX Filme auf DVD TerraTec Edition durch einen Dop-pelklick auf das dazugehörige Desktop- Symbol. Nach dem Anlegen eines neuen Disc-Projektes wählen Sie bitte „Aufnahme“ und dann den Punkt „analoges Video.“
HilfeEin ausführliches Online-Handbuch zu der Software erhalten Sie, wenn Sie bei geöffnetem Programm die Taste F1 drücken.
Installing drivers and software under Windows XPSwitch on your computer and wait until Windows XP (min. Service Pack 2) has loaded completely. Then insert the installation DVD provided into your DVD drive and, if applicable, ignore the AutoStart. Now plug the USB cable into the jack of the G3 and then into a USB 2.0 port on your computer.
Once you have connected the G3 to your computer, Windows will display a message bubble in the taskbar to indicate that it has found new hardware - TerraTec G3. The Windows installation wizard will now appear. Select “No, not this time”, followed by “Install the software automatically (recommended)” and click “Next”. The drivers are now installed. You may get a message that the driver did not pass the Windows Logo test. It is safe to ignore this information and continue the installation by clicking „Continue anyway“. Click “Finish” to complete the installation once the driver files have been copied. Switch back to the DVD drive, select your language, then the Software item and continue with the installation of MAGIX „Movies on DVD TerraTec Edition“. Simply follow the instructions provided.
Connecting and starting the first timeThe TerraTec G3 can be connected via Scart as well as via S-Video/composite. Before starting the software, push the switch next to the USB port into the correct position.Now, start MAGIX „Movies on DVD TerraTec Edition“ by double-clicking its icon on the desktop. After creating a new disc project, select „Recording“ and then the „Analog video“ item.
HelpTo access a detailed online manual for the software, press „F1“ while the program is running.
Installation des pilotes et des logiciels sous Windows XPAllumez votre PC et attendez que Windows XP (au moins Service Pack 2) soit entiè-rement chargé. Insérez ensuite le DVD d’installation joint dans le lecteur de disque et ignorez le cas échéant la fenêtre de démarrage automatique. Reliez le câble USB au connecteur du G3 puis à un port USB 2.0 de votre PC. Dès que vous avez relié le G3
au PC, Windows signale qu’un nouveau matériel – le TerraTec G3 – a été détecté en affichant une infobulle dans la barre des tâches. L’assistant d’installation de Windows démarre. Sélectionnez «Non, pas maintenant» puis «Installer le logiciel automatiquement (recommandé)», et «Suivant». Windows installe le pilote. Eventuellement un message indique que le pilote n‘a pas été validé lors du test permettant d‘obtenir le logo Windows. Vous pouvez ignorer ce message et continuer en cliquant sur « Poursuivre l‘installation ». Une fois que les fichiers des pilotes ont été copiés, terminez l’installation en cliquant sur «Terminer». Sélectionnez votre lecteur de DVD, puis choisis-sez votre langue, ensuite le dossier Software et procédez à l‘installation du logiciel MAGIX Films sur DVD Edition TerraTec. Suivez simplement les instructions affichées.
Connexion et première utilisationLe TerraTec G3 peut être connecté via la prise Péritel aussi bien que via la prise S-vidéo/Com-posite. Avant d‘exécuter le logiciel, mettez le bouton à côté de la prise USB dans la position correspondante.Exécutez maintenant MAGIX Films sur DVD Edition TerraTec en double-cliquant sur l‘icône correspondante. Après avoir créé un nouveau projet de gravure de disque, sélectionnez « Enre-gistrement » puis « Vidéo analogique ».
Aide :Pour consulter l‘aide en ligne décrivant le logiciel en détail, appuyez sur la touche de fonction F1.
Quick Start GuideWindows XP G3
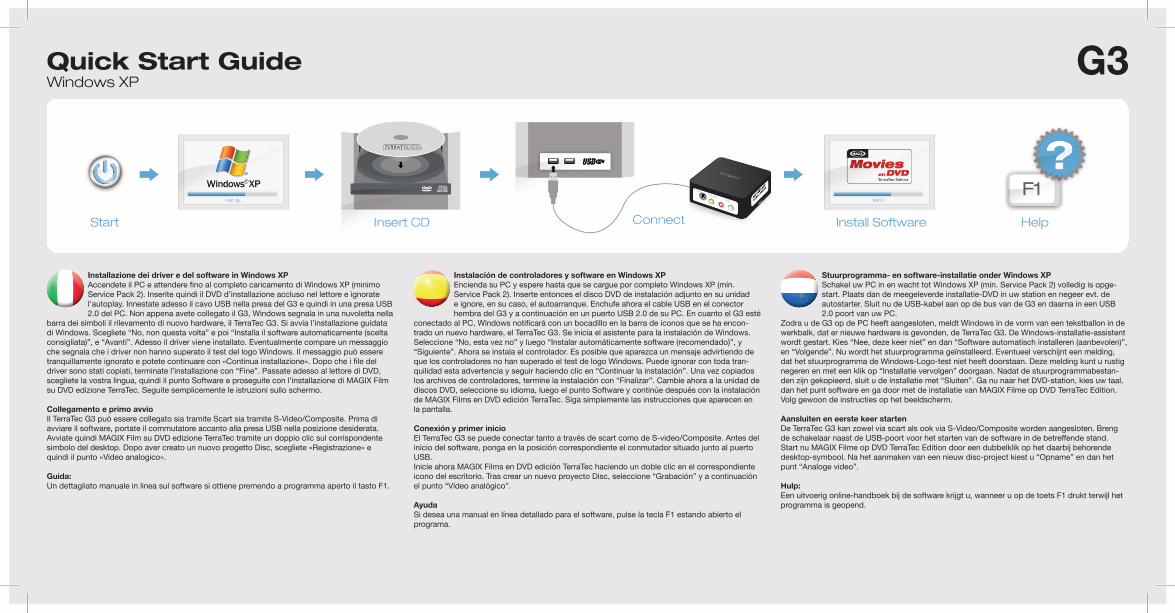
Installazione dei driver e del software in Windows XPAccendete il PC e attendere fino al completo caricamento di Windows XP (minimo Service Pack 2). Inserite quindi il DVD d’installazione accluso nel lettore e ignorate l’autoplay. Innestate adesso il cavo USB nella presa del G3 e quindi in una presa USB 2.0 del PC. Non appena avete collegato il G3, Windows segnala in una nuvoletta nella
barra dei simboli il rilevamento di nuovo hardware, il TerraTec G3. Si avvia l’installazione guidata di Windows. Scegliete “No, non questa volta” e poi “Installa il software automaticamente (scelta consigliata)”, e “Avanti”. Adesso il driver viene installato. Eventualmente compare un messaggio che segnala che i driver non hanno superato il test del logo Windows. Il messaggio può essere tranquillamente ignorato e potete continuare con «Continua installazione». Dopo che i file del driver sono stati copiati, terminate l’installazione con “Fine”. Passate adesso al lettore di DVD, scegliete la vostra lingua, quindi il punto Software e proseguite con l’installazione di MAGIX Film su DVD edizione TerraTec. Seguite semplicemente le istruzioni sullo schermo.
Collegamento e primo avvioIl TerraTec G3 può essere collegato sia tramite Scart sia tramite S-Video/Composite. Prima di avviare il software, portate il commutatore accanto alla presa USB nella posizione desiderata.Avviate quindi MAGIX Film su DVD edizione TerraTec tramite un doppio clic sul corrispondente simbolo del desktop. Dopo aver creato un nuovo progetto Disc, scegliete «Registrazione» e quindi il punto «Video analogico».
Guida:Un dettagliato manuale in linea sul software si ottiene premendo a programma aperto il tasto F1.
Instalación de controladores y software en Windows XPEncienda su PC y espere hasta que se cargue por completo Windows XP (mín. Service Pack 2). Inserte entonces el disco DVD de instalación adjunto en su unidad e ignore, en su caso, el autoarranque. Enchufe ahora el cable USB en el conector hembra del G3 y a continuación en un puerto USB 2.0 de su PC. En cuanto el G3 esté
conectado al PC, Windows notificará con un bocadillo en la barra de iconos que se ha encon-trado un nuevo hardware, el TerraTec G3. Se inicia el asistente para la instalación de Windows. Seleccione “No, esta vez no” y luego “Instalar automáticamente software (recomendado)”, y “Siguiente”. Ahora se instala el controlador. Es posible que aparezca un mensaje advirtiendo de que los controladores no han superado el test de logo Windows. Puede ignorar con toda tran-quilidad esta advertencia y seguir haciendo clic en “Continuar la instalación”. Una vez copiados los archivos de controladores, termine la instalación con “Finalizar”. Cambie ahora a la unidad de discos DVD, seleccione su idioma, luego el punto Software y continúe después con la instalación de MAGIX Films en DVD edición TerraTec. Siga simplemente las instrucciones que aparecen en la pantalla.
Conexión y primer inicioEl TerraTec G3 se puede conectar tanto a través de scart como de S-video/Composite. Antes del inicio del software, ponga en la posición correspondiente el conmutador situado junto al puerto USB.Inicie ahora MAGIX Films en DVD edición TerraTec haciendo un doble clic en el correspondiente icono del escritorio. Tras crear un nuevo proyecto Disc, seleccione “Grabación” y a continuación el punto “Vídeo analógico”.
AyudaSi desea una manual en línea detallado para el software, pulse la tecla F1 estando abierto el programa.
Stuurprogramma- en software-installatie onder Windows XPSchakel uw PC in en wacht tot Windows XP (min. Service Pack 2) volledig is opge-start. Plaats dan de meegeleverde installatie-DVD in uw station en negeer evt. de autostarter. Sluit nu de USB-kabel aan op de bus van de G3 en daarna in een USB 2.0 poort van uw PC.
Zodra u de G3 op de PC heeft aangesloten, meldt Windows in de vorm van een tekstballon in de werkbalk, dat er nieuwe hardware is gevonden, de TerraTec G3. De Windows-installatie-assistent wordt gestart. Kies “Nee, deze keer niet” en dan “Software automatisch installeren (aanbevolen)”, en “Volgende”. Nu wordt het stuurprogramma geïnstalleerd. Eventueel verschijnt een melding, dat het stuurprogramma de Windows-Logo-test niet heeft doorstaan. Deze melding kunt u rustig negeren en met een klik op “Installatie vervolgen” doorgaan. Nadat de stuurprogrammabestan-den zijn gekopieerd, sluit u de installatie met “Sluiten”. Ga nu naar het DVD-station, kies uw taal, dan het punt software en ga door met de installatie van MAGIX Filme op DVD TerraTec Edition.Volg gewoon de instructies op het beeldscherm.
Aansluiten en eerste keer startenDe TerraTec G3 kan zowel via scart als ook via S-Video/Composite worden aangesloten. Breng de schakelaar naast de USB-poort voor het starten van de software in de betreffende stand.Start nu MAGIX Filme op DVD TerraTec Edition door een dubbelklik op het daarbij behorende desktop-symbool. Na het aanmaken van een nieuw disc-project kiest u “Opname” en dan het punt “Analoge video”.
Hulp:Een uitvoerig online-handboek bij de software krijgt u, wanneer u op de toets F1 drukt terwijl het programma is geopend.
Quick Start GuideWindows XP
G3