Embed Size (px)
Citation preview

JH Termite Barrier (TB)
Page 1 of 67 Copyright JH Envirtech JHTBM 1.19.01.2018
JH Termite Barrier (TB) Installation Manual
JH Envirtech Pty Ltd ABN 36 163 906 241

JH Termite Barrier (TB)
Page 2 of 67 Copyright JH Envirtech JHTBM 1.19.01.2018
Index JH Termite Barrier (TB) …………………………………………………………………….. 4
Structure …………………………………………………………………….. 4
Upper Layer …………………………………………………………………….. 4
Middle Layer …………………………………………………………………….. 4
Lower Layer …………………………………………………………………….. 4
Finished Layer …………………………………………………………………….. 4
JH Termite Barrier Advantages …………………………………………………………………….. 4
Chemical Foundation …………………………………………………………………….. 5
Security …………………………………………………………………….. 5
Flexibility …………………………………………………………………….. 5
Compliance …………………………………………………………………….. 6
Authorised Operators / Training …………………………………………………………………….. 7
Authorised Operators / Registration …………………………………………………………………….. 7
Technical Support …………………………………………………………………….. 7
Builders Responsibility …………………………………………………………………….. 7
JH TB Warranty …………………………………………………………………….. 7
Home Owners Responsibility / Annual Inspections ………………………………………………………….. 7
JH TB Installation Process …………………………………………………………………….. 8
JH TB Collar Installation …………………………………………………………………….. 9
Pipe / Service Penetrations …………………………………………………………………….. 9
JH TB Collars …………………………………………………………………….. 9
JH TB Collar Installation Details …………………………………………………………………….. 10
JH TB Tubes / Electrical Conduit Installation Details ………………………………………………. 11
Horizontal Penetrations …………………………………………………………………….. 12
Multiple Penetrations …………………………………………………………………….. 13
JH TB Perimeter Protection …………………………………………………………………….. 14
JH TB Slab Edge Rebate - Detail …………………………………………………………………….. 15
One Brick Rebate …………………………………………………………………….. 15
Two Brick Rebate …………………………………………………………………….. 16
Joins / Repairs …………………………………………………………………….. 17
Corner Details …………………………………………………………………….. 18
Inspection Zones …………………………………………………………………….. 19
Render Detail …………………………………………………………………….. 20
Knock–out Block Installation Detail ………….………………………………………………………….. 21
Brick Edge Detail …………………………………………………………………….. 22
Full Under Slab Termite Protection & Moisture Barrier Details……………………………………………… 23 -24
Step Down Installation Details …………………………………………………………………….. 25-26
Paving, Garage / Driveway & Concrete Path Details ………… ……………………………………. 27
Retaining Wall Details …………………………………………………………………….. 28-34
Zero Building Alignment Installation Details …………………………………………………………………….. 35-37
Construction Joint Installation Details …………………………………………………………………….. 38
Infill Slab Using brickwork as Formwork Installation Detail …………………………………………….... 39

JH Termite Barrier (TB)
Page 3 of 67 Copyright JH Envirtech JHTBM 1.19.01.2018
Index (cont.)
Commercial Installation Details ………………………………………………………………… 40-46
Hebel Installation Details ………………………………………………………………… 47-50
Bearer & Joist Installation Detail ………………………………………………………………… 51-52
Renovation Slab Installation Details ………………………………………………………………… 53
Renovation Bearer& Joist (Timber Replacement Detail) ………………………………………….. 54
Renovation (Replacement Timber Floor) Installation Detail ………………………………………….. 55
Renovation Floating Floor Installation Detail ………………………………………………………………... 56
Door Sill Installation Detail ………………………………………………………………… 57-58
DPC Installation Detail ………………………………………………………………… 59
Essential Equipment ………………………………………………………………… 60
Paperwork / Warranty Process ………………………………………………………………… 60
Site Installation Report / Certificate of Compliance ……………………………………………………… 61
Terms & Conditions ………………………………………………………………… 62
Termite Protection Notice ………………………………………………………………… 63
Training Assessment ………………………………………………………………… 64-65
JH Hard Collar details ………………………………………………………………… 66
JH Pre-formed Internal & External Corner details ……………………………………………………… 67
JH Envirtech Contact Detail ………………………………………………………………... 67

JH Termite Barrier (TB)
Page 4 of 67 Copyright JH Envirtech JHTBM 1.19.01.2018
JH Termite Barrier (TB)
Structure
JH Termite Barrier (TB) consists of a quality controlled –
Upper layer
High impact resistant polyethylene patterned laminate with a thickness of 200 microns and coloured with a
distinguishing green pigment. Nominal weight 170 -200 g/m2. The sheet is to be laminated tightly at all points to the
middle layer modulus fibre blanket.
Middle layer
A quality controlled manufactured Non-woven modulus fibre blanket comprising polypropylene fibres. Nominal
weight 150g/m2, thickness (unweighted) max .6mm.
Precisely impregnated with the Pyrethroid (Deltamethrin) with a quality controlled loading of 1g/m2 minimum; with
target loading of 1.45g/m2.
Lower layer
Vapour resistant polyethylene laminate with a thickness of 100 microns and white pigment. Nominal weight
80g/m2. The sheet is to be laminated tightly at all points to the middle layer modulus fibre blanket.
Finished Product
To be rolled with white LDPE layer on the outside of the roll.
No cardboard tubes down centre of rolls.
Packed in solar resistant plastic bags; one roll per bag or 3 rolls per bag.
JH TB Advantages
The JH Termite Barrier (TB) has distinct advantages.
1. JH TB has the ability to KILL termites when they come into contact with the Deltamethrin impregnated
modulus fibre.
2. JH TB which has Detamethrin impregnated into its modulus fibre REPELLS termites before they are able to
reach the critical entry paths into building structures.
3. JH TB with its toughened physical outer layers encapsulating the Deltamethrin impregnated modulus fibre
acts as a Durable PHYSICAL TERMITE BARRIER
4. JH TB with its toughened polyethylene outer layers acts as a Damp Proof Course / Vapour Barrier when
incorporated in the JH TB full under slab and perimeter termite protection system.

JH Termite Barrier (TB)
Page 5 of 67 Copyright JH Envirtech JHTBM 1.19.01.2018
Chemical Foundation
Deltamethrin is the active ingredient in the JH TB a Pyrethriod / termicide / insecticide, Delamethrin has an
exceptional 50 year life expectancy, coupled with its recognised attributes in the control of termites. This has led to
the JH Termite Barrier’s registration with the Australian Pesticides and Veterinary Medicines Authority (APVMA
Approval Number 80846). JH TB Chemical Testing and verification carried out by PGR International Pty Ltd.
Security
JH TB protects the most valuable asset that most Australian families have acquired for their future prosperity and
security ‘there home’. The fact that the majority of household insurance companies will NOT insure against the
ingress of subterranean termites into a dwelling has led to the BCA making it a requirement that an approved
termite protection system be installed when a primary building element of a Class 1 and 10 building is considered
susceptible to termite attack.
Flexibility
JH TB is able to be /cut /joined/ moulded/to encompass the complex building designs which are required to
accommodate the demanding geographic landscapes found in Australian.
Figure 1

JH Termite Barrier (TB)
Page 6 of 67 Copyright JH Envirtech JHTBM 1.19.01.2018
Compliance
JH TB is approved as an alternative solution in accord with the Building Code of Australia (BCA). The approved
Assessment Method demonstrates that independent scientific evidence has been produced to prove that JH TB
meets the Performance Requirements and/or the Deemed-to-Satisfy Provisions of the Australian Standards AS
3600 Series – Termite management.
Efficacy trials undertaken by Further Research and Consulting Pty Ltd has demonstrated that JH TB may be used in
accord with, and meets, the requirements of:
AS 3660.1-2014 Termite Management – Part 1: New building work;
AS 3660.2-2014 Termite Management – Part 2: In and around existing building and structures;
AS 3660.3-2014 Termite Management – Part 3: Assessment criteria for termite management systems;
AS 2870-2011 Residential slabs and footings;
AS 3600 Concrete structures;
AS 4773.1-2010 Masonry in small buildings, Part 1: Design
AS 4773.2-2010 Masonry in small buildings, Part 2: Construction
AS/NZS 4347:1995 Damp Proof Courses and Flashings
Independent trials, conducted by PGR International Pty Ltd, in accordance with the requirements of the Australian
Standard AS 3660.3.2014 Termite management Part 3 Assessment criteria for termite management systems; show
that the JH TB should remain as an effective termite measure for a minimum of 50 years.
JH TB meets the performance criteria of section 1 Clause 1.3, of AS 3660 – 2000 Termite management Part 1, New
building work in accordance to AS 3660 – 2014 Termite management Part 3 Assessment criteria for termite
management systems.
JH TB also meets the BCA performance and assessment requirements BCA Class 2 and Class 9 Buildings – Volume
One: BP1.1, BP2.1 and BCA Class 1 and Class 10 Buildings Volume Two: P2 1.1, QLD P2.1.3
JH TB meets the performance criteria of AS/NZS 4347:1995 Damp Proof Courses and Flashings / Methods 1, 4,
5, 6 and 9
JH TB also meets the BCA 2015 performance and assessment requirements BCA Class 2 and Class 9 Buildings
Clauses: Volume One: F1.9, SA F1.9(b) and BCA Class 1 and Class 10 Buildings Volume Two: 3.3.4.0, SA 3.3.4.0
JH TB has APVMA Registration /Label Approval No: 80846/101770 Contains Pyrethroid / Deltamethrin which has a
proven track record in deterring termite attack.
CodeMark Certification (SAIG-CM20096)
HIA Green Smart Member
Ecospecifier / Verified Product Certified
50 Year Life Expectancy

JH Termite Barrier (TB)
Page 7 of 67 Copyright JH Envirtech JHTBM 1.19.01.2018
Authorised Operators / Training
To become an accredited JH TB authorised operator you must have undergone both theoretical and practical
training by a JH TB Accredited Trainer.
Authorised Operators / Registration
It is essential that the JH TB Accredited installer must be a Certified Pest Controller with current Pest Controller
Licence and current Professional Indemnity. Any Certified Installer who decides for whatever reason to terminate
their trade/skill in Pest Control after being trained by JH Envirtech must provide to JH Envirtech in writing of their
intention. JJH Envirtech requires notification of cancellation or non-renewal of professional indemnity. Pest
controllers may not install JH TB without current professional indemnity or public liability. All JH Envirtech trained
operators will be registered with JH Envitrtech Pty Ltd after demonstrating adequate competency to carrying out
practical installations.
Technical Support
JH Envirtech provides professional technical support for all aspects of termite management including design
specifications and installation issues which may be encountered on difficult building sites. JH Envirtech Pty Ltd
Head Office is based in Sydney NSW
Builders Responsibility
It is the builder’s responsibility to ensure that –
1. All through slab penetrations are in there correct and final position prior to being treated with the JH TB
2. All ground works are correctly prepared to and the concrete slab meets the requirements of AS 2870-2011
Residential slabs and footings
3. Has a comprehensive understanding of the JH TB to ensure the barrier is not compromised by other trades
during and after installation.
4. To contact the JH TB Operator if the barrier has been compromised and requires any rectification.
5. Ensures all JH TB certification / warranty paperwork is passed onto the client at the time of the building
hand over.
JH TB Warranty
JH TB carries a 50 year manufactures product warranty when installed as detailed in the correct manner as outlined
in the JH Termite Barrier Installation Manual and by Authorised JH Termite Barrier Accredited Installers
Home Owners Responsibility / Annual Inspections
It is the home owner’s responsibility to ensure that annual inspections are carried out by a professional timber pest
inspector in accord with the requirements of the Australian Standard Series AS 3660 Termite management. This is
essential to maintain the security of the home from subterranean termite damage and to maintain the
Manufactures Product Warranty. If subterranean termite damage should occur through failure of the JH TB the
warranty covers both structural and decorative timbers.

JH Termite Barrier (TB)
Page 8 of 67 Copyright JH Envirtech JHTBM 1.19.01.2018
JH TB Installation Process
1. All service penetration (water pipes, electrical conduits, waste sevice pipes, GPO, gas ect) extending
through the re-enforced concrete slab are to protected wth JH TB Collars, Wraps or JH Termistop PVC Hard
Collars (Ref Page 66)
2. After the concrete pour, liase with the builder to establish the positioning of timber wall frames and mark
their positioning on the concret slab with chalk lines.
3. Liase with the builder / bricklayer to establish the number of brick courses that are to be layed before the
positioning of the Damp Proof Course and flashing. This will determine the width of the Jinhng TPB strip
required for the installation, though this may vary due to step downs in brickwork levels.
4. Install Jinhong strips to the chalk lines, fixing the stip in place with 15mm concrete pins or nail gun at
approximatley 350mm centres, 3M spray adhesive may be used to fix the JH TB to the concrete slab and
brickwork..
5. Ensure all internal and external corner overlaps are securley nailed and glued, to avoid damage and
movement during the standing of the wall frames.
6. The bricklayer will now lay the required courses of brickwork to allow the positioning of the DPC / Flashing.
7. Ensure all corner overlaps and joins in the JH TB are securely glued with (3M spray adhesive or equivalent)
and taped ( quality cloth tape).
8. Ensure that the JH TB strips will reach the outside edge of the brickwork and glue into place.
9. Carefull attentention should be taken to areas such as window sills, doorways and garage openings.
10. Ensure that sheets installed over brick piers with threaded rod should be installed tight over the rod with no
gaps around threaded rod. (see Figure 10)
11. Liase with the builder to establish the timing of re-visits to the site in cases where driveways will need
treating and in some cases the positioning of JH TB for access ramps, patio’s, paths, colunms ect.
12. Position the metre box sticker, only when you are prepared to sign off on the JH TB installation and supply
the builder, council, home owner and JH Envirtech with the required installation certificates, (JH TB
Installation Certificate, Certificate of Compliance, Warranty Conditions).
JH TB Collars & Tube JH TB Rolls
Figure 2 Figure 3

JH Termite Barrier (TB)
Page 9 of 67 Copyright JH Envirtech JHTBM 1.19.01.2018
JH TB Collar Installation
Pipe penetration (Plumbing, electrical, telecommunication and gas) may be treated with either JH TB Collars , JH TB
Tubes or JH Termistop PVC Hard Collars (Ref Page 66)
Pipe / Service Penetrations
Pipe penetrations can be protected with either JH TB Collars, JH TB Tubes or JH Termi Stop PVC Hard Collars.
JH TB Collars are available in two sizes, 120mm for pipes up to 100mm diameter, and 60mm for pipes up to 50mm
diameter. For larger pipes, two 120mm Collars may be cut at the seam and joined together (glued). They MUST be
secured in place using two cable ties.
JH TB Collars
Take care when Installing JH TB Collars, not to overstretch or place unnecessary pressure on the joint seals. Secure
JH TB Collars to the pipe with a cable tie, position the cable tie near the base of the Collar tube, and tighten with a
set of pliers. Ensure there are no gaps between pipe and JH TB Collar.
Where JH TB Collars are used in conjunction with whole of slab installations, the JH TB Collars should be taped
horizontally to the full under slab JH TB Sheet to complete the moisture membrane.
Figure 4

JH Termite Barrier (TB)
Page 10 of 67 Copyright JH Envirtech JHTBM 1.19.01.2018
JH TB Collar Installation Details
1. Position JH TB Collar over pipe and slide down till collar flange sits on plastic vapour barrier.
2. Secure JH TB Collar to pipe with two cable ties, the first at base of the corrar the second approx 50mm
above the first.
Figure 5
Figure 6
Figure 7

JH Termite Barrier (TB)
Page 11 of 67 Copyright JH Envirtech JHTBM 1.19.01.2018
JH TB Tubes / Electrical Conduits Installation Details
Wrap JH TB Tubes around all electrical conduits penetrating the slab for a length of about 300mm. The JH TB should
remain visible after the concrete pour on any conduit. Ensuring the wrapped tube overlaps before positioning the
cable ties.
Cable ties at either end of the JH TB Tube are used to secure the JH TB Tube to the pipe, the JH TB Tube will extend
through the concrete slab at either end. Where conduits are in clusters, each pipe must be wrapped individually.
When wrapping conduits with JH TB sheet material the white side of the JH TB must be facing outwards.
Figure 8

JH Termite Barrier (TB)
Page 12 of 67 Copyright JH Envirtech JHTBM 1.19.01.2018
Horizontal Penetrations
A horizontal penetration is a right-angle insertion into the slab. It usually occurs where a service penetration goes
through an edge beam or structural beam. This may allow concealed termite entry through any hollow building
materials holding the service penetrations in place (e.g. copper or PVC pipe). All such hollow structures must be
treated with JH TB tubes or collars prior to concrete pour. In some cases the JH TB may be required to be fitted to
the outside of the concrete slab due to positioning of pies after the concrete slab has been poured. See diagram
below.
Figure 9

JH Termite Barrier (TB)
Page 13 of 67 Copyright JH Envirtech JHTBM 1.19.01.2018
Multiple Penetrations
This is where there are several service penetrations that are close to each other. Often these consist of different
pipe sizes. JH TB Collars, Tubes or wrapping the pipes in JH TB Sheet cut to size are ideal in these cases. Treat each
penetration separately with JH TB Collars / Tubes or moulded sheet.
Figure 10 Figure 11
Figure 12

JH Termite Barrier (TB)
Page 14 of 67 Copyright JH Envirtech JHTBM 1.19.01.2018
JH TB Perimeter Protection.
When JH TB is installed in conjunction with AS 2870: Residential slabs and footings – Construction and AS 3600:
Concrete structures. When fixing the JH TB to the perimeter of the concrete foundation it will become a continuous
termite perimeter barrier.
JH TB Perimeter installations are to be strictly adhered to as displayed in the JH TB Manual and the Australian
Standard AS 3660 Termite management Part 1: New building work.
A BCA approved damp-proof course will be positioned above the JH TB.
Consultation with the builder / home owner is highly recommended (Note: the builder may not be responsible for
the landscaping and paths), this should take place prior to the positioning of the JH TB to establish where the
finished ground levels (for the full perimeter of the building) will be aligned in relation to the concrete rebate and
brickwork. This will include but is not limited to areas such as concrete paths / driveways / access ramps / patios / car
ports / stairs / garden beds / land scaping etc.
In some situations the Damp-proof course will be positioned under the first course of brickwork, in this situation the
bottom of the weep-holes will be directly above the concrete rebate, this situation will require special consideration
as the weep-holes may be easily compromised by subterranean termites.
Where the installation may be compromised by a build-up of soil at the weephole level or rendering of the bricks, it
is recommended that either a 75mm pavement / mowing strip is installed this will be in conjunction with the JH TB
extending under the mowing strip or 75mm of the vertical slab edge is exposed.
Figure 13

JH Termite Barrier (TB)
Page 15 of 67 Copyright JH Envirtech JHTBM 1.19.01.2018
JH TB Slab Edge Rebate – Detail
One Brick Rebate
JH TB perimeter strips will be require to be nailed at 300 – 400 mm intervals with concrete clouts or Ramset
concrete nails and glued to the concrete slab, so that it will be positioned below the bottom plate of the framing
timbers (in brick veneer construction) or below brickwork (in cavity brick construction) this will allow the JH TB to be
securely held in place until the external brickwork is laid. The flexibility of the JH TB allows any excess barrier to be
placed into the wall cavity.
When positioning the JH TB strip, align one edge of the strip with the outside edge of the concrete rebate and
extend the other edge to the top of the concrete slab, fasten the edge that extends to the top of the concrete slab
with concrete clouts or Ramset Nails and 3M Super 74 Spray Adhesive.
A BCA approved damp-proof course will be positioned above the JH TB.
Consultation with the builder / home owner is highly recommended (Note: the builder may not be responsible for
the landscaping and paths), this should take place prior to the positioning of the JH TB to establish where the
finished ground levels (for the full perimeter of the building) will be aligned in relation to the concrete rebate and
brickwork. This will include but is not limited to areas such as concrete paths / driveways / access ramps / patios / car
ports / stairs / garden beds / land scaping etc.
In some situations the Damp-proof course will be positioned under the first course of brickwork, in this situation the
bottom of the weep-holes will be directly above the concrete rebate, this situation will require special consideration
as the weep-holes may be easily compromised by subterranean termites
Where the installation may be compromised by a build-up of soil at the weephole level or rendering of the bricks, it
is recommended that either a 75mm pavement / mowing strip is installed this will be in conjunction with the JH TB
extending under the mowing strip or 75mm of the vertical slab edge is exposed.
Figure 14
JH Termite Barrier (TB)
Page 16 of 67 Copyright JH Envirtech JHTBM 1.19.01.2018
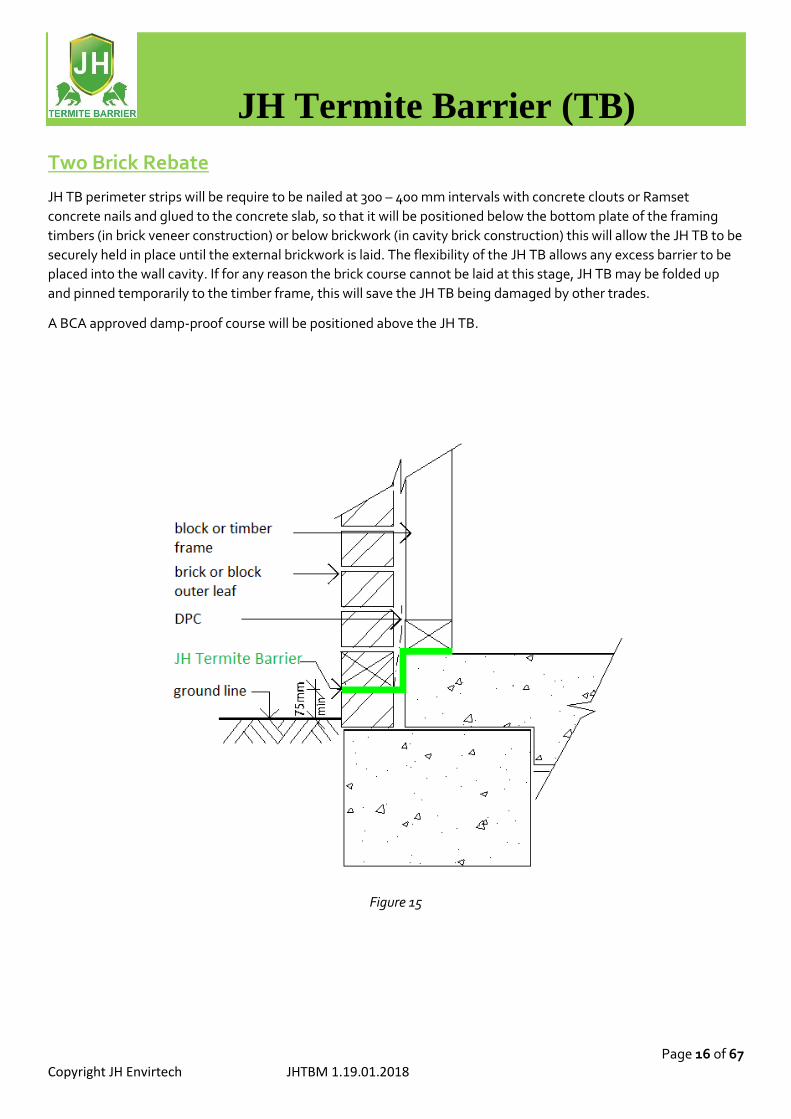
Two Brick Rebate
JH TB perimeter strips will be require to be nailed at 300 – 400 mm intervals with concrete clouts or Ramset
concrete nails and glued to the concrete slab, so that it will be positioned below the bottom plate of the framing
timbers (in brick veneer construction) or below brickwork (in cavity brick construction) this will allow the JH TB to be
securely held in place until the external brickwork is laid. The flexibility of the JH TB allows any excess barrier to be
placed into the wall cavity. If for any reason the brick course cannot be laid at this stage, JH TB may be folded up
and pinned temporarily to the timber frame, this will save the JH TB being damaged by other trades.
A BCA approved damp-proof course will be positioned above the JH TB.
Figure 15

JH Termite Barrier (TB)
Page 17 of 67 Copyright JH Envirtech JHTBM 1.19.01.2018
JH TB Joins / Repairs
When joining the JH TB Strips, a minimum 50mm overlap is required at all perimeter joins, at all internal and
external corner overlaps or where a repair patch is required. All JH TB joins / overlaps are to be glued into position
with 3M Scotch-Weld Non-Flammable Foam Fast 74 NF Spray Adhesive or equivalent.
Always ensure JH TB will be laid above the proposed level of any future landscaping etc., and prior to the laying of
concrete mowing strips and pavements if the latter are required or planned.
Where external walls are face brick and the mortar is pointed, the JH TB strip is laid 3 – 5mm back from the edge of
the brick.
Figure 16 Figure 17
JH TB Corner Detail’s (Internal)
Extend JH TB sheet 50mm past
internal rebate & cut horizontally at
corners of rebate. Overlap 50mm
extensions & fasten into position with
clouts or 3M Adhesive Spray.
Align JH TB sheet with
edge of brickwork.
Align JH TB sheet with
edge of brickwork.
Select & position the require JH
TB perimeter sheet to protect
the perimeter rebate.
Figure 18 Figure 19
JH Termite Barrier (TB)
Page 18 of 67 Copyright JH Envirtech JHTBM 1.19.01.2018
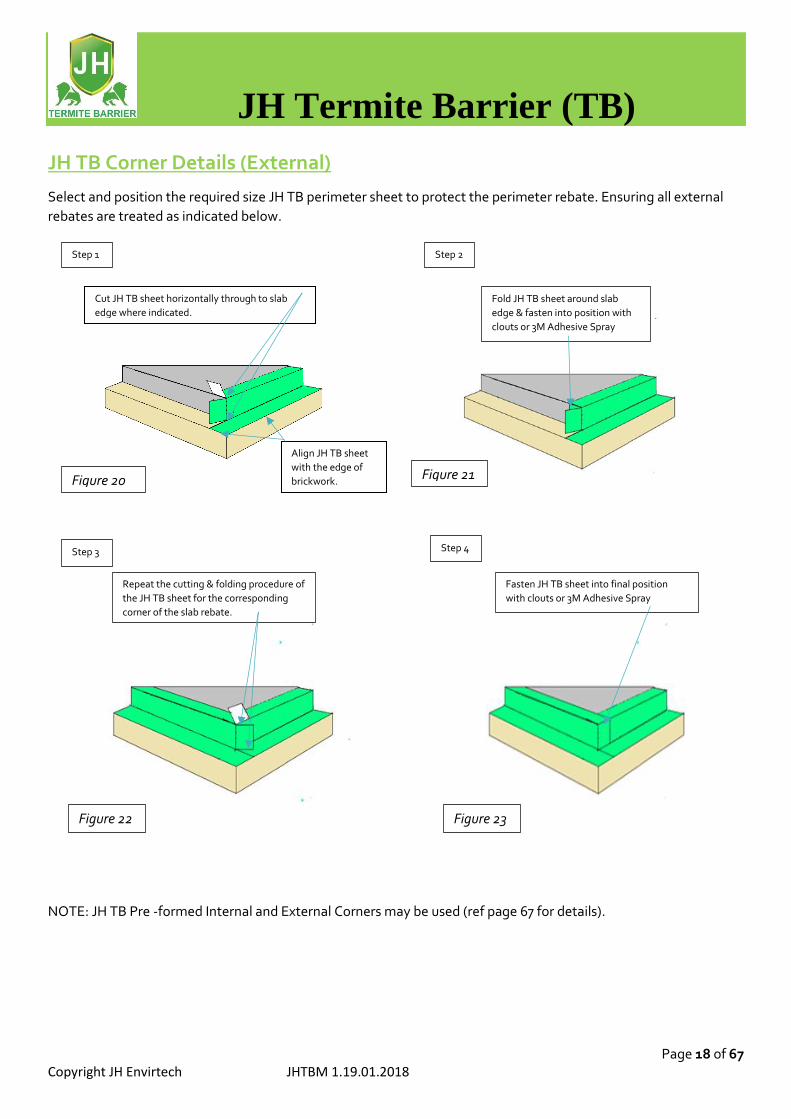
JH TB Corner Details (External)
Select and position the required size JH TB perimeter sheet to protect the perimeter rebate. Ensuring all external
rebates are treated as indicated below.
NOTE: JH TB Pre -formed Internal and External Corners may be used (ref page 67 for details).
Align JH TB sheet
with the edge of
brickwork.
Cut JH TB sheet horizontally through to slab
edge where indicated.
Fold JH TB sheet around slab
edge & fasten into position with
clouts or 3M Adhesive Spray
Repeat the cutting & folding procedure of
the JH TB sheet for the corresponding
corner of the slab rebate.
Fasten JH TB sheet into final position
with clouts or 3M Adhesive Spray
Step 1 Step 2
Step 3 Step 4
Figure 20 Figure 21
Figure 22 Figure 23

JH Termite Barrier (TB)
Page 19 of 67 Copyright JH Envirtech JHTBM 1.19.01.2018
JH TB Inspection Zones
The Australian Standard AS 3660.1 2000 Termite management – New building work, refers to a 75mm inspection
zone between the exposed edge of a termite barrier system in the outer wall of a building and the finished ground
level (FGL) beneath it.
The purpose of this inspection zone is to ensure that an unobstructed, visual surface exists to allow for easy
identification of subterranean termite mud-tubes on the outer wall structure during a termite inspection. It was
decided at the time by the Standards Committee that a distance of 75mm (the depth of one standard building brick)
would allow for changing grade levels due to gardening activities in adjacent soil, the depth of growing grass and so
on, while still leaving sufficient un-obstructed surface to allow for efficient inspection.
With installations of JH TB, where hard surfaces such as concrete, paved pathways, patios, driveways and paving
exist this inspection zone may be reduced to a minimum distance of 25mm between the outer exposed edge of the
termite barrier system and the top surface of the concrete or paving, a 25mm distance is considered adequate to
allow for identification of termite mud-tubes by those trained to do so. This is particularly important where the
reduced step-downs in doorways and windows occur.
Figure 24

JH Termite Barrier (TB)
Page 20 of 67 Copyright JH Envirtech JHTBM 1.19.01.2018
JH TB Render Detail
Where the external brickwork is to be rendered over, the JH TB is to be set back from the edge of the brickwork and
a vee joint is to be inserted into the render at the level the JH TB. This will create an area that the subterranean
termites will have to bridge round with their mud tubes.
Figure 25
JH Termite Barrier (TB)
Page 21 of 67 Copyright JH Envirtech JHTBM 1.19.01.2018
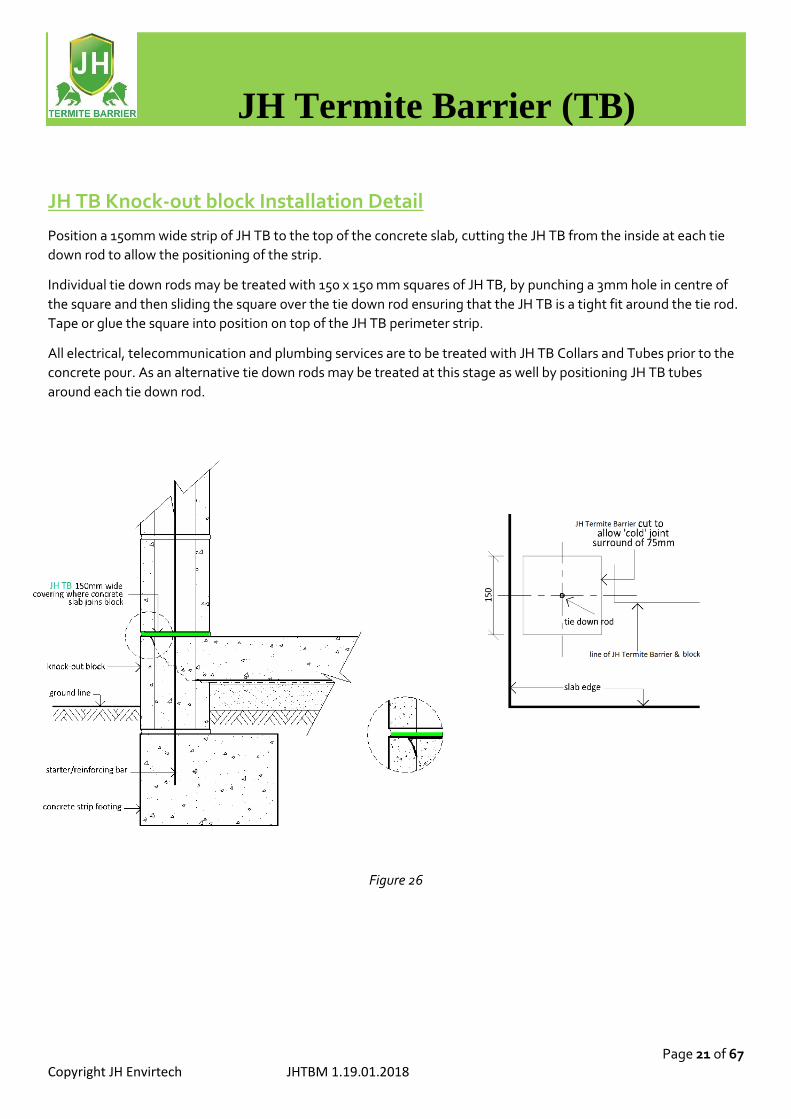
JH TB Knock-out block Installation Detail
Position a 150mm wide strip of JH TB to the top of the concrete slab, cutting the JH TB from the inside at each tie
down rod to allow the positioning of the strip.
Individual tie down rods may be treated with 150 x 150 mm squares of JH TB, by punching a 3mm hole in centre of
the square and then sliding the square over the tie down rod ensuring that the JH TB is a tight fit around the tie rod.
Tape or glue the square into position on top of the JH TB perimeter strip.
All electrical, telecommunication and plumbing services are to be treated with JH TB Collars and Tubes prior to the
concrete pour. As an alternative tie down rods may be treated at this stage as well by positioning JH TB tubes
around each tie down rod.
Figure 26

JH Termite Barrier (TB)
Page 22 of 67 Copyright JH Envirtech JHTBM 1.19.01.2018
JH TB Brickwork Edge Detail
The JH TB may be required to be finished flush with the brickwork or set back 3-5mm where the mortar joints in the
brickwork are to be of a raked finish (see below).
Figure 27

JH Termite Barrier (TB)
Page 23 of 67 Copyright JH Envirtech JHTBM 1.19.01.2018
JH TB Full Under Slab Termite Protection & Moisture Barrier Details
Figure 28
Figure 29 Figure 30

JH Termite Barrier (TB)
Page 24 of 67 Copyright JH Envirtech JHTBM 1.19.01.2018
Full Under Slab Termite Protection & Moisture Barrier Details Con’t
Figure 31 Figure 32

JH Termite Barrier (TB)
Page 25 of 67 Copyright JH Envirtech JHTBM 1.19.01.2018
JH TB Step Downs Installation Detail
Steps downs between concrete floors need to be completely protected with JH TB
Before installing JH TB you need to clean off any excess mortar from the top layer of bricks and continue down the
vertical face of the internal brickwork. This allows for JH TB to be fitted between the edges of the concrete slabs and
to completely cover the bricks. A suitable length of JH TB is used on internal or external corners (if required) and is
secured to the brickwork with clout nails or spray adhesive. The perimeter JH TB is then cut to shape and positioned
between the internal/ external corners, overlapping the prepositioned corner pieces by 50mm and secured into
position by clouts and spray adhesive.
Figure 33
Figure 34

JH Termite Barrier (TB)
Page 26 of 67 Copyright JH Envirtech JHTBM 1.19.01.2018
Figure 35 Figure 36
Figure 37 Figure 38

JH Termite Barrier (TB)
Page 27 of 67 Copyright JH Envirtech JHTBM 1.19.01.2018
JH TB Paving, Garage /Driveway and Concrete Path Details
With installations of JH TB, where hard surfaces such as concrete, paved pathways, patios, driveways and paving
exist this inspection zone may be reduced to a minimum distance of 25mm between the outer exposed edge of the
termite barrier system and the top surface of the concrete or paving a 25mm distance is considered adequate to
allow for identification of termite mud-tubes by those trained to do so. This is particularly important where the
reduced step-downs in doorways and windows occur.
Figure 39 Figure 40
Figure 41

JH Termite Barrier (TB)
Page 28 of 67 Copyright JH Envirtech JHTBM 1.19.01.2018
JH TB Retaining Wall Installation Details
Figure 42

JH Termite Barrier (TB)
Page 29 of 67 Copyright JH Envirtech JHTBM 1.19.01.2018
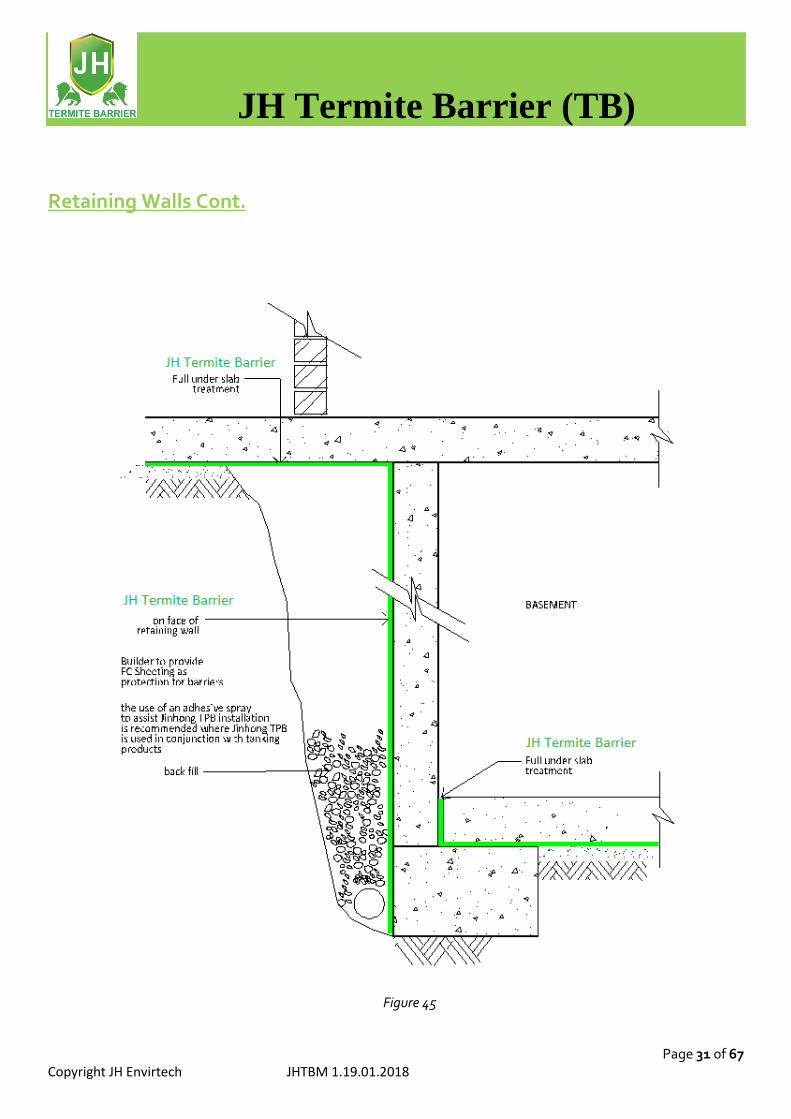
Retaining Walls Cont.
Figure 43

JH Termite Barrier (TB)
Page 30 of 67 Copyright JH Envirtech JHTBM 1.19.01.2018
Retaining Walls Cont.
Figure 44
JH Termite Barrier (TB)
Page 31 of 67 Copyright JH Envirtech JHTBM 1.19.01.2018
Retaining Walls Cont.
Figure 45

JH Termite Barrier (TB)
Page 32 of 67 Copyright JH Envirtech JHTBM 1.19.01.2018
Retaining Walls Cont.
Figure 46

JH Termite Barrier (TB)
Page 33 of 67 Copyright JH Envirtech JHTBM 1.19.01.2018
Retaining Walls Cont.
Figure 47

JH Termite Barrier (TB)
Page 34 of 67 Copyright JH Envirtech JHTBM 1.19.01.2018
JH TB Retaining Walls Cont.
Figure 48

JH Termite Barrier (TB)
Page 35 of 67 Copyright JH Envirtech JHTBM 1.19.01.2018
JH TB Zero Building Alignment Installation Details
Where zero building alignment is require JH TB may be used to protect the new building from termite infestation
coming from the existing building. This will require the permission of the existing building owner to allow the
existing building being sheeted with 1500mm sheets of JH TB, it will be required to overlap the sheet by 50mm and
glue the overlapped sheets with 3M spray adhesive. Galvanized hoop iron and concrete nails may also be used to
fasten the JH TB to the existing building or 3M spray adhesive.
Figure 49

JH Termite Barrier (TB)
Page 36 of 67 Copyright JH Envirtech JHTBM 1.19.01.2018
Zero Building Alignment Con’t
Figure 50

JH Termite Barrier (TB)
Page 37 of 67 Copyright JH Envirtech JHTBM 1.19.01.2018
Zero Building Alignement Con’t
Figure 51
JH Termite Barrier (TB)
Page 38 of 67 Copyright JH Envirtech JHTBM 1.19.01.2018
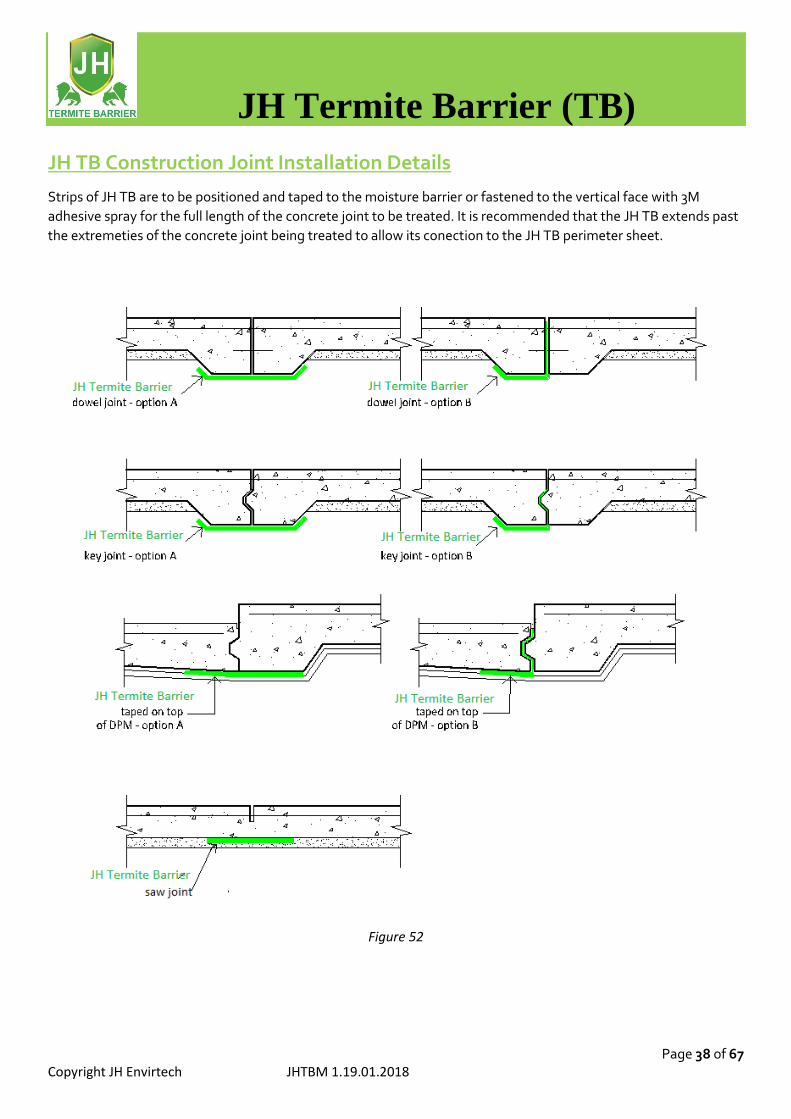
JH TB Construction Joint Installation Details
Strips of JH TB are to be positioned and taped to the moisture barrier or fastened to the vertical face with 3M
adhesive spray for the full length of the concrete joint to be treated. It is recommended that the JH TB extends past
the extremeties of the concrete joint being treated to allow its conection to the JH TB perimeter sheet.
Figure 52

JH Termite Barrier (TB)
Page 39 of 67 Copyright JH Envirtech JHTBM 1.19.01.2018
JH TB Infill Slab / Using brickwork as formwork Installation Detail
Install JH TB to top and internal face of brickwork ensuring that the JH TB sheet laps onto the concrete footing,
fasten the JH TB sheet into place by using concrete clouts into the mortar joints or 3M spray adhesive. The 50mm
overlapping joins are to be secured with 3M spray adhesive and cloth tape.
Figure 53
JH Termite Barrier (TB)
Page 40 of 67 Copyright JH Envirtech JHTBM 1.19.01.2018
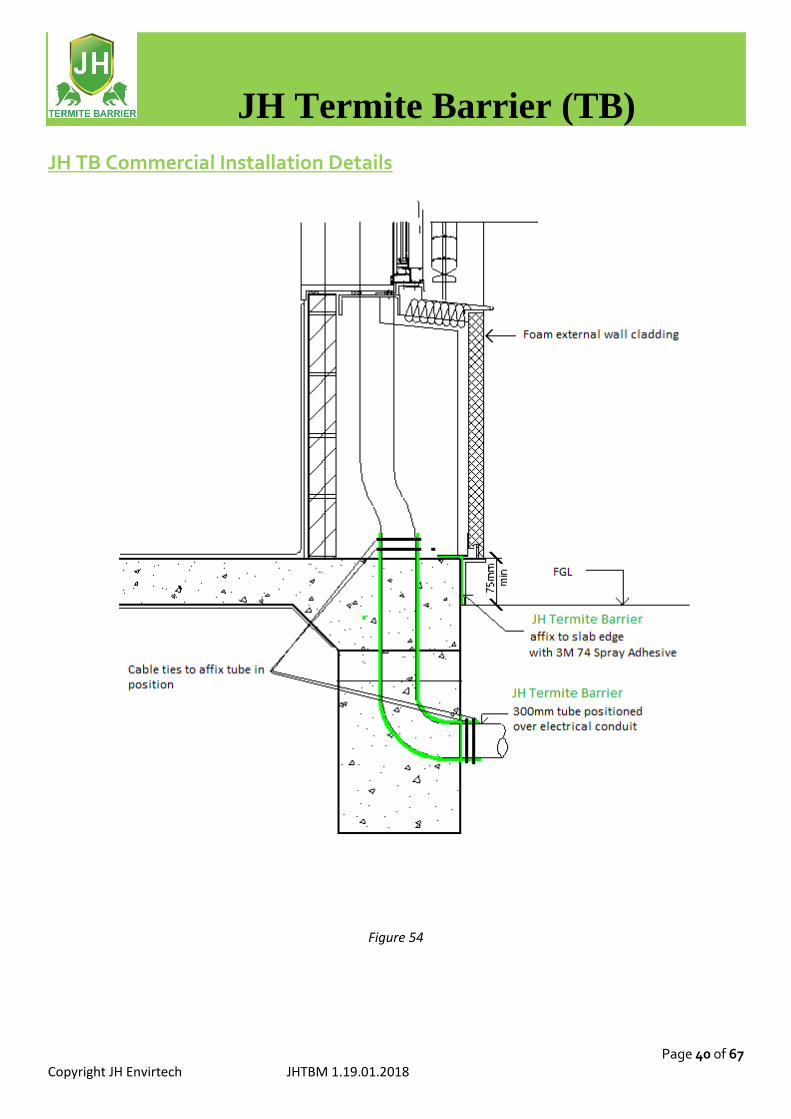
JH TB Commercial Installation Details
Figure 54

JH Termite Barrier (TB)
Page 41 of 67 Copyright JH Envirtech JHTBM 1.19.01.2018
Commercial Installation Details Cont.
Figure 55

JH Termite Barrier (TB)
Page 42 of 67 Copyright JH Envirtech JHTBM 1.19.01.2018
Commercial Installation Details Cont.
Figure 56
Plan View
Figure 57

JH Termite Barrier (TB)
Page 43 of 67 Copyright JH Envirtech JHTBM 1.19.01.2018
JH TB Commercial Installations Details Cont.
Figure 59
Figure 58

JH Termite Barrier (TB)
Page 44 of 67 Copyright JH Envirtech JHTBM 1.19.01.2018
JH TB Commercial Installation Details Cont.
Figure 60

JH Termite Barrier (TB)
Page 45 of 67 Copyright JH Envirtech JHTBM 1.19.01.2018
JH TB Commercial Installation Details Cont.
Figure 62
Figure 61

JH Termite Barrier (TB)
Page 46 of 67 Copyright JH Envirtech JHTBM 1.19.01.2018
JH TB Commercial Installation Details Cont.
Figure 64
Figure 63

JH Termite Barrier (TB)
Page 47 of 67 Copyright JH Envirtech JHTBM 1.19.01.2018
JH TB Hebel Installation Details
Figure 65 Figure 66
Figure 67 Figure 68

JH Termite Barrier (TB)
Page 48 of 67 Copyright JH Envirtech JHTBM 1.19.01.2018
JH TB Hebel Installation Details Cont.
Figure 69

JH Termite Barrier (TB)
Page 49 of 67 Copyright JH Envirtech JHTBM 1.19.01.2018
JH TB Hebel Installation Details Cont.
Figure 71
Figure 70
JH Termite Barrier (TB)
Page 50 of 67 Copyright JH Envirtech JHTBM 1.19.01.2018
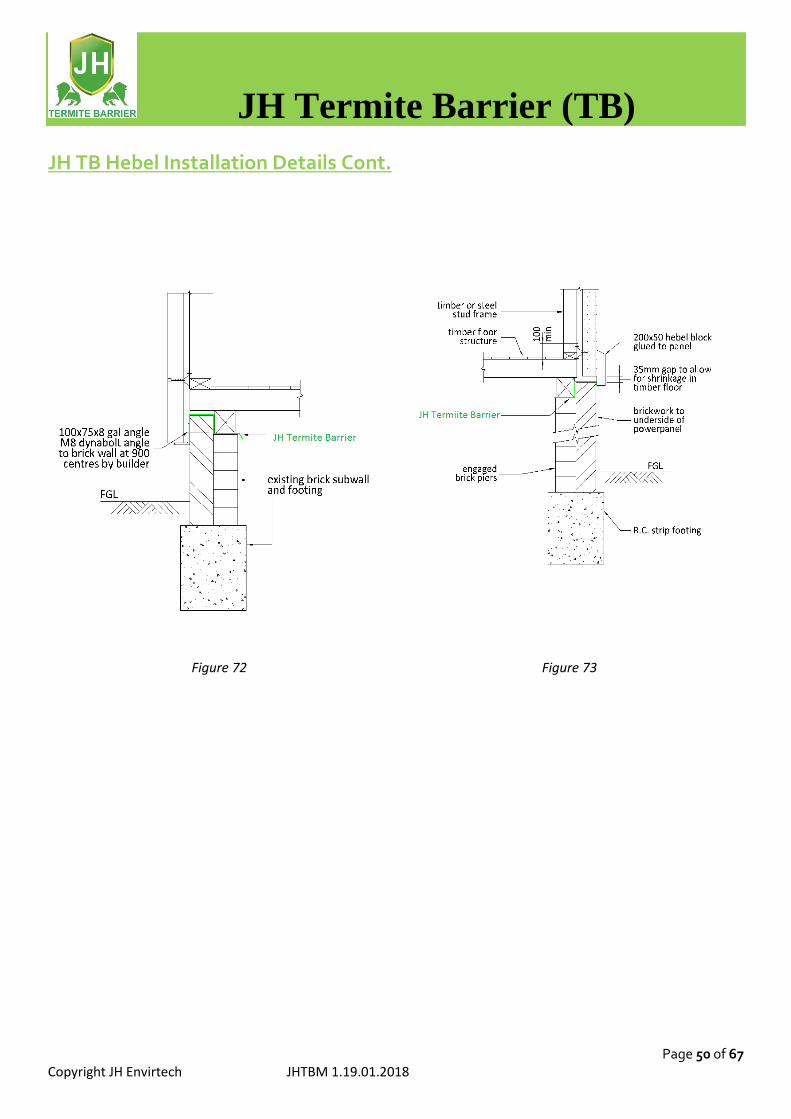
JH TB Hebel Installation Details Cont.
Figure 72 Figure 73

JH Termite Barrier (TB)
Page 51 of 67 Copyright JH Envirtech JHTBM 1.19.01.2018
JH TB Bearer & Joist Installation Details
Figure 74

JH Termite Barrier (TB)
Page 52 of 67 Copyright JH Envirtech JHTBM 1.19.01.2018
Figure 75 Figure 76
Figure 77 Figure 78
Figure 79 Figure 80

JH Termite Barrier (TB)
Page 53 of 67 Copyright JH Envirtech JHTBM 1.19.01.2018
JH TB Renovation Slab Installation Details
JH TB strip used as replacement expansion material for deteriorated construction joint caulking. The use of the JH
TB will still allow concrete slab movement as well as stopping the ingress of subterranean termites.
Figure 81
Figure 82

JH Termite Barrier (TB)
Page 54 of 67 Copyright JH Envirtech JHTBM 1.19.01.2018
JH TB Renovation Bearer & Joist (Timber Replacement Detail)
Figure 83

JH Termite Barrier (TB)
Page 55 of 67 Copyright JH Envirtech JHTBM 1.19.01.2018
JH TB Renovation (Replacement Timber Floor) Installation Detail
Figure 84

JH Termite Barrier (TB)
Page 56 of 67 Copyright JH Envirtech JHTBM 1.19.01.2018
JH TB Renovation Floating Floor Installation Detail
Figure 84

JH Termite Barrier (TB)
Page 57 of 67 Copyright JH Envirtech JHTBM 1.19.01.2018
JH TB Door Sill Installation Details
Figure 85
Figure 86

JH Termite Barrier (TB)
Page 58 of 67 Copyright JH Envirtech JHTBM 1.19.01.2018
Figure 87
Figure 88

JH Termite Barrier (TB)
Page 59 of 67 Copyright JH Envirtech JHTBM 1.19.01.2018
JH TB / DPC Installation Detail
Figure 89 Figure 90
NOTE
When JH TB is to be used as a DPC the following AS 4773.1 -2010 Claus 14.8.2 is to be implemented
14.8.2 Damp-proof courses
Damp-proof courses (DPCs) shall be provided to protect all masonry against rising ground water. The DPC shall be placed as low as possible in the wall and in no case higher than the finished floor level.
The position of the DPC shall be not less than –
(a) 150 mm above the adjacent finished ground level; (b) 100 mm above sandy well-drained areas that extend to the full depth of the footing system; (c) 75 mm above the finished paved or concreted area; or (d) 50 mm above finished paved or concreted area and protected from the direct effect of the weather by a
carport, veranda or similar structures.
Note: Cavity flashing can also act as a DPC to prevent the upward or downward passage of moisture within masonry.
NOTE: Due to wide range construction methods in the building industry, not all installation details are able to
be covered in the JH TB installation manual, for any variations in construction methods not found in the JH TB
installation manual, contact the manufacturer for technical advice.

JH Termite Barrier (TB)
Page 60 of 67 Copyright JH Envirtech JHTBM 1.19.01.2018
Essential Equipment Cutting Tool / sharp cutting knife, for cutting JH TB.
Wiltshire Stay-Sharp Scissors (or similar).
3M 8979 Performance Plus Duct Tape (preferred) or Tessa 4688 Black Cloth Tape for joins.
3M Scotch-Weld Non-Flammable Foam Fast 74 NF Spray Adhesive or Tensor Grip C40 Pressure Sensitive Spray Adhesive (preferred) (or similar).
Cable Ties (approx. 400mm & 100mm) for sealing JH TB Collars and tubes to pipe penetrations.
Builders square (to assist with the accurate measuring & cutting of the JH TB)
Hammer and concrete clout nails (30mm).
Nail Gun (recommended) with 16-20mm nails.
Tape Measure for accurate measurements.
Measure Wheel.
Galvanized hoop iron
Bolster (to clean down brickwork)
Course bristle & bannister brush to clean concrete.
Rubber gloves for handling products
PPE – to satisfy OHS requirements.
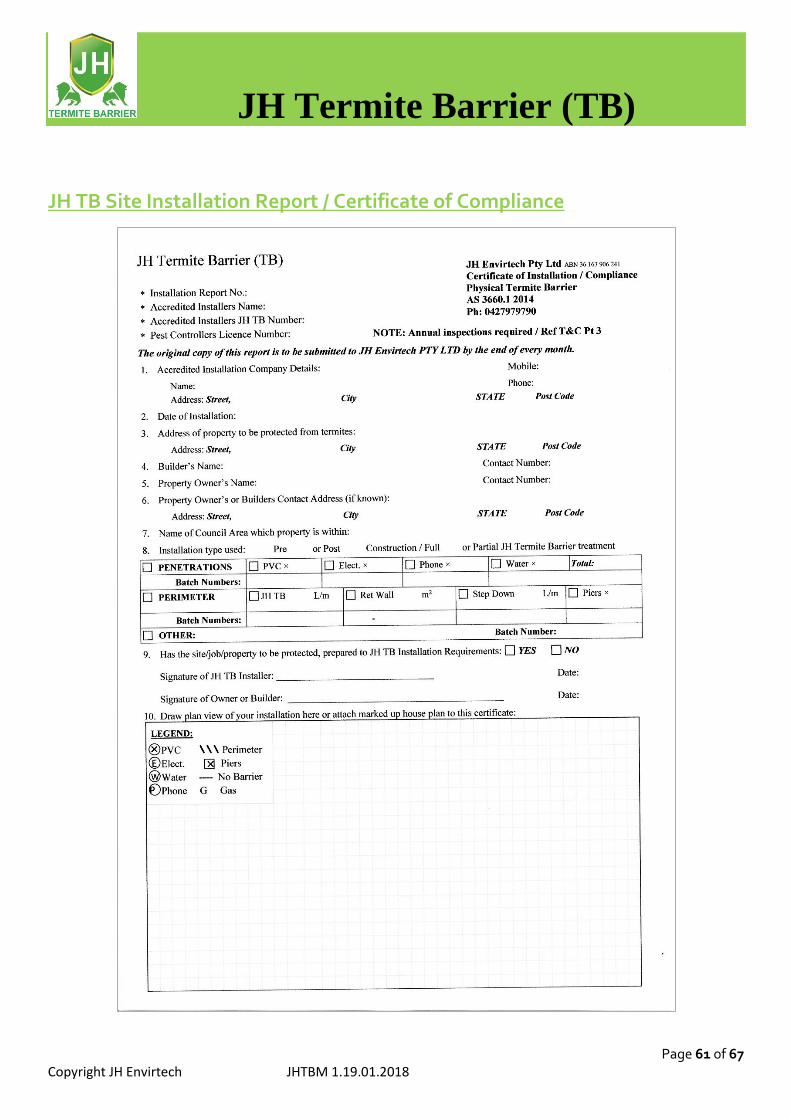
Paperwork / Warranty Process The JH TB Authorised Operator:
1. Installs JH TB as detailed in the JH Termite Barrier Installation Manual. 2. Arranges for placement of ‘AS 3660 Stickers’ in Electrical Meter Box and/or inside cupboard door in
kitchen BCA requirement for (QLD). 3. Completes the Part A & B Site Installation / Certificate of Compliance Report, along with JH TB site
installation diagram... 4. Provides the builder/property owner with JH TB 50 year Warranty Information: Certificate of Installation / Compliance Report / Warranty Activation Form
.
JH Termite Barrier (TB)
Page 61 of 67 Copyright JH Envirtech JHTBM 1.19.01.2018
JH TB Site Installation Report / Certificate of Compliance

JH Termite Barrier (TB)
Page 62 of 67 Copyright JH Envirtech JHTBM 1.19.01.2018
JH TB Terms & Conditions

JH Termite Barrier (TB)
Page 63 of 67 Copyright JH Envirtech JHTBM 1.19.01.2018
JH TB Termite Protection Notice
JH Termite Barrier (TB)
Address Suite 40, L2, 89-92 Jones Street, Ultimo, NSW 2007 Phone: 0450 622 882
JH TB PROTECTION NOTICE
IMPORTANT
This Building has the JH TB system installed. JH TB complies with AS 3660.1.2014 &
AS 3660.3.2014.Termite Barrier. JH Envirtech P/L warrants the product providing the installation is
carried out by an accredited Pest Controller trained by JH Envirtech P/L
PERIMETER CAVITY TREATED YES / NO
PENETRATIONS TREATED YES / NO
FULL UNDER SLAB TREATED YES / NO
DATE APPLIED / INSTALLED ………………………………………………………………………………..
INSTALLER…………………………………………………………………………………………………………..
COMPANY NAME………………………………………………………………………………………….......
CONTACT PH NUMBERS……………………………………………………………………………………..
CAUTION – Disturbance by others after date of installation could render the JH TB VOID. If in doubt
please contact the JH TB Installer above or contact JH Envitech office 0295642199 Ensure the barrier
is 75mm min above gardens and 25mm above paths.
NOTE – It is the building OWNER’S responsibility to arrange visual inspections by an expert in Pest
Control management at ANNUAL intervals to check for possible ingress of Subterranean TERMITES.
ABN – 36 163 906 241

JH Termite Barrier (TB)
Page 64 of 67 Copyright JH Envirtech JHTBM 1.19.01.2018
JH TB Training Assessment
Applicants Name ……………………………………………………………..
Company Name ……………………………………………………………..
Company Address ……………………………………………………………..
……………………………………………………………..
Office Phone ……………………………………………………………..
Fax ……………………………………………………………..
Mobile ……………………………………………………………..
Email ……………………………………………………………..
Web Site www………………………………………………………
Theoretical Assessment Q.1
Question 1.1 To becoming an Accredited JH TB Installer are the following documents required and copies
of each document supplied to JH Envirtech?
a) Pest Control Licence (current) (Yes / No)
b) Professional Indemnity Insurance (Yes / No)
c) Public Liability Insurance (Yes / No)
Question 1.2 Does the installer require the following from the builder / home owner before the
positioning of the JH TB takes place.
a) All through slab penetrations are in their final position (Yes / No)
b) All ground works are correctly prepared & vapour barrier positioned (Yes / No)
c) Has a sound understanding of the JH TB installation system (Yes / No)
d) To contact the JH TB Installer if Barrier is compromised after installation (Yes / No)
e) Establish where all FGL’s / Paths / Driveways / Garden Beds / Retaining Walls
(Yes / No)
f) Understands the Terms & Conditions of the JH TB Warranty (Yes / No)
g) Understands requirements of AS 3660 Termite management (Yes / No)
h) Concrete slab meets AS 2870-2011 Residential slabs & footings (Yes / No)
i) Has sound understanding of the required inspection zones (Yes / No)
Question 1.3 Is the JH TB Installer / Company required to have a sound understanding of the following
and able to complete the following paperwork?
a) JH TB Installation Manual (Yes / No)
b) JH TB use as a DPC as per AS 4773.1 -2010 Claus 14.8.2 (Yes / No)
c) JH TB Site Installation / Certificate of Conformity Report (Yes / No)
d) JH TB Termite Protection Notice (Meter box sticker) (Yes / No)
e) Form 16 (BCA QLD Requirement) Only (Yes / No)

JH Termite Barrier (TB)
Page 65 of 67 Copyright JH Envirtech JHTBM 1.19.01.2018
Practical Assessment Q.2
NOTE: Does the JH TB Installer have a sound understanding of the following installation process as
outlined in the JH TB Installation Manual?
Question 2.1 JH TB Collars / Tubes / Wrapping of Pipes with Sheet - (Through slab collar sizing and
installation requirements for);
a) Plumbing waste / water pipes (collar positioning) (Yes / No)
b) Electrical / Gas / Telecommunication / Tie Down Bars penetrations (Yes / No)
c) Available Collar sizes 60mm, 120mm, 30mm tubes & sheet (Yes / No)
d) Multiple Penetrations (individually treated) (Yes / No)
Question 2.2 JH TB Full Under-slab treatment.
a) Is JH TB able to be used for full under-slab treatment (Yes / No)
b) Does JH TB require a 50mm overlap at all joins (Yes / No)
c) Do JH TB over-laps require gluing and / or taping (Yes / No)
Question 2.3 JH TB Perimeter Treatment
a) Does JH TB require correct positioning under wall frames (Yes / No)
b) Is the JH TB Installer require to establish the external wall finish of the
Building with the builder to establish the positioning of the JH TB (Yes / No)
c) Does JH TB require a 50mm overlap at all joins at internal & external
Corners. (Yes / No)
d) What are the minimum heights the JH TB should be positioned above; circle correct
height.
Garden Beds 25mm or 75mm
Normal Finished Ground Levels 25mm or 75mm
Paved Areas 25mm or 75mm
Doorways 25mm or 75mm
Concrete Paths 25mm or 75mm
Access Ramps 25mm or 75mm
Question 2.4 Are the following (areas for special attention) when installing JH TB
a) Retaining walls (Yes / No)
b) Internal wall step-downs (Yes / No)
c) Construction Joints (Yes / No)
d) Garage Door Openings (wall to door junction) (Yes / No)
e) Doorways (Yes / No)
f) Access Ramps / Paths / Driveways (Yes / No)
Applicants Name …………………………………. JH TB Trainers Name ………………………………
Signature ……………………………… Signature …………………………..
Date …./…./…….. Date …./…./…

JH Termite Barrier (TB)
Page 66 of 67 Copyright JH Envirtech JHTBM .22.19.01.2018
JH PVC Hard Collar
PVC – Plastic Collar meet the requirements AS 3660.1.2014 and AS3660.3.2014, having a minimum thickness of 1
mm and a minimum annular width of 15 mm and minimum height against the pipe or service of 20 mm as well as a
minimum hardness Shore D 80 (instantaneous).
AS 3660.1.2014 / Section 3 - 3.2 (f) / Section 5 – 5.2 (g), Section 5 - 5.3.6
AS 3660.3.2014 / Section 7 - 7.5
To be installed as depicted in Figure 91 & 92 prior to concrete pour.
Fig 91 (below)
Fig 92
Page 67 of 67 Copyright JH Envirtech JHTBM 1.19.01.2018
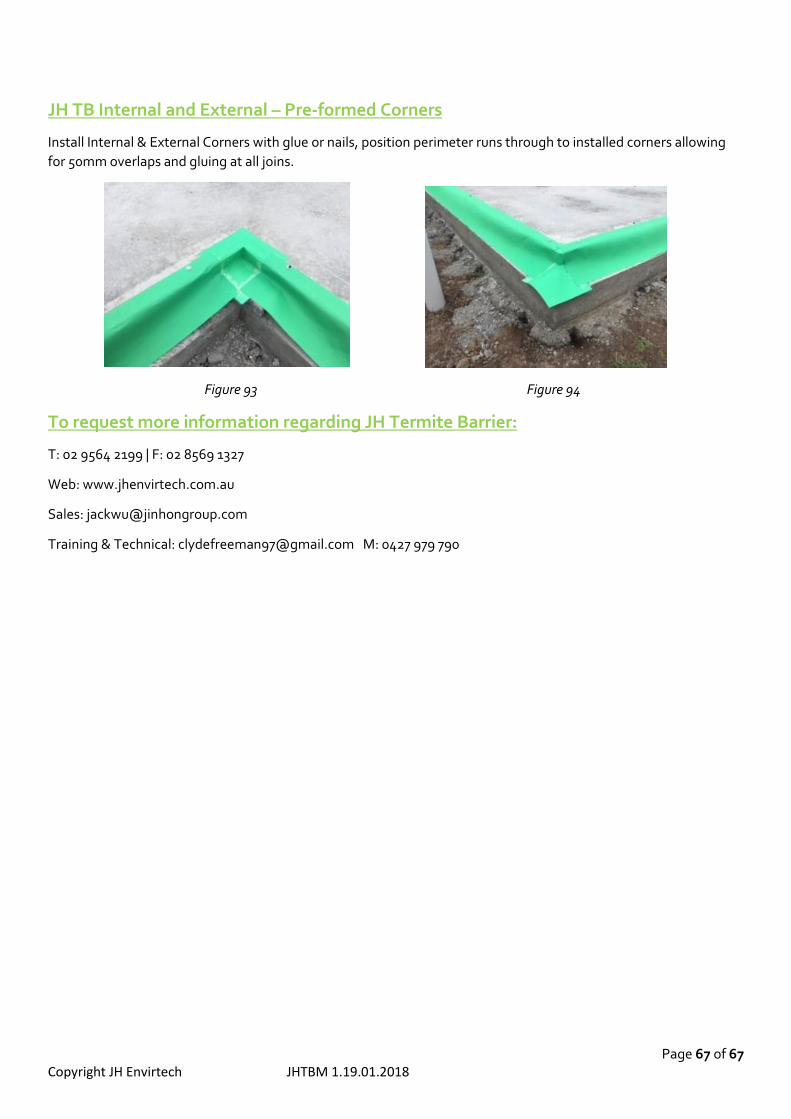
JH TB Internal and External – Pre-formed Corners
Install Internal & External Corners with glue or nails, position perimeter runs through to installed corners allowing
for 50mm overlaps and gluing at all joins.
Figure 93 Figure 94
To request more information regarding JH Termite Barrier:
T: 02 9564 2199 | F: 02 8569 1327
Web: www.jhenvirtech.com.au
Sales: [email protected]
Training & Technical: [email protected] M: 0427 979 790
![eaxyeaxyokjokjokj] ]] ] 22229999 ek?kek?kek?k] ]] ] ‘kd ...-4-10 Jh vt; VEVk 11 Jh pUnu jke nkl 12 Jh x.ks'k tks'kh 13 Jh lqjsUnz flag thuk 14 Jh vjfoUn ik.Ms 15 Jh izsepUn vxzoky](https://img.pdfslide.tips/doc/110x75/60caeef45dbf5015477e44ee/eaxyeaxyokjokjokj-22229999-ekkekkekk-akd-4-10-jh-vt-vevk.jpg)


![Rayap...ssst..terminix aja [design visual termite control]](https://img.pdfslide.tips/doc/110x75/5582a548d8b42a94688b54dc/rayapssstterminix-aja-design-visual-termite-control.jpg)