Embed Size (px)
Citation preview
Switching to Gmail from Microsoft Outlook 2013
gsuite.google.com/learning-centerLearning Center |
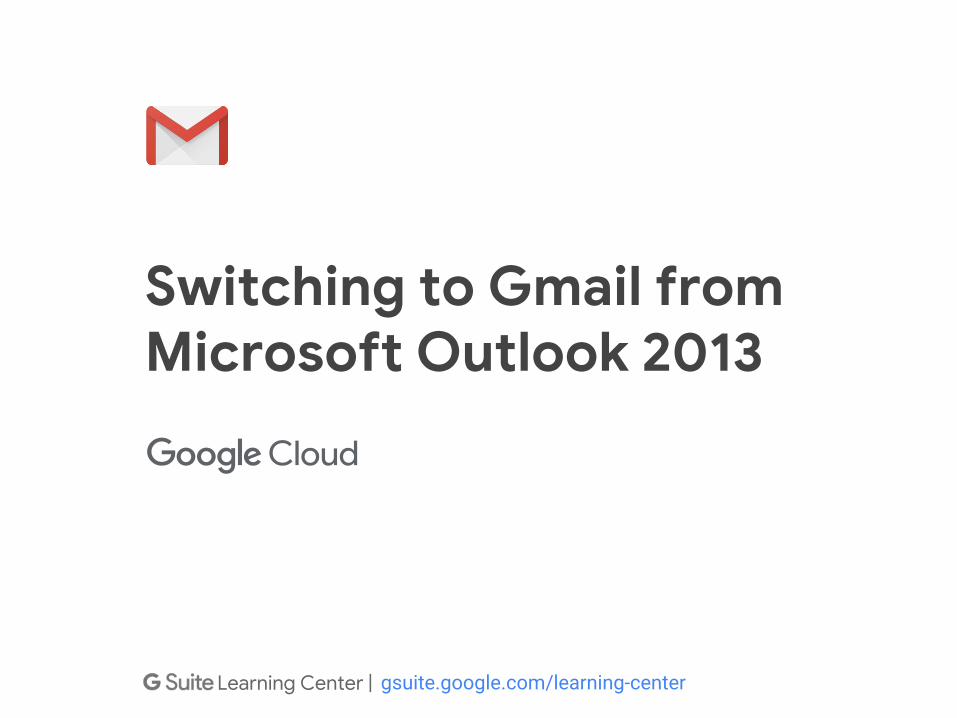
Welcome to Gmail
Access Gmail Make Gmail look like Outlook
Send email Reply to email Organize email
1 2 3 4 5
Switching to Gmail from Microsoft Outlook 2
6
Collaborate
7
Productivity tips
Now that you've switched from Microsoft® Outlook® to G Suite, learn how to use Gmail as your new mail program.
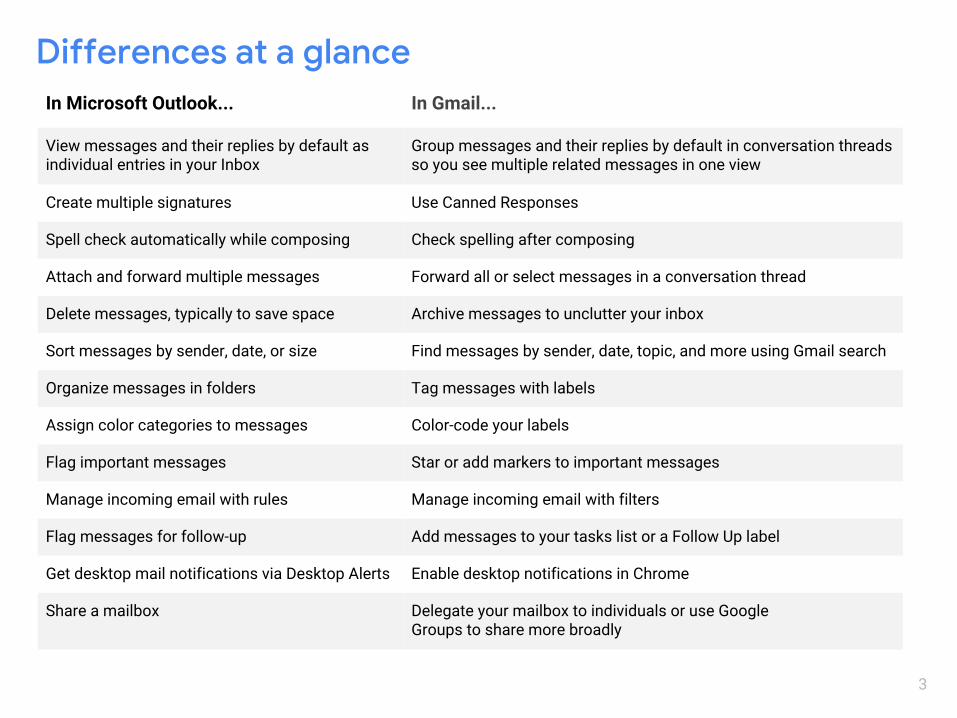
In Microsoft Outlook... In Gmail...
View messages and their replies by default as individual entries in your Inbox
Group messages and their replies by default in conversation threads so you see multiple related messages in one view
Create multiple signatures Use Canned Responses
Spell check automatically while composing Check spelling after composing
Attach and forward multiple messages Forward all or select messages in a conversation thread
Delete messages, typically to save space Archive messages to unclutter your inbox
Sort messages by sender, date, or size Find messages by sender, date, topic, and more using Gmail search
Organize messages in folders Tag messages with labels
Assign color categories to messages Color-code your labels
Flag important messages Star or add markers to important messages
Manage incoming email with rules Manage incoming email with filters
Flag messages for follow-up Add messages to your tasks list or a Follow Up label
Get desktop mail notifications via Desktop Alerts Enable desktop notifications in Chrome
Share a mailbox Delegate your mailbox to individuals or use GoogleGroups to share more broadly
3
AccessGmail
1.1 Get Gmail on your devices
1.2 (Optional) Add multiple Google accounts
1.3 Create a browser bookmark
1.4 Add a Gmail desktop shortcut
1
Switching to Gmail from Microsoft Outlook 4
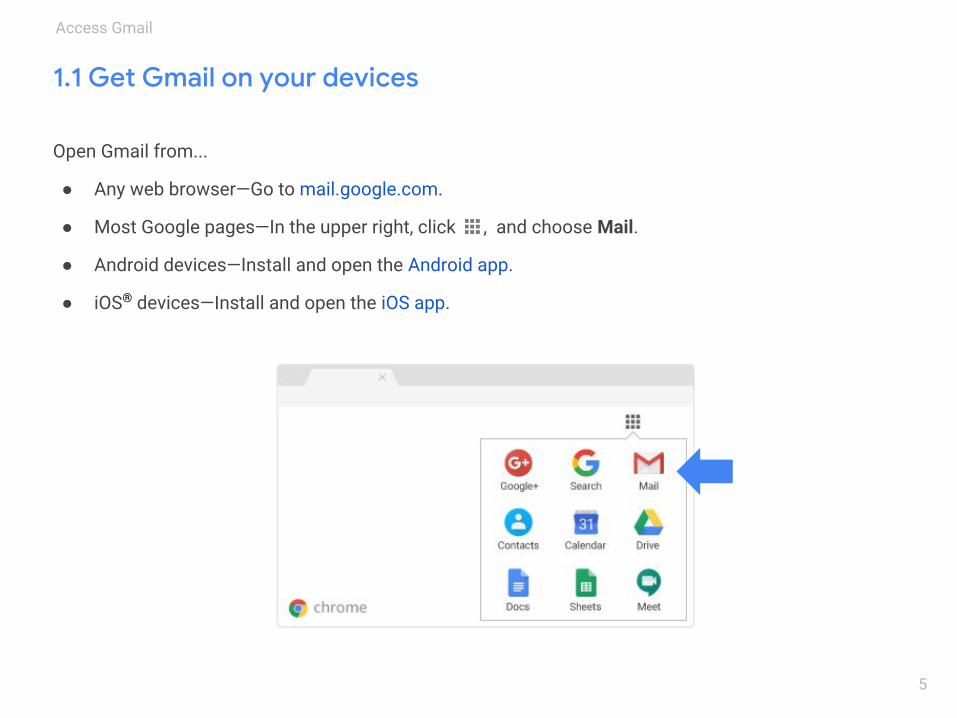
Open Gmail from...
● Any web browser—Go to mail.google.com.
● Most Google pages—In the upper right, click , and choose Mail.
● Android devices—Install and open the Android app.
● iOS® devices—Install and open the iOS app.
5
Access Gmail
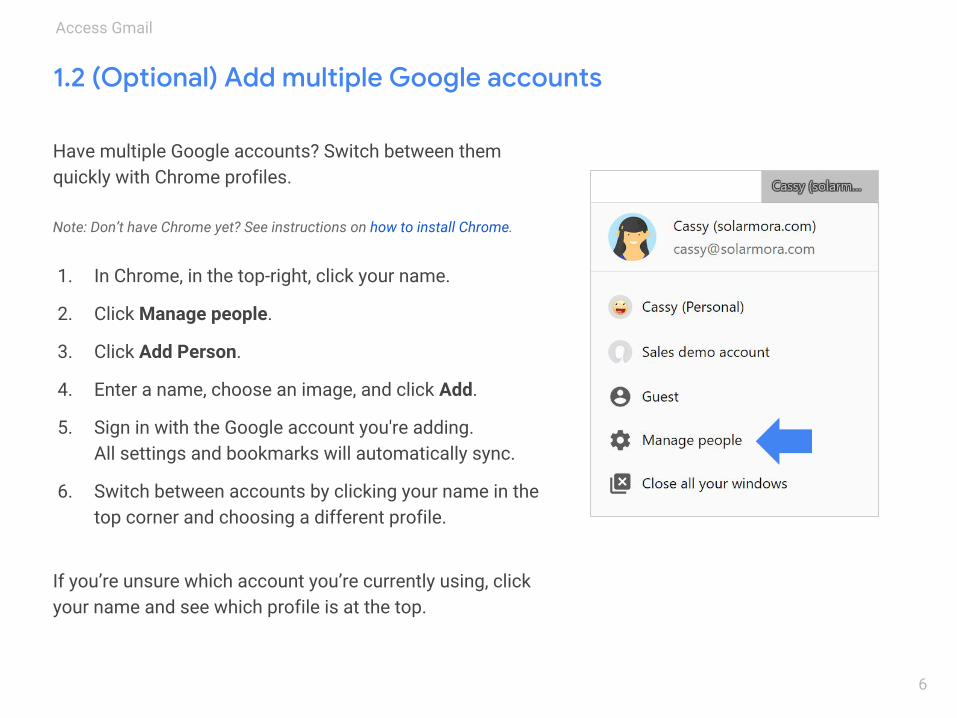
Have multiple Google accounts? Switch between them quickly with Chrome profiles.
Note: Don’t have Chrome yet? See instructions on how to install Chrome.
1. In Chrome, in the top-right, click your name.
2. Click Manage people.
3. Click Add Person.
4. Enter a name, choose an image, and click Add.
5. Sign in with the Google account you're adding. All settings and bookmarks will automatically sync.
6. Switch between accounts by clicking your name in the top corner and choosing a different profile.
If you’re unsure which account you’re currently using, click your name and see which profile is at the top.
6
Access Gmail
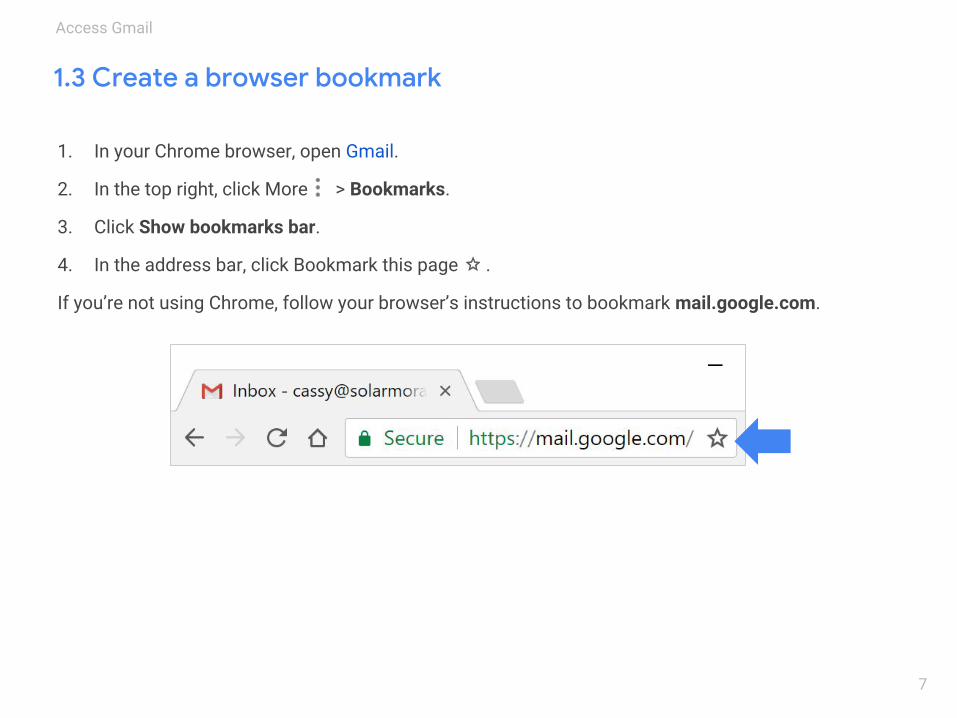
1. In your Chrome browser, open Gmail.
2. In the top right, click More > Bookmarks.
3. Click Show bookmarks bar.
4. In the address bar, click Bookmark this page .
If you’re not using Chrome, follow your browser’s instructions to bookmark mail.google.com.
7
Access Gmail
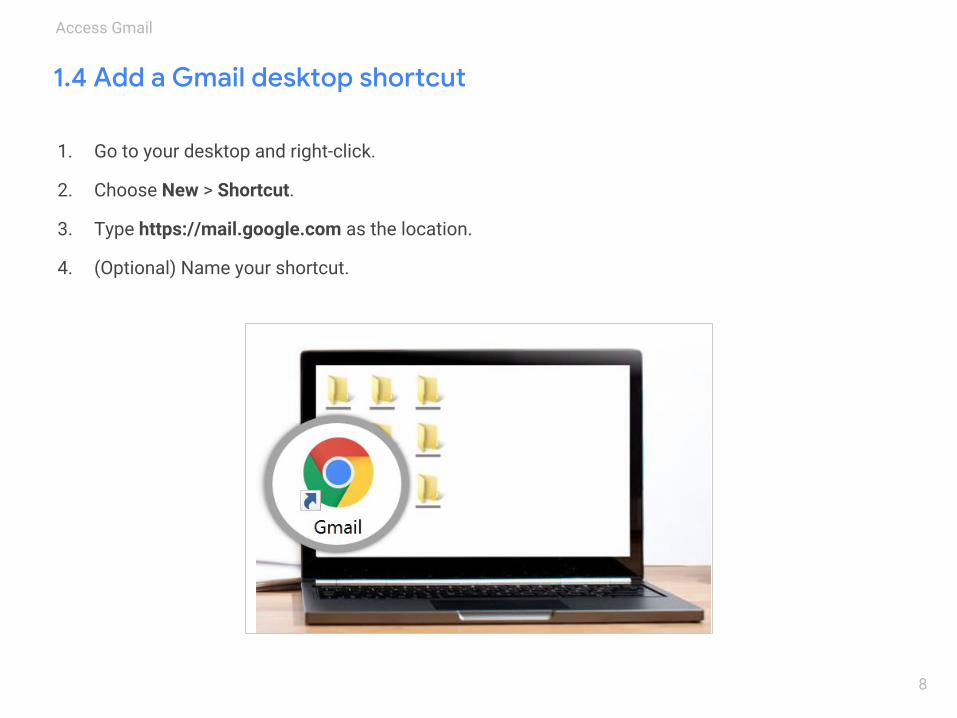
1. Go to your desktop and right-click.
2. Choose New > Shortcut.
3. Type https://mail.google.com as the location.
4. (Optional) Name your shortcut.
8
Access Gmail
Make Gmail look like Outlook
2.1 (Optional) List messages separately
2.2 Add a preview pane
2.3 View your Google Calendar in your inbox
2.4 Create task lists
2.5 Add a signature
2.6 Use and change keyboard shortcuts
2
Switching to Gmail from Microsoft Outlook 9
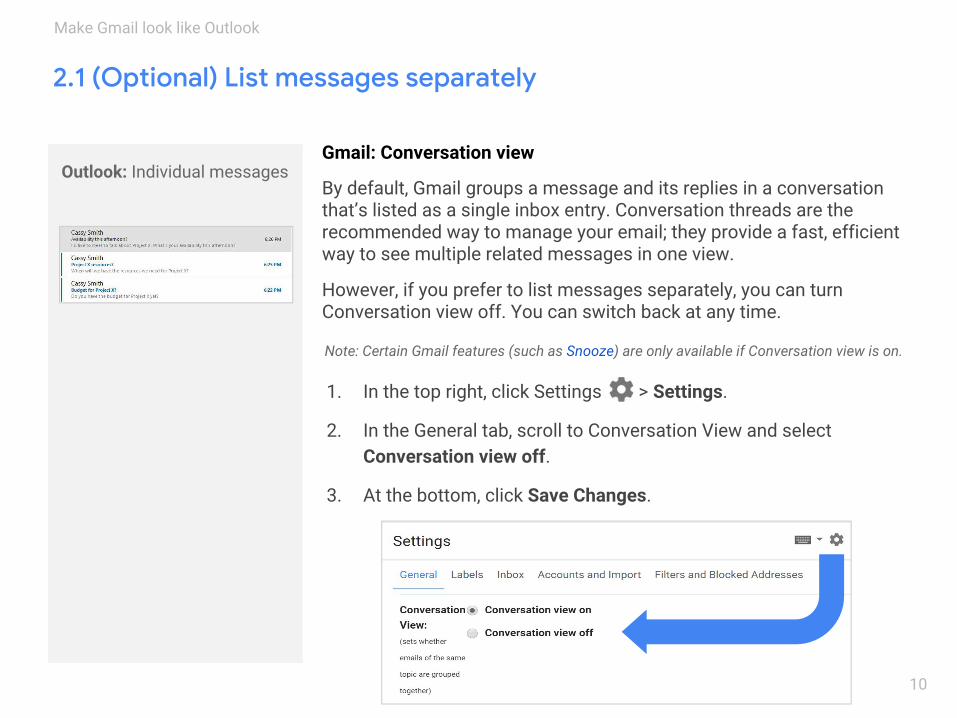
Gmail: Conversation view
By default, Gmail groups a message and its replies in a conversation that’s listed as a single inbox entry. Conversation threads are the recommended way to manage your email; they provide a fast, efficient way to see multiple related messages in one view.
However, if you prefer to list messages separately, you can turn Conversation view off. You can switch back at any time.
1. In the top right, click Settings > Settings.
2. In the General tab, scroll to Conversation View and select Conversation view off.
3. At the bottom, click Save Changes.
Outlook: Individual messages
Note: Certain Gmail features (such as Snooze) are only available if Conversation view is on.
10
Make Gmail look like Outlook
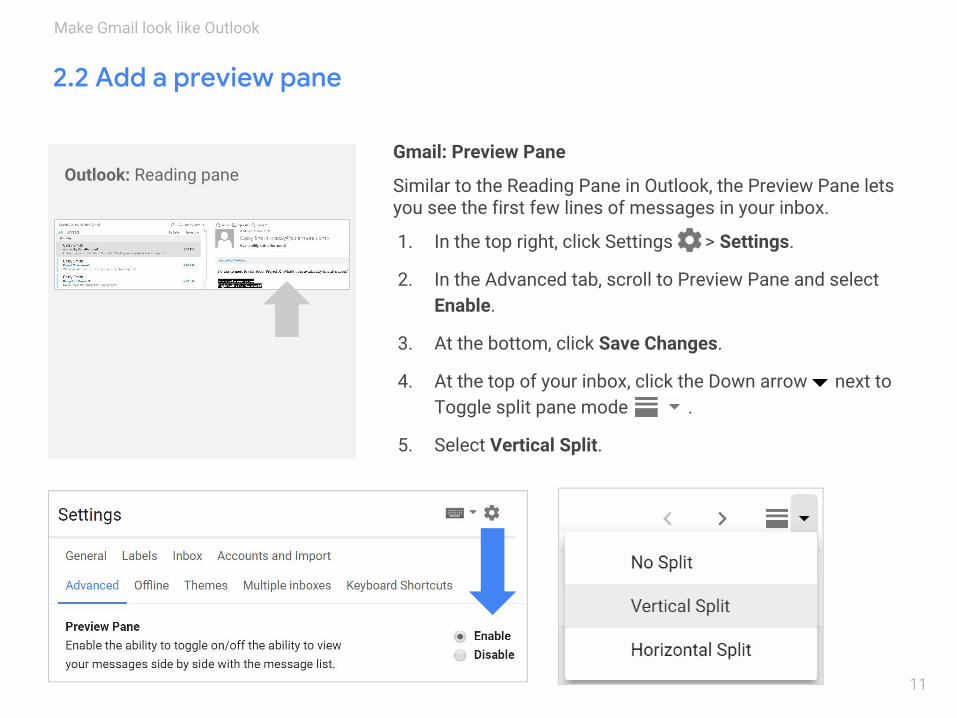
Outlook: Reading paneGmail: Preview Pane
Similar to the Reading Pane in Outlook, the Preview Pane lets you see the first few lines of messages in your inbox.
1. In the top right, click Settings > Settings.
2. In the Advanced tab, scroll to Preview Pane and select Enable.
3. At the bottom, click Save Changes.
4. At the top of your inbox, click the Down arrow next to Toggle split pane mode .
5. Select Vertical Split.
11
Make Gmail look like Outlook
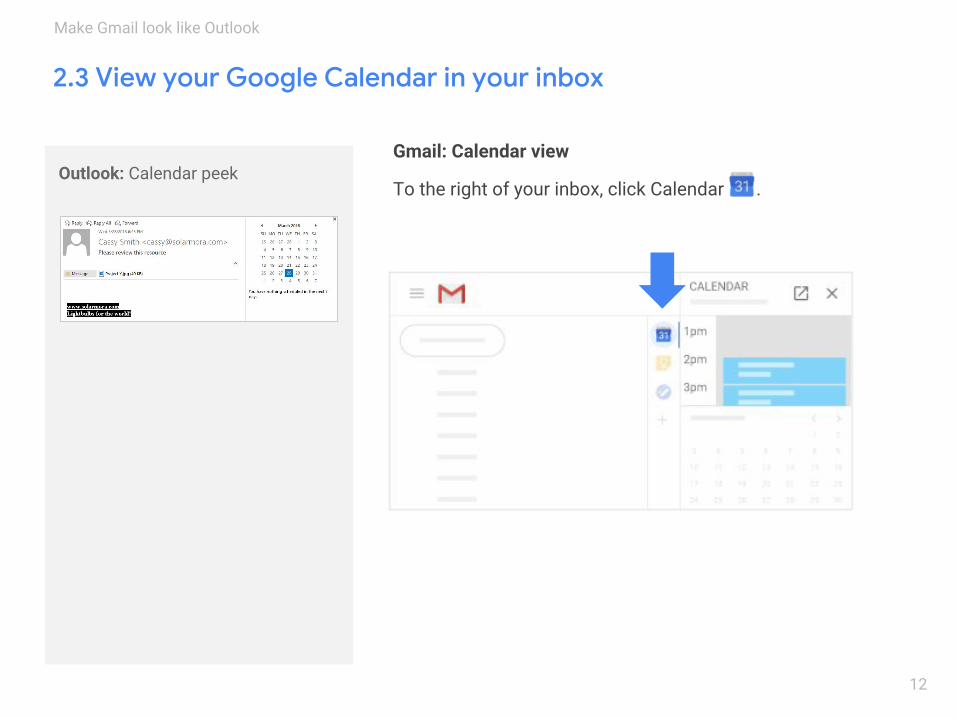
Outlook: Calendar peekGmail: Calendar view
To the right of your inbox, click Calendar .
12
Make Gmail look like Outlook
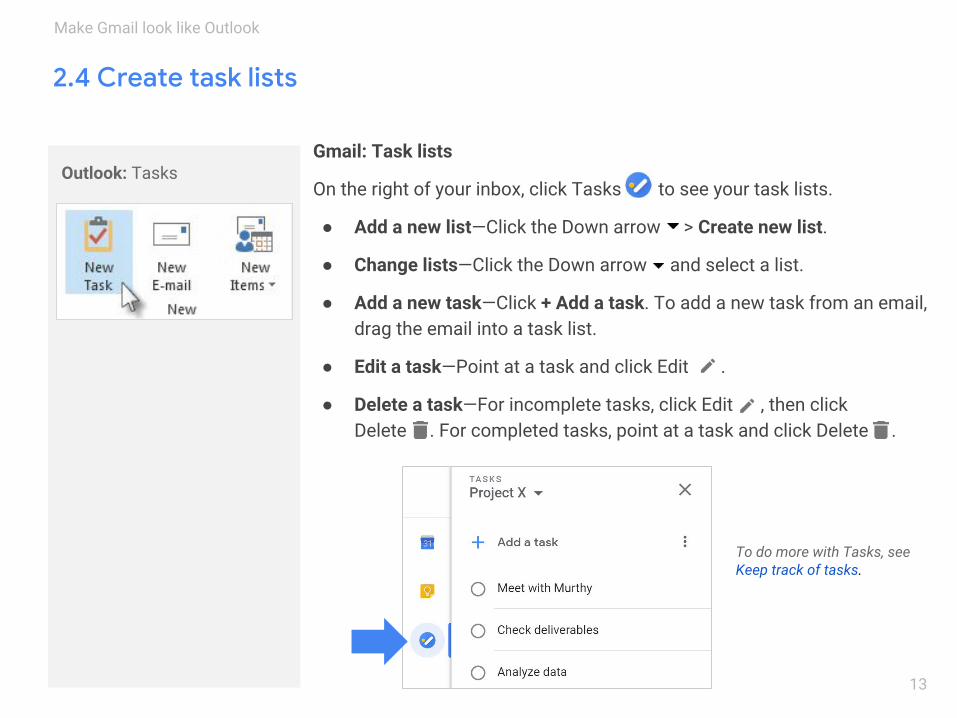
Outlook: TasksGmail: Task lists
On the right of your inbox, click Tasks to see your task lists.
● Add a new list—Click the Down arrow > Create new list.
● Change lists—Click the Down arrow and select a list.
● Add a new task—Click + Add a task. To add a new task from an email, drag the email into a task list.
● Edit a task—Point at a task and click Edit .
● Delete a task—For incomplete tasks, click Edit , then click Delete . For completed tasks, point at a task and click Delete .
To do more with Tasks, seeKeep track of tasks.
13
Make Gmail look like Outlook
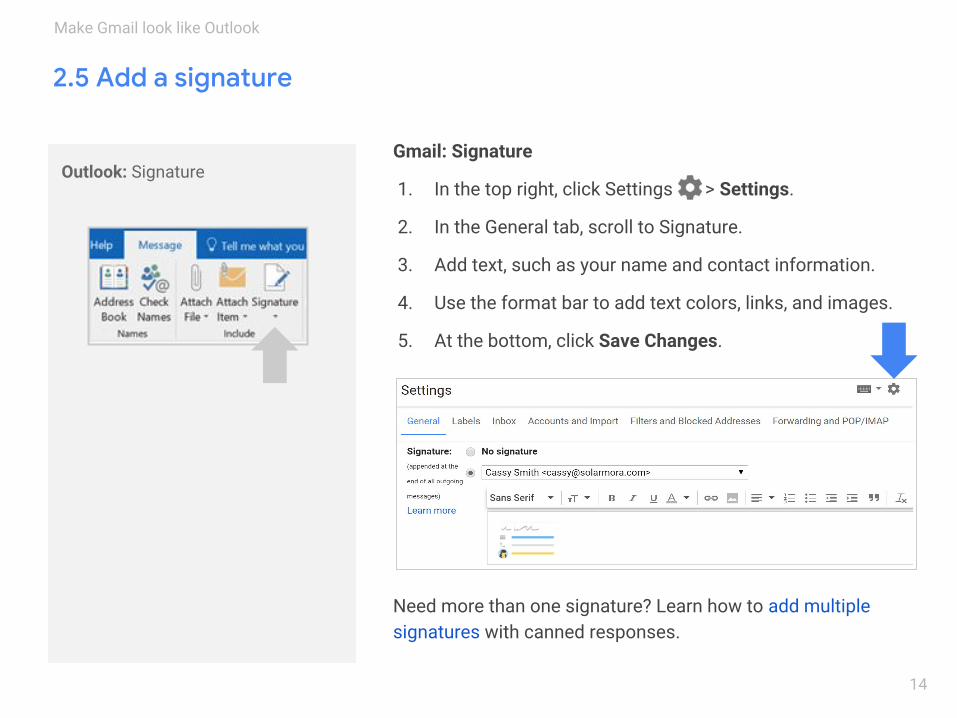
Outlook: SignatureGmail: Signature
1. In the top right, click Settings > Settings.
2. In the General tab, scroll to Signature.
3. Add text, such as your name and contact information.
4. Use the format bar to add text colors, links, and images.
5. At the bottom, click Save Changes.
Need more than one signature? Learn how to add multiple signatures with canned responses.
14
Make Gmail look like Outlook
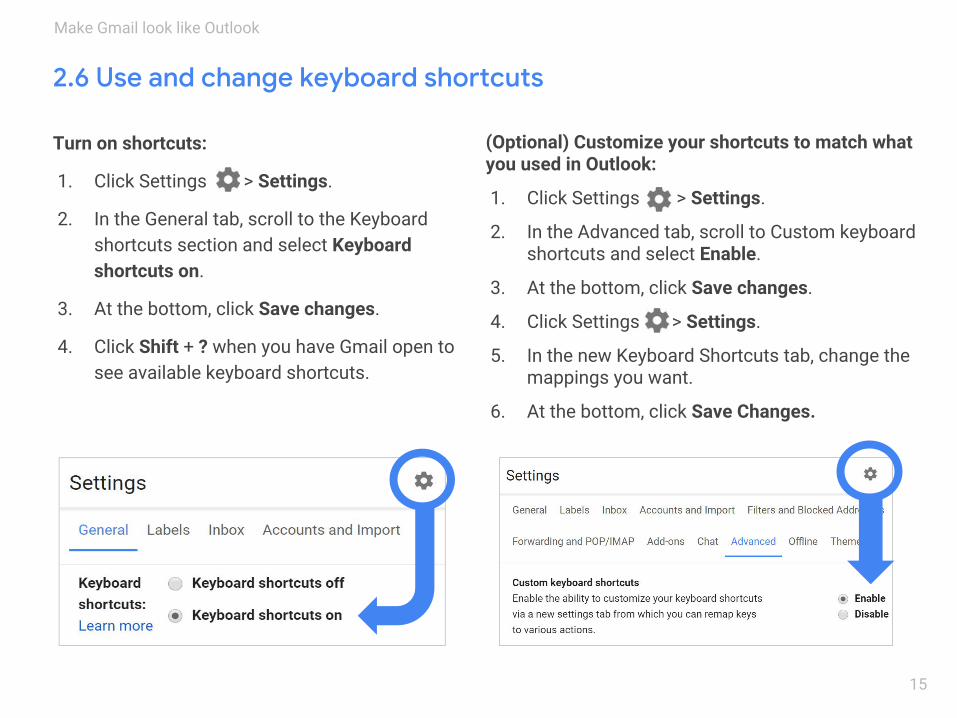
Turn on shortcuts:
1. Click Settings > Settings.
2. In the General tab, scroll to the Keyboard shortcuts section and select Keyboard shortcuts on.
3. At the bottom, click Save changes.
4. Click Shift + ? when you have Gmail open to see available keyboard shortcuts.
(Optional) Customize your shortcuts to match what you used in Outlook:
1. Click Settings > Settings.
2. In the Advanced tab, scroll to Custom keyboard shortcuts and select Enable.
3. At the bottom, click Save changes.
4. Click Settings > Settings.
5. In the new Keyboard Shortcuts tab, change the mappings you want.
6. At the bottom, click Save Changes.
15
Make Gmail look like Outlook
Send email 3.1 Compose a new email
3.2 Format text and add images or attachments
3.3 Use spell check
3.4 Send and undo send
3
Switching to Gmail from Microsoft Outlook 16
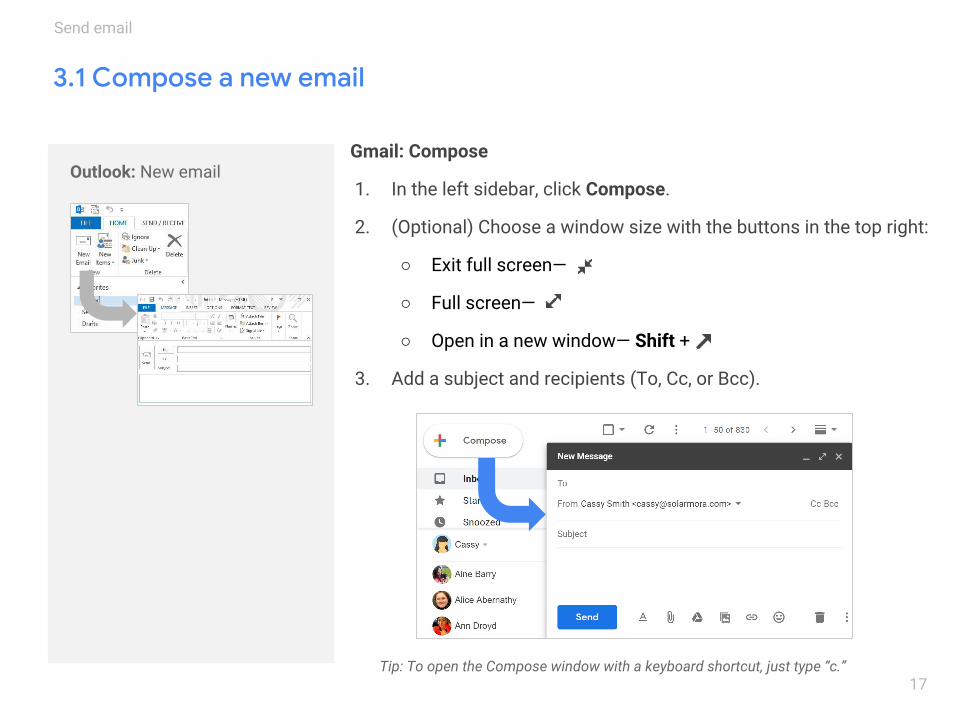
Outlook: New emailGmail: Compose
1. In the left sidebar, click Compose.
2. (Optional) Choose a window size with the buttons in the top right:
○ Exit full screen—
○ Full screen—
○ Open in a new window— Shift +
3. Add a subject and recipients (To, Cc, or Bcc).
17
Send email
Tip: To open the Compose window with a keyboard shortcut, just type “c.”
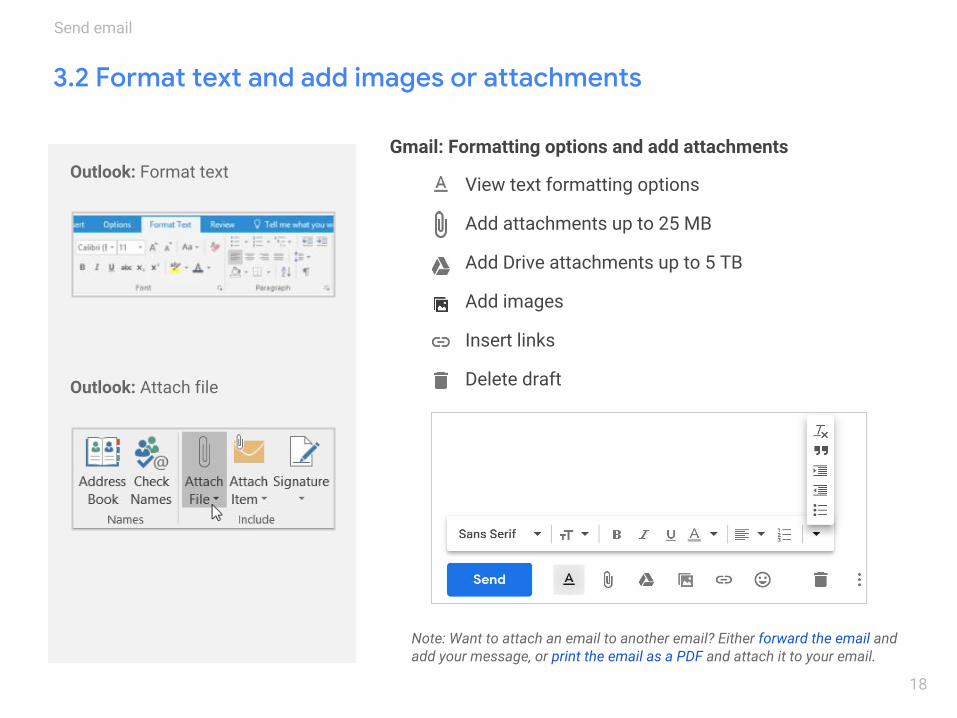
Outlook: Format text
Outlook: Attach file
Gmail: Formatting options and add attachments
View text formatting options
Add attachments up to 25 MB
Add Drive attachments up to 5 TB
Add images
Insert links
Delete draft
18
Send email
Note: Want to attach an email to another email? Either forward the email and add your message, or print the email as a PDF and attach it to your email.
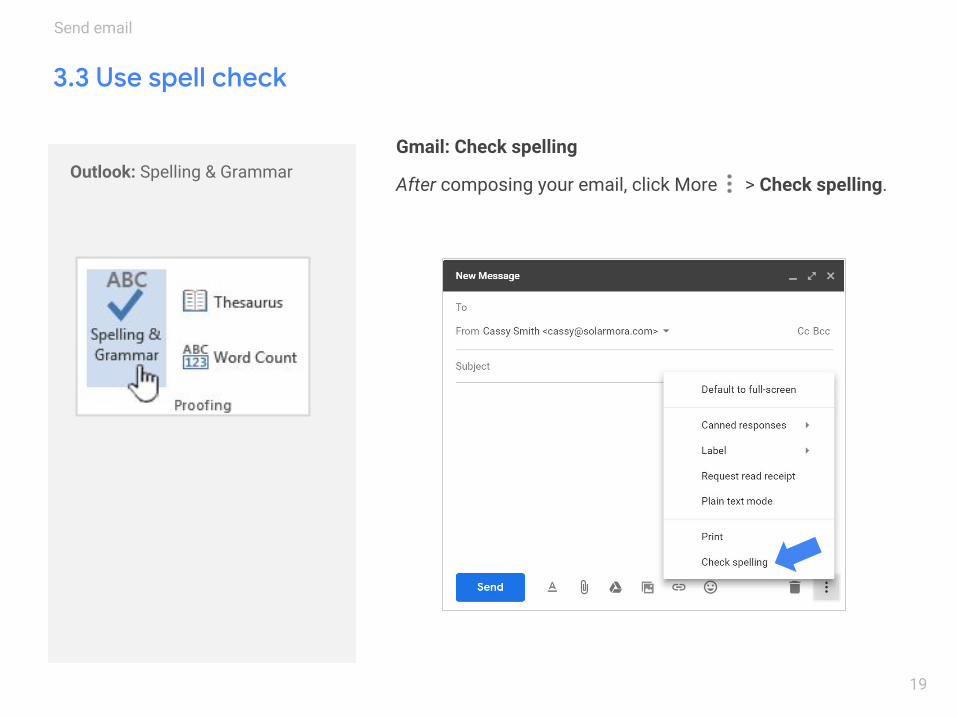
Outlook: Spelling & GrammarGmail: Check spelling
After composing your email, click More > Check spelling.
19
Send email
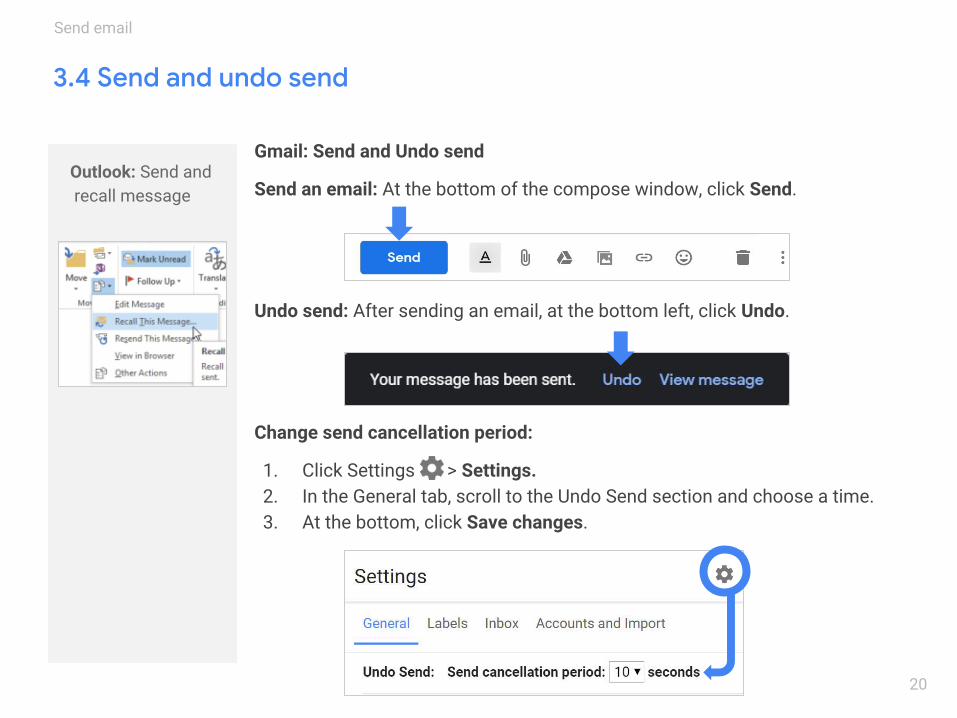
Outlook: Send and recall message
Gmail: Send and Undo send
Send an email: At the bottom of the compose window, click Send.
Undo send: After sending an email, at the bottom left, click Undo.
Change send cancellation period:
1. Click Settings > Settings.2. In the General tab, scroll to the Undo Send section and choose a time. 3. At the bottom, click Save changes.
20
Send email
Reply to email
4.1 Reply to, forward, and print email
4.2 Change recipients and subjects
4.3 Save attachments
4
Switching to Gmail from Microsoft Outlook 21
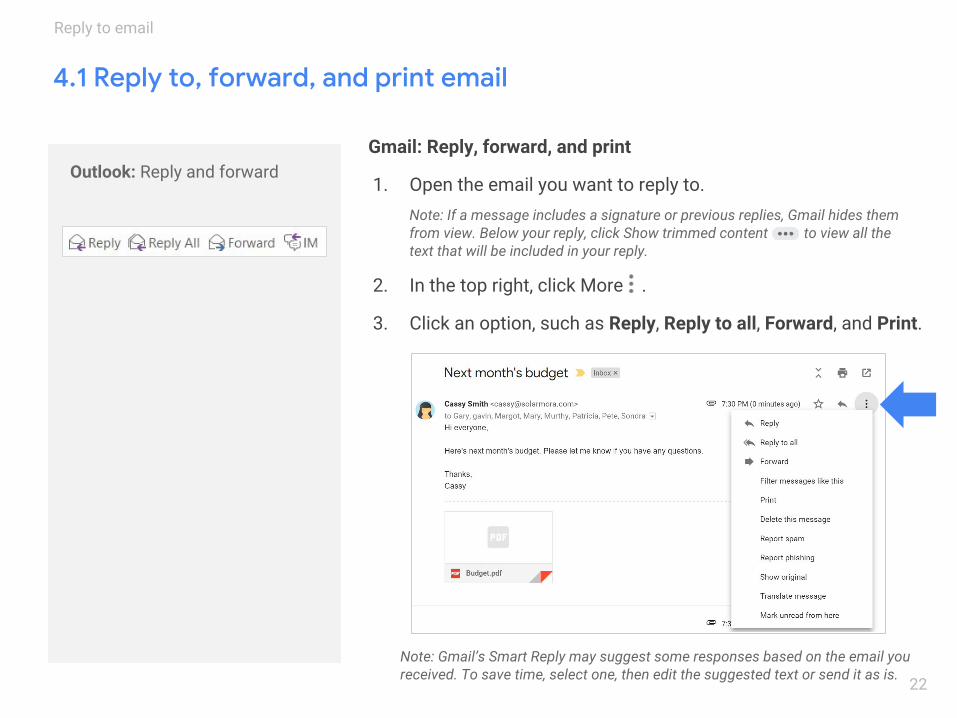
Gmail: Reply, forward, and print
1. Open the email you want to reply to.
2. In the top right, click More .
3. Click an option, such as Reply, Reply to all, Forward, and Print.
Outlook: Reply and forward
Note: If a message includes a signature or previous replies, Gmail hides them from view. Below your reply, click Show trimmed content to view all thetext that will be included in your reply.
22
Reply to email
Note: Gmail’s Smart Reply may suggest some responses based on the email you received. To save time, select one, then edit the suggested text or send it as is.
Outlook: Change recipients and subjects
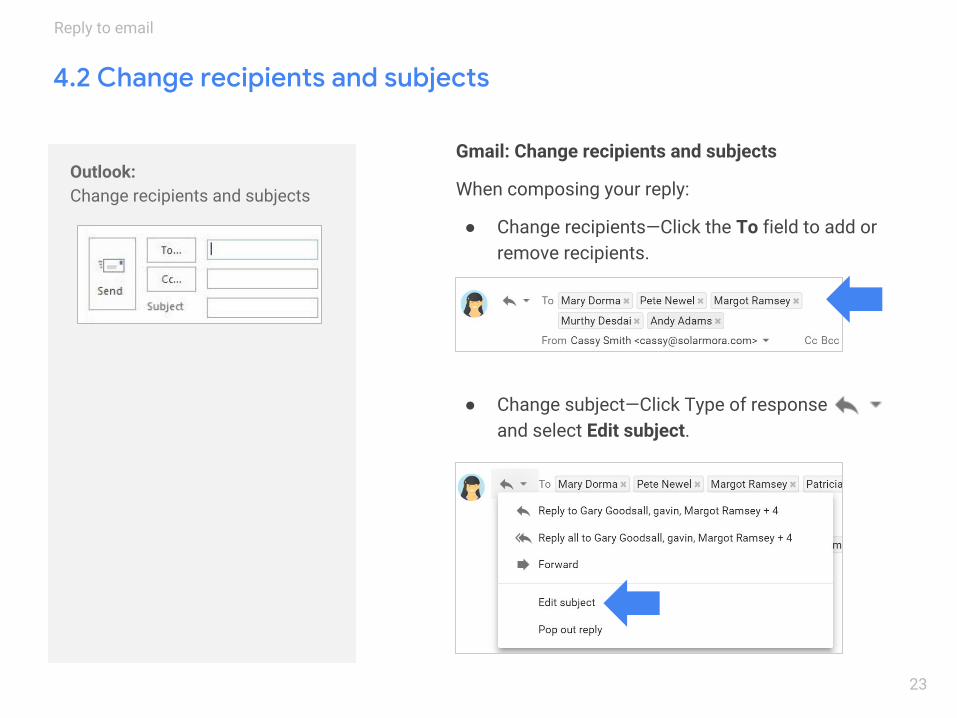
Gmail: Change recipients and subjects
When composing your reply:
● Change recipients—Click the To field to add or remove recipients.
● Change subject—Click Type of response and select Edit subject.
23
Reply to email
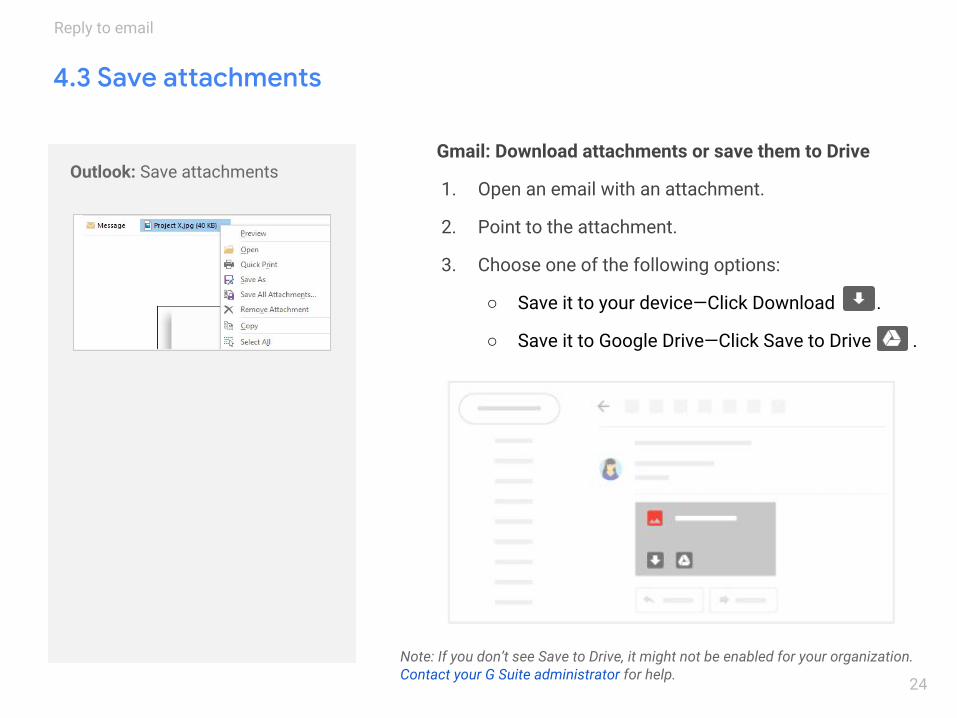
Outlook: Save attachmentsGmail: Download attachments or save them to Drive
1. Open an email with an attachment.
2. Point to the attachment.
3. Choose one of the following options:
○ Save it to your device—Click Download .
○ Save it to Google Drive—Click Save to Drive .
24
Reply to email
Note: If you don’t see Save to Drive, it might not be enabled for your organization. Contact your G Suite administrator for help.
Organize email
5.1 Delete vs. Archive or delete
5.2 Sort vs. Search
5.3 Folders with color categories vs. Labels with colors
5.4 Flags vs. Stars and importance markers
5.5 Rules vs. Filters
5
Switching to Gmail from Microsoft Outlook 25
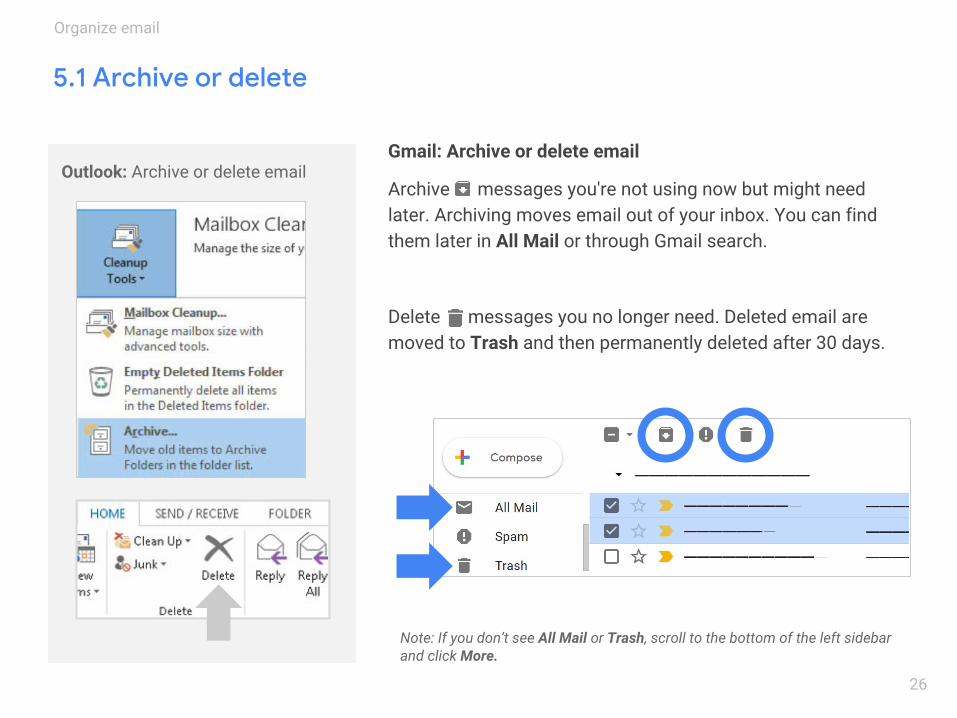
Outlook: Archive or delete emailGmail: Archive or delete email
Archive messages you're not using now but might need later. Archiving moves email out of your inbox. You can find them later in All Mail or through Gmail search.
Delete messages you no longer need. Deleted email are moved to Trash and then permanently deleted after 30 days.
26
Organize email
Note: If you don’t see All Mail or Trash, scroll to the bottom of the left sidebar and click More.
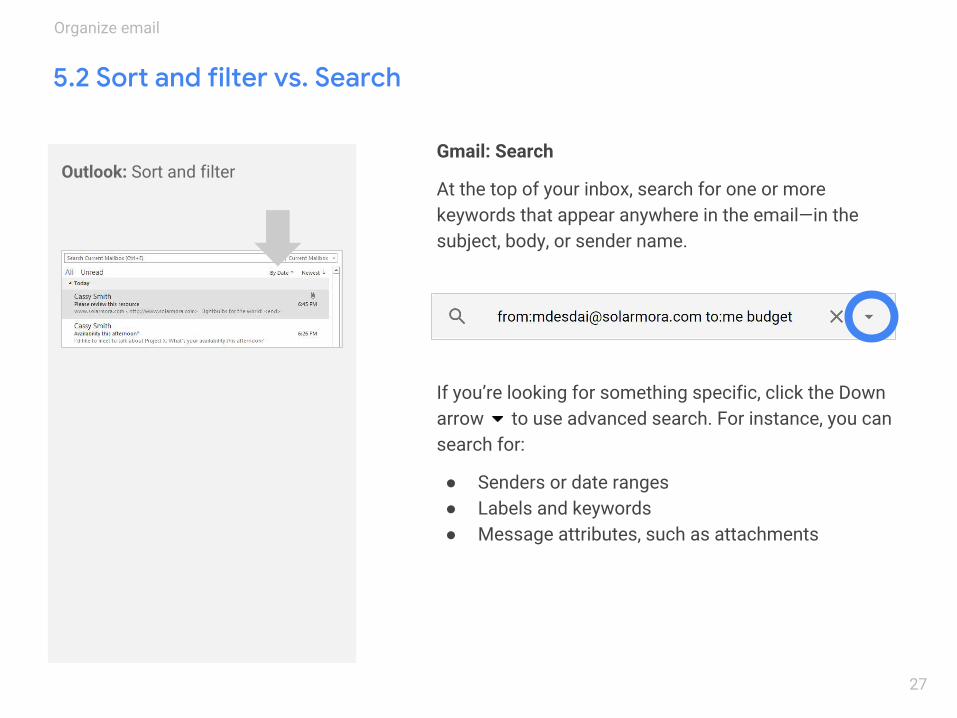
Outlook: Calendar peek Outlook: Sort and filterGmail: Search
At the top of your inbox, search for one or more keywords that appear anywhere in the email—in the subject, body, or sender name.
If you’re looking for something specific, click the Down arrow to use advanced search. For instance, you can search for:
● Senders or date ranges● Labels and keywords● Message attributes, such as attachments
27
Organize email
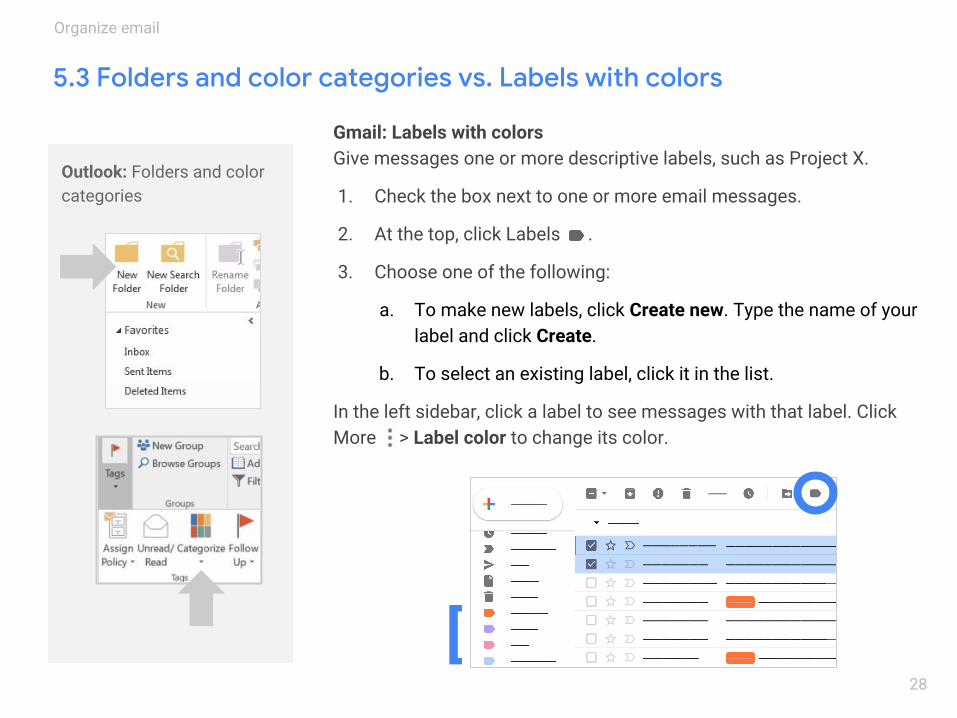
Outlook: Folders and color categories
Gmail: Labels with colorsGive messages one or more descriptive labels, such as Project X.
1. Check the box next to one or more email messages.
2. At the top, click Labels .
3. Choose one of the following:
a. To make new labels, click Create new. Type the name of your label and click Create.
b. To select an existing label, click it in the list.
In the left sidebar, click a label to see messages with that label. Click More > Label color to change its color.
28
[
Organize email
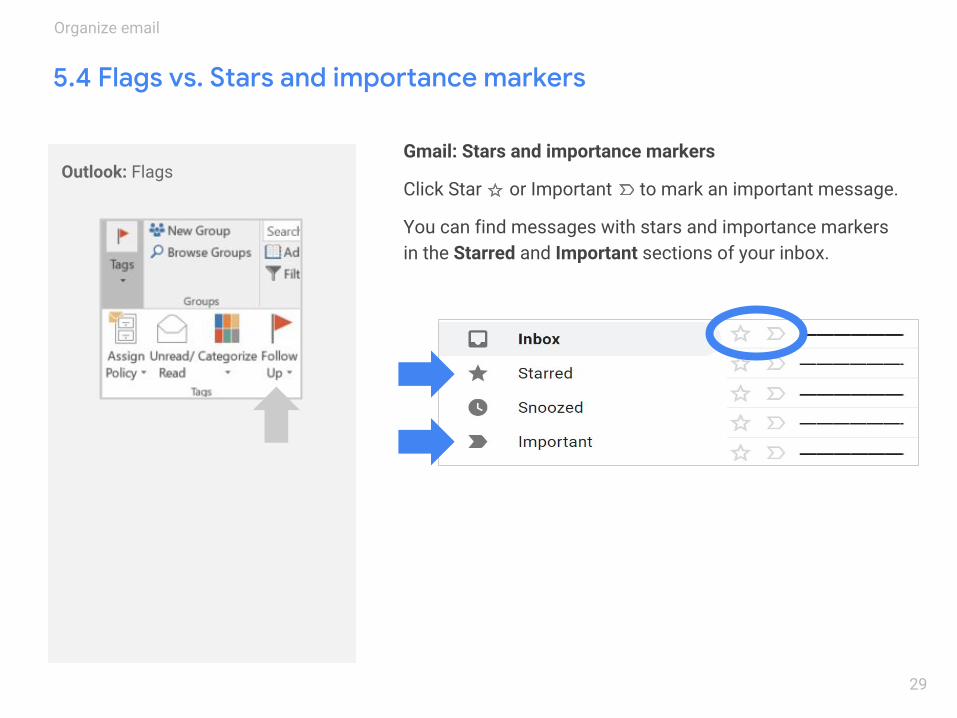
Outlook: FlagsGmail: Stars and importance markers
Click Star or Important to mark an important message.
You can find messages with stars and importance markers in the Starred and Important sections of your inbox.
29
Organize email
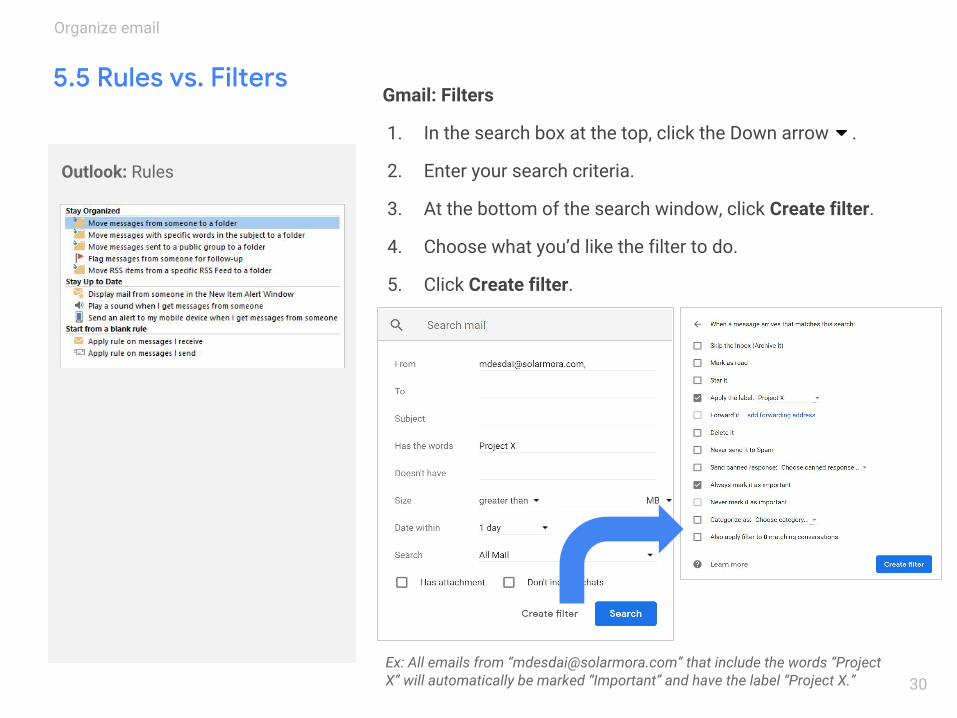
Outlook: Rules
Gmail: Filters
1. In the search box at the top, click the Down arrow .
2. Enter your search criteria.
3. At the bottom of the search window, click Create filter.
4. Choose what you’d like the filter to do.
5. Click Create filter.
Ex: All emails from “[email protected]” that include the words “Project X” will automatically be marked “Important” and have the label “Project X.” 30
Organize email
Collaborate 6.1 Vacation notifications
6.2 Desktop notifications
6.3 Mail delegation
6.4 Shared mailbox
6
Switching to Gmail from Microsoft Outlook 31
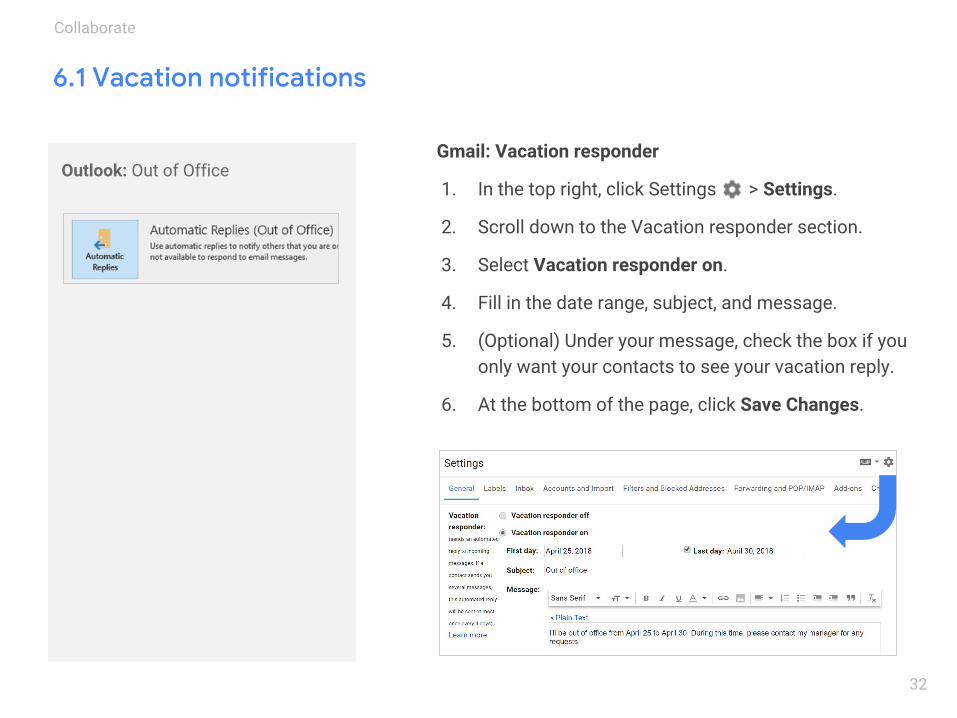
Outlook: Out of OfficeGmail: Vacation responder
1. In the top right, click Settings > Settings.
2. Scroll down to the Vacation responder section.
3. Select Vacation responder on.
4. Fill in the date range, subject, and message.
5. (Optional) Under your message, check the box if you only want your contacts to see your vacation reply.
6. At the bottom of the page, click Save Changes.
32
Collaborate
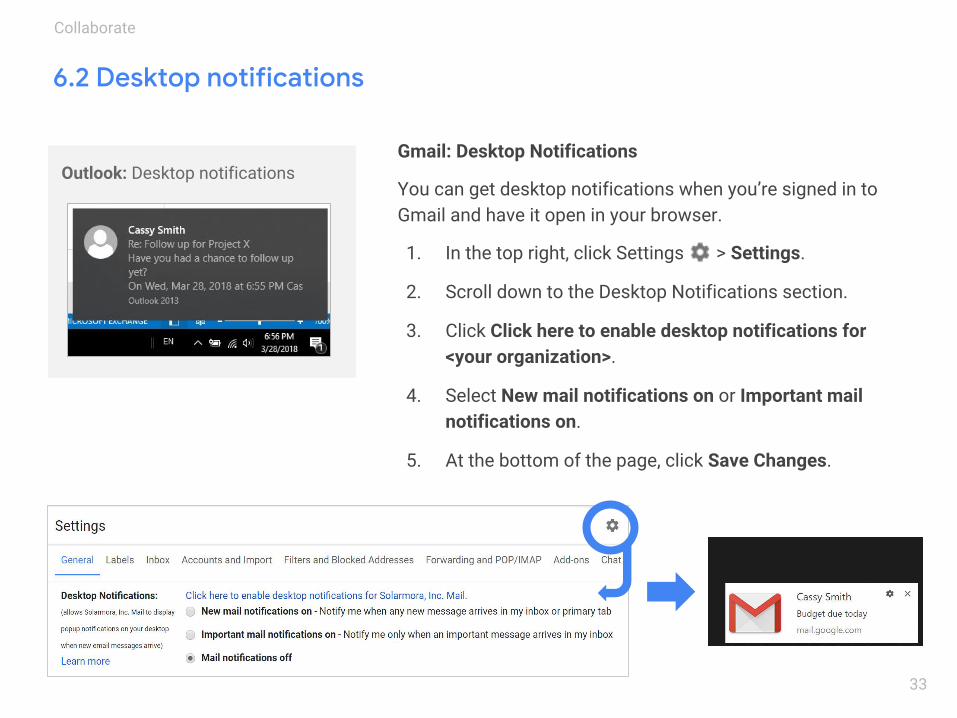
Outlook: Desktop notificationsGmail: Desktop Notifications
You can get desktop notifications when you’re signed in to Gmail and have it open in your browser.
1. In the top right, click Settings > Settings.
2. Scroll down to the Desktop Notifications section.
3. Click Click here to enable desktop notifications for <your organization>.
4. Select New mail notifications on or Important mail notifications on.
5. At the bottom of the page, click Save Changes.
33
Collaborate
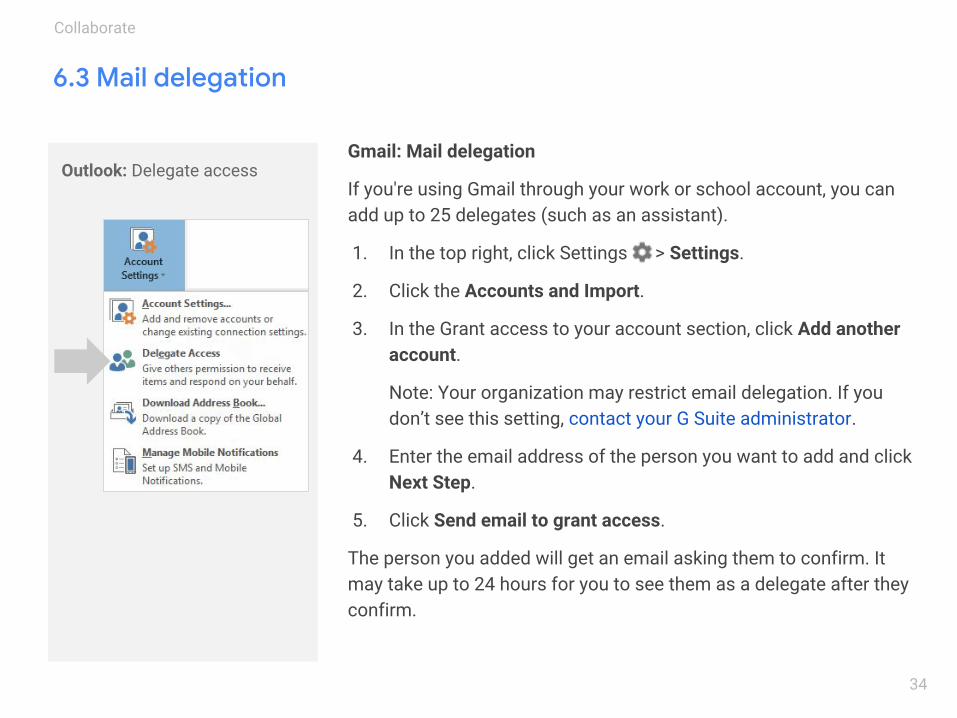
Outlook: Delegate accessGmail: Mail delegation
If you're using Gmail through your work or school account, you can add up to 25 delegates (such as an assistant).
1. In the top right, click Settings > Settings.
2. Click the Accounts and Import.
3. In the Grant access to your account section, click Add another account.
Note: Your organization may restrict email delegation. If you don’t see this setting, contact your G Suite administrator.
4. Enter the email address of the person you want to add and click Next Step.
5. Click Send email to grant access.
The person you added will get an email asking them to confirm. It may take up to 24 hours for you to see them as a delegate after they confirm.
34
Collaborate
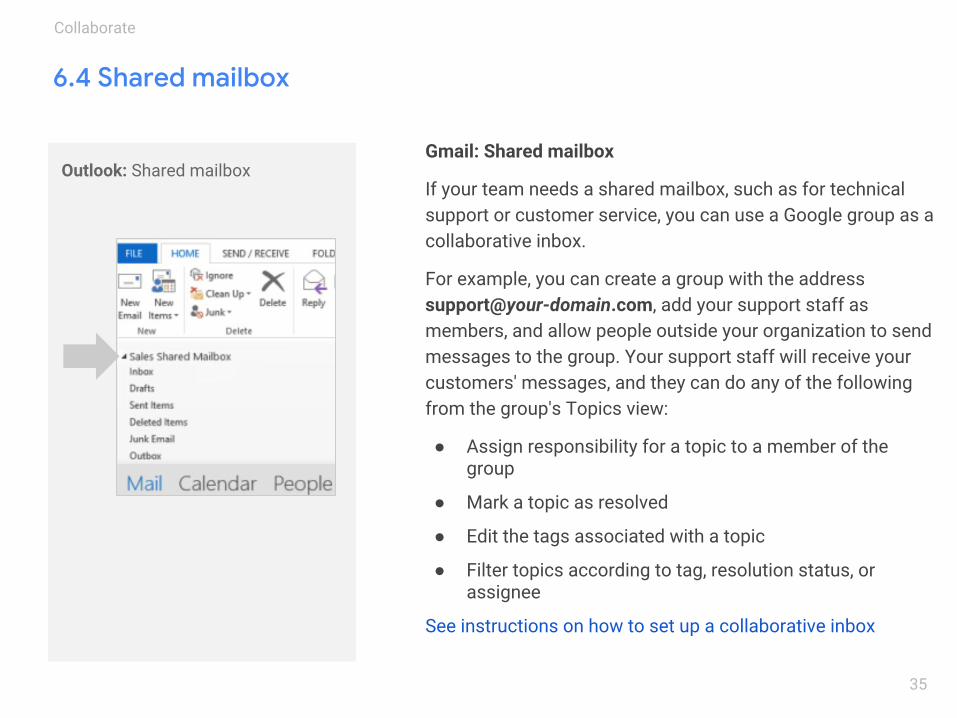
Outlook: Shared mailboxGmail: Shared mailbox
If your team needs a shared mailbox, such as for technical support or customer service, you can use a Google group as a collaborative inbox.
For example, you can create a group with the address [email protected], add your support staff as members, and allow people outside your organization to send messages to the group. Your support staff will receive your customers' messages, and they can do any of the following from the group's Topics view:
● Assign responsibility for a topic to a member of the group
● Mark a topic as resolved
● Edit the tags associated with a topic
● Filter topics according to tag, resolution status, or assignee
See instructions on how to set up a collaborative inbox
35
Collaborate
Productivity tips
7.1 Read and respond to email offline
7.2 Snooze email
7.3 Email templates
7.4 Priority inbox
7
Switching to Gmail from Microsoft Outlook 36
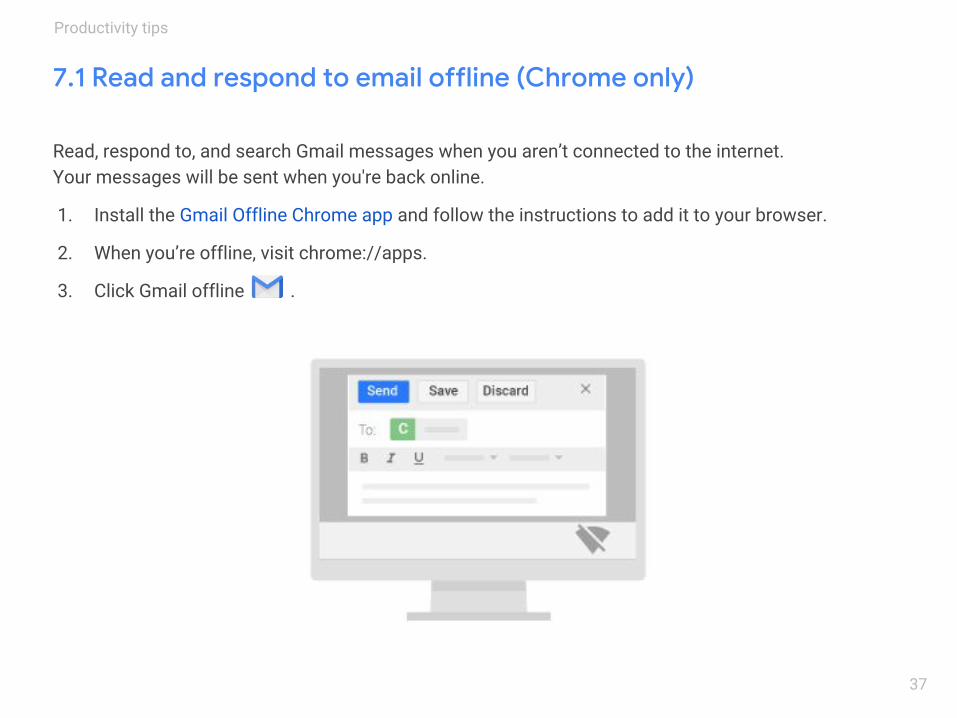
Read, respond to, and search Gmail messages when you aren’t connected to the internet. Your messages will be sent when you're back online.
1. Install the Gmail Offline Chrome app and follow the instructions to add it to your browser.
2. When you’re offline, visit chrome://apps.
3. Click Gmail offline .
37
Productivity tips
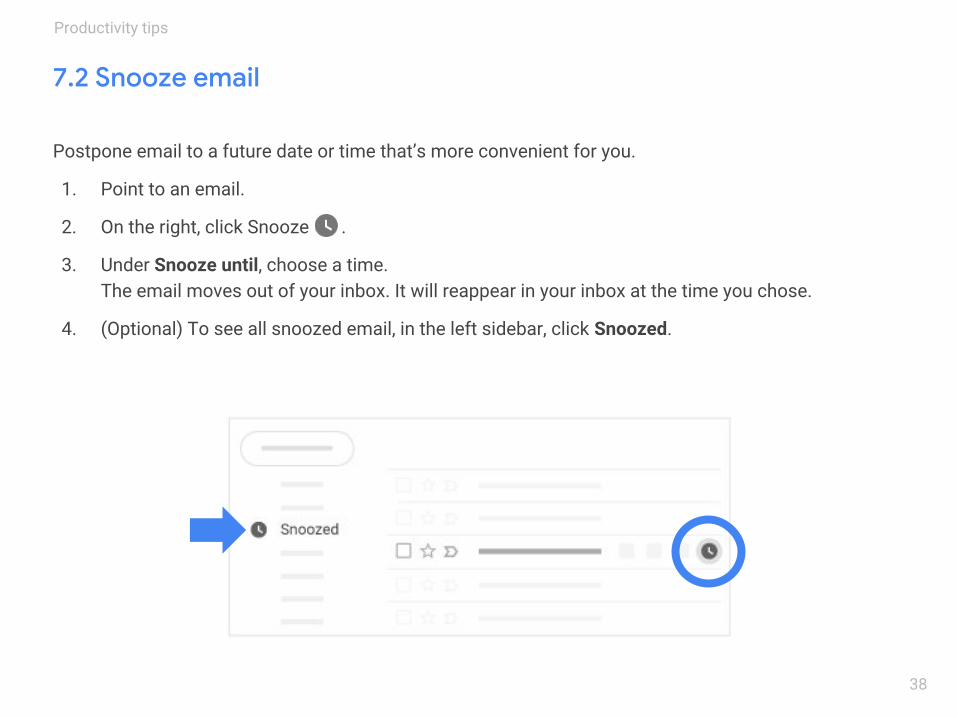
Postpone email to a future date or time that’s more convenient for you.
1. Point to an email.
2. On the right, click Snooze .
3. Under Snooze until, choose a time. The email moves out of your inbox. It will reappear in your inbox at the time you chose.
4. (Optional) To see all snoozed email, in the left sidebar, click Snoozed.
38
Productivity tips
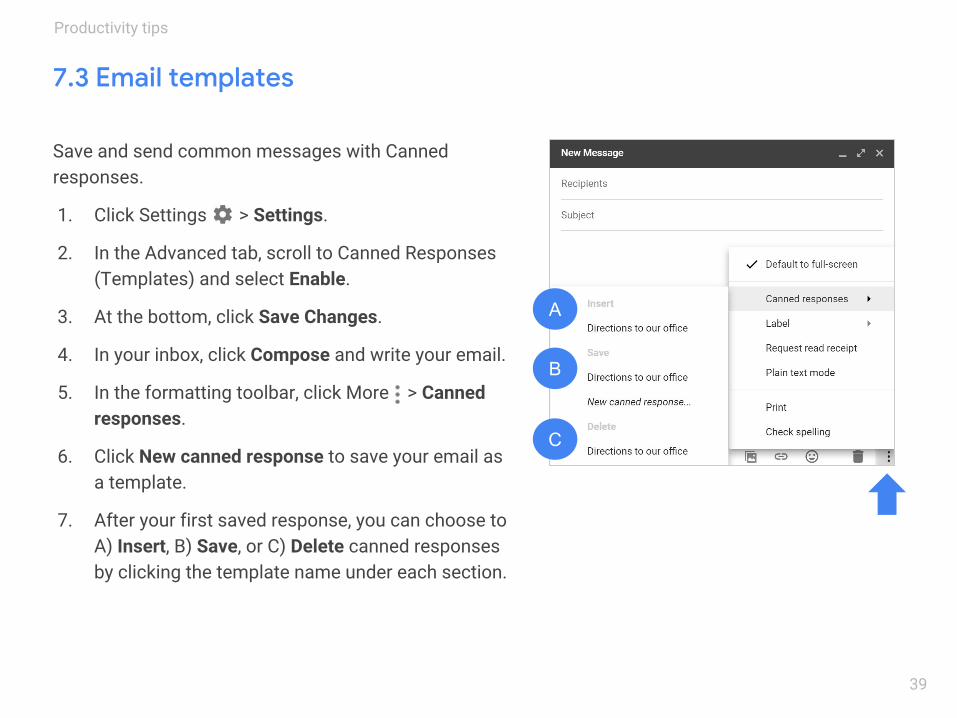
Save and send common messages with Canned responses.
1. Click Settings > Settings.
2. In the Advanced tab, scroll to Canned Responses (Templates) and select Enable.
3. At the bottom, click Save Changes.
4. In your inbox, click Compose and write your email.
5. In the formatting toolbar, click More > Canned responses.
6. Click New canned response to save your email as a template.
7. After your first saved response, you can choose to A) Insert, B) Save, or C) Delete canned responses by clicking the template name under each section.
39
Productivity tips
A
B
C
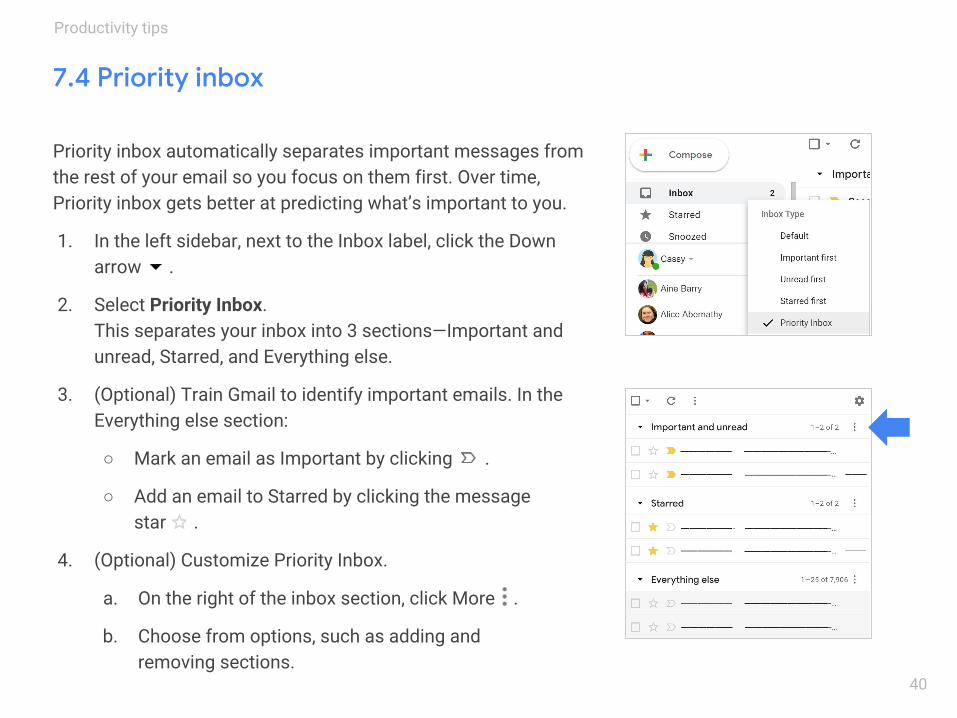
Priority inbox automatically separates important messages from the rest of your email so you focus on them first. Over time, Priority inbox gets better at predicting what’s important to you.
1. In the left sidebar, next to the Inbox label, click the Down arrow .
2. Select Priority Inbox. This separates your inbox into 3 sections—Important and unread, Starred, and Everything else.
3. (Optional) Train Gmail to identify important emails. In the Everything else section:
○ Mark an email as Important by clicking .
○ Add an email to Starred by clicking the message star .
4. (Optional) Customize Priority Inbox.
a. On the right of the inbox section, click More .
b. Choose from options, such as adding and removing sections.
40
Productivity tips
41
1. Help us improve this guide:
2. Get more training resources at the G Suite Learning Center (gsuite.google.com/learning-center), such as:
■ Cheat sheets
■ Product FAQ
■ Productivity tips
■ Customer examples
Visit the Learning Center
Next steps
Submit feedback