Embed Size (px)
Citation preview

Modelling and evaluation of fasteners under fatigue
Vignesh Nagarajan
Master of Science Thesis TRITA-ITM-EX 2019:590 KTH Industrial Engineering and Management
Machine Design SE-100 45 STOCKHOLM


1
Examensarbete TRITA-ITM-EX 2019:590
Modellering och utmattningsutvärdering av
fästelement
Vignesh Nagarajan
Godkänt
2019-09-11
Examinator
Ulf Sellgren,
Handledare
Ulf Sellgren,
Uppdragsgivare
Daniele Piva
Daniele.piva@sigma
Kontaktperson
Daniel Tanner
Sammanfattning På beräkningsgruppen på Sigma Industry East North har den traditionella metoden för
utvärdering av fästelement varit att använda sig av manualen VDI 2230. Ökad komplexitet gör
utvärderingen svårare att genomföra. Målet med detta examensarbete är att föreslå en robust
utvärderingsmetod som kombinerar VDI 2230 med Finita Element-Analys (FEA). Olika ämnen
såsom vekhet för fästelement och plåtar, sättningar, kraftvägar genom fästelement eller plåtar,
minsta ingreppslängd, laster och utmattningseffekter diskuteras. Flödesdiagrammet avhandlar
processflödet, det vill säga var man ska använda VDI2230 och när FE-metoden bör användas.
Examensarbetet är också till för att skapa förståelse för hur man konstruerar skruvar, såsom val
av skruvdiameter vid olika tillämpningar. Fokus har också varit att minska tidsåtgången för
utvärdering av fästelement och att sätta upp tekniker för utvärdering att användas i den dagliga
verksamheten.
Utvärderingsmetoden verifieras med hjälp av ett provfall.
Nyckelord: brott; fästelement; simulering; skruvförband;

2

3
Master of Science Thesis TRITA-ITM-EX 2019:590
Modelling and evaluation of fasteners under fatigue
Vignesh Nagarajan
Approved
2019-09-11
Examiner
Ulf Sellgren,
Supervisor
Ulf Sellgren,
Commissioner
Daniele Piva
Daniele.piva@sigma
Contact person
Daniel Tanner
Abstract At the calculations group in Sigma Industry East North, the traditional method for evaluating
fasteners has been by use of the VDI2230 manual. As the complexity of a model increases the
evaluation also becomes harder. The goal of this thesis is to set a robust evaluation method by
combining the VDI2230 with the Finite Element (FE) method. Varied topics such as fastener and
plate compliance, embedding effect, forces through the fastener and plate, minimum thread
engagement length, service loads and the fatigue effect in fasteners is discussed. The flowchart
discusses the process flow, as in, where to use the VDI2230 and where the FE method comes
into use. The thesis also helps to understand designing of bolts like selection of the bolt diameter
of varied applications and is user friendly to handle. The focus is also on reducing the time taken
for fastener evaluation and setting up of an in-house technique for the evaluation.
The evaluation method is verified using a test case.
Keywords: fastener; bolted joints; failure; simulations

4

5
Acknowledgement
This thesis work has been carried out from January 2019 to August 2019 as a final requirement
for the completion of my Master’s degree in Machine Design at KTH Royal Institute of
Technology, Stockholm. Firstly, I would like to thank my manager and supervisor, Danielle
Piva and Daniel Tanner respectively, from the Calculations team at Sigma Industry East North
for handing and entrusting me with this project. I would also like to thank the entire
Calculations team for the constant support and guidance they have shown and the interest to see
the project shape to be something useful for the company.
I am also grateful to my supervisor and examiner at KTH Royal Institute of Technology, Ulf
Sellgren for his timely guidance and support.
Vignesh Nagarajan
Stockholm, Sweden

6
7
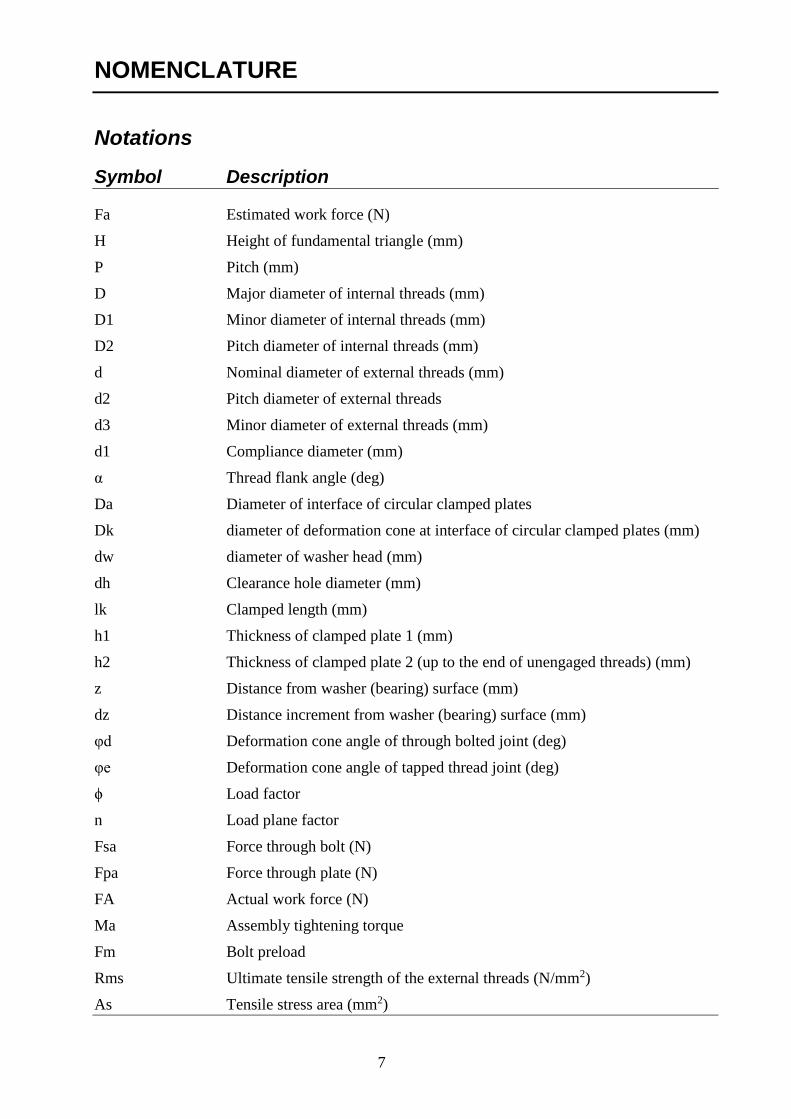
NOMENCLATURE
Notations
Symbol Description
Fa Estimated work force (N)
H Height of fundamental triangle (mm)
P Pitch (mm)
D Major diameter of internal threads (mm)
D1 Minor diameter of internal threads (mm)
D2 Pitch diameter of internal threads (mm)
d Nominal diameter of external threads (mm)
d2 Pitch diameter of external threads
d3 Minor diameter of external threads (mm)
d1 Compliance diameter (mm)
α Thread flank angle (deg)
Da Diameter of interface of circular clamped plates
Dk diameter of deformation cone at interface of circular clamped plates (mm)
dw diameter of washer head (mm)
dh Clearance hole diameter (mm)
lk Clamped length (mm)
h1 Thickness of clamped plate 1 (mm)
h2 Thickness of clamped plate 2 (up to the end of unengaged threads) (mm)
z Distance from washer (bearing) surface (mm)
dz Distance increment from washer (bearing) surface (mm)
φd Deformation cone angle of through bolted joint (deg)
φe Deformation cone angle of tapped thread joint (deg)
ϕ Load factor
n Load plane factor
Fsa Force through bolt (N)
Fpa Force through plate (N)
FA Actual work force (N)
Ma Assembly tightening torque
Fm Bolt preload
Rms Ultimate tensile strength of the external threads (N/mm2)
As Tensile stress area (mm2)
8
Τbm Ultimate shear strength of the external threads (N/mm2)
C1 Internal thread dilation strength reduction factor
C2 External thread strength reduction factor
C3 Internal thread strength reduction factor
δ Elastic compliance
k Stiffness
F Applied force
f Deformation due to force F
E Young’s modulus
A Cross- sectional area
l Component length
φ Cone angle
delta_s Compliance of bolt
delta_p Compliance of plates
ρ Density of steel (kg/m3)
Ma Assembly tightening torque (Nm)
Mg Thread torque (Nm)
Mk Under-head torque (Nm)
Fz Preload loss (N)
Fz Total plastic deformation (µm)
Fkerf Required minimum clamp force (N)
αA Tightening factor
Fmzul Assembly preload loss (N)
σmzul Permissible assembly stress (N/mm2)
Ft Tangential force (N)
τm Max shear stress (N/mm2)
σredm Equivalent von Mises stress (N/mm2)
Fq Transverse loads (N)
Mt Torque about bolt axis (N-mm)
qf Number of slipping planes
Rp0.2min Minimum 0.2% yield strength of external threads (N/mm2)
Pg Permissible pressure (N/mm2)
Abbreviations
VDI Verein Deutscher Ingenieure
FEM Finite Element Method

9
PLM Product Lifecycle Management
YM Young’s Modulus
List of figures
Figure number Description Figure 1 Stakeholder Assessment Grid
Figure 2 Nomenclature of ISO metric threads
Figure 3 Sections of through-bolted joint and its theoretical deformation
cone shape
Figure 4 Sections of tapped thread (screw) joint and its theoretical deformation
Figure 5 Moment vs rotation curves obtained from two tests on the joint type
Figure 6 Definitions of Grip length (Lg), Thread length (Lt) and thread
engagement length
Figure 7 Process flow for the evaluation of fasteners
Figure 8 Bolt model
Figure 9 Section sketch of the model
Figure 10 Load and constraints condition
Figure 11 Mesh diagram
Figure 12 Large plates for Through-bolted joints
Figure 13 Load and constraints on the large plates
Figure 14 Mesh of the large plates with washer split
Figure 15 Small plates for Through-bolted joints
Figure 16 Load and constraints on the small plates
Figure 17 Mesh of the small plates with washer split
Figure 18 Large plates for tapped-thread joint
Figure 19 Section model for Large plates
Figure 20 Coupling of reference point with engaged thread surface in large plates
Figure 21 Load and constraint on the large plates
Figure 22 Sectional views of the load and constraints
Figure 23 Mesh of the large plates with washer split
Figure 24 Small plates for tapped-thread joint
Figure 25 Section model for small plates
Figure 26 Interaction property manager for small plates
Figure 27 Coupling of reference point with engaged thread section in small plates
Figure 28 Load and constraints of Small plates
Figure 29 X-Constraints in the mid plane of the small plates
Figure 30 Z-Constraints in the mid plane of the small plates
Figure 31 Small plates for tapped-thread joint without washer split
Figure 32 Small plates for tapped-thread joint with washer split
Figure 33 Mesh of the small plates with washer split
Figure 34 Bolted joint assembly model to calculate Fsa value
Figure 35 a) Elastic force vs deformation curve and b) joint force diagram [1]
Figure 36 Displacement contours of the M10 bolt
Figure 37 Probing method for compliance checks
Figure 38 Von-Mises Stress of large plates with same YM
Figure 39 Displacement of large plates with same YM
Figure 40 Von-Mises stress of small plates with same YM
Figure 41 Displacement of small plates with same YM

10
Figure 42 Von-Mises stress of large plates with diff. YM
Figure 43 Displacement in of large plates with diff. YM
Figure 44 Von-Mises stress of small plates with diff. YM
Figure 45 Displacement of small plates with diff. YM
Figure 46 Von-Mises stress of plates with varying thickness
Figure 47 Displacement of plates with varying thickness
Figure 48 Von-Mises stress of plates with varying thickness
Figure 49 Displacement of plates with varying thickness
Figure 50 Von-Mises stress of large plates with Varying thickness and diff. YM
Figure 51 Displacement of large plates with varying thickness and diff. YM
Figure 52 Von-Mises stress of small plates with varying thickness and diff. YM
Figure 53 Displacement of small plates with varying thickness and diff. YM
Figure 54 Von-Mises stress of large plates with same Young’s modulus
Figure 55 Displacement of large plates with same Young’s modulus
Figure 56 Von-Mises stress of small plates with same Young’s modulus
Figure 57 Displacement of small plates with same Young’s modulus
Figure 58 Von-Mises stress of large plates with different Young’s modulus
Figure 59 Displacement of large plates with different Young’s modulus
Figure 60 Von-Mises stress of small plates with different Young’s modulus
Figure 61 Displacement of small plates with different Young’s modulus
Figure 62 Elastic force vs Deformation curve from calculations
Figure 63 Joint force diagram from calculations
Figure 64 Load and constraints provided to the bolts
Figure 65 Load and constraints provided to the plates
Figure 66 Kinematic coupling of the washer surface
Figure 67 Surface partition the region between the washer and hole diameter
List of Tables
Table 1 Different cases for plate compliance check
Table 2 FEM results in comparison with the calculated results
Table 3 Difference % between FEM and MATLAB

11
TABLE OF CONTENTS
SAMMANFATTNING (SWEDISH) 1
ABSTRACT …………............................................................................................................... 3
FOREWORD ………….............................................................................................................. 5
NOMENCLATURE ………….................................................................................................. 7
TABLE OF CONTENTS …………......................................................................................... 11
1 INTRODUCTION ………….......................................................................................... 14
1.1 Background …………............................................................................................ 14
1.2 Purpose ………….................................................................................................. 14
1.2.1 Project goals…………...................................................................................14
1.2.2 Project requirements………….......................................................................14
1.2.3 Project deliverables………………………………………………………...15
1.2.4 Project stakeholders………………………………………………………..15
1.3 Delimitations 16
1.4 Method 16
2 FRAME OF REFERENCE 18
2.1 Frame of reference topics 18
2.1.1 Verein Deutscher Ingenieure 2230 (VDI2230)………………………... 18
2.1.2 Failure modes of bolt and nut assemblies undergoing tensile loading…20
3 IMPLEMENTATION 23
3.1 Definitions …………………………………………………………………………. 23
3.2 Process flow…………………………………………………………………………24
3.3Finite Element Analysis (FEM) ……………………………………………………..26
3.3.1 Bolt compliance evaluation …………………………………………………26
12
3.3.2 Plate compliance evaluation ……………………………………………….. 29
3.4 Assembly loads on bolted joints ……………………………………………………. 46
3.5 Minimum thread engagement length ……………………………………………….. 47
3.6 Service loads on bolted joints ………………………………………………………. 47
4 RESULTS AND DISCUSSIONS 50
4.1 Design phase ………………………………………………………………………..50
4.2 Bolt compliance……………………………………………………………………..50
4.3 Plate compliance …………………………………………………………………….51
4.3.1 Through bolted joint …………………………………………………………53
4.3.2 Tapped-thread joint …………………………………………………………..57
4.3.3 FEM Results ………………………………………………………………….59
4.4 Assembly loads on bolted joints ……………………………………………………..61
4.5 Service loads ………………………………………………………………………….62
5 CONCLUSIONS …………............................................................................................... 63
5.1 Conclusions …………...............................................................................................63
6 FUTURE WORK …………............................................................................................. 68
6.1 Future work 68
7 REFERENCES 70
APPENDIX A: SUPPLEMENTARY INFORMATION 72

13

14
1 INTRODUCTION
This chapter would explain the background of the project such as company history, purpose of
the project, delimitations, description of the project goals and scope.
1.1 Background
Sigma is a group of leading consulting companies with the goal of making the customers of the
company more competitive. Sigma’s means are technological know-how with the constant need
for finding better solutions. The company was founded in 1986 and has six major business areas;
Sigma IT Consulting, Sigma Technology, Sigma Connectivity, Sigma Industry, Sigma Civil, and
Sigma Software.
The company’s tag line “Expect a better tomorrow” is not just through the engineering solutions
but also by being socially responsible. The Star for life, a non-profit organization which works in
preventing the spread of HIV and in ensuring schooling is provided for every child in Southern
Africa.
1.2 Purpose
Sigma has several projects that are handled with expertise where extensive simulations and
design consulting work is performed by the company. Among these an important analysis to be
performed is the bolt design and evaluation. Different companies use their several years of
expertise and have their own evaluation technique for bolted joints. Sigma would also like for an
In-house procedure or program to evaluate bolted joints undergoing fatigue.
1.2.1 Project goals
The project aims at bringing a state of the art evaluation model for bolted joints under fatigue
and to bring a standard procedure which can be used under all scenarios for fastener simulation
and to answer the following research questions:
Research questions
1. In the bolted joint analysis, what is the better way to constraint and load the bolts and
plates for an effective analysis?
2. Can the plate compliance calculation be used to check for plates of different thickness
and Young’s modulus?
1.2.2 Project requirements:
Should have:
Guidelines for modelling and evaluation for bolted joint
Axial loaded joints being covered
Apply procedure on a test case

15
Can have:
Complex loading cases like transverse, shear loading
Plug-in setup
1.2.3 Project deliverables
To check for the method being used currently and to clearly distinguish the ”should
have” and the ”can have” according to the company requirement
To research all the possible available standards for evaluation and to check which is the
most suited for the company
To take a test case for one bolt of one bolt class (Eg: one bolt of M10) and run a simple
case to clearly understand the inputs and what we’re going to find out with Scripting and
what we’d find out through FEM
To make this procedure suitable for n-Bolts and for all Bolt classes
To test this standard process for previous test cases
Set-up a plugin which can be used for all scenarios
1.2.4 Project stakeholders
An important part of any project is to assess the stakeholders the project tends to and make sure
that the requirements are satisfied correctly.
1) Ulf Sellgren
(KTH)
2) ITM department
(KTH)
1) Daniele Piva (Sigma
Supervisor)
2) Daniel Tanner (Sigma
Supervisor)
3) Sigma calculations team
4) Sigma customers
1) Environment
2) Society
3) KTH
4) Other master
thesis students
1) Sigma employees
2) Competitors
Pow
er
Interest
Low High
Low
Hig
h
Figure 1: Stakeholder Assessment Grid

16
The stakeholders with the most power and the most interest are the two supervisors at
Sigma and the company as a whole. Primary importance is also that of the calculations
team at the industry and they have at most use and concern for the completion of the
project. The customer is always important and gets the most use from the resource as the
time is reduced due to the ease in evaluation.
The stakeholder with high power but low interest in terms of the final result, in
comparison to the supervisors at Sigma is the KTH supervisor and the department under
which the project is being done.
The people with high interest but low power are the other department Sigma employees
as the project details don’t matter a lot to them but the project is of interest keeping the
benefit the company gains in mind. The competitors are also included to keep in mind the
market being tended to.
The final group is the one with the least power and least interest which are factors which
could influence the project but wouldn’t have major impact which are the other master
thesis students, KTH University, society and other minor factors. These are factors which
might affect the project at the start or the very end (Final report).
1.3 Delimitations
The project will not go too much into the details about the design of bolted joints
Detailed modelling of threads
Thread stripping
Focus mainly on metals
Co-efficient of friction is taken as 1.2 and not analysed for different conditions
1.4 Method
The evaluation is a complex process and the preliminary procedure is to look for all the available
standards for evaluation and to assess which amongst them is the most powerful. The available
standards were mainly the Verein Deutscher Ingenieure [1] or popularly known as the VDI2230
standard, which is also a company and the Eurocode [2] which is again extensively used in
industries.
Amongst these the VDI is widely used but has quite some limitations and as the complexity of
the models increases handling the VDI becomes a challenge. This is where the FEM analysis
using ABAQUS comes in handy in providing the essential information which would be difficult
to obtain just through the VDI2230 like the stiffness value [3]. To essentially get a good
understanding of bolt evaluation the failure modes of bolt and nut assemblies [4] under loading
must be studied.
The first step is the fastener selection which is followed by the assessment of bolt and plate
compliance. The program would be versatile would have a procedural approach to bolted joint
evaluation. The FEM is linked with the VDI procedure to deal with complex models and
multiple fastener analysis at the same time. The forces through the plate and the work force are
calculated by extracting the value of the force through the bolt from FEM.
There are several challenges to be addressed in the process but a few assumptions made
according to the VDI standard such as,
a) Any sort of thread-stripping is avoided

17
b) Bolt shank must fail in tension prior to thread-stripping
The evaluation is conducted for two cases– Through bolted joint & Tapped-thread joint. . There
is a test case which is taken and the entire evaluation procedure is run.

18
2 FRAME OF REFERENCE
The available literature in reference to the thesis is presented here and these are the current
state of the art being used primarily in the industry. This chapter would begin by highlighting
about the VDI2230 and illustrate a few important aspects of it. Further a discussion on the
evaluation methods and previously available material on the linking of calculations with FE
method is shown.
2.1 Frame of reference topics
Available standards:
o VDI2230
Failure modes for bolted joints:
o Failure modes of bolt and nut assemblies under tensile loading
o VDI2230
2.1.1 Verein Deutscher Ingenieure 2230 (VDI2230)
The VDI2230 is a calculation manual for determining the stresses, compliance, force through
a bolt and plate, assembly loads, service loads and fatigue strength of the bolt. It sets a
guideline for ISO metric bolted joints to prevent potential failures like bolt yielding due to
overstressing, clamp plates crushing, bolted joint preload loss due to embedding, crushing
and slipping, thread stripping and bolt fatigue failures. The VDI covers high-duty bolted
joints with constant or alternating loads. A joint must fulfil its function and withstand the
working load. The first step describes the design phase where the bolt diameter is extracted
by inputting the value of work force (Fa) being applied, the type of tooling due to tightening,
the type of force and the strength grade (8.8, 10.9 and 12.9) of the bolt. Once the bolt
diameter is extracted, the minimum and maximum preload that the particular bolt can
withstand can be found based on the strength grade of the bolt.
The assumptions in the VDI2230 are mainly-
The bolt shank must fail in tension prior to thread stripping,
Any sort of thread stripping must be avoided
The manual deals with two kinds of bolts mainly- Through bolted joints and Tapped-thread
joints. The range of validity for the manual is from M4 to M39 steel bolts at room temperature.
Figure 2: Nomenclature of ISO metric threads

19
Figure 3- Sections of through-bolted joint and its theoretical deformation cone shape
The most important part of the VDI is calculating the compliance of the bolt and plates. The
elastic compliance of a bolt characterizes the capability of a component to deform elastically
under a unit force. It’s the inverse of stiffness or the ratio of deformation to the applied force.
The bolt compliance is a sum of the compliance of the bolt head, bolt sections, unengaged
threads, engaged threads and depending on whether the nut is present or not, it includes the
compliance of the nut.
The plate compliance is a methodic calculation, where firstly, the limiting cone diameter is
calculated. The limiting diameter (Dk) with the cone angle (φ) is then extracted and lastly the
plate compliance is found. The bolt and plate compliance is used to calculate the load factor (ϕ).
The Force through bolt (Fsa) is extracted from the assembly model using FEM to calculate the
assembly loads. The ratio of the force through bolt and the load factor is used to calculate the
actual work force (FA) and finally the force through the plate (Fpa) is extracted.
In the next chapter of the VDI, the assembly loads are calculated. When the bolt is tightened to
an assembly tightening torque (Ma), the bolt is stretched and clamped plates are compressed by
the same amount of bolt preload (Fm). After the bolt assembly process, surface flattening occurs
Figure 4- Sections of tapped thread (screw) joint and its theoretical deformation
cone shape

20
as a result of local plastic deformation of rough surfaces at contact areas, such as threads, head,
nut-bearing areas and interfaces of clamped plates. This is called embedding. Embedding
reduces the magnitude of preload. The assembly maximum and minimum preload is calculated
by inputting the required minimum clamp force using which the minimum preload is calculated.
The minimum preload is a summation of the required minimum clamp force, the force through
the plate and the preload loss. The maximum preload loss is a product of the tightening factor to
the minimum preload force. The tightening factor is a measure of the scatter in a bolt's clamp
force as a result of the tightening method used to tighten the fastener.
The values are used to get the permissible assembly stresses to check for yielding where the
maximum preload must be less than the permissible load for yielding to not occur. Bolt failure
due to overtensioning occurs when the equivalent stress during installation process exceeds the
tensile yield strength of the bolt. Clamped plates crushing under excessive pressure occurs when
the interfacial pressure during installation exceeds the permissible pressure of one of the clamped
plates.
The minimum thread engagement length for a bolted joint is calculated based on the design
criterion that the bolt shank should fail prior to the thread stripping, which requires that the
maximum tensile force of the bolt must be lower than the maximum shear force of the nut thread
during engagement. The minimum thread engagement length is a function of the ultimate tensile
strength of the external threads (Rms), tensile stress area (As), Pitch (P), ultimate shear strength
of the external threads (τbm), internal thread dilation strength reduction factor (C1), external
thread strength reduction factor (C2), internal thread strength reduction factor (C3), nominal
diameter (d), pitch diameter of external threads (D2).
The last part of the VDI calculates the service loads on bolted joints to check for potential
failures. Yielding in a bolt is due to overstressing in tension, bending or torsion. It occurs when
the equivalent stress achieved during service exceeds the tensile yield strength, which can cause
loss of preload. Gapping occurs when the service load causes clamp force to decrease to zero,
resulting in gaps between the bolt and clamped plates. Plate crushing occurs when the interfacial
pressure achieved during service loading exceeds the permissible pressure of one of the clamped
plates, as a result plates would crush and cause loss of preload. Slipping occurs when a
transverse force or torsional moment exceeds reaction force of the normal force multiplied by
coefficient between clamped plates. If slip occurs on opposite directions and repeats, fretting
may occur causing loss of clamping load or nut may back off. Fatigue failure occurs when
alternating service loading amplitude exceeds endurance limit of a bolt. Fatigue life reduces if
pitting or corrosion occurs. VDI uses the infinite-life design concept for bolted joints by using
nominal stress-life (S-N) approach. The fatigue life is taken as 2*10^6 cycles for the infinite life
approach and is taken as an input in the finite life approach. The safety factor against fatigue is
taken as 1.2 and the fatigue strength is calculated for rolled threads before treatment and for
rolled threads after treatment.
2.1.2 Failure modes of bolt and nut assemblies undergoing tensile
loading
There are three common failure modes of bolt and nut assemblies under tension- bolt fracture,
bolt thread failure, nut thread failure. Bolt thread failure and nut thread failure are forms of
thread failure. Thread failure of bolt and nut assemblies subjected to tension is generally
undesired because it’s a less ductile failure mode than fracture of threaded shank of the bolt. The
failure of threads due to over-tightening is difficult to detect during installation. The paper
indicates that using partially threaded bolts rather than fully threaded ones increases the chances

21
of failure. The intended fracture mode of bolt and nut assemblies with regular nuts is bolt
fracture.
Two replicate quasi static tests were performed a) with one nut b) with two nuts and it was found
that when one nut was employed thread failure occurred whereas with two nuts the failure mode
was bolt fracture. The moment vs rotation of the joint curves is displayed below-
Figure 5- Moment vs rotation curves obtained from two tests on the joint type
The two nuts give an approximately 10% increase in maximum measured joint moment and
130% increase of joint rotation upon initiation of bolt fracture. The failure mode of bolt and nut
assemblies subjected to tensile loading is determined by several factors like geometry and
dimensions, mechanical properties of the bolt and nut assemblies and length of bolt shank.
Figure 6- Definitions of Grip length (Lg), Thread length (Lt) and thread engagement length
The primary objective of this paper is to study how the threaded length affects the tensile
behavior of the bolt and nut assemblies, mainly in terms of the failure modes. This paper
presents results from a series of direct tension tests carried on partially and fully threaded bolt
and nut assemblies, where grip length and thread length are varied. The FE model of the tests are
also studied for investigating mechanisms determining the failure modes and for evaluating the
test results. After validating the FE model against experimental results, the model was employed
to investigate how the response was affected by varying the yield strength and hardening of the
nut, and whether thread failure can be prevented by using a high nut.
An axisymmetric FE model is used for the purpose of the study, the bolts tested were only
loaded in tension. In many cases, the bolts can also be subjected to shear forces and/or eccentric
axial forces, which may impose a non-symmetric pressure distribution onto the bearing face of
the nut. This may further increase the chances of thread failure. The ways to prevent thread

22
failure are by appropriately selecting the fastener, must be at least one full thread in the grip for
non-preloaded bolts and four full threads are needed in the grip for preloaded bolts. The purpose
of these requirements is to ensure correct installation without jamming the nut on the thread run-
out of the bolt. The probability of thread failure can be reduced by increasing the length Lt or
by increasing the thread engagement length. Thus for bolts subjected to tension it is desired to
use fully threaded bolts.

23
3 IMPLEMENTATION
In this chapter the methodology for conducting this thesis is discussed. The work flow, FEM
models and their link with the calculations is shown, plots are extracted and analysed and the
assembly and service loads of the fasteners are calculated.
3.1 Definitions
To get a clear view of the thesis a few definitions have to be understood. This section of the
thesis covers the important definitions to be known-
1. Compliance (δ) - The elastic compliance shows the capability of a component to deform
elastically under a unit force.
δ = 1/k = f/F = l/EA
2. Cone angle (φ)- As the bolts are tightened the clamped plates deform, the compressive
stress distribution spreads out from the bolt contact areas and generates conical volume,
the conical volume generated is called the cone angle or deformation cone.
3. Clamp length (lk) - The length of the bolt stretched under tension, in a through-bolt it is
the distance between the bolt and the nut, in tapped thread bolt it is the distance between
the bolt head and the first engaged thread.
lk= h1+h2
Where,
h1= thickness of plate 1 (mm)
h2= thickness of plate 2 till first engaged thread (mm)
4. Load plane factor (n) - The load introduction factor helps to determine the loading
plane. The n factor is a value between 0 and 1. When n is 0 the entire load is absorbed by
the clamped plates and when n is 1 the load is completely absorbed by the fastener. It is
recommended as 1 in this thesis.
5. Load factor (ϕ)- Percentage of externally applied load which passes through the bolt
6. Residual clamp force (Fkerf) - The difference between the preload force and the force
through the plate. It is the preload force which remains after the preload losses and work
force are removed.
7. Embedding- The assembly process of the bolt causes a surface flattening due to local
deformation of rough surfaces at contact areas, such as threads, head and nut-bearing
areas, interfaces of clamped plates. This is called embedding and it reduces the preload.
8. Average surface height (Rz) - The mean value of the five surface height values from the
five sampling lengths within the evaluation length.

24
9. Thread torque (Mg) - The product of the tangential force on the thread contact surface
and the thread pitch radius.
10. Gapping- Condition which occurs when the service load causes the clamp force to
decrease to zero resulting in gaps between the bolt and the clamped plates.
11. Crushing- Condition which occurs when the interfacial pressure achieved during service
loading exceeds the permissible pressure of one of the clamped plates.
12. Slipping- Condition which occurs when a transverse force or torsional moment exceeds
the reaction force of the normal force multiplied by the coefficient between clamped
plates.
13. Fatigue- Condition which occurs when alternating service loading amplitude exceeds the
endurance limit of the bolt.
3.2 Process flow
Figure 7- Process flow for the evaluation of fasteners

25
The flowchart shows the process flow being followed in this thesis. This is a common process
for Tapped thread joints and through bolted joints. The places where there are a difference in
approach or formulas will be specifically explained. The flow has been split to a few optional
columns which can or need not be performed as they’re parameter checks which have been
placed. The first yellow block is the Design Phase. In this phase, the goal is to find the correct
bolt diameter and the minimum & maximum preload values that the bolt can withstand. The
input values are highlighted in the transparent black border box below the yellow box. The
inputs required are the estimated work force, the type of tooling, the type of force and strength
grade. This is a procedure followed from the VDI and the MATLAB code automatically finds
the outputs on specifying the inputs.
The first orange block is an optional box in the process is the bolt compliance check. The bolt
compliance is calculated as a sum of the compliances of the bolt head, bolt sections, unengaged
threads, engaged threads and nuts or tapped threads should be included. The compliance as
already specified before is the inverse of stiffness of the bolt. Here, the bolt head compliance is a
function of the nominal diameter, the nominal area and the Young’s modulus of the bolt. The
formulas are different for the bolt head compliance for a hexagon head bolt and socket head cap
screws. The compliance of a bolt shank is an important contributor to calculate the compliance
diameter which reduces the varying diameters present on the shank and brings an equivalent
diameter. The shank diameter is a function of the length of the section, Young’s modulus of the
bolt and area of the section. The shank compliance is the sum of the section compliances and the
unengaged thread compliance. The other formula for compliance is l/EA and using this, the
compliance radius is calculated. The compliance radius is used in the FEM to check for the
compliance obtained by calculations. The compliance radius reduces complexity in designing
when the number of bolts becomes higher. The compliance of the nut for tapped thread and
through bolted joint is different. The type of fastener is selected at the beginning of the
calculation and the total compliance is the sum of the bolt compliance and the plate compliance.
The second orange box is when the bolt in a joint is tightened, the clamped plates deform. Linear
elastic FEA’s are performed to determine the axial compressive stress contour line for a through-
bolted joint and a tapped thread joint. The clamped plate’s geometry determines the slope of the
deformation cone. The cone is used to extract the compliance of the clamped plates. The
clamped plates’ compliance are separately calculated as plate 1 and plate 2. This allows for
leeway to use different Young’s modulus of the plates, different thickness of the plates and
reduces discrepancy of using an equivalent Young’s modulus taking the two plates as an
equivalent block. When the projected deformation cone is lesser than the diameter of circular
clamped plates (Da>=Dk) a set of formula is used for a through and tapped thread joint and when
the diameter of circular clamped plates lies between the washer diameter and the projected
deformation cone diameter a different set of formulas are used. This is automatically done by
calculating the limiting diameter of the deformation cone. The limiting diameter is a function of
the clamping length which is defined as the sum of the thickness from the top of the plate till the
length of the first engaged threads (Lk=h1+h2), the cone angle which is different for tapped
thread and through bolted joints. This is also checked by using FEM of the two plates and cross
checking with the results obtained through calculations.
The first blue box is to find the load factor, force through a plate and actual work force. An axial
load to a bolted joint is not typically applied under the bolt head and nut. The clamped plates
have load applied at an intermediate level. The location of the external load is described using
loading planes in a bolted joint. The location of the loading plane can be expressed by a
percentage of clamped plate length (lk) with respect to the mating surface of clamped plates.
When the load plane factor (n) is taken as 1, the entire load is passed through the bolt, whereas,

26
if the n value is 0, the entire load is passed through clamped plates. In this thesis, the n factor is
taken as 1.
Φ = (𝑛∗𝑑𝑒𝑙𝑡𝑎_𝑝)
(𝑑𝑒𝑙𝑡𝑎_𝑠+𝑑𝑒𝑙𝑡𝑎_𝑝)
Φ- Load factor
delta_p- Compliance of plate
delta_s- Compliance of bolt
n- Load plane factor
Fa= 𝐹𝑠𝑎
Φ
Fa- Actual work force
Fsa- Force through bolt
Fpa= (1-ϕ)*Fa
Fpa= Force through plate
To obtain the force through the bolt, the process is taken to FEM.
3.3 Finite Element Analysis
The first green box is the force through the bolt extraction box. Finite element analysis is used to
extract the force value through a bolt. Firstly, the scope of the VDI is discussed- it’s valid mainly
for cylindrical or prismatic clamped plates, the guideline is valid for single bolted joints and not
multiple bolted joints, elastic compliance for clamped plates is calculated based on simplified
deformation cone/sleeve approach. These can be made easier by using finite element analysis as
a real time value can be achieved and is better for physical representation and understanding of
the plates and fastener.
The FEM software used is ABAQUS and is a powerful analysis software used at Sigma for
general FE analysis including bolt analysis. ABAQUS’ application is multiple, mainly for both
modelling and analysis of mechanical components and assemblies (pre-processing) and
visualizing FEM result. [5]
The bolted joint calculation is discussed in the previous section and this can also optionally be
achieved using FEM.
3.3.1 Bolt compliance evaluation
The bolt is modelled by using the compliance diameter as the shank diameter and the
corresponding bolt head diameter. The length is taken the same in the calculations and the FEM
for cross-checking purposes. The concept is the same for through bolted joint and tapped thread
joint and the modelling of the bolt is made until the first engaged thread. The example case is
taken to show the process in which bolt analysis is made.

27
Nominal diameter= 10mm
Compliance diameter, d1= 9.3787mm
Bolt head diameter= washer diameter= 16mm
Bolt head thickness= 6.4mm
Section length= 40mm
Engaged thread length= 15mm
Young’s modulus of the nut= 200e+03 MPa
Poisson’s ratio= 0.26
Density= 7.7e-09 tonne/mm3 or 7,750 kg/m3
Figure 8- Bolt model
Figure 9- Section sketch of the model

28
The step is taken as static, general and the bolt has no interactions. The load and constraints are
taken to tension the bolt, the bolt central bottom node is constrained in 6 degrees (fully fixed)
and the under head of the bolt is where a total work force of 10,000N is applied.
Figure 10- Load and constraints condition
The mesh size is taken as 2mm and the mesh control is designated as sweep with medial axis
option and the mesh is preferred to be a hex mesh.
’ Figure 11- Mesh diagram

29
Once the bolt is meshed, it’s submitted as a job to get the value of the stress and the
displacement in the y-direction, that is, along the axis is checked to get the compliance value.
The displacement is measured from the under head of the bolt to the first engaged thread and is
divided by the total force value to get the bolt compliance value.
The best conditions for bolt evaluation is to design the bolt head according to the washer
diameter and the bolt shank diameter equals the compliance diameter. The shank length for
through bolted joint is designed till the first engaged thread and in Tapped-thread joint the whole
fastener is designed. In bolt evaluation, the constraint is at a central node in the bottom and the
load is provided in tension on the under head of the bolt. The mesh for an M10 bolt is best to be
given as a 4mm mesh as the convergence occurs at that element size.
3.3.2 Plate compliance evaluation
The plate compliance value is a bit more complex to calculate, in comparison to the bolt
compliance value. The plate compliance calculation method is shown for both the fasteners-
through bolted joint and tapped thread joint and for each of these joints, it’s analysed for
Da>=Dk (Large plates) and dw<Da<Dk (Small plates). Firstly, the methodology for through
bolted joints is seen.
3.3.2.1 Through-bolted joints
The modelling of the clamped plates in through bolted joints, the two plates are modelled
separately at first and assembled. The compliance check is done without a bolt but simulating
similar conditions as if a bolt were present. The plate modelling here is done for two cases-
Large plates and small plates. In reality, this would vary from evaluation to evaluation and the
size of the plate. The difference between the large and small plates is that, in the large plates the
cone lies completely within the plate and in small plates the cone extends outside the plate and to
the sides. As this is a design manual, the procedure is shown for both cases.
Common dimensions for both cases:
h1= 27.5mm
h2=27.5mm
dw=16mm
d1= 9.3787mm
Large plates:
Da= 55mm
l2= 15mm
Ep1=200GPa
Ep2=200GPa
The plates are each modelled as a cube of 55mm*55mm*27.5mm. The plate diameter is taken as
55mm as the large plate condition is when the plate diameter is greater than the limiting
diameter. The Young’s modulus of both plates are taken as the same and the width of the plates
aren’t varied. This would be shown in the results and discussion section. The plates are made of
steel with a density of 7,750 kg/m3 and Poisson’s ratio of 0.26. The plates are then assembled by
mating the surfaces and the constraints are converted to prevent the plates from moving by
30
selecting the convert constraints command from the instance option in the toolbar. The plates
after assembly looks as shown below-
Figure 12- Large plates for Through-bolted joints
The plates 1 and 2 can be clearly seen with the central separation line and look similar from the
top and bottom. The datum planes and separation are to make the meshing symmetric and even.
The compliance diameter is 9.3787mm and the washer diameter is 16mm.
The step for the plate is taken as static and the damping factor is specified as 0.002 between the
plates. In interaction between the plates, a general contact is established and a tangential
behavior penalty is set, ie. Friction co-efficient of 0.12. The load is placed both on the top and
bottom faces between the washer diameter and the compliance diameter. The constraints are only
set in the x-direction and the z-direction by partitioning the plates and establishing the
constraints at the middle of the plate.

31
Figure 13- Load and constraints on the large plates
On preliminary mesh study it was seen that the meshing made the number of elements between
the washer diameter and the compliance diameter was one till the mesh size was about 2mm and
for a 1mm mesh the number of elements became 2 within the confines and a significant change
in the compliance value. So a washer split is set as seen to make the number of elements two in
number, uniformly. A washer split is a partition surface between the washer diameter and the
hole diameter. These splits are made only for the meshing and does not affect the compliance
values in anyway. These are made to bring the compliance value through FEM converge with
that obtained by calculations. The mesh is a linear mesh and is preferred to be taken as hex
elements which is swept across the medial axis. For research purposes the mesh size is taken as
2mm but normally a 4mm mesh with a washer split to accommodate 2 elements in the space is
ideal. As the plates are modelled independently the meshing of the plates are done individually
before assembly.

32
Figure 14- Mesh of the large plates with washer split
After the meshing the model, the job is submitted and the compliance is checked by splitting the
plate and looking at the displacement in the y-direction for the compliance diameter. As the
width of the plates and the loads are symmetric, the value of the displacement in the upper and
lower half would be the same.
Small Plates:
Da= 25mm
l2= 15mm
Ep1=200GPa
Ep2=200GPa
The plates are each modelled as a cube of 25mm*25mm*27.5mm. The plates are taken as a
25mm plate as the plate diameter is less than the limiting diameter which is the case for small
plates. The Young’s modulus of both plates are taken as the same and the width of the plates
aren’t varied. This would be shown in the results and discussion section. The plates are made of
steel with a density of 7,750kg/m3 and Poisson’s ratio of 0.26. The step, interaction and the
loading conditions are similar as that of large plates.
33
Figure 15- Small plates for Through-bolted joints
Figure 16- Load and constraints on the small plates

34
Figure 17- Mesh of the small plates with washer split
The mesh size is taken as 2mm for research purposes but the mesh size can be 4mm with a
refinement around the washer region to make the compliance converge with the calculated value.
The mesh convergence values are shown in the result section. After the meshing is done the job
is submitted and the compliance value is calculated by looking at the displacement along the y-
direction from the bolt under head region to the first engaged thread.
3.3.2.2 Tapped-thread joint
Tapped thread joints, otherwise called screw joints are used for several purposes such as,
connecting threaded pipes and hoses to each other and to caps and fixtures. Screw thread has
predominantly two main functions, converting rotary motion into linear motion and prevents
linear motion without the corresponding rotation. [6] The core methodology of tapped thread
joints are similar to through bolted joints with some changes adopted for the joint. The first step
is the plate modelling, wherein contrary to the through bolted joint the fastener doesn’t pass all
the way through the plates. Hence, there’s no symmetry in the displacement values obtained. The
analysis for tapped thread joints are also done for large and small plates as seen for the through
bolted joint analysis. For tapped thread joints, the h1+h2=lk, value is taken as from the under
head of the fastener to the first engaged thread. The h2 value isn’t the thickness of the second
plate fully. In this case, the thickness of the second plate is 27.5mm but the h2 vale is taken as
10.5 as it’s till the first engaged thread.

35
Common dimensions for both cases:
h1= 27.5mm
h2= 10.5mm
lg=10mm
dw=16mm
d1=9.3787mm
Large plates:
Da= 65mm
Ep1=200GPa
Ep2=200GPa
dh= 10.4mm
The model is made such that the diameter at the beginning is the dh value to facilitate easy fit on
the screw and where the threaded portion begins the diameter is the compliance diameter. The
model and the section model are shown below-
Figure 18- Large plates for tapped-thread joint

36
Figure 19- Section model for Large plates
The washer split is done similar to that seen in through bolted joints to have two element rows
instead of one and make the results converge better to the calculated results. The plates are each
modelled as a cube of 55mm*55mm*27.5mm. The Young’s modulus of both plates are taken as
the same and the width of the plates aren’t varied. This would be shown in the results and
discussion section. The plates are made of steel with a density of 7,750 kg/m^3 and Poisson’s
ratio of 0.26. The plates are then assembled by mating the surfaces and the constraints are
converted to prevent the plates from moving by selecting the convert constraints command from
the instance option in the toolbar. The plates after assembly looks as shown above.
In the step manager, a damping factor of 0.002 is set and the interaction is set to contact between
the plates. The friction coefficient is 0.12 and a reference point is established at the center, in the
beginning of the engaged thread section. The reference point being the control point and the
engaged thread length area is the surface the point is coupled with. The load is applied on the
upper plate just as it is in a through bolted joint, that is, in the washer region while in the lower
plate it’s applied as a concentrated load on the reference point. All the points coupled with the
reference point have the same load acting on it.
Split plane between
washer and hole
diameter

37
Figure 20- Coupling of reference point with engaged thread surface in large plates
Figure 21- Load and constraint on the large plates

38
Figure 22- Sectional view of the load and constraints
The load in the upper plate and the concentrated load are the same in magnitude of 10,000N in
the axial direction (Y-direction). The constraints are applied mid-plane and the plates are
prevented from moving in the x-direction and z-direction, thereby preventing the plates from
floating away and being the minimum, most effective constraints condition. For research
purpose, the mesh size is taken as 2mm and the washer region is refined to accommodate 2
element rows. For practical purpose, a 4mm mesh should be enough and the element type is
hexagonal element with a sweep along the medial axis.

39
Figure 23- Mesh of the large plates with washer split
The model post meshing is submitted and the compliance of the large plates is extracted and
checked with the values obtained through calculations.
Small plates:
Da= 25mm
Ep1=200GPa
Ep2=200GPa
dh= 10.4mm
The modelling and methodology for the small plates in a tapped-thread joint is similar to the
large plates as described above. The assembly model and the section model are shown below-

40
Figure 24- Small plates for tapped-thread joint
Figure 25- Section model for small plates

41
In the step manager, a damping factor of 0.002 is set and the interaction is set to contact between
the plates. The friction coefficient is 0.12 and a reference point is established at the center, in the
beginning of the engaged thread section. The interaction and the loading cases are similar to that
of the large plates in a tapped thread joint, as shown in the previous section.
Figure 26- Interaction property manager for small plates
Once the friction coefficient is set up, the reference point is placed to have a coupling at the
engaged thread section area.
Figure 27- Coupling of reference point with engaged thread section in small plates

42
Figure 28- Load and constraints of Small plates
Figure 29- X-Constraints in the mid plane of the small plates

43
Figure 30- Z-Constraints in the mid plane of the small plates
The images below, explain the loading and the constraints in detail as this is the similar loading
and constraint method followed for the tapped-thread joint, irrespective of being small or large
plates. The model is shown with and without washer split, and it’s evident to see the two element
row when a washer split is placed which provides better results.
Figure 31- Small plates for tapped-thread joint without washer split

44
Figure 32- Small plates for tapped-thread joint with washer split
Figure 33- Mesh of the small plates with washer split
After the meshing, the model is submitted and the compliance of the plates are checked with
calculations.

45
After the modelling is complete the bolt and the plates are assembled with a tie at the bolt and
the plate surface. The loading is done in two steps where an initial pretension is applied followed
by an external load. The part meshing is done and the model is submitted similar to the
procedure seen above. Section is made at the center of the bolt and the force through the bolt is
extracted. For verification several sections, that is, at the under head of the bolt, the center of the
bolt and at the unengaged thread section and the force through the bolt is checked.
Figure 34- Bolted joint assembly model to calculate Fsa value
The plate compliance formulas are modified so as to accommodate the varying plate thickness
and different Young’s modulus values. The load plane factor is taken as 1, so all the force passes
through the bolt. The force through the bolt obtained by FEM is taken as an input, to calculate
the work force and force through the plates. The load plane factor when multiplied by the clamp
length, denotes the thickness of sections of clamped plates unloaded by Fa. Joint materials
between the loading planes will be unloaded by Fa.
φ= 𝑛∗𝑃𝑙𝑎𝑡𝑒 𝑐𝑜𝑚𝑝𝑙𝑖𝑎𝑛𝑐𝑒
(𝐵𝑜𝑙𝑡 𝑐𝑜𝑚𝑝𝑙𝑖𝑎𝑛𝑐𝑒+𝑃𝑙𝑎𝑡𝑒 𝑐𝑜𝑚𝑝𝑙𝑖𝑎𝑛𝑐𝑒)
Fa= Fsa
ф
Fpa= (1-ф)*Fsa
Joint materials outside of the loading planes will be further compressed. The force through the
bolt is inputted to obtain the actual work force value and the force through the plates. The load
factor is an important parameter which represents the percentage of the externally applied load to
the bolt.

46
3.4 Assembly Loads on Bolted Joints
The second and third blue box is to get the other assembly loads. When bolts are tightened to the
assembly tightening torque, the bolt is elongated and the plates are compressed by the same
preload force (Fm). The applied torque (Ma) can be obtained by summing the thread torque (Mg)
and under-head torque (Mk).
𝑀𝑎 = 𝑀𝑔 +𝑀𝑘
After the bolt is assembled, surface flattening occurs due to local deformation of rough surfaces
at contact areas, like threads, head and interfaces of clamped plates. This phenomenon is called
embedding and this causes reduction in magnitude of preload. An assumption is made that the
same preload loss (Fz) occurs in the bolt and clamped plates due to total plastic deformation (fz).
The next important step is to find the maximum and minimum preload force that is required for
the assembly.
Figure 35- a) Elastic force vs deformation curve and b) joint force diagram [1]
The elastic force vs deformation curve gets the bolt, plate compliance and preload force in the
same plot diagram. The plot shows the deformation which occurs due to a preload being applied.
In reality, a preload force is applied initially and then an external force is introduced which is
shown in the joint force diagram. This can be seen by the force through the bolt, force through
the plate and the actual force value. The minimum residual clamp length is also inputted to the
plot. The force through the bolt is inputted and the force through the plate and actual work force
can be found with the formulas stated above. The compliance is checked to get the correct load
factor value.
The residual clamp force (Fkerf) is taken as input or is taken as the maximum of the frictional
grip to transmit a transverse load and torque about bolt axis and special force required for
sealing. This is different from the approach the VDI follows as it takes the residual clamp load as
an output and the transverse loads and number of slipping planes as input. It is important to have
the minimum clamp force at all times in the joint to make sure there is sealing and maintain a
frictional grip in the interfaces. The minimum preload force is calculated by the formula-
𝐹𝑚𝑚𝑖𝑛 = 𝐹𝑘𝑒𝑟𝑓 + (1 − 𝜙)𝐹𝑎 + 𝐹𝑧

47
The tightening factor (αA) is obtained by the tightening technique which is used to calculate the
maximum preload force,
𝐹𝑚𝑚𝑎𝑥 = 𝛼𝐴 ∗ 𝐹𝑚𝑚𝑖𝑛
The VDI2230, provides formulas to calculate the permissible assembly stress (σmzul), preload
loss (Fmzul), tangential force (Ft), maximum shear stress (τm) and equivalent von Mises stress
(σredm). The product of utilization of initial or gross yield stress during tightening and the
minimum yield strength of external threads (N/mm^2) gives the yielding criteria. If the von
Mises stress equals the product, then yielding occurs else no yielding occurs. The maximum
pressure of the clamped plates is the ratio of preload loss to the nut-bearing area. When the
maximum surface pressure due to bolted joint assembly is less than permissible surface pressure
of the clamped plates, then plates would not be crushed under excess pressure, else the plates
would crush under pressure.
3.5 Minimum thread engagement length The assumptions of the VDI for the minimum thread engagement length of a bolted joint is bolt
shank must fail prior to thread stripping, which needs maximum tensile force to be lower than
maximum shear force of the nut thread during engagement. The threaded bolts exhibit great
strengths than predicted by material strength and root area, and behave as if they had a larger
cross-sectional area. The tensile stress area is determined and the ultimate tensile strength is
computed using it. Three constants, such as internal thread dilation strength reduction factor,
external thread strength reduction factor and internal thread strength reduction factor are required
to compute the minimum thread engagement length. This is an integral part of the design phase.
3.6 Service loads on bolted joints The service loads must be calculated to assess the possible failure modes and if the bolts would
fail or not. The possible failure modes being, bolt yielding due to overstressing, clamp load loss
due to gapping, thread stripping, clamped plates crushing due to excessive pressure, slipping due
to transverse loads and fatigue failure.
3.6.1 Bolt yielding due to overstressing
Yielding in bolts occur due to overstressing in tension, bending or torsion. It occurs when the
equivalent stress achieved during service exceeds the tensile yield strength of the bolt, which
causes loss of preload. The safety factor against bolt yielding is the ratio of minimum 0.2% yield
strength of external threads to the equivalent von Mises stress. If the safety factor is greater or
equal to 1, the bolt yielding under service loads is prevented, else bolt yielding under service
load occurs.
3.6.2 Clamp load loss due to gapping
Gapping occurs when the service loads causes clamp force to reduce to zero, causing gaps
between the fastener and clamped plates. The minimum residual clamp load must be followed at
the interface to prevent gapping from occurring. If, the residual clamp load is greater than zero
then the clamp load loss due to gapping is prevented else it occurs.

48
3.6.3 Clamped plates crushing due to excessive power
Plates crushing occurs when interfacial pressure achieved during service loading exceeds the
permissible pressure of one of the clamped plates due to which the plates crush and causes loss
of preload. If the safety factor against clamped plates is greater than one then the plates will not
get crushed else it will get crushed.
3.6.4 Slipping due to transverse loads
Slipping occurs when transverse force or torsional moment exceeds reaction force multiplied by
coefficient between clamped plates. Slip in one direction is alright but if it occurs in opposite
directions and repeats, fretting may occur causing loss of clamping load or nut may back off. A
safety factor of 1.2 is recommended by the VDI2230 for static loading and 1.8 for dynamic
loading.
3.6.5 Fatigue failure
Fatigue failure occurs when alternating service loading amplitude exceeds the endurance limit of
a bolt. Fatigue life may reduce significantly if pitting or corrosion occurs. An infinite life
approach is taken and is done for rolled threads before and after treatment. For the infinite life
approach the cycles are taken as more than 2*106 cycles and for the finite approach the cycles
are taken between 104 cycles and 2*106 cycles. Fatigue strength of rolled threads made by rolling
after treatment, resulting in compressive residual stresses at the threaded root, are better than
those rolled after treatment.

49

50
4 RESULTS AND DISCUSSIONS
In this chapter, the results are shown for the method explained in the previous chapter with a test
case.
4.1 Design Phase
The methodology is explained in the previous chapter and the results for the process flow are
shown categorically. The first design block is optional and shows the correct fastener to be used
and the maximum and minimum preload the fastener can handle. For 10kN work force chosen
and strength grade of 12.9 the fastener size selected is of an M10 bolt. The minimum and
maximum preload value the bolt can take are 25000N & 40000N respectively.
4.2 Bolt compliance
The next results block is the compliance checks for the bolt and plate. This is done to ensure two
things, firstly, the compliance calculated from the VDI2230 converges with the compliance
obtained through FEM. A test case is taken for the through and tapped thread joints and is
maintained the same in FEM and calculations for each of the joints. The compliance diameter is
that which is used for design purposes to reduce the shank design with sections and instead one
uniform diameter is calculated. This is also regarded as the equivalent diameter. This comes
handy when multiple bolts are analysed at a given time and must be designed together. The
elastic compliance shows the capability of a component to deform elastically under a unit force.
The compliance diameter is obtained by calculating the shank compliance. The compliance
diameter for an M10 bolt is found to be 9.3787 mm. The bolt can now be designed without the
threading and as a cylindrical section. The inputs provided to the calculations and FEM are,
• Nominal diameter, d= 10mm
• Shank diameter, dh= 9.3787mm
• Head diameter, dw= 16mm
• Unengaged thread length, l2=15mm
• Engaged thread length, lg= 7mm
The compliance diameter is extracted from the calculations and taken to FEM for checking. The
bolt is designed until the unengaged thread section of the bolt as that’s where the probing is
needed until. The bolt is first analysed and the compliance obtained for the bolt through
calculations is 3.9806e-06 mm/N and that obtained through FEM for a bolt mesh of 2mm is
3.85e-06 mm/N. The difference percentage is 3.37%. The allowable difference percentage is
tried to be kept below 15% for the bolt. The probe must be placed from the under head of the
bolt to the first engaged thread to check for the displacement due to the workforce in compliance
check.

51
Figure 36- Displacement contours of the M10 bolt
Figure 37- Probing method for compliance checks
4.3 Plate compliance
Two types of plates- large and small plates are taken as there’s a limiting cone diameter which is
calculated and plates smaller than the limiting diameter and larger than the washer diameter is
considered as small plates. The plates which are larger than the limiting diameter is taken as
large plates and the formula differs for both the plates chosen. The large plates have the impact
cone well within the plate diameter and for small plates the cone extends to the side of the plate.

52
There are different case scenarios which are checked for the plate compliance as the formula has
been altered from the VDI2230 to a more versatile formula which calculates the compliance of
each plate individually and where there’s scope to have different plate thickness. The program
has been made to make all the calculations happen with a click after the correct inputs are given
for different fastener types- Tapped-thread joint and through bolted joint. The different cases
chosen are shown below-
Table 1- Different cases for plate compliance check
The same inputs are given to MATLAB and the FEM analysis for the compliance check.
Input for through-bolted joint
• Nominal diameter, d= 10mm
• Washer diameter, dw= 16mm
• Hole diameter, dh= 9.3787mm
• Plate 1 thickness, h1= 27.5mm
• Plate 2 thickness, h2= 27.5mm
• Small plate diameter, Da= 25mm
• Large plate diameter, Da= 55mm
• Unengaged thread length, l2=15mm
• Engaged thread length, lg= 7mm
Input for tapped-thread joint
• Nominal diameter, d= 10mm
• Hole diameter, dh= 10.4mm
• Washer diameter, dw= 16mm
• Plate 1 thickness, h1= 27.5mm
• Plate 2 thickness, h2= 10.5mm
• Small plate diameter, Da= 25mm
• Large plate diameter, Da= 65mm
• Compliance diameter, d1= 9.3787mm
• Engaged thread lengh, lg= 10mm

53
4.3.1 Through bolted joint
The results for all the cases are displayed in this section and is consolidated in a table at the end
for easier understanding.
Case 1- Same Young’s Modulus
Large plates:
Figure 38- Von-Mises Stress of large plates with same YM Figure 39- Displacement of large plates with same YM
As it can be seen in the Von-Mises stress diagram that the cone is well within the confines of the
plate and hence it’s regarded as large plates. The displacement values obtained are divided by the
force value of 10kN to get the compliance value.
Small plates:
Figure 40- Von-Mises stress of small plates with same YM Figure 41- Displacement of small plates with same YM

54
The Von-Mises stress diagram shows that the limiting cone extends beyond the confines of the
plates to the sides. The small plates also have a slight interfacial stress.
Case 2- Different Young’s Modulus
The upper plate is made of steel having a Young’s Modulus of 200GPa and the lower plate is
made of Aluminium having a Young’s Modulus of 69GPa.
Large plates:
Figure 42- Von-Mises stress of large plates with diff. YM Figure 43- Displacement in of large plates with diff. YM
The lower plates being made of Aluminium has a lower displacement value and contrary to the
VDI approach of equivalent Young’s Modulus calculation, the compliance are calculated for
each individual plate and summed up.
Small plates:
Figure 44- Von-Mises stress of small plates with diff. YM Figure 45- Displacement of small plates with diff.
YM

55
Case 3- Varying thickness of plates
The upper plate thickness, h1 is taken as 40mm and the lower plate thickness, h2 is taken as
15mm hence keeping the clamp length the same 55mm.
Large Plates:
Small plates:
Figure 48- Von-Mises stress of plates with
varying thickness Figure 49- Displacement of plates with
varying thickness
Figure 46- Von-Mises stress of
plates with varying thickness
Figure 47- Displacement of
plates with varying thickness

56
Case 4- Different Young’s modulus and varying thickness of plates
Case 2 and 3 are combined to form case 4, hence the upper plate is made of steel with Young’s
modulus of 200GPa and 40mm thickness & the lower plate is made of Aluminium and has a
thickness of 15mm.
Large plates:
Figure 50- Von-Mises stress of large plates with Varying thickness and diff. YM
Small plates-
Figure 51- Displacement of large plates with
varying thickness and diff. YM
Figure 52- Von-Mises stress of small plates
with varying thickness and diff. YM
Figure 53- Displacement of small plates
with varying thickness and diff. YM

57
4.3.2 Tapped-thread joint
Tapped-thread joint is probed from the under head of the bolt to the first engaged thread to get
the compliance value. The bolt is designed completely including the engaged thread section. The
methodology is explained in the previous section. In this case varying lengths are taken and the
two cases dealt with are both plates having same Young’s modulus and plates having different
Young’s modulus. Different from the through bolted joints the large plate diameter is taken as
65mm and that of the small plates are taken as 25mm.
Case 1- Same Young’s modulus
Large plates:
Small plates:
Case 2-
Different
Young’s
modulus
The upper
plate is made
of steel and
has a Young’s
modulus of
200GPa and
the lower plate is made of aluminium and has a
Young’s modulus of 69GPa.
Figure 54- Von-Mises stress of large plates
with same Young’s modulus
Figure 55- Displacement of large plates
with same Young’s modulus
Figure 56- Von-Mises stress of small
plates with same Young’s modulus Figure 57- Displacement of small plates
with same Young’s modulus

58
Large plates:
Case 2- Different Young’s modulus
The upper plate is made of steel and has a Young’s modulus of 200GPa and the lower plate is
made of aluminium and has a Young’s modulus of 69GPa.
Small plates-
Figure 58- Von-Mises stress of large plates with
different Young’s modulus
Figure 60- Von-Mises stress of small
plates with different Young’s modulus
Figure 61- Displacement of small plates
with different Young’s modulus
Figure 59- Displacement of large plates with
different Young’s modulus

59
4.3.3 FEM Results
S.No. Cases Bolt Compliance(mm/N)
1 Bolted joint(M10)
On Calculation: 3.9807e-06
From FEM: 4.26e-06 (4mm mesh)
3.85e-06 (3mm)
3.84e-06 (2mm)
3.83e-06 (1mm)
S.No. Cases Large Plate compliance(D55mm)
(mm/N)
1 Same Young’s
Modulus(200GPa)
6.93e-07 (4mm)
6.84e-07 (3mm)
6.77e-07 (2mm)
5.43e-07 (1mm)
On calculation: 6.1726e-07
Through
Bolted
Joint
Cases Large
Plates(D55)(mm/N)
Small
Plates(D25)(mm/N)
1 Same Young’s
Modulus(200GPa)
5.45e-07
10.080e-07
On Calculation: 6.1726e-07 9.2040e-07
3 Plate 1- 200GPa
Plate 2- 69GPa
10.5e-07
19.69e-07
On Calculation: 12.032e-07 17.94e-07
4 Varying thickness
of plates(Same
YM)
Plate 1- 15mm
Plate 2- 40mm
6e-07 10.21e-07
On Calculation: 5.9043e-07 9.2040e-07
5 Varying thickness
and Diff
YM(Steel-Al)
Plate 1- 15mm
Plate 2- 40mm
11.55e-07
22.02e-07
On calculation: 12.307e-07 20.939e-07
Tapped
thread
joint
Cases Large plates
(D65)(mm/N)
Small plates
(D25)(mm/N)
6 Same Young’s
Modulus(200GPa)
5.45e-07
6.96629e-07
On calculation: 4.9155e-07 7.06e-07
FEM RESULTS

60
Table 2- FEM results in comparison with the calculated results
The FEM results are compared with the calculated results using the evaluation script which
follows the VDI2230 with altercations made to the way the plate compliance is calculated. The
difference in results as percentage between the MATLAB script and the FEM results is shown in
the table below
Table 3- Difference % between FEM and MATLAB
The table shows the percentage difference between the MATLAB calculated value and the
FEM results keeping the input conditions the same for both. There is no correct value as such
amongst the two of it but the difference % is tried to be brought as close as possible as we use
the compliance value as a check to calculate the load factor and force through the bolt value. The
difference has been brought down in several cases through changes made in the formulas from
the VDI to make the results more versatile to making the methodology in calculating results
through FEM robust. The FEM results are very sensitive and small changes bring a large change
in the compliance values. The better ways of calculating the results are shown in the previous
section. The best results are obtained when a kinematic coupling is provided at the under head of
the bolt or the washer region with a concentrated force acting from the center of the bolt hole.
But kinematic coupling in this region cannot be set as loading conditions for an assembly as a
bolt would be present and there would be several bolts to analyse. Once the compliance values
are brought closest to each other the next step is to calculate the force through the bolt to get the
assembly loads.
7 Plate 1- 200GPa
Plate 2- 69GPa
8.1456e-07 10.6104e-07
On Calculation- 8.81e-07 11.739e-07
Same Young’s Modulus= 9.1%
Different Young’s Modulus= 12.73%
Varying thickness of plates= 1.7%
Different Young’s Modulus and Varying
thickness= 6.15%
Same Young’s Modulus= 9.5%
Different Young’s Modulus= 9.75%
Varying thickness of plates= 11%
Different Young’s Modulus and Varying
thickness= 5.1%
Same Young’s Modulus= 9.2%
Different Young’s Modulus= 8.1%
Same Young’s Modulus= 1.3%
Different Young’s Modulus= 9.4%
Large plates Small plates
Through bolted
joint
Tapped-thread
joint

61
4.4 Assembly loads on bolted joints The input taken for calculating assembly loads is M10 tapped-thread joint with shank length
27.5mm, unengaged thread 10.5mm and engaged thread being 10mm. The compliance diameter
is 9.3787mm and the washer diameter is 16mm. The load factor after calculating the compliance
values is found to be 0.2175 for a bolt compliance of 3.1716e-06 mm/N and plate compliance
8.82e-07 mm/N. This means that 21.75% of the externally applied load goes to the bolt. The
compliance checks are mainly done to get the correct load factor value and in turn the force
through the bolt and the actual work force. The force through the plate is obtained as 14,387N
and the summation of the force through the plate and force through the bolt gives the total actual
work force of 18,387N.
These are the initial assembly forces extracted after getting the force through the bolt value by
making sections on the bolt in the bolt-plate assembly model. The minimum required clamp
force or sealing force is a requirement to know and can be gotten from the customer. This helps
to calculate the minimum and maximum preload force required for the assembly and also the
tangential force and assembly preload loss. The minimum and maximum preload force the bolt
assembly requires is gotten as 16kN and 27kN. The code is also made so as to generate the
elastic-force vs deformation curve and the joint force diagram.
The plot is customized and made for each analysis and this makes the analysis easier to
understand and obtain values from. The inputs given to calculate the other assembly loads such
as tangential force, assembly preload loss, equivalent Von-Mises stress and allowable assembly
preload are transverse loads (Fq), torque about bolt axis (Mt), maximum internal pressure to be
Fkerf+Fz
fpm fsm
Figure 62- Elastic force vs Deformation curve from calculations Figure 63- Joint force diagram from calculations
Fpa
Fsa

62
sealed all of which are taken as zero, number of slipping planes (qf) is taken as one, tightening
factor (αA) is taken as 1.7, minimum yield strength (Rp0.2min) is 940 N/mm2 and permissible
pressure (pg) of 1100 N/mm2. The other assembly loads which are obtained are the tangential
force (Ft) which is 2,835N and the assembly preload loss (Fz) is found to be 1,973N. The other
assembly loads obtained are equivalent Von-Mises stress of 282N/mm2 and the allowable
assembly preload loss of 749N. The equivalent stress is used to check if bolt yielding occurs or
not and the maximum surface pressure is used to check if clamped plates crush or not under
pressure. These can also be considered as assembly load checks. The minimum thread
engagement length is a parameter from the design phase and is used to prevent thread stripping
from occurring and that is obtained as 8mm. In the design it’s taken as 10mm to prevent the
failure from happening.
4.5 Service loads
The service loads are calculated to check for possible failures. The inputs provided are shear
stress reduction factor (Kτ) which is taken as 0.5, safety factor against slipping (Sg) is taken as
1.2 for static loads and 1.8 for cyclic loads as recommended by the VDI2230, number of fatigue
life cycles taken as 2*106 for infinite life cycle and is chosen as rolled before heat treatment. The
service loads which are checked for are if bolt yielding, the plates gapping, clamped plates
crushing, slipping due to transverse loads and fatigue failure would occur or not. The results
obtained are that bolt yielding due to overstressing does not occur, plates will not get crushed,
slipping due to transverse load occurs, clamp load loss due to gapping occurs and fatigue failure
does not occur.

63
5 CONCLUSIONS
Based on the investigations carried out the chapter answers the research question while also
giving an overall outline of the thesis.
5.1 Conclusions
The thesis aims to create an evaluation manual for in-house projects at Sigma AB. The existing VDI script is further developed to include the use of FEM to make the analysis of multiple fasteners and complex structures easier. The evaluation manual is made user friendly and a separate user manual is also handed over for methodical understanding of the manual. The research question which aims to understand the purpose for the thesis has to be addressed.
Research question 1- In the bolted joint analysis, what is the better way to constraint and load the bolts and plates for an effective analysis?
The first aspect to discuss is the designing of the bolted joints. The bolt shank diameter is the
compliance diameter and the bolted joint is probed from the under head of the bolt to the first
engaged thread. The compliance diameter reduces the effort in designing sections on the bolt
shank and is an equivalent diameter for the entire shank length.
When bolts are separately analysed for through bolted joints the bolts are designed only till the
first engaged thread and in tapped thread joint the entire bolt is designed including the engaged
thread section. The effective way to load and constraint the bolts is by constraining the central
node at the bottom of the bolt and providing the work load at the under head of the bolt hence
elongating the bolt.
Figure 64- Load and constraints provided to the bolts

64
The best way to constraint the plate is by partitioning the central planes which are perpendicular
to the x and z axis and loading the y axis at the under head of the bolt.
By constraining the central planes the deformation of the plates happens more freely in
comparison to when node constraints are provided. The more freely the plates deform better
would be the compliance value, that is, the closer it would match with the calculated value. Apart
from the assembly if the plates are separately analysed the better way to load the plates would be
by providing a concentrated load and kinematically coupling the washer surface to the hole
centre.
Figure 65- Load and constraints provided to the plates
Figure 66- Kinematic coupling of the washer surface

65
The meshing conditions that work better for bolts is to use linear hex elements and a mesh size
of 2mm. The bolt can also be partitioned into four in the axial direction to obtain a symmetry in
the meshing. The plates are part meshed and are also partitioned axially and uses linear hex
elements though the difference in compliance value from the quadratic elements isn’t much. The
surface between washer region and the hole is split as kinematic coupling can’t be provided in
assembly. The mesh convergence shows that when the element size reaches 1mm there’s a
significant decrease in the compliance value and this is due to two elements rows being
introduced in the washer region in comparison to the one element row. The recommended mesh
size is 4mm for the plates with a certain mesh refinement being provided in the washer region to
introduce more elements.
Figure 67- Surface partition the region between the washer and hole diameter
In reality, multiple joints are analysed at the same time and hence the plates are tie constrained
with the bolt. The bolt shank diameter and hole diameter of the plate is the compliance diameter
for through bolted joints and the hole diameter is bigger than the shank diameter for tapped
thread joints. The loading is provided as two steps- firstly the bolt is preloaded and then the
external loading condition occurs. The constraint is provided similarly in the central planes as
shown above and the loading conditions are similar to how the plates are loaded. The bolt is
sectioned along the diameter at several regions along the shank and the force through the bolt is
extracted to calculate the assembly loads.
Research question 2-
Can the plate compliance calculation be used to check for plates of different thickness and different Young’s modulus?
The plate compliance formula that the VDI proposes is meant to be calculated for plates with the
same thickness and equal Young’s modulus. In reality, the plates can be made of different
material and were checked using an equivalent Young’s modulus but this would fail when the
thickness of the plates vary. Hence a formula to calculate for all these conditions is essential. The
modified formula calculates the compliance for each plate individually and sums it up to get the
total plate compliance. The plate compliance formula modification as opposed to the original
66
formula for one of the cases where a tapped thread joint or through bolted joint with large plates,
that is, the plate diameter is larger than the limiting diameter is shown.
Plate 1 compliance= 1
(𝜋∗𝐸𝑝1∗𝑑ℎ∗𝑡𝑎𝑛∅) * ln
(𝑑𝑤+𝑑ℎ)∗(𝑑𝑤+(2∗ℎ1∗𝑡𝑎𝑛∅)−𝑑ℎ)
(𝑑𝑤−𝑑ℎ)∗(𝑑𝑤+(2∗ℎ1∗𝑡𝑎𝑛∅)+𝑑ℎ)
Plate 2 compliance= 1
(𝜋∗𝐸𝑝2∗𝑑ℎ∗𝑡𝑎𝑛∅) * ln
(𝑑𝑤+𝑑ℎ)∗(𝑑𝑤+(2∗ℎ2∗𝑡𝑎𝑛∅)−𝑑ℎ)
(𝑑𝑤−𝑑ℎ)∗(𝑑𝑤+(2∗ℎ2∗𝑡𝑎𝑛∅)+𝑑ℎ)
Total plate compliance = Plate 1 compliance + Plate 2 compliance
The original formula which is for plates with same thickness and same Young’s modulus is
shown.
Plate compliance= 2
(𝜋∗𝑤∗𝐸𝑝∗𝑑ℎ∗𝑡𝑎𝑛∅) * ln
(𝑑𝑤+𝑑ℎ)∗(𝑑𝑤+(𝑤∗𝑙𝑘∗𝑡𝑎𝑛∅)−𝑑ℎ)
(𝑑𝑤−𝑑ℎ)∗(𝑑𝑤+(𝑤∗𝑙𝑘∗𝑡𝑎𝑛∅)+𝑑ℎ)
Where, w = 1 for through bolted joints and w=2 for tapped thread joints
The results show that the modified formula brings the difference between the calculated
compliance value and the FEM compliance value closer. The compliance value is an important
check to assure the joint is designed right in calculating the force through the bolt value.
Same Young’s Modulus= 9.1%
Different Young’s Modulus= 12.73%
Varying thickness of plates= 1.7%
Different Young’s Modulus and Varying
thickness= 6.15%
Same Young’s Modulus= 9.5%
Different Young’s Modulus= 9.75%
Varying thickness of plates= 11%
Different Young’s Modulus and Varying
thickness= 5.1%
Same Young’s Modulus= 9.2%
Different Young’s Modulus= 8.1%
Same Young’s Modulus= 1.3%
Different Young’s Modulus= 9.4%
Large plates Small plates
Through bolted
joint
Tapped-thread
joint
Table 3- Difference % between FEM and MATLAB

67

68
6 FUTURE WORK
6.1 Future work
The evaluation manual can be further developed and the various avenues which can be improved
or introduced is given below:
• Evaluation models for bolts can be generated using ABAQUS macros.
• Load plane factor can be studied.
• Introduction of transverse and shear loads and the effect on the assemblies should be
analysed.
• The effects of thread stripping and how they affect the assembly loads must be checked.
• Vibration effects on the bolt and clamped plates is to be studied.
• The evaluation manual is to be checked for other bolt classes.
• Plug-In for the evaluation manual can be set using Graphical User Interfaces available to
make the program user friendly.
• The co-efficient of friction for varying conditions can be analysed.

69
70
7 REFERENCES
[1] Yung Li Lee, Mark E. Barkey, Hong-Tae Kang,”Design and analysis of metric bolted joints”
Verein Deutscher Ingenieure(VDI2230), Chapter 12, 2012, pp 462-507.
[2] EN 1993-1-8 (2005) (English): Eurocode 3: Design of steel structures - Part 1-8: Design of
joints [Authority: The European Union Per Regulation 305/2011, Directive 98/34/EC, Directive
2004/18/EC]
[3] J. Wileman, M. Choudhury, 1. Gree, “Computation of Member Stiffness in Bolted
Connections”, 1991. [Online]. Available:
https://www.researchgate.net/publication/245365104_Computation_of_Member_Stiffness_in_B
olted_Connections, [Accessed 14 02 2019]
[4] E. L. Grimsmo*, A. Aalberg, M. Langseth, A. H. Clause, “Failure modes of bolt and nut
assemblies under tensile loading”, 2017, Available:
https://www.sciencedirect.com/science/article/pii/S0143974X16301857 , [Accessed 01 02 2019]
[5] https://en.wikipedia.org/wiki/Abaqus
[6] https://en.wikipedia.org/wiki/Screw_thread

71

72
APPENDIX A: SUPPLEMENTARY INFORMATION
The appendix explains the process flow and the structure of the thesis. This section contains the
Gantt chart, the Work-Breakdown Structure (WBS), Risk analysis.
Gantt chart
A Gantt chart is presented to provide a time-flow structure of the project, to set deadlines and
structure for when a particular task can be completed. This data must be constantly edited and
checked whether it’s being followed. If tasks are completed earlier sufficient time is present to
start the next task and if any task if delayed the schedule must be altered to match up to the
deadline.
Gantt Chart Diagram

73
Work Breakdown structure
This section contains the WBS of this project.
Work Breakdown Structure Diagram

74
Risk analysis
The risk analysis and the impact it could have on the project are presented to keep in mind all the
possible problems which could arise. This is achieved with a brainstorming session with the
supervisors to get perspective on the risk and creating fool-proof methods to tackle them.
Risk Analysis Diagram


![3D characterization and modelling of small fatigue cracks ...irsp2016.malab.com/wp-content/uploads/2016/07/AT13... · Small strain crystal plasticity [Meric and Cailletaud, 1991]](https://img.pdfslide.tips/doc/110x75/5ec1f4b393e4a025a2723ab5/3d-characterization-and-modelling-of-small-fatigue-cracks-small-strain-crystal.jpg)