Embed Size (px)
Citation preview
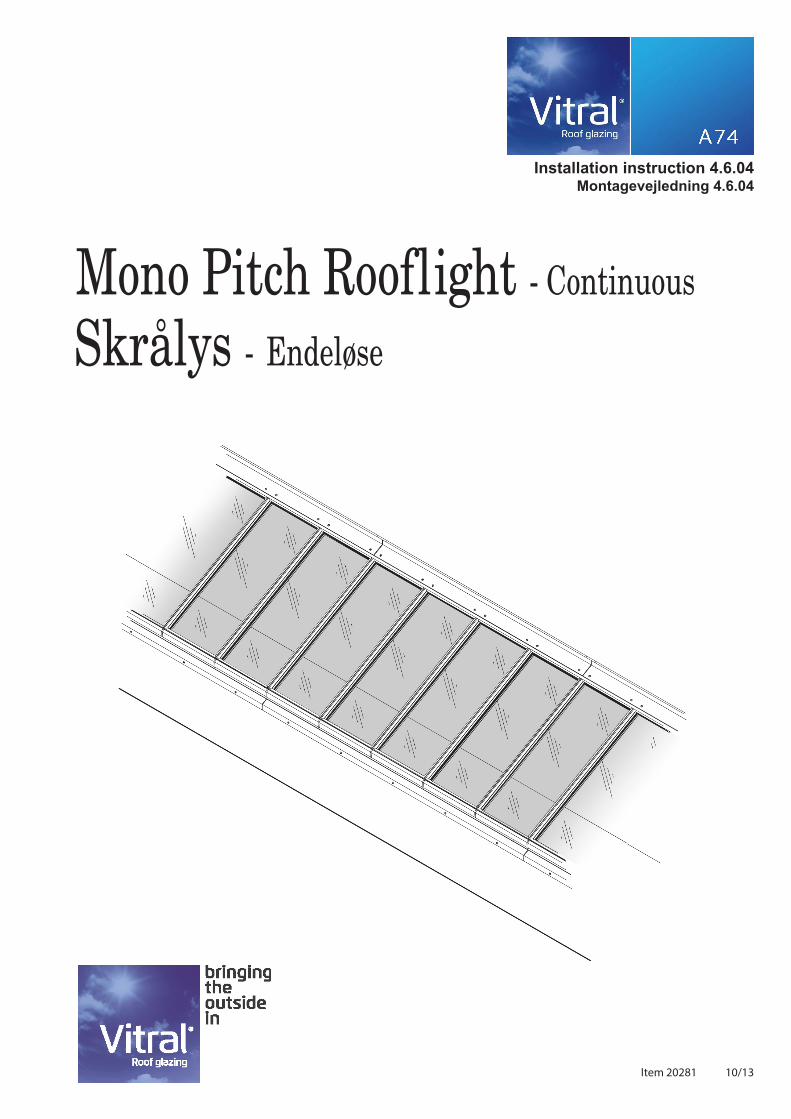
Installation instruction 4.6.04 Montagevejledning 4.6.04
Mono Pitch Rooflight - Continuous
Skrålys - Endeløse
Item 20281 10/13
2
Kontrol af karm, afsætning af vinkellinie ............. 4Kontrol af første modul i begge ender ................. 4Montering af membran .............................................. 5Fremstilling og brug af montagelære ................... 5Opmåling og afsætning ............................................. 6Modul udlægges parallelt med vinkellinie .......... 6Fastgørelse af montageprofil ................................... 7Montering af hældningsprofil .................................. 8Montering af tætning ved fod ................................. 9Klargøring og montering af paneler ...................... 10Montering og låsning af første panel .................... 11Fastgørelse/justering af paneler .............................. 12 - 13Montering af næste hældningsprofil .................... 14Fastgørelse af næste hældningsprofil ................... 15 Montering af A paneler .............................................. 16Montering af B paneler .............................................. 17Montering af inddækningspakning ...................... 18Montering af forkantinddækning ......................... 19Montering af bagkantinddækning ........................ 20 Opmåling til fastgørelse af bagkantinddækning 21Fastgørelse af bagkantinddækning ....................... 22Montering af gummipropper og montering af kappe 23
Indholdsfortegnelse
Checking frame, setting-out of kerbs ................. 4Checking first module at both ends .................... 4Installation of barrier membrane .......................... 5Development and use of element gauge ......... 5Measuring and setting-out ..................................... 6Placement of modules parallel with kerb .......... 6Attachment of element section ............................ 7Installation of slope section .................................... 8Installation of cill gasket .......................................... 9Preparation and Installation of panels ................ 10Installation and locking of first panel .................. 11Attachment/adjustment of panels ....................... 12 - 13Installation of next slope section ......................... 14Attachment of next slope section ........................ 15Installation of panels A ............................................. 16Installation of panels B ............................................. 17Installation of flashing gasket ................................ 18Installation of edge flashing ................................... 19Installation of rear flashing ..................................... 20Measurement for attachment of rear flashing 21Attachment of rear flashing .................................... 22Installation of rubberplugs and front cover cap 23
Content
3
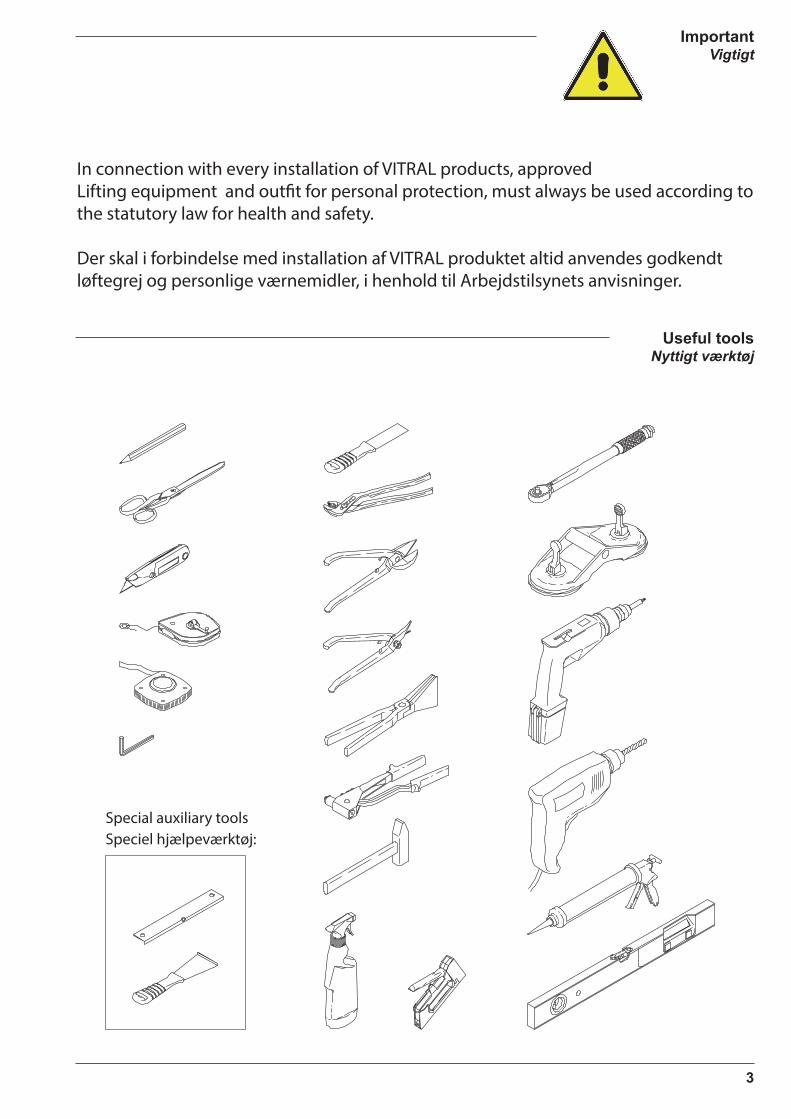
Special auxiliary toolsSpeciel hjælpeværktøj:
Useful toolsNyttigt værktøj
ImportantVigtigt
In connection with every installation of VITRAL products, approved Lifting equipment and outfit for personal protection, must always be used according to the statutory law for health and safety.
Der skal i forbindelse med installation af VITRAL produktet altid anvendes godkendt løftegrej og personlige værnemidler, i henhold til Arbejdstilsynets anvisninger.

4
Checking frame, setting-out of kerbsChecking first module at both endsKontrol af karm, afsætning af vinkellinieKontrol af første modul i begge ender

5
Development and use of element gaugeFremstilling og brug af montagelære
Installation of barrier mambraneMontering af membran

6
Measuring and setting-outPlacement of modules parallet with kerbOpmåling og afsætningModuler udlægges parallelt med vinkellinie
7
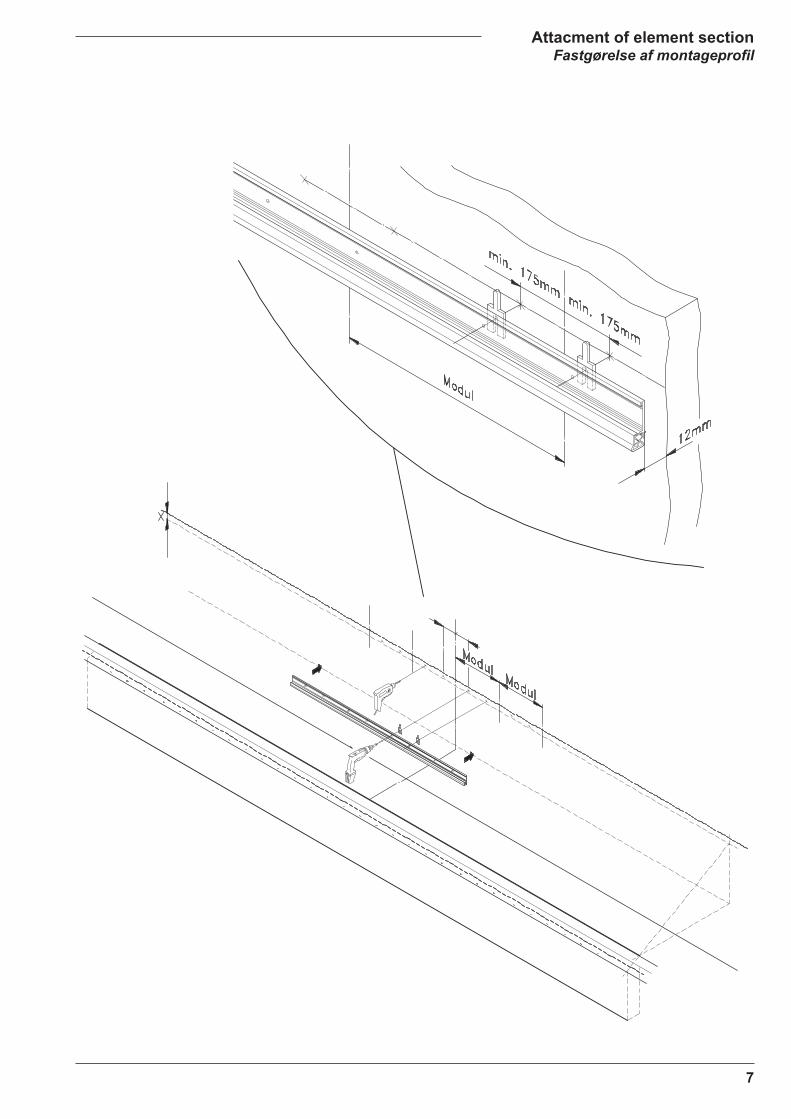
Attacment of element sectionFastgørelse af montageprofil
8
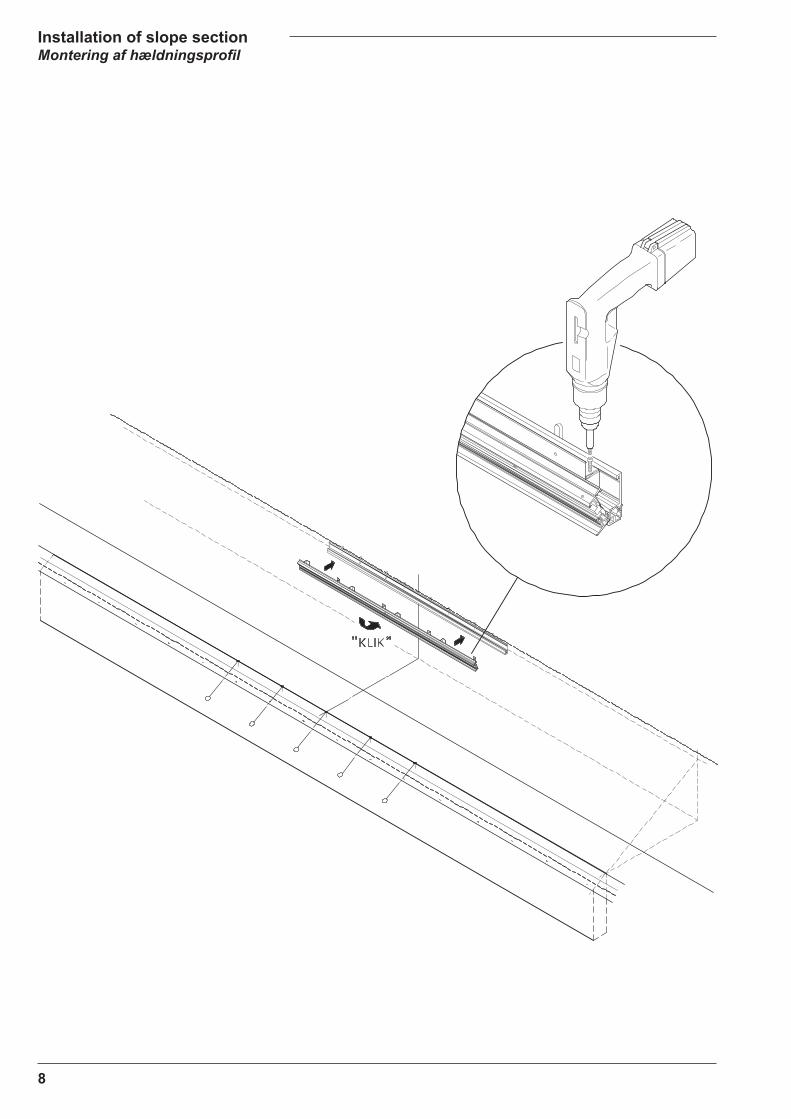
Installation of slope sectionMontering af hældningsprofil
9
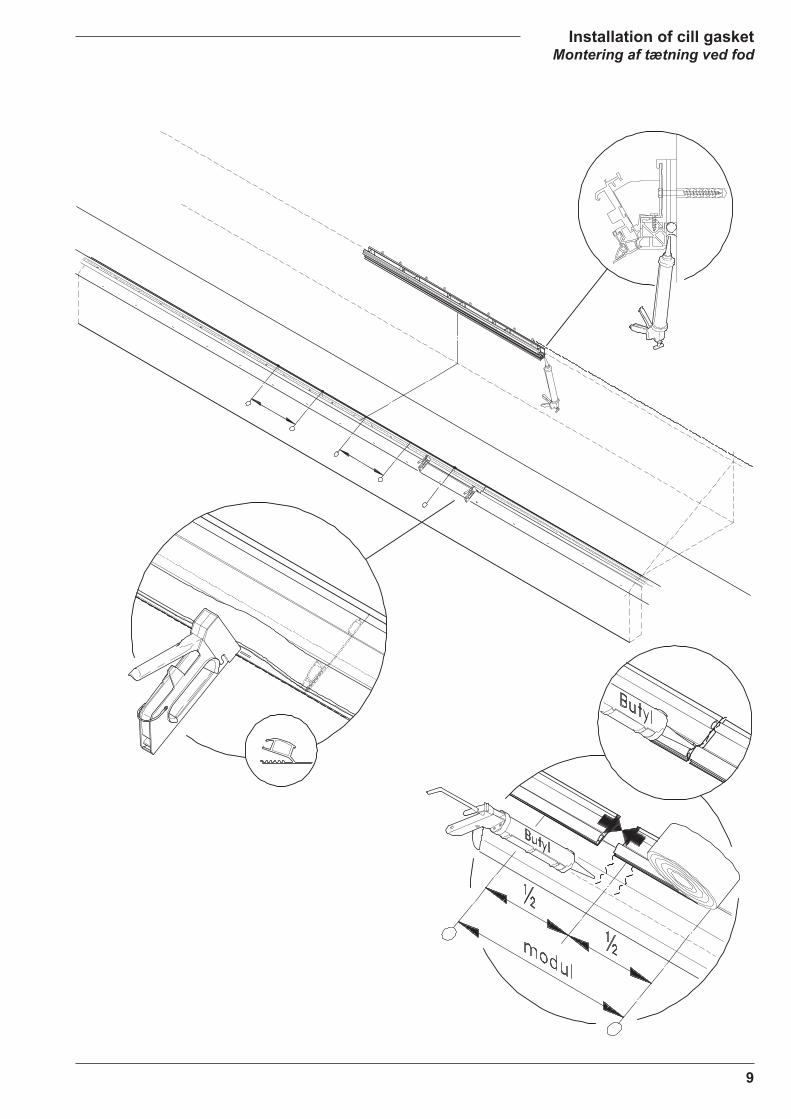
Installation of cill gasketMontering af tætning ved fod
10
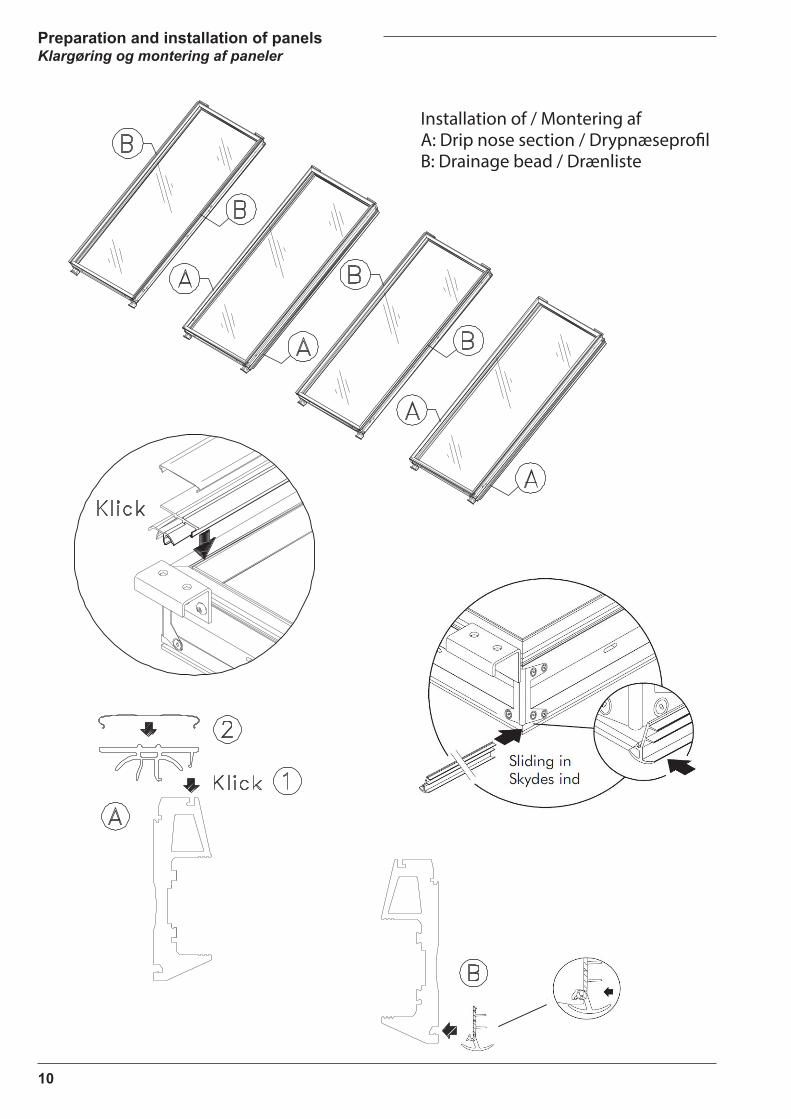
Preparation and installation of panelsKlargøring og montering af paneler
Installation of / Montering af A: Drip nose section / Drypnæseprofil B: Drainage bead / Drænliste

11
Installation and locking of first panelMontering og låsning af første panel
1
2
3
12
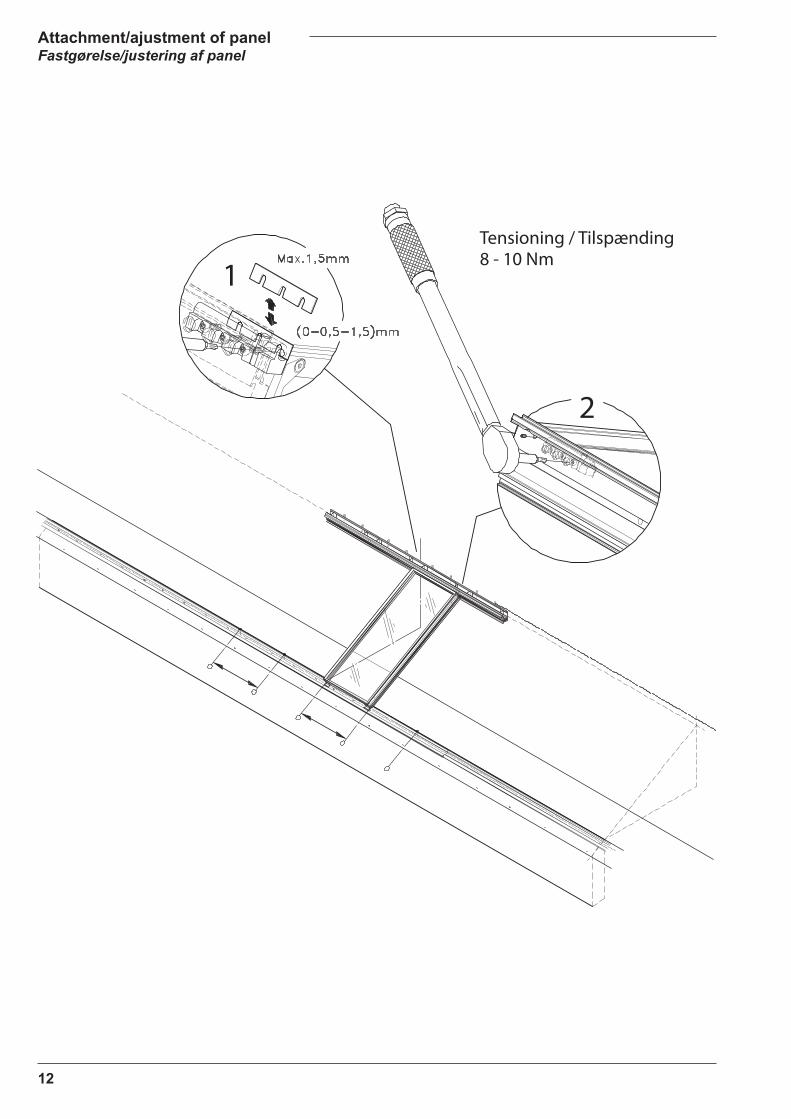
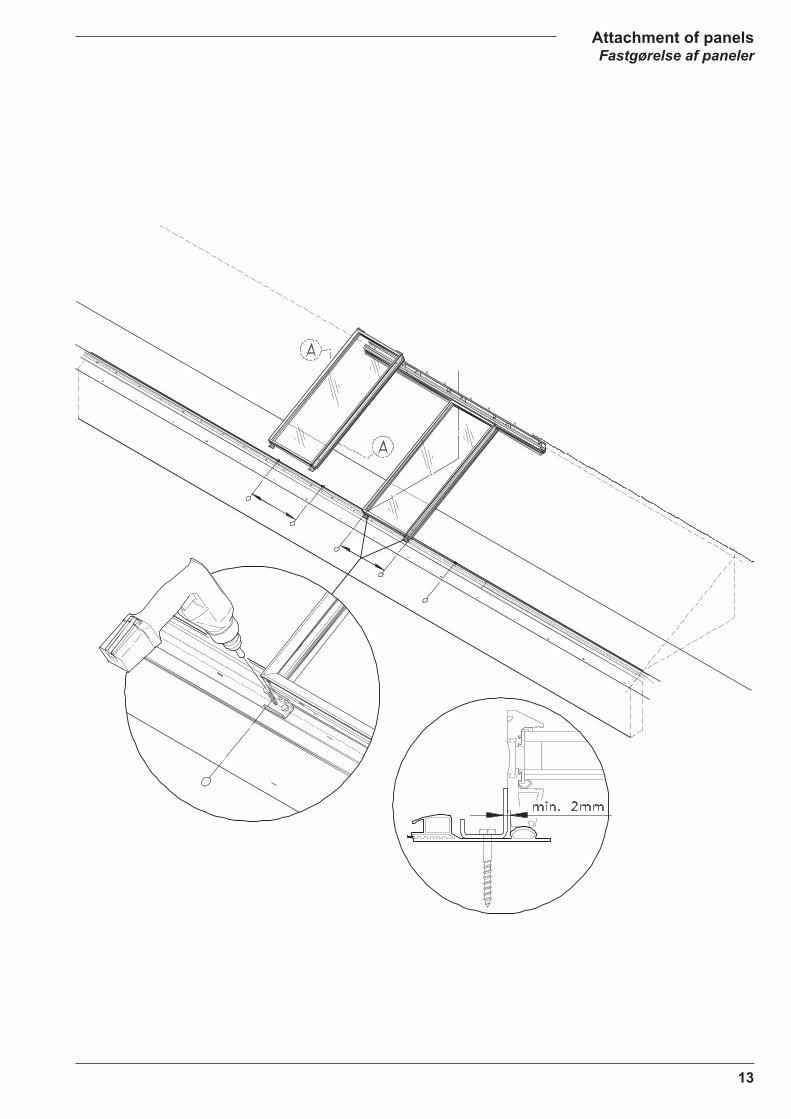
Attachment/ajustment of panelFastgørelse/justering af panel
Tensioning / Tilspænding8 - 10 Nm
1
2
13
Attachment of panelsFastgørelse af paneler
14
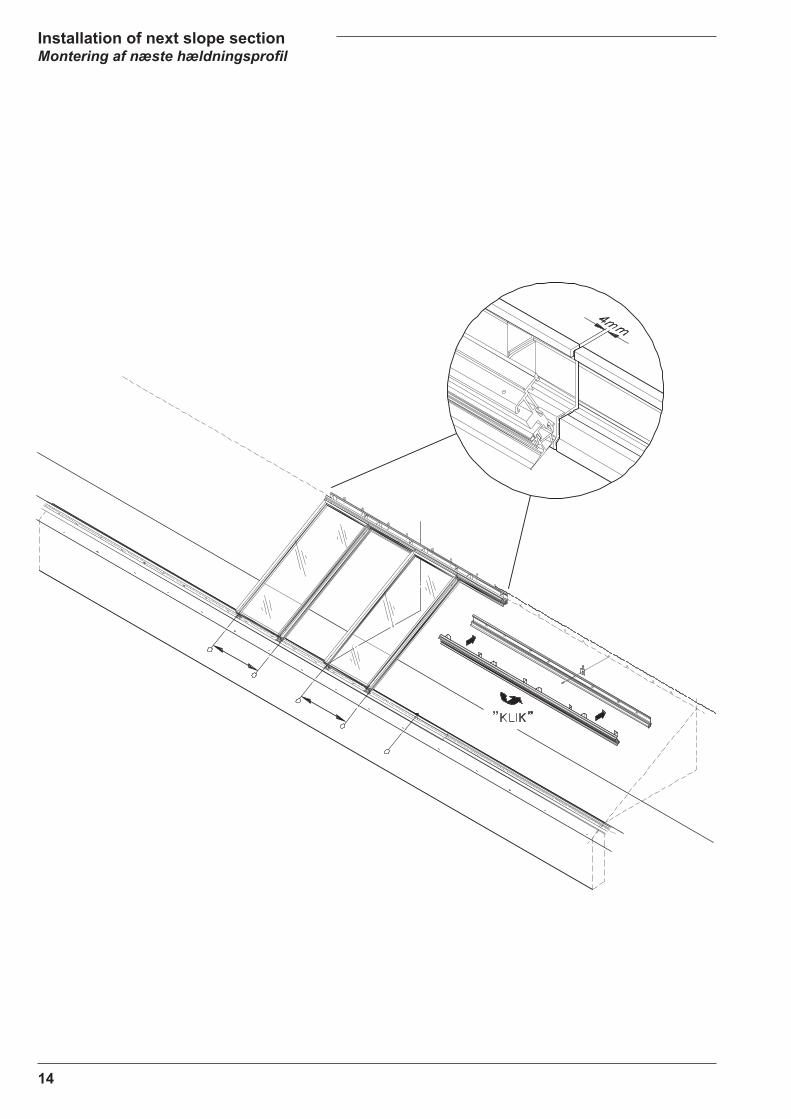
Installation of next slope sectionMontering af næste hældningsprofil
15
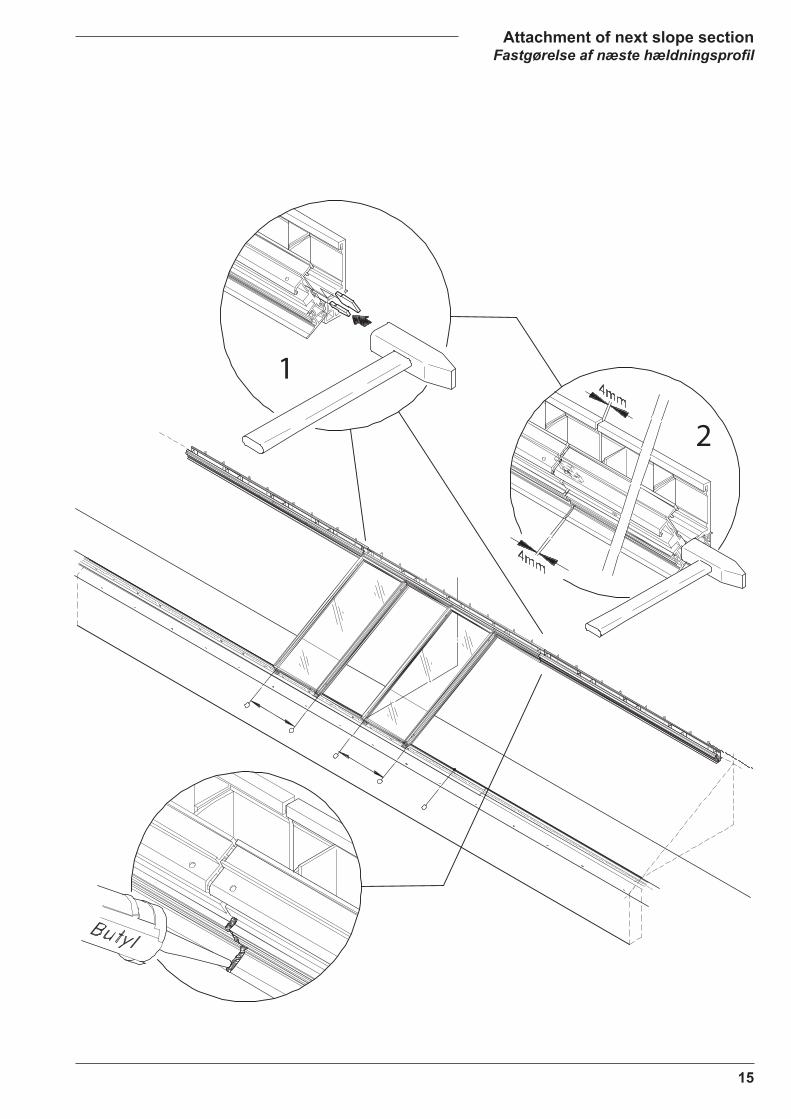
Attachment of next slope sectionFastgørelse af næste hældningsprofil
1
2

16
Installation of panels AMontering af A paneler
17
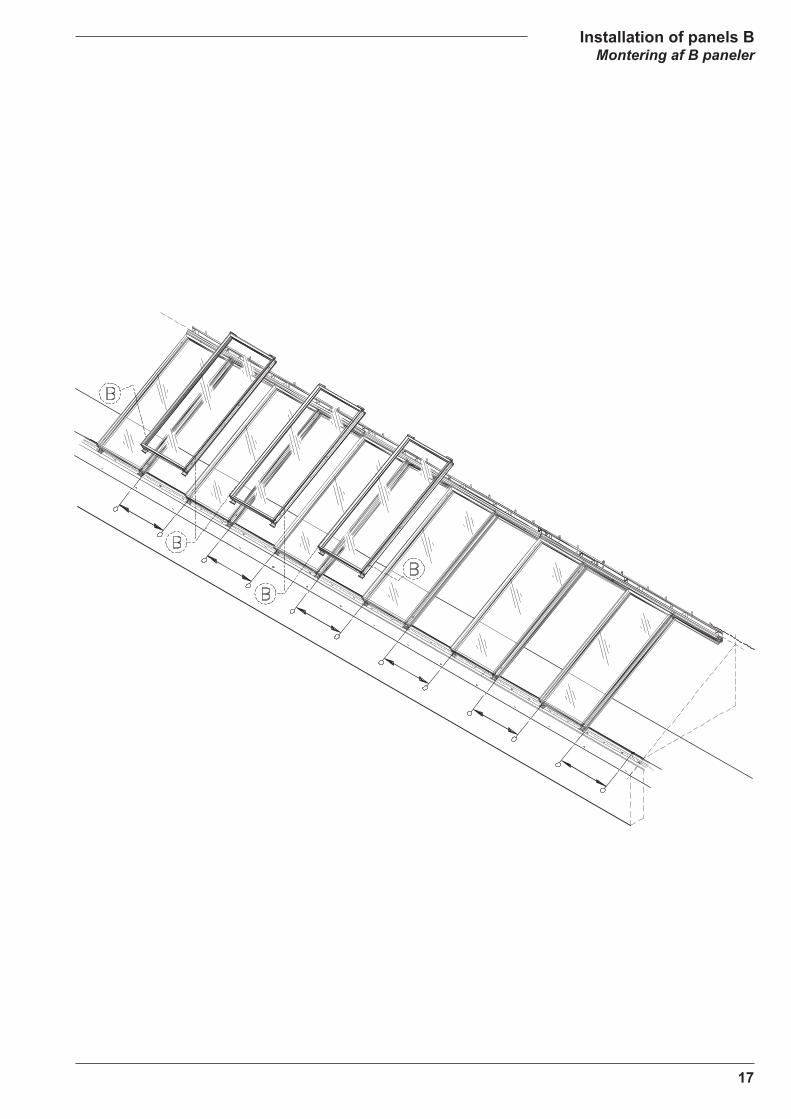
Installation of panels BMontering af B paneler
18
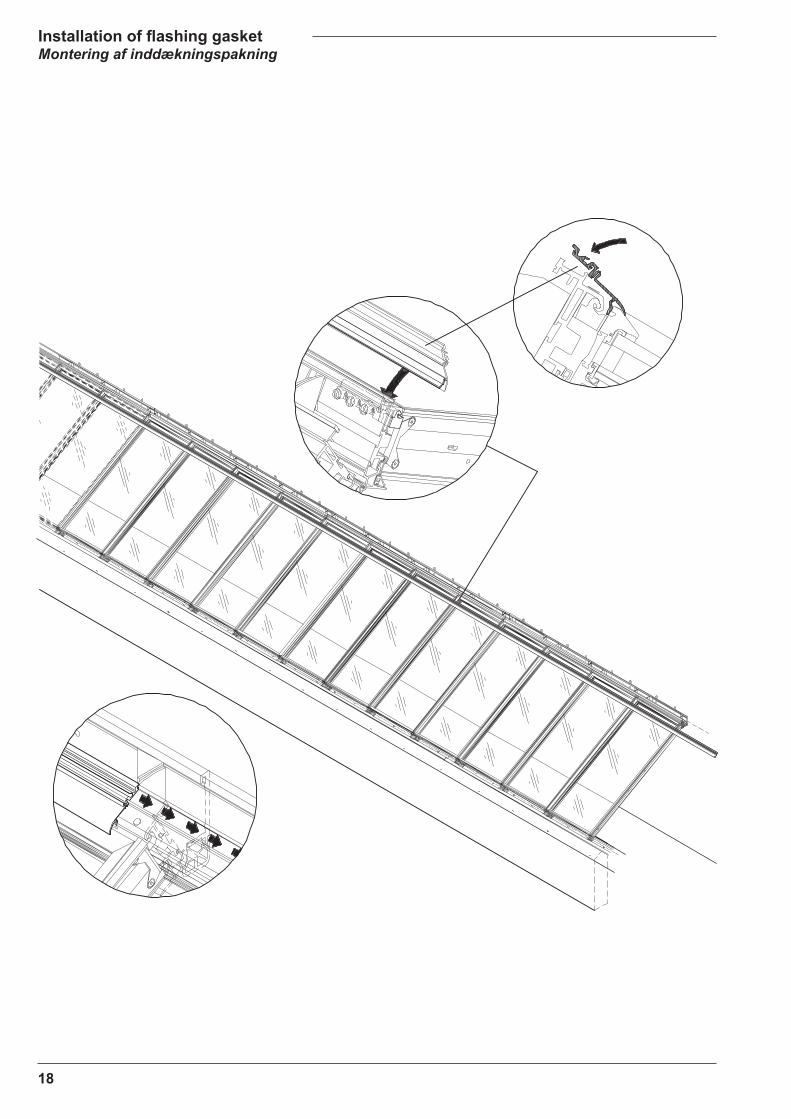
Installation of flashing gasketMontering af inddækningspakning
19
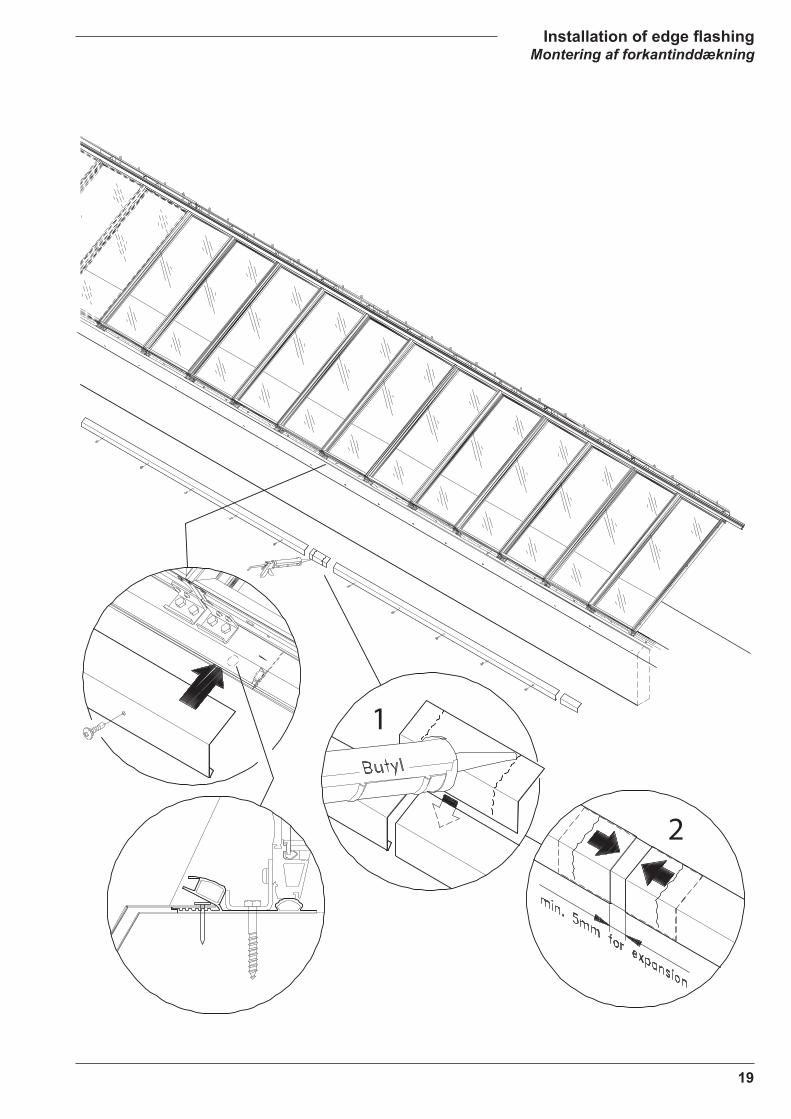
Installation of edge flashingMontering af forkantinddækning
1
2

20
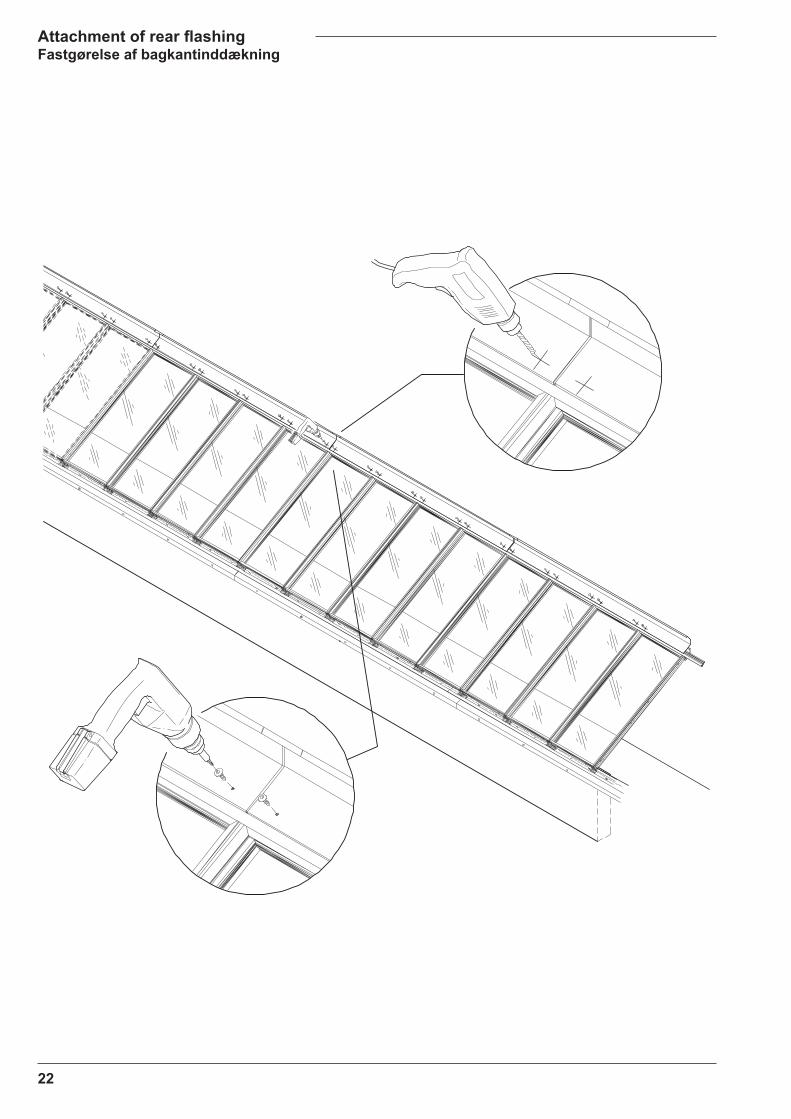
Installation of rear flashingMontering af bagkantinddækning

21
Measurement for attachment of rear flashingOpmåling til fastgørelse af bagkantinddækning
22
Attachment of rear flashingFastgørelse af bagkantinddækning

23
1. Installation of rubberplugs and front cover cap2. Montering af gummipropper og montering af kappe
2
1

VITRAL A/S Phone: +45 47 18 01 00Lyfa Parken Fax: +45 47 18 01 11Måløv Byvej 229 E-mail: [email protected] Måløv, Denmark www.vitral.dk
![TEMPERATURER FLEKSIBILITET VED HØJE - res.cloudinary.com · HT/Armaflex endeløse plader Bredde 1,0 m, Beklædning på begge sider Kode Vare nr. Isoleringstykkelse [mm] Rulle-længde](https://img.pdfslide.tips/doc/110x75/5d64724588c993ea738b9a1e/temperaturer-fleksibilitet-ved-hoje-res-htarmaflex-endelose-plader-bredde.jpg)
![EFFEKTIVITET CELLEGUMMI TIL ØGET TERMISK Armaflex... · HT/Armaflex endeløse plader Bredde 1,0 m, Beklædning på begge sider Kode Vare nr. Isoleringstykkelse [mm] Rulle-længde](https://img.pdfslide.tips/doc/110x75/5c82e4b709d3f27e788ccf12/effektivitet-cellegummi-til-oget-armaflex-htarmaflex-endelose-plader-bredde.jpg)