Embed Size (px)
Citation preview

1
Schweitzer Prime Timers Piwigo
PhotoGalleryGuide
Version 1.1
30-Jan-2015
1 Introduction .............................................................................................................................................. 2
2 Overview ..................................................................................................................................................... 3
3 Users............................................................................................................................................................. 5
3.1 Guests................................................................................................................................................... 5
3.2 Registered Users ............................................................................................................................ 5
3.3 Administrators ................................................................................................................................. 5
4 Viewing Photos ....................................................................................................................................... 6
5 Registering ................................................................................................................................................ 8
6 Logging In ................................................................................................................................................ 10
7 Customizing ............................................................................................................................................ 11
8 Uploading Photos ................................................................................................................................. 12
9 Adding Comments ............................................................................................................................... 16

2
1 Introduction
This document shows how to navigate and operate the Schweitzer Prime Timer’s
Piwigo Photo Gallery. Piwigo is an open source photo gallery software app for
the web that comes with powerful features to publish and manage your collection
of pictures. After reading this document you will be able to:
View photos
Register
Log in
Customize
Add photos to albums
Add comments
Please read and familiarize yourself with this document before attempting to
upload photos to the gallery.
3
2 Overview
The Schweitzer Prime Timer’s Piwigo Photo Gallery is where members can create
albums and upload photos to those albums that are immediately displayed on the
website. All photos are housed within an album or sub-album.
To access the Photo Gallery you need to start up a web browser and go to the
www.schweitzerprimetimers.org website.
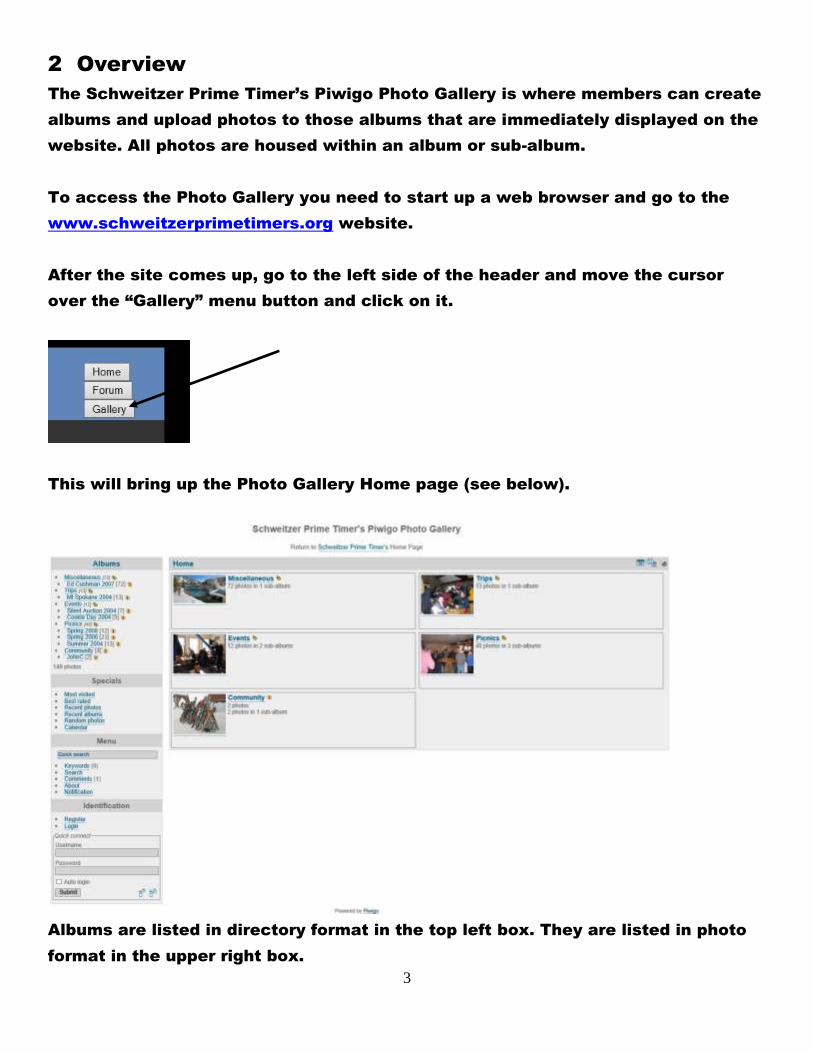
After the site comes up, go to the left side of the header and move the cursor
over the “Gallery” menu button and click on it.
This will bring up the Photo Gallery Home page (see below).
Albums are listed in directory format in the top left box. They are listed in photo
format in the upper right box.
4
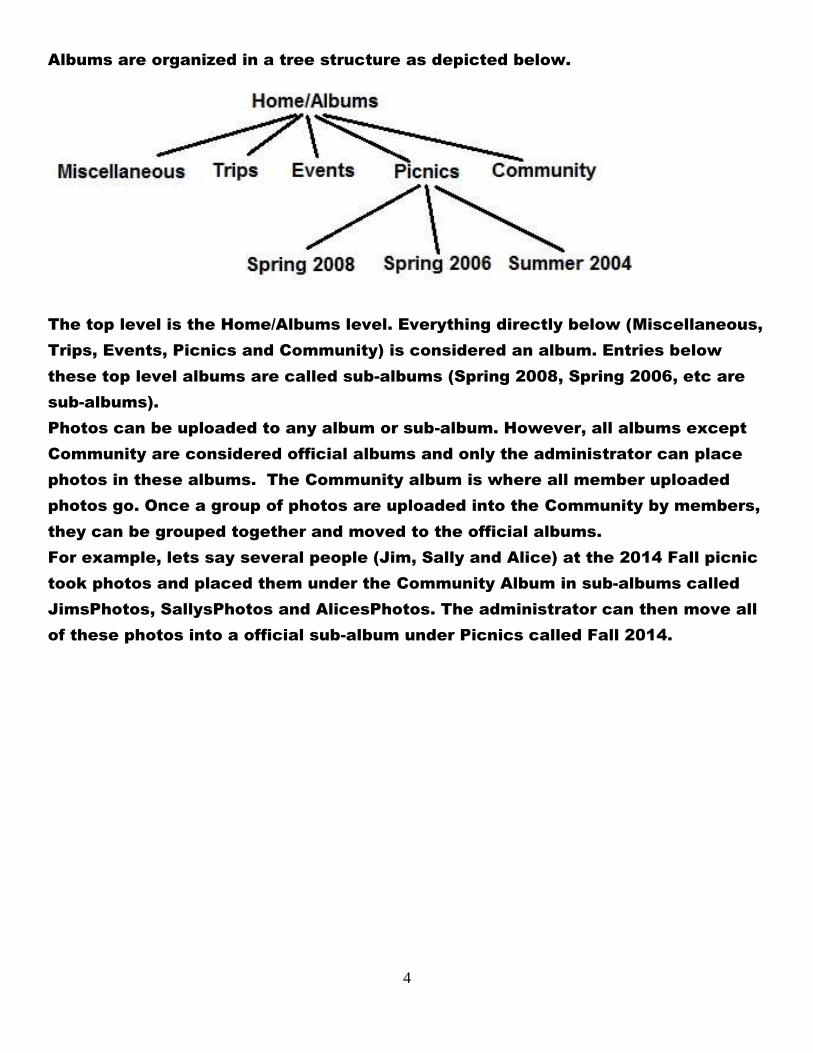
Albums are organized in a tree structure as depicted below.
The top level is the Home/Albums level. Everything directly below (Miscellaneous,
Trips, Events, Picnics and Community) is considered an album. Entries below
these top level albums are called sub-albums (Spring 2008, Spring 2006, etc are
sub-albums).
Photos can be uploaded to any album or sub-album. However, all albums except
Community are considered official albums and only the administrator can place
photos in these albums. The Community album is where all member uploaded
photos go. Once a group of photos are uploaded into the Community by members,
they can be grouped together and moved to the official albums.
For example, lets say several people (Jim, Sally and Alice) at the 2014 Fall picnic
took photos and placed them under the Community Album in sub-albums called
JimsPhotos, SallysPhotos and AlicesPhotos. The administrator can then move all
of these photos into a official sub-album under Picnics called Fall 2014.
5
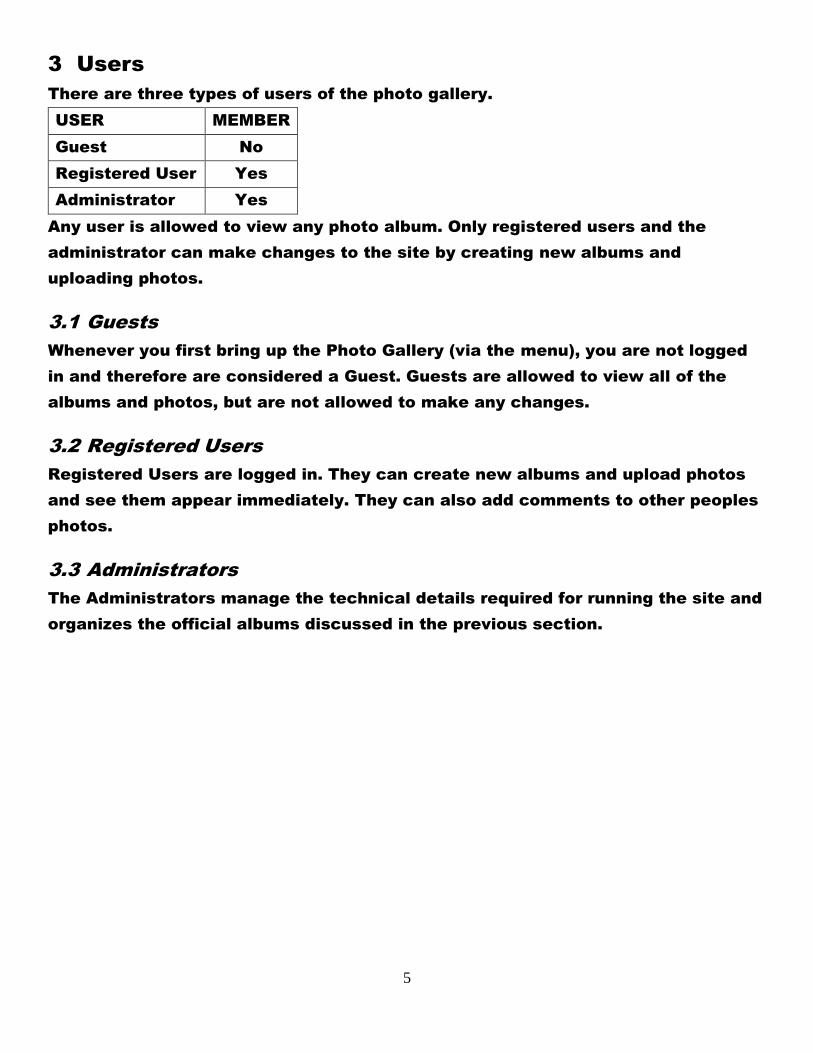
3 Users
There are three types of users of the photo gallery.
USER MEMBER
Guest No
Registered User Yes
Administrator Yes
Any user is allowed to view any photo album. Only registered users and the
administrator can make changes to the site by creating new albums and
uploading photos.
3.1 Guests
Whenever you first bring up the Photo Gallery (via the menu), you are not logged
in and therefore are considered a Guest. Guests are allowed to view all of the
albums and photos, but are not allowed to make any changes.
3.2 Registered Users
Registered Users are logged in. They can create new albums and upload photos
and see them appear immediately. They can also add comments to other peoples
photos.
3.3 Administrators
The Administrators manage the technical details required for running the site and
organizes the official albums discussed in the previous section.
6
4 Viewing Photos
All photos are contained within an album or sub-album. Anyone is allowed to open
any album or sub-album and view these photos. You do not need to register and
log in.
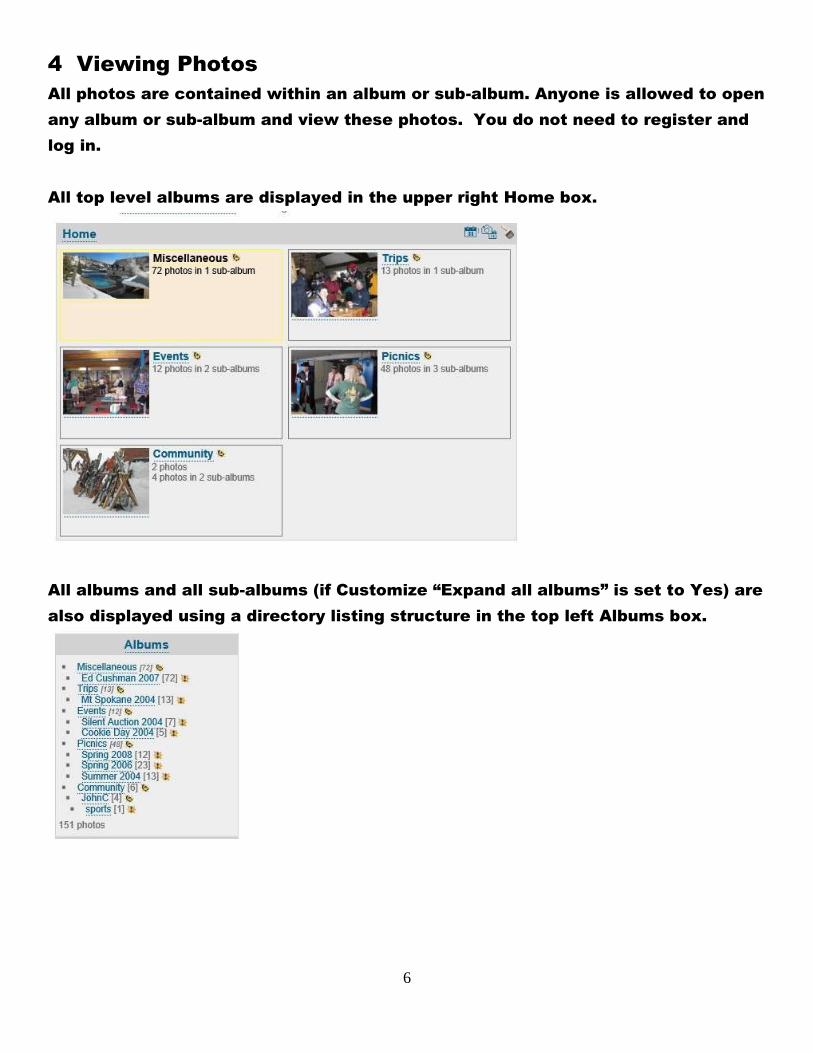
All top level albums are displayed in the upper right Home box.
All albums and all sub-albums (if Customize “Expand all albums” is set to Yes) are
also displayed using a directory listing structure in the top left Albums box.
7
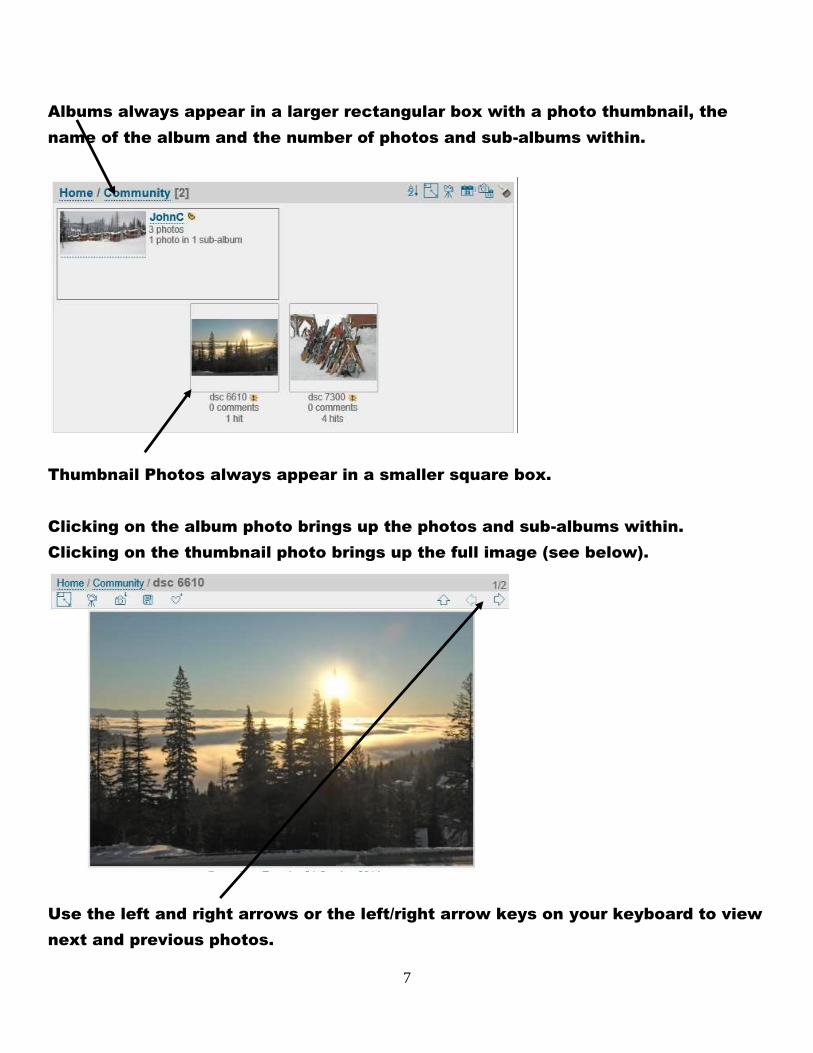
Albums always appear in a larger rectangular box with a photo thumbnail, the
name of the album and the number of photos and sub-albums within.
Thumbnail Photos always appear in a smaller square box.
Clicking on the album photo brings up the photos and sub-albums within.
Clicking on the thumbnail photo brings up the full image (see below).
Use the left and right arrows or the left/right arrow keys on your keyboard to view
next and previous photos.
8
5 Registering
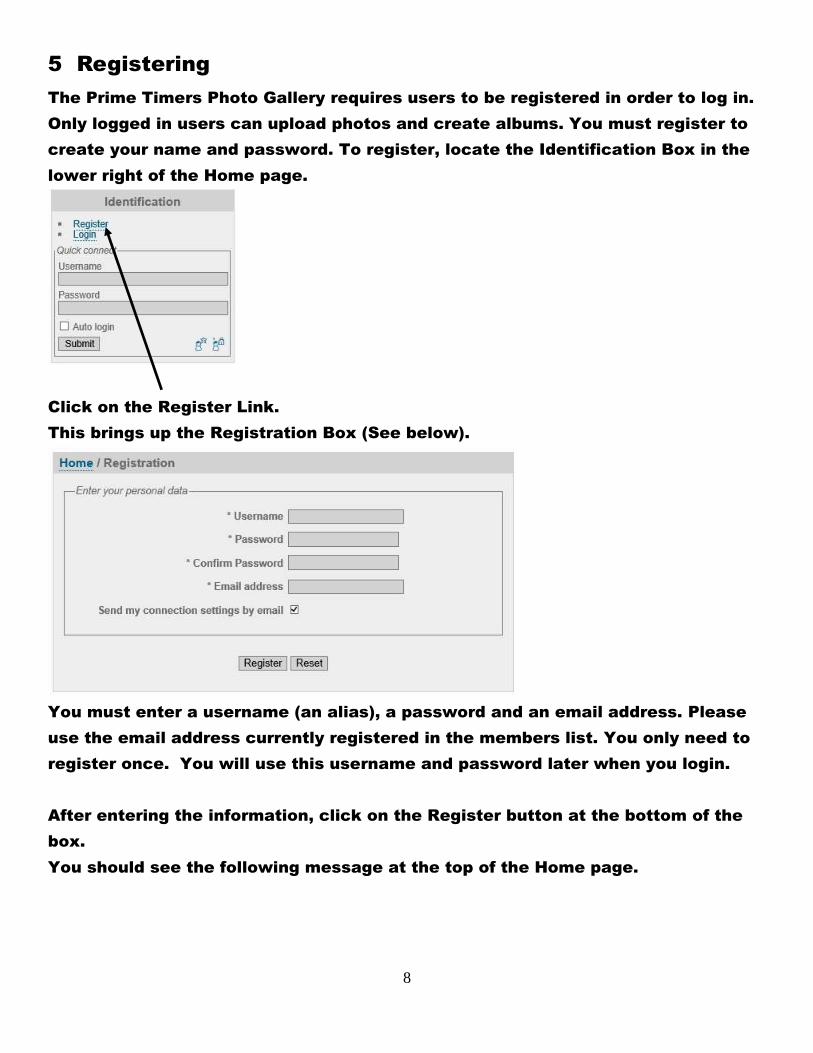
The Prime Timers Photo Gallery requires users to be registered in order to log in.
Only logged in users can upload photos and create albums. You must register to
create your name and password. To register, locate the Identification Box in the
lower right of the Home page.
Click on the Register Link.
This brings up the Registration Box (See below).
You must enter a username (an alias), a password and an email address. Please
use the email address currently registered in the members list. You only need to
register once. You will use this username and password later when you login.
After entering the information, click on the Register button at the bottom of the
box.
You should see the following message at the top of the Home page.

9
This means your registration was done properly.
After you have successfully registered you are now considered a registered user
and can log in.
10
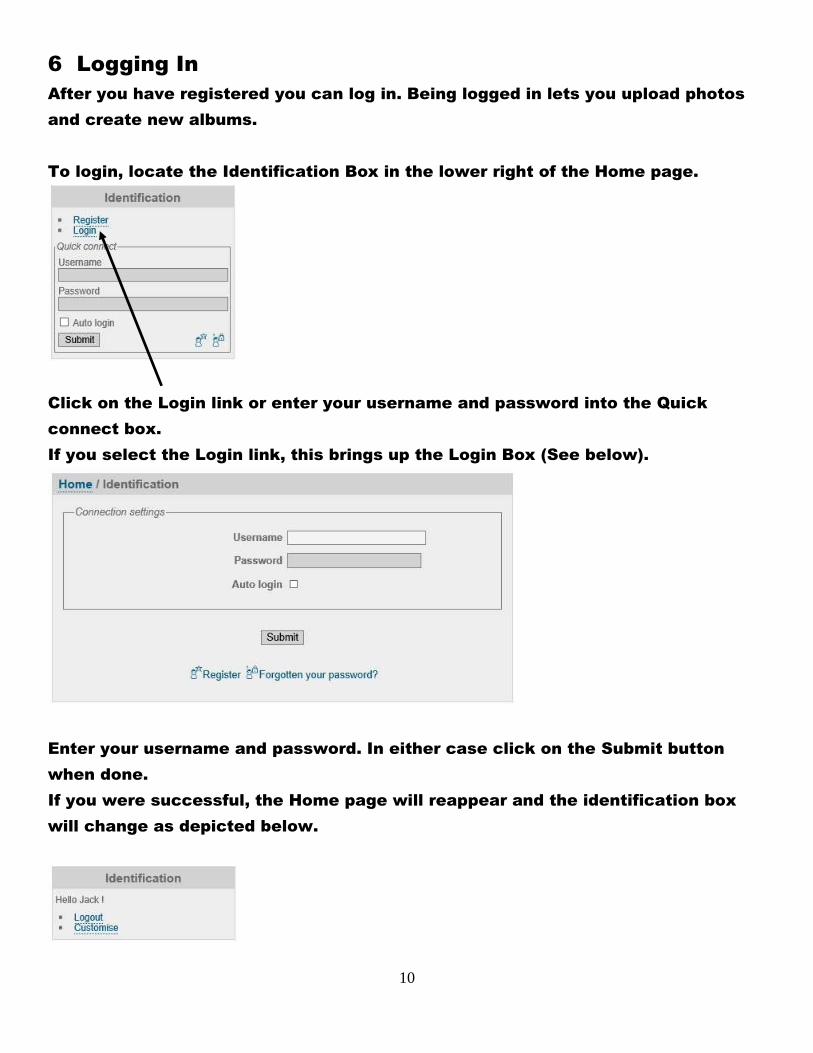
6 Logging In
After you have registered you can log in. Being logged in lets you upload photos
and create new albums.
To login, locate the Identification Box in the lower right of the Home page.
Click on the Login link or enter your username and password into the Quick
connect box.
If you select the Login link, this brings up the Login Box (See below).
Enter your username and password. In either case click on the Submit button
when done.
If you were successful, the Home page will reappear and the identification box
will change as depicted below.
11
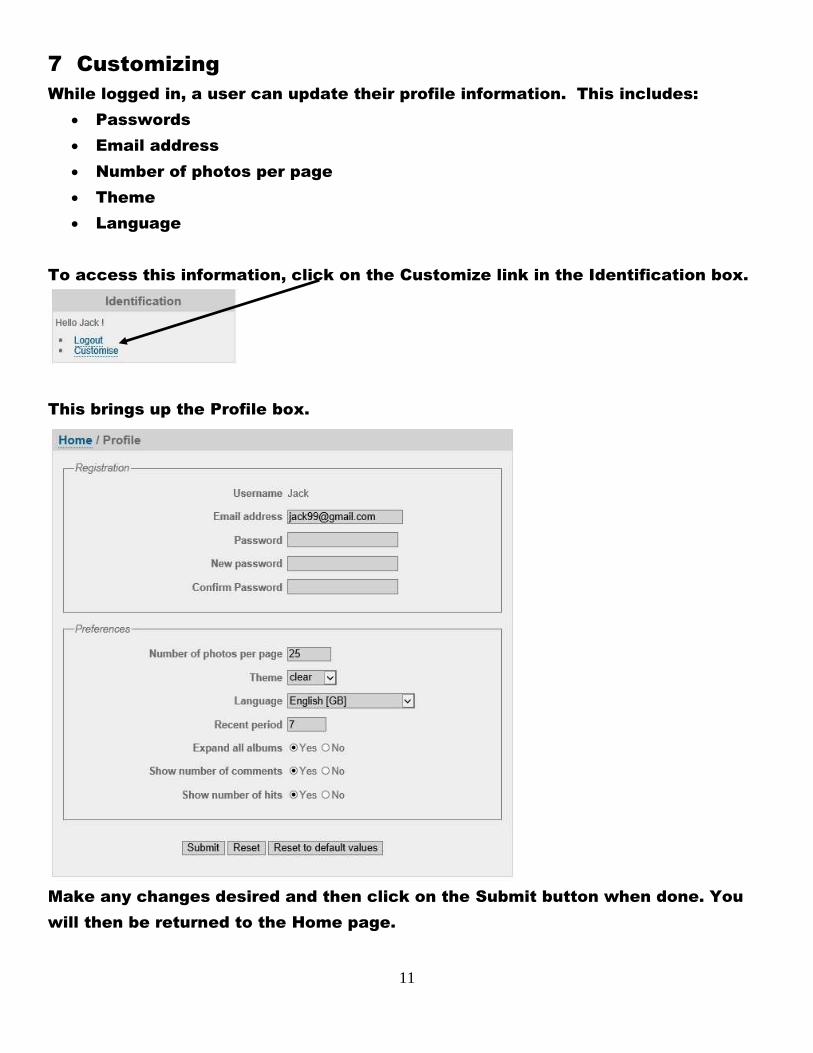
7 Customizing
While logged in, a user can update their profile information. This includes:
Passwords
Email address
Number of photos per page
Theme
Language
To access this information, click on the Customize link in the Identification box.
This brings up the Profile box.
Make any changes desired and then click on the Submit button when done. You
will then be returned to the Home page.
12
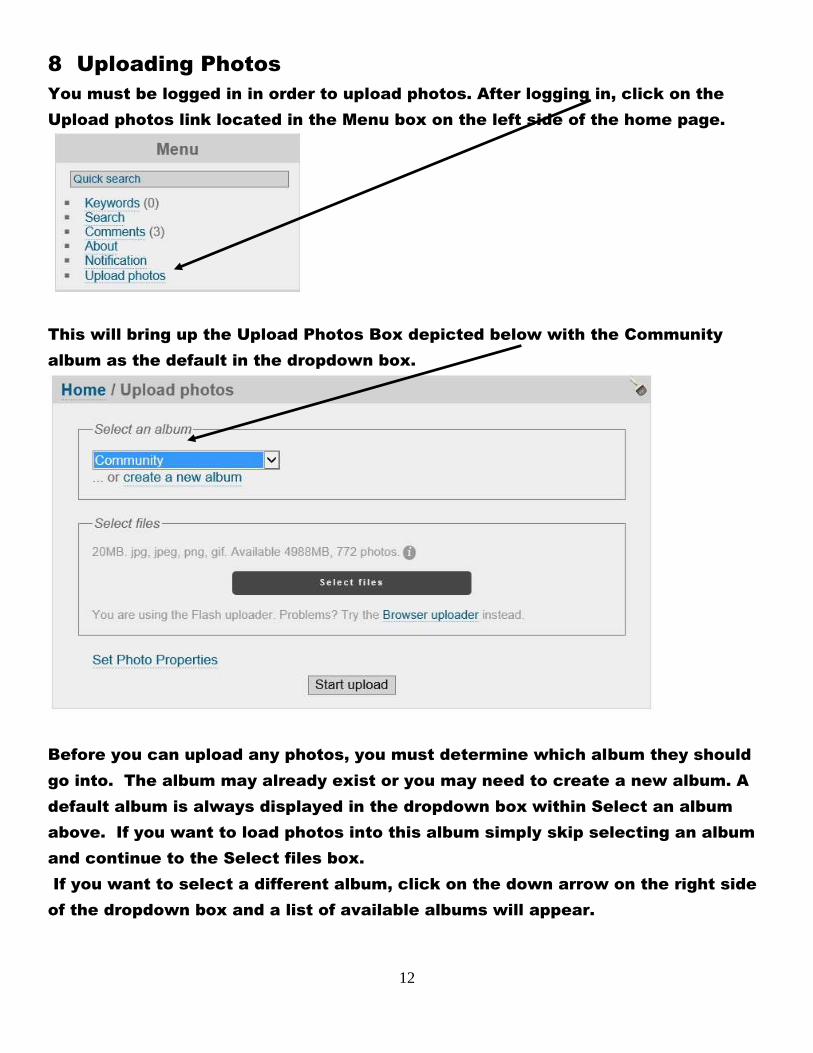
8 Uploading Photos
You must be logged in in order to upload photos. After logging in, click on the
Upload photos link located in the Menu box on the left side of the home page.
This will bring up the Upload Photos Box depicted below with the Community
album as the default in the dropdown box.
Before you can upload any photos, you must determine which album they should
go into. The album may already exist or you may need to create a new album. A
default album is always displayed in the dropdown box within Select an album
above. If you want to load photos into this album simply skip selecting an album
and continue to the Select files box.
If you want to select a different album, click on the down arrow on the right side
of the dropdown box and a list of available albums will appear.
13
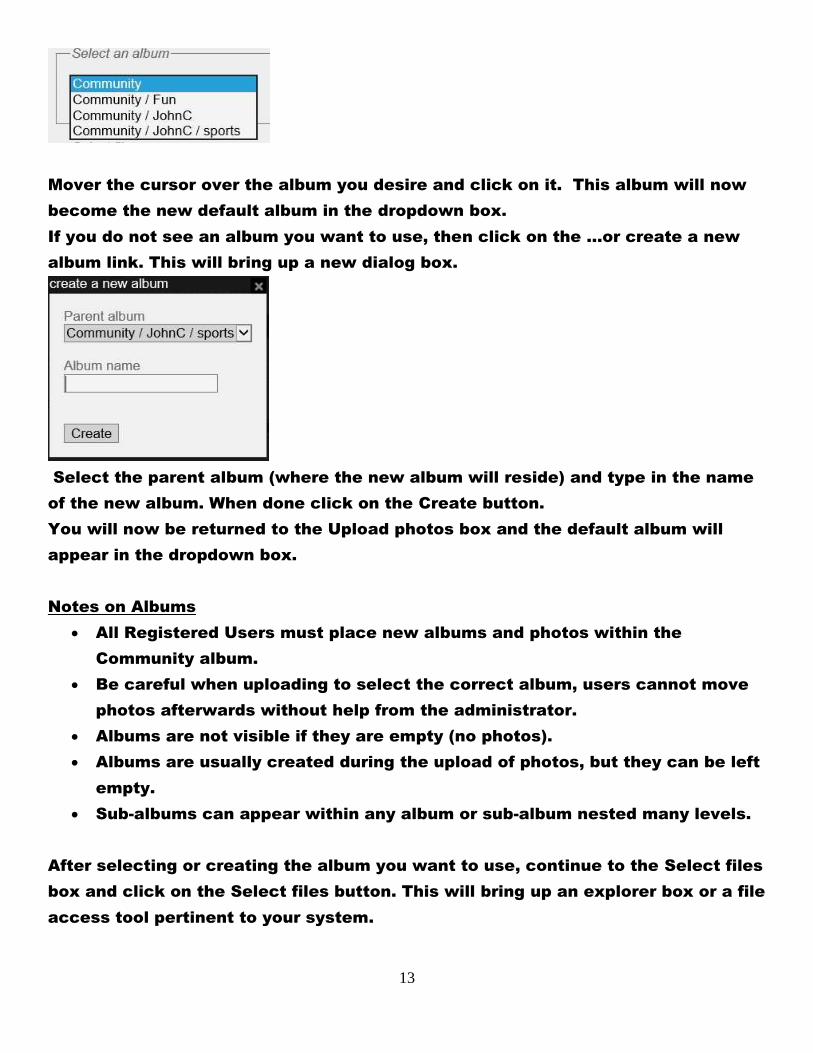
Mover the cursor over the album you desire and click on it. This album will now
become the new default album in the dropdown box.
If you do not see an album you want to use, then click on the …or create a new
album link. This will bring up a new dialog box.
Select the parent album (where the new album will reside) and type in the name
of the new album. When done click on the Create button.
You will now be returned to the Upload photos box and the default album will
appear in the dropdown box.
Notes on Albums
All Registered Users must place new albums and photos within the
Community album.
Be careful when uploading to select the correct album, users cannot move
photos afterwards without help from the administrator.
Albums are not visible if they are empty (no photos).
Albums are usually created during the upload of photos, but they can be left
empty.
Sub-albums can appear within any album or sub-album nested many levels.
After selecting or creating the album you want to use, continue to the Select files
box and click on the Select files button. This will bring up an explorer box or a file
access tool pertinent to your system.
14
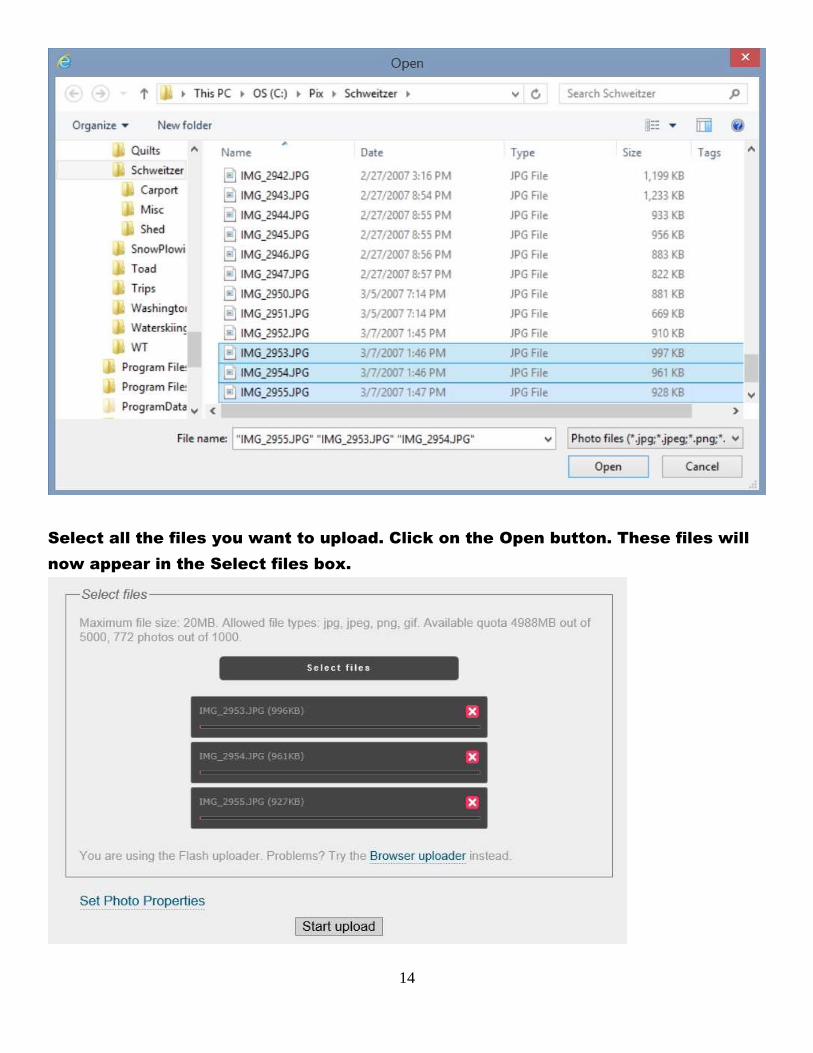
Select all the files you want to upload. Click on the Open button. These files will
now appear in the Select files box.
15
Next click on the Start upload button.
The upload process will start and display a status bar. When done, the selected
album and photos will be displayed.
Notes on Photos
The maximum size for a photo is currently 20M Bytes.
Please keep the photo sizes to around 600K Bytes or less. This will expedite
upload times and let the user add a lot more photos, since each user
currently has an upper storage limit of 1000M Bytes.
Use applications like Microsoft Paint to reduce the size of photos before
uploading them.
16
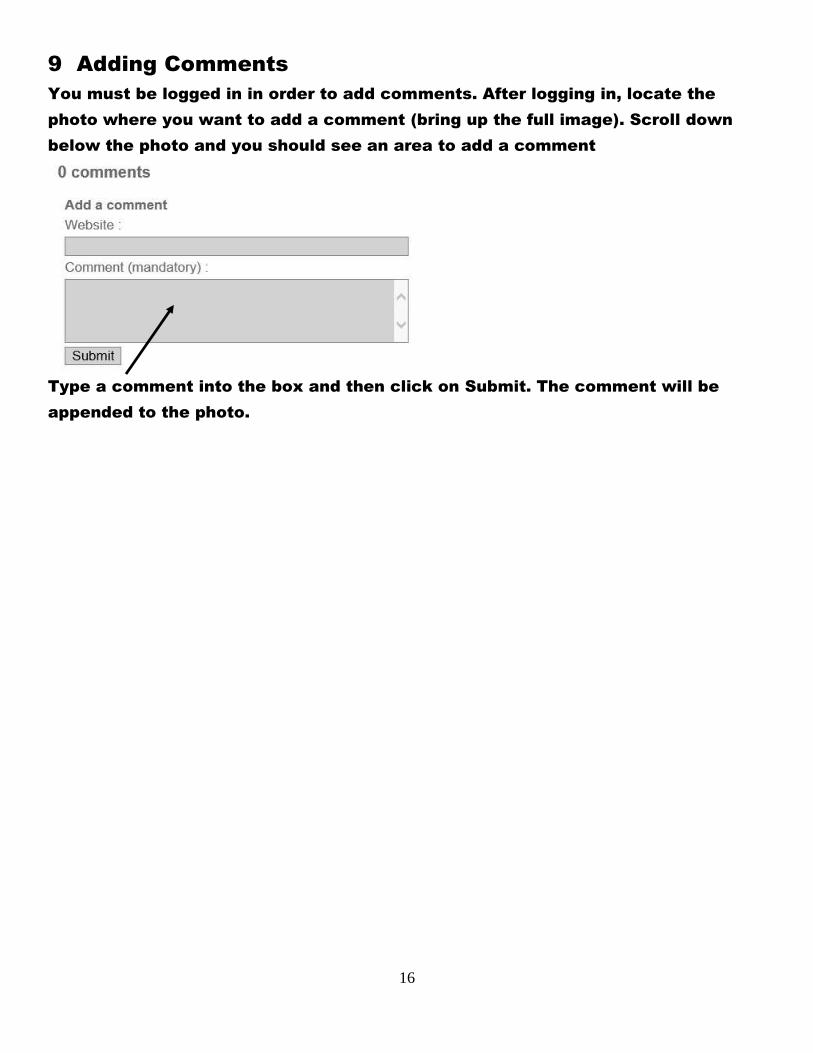
9 Adding Comments
You must be logged in in order to add comments. After logging in, locate the
photo where you want to add a comment (bring up the full image). Scroll down
below the photo and you should see an area to add a comment
Type a comment into the box and then click on Submit. The comment will be
appended to the photo.