Embed Size (px)
Citation preview

Tennis Bag Tutorialfor Sew Mama Sewwww.sewmamasew.comby Green Bag Lady(aka Teresa VanHatten-Granath)www.greenbaglady.org

Materials:
•sewing machine•cutting mat•ruler•scissors•rotary cutter (optional)•straight pins•small hair binder (sold at Walgreens, WalMart, Target, etc)•1 button, at least 1 inch in diameter•1 magnetic snap (sold in fabric stores or online)•fabric (1.5 yards each of 2 coordinating prints/solids, 1 for outside and 1 for lining, outside fabric can be upholstery or canvas, 1/4 yd fabric for int. pockets)•2.5 yards fusible interfacing (I used Pellon Craft-Fuse 808)•1.5 yards, 1” wide handle strapping or webbing (usually sold by the yard at fabric stores)•1 inch biased tape maker (or premade biased tape)•disappearing ink pen (found in notions section of fabric store)•iron and ironing board
outside fabric(1.5 yds)
lining fabric(1.5 yds) pocket fabric
(1/4 yd)
page 2
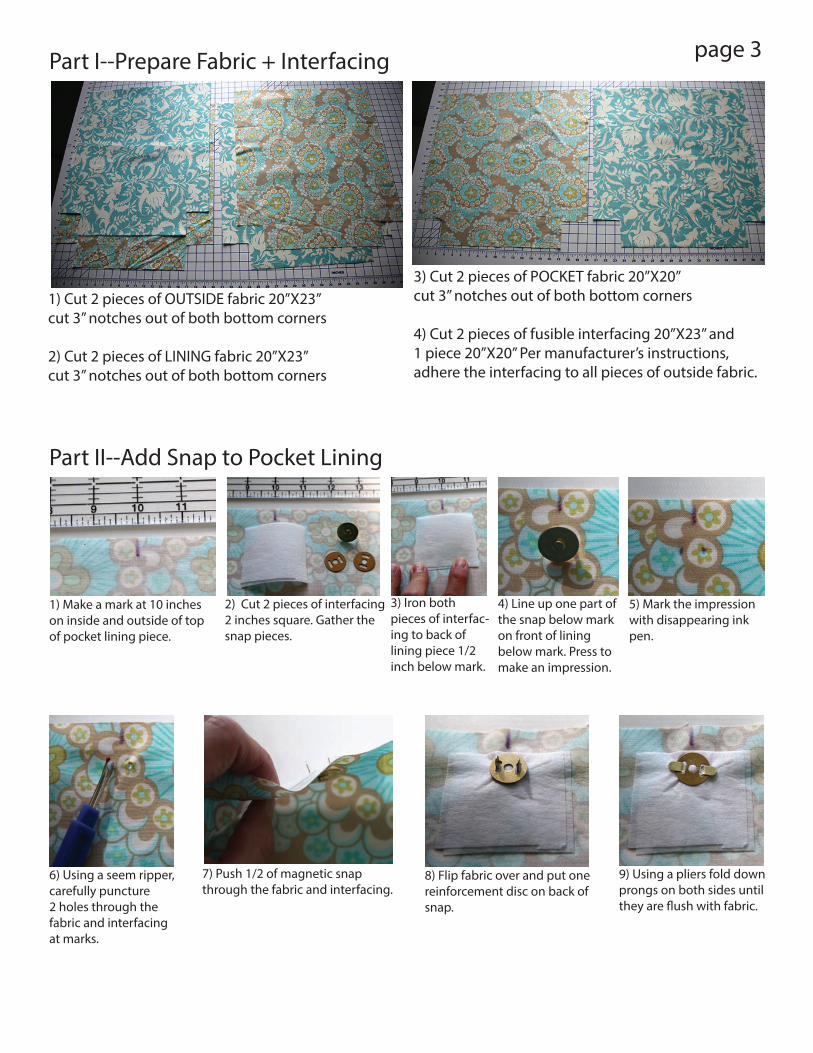
1) Cut 2 pieces of OUTSIDE fabric 20”X23”cut 3” notches out of both bottom corners
2) Cut 2 pieces of LINING fabric 20”X23”cut 3” notches out of both bottom corners
Part I--Prepare Fabric + Interfacing
3) Cut 2 pieces of POCKET fabric 20”X20”cut 3” notches out of both bottom corners
4) Cut 2 pieces of fusible interfacing 20”X23” and1 piece 20”X20” Per manufacturer’s instructions, adhere the interfacing to all pieces of outside fabric.
Part II--Add Snap to Pocket Lining
1) Make a mark at 10 inches on inside and outside of top of pocket lining piece.
2) Cut 2 pieces of interfacing2 inches square. Gather thesnap pieces.
3) Iron both pieces of interfac-ing to back of lining piece 1/2 inch below mark.
4) Line up one part ofthe snap below markon front of liningbelow mark. Press tomake an impression.
5) Mark the impressionwith disappearing inkpen.
6) Using a seem ripper,carefully puncture2 holes through thefabric and interfacingat marks.
7) Push 1/2 of magnetic snap through the fabric and interfacing.
8) Flip fabric over and put onereinforcement disc on back of snap.
9) Using a pliers fold downprongs on both sides until they are �ush with fabric.
page 3
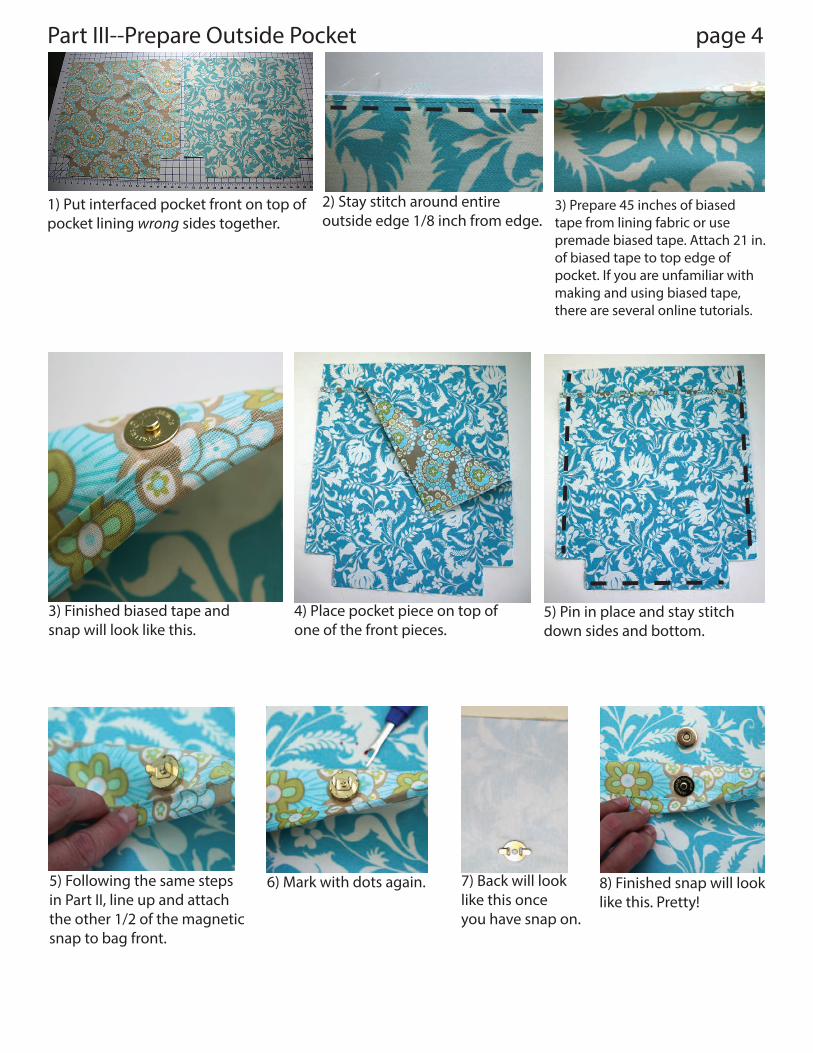
Part III--Prepare Outside Pocket
1) Put interfaced pocket front on top of pocket lining wrong sides together.
3) Prepare 45 inches of biased tape from lining fabric or use premade biased tape. Attach 21 in.of biased tape to top edge of pocket. If you are unfamiliar with making and using biased tape, there are several online tutorials.
4) Place pocket piece on top of one of the front pieces.
3) Finished biased tape and snap will look like this.
5) Following the same steps in Part II, line up and attach the other 1/2 of the magnetic snap to bag front.
6) Mark with dots again. 7) Back will looklike this once you have snap on.
8) Finished snap will looklike this. Pretty!
5) Pin in place and stay stitch down sides and bottom.
2) Stay stitch around entire outside edge 1/8 inch from edge.
page 4

5)--Pinch sides at corner topull fabric apart, match upseems.
6) Pin. 7) Sew from onecorner to the other.
1) Place both outside pieces together, right sides facing.
2) Pin around edges of outside pieces.
3) Sew together on dotted lines asshown. DO NOT sew corners yet.
Part IV--Putting Outside Together
do notsew here
4) Use a 1/4 inch seam allowance.
8) The bottom of your bag will look like this so far.
9) Turn bag right side out.
10) Using a ruler at the top of bag, mark the middle with disappearingink pen on front of bag. Pin binder tothis mark. Make a mark 3 inches to theleft and right of the center mark and pin your handles on. Stay stitch aroundentire top to secure binders & handles.
page 5

Part V--Lining + Interior Pockets
1) Decide how many and what kind ofpockets you would like on the interior.Phone pocket measures 4wX4.5h inches.Ball/Water bottle pocket measures 7wX10h inches. Cut fabric and interfac-ing, iron on interfacing, sew biased tape on top of pockets. Surge sides and bottom of pockets OR cut thepockets 4.5wX5h and 7.5wX10.5h and press sides and bottom under 1/4 inch.
2) Make a mark on top of lining at 10 inches. Line uppocket 2 inches from top and3 inches left of 10 inch mark.
3) All pockets should be 2 inchesfrom top of lining.
4) Finished phone pocket looks likethis.
5) For the water bottle pocket,make a mark bottom at 2.5, 3.5 and 4.5 inches.
6) Pinch fabric at the 2.5 and 4.5 marks and pin.
7) After pinching, the bottom of thepocket should now measure 5 in.
8) Pin pocket to lining 3 infrom left side. Make sure both sides are straight. The top of the pocket will stickout from lining fabric.
9) Again, make sure pockets line up 2 infrom top of lining.
10) Sew on water bottle pocket to look like this.
page 6
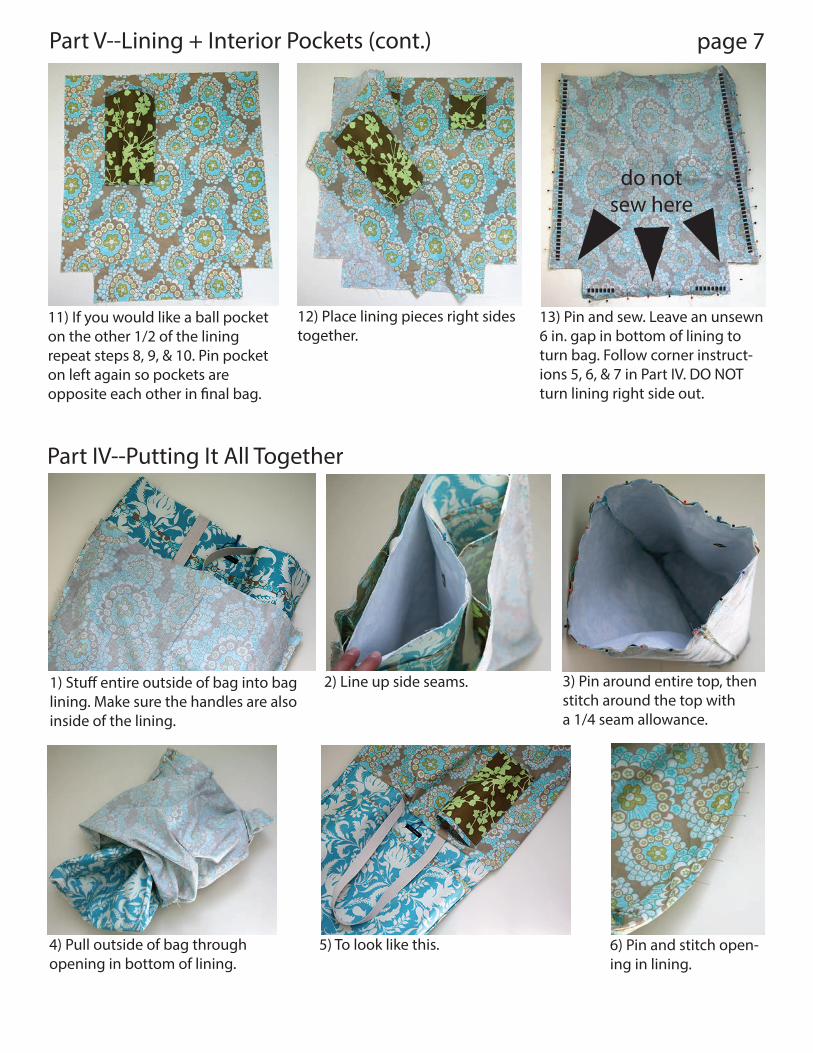
Part IV--Putting It All Together
Part V--Lining + Interior Pockets (cont.)
11) If you would like a ball pocketon the other 1/2 of the liningrepeat steps 8, 9, & 10. Pin pocketon left again so pockets areopposite each other in final bag.
12) Place lining pieces right sidestogether.
13) Pin and sew. Leave an unsewn6 in. gap in bottom of lining to turn bag. Follow corner instruct-ions 5, 6, & 7 in Part IV. DO NOTturn lining right side out.
do notsew here
1) Stuff entire outside of bag into baglining. Make sure the handles are alsoinside of the lining.
2) Line up side seams. 3) Pin around entire top, thenstitch around the top witha 1/4 seam allowance.
4) Pull outside of bag through opening in bottom of lining.
5) To look like this. 6) Pin and stitch open-ing in lining.
page 7

Part IV--Putting It All Together (cont.)
7) The top of your bag will now look like this.
8) Press and pin.
9) Stitch around entire top of bag 1/8 inch from top to look like this.
10) Sew button in place on back of bag and you are done. Enjoy!
Finished Bag!
page 8