Embed Size (px)
Citation preview
1
Zásuvkový termostat HT-600
Tento programovatelný zásuvkový termostat je určen pro použití s elektrickými topidly a podobnými
zařízeními.
Hlavní přednosti Zásuvkový design pro jednoduchou instalaci. Pět tlačítek pro snadnou obsluhu. 161 spínacích programů týdně (23 programů, časových změn, na den). Režimy Komfortní a útlumové teploty. Displej zobrazuje nastavenou teplotu nebo naměřenou teplotu (naměřenou teplotu, když je aktivní). Zobrazení teploty ve stupních Celsia. Kalibrace teploty. Nastavení zvukového alarmu. Režim vnitřního nebo vnějšího čidla. Nastavení limitu Nízké nebo Vysoké teploty. Umožnění nebo zablokování režimu programování. Vestavěná EEPROM
Technické parametry
Výstupní napětí: 230V Maximální zátěž: 3600W/16A Zálohování: EEPROM Režim čidla: Vnitřní čidlo Čas, datum a výpadek proudu: Nastavení je uloženo v paměti po dobu 6 měsíců Nastavení teploty: 0°C ~ 60°C, zvýšení po 0,5°C Přesnost: +/- 0,5°C (+/- 1°F) Rozměry termostatu: 140mm x 70mm x 39mm, displej 37x16mm Barva: Bílá Krytí IP: 20 Certifikace: CE a dle předpisů EN
Tlačítko Funkce
Zapnuto/vypnuto
Zvýšení teploty, nastavení
Snížení teploty, nastavení
Volba režimu – krátké stisknutí
Nastavení času, dne a programu
Nastavení parametru
+ Dlouhé stisknutí pro zastavení zvukové signalizace
- zvukového alarmu
N647/R01 (19.11.15)
2
Nastavení parametrů
Ve vypnutém stavu stiskněte zároveň tlačítko “M” a “+” . Budete moci vstoupit do nastavení parametrů.
Každým stisknutím tlačítka “M” se přesunete do další položky nastavení.
Poznámka: Pokud je třeba reset do továrního nastavení, po zvolení 1 stiskněte dlouze tlačítko ON/OF pro jeho
aktivaci.
01) Možnost kalibrovat teplotu dle referenčního teploměru.
02) Je možné nastavit limit Nízké teploty (například 15°C)
03) Je možné nastavit limit Vysoké teploty (například 45°C)
04) Volba režimu čidla: vnitřní čidlo nebo vnější, kabelové, čidlo
05) Je možné aktivovat či deaktivovat zvukovou signalizaci vysoké teploty. Když je aktivována, zvukový
alarm se spustí při překročení nastaveného limitu vysoké teploty.
06) Pro aktivaci či deaktivaci programovací funkce zásuvkového termostatu. Když je funkce aktivována,
termostat funguje jako programovatelný termostat, když není, termostat reaguje pouze pomocí
tlačítek "+" a "-".
07) Reset do továrního nastavení, na hodnoty přednastavené z výroby!
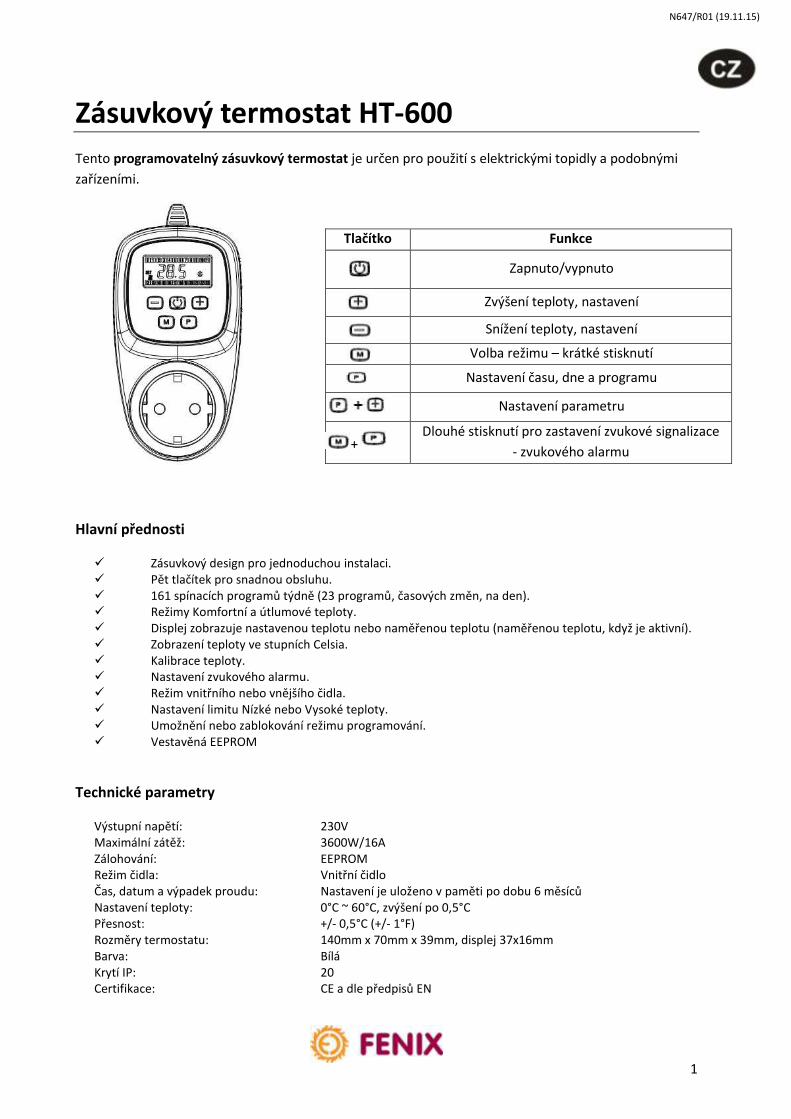
Přednastavení režimu teploty.
Režim teploty může být nastaven dle níže uvedených kroků:
- Stiskněte tlačítko “M” a podržte jej po dobu cca 3 vteřin. Objeví se režim KOMFORT (Obr. A).
- Nastavte požadovanou teplotu pomocí tlačítek “+” nebo “-”.
- Stiskněte tlačítko “M”, objeví se režim Útlum (obr. B).
- Nastavte požadovanou teplotu pomocí tlačítek “+” nebo “-” .
Funkce Komfort je zobrazena symbolem (např. 25,5°C).
Funkce Útlum je zobrazena symbolem (např. 20,5°C).
Nastavení bude uloženo do paměti EEPROM.
Č. Položka Rozsah Standardní nastavení
01 Kalibrace teploty -9 ~+9°C 0°C
02 Limit Nízké teploty 0’C ~ 25 °C 10°C
03 Limit Vysoké teploty 20’C ~ 60 °C 45°C
04 Volba čidla 1: Vnější 0: Vnitřní 1
05 Zvukový alarm 0: Deaktivovat 1: Aktivovat Aktivován
06 Funkce PRG (program) 0: Deaktivovat 1: Aktivovat Aktivována
07 Reset továrního nastavení 0: NE 1: ANO 0
08 Verze softwaru 1045
Obr.A Obr.B
3
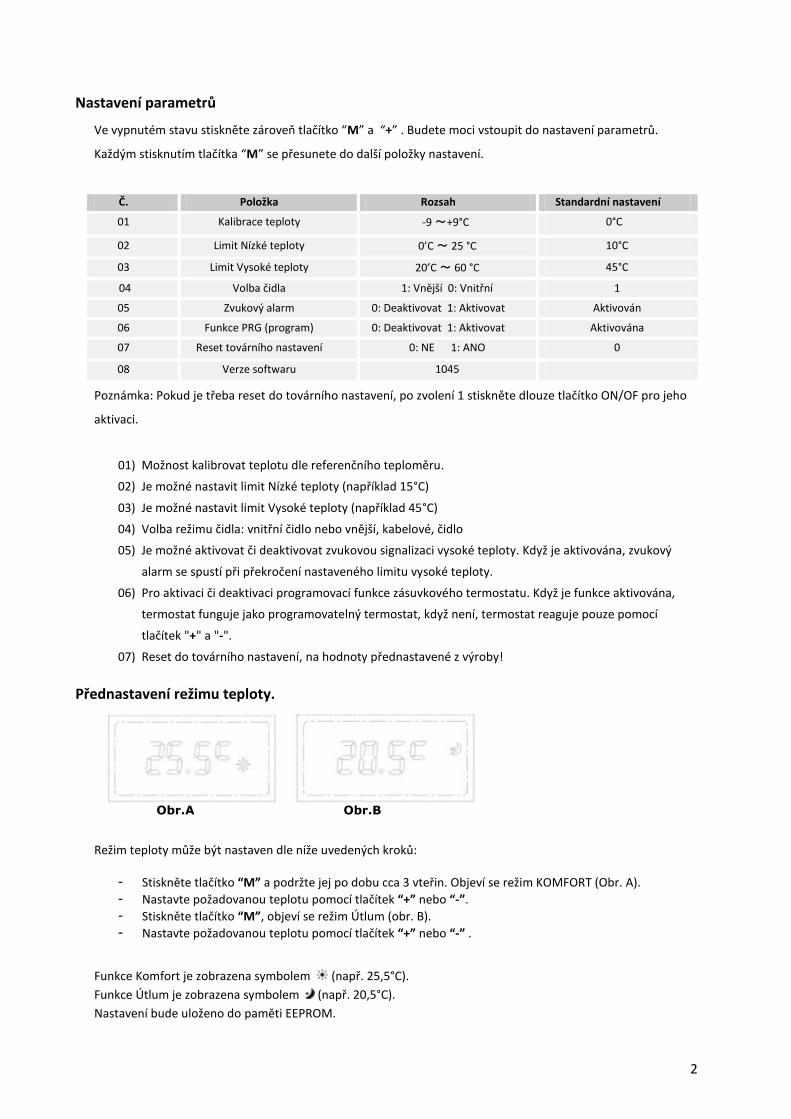
Nastavení dne, času a programu (PRG).
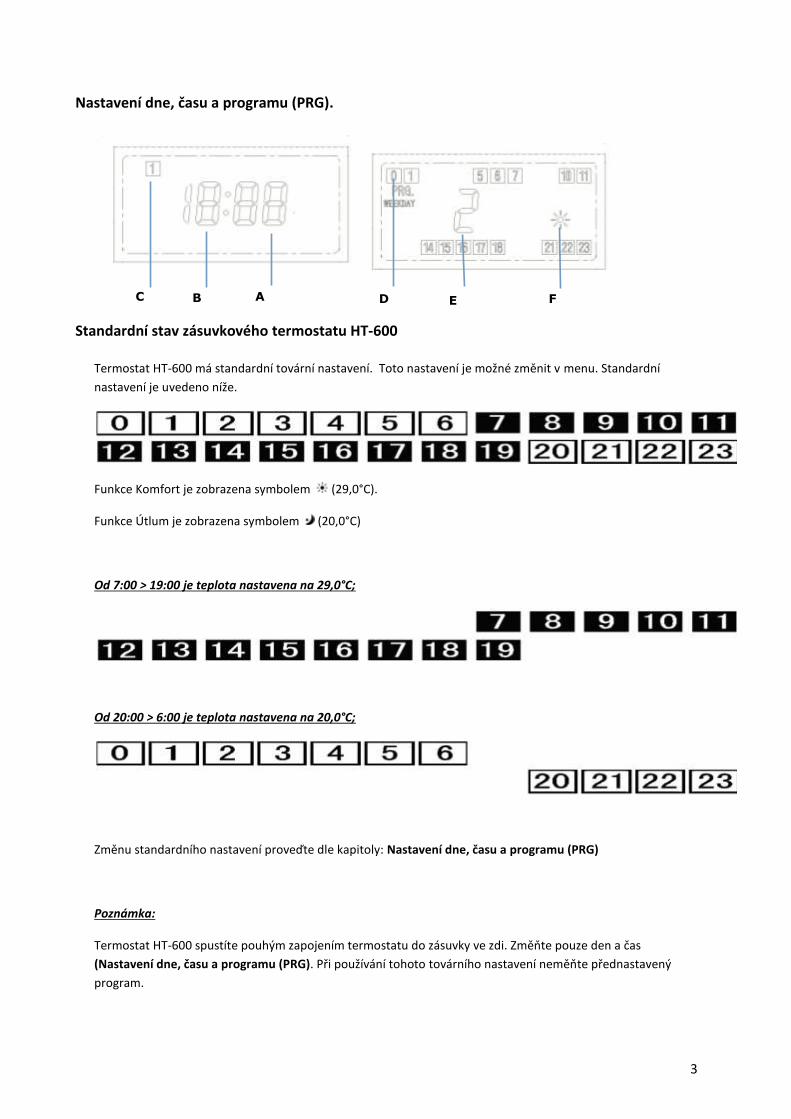
Standardní stav zásuvkového termostatu HT-600
Termostat HT-600 má standardní tovární nastavení. Toto nastavení je možné změnit v menu. Standardní
nastavení je uvedeno níže.
Funkce Komfort je zobrazena symbolem (29,0°C).
Funkce Útlum je zobrazena symbolem (20,0°C)
Od 7:00 > 19:00 je teplota nastavena na 29,0°C;
Od 20:00 > 6:00 je teplota nastavena na 20,0°C;
Změnu standardního nastavení proveďte dle kapitoly: Nastavení dne, času a programu (PRG)
Poznámka:
Termostat HT-600 spustíte pouhým zapojením termostatu do zásuvky ve zdi. Změňte pouze den a čas
(Nastavení dne, času a programu (PRG). Při používání tohoto továrního nastavení neměňte přednastavený
program.
A B C D E F
4
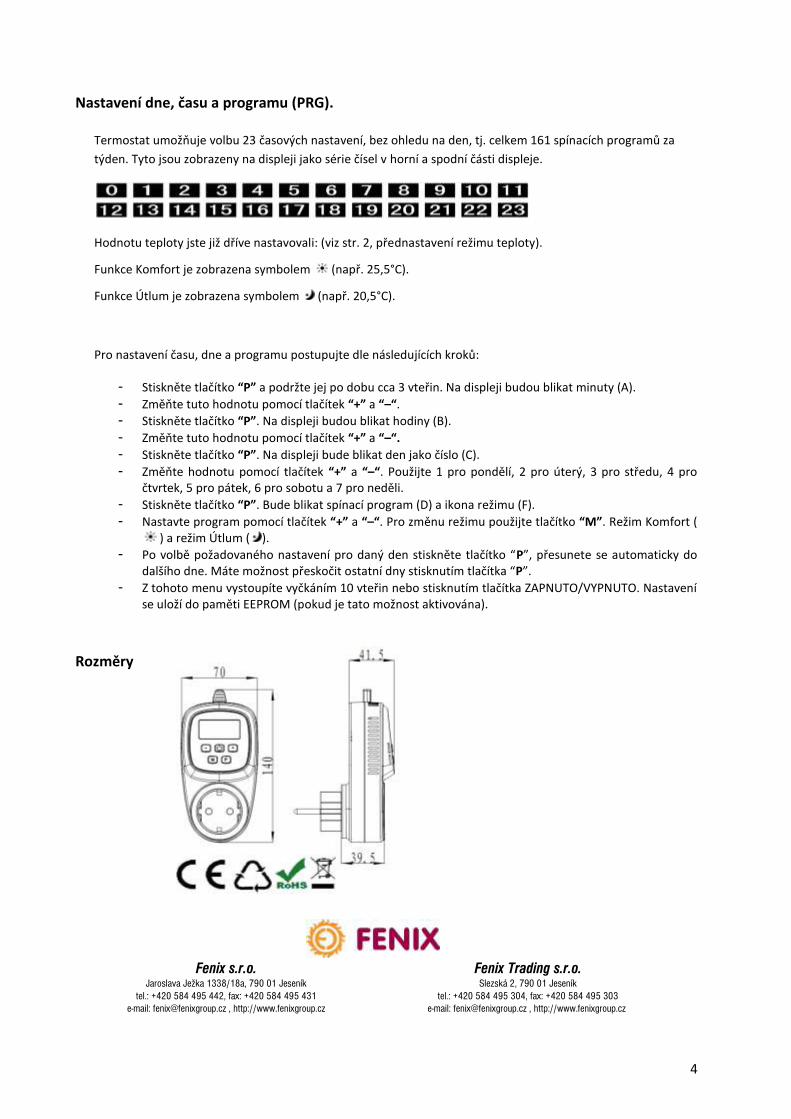
Nastavení dne, času a programu (PRG).
Termostat umožňuje volbu 23 časových nastavení, bez ohledu na den, tj. celkem 161 spínacích programů za
týden. Tyto jsou zobrazeny na displeji jako série čísel v horní a spodní části displeje.
Hodnotu teploty jste již dříve nastavovali: (viz str. 2, přednastavení režimu teploty).
Funkce Komfort je zobrazena symbolem (např. 25,5°C).
Funkce Útlum je zobrazena symbolem (např. 20,5°C).
Pro nastavení času, dne a programu postupujte dle následujících kroků:
- Stiskněte tlačítko “P” a podržte jej po dobu cca 3 vteřin. Na displeji budou blikat minuty (A).
- Změňte tuto hodnotu pomocí tlačítek “+” a “–“.
- Stiskněte tlačítko “P”. Na displeji budou blikat hodiny (B).
- Změňte tuto hodnotu pomocí tlačítek “+” a “–“.
- Stiskněte tlačítko “P”. Na displeji bude blikat den jako číslo (C).
- Změňte hodnotu pomocí tlačítek “+” a “–“. Použijte 1 pro pondělí, 2 pro úterý, 3 pro středu, 4 pro čtvrtek, 5 pro pátek, 6 pro sobotu a 7 pro neděli.
- Stiskněte tlačítko “P”. Bude blikat spínací program (D) a ikona režimu (F).
- Nastavte program pomocí tlačítek “+” a “–“. Pro změnu režimu použijte tlačítko “M”. Režim Komfort ( ) a režim Útlum ( ).
- Po volbě požadovaného nastavení pro daný den stiskněte tlačítko “P”, přesunete se automaticky do dalšího dne. Máte možnost přeskočit ostatní dny stisknutím tlačítka “P”.
- Z tohoto menu vystoupíte vyčkáním 10 vteřin nebo stisknutím tlačítka ZAPNUTO/VYPNUTO. Nastavení se uloží do paměti EEPROM (pokud je tato možnost aktivována).
Rozměry
Fenix s.r.o. Fenix Trading s.r.o. Jaroslava Ježka 1338/18a, 790 01 Jeseník Slezská 2, 790 01 Jeseník tel.: +420 584 495 442, fax: +420 584 495 431 tel.: +420 584 495 304, fax: +420 584 495 303 e-mail: [email protected] , http://www.fenixgroup.cz e-mail: [email protected] , http://www.fenixgroup.cz
5
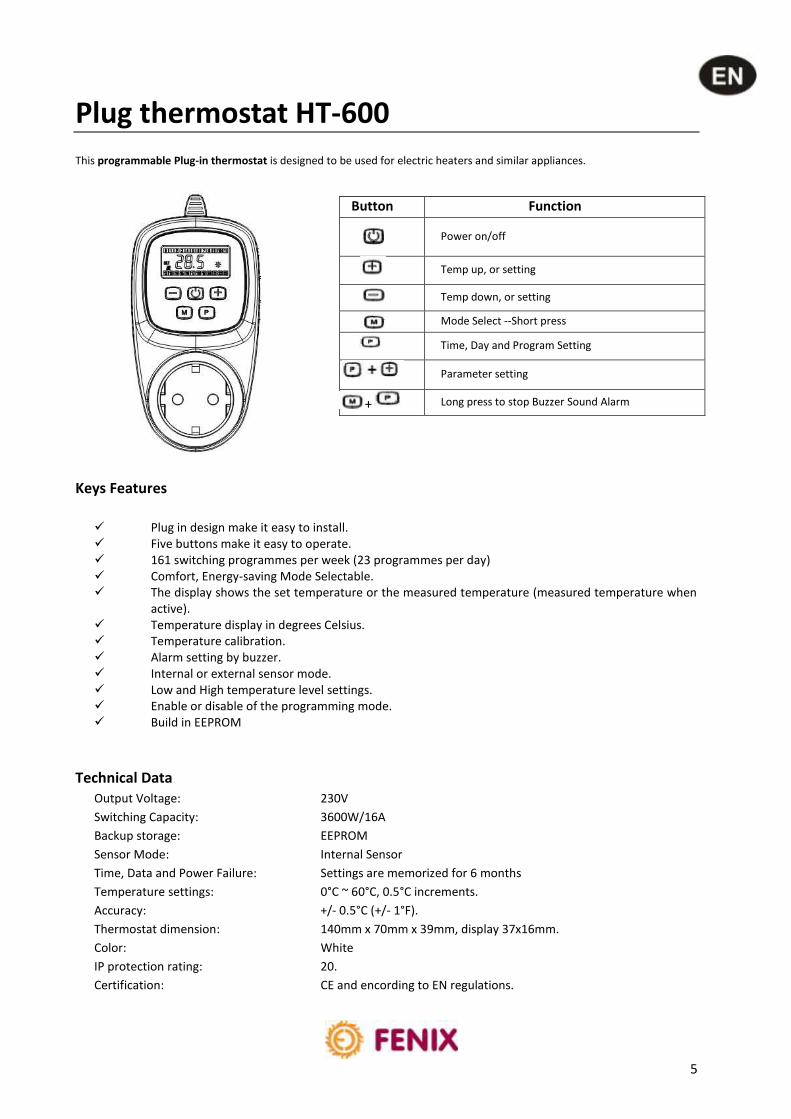
Plug thermostat HT-600 This programmable Plug-in thermostat is designed to be used for electric heaters and similar appliances.
Keys Features
Plug in design make it easy to install. Five buttons make it easy to operate. 161 switching programmes per week (23 programmes per day) Comfort, Energy-saving Mode Selectable. The display shows the set temperature or the measured temperature (measured temperature when active). Temperature display in degrees Celsius. Temperature calibration. Alarm setting by buzzer. Internal or external sensor mode. Low and High temperature level settings. Enable or disable of the programming mode. Build in EEPROM
Technical Data Output Voltage: 230V
Switching Capacity: 3600W/16A
Backup storage: EEPROM
Sensor Mode: Internal Sensor
Time, Data and Power Failure: Settings are memorized for 6 months
Temperature settings: 0°C ~ 60°C, 0.5°C increments.
Accuracy: +/- 0.5°C (+/- 1°F).
Thermostat dimension: 140mm x 70mm x 39mm, display 37x16mm.
Color: White
IP protection rating: 20.
Certification: CE and encording to EN regulations.
Button Function
Power on/off
Temp up, or setting
Temp down, or setting
Mode Select --Short press
Time, Day and Program Setting
Parameter setting
+ Long press to stop Buzzer Sound Alarm
6
Parameter Settings
Under off status, press “M” button and “+”button at the same time. You be able to enter the parameter
settings. Each press of “M” button can into next item setting.
Note: If factory reset need, after select 1, please long press ON/OFF button to activate it.
01) When the temperature must be changed, temperature can be calibrated with the real temperature.
02) The low level temperature can be set (for example 15°C)
03) The high level temperature can be set (for example 45°C)
04) Selection of the sensor mode: room sensor or external sensor
05) The high level temperature buzzer can be disable or enabled. When enabled the buzzer activate when
the high level temperature is exceeded.
06) To enable or disable the programming function of the plugin thermostat. When enabled the
thermostat works as a programmable thermostat, when disabled the thermostat reacts only with the
UP and DOWN button.
07) Factory reset to set the default factory settings!
Mode Temperature Pre-set.
The Mode temperature can be set as the below following steps:
- Press and hold the “M” button for around 3 seconds. The COMFORT mode (pic. A) display.
- Change the mode temperature by the “+” or “-” buttons.
- Press “M” button , the Energy-saving mode display (pic. B).
- Change the mode temperature by the “+” or “-” buttons.
The comfort function is displayed as a symbol (e.g. 25.5°C).
The energy-saving function is displayed as a symbol (e.g. 20.5°C).
The setup will be memorized by the EEPROM.
No. Item Range Default
01 Temp. Calibration -9 ~+9 °C 0°C
02 Low Temp. Limit 0’C ~ 25 °C 10°C
03 High Temp. Limit 20’C ~ 60 °C 45°C
04 Sensor Select 1: External 0: Internal 1
05 Buzzer Sound Alarm 0: Disable 1: Enable Enable
06 PRG Function 0: Disable 1: Enable Enable
07 Factory Reset 0: NO 1: YES 0
08 Software Version 1045
Pic.B Pic.A
7
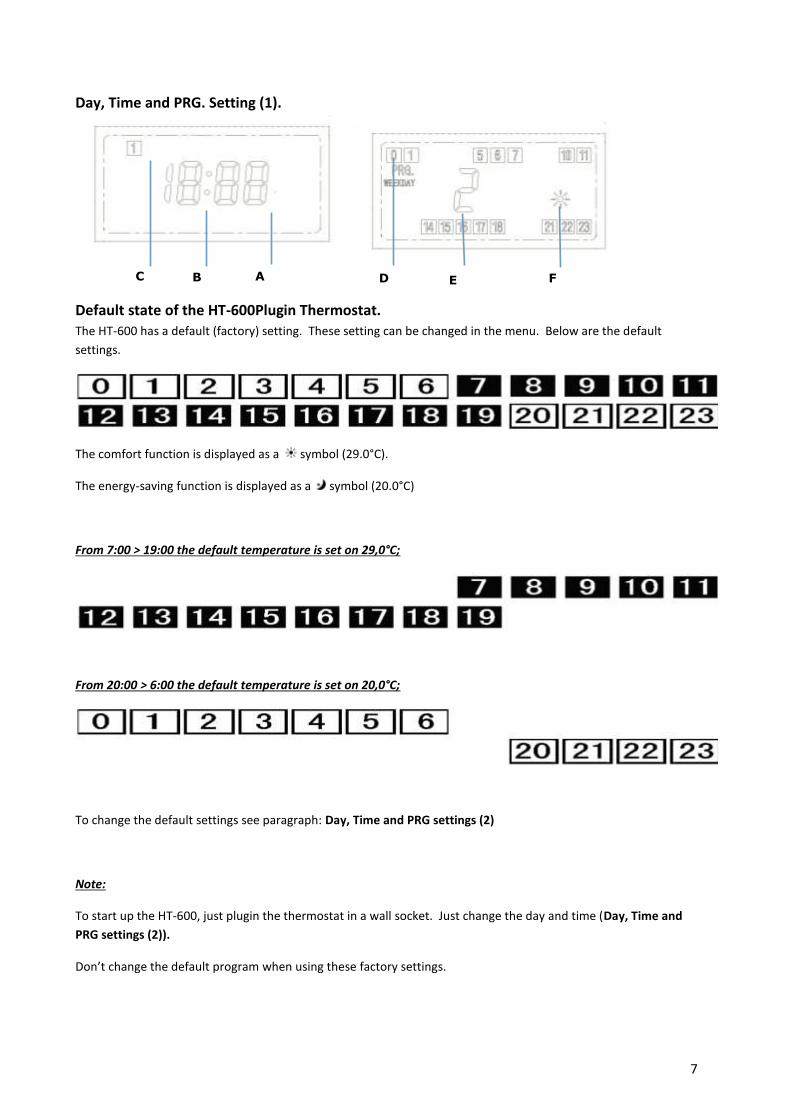
Day, Time and PRG. Setting (1).
Default state of the HT-600Plugin Thermostat. The HT-600 has a default (factory) setting. These setting can be changed in the menu. Below are the default
settings.
The comfort function is displayed as a symbol (29.0°C).
The energy-saving function is displayed as a symbol (20.0°C)
From 7:00 > 19:00 the default temperature is set on 29,0°C;
From 20:00 > 6:00 the default temperature is set on 20,0°C;
To change the default settings see paragraph: Day, Time and PRG settings (2)
Note:
To start up the HT-600, just plugin the thermostat in a wall socket. Just change the day and time (Day, Time and
PRG settings (2)).
Don’t change the default program when using these factory settings.
A B C D E F
8
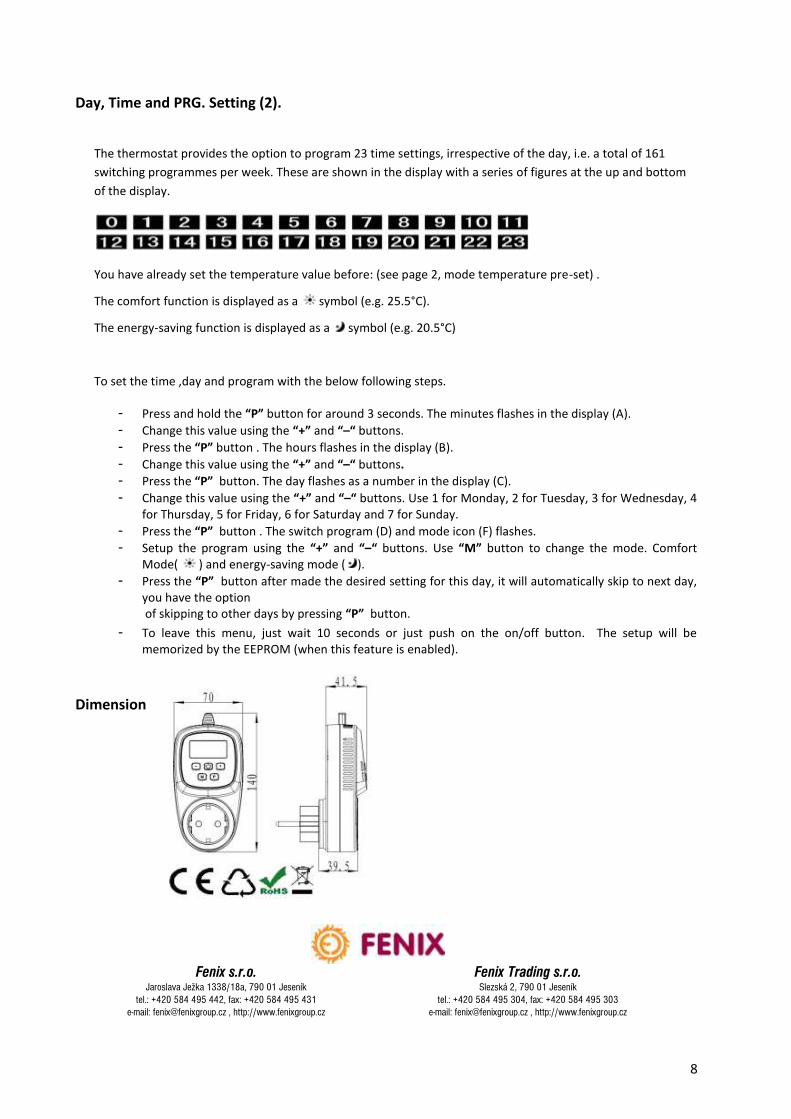
Day, Time and PRG. Setting (2).
The thermostat provides the option to program 23 time settings, irrespective of the day, i.e. a total of 161
switching programmes per week. These are shown in the display with a series of figures at the up and bottom
of the display.
You have already set the temperature value before: (see page 2, mode temperature pre-set) .
The comfort function is displayed as a symbol (e.g. 25.5°C).
The energy-saving function is displayed as a symbol (e.g. 20.5°C)
To set the time ,day and program with the below following steps.
- Press and hold the “P” button for around 3 seconds. The minutes flashes in the display (A).
- Change this value using the “+” and “–“ buttons.
- Press the “P” button . The hours flashes in the display (B).
- Change this value using the “+” and “–“ buttons.
- Press the “P” button. The day flashes as a number in the display (C).
- Change this value using the “+” and “–“ buttons. Use 1 for Monday, 2 for Tuesday, 3 for Wednesday, 4 for Thursday, 5 for Friday, 6 for Saturday and 7 for Sunday.
- Press the “P” button . The switch program (D) and mode icon (F) flashes.
- Setup the program using the “+” and “–“ buttons. Use “M” button to change the mode. Comfort Mode( ) and energy-saving mode ( ).
- Press the “P” button after made the desired setting for this day, it will automatically skip to next day, you have the option of skipping to other days by pressing “P” button.
- To leave this menu, just wait 10 seconds or just push on the on/off button. The setup will be memorized by the EEPROM (when this feature is enabled).
Dimension
Fenix s.r.o. Fenix Trading s.r.o. Jaroslava Ježka 1338/18a, 790 01 Jeseník Slezská 2, 790 01 Jeseník tel.: +420 584 495 442, fax: +420 584 495 431 tel.: +420 584 495 304, fax: +420 584 495 303 e-mail: [email protected] , http://www.fenixgroup.cz e-mail: [email protected] , http://www.fenixgroup.cz
9
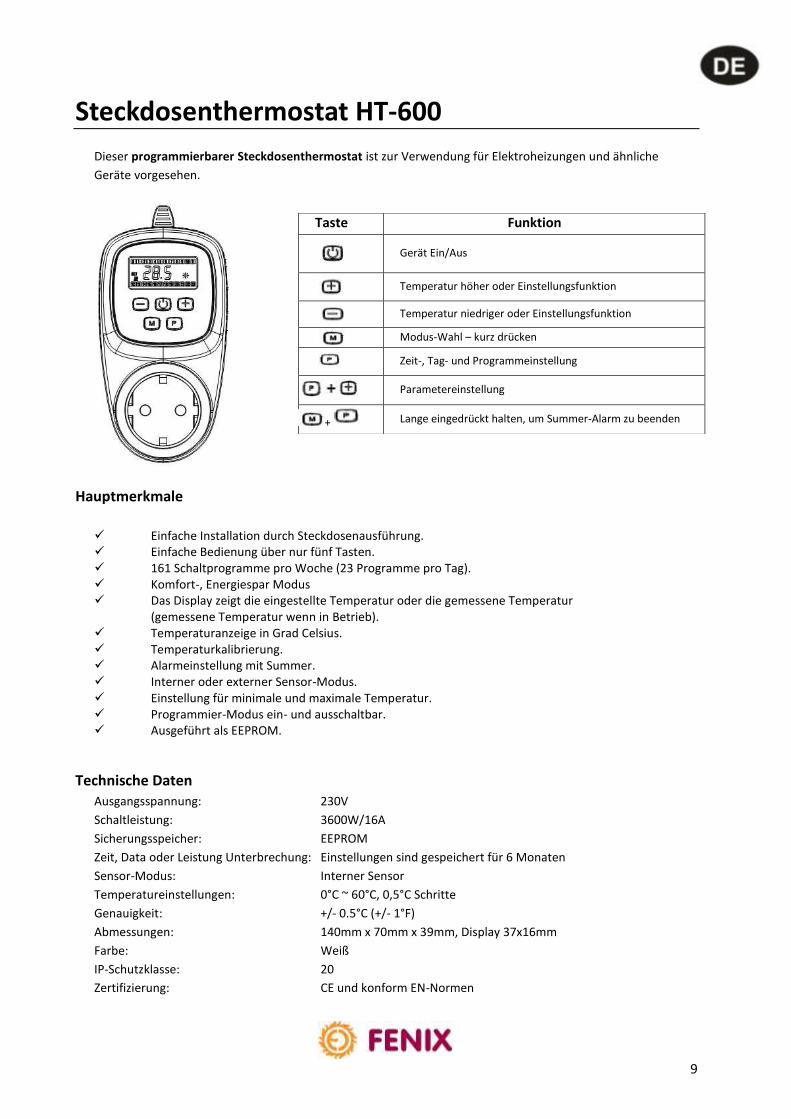
Steckdosenthermostat HT-600
Dieser programmierbarer Steckdosenthermostat ist zur Verwendung für Elektroheizungen und ähnliche
Geräte vorgesehen.
Hauptmerkmale
Einfache Installation durch Steckdosenausführung. Einfache Bedienung über nur fünf Tasten. 161 Schaltprogramme pro Woche (23 Programme pro Tag). Komfort-, Energiespar Modus Das Display zeigt die eingestellte Temperatur oder die gemessene Temperatur (gemessene Temperatur wenn in Betrieb). Temperaturanzeige in Grad Celsius. Temperaturkalibrierung. Alarmeinstellung mit Summer. Interner oder externer Sensor-Modus. Einstellung für minimale und maximale Temperatur. Programmier-Modus ein- und ausschaltbar. Ausgeführt als EEPROM.
Technische Daten Ausgangsspannung: 230V
Schaltleistung: 3600W/16A
Sicherungsspeicher: EEPROM
Zeit, Data oder Leistung Unterbrechung: Einstellungen sind gespeichert für 6 Monaten
Sensor-Modus: Interner Sensor
Temperatureinstellungen: 0°C ~ 60°C, 0,5°C Schritte
Genauigkeit: +/- 0.5°C (+/- 1°F)
Abmessungen: 140mm x 70mm x 39mm, Display 37x16mm
Farbe: Weiß
IP-Schutzklasse: 20
Zertifizierung: CE und konform EN-Normen
Taste Funktion
Gerät Ein/Aus
Temperatur höher oder Einstellungsfunktion
Temperatur niedriger oder Einstellungsfunktion
Modus-Wahl – kurz drücken
Zeit-, Tag- und Programmeinstellung
Parametereinstellung
+ Lange eingedrückt halten, um Summer-Alarm zu beenden
10
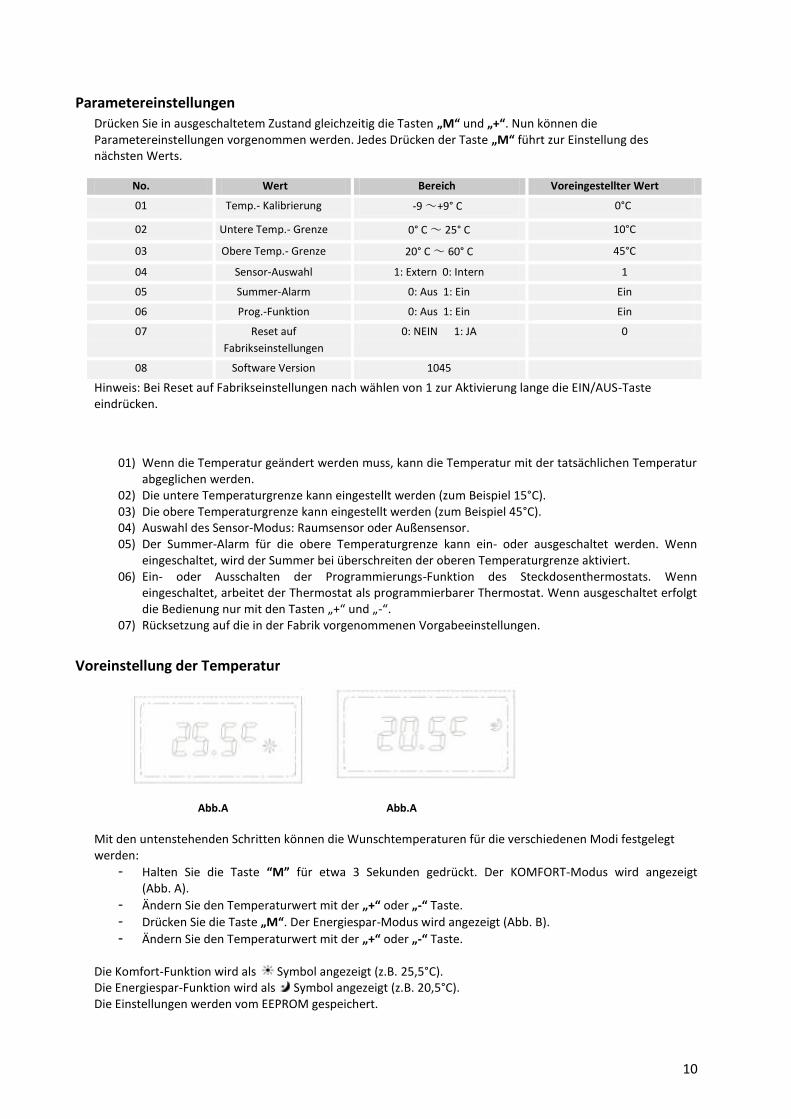
Parametereinstellungen Drücken Sie in ausgeschaltetem Zustand gleichzeitig die Tasten „M“ und „+“. Nun können die Parametereinstellungen vorgenommen werden. Jedes Drücken der Taste „M“ führt zur Einstellung des nächsten Werts.
Hinweis: Bei Reset auf Fabrikseinstellungen nach wählen von 1 zur Aktivierung lange die EIN/AUS-Taste eindrücken.
01) Wenn die Temperatur geändert werden muss, kann die Temperatur mit der tatsächlichen Temperatur abgeglichen werden.
02) Die untere Temperaturgrenze kann eingestellt werden (zum Beispiel 15°C). 03) Die obere Temperaturgrenze kann eingestellt werden (zum Beispiel 45°C). 04) Auswahl des Sensor-Modus: Raumsensor oder Außensensor. 05) Der Summer-Alarm für die obere Temperaturgrenze kann ein- oder ausgeschaltet werden. Wenn
eingeschaltet, wird der Summer bei überschreiten der oberen Temperaturgrenze aktiviert. 06) Ein- oder Ausschalten der Programmierungs-Funktion des Steckdosenthermostats. Wenn
eingeschaltet, arbeitet der Thermostat als programmierbarer Thermostat. Wenn ausgeschaltet erfolgt die Bedienung nur mit den Tasten „+“ und „-“.
07) Rücksetzung auf die in der Fabrik vorgenommenen Vorgabeeinstellungen.
Voreinstellung der Temperatur
Abb.A Abb.A
Mit den untenstehenden Schritten können die Wunschtemperaturen für die verschiedenen Modi festgelegt werden:
- Halten Sie die Taste “M” für etwa 3 Sekunden gedrückt. Der KOMFORT-Modus wird angezeigt (Abb. A).
- Ändern Sie den Temperaturwert mit der „+“ oder „-“ Taste.
- Drücken Sie die Taste „M“. Der Energiespar-Modus wird angezeigt (Abb. B).
- Ändern Sie den Temperaturwert mit der „+“ oder „-“ Taste. Die Komfort-Funktion wird als Symbol angezeigt (z.B. 25,5°C). Die Energiespar-Funktion wird als Symbol angezeigt (z.B. 20,5°C). Die Einstellungen werden vom EEPROM gespeichert.
No. Wert Bereich Voreingestellter Wert
01 Temp.- Kalibrierung -9 ~+9° C 0°C
02 Untere Temp.- Grenze 0° C ~ 25° C 10°C
03 Obere Temp.- Grenze 20° C ~ 60° C 45°C
04 Sensor-Auswahl 1: Extern 0: Intern 1
05 Summer-Alarm 0: Aus 1: Ein Ein
06 Prog.-Funktion 0: Aus 1: Ein Ein
07 Reset auf
Fabrikseinstellungen
0: NEIN 1: JA 0
08 Software Version 1045
11
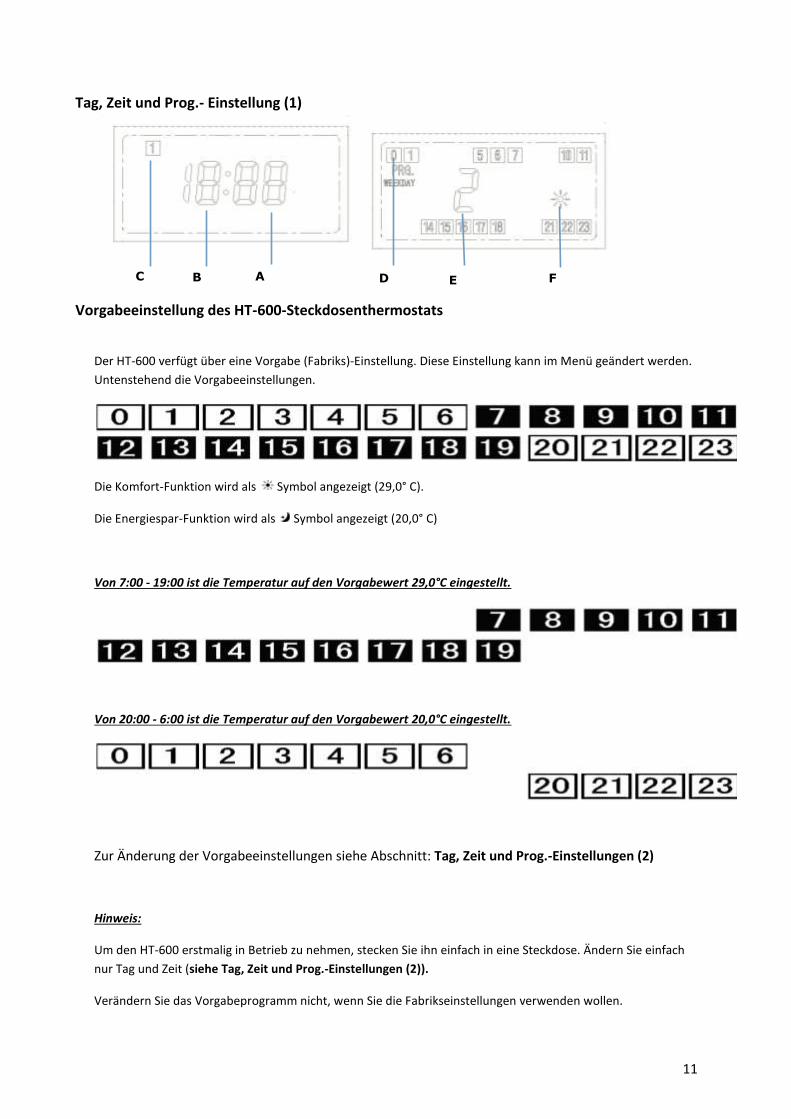
Tag, Zeit und Prog.- Einstellung (1)
Vorgabeeinstellung des HT-600-Steckdosenthermostats
Der HT-600 verfügt über eine Vorgabe (Fabriks)-Einstellung. Diese Einstellung kann im Menü geändert werden.
Untenstehend die Vorgabeeinstellungen.
Die Komfort-Funktion wird als Symbol angezeigt (29,0° C).
Die Energiespar-Funktion wird als Symbol angezeigt (20,0° C)
Von 7:00 - 19:00 ist die Temperatur auf den Vorgabewert 29,0°C eingestellt.
Von 20:00 - 6:00 ist die Temperatur auf den Vorgabewert 20,0°C eingestellt.
Zur Änderung der Vorgabeeinstellungen siehe Abschnitt: Tag, Zeit und Prog.-Einstellungen (2)
Hinweis:
Um den HT-600 erstmalig in Betrieb zu nehmen, stecken Sie ihn einfach in eine Steckdose. Ändern Sie einfach
nur Tag und Zeit (siehe Tag, Zeit und Prog.-Einstellungen (2)).
Verändern Sie das Vorgabeprogramm nicht, wenn Sie die Fabrikseinstellungen verwenden wollen.
A B C D E F
12
Tag, Zeit und Prog.- Einstellung (2).
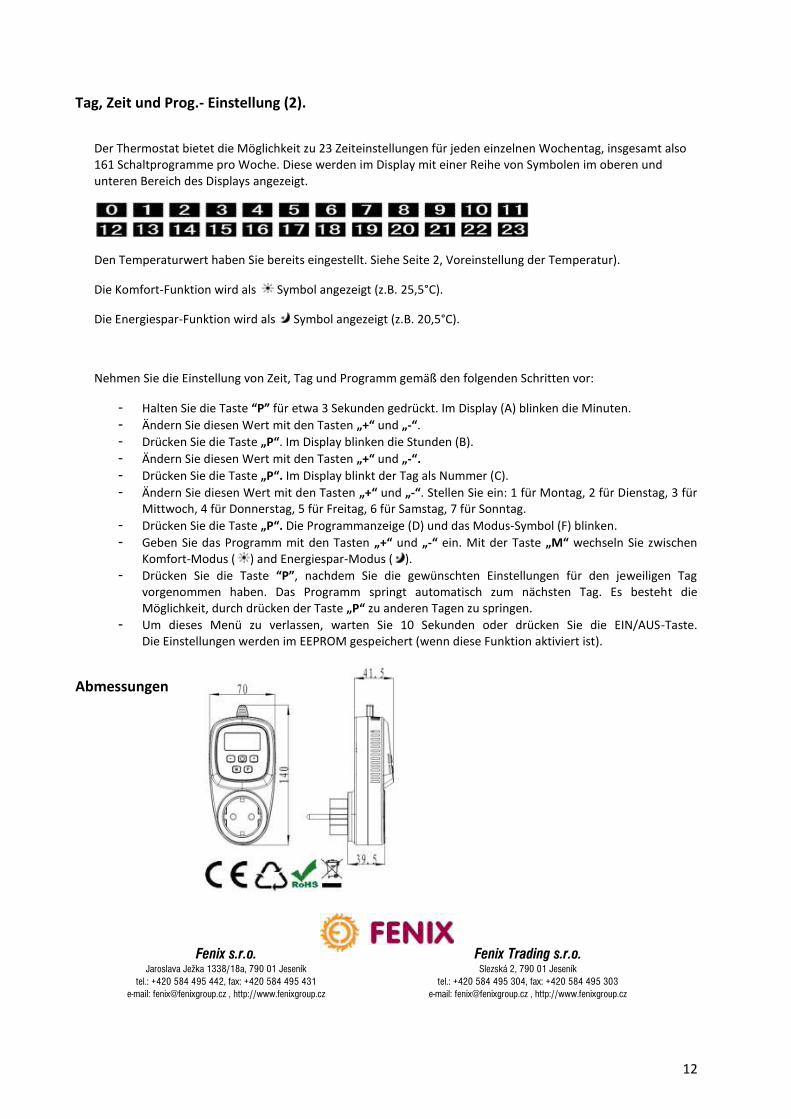
Der Thermostat bietet die Möglichkeit zu 23 Zeiteinstellungen für jeden einzelnen Wochentag, insgesamt also 161 Schaltprogramme pro Woche. Diese werden im Display mit einer Reihe von Symbolen im oberen und unteren Bereich des Displays angezeigt.
Den Temperaturwert haben Sie bereits eingestellt. Siehe Seite 2, Voreinstellung der Temperatur).
Die Komfort-Funktion wird als Symbol angezeigt (z.B. 25,5°C).
Die Energiespar-Funktion wird als Symbol angezeigt (z.B. 20,5°C).
Nehmen Sie die Einstellung von Zeit, Tag und Programm gemäß den folgenden Schritten vor:
- Halten Sie die Taste “P” für etwa 3 Sekunden gedrückt. Im Display (A) blinken die Minuten.
- Ändern Sie diesen Wert mit den Tasten „+“ und „-“.
- Drücken Sie die Taste „P“. Im Display blinken die Stunden (B).
- Ändern Sie diesen Wert mit den Tasten „+“ und „-“.
- Drücken Sie die Taste „P“. Im Display blinkt der Tag als Nummer (C).
- Ändern Sie diesen Wert mit den Tasten „+“ und „-“. Stellen Sie ein: 1 für Montag, 2 für Dienstag, 3 für Mittwoch, 4 für Donnerstag, 5 für Freitag, 6 für Samstag, 7 für Sonntag.
- Drücken Sie die Taste „P“. Die Programmanzeige (D) und das Modus-Symbol (F) blinken.
- Geben Sie das Programm mit den Tasten „+“ und „-“ ein. Mit der Taste „M“ wechseln Sie zwischen Komfort-Modus ( ) and Energiespar-Modus ( ).
- Drücken Sie die Taste “P”, nachdem Sie die gewünschten Einstellungen für den jeweiligen Tag vorgenommen haben. Das Programm springt automatisch zum nächsten Tag. Es besteht die Möglichkeit, durch drücken der Taste „P“ zu anderen Tagen zu springen.
- Um dieses Menü zu verlassen, warten Sie 10 Sekunden oder drücken Sie die EIN/AUS-Taste. Die Einstellungen werden im EEPROM gespeichert (wenn diese Funktion aktiviert ist).
Abmessungen
Fenix s.r.o. Fenix Trading s.r.o. Jaroslava Ježka 1338/18a, 790 01 Jeseník Slezská 2, 790 01 Jeseník tel.: +420 584 495 442, fax: +420 584 495 431 tel.: +420 584 495 304, fax: +420 584 495 303 e-mail: [email protected] , http://www.fenixgroup.cz e-mail: [email protected] , http://www.fenixgroup.cz