Embed Size (px)
Citation preview

8/8/2019 BCA Flash Ch01
http://slidepdf.com/reader/full/bca-flash-ch01 1/28

8/8/2019 BCA Flash Ch01
http://slidepdf.com/reader/full/bca-flash-ch01 2/28
Ch 1: The Animator’s Flash
The first chapter of this Bitey Castle Academy ebook is free. Go ahead and download,print and distribute it amongst your friends, enemies and colleagues. You may not sell itor reproduce any part of it in your own animation tutorials/books/articles in any medium,including print and online, without express written permission from me.
Feel free to email me with cash, questions, comments, errata, etc through my website:www.biteycastle.com
Table of Contents
The Animator ’s Flash ......................................................................................... ‐ 2 ‐
Flash for Animation ........................................................................................... ‐ 3 ‐
Flash Interface ................................................................................................... ‐ 4 ‐
1. The Stage ............................................................................................... ‐ 5 ‐
2. The Tools ............................................................................................... ‐ 5 ‐
3. The Timeline .......................................................................................... ‐ 6 ‐
4. The Panels.............................................................................................. ‐ 6 ‐
The Workspace .................................................................................................. ‐ 6 ‐
Customising the Workspace .......................................................................... ‐ 6 ‐
Working with Panels ...................................................................................... ‐ 7 ‐
Panel features ............................................................................................ ‐ 8 ‐Essential panels for the animator ................................................................ ‐ 10 ‐
Stacking and docking ............................................................................... ‐ 11 ‐
Saving the Workspace ................................................................................. ‐ 13 ‐
More elbow room? ...................................................................................... ‐ 14 ‐
Animating! ....................................................................................................... ‐ 15 ‐
Setting up the movie ................................................................................... ‐ 15 ‐
Stage Zoom Shortcuts ............................................................................. ‐ 17 ‐
Create some graphics .................................................................................. ‐ 18 ‐
Simple Frame ‐by ‐frame Animation ............................................................. ‐ 20 ‐
Export the animated GIF ............................................................................. ‐ 26 ‐
A d a m P h i l l i p s P a g e | - 1 -
Summary ......................................................................................................... ‐ 27 ‐

8/8/2019 BCA Flash Ch01
http://slidepdf.com/reader/full/bca-flash-ch01 3/28
BCA: Flash Animation
The Animator’s Flash
If you’re reading this , chances are you want to learn to use Flash for animation, whetherit’s for a simple animated GIF or forum signature, a splash intro for a website or a fullanimated short.
When we learn anything, it’s natural to want to dive right into the deep end and starthammering out results. That’s why, in this very chapter you’ll complete a piece of frame-by-frame animation, step by step.
Before you can really start to use Flash, you’ll need to know where everything is, andwhat everything does. Well, that’s the reason for this chapter: to introduce you to theFlash environment, help you set up and customise the work area, and best of all, get yourface wet with some animation.
This entire book is about animation, so don’t expect to see much ActionScript on these pages . That said, later on we will cover the very basics of adding interactivity to a Flashmovie, for the purposes of play/replay buttons and a simple preloader.
- 2 - | P a g e w w w . b i t e y c a s t l e . c o m

8/8/2019 BCA Flash Ch01
http://slidepdf.com/reader/full/bca-flash-ch01 4/28
Ch 1: The Animator’s Flash
Flash for AnimationThe most successful animated shorts and movies on the web today are a combination of
entertaining material that is appealing in any number of ways. It’s the aim of this book todemonstrate what’s important for animation, storytelling, online recognition and success.
For many years now the online world has seen Flash as a web and applicationdevelopment program. However as many of us know, Flash at its heart is and always wasan animation program, specifically designed for creating vector graphics and simpleanimation for the web.
Unfortunately due to an early but sticky reputation for clunky, low-quality toons andshitty slideshows, the animation tools have evolved with all the speed of a crippled snail.The makers of Flash have thrown money and resources into improving the developer’stools, while comparitively speaking, the animation side of things is sadly left in a dark
corner with a few meagre food scraps occasionally thrown at it.
Now don’t get me wrong! Flash is and has been for many years, a remarkable piece of animation software. The slow evolution of its animation side hasn’t stopped animatorsthe world over from using Flash and pushing its limits. Occasionally we do hear somehigh-profile animator whining publically about Flash’s shortcomings, slamming doorsand threatening to migrate to some other software. The fact is that despite its limitations,Flash is a fantastic little program and anyone vowing never to return will soon miss thethings that Flash does better than others.
You don’t need to look far to find examples of ground breaking Flash animation and
graphics. Aside from the personal websites of individual animators, there are thrivingcommunities out there dedicated to showcasing great Flash animation. These animatorshave embraced what appears on the surface to be a limited tool, and then set aboutshowing the world that Flash is not as limited as it might seem.
With that in mind, let’s get started by looking at the various parts of Flash CS3’sinterface, then towards the end of the chapter we’ll move on to creating a simple piece of frame-by-frame animation.
A d a m P h i l l i p s P a g e | - 3 -

8/8/2019 BCA Flash Ch01
http://slidepdf.com/reader/full/bca-flash-ch01 5/28
BCA: Flash Animation
Flash InterfaceStart Flash CS3 and before you can explore the authoring environment, you’ll need to
create a new, blank file to work in. The image below shows the start page that presentsyou with a number of options:
Fig. 1.01 – Flash CS3 Start page
In the central column named ‘ Create New ’, click on the first option: ‘ Flash File(ActionScript 3.0) ’ and Flash will open with a blank movie.
We’ll now look at the individual parts of the interface but just to be sure we’re all lookingat the same thing, go to Window > Workspace > Default , then cast your eye over theinterface.
- 4 - | P a g e w w w . b i t e y c a s t l e . c o m

8/8/2019 BCA Flash Ch01
http://slidepdf.com/reader/full/bca-flash-ch01 6/28
Ch 1: The Animator’s Flash
1. The StageSee Fig. 1.02 below. The blank white space in the main window of a new Flashdocument is the Stage . It’s where you assemble your cast and play out your story. TheStage shows us one frame of the movie, like a single page in a flipbook .
Fig 1.02: The Flash CS3 interface
2. The ToolsThe Tools panel contains all the tools you need to create and transform your movie’sgraphics. We’ll deal with some individual tools in depth a little later, but look over all of the icons there and you can see that pretty much everything is covered, not only forcreating vector graphics and text, but for colouring and transforming them too. Some of them may look a little alien right now, but don’t worry.. we’ll be using each and everyone in the chapters to come.
A d a m P h i l l i p s P a g e | - 5 -

8/8/2019 BCA Flash Ch01
http://slidepdf.com/reader/full/bca-flash-ch01 7/28
BCA: Flash Animation
3. The TimelineThe numbered strip is the Timeline, which shows a sequence of frames. In a new movie,the Timeline contains one blank frame on a single Layer. We’ll touch on the concept of Layers a bit further into the chapter.
4. The PanelsA Panel is where you control various tools or functions in Flash. One that you’ll be usingvery frequently is the Properties Panel . It’s a context-sensitive panel, meaning that itdisplays options and information specific to the selected tool or item.
Other panels such as the History Panel , the Color Panel , the Scene Panel and theLibrary will be discussed in greater depth a bit later.
The WorkspaceIn Flash there are many individual panels dedicated to particular tools or effects. In timeas you become accustomed to working in the interface, you’ll come to know what youuse most and what you don’t need. In this section we’ll talk about the Flash tools andpanels favoured by the Flash animator . Keeping those tools, panels or options withinreach is the key to streamlining your workflow.
Each new version of Flash has introduced more customization options and better ways totailor the interface, none more so than Flash CS3. In the following couple of pages you’llcustomize the work area to give you some room to move. Following that we’ll move onto look at the most essential tools and you’ll create a customised animator’s workspace.
Customising the WorkspaceThe animator working in Flash ideally requires as much space as possible; the more, thebetter. If you have a dual (or triple!) monitor setup, then you can spread Flash out over alarge area, putting your stage on the main monitor while your panels and tools sit on asecondary monitor. If you use a single monitor though, you’ll need to carefully organisethe work area.
As you gain more experience with Flash you’ll soon come to know what workspaceworks best for you and exactly which interface items you’ll want to hide and unhide. Weall like a lot of elbow room though, so here are some ways to free up space. This sectionwill also serve as a further introduction to the Flash CS3 authoring environment.
Follow me – open Flash
- 6 - | P a g e w w w . b i t e y c a s t l e . c o m
If you don’t have Flash CS3 open already, start the program and choose ‘ Flash Document (Actionscript 3.0) ’ from the ‘ Create New ’ heading. A new movie called Untitled-1 witha blank stage appears, just like Fig. 1.02 .

8/8/2019 BCA Flash Ch01
http://slidepdf.com/reader/full/bca-flash-ch01 8/28
Ch 1: The Animator’s Flash
The first step toward maximizing your workspace is getting rid of things you don’t need.We can’t expect you to know much about that at this stage, so I’ll start you off. Firstthough, let’s look at what panels are and how they work.
For the purposes of this exercise, load the default layout ( Window > Workspace > Default ) and you’ll see a few panels in the right-hand column, called the dock . The dock is a versatile kind of tray that allows us to load up with every panel in the list withoutcluttering the screen.
Working with PanelsFollow along now as we take a look at some more features of the panel dock. First up,note the tiny double-arrow at the top right of the dock. Click this and the entire dock willminimise . Click it again to expand the dock.
Fig. 1.03 – The panel column minimise button
As seen in Fig. 1.04 and 1.05 , you can minimise the dock even further by dragging theleft-hand handle at the top of the dock. In this state, the panels are reduced to icons. Verynice!
Fig. 1.04 – Drag the left handle Fig. 1.05 – The iconised panels
A d a m P h i l l i p s P a g e | - 7 -
8/8/2019 BCA Flash Ch01
http://slidepdf.com/reader/full/bca-flash-ch01 9/28
BCA: Flash Animation
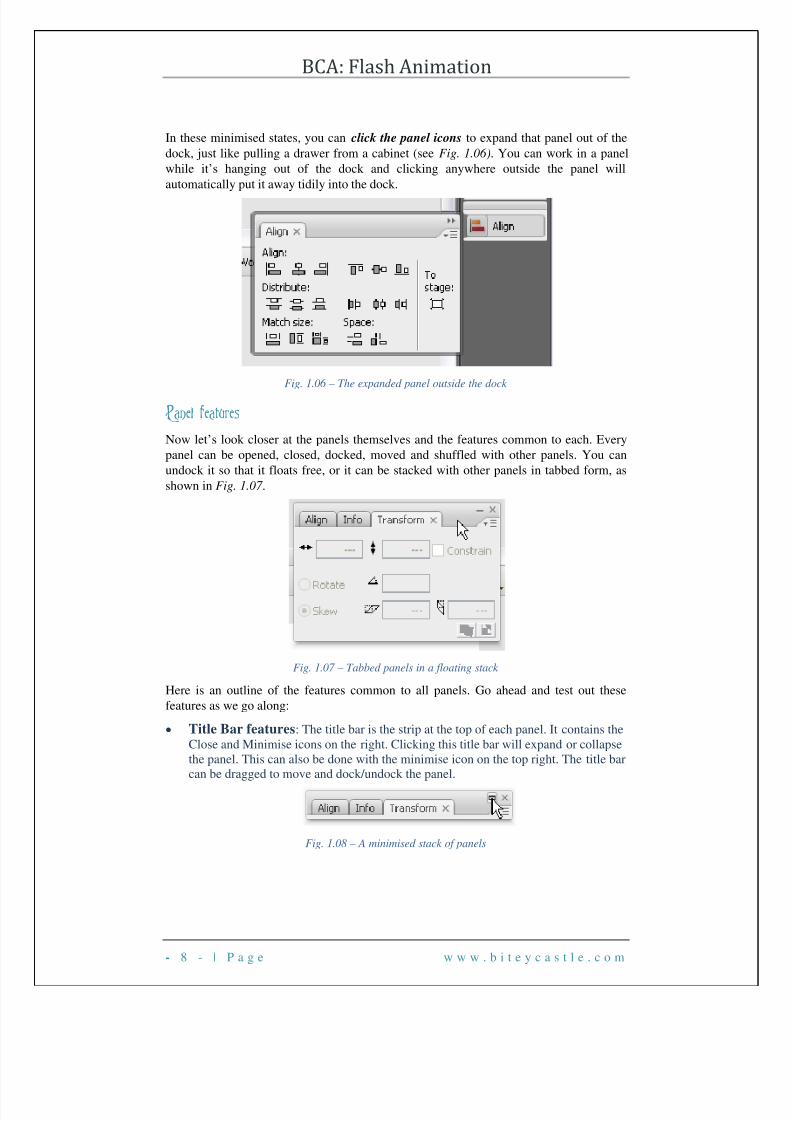
In these minimised states, you can click the panel icons to expand that panel out of thedock, just like pulling a drawer from a cabinet (see Fig. 1.06) . You can work in a panelwhile it’s hanging out of the dock and clicking anywhere outside the panel willautomatically put it away tidily into the dock.
Fig. 1.06 – The expanded panel outside the dock
Panel featuresNow let’s look closer at the panels themselves and the features common to each. Everypanel can be opened, closed, docked, moved and shuffled with other panels. You canundock it so that it floats free, or it can be stacked with other panels in tabbed form, asshown in Fig. 1.07 .
Fig. 1.07 – Tabbed panels in a floating stack
Here is an outline of the features common to all panels. Go ahead and test out thesefeatures as we go along:
• Title Bar features : The title bar is the strip at the top of each panel. It contains theClose and Minimise icons on the right. Clicking this title bar will expand or collapsethe panel. This can also be done with the minimise icon on the top right. The title barcan be dragged to move and dock/undock the panel.
Fig. 1.08 – A minimised stack of panels
- 8 - | P a g e w w w . b i t e y c a s t l e . c o m

8/8/2019 BCA Flash Ch01
http://slidepdf.com/reader/full/bca-flash-ch01 10/28

8/8/2019 BCA Flash Ch01
http://slidepdf.com/reader/full/bca-flash-ch01 11/28
BCA: Flash Animation
Essential panels for the animatorOpen the Window menu and check out the list of panels. Working more often on graphics
and animation, the panels you will probably need and use most are:• Color• Swatches• Align• Info• Transform• Library
In Window > Other Panels , you’ll find the Scene and History panels, which are alsovery useful for animators.
One by one, select these from the Window menu and the Window > Other panels sub-menu. You’ll see that as you select each one, it appears in the dock, but some appearfloating in the middle of the Stage. For any that are floating on the Stage, you canorganise them by dragging them into the dock using the panel handle (drag the title bar).
In the image below ( Fig. 1.11 ) you’ll see which panels I have in my dock. Feel free toload up your dock with the same ones. Next we’ll talk about how to shuffle and re-order the dock.
Fig. 1.11a – Panels stacked in the dock
- 1 0 - | P a g e w w w . b i t e y c a s t l e . c o m

8/8/2019 BCA Flash Ch01
http://slidepdf.com/reader/full/bca-flash-ch01 12/28
Ch 1: The Animator’s Flash
Stacking and docking In the dock, it’s possible to re-order and stack the panels however you like. Do this bydragging the title bar of the panel. To get rid of any panel you don’t need (for now atleast) simply click its close icon.
Fig. 1.11b – Panels docked and stacked
When dragging a panel into the dock, a blue indicator will appear to help you to put thepanels in the desired order.
Follow me – shuffling panels
Let’s run through a quick exercise in shuffling the panel stack. You can do this with anypanel you like but I’ll be demonstrating with the Transform panel.
1. Click and drag the Transform panel tab away from the stack until it detaches.As long as you click and hold, you’re dragging a ghosted Transform panel.
2. Without dropping it, drag the panel around the dock and note how the blueindicator changes, depending on where you’re hovering.
Fig. 1.11c & 1.11d – the blue indicator
A d a m P h i l l i p s P a g e | - 11 -

8/8/2019 BCA Flash Ch01
http://slidepdf.com/reader/full/bca-flash-ch01 13/28
BCA: Flash Animation
3. Watching the blue indicator as you drag, now place the Transform panel in thesame stack as the Color panel.
Fig. 1.11e & Fig 1.11f – Stacking a panel with others
You will notice that a panel opens when you drop it in a stack. As we sawearlier, you can simply collapse the stack again by clicking the title bar, or the tab itself.
Stacking works whether the panels are collapsed or expanded so you maychoose to work either way, it doesn’t really matter.
4. Now move it into its own stack between two existing stacks.
Fig. 1.11g & 1.11h – Stacking a panel between other stacks
Now you know how panels operate, go ahead and customise your dock with theanimator’s panels (refer to the list on Page 9). Once again, any panel is available from theWindow menu and the Window > Other Panels menu.
If you open a panel you don’t want, just use its close button. If you accidentally close apanel that you want to keep, simply retrieve it from the Window menu or the Window >Other Panels menu.
When you’re finished, we’ll save the workspace so Flash will remember theconfiguration you worked so hard to customise.
- 1 2 - | P a g e w w w . b i t e y c a s t l e . c o m

8/8/2019 BCA Flash Ch01
http://slidepdf.com/reader/full/bca-flash-ch01 14/28
Ch 1: The Animator’s Flash
Saving the WorkspaceIf you were to close Flash now and reopen it, all your shuffling and ordering would be
gone. After all the work you’ve done organising the dock, you can save the workspace.You can also revert back a saved layout, should you accidentally close a bunch of panelsor otherwise make a complete mess of the workspace later on.
Go to Window > Workspace > Save Current… Enter the title ‘ Animator ’ and click OK.
Fig. 1.12 – Saving the workspace
Now if you go to Window > Workspace , you will see your new Animator layout as partof the Workspace menu (see Fig. 1.13 )
Fig. 1.13 – The saved workspace
Later, if you find some new way of improving your workspace, you can overwrite theAnimator layout at any time, simply by saving the layout with the same name.
Fig. 1.14 – The “Overwrite Workspace?” warning.
A d a m P h i l l i p s P a g e | - 13 -

8/8/2019 BCA Flash Ch01
http://slidepdf.com/reader/full/bca-flash-ch01 15/28
BCA: Flash Animation
You’ll notice that we haven’t touched those panels at the bottom of the Flash window.Here in this special horizontal stack you’ll see the Properties , Filters and Parameters panels.
Properties and Filters are definitely very useful for us as animators, but unless you’ll beusing special add-on components, or creating your own, the Parameters panel is quiteuseless to us. You can close it now by bringing it to the front of the stack (click theParameters tab) and clicking the close icon on the tab.
Fig. 1.15 – Closing the Parameters panel
Note : if you accidentally close the entire stack by clicking the wrongclose icon, just choose Window > Properties > Properties . This willbring back the stack and you can now close the Parameters tab.
More elbow room?If you’re really obsessed with freeing up more space in the work area, you will like theF4 key, which hides all the panels. Just hit F4 to bring them back. Simple!
You may like to even hide the Timeline, which you can toggle on and off by choosingWindow > Timeline . You can also hide the Tools panel from the Window menu.
Check this out: Hide the timeline and tools, then press F4 . Now press
Ctrl 2 (maximises the stage). My, what a big Stage you have! I wouldshow you a screenshot of that but trust me, it’s mostly white.
Bring everything back when you’re done though, as we’ll need a functional workspacefor the following exercises.
When you’ve got a work space that you’re happy with, save it once again by choosingWorkspace > Save Current and overwrite your Animator layout.
With the workspace saved, close Flash now and reopen it. Everything should be as youleft it and your saved workspace is ready for work.
So far we’ve opened up a lot of room for an uncluttered work space by customising theFlash CS3 interface. With docking, grouping, stacking and keyboard shortcut keys, youcan pretty much hide everything, yet still have it all at your fingertips. Awesome.
- 1 4 - | P a g e w w w . b i t e y c a s t l e . c o m

8/8/2019 BCA Flash Ch01
http://slidepdf.com/reader/full/bca-flash-ch01 16/28

8/8/2019 BCA Flash Ch01
http://slidepdf.com/reader/full/bca-flash-ch01 17/28
BCA: Flash Animation
Fig. 1.17 – Document Properties window with default settings
To create an animated GIF for use as a forum avatar, let’s set the dimensions of thismovie to 64 x 64 pixels, which is a pretty standard avatar size for most online forums.
3. The default dimensions are height: 550 , width: 400 . Change both of those fieldsto 64.
Note: it’s not necessary to type ‘px’ into each field.
4. Click the background colour swatch and choose black.
Fig. 1.18 – The settings for our animated GIF avatar
5. Done! Click OK to finish and close the window.
- 1 6 - | P a g e w w w . b i t e y c a s t l e . c o m

8/8/2019 BCA Flash Ch01
http://slidepdf.com/reader/full/bca-flash-ch01 18/28
Ch 1: The Animator’s Flash
Your Stage has shrunk to the size of a postage stamp but you canzoom in. At the top right of the Stage, the zoom percentage fieldprobably shows 100%.
Fig. 1.19 – The Stage zoom percentage
When you’re working at small dimensions, you can use the zoomdropdown list shown above, or the Zoom Tool from the Tools panel.
The Zoom tool
With the Zoom tool click on the Stage to zoom in, Alt+click to zoom out (that is, hold down your Alt key while clicking).
Additionally, there are some nice little default keyboard shortcuts forStage zooming:
See the sidebar on this page for a full list of zoom shortcuts.
Follow me – adding frames
1. Choose 800% from the Stage Zoom dropdown list (see Fig.1.19 ), and your Stage will zoom in to a more comfortableworking size.
Now for a forum avatar we’re going to create a simple ball of lightwith an animated electricity effect over about 10 frames.
Currently the movie consists of just one frame (not much of a movie),so we’ll now add more frames to the movie.
2. Click once on frame 10 of the timeline.
Fig. 1.20 – Click once on frame 10
A d a m P h i l l i p s P a g e | - 17 -
Stage Zoom Shortcuts• Ctrl 1 = 100%• Ctrl 2 = Fit in window
• Ctrl 3 = Show All
• Ctrl 4 = 400%
• Ctrl 8 = 800%
While it’s generally easierto work with a higher stagemagnification, it’s alwaysa good idea to check how
your movie looks at 100%,because when working atgreater magnification, it’svery easy to put in a levelof detail that is overkill.
Zooming back out to 100%now and then gives you abetter idea of what it willlook like, and what detailyou need.

8/8/2019 BCA Flash Ch01
http://slidepdf.com/reader/full/bca-flash-ch01 19/28
BCA: Flash Animation
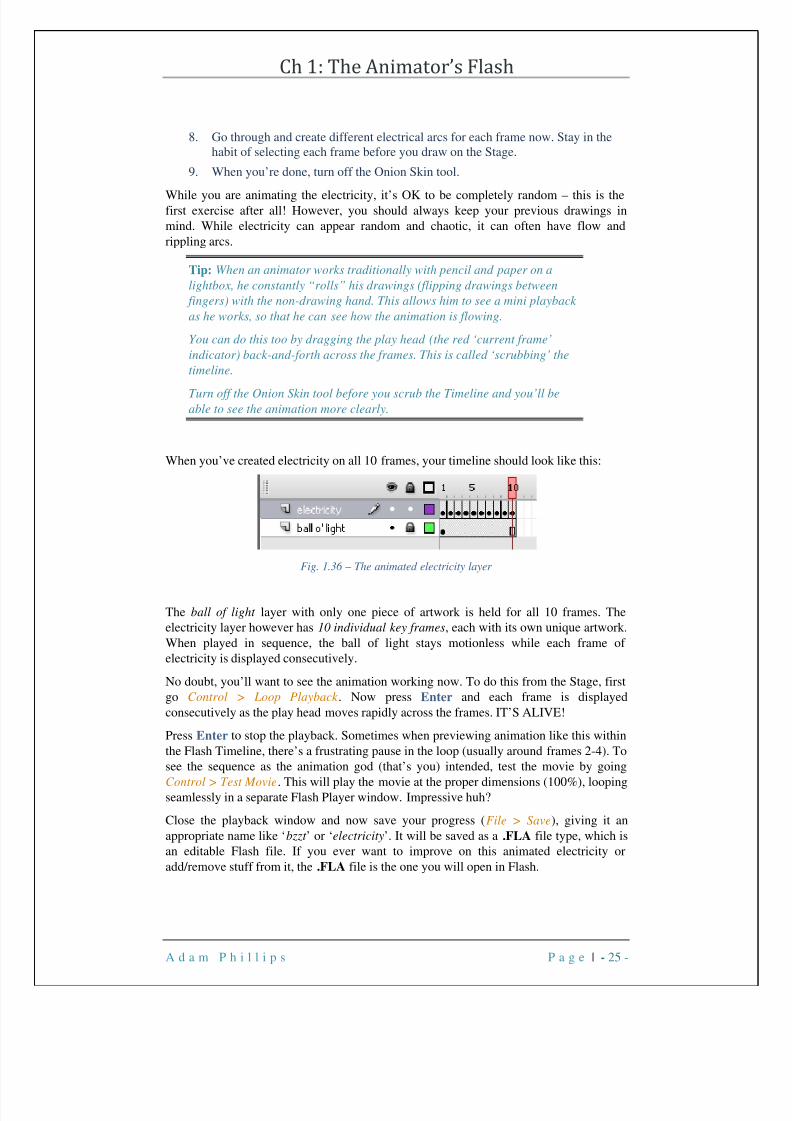
3. Press your keyboard’s F5 key and the timeline now has 10 blank frames..oO0oh!
Fig. 1.21 – F5 extends the exposure to the selected frame
Create some graphicsWhen you have a frame selected in the timeline, the Stage shows you what is on thatframe. Currently we still have nothing in the movie, so selecting the frames shows nocontent on the Stage. Let’s change that now.
Follow me - painting
1. Choose the Paint Brush tool from the Tools Panel. The keyboard shortcut forthis tool is ( B).
In the Properties Panel at the bottom of the Flash window, you should see the Brush tool properties displayed.
2. Set the Smoothing to 20 . Higher brush smoothing makes smoother strokes, butwe don’t want that just yet.
Fig. 1.22 – Brush Smoothing
3. You can also choose the paint colour here in the Properties panel. Click the FillColor swatch (next to the paint bucket icon) and choose white paint from thepalette.
Tip: Other places to select the Fill colour are from the Tools panel and theColor panel, as shown in Fig. 1.23.
- 1 8 - | P a g e w w w . b i t e y c a s t l e . c o m

8/8/2019 BCA Flash Ch01
http://slidepdf.com/reader/full/bca-flash-ch01 20/28
Ch 1: The Animator’s Flash
Fig. 1.23 – The Color panel’s Fill Color swatch
4.
You’re ready for painting now, so paint a white circle in the centre of the Stage.Don’t worry if it’s a little uneven. This is a simple introductory exercise andlater you’ll be able to create much better things.
5. Choose the Paint Bucket ( or press its keyboard shortcut - K ) and click insideyour white circle to fill it with paint.
Fig. 1.24 – White circle on the Stage
Fig. 1.25 – Filled using the Paint Bucket
You’ll notice that the timeline now indicates 10 frames are filled with content (see Fig.1.26 ). Select any frame of these ten and you’ll see the same white blob on the Stage,meaning that if we were to test the movie, we would see a white blob sitting there for tenframes. Quite boring at this early stage, so let’s make it do something.
Fig. 1.26 – One blob, ten frames
A d a m P h i l l i p s P a g e | - 19 -

8/8/2019 BCA Flash Ch01
http://slidepdf.com/reader/full/bca-flash-ch01 21/28
BCA: Flash Animation
Simple Frame-by-frame AnimationThe white blob is a ball of light that won’t change throughout the movie. It’ll remain
stationary while we make little electrical arcs crackle around it. It would be time-consuming to draw that ball of light for each frame of the movie, but thanks to TimelineLayers , we don’t need to.
We’re going to add a second Layer to the Timeline so that we can add electricity thatmoves independently of the ball of light.
Follow me – working with Layers
1. Click the Insert Layer button as shown in Fig. 1.27 below.
Fig. 1.27 – The “Add Layer” button
You will now have two layers in the timeline. The first, lower layer contains the ball of light which is held for ten frames. Let’s now create our animated electricity effects onthis new layer.
2. We’ll be drawing the animated electricity in the new layer, so now lock thelower layer so that we don’t accidentally draw on our precious ball of light.
Fig. 1.28 – The “Lock Layer” padlock
- 2 0 - | P a g e w w w . b i t e y c a s t l e . c o m

8/8/2019 BCA Flash Ch01
http://slidepdf.com/reader/full/bca-flash-ch01 22/28
Ch 1: The Animator’s Flash
Before we move on, a bit of house-keeping. Naming layers is very good practice,making it easier for you to find elements of your scene quickly. Sure it may seem a littlepointless to you now, but trust me, later there will be more than two layers and ten framesin your movies.
3. Double-click the name of Layer 2 , and rename the layer ‘ electricity’ . Youshould rename the lower layer while you’re at it.
Fig. 1.29 – Renaming the layers
4. You should develop a habit of always selecting the frame you’re about to startworking on, so select the first frame of the electricity layer.
Fig. 1.29a – Select the frame you’ll be working on
Important Note: Whenever you select something in Flash, you’llalways see some kind of selection effect, to let you know that it’s theactive item.
In the Tools panel, a selected tool is highlighted. In the timeline,selected frames turn black. In a drop-down list, the selected item isticked/checked.
Always keep this in mind as you use tools and select items, especiallywith frames. If frame 10 is selected, you can’t add content to frame 1!
A d a m P h i l l i p s P a g e | - 21 -

8/8/2019 BCA Flash Ch01
http://slidepdf.com/reader/full/bca-flash-ch01 23/28
BCA: Flash Animation
Follow me - animation
OK let’s go:
1. With the Brush Tool still selected, notice at the bottom of the Tools panelthere’s a Brush Size section. Choose a finer brush size from the drop-down listin the Brush Options.
Fig. 1.30 – Smaller Brush size
2. Now on the stage, draw an electrical arc from the ball of light to the edge of theStage. It doesn’t matter if you go outside the Stage, because anything outsidethat edge will not show up in the final movie.
Fig. 1.31 – The first electrical arc!
We now have a ball of light held for 10 frames and one electrical arc, also held for 10frames. Testing the movie now would still result in an incredibly boring playback! Toliven things up we need to animate this electricity.
- 2 2 - | P a g e w w w . b i t e y c a s t l e . c o m

8/8/2019 BCA Flash Ch01
http://slidepdf.com/reader/full/bca-flash-ch01 24/28
Ch 1: The Animator’s Flash
Each electrical arc should last for 1 frame only, so we need to split this layer into 10individual “keyframes”. Sound complicated? Well it’s not:
3. In the Timeline, select frame 2 of the ‘ electricity ’ layer, then press F7 (Create
Blank Keyframe )
Fig. 1.32 – One frame electricity, nine frames blank
The electricity layer is now blank except for frame 1, which contains the first electricalarc.
Notice in the screenshot above ( Fig. 1.32 ) that the timeline displays frame 1 with a solidblack dot, indicating that this frame has something on it. Frame 2 has a hollow dot, whichindicates there’s nothing on it.
What we want to do for this entire layer is create blank keyframes for all nine remainingframes, then one by one, create electricity for each.
4. In the electricity layer, double-click any frame between 2 and 10. This selectsall frames between the blank keyframe (2) and the end of the scene (10).
5.
Press F7 (Create Blank Keyframe ) and all of your selected frames become blank keyframes.
Fig. 1.33 – Nine blank keyframe, awaiting orders
A d a m P h i l l i p s P a g e | - 23 -

8/8/2019 BCA Flash Ch01
http://slidepdf.com/reader/full/bca-flash-ch01 25/28
BCA: Flash Animation
Now we’ve split the electricity layer into individual keyframes and as indicated by thehollow circles, those keyframes are empty. Each blank keyframe is just like a blank pagein an animation flip-book. Let’s proceed by adding drawings to those blank “pages”.
6.
Again, always remember to first select the frame you want to draw on. So selectframe 2 of the electricity layer, then on the Stage draw another electrical arc,maybe even 2 or 3 of them.
Fig. 1.34 – The second electricity drawing
If you’d like to see your previous drawings as you create new ones, you should use theOnion Skin tool. This handy little button simulates the effect of a traditional animator’slightbox , which shines light through sheets of paper in order to see previous drawings.
7. Select frame 3 now, before clicking the Onion Skin tool. You will faintly seeyour first two drawings. Now you can create the artwork for frame 3 whilekeeping the other frames in sight, a technique essential for good animation.
Fig. 1.35 – The Onion Skin tool
- 2 4 - | P a g e w w w . b i t e y c a s t l e . c o m
8/8/2019 BCA Flash Ch01
http://slidepdf.com/reader/full/bca-flash-ch01 26/28

8/8/2019 BCA Flash Ch01
http://slidepdf.com/reader/full/bca-flash-ch01 27/28
BCA: Flash Animation
Export the animated GIFYou’ve successfully created a working piece of animation. Congratu-bloody-lations!
Now let’s finish it off by turning it into an animated GIF . The .FLA file that you createdin the authoring environment now needs to be compiled and compressed into astandalone playable movie file. To do that you will need to export the movie .
Follow me - export
1. Go to File > Export > Export Movie…
2. Type a name for your animated GIF, and then from the ‘ Save as type’ dropdownlist, choose Animated GIF .
Fig. 1.37 – Saving as Animated GIF
3. I suggest saving it to your desktop or somewhere easy to find. Then click Save .
4. You will be presented with several other options for your exported GIF, butleave them as they are for now. Click OK to create your first animated GIF.
You can watch the GIF crackling away by locating it on your desktop (or wherever yousaved it on the computer) and opening it. If all has gone according to plan, you’ll have asmall animated ball of electricity that you can use as an avatar for a forum, blog profile orwhatever.
Fig. 1.38 – Locate the image, open it and bzzzt!
- 2 6 - | P a g e w w w . b i t e y c a s t l e . c o m

8/8/2019 BCA Flash Ch01
http://slidepdf.com/reader/full/bca-flash-ch01 28/28
Ch 1: The Animator’s Flash
SummaryProud of yourself? You should be!
My finished electricity GIF has a file size of just 3k, which is way under the averageavatar limit imposed by even the tightest forum administrators. Of course, this littleexperimental GIF consists of only 10 frames, very simple animation and just two colors.Creating a more complex GIF will result in much bigger files but at least now you’vestarted the journey and you can work up from here.
Why not build on what you’ve learned by making a more interesting ball of light?Experiment with colours and brush strokes. You might even like to add more layers to theTimeline for extra animated detail.
After this short introduction to the Flash CS3 working environment, you should have abasic idea of where everything is and how the interface works. Not only have youcustomised the interface but you’ve also used it to create some impressive frame-by-
frame animation.In the next chapter we’re going to look more closely at the tools you’ll be using to creategraphics for Flash animation. We’ll put some of these into practice by completing somedrawing exercises.
BCA: Flash Animation
by Adam Phillips
nment. All rights reserved.Copyright ©2008 Brackenwood Entertai
ne from Sydney, AustraliaPublished onli
Published by
t,Brackenwood Entertainmen
on NSW,PO Box 177, Croyd
2132 AUSTRALIA
ww.biteycastle.comw
Technical Editor: Jeanette Imer