Embed Size (px)
Citation preview
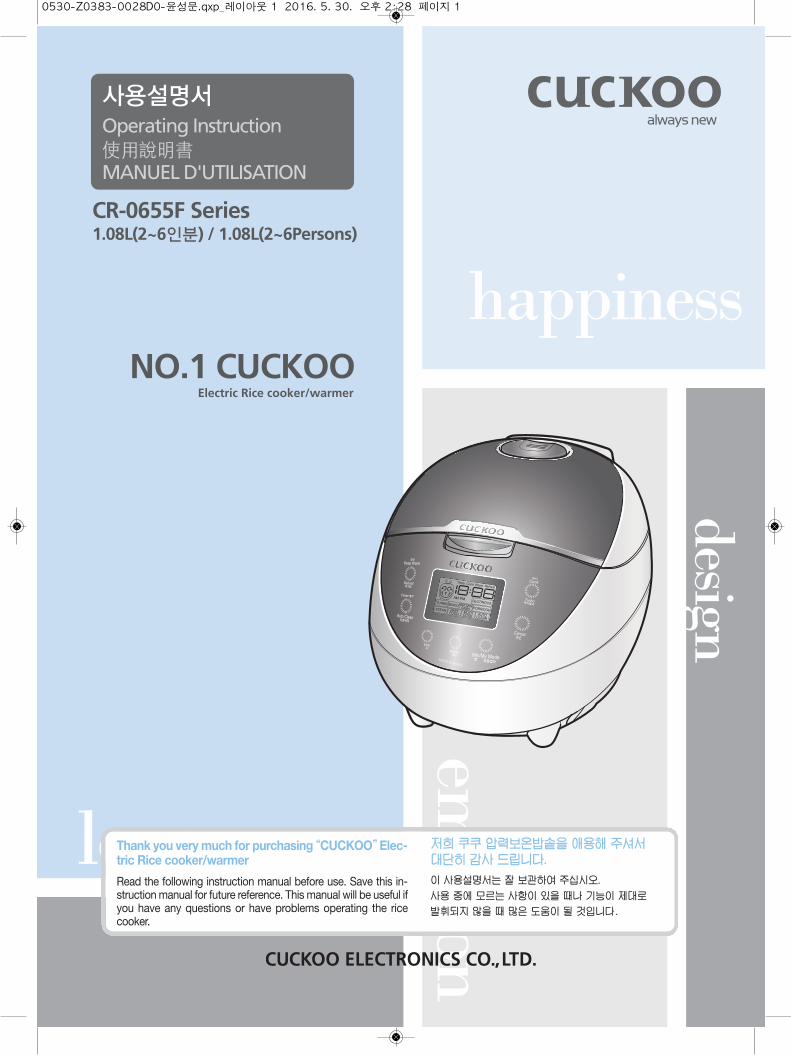
CR-0655F Series1.08L(2~6인분) / 1.08L(2~6Persons)
NO.1 CUCKOOElectric Rice cooker/warmer
使用說明書
사용설명서
MANUEL D'UTILISATION
Operating Instruction
저희 쿠쿠 압력보온밥솥을 애용해 주셔서 대단히 감사 드립니다.
이 사용설명서는 잘 보관하여 주십시오.
사용 중에 모르는 사항이 있을 때나 기능이 제대로
발휘되지 않을 때 많은 도움이 될 것입니다.
Thank you very much for purchasing “CUCKOO” Elec-tric Rice cooker/warmer
Read the following instruction manual before use. Save this in-struction manual for future reference. This manual will be useful ifyou have any questions or have problems operating the ricecooker.
0530-Z0383-0028D0-윤성문.qxp_레이아웃 1 2016. 5. 30. 오후 2:28 페이지 1
2
………………………………………… 3……………………………………………………… 5
…………………………………………… 12~13……………………………………………… 60
………………………………… 61~62……………… 63
……………………………………………………… 64……………………………………………… 65
………………………………………………… 66~67………………………………………… 68
………………………………………………… 69………………………………………… 70~71
………………………………………………… 72 ………………………………………… 73
………………………………………………… 74~75………………………………………………… 76~77………………………………………………… 78~80
……………………………………… 81~82
목 차
사용하기전에Important safeguards ............................................ 3제품규격 ................................................................. 5안전상의 경고 ................................................... 10~11각 부분의 이름 ...................................................... 37제품 손질 방법 ................................................. 38~39기능 조작부의 이름과 역할 / 기능 표시부의 이상 점검 기능 ..... 40
사용할 때현재시각의 설정 ..................................................... 41취사전 준비사항 ..................................................... 42취사는 이렇게 하십시오 ..................................... 43~44쿠쿠 맞춤밥맛 기능은 이렇게 하십시오 ..................... 45쿠쿠 맞춤취사 기능은 이렇게 하십시오 ..................... 46현미/발아는 이렇게 하십시오 .............................. 47~48찜은 이렇게 하십시오 ............................................. 49이유식은 이렇게 하십시오 ...................................... 50웰빙쿡은 이렇게 하십시오 .................................. 51~52예약 취사는 이렇게 하십시오 .............................. 53~54밥을 맛있게 보온하려면 ..................................... 55~57
고장 신고 전에고장신고 전에 확인하십시오 ................................ 58~59
CONTENTSBEFORE USINGImportant safeguards .................................................................. 3Specifications .............................................................................. 5SAFEFTY PRECAUTIONS.................................................... 6~7Name of each part .................................................................... 14Cleaning and Maintenance ................................................ 15~16Function operating part ............................................................ 17
WHEN USINGHow to set current time ............................................................ 18Before cooking rice ................................................................... 19How to cook ........................................................................ 20~21How to use “MY MODE” .................................................... 22~23How to use “GABA” ............................................................ 24~25How to use “STEAM” ................................................................ 26How to use “BABY FOOD” ...................................................... 27How to use "MULTI COOK" .............................................. 28~29How to preset timer for cooking ......................................... 30~31To keep cooked rice warm and tasty ................................ 32~34
BEFORE ASKING FOR SERVICECheck before asking for service ......................................... 35~36
CONTENTS
TABLE DES MATIÈRESAVANT L'UTILISATIONImportant safeguards ………………………………………… 3Spécifications du produit……………………………………… 5MESURES DE SÉCURITÉ ……………………………… 8~9
0530-Z0383-0028D0-윤성문.qxp_레이아웃 1 2016. 5. 30. 오후 2:28 페이지 2
3
ww
w.cu
ckoo
.co.kr
1. Read all instructions before using this appliance.2. Do not touch hot surfaces. Use handles or knobs.3. To protect against fire, electric shock and / or injury to persons do not immerse cord, plugs, or Pres-
sure Cooker Body in water or any other liquid.4. Close supervision is necessary when this appliance is used by or near children. This appliance is
not intended for use by young children without supervision. 5. Unplug cord from outlet when not in use and before cleaning.
Allow appliance to cool before putting on or taking off parts, and before cleaning the appliance.6. Do not operate any appliance with a damaged cord or plug, after the appliance malfunctions, or has
been damaged in any manner. Return the appliance to the nearest authorized service facility for ex-amination, repair or adjustment.
7. The use of accessory attachments not recommended by the appliance manufacturer may result infire, electric shock, and / or injury to persons.
8. If the supply cord is damaged, it must be replaced by a special cord or assembly available from the manufacturer or your service agent.
9. Do not use outdoors.10. Do not let the cord hang over the edge of a table or counter, or touch hot surfaces.11. Do not place on or near a hot gas, electric burner, or in a heated oven.12. Always attach the plug to the appliance first, then plug the cord into the wall outlet. To disconnect,
or set all control to “off”, then remove the plug from the wall outlet.13. Do not use this appliance for other than its intended use.14. Extreme caution must be used when moving an appliance containing hot oil or any hot liquids.15. Oversized foods, metal foil packages, or utensils must not be inserted into the appliance as they
are a risk of fire or electric shock.16. Fire may occur if the appliance is covered or touching flammable material, including curtains,
draperies, walls, etc while in operation.17. To reduce the risk of electric shock, cook only in the provided removable container.18. This appliance cooks under pressure. Improper use may result in scalding injury.
Before operating the unit, properly secure and close the unit. See “Operating Instructions.”19. Do not cook foods such as applesauce, cranberries, cereals, macaroni, spaghetti, or other foods.
These foods tend to foam, froth, and sputter, and may block the pressure releasing device20. Before use always check the pressure releasing device for clogging.21. Do not open the pressure cooker until the unit has cooled and internal pressure has been reduced.
See “Operating Instructions.” 22. Do not use this pressure cooker to fry in oil.
IMPORTANT SAFEGUARDS
ADDITIONAL IMPORTANT SAFEGUARDS
SAVE THESE INSTRUCTIONSTHIS APPLIANCE IS FOR HOUSEHOLD USE ONLY
WARNING : This appliance generates heat and releases steam during use. Use proper precau-tion to prevent risk of burns, fires, other injuries, or damage to property.
1. Keep hands and face away from the Pressure Release Valve when releasing pressure.2. Take extreme caution when opening the Lid after cooking. Severe burns can result from steam
inside.3. Never open the Lid while the unit is in operation.4. Do not use without the inner Pot in place.5. Do not cover the Pressure Valve with anything as an explosion may occur.6. Do not touch the inner pot nor any heating parts, immediately after use.
Allow the unit to cool down completely first.This appliance is intended to be used in household and similar applications such as :- staff kitchen areas in shops, offices and other working environments;- farm houses;- by clients in hotels, motels and other residential type environments;- bed and breakfast type environments.
0530-Z0383-0028D0-윤성문.qxp_레이아웃 1 2016. 5. 30. 오후 2:28 페이지 3
5
ww
w.cu
ckoo
.co.kr
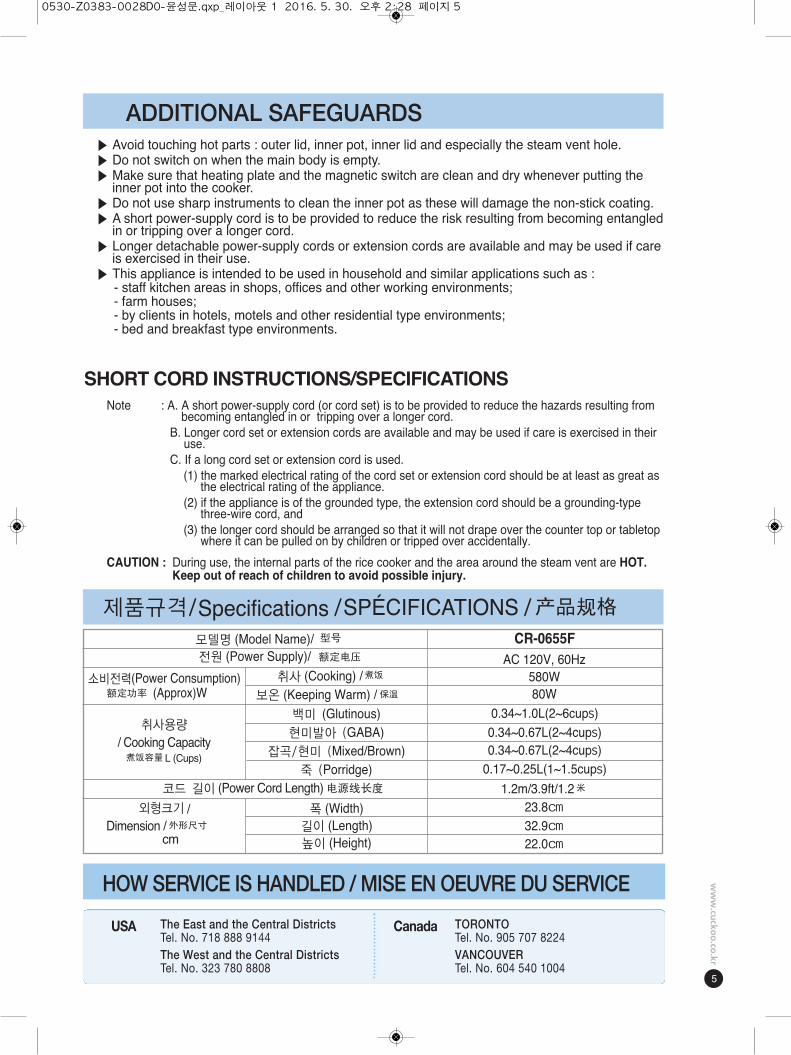
▶ Avoid touching hot parts : outer lid, inner pot, inner lid and especially the steam vent hole.▶ Do not switch on when the main body is empty.▶ Make sure that heating plate and the magnetic switch are clean and dry whenever putting the
inner pot into the cooker.▶ Do not use sharp instruments to clean the inner pot as these will damage the non-stick coating.▶ A short power-supply cord is to be provided to reduce the risk resulting from becoming entangled
in or tripping over a longer cord.▶ Longer detachable power-supply cords or extension cords are available and may be used if care
is exercised in their use.▶ This appliance is intended to be used in household and similar applications such as :
- staff kitchen areas in shops, offices and other working environments;- farm houses;- by clients in hotels, motels and other residential type environments;- bed and breakfast type environments.
Note : A. A short power-supply cord (or cord set) is to be provided to reduce the hazards resulting frombecoming entangled in or tripping over a longer cord.
B. Longer cord set or extension cords are available and may be used if care is exercised in theiruse.
C. If a long cord set or extension cord is used.(1) the marked electrical rating of the cord set or extension cord should be at least as great as
the electrical rating of the appliance.(2) if the appliance is of the grounded type, the extension cord should be a grounding-type
three-wire cord, and(3) the longer cord should be arranged so that it will not drape over the counter top or tabletop
where it can be pulled on by children or tripped over accidentally.CAUTION : During use, the internal parts of the rice cooker and the area around the steam vent are HOT.
Keep out of reach of children to avoid possible injury.
SHORT CORD INSTRUCTIONS/SPECIFICATIONS
ADDITIONAL SAFEGUARDS
제품규격/Specifications /SPÉCIFICATIONS /
HOW SERVICE IS HANDLED / MISE EN OEUVRE DU SERVICE
The East and the Central DistrictsTel. No. 718 888 9144The West and the Central DistrictsTel. No. 323 780 8808
TORONTOTel. No. 905 707 8224 VANCOUVERTel. No. 604 540 1004
USA Canada
AC 120V, 60Hz580W80W
CR-0655F
0.34~1.0L(2~6cups)0.34~0.67L(2~4cups)0.34~0.67L(2~4cups)
0.17~0.25L(1~1.5cups)
23.8㎝32.9㎝22.0㎝
취사용량/ Cooking Capacity
L (Cups)
외형크기 /Dimension / 0
cm
코드 길이 (Power Cord Length) 00
모델명 (Model Name)/ 전원 (Power Supply)/
소비전력(Power Consumption)(Approx)W
취사 (Cooking) / 00보온 (Keeping Warm) / 00
백미 (Glutinous)현미발아 (GABA)
잡곡/현미 (Mixed/Brown)죽 (Porridge)
1.2m/3.9ft/1.2??폭 (Width)
길이 (Length)높이 (Height)
0530-Z0383-0028D0-윤성문.qxp_레이아웃 1 2016. 5. 30. 오후 2:28 페이지 5
CAUTION FOR SAFETY
6
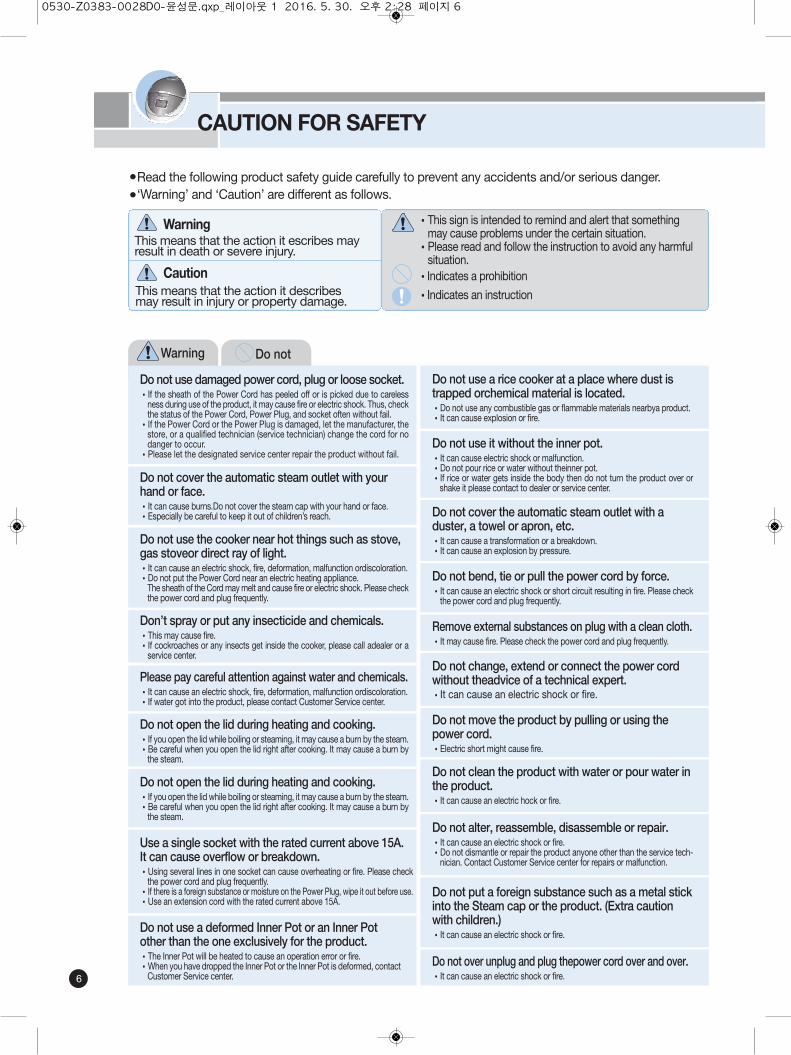
Do not cover the automatic steam outlet with yourhand or face.•It can cause burns.Do not cover the steam cap with your hand or face.•Especially be careful to keep it out of children’s reach.
Do not use the cooker near hot things such as stove,gas stoveor direct ray of light.•It can cause an electric shock, fire, deformation, malfunction ordiscoloration.•Do not put the Power Cord near an electric heating appliance.The sheath of the Cord may melt and cause fire or electric shock. Please checkthe power cord and plug frequently.
Don’t spray or put any insecticide and chemicals.•This may cause fire.•If cockroaches or any insects get inside the cooker, please call adealer or aservice center.
Please pay careful attention against water and chemicals.•It can cause an electric shock, fire, deformation, malfunction ordiscoloration.•If water got into the product, please contact Customer Service center.
Do not open the lid during heating and cooking.•If you open the lid while boiling or steaming, it may cause a burn by the steam.•Be careful when you open the lid right after cooking. It may cause a burn bythe steam.
Do not open the lid during heating and cooking.•If you open the lid while boiling or steaming, it may cause a burn by the steam.•Be careful when you open the lid right after cooking. It may cause a burn bythe steam.
Do not over unplug and plug thepower cord over and over.•It can cause an electric shock or fire.
Use a single socket with the rated current above 15A.It can cause overflow or breakdown.•Using several lines in one socket can cause overheating or fire. Please checkthe power cord and plug frequently.
•If there is a foreign substance or moisture on the Power Plug, wipe it out before use.•Use an extension cord with the rated current above 15A.
Do not use a rice cooker at a place where dust istrapped orchemical material is located.•Do not use any combustible gas or flammable materials nearbya product.•It can cause explosion or fire.
Do not use a deformed Inner Pot or an Inner Potother than the one exclusively for the product.•The Inner Pot will be heated to cause an operation error or fire.•When you have dropped the Inner Pot or the Inner Pot is deformed, contactCustomer Service center.
Do not use it without the inner pot.•It can cause electric shock or malfunction.•Do not pour rice or water without theinner pot.•If rice or water gets inside the body then do not turn the product over orshake it please contact to dealer or service center.
Do not cover the automatic steam outlet with aduster, a towel or apron, etc.•It can cause a transformation or a breakdown.•It can cause an explosion by pressure.
Do not bend, tie or pull the power cord by force.•It can cause an electric shock or short circuit resulting in fire. Please checkthe power cord and plug frequently.
Remove external substances on plug with a clean cloth.•It may cause fire. Please check the power cord and plug frequently.
Do not change, extend or connect the power cordwithout theadvice of a technical expert.•It can cause an electric shock or fire.
Do not move the product by pulling or using thepower cord.•Electric short might cause fire.
Do not clean the product with water or pour water inthe product.•It can cause an electric hock or fire.
Do not alter, reassemble, disassemble or repair.•It can cause an electric shock or fire.•Do not dismantle or repair the product anyone other than the service tech-nician. Contact Customer Service center for repairs or malfunction.
Do not put a foreign substance such as a metal stickinto the Steam cap or the product. (Extra cautionwith children.)•It can cause an electric shock or fire.
•This sign is intended to remind and alert that somethingmay cause problems under the certain situation.
•Please read and follow the instruction to avoid any harmfulsituation.
•Indicates a prohibition
This means that the action it escribes mayresult in death or severe injury.
•Indicates an instruction
Read the following product safety guide carefully to prevent any accidents and/or serious danger.‘Warning’ and ‘Caution’ are different as follows.
●
●
Warning
This means that the action it describesmay result in injury or property damage.
Caution
Warning Do not
Do not use damaged power cord, plug or loose socket.•If the sheath of the Power Cord has peeled off or is picked due to carelessness during use of the product, it may cause fire or electric shock. Thus, checkthe status of the Power Cord, Power Plug, and socket often without fail.
•If the Power Cord or the Power Plug is damaged, let the manufacturer, thestore, or a qualified technician (service technician) change the cord for nodanger to occur.
•Please let the designated service center repair the product without fail.
0530-Z0383-0028D0-윤성문.qxp_레이아웃 1 2016. 5. 30. 오후 2:28 페이지 6
SAFETY PRECAUTIONS
7
ww
w.cu
ckoo
.co.kr
EN
GL
ISH
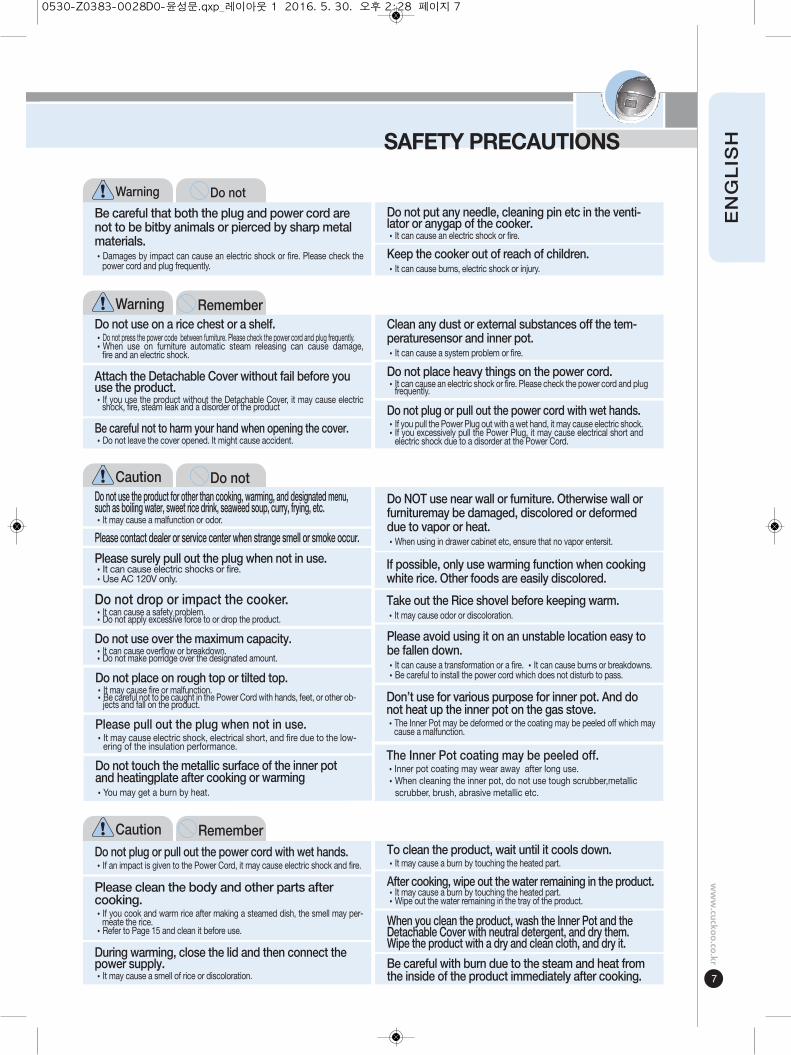
Please clean the body and other parts aftercooking.•If you cook and warm rice after making a steamed dish, the smell may per-meate the rice.
•Refer to Page 15 and clean it before use.
To clean the product, wait until it cools down.•It may cause a burn by touching the heated part.
When you clean the product, wash the Inner Pot and theDetachable Cover with neutral detergent, and dry them.Wipe the product with a dry and clean cloth, and dry it.
Be careful with burn due to the steam and heat fromthe inside of the product immediately after cooking.
After cooking, wipe out the water remaining in the product.•It may cause a burn by touching the heated part.•Wipe out the water remaining in the tray of the product.
Do not place on rough top or tilted top.•It may cause fire or malfunction.•Be careful not to be caught in the Power Cord with hands, feet, or other ob-jects and fall on the product.
Please pull out the plug when not in use.•It may cause electric shock, electrical short, and fire due to the low-ering of the insulation performance.
Do not touch the metallic surface of the inner potand heatingplate after cooking or warming•You may get a burn by heat.
Please contact dealer or service center when strange smell or smoke occur.
Do NOT use near wall or furniture. Otherwise wall orfurnituremay be damaged, discolored or deformeddue to vapor or heat.•When using in drawer cabinet etc, ensure that no vapor entersit.
Please surely pull out the plug when not in use.•It can cause electric shocks or fire.•Use AC 120V only.
Do not drop or impact the cooker.•It can cause a safety problem.•Do not apply excessive force to or drop the product.
Do not use over the maximum capacity.•It can cause overflow or breakdown.•Do not make porridge over the designated amount.
Don’t use for various purpose for inner pot. And donot heat up the inner pot on the gas stove.•The Inner Pot may be deformed or the coating may be peeled off which maycause a malfunction.
The Inner Pot coating may be peeled off.•Inner pot coating may wear away after long use.•When cleaning the inner pot, do not use tough scrubber,metallicscrubber, brush, abrasive metallic etc.
Please avoid using it on an unstable location easy tobe fallen down.•It can cause a transformation or a fire. •It can cause burns or breakdowns.•Be careful to install the power cord which does not disturb to pass.
Take out the Rice shovel before keeping warm.•It may cause odor or discoloration.
If possible, only use warming function when cookingwhite rice. Other foods are easily discolored.
During warming, close the lid and then connect thepower supply. •It may cause a smell of rice or discoloration.
Do not put any needle, cleaning pin etc in the venti-lator or anygap of the cooker.•It can cause an electric shock or fire.
Keep the cooker out of reach of children.•It can cause burns, electric shock or injury.
Warning Do not
Warning Remember
Caution Do not
Caution Remember
Be careful that both the plug and power cord arenot to be bitby animals or pierced by sharp metalmaterials.•Damages by impact can cause an electric shock or fire. Please check thepower cord and plug frequently.
Do not plug or pull out the power cord with wet hands.•If an impact is given to the Power Cord, it may cause electric shock and fire.
Do not use the product for other than cooking, warming, and designated menu,such as boiling water, sweet rice drink, seaweed soup, curry, frying, etc.•It may cause a malfunction or odor.
Do not use on a rice chest or a shelf.•Do not press the power code between furniture. Please check the power cord and plug frequently.•When use on furniture automatic steam releasing can cause damage,fire and an electric shock.
Clean any dust or external substances off the tem-peraturesensor and inner pot.•It can cause a system problem or fire.
Attach the Detachable Cover without fail before youuse the product.•If you use the product without the Detachable Cover, it may cause electricshock, fire, steam leak and a disorder of the product
Do not place heavy things on the power cord.•It can cause an electric shock or fire. Please check the power cord and plugfrequently.
Be careful not to harm your hand when opening the cover.•Do not leave the cover opened. It might cause accident.
Do not plug or pull out the power cord with wet hands.•If you pull the Power Plug out with a wet hand, it may cause electric shock.•If you excessively pull the Power Plug, it may cause electrical short andelectric shock due to a disorder at the Power Cord.
0530-Z0383-0028D0-윤성문.qxp_레이아웃 1 2016. 5. 30. 오후 2:28 페이지 7

NAME OF EACH PART
14
Name of each part
How to assemble the steam cap
Accessories
Manual
Rice scoop
Rice measuringcup
Lid
Detachable cover lever
Detachable cover
Detachable cover packing
Clamp knob
Steam cap
Inner pot
Control panel
Power plug
Temperature sensor
Power cord
1. Hold the Soft SteamCap as in the picture.
2. Match it with the Lock/Un-lock Handle. Turn it to"Lock" to lock.
※ Follow the reversing order tounlock.
Lock
▶ Assemble the Soft Steam Capfirst, and then combine it withthe Cooker.
Drain dishAfter cooking or warming, throwthe water out of dew dish.Remaining rice water in dew dishcan cause a bad smell.
Heating plate
0530-Z0383-0028D0-윤성문.qxp_레이아웃 1 2016. 5. 30. 오후 2:29 페이지 14
CLEANING AND MAINTENANCE
15
ww
w.cu
ckoo
.co.kr
EN
GL
ISH
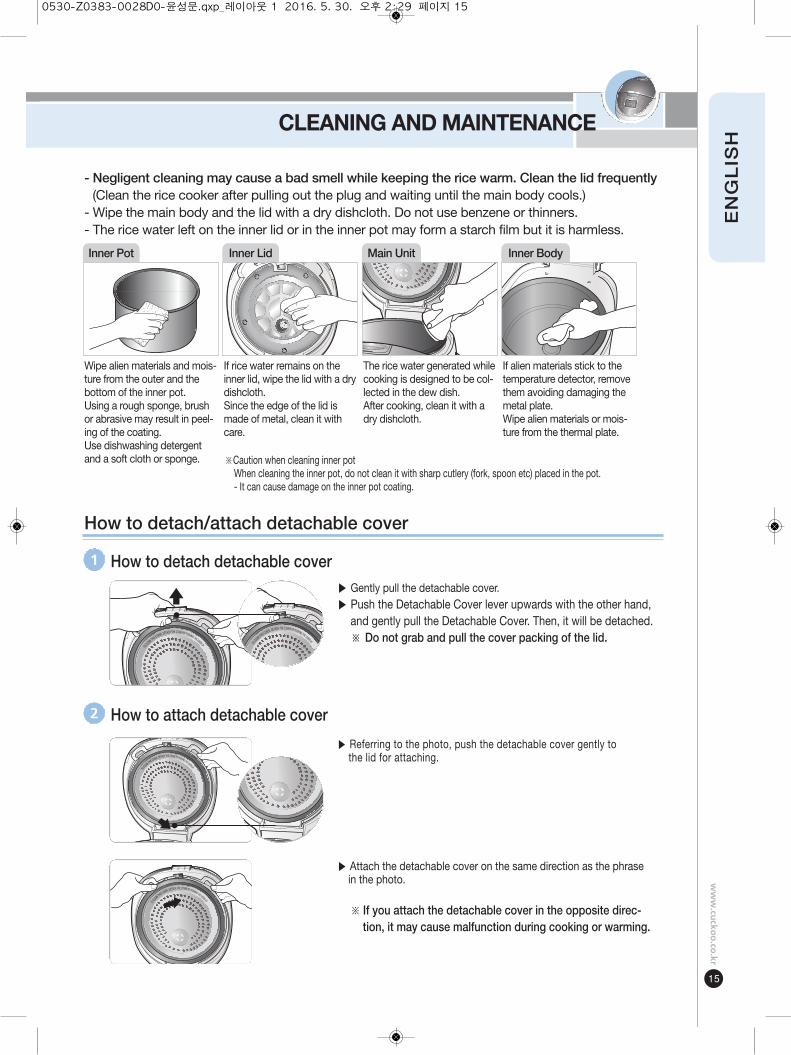
- Negligent cleaning may cause a bad smell while keeping the rice warm. Clean the lid frequently(Clean the rice cooker after pulling out the plug and waiting until the main body cools.)
- Wipe the main body and the lid with a dry dishcloth. Do not use benzene or thinners.- The rice water left on the inner lid or in the inner pot may form a starch film but it is harmless.
Wipe alien materials and mois-ture from the outer and thebottom of the inner pot.Using a rough sponge, brushor abrasive may result in peel-ing of the coating.Use dishwashing detergentand a soft cloth or sponge.
If rice water remains on theinner lid, wipe the lid with a drydishcloth.Since the edge of the lid ismade of metal, clean it withcare.
The rice water generated whilecooking is designed to be col-lected in the dew dish.After cooking, clean it with adry dishcloth.
Inner Pot Main Unit
If alien materials stick to thetemperature detector, removethem avoiding damaging themetal plate.Wipe alien materials or mois-ture from the thermal plate.
Inner BodyInner Lid
How to detach/attach detachable cover
How to detach detachable cover▶ Gently pull the detachable cover.▶ Push the Detachable Cover lever upwards with the other hand,
and gently pull the Detachable Cover. Then, it will be detached.※ Do not grab and pull the cover packing of the lid.
1
How to attach detachable cover
▶ Referring to the photo, push the detachable cover gently to the lid for attaching.
▶ Attach the detachable cover on the same direction as the phrase in the photo.
※ If you attach the detachable cover in the opposite direc-tion, it may cause malfunction during cooking or warming.
2
※Caution when cleaning inner potWhen cleaning the inner pot, do not clean it with sharp cutlery (fork, spoon etc) placed in the pot.- It can cause damage on the inner pot coating.
0530-Z0383-0028D0-윤성문.qxp_레이아웃 1 2016. 5. 30. 오후 2:29 페이지 15

CLEANING AND MAINTENANCE
16
The steam cap
1. Remove the steam cap bysimply pulling it off fromthe lid after every use.
2. Separate the steam capinto 2 parts and soakthem in lukewarm water.Wash with a sponge or asoft cloth.
3. Assemble the two till itmakes clicking sound.
4. Turn the Soft Steam Cap tofit the lid tightly.
- Use the Rice Scoop.- Do not put a metallic spoon or dishware into the product.- Do not use benzene, thinner etc.- If you have used seasoning, wash the product immediately after use.- Some stain may remain during the use, but this does not affect the hygiene.
We have coated the inside of the product with non-stick fluorocarbon coating in order to prevent ricefrom sticking on the pot.
How to Manage the Inner Part
After cooking, wipe the water with a wetcloth because of the smell.
Before cleaning, unplug thesteam cap.
Before cleaning, unplug the detach-able cover.
When storing, cooking, and warm-ing, make sure to wipe out all themoisture off the outer part of theoven. It may cause outer coating tochange color.
If there is any alien substance onthe temperature sensor carefullywipe it out without damping themetal plate.
0530-Z0383-0028D0-윤성문.qxp_레이아웃 1 2016. 5. 30. 오후 2:29 페이지 16
FUNCTION OPERATING PART
17
ww
w.cu
ckoo
.co.kr
EN
GL
ISH
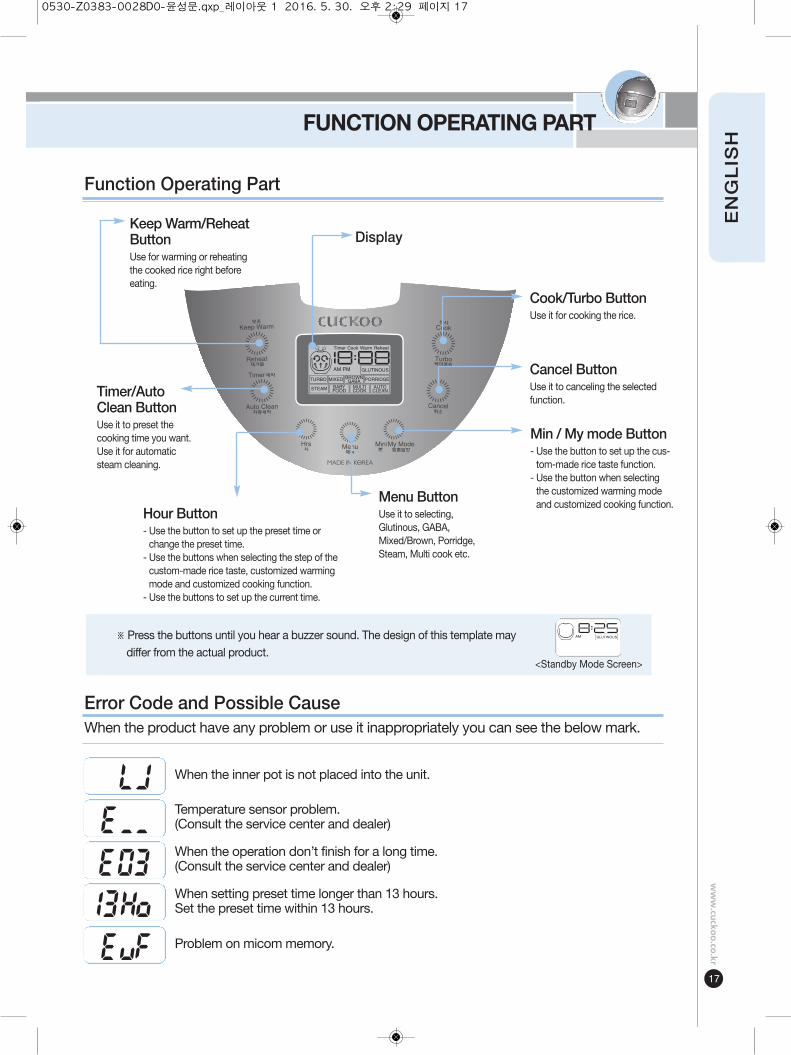
※Press the buttons until you hear a buzzer sound. The design of this template may differ from the actual product.
When the product have any problem or use it inappropriately you can see the below mark.
Error Code and Possible Cause
Temperature sensor problem.(Consult the service center and dealer)
When the inner pot is not placed into the unit.
When setting preset time longer than 13 hours.Set the preset time within 13 hours.
Problem on micom memory.
When the operation don’t finish for a long time.(Consult the service center and dealer)
Min / My mode Button- Use the button to set up the cus-tom-made rice taste function.
- Use the button when selectingthe customized warming modeand customized cooking function.
<Standby Mode Screen>
Cancel ButtonUse it to canceling the selectedfunction.
Hour Button- Use the button to set up the preset time orchange the preset time.
- Use the buttons when selecting the step of thecustom-made rice taste, customized warmingmode and customized cooking function.
- Use the buttons to set up the current time.
Display
Menu ButtonUse it to selecting, Glutinous, GABA,Mixed/Brown, Porridge,Steam, Multi cook etc.
Keep Warm/ReheatButtonUse for warming or reheatingthe cooked rice right beforeeating.
Cook/Turbo ButtonUse it for cooking the rice.
Timer/AutoClean ButtonUse it to preset thecooking time you want. Use it for automaticsteam cleaning.
Function Operating Part
0530-Z0383-0028D0-윤성문.qxp_레이아웃 1 2016. 5. 30. 오후 2:29 페이지 17
HOW TO SET CURRENT TIME
18
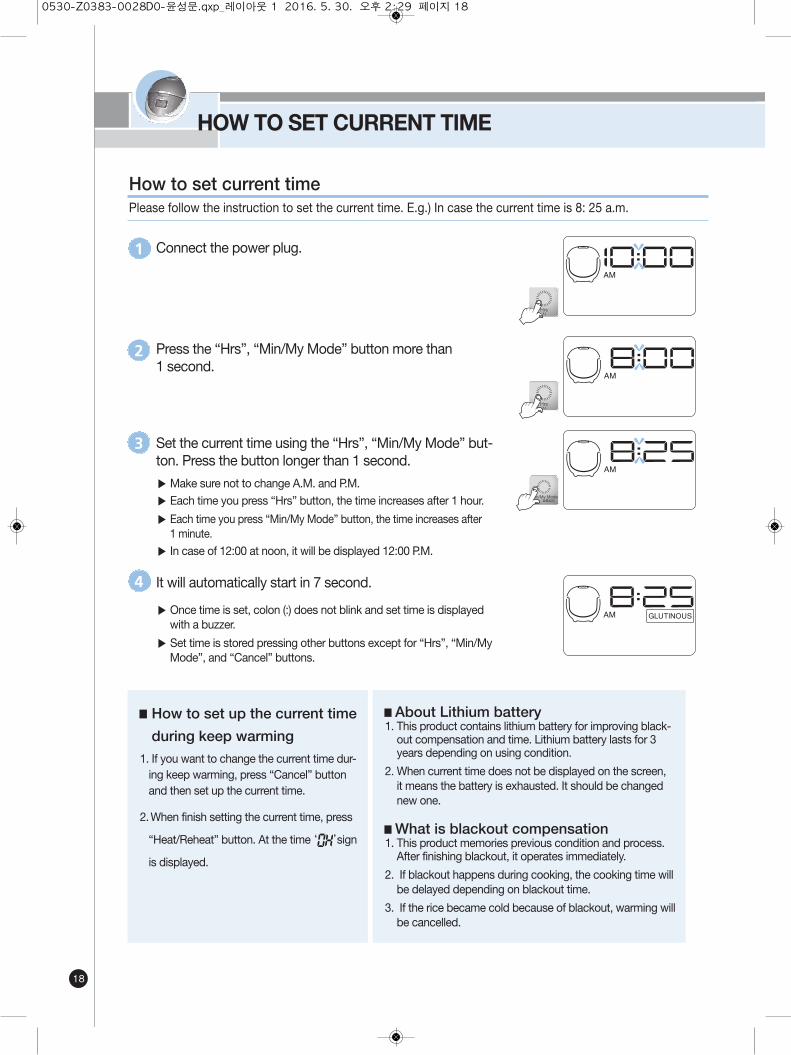
Please follow the instruction to set the current time. E.g.) In case the current time is 8: 25 a.m.
How to set current time
Connect the power plug.1
Press the “Hrs”, “Min/My Mode” button more than1 second.
2
Set the current time using the “Hrs”, “Min/My Mode” but-ton. Press the button longer than 1 second.
▶Make sure not to change A.M. and P.M.▶ Each time you press “Hrs” button, the time increases after 1 hour.
▶ Each time you press “Min/My Mode” button, the time increases after1 minute.
▶ In case of 12:00 at noon, it will be displayed 12:00 P.M.
3
It will automatically start in 7 second.
▶ Once time is set, colon (:) does not blink and set time is displayedwith a buzzer.
▶ Set time is stored pressing other buttons except for “Hrs”, “Min/MyMode”, and “Cancel” buttons.
4
■About Lithium battery1. This product contains lithium battery for improving black-out compensation and time. Lithium battery lasts for 3years depending on using condition.
2. When current time does not be displayed on the screen,it means the battery is exhausted. It should be changednew one.
■What is blackout compensation1. This product memories previous condition and process.After finishing blackout, it operates immediately.
2. If blackout happens during cooking, the cooking time willbe delayed depending on blackout time.
3. If the rice became cold because of blackout, warming willbe cancelled.
■How to set up the current time
during keep warming
1. If you want to change the current time dur-ing keep warming, press “Cancel” buttonand then set up the current time.
2.When finish setting the current time, press
“Heat/Reheat” button. At the time ‘ ’sign
is displayed.
0530-Z0383-0028D0-윤성문.qxp_레이아웃 1 2016. 5. 30. 오후 2:29 페이지 18
BEFORE COOKING RICE
19
ww
w.cu
ckoo
.co.kr
EN
GL
ISH
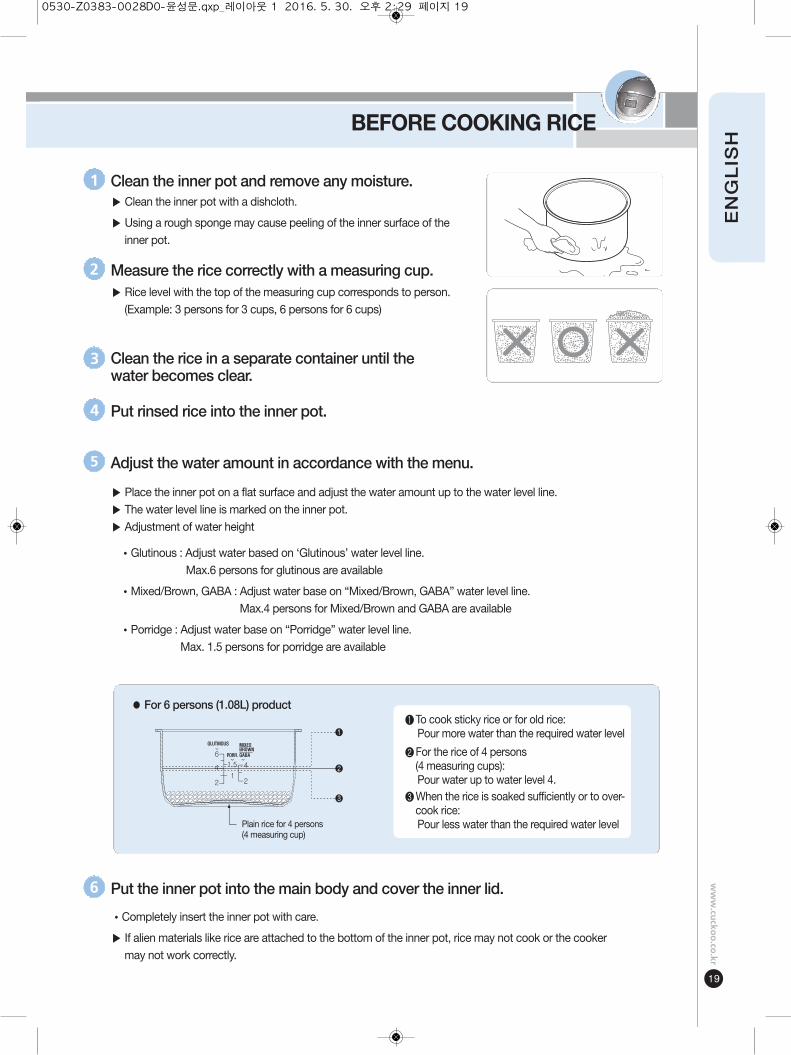
Clean the inner pot and remove any moisture.▶ Clean the inner pot with a dishcloth.
▶ Using a rough sponge may cause peeling of the inner surface of theinner pot.
1
Measure the rice correctly with a measuring cup.▶ Rice level with the top of the measuring cup corresponds to person.
(Example: 3 persons for 3 cups, 6 persons for 6 cups)
2
Clean the rice in a separate container until thewater becomes clear.
3
Put rinsed rice into the inner pot.4
Put the inner pot into the main body and cover the inner lid.
•Completely insert the inner pot with care.
▶ If alien materials like rice are attached to the bottom of the inner pot, rice may not cook or the cookermay not work correctly.
6
❷For the rice of 4 persons(4 measuring cups): Pour water up to water level 4.
❸When the rice is soaked sufficiently or to over-cook rice: Pour less water than the required water level
❶To cook sticky rice or for old rice: Pour more water than the required water level❶
❷
❸
Adjust the water amount in accordance with the menu.
▶ Place the inner pot on a flat surface and adjust the water amount up to the water level line.▶ The water level line is marked on the inner pot.▶ Adjustment of water height
•Glutinous : Adjust water based on ‘Glutinous’ water level line.Max.6 persons for glutinous are available
•Mixed/Brown, GABA : Adjust water base on “Mixed/Brown, GABA” water level line. Max.4 persons for Mixed/Brown and GABA are available
•Porridge : Adjust water base on “Porridge” water level line. Max. 1.5 persons for porridge are available
5
● For 6 persons (1.08L) product
Plain rice for 4 persons(4 measuring cup)
0530-Z0383-0028D0-윤성문.qxp_레이아웃 1 2016. 5. 30. 오후 2:29 페이지 19
HOW TO COOK
20
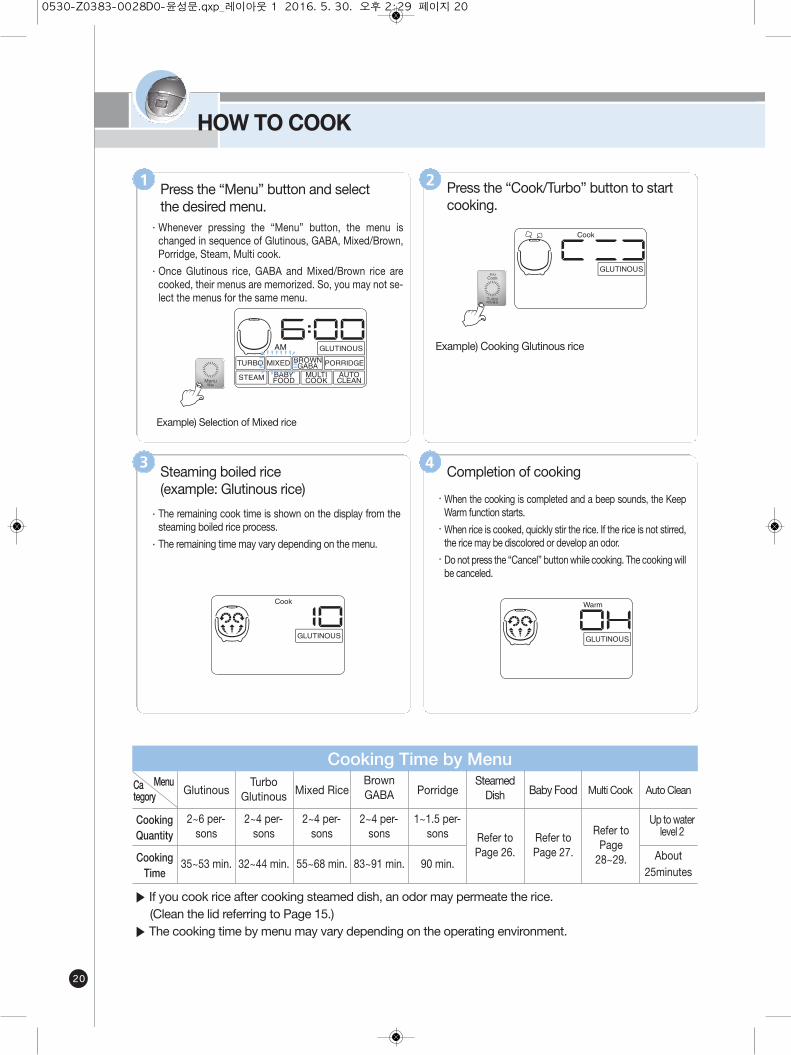
Press the “Menu” button and selectthe desired menu.
Press the “Cook/Turbo” button to startcooking.
˙Whenever pressing the “Menu” button, the menu ischanged in sequence of Glutinous, GABA, Mixed/Brown,Porridge, Steam, Multi cook.
˙Once Glutinous rice, GABA and Mixed/Brown rice arecooked, their menus are memorized. So, you may not se-lect the menus for the same menu.
1 2
Completion of cooking
˙When the cooking is completed and a beep sounds, the KeepWarm function starts.
˙When rice is cooked, quickly stir the rice. If the rice is not stirred,the rice may be discolored or develop an odor.
˙Do not press the “Cancel” button while cooking. The cooking willbe canceled.
4Steaming boiled rice (example: Glutinous rice)
·The remaining cook time is shown on the display from thesteaming boiled rice process.
·The remaining time may vary depending on the menu.
3
Category
Menu
CookingQuantity
CookingTime
▶ If you cook rice after cooking steamed dish, an odor may permeate the rice.(Clean the lid referring to Page 15.)
▶ The cooking time by menu may vary depending on the operating environment.
Example) Selection of Mixed rice
Example) Cooking Glutinous rice
Cooking Time by Menu
Glutinous
2~6 per-sons Refer to
Page28~29.
Refer toPage 26.
Refer toPage 27.
35~53 min.
TurboGlutinous
2~4 per-sons
32~44 min.
Mixed Rice
2~4 per-sons
55~68 min.
BrownGABA
2~4 per-sons
83~91 min.
Porridge
1~1.5 per-sons
90 min.
SteamedDish Baby Food Multi Cook Auto Clean
Up to waterlevel 2
About25minutes
0530-Z0383-0028D0-윤성문.qxp_레이아웃 1 2016. 5. 30. 오후 2:29 페이지 20
HOW TO COOK
21
ww
w.cu
ckoo
.co.kr
EN
GL
ISH
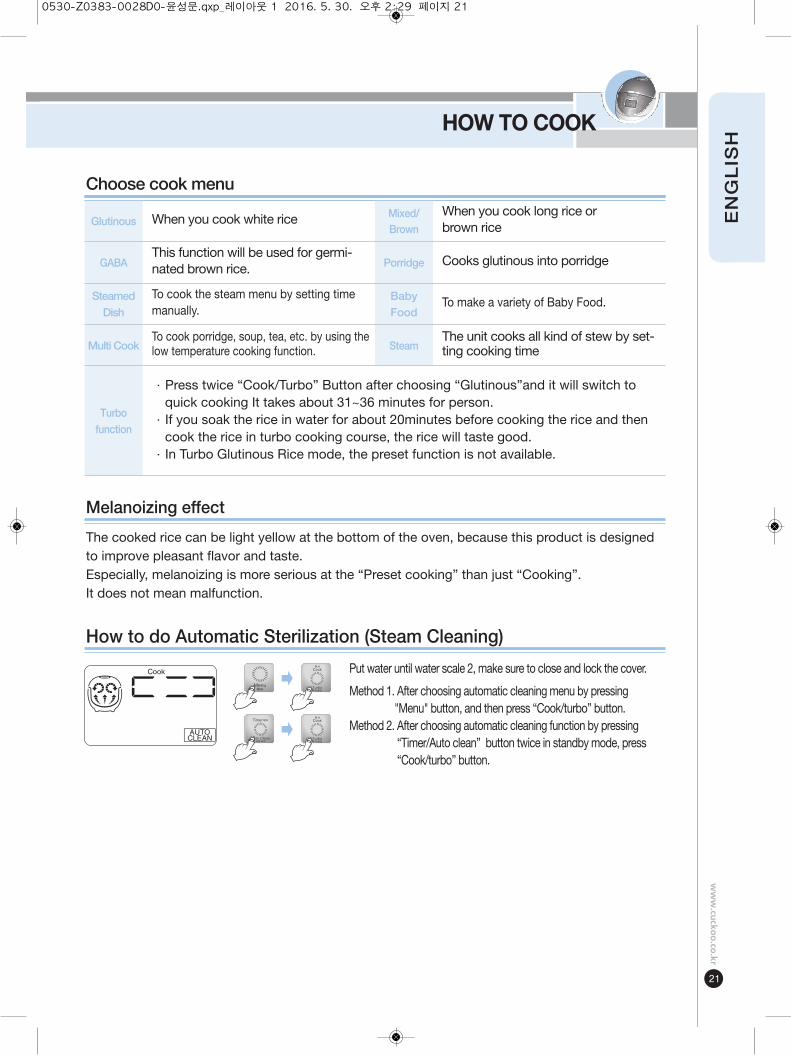
The cooked rice can be light yellow at the bottom of the oven, because this product is designedto improve pleasant flavor and taste.Especially, melanoizing is more serious at the “Preset cooking” than just “Cooking”. It does not mean malfunction.
Melanoizing effect
How to do Automatic Sterilization (Steam Cleaning)
Choose cook menu
Glutinous When you cook white rice
GABA
Turbo
function
This function will be used for germi-nated brown rice.
·Press twice “Cook/Turbo” Button after choosing “Glutinous”and it will switch toquick cooking It takes about 31~36 minutes for person.
·If you soak the rice in water for about 20minutes before cooking the rice and thencook the rice in turbo cooking course, the rice will taste good.
·In Turbo Glutinous Rice mode, the preset function is not available.
Mixed/Brown
When you cook long rice orbrown rice
Porridge Cooks glutinous into porridge
Steamed
Dish
To cook the steam menu by setting timemanually.
Baby
Food To make a variety of Baby Food.
Multi CookTo cook porridge, soup, tea, etc. by using thelow temperature cooking function. Steam
The unit cooks all kind of stew by set-ting cooking time
Put water until water scale 2, make sure to close and lock the cover.
Method 1. After choosing automatic cleaning menu by pressing"Menu" button, and then press “Cook/turbo” button.
Method 2. After choosing automatic cleaning function by pressing“Timer/Auto clean” button twice in standby mode, press“Cook/turbo” button.
➡
➡
0530-Z0383-0028D0-윤성문.qxp_레이아웃 1 2016. 5. 30. 오후 2:29 페이지 21
HOW TO USE “MY MODE”
22
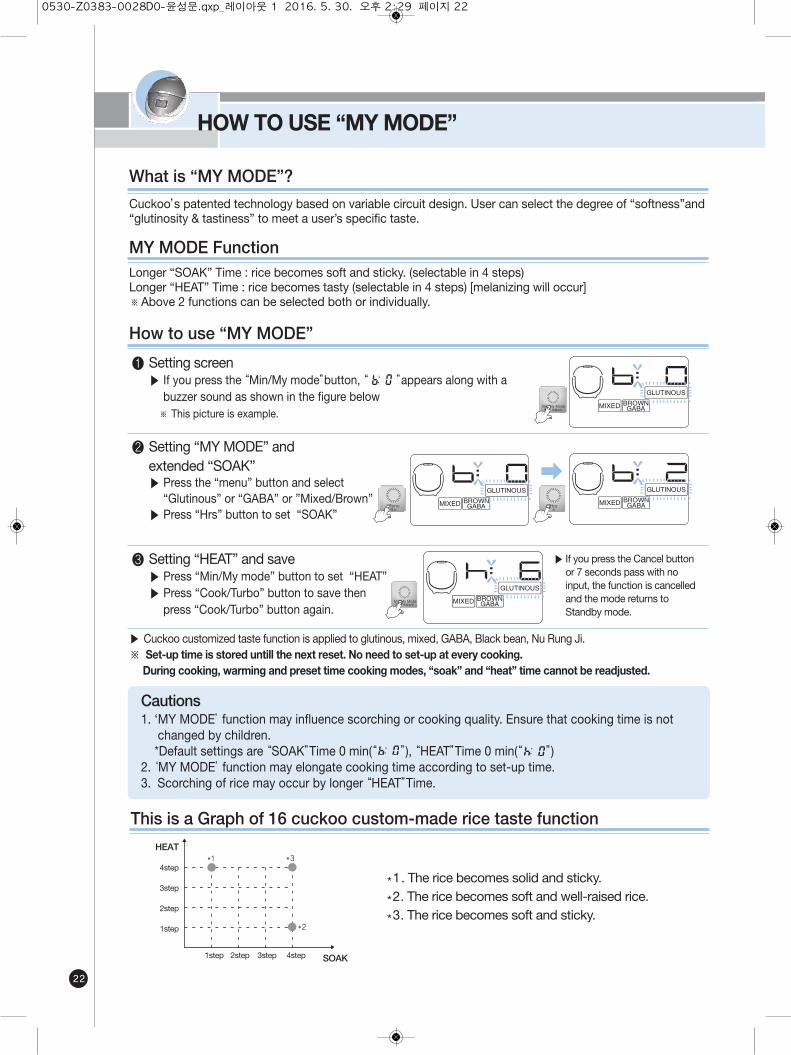
1. ‘MY MODE’ function may influence scorching or cooking quality. Ensure that cooking time is notchanged by children.*Default settings are “SOAK”Time 0 min(“ ”), “HEAT”Time 0 min(“ ”)
2. ‘MY MODE’ function may elongate cooking time according to set-up time. 3. Scorching of rice may occur by longer “HEAT”Time.
Cautions
Cuckoo’s patented technology based on variable circuit design. User can select the degree of “softness”and“glutinosity & tastiness” to meet a user’s specific taste.
What is “MY MODE”?
Longer “SOAK” Time : rice becomes soft and sticky. (selectable in 4 steps)Longer “HEAT” Time : rice becomes tasty (selectable in 4 steps) [melanizing will occur]※Above 2 functions can be selected both or individually.
▶ Cuckoo customized taste function is applied to glutinous, mixed, GABA, Black bean, Nu Rung Ji.※ Set-up time is stored untill the next reset. No need to set-up at every cooking.
During cooking, warming and preset time cooking modes, “soak” and “heat” time cannot be readjusted.
MY MODE Function
How to use “MY MODE”
❶ Setting screen ▶ If you press the “Min/My mode”button, “ ”appears along with a
buzzer sound as shown in the figure below ※ This picture is example.
❷ Setting “MY MODE” andextended “SOAK”
▶ Press the “menu” button and select“Glutinous” or “GABA” or ”Mixed/Brown”
▶ Press “Hrs” button to set “SOAK”
❸ Setting “HEAT” and save ▶ Press “Min/My mode” button to set “HEAT” ▶ Press “Cook/Turbo” button to save then
press “Cook/Turbo” button again.
▶ If you press the Cancel buttonor 7 seconds pass with noinput, the function is cancelledand the mode returns toStandby mode.
This is a Graph of 16 cuckoo custom-made rice taste function
1step 2step 3step 4step SOAK
*1. The rice becomes solid and sticky.
*2. The rice becomes soft and well-raised rice.
*3. The rice becomes soft and sticky.
HEAT
4step
3step
2step
1step
0530-Z0383-0028D0-윤성문.qxp_레이아웃 1 2016. 5. 30. 오후 2:29 페이지 22
HOW TO USE “MY MODE”
23
ww
w.cu
ckoo
.co.kr
EN
GL
ISH
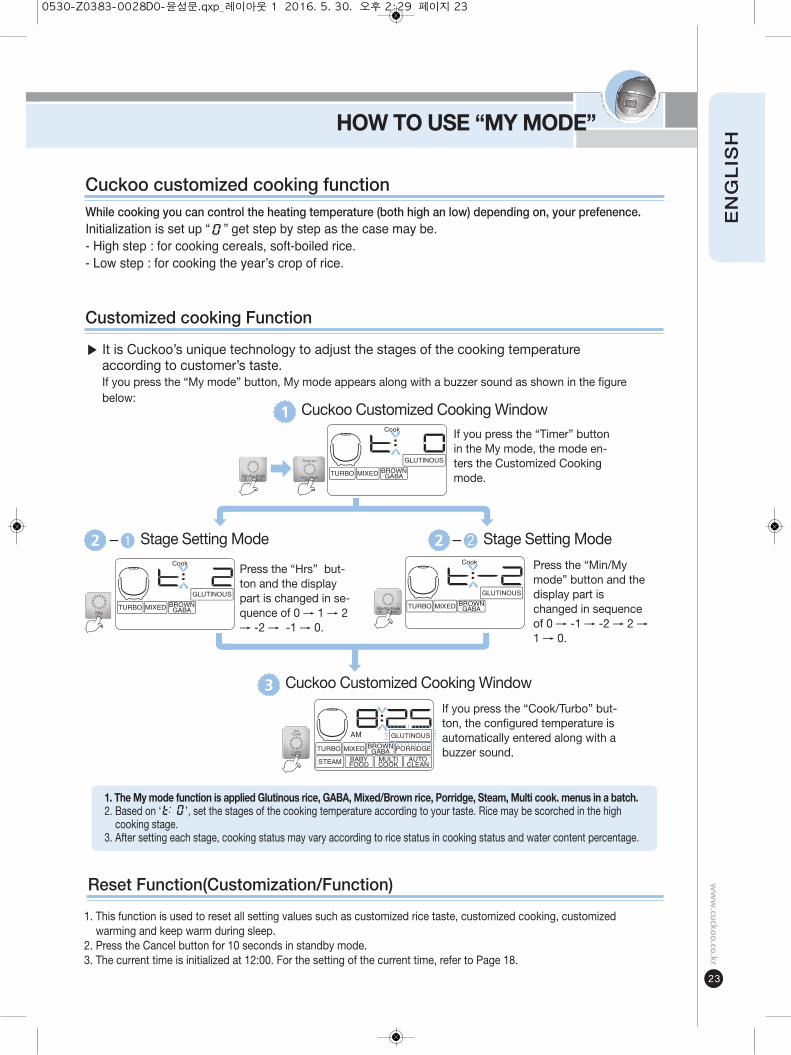
Customized cooking Function
▶ It is Cuckoo’s unique technology to adjust the stages of the cooking temperatureaccording to customer’s taste.If you press the “My mode” button, My mode appears along with a buzzer sound as shown in the figurebelow:
If you press the “Timer” buttonin the My mode, the mode en-ters the Customized Cookingmode.
Cuckoo Customized Cooking Window1
If you press the “Cook/Turbo” but-ton, the configured temperature isautomatically entered along with abuzzer sound.
Cuckoo Customized Cooking Window3
Press the “Hrs” but-ton and the displaypart is changed in se-quence of 0 → 1 → 2→ -2 → -1 → 0.
Press the “Min/Mymode” button and thedisplay part ischanged in sequenceof 0 → -1 → -2 → 2 →1 → 0.
-❶ Stage Setting Mode2 -❷ Stage Setting Mode2
1. The My mode function is applied Glutinous rice, GABA, Mixed/Brown rice, Porridge, Steam, Multi cook. menus in a batch.2. Based on ‘ ’, set the stages of the cooking temperature according to your taste. Rice may be scorched in the highcooking stage.
3. After setting each stage, cooking status may vary according to rice status in cooking status and water content percentage.
Reset Function(Customization/Function)
1. This function is used to reset all setting values such as customized rice taste, customized cooking, customizedwarming and keep warm during sleep.
2. Press the Cancel button for 10 seconds in standby mode.3. The current time is initialized at 12:00. For the setting of the current time, refer to Page 18.
Initialization is set up “ ” get step by step as the case may be.- High step : for cooking cereals, soft-boiled rice.- Low step : for cooking the year’s crop of rice.
While cooking you can control the heating temperature (both high an low) depending on, your prefenence.
Cuckoo customized cooking function
0530-Z0383-0028D0-윤성문.qxp_레이아웃 1 2016. 5. 30. 오후 2:29 페이지 23
HOW TO USE “GABA”
24
Using “GABA” Meun
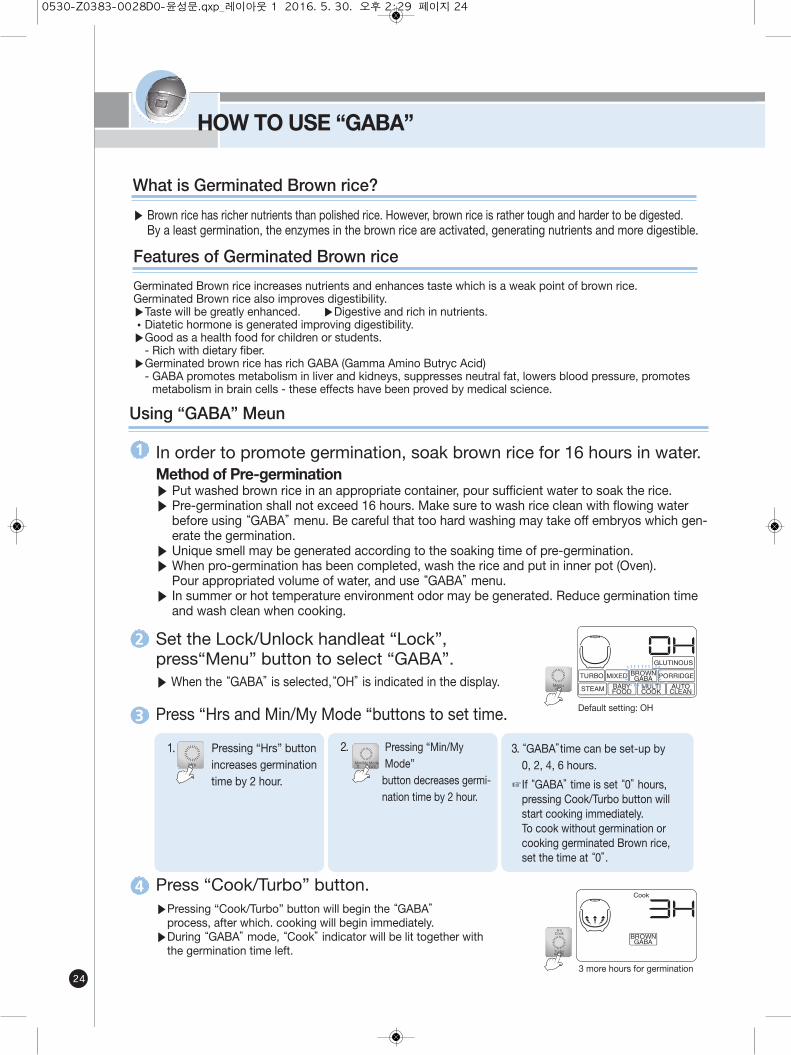
In order to promote germination, soak brown rice for 16 hours in water.Method of Pre-germination▶ Put washed brown rice in an appropriate container, pour sufficient water to soak the rice.▶ Pre-germination shall not exceed 16 hours. Make sure to wash rice clean with flowing water
before using “GABA” menu. Be careful that too hard washing may take off embryos which gen-erate the germination.
▶ Unique smell may be generated according to the soaking time of pre-germination.▶ When pro-germination has been completed, wash the rice and put in inner pot (Oven).
Pour appropriated volume of water, and use “GABA” menu.▶ In summer or hot temperature environment odor may be generated. Reduce germination time
and wash clean when cooking.
▶ When the “GABA” is selected,“OH” is indicated in the display.
1
Set the Lock/Unlock handleat “Lock”,press“Menu” button to select “GABA”.
2
Press “Hrs and Min/My Mode “buttons to set time.3
1. Pressing “Hrs” buttonincreases germinationtime by 2 hour.
2. Pressing “Min/MyMode” button decreases germi-nation time by 2 hour.
3. “GABA”time can be set-up by0, 2, 4, 6 hours.
☞If “GABA” time is set “0” hours,pressing Cook/Turbo button willstart cooking immediately.To cook without germination orcooking germinated Brown rice,set the time at “0”.
▶Pressing “Cook/Turbo” button will begin the “GABA”process, after which. cooking will begin immediately.
▶During “GABA” mode, “Cook” indicator will be lit together withthe germination time left.
Press “Cook/Turbo” button.4
3 more hours for germination
Default setting: OH
▶ Brown rice has richer nutrients than polished rice. However, brown rice is rather tough and harder to be digested.By a least germination, the enzymes in the brown rice are activated, generating nutrients and more digestible.
What is Germinated Brown rice?
Germinated Brown rice increases nutrients and enhances taste which is a weak point of brown rice.Germinated Brown rice also improves digestibility.▶Taste will be greatly enhanced. ▶Digestive and rich in nutrients. •Diatetic hormone is generated improving digestibility.▶Good as a health food for children or students.- Rich with dietary fiber.
▶Germinated brown rice has rich GABA (Gamma Amino Butryc Acid)- GABA promotes metabolism in liver and kidneys, suppresses neutral fat, lowers blood pressure, promotesmetabolism in brain cells - these effects have been proved by medical science.
Features of Germinated Brown rice
0530-Z0383-0028D0-윤성문.qxp_레이아웃 1 2016. 5. 30. 오후 2:29 페이지 24
HOW TO USE “GABA”
25
ww
w.cu
ckoo
.co.kr
EN
GL
ISH
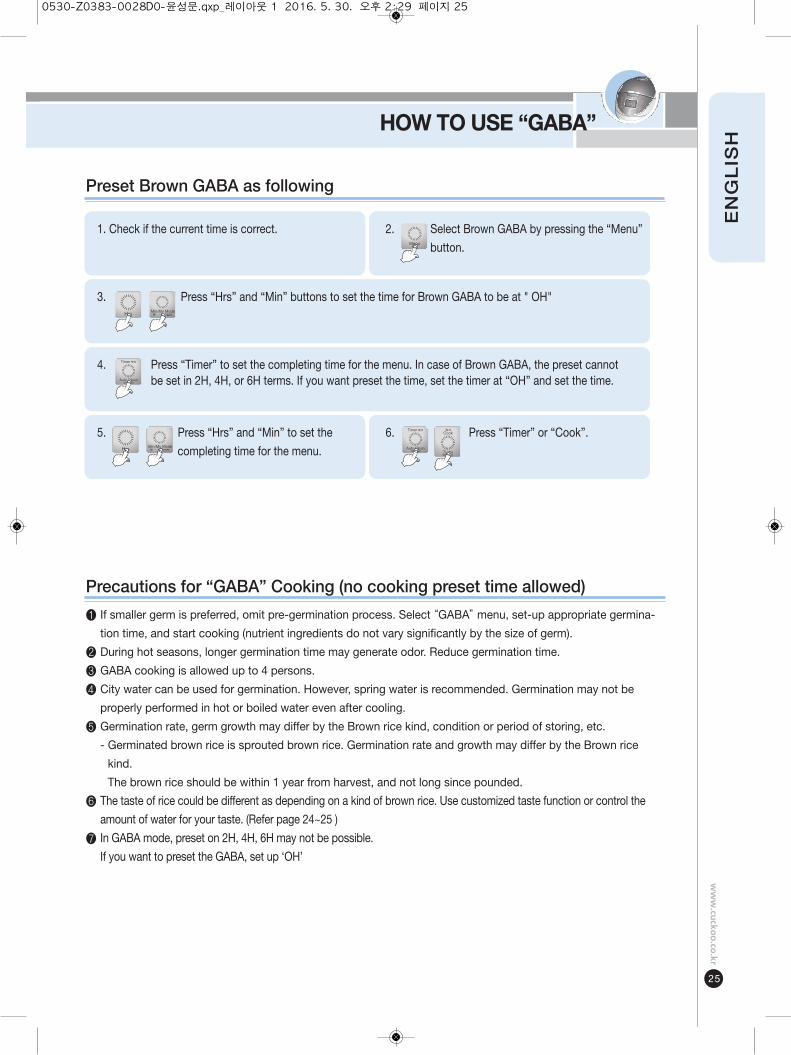
5. Press “Hrs” and “Min” to set the
completing time for the menu.
6. Press “Timer” or “Cook”.
Precautions for “GABA” Cooking (no cooking preset time allowed)
❶ If smaller germ is preferred, omit pre-germination process. Select “GABA” menu, set-up appropriate germina-tion time, and start cooking (nutrient ingredients do not vary significantly by the size of germ).
❷ During hot seasons, longer germination time may generate odor. Reduce germination time.❸ GABA cooking is allowed up to 4 persons.❹ City water can be used for germination. However, spring water is recommended. Germination may not be
properly performed in hot or boiled water even after cooling.
❺ Germination rate, germ growth may differ by the Brown rice kind, condition or period of storing, etc.- Germinated brown rice is sprouted brown rice. Germination rate and growth may differ by the Brown rice
kind.
The brown rice should be within 1 year from harvest, and not long since pounded.
❻ The taste of rice could be different as depending on a kind of brown rice. Use customized taste function or control theamount of water for your taste. (Refer page 24~25 )
❼ In GABA mode, preset on 2H, 4H, 6H may not be possible.If you want to preset the GABA, set up ‘OH’
Preset Brown GABA as following
1. Check if the current time is correct.
3. Press “Hrs” and “Min” buttons to set the time for Brown GABA to be at " OH"
4. Press “Timer” to set the completing time for the menu. In case of Brown GABA, the preset cannotbe set in 2H, 4H, or 6H terms. If you want preset the time, set the timer at “OH” and set the time.
2. Select Brown GABA by pressing the “Menu”
button.
0530-Z0383-0028D0-윤성문.qxp_레이아웃 1 2016. 5. 30. 오후 2:29 페이지 25
HOW TO USE “STEAM”
26
How to use Steam function and preset time
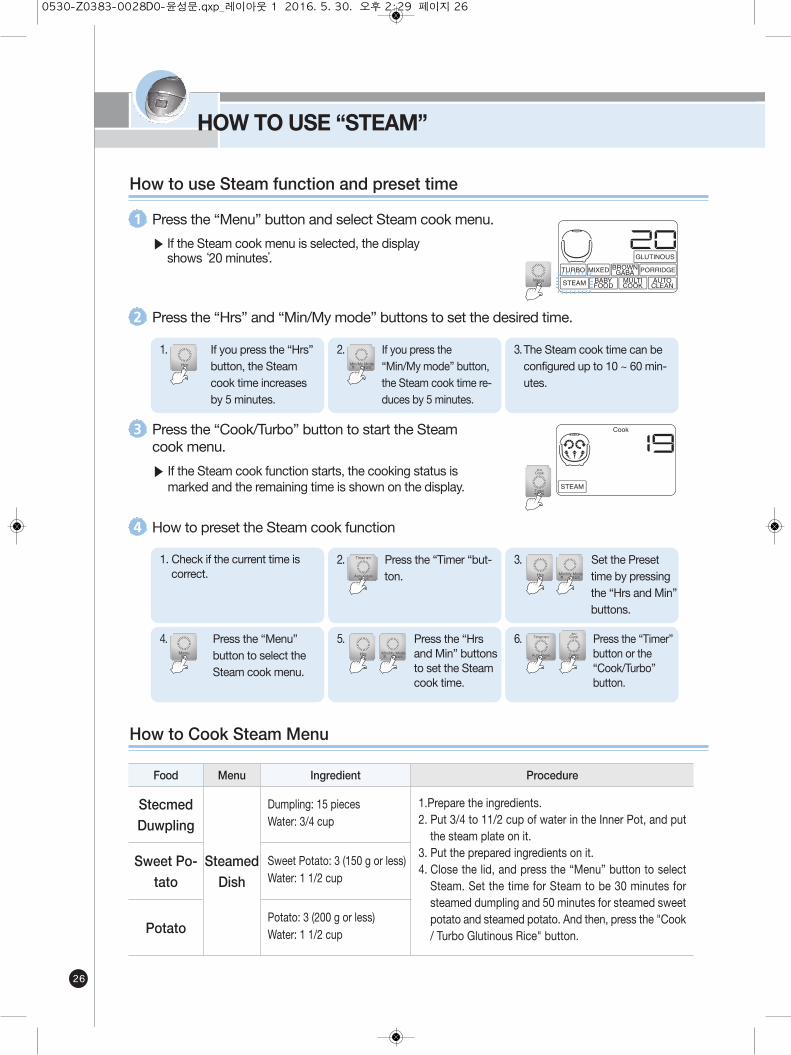
Press the “Menu” button and select Steam cook menu.1
▶ If the Steam cook menu is selected, the displayshows ‘20 minutes’.
Press the “Hrs” and “Min/My mode” buttons to set the desired time.2
1. If you press the “Hrs”button, the Steamcook time increasesby 5 minutes.
2. If you press the“Min/My mode” button,the Steam cook time re-duces by 5 minutes.
3.The Steam cook time can beconfigured up to 10 ~ 60 min-utes.
Press the “Cook/Turbo” button to start the Steamcook menu.
3
▶ If the Steam cook function starts, the cooking status ismarked and the remaining time is shown on the display.
How to preset the Steam cook function4
1. Check if the current time iscorrect.
2. Press the “Timer “but-ton.
3. Set the Presettime by pressingthe “Hrs and Min”buttons.
4. Press the “Menu”button to select theSteam cook menu.
5. Press the “Hrsand Min” buttonsto set the Steamcook time.
6. Press the “Timer”button or the“Cook/Turbo”button.
Dumpling: 15 pieces Water: 3/4 cup
1.Prepare the ingredients.2. Put 3/4 to 11/2 cup of water in the Inner Pot, and putthe steam plate on it.
3. Put the prepared ingredients on it.4. Close the lid, and press the “Menu” button to selectSteam. Set the time for Steam to be 30 minutes forsteamed dumpling and 50 minutes for steamed sweetpotato and steamed potato. And then, press the "Cook/ Turbo Glutinous Rice" button.
Ingredient Procedure
How to Cook Steam Menu
Food
StecmedDuwpling
Sweet Potato: 3 (150 g or less) Water: 1 1/2 cup
Sweet Po-tato
Potato: 3 (200 g or less)Water: 1 1/2 cup Potato
SteamedDish
Menu
0530-Z0383-0028D0-윤성문.qxp_레이아웃 1 2016. 5. 30. 오후 2:29 페이지 26
HOW TO USE “BABY FOOD”
27
ww
w.cu
ckoo
.co.kr
EN
GL
ISH
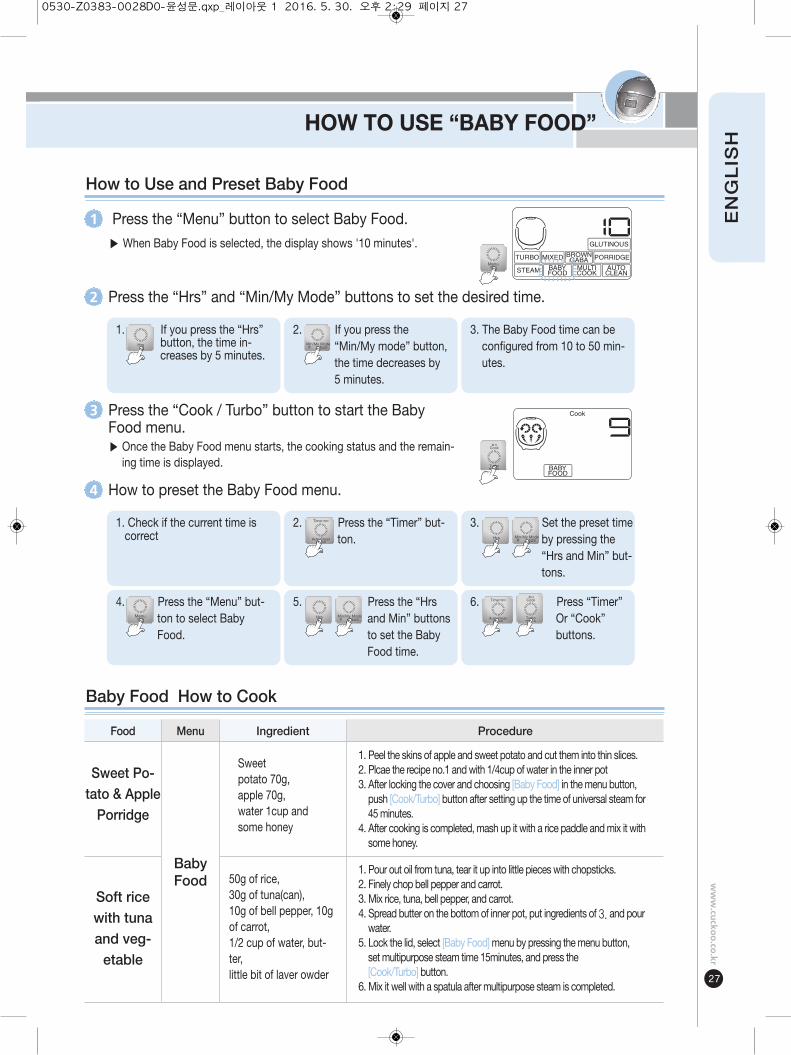
Sweet potato 70g, apple 70g, water 1cup andsome honey
1. Peel the skins of apple and sweet potato and cut them into thin slices.2. Plcae the recipe no.1 and with 1/4cup of water in the inner pot3. After locking the cover and choosing [Baby Food] in the menu button,push [Cook/Turbo] button after setting up the time of universal steam for45 minutes.
4. After cooking is completed, mash up it with a rice paddle and mix it withsome honey.
Ingredient Procedure
Baby Food How to Cook
Food
Sweet Po-tato & Apple
Porridge
50g of rice, 30g of tuna(can), 10g of bell pepper, 10gof carrot, 1/2 cup of water, but-ter, little bit of laver owder
1. Pour out oil from tuna, tear it up into little pieces with chopsticks.2. Finely chop bell pepper and carrot.3. Mix rice, tuna, bell pepper, and carrot.4. Spread butter on the bottom of inner pot, put ingredients of 3. and pourwater.
5. Lock the lid, select [Baby Food]menu by pressing the menu button,set multipurpose steam time 15minutes, and press the[Cook/Turbo] button.
6. Mix it well with a spatula after multipurpose steam is completed.
Soft ricewith tunaand veg-
etable
BabyFood
Menu
How to Use and Preset Baby Food
Press the “Menu” button to select Baby Food.1
▶ When Baby Food is selected, the display shows '10 minutes'.
Press the “Hrs” and “Min/My Mode” buttons to set the desired time.2
1. If you press the “Hrs”button, the time in-creases by 5 minutes.
2. If you press the “Min/My mode” button,the time decreases by5 minutes.
3. The Baby Food time can beconfigured from 10 to 50 min-utes.
Press the “Cook / Turbo” button to start the BabyFood menu.
3
▶ Once the Baby Food menu starts, the cooking status and the remain-ing time is displayed.
How to preset the Baby Food menu.4
1. Check if the current time iscorrect
2. Press the “Timer” but-ton.
3. Set the preset timeby pressing the“Hrs and Min” but-tons.
4. Press the “Menu” but-ton to select BabyFood.
5. Press the “Hrsand Min” buttonsto set the BabyFood time.
6. Press “Timer”Or “Cook”buttons.
0530-Z0383-0028D0-윤성문.qxp_레이아웃 1 2016. 5. 30. 오후 2:29 페이지 27
HOW TO USE “MULTI COOK”
28
How to use Multi cook function and preset time
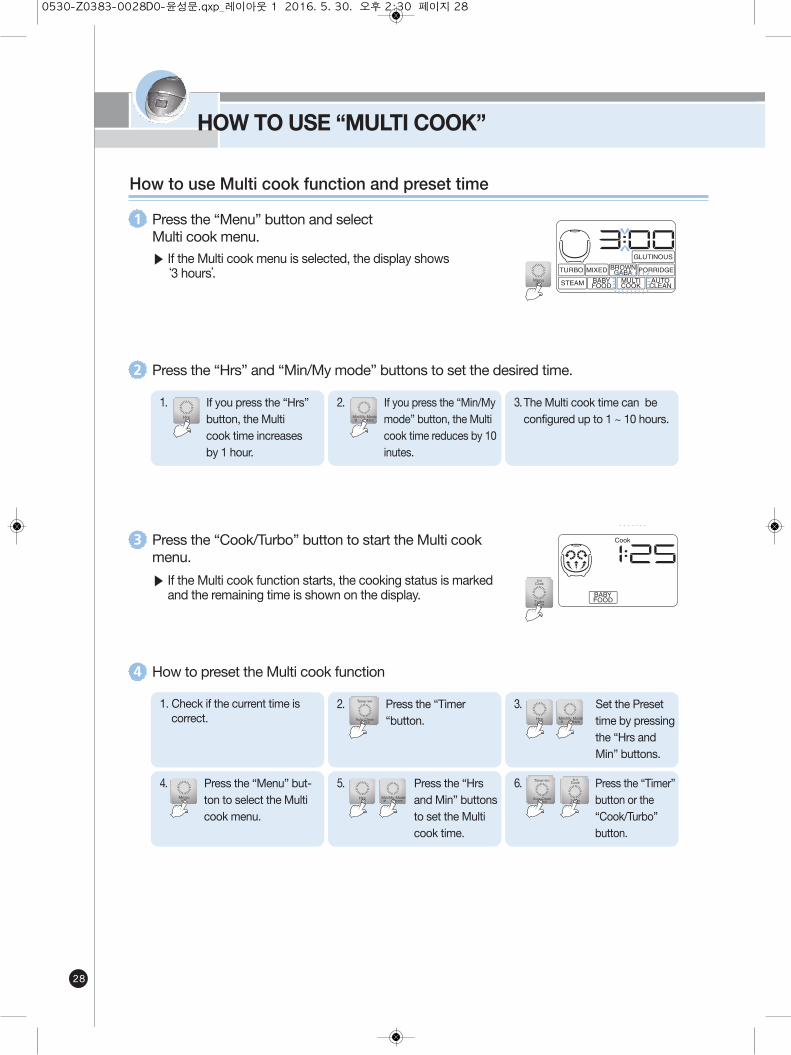
Press the “Menu” button and selectMulti cook menu.
1
▶ If the Multi cook menu is selected, the display shows‘3 hours’.
Press the “Hrs” and “Min/My mode” buttons to set the desired time.2
1. If you press the “Hrs”button, the Multicook time increasesby 1 hour.
2. If you press the “Min/Mymode” button, the Multicook time reduces by 10inutes.
3.The Multi cook time can beconfigured up to 1 ~ 10 hours.
Press the “Cook/Turbo” button to start the Multi cookmenu.
3
▶ If the Multi cook function starts, the cooking status is markedand the remaining time is shown on the display.
How to preset the Multi cook function4
1. Check if the current time iscorrect.
2. Press the “Timer“button.
3. Set the Presettime by pressingthe “Hrs andMin” buttons.
4. Press the “Menu” but-ton to select the Multicook menu.
5. Press the “Hrsand Min” buttonsto set the Multicook time.
6. Press the “Timer”button or the“Cook/Turbo”button.
0530-Z0383-0028D0-윤성문.qxp_레이아웃 1 2016. 5. 30. 오후 2:30 페이지 28
HOW TO USE “MULTI COOK”
29
ww
w.cu
ckoo
.co.kr
EN
GL
ISH
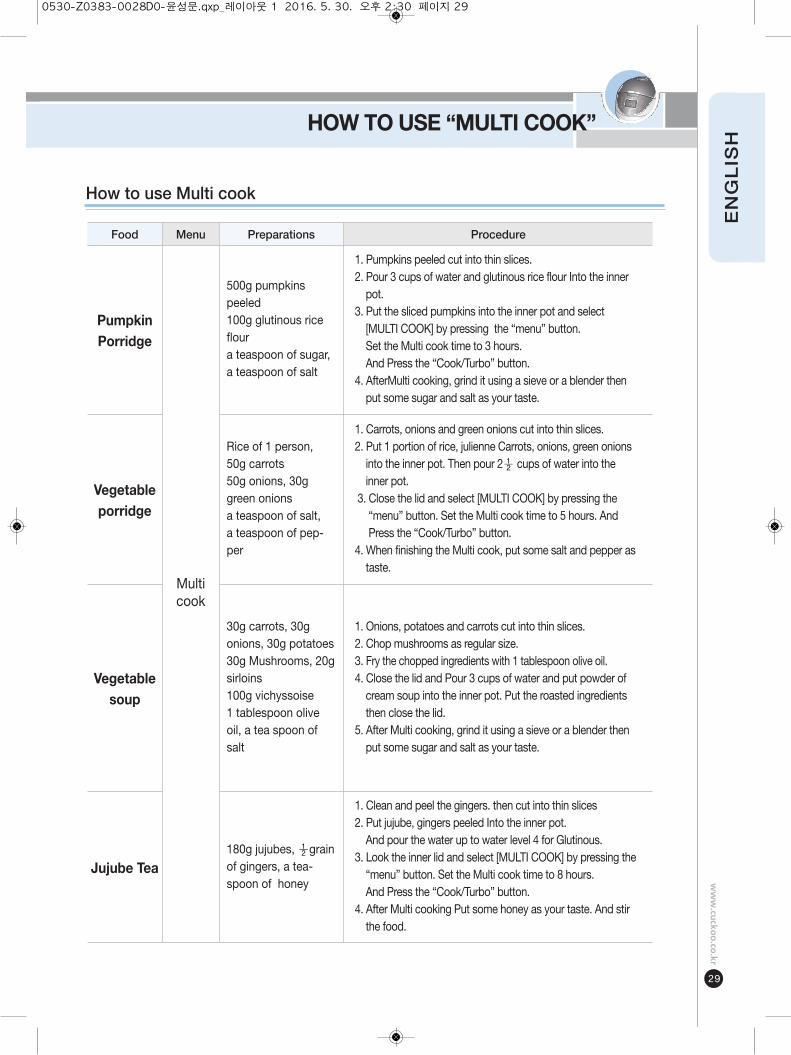
500g pumpkinspeeled100g glutinous ricefloura teaspoon of sugar, a teaspoon of salt
Rice of 1 person,50g carrots50g onions, 30ggreen onionsa teaspoon of salt, a teaspoon of pep-per
30g carrots, 30gonions, 30g potatoes30g Mushrooms, 20gsirloins100g vichyssoise 1 tablespoon oliveoil, a tea spoon ofsalt
180g jujubes, ½grainof gingers, a tea-spoon of honey
1. Pumpkins peeled cut into thin slices.2. Pour 3 cups of water and glutinous rice flour Into the innerpot.
3. Put the sliced pumpkins into the inner pot and select[MULTI COOK] by pressing the “menu” button. Set the Multi cook time to 3 hours. And Press the “Cook/Turbo” button.
4. AfterMulti cooking, grind it using a sieve or a blender thenput some sugar and salt as your taste.
1. Carrots, onions and green onions cut into thin slices.2. Put 1 portion of rice, julienne Carrots, onions, green onionsinto the inner pot. Then pour 2½ cups of water into theinner pot.
3. Close the lid and select [MULTI COOK] by pressing the“menu” button. Set the Multi cook time to 5 hours. AndPress the “Cook/Turbo” button.
4. When finishing the Multi cook, put some salt and pepper astaste.
1. Onions, potatoes and carrots cut into thin slices.2. Chop mushrooms as regular size.3. Fry the chopped ingredients with 1 tablespoon olive oil.4. Close the lid and Pour 3 cups of water and put powder ofcream soup into the inner pot. Put the roasted ingredientsthen close the lid.
5. After Multi cooking, grind it using a sieve or a blender thenput some sugar and salt as your taste.
1. Clean and peel the gingers. then cut into thin slices2. Put jujube, gingers peeled Into the inner pot. And pour the water up to water level 4 for Glutinous.
3. Look the inner lid and select [MULTI COOK] by pressing the“menu” button. Set the Multi cook time to 8 hours. And Press the “Cook/Turbo” button.
4. After Multi cooking Put some honey as your taste. And stirthe food.
Preparations Procedure
How to use Multi cook
Food
PumpkinPorridge
Vegetableporridge
Vegetablesoup
Jujube Tea
Multicook
Menu
0530-Z0383-0028D0-윤성문.qxp_레이아웃 1 2016. 5. 30. 오후 2:30 페이지 29
HOW TO PRESET TIMER FOR COOKING
30
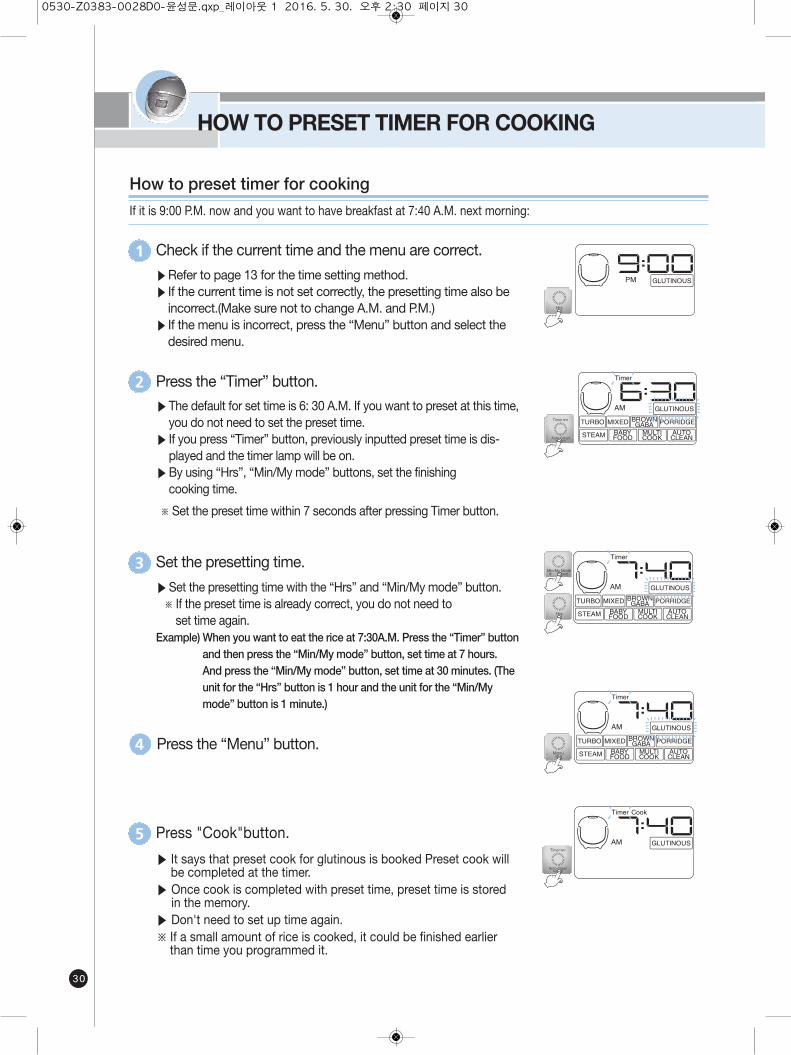
Check if the current time and the menu are correct.
▶Refer to page 13 for the time setting method.▶ If the current time is not set correctly, the presetting time also beincorrect.(Make sure not to change A.M. and P.M.)
▶ If the menu is incorrect, press the “Menu” button and select thedesired menu.
1
Press the “Timer” button.2
Set the presetting time.
▶Set the presetting time with the “Hrs” and “Min/My mode” button.※ If the preset time is already correct, you do not need to set time again.
Example) When you want to eat the rice at 7:30A.M. Press the “Timer” buttonand then press the “Min/My mode” button, set time at 7 hours.And press the “Min/My mode” button, set time at 30 minutes. (Theunit for the “Hrs” button is 1 hour and the unit for the “Min/Mymode” button is 1 minute.)
3
Press "Cook"button.
▶ It says that preset cook for glutinous is booked Preset cook willbe completed at the timer.
▶ Once cook is completed with preset time, preset time is storedin the memory.
▶ Don't need to set up time again.※ If a small amount of rice is cooked, it could be finished earlier
than time you programmed it.
5
Press the “Menu” button.4
How to preset timer for cooking
If it is 9:00 P.M. now and you want to have breakfast at 7:40 A.M. next morning:
▶The default for set time is 6: 30 A.M. If you want to preset at this time,you do not need to set the preset time.
▶ If you press “Timer” button, previously inputted preset time is dis-played and the timer lamp will be on.
▶By using “Hrs”, “Min/My mode” buttons, set the finishing cooking time.
※Set the preset time within 7 seconds after pressing Timer button.
0530-Z0383-0028D0-윤성문.qxp_레이아웃 1 2016. 5. 30. 오후 2:30 페이지 30
HOW TO PRESET TIMER FOR COOKING
31
ww
w.cu
ckoo
.co.kr
EN
GL
ISH
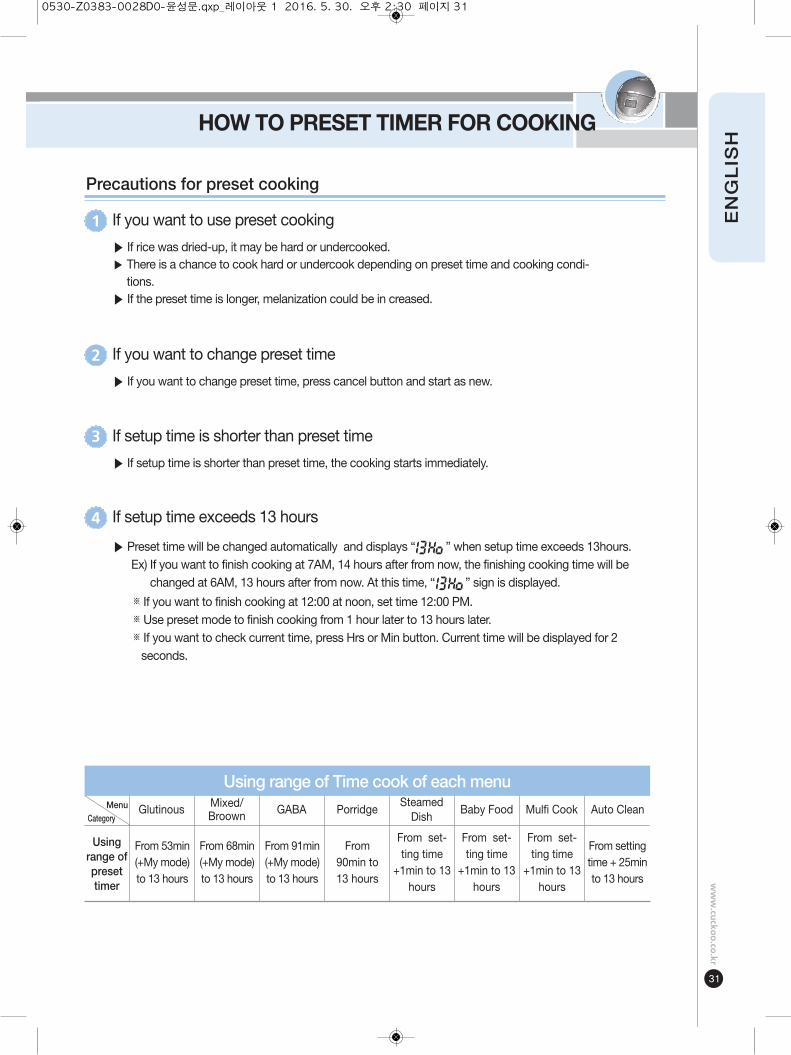
▶ Preset time will be changed automatically and displays “ ” when setup time exceeds 13hours. Ex) If you want to finish cooking at 7AM, 14 hours after from now, the finishing cooking time will be
changed at 6AM, 13 hours after from now. At this time, “ ” sign is displayed. ※ If you want to finish cooking at 12:00 at noon, set time 12:00 PM. ※Use preset mode to finish cooking from 1 hour later to 13 hours later. ※ If you want to check current time, press Hrs or Min button. Current time will be displayed for 2
seconds.
Precautions for preset cooking
If you want to use preset cooking
▶ If rice was dried-up, it may be hard or undercooked.▶ There is a chance to cook hard or undercook depending on preset time and cooking condi-
tions.▶ If the preset time is longer, melanization could be in creased.
1
If you want to change preset time
▶ If you want to change preset time, press cancel button and start as new.
2
If setup time is shorter than preset time
▶ If setup time is shorter than preset time, the cooking starts immediately.
3
If setup time exceeds 13 hours4
Using range of Time cook of each menu
Usingrange ofpresettimer
GlutinousMenu
Category
From 53min(+My mode)to 13 hours
Mixed/Broown
From 68min(+My mode)to 13 hours
GABA
From 91min(+My mode)to 13 hours
Porridge
From90min to13 hours
SteamedDish
From set-ting time
+1min to 13hours
Baby Food
From set-ting time
+1min to 13hours
Mulfi Cook
From set-ting time
+1min to 13hours
Auto Clean
From settingtime + 25minto 13 hours
0530-Z0383-0028D0-윤성문.qxp_레이아웃 1 2016. 5. 30. 오후 2:30 페이지 31
TO KEEP COOKED RICE WARM AND TASTY
32
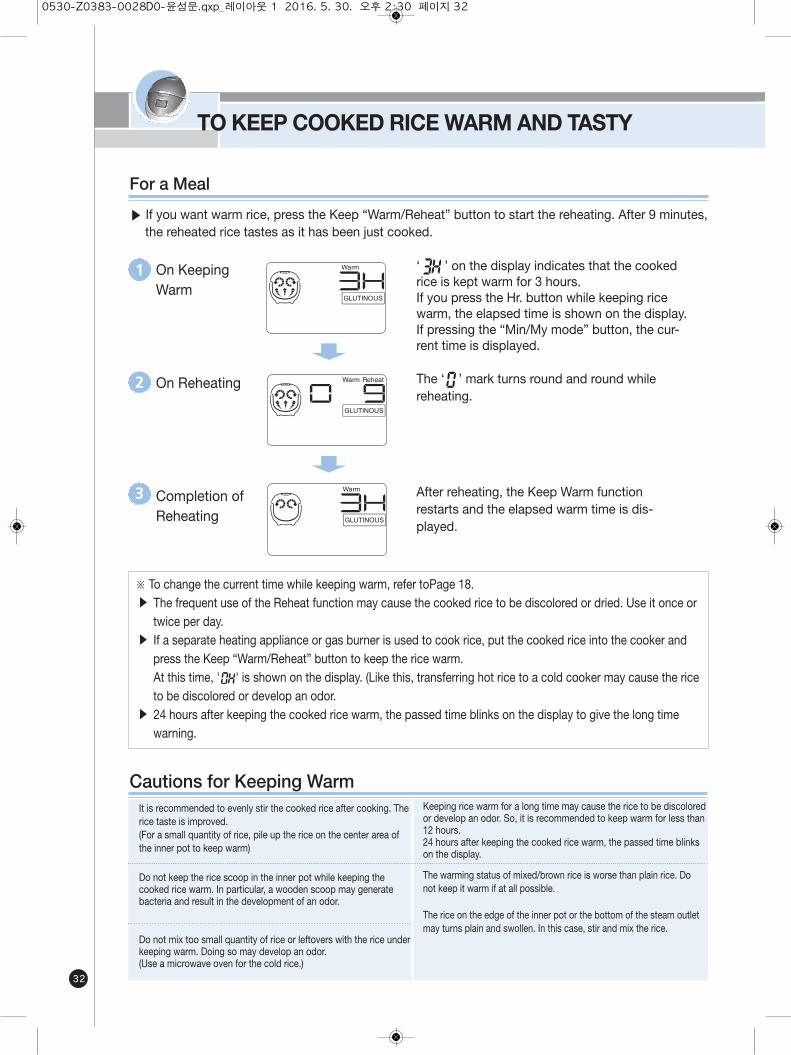
‘ ’ on the display indicates that the cookedrice is kept warm for 3 hours.If you press the Hr. button while keeping ricewarm, the elapsed time is shown on the display.If pressing the “Min/My mode” button, the cur-rent time is displayed.
The ‘ ’ mark turns round and round whilereheating.
After reheating, the Keep Warm functionrestarts and the elapsed warm time is dis-played.
For a Meal
▶ If you want warm rice, press the Keep “Warm/Reheat” button to start the reheating. After 9 minutes, the reheated rice tastes as it has been just cooked.
※ To change the current time while keeping warm, refer toPage 18.▶ The frequent use of the Reheat function may cause the cooked rice to be discolored or dried. Use it once or
twice per day.▶ If a separate heating appliance or gas burner is used to cook rice, put the cooked rice into the cooker and
press the Keep “Warm/Reheat” button to keep the rice warm.At this time, ' ' is shown on the display. (Like this, transferring hot rice to a cold cooker may cause the riceto be discolored or develop an odor.
▶ 24 hours after keeping the cooked rice warm, the passed time blinks on the display to give the long timewarning.
On KeepingWarm
1
On Reheating2
Completion ofReheating
3
It is recommended to evenly stir the cooked rice after cooking. Therice taste is improved.(For a small quantity of rice, pile up the rice on the center area ofthe inner pot to keep warm)
Do not keep the rice scoop in the inner pot while keeping thecooked rice warm. In particular, a wooden scoop may generatebacteria and result in the development of an odor.
Do not mix too small quantity of rice or leftovers with the rice underkeeping warm. Doing so may develop an odor.(Use a microwave oven for the cold rice.)
Keeping rice warm for a long time may cause the rice to be discoloredor develop an odor. So, it is recommended to keep warm for less than12 hours.24 hours after keeping the cooked rice warm, the passed time blinkson the display.
The warming status of mixed/brown rice is worse than plain rice. Donot keep it warm if at all possible.
The rice on the edge of the inner pot or the bottom of the steam outletmay turns plain and swollen. In this case, stir and mix the rice.
Cautions for Keeping Warm
0530-Z0383-0028D0-윤성문.qxp_레이아웃 1 2016. 5. 30. 오후 2:30 페이지 32
TO KEEP COOKED RICE WARM AND TASTY
33
ww
w.cu
ckoo
.co.kr
EN
GL
ISH
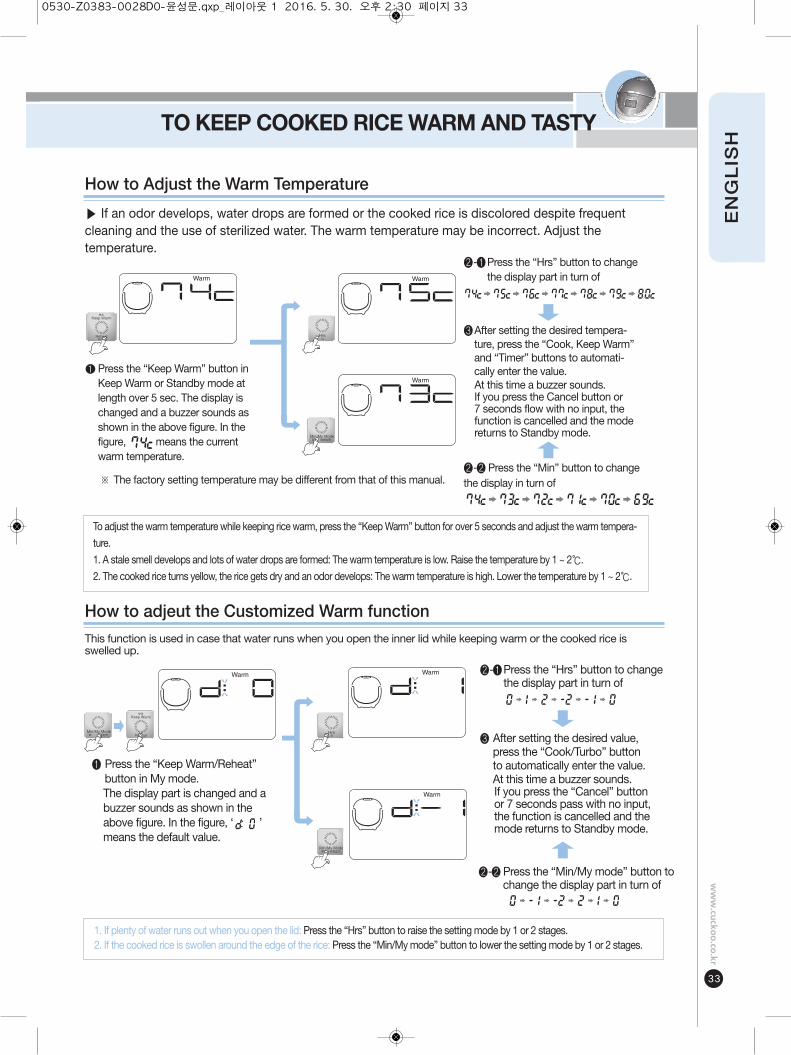
❷-❷ Press the “Min” button to changethe display in turn of
❶ Press the “Keep Warm” button inKeep Warm or Standby mode atlength over 5 sec. The display ischanged and a buzzer sounds asshown in the above figure. In thefigure, means the currentwarm temperature.
❷-❶Press the “Hrs” button to changethe display part in turn of
How to Adjust the Warm Temperature
▶ If an odor develops, water drops are formed or the cooked rice is discolored despite frequentcleaning and the use of sterilized water. The warm temperature may be incorrect. Adjust thetemperature.
❸After setting the desired tempera-ture, press the “Cook, Keep Warm”and “Timer” buttons to automati-cally enter the value. At this time a buzzer sounds.If you press the Cancel button or7 seconds flow with no input, thefunction is cancelled and the modereturns to Standby mode.
❷-❷Press the “Min/My mode” button tochange the display part in turn of
❶ Press the “Keep Warm/Reheat”button in My mode.The display part is changed and abuzzer sounds as shown in theabove figure. In the figure, ‘ ’means the default value.
❸ After setting the desired value,press the “Cook/Turbo” buttonto automatically enter the value.At this time a buzzer sounds.If you press the “Cancel” buttonor 7 seconds pass with no input,the function is cancelled and themode returns to Standby mode.
❷-❶Press the “Hrs” button to changethe display part in turn of
How to adjeut the Customized Warm function
This function is used in case that water runs when you open the inner lid while keeping warm or the cooked rice isswelled up.
To adjust the warm temperature while keeping rice warm, press the “Keep Warm” button for over 5 seconds and adjust the warm tempera-
ture.
1. A stale smell develops and lots of water drops are formed: The warm temperature is low. Raise the temperature by 1 ~ 2℃.
2. The cooked rice turns yellow, the rice gets dry and an odor develops: The warm temperature is high. Lower the temperature by 1 ~ 2℃.
※ The factory setting temperature may be different from that of this manual.
1. If plenty of water runs out when you open the lid: Press the “Hrs” button to raise the setting mode by 1 or 2 stages.2. If the cooked rice is swollen around the edge of the rice: Press the “Min/My mode” button to lower the setting mode by 1 or 2 stages.
0530-Z0383-0028D0-윤성문.qxp_레이아웃 1 2016. 5. 30. 오후 2:30 페이지 33
TO KEEP COOKED RICE WARM AND TASTY
34
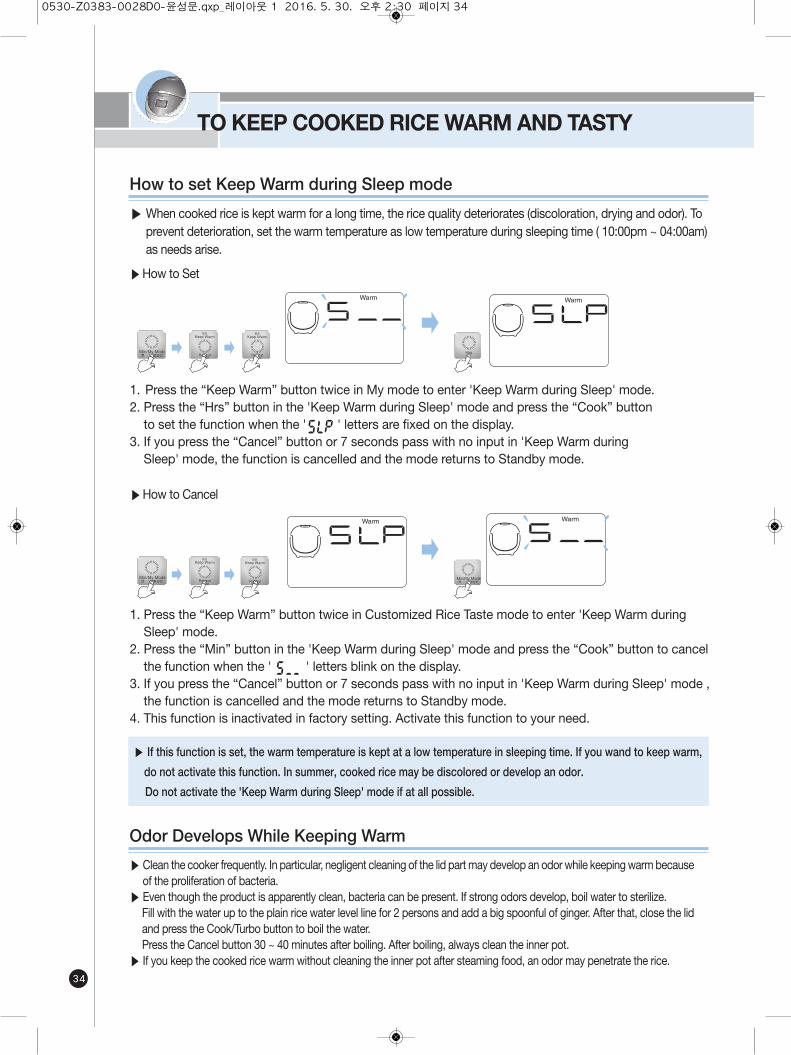
1. Press the “Keep Warm” button twice in My mode to enter 'Keep Warm during Sleep' mode.2. Press the “Hrs” button in the 'Keep Warm during Sleep' mode and press the “Cook” buttonto set the function when the ' ' letters are fixed on the display.
3. If you press the “Cancel” button or 7 seconds pass with no input in 'Keep Warm duringSleep' mode, the function is cancelled and the mode returns to Standby mode.
▶How to Cancel
1. Press the “Keep Warm” button twice in Customized Rice Taste mode to enter 'Keep Warm duringSleep' mode.
2. Press the “Min” button in the 'Keep Warm during Sleep' mode and press the “Cook” button to cancelthe function when the ' ' letters blink on the display.
3. If you press the “Cancel” button or 7 seconds pass with no input in 'Keep Warm during Sleep' mode ,the function is cancelled and the mode returns to Standby mode.
4. This function is inactivated in factory setting. Activate this function to your need.
▶ If this function is set, the warm temperature is kept at a low temperature in sleeping time. If you wand to keep warm,
do not activate this function. In summer, cooked rice may be discolored or develop an odor.
Do not activate the 'Keep Warm during Sleep' mode if at all possible.
How to set Keep Warm during Sleep mode
▶When cooked rice is kept warm for a long time, the rice quality deteriorates (discoloration, drying and odor). Toprevent deterioration, set the warm temperature as low temperature during sleeping time ( 10:00pm ~ 04:00am)as needs arise.
▶How to Set
Odor Develops While Keeping Warm
▶ Clean the cooker frequently. In particular, negligent cleaning of the lid part may develop an odor while keeping warm becauseof the proliferation of bacteria.
▶ Even though the product is apparently clean, bacteria can be present. If strong odors develop, boil water to sterilize.Fill with the water up to the plain rice water level line for 2 persons and add a big spoonful of ginger. After that, close the lidand press the Cook/Turbo button to boil the water.Press the Cancel button 30 ~ 40 minutes after boiling. After boiling, always clean the inner pot.
▶ If you keep the cooked rice warm without cleaning the inner pot after steaming food, an odor may penetrate the rice.
0530-Z0383-0028D0-윤성문.qxp_레이아웃 1 2016. 5. 30. 오후 2:30 페이지 34

35
ww
w.cu
ckoo
.co.kr
▼ If there is a problem with your cooker, check the following details before requesting service to your dealer.Sometimes the cooker may not operate as desired if used incorrectly.
Case
When the rice is not well
cooked.
Been(other grains)is half
cooked.
Rice is too watery or stiff.
When the water overflow.
When you smell something
while warming.
“ ”sign is appeared.
Check points
•Did you use the measuring cup tomeasure your rice?
•Did you measure proper water?•Did you clean the rice before cooking?•Did you put rice in water too long time?•Is the rice old or dry?
•Is bean (other grains) is too dry?
•Is it selected the menu correctly?•Did you measure proper water?•Did you open the lid before cookingwas finished?
•Did you use the measuring cup?•Did you measure proper water?•Did you open the lid before cookingwas finished?
•Did you close the lid.•Please check the power cord input towall socket.
•Did it warm over 12 hours?
•Is there any other substance such asrice scoop or cold rice.
•There is some problem on the temper-ature sensor.
During warm, “time”display
shine
During warm, rice is cold or
wet
•Did “Warm” time spend over 24hrs?
•Did you set “sleep warm” mode?
Do the following
•The shining display announces that“Warm”time is over 24hrs.
•You change mode or set the warm tempera-ture.
•Close the top cover perfectly.•Alway be keeping the power on while warm-ing.
•As possible as warming time is within 12hours.
•Don’t warm rice with other substance.
•Please contact to dealer or service center.
•Soaked or steam beans other grains before cook-ing in the pressure cooker in order to avoid par-tially cooked beans or grains. Beans should besoaked for-to-minutes or steamed for-to-minutesprior to cooking, depending on your taste.
•Refer to page 19.
•Insert some more water (about half of 1 level)
•Refer to page 19.
•Selected the correct menu.•Measure the proper water.•Open the lid after cooking finished.
•Press the “Cook/Turbo”button once. Andcheck“ ”sign on the display.
•Re-press the “Cook/Turbo”button
•“Cook/Turbo”button is pressed?
•Is there power cut while in cooking?
When the rice is not
cooked.
CHECK BEFORE ASKINGFOR SERVICE
0530-Z0383-0028D0-윤성문.qxp_레이아웃 1 2016. 5. 30. 오후 2:30 페이지 35
36
CHECK BEFORE ASKINGFOR SERVICE
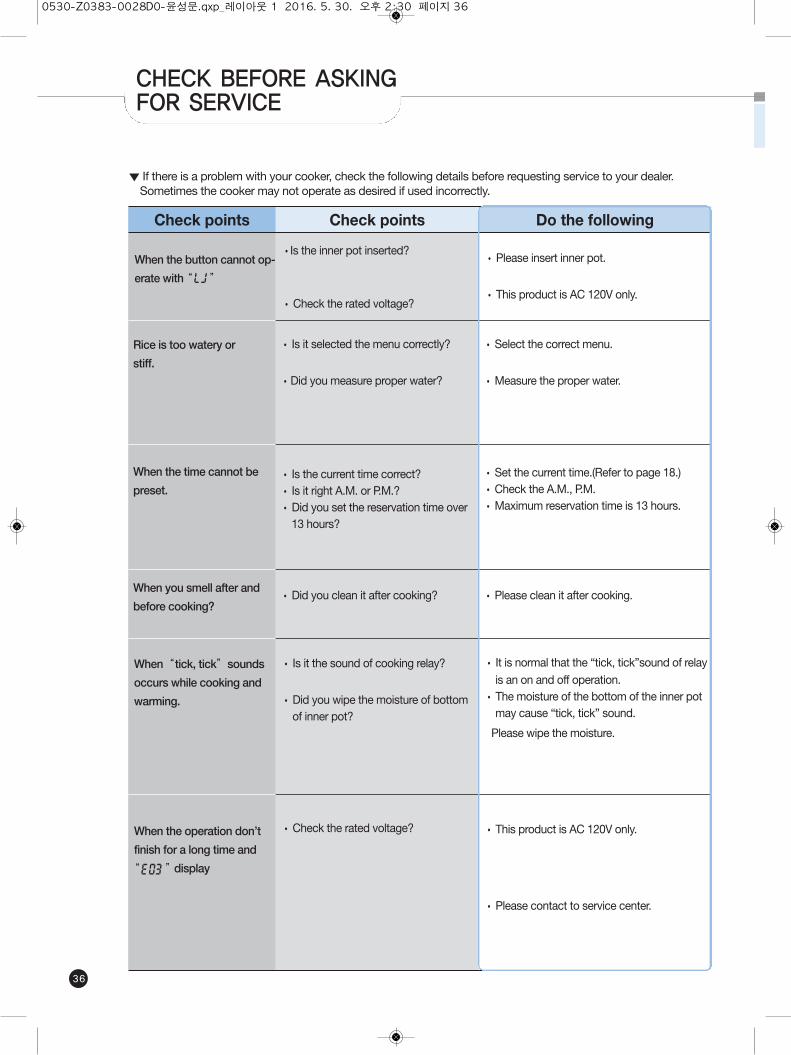
▼ If there is a problem with your cooker, check the following details before requesting service to your dealer.Sometimes the cooker may not operate as desired if used incorrectly.
Check points
When the time cannot be
preset.
When you smell after and
before cooking?
Check points
• Is the current time correct?• Is it right A.M. or P.M.?•Did you set the reservation time over13 hours?
•Did you clean it after cooking?
Do the following
Rice is too watery or
stiff.
• Is it selected the menu correctly?
•Did you measure proper water?
•Select the correct menu.
•Measure the proper water.
•Set the current time.(Refer to page 18.)•Check the A.M., P.M.•Maximum reservation time is 13 hours.
•Please clean it after cooking.
When the button cannot op-
erate with“ ”
•Is the inner pot inserted?
•Check the rated voltage?
•Please insert inner pot.
• This product is AC 120V only.
When“tick, tick”sounds
occurs while cooking and
warming.
When the operation don’t
finish for a long time and
“ ”display
• Is it the sound of cooking relay?
•Did you wipe the moisture of bottomof inner pot?
•Check the rated voltage?
• It is normal that the “tick, tick”sound of relayis an on and off operation.
• The moisture of the bottom of the inner potmay cause “tick, tick” sound.
Please wipe the moisture.
• This product is AC 120V only.
•Please contact to service center.
0530-Z0383-0028D0-윤성문.qxp_레이아웃 1 2016. 5. 30. 오후 2:30 페이지 36

83
ww
w.cu
ckoo
.co.kr
메모
0530-Z0383-0028D0-윤성문.qxp_레이아웃 1 2016. 5. 30. 오후 2:33 페이지 83
100% Recycled paper Z0383-0028D0 Rev.0
CR-0655F
0530-Z0383-0028D0-윤성문.qxp_레이아웃 1 2016. 5. 30. 오후 2:33 페이지 84