Embed Size (px)
Citation preview

8/6/2019 pftek
http://slidepdf.com/reader/full/pftek 1/16
PF Tek

8/6/2019 pftek
http://slidepdf.com/reader/full/pftek 2/16
Contents
1 Preface 2
2 Introduction 2
2.1 A Note On Cleanliness . . . . . . . . . . . . . . . . . . . . . . . . . . . . . . . . . . . . . 2
3 Materials 2
3.1 Vermiculite . . . . . . . . . . . . . . . . . . . . . . . . . . . . . . . . . . . . . . . . . . . 2
3.2 Brown rice flour (BRF) . . . . . . . . . . . . . . . . . . . . . . . . . . . . . . . . . . . . . 2
3.3 Water . . . . . . . . . . . . . . . . . . . . . . . . . . . . . . . . . . . . . . . . . . . . . . 4
3.4 Spore Syringe . . . . . . . . . . . . . . . . . . . . . . . . . . . . . . . . . . . . . . . . . . 4
3.5 Jars . . . . . . . . . . . . . . . . . . . . . . . . . . . . . . . . . . . . . . . . . . . . . . . 4
4 Getting Started 4
4.1 Overview . . . . . . . . . . . . . . . . . . . . . . . . . . . . . . . . . . . . . . . . . . . . 4
4.2 Substrate Preparation . . . . . . . . . . . . . . . . . . . . . . . . . . . . . . . . . . . . . . 5
4.2.1 Ingredients . . . . . . . . . . . . . . . . . . . . . . . . . . . . . . . . . . . . . . . 5
4.2.2 Mixing and filling jars . . . . . . . . . . . . . . . . . . . . . . . . . . . . . . . . . 5
4.3 Sterilization . . . . . . . . . . . . . . . . . . . . . . . . . . . . . . . . . . . . . . . . . . . 6
4.4 Inoculation . . . . . . . . . . . . . . . . . . . . . . . . . . . . . . . . . . . . . . . . . . . 6
4.5 Incubation . . . . . . . . . . . . . . . . . . . . . . . . . . . . . . . . . . . . . . . . . . . . 7
5 Fruiting 8
6 Dunk Tek 10
7 Drying 11
7.1 Easy Drying Box . . . . . . . . . . . . . . . . . . . . . . . . . . . . . . . . . . . . . . . . 11
7.2 Other Methods . . . . . . . . . . . . . . . . . . . . . . . . . . . . . . . . . . . . . . . . . 12
8 Keeping the Cycle Going 13
8.1 Spore Printing . . . . . . . . . . . . . . . . . . . . . . . . . . . . . . . . . . . . . . . . . . 13
8.2 Making a Syringe . . . . . . . . . . . . . . . . . . . . . . . . . . . . . . . . . . . . . . . . 13
9 Tips for Success 15
1

8/6/2019 pftek
http://slidepdf.com/reader/full/pftek 3/16
1 Preface
This PDF is a mashup of the original PF Tek[3] and a method called, PF Tek for Simple Minds[1]. Almost
all of this text and its pictures are from one of those two sources. This method is really simple and if you
follow the instructions, you will have success. Enjoy and have fun!
2 Introduction
The PF TEK is basically a brown rice method with an improved formula by using vermiculite as a base
and adding pulverized brown rice. The secret is in the vermiculite. When mycelium is cultured in just
grain, the mycelium turns into a mass with little air space. But when grown with vermiculite, the mycelial
threads stretch across space. The important thing about the PF TEK, is that it copies nature. Instead of the
usual cloning of mushroom tissue and growing mushrooms from that, a mass spore inoculation is employed
directly to the fruiting substrate. That way, the genotype remains complete. Senescence (mutating and
ceased fruiting) is no longer a problem. The spores insure a never ending succession of fungus, with all the
power of the spores reproductive ability intact.
2.1 A Note On Cleanliness
By growing mushrooms indoors on a nutritious substrate you create conditions than not only favor the
growth of the mushrooms, but also the growth of a large number of other organisms(molds, bacteria), many
of them potentially hazardous to the health. To ensure that only the desired mushroom is grown, it is very
important to assure cleanliness in all of the cultivation related procedures.
Before you work, wash your hands with (antibacterial) soap and warm water. Afterward, wipe them dry
and rub with Lysol or isopropyl alcohol(iso-propanol). Keep the place where you do the inoculation and
fruiting dust free and clean and don’t bring in dirty clothing or shoes. Personal hygiene is equally important.
Dirty hands and even dirty hair are a hotbed for all kinds of unwanted microorganisms which can destroy
your cultivation project.
3 Materials
Most materials are easily available at the local shops. A quick Google search will help you find anything
else you need.
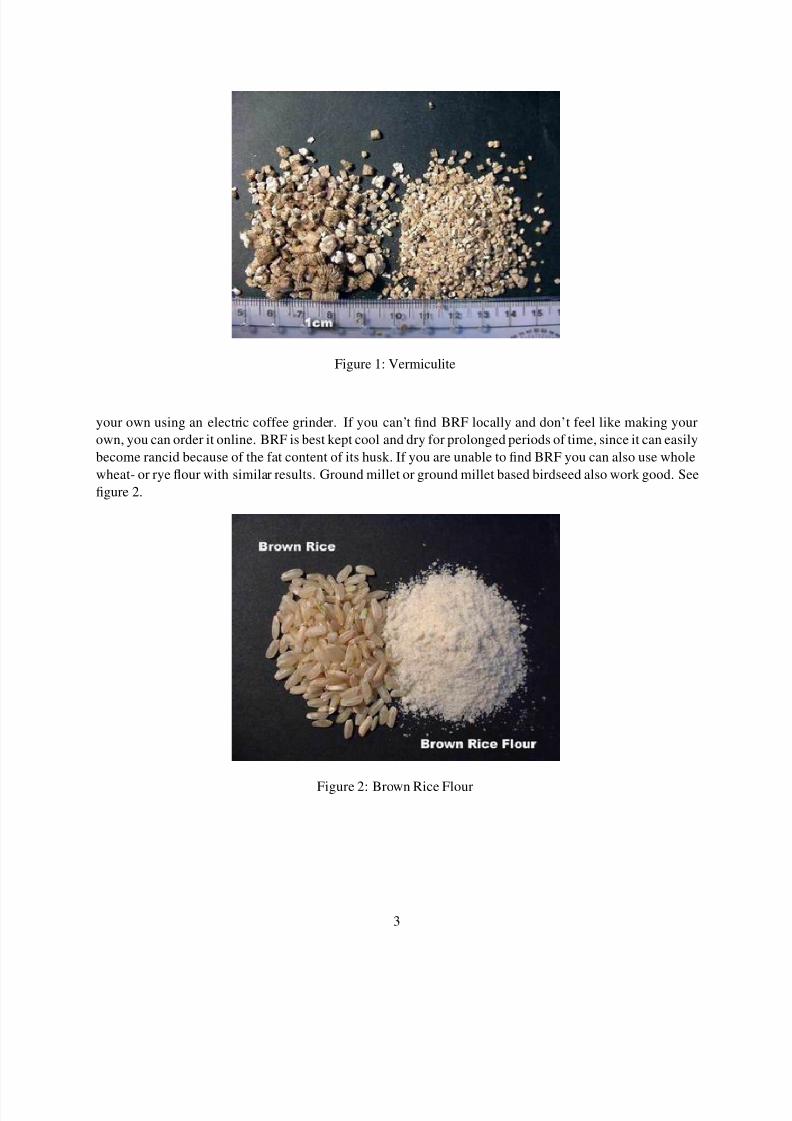
3.1 Vermiculite
Vermiculite is made from a naturally occurring mineral - mica. Crushed mica containing water is heated and
expands to a volume several times greater than that of the untreated mica. Vermiculite is able to hold several
times its own weight in water and it gives the substrate an airy structure. Vermiculite is available in several
grades, the middle and the middle-fine grade are most suitable for cultivation purposes. See figure 1.
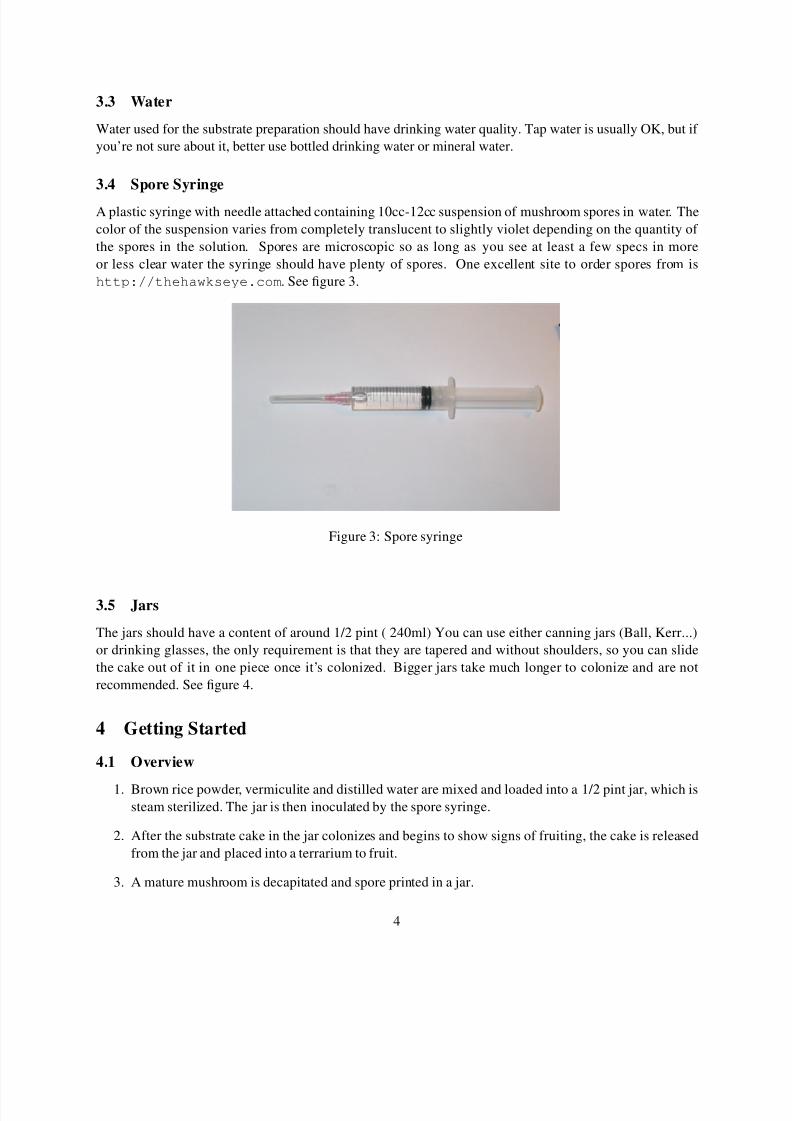
3.2 Brown rice flour (BRF)
BRF is available in health food shops either already ground, sometimes though there is only whole brown
rice available. In this case you can grind the rice either in the shop or if this option is not available, grind
2
8/6/2019 pftek
http://slidepdf.com/reader/full/pftek 4/16
Figure 1: Vermiculite
your own using an electric coffee grinder. If you can’t find BRF locally and don’t feel like making your
own, you can order it online. BRF is best kept cool and dry for prolonged periods of time, since it can easily
become rancid because of the fat content of its husk. If you are unable to find BRF you can also use whole
wheat- or rye flour with similar results. Ground millet or ground millet based birdseed also work good. See
figure 2.
Figure 2: Brown Rice Flour
3
8/6/2019 pftek
http://slidepdf.com/reader/full/pftek 5/16
3.3 Water
Water used for the substrate preparation should have drinking water quality. Tap water is usually OK, but if
you’re not sure about it, better use bottled drinking water or mineral water.
3.4 Spore Syringe
A plastic syringe with needle attached containing 10cc-12cc suspension of mushroom spores in water. The
color of the suspension varies from completely translucent to slightly violet depending on the quantity of
the spores in the solution. Spores are microscopic so as long as you see at least a few specs in more
or less clear water the syringe should have plenty of spores. One excellent site to order spores from is
http://thehawkseye.com. See figure 3.
Figure 3: Spore syringe
3.5 Jars
The jars should have a content of around 1/2 pint ( 240ml) You can use either canning jars (Ball, Kerr...)
or drinking glasses, the only requirement is that they are tapered and without shoulders, so you can slide
the cake out of it in one piece once it’s colonized. Bigger jars take much longer to colonize and are not
recommended. See figure 4.
4 Getting Started
4.1 Overview
1. Brown rice powder, vermiculite and distilled water are mixed and loaded into a 1/2 pint jar, which issteam sterilized. The jar is then inoculated by the spore syringe.
2. After the substrate cake in the jar colonizes and begins to show signs of fruiting, the cake is released
from the jar and placed into a terrarium to fruit.
3. A mature mushroom is decapitated and spore printed in a jar.
4

8/6/2019 pftek
http://slidepdf.com/reader/full/pftek 6/16
Figure 4: Canning jars
4. Spore syringes are prepared with the spore print jar to begin another life cycle.
4.2 Substrate Preparation
4.2.1 Ingredients
For one 1/2 pint jar(240 ml) you will need:
1. 140 ml vermiculite
2. 40 ml brown rice flour
3. Some vermiculite to fill the jar to the top (app. 20 ml)
4. Water
For 6 jars, this amounts to:
1. 3.5 US cups vermiculite
2. 1 US cup brown rice flour
Note: 1/2pt(US pint) = 1cp (US cup) = 236ml(milliliter) = 236cc(cubic centimeter) = 1/4 qt(US quart)
4.2.2 Mixing and filling jars
1. Put the required amount of vermiculite for all the jars of one batch (for instance 6 jars: 6 x 140 ml =
840 ml or about 3.5 US cups ) in a bowl.
2. Pour water slowly over the vermiculite while stirring with a spoon. Be careful to only put that much
water in as it can be absorbed by the vermiculite. Stir it well so all the vermiculite is uniformly soaked
with water.
5

8/6/2019 pftek
http://slidepdf.com/reader/full/pftek 7/16
3. When you tilt the bowl you should see just a little water starting coming from the vermiculite. This
is when the correct water content is achieved. If there is too much water in the bowl, pour the wet
vermiculite in a strainer and let the excess water drain for a minute. Then the vermiculite will be at
the field capacity, which is perfect.
4. Now put the required amount of the BRF (for instance 6 x 40 ml = 240 ml = 1 US cup) into the wet
vermiculite at once and mix it in with the spoon. The goal is to uniformly coat the wet vermiculite
particles with a layer of BRF.
5. Fill the mixture in jars 1/2 inch (1cm) under the top. It’s very important to fill the substrate in the jars
without tapping it down at all. It should stay very airy and loose to provide optimum conditions for
the growth of mycelium. Be careful not to leave any substrate on the upper edge of the jar. If you
weren’t careful enough and there are some substrate specks at the edge take a clean moist cloth and
wipe the upper portion of the jar clean. Otherwise contaminants can start at those spots and work their
way down into the jar.
6. Fill up the jar with dry vermiculite to the top. This layer hinders airborne contaminants reaching the
underlying substrate in case they manage to come in during the inoculation and incubation.
4.3 Sterilization
For sterilization, you can use a big pot with a lid. Place the lid on the jar with the rubberized edge up
(jagged edges of the needle holes down). Screw the lid band on. Place pieces of masking tape (holds on
during steaming) over the needle holes. This is to protect the needle holes from contaminant entry. Put
something in the bottom of the pot like a grate or a dish towel. When steaming or pressure canning is
performed, the jars must be protected from water dripping down from the underside of the pot lid caused by
heavy condensation and drip off during boiling. This water can get into the jars by entering under the jar
lids that aren’t tight and soaking the substrate - throwing off the formula and setting up failure. To prevent
this, wrap some tin foil around the cap to ward off the water. The tin foil can be removed after steaming
(with the tape guarding the needle holes - or the tin foil can be left on until it is inoculation time.) Steam the jars for 1.5 hours in a pot lid on. Use only approximately 1 inch of water at the bottom. You might have to
add some water to the pot during steaming due to evaporation.
4.4 Inoculation
Any jar to be inoculated must be cool to the touch before proceeding. Make sure the lid is tight. Shake the
syringe well and remove the tape from the syringe needle guard. This shaking of the syringe is important
as to redistribute the spores in the water. Take off the tape covering the needle holes. Remove the needle
guard and insert the needle through the lid hole. Tilt the syringe body back towards the center of the lid
with the needle tip touching the glass. This distributes the spore water down the side of the jar, giving a
good inoculation down the side of the substrate cake. Inoculate a few drops down each needle hole. As the
syringe plunger is pressed, observe the needle tip against the inside of the glass. As soon as water appears
around the needle tip, release the syringe plunger pressure. In between each hole inoculation, shake the
syringe a little to keep the spores distributed. Use 1 cc per jar. This will allow the syringe to inoculate 10
jars. More spore solution per jar can be used (speeds colonization), but fewer jars can be inoculated. If the
syringe needle plugs up as it is inserted into the substrate, draw the needle back a little and it will unplug.
See figure 5 for an example on how to inoculate.
6

8/6/2019 pftek
http://slidepdf.com/reader/full/pftek 8/16
Figure 5: The vermiculite shown it much coarser than what you would really want to use.
4.5 Incubation
The jars should be stored at 21-27◦C (70-81◦F), the warmer the better, but not exceeding 27◦C. If you don’t
have these temperatures at home you can build an incubator to accommodate the jars.
Providing the jars are kept warm you should see the first sign of germination after 3-5 days as bright
white specks. This is mycelium. If anything grows that is not white, for instance green, black or pink,
then the jars are contaminated and their content must be discarded and your clean procedures need some
improvement. After the jars are emptied and the jar is washed with detergent and hot water it can be used
again. Check the Shroomery Contamination FAQ[2] for more information on possible contamination in
mushroom culture.
Depending on the temperature and the viability of the spore syringe it takes 14-28 days for the myceliumto colonize the whole jar. Once colonized store the jars at normal room temperature, about 21◦C (70◦F) to
initiate pinning. Don’t expose the jars to direct sunlight. Indirect sunlight (= the natural light that lights up
a room because at day time out) or a low wattage lamp (cool white fluorescent lamp is ideal, incandescent
lamp is less suitable) for 4-12 hours a day is sufficient.
Within 5-10 days (with certain mushroom strains it can however take up to 30 days) pinhead-size accu-
mulations of mycelium should form. These so called pins represent the beginning of mushroom growth. In
the following days also small mushrooms with brown heads become visible. When this is the case it’s time
to birth the cake into the fruiting container where the mushrooms can develop to maturity. Some strains
don’t easily develop pins. In this case put the colonized jar wrapped in a plastic bag in the fridge over night
and then proceed to fruiting next day, even if the cake doesn’t show pins yet. This cold shocking usually
helps trigger pinning somewhat. Take a look at figure 6 to see what a cake looks like when it’s ready to startfruiting.
7

8/6/2019 pftek
http://slidepdf.com/reader/full/pftek 9/16
Figure 6: A fully colonized cake with a small pin showing.
5 Fruiting
The fruiting of the cakes can be accomplished in any sort of container that can be loosely sealed and has
at least one translucent side, preferably on the top. Suitable containers are a plastic bucket, Rubbermaid
container, terrarium, aquarium. . .
Put an 1/2 inch layer of moistened perlite or expanded clay pellets or even a wet paper towel at the
bottom of the container and birth the cakes onto this layer by letting them slide from the jar upside down.
Sometimes the cake doesn’t slide out of the jar easily by itself. You just need to turn the colonized jar
upside down in your hand and slam the hand lightly against the palm of the other hand. This will make the
cake slide against the lid and it can be birthed with ease.
If you have a bigger fruiting chamber (a bigger plastic container or a terrarium) you can of course put in
more than one cake to fruit. The distance between the cakes should be at least 2” (5cm) for the mushrooms
have room to grow. Put a sheet of translucent plastic over the opening of the fruiting container (see figure
7). Take this sheet off once a day and fan the air out with a piece of cardboard. If the bottom layer begins to
dry out, spray it with some water to keep it moist since this layer provides moisture for the air to stay very
humid. Don’t spray the cakes directly. Handle the cakes as little as possible but when you do it always wash
your hands thoroughly beforehand. Over a course of the next 7-14 days the cakes will begin to pin(if the
haven’t began to pin in the jars yet) and the small mushrooms will grow big in a matter of 2-5 days and as
soon the caps begin to open they can be harvested. This simultaneous maturation of all mushrooms is called
a flush.
After the mushrooms have grown big there are usually a few small, stunted mushrooms left over, they
are called aborts. They can be recognized by their blackish heads and the fact that they stopped growing atsome point. Still they are good to use unless they are rotten.
It’s crucial that you harvest all mushrooms, also the aborts, after the flush. This is most easily accom-
plished if you harvest the mushrooms off by gently twisting and tearing them off the cake with clean hands.
Optionally you can dunk the cakes in cold water for about 12 hours after each flush, this can increase the
flush size significantly. See section 6 for details on dunking.
8

8/6/2019 pftek
http://slidepdf.com/reader/full/pftek 10/16
Figure 7: A terrarium made from a trash can and a plastic bag.
After approximately one week small mushrooms begin to form again and mature during the next days.
This cycle can repeat itself up to 4 times sometimes even more. After that the cake is exhausted it produces
no more mushrooms and can be discarded.
Figure 8: A cake ready to be harvested.
Sometimes green mold attacks the cakes even before they are completely exhausted. If this is the case
remove and discard the contaminated cakes immediately to prevent the spreading of the contamination.
9

8/6/2019 pftek
http://slidepdf.com/reader/full/pftek 11/16
6 Dunk Tek
Dunk Tek is a simple yet effective way to extend the useful lifespan of cubensis cultures such as PF cakes.
This Tek should be used whenever the cakes/casings dry out. Also it can be given after full colonization to
replace water lost so far.
The Tek itself is quite simple. It essentially consists of submersion of the cake/casing underwater for
12 to 24 hours. Don’t worry, that will not harm your cakes/casings. This is best done under refrigeration,
if possible. One can even dunk cakes/casing that already have small pins safely. Just don’t overdo it, by 48
hours underwater they will be dead. As for what kind of water to use, natural spring water is best but you
can even use it straight from your faucet if need be.
Temperature during the dunking should be cold, or as cool as possible and still above freezing. Time
spent dunking should be not less than 6 hours for minimal benefits. 12 hours is about right for dunking in
between flushes and at birth but 24 hours is the maximum for full re-hydration of nearly spent cakes. There
are at least 2 options for how to dunk. My preferred method is to dunk each cake individually by placing
it in a jar, filling with water, then screw on the lid to keep the cake submerged. This way is good for small
batches, and has the advantage of keeping each cake isolated so no contaminants are spread from cake to
cake. For larger batches, you can simply place several cakes in a large pan or bucket, cover with water and
weigh down the cakes by placing a weighted down lid, plate, etc. on top of the cakes. After dunking, drainwell, gently pat dry with paper towels, etc. and return it to the fruiting environment. See figure 9 to see a
dunk in action.
Figure 9: A cake being dunked in cold water.
10

8/6/2019 pftek
http://slidepdf.com/reader/full/pftek 12/16
7 Drying
The immature specimens are the best in quality, digestibility and potency. They are characterized as being
very light in color with white stems and light colored caps. The cap will spread out after the veil breaks.
Just before or right after the veil breaks is a good time to harvest. The gills on the underside of the cap will
be light in color. The mushrooms will be conical shaped and sporulation hasn’t really begun yet. These are
the mushrooms that are the best for harvesting.
7.1 Easy Drying Box
One of the easiest ways to dry the fungi is to place them on a wire screen with air available to all sides.
Never dry them in an oven or use hot air dryers. The heat leaches the chemical constituents and reduces
their quality. Using desiccant to cool dry mushrooms is overall, the best drying technique. The easiest
desiccant to find will be something called, ”Damp Gone”. It looks like kitty litter but it’s for drying closets
and damp places in the home. You should be able to find this at a hardware store. This is inexpensive
desiccant but works as well as any.
Figure 10: Box frame with a screen used for drying.
What desiccant does, is absorb moisture out of the air. As the fungus transpires moisture, the moisture
is immediately absorbed back into the desiccant, drying the fungi. Desiccant can be reused and lasts indef-
initely. After use, the desiccant is heated, dried and stored for future use. Store it in an air tight container
so that it stays dry and ready for use. Heat the desiccant in an oven as instructed by the manufacturer. This
preheating should be done before the desiccant is used because when it is purchased - it is usually somewhat
damp which will thwart its function for drying air.
In drying a medium sized mushroom such as Psilocybe Cubensis, use a 1 inch layer of desiccant on thebottom of the container, under the mushrooms. Place the mushrooms on a wire screen and lay them on the
desiccant that is in the container. Put the container with the shrooms and desiccant into a plastic bag. A
garbage bag type wire tie is sufficient to close the bag. If a clear plastic bag can be found, use that to observe
the drying process. After 24 hours, a little shriveling of the shrooms can be seen. About 4 or 5 days later,
the shrooms will be dried rock hard. To check the drying - the stem should snap cleanly when bent.
11

8/6/2019 pftek
http://slidepdf.com/reader/full/pftek 13/16
Figure 11: The drying box sitting over a tub of desiccant inside a plastic bag.
Mushrooms dried in this way lose hardly any chemical constituents and their truly desiccated state
preserves them in their prime for months. Store them by sealing them in plastic bags or keep them in
canning jars with the rubber edged canning lid on tight (as in the photo - dried shrooms in little bags stored
on top of desiccant). The freezer is a good place for preservation, but make sure the fungi are tightly sealed
in their containers to protect them against the moisture in the freezer.
Figure 12: A jar of dried mushrooms, ready for storage.
7.2 Other Methods
A simple box fan also dries out mushrooms well. Lay the fan down on the floor with a book or two under
it. The books are there so that there is some airflow even though the fan is facing the floor. Put the fan on
the books so that the air is sucking down from the top and blowing the air out at the floor. Then, lay your
12

8/6/2019 pftek
http://slidepdf.com/reader/full/pftek 14/16
mushrooms right on the fan’s grate. If the holes are too big, place a finer screen on top of the fan, or even a
few paper towels.
You may also have some luck by putting the mushrooms in some paper towels and keeping them in the
fridge or freezer. Your fridge or freezer must be frost free for this to work. Also, change the paper towels
every couple days.
8 Keeping the Cycle Going
8.1 Spore Printing
To make a spore print, you will need:
1. 1/2 pint canning jar
2. Small scissors
3. Rubbing alcohol
Presterilize the jar and regular metal lid (rubber edge up) in a small toaster oven at around 300 degreesFahrenheit for around a half hour. Keep the lid loose during the sterilization cycle. When the jar has cooled
down, tighten the lid until it is time to use the jar for a spore print. The rubberized edge will be a bit melted,
but that won’t be any problem in this technique.
Note: What follows is a sterile technique. The first rule that must be always followed is to wash hands
prior to sterile work. Hands are a prime source for bacteria and microspore contaminants. Sterilize all the
work surfaces with rubbing alcohol. Minimize drafts. Try for a still air environment. Don’t breathe on the
work. Run a small home appliance style HEPA air cleaner (99.97% rated efficiency - available at drug and
department stores) for a few hours in a closed room to clean the air before doing sterile work.
Flame sterilize the scissors with an alcohol flame and snip off the mushroom cap. Cut the top of the
stem as far up into the cap as possible so that the gills of the mushroom will sit flat on the surface of the jar
bottom. With quick and sure movements, place the cap into the jar and place the lid on loosely. Pierce thetop of the cap with a straight pin to pick it up and handle it.
Leave the jar with a loose cap for a couple of days in a draft free area away from direct sunlight. After
the print is taken, quickly and with as little air disturbance as possible, remove the jar cap and extract the
mushroom cap from the jar. With a loose jar cap, let the jar sit in a draft free place to dehumidify for a few
days before sealing it up (with tape) because there will be some residual moisture left behind on the spores
and glass. Store the spore print jar at room temperatures in a dark place away from sunlight. Don’t store it
in a refrigerator.
Psilocybe Cubensis spores begin to degrade a few months after they are taken. After approximately 1
1/2 years, spore germination will be greatly reduced or won’t occur at all. Germination is massive and quick
when the spores are fresh.
8.2 Making a Syringe
Boil a pot of water. Draw boiling water into a syringe and squirt it out several times. Refill the syringe with
boiling water, replace the needle quard and wrap the syringe in tin foil. Prepare several syringes like this.
Drop the syringes into the boiling water and boil them for one hour. Let them cool before using.
13

8/6/2019 pftek
http://slidepdf.com/reader/full/pftek 15/16
The main point of this technique would be to expose the interior of the jar to as little room air as possible.
Always protect the holes in the lid by placing tin foil or sterile surgical tape over the holes before and after
this procedure.
1. Inject sterile water into the spore print jar through the needle hole.
2. Flame sterilize a glass (preferably) stirring rod and let it cool a minute. Insert it through the center lidhole and with the rod end, scrape spores into the water. See figure 13.
3. Insert the sterile syringe needle through the small hole at the edge of the lid. Tilt the jar until the water
comes up to the needle tip and draw the spore water into the sterile syringe. See figure 14.
Figure 13: A jar with a stirring rod through the lid.
Figure 14: Loading the syringe with the spore water in the jar.
Store the syringe at cool temperatures in the dark. A properly prepared spore syringe will be good for
several months and even up to a year or more.
14

8/6/2019 pftek
http://slidepdf.com/reader/full/pftek 16/16
9 Tips for Success
1. When inoculating, being as sterile as possible is very important.
2. Take your time setting up your jars, this is the most crucial phase of the whole operation.
3. During incubation, keep the jars as warm as possible, around 85◦
F is good.
4. During fruiting, keep the jars as humid as possible.
5. Use the Dunk Tek, the Dunk Tek is good. See section 6.
6. Make sure to thoroughly dry out your mushrooms before storing them.
References
[1] PF Tek for Simple Minds. fungifun.org. http://www.fungifun.org/English/Pftek.
[2] Shroomery Contamination Problems. shroomery.org. http://www.shroomery.org/ref/1519/index/par/3344.
[3] Original PF Tek . fanaticus.com, 1992. http://www.fungifun.org/fanaticus/index.htm.
15


