Embed Size (px)
Citation preview
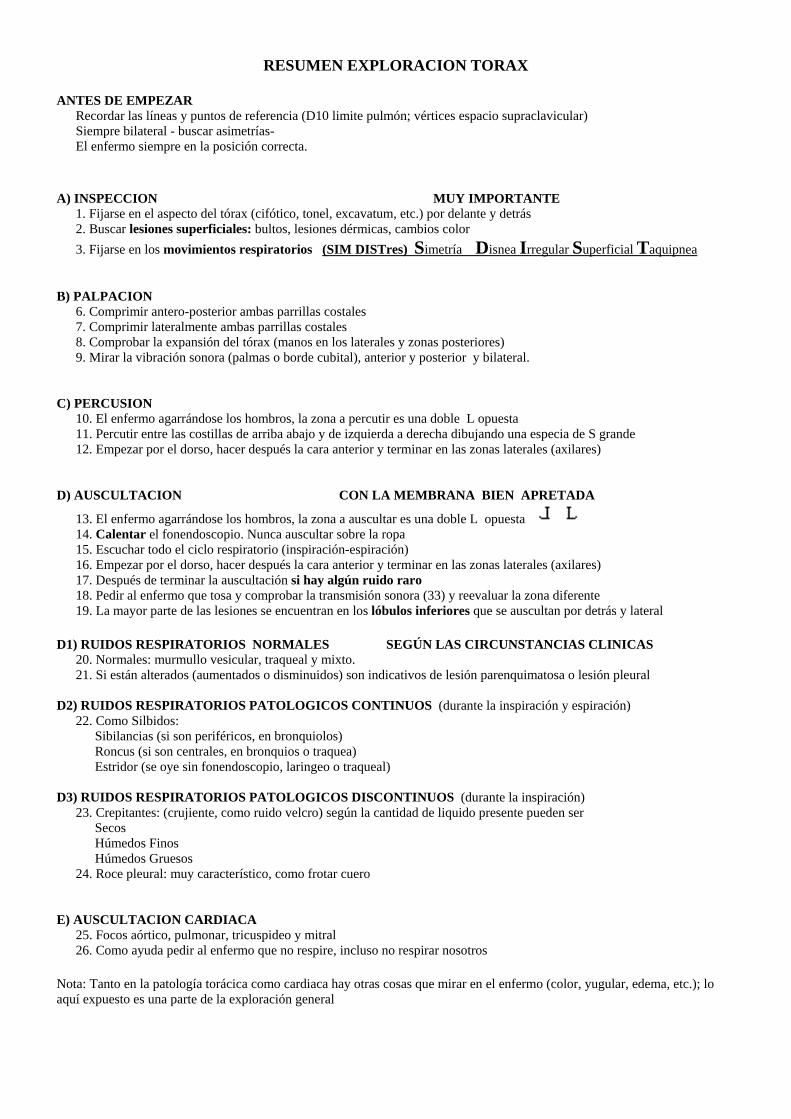
RESUMEN EXPLORACION TORAX ANTES DE EMPEZAR
Recordar las líneas y puntos de referencia (D10 limite pulmón; vértices espacio supraclavicular) Siempre bilateral - buscar asimetrías- El enfermo siempre en la posición correcta.
A) INSPECCION MUY IMPORTANTE
1. Fijarse en el aspecto del tórax (cifótico, tonel, excavatum, etc.) por delante y detrás 2. Buscar lesiones superficiales: bultos, lesiones dérmicas, cambios color
3. Fijarse en los movimientos respiratorios (SIM DISTres) Simetría Disnea Irregular Superficial Taquipnea B) PALPACION
6. Comprimir antero-posterior ambas parrillas costales 7. Comprimir lateralmente ambas parrillas costales 8. Comprobar la expansión del tórax (manos en los laterales y zonas posteriores) 9. Mirar la vibración sonora (palmas o borde cubital), anterior y posterior y bilateral.
C) PERCUSION
10. El enfermo agarrándose los hombros, la zona a percutir es una doble L opuesta 11. Percutir entre las costillas de arriba abajo y de izquierda a derecha dibujando una especia de S grande 12. Empezar por el dorso, hacer después la cara anterior y terminar en las zonas laterales (axilares)
D) AUSCULTACION CON LA MEMBRANA BIEN APRETADA
13. El enfermo agarrándose los hombros, la zona a auscultar es una doble L opuesta 14. Calentar el fonendoscopio. Nunca auscultar sobre la ropa 15. Escuchar todo el ciclo respiratorio (inspiración-espiración) 16. Empezar por el dorso, hacer después la cara anterior y terminar en las zonas laterales (axilares) 17. Después de terminar la auscultación si hay algún ruido raro 18. Pedir al enfermo que tosa y comprobar la transmisión sonora (33) y reevaluar la zona diferente 19. La mayor parte de las lesiones se encuentran en los lóbulos inferiores que se auscultan por detrás y lateral
D1) RUIDOS RESPIRATORIOS NORMALES SEGÚN LAS CIRCUNSTANCIAS CLINICAS
20. Normales: murmullo vesicular, traqueal y mixto. 21. Si están alterados (aumentados o disminuidos) son indicativos de lesión parenquimatosa o lesión pleural
D2) RUIDOS RESPIRATORIOS PATOLOGICOS CONTINUOS (durante la inspiración y espiración) 22. Como Silbidos:
Sibilancias (si son periféricos, en bronquiolos) Roncus (si son centrales, en bronquios o traquea) Estridor (se oye sin fonendoscopio, laringeo o traqueal)
D3) RUIDOS RESPIRATORIOS PATOLOGICOS DISCONTINUOS (durante la inspiración)
23. Crepitantes: (crujiente, como ruido velcro) según la cantidad de liquido presente pueden ser Secos Húmedos Finos Húmedos Gruesos
24. Roce pleural: muy característico, como frotar cuero
E) AUSCULTACION CARDIACA 25. Focos aórtico, pulmonar, tricuspideo y mitral 26. Como ayuda pedir al enfermo que no respire, incluso no respirar nosotros
Nota: Tanto en la patología torácica como cardiaca hay otras cosas que mirar en el enfermo (color, yugular, edema, etc.); lo aquí expuesto es una parte de la exploración general
MD0568 2-2
PHYSICAL ASSESSMENT OF THE RESPIRATORY SYSTEM
Section I. GENERAL APPROACH TO PHYSICAL ASSESSMENT 2-1. PATIENT'S HISTORY The patient's history, obtained by interviewing him, is the patient's view of his health problems, general health condition, past medical history, family health history, and profile of his personal and social life and well-being. Additionally, the patient's history will show information the patient knows about his health, what is important in terms of health care, and what he expects from the health care being asked for. Since the interviewer is getting the information from the patient rather than observing him directly, the patient history information is subjective information. Be sure to record this information immediately and in an organized manner. 2-2. CONDITIONS The patient should be undressed to the waist. Be sure the examination is conducted in a room with good light. 2-3. PROCEDURE a. Working from the top of the patient's body down, perform the examination systematically from the head to the foot. In this way, you will be thorough and not miss anything. b. Compare the findings on one side of the body with the findings on the other side of the body. In many instances, the body is bilaterally symmetrical; that is, the left side of the body has many of the same parts as the right side of the body. The parts are arranged as if the right side had been turned over. c. Throughout the examination, try to visualize the structure of the body parts underneath the tissues. In each region of the body, consider the function of the body parts and be alert for any abnormalities. d. Examine the patient's posterior thorax and lungs while he is in the sitting position. The patient's arms should be folded across his chest so that the scapulae (the shoulder blades) are partly out of the way. Then ask the patient to lie down while you examine his anterior thorax and lungs.
MD0568 2-3
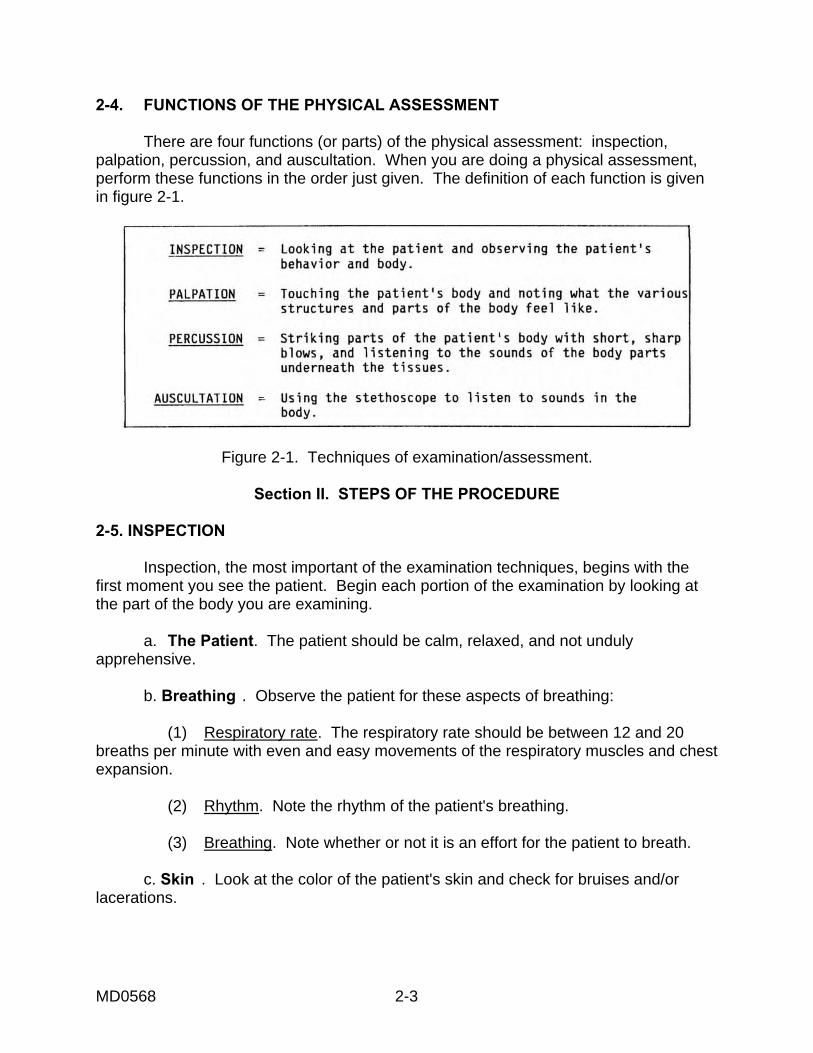
2-4. FUNCTIONS OF THE PHYSICAL ASSESSMENT There are four functions (or parts) of the physical assessment: inspection, palpation, percussion, and auscultation. When you are doing a physical assessment, perform these functions in the order just given. The definition of each function is given in figure 2-1.
Figure 2-1. Techniques of examination/assessment.
Section II. STEPS OF THE PROCEDURE 2-5. INSPECTION Inspection, the most important of the examination techniques, begins with the first moment you see the patient. Begin each portion of the examination by looking at the part of the body you are examining. a. The Patient. The patient should be calm, relaxed, and not unduly apprehensive. b. Breathing . Observe the patient for these aspects of breathing: (1) Respiratory rate. The respiratory rate should be between 12 and 20 breaths per minute with even and easy movements of the respiratory muscles and chest expansion. (2) Rhythm. Note the rhythm of the patient's breathing. (3) Breathing. Note whether or not it is an effort for the patient to breath. c. Skin . Look at the color of the patient's skin and check for bruises and/or lacerations.
MD0568 2-4
d. Chest . Observe the shape of the patient's chest. The chest should be bilaterally symmetrical. e. Respirations . Respirations should be the result of movement of the diaphragm. 2-6. PALPATION Palpation is touching the part of the patient's body you have just inspected and becoming sensitive to what that body part feels like. It is possible to feel an abnormal from a normal body part. a. Four Uses for Palpation of the Chest. (1) Identify areas of tenderness. Any area where the patient has reported pain or where there are lesions (a hurt, injury, wound) should be palpated. (2) Assess observed abnormalities. If you have seen masses or sinus tracts (blind, inflammatory, tube-like structures opening into the skin), palpate the area to evaluate the problem further. (3) Further assess the respiratory excursion. Determine the range of respiratory movement (how far the chest expands when he inhales and how far the chest contracts when he exhales). You can also feel symmetry of respiratory movement (whether or not the body parts feel the same on both sides during a respiration). 1 INHALATION REMEMBER: 1 RESPIRATION = + 1 EXHALATION (4) Elicit tactile fremitus. When a person speaks, vibrations that can be felt are transmitted through the bronchopulmonary system to the chest wall. These vibrations can best be felt when a person says the words "ninety-nine" or "one-one-one." Ask the person to speak louder or lower his head if you cannot feel the vibrations. b. Finger Placement. Place your finger pads on the skin surface over the area you are palpating. Do not move your fingers over the skin surface during palpation. Palpation should reveal a chest free from pain, tenderness, lesions, and masses. The wall should be firm with no indication of rib fractures or abscesses. The trachea will be midline; a deviated trachea is abnormal. Palpation of the respiratory excursion (respiration at rest position) should reveal an even, symmetrical movement of the chest.
MD0568 2-5
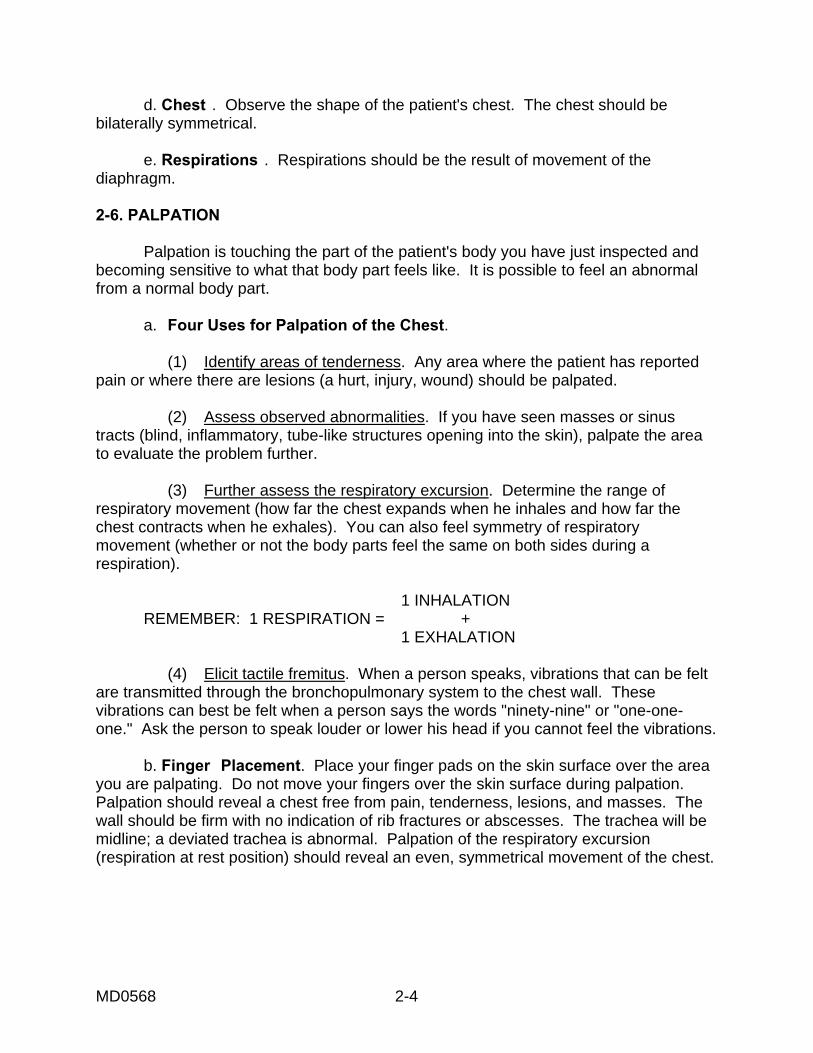
c. Assessment of Respiratory Excursion. (1) Posterior (figure 2-2). (a) Place your thumbs about the level of and parallel to the 10th rib, your hands grasping the lateral rib cage. (b) As you position your hands, slide them medially in order to raise loose skin folds between your thumbs and the patient's spine. (c) Feel for range of symmetry of respiratory movement.
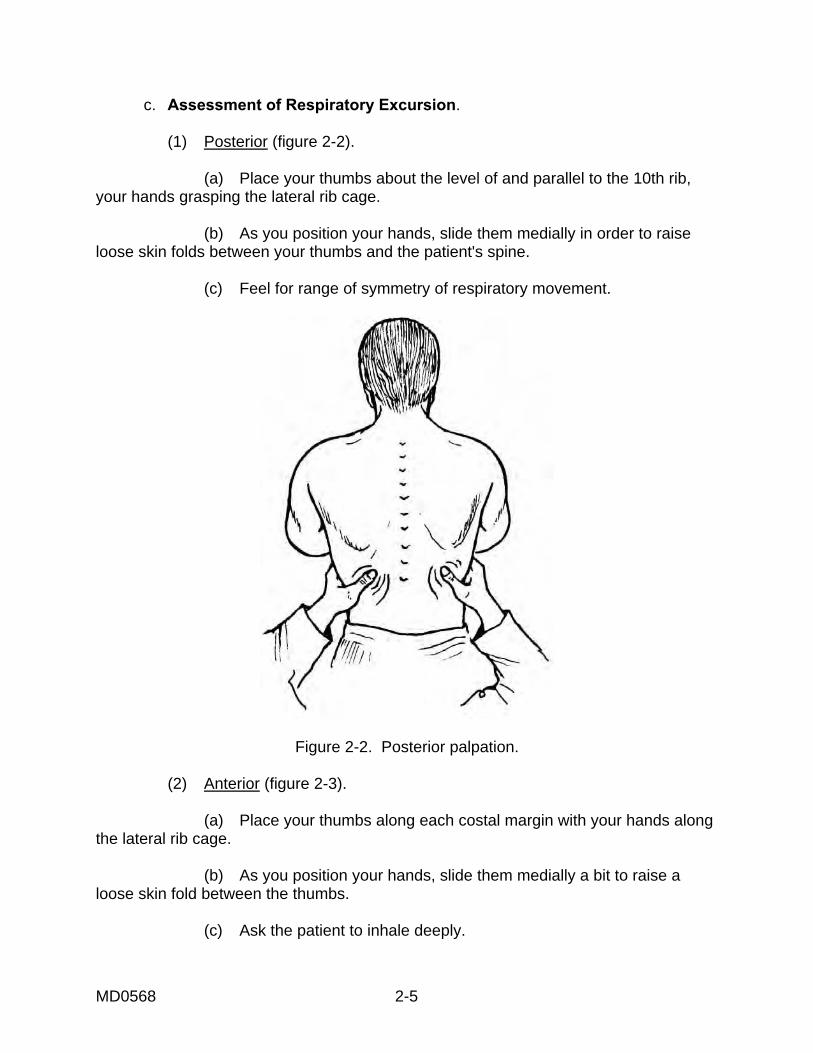
Figure 2-2. Posterior palpation. (2) Anterior (figure 2-3). (a) Place your thumbs along each costal margin with your hands along the lateral rib cage. (b) As you position your hands, slide them medially a bit to raise a loose skin fold between the thumbs. (c) Ask the patient to inhale deeply.
MD0568 2-6
(d) Watch for your thumbs to separate as the thorax expands. (e) Feel for the range and symmetry of respiratory movement.
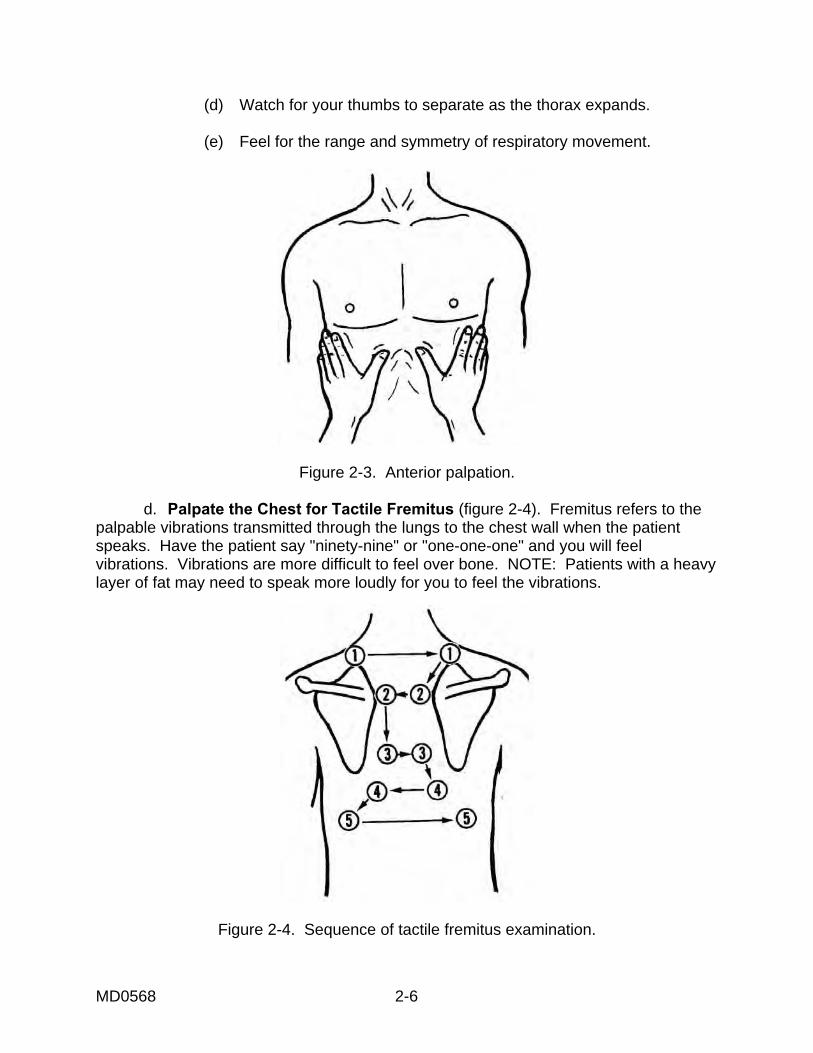
Figure 2-3. Anterior palpation. d. Palpate the Chest for Tactile Fremitus (figure 2-4). Fremitus refers to the palpable vibrations transmitted through the lungs to the chest wall when the patient speaks. Have the patient say "ninety-nine" or "one-one-one" and you will feel vibrations. Vibrations are more difficult to feel over bone. NOTE: Patients with a heavy layer of fat may need to speak more loudly for you to feel the vibrations.
Figure 2-4. Sequence of tactile fremitus examination.
MD0568 2-7
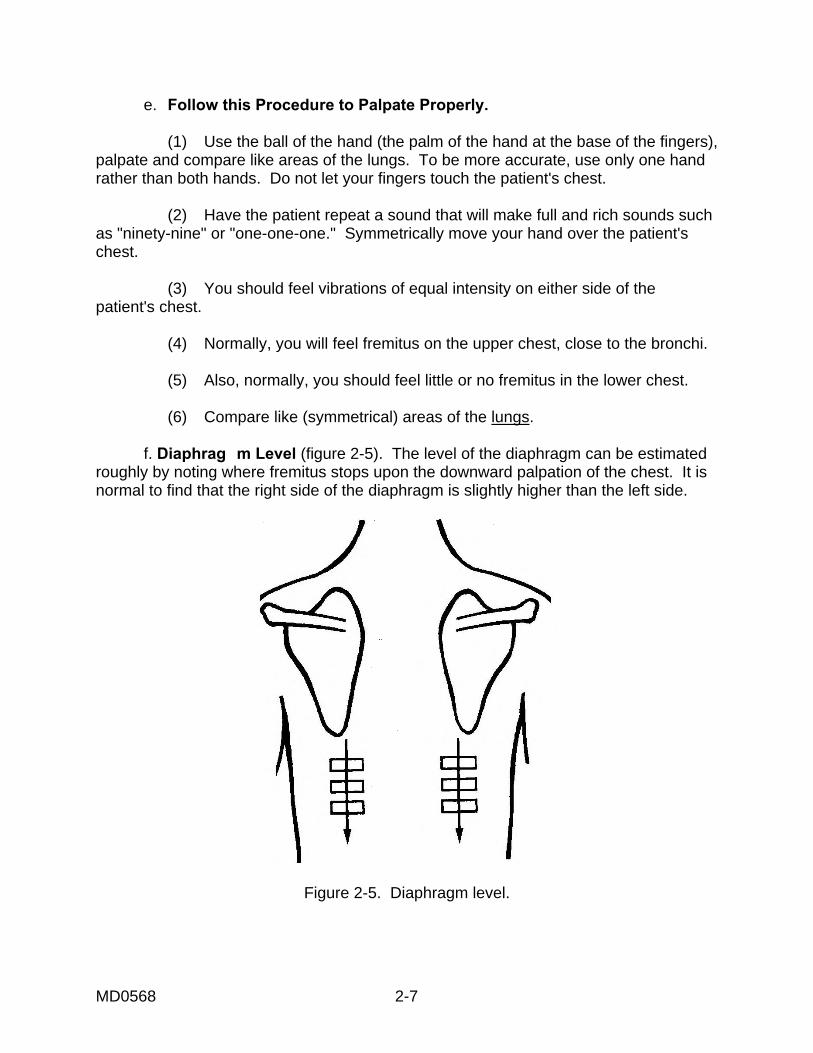
e. Follow this Procedure to Palpate Properly. (1) Use the ball of the hand (the palm of the hand at the base of the fingers), palpate and compare like areas of the lungs. To be more accurate, use only one hand rather than both hands. Do not let your fingers touch the patient's chest. (2) Have the patient repeat a sound that will make full and rich sounds such as "ninety-nine" or "one-one-one." Symmetrically move your hand over the patient's chest. (3) You should feel vibrations of equal intensity on either side of the patient's chest. (4) Normally, you will feel fremitus on the upper chest, close to the bronchi. (5) Also, normally, you should feel little or no fremitus in the lower chest. (6) Compare like (symmetrical) areas of the lungs. f. Diaphrag m Level (figure 2-5). The level of the diaphragm can be estimated roughly by noting where fremitus stops upon the downward palpation of the chest. It is normal to find that the right side of the diaphragm is slightly higher than the left side.
Figure 2-5. Diaphragm level.
MD0568 2-8
2-7. PERCUSSION OF CHEST To perform a percussion examination, strike the surface of the body. When this is done, various sounds can be heard. The sounds are different depending on the underlying structure of the body. There are two reasons to use percussion as an examination technique. First, percussion results in setting the chest wall and underlying tissues in motion. This produces sounds that can be heard. Second, percussion sounds can be divided into four recognizable notes. Train your ear to recognize the pitch and duration of these notes. The sound can indicate whether the underlying tissues are filled with air, filled with fluid, or solid. NOTE: Percussion will set tissues in motion only about five to seven centimeters into the chest, so the percussion examination technique is not a way to detect lesions that are very deep.
Table 2-1. Table of percussion notes.
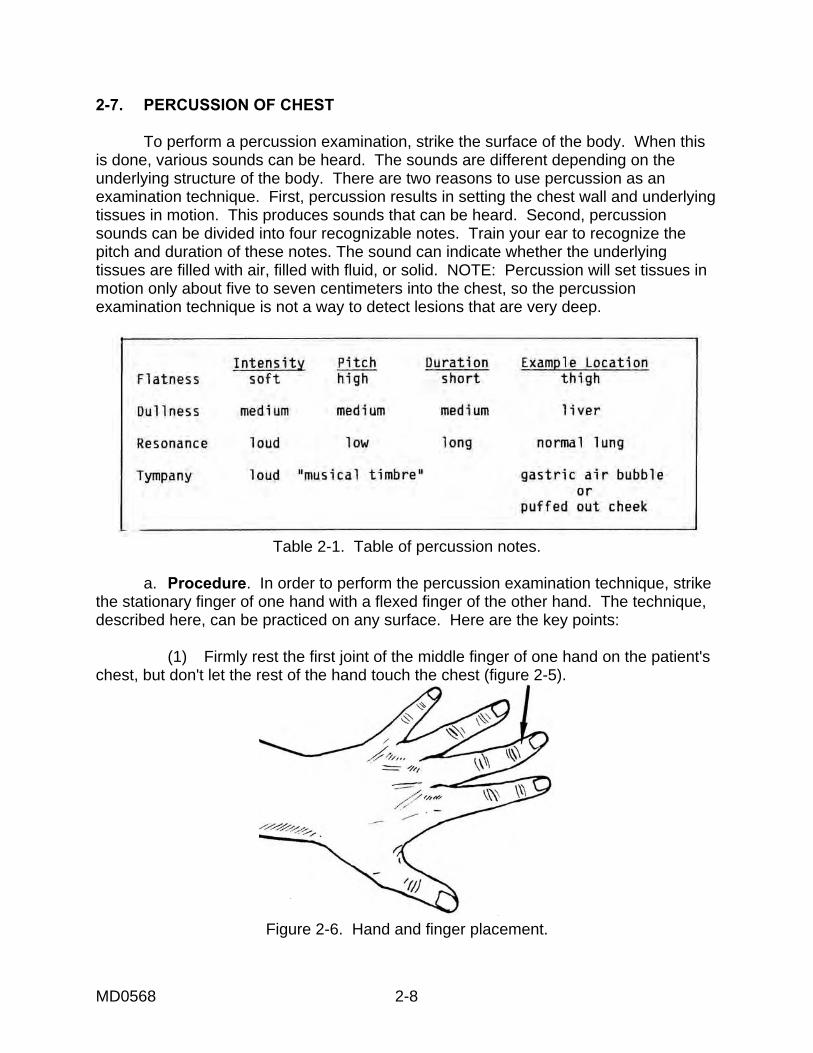
a. Procedure. In order to perform the percussion examination technique, strike the stationary finger of one hand with a flexed finger of the other hand. The technique, described here, can be practiced on any surface. Here are the key points: (1) Firmly rest the first joint of the middle finger of one hand on the patient's chest, but don't let the rest of the hand touch the chest (figure 2-5).
Figure 2-6. Hand and finger placement.
MD0568 2-9
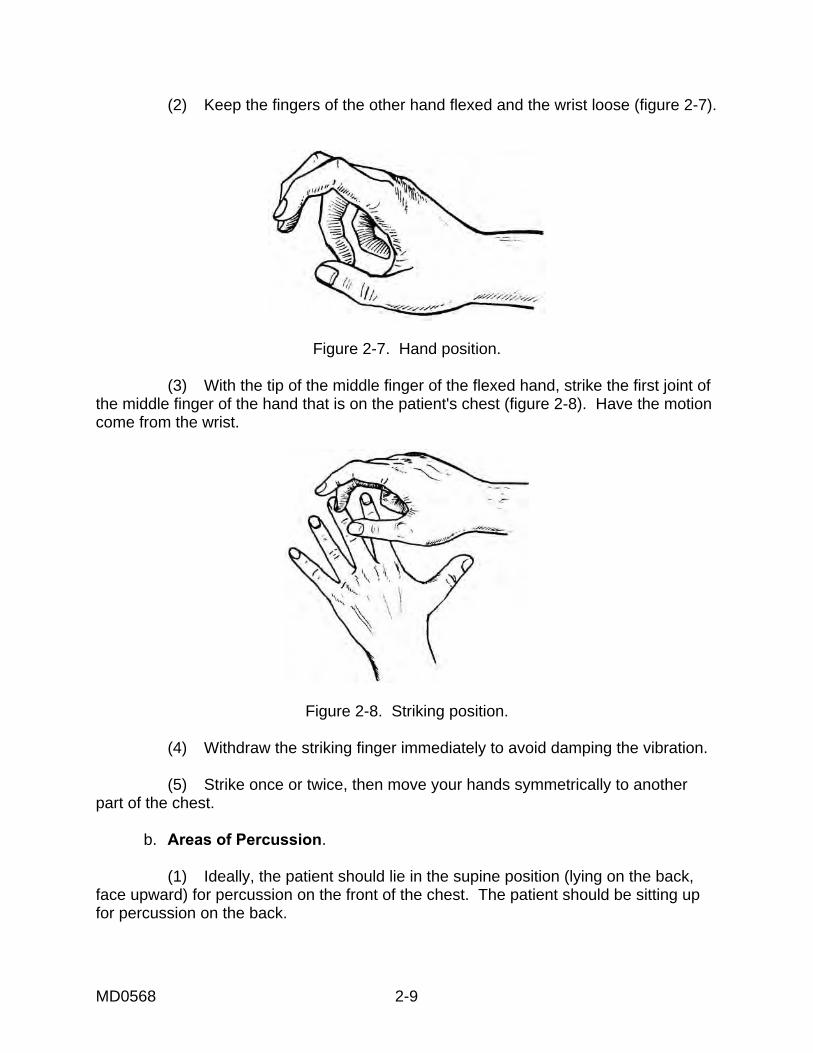
(2) Keep the fingers of the other hand flexed and the wrist loose (figure 2-7).
Figure 2-7. Hand position. (3) With the tip of the middle finger of the flexed hand, strike the first joint of the middle finger of the hand that is on the patient's chest (figure 2-8). Have the motion come from the wrist.
Figure 2-8. Striking position. (4) Withdraw the striking finger immediately to avoid damping the vibration. (5) Strike once or twice, then move your hands symmetrically to another part of the chest. b. Areas of Percussion. (1) Ideally, the patient should lie in the supine position (lying on the back, face upward) for percussion on the front of the chest. The patient should be sitting up for percussion on the back.

MD0568 2-10
(2) If the patient is ill and unable to sit up, examine with the patient lying on the right or left side. (3) Percuss the patient's anterior chest (figure 2-9). In a healthy patient, the entire upper chest is resonant except for the area of cardiac dullness. Percuss across the top of the body and work downward, symmetrically.
Figure 2-9. Anterior percussion. (4) Percuss the patient's posterior chest, symmetrically down the chest wall making a side to side comparison (figure 2-10). Percussion over lung fields should reveal equal bilateral findings. Omit percussion over the shoulder blades.
Figure 2-10. Posterior percussion.

MD0568 2-11
(5) Measure the diaphragmatic excursion (movement of the diaphragm from a position of rest) by noting the difference between the levels of dullness when the person inhales fully and exhales fully. See figure 2-11. The difference is normally about 5 or 6 cm.
Figure 2-11. Diaphragmatic excursion. 2-8. AUS CULTATION OF CHEST Auscultation (listening with a stethoscope) of the lungs is useful in estimating the airflow through the tracheobronchial tree, detecting an obstruction, and assessing the condition of the surrounding lungs and the pleural space. a. Position the patient. Have the patient sitting or in a supine position. When the patient is lying down, examine his back by turning the patient from side to side. b. Show the patient how you want him to breath through the mouth, deeper and more forcefully than usual. c. Listen with the stethoscope. (1) Start at the top of the back and work downward, comparing the right and the left sides. (2) Then, start at the top of the chest and work downward, comparing symmetric points sequentially. (a) Listen to one full breath in each location. (b) Be alert for patient discomfort--light-headedness, faintness--that signals hyperventilation.
MD0568 2-12
d. Auscultate normal breath sounds. Auscultate (examine by listening) normal breath sounds in accordance with table in 2-2.
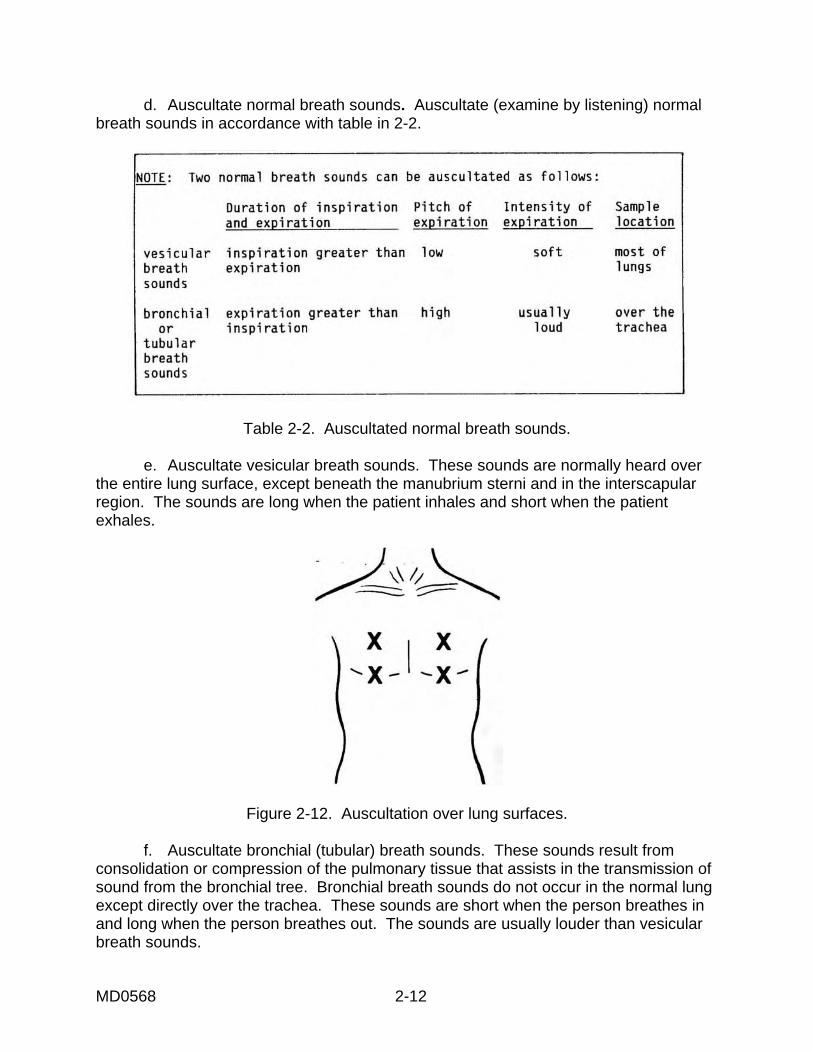
Table 2-2. Auscultated normal breath sounds. e. Auscultate vesicular breath sounds. These sounds are normally heard over the entire lung surface, except beneath the manubrium sterni and in the interscapular region. The sounds are long when the patient inhales and short when the patient exhales.
Figure 2-12. Auscultation over lung surfaces. f. Auscultate bronchial (tubular) breath sounds. These sounds result from consolidation or compression of the pulmonary tissue that assists in the transmission of sound from the bronchial tree. Bronchial breath sounds do not occur in the normal lung except directly over the trachea. These sounds are short when the person breathes in and long when the person breathes out. The sounds are usually louder than vesicular breath sounds.
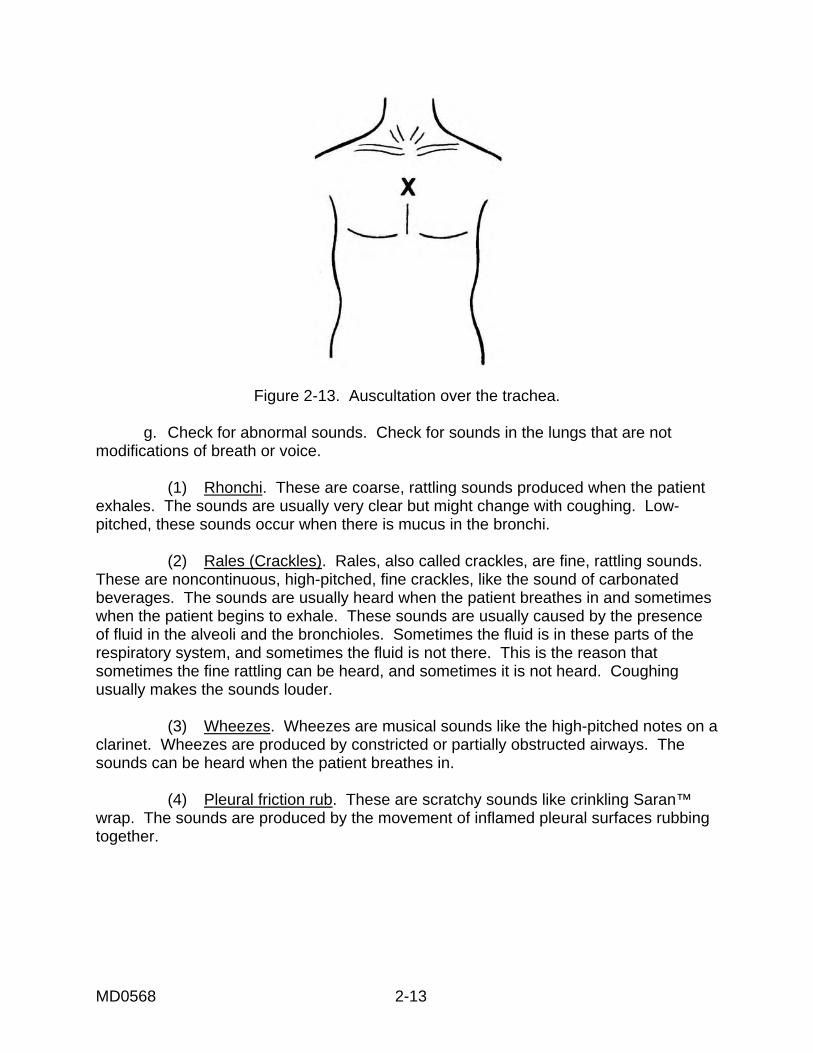
MD0568 2-13
Figure 2-13. Auscultation over the trachea. g. Check for abnormal sounds. Check for sounds in the lungs that are not modifications of breath or voice. (1) Rhonchi. These are coarse, rattling sounds produced when the patient exhales. The sounds are usually very clear but might change with coughing. Low-pitched, these sounds occur when there is mucus in the bronchi. (2) Rales (Crackles). Rales, also called crackles, are fine, rattling sounds. These are noncontinuous, high-pitched, fine crackles, like the sound of carbonated beverages. The sounds are usually heard when the patient breathes in and sometimes when the patient begins to exhale. These sounds are usually caused by the presence of fluid in the alveoli and the bronchioles. Sometimes the fluid is in these parts of the respiratory system, and sometimes the fluid is not there. This is the reason that sometimes the fine rattling can be heard, and sometimes it is not heard. Coughing usually makes the sounds louder. (3) Wheezes. Wheezes are musical sounds like the high-pitched notes on a clarinet. Wheezes are produced by constricted or partially obstructed airways. The sounds can be heard when the patient breathes in. (4) Pleural friction rub. These are scratchy sounds like crinkling Saran™ wrap. The sounds are produced by the movement of inflamed pleural surfaces rubbing together.
HEART EXAM DETAILS WASH HANDS 1. Name the four principal factors that influence arterial blood pressure.
A. LV stroke volume B. Distensibility of Aorta and large arteries C. Peripheral Vascular Resistance D. Blood volume
2. Locate, count, and describe the patient’s radial pulse.
Technique = student should use finger pads (not tips) and describe beats/min and rhythm, e.g., is the rhythm regular or irregular? If the rhythm is irregular, is there any pattern to the irregularity, or is the rhythm irregularly irregular? If you cannot identify the radial pulse, then extend the elbow and check for the brachial artery pulse in the antecubital fossa.
3. Locate, count, and describe the patient’s carotid pulse.
Technique = student should only check for ONE carotid pulse at a time and should have finger pads in lower half to lower third of neck, usually medial to sternocleidomastoid muscle, about at the level of the cricoid cartilage.
4. Demonstrate how to determine the correct BP cuff size for their patient, and
demonstrate. Answer = width of cuff should be about 40% of the circumference of patient’s arm. Length of bladder (not entire cuff) should be about 80% of circumference of patient’s arm. If the cuff is too small, blood pressure will be falsely elevated. There are four different cuff sizes: �� A thigh cuff: 18 cm width �� Large adult cuff: 15 cm width �� Normal adult cuff: 12-13 cm width �� Pediatric or small adult cuff: 10 cm width
5. First, correctly measure the patient’s BP by palpation in one arm.
Technique: �� Patient’s arm can be resting at their side, does not have to be elevated at heart level. �� Patient should have been sitting calmly for at least 5 minutes �� Use appropriate size cuff �� Place BP cuff on SKIN (not over gown) about 2-3 cm above antecubital fossa. �� Locate and palpate radial pulse with one hand and at the same time, with the other
hand, blow up cuff until pulse disappears and to about 20 mm Hg higher �� Slowly release the air in the cuff (about 3 mm Hg per second). �� At the return of the radial pulse = estimate of SYSTOLIC BP.
6. Correctly measure (auscultate) BP in both extremities.
Technique is same as above, except that the student elevates the patient’s relaxed arm so that the brachial artery is elevated to about heart level. Student should only blow up the cuff about 20 – 30 mm Hg above their systolic BP by palpation. Air should be released from the cuff slowly (about 3 mmHg per second). Repeat on other arm.
7. Describe what the maximal height of the internal jugular vein represents.
Answer = reflection or indication of right atrial pressure, which reflects hydration or volume status of patient.
8. Identify the point of maximal height of pulsation of the right internal jugular vein on
the patient and measure the JVP. Technique = student is on patient’s right side, student should have pt. lay back and should adjust the exam table between 30 – 45 degrees, and should be able to point out the height of maximum pulsation of the right internal jugular neck vein, turn patient's head slightly to their left. To measure, student places a ruler on sternal angle and uses a horizontal surface from the point of maximal height of the right int. jugular vein. Student adds 5 cm to their measurement to get the patient’s JVP.
9. Identify and locate the apex and base of the heart.
Answer = base is the junction between the heart and the great vessels; lies just below sternal angle
10. Identify and locate the apex of the heart. Answer = apex is the tip of the LV; normally found in midclavicular line, about 5th intercostal space
11. Identify and locate the surface projection on the precordium of the right atrium.
Answer = right heart border, from right 2nd ICS (intercostal space) to about 3rd or 4th Right ICS
12. Identify and locate the surface projection on the precordium of the right ventricle.
Answer = RV occupies most of the anterior cardiac surface; RV is a wedge-like structure deep and to the left of the sternum with the inferior border just below the junction of the sternum and xiphoid process. The RV narrows superiorly and meets the pulmonary artery at left 3rd ICS near the sternum.
13. Identify and locate the surface projection on the precordium of the left ventricle.
Answer = LV is the left lateral border of the anterior cardiac surface.
14. Inspect the precordium. Notice any scars, deformities, lifts or heaves.
15. Palpate the precordium in five areas, identify the PMI (apical impulse). Technique = exam done on skin (not over a gown), patient lying flat, student on patient’s right side. Student tries to inspect for PMI. If the PMI is not visible while the patient is supine, you may ask the patient to roll 45 degrees to the left and also ask the patient to exhale fully and hold their breath while the student looks for and palpates for PMI. (These maneuvers bring the heart closer to the chest wall.) Student uses palmar surface of their hand, gently placing the ball of their hand (metacarpal-phalangeal joints) on the precordium. Five locations on the precordium are palpated (any order is acceptable): A. Apex (PMI: normally 2.5 cm or less in size and located in only one intercostal space) B. Left parasternal area (left 3rd to 5th intercostal space) C. Left 2nd ICS (Pulmonic area) D. Right 2nd ICS (aortic area) E. Epigastrium
16. If you cannot locate the apex by palpation, you can locate the left heart border by
percussion. Technique = Patient is supine; percussion is done on skin (not over a gown); student is on patient’s right side; percussion begins laterally in 4th or 5th ICS in about the anterior axillary line. The student percusses lateral to medial along an ICS, until dullness is heard then student percusses in ICS above or below: A. Student may ask patient to hold their breath (to prevent respiratory movement) or
ask patient to exhale completely and hold their breath while they percuss. This maneuver brings the heart closer to the chest wall.
B. Student should correctly identify left cardiac border as resonance changes to dullness
17. Correctly auscultate the heart in 5 locations.
Technique = patient is supine or, at most, 30 degrees; exam is done on skin (not over a gown); student is on patient’s right side; student first uses bell of stethoscope and then repeats exam with bell. Five locations on the precordium are auscultated: A. Apex B. Left sternal border C. Epigastrium D. Left 2nd ICS (pulmonic area) E. Right 2nd ICS (aortic area)
18. Palpate the suprasternal notch
WASH HANDS