Embed Size (px)
Citation preview
7 - 1
TCruise Template Setup and Editing• Step #1 – Tract Info 7-1
• Step #2 – Active Cruise Parameters 7-2
• Step #3 – Species Groups 7-2
• Step #4 – Products by Group Name 7-3
• Step #5 – Group Specifications 7-3
• Step #6 – Stumpage Parameters 7-7
• Step #7 – Species Names and Codes 7-7
• Step #8 – Profile/Volume Calculation Functions 7-8
• Step #9 – Species Grade 7-12
• Step #10 – Custom Information Design 7-15
• Step #11 – Plot Strata ID List 7-17
• Step #12 – Tree Category List 7-18
• Step #13 – Customizing the Display Columns 7-19
• Step #14 – Report Options 7-24
• Step #15 – Enter Default Species Code 7-26
• Step #16 – Saving the Template 7-26
• Step #17 – Exporting Codes and Parameters 7-27
• Step #18 – Syncing with the PC 7-27
• Step #19 – Transferring Data to the Handheld 7-30
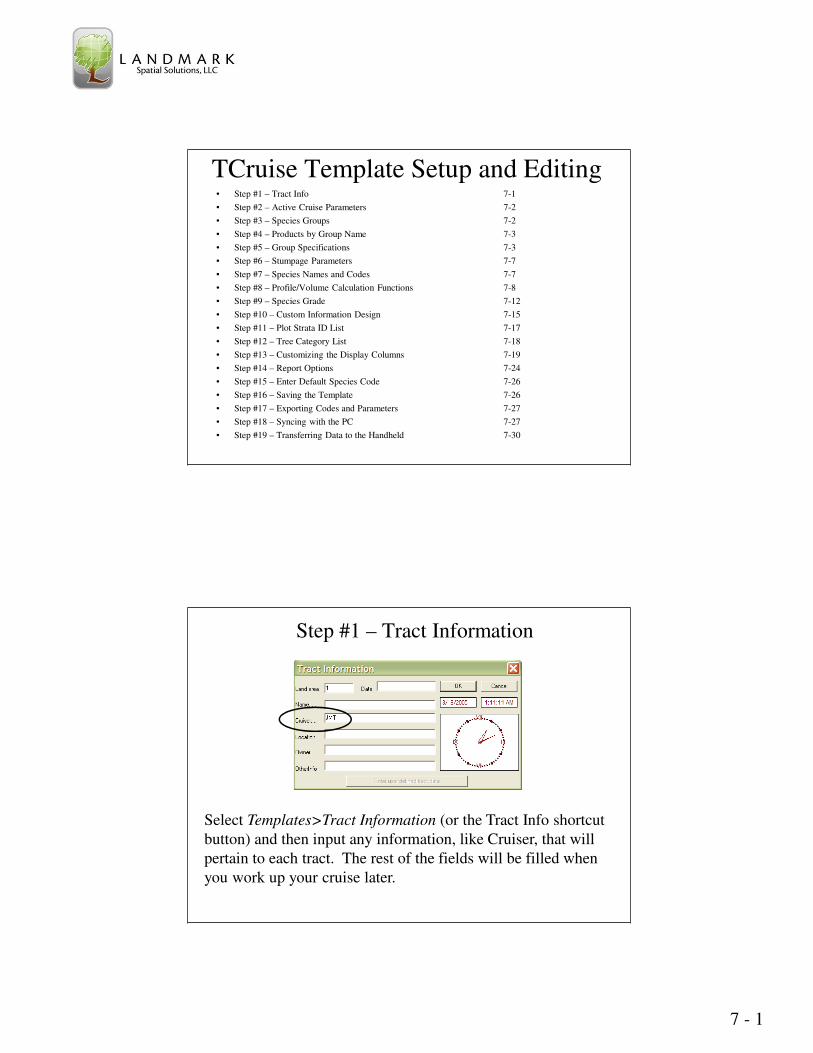
Step #1 – Tract Information
Select Templates>Tract Information (or the Tract Info shortcut
button) and then input any information, like Cruiser, that will
pertain to each tract. The rest of the fields will be filled when
you work up your cruise later.
7 - 2
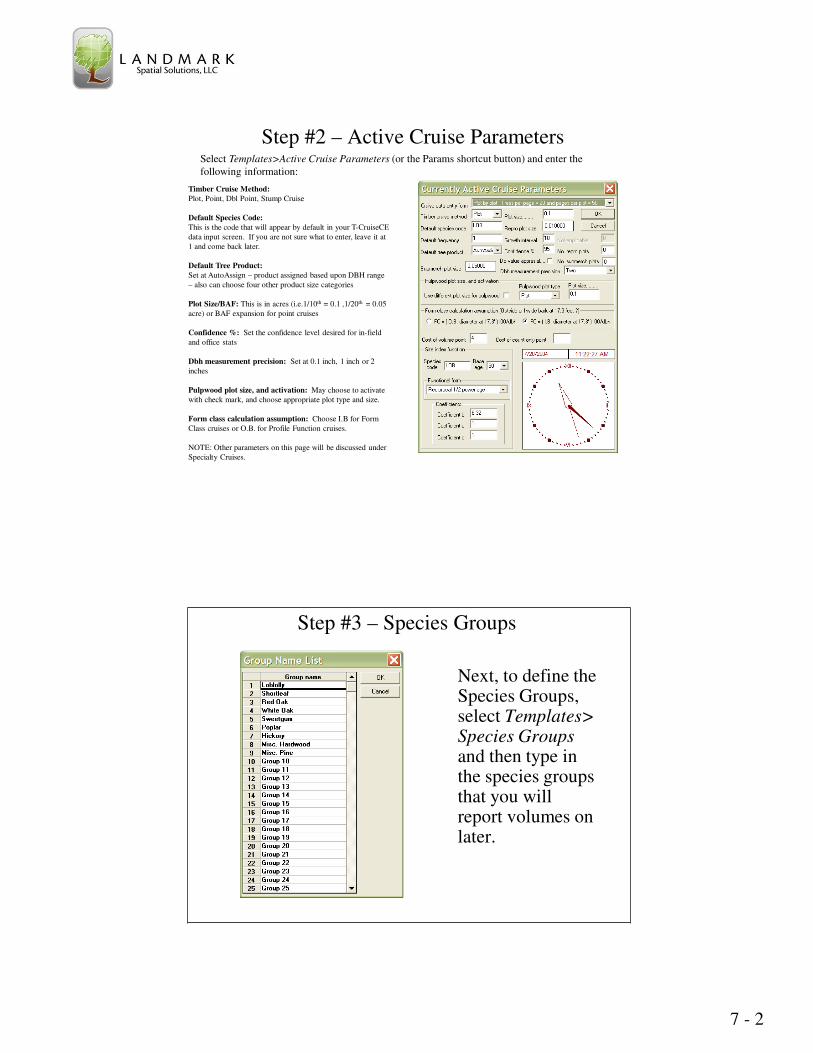
Step #2 – Active Cruise Parameters
Timber Cruise Method:
Plot, Point, Dbl Point, Stump Cruise
Default Species Code:
This is the code that will appear by default in your T-CruiseCE
data input screen. If you are not sure what to enter, leave it at
1 and come back later.
Default Tree Product:
Set at AutoAssign – product assigned based upon DBH range
– also can choose four other product size categories
Plot Size/BAF: This is in acres (i.e.1/10th = 0.1 ,1/20th = 0.05
acre) or BAF expansion for point cruises
Confidence %: Set the confidence level desired for in-field
and office stats
Dbh measurement precision: Set at 0.1 inch, 1 inch or 2
inches
Pulpwood plot size, and activation: May choose to activate
with check mark, and choose appropriate plot type and size.
Form class calculation assumption: Choose I.B for Form
Class cruises or O.B. for Profile Function cruises.
NOTE: Other parameters on this page will be discussed under
Specialty Cruises.
Select Templates>Active Cruise Parameters (or the Params shortcut button) and enter the
following information:
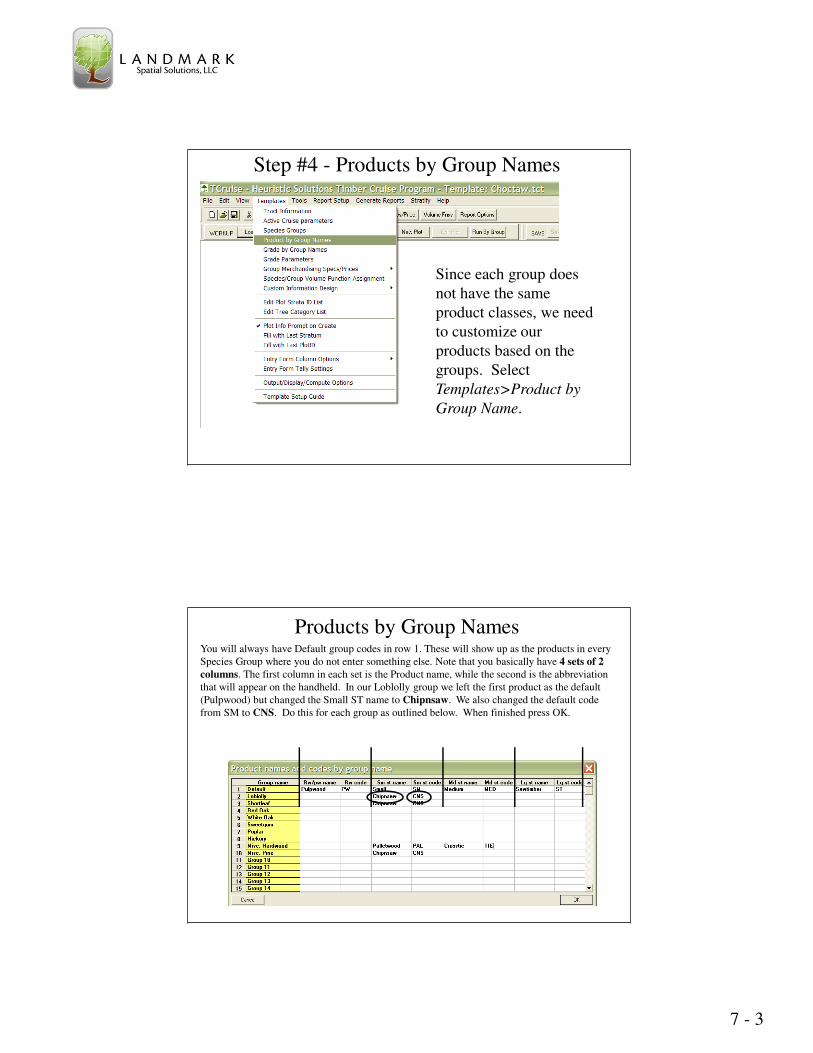
Step #3 – Species Groups
Next, to define the Species Groups, select Templates> Species Groupsand then type in the species groups that you will report volumes on later.
7 - 3
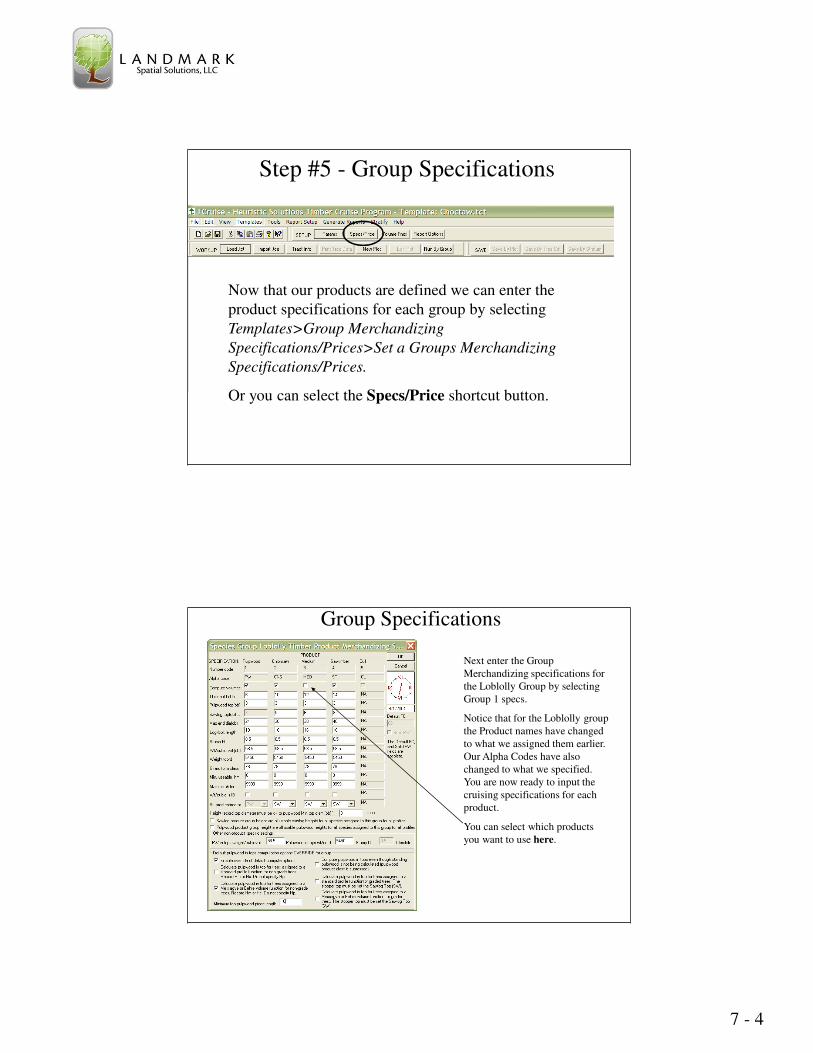
Step #4 - Products by Group Names
Since each group does
not have the same
product classes, we need
to customize our
products based on the
groups. Select
Templates>Product by
Group Name.
Products by Group NamesYou will always have Default group codes in row 1. These will show up as the products in every
Species Group where you do not enter something else. Note that you basically have 4 sets of 2
columns. The first column in each set is the Product name, while the second is the abbreviation
that will appear on the handheld. In our Loblolly group we left the first product as the default
(Pulpwood) but changed the Small ST name to Chipnsaw. We also changed the default code
from SM to CNS. Do this for each group as outlined below. When finished press OK.
7 - 4
Step #5 - Group Specifications
Now that our products are defined we can enter the
product specifications for each group by selecting
Templates>Group Merchandizing
Specifications/Prices>Set a Groups Merchandizing
Specifications/Prices.
Or you can select the Specs/Price shortcut button.
Group Specifications
Next enter the Group
Merchandizing specifications for
the Loblolly Group by selecting
Group 1 specs.
Notice that for the Loblolly group
the Product names have changed
to what we assigned them earlier.
Our Alpha Codes have also
changed to what we specified.
You are now ready to input the
cruising specifications for each
product.
You can select which products
you want to use here.
7 - 5
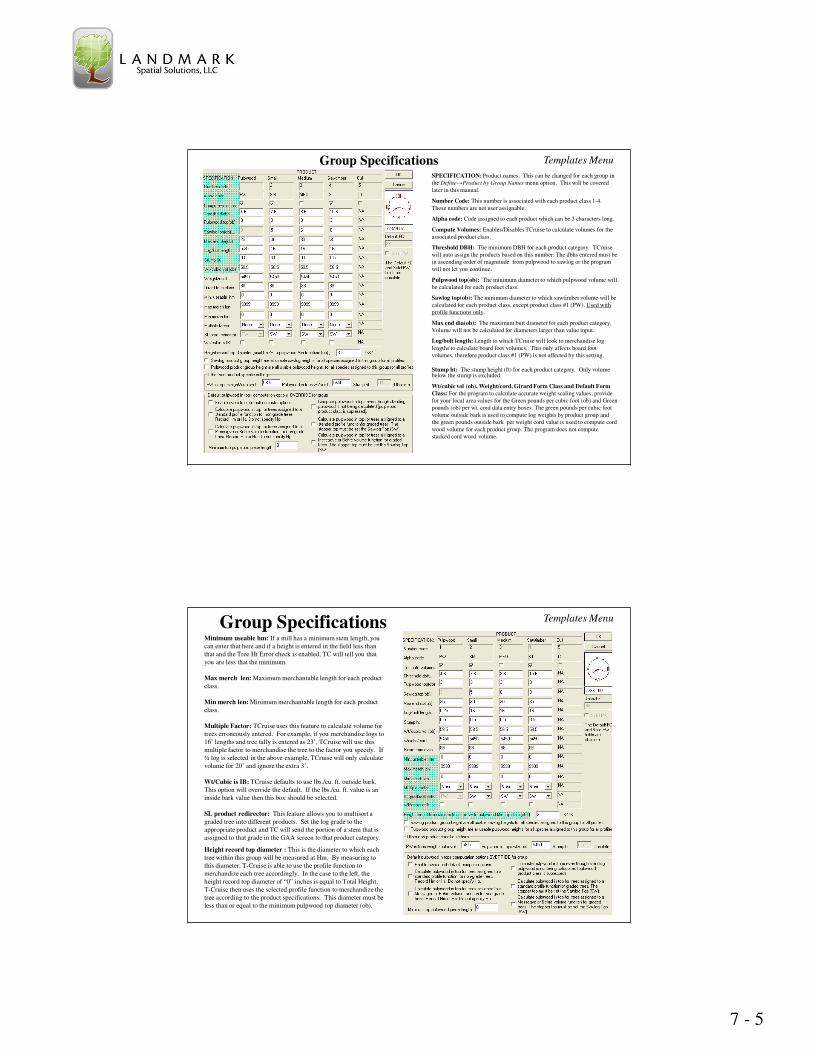
Templates MenuGroup SpecificationsSPECIFICATION: Product names. This can be changed for each group in
the Define→Product by Group Names menu option. This will be covered
later in this manual.
Number Code: This number is associated with each product class 1-4.
These numbers are not user assignable.
Alpha code: Code assigned to each product which can be 3 characters long.
Compute Volumes: Enables/Disables TCruise to calculate volumes for the
associated product class.
Threshold DBH: The minimum DBH for each product category. TCruise
will auto assign the products based on this number. The dbhs entered must be
in ascending order of magnitude from pulpwood to sawlog or the program
will not let you continue.
Pulpwood top(ob): The minimum diameter to which pulpwood volume will
be calculated for each product class.
Sawlog top(ob): The minimum diameter to which sawtimber volume will be
calculated for each product class, except product class #1 (PW). Used with
profile functions only.
Max end dia(ob): The maximum butt diameter for each product category.
Volume will not be calculated for diameters larger than value input.
Log/bolt length: Length to which TCruise will look to merchandise log
lengths to calculate board foot volumes. This only affects board foot
volumes, therefore product class #1 (PW) is not affected by this setting.
Stump ht: The stump height (ft) for each product category. Only volume below the stump is excluded.
Wt/cubic vol (ob), Weight/cord, Girard Form Class and Default Form
Class: For the program to calculate accurate weight scaling values, provide
for your local area values for the Green pounds per cubic foot (ob) and Green
pounds (ob) per wt. cord data entry boxes. The green pounds per cubic foot
volume outside bark is used to compute log weights by product group and
the green pounds outside bark per weight cord value is used to compute cord
wood volume for each product group. The program does not compute
stacked cord wood volume.
Templates MenuGroup SpecificationsMinimum useable hm: If a mill has a minimum stem length, you
can enter that here and if a height is entered in the field less than
that and the Tree Ht Error check is enabled, TC will tell you that
you are less that the minimum.
Max merch len: Maximum merchantable length for each product
class.
Min merch len: Minimum merchantable length for each product
class.
Multiple Factor: TCruise uses this feature to calculate volume for
trees erroneously entered. For example, if you merchandise logs to
16’ lengths and tree tally is entered as 23’, TCruise will use this
multiple factor to merchandise the tree to the factor you specify. If
¼ log is selected in the above example, TCruise will only calculate
volume for 20’ and ignore the extra 3’.
Wt/Cubic is IB: TCruise defaults to use lbs./cu. ft. outside bark.
This option will override the default. If the lbs./cu. ft. value is an
inside bark value then this box should be selected.
SL product redirector: This feature allows you to multisort a
graded tree into different products. Set the log grade to the
appropriate product and TC will send the portion of a stem that is
assigned to that grade in the GAA screen to that product category.
Height record top diameter : This is the diameter to which each
tree within this group will be measured at Hm. By measuring to
this diameter, T-Cruise is able to use the profile function to
merchandize each tree accordingly. In the case to the left, the
height record top diameter of “0” inches is equal to Total Height.
T-Cruise then uses the selected profile function to merchandize the
tree according to the product specifications. This diameter must be
less than or equal to the minimum pulpwood top diameter (ob).
7 - 6
Templates Menu
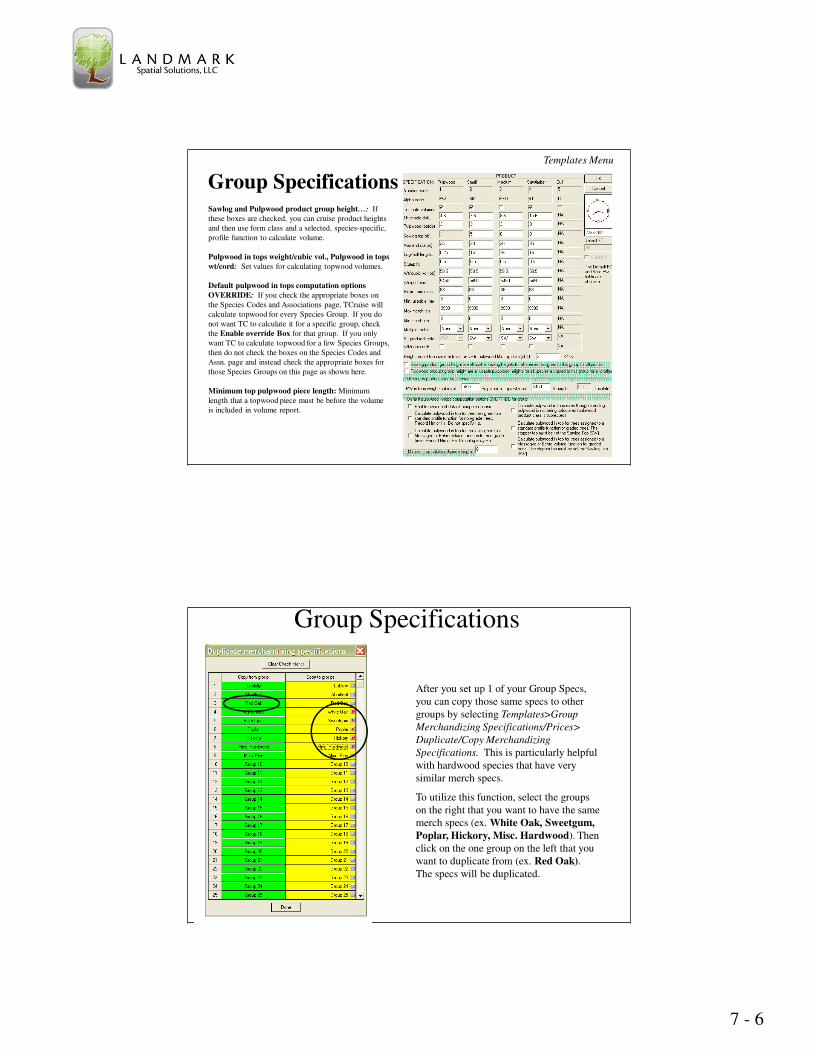
Group SpecificationsSawlog and Pulpwood product group height…: If
these boxes are checked, you can cruise product heights
and then use form class and a selected, species-specific,
profile function to calculate volume.
Pulpwood in tops weight/cubic vol., Pulpwood in tops
wt/cord: Set values for calculating topwood volumes.
Default pulpwood in tops computation options
OVERRIDE: If you check the appropriate boxes on
the Species Codes and Associations page, TCruise will
calculate topwood for every Species Group. If you do
not want TC to calculate it for a specific group, check
the Enable override Box for that group. If you only
want TC to calculate topwood for a few Species Groups,
then do not check the boxes on the Species Codes and
Assn. page and instead check the appropriate boxes for
those Species Groups on this page as shown here.
Minimum top pulpwood piece length: Minimum
length that a topwood piece must be before the volume
is included in volume report.
Group Specifications
After you set up 1 of your Group Specs,
you can copy those same specs to other
groups by selecting Templates>Group
Merchandizing Specifications/Prices>
Duplicate/Copy Merchandizing
Specifications. This is particularly helpful
with hardwood species that have very
similar merch specs.
To utilize this function, select the groups
on the right that you want to have the same
merch specs (ex. White Oak, Sweetgum,
Poplar, Hickory, Misc. Hardwood). Then
click on the one group on the left that you
want to duplicate from (ex. Red Oak).
The specs will be duplicated.
7 - 7
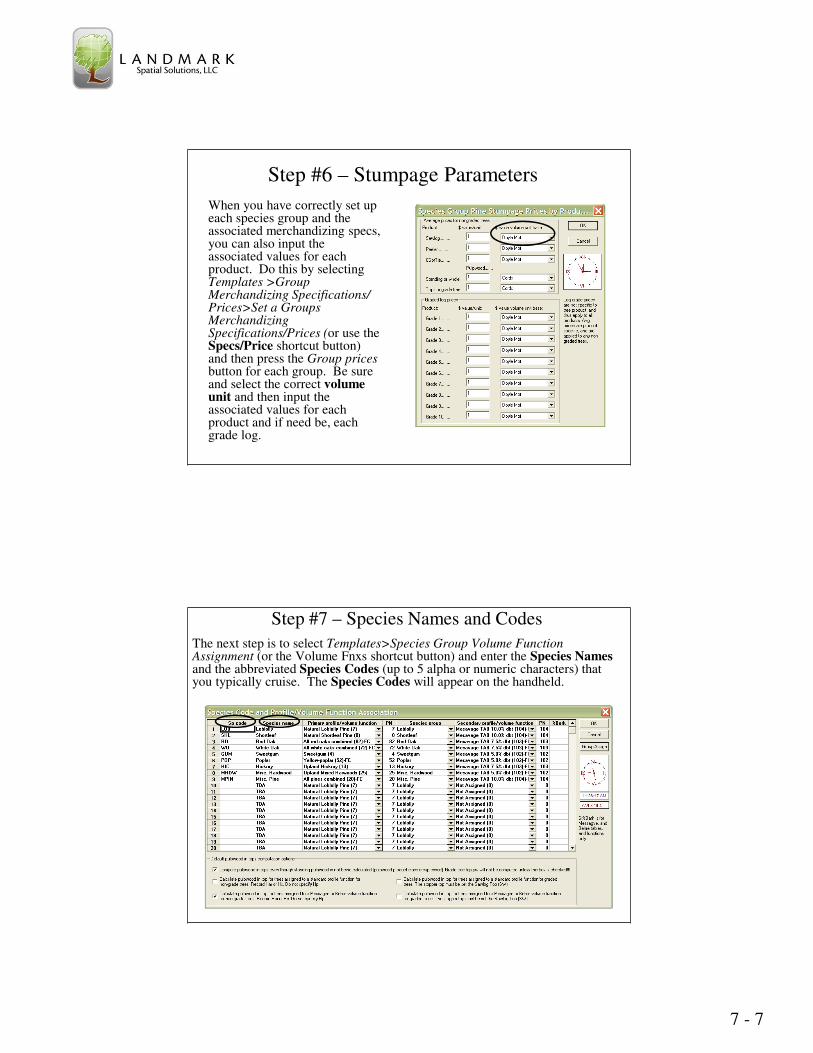
Step #6 – Stumpage Parameters
When you have correctly set up each species group and the associated merchandizing specs, you can also input the associated values for each product. Do this by selecting Templates >Group Merchandizing Specifications/ Prices>Set a Groups Merchandizing Specifications/Prices (or use the Specs/Price shortcut button) and then press the Group pricesbutton for each group. Be sure and select the correct volume unit and then input the associated values for each product and if need be, each grade log.
Step #7 – Species Names and Codes
The next step is to select Templates>Species Group Volume Function Assignment (or the Volume Fnxs shortcut button) and enter the Species Namesand the abbreviated Species Codes (up to 5 alpha or numeric characters) that you typically cruise. The Species Codes will appear on the handheld.
7 - 8
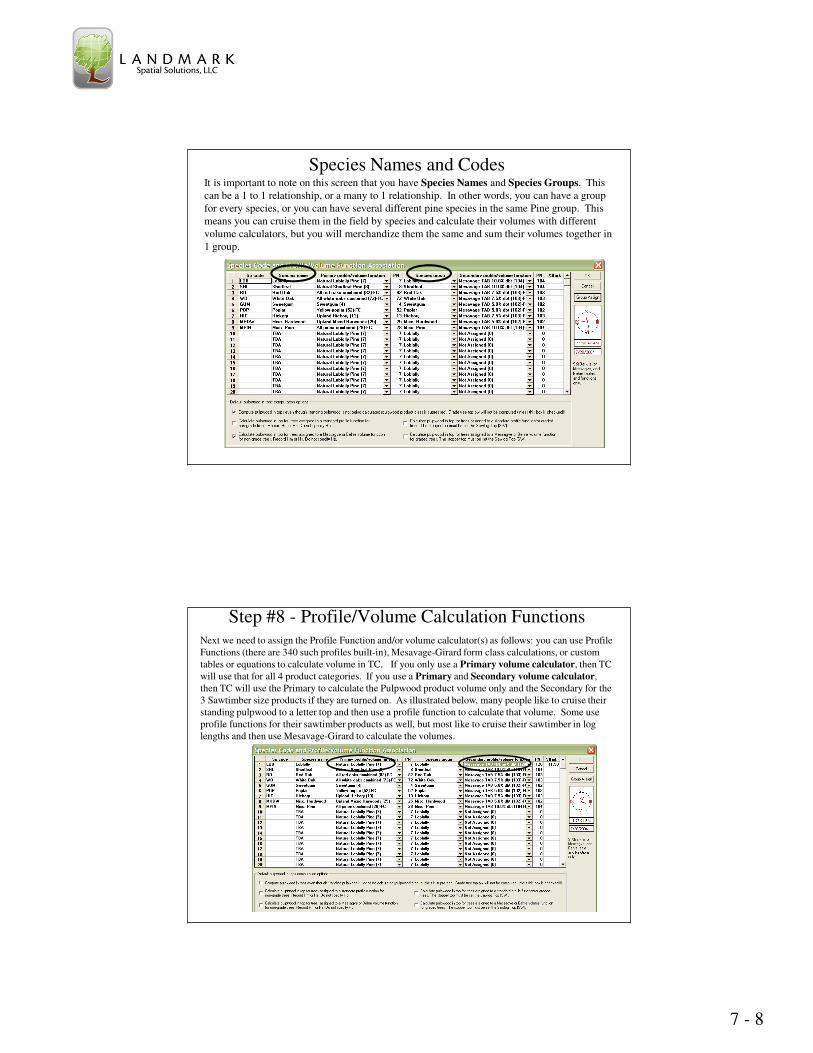
Species Names and CodesIt is important to note on this screen that you have Species Names and Species Groups. This
can be a 1 to 1 relationship, or a many to 1 relationship. In other words, you can have a group
for every species, or you can have several different pine species in the same Pine group. This
means you can cruise them in the field by species and calculate their volumes with different
volume calculators, but you will merchandize them the same and sum their volumes together in
1 group.
Step #8 - Profile/Volume Calculation FunctionsNext we need to assign the Profile Function and/or volume calculator(s) as follows: you can use Profile
Functions (there are 340 such profiles built-in), Mesavage-Girard form class calculations, or custom
tables or equations to calculate volume in TC. If you only use a Primary volume calculator, then TC
will use that for all 4 product categories. If you use a Primary and Secondary volume calculator,
then TC will use the Primary to calculate the Pulpwood product volume only and the Secondary for the
3 Sawtimber size products if they are turned on. As illustrated below, many people like to cruise their
standing pulpwood to a letter top and then use a profile function to calculate that volume. Some use
profile functions for their sawtimber products as well, but most like to cruise their sawtimber in log
lengths and then use Mesavage-Girard to calculate the volumes.
7 - 9
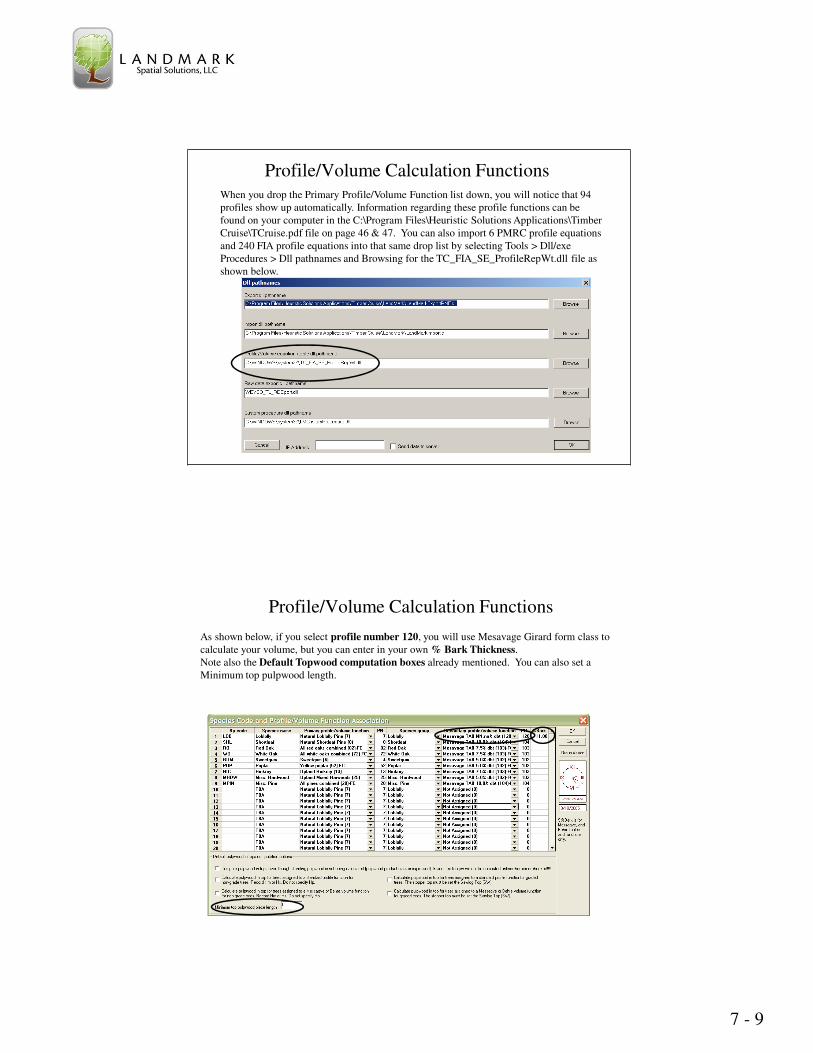
Profile/Volume Calculation Functions
When you drop the Primary Profile/Volume Function list down, you will notice that 94
profiles show up automatically. Information regarding these profile functions can be
found on your computer in the C:\Program Files\Heuristic Solutions Applications\Timber
Cruise\TCruise.pdf file on page 46 & 47. You can also import 6 PMRC profile equations
and 240 FIA profile equations into that same drop list by selecting Tools > Dll/exe
Procedures > Dll pathnames and Browsing for the TC_FIA_SE_ProfileRepWt.dll file as
shown below.
Profile/Volume Calculation Functions
As shown below, if you select profile number 120, you will use Mesavage Girard form class to
calculate your volume, but you can enter in your own % Bark Thickness.
Note also the Default Topwood computation boxes already mentioned. You can also set a
Minimum top pulpwood length.
7 - 10
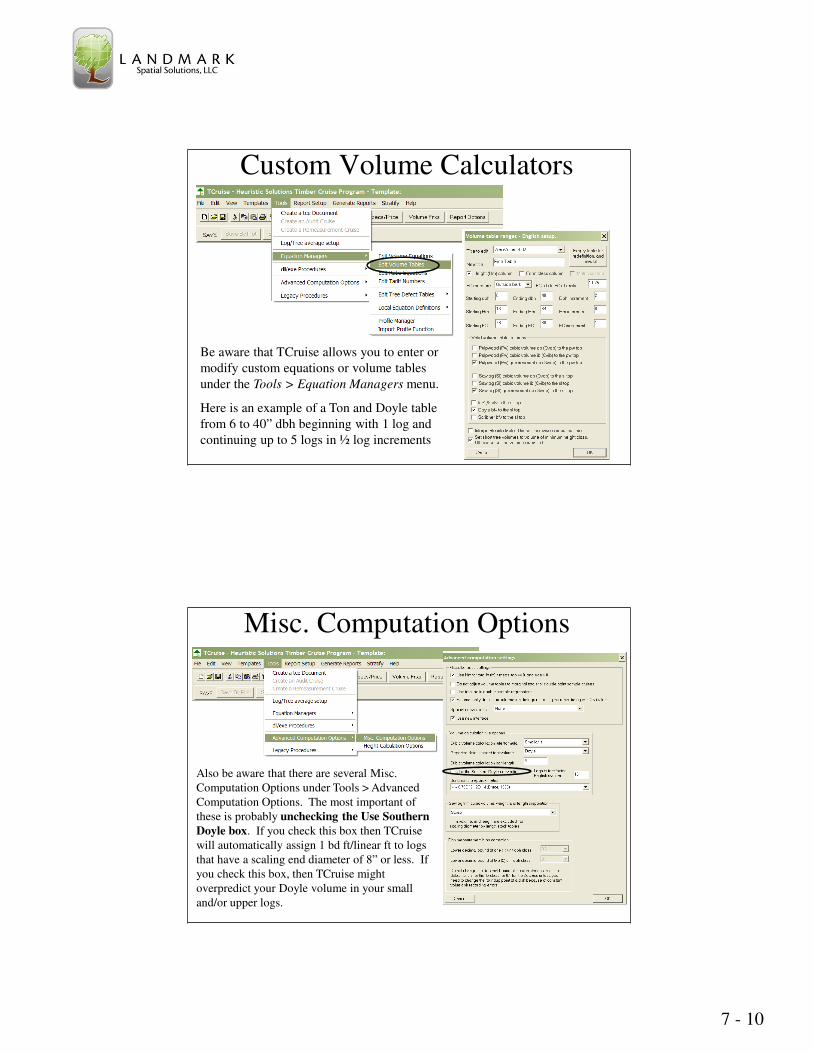
Custom Volume Calculators
Be aware that TCruise allows you to enter or
modify custom equations or volume tables
under the Tools > Equation Managers menu.
Here is an example of a Ton and Doyle table
from 6 to 40” dbh beginning with 1 log and
continuing up to 5 logs in ½ log increments
Misc. Computation Options
Also be aware that there are several Misc.
Computation Options under Tools > Advanced
Computation Options. The most important of
these is probably unchecking the Use Southern
Doyle box. If you check this box then TCruise
will automatically assign 1 bd ft/linear ft to logs
that have a scaling end diameter of 8” or less. If
you check this box, then TCruise might
overpredict your Doyle volume in your small
and/or upper logs.
7 - 11
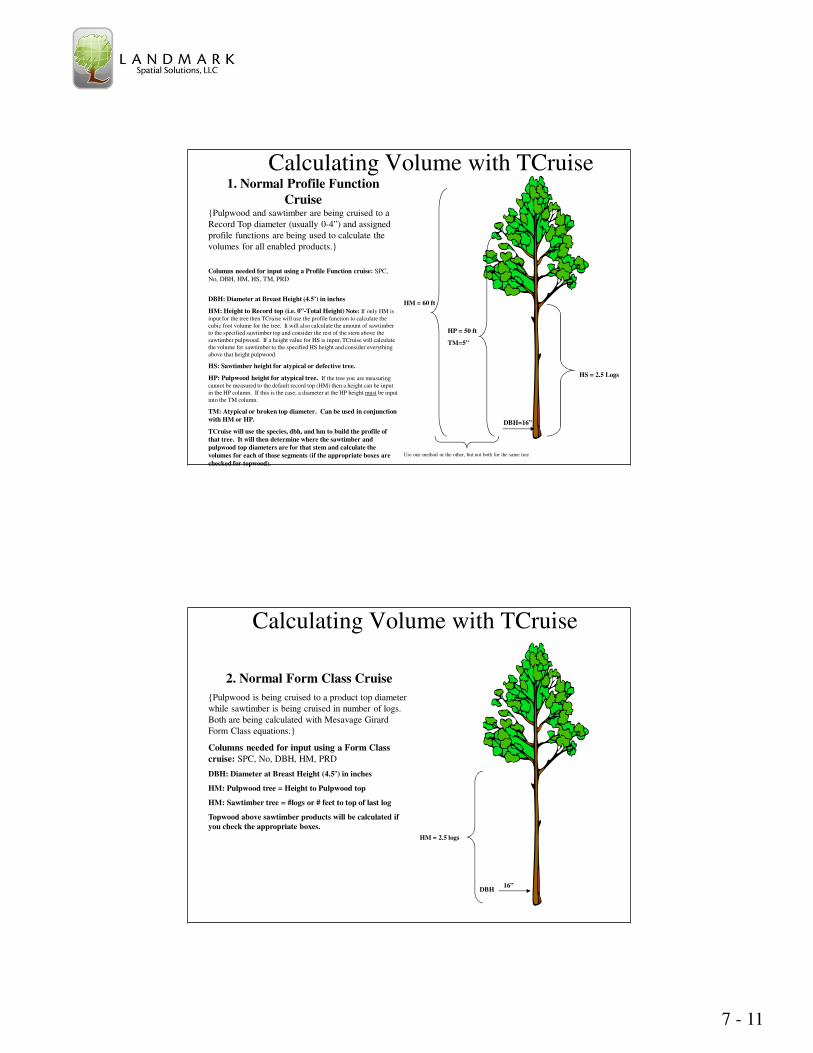
1. Normal Profile Function
Cruise{Pulpwood and sawtimber are being cruised to a
Record Top diameter (usually 0-4”) and assigned
profile functions are being used to calculate the
volumes for all enabled products.}
Columns needed for input using a Profile Function cruise: SPC,
No, DBH, HM, HS, TM, PRD
DBH: Diameter at Breast Height (4.5’) in inches
HM: Height to Record top (i.e. 0”-Total Height) Note: If only HM is
input for the tree then TCruise will use the profile function to calculate the
cubic foot volume for the tree. It will also calculate the amount of sawtimber
to the specified sawtimber top and consider the rest of the stem above the
sawtimber pulpwood. If a height value for HS is input, TCruise will calculate
the volume for sawtimber to the specified HS height and consider everything
above that height pulpwood.
HS: Sawtimber height for atypical or defective tree.
HP: Pulpwood height for atypical tree. If the tree you are measuring
cannot be measured to the default record top (HM) then a height can be input
in the HP column. If this is the case, a diameter at the HP height must be input
into the TM column.
TM: Atypical or broken top diameter. Can be used in conjunction
with HM or HP.
TCruise will use the species, dbh, and hm to build the profile of
that tree. It will then determine where the sawtimber and
pulpwood top diameters are for that stem and calculate the
volumes for each of those segments (if the appropriate boxes are
checked for topwood).
DBH=16”
HS = 2.5 Logs
HM = 60 ft
HP = 50 ft
TM=5”
Use one method or the other, but not both for the same tree
Calculating Volume with TCruise
DBH
2. Normal Form Class Cruise
{Pulpwood is being cruised to a product top diameter
while sawtimber is being cruised in number of logs.
Both are being calculated with Mesavage Girard
Form Class equations.}
Columns needed for input using a Form Class
cruise: SPC, No, DBH, HM, PRD
DBH: Diameter at Breast Height (4.5’) in inches
HM: Pulpwood tree = Height to Pulpwood top
HM: Sawtimber tree = #logs or # feet to top of last log
Topwood above sawtimber products will be calculated if
you check the appropriate boxes.
16”
HM = 2.5 logs
Calculating Volume with TCruise
7 - 12
DBH
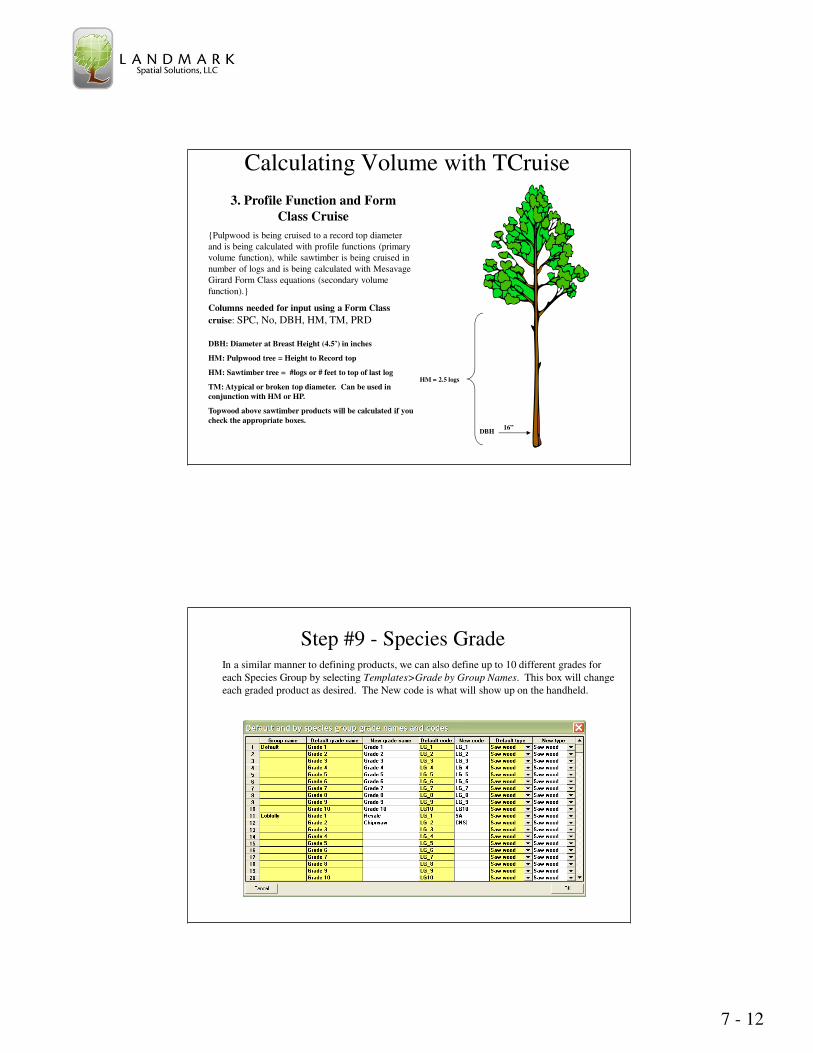
3. Profile Function and Form
Class Cruise
{Pulpwood is being cruised to a record top diameter
and is being calculated with profile functions (primary
volume function), while sawtimber is being cruised in
number of logs and is being calculated with Mesavage
Girard Form Class equations (secondary volume
function).}
Columns needed for input using a Form Class
cruise: SPC, No, DBH, HM, TM, PRD
DBH: Diameter at Breast Height (4.5’) in inches
HM: Pulpwood tree = Height to Record top
HM: Sawtimber tree = #logs or # feet to top of last log
TM: Atypical or broken top diameter. Can be used in
conjunction with HM or HP.
Topwood above sawtimber products will be calculated if you
check the appropriate boxes.16”
HM = 2.5 logs
Calculating Volume with TCruise
Step #9 - Species GradeIn a similar manner to defining products, we can also define up to 10 different grades for
each Species Group by selecting Templates>Grade by Group Names. This box will change
each graded product as desired. The New code is what will show up on the handheld.
7 - 13
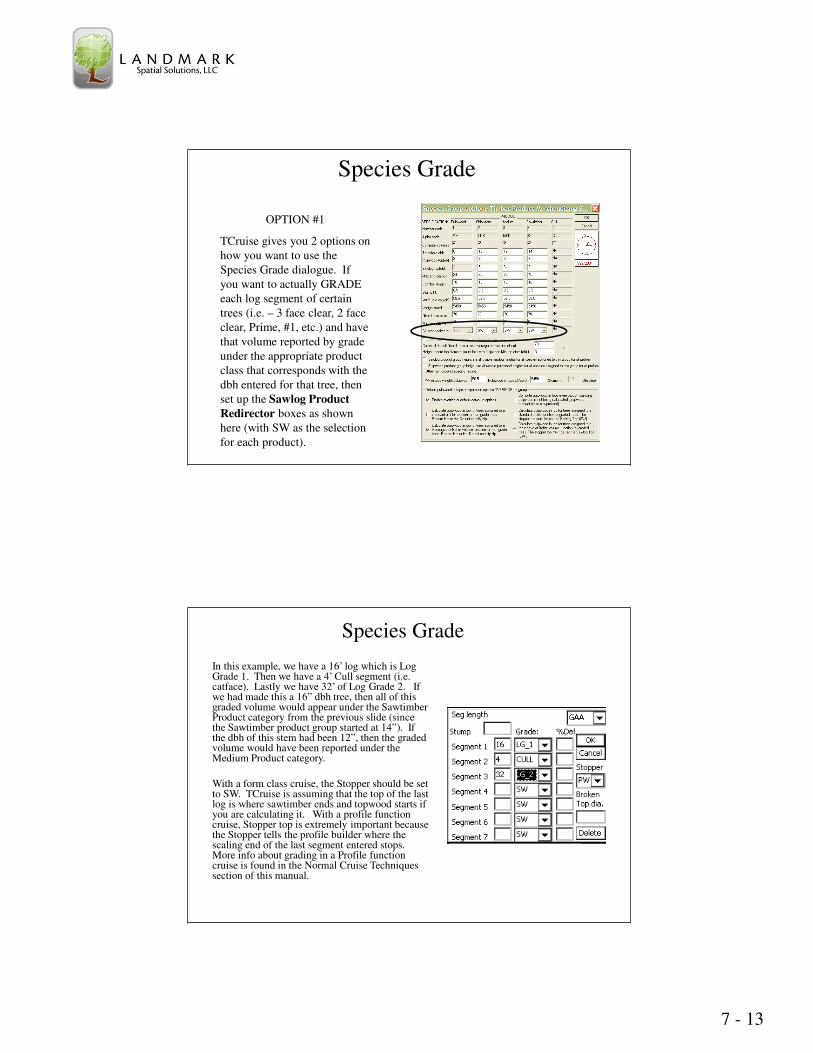
Species Grade
OPTION #1
TCruise gives you 2 options on
how you want to use the
Species Grade dialogue. If
you want to actually GRADE
each log segment of certain
trees (i.e. – 3 face clear, 2 face
clear, Prime, #1, etc.) and have
that volume reported by grade
under the appropriate product
class that corresponds with the
dbh entered for that tree, then
set up the Sawlog Product
Redirector boxes as shown
here (with SW as the selection
for each product).
Species Grade
In this example, we have a 16’ log which is Log Grade 1. Then we have a 4’ Cull segment (i.e. catface). Lastly we have 32’ of Log Grade 2. If we had made this a 16” dbh tree, then all of this graded volume would appear under the Sawtimber Product category from the previous slide (since the Sawtimber product group started at 14”). If the dbh of this stem had been 12”, then the graded volume would have been reported under the Medium Product category.
With a form class cruise, the Stopper should be set to SW. TCruise is assuming that the top of the last log is where sawtimber ends and topwood starts if you are calculating it. With a profile function cruise, Stopper top is extremely important because the Stopper tells the profile builder where the scaling end of the last segment entered stops. More info about grading in a Profile function cruise is found in the Normal Cruise Techniques section of this manual.
7 - 14
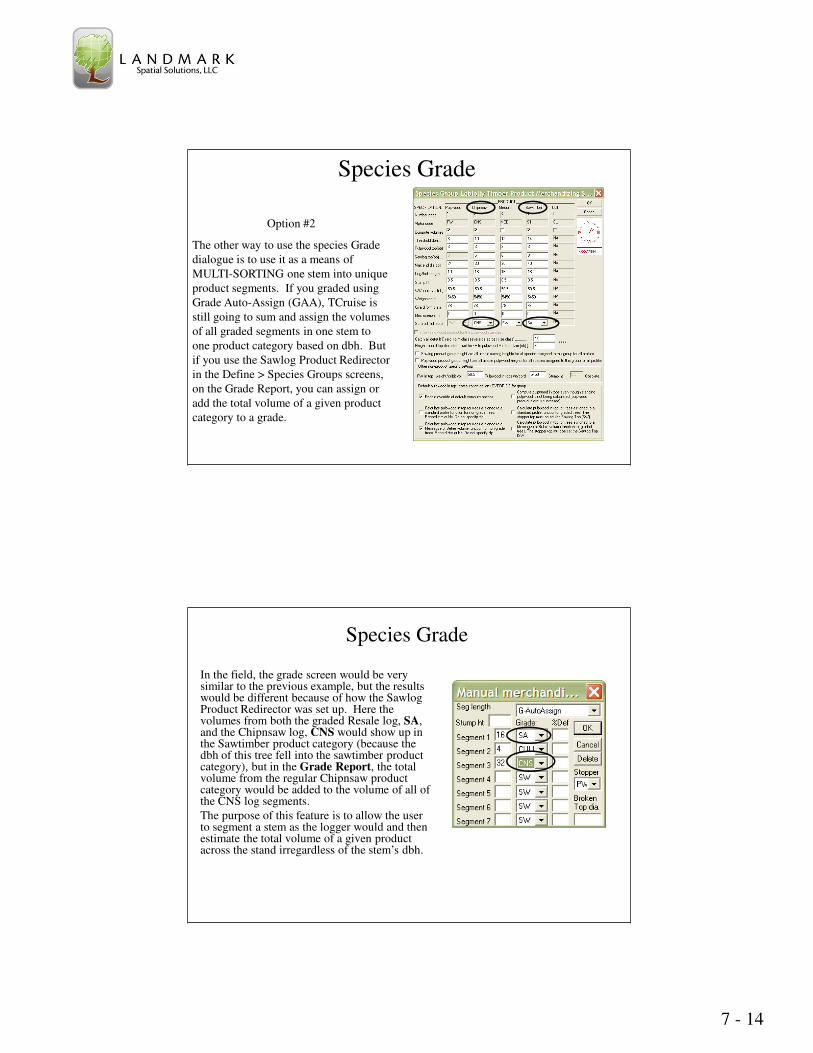
Species Grade
Option #2
The other way to use the species Grade
dialogue is to use it as a means of
MULTI-SORTING one stem into unique
product segments. If you graded using
Grade Auto-Assign (GAA), TCruise is
still going to sum and assign the volumes
of all graded segments in one stem to
one product category based on dbh. But
if you use the Sawlog Product Redirector
in the Define > Species Groups screens,
on the Grade Report, you can assign or
add the total volume of a given product
category to a grade.
Species Grade
In the field, the grade screen would be very similar to the previous example, but the results would be different because of how the Sawlog Product Redirector was set up. Here the volumes from both the graded Resale log, SA, and the Chipnsaw log, CNS would show up in the Sawtimber product category (because the dbh of this tree fell into the sawtimber product category), but in the Grade Report, the total volume from the regular Chipnsaw product category would be added to the volume of all of the CNS log segments.
The purpose of this feature is to allow the user to segment a stem as the logger would and then estimate the total volume of a given product across the stand irregardless of the stem’s dbh.
7 - 15
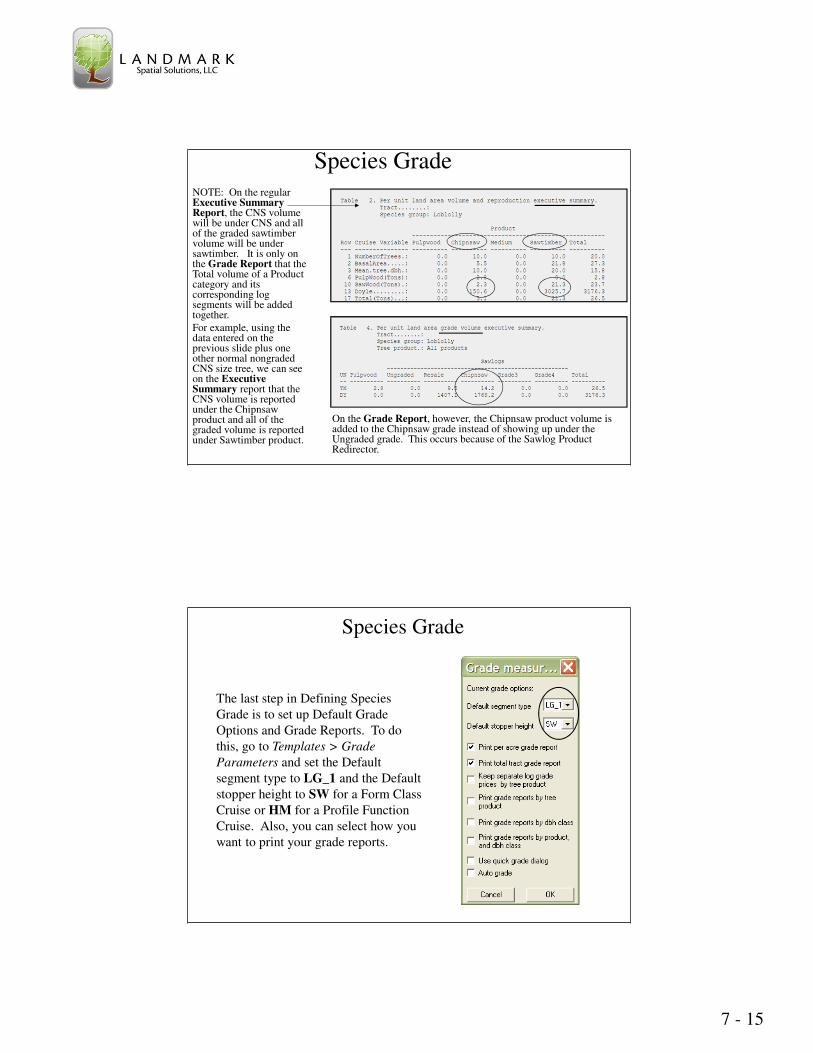
Species Grade
NOTE: On the regular Executive Summary Report, the CNS volume will be under CNS and all of the graded sawtimber volume will be under sawtimber. It is only on the Grade Report that the Total volume of a Product category and its corresponding log segments will be added together.
For example, using the data entered on the previous slide plus one other normal nongraded CNS size tree, we can see on the Executive Summary report that the CNS volume is reported under the Chipnsaw product and all of the graded volume is reported under Sawtimber product.
On the Grade Report, however, the Chipnsaw product volume is added to the Chipnsaw grade instead of showing up under the Ungraded grade. This occurs because of the Sawlog Product Redirector.
Species Grade
The last step in Defining Species
Grade is to set up Default Grade
Options and Grade Reports. To do
this, go to Templates > Grade
Parameters and set the Default
segment type to LG_1 and the Default
stopper height to SW for a Form Class
Cruise or HM for a Profile Function
Cruise. Also, you can select how you
want to print your grade reports.
7 - 16
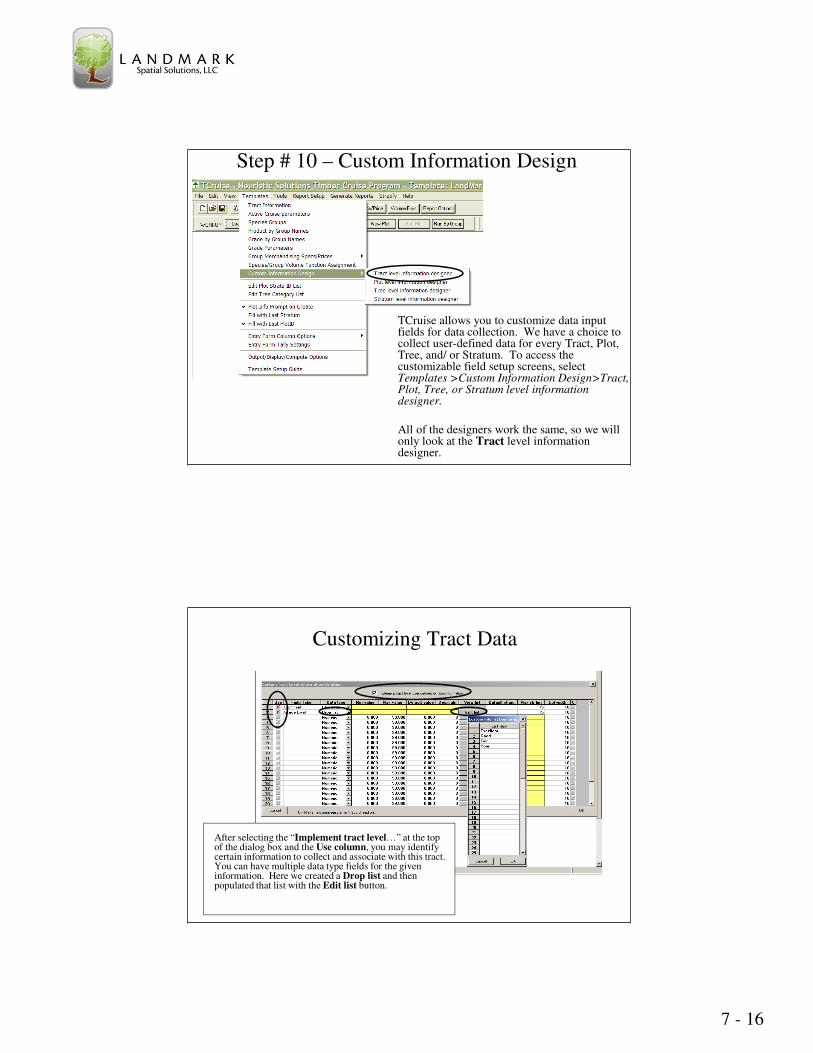
Step # 10 – Custom Information Design
TCruise allows you to customize data input fields for data collection. We have a choice to collect user-defined data for every Tract, Plot, Tree, and/ or Stratum. To access the customizable field setup screens, select Templates >Custom Information Design>Tract, Plot, Tree, or Stratum level information designer.
All of the designers work the same, so we will only look at the Tract level information designer.
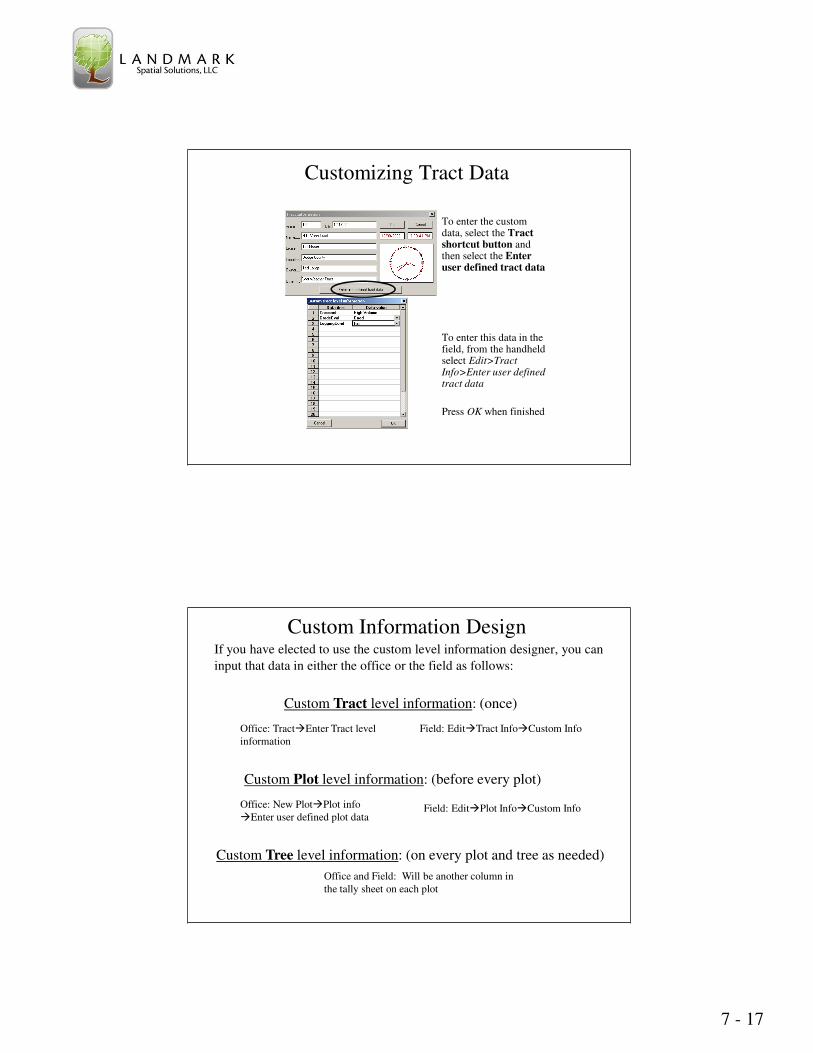
Customizing Tract Data
After selecting the “Implement tract level…” at the top of the dialog box and the Use column, you may identify certain information to collect and associate with this tract. You can have multiple data type fields for the given information. Here we created a Drop list and then populated that list with the Edit list button.
7 - 17
Customizing Tract Data
To enter the custom data, select the Tract shortcut button and then select the Enter user defined tract data
To enter this data in the field, from the handheld select Edit>Tract Info>Enter user defined tract data
Press OK when finished
Custom Information DesignIf you have elected to use the custom level information designer, you can
input that data in either the office or the field as follows:
Custom Tract level information: (once)
Custom Plot level information: (before every plot)
Custom Tree level information: (on every plot and tree as needed)
Office: Tract�Enter Tract level
information
Field: Edit�Tract Info�Custom Info
Office: New Plot�Plot info
�Enter user defined plot dataField: Edit�Plot Info�Custom Info
Office and Field: Will be another column in
the tally sheet on each plot
7 - 18
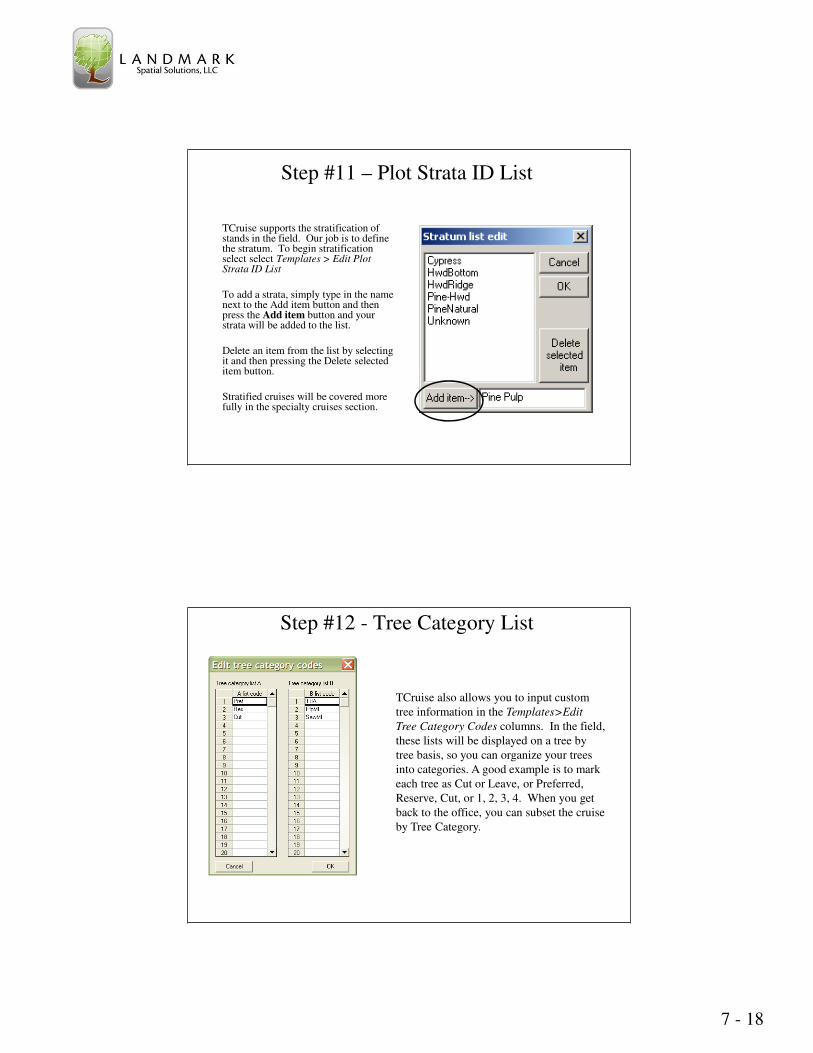
Step #11 – Plot Strata ID List
TCruise supports the stratification of stands in the field. Our job is to define the stratum. To begin stratification select select Templates > Edit Plot Strata ID List
To add a strata, simply type in the name next to the Add item button and then press the Add item button and your strata will be added to the list.
Delete an item from the list by selecting it and then pressing the Delete selected item button.
Stratified cruises will be covered more fully in the specialty cruises section.
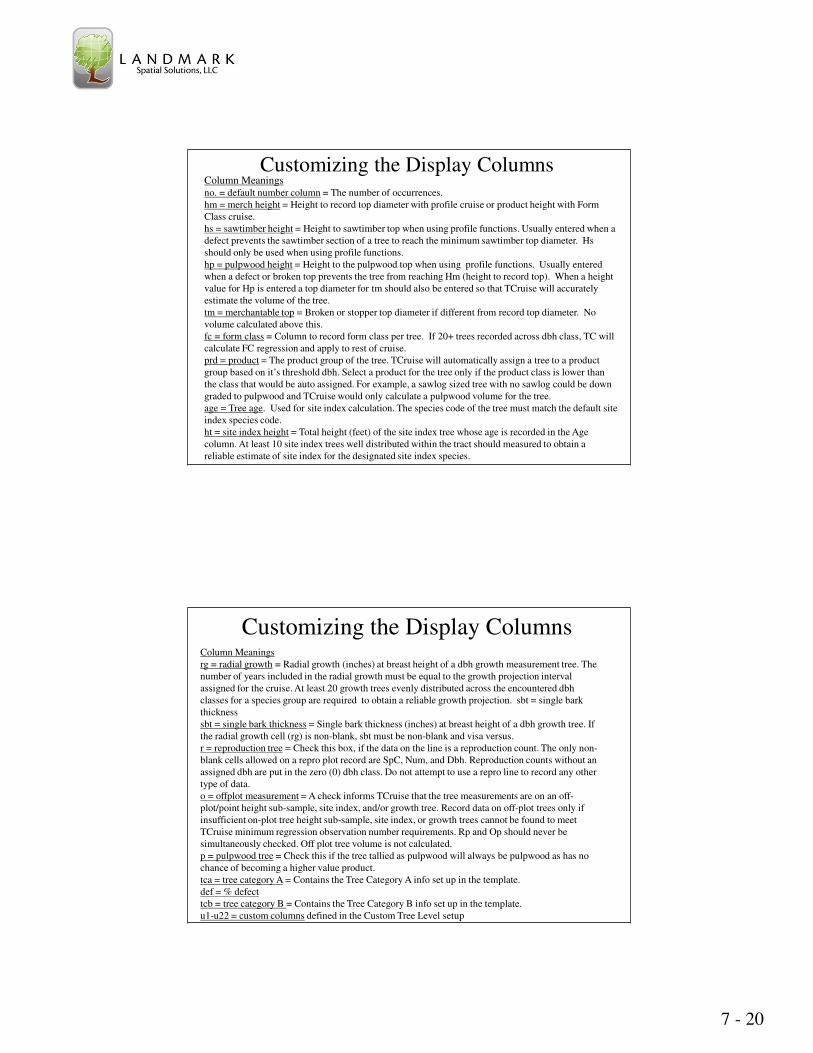
Step #12 - Tree Category List
TCruise also allows you to input custom
tree information in the Templates>Edit
Tree Category Codes columns. In the field,
these lists will be displayed on a tree by
tree basis, so you can organize your trees
into categories. A good example is to mark
each tree as Cut or Leave, or Preferred,
Reserve, Cut, or 1, 2, 3, 4. When you get
back to the office, you can subset the cruise
by Tree Category.

7 - 19
Step #13 - Customizing the Display Columns
TCruise will allow you to customize the display columns for data entry. For example, if you are not collecting regeneration data then you do not need to see the columns for collecting regeneration information. To customize the display columns select Templates >Entry Form Column Options > Hide/Order Grid Columns. The screen to the right should appear.
Customizing the Display Columns
To begin reordering the
columns, press the Columns button in the Sample Plot section of the dialog box.
We can now select the columns we want to see by selecting the box next to the column heading. In this example we will be using the no., hm, tm, and prd (product) columns. Press OK when finished.
Subsample plot cycle and Double Point cycle will be discussed in the Specialty Cruise section.
7 - 20
Customizing the Display ColumnsColumn Meanings
no. = default number column = The number of occurrences.
hm = merch height = Height to record top diameter with profile cruise or product height with Form
Class cruise.
hs = sawtimber height = Height to sawtimber top when using profile functions. Usually entered when a
defect prevents the sawtimber section of a tree to reach the minimum sawtimber top diameter. Hs
should only be used when using profile functions.
hp = pulpwood height = Height to the pulpwood top when using profile functions. Usually entered
when a defect or broken top prevents the tree from reaching Hm (height to record top). When a height
value for Hp is entered a top diameter for tm should also be entered so that TCruise will accurately
estimate the volume of the tree.
tm = merchantable top = Broken or stopper top diameter if different from record top diameter. No
volume calculated above this.
fc = form class = Column to record form class per tree. If 20+ trees recorded across dbh class, TC will
calculate FC regression and apply to rest of cruise.
prd = product = The product group of the tree. TCruise will automatically assign a tree to a product
group based on it’s threshold dbh. Select a product for the tree only if the product class is lower than
the class that would be auto assigned. For example, a sawlog sized tree with no sawlog could be down
graded to pulpwood and TCruise would only calculate a pulpwood volume for the tree.
age = Tree age. Used for site index calculation. The species code of the tree must match the default site
index species code.
ht = site index height = Total height (feet) of the site index tree whose age is recorded in the Age
column. At least 10 site index trees well distributed within the tract should measured to obtain a
reliable estimate of site index for the designated site index species.
Customizing the Display ColumnsColumn Meanings
rg = radial growth = Radial growth (inches) at breast height of a dbh growth measurement tree. The
number of years included in the radial growth must be equal to the growth projection interval
assigned for the cruise. At least 20 growth trees evenly distributed across the encountered dbh
classes for a species group are required to obtain a reliable growth projection. sbt = single bark
thickness
sbt = single bark thickness = Single bark thickness (inches) at breast height of a dbh growth tree. If
the radial growth cell (rg) is non-blank, sbt must be non-blank and visa versus.
r = reproduction tree = Check this box, if the data on the line is a reproduction count. The only non-
blank cells allowed on a repro plot record are SpC, Num, and Dbh. Reproduction counts without an
assigned dbh are put in the zero (0) dbh class. Do not attempt to use a repro line to record any other
type of data.
o = offplot measurement = A check informs TCruise that the tree measurements are on an off-
plot/point height sub-sample, site index, and/or growth tree. Record data on off-plot trees only if
insufficient on-plot tree height sub-sample, site index, or growth trees cannot be found to meet
TCruise minimum regression observation number requirements. Rp and Op should never be
simultaneously checked. Off plot tree volume is not calculated.
p = pulpwood tree = Check this if the tree tallied as pulpwood will always be pulpwood as has no
chance of becoming a higher value product.
tca = tree category A = Contains the Tree Category A info set up in the template.
def = % defect
tcb = tree category B = Contains the Tree Category B info set up in the template.
u1-u22 = custom columns defined in the Custom Tree Level setup
7 - 21
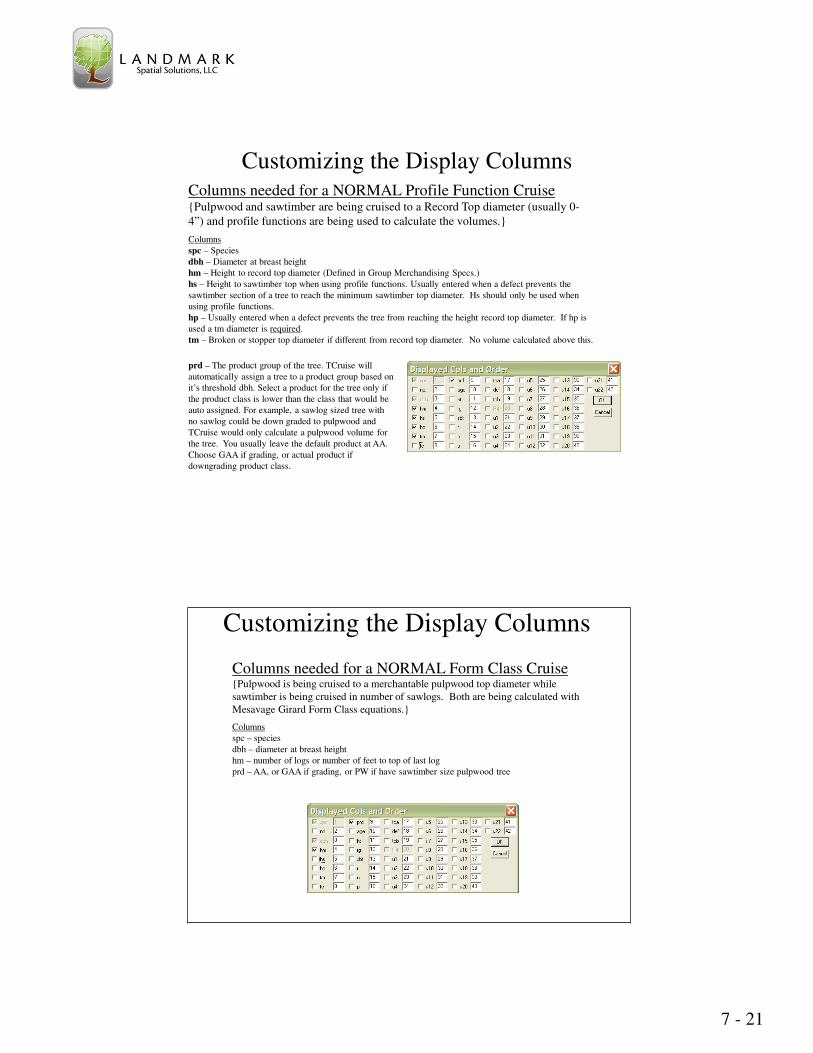
Customizing the Display ColumnsColumns needed for a NORMAL Profile Function Cruise{Pulpwood and sawtimber are being cruised to a Record Top diameter (usually 0-
4”) and profile functions are being used to calculate the volumes.}
Columns
spc – Species
dbh – Diameter at breast height
hm – Height to record top diameter (Defined in Group Merchandising Specs.)
hs – Height to sawtimber top when using profile functions. Usually entered when a defect prevents the
sawtimber section of a tree to reach the minimum sawtimber top diameter. Hs should only be used when
using profile functions.
hp – Usually entered when a defect prevents the tree from reaching the height record top diameter. If hp is
used a tm diameter is required.
tm – Broken or stopper top diameter if different from record top diameter. No volume calculated above this.
prd – The product group of the tree. TCruise will
automatically assign a tree to a product group based on
it’s threshold dbh. Select a product for the tree only if
the product class is lower than the class that would be
auto assigned. For example, a sawlog sized tree with
no sawlog could be down graded to pulpwood and
TCruise would only calculate a pulpwood volume for
the tree. You usually leave the default product at AA.
Choose GAA if grading, or actual product if
downgrading product class.
Customizing the Display Columns
Columns needed for a NORMAL Form Class Cruise{Pulpwood is being cruised to a merchantable pulpwood top diameter while
sawtimber is being cruised in number of sawlogs. Both are being calculated with
Mesavage Girard Form Class equations.}
Columns
spc – species
dbh – diameter at breast height
hm – number of logs or number of feet to top of last log
prd – AA, or GAA if grading, or PW if have sawtimber size pulpwood tree
7 - 22
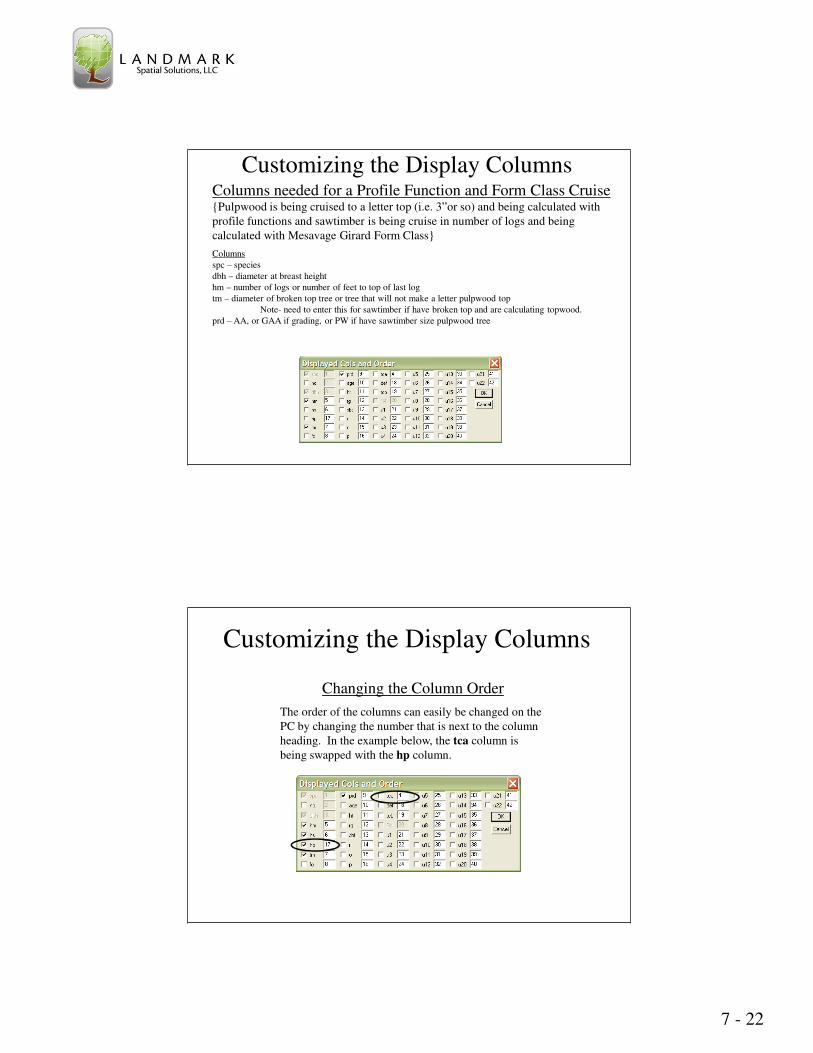
Customizing the Display ColumnsColumns needed for a Profile Function and Form Class Cruise{Pulpwood is being cruised to a letter top (i.e. 3”or so) and being calculated with
profile functions and sawtimber is being cruise in number of logs and being
calculated with Mesavage Girard Form Class}
Columns
spc – species
dbh – diameter at breast height
hm – number of logs or number of feet to top of last log
tm – diameter of broken top tree or tree that will not make a letter pulpwood top
Note- need to enter this for sawtimber if have broken top and are calculating topwood.
prd – AA, or GAA if grading, or PW if have sawtimber size pulpwood tree
Customizing the Display Columns
Changing the Column Order
The order of the columns can easily be changed on the
PC by changing the number that is next to the column
heading. In the example below, the tca column is
being swapped with the hp column.
7 - 23
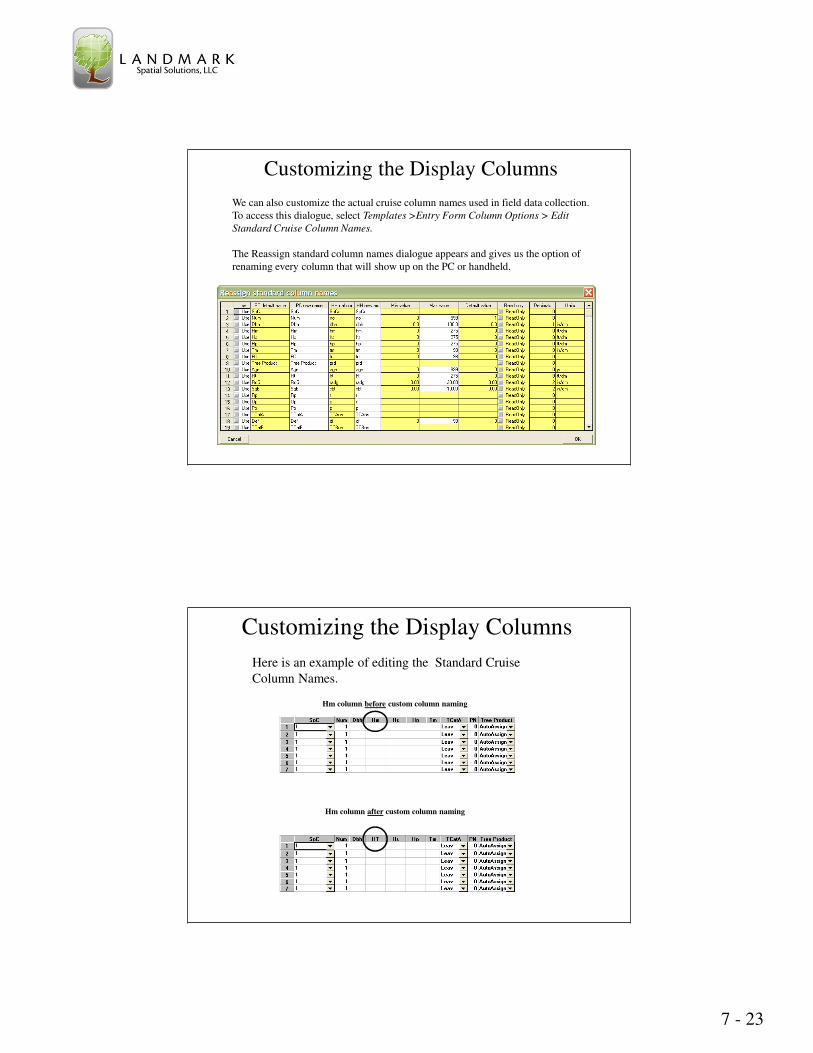
Customizing the Display Columns
We can also customize the actual cruise column names used in field data collection.
To access this dialogue, select Templates >Entry Form Column Options > Edit
Standard Cruise Column Names.
The Reassign standard column names dialogue appears and gives us the option of
renaming every column that will show up on the PC or handheld.
Customizing the Display Columns
Hm column before custom column naming
Hm column after custom column naming
Here is an example of editing the Standard Cruise
Column Names.
7 - 24
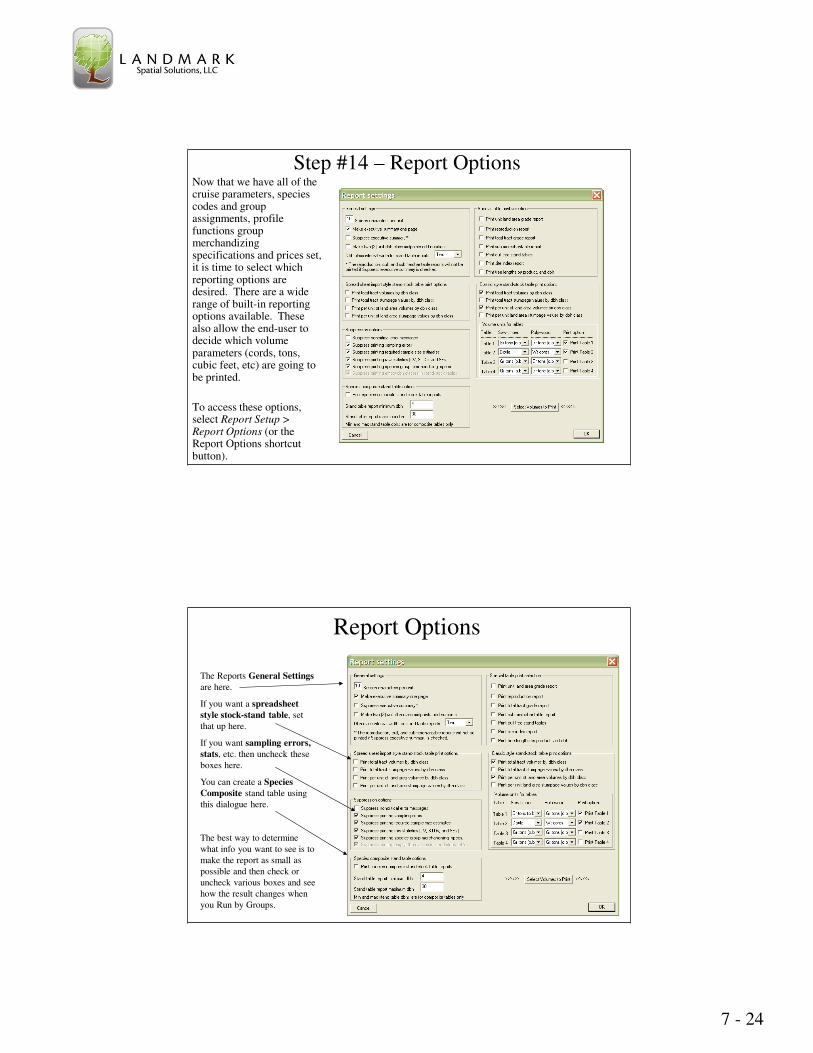
Step #14 – Report OptionsNow that we have all of the cruise parameters, species codes and group assignments, profile functions group merchandizing specifications and prices set, it is time to select which reporting options are desired. There are a wide range of built-in reporting options available. These also allow the end-user to decide which volume parameters (cords, tons, cubic feet, etc) are going to be printed.
To access these options, select Report Setup > Report Options (or the Report Options shortcut button).
Report Options
The Reports General Settings
are here.
If you want a spreadsheet
style stock-stand table, set
that up here.
If you want sampling errors,
stats, etc. then uncheck these
boxes here.
You can create a Species
Composite stand table using
this dialogue here.
The best way to determine
what info you want to see is to
make the report as small as
possible and then check or
uncheck various boxes and see
how the result changes when
you Run by Groups.
7 - 25
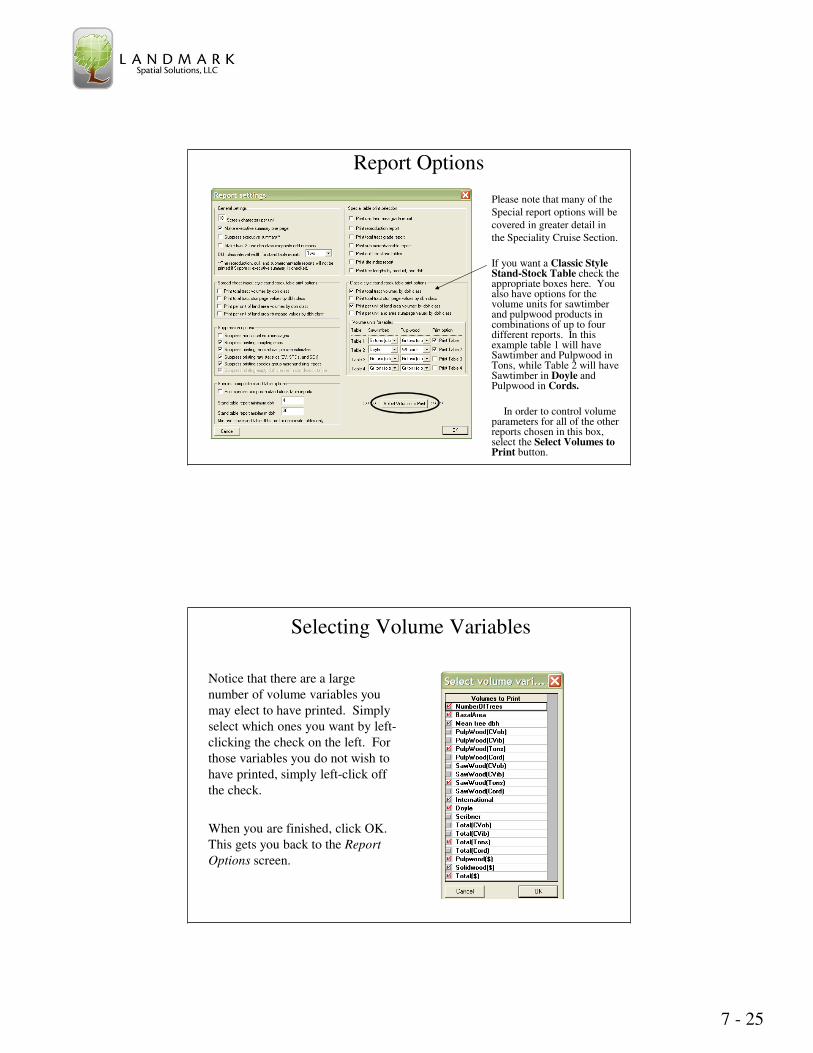
Report Options
Please note that many of the
Special report options will be
covered in greater detail in
the Speciality Cruise Section.
If you want a Classic Style Stand-Stock Table check the appropriate boxes here. You also have options for the volume units for sawtimber and pulpwood products in combinations of up to four different reports. In this example table 1 will have Sawtimber and Pulpwood in Tons, while Table 2 will have Sawtimber in Doyle and Pulpwood in Cords.
In order to control volume parameters for all of the other reports chosen in this box, select the Select Volumes to Print button.
Selecting Volume Variables
Notice that there are a large
number of volume variables you
may elect to have printed. Simply
select which ones you want by left-
clicking the check on the left. For
those variables you do not wish to
have printed, simply left-click off
the check.
When you are finished, click OK.
This gets you back to the Report
Options screen.
7 - 26
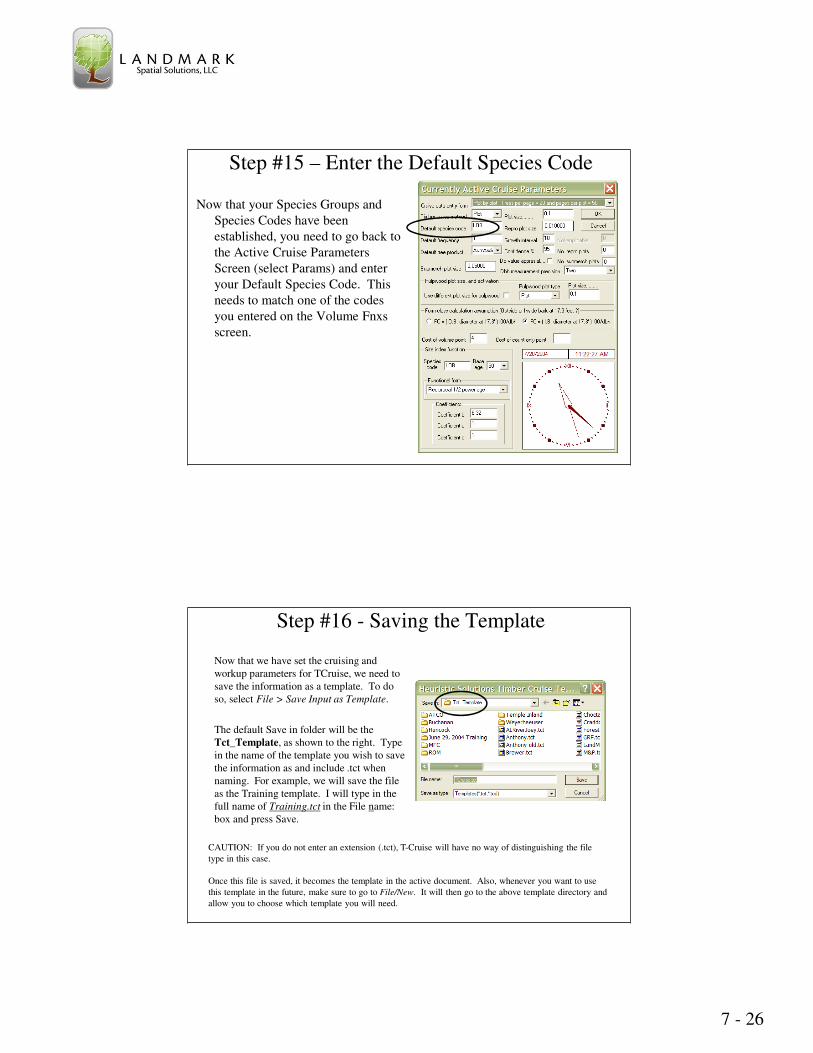
Step #15 – Enter the Default Species Code
Now that your Species Groups and
Species Codes have been
established, you need to go back to
the Active Cruise Parameters
Screen (select Params) and enter
your Default Species Code. This
needs to match one of the codes
you entered on the Volume Fnxs
screen.
Step #16 - Saving the Template
Now that we have set the cruising and
workup parameters for TCruise, we need to
save the information as a template. To do
so, select File > Save Input as Template.
The default Save in folder will be the
Tct_Template, as shown to the right. Type
in the name of the template you wish to save
the information as and include .tct when
naming. For example, we will save the file
as the Training template. I will type in the
full name of Training.tct in the File name:
box and press Save.
CAUTION: If you do not enter an extension (.tct), T-Cruise will have no way of distinguishing the file
type in this case.
Once this file is saved, it becomes the template in the active document. Also, whenever you want to use
this template in the future, make sure to go to File/New. It will then go to the above template directory and
allow you to choose which template you will need.
7 - 27
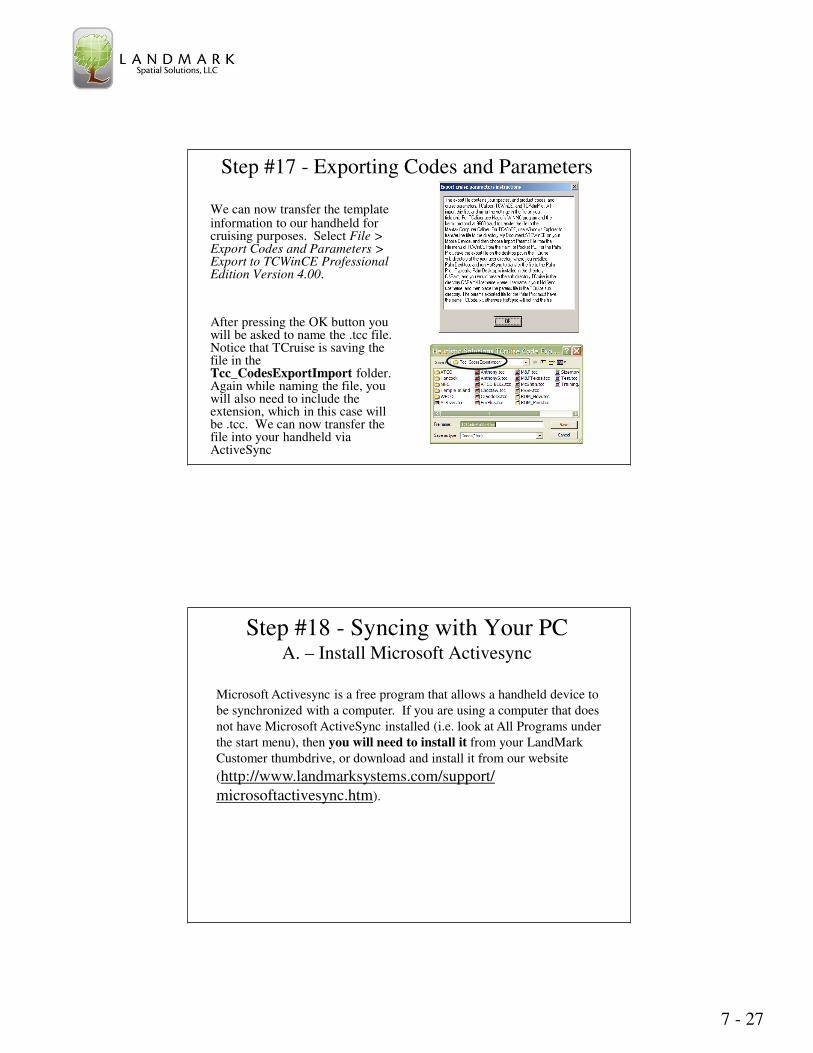
Step #17 - Exporting Codes and Parameters
We can now transfer the template information to our handheld for cruising purposes. Select File > Export Codes and Parameters > Export to TCWinCE Professional Edition Version 4.00.
After pressing the OK button you will be asked to name the .tcc file. Notice that TCruise is saving the file in the Tcc_CodesExportImport folder. Again while naming the file, you will also need to include the extension, which in this case will be .tcc. We can now transfer the file into your handheld via ActiveSync
Step #18 - Syncing with Your PCA. – Install Microsoft Activesync
Microsoft Activesync is a free program that allows a handheld device to
be synchronized with a computer. If you are using a computer that does
not have Microsoft ActiveSync installed (i.e. look at All Programs under
the start menu), then you will need to install it from your LandMark
Customer thumbdrive, or download and install it from our website
(http://www.landmarksystems.com/support/
microsoftactivesync.htm).
7 - 28
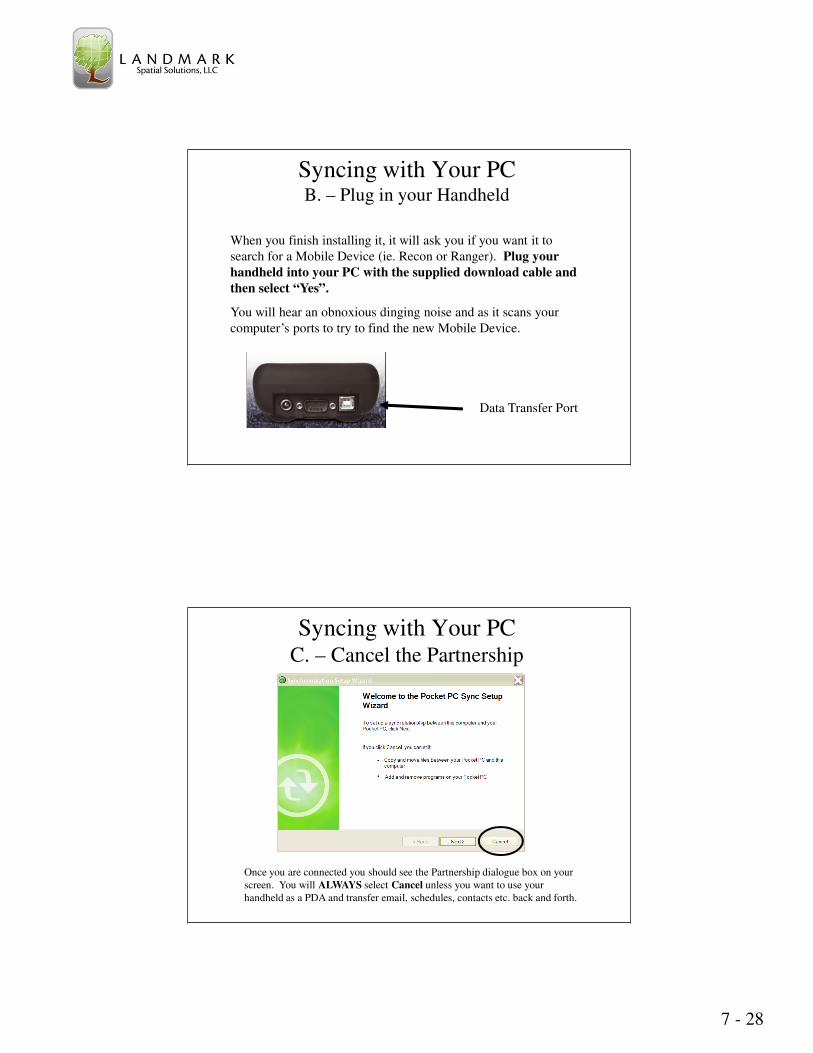
Syncing with Your PCB. – Plug in your Handheld
When you finish installing it, it will ask you if you want it to
search for a Mobile Device (ie. Recon or Ranger). Plug your
handheld into your PC with the supplied download cable and
then select “Yes”.
You will hear an obnoxious dinging noise and as it scans your
computer’s ports to try to find the new Mobile Device.
Data Transfer Port
Syncing with Your PCC. – Cancel the Partnership
Once you are connected you should see the Partnership dialogue box on your
screen. You will ALWAYS select Cancel unless you want to use your
handheld as a PDA and transfer email, schedules, contacts etc. back and forth.
7 - 29
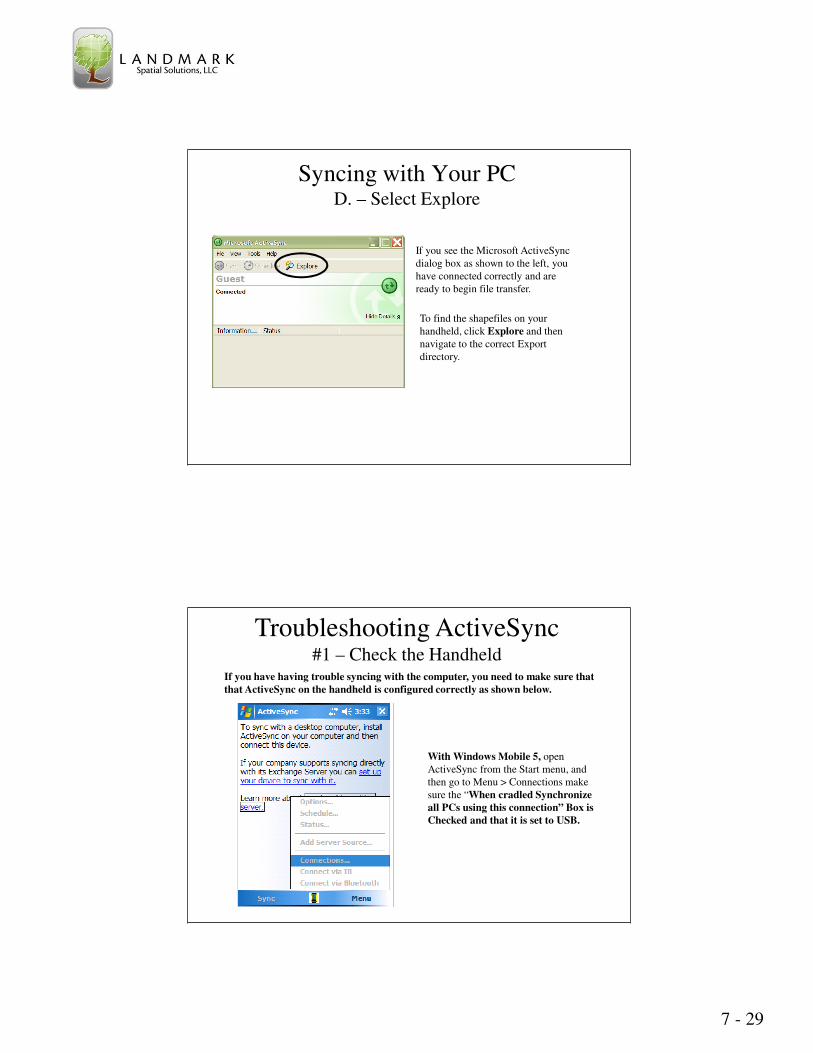
Syncing with Your PCD. – Select Explore
If you see the Microsoft ActiveSync
dialog box as shown to the left, you
have connected correctly and are
ready to begin file transfer.
To find the shapefiles on your
handheld, click Explore and then
navigate to the correct Export
directory.
Troubleshooting ActiveSync#1 – Check the Handheld
With Windows Mobile 5, open
ActiveSync from the Start menu, and
then go to Menu > Connections make
sure the “When cradled Synchronize
all PCs using this connection” Box is
Checked and that it is set to USB.
If you have having trouble syncing with the computer, you need to make sure that
that ActiveSync on the handheld is configured correctly as shown below.
7 - 30
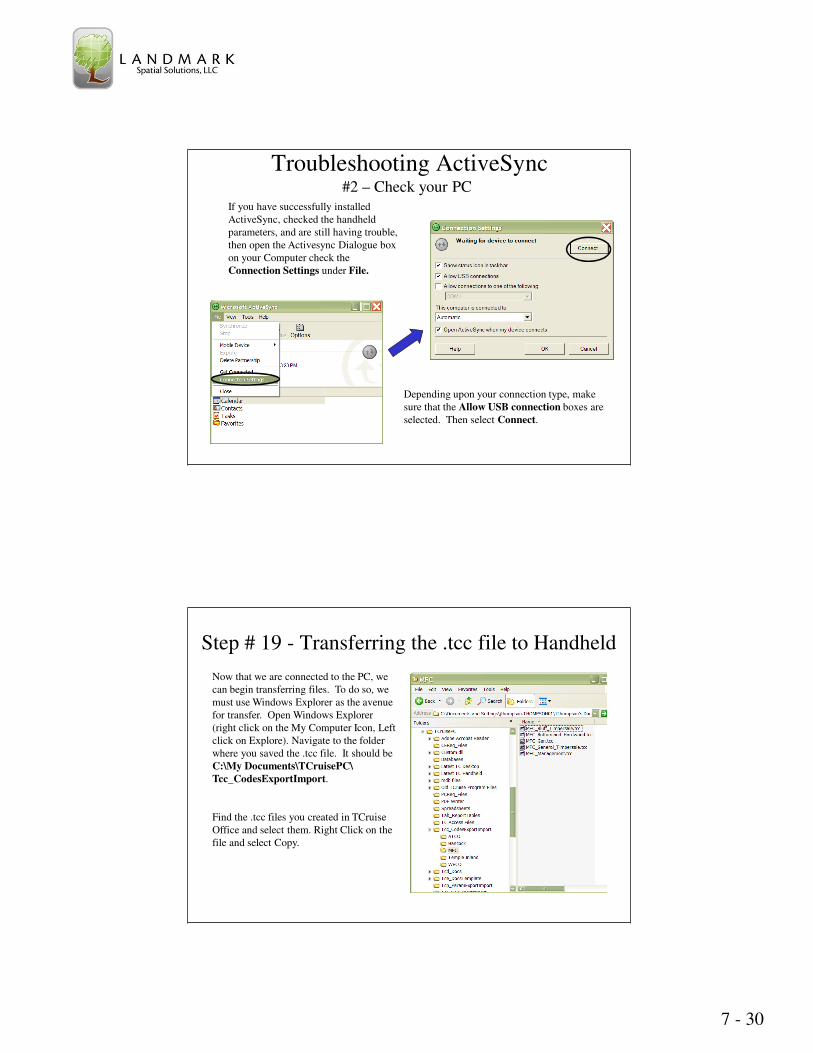
Troubleshooting ActiveSync#2 – Check your PC
If you have successfully installed
ActiveSync, checked the handheld
parameters, and are still having trouble,
then open the Activesync Dialogue box
on your Computer check the
Connection Settings under File.
Depending upon your connection type, make
sure that the Allow USB connection boxes are
selected. Then select Connect.
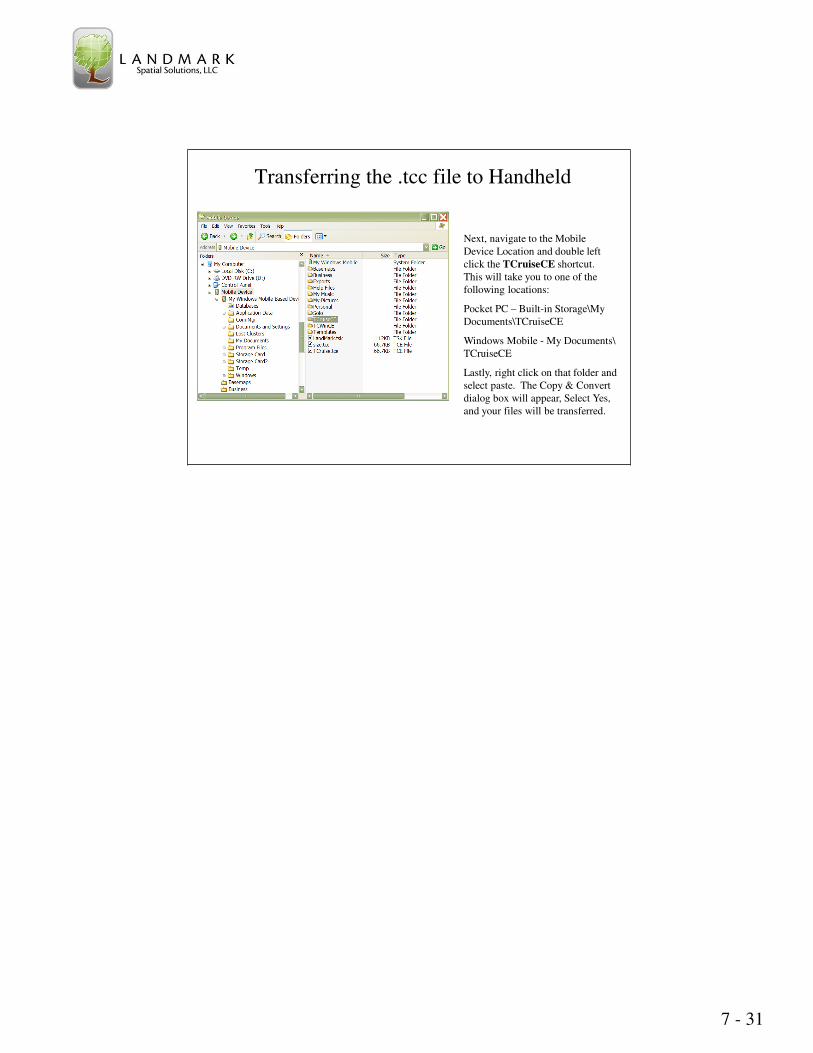
Step # 19 - Transferring the .tcc file to Handheld
Now that we are connected to the PC, we
can begin transferring files. To do so, we
must use Windows Explorer as the avenue
for transfer. Open Windows Explorer
(right click on the My Computer Icon, Left
click on Explore). Navigate to the folder
where you saved the .tcc file. It should be
C:\My Documents\TCruisePC\
Tcc_CodesExportImport.
Find the .tcc files you created in TCruise
Office and select them. Right Click on the
file and select Copy.
7 - 31
Transferring the .tcc file to Handheld
Next, navigate to the Mobile
Device Location and double left
click the TCruiseCE shortcut.
This will take you to one of the
following locations:
Pocket PC – Built-in Storage\My
Documents\TCruiseCE
Windows Mobile - My Documents\
TCruiseCE
Lastly, right click on that folder and
select paste. The Copy & Convert
dialog box will appear, Select Yes,
and your files will be transferred.


![[heaven] Tweet me if you can](https://img.pdfslide.tips/doc/110x75/555c7842d8b42a12348b4bd0/heaven-tweet-me-if-you-can.jpg)


![[1106 조진현] if you( batch rendering )](https://img.pdfslide.tips/doc/110x75/559868331a28abae738b460e/1106-if-you-batch-rendering-.jpg)