Embed Size (px)
Citation preview
ArcGIS®
9Using ArcGIS® Publisher
���������� ��� ������
�����������������
�������������������� �!���"��
#���� ��!����"��������������"$!�������%"�$������������ �����#���&��'������"��$�������������"���������&�����"���������&�� �������"�$������ ��������������"�(���������������&�)������)���*��"����������+����� ���&��'!��(�������$"��������!�������� ��!��(����!����)���"����"��!�"����"��)��"�$��������"����������"������)��(������ ��!������������������������!)�%"�����%����������!�����&�����(�����������,$������$��(�����������-�����"�.������)����)�/ +�&0��'����)��������)��1��2�3/4 )����
#���� ��!����"��������������"$!�����$(5�"�"�����&���$���"��
�����������������
��������������� �������������
�� ������������ �������������������
����� &���)��"$!������)���*������������������$�������$(5�"�����!�� ��6�"���������!����������������������7�����!���",$���������������#���#�8*6�.�#�8��79#����!���!$!)$��)�$���"����)�����"���$��(�������7�����!�����$(5�"������"�������� �����:��;<����234����������)��)������=>�+41/2?@:��;<����2341=>�+41/2?���*��:��;4���44*4���4�=��!!��"���#�"���"��8��*��!�$���� &���?@���8:���A;�<����232 4<=+BC411<?=#�"���"��8��?���*��8:���;��2�2� �=��!�$���� &���?)�������"�(��������"��*.��$ �"$���������)�/ +�&0��'����)��������)��1��2�3/4 )����
����) �� ���� ���(� ����)��"������)��"7��) ����"7�� ����) 7�� (� ����)��".��) 7��������+�&��')��"������)��"�8�)��"�.�)������A8��(���������)�8�)&&&������������&��'�"�!)���&&&������"�!�������!��'�)�������������!��'�)�������"�!��'�� �����������������)���$��������!!$���)��"���������5$�����"�����
B���"�!�������������$"�!��������������������!��'����������������!��'�� ���������"�������!��'�&�����
Attribution.pmd 02/17/2004, 11:22 AM1
iii
Contents 1 Welcome to ArcGIS Publisher 1��������������������� ��������������������������������������������������������������������������������� ����������������!"������������������� ����������������#
2 Quick-start tutorial 9���������$%����������������������$&��������� %�'�����(�������� �������������������������$�����������%�)��������� �������������������*��������������$+����������%�'������������������,��������$-
3 ArcGIS Publisher basics 23������������� ���������������� �����������������������������������.������� �'���������������������������������������,������ !'����������������������������������������� +'������������������� ������������������&)�����������������������������$"���.���'�������������*���������������+��������*�������������-"�����������,����������&'������������������,���������$'��������������������������������,����������'������������������������������������,����/�������
Glossary 47
Index 51
TOC.pmd 02/17/2004, 1:05 PM3

TOC.pmd 02/17/2004, 1:05 PM4
IN THIS CHAPTER
1
Welcome to ArcGIS Publisher 1••••• Sharing information
••••• Viewing maps
••••• Exploring data
••••• Publishing maps with ArcGISPublisher
••••• Tips on learning ArcGIS Publisher
Welcome to ESRI® ArcGIS® Publisher extension—a tool for publishing mapsdesigned in ArcMap™. Have you ever wanted to share an ArcMap mapdocument with others, only to find out that those you want to share the mapwith do not have ArcMap? ArcGIS Publisher can solve this problem byallowing you to publish and share maps with other people, even if they don’thave ArcMap. ArcGIS Publisher provides an environment for sharing anddistributing maps. ArcGIS Publisher converts ArcMap map documents intothe published map file (.pmf) format. These published maps can then beshared with other users who have the free ArcReader™ software.
This book shows you how to use ArcGIS Publisher to publish maps so thatyou can share your maps with other organizations or within your ownorganization. This chapter provides an introduction to ArcGIS Publisher.Refer to Chapter 2, ‘Quick-start tutorial’, to gain a quick understanding ofhow to use ArcGIS Publisher. Chapter 3, ‘ArcGIS Publisher basics’, outlineshow to use ArcGIS Publisher.
2 USING ARCGIS PUBLISHER
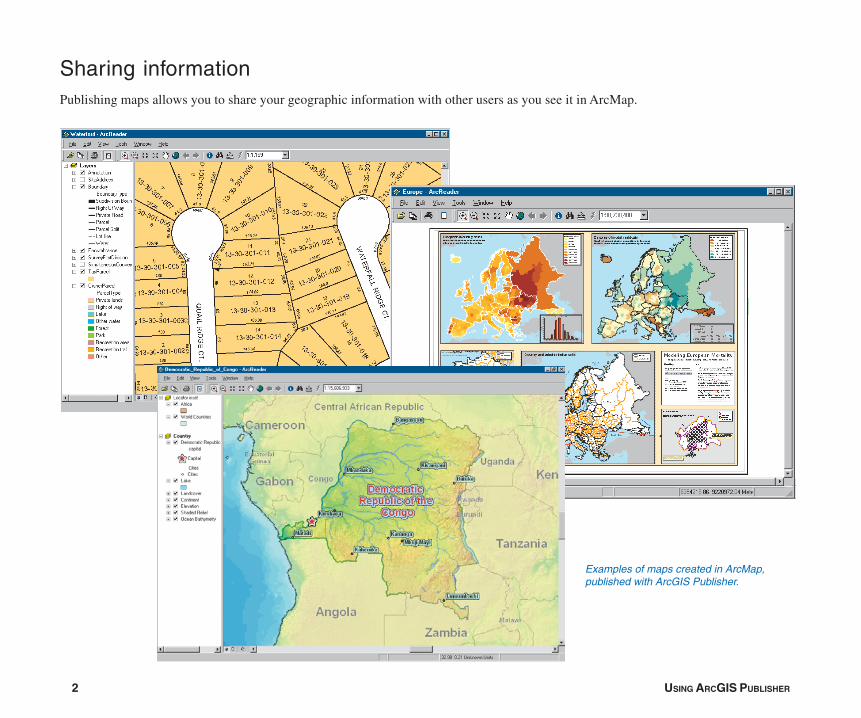
Sharing informationPublishing maps allows you to share your geographic information with other users as you see it in ArcMap.
Examples of maps created in ArcMap,published with ArcGIS Publisher.
WELCOME TO ARCGIS PUBLISHER 3
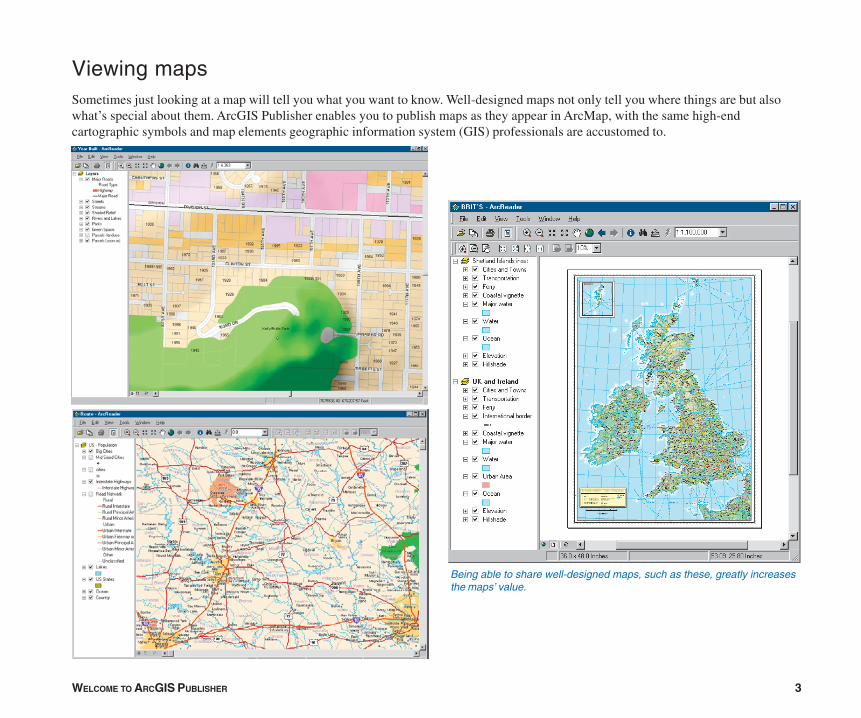
Viewing mapsSometimes just looking at a map will tell you what you want to know. Well-designed maps not only tell you where things are but alsowhat’s special about them. ArcGIS Publisher enables you to publish maps as they appear in ArcMap, with the same high-endcartographic symbols and map elements geographic information system (GIS) professionals are accustomed to.
Being able to share well-designed maps, such as these, greatly increasesthe maps’ value.
4 USING ARCGIS PUBLISHER
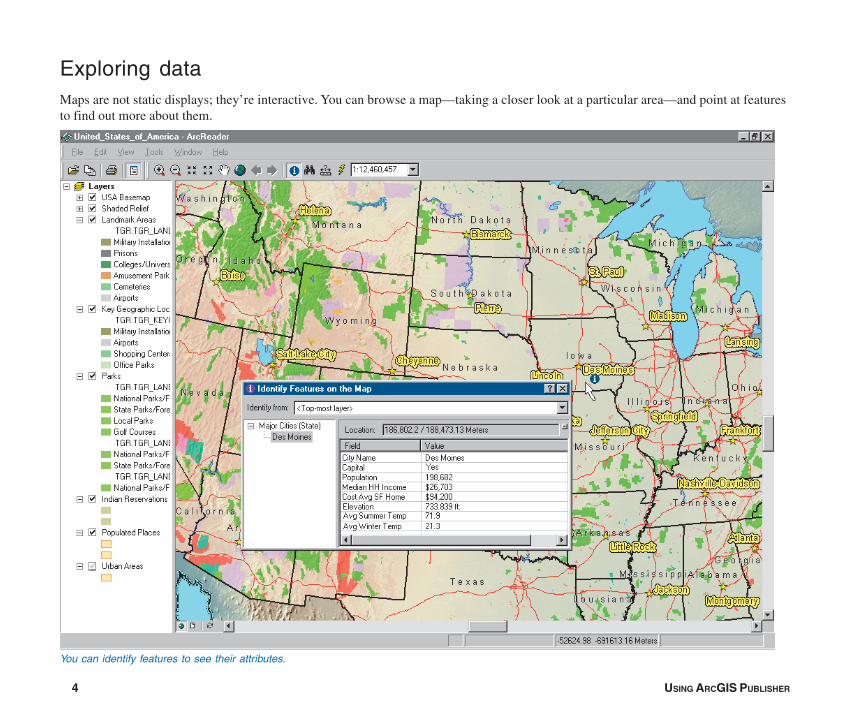
Exploring dataMaps are not static displays; they’re interactive. You can browse a map—taking a closer look at a particular area—and point at featuresto find out more about them.
You can identify features to see their attributes.
WELCOME TO ARCGIS PUBLISHER 5
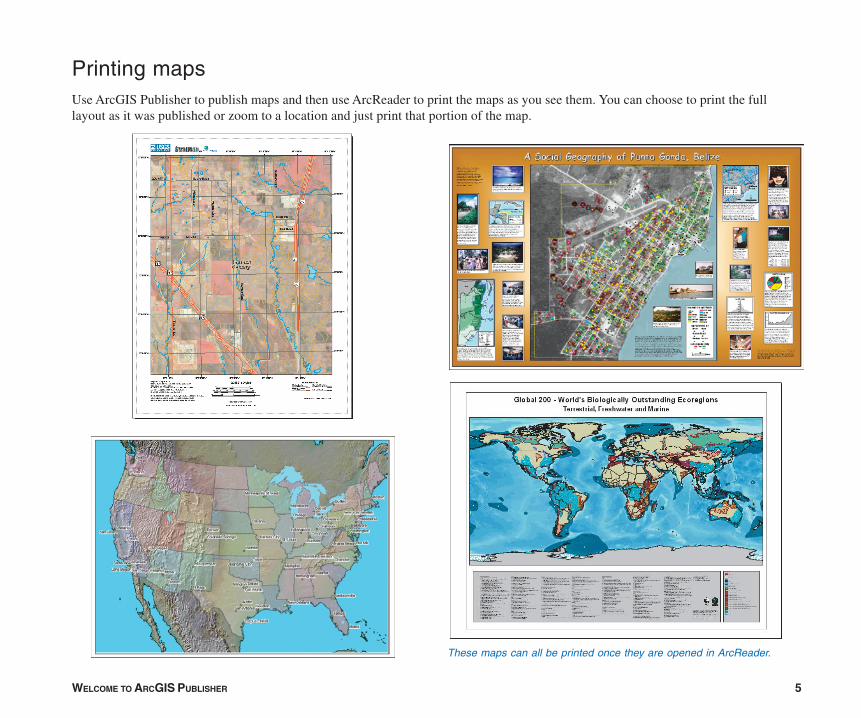
Printing mapsUse ArcGIS Publisher to publish maps and then use ArcReader to print the maps as you see them. You can choose to print the fulllayout as it was published or zoom to a location and just print that portion of the map.
These maps can all be printed once they are opened in ArcReader.
6 USING ARCGIS PUBLISHER
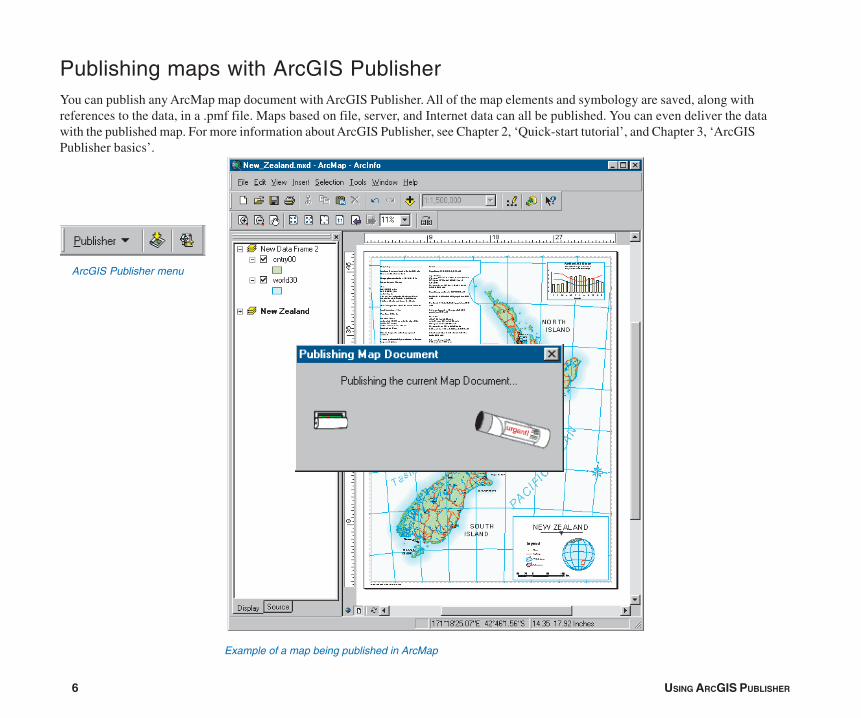
Publishing maps with ArcGIS PublisherYou can publish any ArcMap map document with ArcGIS Publisher. All of the map elements and symbology are saved, along withreferences to the data, in a .pmf file. Maps based on file, server, and Internet data can all be published. You can even deliver the datawith the published map. For more information about ArcGIS Publisher, see Chapter 2, ‘Quick-start tutorial’, and Chapter 3, ‘ArcGISPublisher basics’.
ArcGIS Publisher menu
Example of a map being published in ArcMap
WELCOME TO ARCGIS PUBLISHER 7
If you’re new to GIS and maps, remember that you don’t have tolearn everything about ArcGIS Publisher to get immediate results.Begin learning ArcGIS Publisher by working through Chapter 2,‘Quick-start tutorial’. This chapter shows you how quickly andeasily ArcGIS Publisher lets you explore a map and obtainvaluable information from it. You can also read the tutorialwithout using your computer.
This book provides information about ArcGIS Publisher. Aftergoing through Chapter 2, ‘Quick-start tutorial’, you can quicklylearn the basics of using the ArcGIS Publisher extension byworking through the exercises.
Finding answers to questions
Like most people, your goal is to complete your tasks whileinvesting a minimum amount of time and effort on learning how touse software. You want intuitive, easy-to-use software that givesyou immediate results without having to read pages ofdocumentation. However, when you do have a question, youwant the answer quickly so you can complete your task. That’swhat this book is all about—getting you the answers you needwhen you need them.
Getting help on your computer
In addition to this book, the ArcMap and ArcGIS Publisher onlineHelp systems are valuable resources for learning how to use thesoftware. To learn how to get help for your questions, seeChapter 3, ‘ArcGIS Publisher basics’.
Tips on learning ArcGIS Publisher
Contacting ESRI
If you need to contact ESRI for technical support, refer to‘Contacting Technical Support’ in the ‘Getting more help’ sectionof the ArcGIS Desktop Help system. You can also visit ESRI onthe Web at www.esri.com and support.esri.com for moreinformation on ArcGIS Publisher.
ESRI education solutions
ESRI provides educational opportunities related to geographicinformation science, GIS applications, and technology. You canchoose among instructor-led courses, Web-based courses, andself-study workbooks to find education solutions that fit yourlearning style. For more information, go towww.esri.com/education.


IN THIS CHAPTER
9
Quick-start tutorial 2• Exercise 1: Publishing a map
• Exercise 2: Customizing ArcGISPublisher settings
• Exercise 3: Using ArcGISPublisher security settings
• Exercise 4: Creating a datapackage
The best way to learn ArcGIS Publisher is to try it yourself. This tutorialguides you through the process of converting your ArcMap map documentinto a published map.
Exercise 1 shows you how to publish a map as well as how to get help withPublisher.
Exercise 2 walks you through different ways that you can publish a map.For example, you can decide what functionality is included with your map orspecify whether the published map can be viewed in Data view, Layoutview, or both.
Exercise 3 shows you how to publish a map that’s password protected.
Exercise 4 teaches you how to create a data package for a published map.
Each exercise in this tutorial takes about 10–15 minutes to complete. Youhave the option of working through the entire tutorial at once or completingeach exercise one at a time.
Before you begin, install Publisher and the ArcReader tutorial data. Toinstall the data, run the Tutorial setup during the ArcGIS Desktop installationor independently. For more information on how to install tutorial data, look atthe ArcGIS Desktop installation guide for your platform.
10 USING ARCGIS PUBLISHER
Choosing a map to publish
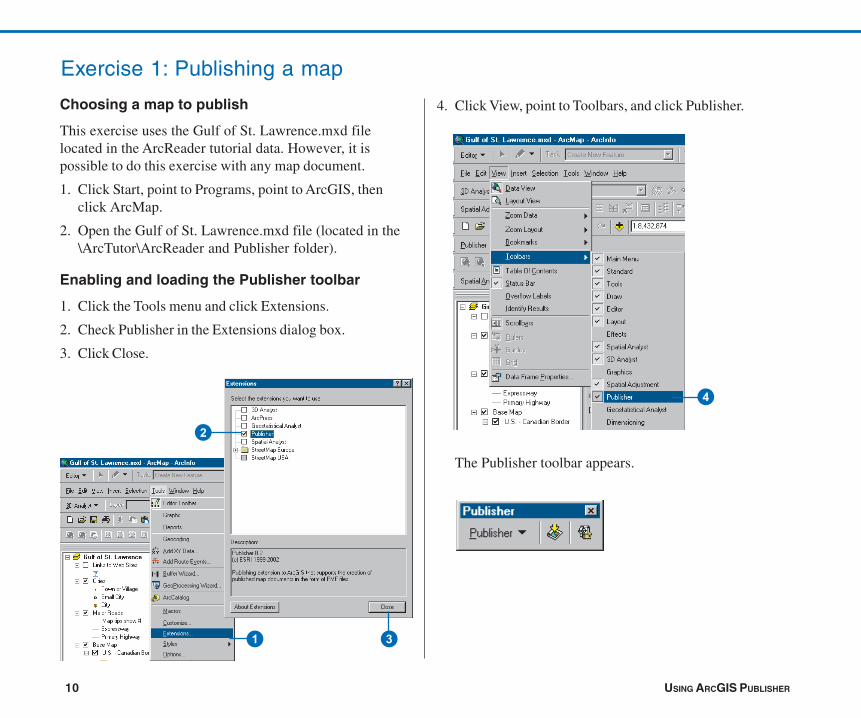
This exercise uses the Gulf of St. Lawrence.mxd filelocated in the ArcReader tutorial data. However, it ispossible to do this exercise with any map document.
1. Click Start, point to Programs, point to ArcGIS, thenclick ArcMap.
2. Open the Gulf of St. Lawrence.mxd file (located in the\ArcTutor\ArcReader and Publisher folder).
Enabling and loading the Publisher toolbar
1. Click the Tools menu and click Extensions.
2. Check Publisher in the Extensions dialog box.
3. Click Close.
4. Click View, point to Toolbars, and click Publisher.
The Publisher toolbar appears.
Exercise 1: Publishing a map
4
2
31
QUICK-START TUTORIAL 11
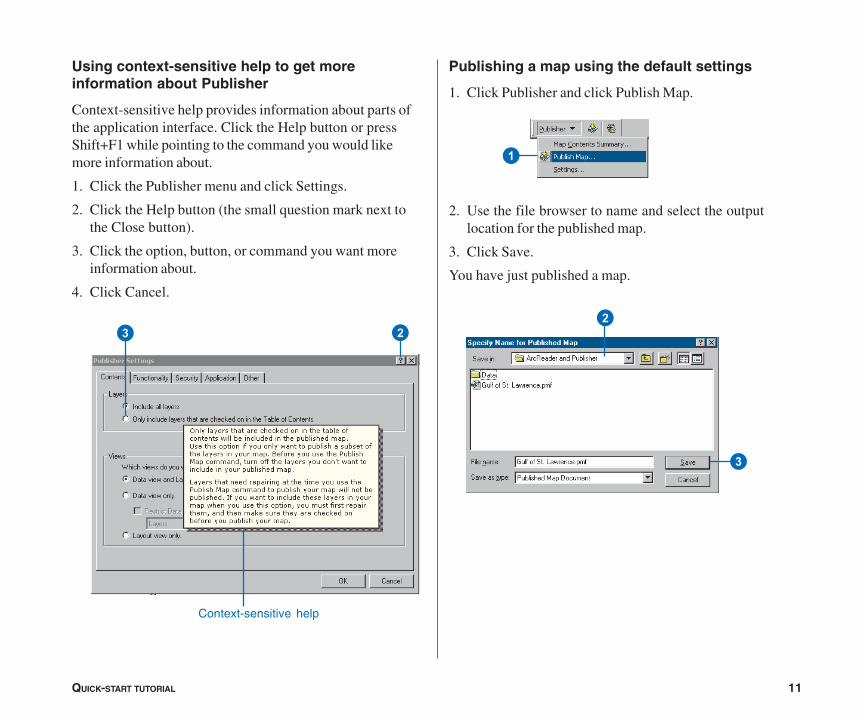
Using context-sensitive help to get moreinformation about Publisher
Context-sensitive help provides information about parts ofthe application interface. Click the Help button or pressShift+F1 while pointing to the command you would likemore information about.
1. Click the Publisher menu and click Settings.
2. Click the Help button (the small question mark next tothe Close button).
3. Click the option, button, or command you want moreinformation about.
4. Click Cancel.
Publishing a map using the default settings
1. Click Publisher and click Publish Map.
2. Use the file browser to name and select the outputlocation for the published map.
3. Click Save.
You have just published a map.
1
2
3
Context-sensitive help
2
3
2
12 USING ARCGIS PUBLISHER
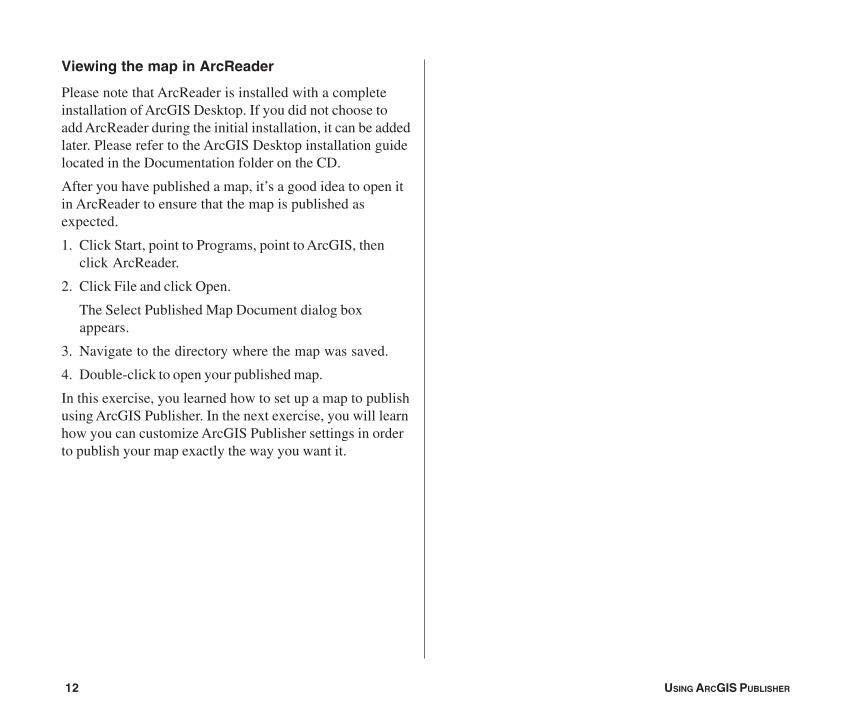
Viewing the map in ArcReader
Please note that ArcReader is installed with a completeinstallation of ArcGIS Desktop. If you did not choose toadd ArcReader during the initial installation, it can be addedlater. Please refer to the ArcGIS Desktop installation guidelocated in the Documentation folder on the CD.
After you have published a map, it’s a good idea to open itin ArcReader to ensure that the map is published asexpected.
1. Click Start, point to Programs, point to ArcGIS, thenclick ArcReader.
2. Click File and click Open.
The Select Published Map Document dialog boxappears.
3. Navigate to the directory where the map was saved.
4. Double-click to open your published map.
In this exercise, you learned how to set up a map to publishusing ArcGIS Publisher. In the next exercise, you will learnhow you can customize ArcGIS Publisher settings in orderto publish your map exactly the way you want it.
QUICK-START TUTORIAL 13
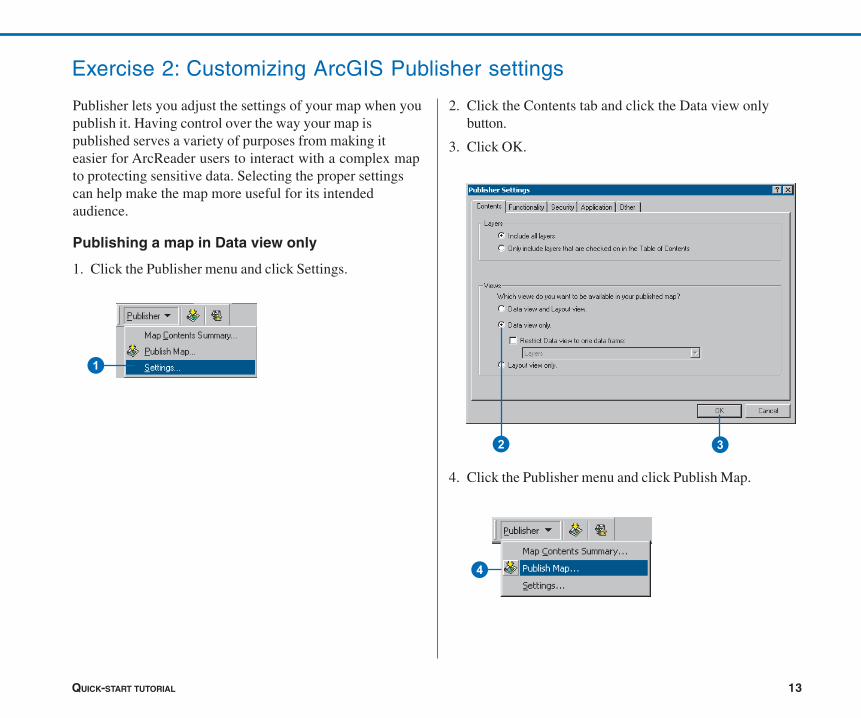
Publisher lets you adjust the settings of your map when youpublish it. Having control over the way your map ispublished serves a variety of purposes from making iteasier for ArcReader users to interact with a complex mapto protecting sensitive data. Selecting the proper settingscan help make the map more useful for its intendedaudience.
Publishing a map in Data view only
1. Click the Publisher menu and click Settings.
Exercise 2: Customizing ArcGIS Publisher settings
2. Click the Contents tab and click the Data view onlybutton.
3. Click OK.
4. Click the Publisher menu and click Publish Map.
4
32
1
14 USING ARCGIS PUBLISHER
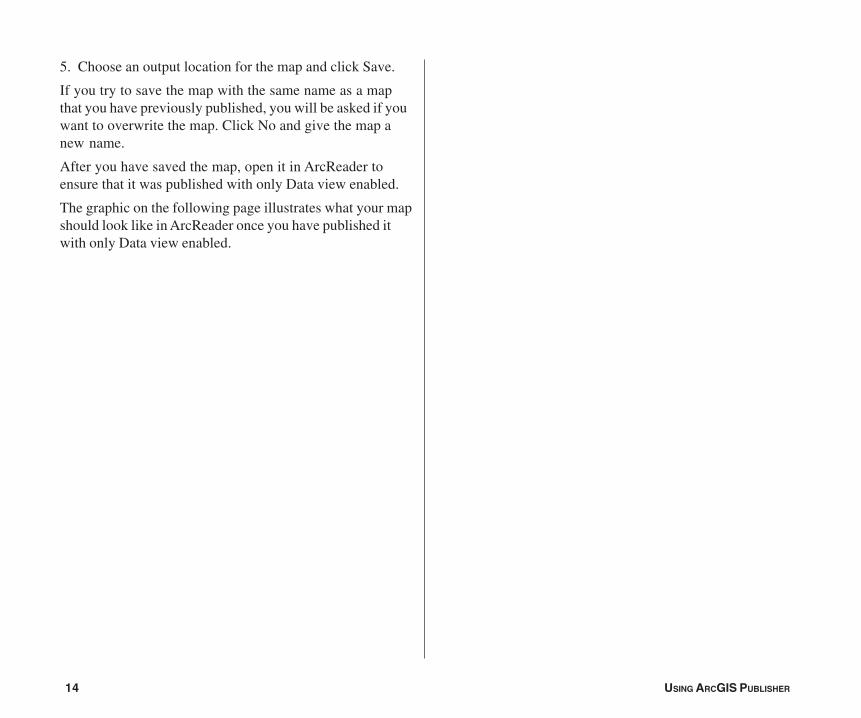
5. Choose an output location for the map and click Save.
If you try to save the map with the same name as a mapthat you have previously published, you will be asked if youwant to overwrite the map. Click No and give the map anew name.
After you have saved the map, open it in ArcReader toensure that it was published with only Data view enabled.
The graphic on the following page illustrates what your mapshould look like in ArcReader once you have published itwith only Data view enabled.
QUICK-START TUTORIAL 15
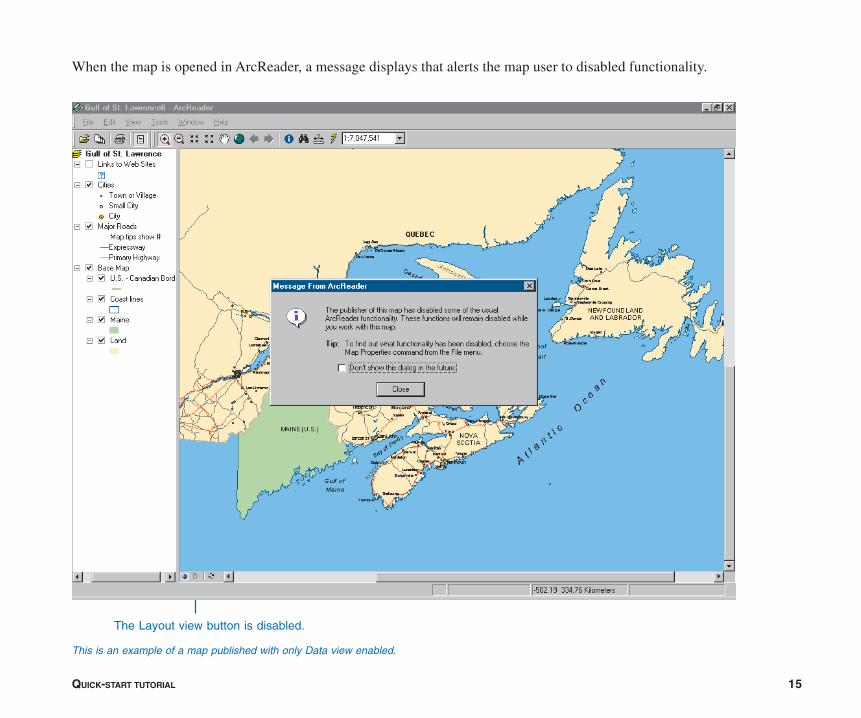
When the map is opened in ArcReader, a message displays that alerts the map user to disabled functionality.
This is an example of a map published with only Data view enabled.
The Layout view button is disabled.
16 USING ARCGIS PUBLISHER
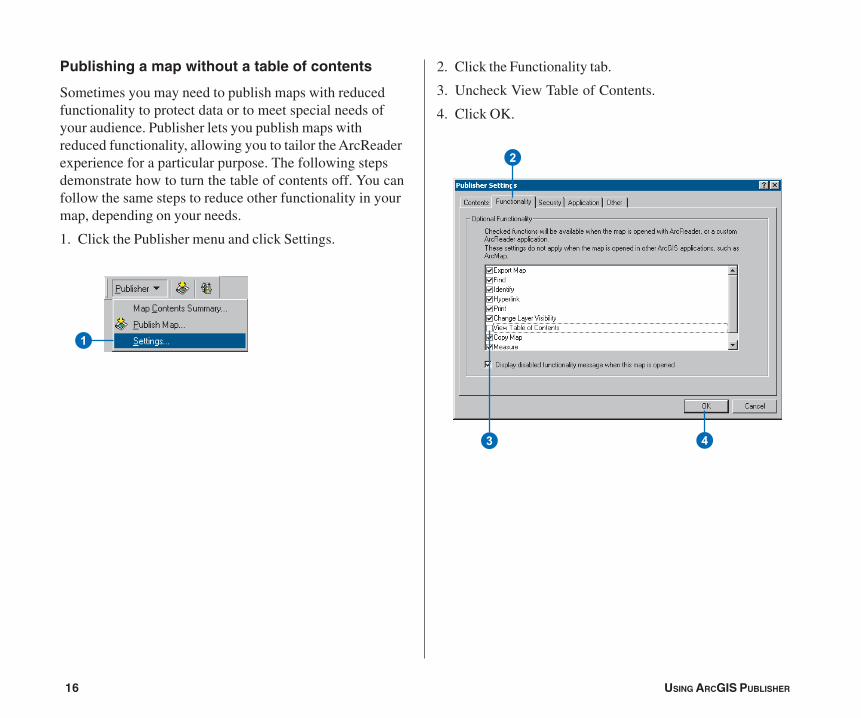
Publishing a map without a table of contents
Sometimes you may need to publish maps with reducedfunctionality to protect data or to meet special needs ofyour audience. Publisher lets you publish maps withreduced functionality, allowing you to tailor the ArcReaderexperience for a particular purpose. The following stepsdemonstrate how to turn the table of contents off. You canfollow the same steps to reduce other functionality in yourmap, depending on your needs.
1. Click the Publisher menu and click Settings.
2. Click the Functionality tab.
3. Uncheck View Table of Contents.
4. Click OK.
2
3 4
1
QUICK-START TUTORIAL 17
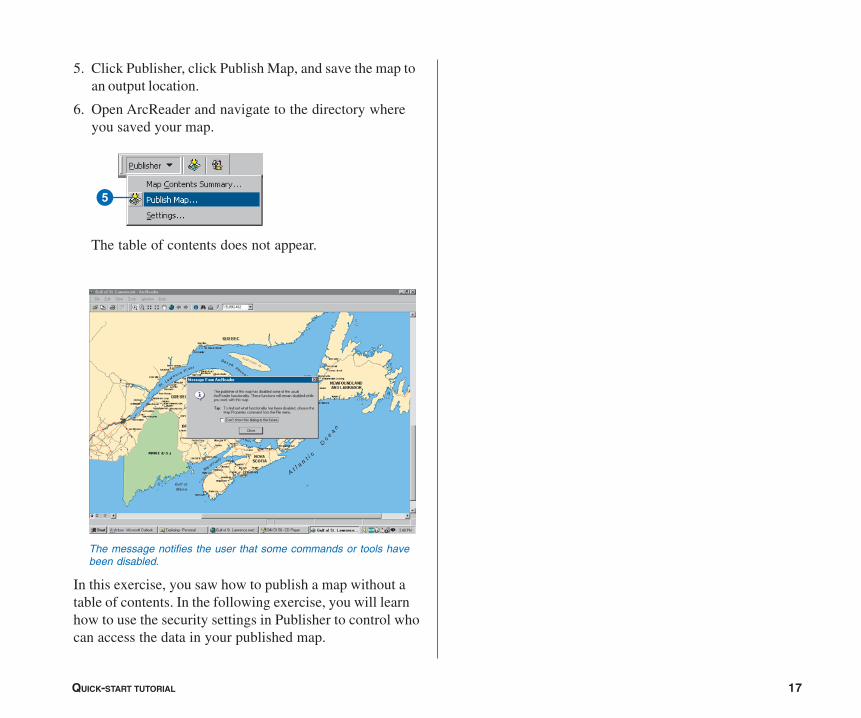
5. Click Publisher, click Publish Map, and save the map toan output location.
6. Open ArcReader and navigate to the directory whereyou saved your map.
The table of contents does not appear.
In this exercise, you saw how to publish a map without atable of contents. In the following exercise, you will learnhow to use the security settings in Publisher to control whocan access the data in your published map.
The message notifies the user that some commands or tools havebeen disabled.
5
18 USING ARCGIS PUBLISHER
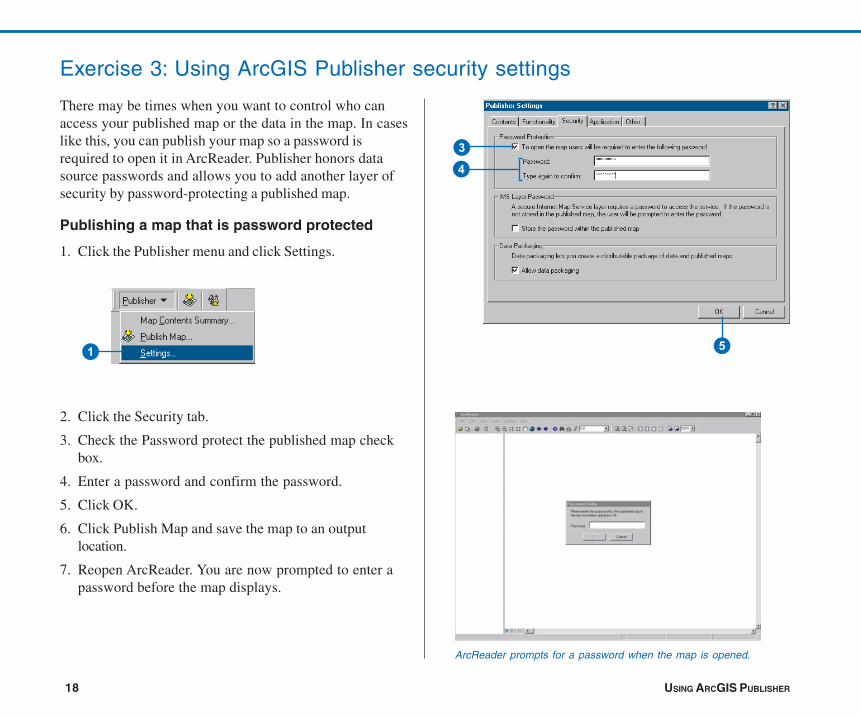
There may be times when you want to control who canaccess your published map or the data in the map. In caseslike this, you can publish your map so a password isrequired to open it in ArcReader. Publisher honors datasource passwords and allows you to add another layer ofsecurity by password-protecting a published map.
Publishing a map that is password protected
1. Click the Publisher menu and click Settings.
2. Click the Security tab.
3. Check the Password protect the published map checkbox.
4. Enter a password and confirm the password.
5. Click OK.
6. Click Publish Map and save the map to an outputlocation.
7. Reopen ArcReader. You are now prompted to enter apassword before the map displays.
Exercise 3: Using ArcGIS Publisher security settings
ArcReader prompts for a password when the map is opened.
4
3
51
QUICK-START TUTORIAL 19
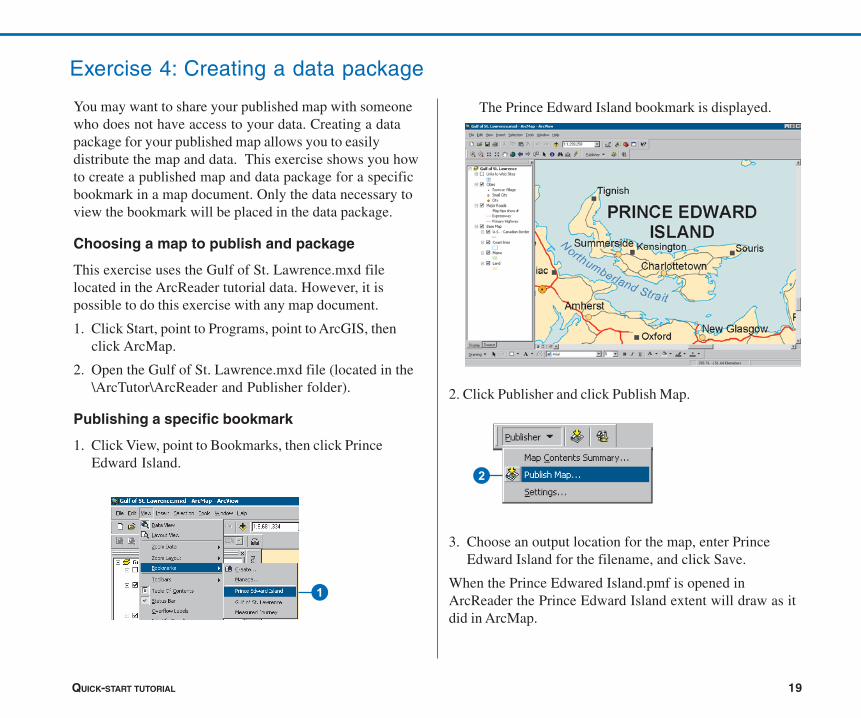
Exercise 4: Creating a data package
You may want to share your published map with someonewho does not have access to your data. Creating a datapackage for your published map allows you to easilydistribute the map and data. This exercise shows you howto create a published map and data package for a specificbookmark in a map document. Only the data necessary toview the bookmark will be placed in the data package.
Choosing a map to publish and package
This exercise uses the Gulf of St. Lawrence.mxd filelocated in the ArcReader tutorial data. However, it ispossible to do this exercise with any map document.
1. Click Start, point to Programs, point to ArcGIS, thenclick ArcMap.
2. Open the Gulf of St. Lawrence.mxd file (located in the\ArcTutor\ArcReader and Publisher folder).
Publishing a specific bookmark
1. Click View, point to Bookmarks, then click PrinceEdward Island.
The Prince Edward Island bookmark is displayed.
2. Click Publisher and click Publish Map.
3. Choose an output location for the map, enter PrinceEdward Island for the filename, and click Save.
When the Prince Edwared Island.pmf is opened inArcReader the Prince Edward Island extent will draw as itdid in ArcMap.
2
1
20 USING ARCGIS PUBLISHER
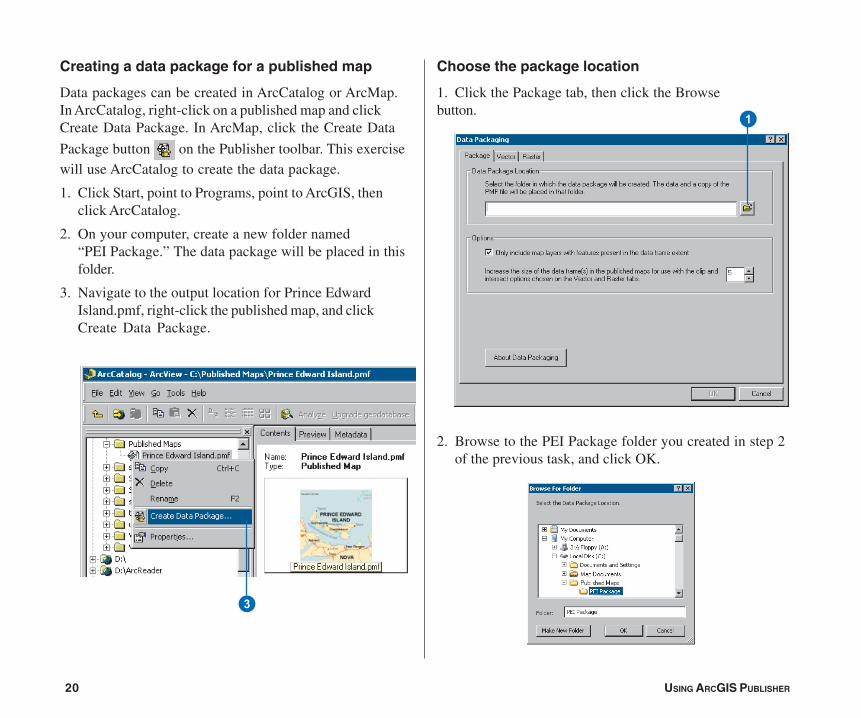
Creating a data package for a published map
Data packages can be created in ArcCatalog or ArcMap.In ArcCatalog, right-click on a published map and clickCreate Data Package. In ArcMap, click the Create Data
Package button on the Publisher toolbar. This exercisewill use ArcCatalog to create the data package.
1. Click Start, point to Programs, point to ArcGIS, thenclick ArcCatalog.
2. On your computer, create a new folder named“PEI Package.” The data package will be placed in thisfolder.
3. Navigate to the output location for Prince EdwardIsland.pmf, right-click the published map, and clickCreate Data Package.
Choose the package location
1. Click the Package tab, then click the Browsebutton.
2. Browse to the PEI Package folder you created in step 2of the previous task, and click OK.
3
1
QUICK-START TUTORIAL 21
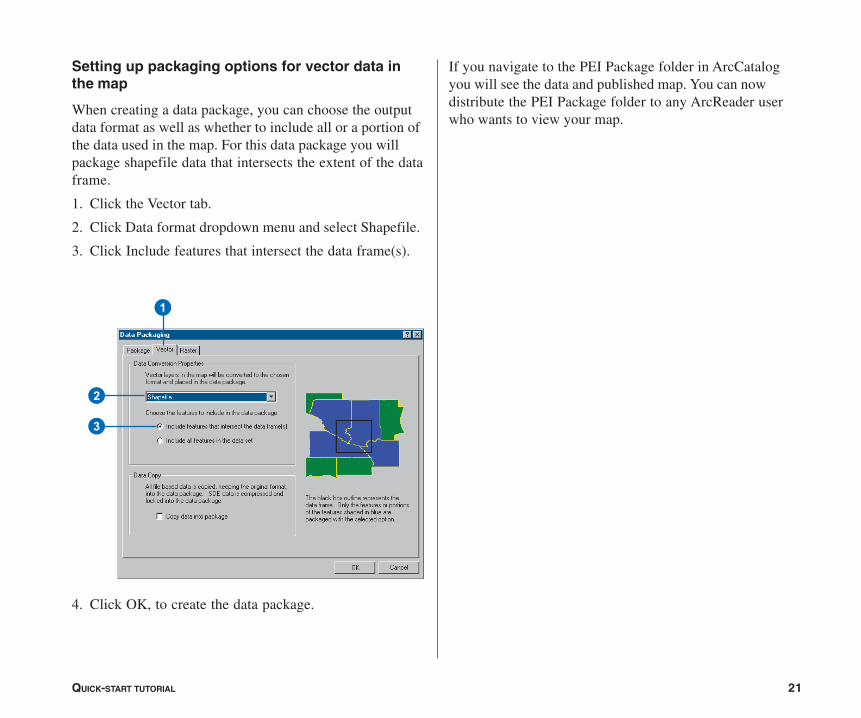
Setting up packaging options for vector data inthe map
When creating a data package, you can choose the outputdata format as well as whether to include all or a portion ofthe data used in the map. For this data package you willpackage shapefile data that intersects the extent of the dataframe.
1. Click the Vector tab.
2. Click Data format dropdown menu and select Shapefile.
3. Click Include features that intersect the data frame(s).
4. Click OK, to create the data package.
If you navigate to the PEI Package folder in ArcCatalogyou will see the data and published map. You can nowdistribute the PEI Package folder to any ArcReader userwho wants to view your map.
3
2
1
22 USING ARCGIS PUBLISHER
In this tutorial, you have been introduced to some functionsof ArcGIS Publisher. You learned how to change thePublisher settings to publish a map that effectively conveysthe information that you want. You also saw how to viewyour published map in ArcReader and how to package yourpublished map. For more information on Publisher, refer tothe ArcGIS Desktop Help system. To get information aboutspecific dialog boxes, options, or commands, use thecontext-sensitive help.
IN THIS CHAPTER
23
ArcGIS Publisher basics 3• Starting ArcGIS Publisher
• Preparing maps for publishing inArcMap
• Creating a map to share on acomputer network
• Creating a map to distribute withdata
• Creating a map with Internet data
• Using Publisher settings
• The Map Contents Summarydialog box
• Sharing your maps
• Creating a data package
ArcGIS Publisher is an optional extension you can install onArcGIS Desktop. Publisher allows you to save maps for distribution andsharing with others. Publisher converts ArcMap map documents (.mxd)into the published map format (.pmf) used with ArcReader. This chapterdescribes the basics of using Publisher, such as how to prepare maps forpublishing, how to control what functionality the map is published with, andhow to share maps.
A quick-start ArcGIS Publisher tutorial follows this chapter; it will help youquickly learn how to use Publisher. It shows you how to publish a map,customize Publisher settings, and create a data package for the publishedmap. Completing the tutorial is a fast way to learn some of what theArcGIS Publisher extension has to offer, and it is a good way to learn howto effectively use Publisher.
24 USING ARCGIS PUBLISHER
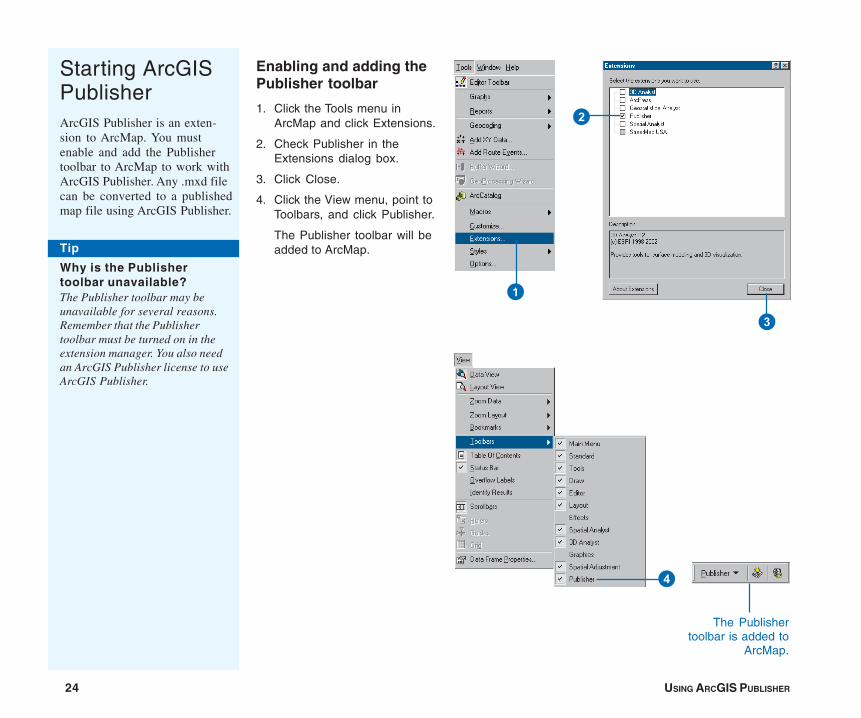
Enabling and adding thePublisher toolbar
1. Click the Tools menu inArcMap and click Extensions.
2. Check Publisher in theExtensions dialog box.
3. Click Close.
4. Click the View menu, point toToolbars, and click Publisher.
The Publisher toolbar will beadded to ArcMap.
Starting ArcGISPublisherArcGIS Publisher is an exten-sion to ArcMap. You mustenable and add the Publishertoolbar to ArcMap to work withArcGIS Publisher. Any .mxd filecan be converted to a publishedmap file using ArcGIS Publisher.
Tip
Why is the Publishertoolbar unavailable?The Publisher toolbar may beunavailable for several reasons.Remember that the Publishertoolbar must be turned on in theextension manager. You also needan ArcGIS Publisher license to useArcGIS Publisher.
The Publishertoolbar is added to
ArcMap.
1
2
3
4
ARCGIS PUBLISHER BASICS 25
Preparing maps for publishing in ArcMap
When publishing a map it is important to consider the purpose ofthe map and how the map will be used in ArcReader. It is alsoimportant to recognize what is in the map and how ArcMapsettings, as well as Publisher settings, will affect how the outputis displayed.
Accessing data
ArcReader references data sources in the same manner thatArcMap does. The data source information in the map documentis also stored in the published map. Because ArcReader will beusing the same method of connecting to the data, it is importantto ensure that the ArcReader user will have access to the data.
In ArcMap, use the Map Properties dialog box and the Source tabon the Layer Properties dialog box to set data sources. You canalso click the Source tab on the table of contents to get a quicklook at the current data source connections for a map.
You need to choose the right data source connection method foryour published map. What connection method you use dependson how the map will be used. For a map that is going to bedistributed on a computer network, you should create the mapwith universal naming convention (UNC) data paths or networkserver-based data. If you plan to deliver the data with thepublished map (perhaps putting everything on digital media, suchas a CD), you should use relative paths to connect to the data.You may also want to consider using Internet-served data. If youdo this, anyone with a Geography NetworkSM connection will beable to use the map in ArcReader. You can also create a datapackage for the map. This is done with the Create Data Packagebutton on the Publisher toolbar. The published map and all of thedata necessary to display it in ArcReader are placed in a directorythat can be easily distributed to ArcReader users. However, thereare situations where you will need to package data manually. SeeDesktop Help for more information on these situations.
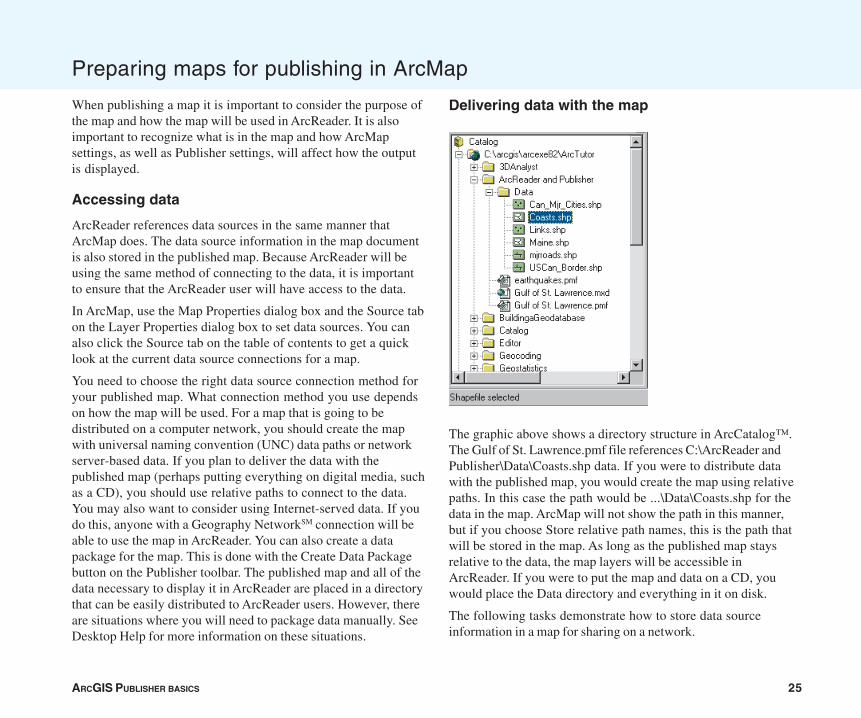
Delivering data with the map
The graphic above shows a directory structure in ArcCatalog™.The Gulf of St. Lawrence.pmf file references C:\ArcReader andPublisher\Data\Coasts.shp data. If you were to distribute datawith the published map, you would create the map using relativepaths. In this case the path would be ...\Data\Coasts.shp for thedata in the map. ArcMap will not show the path in this manner,but if you choose Store relative path names, this is the path thatwill be stored in the map. As long as the published map staysrelative to the data, the map layers will be accessible inArcReader. If you were to put the map and data on a CD, youwould place the Data directory and everything in it on disk.
The following tasks demonstrate how to store data sourceinformation in a map for sharing on a network.
26 USING ARCGIS PUBLISHER
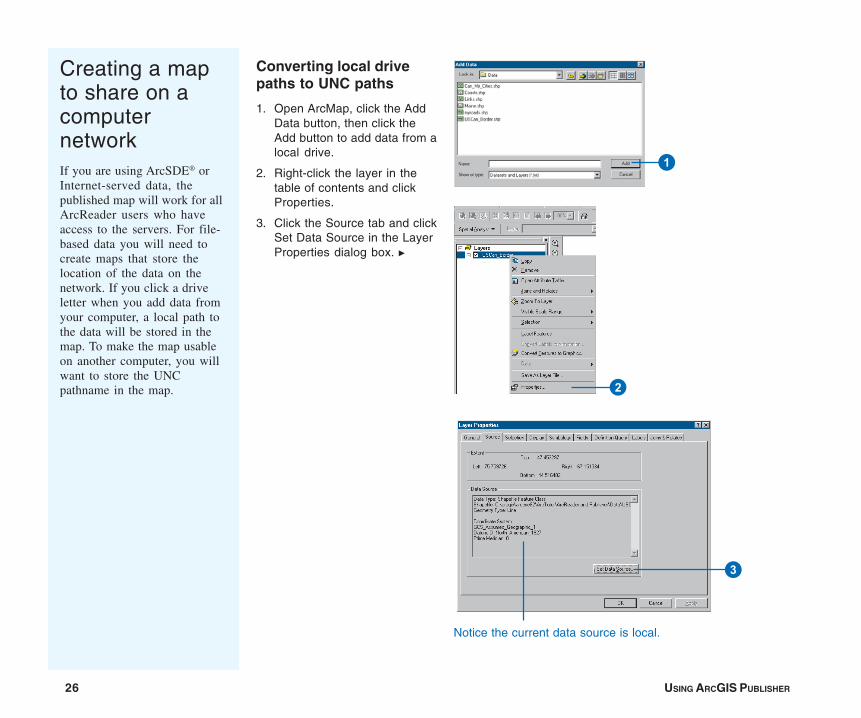
Converting local drivepaths to UNC paths
1. Open ArcMap, click the AddData button, then click theAdd button to add data from alocal drive.
2. Right-click the layer in thetable of contents and clickProperties.
3. Click the Source tab and clickSet Data Source in the LayerProperties dialog box. u
Creating a mapto share on acomputernetworkIf you are using ArcSDE® orInternet-served data, thepublished map will work for allArcReader users who haveaccess to the servers. For file-based data you will need tocreate maps that store thelocation of the data on thenetwork. If you click a driveletter when you add data fromyour computer, a local path tothe data will be stored in themap. To make the map usableon another computer, you willwant to store the UNCpathname in the map.
3
Notice the current data source is local.
2
1
ARCGIS PUBLISHER BASICS 27
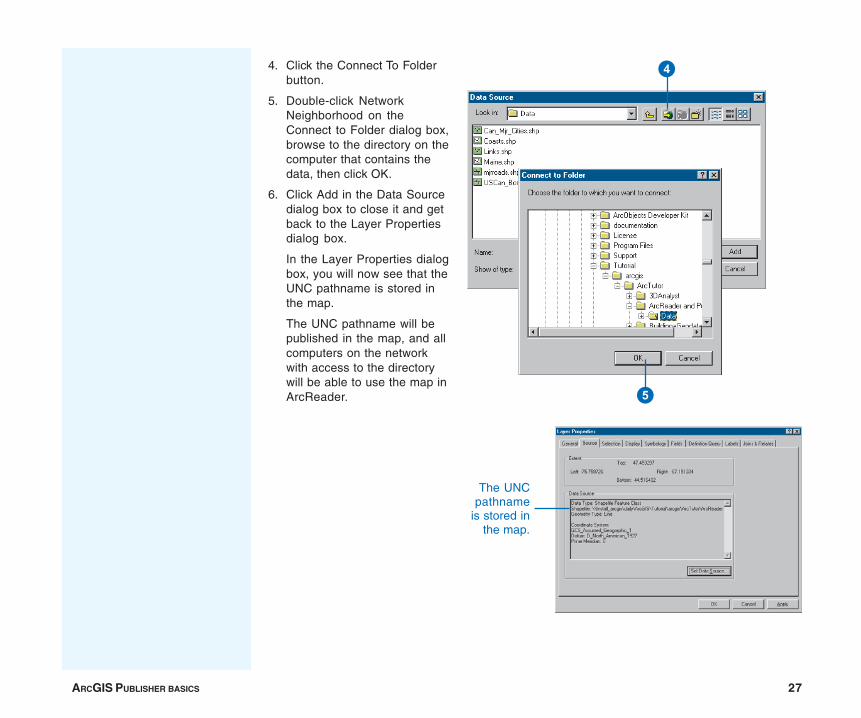
4. Click the Connect To Folderbutton.
5. Double-click NetworkNeighborhood on theConnect to Folder dialog box,browse to the directory on thecomputer that contains thedata, then click OK.
6. Click Add in the Data Sourcedialog box to close it and getback to the Layer Propertiesdialog box.
In the Layer Properties dialogbox, you will now see that theUNC pathname is stored inthe map.
The UNC pathname will bepublished in the map, and allcomputers on the networkwith access to the directorywill be able to use the map inArcReader.
The UNCpathname
is stored inthe map.
5
4
28 USING ARCGIS PUBLISHER
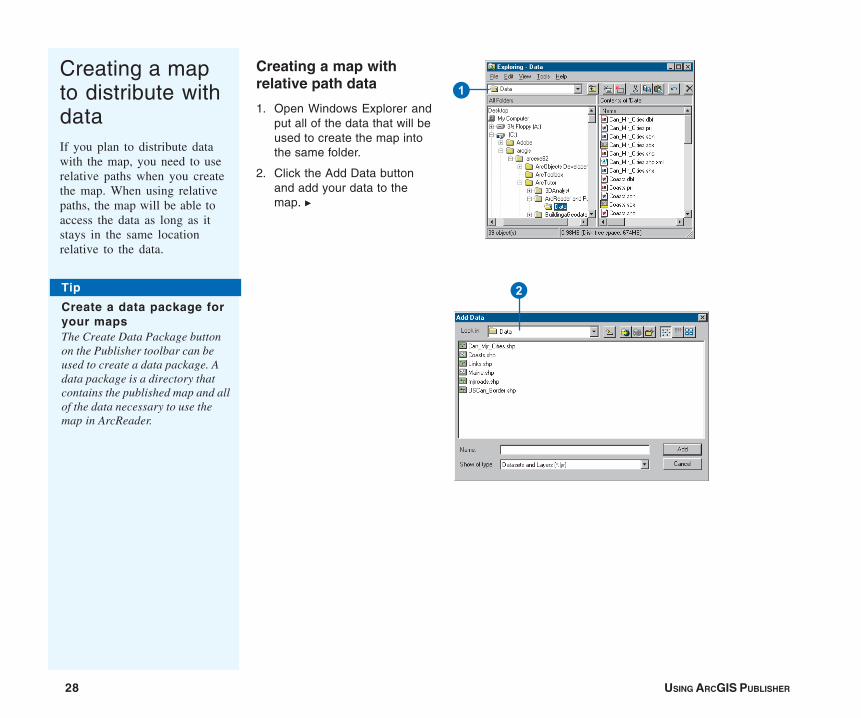
Creating a mapto distribute withdataIf you plan to distribute datawith the map, you need to userelative paths when you createthe map. When using relativepaths, the map will be able toaccess the data as long as itstays in the same locationrelative to the data.
Creating a map withrelative path data
1. Open Windows Explorer andput all of the data that will beused to create the map intothe same folder.
2. Click the Add Data buttonand add your data to themap. u
1
2Tip
Create a data package foryour mapsThe Create Data Package buttonon the Publisher toolbar can beused to create a data package. Adata package is a directory thatcontains the published map and allof the data necessary to use themap in ArcReader.
ARCGIS PUBLISHER BASICS 29
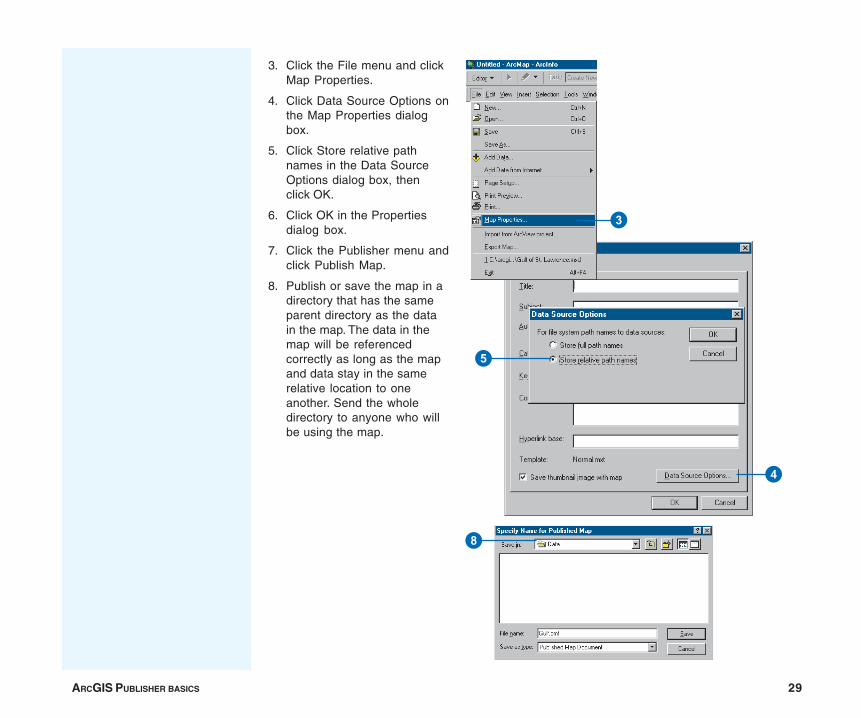
3. Click the File menu and clickMap Properties.
4. Click Data Source Options onthe Map Properties dialogbox.
5. Click Store relative pathnames in the Data SourceOptions dialog box, thenclick OK.
6. Click OK in the Propertiesdialog box.
7. Click the Publisher menu andclick Publish Map.
8. Publish or save the map in adirectory that has the sameparent directory as the datain the map. The data in themap will be referencedcorrectly as long as the mapand data stay in the samerelative location to oneanother. Send the wholedirectory to anyone who willbe using the map.
8
4
5
3
30 USING ARCGIS PUBLISHER
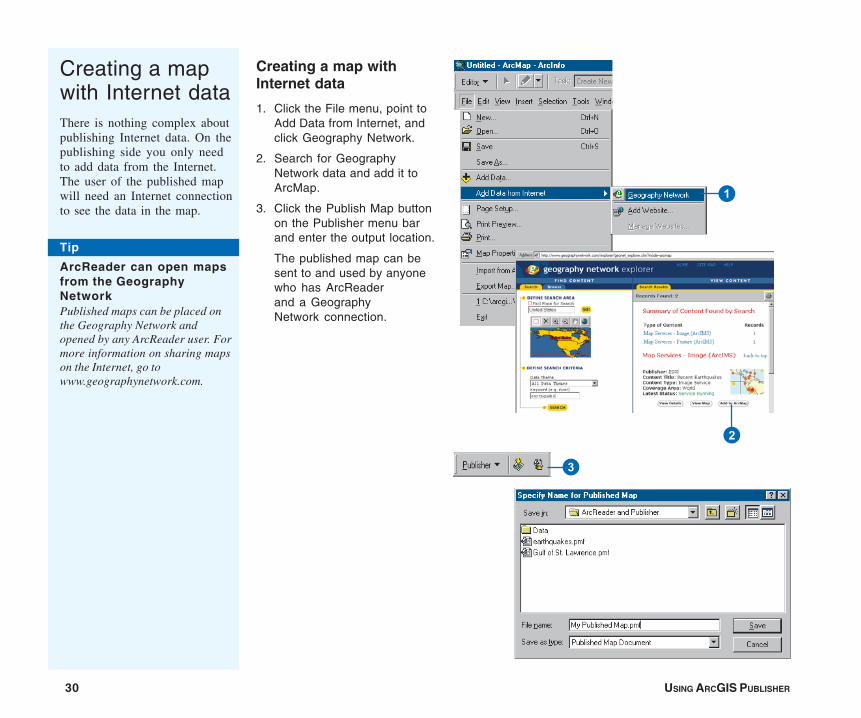
Creating a mapwith Internet dataThere is nothing complex aboutpublishing Internet data. On thepublishing side you only needto add data from the Internet.The user of the published mapwill need an Internet connectionto see the data in the map.
Creating a map withInternet data
1. Click the File menu, point toAdd Data from Internet, andclick Geography Network.
2. Search for GeographyNetwork data and add it toArcMap.
3. Click the Publish Map buttonon the Publisher menu barand enter the output location.
The published map can besent to and used by anyonewho has ArcReaderand a GeographyNetwork connection.
Tip
ArcReader can open mapsfrom the GeographyNetworkPublished maps can be placed onthe Geography Network andopened by any ArcReader user. Formore information on sharing mapson the Internet, go towww.geographynetwork.com.
1
2
3

ARCGIS PUBLISHER BASICS 31
Using PublishersettingsPublishing a map allows it to beused in ArcReader. By default,what you see in ArcMap iswhat you will see in ArcReader.However, there are someoptions available that allow youto control how the map will beviewed and used in ArcReader.Using Publisher, you canrestrict the view to a specificdata frame, limit the use of somecommands, or even specify apassword to protect the map.The settings are designed togive the map author controlover how the map is viewed andhow the data is explored. Thefollowing tasks show you howto publish a map with differentoptions or restrictedfunctionality.
Publishing a map withdefault settings
1. Open a map document inArcMap.
2. Click the Publisher menu.
3. Click Publish Map.
4. Choose the output locationfor your published map andclick Save.
A published map will becreated that will look thesame in ArcReader as itdoes in ArcMap.
2
4

32 USING ARCGIS PUBLISHER
Publishing a map withjust the visible layers
1. Click the Publisher menu andclick Settings.
2. Click the Contents tab in thePublisher settings dialog boxand click Only include layersthat are checked on in theTable of Contents.
This setting allows you tochoose specific layers forpublishing in a map withoutremoving the layers from themap.
3. Click OK.
4. Click the Publisher menu andclick Publish Map.
Publishing a map withjust the Data viewenabled
1. Click the Publisher menu andclick Settings.
2. Click the Contents tab in thePublisher Settings dialog boxand click Data view only.
Only the data frames will beviewable in ArcReader. Thatmeans the map’s page layoutelements will not be includedin the published map andLayout view will beunavailable.
If you want, you can alsochoose the data frame thatwill be visible in ArcReader. u
1
2
1
2
ARCGIS PUBLISHER BASICS 33
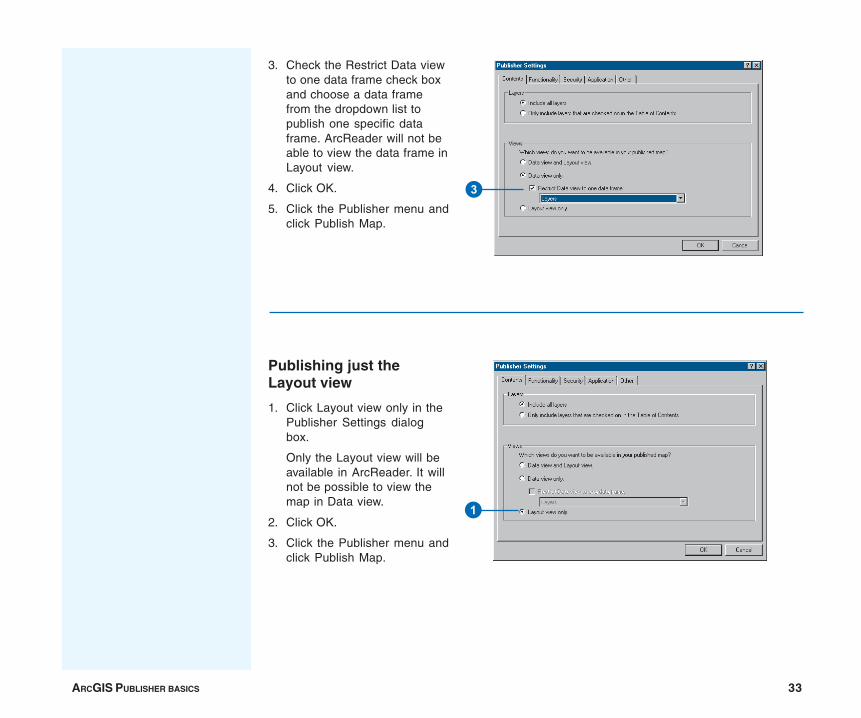
3. Check the Restrict Data viewto one data frame check boxand choose a data framefrom the dropdown list topublish one specific dataframe. ArcReader will not beable to view the data frame inLayout view.
4. Click OK.
5. Click the Publisher menu andclick Publish Map.
Publishing just theLayout view
1. Click Layout view only in thePublisher Settings dialogbox.
Only the Layout view will beavailable in ArcReader. It willnot be possible to view themap in Data view.
2. Click OK.
3. Click the Publisher menu andclick Publish Map.
1
3
34 USING ARCGIS PUBLISHER
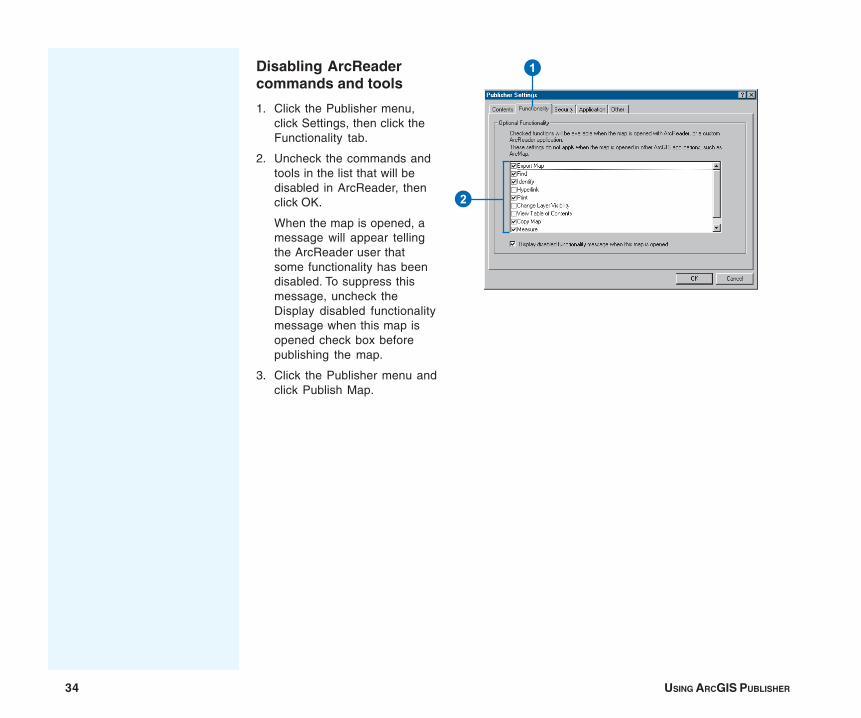
Disabling ArcReadercommands and tools
1. Click the Publisher menu,click Settings, then click theFunctionality tab.
2. Uncheck the commands andtools in the list that will bedisabled in ArcReader, thenclick OK.
When the map is opened, amessage will appear tellingthe ArcReader user thatsome functionality has beendisabled. To suppress thismessage, uncheck theDisplay disabled functionalitymessage when this map isopened check box beforepublishing the map.
3. Click the Publisher menu andclick Publish Map.
1
2
ARCGIS PUBLISHER BASICS 35
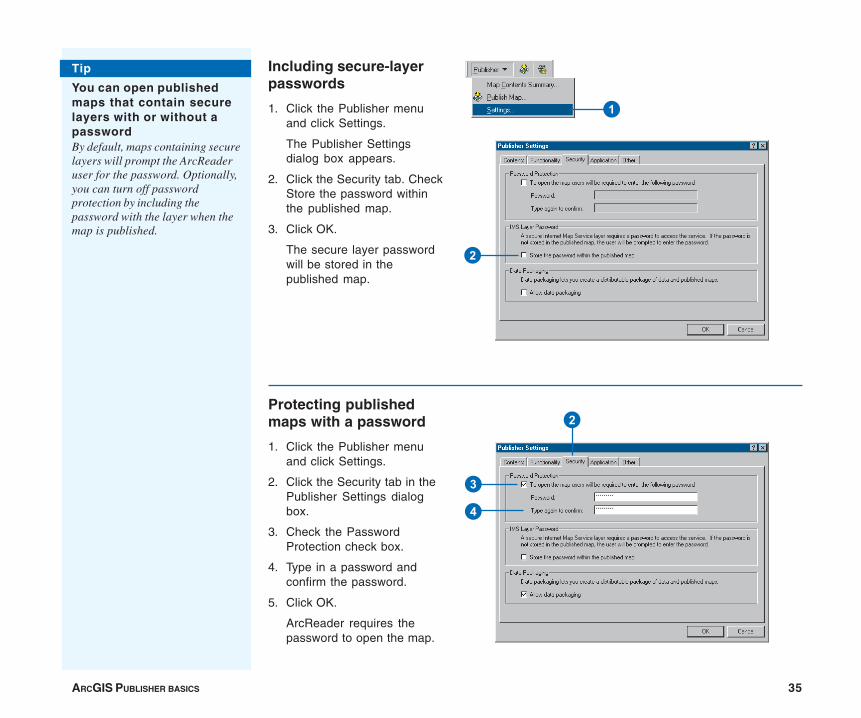
Protecting publishedmaps with a password
1. Click the Publisher menuand click Settings.
2. Click the Security tab in thePublisher Settings dialogbox.
3. Check the PasswordProtection check box.
4. Type in a password andconfirm the password.
5. Click OK.
ArcReader requires thepassword to open the map.
Including secure-layerpasswords
1. Click the Publisher menuand click Settings.
The Publisher Settingsdialog box appears.
2. Click the Security tab. CheckStore the password withinthe published map.
3. Click OK.
The secure layer passwordwill be stored in thepublished map.
1
3
4
2
2
Tip
You can open publishedmaps that contain securelayers with or without apasswordBy default, maps containing securelayers will prompt the ArcReaderuser for the password. Optionally,you can turn off passwordprotection by including thepassword with the layer when themap is published.
36 USING ARCGIS PUBLISHER
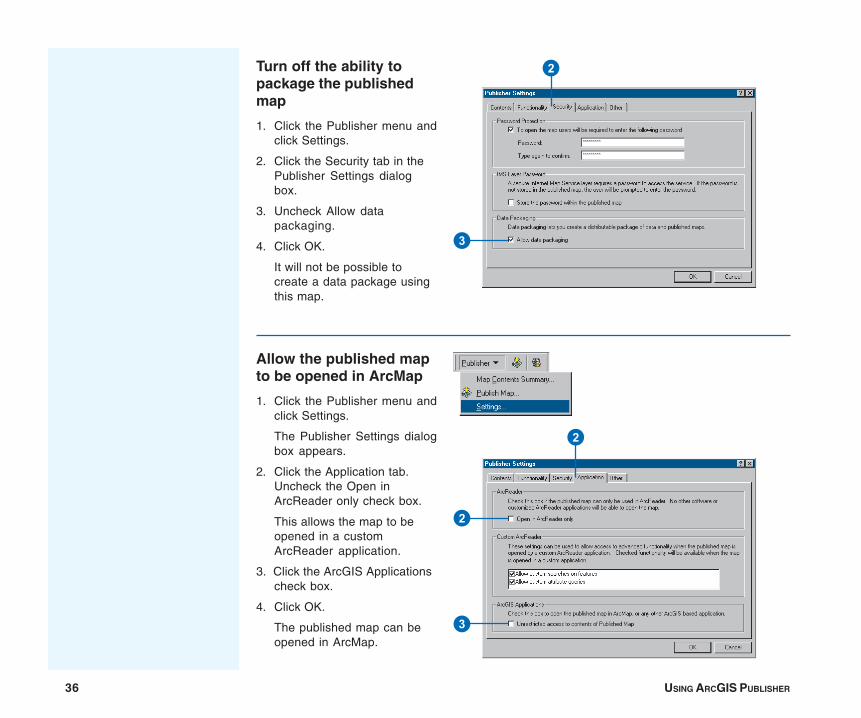
Allow the published mapto be opened in ArcMap
1. Click the Publisher menu andclick Settings.
The Publisher Settings dialogbox appears.
2. Click the Application tab.Uncheck the Open inArcReader only check box.
This allows the map to beopened in a customArcReader application.
3. Click the ArcGIS Applicationscheck box.
4. Click OK.
The published map can beopened in ArcMap.
Turn off the ability topackage the publishedmap
1. Click the Publisher menu andclick Settings.
2. Click the Security tab in thePublisher Settings dialogbox.
3. Uncheck Allow datapackaging.
4. Click OK.
It will not be possible tocreate a data package usingthis map.
3
2
2
3
2
ARCGIS PUBLISHER BASICS 37
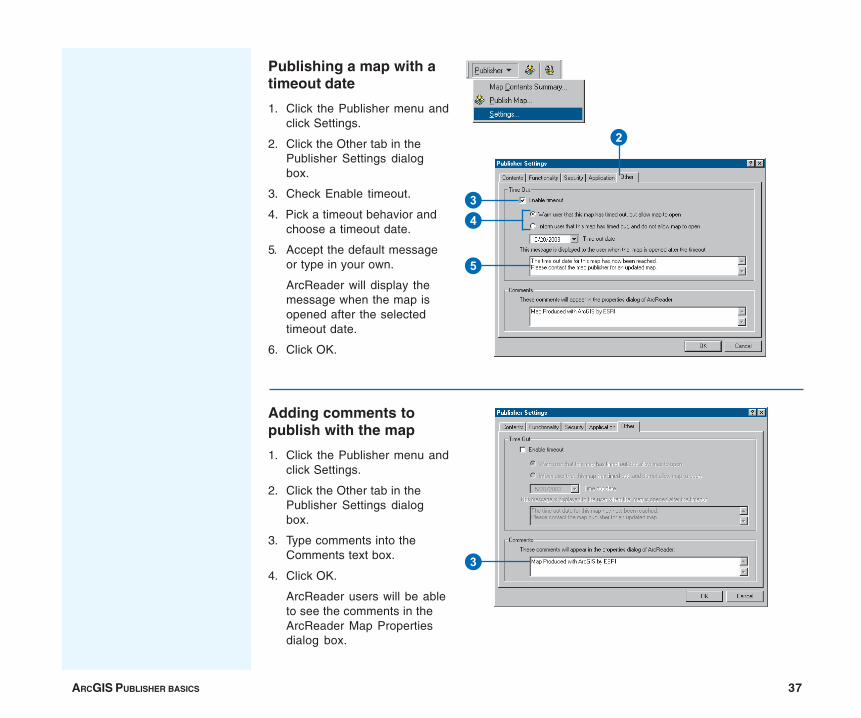
Adding comments topublish with the map
1. Click the Publisher menu andclick Settings.
2. Click the Other tab in thePublisher Settings dialogbox.
3. Type comments into theComments text box.
4. Click OK.
ArcReader users will be ableto see the comments in theArcReader Map Propertiesdialog box.
Publishing a map with atimeout date
1. Click the Publisher menu andclick Settings.
2. Click the Other tab in thePublisher Settings dialogbox.
3. Check Enable timeout.
4. Pick a timeout behavior andchoose a timeout date.
5. Accept the default messageor type in your own.
ArcReader will display themessage when the map isopened after the selectedtimeout date.
6. Click OK.
34
5
2
3
38 USING ARCGIS PUBLISHER
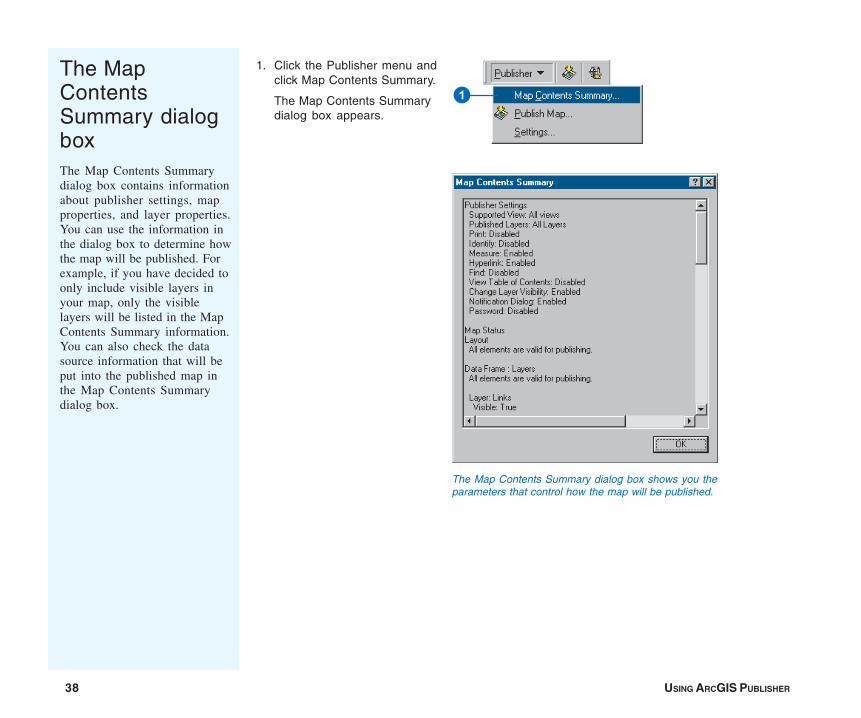
The MapContentsSummary dialogboxThe Map Contents Summarydialog box contains informationabout publisher settings, mapproperties, and layer properties.You can use the information inthe dialog box to determine howthe map will be published. Forexample, if you have decided toonly include visible layers inyour map, only the visiblelayers will be listed in the MapContents Summary information.You can also check the datasource information that will beput into the published map inthe Map Contents Summarydialog box.
1. Click the Publisher menu andclick Map Contents Summary.
The Map Contents Summarydialog box appears.
1
The Map Contents Summary dialog box shows you theparameters that control how the map will be published.
ARCGIS PUBLISHER BASICS 39
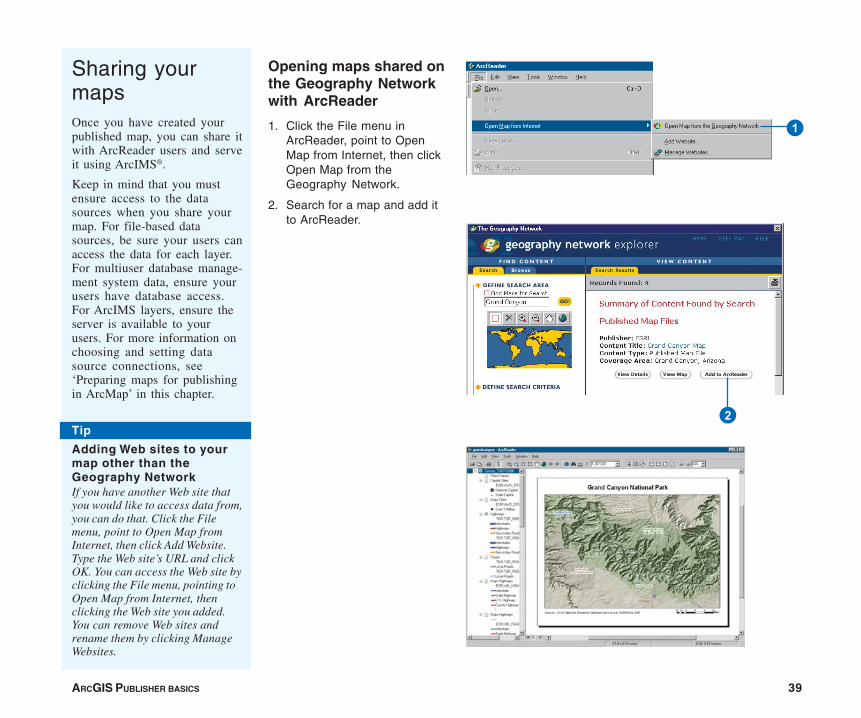
Sharing yourmapsOnce you have created yourpublished map, you can share itwith ArcReader users and serveit using ArcIMS®.
Keep in mind that you mustensure access to the datasources when you share yourmap. For file-based datasources, be sure your users canaccess the data for each layer.For multiuser database manage-ment system data, ensure yourusers have database access.For ArcIMS layers, ensure theserver is available to yourusers. For more information onchoosing and setting datasource connections, see‘Preparing maps for publishingin ArcMap’ in this chapter.
Opening maps shared onthe Geography Networkwith ArcReader
1. Click the File menu inArcReader, point to OpenMap from Internet, then clickOpen Map from theGeography Network.
2. Search for a map and add itto ArcReader.
Tip
Adding Web sites to yourmap other than theGeography NetworkIf you have another Web site thatyou would like to access data from,you can do that. Click the Filemenu, point to Open Map fromInternet, then click Add Website.Type the Web site’s URL and clickOK. You can access the Web site byclicking the File menu, pointing toOpen Map from Internet, thenclicking the Web site you added.You can remove Web sites andrename them by clicking ManageWebsites.
1
2

40 USING ARCGIS PUBLISHER
The data packager
Creating a data package allows you to easily distribute a completed published map and the data necessary to use the map. There areoptions that allow you to package the data to suit your needs, such as buffering, clipping, and formatting. You can also packagemultiple maps at the same time in ArcMap or ArcCatalog.
Creating a data package in ArcCatalog
The Data Packaging dialog box allows you to choose an output locationfor the data package. The Vector and Raster tabs have options that allowyou to control the format and amount of data that is included in the datapackage.
Data Packaging button on thePublisher toolbar in ArcMap
ARCGIS PUBLISHER BASICS 41
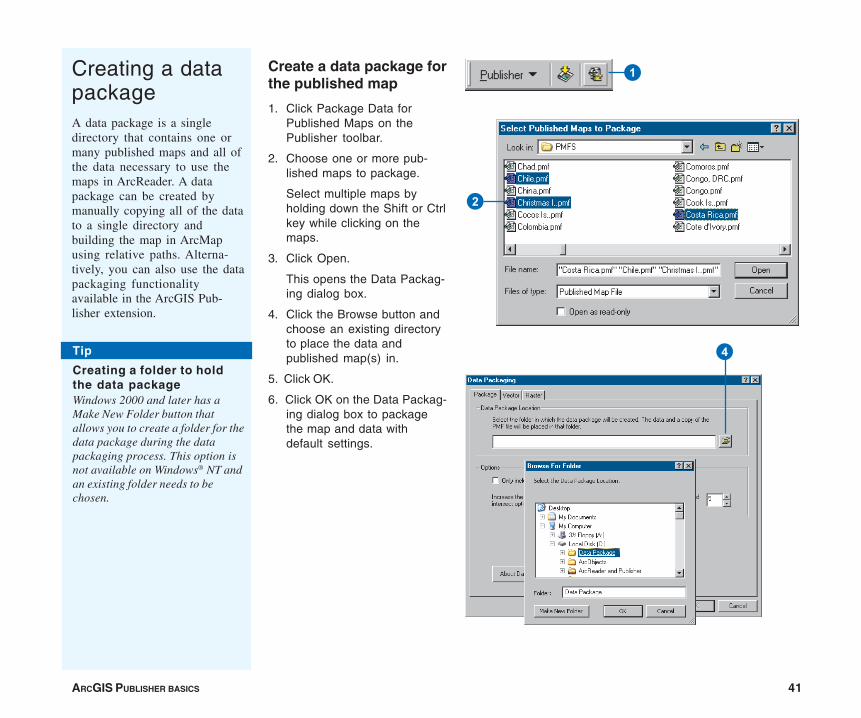
Creating a datapackageA data package is a singledirectory that contains one ormany published maps and all ofthe data necessary to use themaps in ArcReader. A datapackage can be created bymanually copying all of the datato a single directory andbuilding the map in ArcMapusing relative paths. Alterna-tively, you can also use the datapackaging functionalityavailable in the ArcGIS Pub-lisher extension.
Create a data package forthe published map
1. Click Package Data forPublished Maps on thePublisher toolbar.
2. Choose one or more pub-lished maps to package.
Select multiple maps byholding down the Shift or Ctrlkey while clicking on themaps.
3. Click Open.
This opens the Data Packag-ing dialog box.
4. Click the Browse button andchoose an existing directoryto place the data andpublished map(s) in.
5. Click OK.
6. Click OK on the Data Packag-ing dialog box to packagethe map and data withdefault settings.
Tip
Creating a folder to holdthe data packageWindows 2000 and later has aMake New Folder button thatallows you to create a folder for thedata package during the datapackaging process. This option isnot available on Windows® NT andan existing folder needs to bechosen.
1
2
4

42 USING ARCGIS PUBLISHER
Removing layers that donot have data included inthe package
1. Click the Package tab.
2. Check Only include maplayers with features presentin the data frame extent.
This will remove layers in thepackaged map that do nothave data in the package.This can occur when theintersect option is used onthe Vector tab.
Increasing the size of thedata frame for use withintersect and clip
1. Click the Package tab.
2. Adjust the percentage of thedata frame to buffer.
You can increase the size ofthe data frame from 0 to 100percent. This is a percentageof the data frame diagonal.
Tip
Package tab OptionsRemoving layers without data andincreasing the size of the dataframe apply to both the Vector andRaster tabs. They also apply to alldata frames in the map.
2
2
ARCGIS PUBLISHER BASICS 43
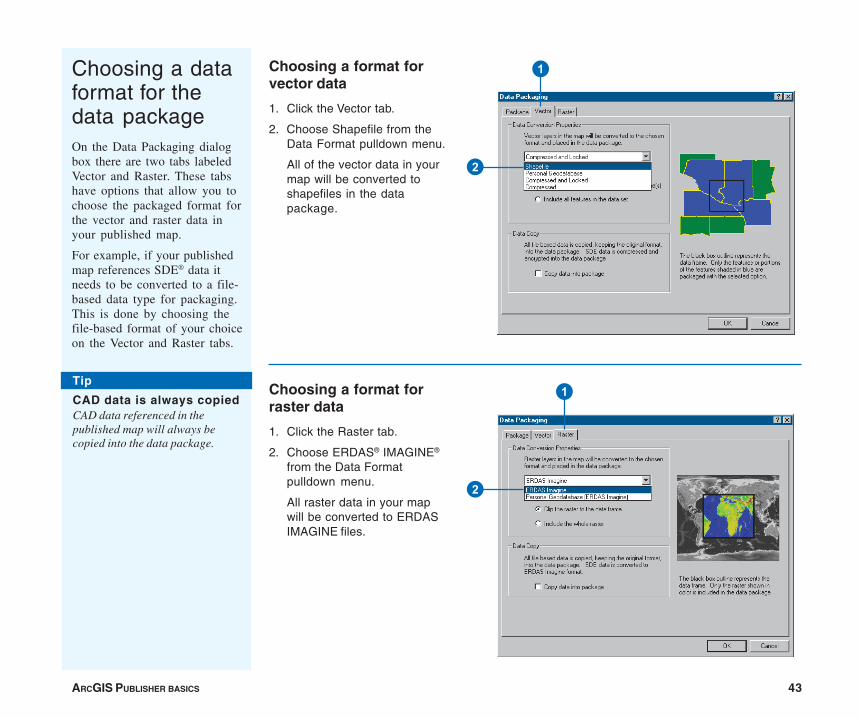
Choosing a dataformat for thedata packageOn the Data Packaging dialogbox there are two tabs labeledVector and Raster. These tabshave options that allow you tochoose the packaged format forthe vector and raster data inyour published map.
For example, if your publishedmap references SDE® data itneeds to be converted to a file-based data type for packaging.This is done by choosing thefile-based format of your choiceon the Vector and Raster tabs.
Choosing a format forvector data
1. Click the Vector tab.
2. Choose Shapefile from theData Format pulldown menu.
All of the vector data in yourmap will be converted toshapefiles in the datapackage.
Choosing a format forraster data
1. Click the Raster tab.
2. Choose ERDAS® IMAGINE®
from the Data Formatpulldown menu.
All raster data in your mapwill be converted to ERDASIMAGINE files.
Tip
CAD data is always copiedCAD data referenced in thepublished map will always becopied into the data package.
1
2
1
2
44 USING ARCGIS PUBLISHER
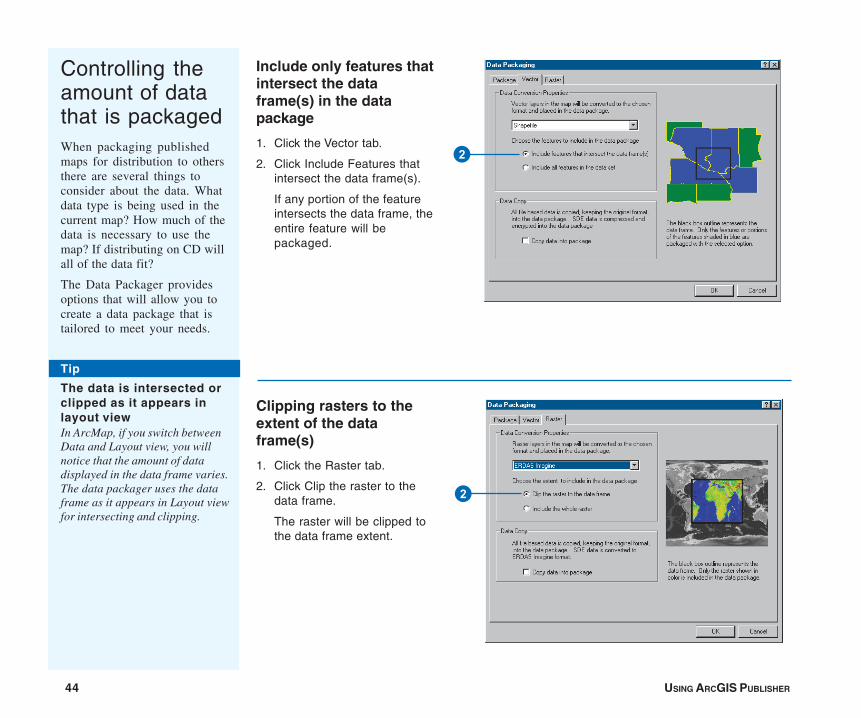
Include only features thatintersect the dataframe(s) in the datapackage
1. Click the Vector tab.
2. Click Include Features thatintersect the data frame(s).
If any portion of the featureintersects the data frame, theentire feature will bepackaged.
Controlling theamount of datathat is packagedWhen packaging publishedmaps for distribution to othersthere are several things toconsider about the data. Whatdata type is being used in thecurrent map? How much of thedata is necessary to use themap? If distributing on CD willall of the data fit?
The Data Packager providesoptions that will allow you tocreate a data package that istailored to meet your needs.
Clipping rasters to theextent of the dataframe(s)
1. Click the Raster tab.
2. Click Clip the raster to thedata frame.
The raster will be clipped tothe data frame extent.
2
2
Tip
The data is intersected orclipped as it appears inlayout viewIn ArcMap, if you switch betweenData and Layout view, you willnotice that the amount of datadisplayed in the data frame varies.The data packager uses the dataframe as it appears in Layout viewfor intersecting and clipping.
ARCGIS PUBLISHER BASICS 45
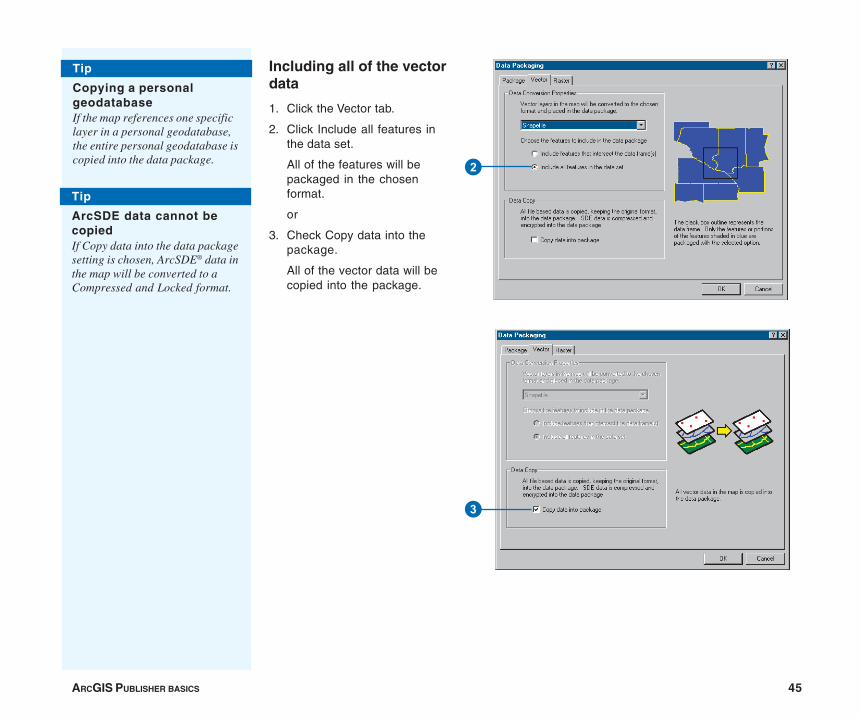
Including all of the vectordata
1. Click the Vector tab.
2. Click Include all features inthe data set.
All of the features will bepackaged in the chosenformat.
or
3. Check Copy data into thepackage.
All of the vector data will becopied into the package.
Tip
ArcSDE data cannot becopiedIf Copy data into the data packagesetting is chosen, ArcSDE® data inthe map will be converted to aCompressed and Locked format.
Tip
Copying a personalgeodatabaseIf the map references one specificlayer in a personal geodatabase,the entire personal geodatabase iscopied into the data package.
3
2
46 USING ARCGIS PUBLISHER
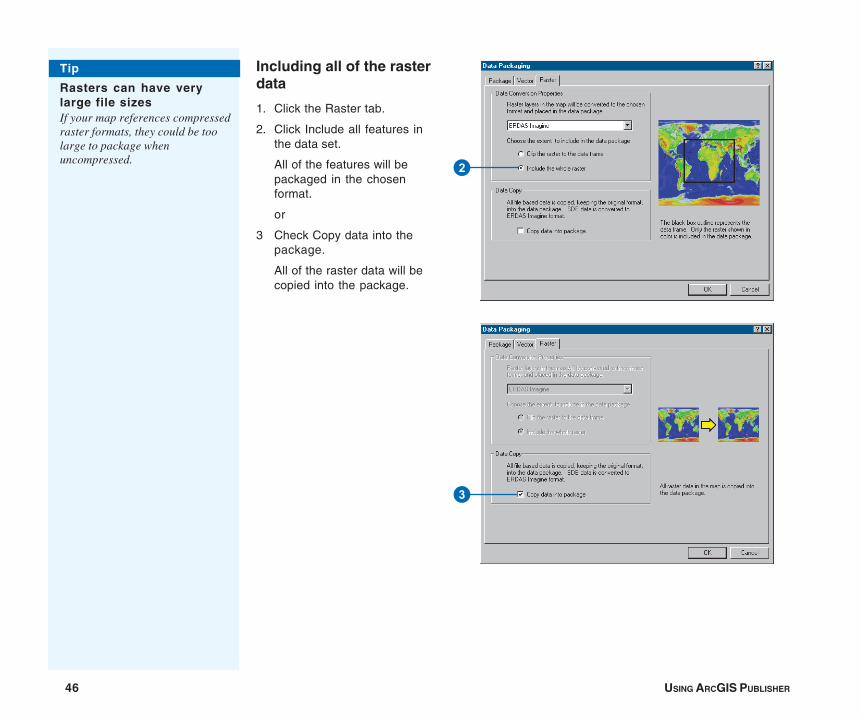
Including all of the rasterdata
1. Click the Raster tab.
2. Click Include all features inthe data set.
All of the features will bepackaged in the chosenformat.
or
3 Check Copy data into thepackage.
All of the raster data will becopied into the package.
Tip
Rasters can have verylarge file sizesIf your map references compressedraster formats, they could be toolarge to package whenuncompressed.
2
3
47
12Glossary active data frameThe data frame you’re currently working with—for example, the one to which you are adding layers.The active data frame is shown in bold in the table of contents.
attributeA characteristic of a map feature. Attributes of a river might include its name, length, average depth,and so on.
attribute tableInformation about features on a map, stored in rows and columns. Each row relates to a singlefeature, while each column contains the values for a single characteristic.
data frameA frame on the map that displays layers occupying the same geographic area. You may have one ormore data frames on your map depending on how you want to organize your data. For instance,one data frame might highlight a study area, and another might provide an overview of where thestudy area is.
data sourceAny geographic data, such as a coverage, shapefile, raster, or geodatabase.
Data viewAn all-purpose view for exploring, displaying, and querying geographic data. This view hides allmap elements, such as titles, North arrows, and scalebars. See also Layout view.
display unitsThe units—for example, feet, miles, meters, or kilometers—ArcReader uses to report measurements,dimensions of shapes, and distance tolerances and offsets.
featureA representation of a real-world object in a layer on a map.
48 USING ARCGIS PUBLISHER
feature class1. A classification describing the format of geographic featuresand supporting data in a coverage. Coverage feature classes forrepresenting geographic features include point, arc, node,route system, route, section, polygon, and region. One or morecoverage features are used to model geographic features; forexample, arcs and nodes can be used to model linear features,such as street centerlines. The tic, annotation, link, and boundaryfeature classes provide supporting data for coverage datamanagement and viewing.
2. The conceptual representation of a geographic feature. Whenreferring to geographic features, feature classes include point,line, area, and surface. In a geodatabase, an object class thatstores features and has a field of type geometry.
fieldA column in a table. Each field contains the values for a singleattribute.
geodatabaseA geographic database that provides services for managinggeographic data. A geodatabase is hosted inside a relationaldatabase management system. A geodatabase contains featuredatasets.
graticuleA graphic representation on a map of the network of parallels andmeridians (latitude and longitude) that subdivide the earth’ssurface.
gridA geographic representation of the world as an array of equallysized square cells arranged in rows and columns. Each grid cell isreferenced by its geographic x,y location. See also raster.
group layerSeveral layers that appear and act like a single layer in the table ofcontents in ArcReader.
imageRepresents geographic features by dividing the world intodiscrete squares called cells. Examples include satellite and aerialphotographs, scanned documents, and building photographs. Seealso raster.
layerA collection of geographic features—such as rivers, lakes,counties, or cities—of a particular area or place for display on amap. A layer references geographic data stored in a data source,such as a coverage, and defines how to display it. You can createand manage layers as you would any other type of data in yourdatabase.
layoutThe design or arrangement of elements—such as geographicdata, North arrows, and scalebars—in a digital map display orprinted map.
Layout viewThe view for laying out your map. Layout view shows the virtualpage upon which you place and arrange geographic data and mapelements—such as titles, legends, and scalebars—for printing.See also Data view.
legendA list of symbols appearing on the map; includes a sample ofeach symbol and text describing which feature each symbolrepresents.
GLOSSARY 49
mapA graphical presentation of geographic information. It containsgeographic data along with other elements, such as a title, Northarrow, legend, and scalebar. You can interactively display andquery the geographic data on the map and also prepare aprintable map by arranging the map elements around the data in avisually pleasing manner.
map displayA graphic representation of the map on the computer screen.
map documentThe disk-based representation of a map. Map documents can beprinted or embedded into other documents. Map documents havea .mxd file extension.
map elementA graphic component, such as a scalebar, North arrow, and title,that helps describe the geographic data on the map.
Map TipsDisplays onscreen descriptions of map features when you pointto the feature.
map unitsThe units—for example, feet, miles, meters, or kilometers—inwhich the coordinates of spatial data are stored.
neatlineA border commonly drawn around geographic features, often toseparate them from other map elements.
North arrowA map element that shows how the map is oriented.
projectionA mathematical formula that transforms feature locations from theearth’s curved surface to a map’s flat surface. A projectedcoordinate system employs a projection to transform locationsexpressed as latitude and longitude values to x,y coordinates.Projections cause distortions in one or more of these spatialproperties: distance, area, shape, and direction.
rasterRepresents any data source that uses a grid structure to storegeographic information. See also grid and image.
scaleThe relationship between the dimensions of features on a mapand the geographic objects they represent on the earth, commonlyexpressed as a fraction or a ratio. A map scale of 1/100,000 or1:100,000 means that one unit of measure on the map equals100,000 of the same unit on the earth.
scalebarA map element that graphically shows a map’s scale.
shapefileA vector data storage format for storing the location, shape, andattributes of geographic features. A shapefile is stored in a folderand contains one feature class.
symbolA graphic representation of an individual feature or class offeatures that helps identify it and distinguish it from otherfeatures.
symbologyThe criteria used to determine symbols for the features in a layer.A characteristic of a feature may influence the size, color, andshape of the symbol used.
50 USING ARCGIS PUBLISHER
table of contentsLists all the layers on the map and shows what the features ineach layer represent.
51
A
Active data framedefined 47
ArcGIS Publishercustomizing settings 13–17settings 31starting 24using security settings 18
ArcGIS Publisher tutorialenabling Publisher toolbar 10loading Publisher tutorial 10publishing a map 10–11, 19viewing map in ArcReader 12
Attribute tablesdefined 47
Attributesdefined 47
D
Dataaccessing 25, 40
Data framesactive
defined 47defined 47
Data sourcesdefined 47
Data viewdefined 47
Displayunits
defined 47
F
Feature classdefined 48
Featuresdefined 47
Fieldsdefined 48
Functionalityrestricting 31
G
Geodatabasedefined 48
Getting startedwith ArcGIS Publisher. See ArcGIS Publisher
tutorialGraticules
defined 48Grid
defined 48Group layers
defined 48
I
Imagesdefined 48
L
Layersdefined 48
Layout viewdefined 48
Legendsdefined 48
M
Map Contents Summary dialog box 38, 41Map display
defined 49Map documents
defined 49
Index
52 USING ARCGIS PUBLISHER
Map elementsdefined 49
Map Tipsdefined 49
Map unitsdefined 49
Mapscreating for computer network 26creating to distribute with data 28creating with Internet data 30defined 49preparing for publishing 25, 40publishing
adjusting settings 31with comments 37
sharing 39
N
Neatlinesdefined 49
North arrowsdefined 49
P
Projectionsdefined 49
Publisher toolbaradding 24enabling 24
Publishing mapsadjusting settings 31
R
Rastersdefined 49
S
Scaledefined 49
Scalebarsdefined 49
Shapefilesdefined 49
Symbologydefined 49
Symbolsdefined 49
T
Table of contentsdefined 50
Tablesfields
defined 48Tutorial
ArcGIS Publisher. See ArcGIS Publishertutorial
U
Unitsdisplay
defined 47map
defined 49