Embed Size (px)
Citation preview
Level 3 Diploma in Site carpentry
© 2013 City and Guilds of London Institute. All rights reserved. 1 of 29
PowerPoint presentation
Setting curved mouldings
Unit 307: Carry out second fixing double doors and mouldings

Level 3 Diploma in Site carpentry
© 2013 City and Guilds of London Institute. All rights reserved. 2 of 29
Overview
• Describe methods used to set out curved mouldings• Describe how to bisect angles

Level 3 Diploma in Site carpentry
© 2013 City and Guilds of London Institute. All rights reserved. 3 of 29
Two main categories for curved mouldings
• Roman mouldings which are based around circles• Grecian mouldings which are based around elliptical curves.
The setting out of Grecian curves is more complex and time-consuming.

Level 3 Diploma in Site carpentry
© 2013 City and Guilds of London Institute. All rights reserved. 4 of 29
Intersection of mouldings
• Where two mouldings join is called the mitre.• It is a straightforward bisection of the angle for moulds of the same
size and which are straight.

Level 3 Diploma in Site carpentry
© 2013 City and Guilds of London Institute. All rights reserved. 5 of 29
Bisecting an angle for straight mouldings
Bisection line
Bisection angle
Source: Steve Redfern

Level 3 Diploma in Site carpentry
© 2013 City and Guilds of London Institute. All rights reserved. 6 of 29
Bisecting a line when a straight and curved moulding meet
• When a straight and curved moulding meet the bisection line will be curved.
• This requires a mitre that has a curved cut.• The wider the material the more pronounced this curve will be.• The more obtuse the angle the straighter the curved of the cut will be.
Level 3 Diploma in Site carpentry
© 2013 City and Guilds of London Institute. All rights reserved. 7 of 29
Bisecting curved and straight mouldings to produce the true curved shape
• Draw the plan of the moulding.• Divide up the profile at appropriate points (1 to 8 for this example).• Draw parallel lines out towards the seat of the mitre.• From the centre of the curve draw arcs passing through these points
at the seat of the mitre.• This produces the true shape of the curve at the mitre.• Make a template for both the concave and convex profiles.• Make saddles to fit the mouldings and with the template mark and cut
the mouldings with the chisel.

Level 3 Diploma in Site carpentry
© 2013 City and Guilds of London Institute. All rights reserved. 8 of 29
Curved mitre setting out

Level 3 Diploma in Site carpentry
© 2013 City and Guilds of London Institute. All rights reserved. 9 of 29
Setting out curved mouldings
• To enable the accurate setting out of shaped mouldings a full size drawing needs to be carried out.
• This will require three pieces of information.– The shape required
• Segmental
• Semi-circular
• Gothic– Span (width of the moulding)
– Rise (height of the curved part of the moulding)

Level 3 Diploma in Site carpentry
© 2013 City and Guilds of London Institute. All rights reserved. 10 of 29
Segmental arch
• For a segmental arch of span AB and rise CD use the following method
1. Draw span AB
2. Bisect line AB and find point C and draw bisecting line
3. Measure rise D up bisecting line
4. Draw line BD and bisect it
5. Where lines bisecting AB and BD intersect mark point O
6. With O as centre OD as radius draw the arc ADB for the arch

Level 3 Diploma in Site carpentry
© 2013 City and Guilds of London Institute. All rights reserved. 11 of 29
Mathematical method
• The formula for calculating the radius of a segmental arch is:
D X D ÷ C + C ÷ 2 = RADIUS
C
D
Radius Source: Steve Redfern
Level 3 Diploma in Site carpentry
© 2013 City and Guilds of London Institute. All rights reserved. 12 of 29
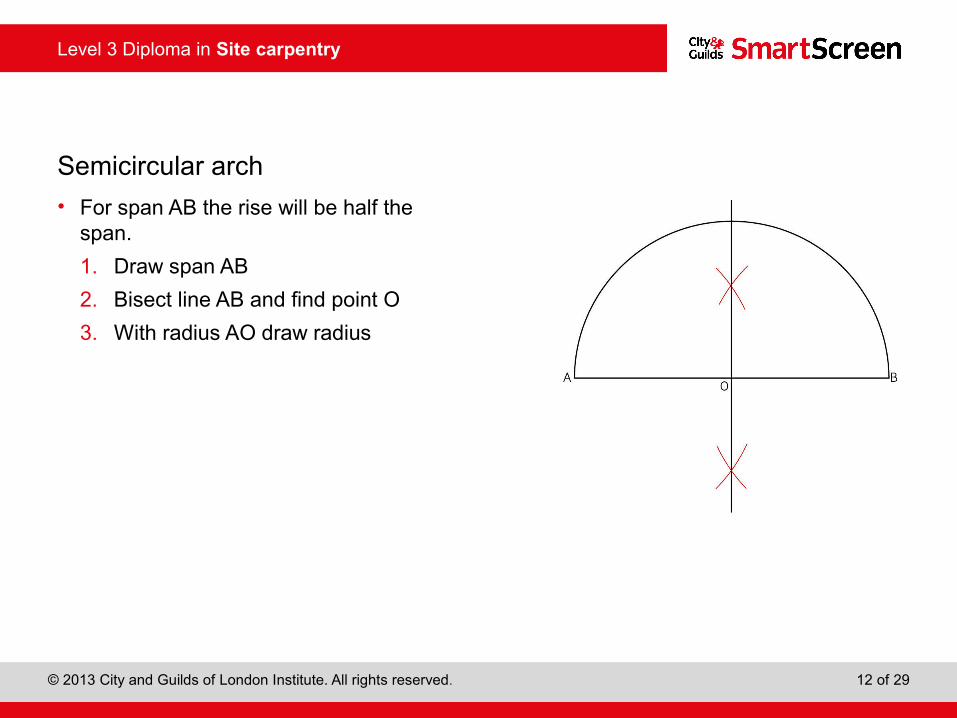
Semicircular arch
• For span AB the rise will be half the span.
1. Draw span AB
2. Bisect line AB and find point O
3. With radius AO draw radius

Level 3 Diploma in Site carpentry
© 2013 City and Guilds of London Institute. All rights reserved. 13 of 29
Gothic or equilateral arch
• For an equilateral arch the radius equals the span
1. Draw span AB
2. With A and B and radius AB draw arcs AC and BC

Level 3 Diploma in Site carpentry
© 2013 City and Guilds of London Institute. All rights reserved. 14 of 29
Elliptical arch
• The elliptical arch can be drawn in several ways. Four methods are:– Concentric circle– Intersecting lines– Pins and string– Trammel
Level 3 Diploma in Site carpentry
© 2013 City and Guilds of London Institute. All rights reserved. 15 of 29
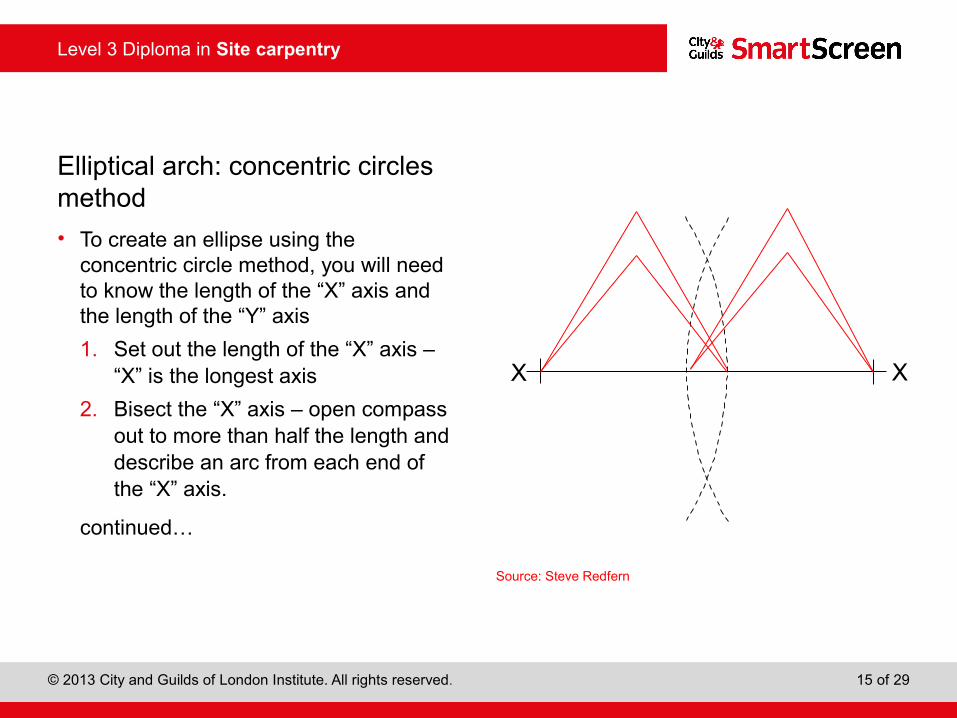
Elliptical arch: concentric circles method
• To create an ellipse using the concentric circle method, you will need to know the length of the “X” axis and the length of the “Y” axis
1. Set out the length of the “X” axis – “X” is the longest axis
2. Bisect the “X” axis – open compass out to more than half the length and describe an arc from each end of the “X” axis.
continued…
XX
Source: Steve Redfern

Level 3 Diploma in Site carpentry
© 2013 City and Guilds of London Institute. All rights reserved. 16 of 29
Elliptical arch: concentric circles method
3. Set out the length of the “Y” axis – “Y” is the shortest axis. Mark off the length of the “Y”, measuring half the length each side of the “X” axis
continued… XX
Y
YSource: Steve Redfern

Level 3 Diploma in Site carpentry
© 2013 City and Guilds of London Institute. All rights reserved. 17 of 29
Elliptical arch: concentric circles method
4. Set a compass to the “Y” radius and describe a circle.
5. Set a compass to the “X” radius and describe a circle.
continued… XX
Y
Y
Source: Steve Redfern

Level 3 Diploma in Site carpentry
© 2013 City and Guilds of London Institute. All rights reserved. 18 of 29
Elliptical arch: concentric circles method
6. Using set squares, break the circle up into sections. The more sections, the easier it is the draw the ellipse
continued… XX
Y
Y
Source: Steve Redfern

Level 3 Diploma in Site carpentry
© 2013 City and Guilds of London Institute. All rights reserved. 19 of 29
Elliptical arch: concentric circles method
7. Using set squares, measure out and down from the circle intersecting points
continued…
XX
Y
Y
Source: Steve Redfern

Level 3 Diploma in Site carpentry
© 2013 City and Guilds of London Institute. All rights reserved. 20 of 29
Elliptical arch: concentric circles method
8. Mark a line joining the intersecting points to form the ellipse.
X
Y
Y
Source: Steve Redfern

Level 3 Diploma in Site carpentry
© 2013 City and Guilds of London Institute. All rights reserved. 21 of 29
Elliptical arch: intersecting lines method
1. Draw span AB (major axis) and rise CD (minor axis).
2. Form rectangle ABCDE.
3. Divide lines AE and AC into equal parts. The more parts the easier it is to draw the ellipse.
continued…
E
A C B
FD
E
A C B
FD
Source: Steve Redfern
Source: Steve Redfern

Level 3 Diploma in Site carpentry
© 2013 City and Guilds of London Institute. All rights reserved. 22 of 29
Elliptical arch: intersecting lines method
4. Extend line DC to point G so line GC is equal to the rise.
5. From point G draw lines through points on line AB until they reach points on lines AE and BF.
continued…
E
A C B
FD
GSource: Steve Redfern

Level 3 Diploma in Site carpentry
© 2013 City and Guilds of London Institute. All rights reserved. 23 of 29
Elliptical arch: intersecting lines method
6. Now complete by drawing lines for the ellipse.
E
C
FD
BA
Source: Steve Redfern
Level 3 Diploma in Site carpentry
© 2013 City and Guilds of London Institute. All rights reserved. 24 of 29
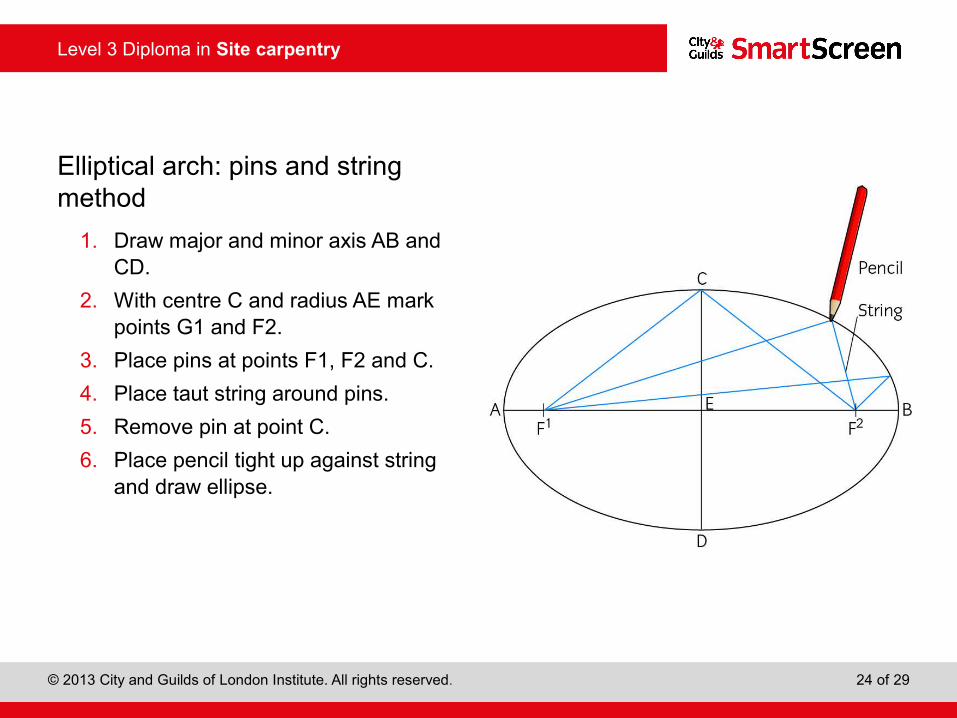
Elliptical arch: pins and string method
1. Draw major and minor axis AB and CD.
2. With centre C and radius AE mark points G1 and F2.
3. Place pins at points F1, F2 and C.
4. Place taut string around pins.
5. Remove pin at point C.
6. Place pencil tight up against string and draw ellipse.

Level 3 Diploma in Site carpentry
© 2013 City and Guilds of London Institute. All rights reserved. 25 of 29
Elliptical arch: trammel method
1. Construct trammel having points equal to half the major axis (run) and half the minor axis (rise) from pencil or cutter.
continued…
Source: www.thisiscarpentry.com
Source:
Level 3 Diploma in Site carpentry
© 2013 City and Guilds of London Institute. All rights reserved. 26 of 29
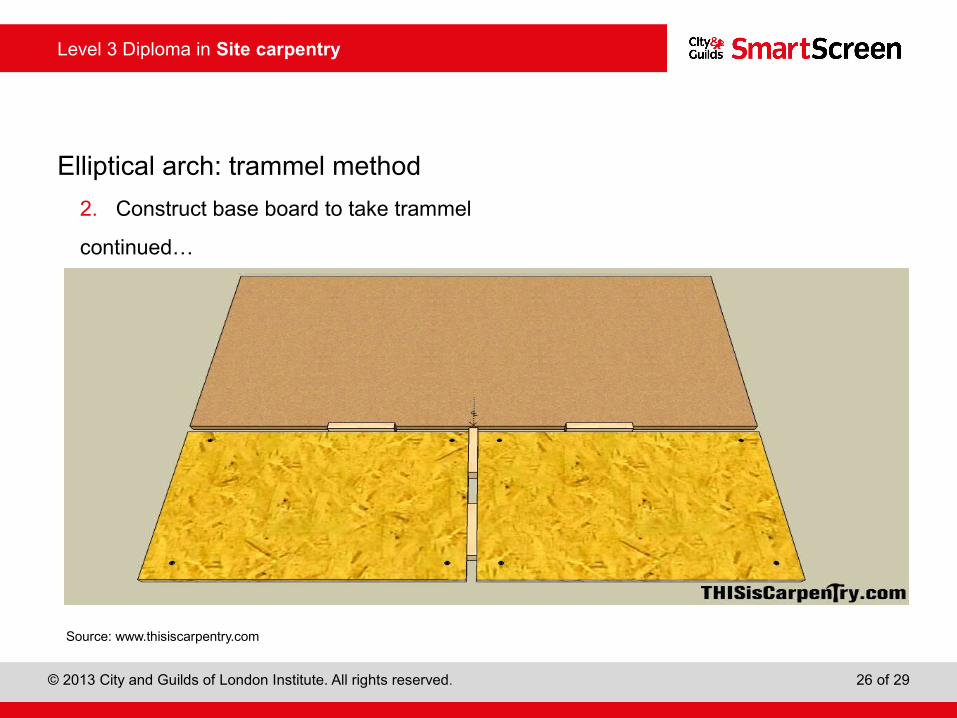
Elliptical arch: trammel method
2. Construct base board to take trammel
continued…
Source: www.thisiscarpentry.com

Level 3 Diploma in Site carpentry
© 2013 City and Guilds of London Institute. All rights reserved. 27 of 29
Elliptical arch: trammel method
Base board using trammel with router attached
Source: www.thisiscarpentry.com
Level 3 Diploma in Site carpentry
© 2013 City and Guilds of London Institute. All rights reserved. 28 of 29
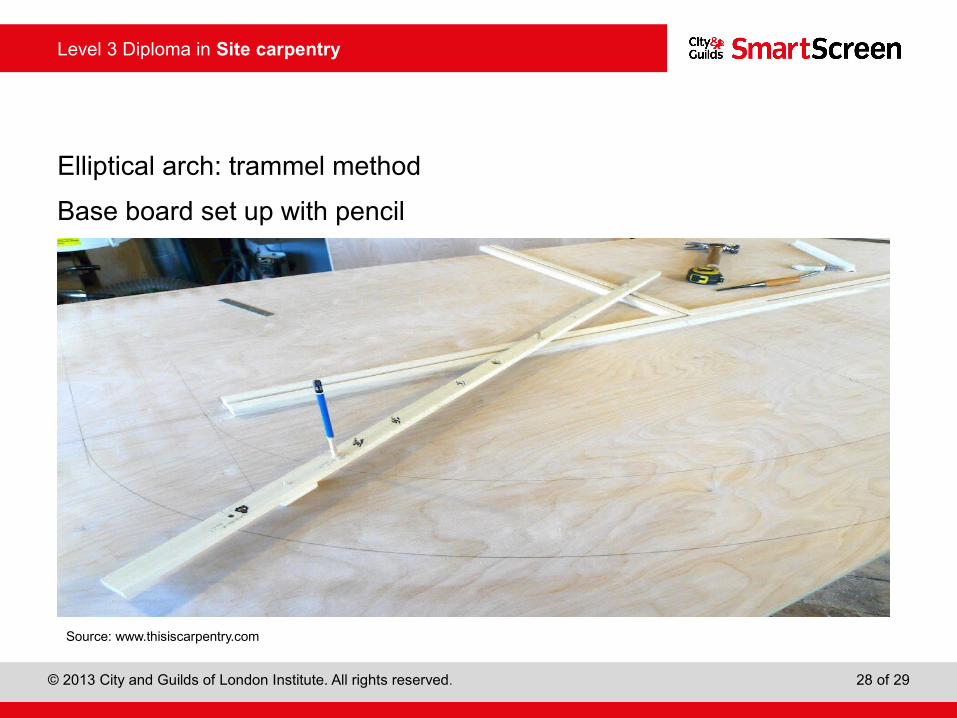
Elliptical arch: trammel method
Base board set up with pencil
Source: www.thisiscarpentry.com

Level 3 Diploma in Site carpentry
© 2013 City and Guilds of London Institute. All rights reserved. 29 of 29
Any questions?