Embed Size (px)
Citation preview
8/7/2019 ad9ec4ae0fbdbb1f44546d3a474e0e87
http://slidepdf.com/reader/full/ad9ec4ae0fbdbb1f44546d3a474e0e87 1/218
En
The Nikon Guide to Digital Photography
with the
DIGITAL CAMERA
8/7/2019 ad9ec4ae0fbdbb1f44546d3a474e0e87
http://slidepdf.com/reader/full/ad9ec4ae0fbdbb1f44546d3a474e0e87 2/218
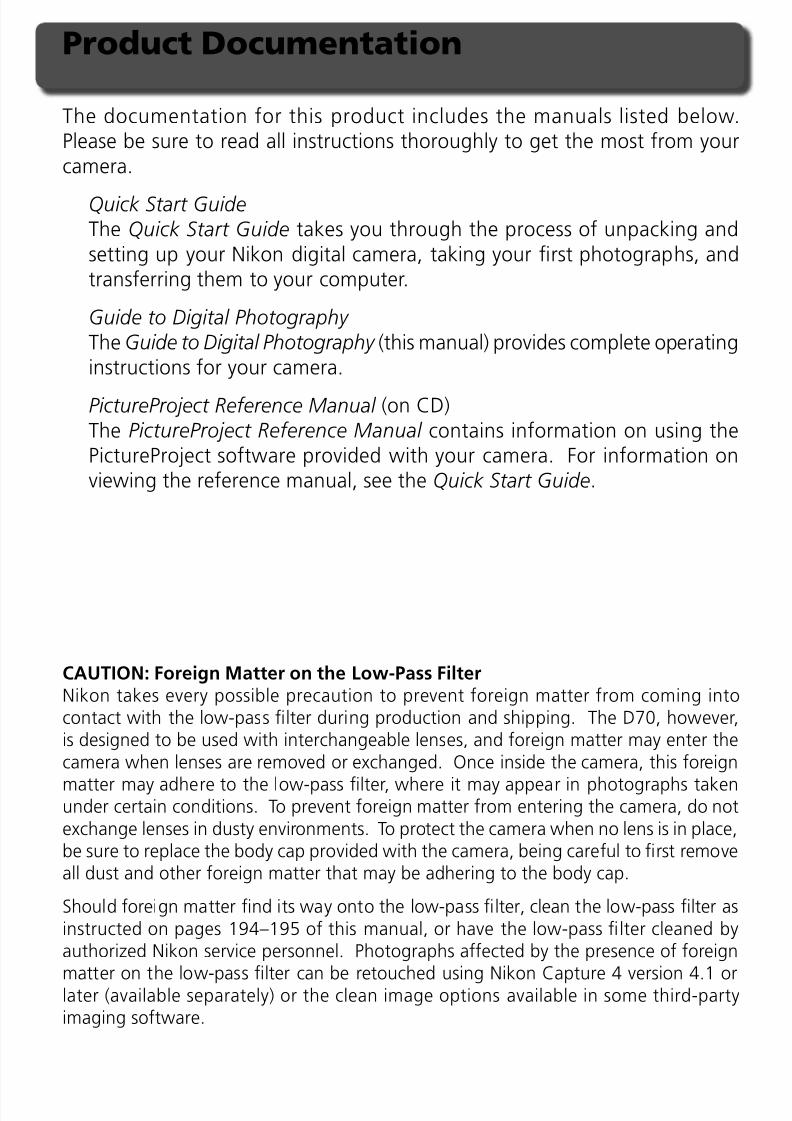
The documentation for this product includes the manuals listed below.Please be sure to read all instructions thoroughly to get the most from yourcamera.
Quick Start GuideThe Quick Start Guide takes you through the process of unpacking andsetting up your Nikon digital camera, taking your fi rst photographs, andtransferring them to your computer.
Guide to Digital Photography The Guide to Digital Photography (this manual) provides complete operatinginstructions for your camera.
PictureProject Reference Manual (on CD)The PictureProject Reference Manual contains information on using thePictureProject software provided with your camera. For information onviewing the reference manual, see the Quick Start Guide.
CAUTION: Foreign Matter on the Low-Pass FilterNikon takes every possible precaution to prevent foreign matter from coming intocontact with the low-pass fi lter during production and shipping. The D70, however,is designed to be used with interchangeable lenses, and foreign matter may enter thecamera when lenses are removed or exchanged. Once inside the camera, this foreign
matter may adhere to the low-pass fi lter, where it may appear in photographs tak enunder certain conditions. To prevent foreign matter from entering the camera, do notexchange lenses in dusty environments. To protect the camera when no lens is in place,be sure to replace the body cap provided with the camera, being careful to fi rst removeall dust and other foreign matter that may be adhering to the body cap.
Should foreign matter fi nd its way onto the low-pass fi lter, clean the low-pass fi lter asinstructed on pages 194–195 of this manual, or have the low-pass fi lter cleaned byauthorized Nikon service personnel. Photographs affected by the presence of foreign
matter on the low-pass fi lter can be retouched using Nikon Capture 4 version 4.1 orlater (available separately) or the clean image options available in some third-partyimaging software.
Product Documentation
8/7/2019 ad9ec4ae0fbdbb1f44546d3a474e0e87
http://slidepdf.com/reader/full/ad9ec4ae0fbdbb1f44546d3a474e0e87 3/218
…on connecting to a computer or TV…
…on printing photos on a PictBridge printer…
How to Read This Manual
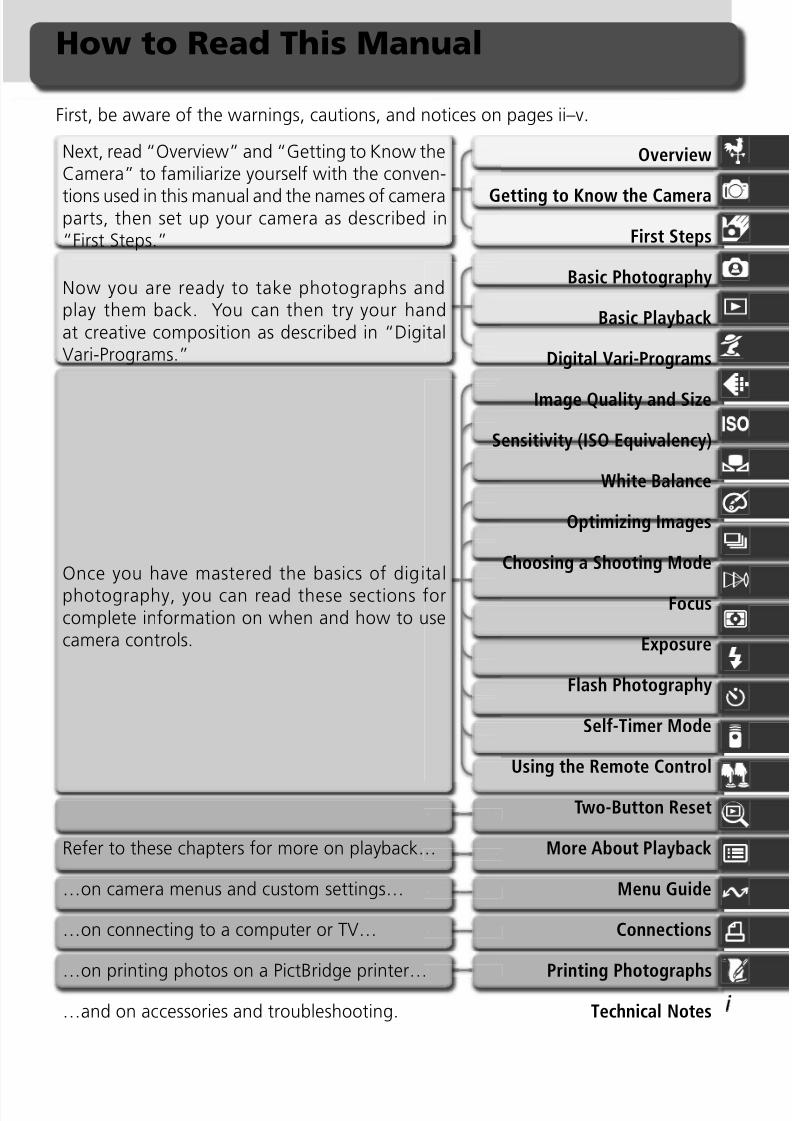
First, be aware of the warnings, cautions, and notices on pages ii–v.
…and on accessories and troubleshooting.
Refer to these chapters for more on playback…
Once you have mastered the basics of digital
photography, you can read these sections forcomplete information on when and how to usecamera controls.
Now you are ready to take photographs andplay them back. You can then try your handat creative composition as described in “DigitalVari-Programs.”
Next, read “Overview” and “Getting to Know theCamera” to familiarize yourself with the conven-
tions used in this manual and the names of cameraparts, then set up your camera as described in“First Steps.”
…on camera menus and custom settings… Menu Guide
More About Playback
Technical Notes
Focus
Digital Vari-Programs
Self-Timer Mode
Sensitivity (ISO Equivalency)
Using the Remote Control
Two-Button Reset
White Balance
Optimizing Images
Choosing a Shooting Mode
Basic Playback
Basic Photography
Getting to Know the Camera
First Steps
Connections
Flash Photography
Exposure
Image Quality and Size
Overview
Printing Photographs
8/7/2019 ad9ec4ae0fbdbb1f44546d3a474e0e87
http://slidepdf.com/reader/full/ad9ec4ae0fbdbb1f44546d3a474e0e87 4/218
ii
WARNINGSDo not look at the sun through the view- fi nderViewing the sun or other strong lightsource through the viewfi nder couldcause permanent visual impairment.
Turn off immediately in the event ofmalfunctionShould you notice smoke or an unusual
smell coming from the equipment orfrom the AC adapter (available sep- arately), unplug the AC adapter andremove the battery immediately, tak-ing care to avoid burns. Continuedoperation could result in injury. Afterremoving the battery, take the equipmentto a Nikon-authorized service center forinspection.
Do not use in the presence of fl am- mable gasDo not use electronic equipment in thepresence of fl ammable gas, as this couldresult in explosion or fi re.
Do not place strap around the neck ofan infant or childPlacing the camera strap around theneck of an infant or child could resultin strangulation.
Do not disassembleTouching the product’s internal partscould result in injury. In the event ofa malfunction, the product should berepaired only by a qualifi ed technician.Should the product break open as theresult of a fall or other accident, removethe battery and/or AC adapter and thentake the product to a Nikon-authorizedservice center for inspection.
Observe proper precautions when han- dling batteriesBatteries may leak or explode if im- properly handled. Observe the followingprecautions when handling batteries foruse in this product:
• Be sure the product is off before re- placing the battery. If you are using an
AC adapter, be sure it is unplugged.• Use only batteries approved for use in
this equipment. Do not mix old and newbatteries or batteries of different types.
• Do not attempt to insert the batteryupside down or backwards.
• Do not short or disassemble the bat- tery.
• Do not expose the battery to fl ame or
to excessive heat.• Do not immerse in or expose to water.
For Your Safety
To prevent damage to your Nikon product or injury to yourself or to others,read the following safety precautions in their entirety before using this equip-ment. Keep these safety instructions where all those who use the product
will read them.The consequences that could result from failure to observe the precautionslisted in this section are indicated by the following symbol:
This icon marks warnings, information that should be read before using thisNikon product to prevent possible injury.
8/7/2019 ad9ec4ae0fbdbb1f44546d3a474e0e87
http://slidepdf.com/reader/full/ad9ec4ae0fbdbb1f44546d3a474e0e87 5/218
iii
• Replace the terminal cover when trans-porting the battery. Do not transportor store with metal objects such asnecklaces or hairpins.
• Batteries are prone to leakage whenfully discharged. To avoid damage tothe product, be sure to remove the bat-tery when no charge remains.
• When the battery is not in use, attachthe terminal cover and store in a coolplace.
• Immediately after use, or when theproduct is used on battery power for
an extended period, the battery maybecome hot. Before removing the bat- tery, turn the camera off and allow thebattery to cool.
• Discontinue use immediately should younotice any changes in the battery, suchas discoloration or deformation.
Use appropriate cablesWhen connecting cables to the input andoutput jacks, use only the cables pro- vided or sold by Nikon for the purpose,to maintain compliance with productregulations.
Keep out of reach of childrenParticular care should be taken to preventinfants from putting the battery or othersmall parts into their mouths.
Removing memory cardsMemory cards may become hot dur- ing use. Observe due caution whenremoving memory cards from the
camera.CD-ROMsThe CD-ROMs on which the softwareand manuals are distributed should notbe played back on audio CD equipment.Playing CD-ROMs on an audio CD playercould cause hearing loss or damage theequipment.
Observe caution when using the fl ash
Using the fl ash close to your subject’seyes could cause temporary visualimpairment. Particular care shouldbe observed if photographing infants,when the fl ash should be no less thanone meter (39˝) from the subject.
When using the viewfi nderWhen operating the diopter adjustmentcontrol with your eye to the viewfi nder,
care should be taken not to put yourfi nger in your eye accidentally.
Avoid contact with liquid crystalShould the monitor break, care shouldbe taken to avoid injury due to brokenglass and to prevent liquid crystal fromthe monitor touching the skin or enteringthe eyes or mouth.

8/7/2019 ad9ec4ae0fbdbb1f44546d3a474e0e87
http://slidepdf.com/reader/full/ad9ec4ae0fbdbb1f44546d3a474e0e87 6/218
iv
Notice for customers in the U.S.A.
Federal Communications Commission (FCC) Radio Frequency Interference StatementD70
Tested To Comply
With FCC Standards
FOR HOME OR OFFICE USE
Notices
CAUTIONSModifi cationsThe FCC requires the user to be notifi ed
that any changes or modifi cations made tothis device that are not expressly approvedby Nikon Corporation may void the user’sauthority to operate the equipment.
Interface CablesUse the interface cables sold or providedby Nikon for your equipment. Using otherinterface cables may exceed the limits of
Class B Part 15 of the FCC rules.Notice for customers in the State of CaliforniaWARNING: Handling the cord on thisproduct will expose you to lead, a chemicalknown to the State of California to causebirth defects or other reproductive harm.Wash hands after handling.
Nikon Inc.,
1300 Walt Whitman Road, Melville, New York11747-3064, U.S.A. Tel.: 631-547-4200
• No part of the manuals included withthis product may be reproduced, trans-mitted, transcribed, stored in a retrievalsystem, or translated into any language
in any form, by any means, withoutNikon’s prior written permission.
• Nikon reserves the right to change thespecifi cations of the hardware and soft-ware described in these manuals at anytime and without prior notice.
• Nikon will not be held liable for anydamages resulting from the use of thisproduct.
• While every effort has been made to
ensure that the information in thesemanuals is accurate and complete, wewould appreciate it were you to bringany errors or omissions to the attentionof the Nikon representative in your area(address provided separately).
This equipment has been tested and foundto comply with the limits for a Class B digi-tal device, pursuant to Part 15 of the FCCrules. These limits are designed to providereasonable protection against harmfulinterference in a residential installation.This equipment generates, uses, and canradiate radio frequency energy and, if not
installed and used in accordance with theinstructions, may cause harmful interfer-ence to radio communications. However,there is no guarantee that interferencewill not occur in a particular installation.If this equipment does cause harmful in-terference to radio or television reception,which can be determined by turning theequipment off and on, the user is encour-
aged to try to correct the interference byone or more of the following measures:• Reorient or relocate the receiving an-
tenna.• Increase the separation between the
equipment and receiver.• Connect the equipment into an outlet
on a circuit different from that to whichthe receiver is connected.
• Consult the dealer or an experiencedradio/television technician for help.
8/7/2019 ad9ec4ae0fbdbb1f44546d3a474e0e87
http://slidepdf.com/reader/full/ad9ec4ae0fbdbb1f44546d3a474e0e87 7/218
v
Notice for customers in Canada
CAUTIONThis class B digital apparatus meets all re-quirements of the Canadian InterferenceCausing Equipment Regulations.
ATTENTIONCet appareil numérique de la classe B res-pecte toutes les exigences du Règlementsur le matériel brouilleur du Canada.
Notice Concerning Prohibition of Copying or Reproduction
Note that simply being in possession of material that has been digitally copied or reproducedby means of a scanner, digital camera or other device may be punishable by law.
• Items prohibited by law from beingcopied or reproducedDo not copy or reproduce paper money,
coins, securities, government bonds, orlocal government bonds, even if suchcopies or reproductions are stamped“Sample.”
The copying or reproduction of papermoney, coins, or securities which arecirculated in a foreign country is pro-hibited.
Unless the prior permission of thegovernment has been obtained, thecopying or reproduction of unused post-age stamps or post cards issued by thegovernment is prohibited.
The copying or reproduction of stampsissued by the government and of cer-tifi ed documents stipulated by law isprohibited.
• Cautions on certain copies and re-productionsThe government has issued cautions on
copies or reproductions of securities is-sued by private companies (shares, bills,checks, gift certifi cates, etc.), commuterpasses, or coupon tickets, except whena minimum of necessary copies are to beprovided for business use by a company.Also, do not copy or reproduce pass-ports issued by the government, licensesissued by public agencies and private
groups, ID cards, and tickets, such aspasses and meal coupons.
• Comply with copyright noticesThe copying or reproduction of copy-righted creative works such as books,music, paintings, woodcut prints, maps,drawings, movies, and photographs isgoverned by national and international
copyright laws. Do not use this productfor the purpose of making illegal copiesor to infringe copyright laws.
Trademark InformationApple, the Apple logo, Macintosh, Mac OS, Power Macintosh, and PowerBook are registered trademarks of AppleComputer, Inc. Power Mac, iMac, and iBook are trademarks of Apple Computer, Inc. Microsoft and Windows areregistered trademarks of Microsoft Corporation. Pentium is a trademark of Intel Corporation. CompactFlash is atrademark of SanDisk Corporation. Microdrive is a registered trademark of Hitachi Global Storage Technologies in
the United States and/or other countries. Lexar Media is a trademark of Lexar Media Corporation. PictBridge is atrademark. All other trade names mentioned in this manual or the other documentation provided with your Nikonproduct are trademarks or registered trademarks of their respective holders.
8/7/2019 ad9ec4ae0fbdbb1f44546d3a474e0e87
http://slidepdf.com/reader/full/ad9ec4ae0fbdbb1f44546d3a474e0e87 8/218
vi
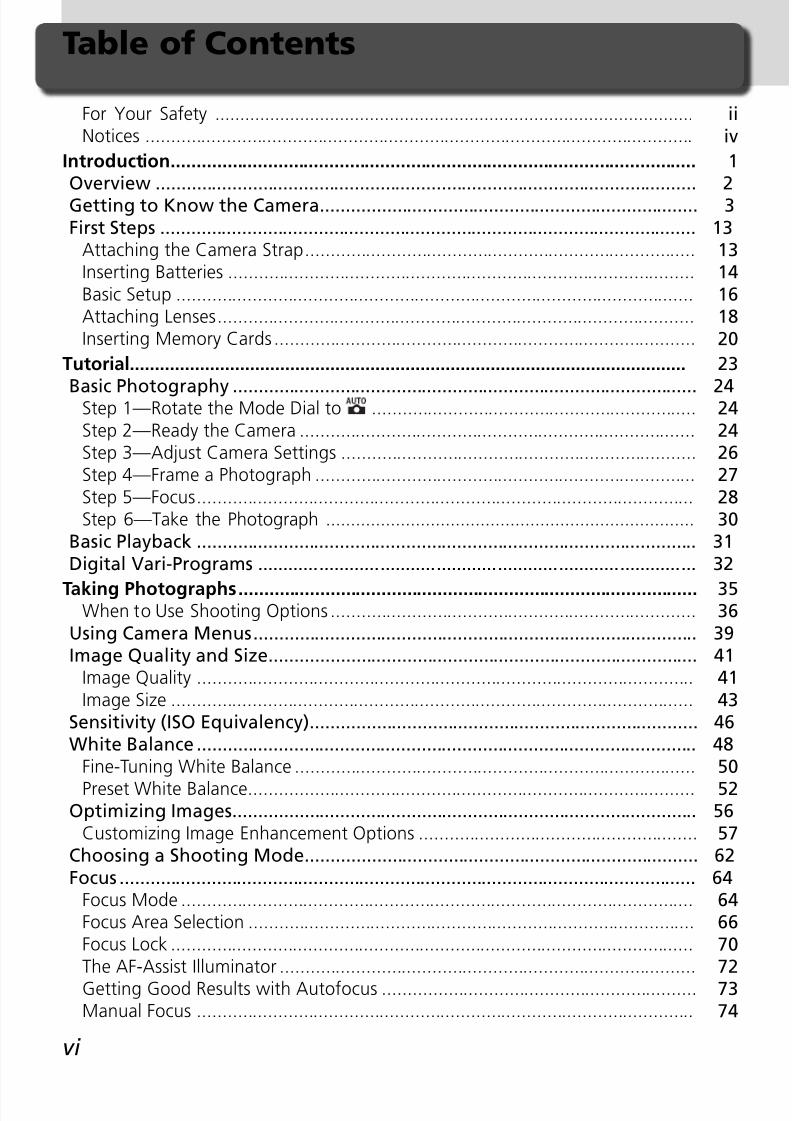
Table of Contents
For Your Safety ................................................................................................ iiNotices ............................................................................................................ iv
Introduction....................................................................................................... 1Overview .......................................................................................................... 2Getting to Know the Camera.......................................................................... 3First Steps ......................................................................................................... 13
Attaching the Camera Strap............................................................................. 13Inserting Batteries ............................................................................................ 14Basic Setup ...................................................................................................... 16Attaching Lenses.............................................................................................. 18Inserting Memory Cards ................................................................................... 20
Tutorial............................................................................................................... 23
Basic Photography ........................................................................................... 24Step 1—Rotate the Mode Dial to ................................................................ 24Step 2—Ready the Camera .............................................................................. 24Step 3—Adjust Camera Settings ...................................................................... 26Step 4—Frame a Photograph ........................................................................... 27Step 5—Focus.................................................................................................. 28Step 6—Take the Photograph .......................................................................... 30
Basic Playback .................................................................................................. 31Digital Vari-Programs ...................................................................................... 32
Taking Photographs.......................................................................................... 35When to Use Shooting Options ........................................................................ 36
Using Camera Menus....................................................................................... 39Image Quality and Size.................................................................................... 41
Image Quality .................................................................................................. 41Image Size ....................................................................................................... 43
Sensitivity (ISO Equivalency)............................................................................ 46White Balance .................................................................................................. 48
Fine-Tuning White Balance ............................................................................... 50
Preset White Balance........................................................................................ 52Optimizing Images........................................................................................... 56
Customizing Image Enhancement Options ....................................................... 57Choosing a Shooting Mode............................................................................. 62Focus ................................................................................................................. 64
Focus Mode ..................................................................................................... 64Focus Area Selection ........................................................................................ 66Focus Lock ....................................................................................................... 70The AF-Assist Illuminator .................................................................................. 72
Getting Good Results with Autofocus .............................................................. 73Manual Focus .................................................................................................. 74
8/7/2019 ad9ec4ae0fbdbb1f44546d3a474e0e87
http://slidepdf.com/reader/full/ad9ec4ae0fbdbb1f44546d3a474e0e87 9/218
vii
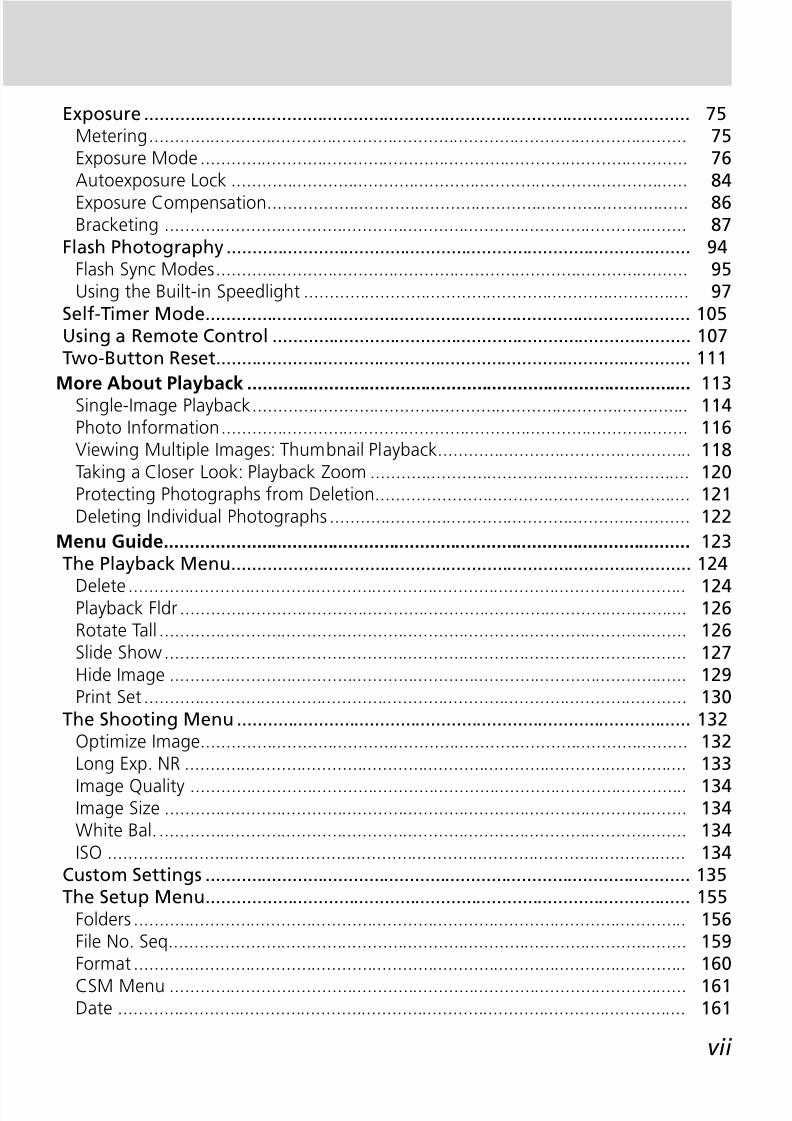
Exposure ........................................................................................................... 75Metering.......................................................................................................... 75Exposure Mode ................................................................................................ 76Autoexposure Lock .......................................................................................... 84
Exposure Compensation................................................................................... 86Bracketing ....................................................................................................... 87
Flash Photography ........................................................................................... 94Flash Sync Modes............................................................................................. 95Using the Built-in Speedlight ............................................................................ 97
Self-Timer Mode............................................................................................... 105Using a Remote Control .................................................................................. 107Two-Button Reset............................................................................................. 111
More About Playback ....................................................................................... 113Single-Image Playback...................................................................................... 114Photo Information............................................................................................ 116Viewing Multiple Images: Thumbnail Playback.................................................. 118Taking a Closer Look: Playback Zoom ............................................................... 120Protecting Photographs from Deletion.............................................................. 121Deleting Individual Photographs ....................................................................... 122
Menu Guide....................................................................................................... 123The Playback Menu.......................................................................................... 124
Delete .............................................................................................................. 124Playback Fldr .................................................................................................... 126Rotate Tall ........................................................................................................ 126Slide Show....................................................................................................... 127Hide Image ...................................................................................................... 129Print Set ........................................................................................................... 130
The Shooting Menu ......................................................................................... 132Optimize Image................................................................................................ 132Long Exp. NR ................................................................................................... 133
Image Quality .................................................................................................. 134Image Size ....................................................................................................... 134White Bal. ........................................................................................................ 134ISO .................................................................................................................. 134
Custom Settings ............................................................................................... 135The Setup Menu............................................................................................... 155
Folders ............................................................................................................. 156File No. Seq...................................................................................................... 159Format ............................................................................................................. 160
CSM Menu ...................................................................................................... 161Date ................................................................................................................ 161
8/7/2019 ad9ec4ae0fbdbb1f44546d3a474e0e87
http://slidepdf.com/reader/full/ad9ec4ae0fbdbb1f44546d3a474e0e87 10/218
viii
LCD Brightness ................................................................................................ 161Mirror Lock-Up................................................................................................. 162Video Mode..................................................................................................... 162Language......................................................................................................... 163
Image Comment .............................................................................................. 163USB ................................................................................................................. 165Dust Ref Photo................................................................................................. 166Firmware Ver. ................................................................................................... 167Image Rotation ................................................................................................ 168
Connections....................................................................................................... 169Television Playback .......................................................................................... 170Connecting to a Computer.............................................................................. 171
Printing Photographs........................................................................................ 175Technical Notes.................................................................................................. 181Camera Settings ............................................................................................... 182Optional Accessories........................................................................................ 183
Lenses for the D70........................................................................................... 183Optional Speedlights ........................................................................................ 186Other Accessories............................................................................................. 190
Caring for the Camera..................................................................................... 193Troubleshooting............................................................................................... 198
Specifi cations ................................................................................................... 201Index .................................................................................................................. 206
8/7/2019 ad9ec4ae0fbdbb1f44546d3a474e0e87
http://slidepdf.com/reader/full/ad9ec4ae0fbdbb1f44546d3a474e0e87 11/218
1
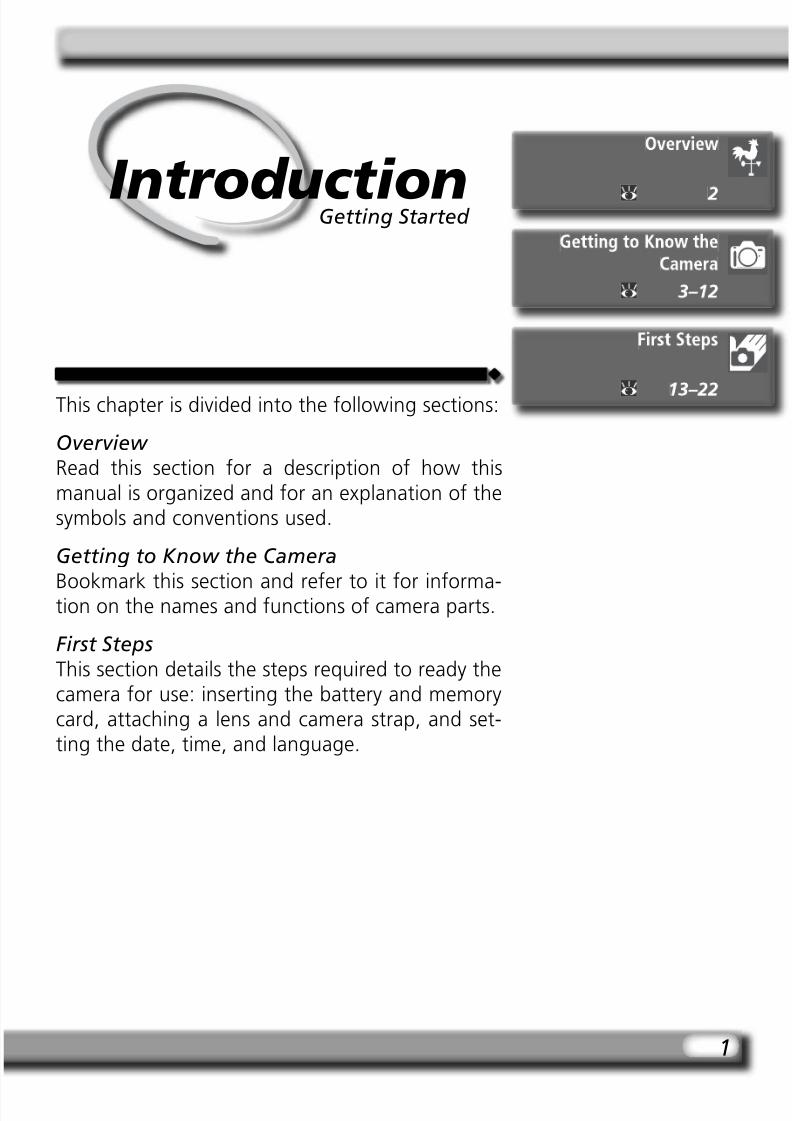
This chapter is divided into the following sections:
Overview Read this section for a description of how thismanual is organized and for an explanation of thesymbols and conventions used.
Getting to Know the Camera
Bookmark this section and refer to it for informa-tion on the names and functions of camera parts.
First StepsThis section details the steps required to ready thecamera for use: inserting the battery and memorycard, attaching a lens and camera strap, and set-ting the date, time, and language.
IntroductionGetting Started
8/7/2019 ad9ec4ae0fbdbb1f44546d3a474e0e87
http://slidepdf.com/reader/full/ad9ec4ae0fbdbb1f44546d3a474e0e87 12/218
2
I nt r od uc t i on—Over vi ew
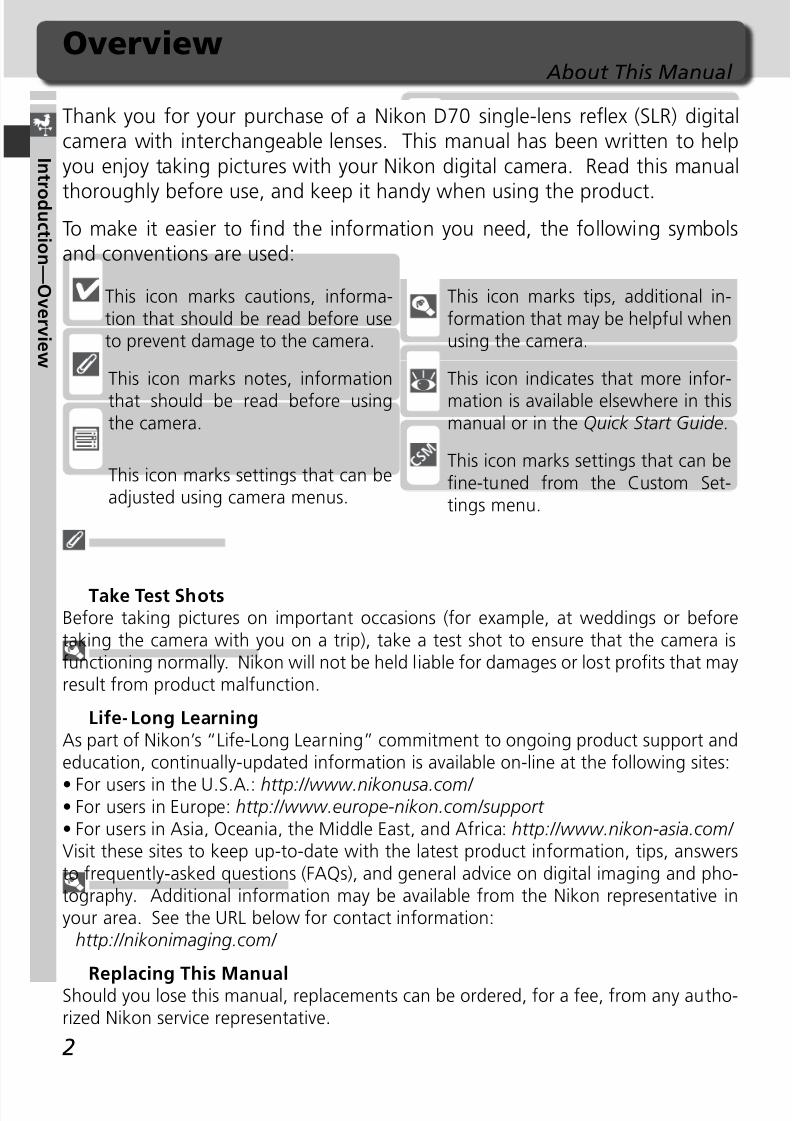
This icon marks settings that can befi ne-tuned from the Custom Set- tings menu.
This icon marks settings that can beadjusted using camera menus.
OverviewAbout This Manual
Take Test ShotsBefore taking pictures on important occasions (for example, at weddings or beforetaking the camera with you on a trip), take a test shot to ensure that the camera isfunctioning normally. Nikon will not be held liable for damages or lost profi ts that mayresult from product malfunction.
Life-Long LearningAs part of Nikon’s “Life-Long Learning” commitment to ongoing product support andeducation, continually-updated information is available on-line at the following sites:
• For users in the U.S.A.: http://www.nikonusa.com/ • For users in Europe: http://www.europe-nikon.com/support • For users in Asia, Oceania, the Middle East, and Africa: http://www.nikon-asia.com/ Visit these sites to keep up-to-date with the latest product information, tips, answersto frequently-asked questions (FAQs), and general advice on digital imaging and pho- tography. Additional information may be available from the Nikon representative inyour area. See the URL below for contact information: http://nikonimaging.com/
Replacing This ManualShould you lose this manual, replacements can be ordered, for a fee, from any autho-rized Nikon service representative.
Thank you for your purchase of a Nikon D70 single-lens refl ex (SLR) digitalcamera with interchangeable lenses. This manual has been written to helpyou enjoy taking pictures with your Nikon digital camera. Read this manual
thoroughly before use, and keep it handy when using the product.To make it easier to fi nd the information you need, the following symbolsand conventions are used:
This icon marks cautions, informa-tion that should be read before useto prevent damage to the camera.
This icon marks tips, additional in-formation that may be helpful whenusing the camera.
This icon marks notes, informationthat should be read before usingthe camera.
This icon indicates that more infor-mation is available elsewhere in thismanual or in the Quick Start Guide.
8/7/2019 ad9ec4ae0fbdbb1f44546d3a474e0e87
http://slidepdf.com/reader/full/ad9ec4ae0fbdbb1f44546d3a474e0e87 13/218
3
I nt r od uc t i on—Get t i ng t o K now t h e C amer a
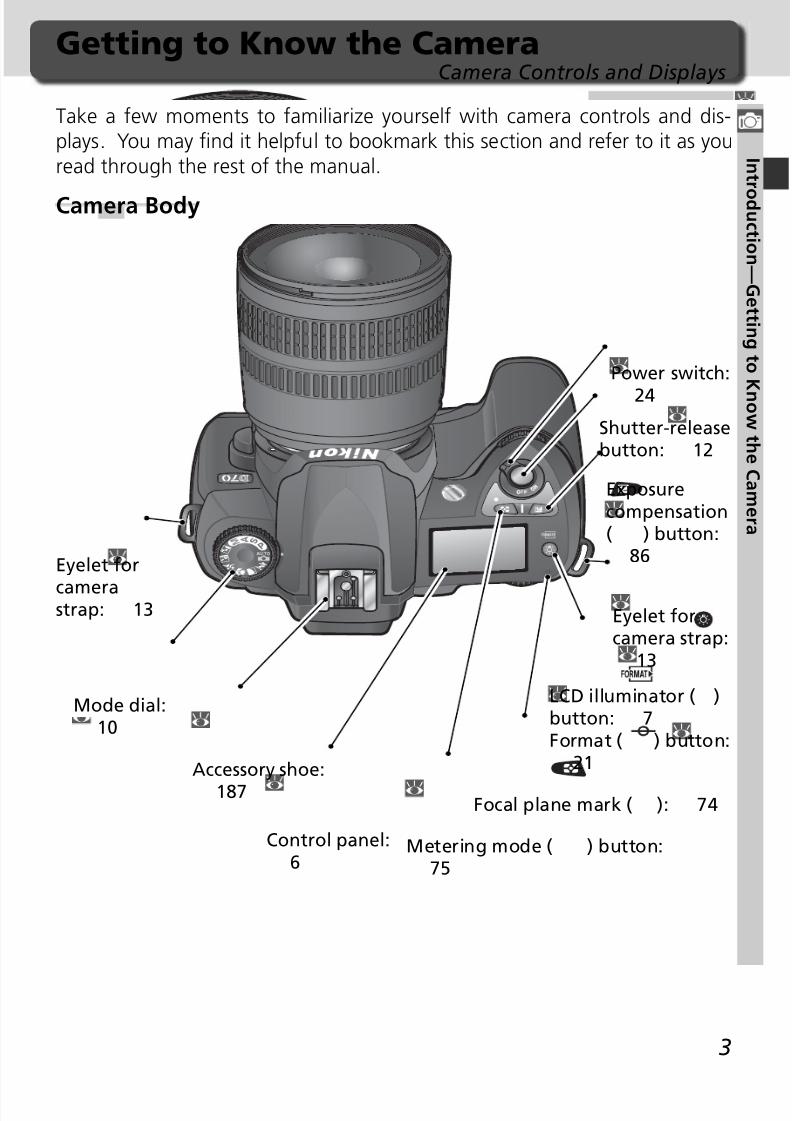
Eyelet for
camerastrap: 13
Mode dial:10
Accessory shoe:
187
LCD illuminator ( )button: 7Format ( ) button:
21
Exposurecompensation( ) button:
86
Shutter-releasebutton: 12
Power switch:
24
Control panel:6
Focal plane mark ( ): 74
Eyelet forcamera strap:
13
Metering mode ( ) button:75
Take a few moments to familiarize yourself with camera controls and dis-plays. You may fi nd it helpful to bookmark this section and refer to it as youread through the rest of the manual.
Camera Body
Getting to Know the CameraCamera Controls and Displays
8/7/2019 ad9ec4ae0fbdbb1f44546d3a474e0e87
http://slidepdf.com/reader/full/ad9ec4ae0fbdbb1f44546d3a474e0e87 14/218
4
I nt r od uc t i on—Get t i ng t o K now t h e C amer a
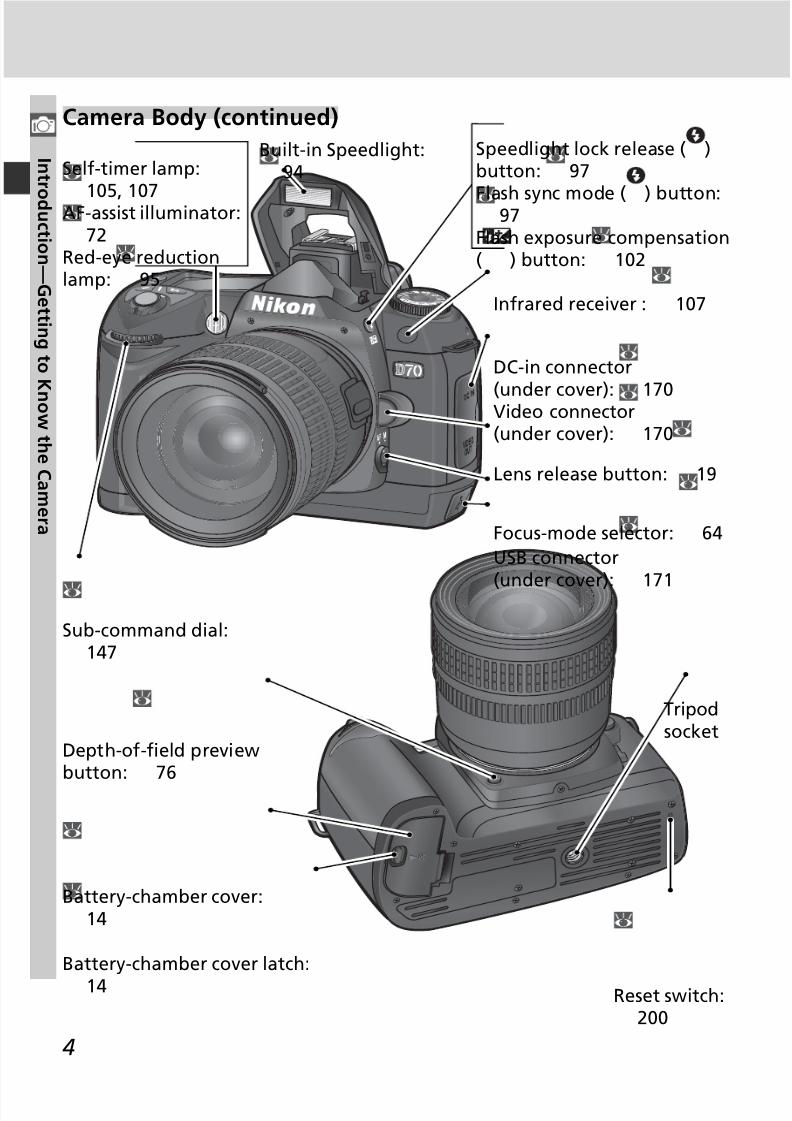
Camera Body (continued)
Depth-of-fi eld previewbutton: 76
Tripodsocket
Battery-chamber cover:14
Battery-chamber cover latch:
14 Reset switch:200
Lens release button: 19
DC-in connector
(under cover): 170Video connector(under cover): 170
Speedlight lock release ( )button: 97
Flash sync mode ( ) button:97
Flash exposure compensation( ) button: 102
Self-timer lamp:
105, 107AF-assist illuminator:72
Red-eye reductionlamp: 95
Sub-command dial:147
Built-in Speedlight:94
USB connector
(under cover): 171
Focus-mode selector: 64
Infrared receiver : 107
8/7/2019 ad9ec4ae0fbdbb1f44546d3a474e0e87
http://slidepdf.com/reader/full/ad9ec4ae0fbdbb1f44546d3a474e0e87 15/218
5
I nt r od uc t i on—Get t i ng t o K now t h e C amer a
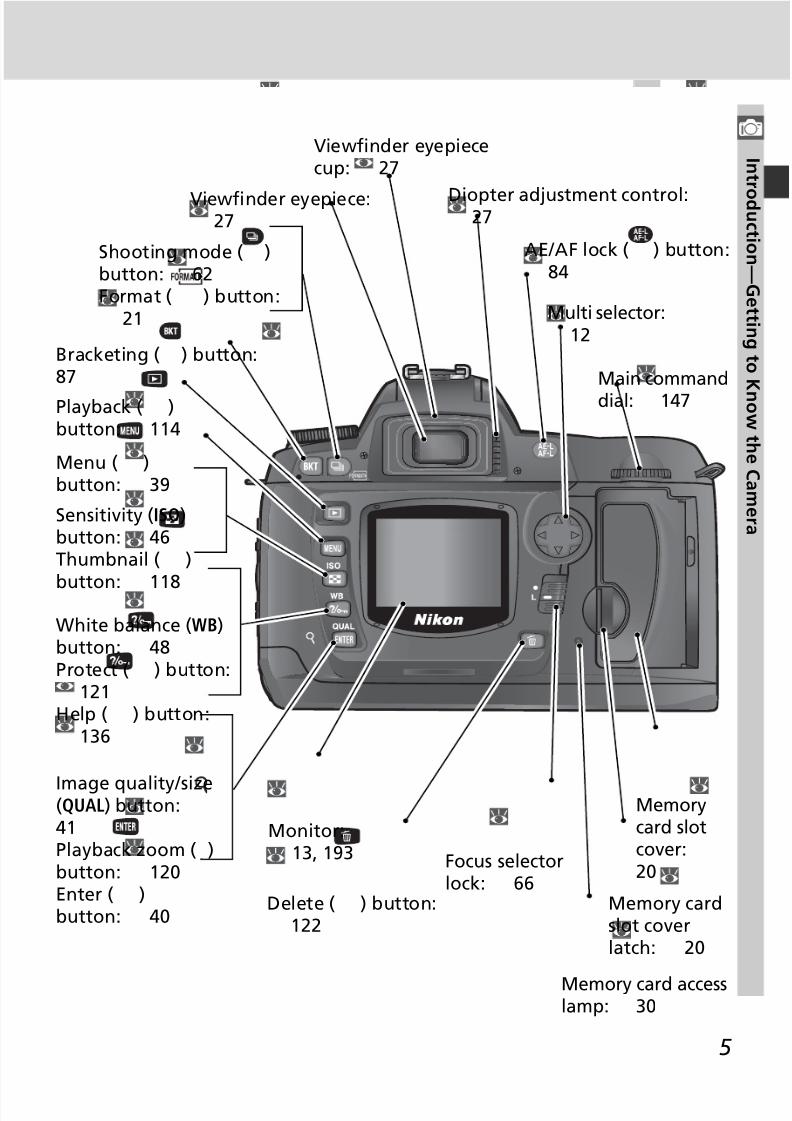
Viewfi nder eyepiece:27
Bracketing ( ) button:87
Playback ( )button: 114
Menu ( )button: 39
Monitor:13, 193
Viewfi nder eyepiececup: 27
Delete ( ) button:122
Focus selectorlock: 66
Memory cardslot coverlatch: 20
Multi selector:12
Main commanddial: 147
AE / AF lock ( ) button:84
Memorycard slotcover:20
Memory card accesslamp: 30
Diopter adjustment control:27
Image quality / size(QUAL) button:41Playback zoom ( )button: 120Enter ( )button: 40
Sensitivity (ISO)button: 46Thumbnail ( )
button: 118
White balance (WB)button: 48Protect ( ) button:
121Help ( ) button:
136
Shooting mode ( )button: 62Format ( ) button:
21
8/7/2019 ad9ec4ae0fbdbb1f44546d3a474e0e87
http://slidepdf.com/reader/full/ad9ec4ae0fbdbb1f44546d3a474e0e87 16/218
6
I nt r od uc t i on—Get t i ng t o K now t h e C amer a
Control Panel
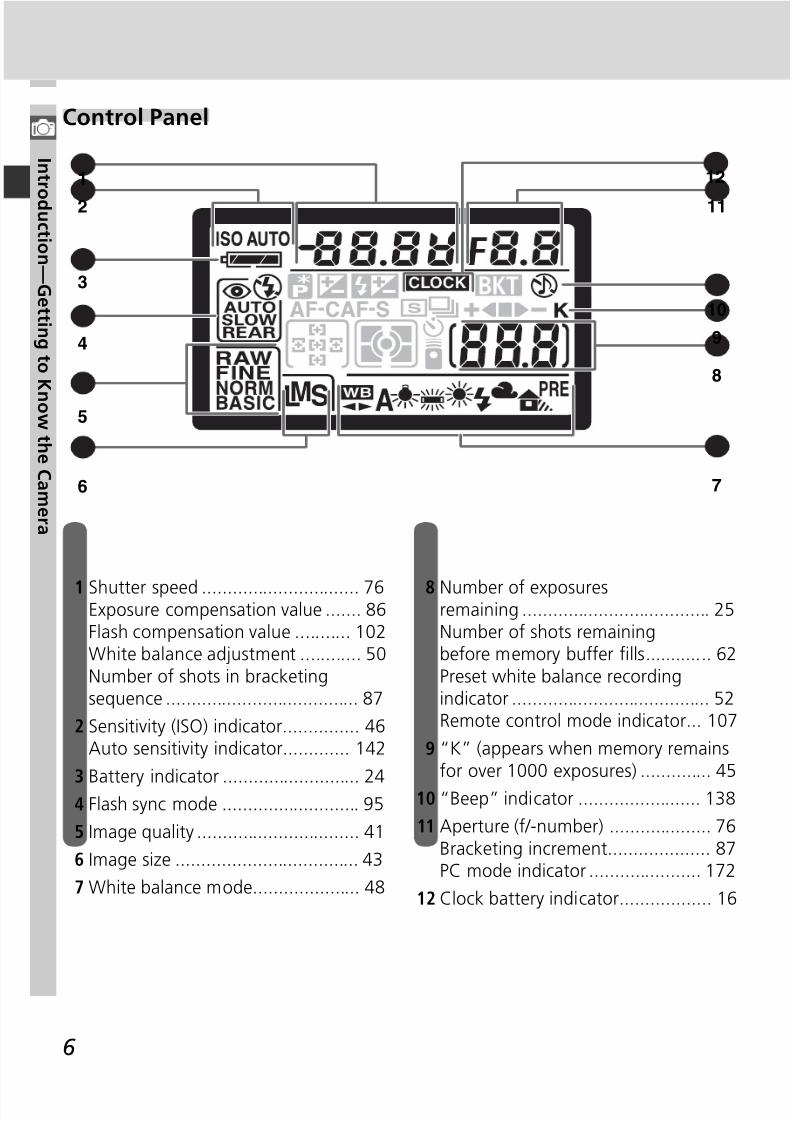
1 Shutter speed ............................... 76Exposure compensation value ....... 86Flash compensation value ........... 102White balance adjustment ............ 50Number of shots in bracketingsequence ...................................... 87
2 Sensitivity (ISO) indicator............... 46Auto sensitivity indicator............. 142
3 Battery indicator ........................... 244 Flash sync mode ........................... 95
5 Image quality ................................ 41
6 Image size .................................... 43
7 White balance mode..................... 48
8 Number of exposuresremaining ..................................... 25Number of shots remainingbefore memory buffer fi lls............. 62Preset white balance recordingindicator ....................................... 52Remote control mode indicator... 107
9 “K” (appears when memory remainsfor over 1000 exposures) .............. 45
10 “Beep” indicator ........................ 138
11 Aperture (f/-number) .................... 76Bracketing increment.................... 87PC mode indicator ...................... 172
12 Clock battery indicator.................. 16
1
2
3
4
5
6 7
8
11
12
10
9

8/7/2019 ad9ec4ae0fbdbb1f44546d3a474e0e87
http://slidepdf.com/reader/full/ad9ec4ae0fbdbb1f44546d3a474e0e87 17/218
7
I nt r od uc t i on—Get t i ng t o K now t h e C amer a
13 Flash compensation indicator...... 10214 Exposure compensation indicator.. 86
15 Flexible program indicator............. 77
16 Autofocus mode......................... 139
17 Focus area .................................... 66AF-area mode ............................. 140
18 Metering mode............................. 7519 Self-timer indicator ..................... 105
Remote control indicator ............ 107
20 Bracketing progress indicator ........ 87
21 Bracketing indicator...................... 87
22 Shooting mode ............................. 62
19
22
21
20
13
14
15
16
17
18
LCD IlluminatorPressing the button activates the control panel backlight (LCD illuminator), allowingthe display to be read in the dark.

8/7/2019 ad9ec4ae0fbdbb1f44546d3a474e0e87
http://slidepdf.com/reader/full/ad9ec4ae0fbdbb1f44546d3a474e0e87 18/218
8
I nt r od uc t i on—Get t i ng t o K now t h e C amer a
The Viewfi nder Display
Advanced Focusing Screen Display
When the background is bright, the active focus area ( 66) is highlighted in black.When the background is dark, the active focus area is highlighted briefl y in red asneeded to establish contrast with the background (“Vari-Brite” focus areas), makingit easier to identify the selected focus area. The viewfi nder is also equipped with on-demand grid lines. When On is selected for Custom Setting 8 (Grid display; 144),a reference grid is superimposed over the display in the viewfi nder. This grid is a usefulaid when composing landscape shots or when tilting or shifting a PC Nikkor lens.
Owing to the characteristics of this type of viewfi nder display, you may notice fi ne lines
radiating outwards from the selected focus area, or that the display in the viewfi nderturns red when the selected focus area is highlighted. These phenomena are normaland do not indicate a malfunction.
1
2
3
2
4 5 6 7 8 9 10 11 12
13 14 15 16
8/7/2019 ad9ec4ae0fbdbb1f44546d3a474e0e87
http://slidepdf.com/reader/full/ad9ec4ae0fbdbb1f44546d3a474e0e87 19/218
9
I nt r od uc t i on—Get t i ng t o K now t h e C amer a
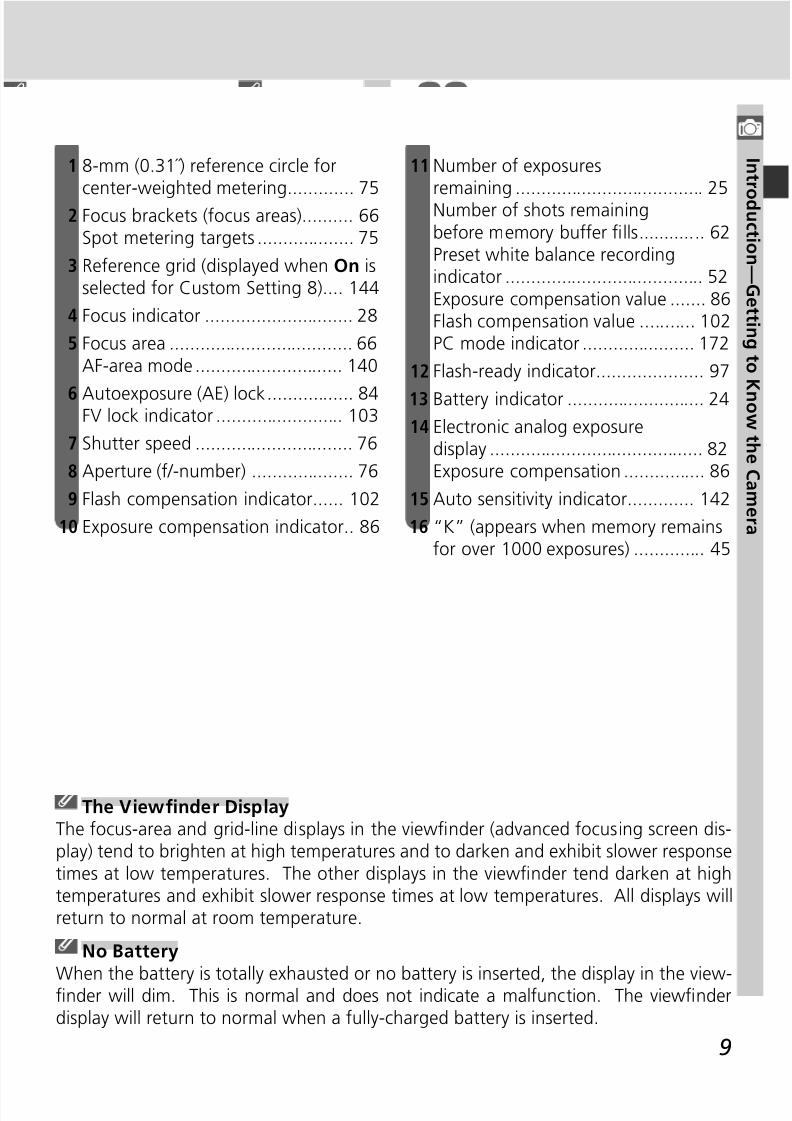
1 8-mm (0.31˝) reference circle for
center-weighted metering............. 752 Focus brackets (focus areas).......... 66
Spot metering targets ................... 75
3 Reference grid (displayed when On isselected for Custom Setting 8).... 144
4 Focus indicator ............................. 28
5 Focus area .................................... 66AF-area mode ............................. 140
6 Autoexposure (AE) lock................. 84FV lock indicator ......................... 103
7 Shutter speed ............................... 76
8 Aperture (f/-number) .................... 76
9 Flash compensation indicator...... 102
10 Exposure compensation indicator.. 86
11 Number of exposures
remaining ..................................... 25Number of shots remainingbefore memory buffer fi lls............. 62Preset white balance recordingindicator ....................................... 52Exposure compensation value ....... 86Flash compensation value ........... 102PC mode indicator ...................... 172
12 Flash-ready indicator..................... 97
13 Battery indicator ........................... 24
14 Electronic analog exposuredisplay .......................................... 82Exposure compensation ................ 86
15 Auto sensitivity indicator............. 142
16 “K” (appears when memory remainsfor over 1000 exposures) .............. 45
The Viewfi nder DisplayThe focus-area and grid-line displays in the viewfi nder (advanced focusing screen dis-play) tend to brighten at high temperatures and to darken and exhibit slower responsetimes at low temperatures. The other displays in the viewfi nder tend darken at hightemperatures and exhibit slower response times at low temperatures. All displays willreturn to normal at room temperature.
No Battery
When the battery is totally exhausted or no battery is inserted, the display in the view-fi nder will dim. This is normal and does not indicate a malfunction. The viewfi nderdisplay will return to normal when a fully-charged battery is inserted.
8/7/2019 ad9ec4ae0fbdbb1f44546d3a474e0e87
http://slidepdf.com/reader/full/ad9ec4ae0fbdbb1f44546d3a474e0e87 20/218
10
I nt r od uc t i on—Get t i ng t o K now t h e C amer a
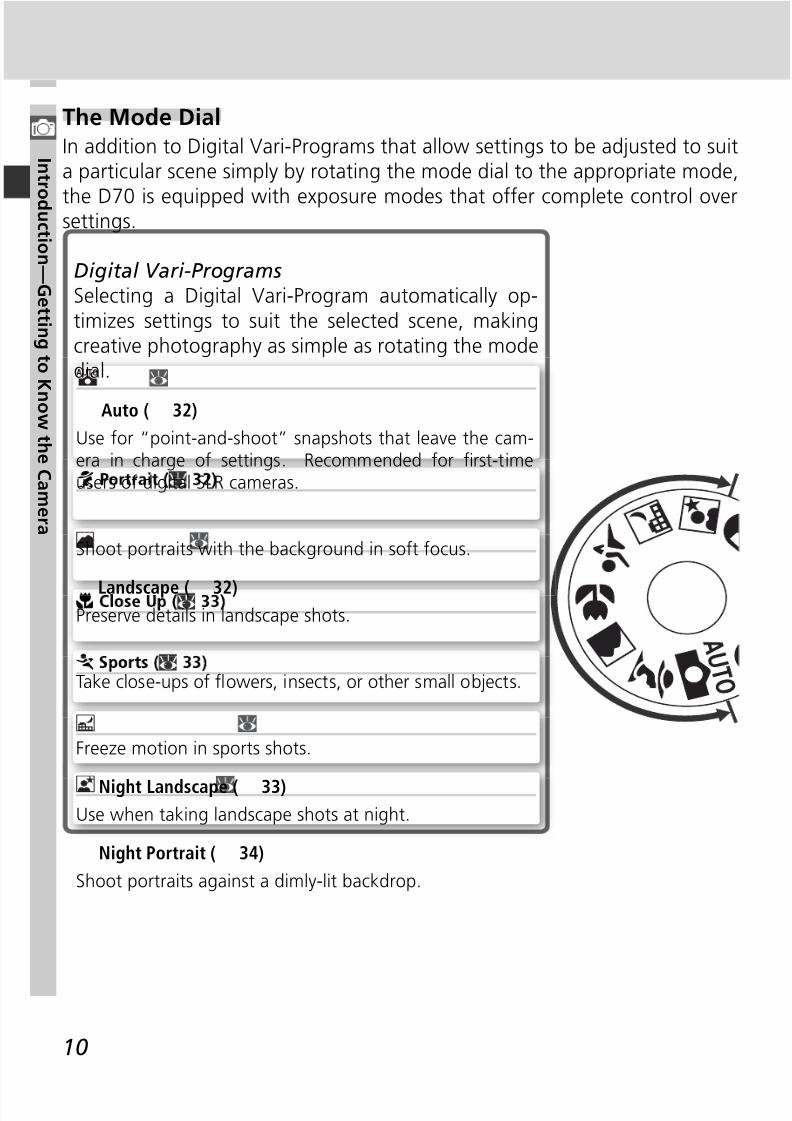
The Mode DialIn addition to Digital Vari-Programs that allow settings to be adjusted to suita particular scene simply by rotating the mode dial to the appropriate mode,
the D70 is equipped with exposure modes that offer complete control oversettings.
Digital Vari-ProgramsSelecting a Digital Vari-Program automatically op-timizes settings to suit the selected scene, makingcreative photography as simple as rotating the modedial.
Freeze motion in sports shots.
Take close-ups of fl owers, insects, or other small objects.
Shoot portraits with the background in soft focus.
Auto ( 32)
Use for “point-and-shoot” snapshots that leave the cam-era in charge of settings. Recommended for fi rst-timeusers of digital SLR cameras.
Night Landscape ( 33)Use when taking landscape shots at night.
Night Portrait ( 34)
Shoot portraits against a dimly-lit backdrop.
Landscape ( 32)Preserve details in landscape shots.

8/7/2019 ad9ec4ae0fbdbb1f44546d3a474e0e87
http://slidepdf.com/reader/full/ad9ec4ae0fbdbb1f44546d3a474e0e87 21/218
11
I nt r od uc t i on—Get t i ng t o K now t h e C amer a
Exposure ModesSelect these modes for full control over camera set-
tings, including shutter speed and aperture, fl ashmode, and camera menus.
P Auto Multi Program ( 77)
Let the camera optimize exposure to suit the subject. Usefl exible program to control shutter speed and aperture (77), or adjust exposure with exposure compensation (86).
Adjust aperture to soften background details, or increasedepth of fi eld to bring both the main subject and the back-ground into focus.
S Shutter-Priority Auto ( 79)Choose fast shutter speeds to freeze action, slow shutterspeeds to suggest motion by blurring moving objects.
M Manual ( 82)Match shutter speed and aperture to your creative intent.

8/7/2019 ad9ec4ae0fbdbb1f44546d3a474e0e87
http://slidepdf.com/reader/full/ad9ec4ae0fbdbb1f44546d3a474e0e87 22/218
12
I nt r od uc t i on—Get t i ng t o K now t h e C amer a
The Multi SelectorThe button can also be used to select items highlighted in the camera menus.There may be some cases in which the operations listed on this page do not apply.
Auto Meter OffAt default settings, the camera continues to meter exposure for six seconds after youremove your fi nger from the shutter-release button. The shutter speed and apertureindicators in the control panel and all indicators in the viewfi nder then turn off to savepower (auto meter off). The length of the auto meter off delay can be adjusted usingCustom Setting 23 (Meter-off; 153).
Navigating the MenusThe multi selector is used to navigate through the camera menus.
Cancel and returnto previous menu,or move cursor left
Display sub-menu,move cursor right,or make selection.
Move cursor up
Move cursor down
The Shutter-Release ButtonThe camera has a two stage shutter-release button. The camera sets focusand exposure when the button is pressed halfway. To take the picture, pressthe shutter-release button the rest of the way down.
8/7/2019 ad9ec4ae0fbdbb1f44546d3a474e0e87
http://slidepdf.com/reader/full/ad9ec4ae0fbdbb1f44546d3a474e0e87 23/218
13
I nt r od uc t i on—F i r s t S t eps
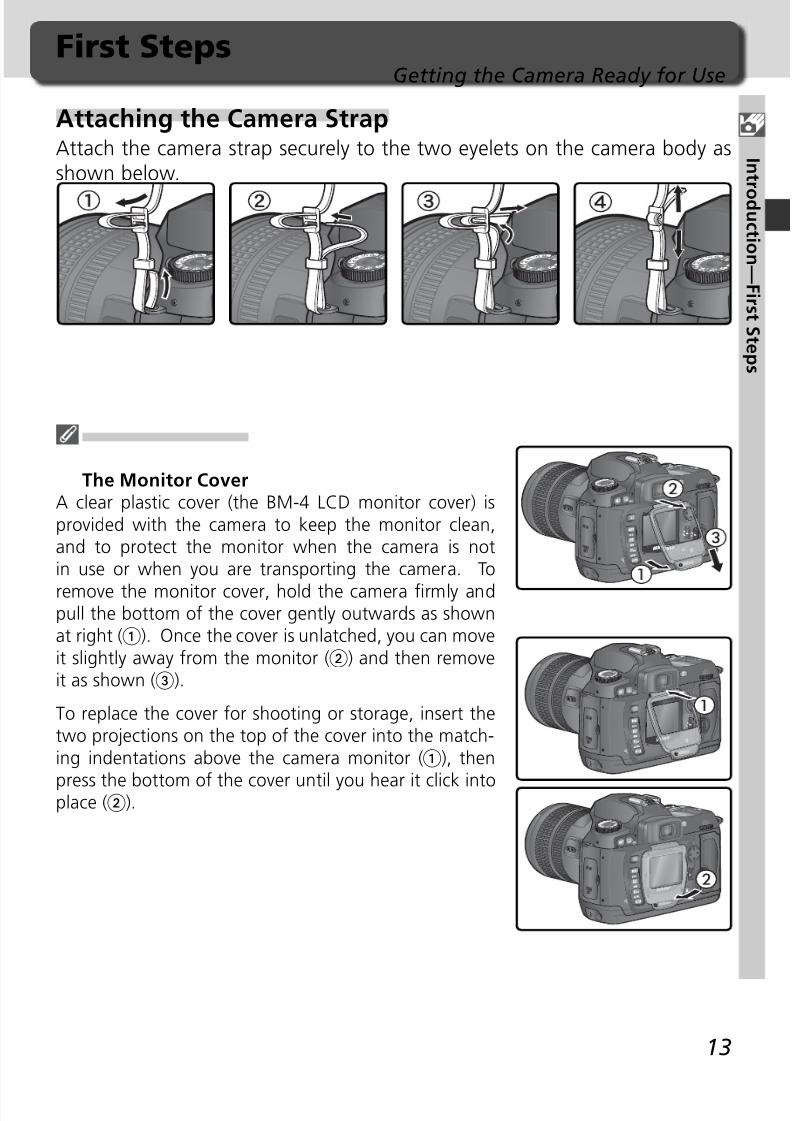
The Monitor CoverA clear plastic cover (the BM-4 LCD monitor cover) isprovided with the camera to keep the monitor clean,and to protect the monitor when the camera is notin use or when you are transporting the camera. To
remove the monitor cover, hold the camera fi rmly andpull the bottom of the cover gently outwards as shownat right (). Once the cover is unlatched, you can moveit slightly away from the monitor () and then removeit as shown ().
To replace the cover for shooting or storage, insert thetwo projections on the top of the cover into the match- ing indentations above the camera monitor (), then
press the bottom of the cover until you hear it click intoplace ().
First StepsGetting the Camera Ready for Use
Attaching the Camera StrapAttach the camera strap securely to the two eyelets on the camera body asshown below.
8/7/2019 ad9ec4ae0fbdbb1f44546d3a474e0e87
http://slidepdf.com/reader/full/ad9ec4ae0fbdbb1f44546d3a474e0e87 24/218
14
I nt r od uc t i on—F i r s t S t eps
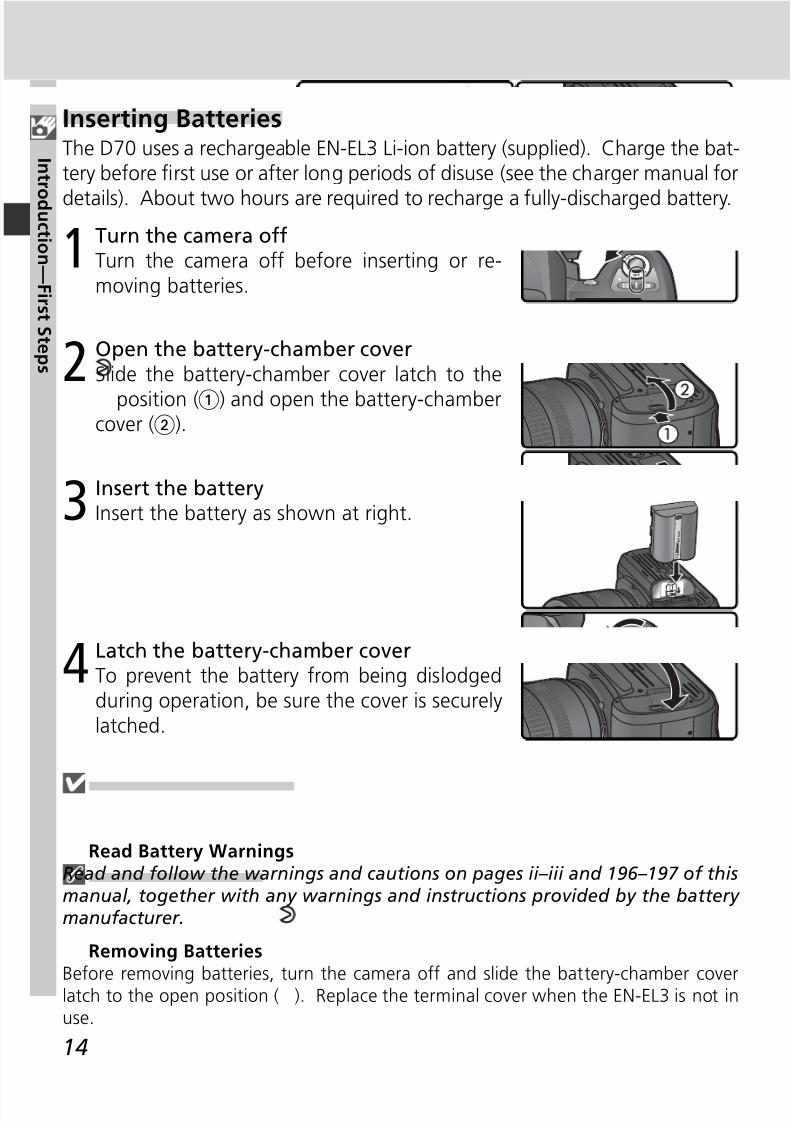
Inserting BatteriesThe D70 uses a rechargeable EN-EL3 Li-ion battery (supplied). Charge the bat-tery before fi rst use or after long periods of disuse (see the charger manual for
details). About two hours are required to recharge a fully-discharged battery.
1 Turn the camera offTurn the camera off before inserting or re- moving batteries.
2 Open the battery-chamber coverSlide the battery-chamber cover latch to the
position () and open the battery-chambercover ().
3 Insert the batteryInsert the battery as shown at right.
Li-i o
nB
ATT
ERY
PAC
K
4 Latch the battery-chamber coverTo prevent the battery from being dislodgedduring operation, be sure the cover is securelylatched.
Read Battery WarningsRead and follow the warnings and cautions on pages ii–iii and 196–197 of thismanual, together with any warnings and instructions provided by the battery manufacturer.
Removing Batteries
Before removing batteries, turn the camera off and slide the battery-chamber coverlatch to the open position ( ). Replace the terminal cover when the EN-EL3 is not inuse.
8/7/2019 ad9ec4ae0fbdbb1f44546d3a474e0e87
http://slidepdf.com/reader/full/ad9ec4ae0fbdbb1f44546d3a474e0e87 25/218
15
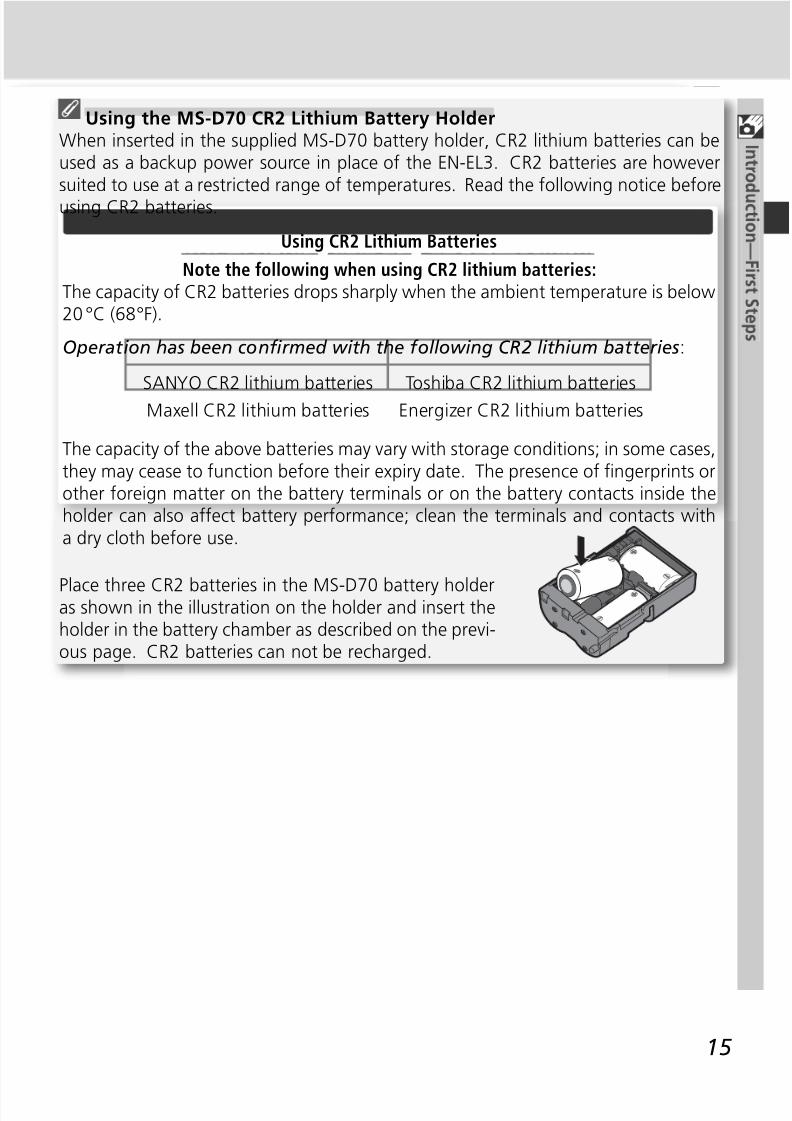
Using the MS-D70 CR2 Lithium Battery HolderWhen inserted in the supplied MS-D70 battery holder, CR2 lithium batteries can beused as a backup power source in place of the EN-EL3. CR2 batteries are howeversuited to use at a restricted range of temperatures. Read the following notice beforeusing CR2 batteries.
Using CR2 Lithium Batteries
Note the following when using CR2 lithium batteries:Note the following when using CR2 lithium batteries:The capacity of CR2 batteries drops sharply when the ambient temperature is below20 °C (68 °F).
Operation has been confi rmed with the following CR2 lithium batteries:
SANYO CR2 lithium batteries Toshiba CR2 lithium batteriesMaxell CR2 lithium batteries Energizer CR2 lithium batteries
The capacity of the above batteries may vary with storage conditions; in some cases,they may cease to function before their expiry date. The presence of fi ngerprints orother foreign matter on the battery terminals or on the battery contacts inside theholder can also affect battery performance; clean the terminals and contacts witha dry cloth before use.
Place three CR2 batteries in the MS-D70 battery holderas shown in the illustration on the holder and insert theholder in the battery chamber as described on the previ-ous page. CR2 batteries can not be recharged.
8/7/2019 ad9ec4ae0fbdbb1f44546d3a474e0e87
http://slidepdf.com/reader/full/ad9ec4ae0fbdbb1f44546d3a474e0e87 26/218
16
I nt r od uc t i on—F i r s t S t eps
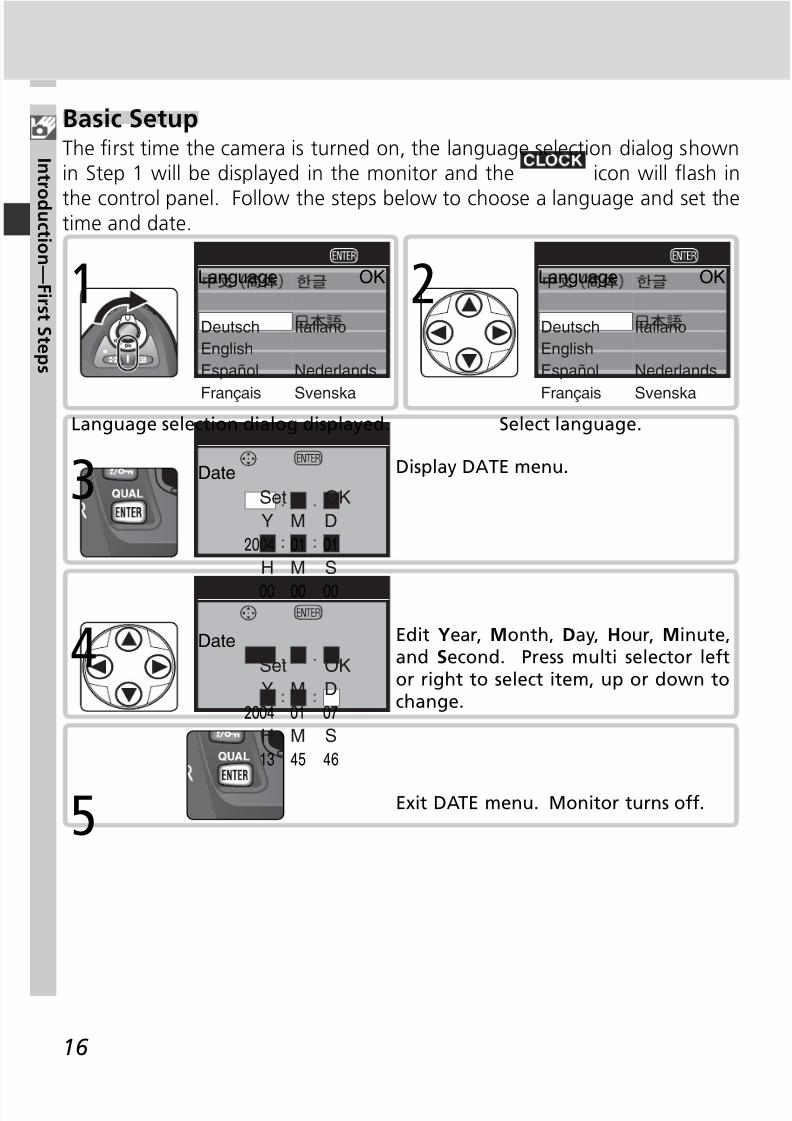
Basic SetupThe fi rst time the camera is turned on, the language selection dialog shownin Step 1 will be displayed in the monitor and the icon will fl ash in
the control panel. Follow the steps below to choose a language and set thetime and date.
Language selection dialog displayed.
1 Language OK
Español
Français
English
Deutsch
Nederlands
Svenska
Italiano
Select language.
2 Language OK
Español
Français
English
Deutsch
Nederlands
Svenska
Italiano
Display DATE menu.Date
Set
Y M D
H M S
2004 01 01
00 0000
OK3
Edit Year, Month, Day, Hour, Minute,and Second. Press multi selector leftor right to select item, up or down tochange.
Date
Set
Y M D
H M S
2004 01 07
45 4613
OK4
Exit DATE menu. Monitor turns off.
5
8/7/2019 ad9ec4ae0fbdbb1f44546d3a474e0e87
http://slidepdf.com/reader/full/ad9ec4ae0fbdbb1f44546d3a474e0e87 27/218
17
I nt r od uc t i on—F i r s t S t eps
Basic SetupIf the button is not pressed at the completion of basic setup, the language selectiondialog will be displayed the next time the camera is turned on. Until setup is complete,the icon will continue to fl ash, and no photographs can be taken nor other
operations performed.
The Clock BatteryThe clock-calendar is powered by an independent, rechargeable power source, whichis charged as necessary when the main batteries are installed or the camera is poweredby an optional EH-5 AC adapter. Three days of charging is suffi cient to provide aboutone month of back-up power. If the icon fl ashes in the control panel, the clockbattery is exhausted and the clock has been reset to 2004.01.01 00:00:00. Set theclock to the correct date and time as described in “The Setup Menu: Date” ( 161).
The Camera ClockThe camera clock is less accurate than most watches and household clocks. Check theclock regularly against more accurate time pieces and reset as necessary.
Language ( 163)To change the language in which camera menus and messages are displayed, use theLanguage option in the setup menu.
Date ( 161)
Use the Date option in the setup menu to change the time and date.

8/7/2019 ad9ec4ae0fbdbb1f44546d3a474e0e87
http://slidepdf.com/reader/full/ad9ec4ae0fbdbb1f44546d3a474e0e87 28/218
18
I nt r od uc t i on—F i r s t S t eps
Attaching LensesNikon recommends using a type G or type D CPU lens to take full advantageof the features the camera offers.
1Turn the camera off
Turn the camera off before attaching or re- moving lenses.
2 Attach a lensKeeping the mounting mark on the lensaligned with the mounting mark on the cam- era body, position the lens in the camera’s
bayonet mount. Being careful not to pressthe lens-release button, rotate the lens coun-ter-clockwise until it clicks into place.
3 Lock aperture at the minimum settingThis step is not necessary if you are using atype G lens not equipped with an aperturering. If you are using a lens of another type,lock aperture at the minimum setting (highest
f/-number).
If this step is omitted when attaching a CPUlens, the aperture displays in the control paneland viewfi nder will show a blinking whenthe camera is turned on. Photographs can notbe taken until the camera is turned off andaperture locked at the highest f/-number.
Type D lensType G lensCPU lenses have CPUcontacts

8/7/2019 ad9ec4ae0fbdbb1f44546d3a474e0e87
http://slidepdf.com/reader/full/ad9ec4ae0fbdbb1f44546d3a474e0e87 29/218
19
I nt r od uc t i on—F i r s t S t eps
Protect the Camera from Dirt and DustAny dust, dirt, or other foreign matter inside yourcamera could show up as specks or blotches in yourphotographs or the viewfi nder display. When no lens is
in place, keep the lens mount covered with the suppliedbody cap. When exchanging lenses or replacing thebody cap, keep the lens mount pointed down.
Detaching LensesBe sure the camera is off when removing or exchanginglenses. To remove the lens, press and hold the lens-re-lease button while turning the lens clockwise.
8/7/2019 ad9ec4ae0fbdbb1f44546d3a474e0e87
http://slidepdf.com/reader/full/ad9ec4ae0fbdbb1f44546d3a474e0e87 30/218
20
I nt r od uc t i on—F i r s t S t eps
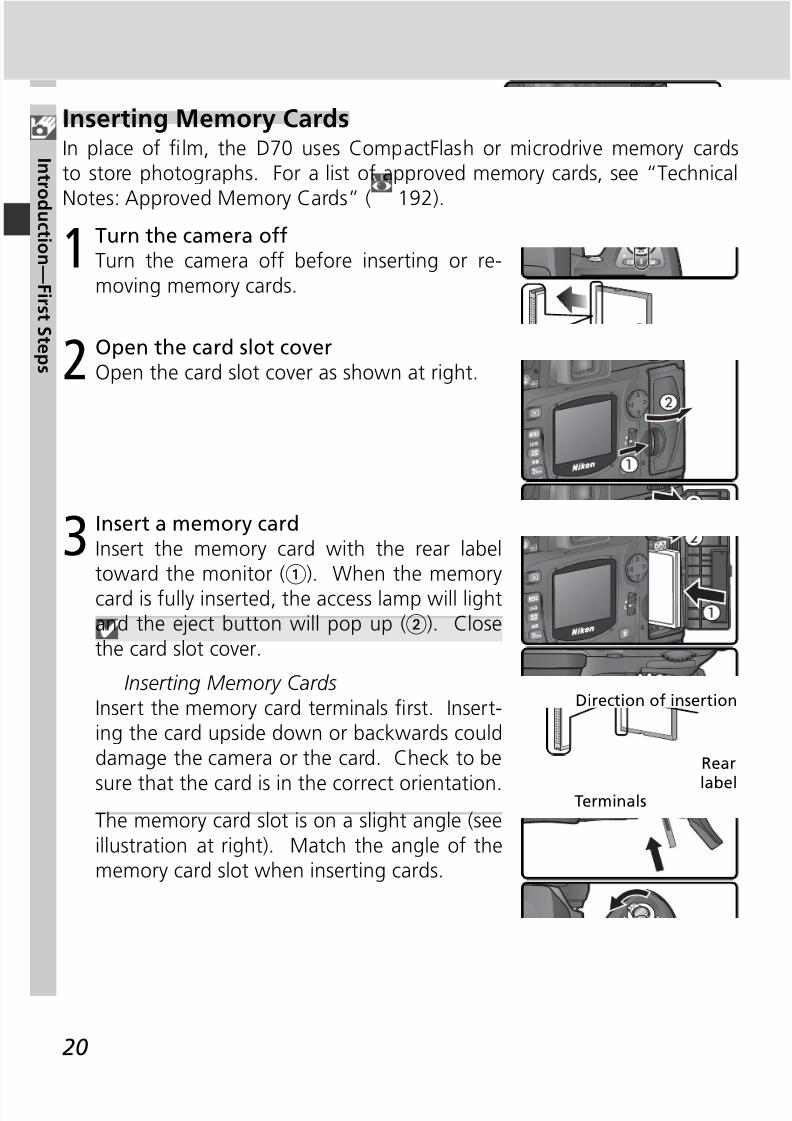
3 Insert a memory cardInsert the memory card with the rear labeltoward the monitor (). When the memorycard is fully inserted, the access lamp will lightand the eject button will pop up (). Closethe card slot cover.
Inserting Memory CardsInsert the memory card terminals fi rst. Insert-ing the card upside down or backwards coulddamage the camera or the card. Check to be
sure that the card is in the correct orientation.
The memory card slot is on a slight angle (seeillustration at right). Match the angle of thememory card slot when inserting cards.
2 Open the card slot coverOpen the card slot cover as shown at right.
Inserting Memory CardsIn place of fi lm, the D70 uses CompactFlash or microdrive memory cardsto store photographs. For a list of approved memory cards, see “Technical
Notes: Approved Memory Cards” ( 192).
1 Turn the camera offTurn the camera off before inserting or re- moving memory cards.
Direction of insertion
Rear
labelTerminals
8/7/2019 ad9ec4ae0fbdbb1f44546d3a474e0e87
http://slidepdf.com/reader/full/ad9ec4ae0fbdbb1f44546d3a474e0e87 31/218
21
I nt r od uc t i on—F i r s t S t eps
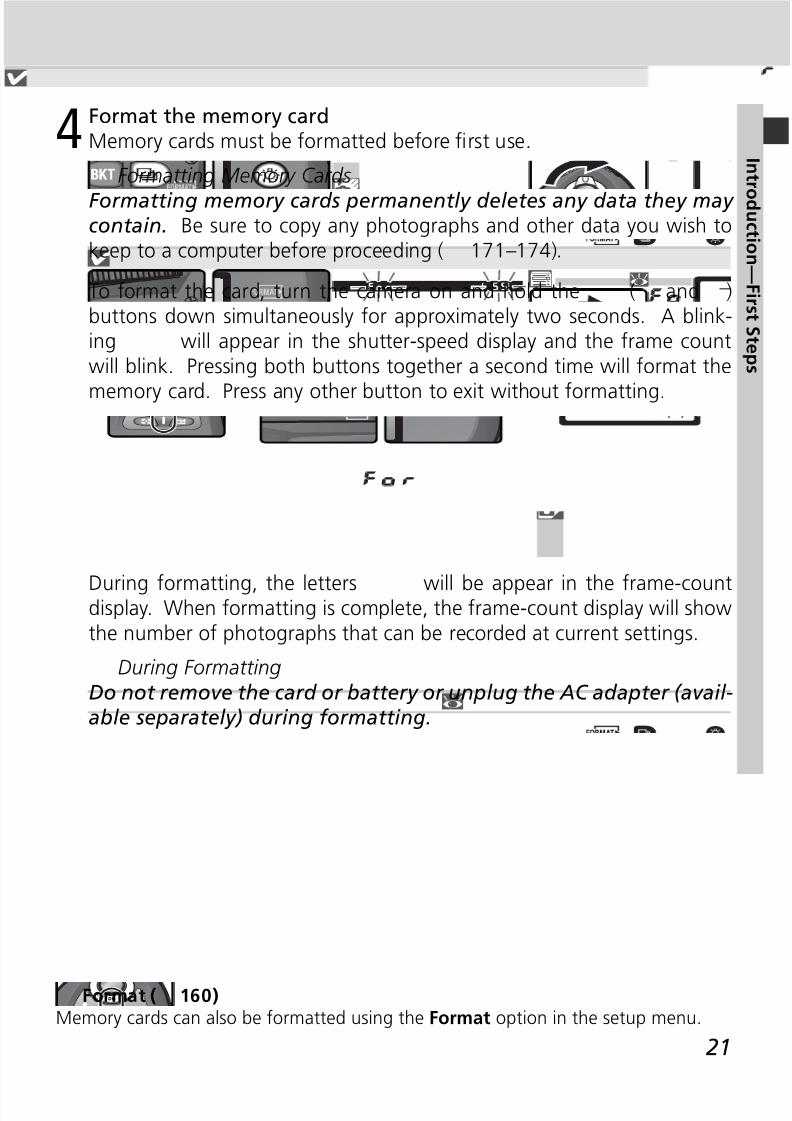
During formatting, the letters will be appear in the frame-countdisplay. When formatting is complete, the frame-count display will showthe number of photographs that can be recorded at current settings.
During FormattingDo not remove the card or battery or unplug the AC adapter (avail-able separately) during formatting.
Format ( 160)Memory cards can also be formatted using the Format option in the setup menu.
4 Format the memory cardMemory cards must be formatted before fi rst use.
Formatting Memory Cards
Formatting memory cards permanently deletes any data they may contain. Be sure to copy any photographs and other data you wish tokeep to a computer before proceeding ( 171–174).
To format the card, turn the camera on and hold the ( and )buttons down simultaneously for approximately two sec onds. A blink- ing will appear in the shutter-speed display and the frame countwill blink. Pressing both buttons together a second time will format the
memory card. Press any other button to exit without formatting.
8/7/2019 ad9ec4ae0fbdbb1f44546d3a474e0e87
http://slidepdf.com/reader/full/ad9ec4ae0fbdbb1f44546d3a474e0e87 32/218
22
I nt r od uc t i on—F i r s t S t eps
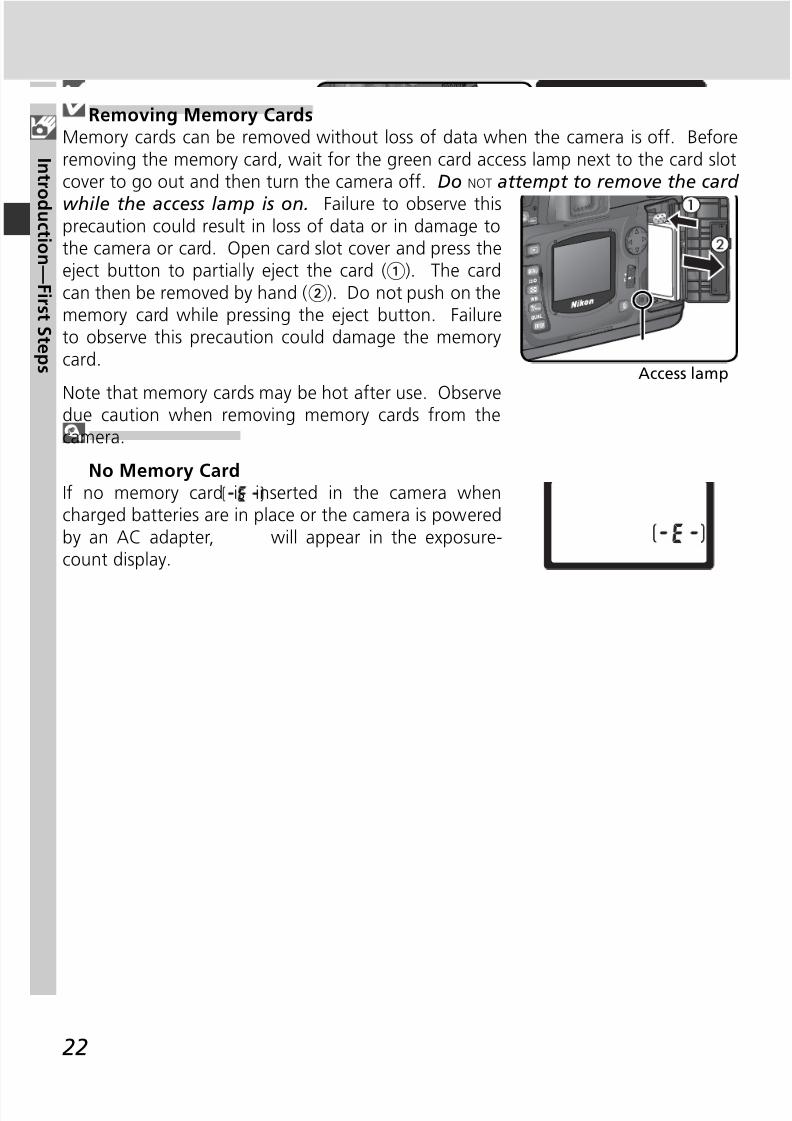
Removing Memory CardsMemory cards can be removed without loss of data when the camera is off. Beforeremoving the memory card, wait for the green card access lamp next to the card slotcover to go out and then turn the camera off. Do NOT at tempt to remove the card while the access lamp is on. Failure to observe thisprecaution could result in loss of data or in damage tothe camera or card. Open card slot cover and press theeject button to partially eject the card (). The cardcan then be removed by hand (). Do not push on thememory card while pressing the eject button. Failureto observe this precaution could damage the memorycard.
Note that memory cards may be hot after use. Observedue caution when removing memory cards from thecamera.
No Memory CardIf no memory card is inserted in the camera whencharged batteries are in place or the camera is poweredby an AC adapter, will appear in the exposure-count display .
Access lamp
8/7/2019 ad9ec4ae0fbdbb1f44546d3a474e0e87
http://slidepdf.com/reader/full/ad9ec4ae0fbdbb1f44546d3a474e0e87 33/218
23
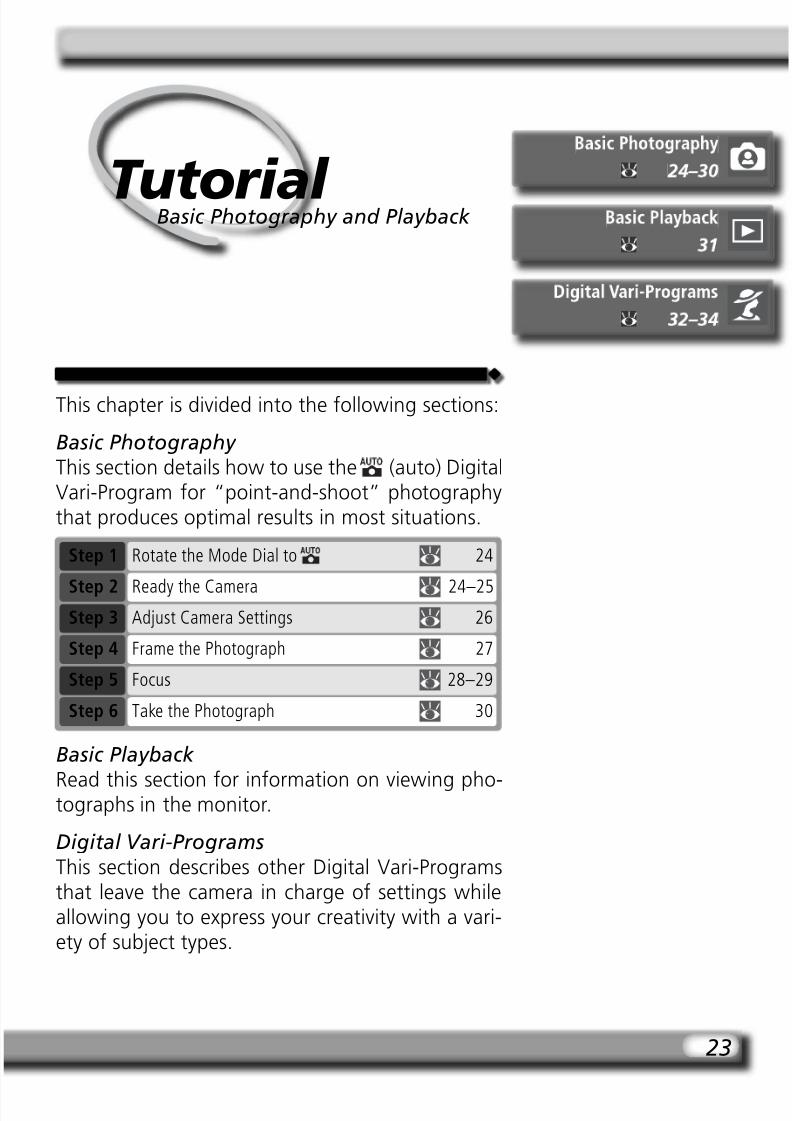
This chapter is divided into the following sections:
Basic Photography This section details how to use the (auto) DigitalVari-Program for “point-and-shoot” photographythat produces optimal results in most situations.
Tutorial Basic Photography and Playback
Basic Playback
Read this section for information on viewing pho- tographs in the monitor.
Digital Vari-ProgramsThis section describes other Digital Vari-Programsthat leave the camera in charge of settings whileallowing you to express your creativity with a vari-ety of subject types.
Rotate the Mode Dial to 24Step 1
Ready the Camera 24–25Step 2Adjust Camera Settings 26Step 3
Frame the Photograph 27Step 4
Focus 28–29Step 5
Take the Photograph 30Step 6
8/7/2019 ad9ec4ae0fbdbb1f44546d3a474e0e87
http://slidepdf.com/reader/full/ad9ec4ae0fbdbb1f44546d3a474e0e87 34/218
24
T ut or i al —B as i c P h ot ogr aph y
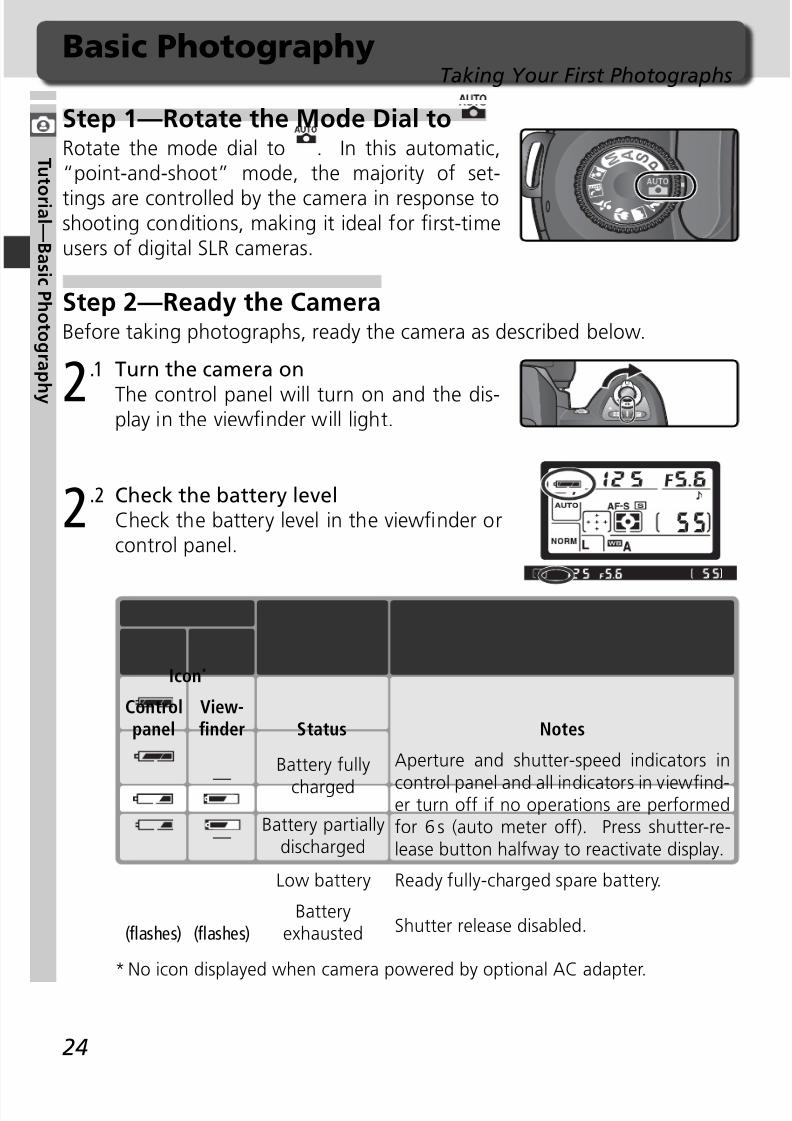
2.2 Check the battery levelCheck the battery level in the viewfi nder orcontrol panel.
Basic PhotographyTaking Your First Photographs
* No icon displayed when camera powered by optional AC adapter.
Icon*
Controlpanel
View-fi nder Status Notes
—
Battery fully
charged
Aperture and shutter-speed indicators in
control panel and all indicators in viewfi nd-er turn off if no operations are performedfor 6 s (auto meter off). Press shutter-re- lease button halfway to reactivate display.
—Battery partially
discharged
(fl ashes)
(fl ashes)
Batteryexhausted Shutter release disabled.
Low battery Ready fully-charged spare battery.
Step 1—Rotate the Mode Dial toRotate the mode dial to . In this automatic,“point-and-shoot” mode, the majority of set-
tings are controlled by the camera in response toshooting conditions, making it ideal for fi rst-timeusers of digital SLR cameras.
Step 2—Ready the CameraBefore taking photographs, ready the camera as described below.
2.1 Turn the camera on
The control panel will turn on and the dis- play in the viewfi nder will light.

8/7/2019 ad9ec4ae0fbdbb1f44546d3a474e0e87
http://slidepdf.com/reader/full/ad9ec4ae0fbdbb1f44546d3a474e0e87 35/218
25
T ut or i al —B as i c P h ot ogr aph y
2
Non-CPU LensesDigital Vari-Program modes (including mode) are available only with CPU lenses.The shutter release is disabled when a non-CPU lens is attached. See “Optional Acces-sories: Lenses for the D70” ( 183).
CR2 Batteries
Depending on the type of battery and on battery use, the camera may require moretime to update the exposure-count display when CR2 batteries are used.
For information on what to do when fl ashes in the exposure-count display, see“Troubleshooting” ( 200).
Camera Off DisplayIf the camera is turned off with a battery and memorycard inserted, the number of exposures remaining will
be displayed in the control panel.
2.3 Check the number of exposures remainingThe exposure-count displays in the controlpanel and viewfi nder show the number of
photographs that can be taken at currentsettings. When this number reaches zero,
will fl ash in the exposure-count displays,while the shutter-speed displays will showa blinking or . No further pic-tures can be taken until you delete picturesor insert a new memory card. You may beable to take additional pictures at lower im-
age quality or size settings.

8/7/2019 ad9ec4ae0fbdbb1f44546d3a474e0e87
http://slidepdf.com/reader/full/ad9ec4ae0fbdbb1f44546d3a474e0e87 36/218
26
T ut or i al —B as i c P h ot ogr aph y
Step 3—Adjust Camera SettingsWhen the mode dial is rotated to , camera settings are automatically ad-justed to produce optimal results in most situations. Image quality, image
size, sensitivity, and shooting mode are set to the values in the table below.See “Taking Photographs” ( 35).
Option Default Description
Shootingmode (Single frame)
62–63
One photograph is taken each time shutter-release-button is pressed.
Sensitivity 20046–47
Sensitivity (digital equivalent of fi lm speed) set tovalue roughly equivalent to ISO 200.
Imagesize
L(Large)
43–45Images are 3,008 × 2,000 pixels in size.
Image
quality
NORM
(JPEG Normal)
41–
42
Pictures are compressed for balance between im-
age quality and fi le size that is ideal for snapshots.
3
Shooting mode
Image quality
Image size
Sensitivity is displayed onlywhen ISO button is pressed.

8/7/2019 ad9ec4ae0fbdbb1f44546d3a474e0e87
http://slidepdf.com/reader/full/ad9ec4ae0fbdbb1f44546d3a474e0e87 37/218
27
T ut or i al —B as i c P h ot ogr aph y
Step 4—Frame a PhotographChoose a focus mode and frame a photograph.
4.1
Choose autofocusConfi rm that the focus-mode selector ispointing to AF (autofocus). At this setting,the camera will focus automatically whenthe shutter-release button is pressed half-way. Pictures can only be taken when thecamera is in focus.
4.2 Frame a photograph
The recommended stance for taking photo-graphs is with one foot a half pace in frontof the other and your upper body stable.To prevent blurred photographs caused byunsteady hands (camera shake), hold thecamera steadily in both hands, with yourelbows propped lightly against your torsofor support. Hold the handgrip in yourright hand and cradle the camera body orlens with your left.
Viewfi nder Frame CoverageThe viewfi nder shows slightly less of the image (approximately 95% both vertically andhorizontally) than appears in the fi nal photograph.
Viewfi nder FocusThe viewfi nder is equipped with diopter adjustmentto accommodate individual differences in vision. Toadjust viewfi nder focus, slide the diopter adjustmentcontrol up and down until the viewfi nder display andfocus brackets are in sharp focus. If necessary, therubber eyepiece cup can be removed; when the cup isreplaced, the lettered face should be down.
When operating the diopter adjustment control with your eye to the viewfi nder, becareful not to put your fi ngers or fi ngernails in your eye.
Diopter can be adjusted in the range –1.6 m–1 to +0.5 m–1. Corrective lenses (availableseparately; 190) allow diopters of –5 m–1 to +3 m–1.
4
8/7/2019 ad9ec4ae0fbdbb1f44546d3a474e0e87
http://slidepdf.com/reader/full/ad9ec4ae0fbdbb1f44546d3a474e0e87 38/218
28
T ut or i al —B as i c P h ot ogr aph y
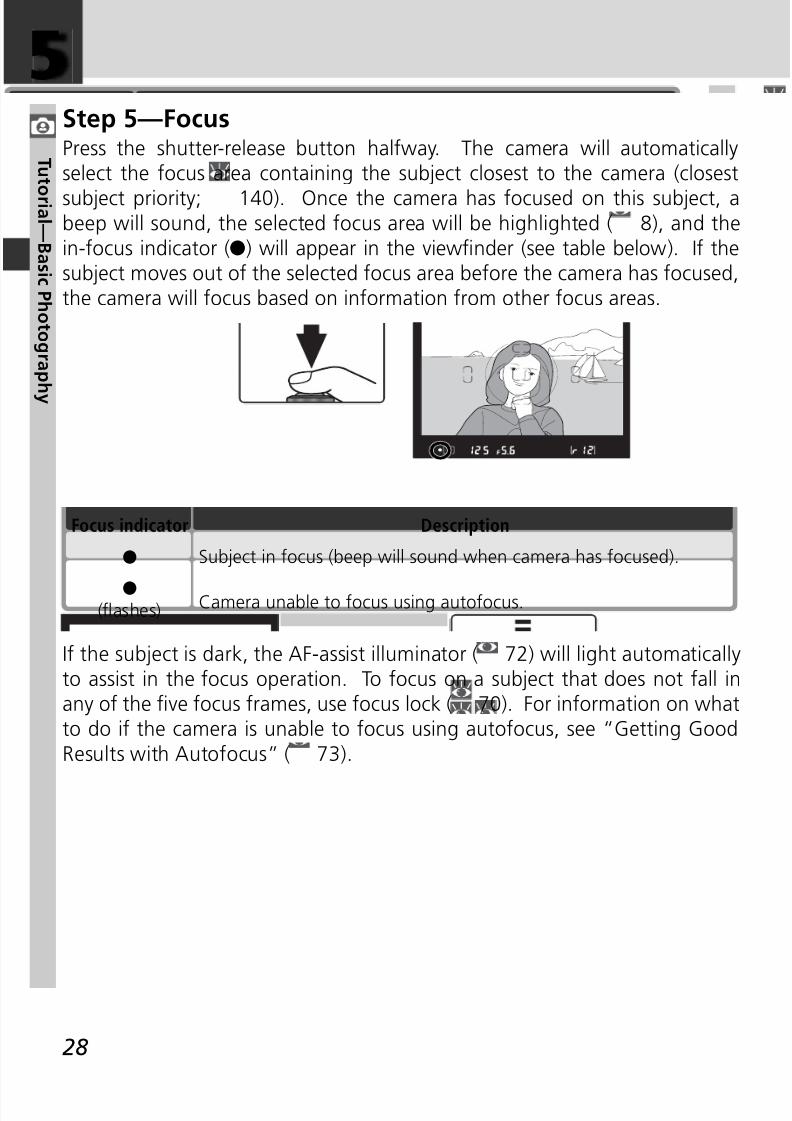
Step 5—FocusPress the shutter-release button halfway. The camera will automaticallyselect the focus area containing the subject closest to the camera (closest
subject priority; 140). Once the camera has focused on this subject, abeep will sound, the selected focus area will be highlighted ( 8), and thein-focus indicator (●) will appear in the viewfi nder (see table below). If thesubject moves out of the selected focus area before the camera has focused,the camera will focus based on information from other focus areas.
If the subject is dark, the AF-assist illuminator ( 72) will light automaticallyto assist in the focus operation. To focus on a subject that does not fall inany of the fi ve focus frames, use focus lock ( 70). For information on whatto do if the camera is unable to focus using autofocus, see “Getting GoodResults with Autofocus” ( 73).
Focus indicator Description
● Subject in focus (beep will sound when camera has focused).
●(fl ashes) Camera unable to focus using autofocus.
5
8/7/2019 ad9ec4ae0fbdbb1f44546d3a474e0e87
http://slidepdf.com/reader/full/ad9ec4ae0fbdbb1f44546d3a474e0e87 39/218
29
T ut or i al —B as i c P h ot ogr aph y
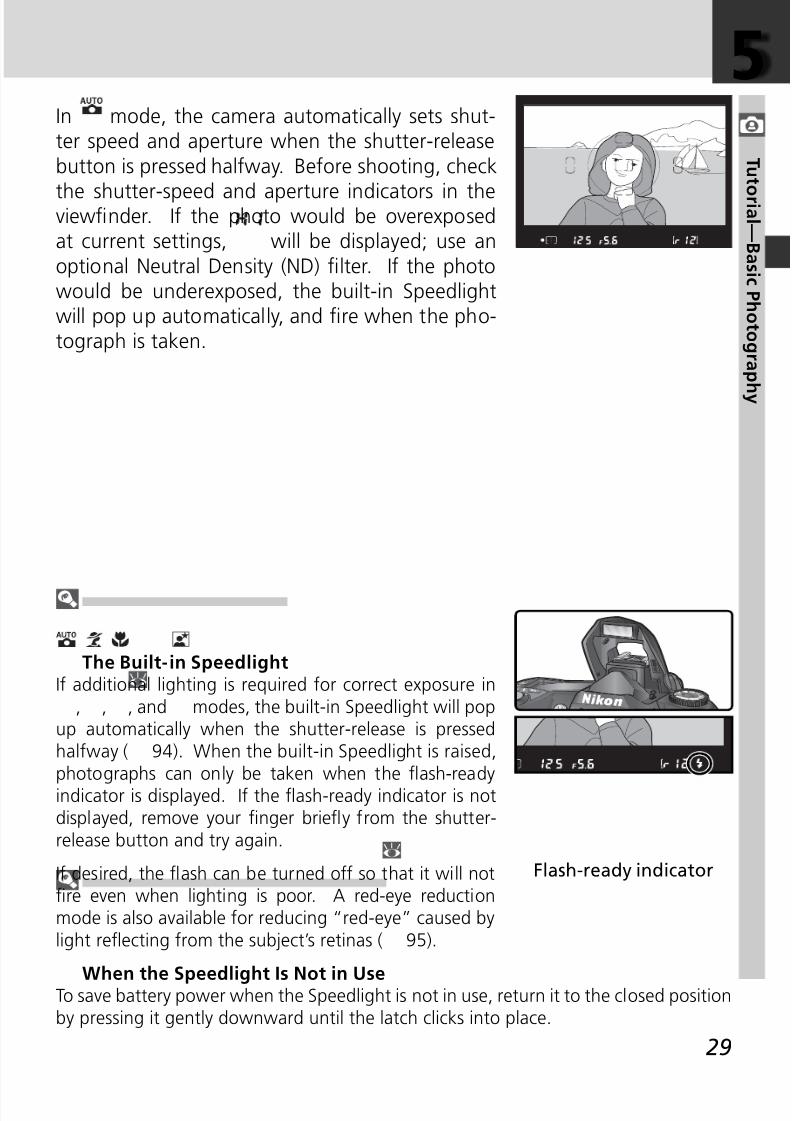
In mode, the camera automatically sets shut-ter speed and aperture when the shutter-releasebutton is pressed halfway. Before shooting, check
the shutter-speed and aperture indicators in theviewfi nder. If the photo would be overexposedat current settings, will be displayed; use anoptional Neutral Density (ND) fi lter. If the photowould be underexposed, the built-in Speedlightwill pop up automatically, and fi re when the pho-tograph is taken.
The Built-in SpeedlightIf additional lighting is required for correct exposure in
, , , and modes, the built-in Speedlight will popup automatically when the shutter-release is pressedhalfway ( 94). When the built-in Speedlight is raised,photographs can only be taken when the fl ash-readyindicator is displayed. If the fl ash-ready indicator is notdisplayed, remove your fi nger briefl y from the shutter-release button and try again.
If desired, the fl ash can be turned off so that it will notfi re even when lighting is poor. A red-eye reductionmode is also available for reducing “red-eye” caused bylight refl ecting from the subject’s retinas ( 95).
When the Speedlight Is Not in UseTo save battery power when the Speedlight is not in use, return it to the closed positionby pressing it gently downward until the latch clicks into place.
5
Flash-ready indicator
8/7/2019 ad9ec4ae0fbdbb1f44546d3a474e0e87
http://slidepdf.com/reader/full/ad9ec4ae0fbdbb1f44546d3a474e0e87 40/218
30
T ut or i al —B as i c P h ot ogr aph y
6
Shutter SoundThe D70 is equipped with a combined electronic (CCD) and mechanical shutter. This
shutter operates on a different principle from the mechanical shutters found in fi lmcameras. As a result, the interval between the sounds made by the shutter and mirrorwill not decrease past a certain point, even at high shutter speeds.
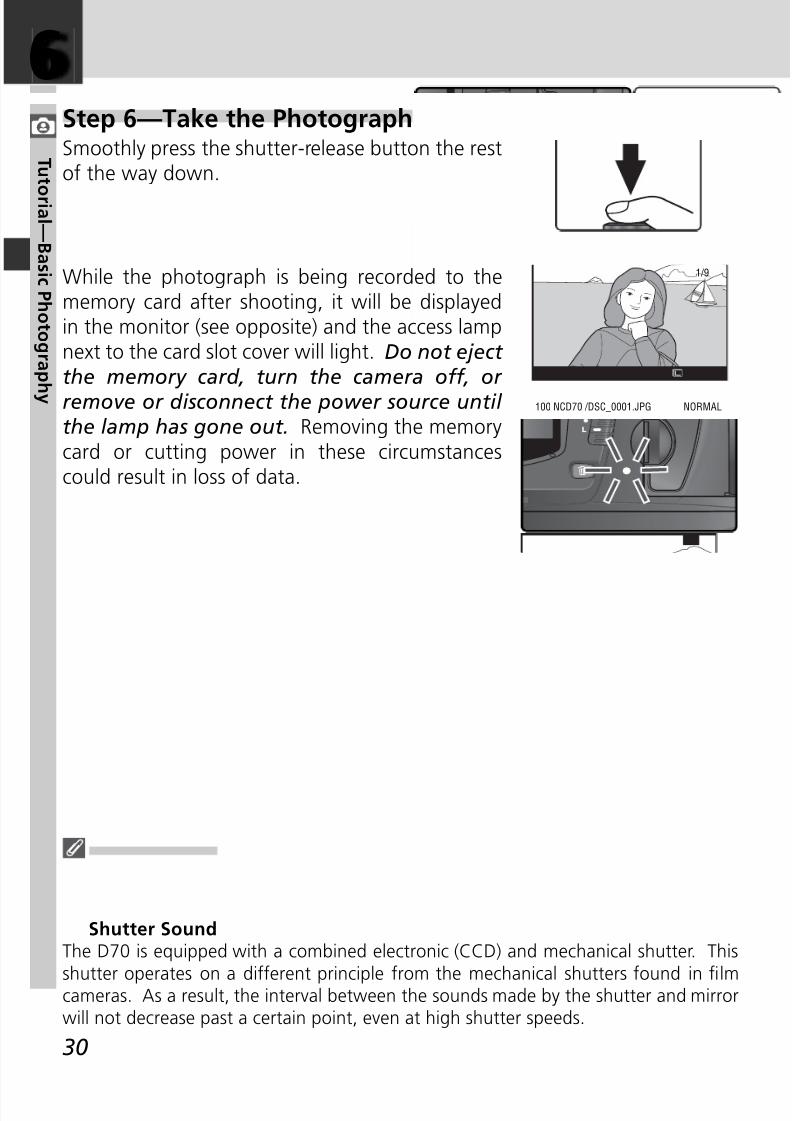
While the photograph is being recorded to thememory card after shooting, it will be displayedin the monitor (see opposite) and the access lampnext to the card slot cover will light. Do not eject the memory card, turn the camera off, or remove or disconnect the power source until the lamp has gone out. Removing the memorycard or cutting power in these circumstancescould result in loss of data.
Step 6—Take the PhotographSmoothly press the shutter-release button the restof the way down.
1/9
100 NCD70 /DSC_0001.JPG NORMAL
8/7/2019 ad9ec4ae0fbdbb1f44546d3a474e0e87
http://slidepdf.com/reader/full/ad9ec4ae0fbdbb1f44546d3a474e0e87 41/218
31
T ut or i al —B as i c P l ayb ac k
Press button at any time to dis-
play most recent photograph.
1/1
100 NCD70 /DSC_0001.JPG NORMAL
TheButton
Photographs are automatically
displayed while being recorded tomemory card.
1/1
100 NCD70 /DSC_0001.JPG NORMAL
DuringRecording
Basic PlaybackViewing Photographs
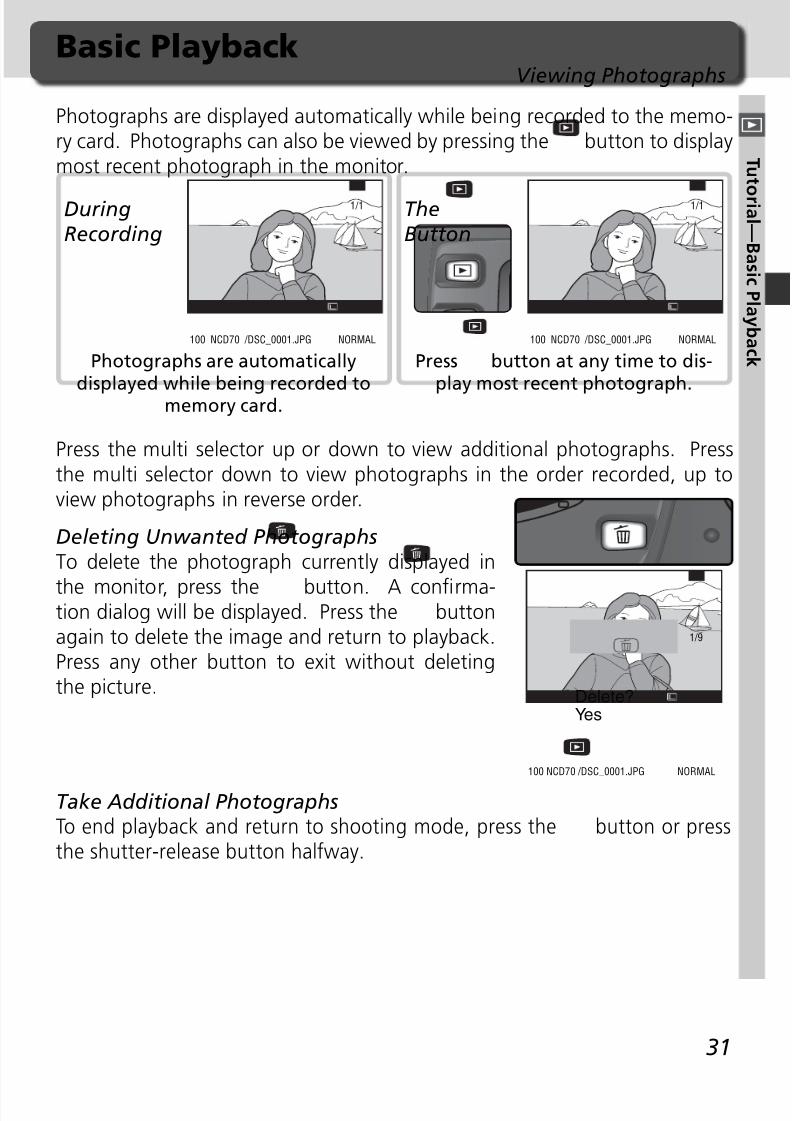
Photographs are displayed automatically while being recorded to the memo-ry card. Photographs can also be viewed by pressing the button to displaymost recent photograph in the monitor.
Press the multi selector up or down to view additional photographs. Pressthe multi selector down to view photographs in the order recorded, up toview photographs in reverse order.
Deleting Unwanted PhotographsTo delete the photograph currently displayed in
the monitor, press the button. A confi rma-tion dialog will be displayed. Press the buttonagain to delete the image and return to playback.Press any other button to exit without deletingthe picture.
1/9
100 NCD70 /DSC_0001.JPG NORMAL
Delete?Yes
Take Additional PhotographsTo end playback and return to shooting mode, press the button or pressthe shutter-release button halfway.
8/7/2019 ad9ec4ae0fbdbb1f44546d3a474e0e87
http://slidepdf.com/reader/full/ad9ec4ae0fbdbb1f44546d3a474e0e87 42/218
32
T ut or i al —Di gi t al V ar i -P r ogr ams
Digital Vari-ProgramsCreative Photography
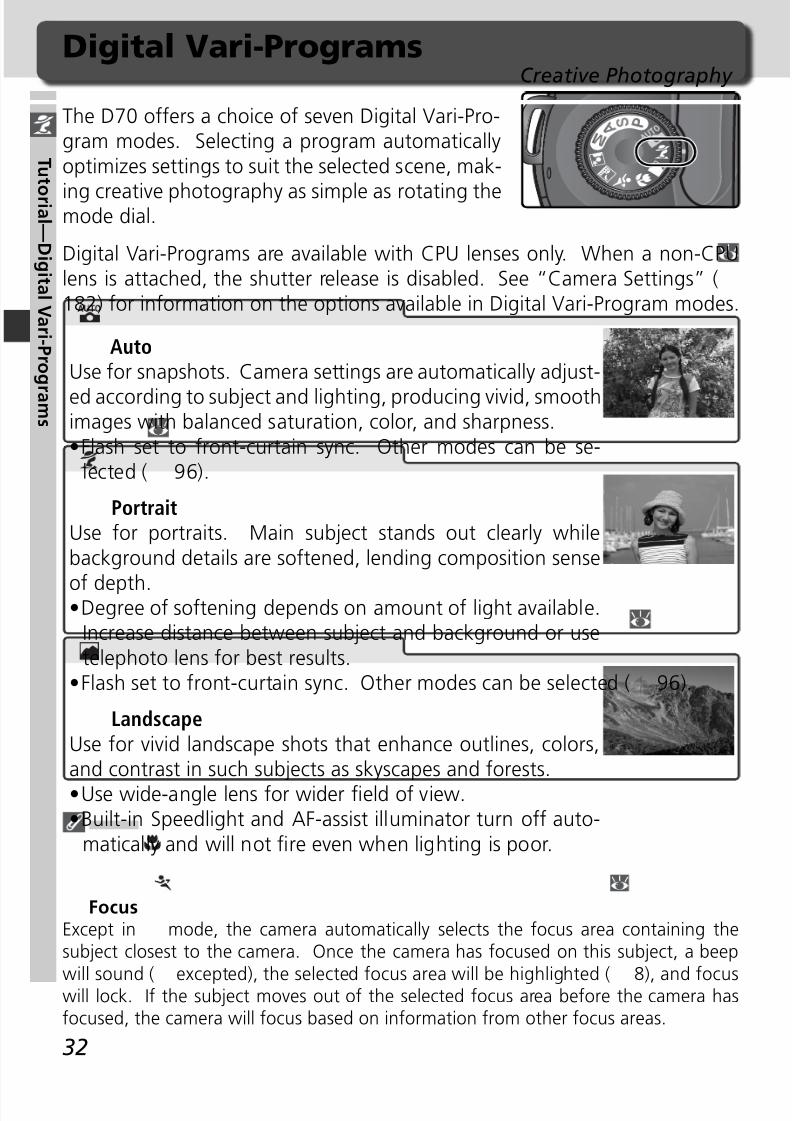
The D70 offers a choice of seven Digital Vari-Pro-gram modes. Selecting a program automaticallyoptimizes settings to suit the selected scene, mak-
ing creative photography as simple as rotating themode dial.
Digital Vari-Programs are available with CPU lenses only. When a non-CPUlens is attached, the shutter release is disabled. See “Camera Settings” (182) for information on the options available in Digital Vari-Program modes.
PortraitUse for portraits. Main subject stands out clearly whilebackground details are softened, lending composition sense
of depth.• Degree of softening depends on amount of light available.Increase distance between subject and background or usetelephoto lens for best results.
• Flash set to front-curtain sync. Other modes can be selected ( 96).
LandscapeUse for vivid landscape shots that enhance outlines, colors,and contrast in such subjects as skyscapes and forests.
• Use wide-angle lens for wider fi eld of view.• Built-in Speedlight and AF-assist illuminator turn off auto-
matically and will not fi re even when lighting is poor.
AutoUse for snapshots. Camera settings are automatically adjust-
ed according to subject and lighting, producing vivid, smoothimages with balanced saturation, color, and sharpness.• Flash set to front-curtain sync. Other modes can be se-
lected ( 96).
FocusExcept in mode, the camera automatically selects the focus area containing thesubject closest to the camera. Once the camera has focused on this subject, a beep
will sound ( excepted), the selected focus area will be highlighted ( 8), and focuswill lock. If the subject moves out of the selected focus area before the camera hasfocused, the camera will focus based on information from other focus areas.
8/7/2019 ad9ec4ae0fbdbb1f44546d3a474e0e87
http://slidepdf.com/reader/full/ad9ec4ae0fbdbb1f44546d3a474e0e87 43/218
33
T ut or i al —Di gi t al V ar i -P r ogr ams
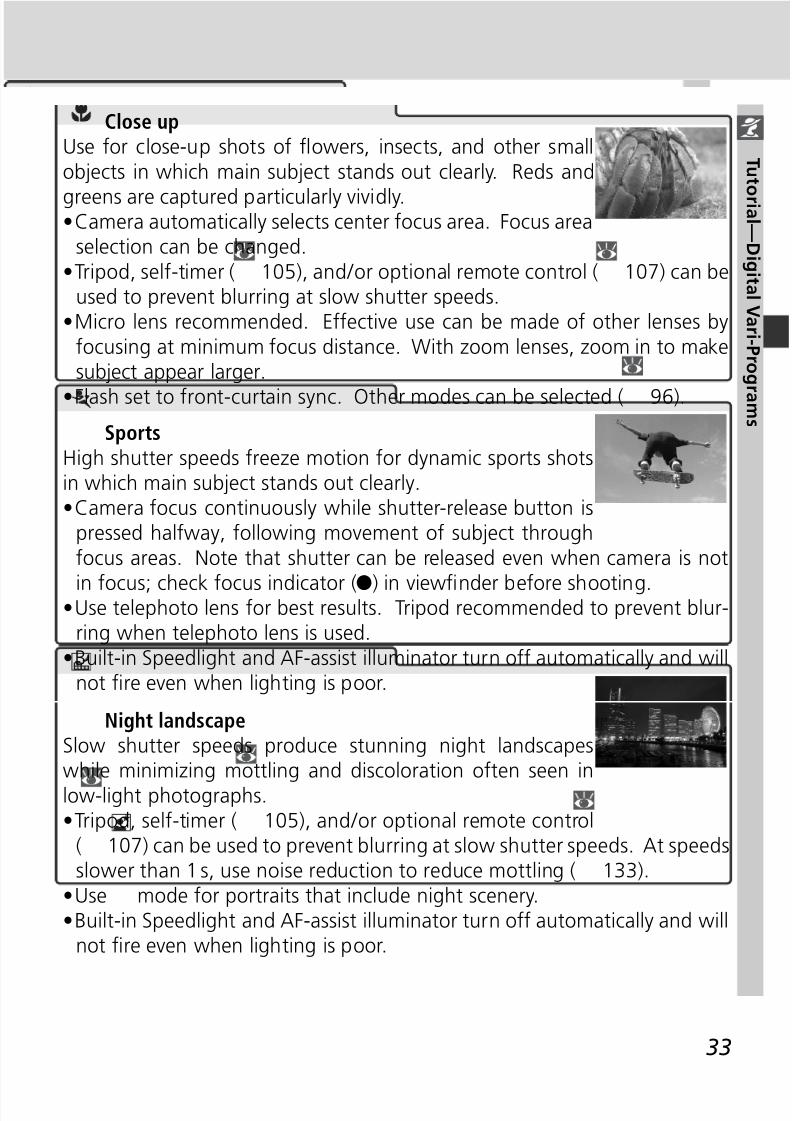
Close upUse for close-up shots of fl owers, insects, and other smallobjects in which main subject stands out clearly. Reds and
greens are captured particularly vividly.• Camera automatically selects center focus area. Focus area
selection can be changed.• Tripod, self-timer ( 105), and / or optional remote control ( 107) can be
used to prevent blurring at slow shutter speeds.• Micro lens recommended. Effective use can be made of other lenses by
focusing at minimum focus distance. With zoom lenses, zoom in to makesubject appear larger.
• Flash set to front-curtain sync. Other modes can be selected ( 96).
Night landscapeSlow shutter speeds produce stunning night landscapeswhile minimizing mottling and discoloration often seen inlow-light photographs.• Tripod, self-timer ( 105), and / or optional remote control
( 107) can be used to prevent blurring at slow shutter speeds. At speedsslower than 1 s, use noise reduction to reduce mottling ( 133).
• Use mode for portraits that include night scenery.• Built-in Speedlight and AF-assist illuminator turn off automatically and will
not fi re even when lighting is poor.
SportsHigh shutter speeds freeze motion for dynamic sports shotsin which main subject stands out clearly.• Camera focus continuously while shutter-release button is
pressed halfway, following movement of subject throughfocus areas. Note that shutter can be released even when camera is not
in focus; check focus indicator (●) in viewfi nder before shooting.• Use telephoto lens for best results. Tripod recommended to prevent blur-ring when telephoto lens is used.
• Built-in Speedlight and AF-assist illuminator turn off automatically and willnot fi re even when lighting is poor.

8/7/2019 ad9ec4ae0fbdbb1f44546d3a474e0e87
http://slidepdf.com/reader/full/ad9ec4ae0fbdbb1f44546d3a474e0e87 44/218
34
T ut or i al —Di gi t al V ar i -P r ogr ams
Subject too dark. Raise sensitivity (ISO equivalency; 46).
DescriptionIndicator
Subject too bright. Use optional Neutral Density (ND) fi lter.
Exposure WarningIf the limits of the exposure metering system are exceeded, one of the following indi-cators will be displayed in the control panel and viewfi nder:
Color SpacePhotos taken in Digital Vari-Program modes are recorded in the sRGB color space (59).
Self-Timer and Remote Control ModesThe self-timer and remote control can be used to allow photographers to appear intheir own photographs or prevent blur caused by the camera moving when the shut-
ter-release button is pressed. At default settings, the self-timer delays shutter releaseuntil about ten seconds after the shutter-release button is pressed. For details, see“Taking Photographs: The Self-Timer” ( 105). The optional ML-L3 remote controlcan be used to release the shutter remotely, either instantaneously or with a two-sec-ond delay. See “Taking Photographs: Using the Remote Control” ( 107).
P, S, A, and M ModesIn addition to the settings available in mode, P, S,A, and M modes offer control over such settings as
shutter speed and aperture, white balance, image op-timization, and exposure compensation. See “TakingPhotographs” ( 35).
Night portraitProvides natural balance between main subject and back-ground in portraits taken under low light. Lighting for por-
trait subject will seem natural even when fl ash is used.• Tripod, self-timer ( 105), and / or optional remote control
( 107) can be used to prevent blurring at slow shutter speeds. At speedsslower than 1 s, use noise reduction to reduce mottling ( 133).
• Use mode for night shots that do not include portrait subject.• Flash set to slow sync. Other modes can be selected ( 94).
8/7/2019 ad9ec4ae0fbdbb1f44546d3a474e0e87
http://slidepdf.com/reader/full/ad9ec4ae0fbdbb1f44546d3a474e0e87 45/218
35
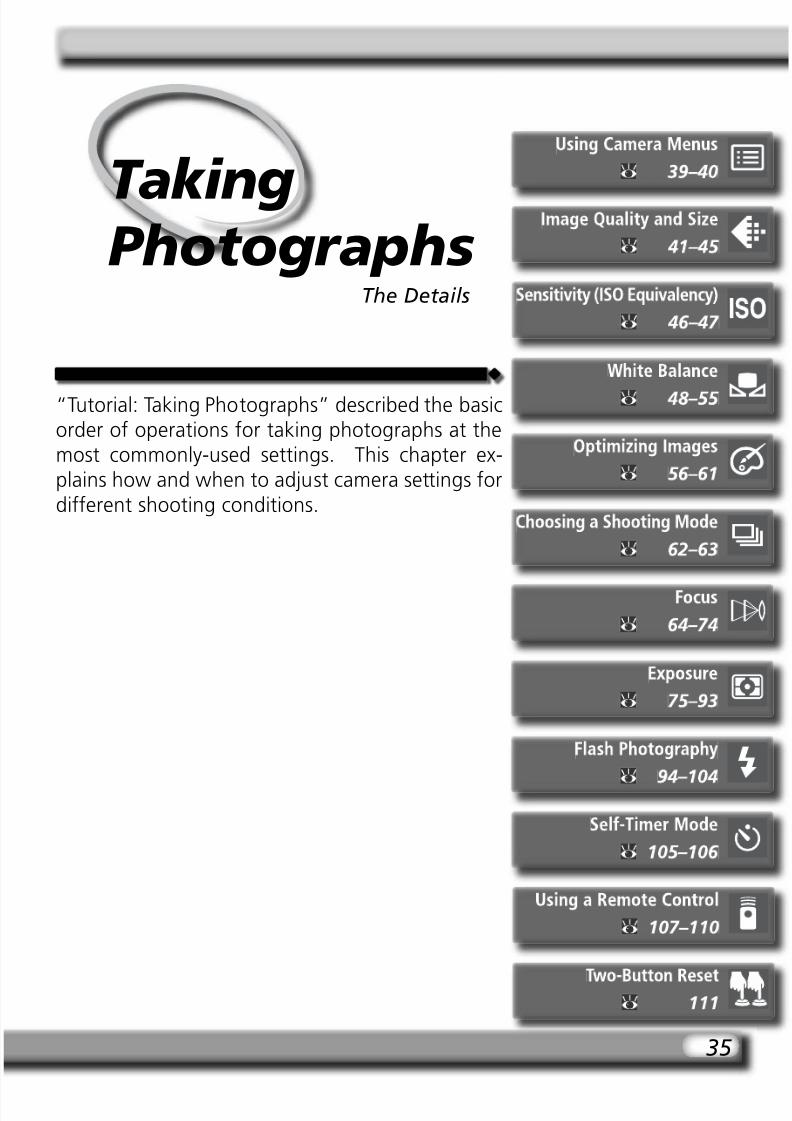
“Tutorial: Taking Photographs” described the basicorder of operations for taking photographs at themost commonly-used settings. This chapter ex-plains how and when to adjust camera settings fordifferent shooting conditions.
Taking Photographs
The Details
8/7/2019 ad9ec4ae0fbdbb1f44546d3a474e0e87
http://slidepdf.com/reader/full/ad9ec4ae0fbdbb1f44546d3a474e0e87 46/218
36
T ak i ng P h ot ogr aph s
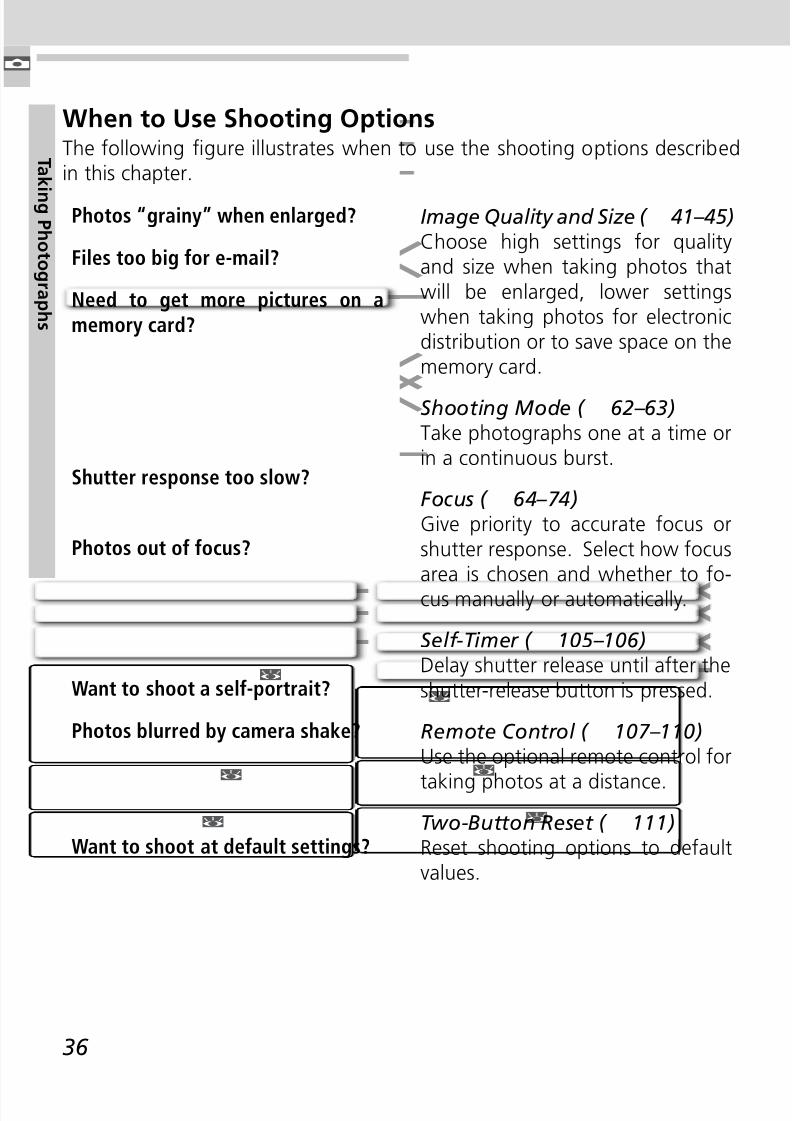
When to Use Shooting OptionsThe following fi gure illustrates when to use the shooting options describedin this chapter.
Image Quality and Size ( 41–45)Choose high settings for qualityand size when taking photos thatwill be enlarged, lower settingswhen taking photos for electronicdistribution or to save space on thememory card.
Shooting Mode ( 62–63)Take photographs one at a time orin a continuous burst.
Focus ( 64–74)Give priority to accurate focus orshutter response. Select how focusarea is chosen and whether to fo-cus manually or automatically.
Self-Timer ( 105–106)Delay shutter release until after theshutter-release button is pressed.
Remote Control ( 107–110)Use the optional remote control for
taking photos at a distance.
Two-Button Reset ( 111)Reset shooting options to defaultvalues.
Photos out of focus?
Photos “grainy” when enlarged?
Need to get more pictures on amemory card?
Files too big for e-mail?
Shutter response too slow?
Want to shoot a self-portrait?
Photos blurred by camera shake?
Want to shoot at default settings?
8/7/2019 ad9ec4ae0fbdbb1f44546d3a474e0e87
http://slidepdf.com/reader/full/ad9ec4ae0fbdbb1f44546d3a474e0e87 47/218
37
T ak i ng P h ot ogr aph s
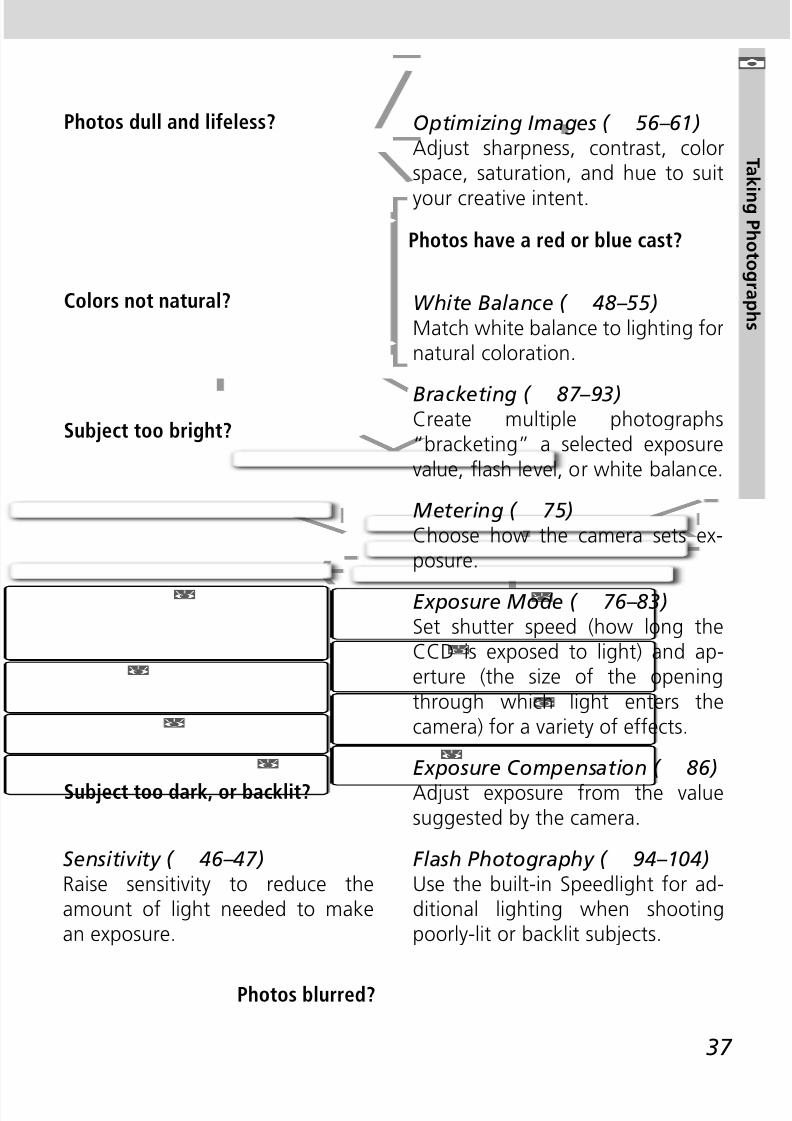
Flash Photography ( 94–104)Use the built-in Speedlight for ad-ditional lighting when shootingpoorly-lit or backlit subjects.
Sensitivity ( 46–47)Raise sensitivity to reduce theamount of light needed to makean exposure.
Optimizing Images ( 56–61)Adjust sharpness, contrast, colorspace, saturation, and hue to suit
your creative intent.
White Balance ( 48–55)Match white balance to lighting fornatural coloration.
Bracketing ( 87–93)Create multiple photographs“bracketing” a selected exposurevalue, fl ash level, or white balance.
Metering ( 75)Choose how the camera sets ex-posure.
Exposure Mode ( 76–83)Set shutter speed (how long theCCD is exposed to light) and ap-erture (the size of the openingthrough which light enters thecamera) for a variety of effects.
Exposure Compensation ( 86)
Adjust exposure from the valuesuggested by the camera.
Photos blurred?
Subject too bright?
Subject too dark, or backlit?
Photos dull and lifeless?
Colors not natural?
Photos have a red or blue cast?
8/7/2019 ad9ec4ae0fbdbb1f44546d3a474e0e87
http://slidepdf.com/reader/full/ad9ec4ae0fbdbb1f44546d3a474e0e87 48/218
38
T ak i ng P h ot ogr aph s
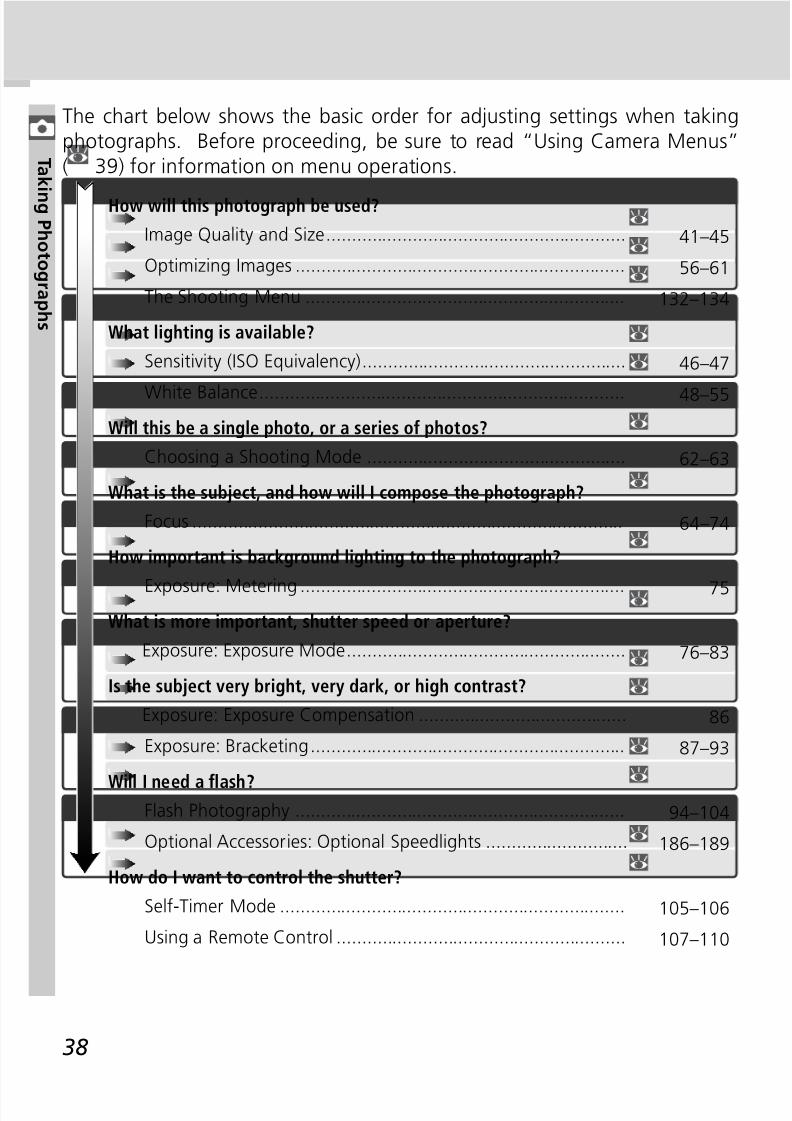
The Shooting Menu ............................................................... 132–134
The chart below shows the basic order for adjusting settings when takingphotographs. Before proceeding, be sure to read “Using Camera Menus”( 39) for information on menu operations.
Image Quality and Size........................................................... 41–45
Choosing a Shooting Mode ................................................... 62–63
Focus ..................................................................................... 64–74
Exposure: Metering ................................................................ 75
Exposure: Exposure Mode....................................................... 76–83
Exposure: Exposure Compensation ......................................... 86
Exposure: Bracketing.............................................................. 87–93
How important is background lighting to the photograph?
Optimizing Images ................................................................. 56–61
Sensitivity (ISO Equivalency).................................................... 46–47
White Balance........................................................................ 48–55
Self-Timer Mode .................................................................... 105–106
Using a Remote Control ......................................................... 107–110
Flash Photography ................................................................. 94–104Will I need a fl ash?
Is the subject very bright, very dark, or high contrast?
What is more important, shutter speed or aperture?
What is the subject, and how will I compose the photograph?
Will this be a single photo, or a series of photos?
How will this photograph be used?
What lighting is available?
How do I want to control the shutter?
Optional Accessories: Optional Speedlights ............................ 186–189
8/7/2019 ad9ec4ae0fbdbb1f44546d3a474e0e87
http://slidepdf.com/reader/full/ad9ec4ae0fbdbb1f44546d3a474e0e87 49/218
39
T ak i ng P h ot ogr aph s —Us i ng C amer a Menus
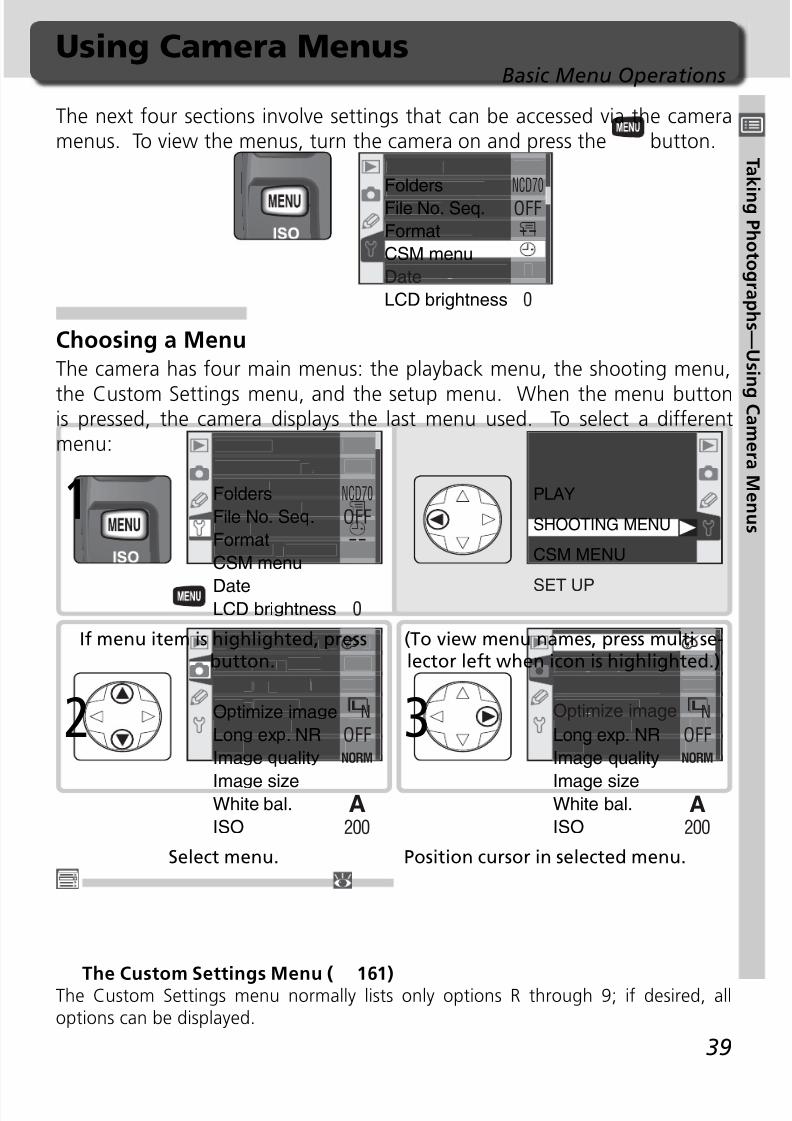
The next four sections involve settings that can be accessed via the cameramenus. To view the menus, turn the camera on and press the button.
OFF
NCD70
--
0
Folders
File No. Seq.
Format
CSM menu
Date
LCD brightness
Select menu.
200A
NORM
OFF
NOptimize image
Long exp. NR
Image quality
Image sizeWhite bal.
ISO
2
Using Camera MenusBasic Menu Operations
Choosing a MenuThe camera has four main menus: the playback menu, the shooting menu,
the Custom Settings menu, and the setup menu. When the menu buttonis pressed, the camera displays the last menu used. To select a differentmenu:
The Custom Settings Menu ( 161)The Custom Settings menu normally lists only options R through 9; if desired, alloptions can be displayed.
If menu item is highlighted, pressbutton.
OFF
NCD70
0
--
Folders
File No. Seq.
Format
CSM menu
DateLCD brightness
1
(To view menu names, press multi se-lector left when icon is highlighted.)
PLAY
SHOOTING MENU
CSM MENU
SET UP
Position cursor in selected menu.
OFF
200A
NORM
NOptimize image
Long exp. NR
Image quality
Image sizeWhite bal.
ISO
3
8/7/2019 ad9ec4ae0fbdbb1f44546d3a474e0e87
http://slidepdf.com/reader/full/ad9ec4ae0fbdbb1f44546d3a474e0e87 50/218
40
T ak i ng P h ot ogr aph s —Us i ng C amer a Menus
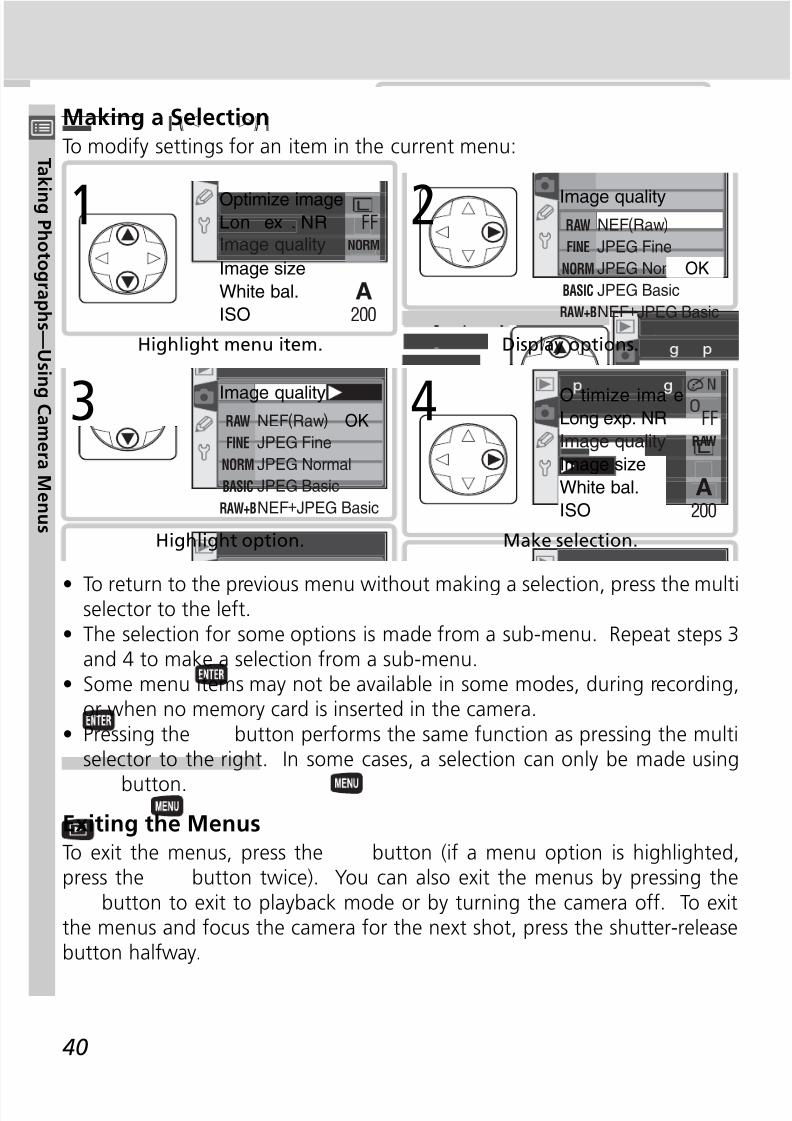
• To return to the previous menu without making a selection, press the multiselector to the left.
• The selection for some options is made from a sub-menu. Repeat steps 3and 4 to make a selection from a sub-menu.
• Some menu items may not be available in some modes, during recording,or when no memory card is inserted in the camera.
• Pressing the button performs the same function as pressing the multiselector to the right. In some cases, a selection can only be made using
button.
Exiting the MenusTo exit the menus, press the button (if a menu option is highlighted,press the button twice). You can also exit the menus by pressing the
button to exit to playback mode or by turning the camera off. To exitthe menus and focus the camera for the next shot, press the shutter-releasebutton halfway.
Highlight menu item. Display options.
RAW
FINE
NORM
BASIC
RAW+B
NEF(Raw)
JPEG Fine
JPEG Normal
JPEG Basic
NEF+JPEG Basic
Image quality
OK
2
200A
NORM
FFOptimize imageLon ex . NR
Image quality
Image size
White bal.
ISO
1
Make selection.
200A
RAW
FFO timize ima eLong exp. NR
Image quality
Image size
White bal.
ISO
4
Highlight option.
RAW
FINE
NORM
BASIC
RAW+B
Image qualityOKNEF(Raw)
JPEG Fine
JPEG Normal
JPEG Basic
NEF+JPEG Basic
3
Making a SelectionTo modify settings for an item in the current menu:
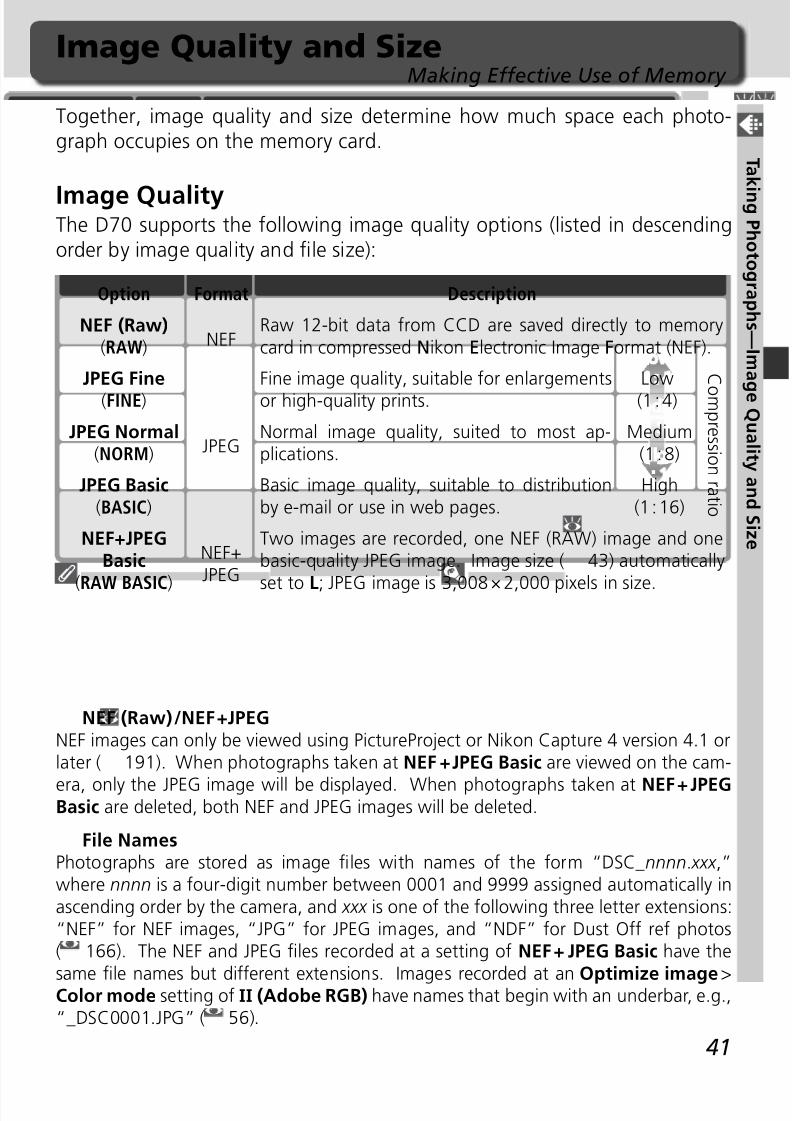
8/7/2019 ad9ec4ae0fbdbb1f44546d3a474e0e87
http://slidepdf.com/reader/full/ad9ec4ae0fbdbb1f44546d3a474e0e87 51/218
41
T ak i ng P h ot ogr aph s —I mage Qual i t y and S i z e
Image Quality and SizeMaking Effective Use of Memory
Together, image quality and size determine how much space each photo-graph occupies on the memory card.
Image QualityThe D70 supports the following image quality options (listed in descendingorder by image quality and fi le size):
Option Description
NEF (Raw)(RAW)
Raw 12-bit data from CCD are saved directly to memorycard in compressed Nikon Electronic Image Format (NEF).
JPEG Normal(NORM)
Normal image quality, suited to most ap-plications.
JPEG Fine(FINE)
Fine image quality, suitable for enlargementsor high-quality prints.
JPEG Basic(BASIC)
Basic image quality, suitable to distributionby e-mail or use in web pages.
NEF+JPEGBasic
(RAW BASIC)
Two images are recorded, one NEF (RAW) image and onebasic-quality JPEG image. Image size ( 43) automatically
set to L; JPEG image is 3,008 × 2,000 pixels in size.
NEF (Raw) / NEF + JPEGNEF images can only be viewed using PictureProject or Nikon Capture 4 version 4.1 orlater ( 191). When photographs taken at NEF + JPEG Basic are viewed on the cam-
era, only the JPEG image will be displayed. When photographs taken at NEF + JPEGBasic are deleted, both NEF and JPEG images will be deleted.
File NamesPhotographs are stored as image fi les with names of the form “DSC_nnnn.xxx ,”where nnnn is a four-digit number between 0001 and 9999 assigned automatically inascending order by the camera, and xxx is one of the following three letter extensions:“NEF” for NEF images, “JPG” for JPEG images, and “NDF” for Dust Off ref photos( 166). The NEF and JPEG fi les recorded at a setting of NEF + JPEG Basic have the
same fi le names but different extensions. Images recorded at an Optimize image>Color mode setting of II (Adobe RGB) have names that begin with an underbar, e.g.,“_DSC0001.JPG” ( 56).
Format
NEF
JPEG
NEF+JPEG
C
ompr e s s i on r a t i o
MediumMedium(1 : 8)(1 : 8)
LowLow(1 : 4)(1 : 4)
HighHigh(1 : 16)(1 : 16)
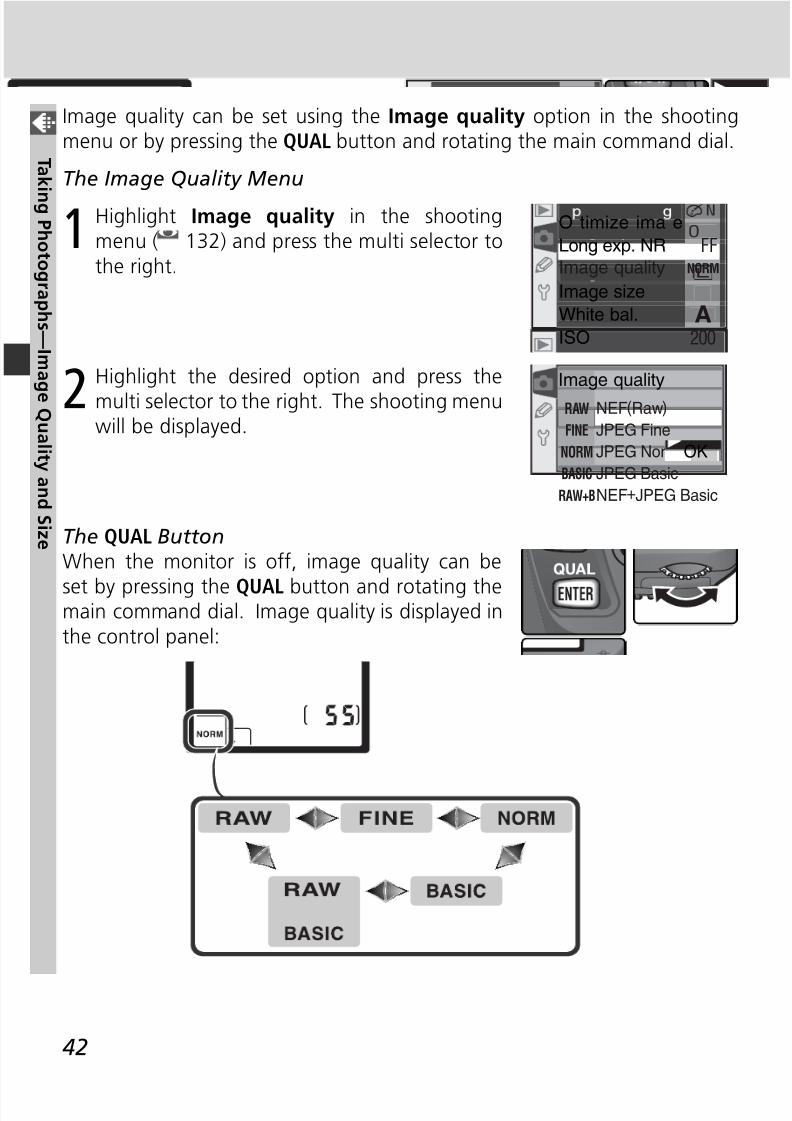
8/7/2019 ad9ec4ae0fbdbb1f44546d3a474e0e87
http://slidepdf.com/reader/full/ad9ec4ae0fbdbb1f44546d3a474e0e87 52/218
42
T ak i ng P h ot ogr aph s —I mage Qual i t y and S i z e
Image quality can be set using the Image quality option in the shootingmenu or by pressing the QUAL button and rotating the main command dial.
The Image Quality Menu
1 Highlight Image quality in the shootingmenu ( 132) and press the multi selector tothe right.
200A
NORM
FF
O timize ima e
Long exp. NR
Image quality
Image size
White bal.
ISO
2Highlight the desired option and press themulti selector to the right. The shooting menuwill be displayed.
RAW
FINE
NORM
BASIC
RAW+B
NEF(Raw)
JPEG Fine
JPEG Normal
JPEG Basic
NEF+JPEG Basic
Image quality
OK
The QUAL ButtonWhen the monitor is off, image quality can be
set by pressing the QUAL button and rotating themain command dial. Image quality is displayed inthe control panel:
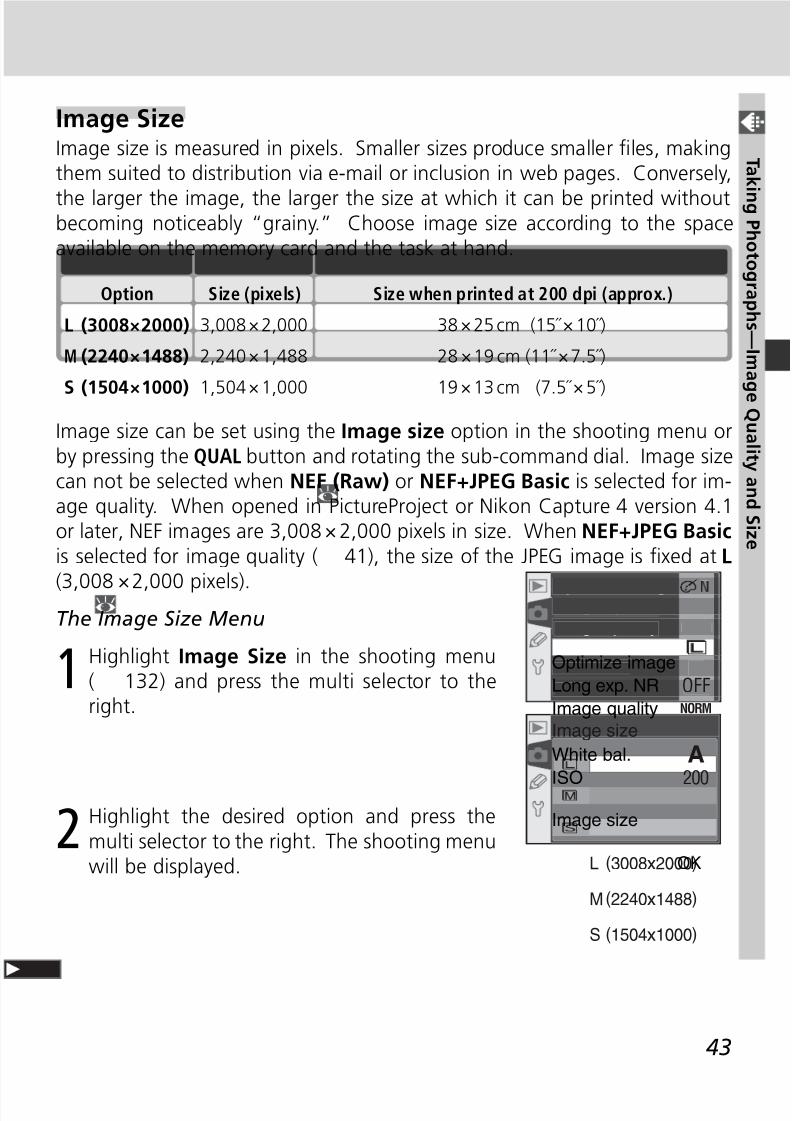
8/7/2019 ad9ec4ae0fbdbb1f44546d3a474e0e87
http://slidepdf.com/reader/full/ad9ec4ae0fbdbb1f44546d3a474e0e87 53/218
43
T ak i ng P h ot ogr aph s —I mage Qual i t y and S i z e
Image SizeImage size is measured in pixels. Smaller sizes produce smaller fi les, makingthem suited to distribution via e-mail or inclusion in web pages. Conversely,
the larger the image, the larger the size at which it can be printed withoutbecoming noticeably “grainy.” Choose image size according to the spaceavailable on the memory card and the task at hand.
Size (pixels) Size when printed at 200 dpi (approx.)
38 × 25 cm (15˝ × 10˝)
28 × 19 cm (11˝ × 7.5˝)
Option
3,008 × 2,000L (3008 × 2000)
2,240 × 1,488M (2240 × 1488)
19 × 13 cm (7.5˝ × 5˝)1,504 × 1,000S (1504 × 1000)
Image size can be set using the Image size option in the shooting menu orby pressing the QUAL button and rotating the sub-command dial. Image sizecan not be selected when NEF (Raw) or NEF+JPEG Basic is selected for im-age quality. When opened in PictureProject or Nikon Capture 4 version 4.1or later, NEF images are 3,008 × 2,000 pixels in size. When NEF+JPEG Basic is selected for image quality ( 41), the size of the JPEG image is fi xed at L
(3,008 × 2,000 pixels).The Image Size Menu
1 Highlight Image Size in the shooting menu( 132) and press the multi selector to theright.
200
A
NORM
OFF
Optimize image
Long exp. NR
Image quality
Image size
White bal.
ISO
2 Highlight the desired option and press themulti selector to the right. The shooting menuwill be displayed. L (3008x2000)
M(2240x1488)
S (1504x1000)
Image size
OK
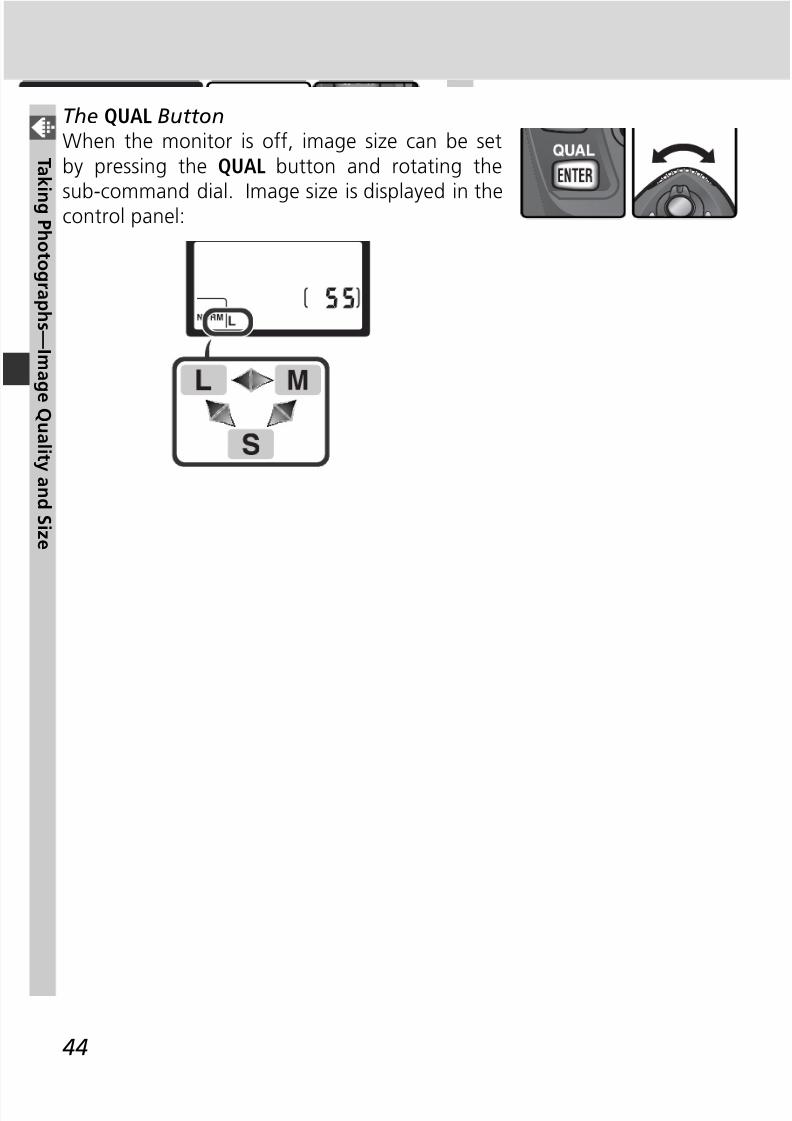
8/7/2019 ad9ec4ae0fbdbb1f44546d3a474e0e87
http://slidepdf.com/reader/full/ad9ec4ae0fbdbb1f44546d3a474e0e87 54/218
44
T ak i ng P h ot ogr aph s —I mage Qual i t y and S i z e
The QUAL ButtonWhen the monitor is off, image size can be setby pressing the QUAL button and rotating the
sub-command dial. Image size is displayed in thecontrol panel:
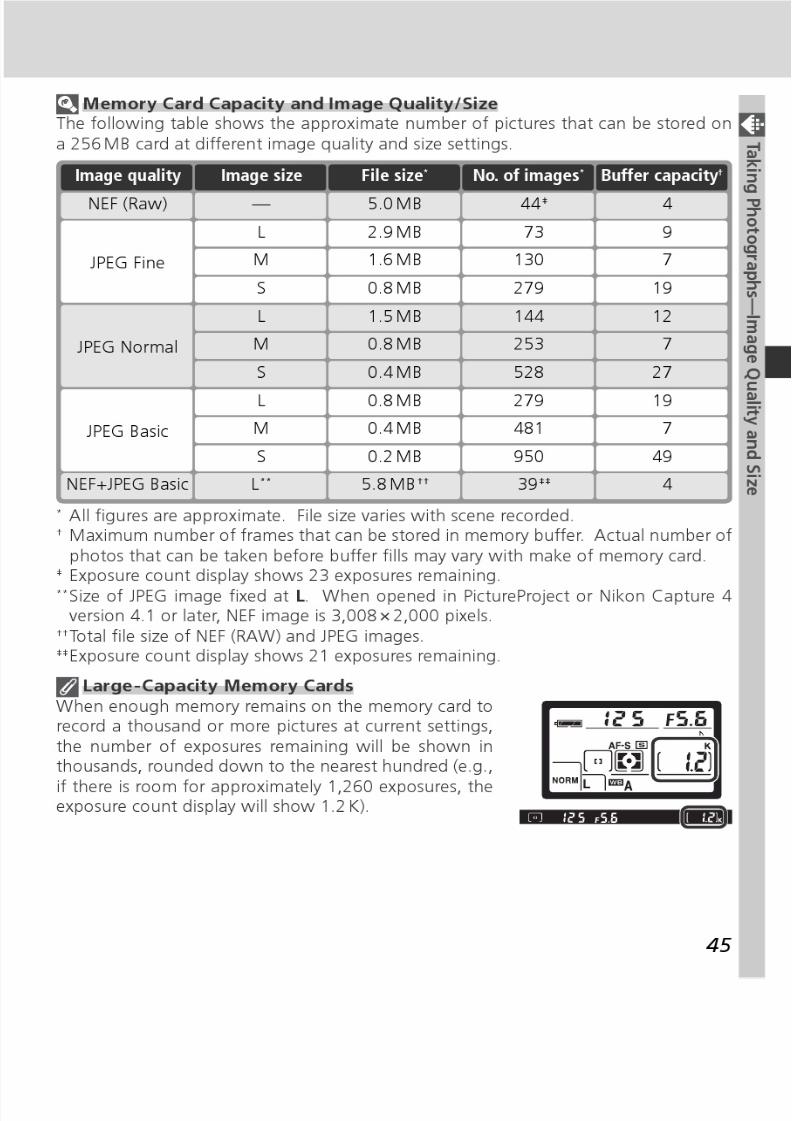
8/7/2019 ad9ec4ae0fbdbb1f44546d3a474e0e87
http://slidepdf.com/reader/full/ad9ec4ae0fbdbb1f44546d3a474e0e87 55/218

8/7/2019 ad9ec4ae0fbdbb1f44546d3a474e0e87
http://slidepdf.com/reader/full/ad9ec4ae0fbdbb1f44546d3a474e0e87 56/218
46
T ak i ng P h ot ogr aph s —S en
s i t i vi t y ( I S O E qui val en
c y)
“Sensitivity” is the digital equivalent of fi lm speed. The higher the sensitivity,the less light needed to make an exposure, allowing higher shutter speedsor smaller apertures.
Sensitivity can be set between values roughly equivalent to ISO 200 and ISO1600 in steps equivalent to 1/ 3 EV. Sensitivity can be adjusted using the ISOoption in the shooting menu or by pressing the ISO button and rotating themain command dial.
The ISO Menu
1
Highlight ISO in the shooting menu ( 132)and press the multi selector to the right.
SensitivityThe higher the sensitivity, the more likely pictures are to be subject to “noise” in theform of randomly-spaced, brightly-colored pixels.
5—ISO Auto ( 142)When On is selected for Custom Setting 5 (ISO auto), the camera will automaticallyvary sensitivity from the value selected by the user to help ensure optimum exposure.
Sensitivity (ISO Equivalency)Reacting Faster to Light
200A
NORMOFF
NOptimize image
Lon ex . NRImage quality
Image size
White bal.
ISO
2 Highlight the desired option and press themulti selector to the right. The shooting menuwill be displayed.
ISO
200
250
320400
500
OK
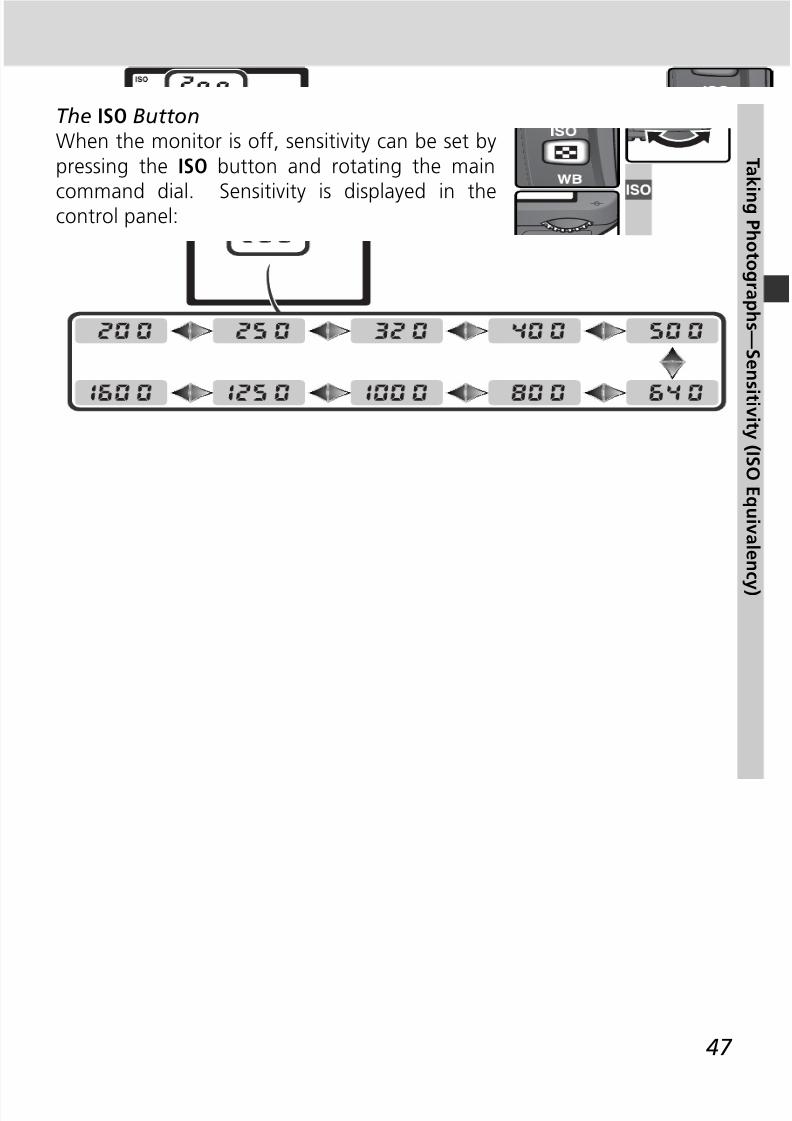
8/7/2019 ad9ec4ae0fbdbb1f44546d3a474e0e87
http://slidepdf.com/reader/full/ad9ec4ae0fbdbb1f44546d3a474e0e87 57/218
47
T ak i ng P h ot ogr aph s —S en
s i t i vi t y ( I S O E qui val en
c y)
The ISO ButtonWhen the monitor is off, sensitivity can be set bypressing the ISO button and rotating the main
command dial. Sensitivity is displayed in thecontrol panel:
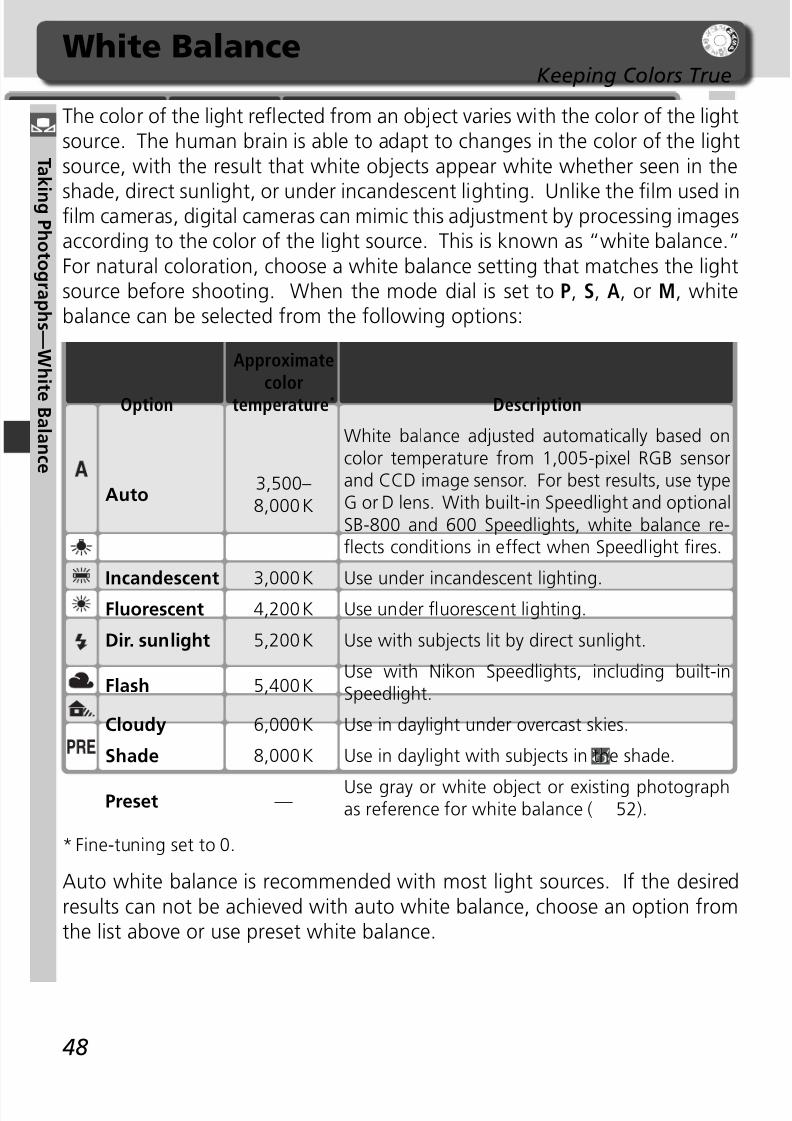
8/7/2019 ad9ec4ae0fbdbb1f44546d3a474e0e87
http://slidepdf.com/reader/full/ad9ec4ae0fbdbb1f44546d3a474e0e87 58/218
48
T ak i ng P h ot ogr aph s —Wh
i t e B al anc e
White BalanceKeeping Colors True
The color of the light refl ected from an object varies with the color of the lightsource. The human brain is able to adapt to changes in the color of the lightsource, with the result that white objects appear white whether seen in the
shade, direct sunlight, or under incandescent lighting. Unlike the fi lm used infi lm cameras, digital cam eras can mimic this adjustment by processing imagesaccording to the color of the light source. This is known as “white balance.”For natural coloration, choose a white balance setting that matches the lightsource before shooting. When the mode dial is set to P, S, A, or M, whitebalance can be selected from the following options:
* Fine-tuning set to 0.
Auto white balance is recommended with most light sources. If the desiredresults can not be achieved with auto white balance, choose an option fromthe list above or use preset white balance.
Approximate
colortemperature*
White balance adjusted automatically based oncolor temperature from 1,005-pixel RGB sensorand CCD image sensor. For best results, use typeG or D lens. With built-in Speedlight and optionalSB-800 and 600 Speedlights, white balance re-fl ects conditions in effect when Speedlight fi res.
3,500–8,000 K
Auto
Use under incandescent lighting.3,000 KIncandescent
DescriptionOption
Use under fl uorescent lighting.4,200 KFluorescent
Use with subjects lit by direct sunlight.5,200 KDir. sunlight
Use with Nikon Speedlights, including built-inSpeedlight.5,400 KFlash
Use in daylight under overcast skies.6,000 KCloudy
Use in daylight with subjects in the shade.8,000 KShade
Use gray or white object or existing photographas reference for white balance ( 52).—Preset
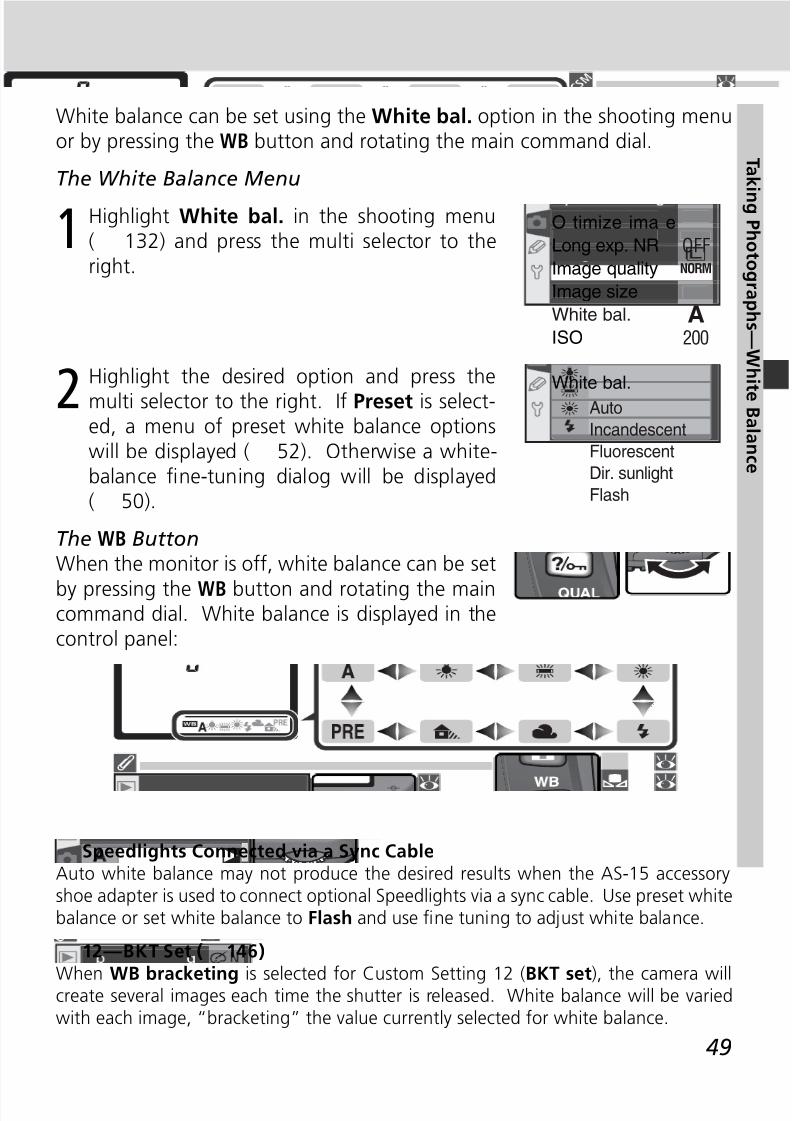
8/7/2019 ad9ec4ae0fbdbb1f44546d3a474e0e87
http://slidepdf.com/reader/full/ad9ec4ae0fbdbb1f44546d3a474e0e87 59/218
49
T ak i ng P h ot ogr aph s —Wh
i t e B al anc e
White balance can be set using the White bal. option in the shooting menuor by pressing the WB button and rotating the main command dial.
The White Balance Menu
1 Highlight White bal. in the shooting menu( 132) and press the multi selector to theright.
200A
NORM
OFF
O timize ima e
Long exp. NR
Image quality
Image size
White bal.
ISO
2Highlight the desired option and press themulti selector to the right. If Preset is select-ed, a menu of preset white balance optionswill be displayed ( 52). Otherwise a white-balance fi ne-tuning dialog will be displayed( 50).
The WB ButtonWhen the monitor is off, white balance can be set
by pressing the WB button and rotating the maincommand dial. White balance is displayed in thecontrol panel:
White bal.
Auto
Incandescent
Fluorescent
Dir. sunlight
Flash
Speedlights Connected via a Sync CableAuto white balance may not produce the desired results when the AS-15 accessoryshoe adapter is used to connect optional Speedlights via a sync cable. Use preset whitebalance or set white balance to Flash and use fi ne tuning to adjust white balance.
12—BKT Set ( 146)
When WB bracketing is selected for Custom Setting 12 (BKT set), the camera willcreate several images each time the shutter is released. White balance will be variedwith each image, “bracketing” the value currently selected for white balance.

8/7/2019 ad9ec4ae0fbdbb1f44546d3a474e0e87
http://slidepdf.com/reader/full/ad9ec4ae0fbdbb1f44546d3a474e0e87 60/218
50
T ak i ng P h ot ogr aph s —Wh
i t e B al anc e
Fine-Tuning White BalanceAt settings other than Preset, white balance can be “fi ne tuned” to compen-sate for variations in the color of the light source or to introduce a deliberate
“warm” or “cold” cast into an image. Higher settings can be used to lendimages a bluish tinge or to compensate for light sources with a yellow or redcast, while lowering white balance can make photographs appear slightlymore yellow or red or compensate for light sources with a blue cast. Adjust-ments can be made in the range +3 to –3 in increments of one. Except inFluorescent mode, each increment is equivalent to about 10 mired.
White balance is fi ne tuned using the White bal. option in the shooting
menu or by pressing the WB button and rotating the sub-command dial. Atsettings other than ±0, a icon appears in the control panel.
The White Balance Menu
1 In the white balance menu ( 49), highlightan option other than Preset and press themulti selector to the right.
0
White bal.
OK
Fine-tune
2 Press the multi selector up or down to choosethe desired value and press the multi selectorto the right. The shooting menu will be dis-played.
White bal.Fine-tune
OK+1
Color TemperatureThe perceived color of a light source varies with the viewer and other conditions. Colortemperature is an objective measure of the color of a light source, defi ned with ref- erence to the temperature to which an object would have to be heated to radiate lightin the same wavelengths. While light sources with a color temperature in the neigh-
borhood of 5,000–5,500 K appear white, light sources with a lower color temperature,such as incandescent light bulbs, appear slightly yellow or red. Light sources with ahigher color temperature appear tinged with blue.

8/7/2019 ad9ec4ae0fbdbb1f44546d3a474e0e87
http://slidepdf.com/reader/full/ad9ec4ae0fbdbb1f44546d3a474e0e87 61/218

8/7/2019 ad9ec4ae0fbdbb1f44546d3a474e0e87
http://slidepdf.com/reader/full/ad9ec4ae0fbdbb1f44546d3a474e0e87 62/218

8/7/2019 ad9ec4ae0fbdbb1f44546d3a474e0e87
http://slidepdf.com/reader/full/ad9ec4ae0fbdbb1f44546d3a474e0e87 63/218
53
T ak i ng P h ot ogr aph s —Wh
i t e B al anc e
3 Release the WB button briefl y and then pressthe button until the icon in the controlpanel starts to fl ash. A blinking will also
appear in the control panel and viewfi nderframe-count displays.
4Frame the reference object so that it fi lls theviewfi nder and press the shutter-release but-ton all the way down. The camera will mea-sure a value for white balance and use thisvalue when preset white balance is selected.No photograph will be recorded; white bal-ance can be measured accurately even whenthe camera is not in focus.
To exit without measuring a new value for white balance, press the WBbutton.
5 If the camera was able to measure a valuefor white balance, will fl ash in thecontrol panel, while the viewfi nder will showa fl ashing . To return to shooting mode,
press the shutter-release button halfway orwait until the exposure meters turn off.
If lighting is too dark or too bright, the cameramay be unable to measure white balance. Afl ashing will appear in the controlpanel and viewfi nder. Return to Step 4 andmeasure white balance again.
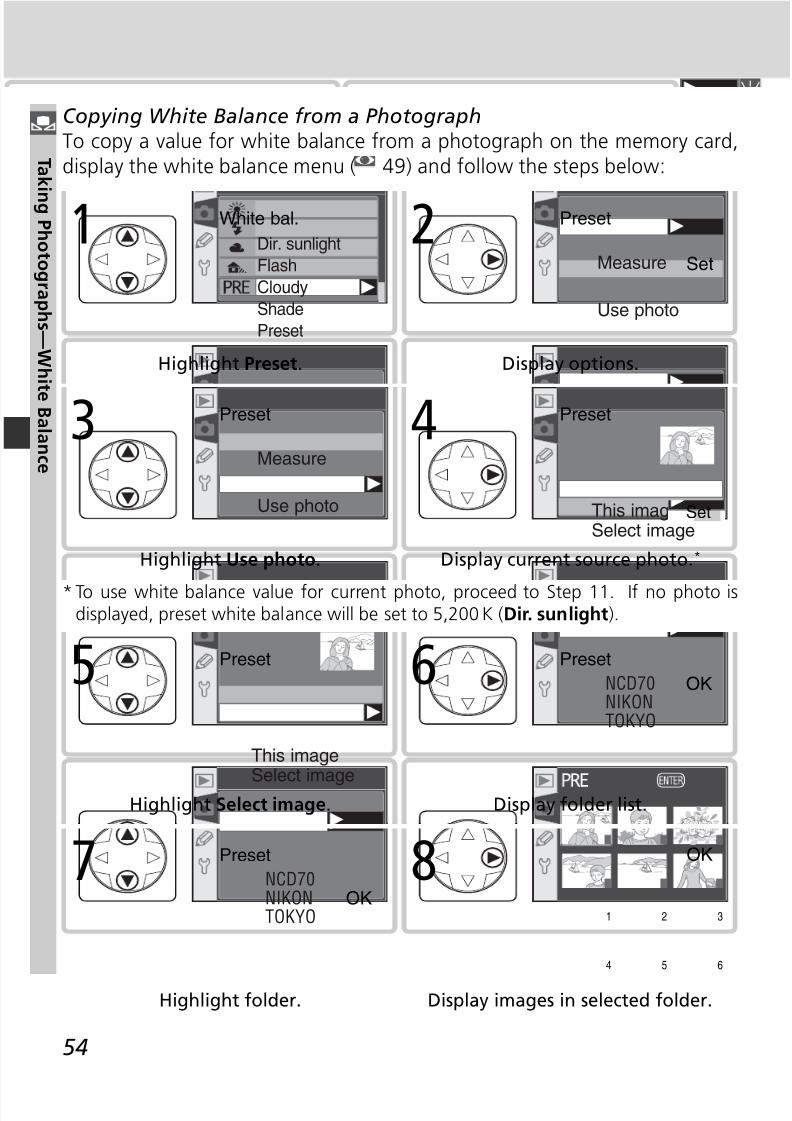
8/7/2019 ad9ec4ae0fbdbb1f44546d3a474e0e87
http://slidepdf.com/reader/full/ad9ec4ae0fbdbb1f44546d3a474e0e87 64/218
54
T ak i ng P h ot ogr aph s —Wh
i t e B al anc e
Display options.
Preset
SetMeasure
Use photo
2
Highlight Preset.
White bal.
Dir. sunlight
Flash
Cloudy
Shade
Preset
1
Display current source photo.*
This imageSelect image
Preset
Set
4
Highlight Use photo.
Preset
Measure
Use photo
3
Copying White Balance from a PhotographTo copy a value for white balance from a photograph on the memory card,display the white balance menu ( 49) and follow the steps below:
* To use white balance value for current photo, proceed to Step 11. If no photo isdisplayed, preset white balance will be set to 5,200 K (Dir. sunlight).
Highlight Select image.
Preset
This imageSelect image
5
Display folder list.
NCD70NIKONTOKYO
OK
Preset6
Display images in selected folder.
1 2 3
4 5 6
OK8
Highlight folder.
NCD70NIKONTOKYO
OK
Preset7
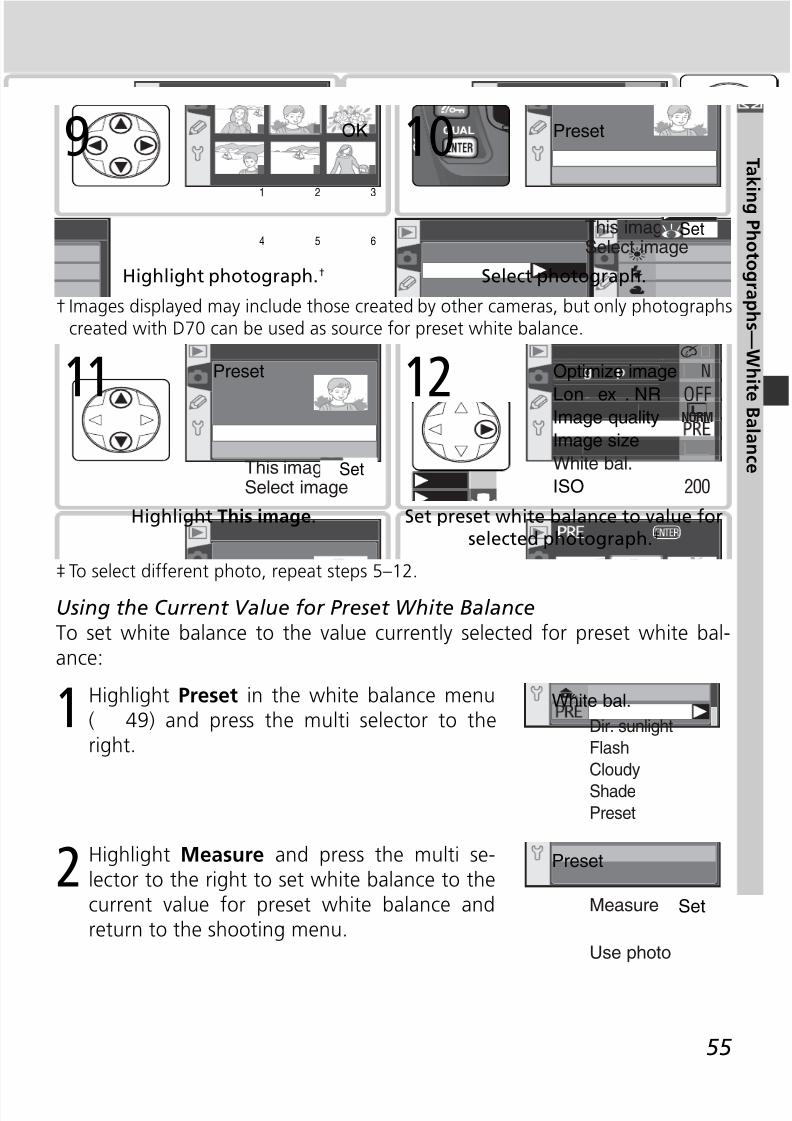
8/7/2019 ad9ec4ae0fbdbb1f44546d3a474e0e87
http://slidepdf.com/reader/full/ad9ec4ae0fbdbb1f44546d3a474e0e87 65/218
55
T ak i ng P h ot ogr aph s —Wh
i t e B al anc e
† Images displayed may include those created by other cameras, but only photographscreated with D70 can be used as source for preset white balance.
Select photograph.
This imageSelect image
Preset
Set
10
Highlight photograph.†
1 2 3
4 5 6
OK9
Highlight This image.
This imageSelect image
Preset
Set
11
Set preset white balance to value forselected photograph.‡
200
NORM
OFF
NOptimize image
Lon ex . NRImage quality
Image size
White bal.
ISO
12
‡ To select different photo, repeat steps 5–12.
Using the Current Value for Preset White BalanceTo set white balance to the value currently selected for preset white bal-ance:
1 Highlight Preset in the white balance menu( 49) and press the multi selector to theright.
White bal.
Dir. sunlight
Flash
Cloudy
ShadePreset
2 Highlight Measure and press the multi se- lector to the right to set white balance to thecurrent value for preset white balance andreturn to the shooting menu.
Preset
SetMeasure
Use photo
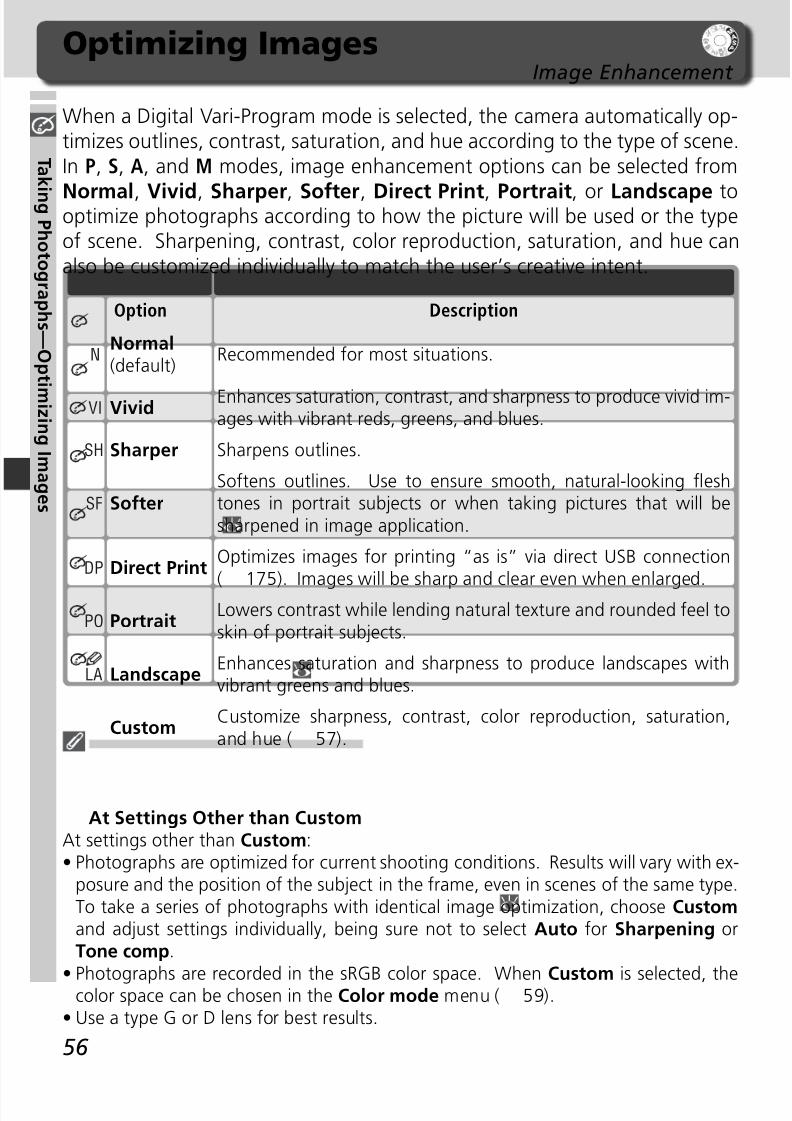
8/7/2019 ad9ec4ae0fbdbb1f44546d3a474e0e87
http://slidepdf.com/reader/full/ad9ec4ae0fbdbb1f44546d3a474e0e87 66/218
56
T ak i ng P h ot ogr aph s —Op
t i mi z i ng I mages
Optimizing ImagesImage Enhancement
When a Digital Vari-Program mode is selected, the camera automatically op-timizes outlines, contrast, saturation, and hue according to the type of scene.In P, S, A, and M modes, image enhancement options can be selected from
Normal, Vivid, Sharper, Softer, Direct Print, Portrait, or Landscape tooptimize photographs according to how the picture will be used or the typeof scene. Sharpening, contrast, color reproduction, saturation, and hue canalso be customized individually to match the user’s creative intent.
Recommended for most situations.Normal(default)
N
Enhances saturation, contrast, and sharpness to produce vivid im-ages with vibrant reds, greens, and blues.
VividVI
DescriptionOption
Sharpens outlines.SharperSH
Softens outlines. Use to ensure smooth, natural-looking fl eshtones in portrait subjects or when taking pictures that will besharpened in image application.
SofterSF
Optimizes images for printing “as is” via direct USB connection( 175). Images will be sharp and clear even when enlarged.
Direct PrintDP
Lowers contrast while lending natural texture and rounded feel toskin of portrait subjects.
PortraitPO
Enhances saturation and sharpness to produce landscapes withvibrant greens and blues.
LandscapeLA
Customize sharpness, contrast, color reproduction, saturation,and hue ( 57).
Custom
At Settings Other than CustomAt settings other than Custom:• Photographs are optimized for current shooting conditions. Results will vary with ex-
posure and the position of the subject in the frame, even in scenes of the same type.To take a series of photographs with identical image optimization, choose Customand adjust settings individually, being sure not to select Auto for Sharpening orTone comp.
• Photographs are recorded in the sRGB color space. When Custom is selected, thecolor space can be chosen in the Color mode menu ( 59).• Use a type G or D lens for best results.
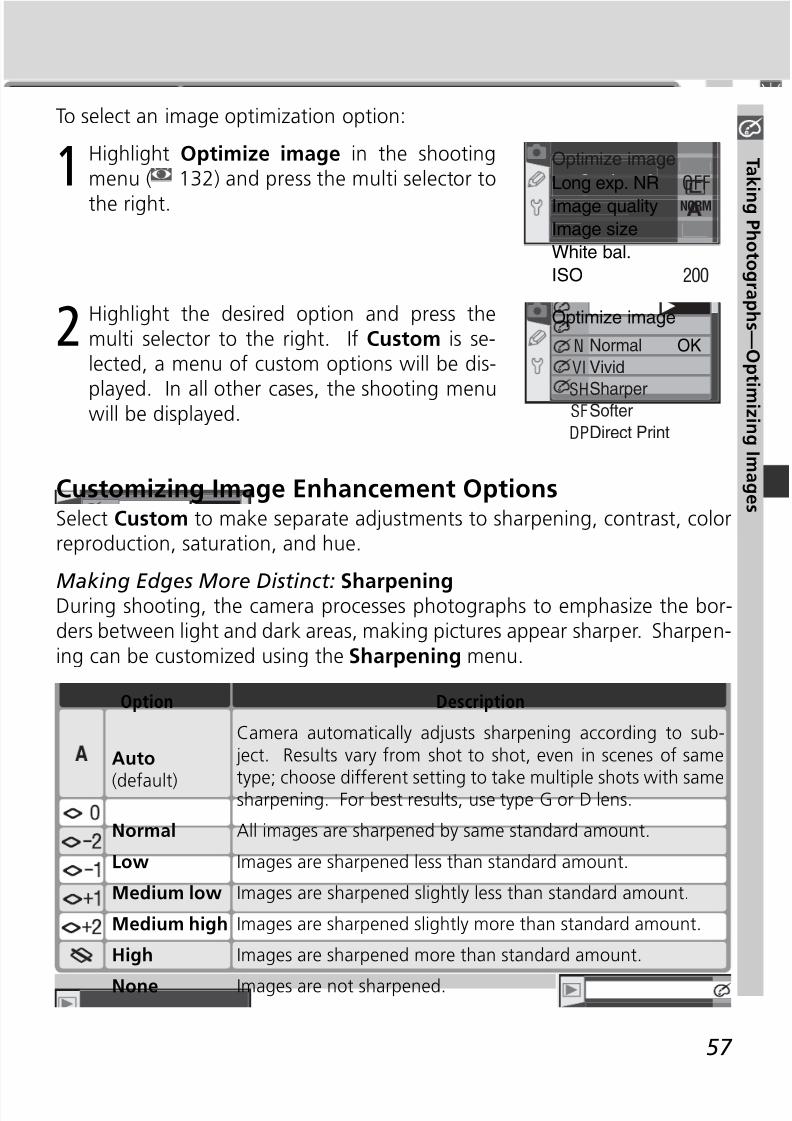
8/7/2019 ad9ec4ae0fbdbb1f44546d3a474e0e87
http://slidepdf.com/reader/full/ad9ec4ae0fbdbb1f44546d3a474e0e87 67/218
57
T ak i ng P h ot ogr aph s —Op
t i mi z i ng I mages
To select an image optimization option:
1 Highlight Optimize image in the shootingmenu ( 132) and press the multi selector to
the right.OFF
200
NORM
Optimize image
Long exp. NR
Image quality
Image size
White bal.
ISO
2 Highlight the desired option and press themulti selector to the right. If Custom is se-lected, a menu of custom options will be dis-
played. In all other cases, the shooting menuwill be displayed. SF
DP
SH
VI
N
Optimize image
OKNormal
Vivid
SharperSofter
Direct Print
Camera automatically adjusts sharpening according to sub-ject. Results vary from shot to shot, even in scenes of same
type; choose different setting to take multiple shots with samesharpening. For best results, use type G or D lens.
All images are sharpened by same standard amount.
Description
Images are sharpened less than standard amount.
Images are sharpened slightly less than standard amount.
Images are sharpened slightly more than standard amount.
Images are sharpened more than standard amount.
Images are not sharpened.None
High
Medium high
Medium low
Low
Option
Normal
Auto
(default)
Customizing Image Enhancement OptionsSelect Custom to make separate adjustments to sharpening, contrast, colorreproduction, saturation, and hue.
Making Edges More Distinct: SharpeningDuring shooting, the camera processes photographs to emphasize the bor-ders between light and dark areas, making pictures appear sharper. Sharpen-ing can be customized using the Sharpening menu.
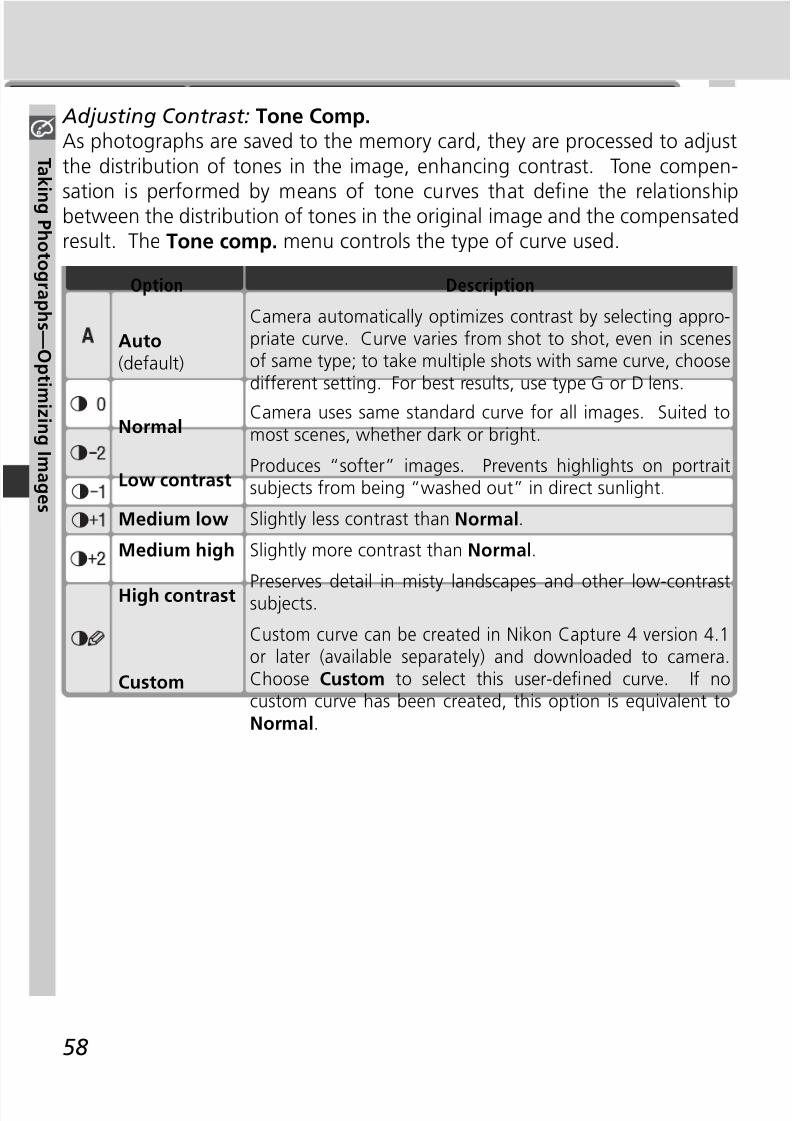
8/7/2019 ad9ec4ae0fbdbb1f44546d3a474e0e87
http://slidepdf.com/reader/full/ad9ec4ae0fbdbb1f44546d3a474e0e87 68/218
58
T ak i ng P h ot ogr aph s —Op
t i mi z i ng I mages
Adjusting Contrast: Tone Comp.As photographs are saved to the memory card, they are processed to adjustthe distribution of tones in the image, enhancing contrast. Tone compen-
sation is performed by means of tone curves that defi ne the relationshipbetween the distribution of tones in the original image and the compensatedresult. The Tone comp. menu controls the type of curve used.
Camera automatically optimizes contrast by selecting appro-priate curve. Curve varies from shot to shot, even in scenesof same type; to take multiple shots with same curve, choose
different setting. For best results, use type G or D lens.
Auto(default)
Camera uses same standard curve for all images. Suited tomost scenes, whether dark or bright.Normal
DescriptionOption
Produces “softer” images. Prevents highlights on portraitsubjects from being “washed out” in direct sunlight.Low contrast
Slightly less contrast than Normal.Medium low
Custom curve can be created in Nikon Capture 4 version 4.1or later (available separately) and downloaded to camera.Choose Custom to select this user-defi ned curve. If nocustom curve has been created, this option is equivalent toNormal.
Custom
Preserves detail in misty landscapes and other low-contrastsubjects.High contrast
Slightly more contrast than Normal.Medium high
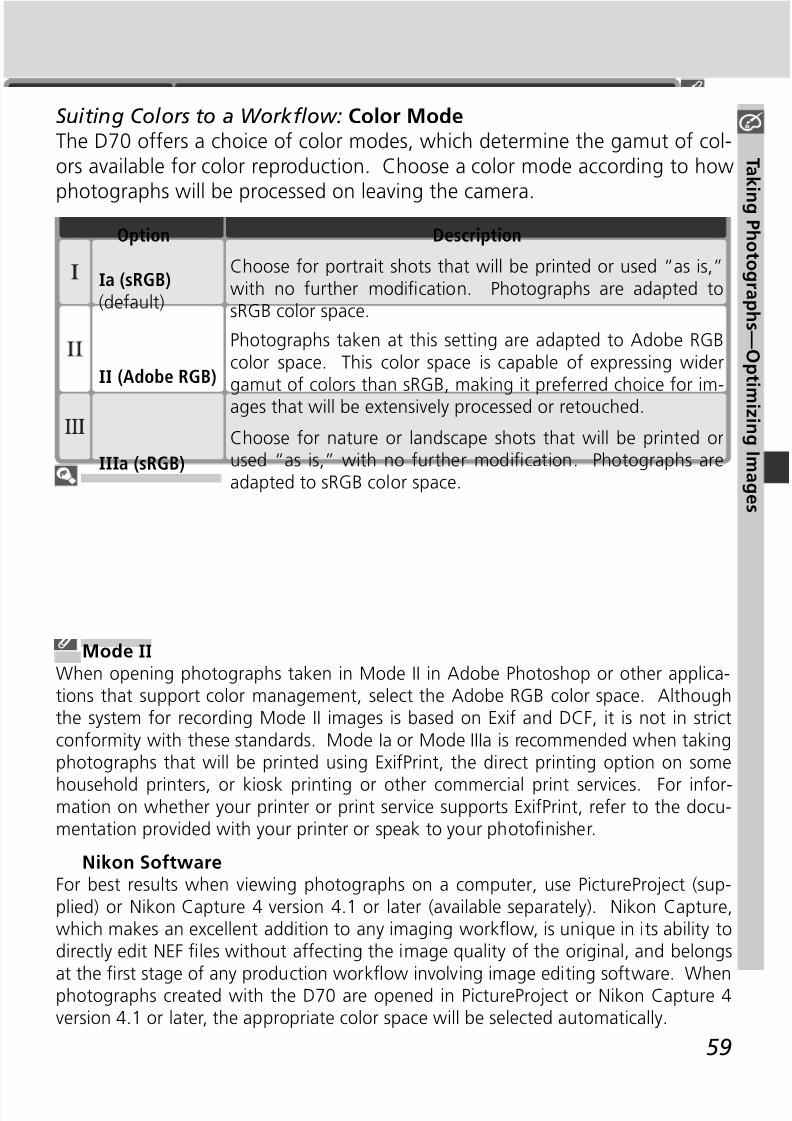
8/7/2019 ad9ec4ae0fbdbb1f44546d3a474e0e87
http://slidepdf.com/reader/full/ad9ec4ae0fbdbb1f44546d3a474e0e87 69/218
59
T ak i ng P h ot ogr aph s —Op
t i mi z i ng I mages
Suiting Colors to a Workfl ow: Color ModeThe D70 offers a choice of color modes, which determine the gamut of col-ors available for color reproduction. Choose a color mode according to how
photographs will be processed on leaving the camera.
Choose for portrait shots that will be printed or used “as is,”with no further modifi cation. Photographs are adapted tosRGB color space.
Ia (sRGB)(default)
Photographs taken at this setting are adapted to Adobe RGBcolor space. This color space is capable of expressing wider
gamut of colors than sRGB, making it preferred choice for im-ages that will be extensively processed or retouched.
II (Adobe RGB)
DescriptionOption
Choose for nature or landscape shots that will be printed orused “as is,” with no further modifi cation. Photographs areadapted to sRGB color space.
IIIa (sRGB)
Mode II
When opening photographs taken in Mode II in Adobe Photoshop or other applica-tions that support color management, select the Adobe RGB color space. Althoughthe system for recording Mode II images is based on Exif and DCF, it is not in strictconformity with these standards. Mode Ia or Mode IIIa is recommended when takingphotographs that will be printed using ExifPrint, the direct printing option on some
household printers, or kiosk printing or other commercial print services. For infor-mation on whether your printer or print service supports ExifPrint, refer to the docu-mentation provided with your printer or speak to your photofi nisher.
Nikon SoftwareFor best results when viewing photographs on a computer, use PictureProject (sup-plied) or Nikon Capture 4 version 4.1 or later (available separately). Nikon Capture,which makes an excellent addition to any imaging workfl ow, is unique in its ability todirectly edit NEF fi les without affecting the image quality of the original, and belongs
at the fi rst stage of any production workfl ow involving image editing software. Whenphotographs created with the D70 are opened in PictureProject or Nikon Capture 4version 4.1 or later, the appropriate color space will be selected automatically.

8/7/2019 ad9ec4ae0fbdbb1f44546d3a474e0e87
http://slidepdf.com/reader/full/ad9ec4ae0fbdbb1f44546d3a474e0e87 70/218
60
T ak i ng P h ot ogr aph s —Op
t i mi z i ng I mages
Controlling Color: Hue AdjustmentHue can be adjusted in the range of about –9 ° to +9 ° in increments of 3 °.If red is taken as the starting color, raising hue above 0 ° (the default setting)would introduce a yellow cast, making colors that would be red at a settingof 0 ° appear increasingly orange. Lowering hue below 0 ° would introducea blue cast, making colors that would be red at a setting of 0 ° appear in- creasingly purple.
HueThe RGB color model used in digital photographs reproduces colors using dif feringamounts of red, green, and blue light. By mixing two colors of light, a variety ofdifferent colors can be produced. For example, red combined with a small amountof green light produces orange. If red and green are mixed in equal amounts, yel-low results, while a smaller amount of red produces a yellow green. Mixing differentamounts of red and blue light produces colors ranging from a reddish purple throughpurple to navy, while mixing different amounts of green and blue light produces colorsranging from emerald to turquoise. (Adding a third color of light results in lighter
hues; if all three are mixed in equal amounts, the results range from white throughgray.) When this progression of hues is arranged in a circle, the result is known as acolor wheel.
Controlling Vividness: SaturationSaturation controls the vividness of colors.
Normal vividness. Recommended for most situations.Normal(default)
Reduced vividness. Use when taking pictures that will later beretouched by computer.Moderate
DescriptionOption
Increased vividness. Use for vivid, photoprint effect when takingpictures that will be printed “as is,” without further modifi cation.Enhanced
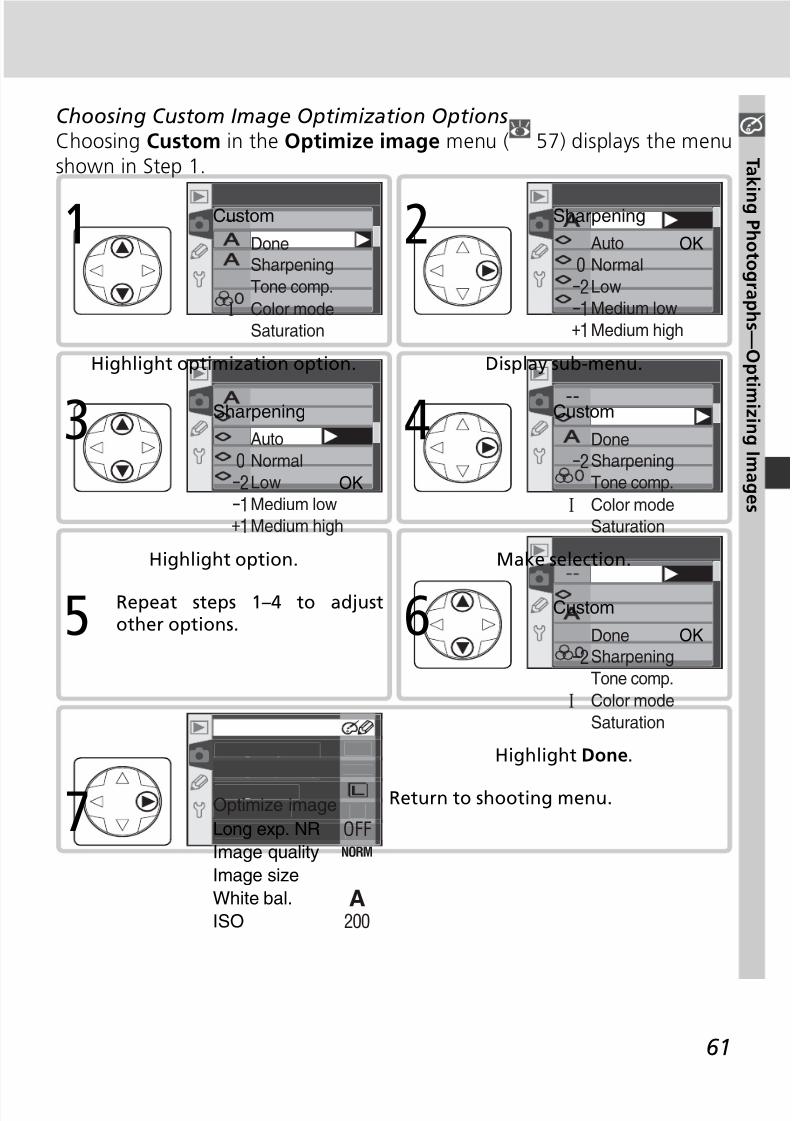
8/7/2019 ad9ec4ae0fbdbb1f44546d3a474e0e87
http://slidepdf.com/reader/full/ad9ec4ae0fbdbb1f44546d3a474e0e87 71/218
61
T ak i ng P h ot ogr aph s —Op
t i mi z i ng I mages
Highlight option.
+1-1
-20
Sharpening
Auto
Normal
Low
Medium low
Medium high
OK
3
Make selection.
I
-2
Custom
Done
Sharpening
Tone comp.
Color mode
Saturation
4
Highlight optimization option.
I
Custom
Done
Sharpening
Tone comp.
Color mode
Saturation
1
Display sub-menu.
+1-1-20
Sharpening
Auto
Normal
Low
Medium low
Medium high
OK2
Choosing Custom Image Optimization OptionsChoosing Custom in the Optimize image menu ( 57) displays the menushown in Step 1.
Repeat steps 1–4 to adjustother options.5
Highlight Done.
I
-2
Custom
Done
Sharpening
Tone comp.
Color mode
Saturation
OK6
Return to shooting menu.
OFF
200A
NORM
Optimize image
Long exp. NR
Image quality
Image size
White bal.
ISO
7
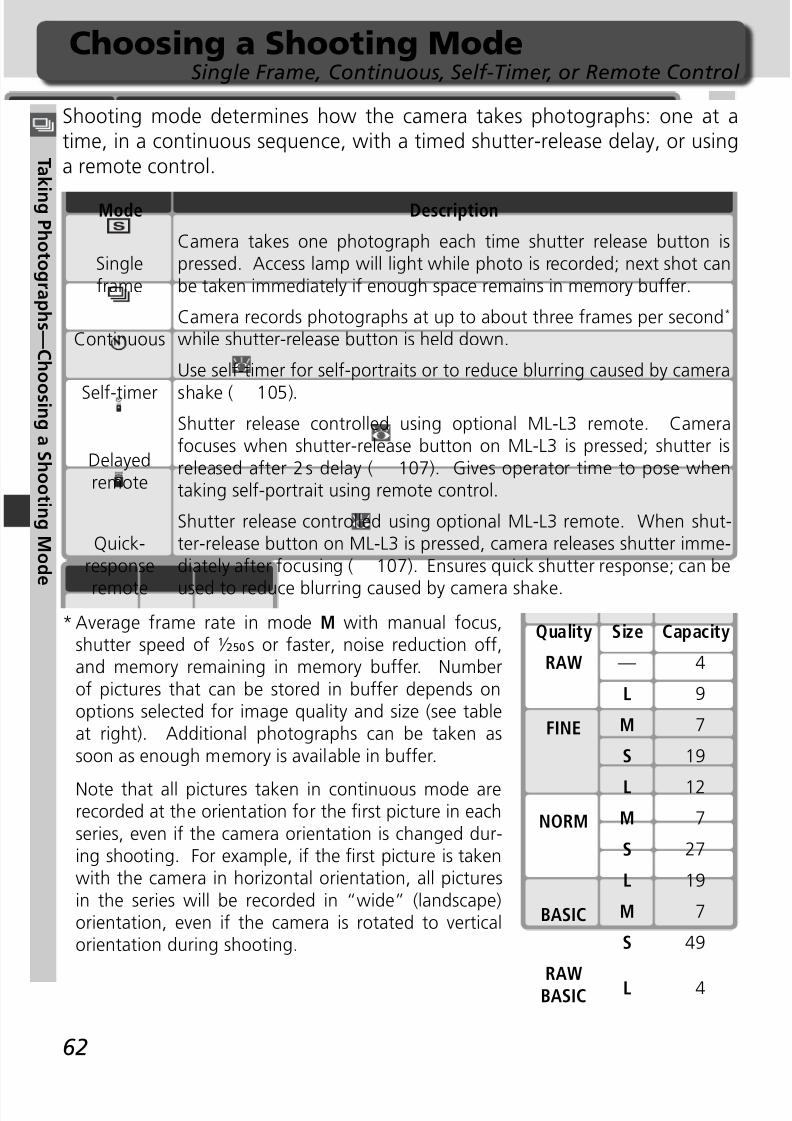
8/7/2019 ad9ec4ae0fbdbb1f44546d3a474e0e87
http://slidepdf.com/reader/full/ad9ec4ae0fbdbb1f44546d3a474e0e87 72/218
62
T ak i ng P h ot ogr aph s —C h oos i ng a S h oot i ng Mod
e
Choosing a Shooting ModeSingle Frame, Continuous, Self-Timer, or Remote Control
Shooting mode determines how the camera takes photographs: one at atime, in a continuous sequence, with a timed shutter-release delay, or usinga remote control.
Camera takes one photograph each time shutter release button ispressed. Access lamp will light while photo is recorded; next shot canbe taken immediately if enough space remains in memory buffer.
Singleframe
DescriptionMode
Shutter release controlled using optional ML-L3 remote. Camerafocuses when shutter-release button on ML-L3 is pressed; shutter isreleased after 2 s delay ( 107). Gives operator time to pose whentaking self-portrait using remote control.
Delayedremote
Shutter release controlled using optional ML-L3 remote. When shut-ter-release button on ML-L3 is pressed, camera releases shutter imme-diately after focusing ( 107). Ensures quick shutter response; can be
used to reduce blurring caused by camera shake.
Quick-response
remote
Camera records photographs at up to about three frames per second* while shutter-release button is held down.Continuous
Use self-timer for self-portraits or to reduce blurring caused by camera
shake ( 105).Self-timer
* Average frame rate in mode M with manual focus,shutter speed of ½50s or faster, noise reduction off,and memory remaining in memory buffer. Numberof pictures that can be stored in buffer depends onoptions selected for image quality and size (see tableat right). Additional photographs can be taken assoon as enough memory is available in buffer.
Note that all pictures taken in continuous mode arerecorded at the orientation for the fi rst picture in eachseries, even if the camera orientation is changed dur-ing shooting. For example, if the fi rst picture is takenwith the camera in horizontal orientation, all picturesin the series will be recorded in “wide” (landscape)orientation, even if the camera is rotated to verticalorientation during shooting.
Quality Size Capacity
RAW 4—
FINE
9L
7M
19S
NORM
12L
7M
27S
BASIC
19L
7M
49S
RAWBASIC 4L
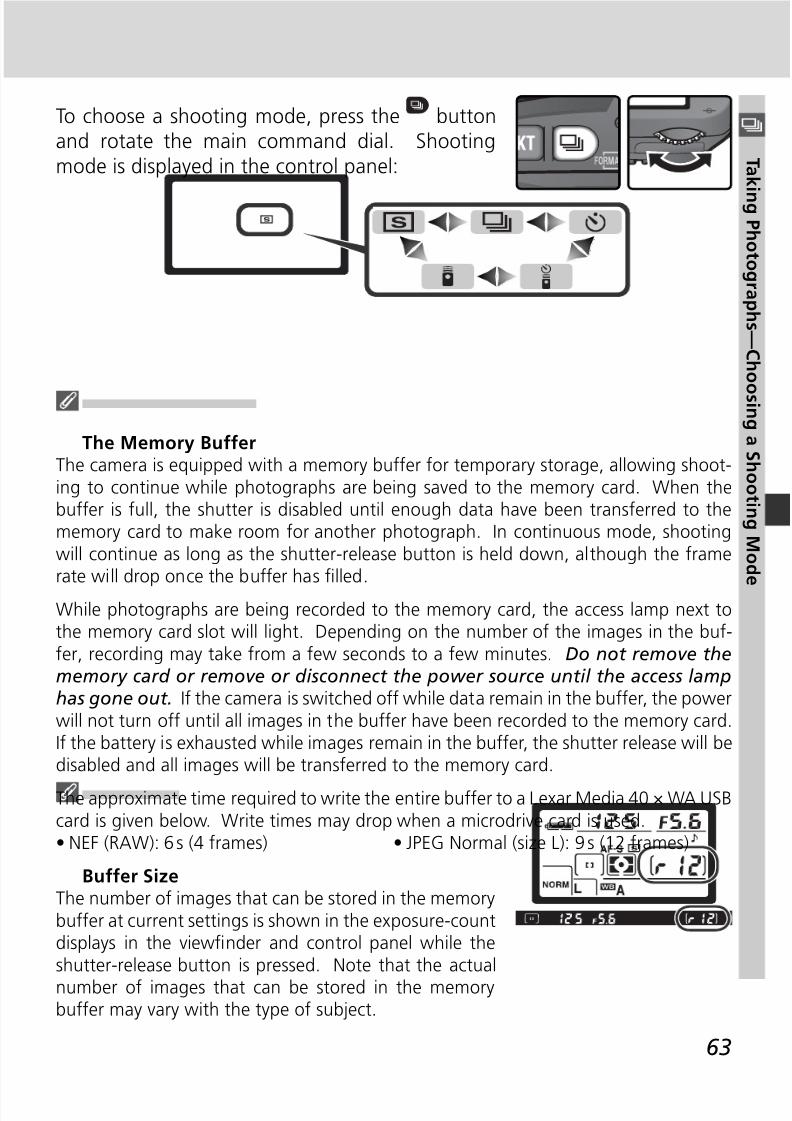
8/7/2019 ad9ec4ae0fbdbb1f44546d3a474e0e87
http://slidepdf.com/reader/full/ad9ec4ae0fbdbb1f44546d3a474e0e87 73/218
63
T ak i ng P h ot ogr aph s —C h oos i ng a S h oot i ng Mod
e
The Memory BufferThe camera is equipped with a memory buffer for temporary storage, allowing shoot-ing to continue while photographs are being saved to the memory card. When thebuffer is full, the shutter is disabled until enough data have been transferred to thememory card to make room for another photograph. In continuous mode, shootingwill continue as long as the shutter-release button is held down, although the framerate will drop once the buffer has fi lled.
While photographs are being recorded to the memory card, the access lamp next tothe memory card slot will light. Depending on the number of the images in the buf-fer, recording may take from a few seconds to a few minutes. Do not remove thememory card or remove or disconnect the power source until the access lamphas gone out. If the camera is switched off while data remain in the buffer, the powerwill not turn off until all images in the buffer have been recorded to the memory card.If the battery is exhausted while images remain in the buffer, the shutter release will bedisabled and all images will be transferred to the memory card.
The approximate time required to write the entire buffer to a Lexar Media 40 × WA USBcard is given below. Write times may drop when a microdrive card is used.• NEF (RAW): 6 s (4 frames) • JPEG Normal (size L): 9 s (12 frames)
Buffer SizeThe number of images that can be stored in the memorybuffer at current settings is shown in the exposure-countdisplays in the viewfi nder and control panel while theshutter-release button is pressed. Note that the actual
number of images that can be stored in the memorybuffer may vary with the type of subject.
To choose a shooting mode, press the buttonand rotate the main command dial. Shootingmode is displayed in the control panel:

8/7/2019 ad9ec4ae0fbdbb1f44546d3a474e0e87
http://slidepdf.com/reader/full/ad9ec4ae0fbdbb1f44546d3a474e0e87 74/218
64
T ak i ng P h ot ogr aph s —F oc
us
FocusControlling How the Camera Focuses
This section describes the options that control how your camera focuses:focus mode, focus-area selection, and AF-area mode.
Focus ModeFocus mode is controlled by the focus mode se- lector on the front of the camera. Two modes areavailable:
VIDEOOUT
Camera focuses automatically when shutter-release button is pressedhalfway. Operation depends on option selected for Custom Setting 2
(Autofocus; 139):• AF-S (single-servo autofocus): When camera focuses, beep sounds
and in-focus indicator (●) appears in viewfi nder. Focus remains lockedwhile shutter-release button is pressed halfway (focus lock ). Shuttercan only be released when in-focus indicator is displayed (focus pri- or i ty ). If subject was moving when shutter-release button was pressedhalfway, camera will track subject until focusing is complete and theshutter can be released (predic tive focus tracking; 65). If subjectstops moving before shutter is released, in-focus indicator will appear
in viewfi nder and focus will lock at this distance.• AF-C (continuous-servo autofocus): Camera focuses continuously
while shutter-release button is pressed halfway. If subject moves, fo-cus will be adjusted to compensate (predictive focus tracking; 65).Photographs can be taken whether or not camera is in focus (releasepriority ).
AFAutofocus
DescriptionOption
Camera does not focus automatically; focus must be adjusted manuallyusing the lens focusing ring. If max imum aperture of lens is f/5.6 or
faster, viewfi nder focus indicator can be used to confi rm focus (elec-tronic range fi nd ing; 74), but photographs can be taken at any time,whether or not camera is in focus.
MManual
Choosing single-servo AF ensures a sharp, focused image. Continuous-servoAF may be a better choice with erratically-moving subjects. Manual focus isrecommended when the camera is unable to focus using autofocus.

8/7/2019 ad9ec4ae0fbdbb1f44546d3a474e0e87
http://slidepdf.com/reader/full/ad9ec4ae0fbdbb1f44546d3a474e0e87 75/218
65
T ak i ng P h ot ogr aph s —F oc
us
Predictive Focus TrackingIf the camera autofocus system detects that the subject is moving when the shutter-release button is pressed halfway, it will automatically initiate predictive focus tracking.If the subject is moving toward or away from the camera, the camera will track focus
while attempting to predict where the subject will be when the shutter is released. Insingle-servo autofocus, the camera will initiate predictive focus tracking if the subjectwas moving when the shutter-release button was pressed halfway. Focus will lockwhen the subject stops moving. In continuous-servo AF, the camera will also initiatepredictive focus tracking if the subject starts moving after the shutter-release button ispressed halfway. Focus will not lock when the subject stops moving.
Predictive focus tracking is not available in manual focus mode.
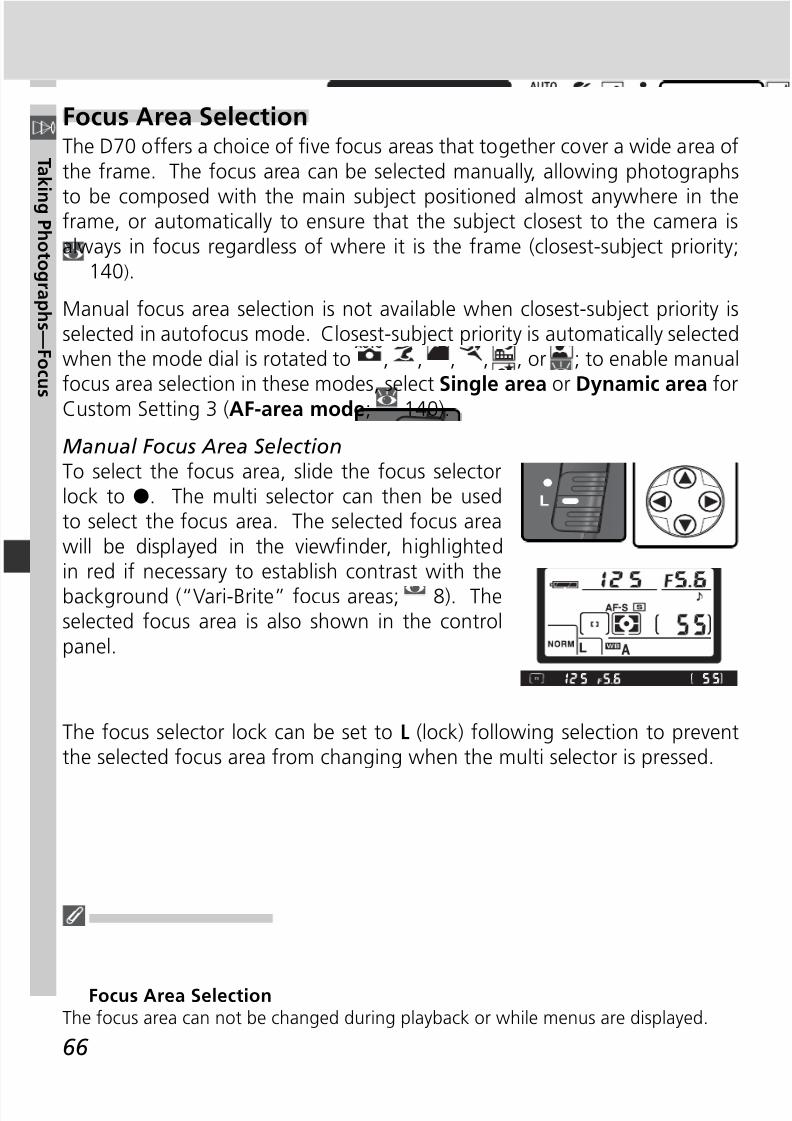
8/7/2019 ad9ec4ae0fbdbb1f44546d3a474e0e87
http://slidepdf.com/reader/full/ad9ec4ae0fbdbb1f44546d3a474e0e87 76/218
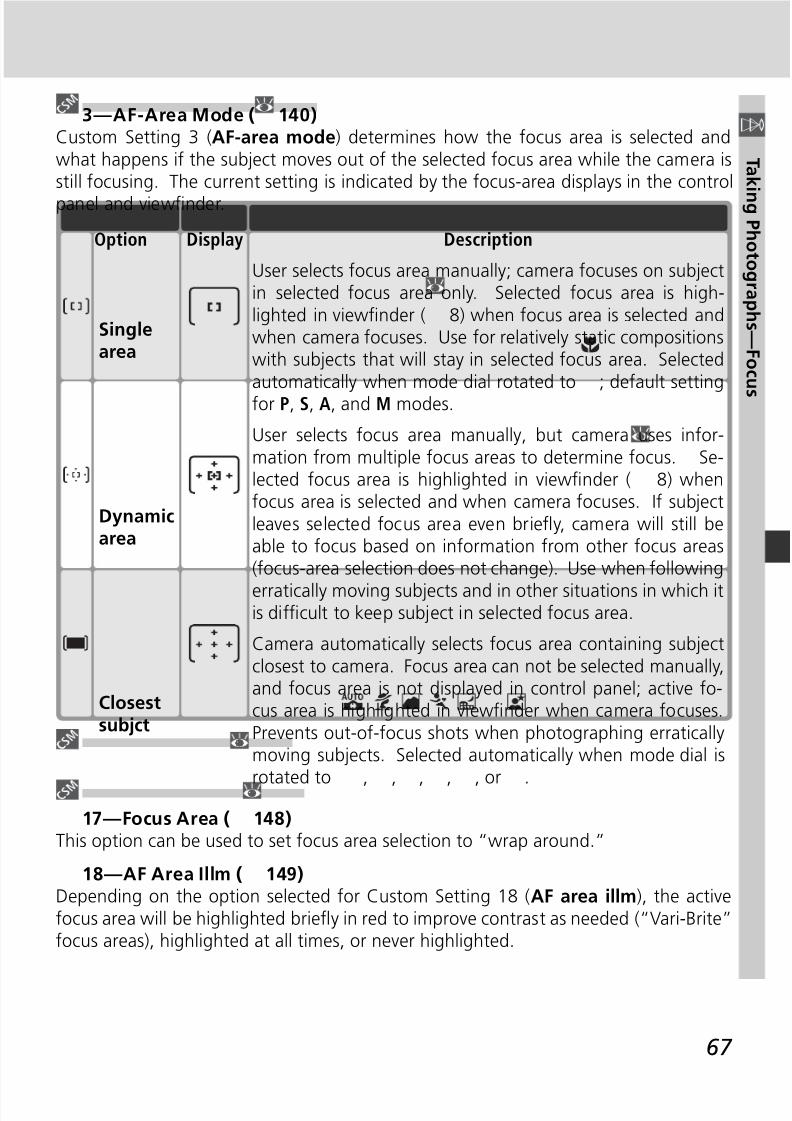
8/7/2019 ad9ec4ae0fbdbb1f44546d3a474e0e87
http://slidepdf.com/reader/full/ad9ec4ae0fbdbb1f44546d3a474e0e87 77/218
67
T ak i ng P h ot ogr aph s —F oc
us
3—AF-Area Mode ( 140)Custom Setting 3 (AF-area mode) determines how the focus area is selected andwhat happens if the subject moves out of the selected focus area while the camera isstill focusing. The current setting is indicated by the focus-area displays in the control
panel and viewfi nder.
Display DescriptionOption
User selects focus area manually; camera focuses on subjectin selected focus area only. Selected focus area is high-lighted in viewfi nder ( 8) when focus area is selected andwhen camera focuses. Use for relatively static compositionswith subjects that will stay in selected focus area. Selectedautomatically when mode dial rotated to ; default settingfor P, S, A, and M modes.
Singlearea
User selects focus area manually, but camera uses infor-mation from multiple focus areas to determine focus. Se-lected focus area is highlighted in viewfi nder ( 8) whenfocus area is selected and when camera focuses. If subjectleaves selected focus area even briefl y, camera will still beable to focus based on information from other focus areas(focus-area selection does not change). Use when following
erratically moving subjects and in other situations in which itis diffi cult to keep subject in selected focus area.
Dynamicarea
Camera automatically selects focus area containing subjectclosest to camera. Focus area can not be selected manually,and focus area is not displayed in control panel; active fo-cus area is highlighted in viewfi nder when camera focuses.Prevents out-of-focus shots when photographing erraticallymoving subjects. Selected automatically when mode dial is
rotated to , , , , , or .
Closestsubjct
17—Focus Area ( 148)This option can be used to set focus area selection to “wrap around.”
18—AF Area Illm ( 149)Depending on the option selected for Custom Setting 18 (AF area illm), the activefocus area will be highlighted briefl y in red to improve contrast as needed (“Vari-Brite”focus areas), highlighted at all times, or never highlighted.

8/7/2019 ad9ec4ae0fbdbb1f44546d3a474e0e87
http://slidepdf.com/reader/full/ad9ec4ae0fbdbb1f44546d3a474e0e87 78/218
68
T ak i ng P h ot ogr aph s —F oc
us
Focus-areaselection
Activefocus area
Custom Setting 3(AF-area mode)
Controlpanel
Summary of Autofocus Options
Custom Setting 2(Autofocus)
AF-S
AF-C
View-fi nder
ManualShown in
viewfi nder andcontrol panel
Single area
Manual
Shown inviewfi nder and
control panel
Single area
ManualShown in
viewfi nder and
control panel
Dynamic area
AutomaticNot shownClosest subjct
ManualShown in
viewfi nder andcontrol panel
Dynamic area
AutomaticNot shownClosest subjct
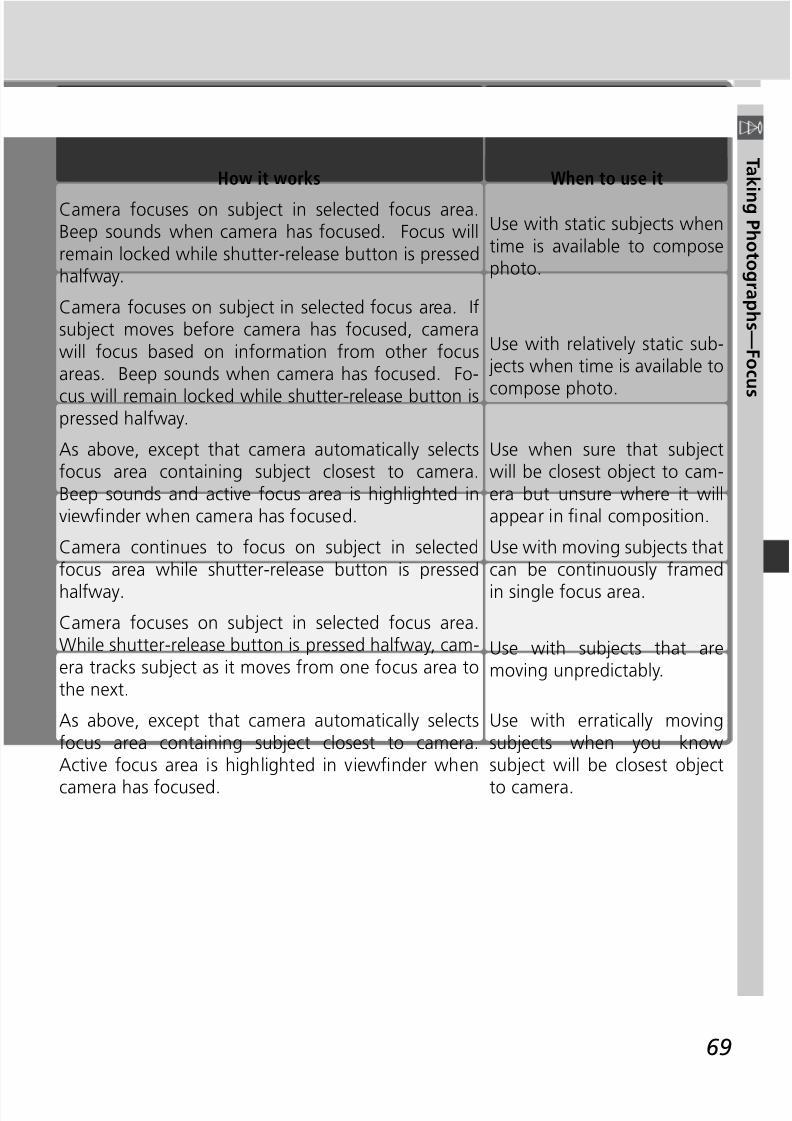
8/7/2019 ad9ec4ae0fbdbb1f44546d3a474e0e87
http://slidepdf.com/reader/full/ad9ec4ae0fbdbb1f44546d3a474e0e87 79/218
69
T ak i ng P h ot ogr aph s —F oc
us
How it works When to use it
Camera focuses on subject in selected focus area.Beep sounds when camera has focused. Focus willremain locked while shutter-release button is pressedhalfway.
Use with static subjects whentime is available to composephoto.
Camera continues to focus on subject in selectedfocus area while shutter-release button is pressed
halfway.
Use with moving subjects thatcan be continuously framed
in single focus area.
Camera focuses on subject in selected focus area. Ifsubject moves before camera has focused, camerawill focus based on information from other focusareas. Beep sounds when camera has focused. Fo-
cus will remain locked while shutter-release button ispressed halfway.
Use with relatively static sub- jects when time is available to
compose photo.
As above, except that camera automatically selectsfocus area containing subject closest to camera.Beep sounds and active focus area is highlighted inviewfi nder when camera has focused.
Use when sure that subjectwill be closest object to cam- era but unsure where it willappear in fi nal composition.
Camera focuses on subject in selected focus area.While shutter-release button is pressed halfway, cam-era tracks subject as it moves from one focus area tothe next.
Use with subjects that aremoving unpredictably.
As above, except that camera automatically selectsfocus area containing subject closest to camera.Active focus area is highlighted in viewfi nder when
camera has focused.
Use with erratically movingsubjects when you knowsubject will be closest object
to camera.
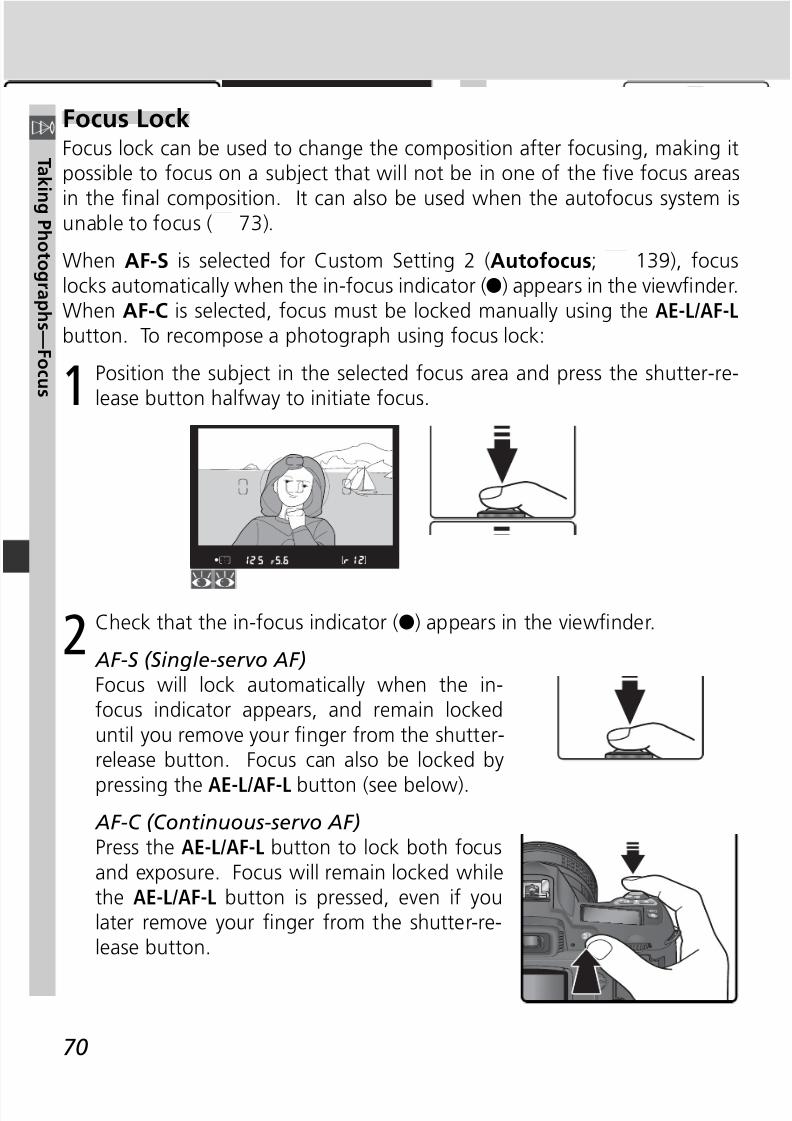
8/7/2019 ad9ec4ae0fbdbb1f44546d3a474e0e87
http://slidepdf.com/reader/full/ad9ec4ae0fbdbb1f44546d3a474e0e87 80/218
70
T ak i ng P h ot ogr aph s —F oc
us
Focus LockFocus lock can be used to change the composition after focusing, making itpossible to focus on a subject that will not be in one of the fi ve focus areas
in the fi nal composition. It can also be used when the autofocus system isunable to focus ( 73).
When AF-S is selected for Custom Setting 2 (Autofocus; 139), focuslocks automatically when the in-focus indicator (●) appears in the viewfi nder.When AF-C is selected, focus must be locked manually using the AE-L/AF-Lbutton. To recompose a photograph using focus lock:
1Position the subject in the selected focus area and press the shutter-re-
lease button halfway to initiate focus.
2 Check that the in-focus indicator (●) appears in the viewfi nder.
AF-S (Single-servo AF)Focus will lock automatically when the in-focus indicator appears, and remain lockeduntil you remove your fi nger from the shutter-release button. Focus can also be locked by
pressing the AE-L/AF-L button (see below).
AF-C (Continuous-servo AF)Press the AE-L/AF-L button to lock both focusand exposure. Focus will remain locked whilethe AE-L/AF-L button is pressed, even if youlater remove your fi nger from the shutter-re- lease button.
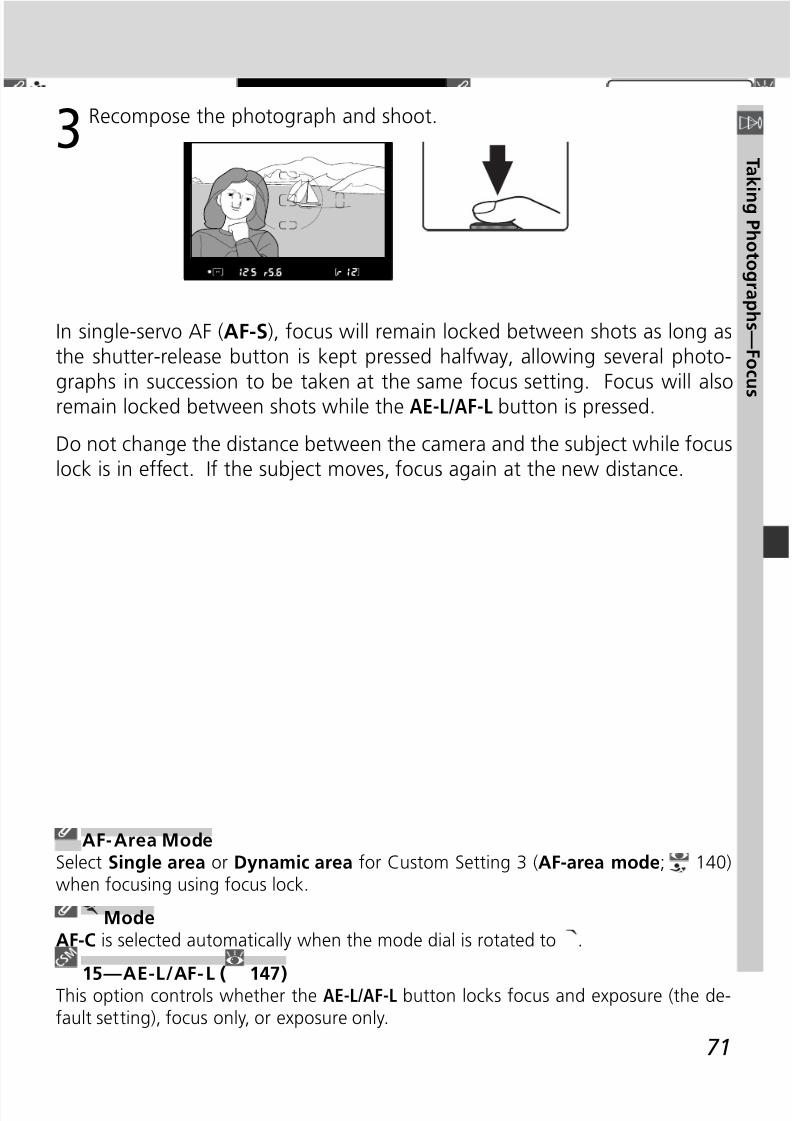
8/7/2019 ad9ec4ae0fbdbb1f44546d3a474e0e87
http://slidepdf.com/reader/full/ad9ec4ae0fbdbb1f44546d3a474e0e87 81/218
71
T ak i ng P h ot ogr aph s —F oc
us
3 Recompose the photograph and shoot.
In single-servo AF (AF-S), focus will remain locked between shots as long asthe shutter-release button is kept pressed halfway, allowing several photo-
graphs in succession to be taken at the same focus setting. Focus will alsoremain locked between shots while the AE-L/AF-L button is pressed.
Do not change the distance between the camera and the subject while focuslock is in effect. If the subject moves, focus again at the new distance.
AF-Area ModeSelect Single area or Dynamic area for Custom Setting 3 (AF-area mode; 140)when focusing using focus lock.
ModeAF-C is selected automatically when the mode dial is rotated to .
15—AE-L/AF-L ( 147)This option controls whether the AE-L/AF-L button locks focus and exposure (the de-fault setting), focus only, or exposure only.
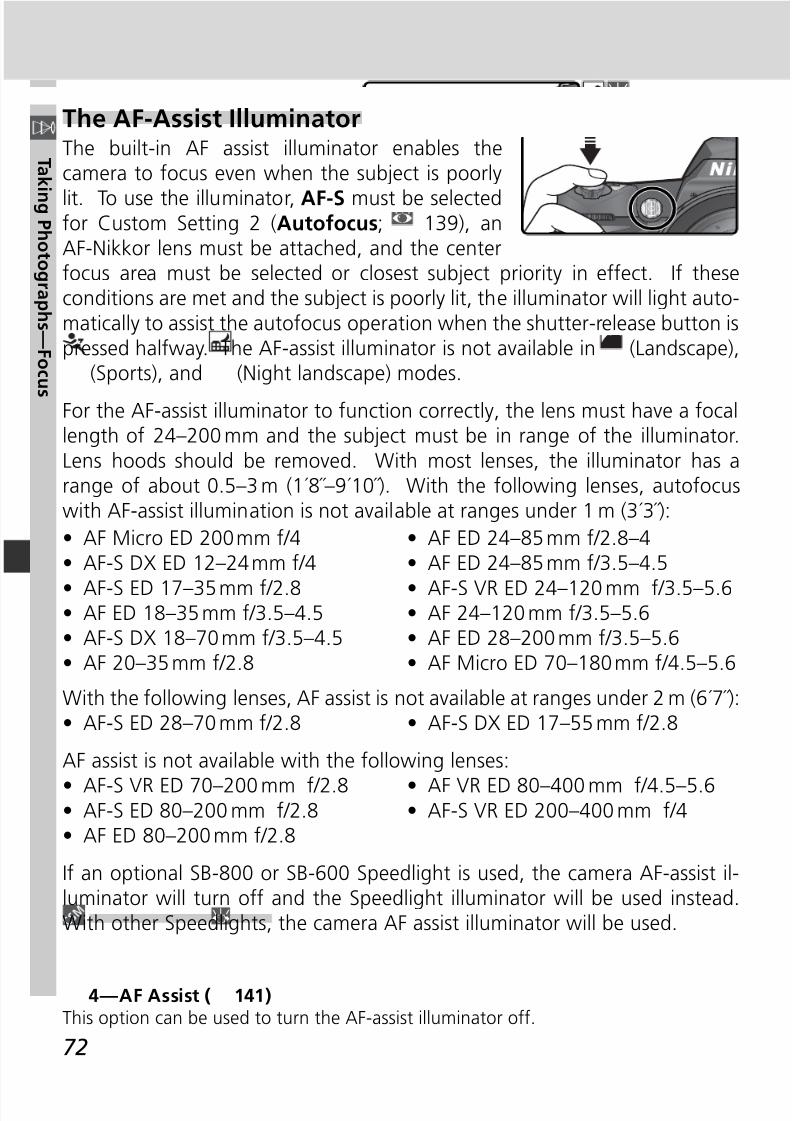
8/7/2019 ad9ec4ae0fbdbb1f44546d3a474e0e87
http://slidepdf.com/reader/full/ad9ec4ae0fbdbb1f44546d3a474e0e87 82/218
72
T ak i ng P h ot ogr aph s —F oc
us
The AF-Assist IlluminatorThe built-in AF assist illuminator enables thecamera to focus even when the subject is poorly
lit. To use the illuminator, AF-S must be selectedfor Custom Setting 2 (Autofocus; 139), anAF-Nikkor lens must be attached, and the centerfocus area must be selected or closest subject priority in effect. If theseconditions are met and the subject is poorly lit, the illuminator will light auto-matically to assist the autofocus operation when the shutter-release button ispressed halfway. The AF-assist illuminator is not available in (Landscape),
(Sports), and (Night landscape) modes.
For the AF-assist illuminator to function correctly, the lens must have a focallength of 24–200 mm and the subject must be in range of the illuminator.Lens hoods should be removed. With most lenses, the illuminator has arange of about 0.5–3 m (1´8˝–9´10˝). With the following lenses, autofocuswith AF-assist illumination is not available at ranges under 1 m (3´3˝):
• AF Micro ED 200 mm f/4• AF-S DX ED 12–24 mm f/4
• AF-S ED 17–35 mm f/2.8• AF ED 18–35 mm f/3.5–4.5• AF-S DX 18–70 mm f/3.5–4.5• AF 20–35 mm f/2.8
• AF ED 24–85 mm f/2.8–4• AF ED 24–85 mm f/3.5–4.5
• AF-S VR ED 24–120 mm f/3.5–5.6• AF 24–120 mm f/3.5–5.6• AF ED 28–200 mm f/3.5–5.6• AF Micro ED 70–180 mm f/4.5–5.6
With the following lenses, AF assist is not available at ranges under 2 m (6´7˝):• AF-S ED 28–70 mm f/2.8 • AF-S DX ED 17–55 mm f/2.8
AF assist is not available with the following lenses:
• AF-S VR ED 70–200 mm f/2.8• AF-S ED 80–200 mm f/2.8• AF ED 80–200 mm f/2.8
• AF VR ED 80–400 mm f/4.5–5.6• AF-S VR ED 200–400 mm f/4
If an optional SB-800 or SB-600 Speedlight is used, the camera AF-assist il-luminator will turn off and the Speedlight illuminator will be used instead.With other Speedlights, the camera AF assist illuminator will be used.
4—AF Assist ( 141)This option can be used to turn the AF-assist illuminator off.
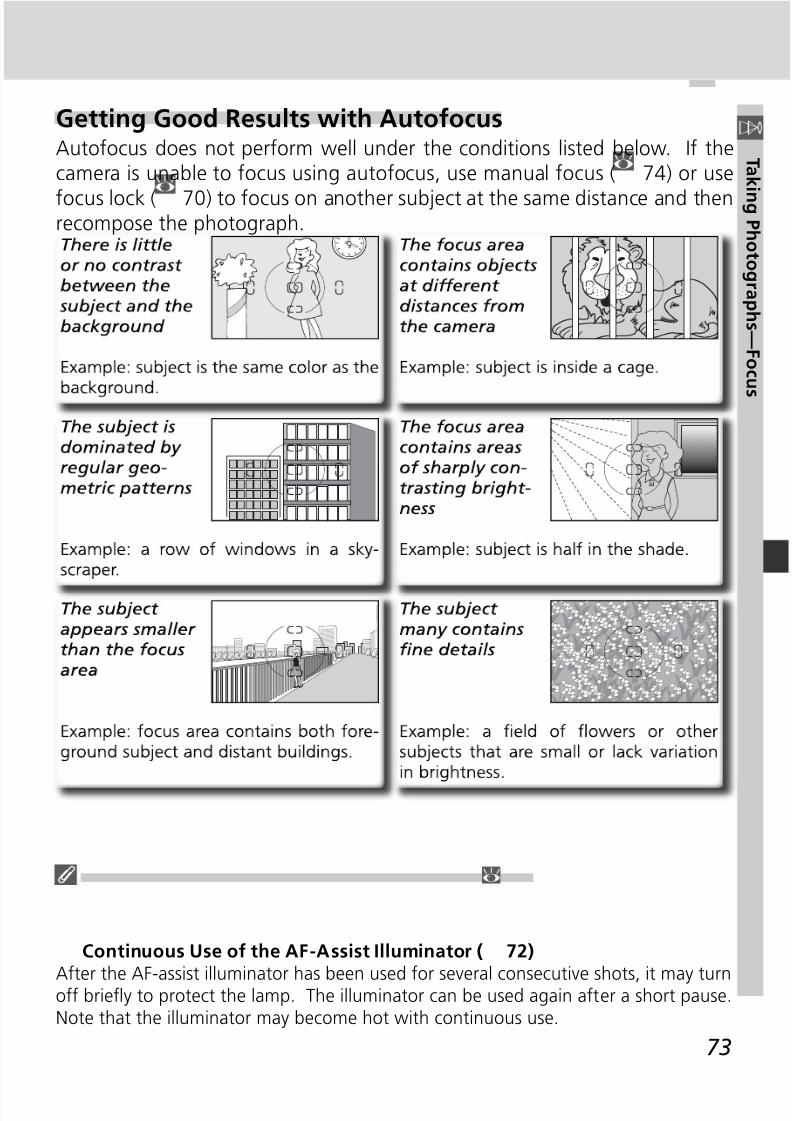
8/7/2019 ad9ec4ae0fbdbb1f44546d3a474e0e87
http://slidepdf.com/reader/full/ad9ec4ae0fbdbb1f44546d3a474e0e87 83/218
73
T ak i ng P h ot ogr aph s —F oc
us
Getting Good Results with AutofocusAutofocus does not perform well under the conditions listed below. If thecamera is unable to focus using autofocus, use manual focus ( 74) or use
focus lock ( 70) to focus on another subject at the same distance and thenrecompose the photograph.
Continuous Use of the AF-Assist Illuminator ( 72)
After the AF-assist illuminator has been used for several consecutive shots, it may turnoff briefl y to protect the lamp. The illuminator can be used again after a short pause.Note that the illuminator may become hot with continuous use.

8/7/2019 ad9ec4ae0fbdbb1f44546d3a474e0e87
http://slidepdf.com/reader/full/ad9ec4ae0fbdbb1f44546d3a474e0e87 84/218
74
T ak i ng P h ot ogr aph s —F oc
us
Manual FocusManual focus is available for lenses that do notsupport autofocus (non-AF Nikkor lenses) or
when autofocus does not produce the desiredresults ( 73). To focus manually, set the focus-mode selector to M and adjust the lens focusingring until the image displayed on the clear mattefi eld in the viewfi nder is in focus. Photographscan be taken at any time, even when the imageis not in focus.
The Electronic Range Finder If the lens has a maximum aperture of f/5.6 orfaster, the viewfi nder focus indicator can be usedto confi rm whether the subject in the selected fo-cus area is in focus. After positioning the subjectin the active focus area, press the shutter-releasebutton halfway and rotate the lens focusing ring
until the in-focus indicator (●
) is displayed.
A-M Selection/Autofocus with Manual PriorityWhen using a lens that offers A-M selection, select M when focusing manually. Withlenses that support M/A (autofocus with manual priority), focus can be adjusted man- ually with the lens set to M or M/A. See the documentation provided with your lensfor details.
Focal Plane PositionTo determine the distance between your subject and
the camera, measure from the focal plane mark on thecamera body. The distance between the lens mountingfl ange and the focal plane is 46.5 mm (1.83˝).
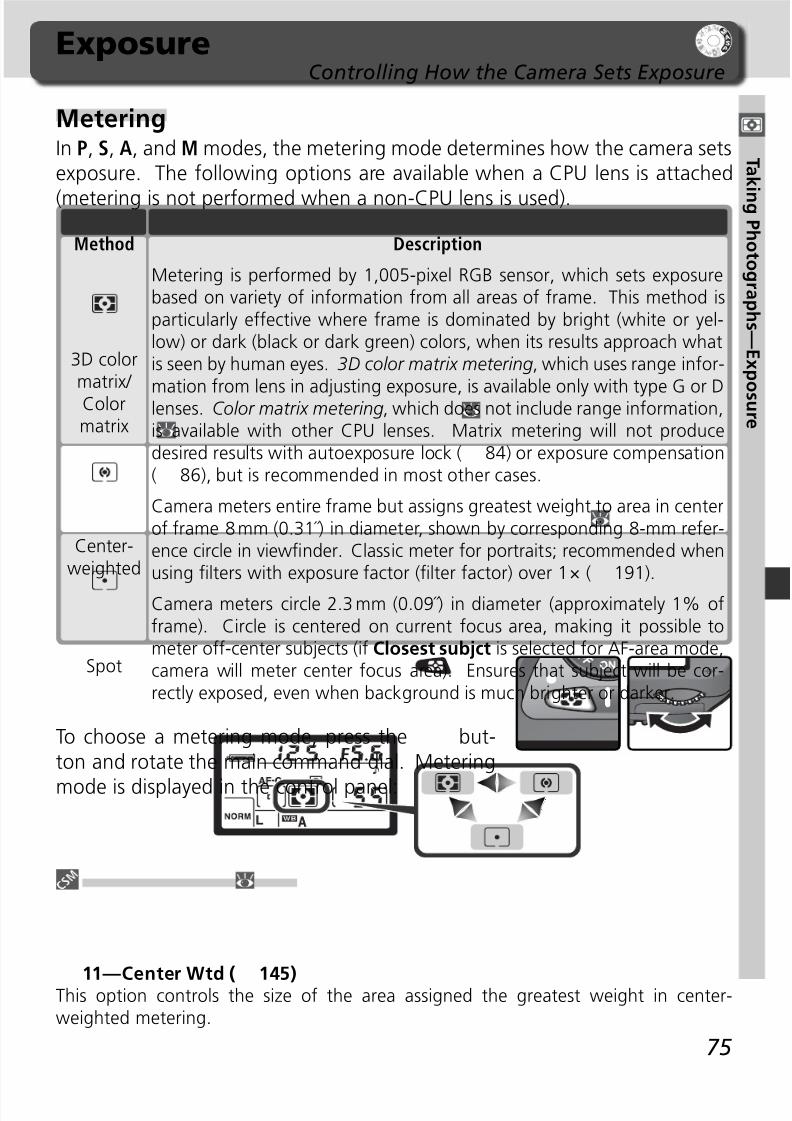
8/7/2019 ad9ec4ae0fbdbb1f44546d3a474e0e87
http://slidepdf.com/reader/full/ad9ec4ae0fbdbb1f44546d3a474e0e87 85/218
75
T ak i ng P h ot ogr aph s —E xp
os ur e
MeteringIn P, S, A, and M modes, the metering mode determines how the camera setsexposure. The following options are available when a CPU lens is attached
(metering is not performed when a non-CPU lens is used).
ExposureControlling How the Camera Sets Exposure
Camera meters circle 2.3 mm (0.09˝) in diameter (approximately 1% offrame). Circle is centered on current focus area, making it possible tometer off-center subjects (if Closest subjct is selected for AF-area mode,camera will meter center focus area). Ensures that subject will be cor-rectly exposed, even when background is much brighter or darker.
Spot
Camera meters entire frame but assigns greatest weight to area in centerof frame 8 mm (0.31˝) in diameter, shown by corresponding 8-mm refer-ence circle in viewfi nder. Classic meter for portraits; recommended whenusing fi lters with exposure factor (fi lter factor) over 1 × ( 191).
Center-weighted
DescriptionMethod
Metering is performed by 1,005-pixel RGB sensor, which sets exposurebased on variety of information from all areas of frame. This method isparticularly effective where frame is dominated by bright (white or yel-low) or dark (black or dark green) colors, when its results approach whatis seen by human eyes. 3D color matrix metering, which uses range infor-
mation from lens in adjusting exposure, is available only with type G or Dlenses. Color matrix metering, which does not include range information,is available with other CPU lenses. Matrix metering will not producedesired results with autoexposure lock ( 84) or exposure compensation( 86), but is recommended in most other cases.
3D colormatrix/ Colormatrix
11—Center Wtd ( 145)This option controls the size of the area assigned the greatest weight in center-weighted metering.
To choose a metering mode, press the but-ton and rotate the main command dial. Metering
mode is displayed in the control panel:
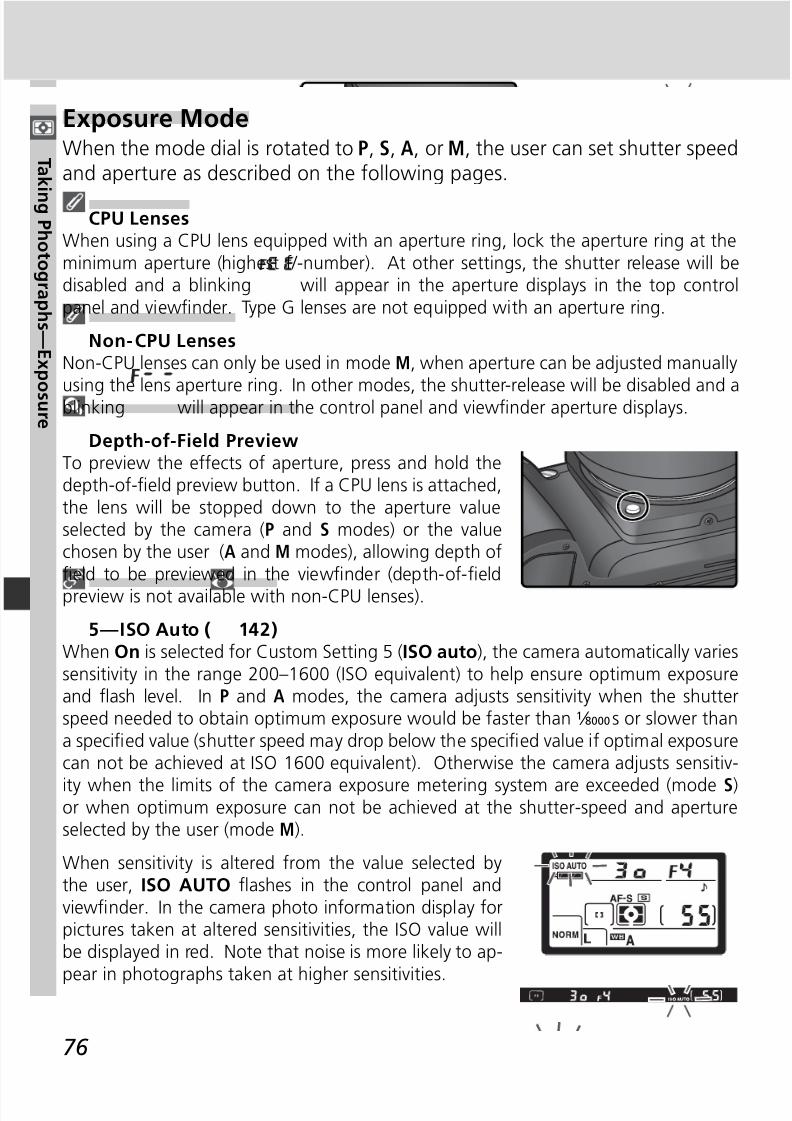
8/7/2019 ad9ec4ae0fbdbb1f44546d3a474e0e87
http://slidepdf.com/reader/full/ad9ec4ae0fbdbb1f44546d3a474e0e87 86/218
76
T ak i ng P h ot ogr aph s —E xp
os ur e
Exposure ModeWhen the mode dial is rotated to P, S, A, or M, the user can set shutter speedand aperture as described on the following pages.
CPU LensesWhen using a CPU lens equipped with an aperture ring, lock the aperture ring at theminimum aperture (highest f/-number). At other settings, the shutter release will bedisabled and a blinking will appear in the aperture displays in the top controlpanel and viewfi nder. Type G lenses are not equipped with an aperture ring.
Non-CPU LensesNon-CPU lenses can only be used in mode M, when aperture can be adjusted manually
using the lens aperture ring. In other modes, the shutter-release will be disabled and ablinking will appear in the control panel and viewfi nder aperture displays.
Depth-of-Field PreviewTo preview the effects of aperture, press and hold thedepth-of-fi eld preview button. If a CPU lens is attached,the lens will be stopped down to the aperture valueselected by the camera (P and S modes) or the valuechosen by the user (A and M modes), allowing depth offi eld to be previewed in the viewfi nder (depth-of-fi eld
preview is not available with non-CPU lenses).
5—ISO Auto ( 142)When On is selected for Custom Setting 5 (ISO auto), the camera automatically variessensitivity in the range 200–1600 (ISO equivalent) to help ensure optimum exposureand fl ash level. In P and A modes, the camera adjusts sensitivity when the shutterspeed needed to obtain optimum exposure would be faster than 1/ 8000s or slower thana specifi ed value (shutter speed may drop below the specifi ed value if optimal exposurecan not be achieved at ISO 1600 equivalent). Otherwise the camera adjusts sensitiv-
ity when the limits of the camera exposure metering system are exceeded (mode S)or when optimum exposure can not be achieved at the shutter-speed and apertureselected by the user (mode M).
When sensitivity is altered from the value selected bythe user, ISO AUTO fl ashes in the control panel andviewfi nder. In the camera photo information display forpictures taken at altered sensitivities, the ISO value willbe displayed in red. Note that noise is more likely to ap-
pear in photographs taken at higher sensitivities.

8/7/2019 ad9ec4ae0fbdbb1f44546d3a474e0e87
http://slidepdf.com/reader/full/ad9ec4ae0fbdbb1f44546d3a474e0e87 87/218
77
T ak i ng P h ot ogr aph s —E xp
os ur e
P: Auto Multi ProgramIn this mode, the camera automatically adjusts shutter speed and apertureaccording to a built-in program ( 78) for optimal exposure in most sit-
uations. This mode is recommended for snapshots and other situations inwhich you want to leave the camera in charge of shutter speed and aperture.Adjustments can be made using fl exible program, exposure compensation( 86), and auto exposure bracketing ( 87). Mode P is only available withCPU lenses.
To take photographs in auto multi program:
1Rotate the mode dial to P.
2 Frame a photograph, focus, and shoot.
Flexible ProgramIn mode P, different combinations of shutter speed andaperture can be selected by rotating the main commanddial (“fl exible program”). All combinations produce thesame exposure. While fl exible program is in effect, aicon appears in the control panel. To restore the defaultshutter speed and aperture, rotate the main commanddial until the icon is no longer displayed. Defaults canalso be restored by turning the camera off, rotating the
mode dial, raising or lowering the built-in Speedlight,performing a two-button reset ( 111), or choosing an-other setting for Custom Setting 9 (EV step; 144).
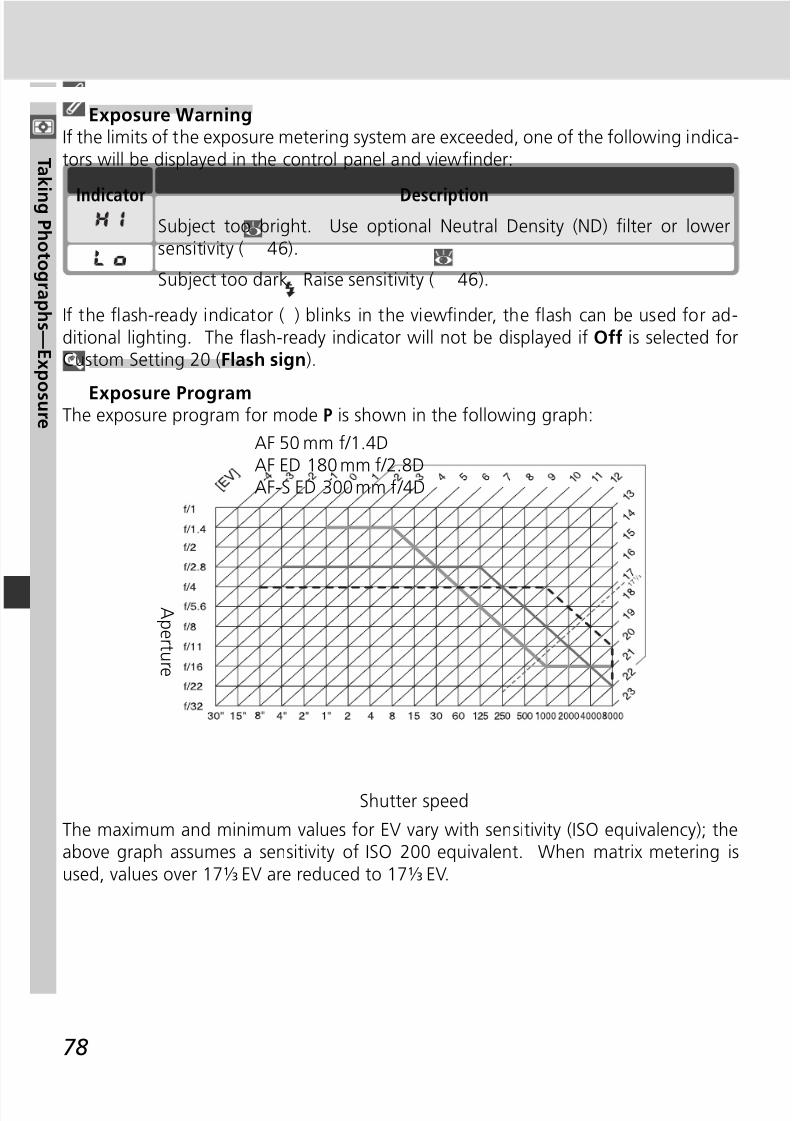
8/7/2019 ad9ec4ae0fbdbb1f44546d3a474e0e87
http://slidepdf.com/reader/full/ad9ec4ae0fbdbb1f44546d3a474e0e87 88/218
78
T ak i ng P h ot ogr aph s —E xp
os ur e
If the fl ash-ready indicator ( ) blinks in the viewfi nder, the fl ash can be used for ad-ditional lighting. The fl ash-ready indicator will not be displayed if Off is selected forCustom Setting 20 (Flash sign).
Exposure ProgramThe exposure program for mode P is shown in the following graph:
The maximum and minimum values for EV vary with sensitivity (ISO equivalency); theabove graph assumes a sensitivity of ISO 200 equivalent. When matrix metering isused, values over 171/ 3 EV are reduced to 171/ 3 EV.
AF 50 mm f/1.4DAF ED 180 mm f/2.8DAF-S ED 300 mm f/4D
A pe r t ur e
Shutter speed
Subject too dark. Raise sensitivity ( 46).
DescriptionIndicatorSubject too bright. Use optional Neutral Density (ND) fi lter or lowersensitivity ( 46).
Exposure WarningIf the limits of the exposure metering system are exceeded, one of the following indica-tors will be displayed in the control panel and viewfi nder:

8/7/2019 ad9ec4ae0fbdbb1f44546d3a474e0e87
http://slidepdf.com/reader/full/ad9ec4ae0fbdbb1f44546d3a474e0e87 89/218
79
T ak i ng P h ot ogr aph s —E xp
os ur e
S: Shutter-Priority AutoIn mode S, you choose the shutter speed while the camera automatically se-lects the aperture that will produce the optimal exposure. Shutter speed can
be set to values between 30 s and 1/ 8,000 s. Use slow shutter speeds to suggestmotion by blurring moving objects, high shutter speeds to “freeze” motion.Mode S is only available with CPU lenses.
To take photographs in shutter-priority auto:
1 Rotate the mode dial to S.
2Rotate the main command dial to choose thedesired shutter speed.
3Frame a photograph, focus, and shoot.
If the fl ash-ready indicator ( ) blinks in the viewfi nder, the fl ash can be used for ad-ditional lighting. The fl ash-ready indicator will not be displayed if Off is selected forCustom Setting 20 (Flash sign).
Subject too dark. Choose slower shutter speed or higher sensitivity (46).
DescriptionIndicator
Subject too bright. Choose faster shutter speed or lower sensitivity (46), or use optional Neutral Density (ND) fi lter.
Exposure WarningIf the limits of the exposure metering system are exceeded, one of the following indica-tors will be displayed in the control panel and viewfi nder:
8/7/2019 ad9ec4ae0fbdbb1f44546d3a474e0e87
http://slidepdf.com/reader/full/ad9ec4ae0fbdbb1f44546d3a474e0e87 90/218
80
T ak i ng P h ot ogr aph s —E xp
os ur e
Changing from Mode M to Mode SIf you select a shutter speed of or (long time exposure) in mode M andthen select mode S without changing the shutter speed, the shutter-speed display willfl ash and the shutter can not be released. Rotate the main command dial to select a
different shutter speed before shooting.
Shutter Speed and Camera ShakeTo prevent blurring caused by camera shake, the shutter speed should be faster thanthe inverse of the focal length of the lens, in seconds (for example, if a lens has a fo-cal length of 300 mm, shutter speed should be faster than 1/ 300 s). Use of a tripod isrecommended when shooting at slower shutter speeds. To prevent blur, try increasingsensitivity ( 46), using the built-in Speedlight ( 94), or attaching a VR lens.

8/7/2019 ad9ec4ae0fbdbb1f44546d3a474e0e87
http://slidepdf.com/reader/full/ad9ec4ae0fbdbb1f44546d3a474e0e87 91/218
81
T ak i ng P h ot ogr aph s —E xp
os ur e
A: Aperture-Priority AutoIn mode A, you choose the aperture while the camera controls shutter speedfor optimal exposure. Small apertures (high f/-numbers) increase depth of
fi eld, bringing both the main subject and background into focus. Largeapertures (low f/-numbers) soften background details and let more light intothe camera, increasing the range of the fl ash and making photographs lesssusceptible to blurring. Mode A is only available with CPU lenses.
To take photographs in aperture-priority auto:
1 Rotate the mode dial to A.
2 Rotate the sub-command dial to choose thedesired aperture.
3 Frame a photograph, focus, and shoot.
If the fl ash-ready indicator ( ) blinks in the viewfi nder, the fl ash can be used for ad-ditional lighting. The fl ash-ready indicator will not be displayed if Off is selected forCustom Setting 20 (Flash sign).
Subject too dark. Choose larger aperture (smaller f/-number) or highersensitivity ( 46).
DescriptionIndicator
Subject too bright. Choose smaller aperture (larger f/-number) or lowersensitivity ( 46), or use optional Neutral Density (ND) fi lter.
Exposure WarningIf the limits of the exposure metering system are exceeded, one of the following indica-tors will be displayed in the control panel and viewfi nder:
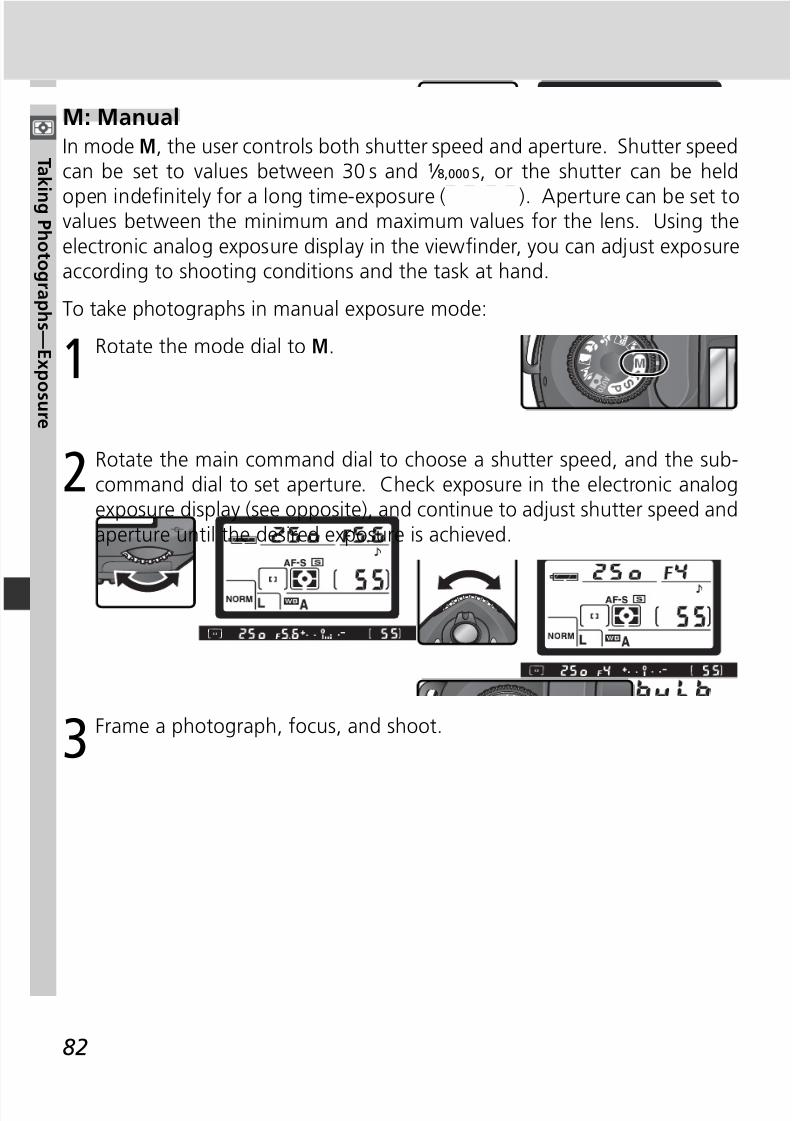
8/7/2019 ad9ec4ae0fbdbb1f44546d3a474e0e87
http://slidepdf.com/reader/full/ad9ec4ae0fbdbb1f44546d3a474e0e87 92/218
82
T ak i ng P h ot ogr aph s —E xp
os ur e
M: ManualIn mode M, the user controls both shutter speed and aperture. Shutter speedcan be set to values between 30 s and 1/ 8,000s, or the shutter can be held
open indefi nitely for a long time-exposure ( ). Aperture can be set tovalues between the minimum and maximum values for the lens. Using theelectronic analog exposure display in the viewfi nder, you can adjust exposureaccording to shooting conditions and the task at hand.
To take photographs in manual exposure mode:
1 Rotate the mode dial to M.
2 Rotate the main command dial to choose a shutter speed, and the sub-command dial to set aperture. Check exposure in the electronic analogexposure display (see opposite), and continue to adjust shutter speed andaperture until the desired exposure is achieved.
3 Frame a photograph, focus, and shoot.
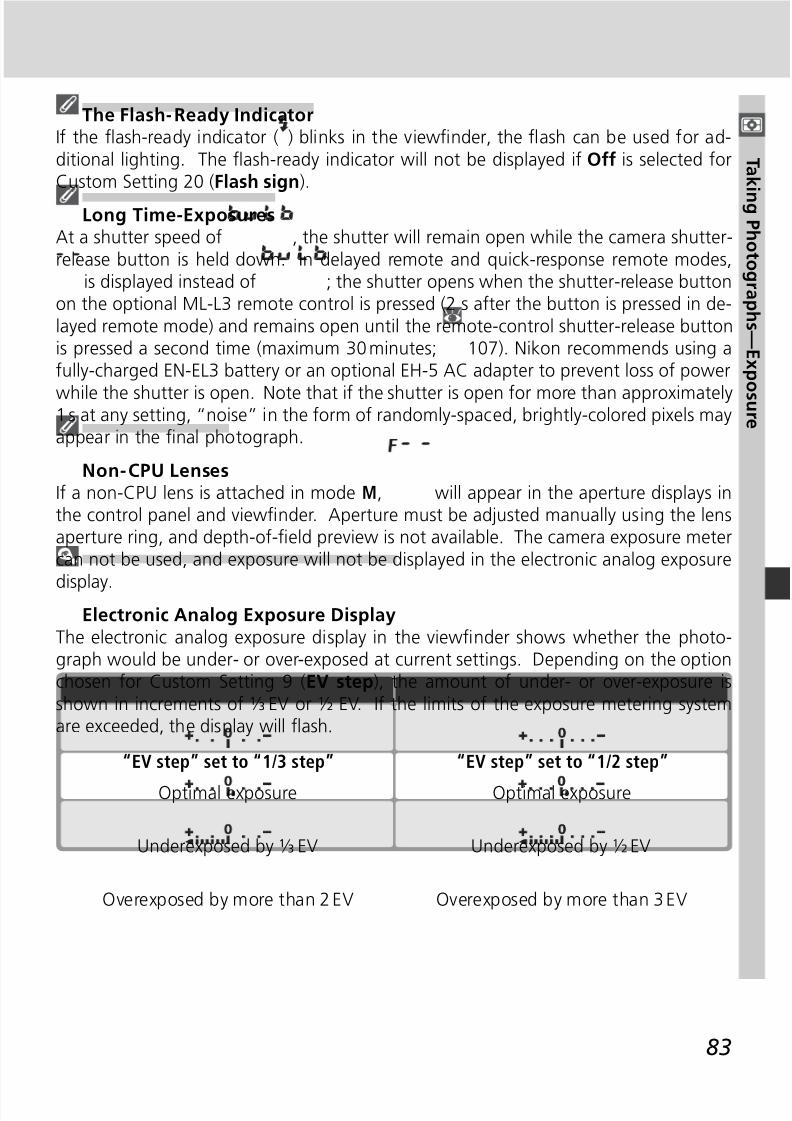
8/7/2019 ad9ec4ae0fbdbb1f44546d3a474e0e87
http://slidepdf.com/reader/full/ad9ec4ae0fbdbb1f44546d3a474e0e87 93/218
83
T ak i ng P h ot ogr aph s —E xp
os ur e
The Flash-Ready IndicatorIf the fl ash-ready indicator ( ) blinks in the viewfi nder, the fl ash can be used for ad-ditional lighting. The fl ash-ready indicator will not be displayed if Off is selected forCustom Setting 20 (Flash sign).
Long Time-ExposuresAt a shutter speed of , the shutter will remain open while the camera shutter-release button is held down. In delayed remote and quick-response remote modes,
is displayed instead of ; the shutter opens when the shutter-release buttonon the optional ML-L3 remote control is pressed (2 s after the button is pressed in de-layed remote mode) and remains open until the remote-control shutter-release buttonis pressed a second time (maximum 30 minutes; 107). Nikon recommends using afully-charged EN-EL3 battery or an optional EH-5 AC adapter to prevent loss of power
while the shutter is open. Note that if the shutter is open for more than approximately1 s at any setting, “noise” in the form of randomly-spaced, brightly-colored pixels mayappear in the fi nal photograph.
Non-CPU LensesIf a non-CPU lens is attached in mode M, will appear in the aperture displays inthe control panel and viewfi nder. Aperture must be adjusted manually using the lensaperture ring, and depth-of-fi eld preview is not available. The camera exposure metercan not be used, and exposure will not be displayed in the electronic analog exposure
display.Electronic Analog Exposure Display
The electronic analog exposure display in the viewfi nder shows whether the photo-graph would be under- or over-exposed at current settings. Depending on the optionchosen for Custom Setting 9 (EV step), the amount of under- or over-exposure isshown in increments of 1/ 3 EV or ½ EV. If the limits of the exposure metering systemare exceeded, the display will fl ash.
“EV step” set to “1/3 step” “EV step” set to “1/2 step”
Underexposed by 1/ 3 EV Underexposed by ½ EV
Optimal exposure Optimal exposure
Overexposed by more than 2 EV Overexposed by more than 3 EV
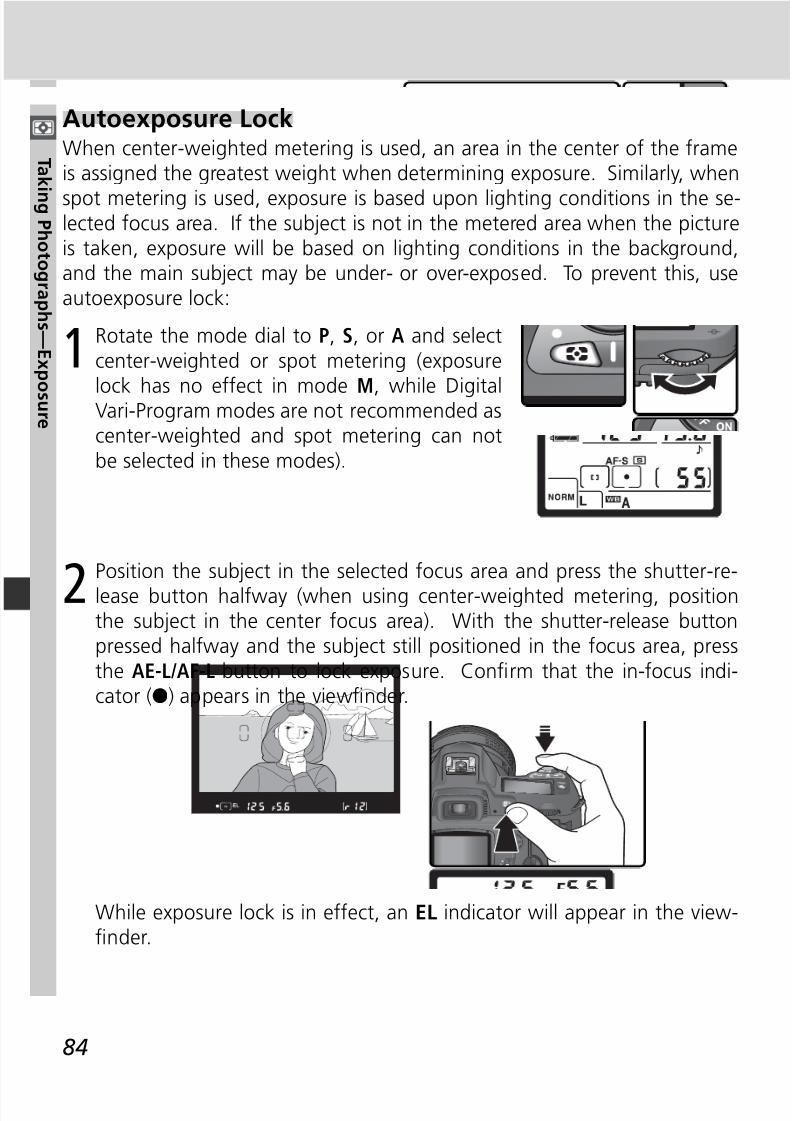
8/7/2019 ad9ec4ae0fbdbb1f44546d3a474e0e87
http://slidepdf.com/reader/full/ad9ec4ae0fbdbb1f44546d3a474e0e87 94/218
84
T ak i ng P h ot ogr aph s —E xp
os ur e
Autoexposure LockWhen center-weighted metering is used, an area in the center of the frameis assigned the greatest weight when determining exposure. Similarly, when
spot metering is used, exposure is based upon lighting conditions in the se-lected focus area. If the subject is not in the metered area when the pictureis taken, exposure will be based on lighting conditions in the background,and the main subject may be under- or over-exposed. To prevent this, useautoexposure lock:
1 Rotate the mode dial to P, S, or A and selectcenter-weighted or spot metering (exposure
lock has no effect in mode M, while DigitalVari-Program modes are not recommended ascenter-weighted and spot metering can notbe selected in these modes).
While exposure lock is in effect, an EL indicator will appear in the view-fi nder.
2Position the subject in the selected focus area and press the shutter-re-
lease button halfway (when using center-weighted metering, positionthe subject in the center focus area). With the shutter-release buttonpressed halfway and the subject still positioned in the focus area, pressthe AE-L/AF-L button to lock exposure. Confi rm that the in-focus indi-cator (●) appears in the viewfi nder.
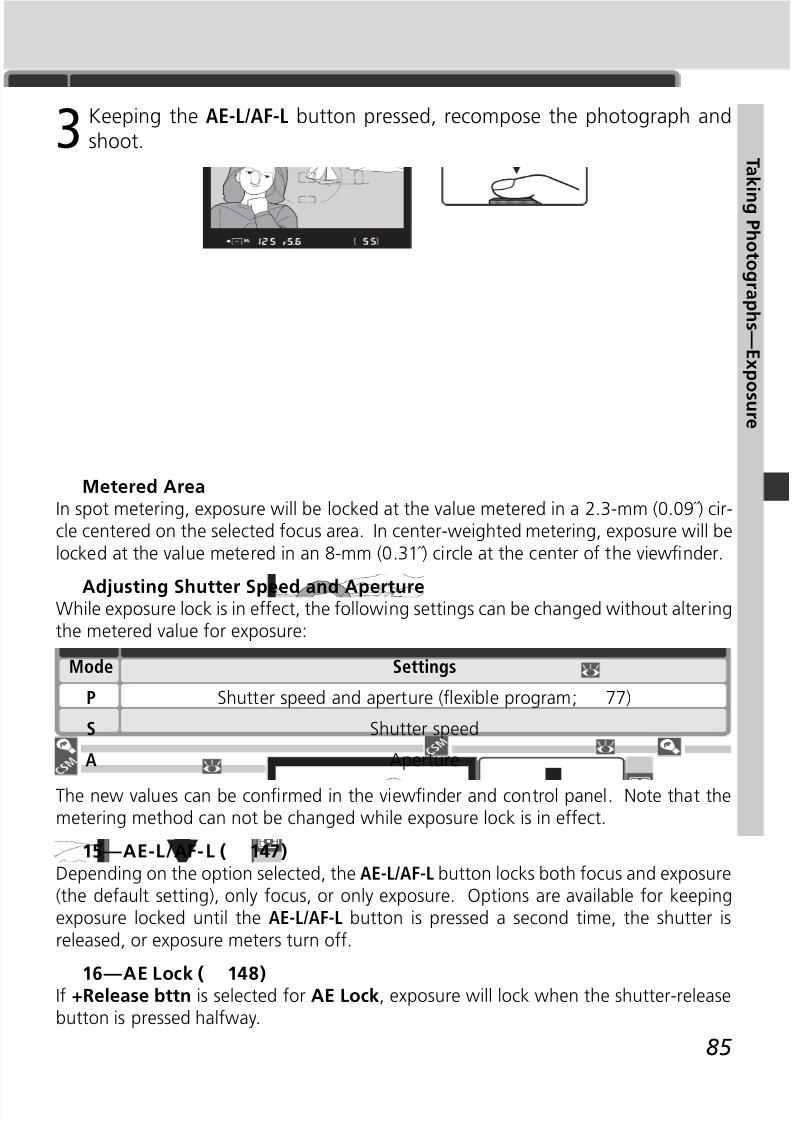
8/7/2019 ad9ec4ae0fbdbb1f44546d3a474e0e87
http://slidepdf.com/reader/full/ad9ec4ae0fbdbb1f44546d3a474e0e87 95/218
85
T ak i ng P h ot ogr aph s —E xp
os ur e
3 Keeping the AE-L/AF-L button pressed, recompose the photograph andshoot.
Metered AreaIn spot metering, exposure will be locked at the value metered in a 2.3-mm (0.09˝) cir-cle centered on the selected focus area. In center-weighted metering, exposure will belocked at the value metered in an 8-mm (0.31˝) circle at the center of the viewfi nder.
Adjusting Shutter Speed and ApertureWhile exposure lock is in effect, the following settings can be changed without alteringthe metered value for exposure:
The new values can be confi rmed in the viewfi nder and control panel. Note that themetering method can not be changed while exposure lock is in effect.
15—AE-L/AF-L ( 147)Depending on the option selected, the AE-L/AF-L button locks both focus and exposure(the default setting), only focus, or only exposure. Options are available for keepingexposure locked until the AE-L/AF-L button is pressed a second time, the shutter isreleased, or exposure meters turn off.
16—AE Lock ( 148)If +Release bttn is selected for AE Lock, exposure will lock when the shutter-releasebutton is pressed halfway.
Shutter speedS
SettingsMode
Shutter speed and aperture (fl exible program; 77)P
ApertureA

8/7/2019 ad9ec4ae0fbdbb1f44546d3a474e0e87
http://slidepdf.com/reader/full/ad9ec4ae0fbdbb1f44546d3a474e0e87 96/218
86
T ak i ng P h ot ogr aph s —E xp
os ur e
Exposure CompensationTo obtain the desired results with certain subject compositions, it may benecessary to use exposure compensation to alter exposure from the value
suggested by the camera. As a rule of thumb, positive compensation maybe needed when the main subject is darker than the background, negativevalues when the main subject is brighter than the background.
Exposure compensation is available in modes P, S, and A (in mode M, only theexposure information in the electronic analog exposure display is affected;shutter speed and aperture do not change).
1Pressing the button, rotate the main
command dial and confi rm exposure com- pensation in the control panel or the elec-tronic analog exposure display (the 0 in theelectronic analog exposure display will fl ash).Exposure compensation can be set to valuesbetween –5 EV (underexposure) and +5 EV(overexposure) in increments of 1/ 3 EV.
The current value for exposure compensationcan be confi rmed by pressing the button.The current value is shown in the control panelwith a icon; in the viewfi nder, positive val-ues are shown by a icon, negative values bya icon.
2
Frame the photograph, focus, and shoot.
Normal exposure can be restored by setting exposure compensation to ±0 orperforming a two button reset ( 111). Exposure compensation is not resetwhen the camera is turned off.
9—EV Step ( 144)Use this option to set the increments for exposure compensation to ½ EV.
10—Exp Comp. ( 145)If desired, exposure compensation can be set without pressing the button.
+2.0 EV
–0.3 EV
±0 EV ( button pressed)
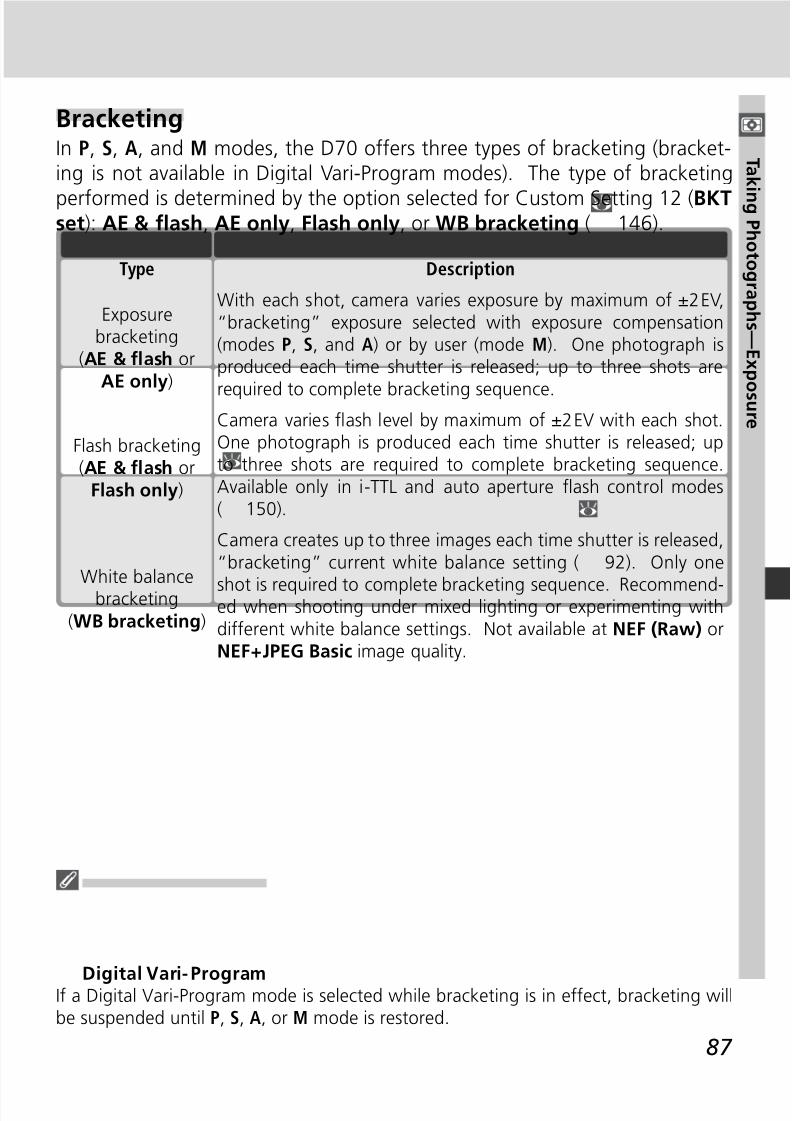
8/7/2019 ad9ec4ae0fbdbb1f44546d3a474e0e87
http://slidepdf.com/reader/full/ad9ec4ae0fbdbb1f44546d3a474e0e87 97/218
87
T ak i ng P h ot ogr aph s —E xp
os ur e
BracketingIn P, S, A, and M modes, the D70 offers three types of bracketing (bracket-ing is not available in Digital Vari-Program modes). The type of bracketing
performed is determined by the option selected for Custom Setting 12 (BKTset): AE & fl ash, AE only, Flash only, or WB bracketing ( 146).
DescriptionType
With each shot, camera varies exposure by maximum of ±2 EV,“bracketing” exposure selected with exposure compensation(modes P, S, and A) or by user (mode M). One photograph isproduced each time shutter is released; up to three shots are
required to complete bracketing sequence.
Exposurebracketing
(AE & fl ash orAE only)
Camera varies fl ash level by maximum of ±2 EV with each shot.One photograph is produced each time shutter is released; upto three shots are required to complete bracketing sequence.Available only in i-TTL and auto aperture fl ash control modes( 150).
Flash bracketing(AE & fl ash or
Flash only)
Camera cre ates up to three images each time shutter is released,“bracketing” current white balance setting ( 92). Only one
shot is required to complete bracketing sequence. Recommend-ed when shooting under mixed lighting or experimenting withdifferent white balance settings. Not available at NEF (Raw) orNEF + JPEG Basic image quality.
White balancebracketing
(WB bracketing)
Digital Vari-ProgramIf a Digital Vari-Program mode is selected while bracketing is in effect, bracketing willbe suspended until P, S, A, or M mode is restored.
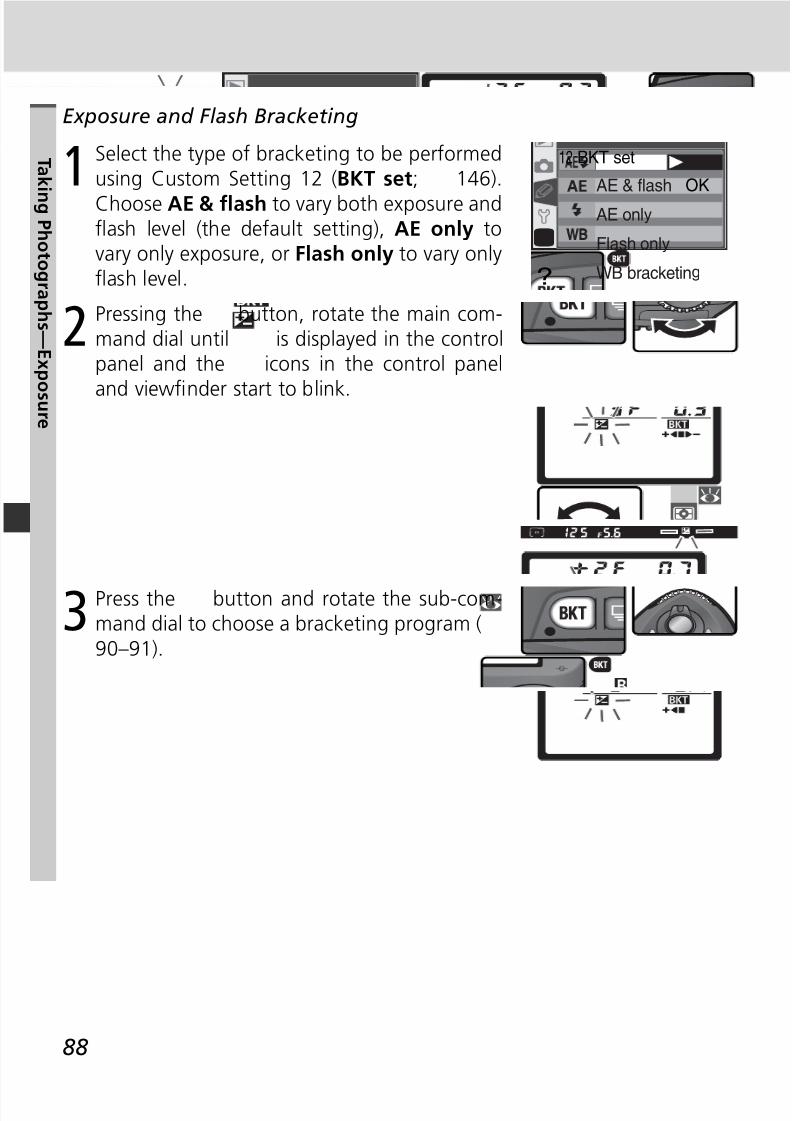
8/7/2019 ad9ec4ae0fbdbb1f44546d3a474e0e87
http://slidepdf.com/reader/full/ad9ec4ae0fbdbb1f44546d3a474e0e87 98/218
88
T ak i ng P h ot ogr aph s —E xp
os ur e
Exposure and Flash Bracketing
1 Select the type of bracketing to be performedusing Custom Setting 12 (BKT set; 146).
Choose AE & fl ash to vary both exposure andfl ash level (the default setting), AE only tovary only exposure, or Flash only to vary onlyfl ash level. ? WB bracketing
AE & flash
AE only
Flash only
12 BKT set
OK
2 Pressing the button, rotate the main com- mand dial until is displayed in the controlpanel and the icons in the control panel
and viewfi nder start to blink.
3Press the button and rotate the sub-com- mand dial to choose a bracketing program (90–91).
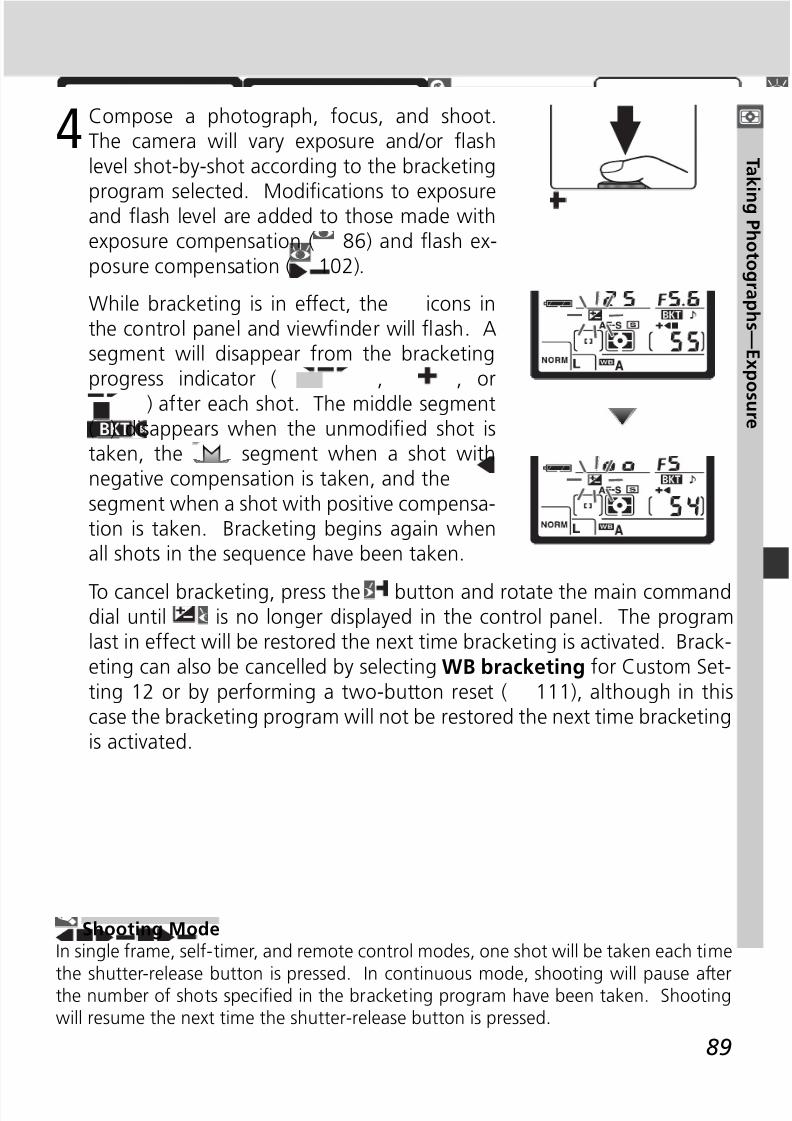
8/7/2019 ad9ec4ae0fbdbb1f44546d3a474e0e87
http://slidepdf.com/reader/full/ad9ec4ae0fbdbb1f44546d3a474e0e87 99/218
89
T ak i ng P h ot ogr aph s —E xp
os ur e
4 Compose a photograph, focus, and shoot.The camera will vary exposure and/or fl ashlevel shot-by-shot according to the bracketing
program selected. Modifi cations to exposureand fl ash level are added to those made withexposure compensation ( 86) and fl ash ex-posure compensation ( 102).
While bracketing is in effect, the icons inthe control panel and viewfi nder will fl ash. Asegment will disappear from the bracketingprogress indicator ( , , or
) after each shot. The middle segment( ) disappears when the unmodifi ed shot istaken, the segment when a shot withnegative compensation is taken, and thesegment when a shot with positive compensa-tion is taken. Bracketing begins again whenall shots in the sequence have been taken.
To cancel bracketing, press the button and rotate the main commanddial until is no longer displayed in the control panel. The programlast in effect will be restored the next time bracketing is activated. Brack- eting can also be cancelled by selecting WB bracketing for Custom Set-ting 12 or by performing a two-button reset ( 111), although in thiscase the bracketing program will not be restored the next time bracketingis activated.
Shooting ModeIn single frame, self-timer, and remote control modes, one shot will be taken each time
the shutter-release button is pressed. In continuous mode, shooting will pause afterthe number of shots specifi ed in the bracketing program have been taken. Shootingwill resume the next time the shutter-release button is pressed.

8/7/2019 ad9ec4ae0fbdbb1f44546d3a474e0e87
http://slidepdf.com/reader/full/ad9ec4ae0fbdbb1f44546d3a474e0e87 100/218
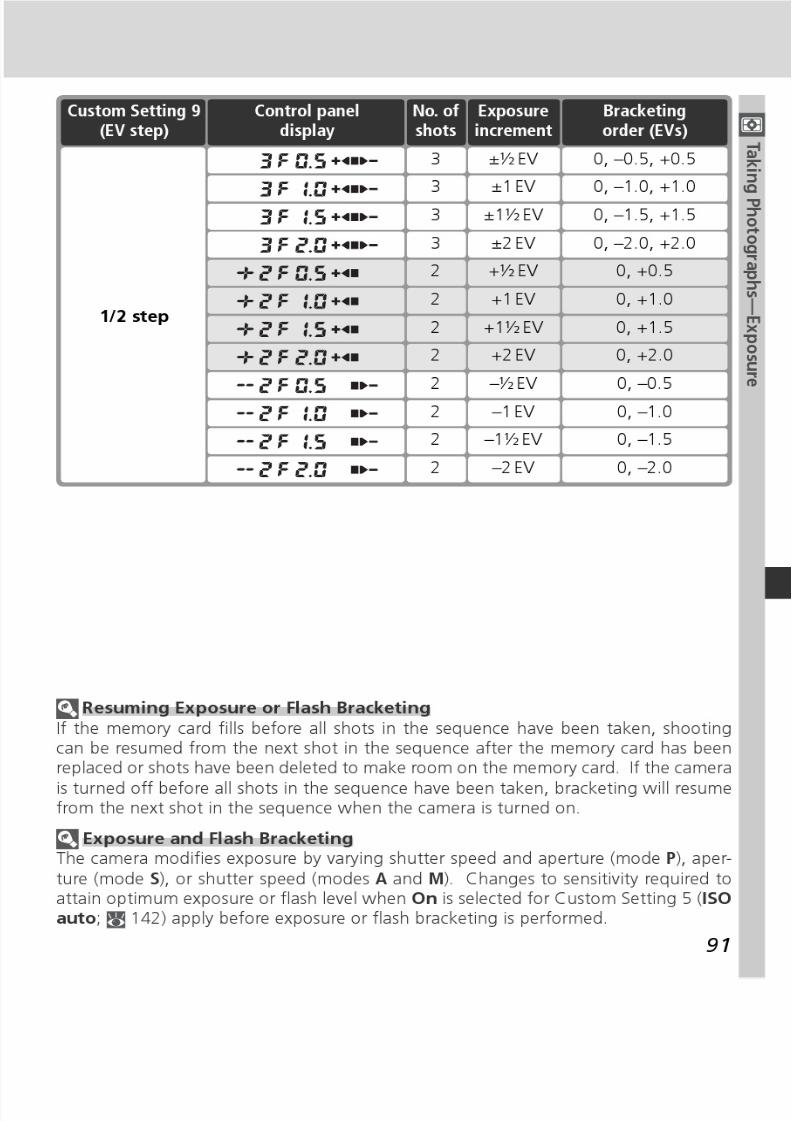
8/7/2019 ad9ec4ae0fbdbb1f44546d3a474e0e87
http://slidepdf.com/reader/full/ad9ec4ae0fbdbb1f44546d3a474e0e87 101/218
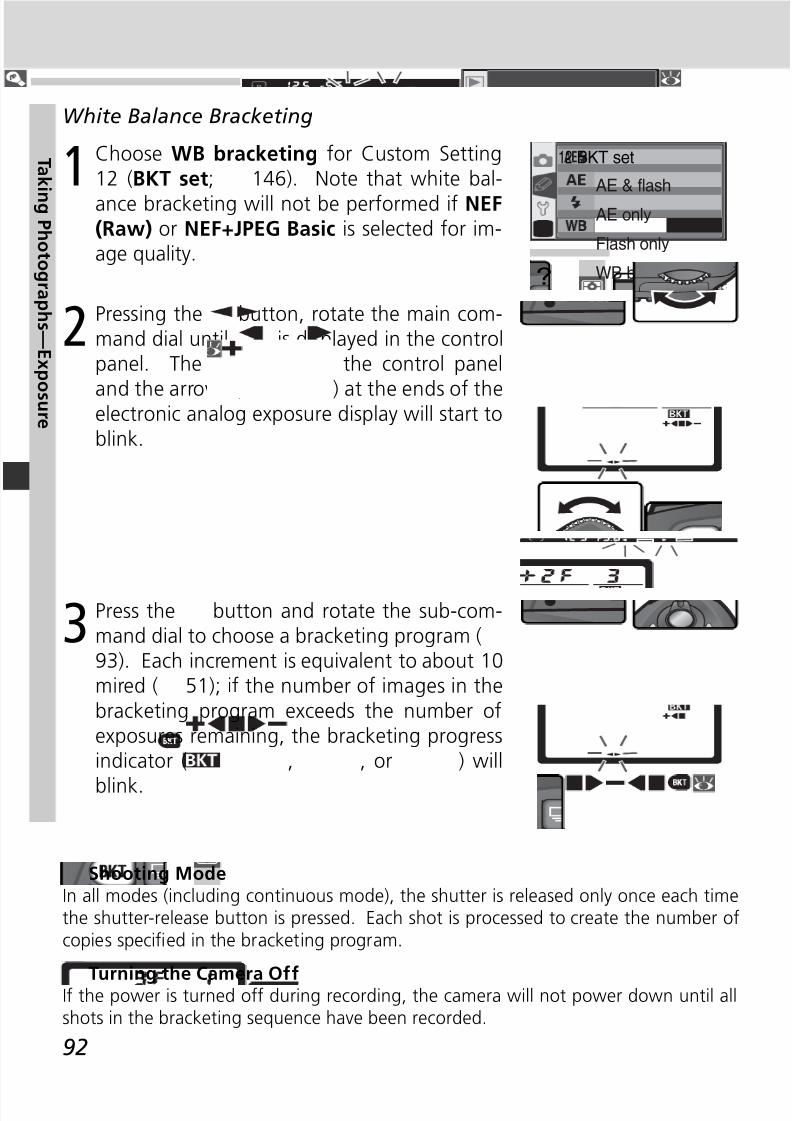
8/7/2019 ad9ec4ae0fbdbb1f44546d3a474e0e87
http://slidepdf.com/reader/full/ad9ec4ae0fbdbb1f44546d3a474e0e87 102/218
92
T ak i ng P h ot ogr aph s —E xp
os ur e
3 Press the button and rotate the sub-com- mand dial to choose a bracketing program (93). Each increment is equivalent to about 10mired ( 51); if the number of images in thebracketing program exceeds the number ofexposures remaining, the bracketing progressindicator ( , , or ) will
blink.
White Balance Bracketing
1 Choose WB bracketing for Custom Setting12 (BKT set; 146). Note that white bal-
ance bracketing will not be performed if NEF(Raw) or NEF+JPEG Basic is selected for im-age quality.
? WB bracketing
12 BKT set
OK
AE & flash
AE only
Flash only
2 Pressing the button, rotate the main com- mand dial until is displayed in the controlpanel. The icon in the control panel
and the arrows ( and ) at the ends of theelectronic analog exposure display will start toblink.
Shooting ModeIn all modes (including continuous mode), the shutter is released only once each timethe shutter-release button is pressed. Each shot is processed to create the number ofcopies specifi ed in the bracketing program.
Turning the Camera OffIf the power is turned off during recording, the camera will not power down until allshots in the bracketing sequence have been recorded.
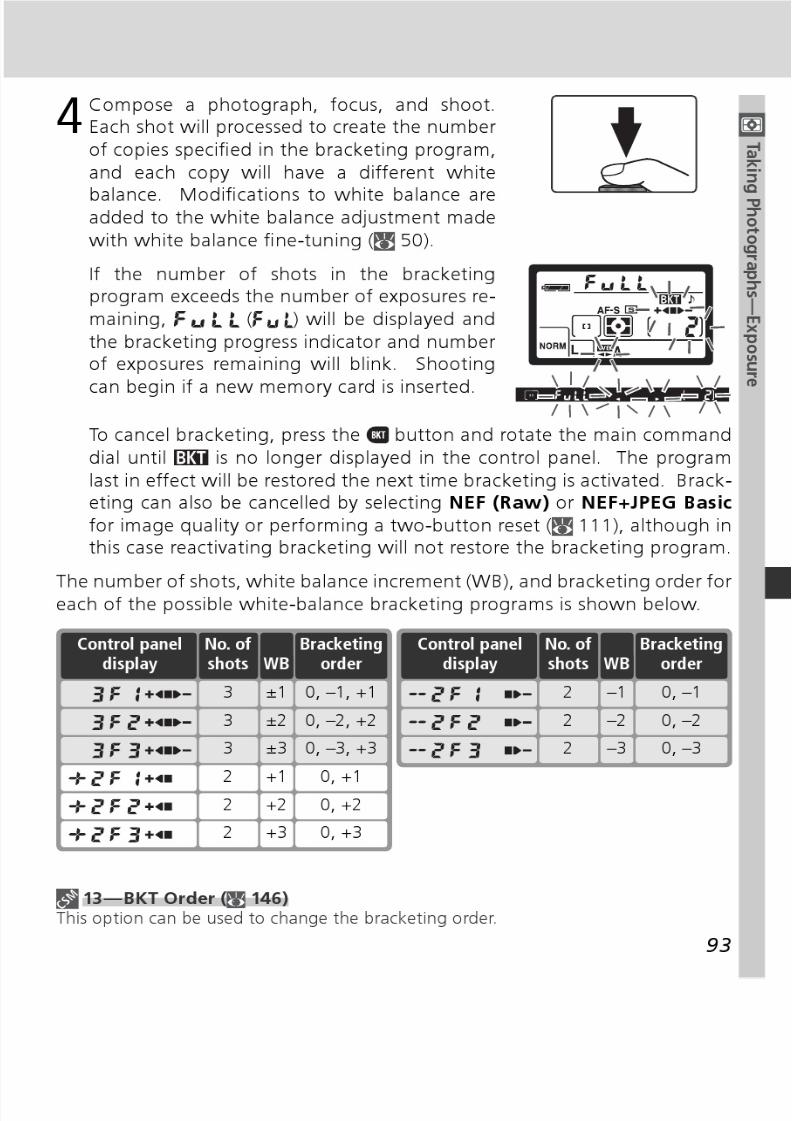
8/7/2019 ad9ec4ae0fbdbb1f44546d3a474e0e87
http://slidepdf.com/reader/full/ad9ec4ae0fbdbb1f44546d3a474e0e87 103/218
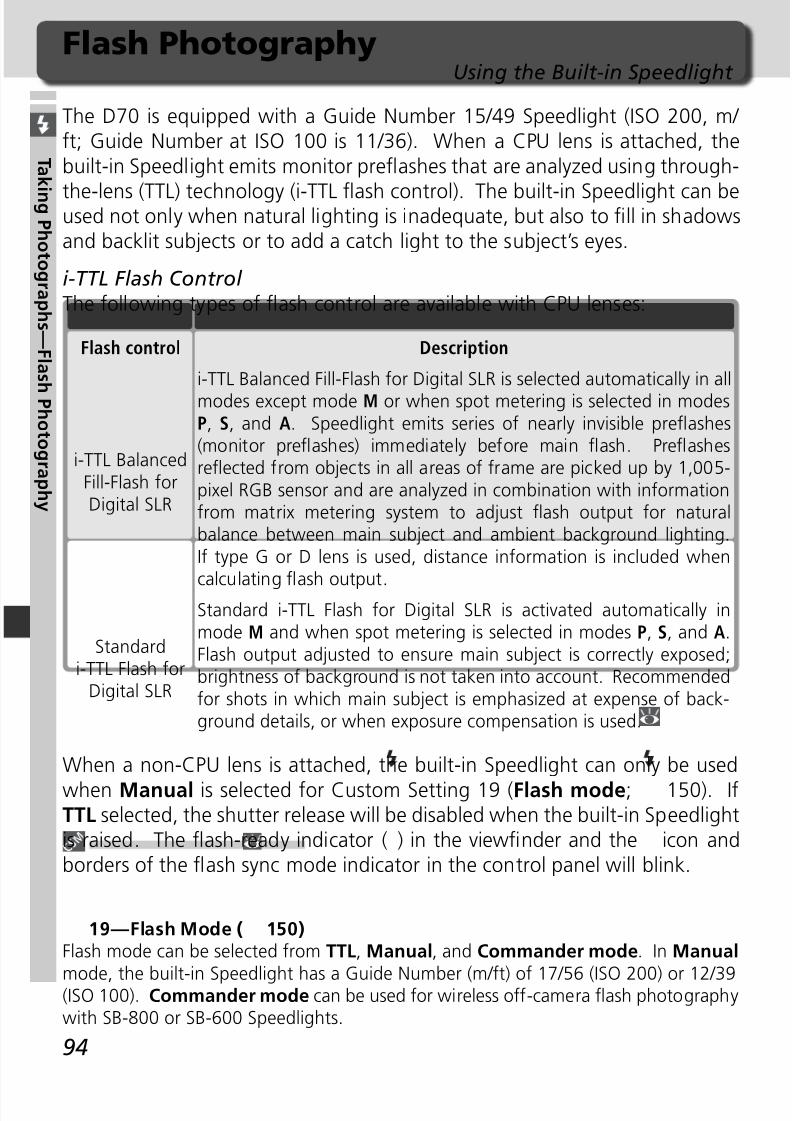
8/7/2019 ad9ec4ae0fbdbb1f44546d3a474e0e87
http://slidepdf.com/reader/full/ad9ec4ae0fbdbb1f44546d3a474e0e87 104/218
94
T ak i ng P h ot ogr aph s —F l as h P h ot ogr aph y
The D70 is equipped with a Guide Number 15/49 Speedlight (ISO 200, m/ ft; Guide Number at ISO 100 is 11/36). When a CPU lens is attached, thebuilt-in Speedlight emits monitor prefl ashes that are analyzed using through-
the-lens (TTL) technology (i-TTL fl ash control). The built-in Speedlight can beused not only when natural lighting is inadequate, but also to fi ll in shadowsand backlit subjects or to add a catch light to the subject’s eyes.
i-TTL Flash Control The following types of fl ash control are available with CPU lenses:
Flash PhotographyUsing the Built-in Speedlight
DescriptionFlash control
i-TTL Balanced Fill-Flash for Digital SLR is selected automatically in allmodes except mode M or when spot metering is selected in modesP, S, and A. Speedlight emits series of nearly invisible prefl ashes(monitor prefl ashes) immediately before main fl ash. Prefl ashesrefl ected from objects in all areas of frame are picked up by 1,005-pixel RGB sensor and are analyzed in combination with informationfrom matrix metering system to adjust fl ash output for naturalbalance between main subject and ambient background lighting.If type G or D lens is used, distance information is included whencalculating fl ash output.
i-TTL BalancedFill-Flash forDigital SLR
Standard i-TTL Flash for Digital SLR is activated automatically inmode M and when spot metering is selected in modes P, S, and A.Flash output adjusted to ensure main subject is correctly exposed;brightness of background is not taken into account. Recommendedfor shots in which main subject is emphasized at expense of back-ground details, or when exposure compensation is used.
Standardi-TTL Flash for
Digital SLR
When a non-CPU lens is attached, the built-in Speedlight can only be used
when Manual is selected for Custom Setting 19 (Flash mode; 150). IfTTL selected, the shutter release will be disabled when the built-in Speedlightis raised. The fl ash-ready indicator ( ) in the viewfi nder and the icon andborders of the fl ash sync mode indicator in the control panel will blink.
19—Flash Mode ( 150)Flash mode can be selected from TTL, Manual, and Commander mode. In Manual
mode, the built-in Speedlight has a Guide Number (m/ft) of 17/56 (ISO 200) or 12/39(ISO 100). Commander mode can be used for wireless off-camera fl ash photographywith SB-800 or SB-600 Speedlights.

8/7/2019 ad9ec4ae0fbdbb1f44546d3a474e0e87
http://slidepdf.com/reader/full/ad9ec4ae0fbdbb1f44546d3a474e0e87 105/218
95
T ak i ng P h ot ogr aph s —F l as h P h ot ogr aph y
Flash Sync ModesThe following fl ash sync settings are available in P, S, A, and M modes:
DescriptionFlash sync modeThis mode is recommended for most situations. In P andA modes, shutter speed will automatically be set to valuesbetween 1/ 60 and 1/ 500 s.
Red-eye reduction lamp lights for approximately 1 s beforemain fl ash, causing pupils in subject’s eyes to contract andreducing “red-eye” effect sometimes caused by fl ash. Ow-ing to 1 s shutter-release delay, red-eye reduction is not
recommended with moving subjects or in other situationsin which quick shutter response is required. Do not movecamera while red-eye reduction lamp is lit.
In S and M modes, fl ash fi res just before shutter closes, creat-ing effect of stream of light following moving subjects. In Pand A modes, slow-rear curtain sync is used to capture bothsubject and background. Use of tripod is recommended toprevent blurring caused by camera shake.
Rear-curtain sync
Slow rear-curtain sync
Combines red-eye reduction with slow sync. Available onlyin P and A modes. Use of tripod is recommended to preventblurring caused by camera shake.
Slow sync with red-eye reduction
Flash is combined with shutter speeds as slow as 30 s tocapture both subject and background at night or under dimlight. Available only in P and A modes. Use of tripod is rec-ommended to prevent blurring caused by camera shake.Slow sync
Red-eye reduction
Front-curtain sync
Flash AngleThe fl ash angle of the built-in Speedlight can cover the fi eld of view of a 20 mm lens. Itmay not be able to light the entire subject with some lenses or apertures ( 101).
ISO AutoWhen On is selected for Custom Setting 5 (ISO auto; 142), sensitivity will automati-cally be adjusted as required for optimal fl ash output. If a high sensitivity is required,
this may result in the background being overexposed when the fl ash is used at slowshutter speeds (slow sync), in bright daylight (daylight sync), or when the backgroundis brightly lit.
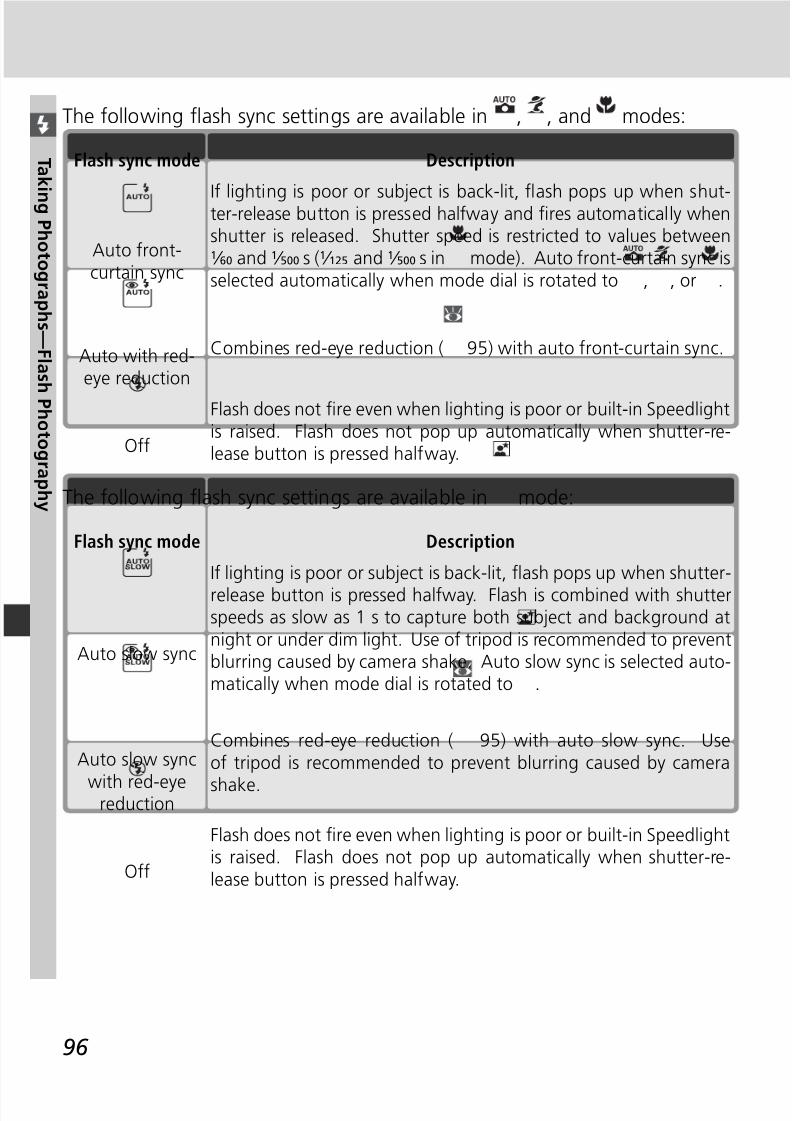
8/7/2019 ad9ec4ae0fbdbb1f44546d3a474e0e87
http://slidepdf.com/reader/full/ad9ec4ae0fbdbb1f44546d3a474e0e87 106/218
96
T ak i ng P h ot ogr aph s —F l as h P h ot ogr aph y
The following fl ash sync settings are available in , , and modes:
DescriptionFlash sync mode
Combines red-eye reduction ( 95) with auto front-curtain sync.Auto with red-eye reduction
Flash does not fi re even when lighting is poor or built-in Speedlightis raised. Flash does not pop up automatically when shutter-re-lease button is pressed halfway.Off
If lighting is poor or subject is back-lit, fl ash pops up when shut-ter-release button is pressed halfway and fi res automatically whenshutter is released. Shutter speed is restricted to values between1/ 60 and 1/ 500 s (1/ 125 and 1/ 500 s in mode). Auto front-curtain sync isselected automatically when mode dial is rotated to , , or .
Auto front-curtain sync
The following fl ash sync settings are available in mode:
DescriptionFlash sync mode
Combines red-eye reduction ( 95) with auto slow sync. Useof tripod is recommended to prevent blurring caused by camera
shake.
Auto slow sync
with red-eyereduction
Flash does not fi re even when lighting is poor or built-in Speedlightis raised. Flash does not pop up automatically when shutter-re-lease button is pressed halfway.Off
If lighting is poor or subject is back-lit, fl ash pops up when shutter-
release button is pressed halfway. Flash is combined with shutterspeeds as slow as 1 s to capture both subject and background atnight or under dim light. Use of tripod is recommended to preventblurring caused by camera shake. Auto slow sync is selected auto-matically when mode dial is rotated to .
Auto slow sync
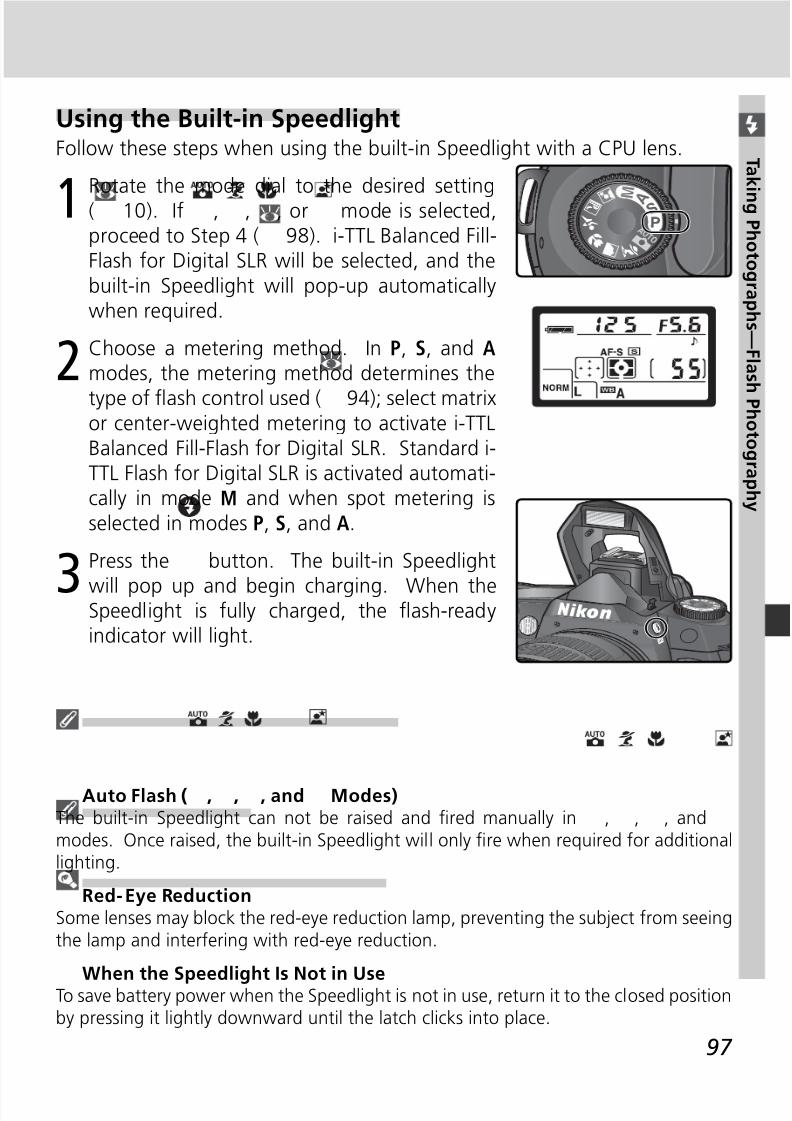
8/7/2019 ad9ec4ae0fbdbb1f44546d3a474e0e87
http://slidepdf.com/reader/full/ad9ec4ae0fbdbb1f44546d3a474e0e87 107/218
97
T ak i ng P h ot ogr aph s —F l as h P h ot ogr aph y
Using the Built-in SpeedlightFollow these steps when using the built-in Speedlight with a CPU lens.
1Rotate the mode dial to the desired setting( 10). If , , , or mode is selected,proceed to Step 4 ( 98). i-TTL Balanced Fill-Flash for Digital SLR will be selected, and thebuilt-in Speedlight will pop-up automaticallywhen required.
2 Choose a metering method. In P, S, and A modes, the metering method determines the
type of fl ash control used ( 94); select matrixor center-weighted metering to activate i-TTLBalanced Fill-Flash for Digital SLR. Standard i-TTL Flash for Digital SLR is activated automati-cally in mode M and when spot metering isselected in modes P, S, and A.
3
Press the button. The built-in Speedlight
will pop up and begin charging. When theSpeedlight is fully charged, the fl ash-readyindicator will light.
Auto Flash ( , , , and Modes)The built-in Speedlight can not be raised and fi red manually in , , , andmodes. Once raised, the built-in Speedlight will only fi re when required for additionallighting.
Red-Eye ReductionSome lenses may block the red-eye reduction lamp, preventing the subject from seeingthe lamp and interfering with red-eye reduction.
When the Speedlight Is Not in UseTo save battery power when the Speedlight is not in use, return it to the closed positionby pressing it lightly downward until the latch clicks into place.

8/7/2019 ad9ec4ae0fbdbb1f44546d3a474e0e87
http://slidepdf.com/reader/full/ad9ec4ae0fbdbb1f44546d3a474e0e87 108/218
98
T ak i ng P h ot ogr aph s —F l as h P h ot ogr aph y
4 Press the button and rotate the main command dial until the desiredfl ash sync icon is displayed in the control panel.
Studio Flash SystemsRear-curtain sync can not be used with studio fl ash systems, as the correct synchro-nization can not be obtained.
The options available depend on the mode selected with the mode dial:
Auto frontcurtain sync
Auto+red-eyereduction
Off
Auto slowsync
Auto slowsync+red-eye
reduction
Off
, ,
1 Available only in P and A modes. If mode dial is rotated to S or M after thisoption has been selected in P or A mode, fl ash sync mode will be set to(red-eye reduction).
2 Available only in P and A modes. If mode dial is rotated to S or M after thisoption has been selected in P or A mode, fl ash sync mode will be set to(front-curtain sync).
3 In P and A modes, fl ash-sync mode will be set to (slow rear-curtain sync)when the button is released.
P, S, A, M
Rear curtainsync3
Slowsync2
Front curtain
sync
Red-eye
reduction
Slow sync+red-
eye reduction1
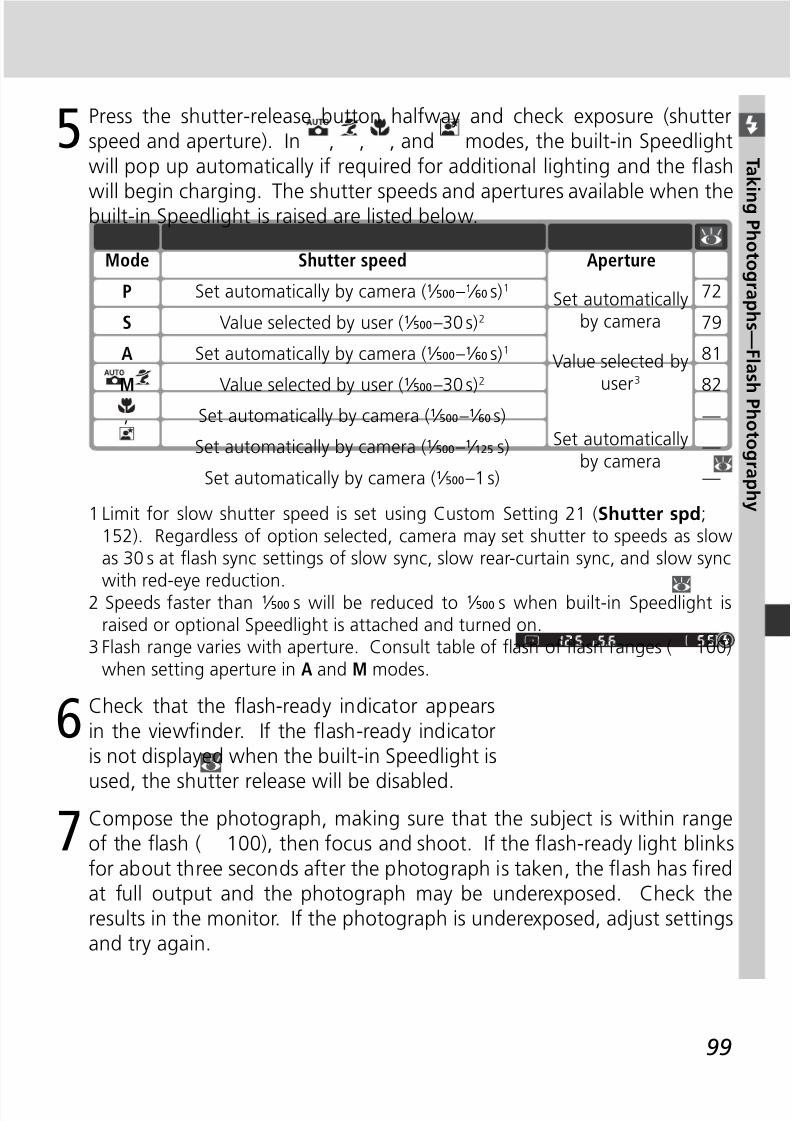
8/7/2019 ad9ec4ae0fbdbb1f44546d3a474e0e87
http://slidepdf.com/reader/full/ad9ec4ae0fbdbb1f44546d3a474e0e87 109/218
99
T ak i ng P h ot ogr aph s —F l as h P h ot ogr aph y
5 Press the shutter-release button halfway and check exposure (shutterspeed and aperture). In , , , and modes, the built-in Speedlightwill pop up automatically if required for additional lighting and the fl ash
will begin charging. The shutter speeds and apertures available when thebuilt-in Speedlight is raised are listed below.
Mode Shutter speed Aperture
Set automaticallyby camera
Value selected by
user
3
P Set automatically by camera (1/ 500–1/ 60 s)1 72
S Value selected by user (1/ 500–30 s)2 79
A Set automatically by camera (1/ 500–1/ 60 s)1 81
M Value selected by user (1/
500–30 s)2
82
Set automatically by camera (1/ 500–1/ 125 s) —
Set automatically by camera (1/ 500–1/ 60 s) —,
Set automatically by camera (1/ 500–1 s) —
Set automaticallyby camera
1 Limit for slow shutter speed is set using Custom Setting 21 (Shutter spd;152). Regardless of option selected, camera may set shutter to speeds as slowas 30 s at fl ash sync settings of slow sync, slow rear-curtain sync, and slow sync
with red-eye reduction.2 Speeds faster than 1/ 500 s will be reduced to 1/ 500 s when built-in Speedlight israised or optional Speedlight is attached and turned on.
3 Flash range varies with aperture. Consult table of fl ash of fl ash ranges ( 100)when setting aperture in A and M modes.
6 Check that the fl ash-ready indicator appearsin the viewfi nder. If the fl ash-ready indicatoris not displayed when the built-in Speedlight is
used, the shutter release will be disabled.
7 Compose the photograph, making sure that the subject is within rangeof the fl ash ( 100), then focus and shoot. If the fl ash-ready light blinksfor about three seconds after the photograph is taken, the fl ash has fi redat full output and the photograph may be underexposed. Check theresults in the monitor. If the photograph is underexposed, adjust settingsand try again.
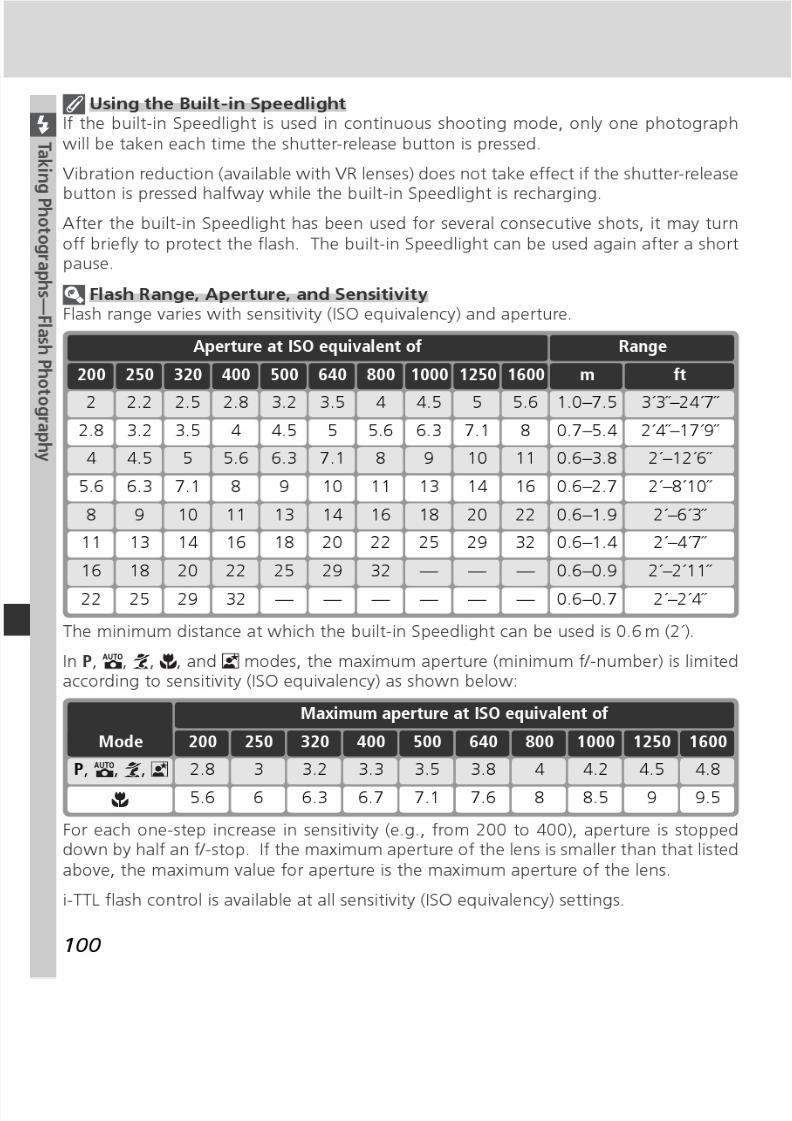
8/7/2019 ad9ec4ae0fbdbb1f44546d3a474e0e87
http://slidepdf.com/reader/full/ad9ec4ae0fbdbb1f44546d3a474e0e87 110/218
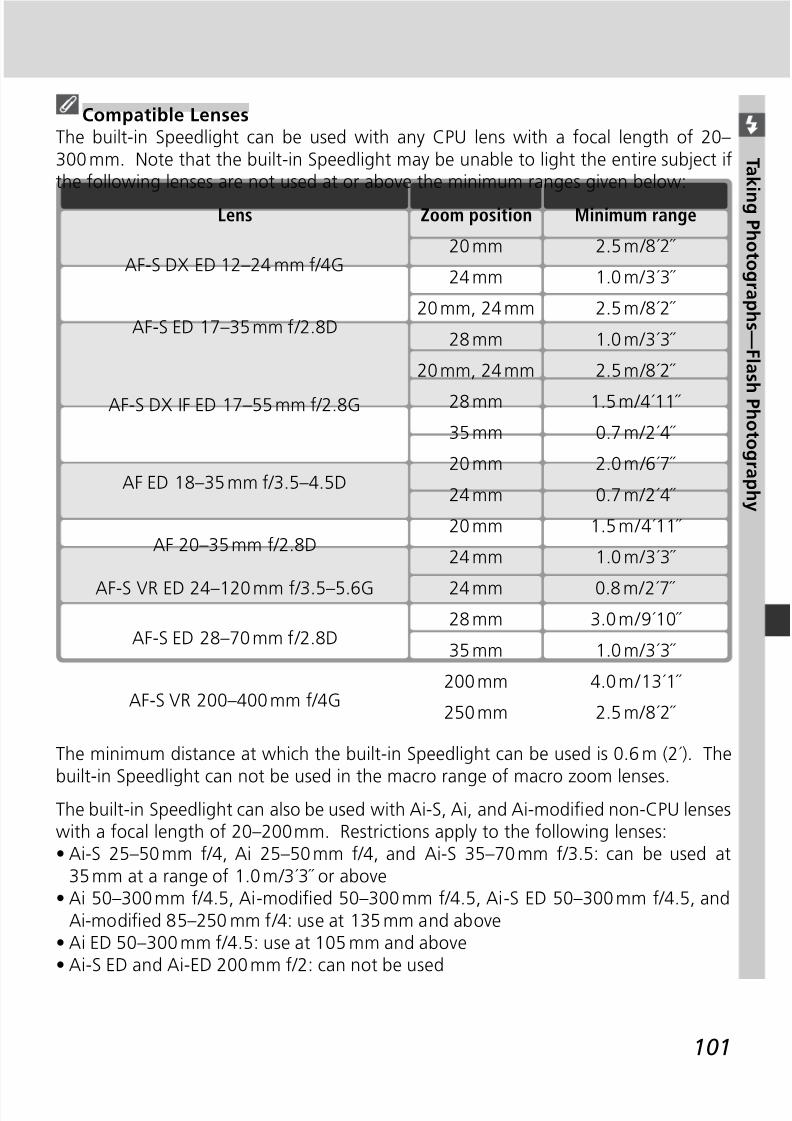
8/7/2019 ad9ec4ae0fbdbb1f44546d3a474e0e87
http://slidepdf.com/reader/full/ad9ec4ae0fbdbb1f44546d3a474e0e87 111/218
101
T ak i ng P h ot ogr aph s —F l as h P h ot ogr aph y
Compatible LensesThe built-in Speedlight can be used with any CPU lens with a focal length of 20–300 mm. Note that the built-in Speedlight may be unable to light the entire subject ifthe following lenses are not used at or above the minimum ranges given below:
The minimum distance at which the built-in Speedlight can be used is 0.6 m (2´). The
built-in Speedlight can not be used in the macro range of macro zoom lenses.The built-in Speedlight can also be used with Ai-S, Ai, and Ai-modifi ed non-CPU lenseswith a focal length of 20–200 mm. Restrictions apply to the following lenses:• Ai-S 25–50 mm f/4, Ai 25–50 mm f/4, and Ai-S 35–70 mm f/3.5: can be used at
35 mm at a range of 1.0 m /3´3˝ or above• Ai 50–300 mm f/4.5, Ai-modifi ed 50–300 mm f/4.5, Ai-S ED 50–300 mm f/4.5, and
Ai-modifi ed 85–250 mm f/4: use at 135 mm and above• Ai ED 50–300 mm f/4.5: use at 105 mm and above• Ai-S ED and Ai-ED 200 mm f/2: can not be used
Lens Zoom position Minimum range
20 mmAF-S DX ED 12–24 mm f/4G
2.5 m / 8´2˝
24 mm 1.0 m / 3´3˝
20 mm, 24 mmAF-S ED 17–35 mm f/2.8D
2.5 m / 8´2˝
28 mm 1.0 m / 3´3˝
20 mm, 24 mm
AF-S DX IF ED 17–55 mm f/2.8G
2.5 m / 8´2˝
28 mm 1.5 m / 4´11˝
35 mm 0.7 m / 2´4˝
20 mmAF ED 18–35 mm f/3.5–4.5D
2.0 m / 6´7˝
24 mm 0.7 m / 2´4˝
20 mmAF 20–35 mm f/2.8D
1.5 m / 4´11˝
24 mm 1.0 m / 3´3˝
24 mmAF-S VR ED 24–120 mm f/3.5–5.6G 0.8 m / 2´7˝ 28 mm
AF-S ED 28–70 mm f/2.8D3.0 m / 9´10˝
35 mm 1.0 m / 3´3˝
200 mmAF-S VR 200–400 mm f/4G
4.0 m / 13´1˝
250 mm 2.5 m / 8´2˝

8/7/2019 ad9ec4ae0fbdbb1f44546d3a474e0e87
http://slidepdf.com/reader/full/ad9ec4ae0fbdbb1f44546d3a474e0e87 112/218
102
T ak i ng P h ot ogr aph s —F l as h P h ot ogr aph y
Flash Exposure CompensationIn P, S, A, and M modes, fl ash exposure compensation can be used to increaseor reduce fl ash output from the level chosen by the camera’s fl ash control
system (fl ash exposure compensation is not available in Digital Vari-Programmodes). Flash output can be increased to make the main subject appearbrighter, or reduced to prevent unwanted highlights or refl ections. As a ruleof thumb, positive compensation may be needed when the main subject isdarker than the background, negative compensation when the main subjectis brighter than the background.
1
Rotate the mode dial to P, S, A, or M and choose a fl ash sync mode as
described in Steps 1–4 of “Using the Built-in Speedlight” ( 97–98).
2 Pressing the button, rotate the sub-com-mand dial and confi rm fl ash exposure com-pensation in the control panel or viewfi nder.Flash exposure compensation can be set tovalues between –3 EV (darker) and +1 EV(brighter) in increments of 1/ 3 EV.
At values other than ±0, a icon will bedisplayed in the control panel and viewfi nderafter you release the button. The currentvalue for fl ash exposure compensation can beconfi rmed by pressing the button.
3 Take a picture as instructed in Steps 5–7 of “Using the Built-in Speed-light” ( 99).
Normal fl ash output can be restored by setting fl ash exposure compensationto ±0.0 or performing a two button reset ( 111). Flash exposure compen-sation is not reset when the camera is turned off.
Using Flash Exposure Compensation with Optional SpeedlightsFlash exposure compensation is also available with optional SB-800 and SB-600 Speed-lights.
9—EV Step ( 144)This option can be used to set the increments for fl ash compensation to ½ EV.
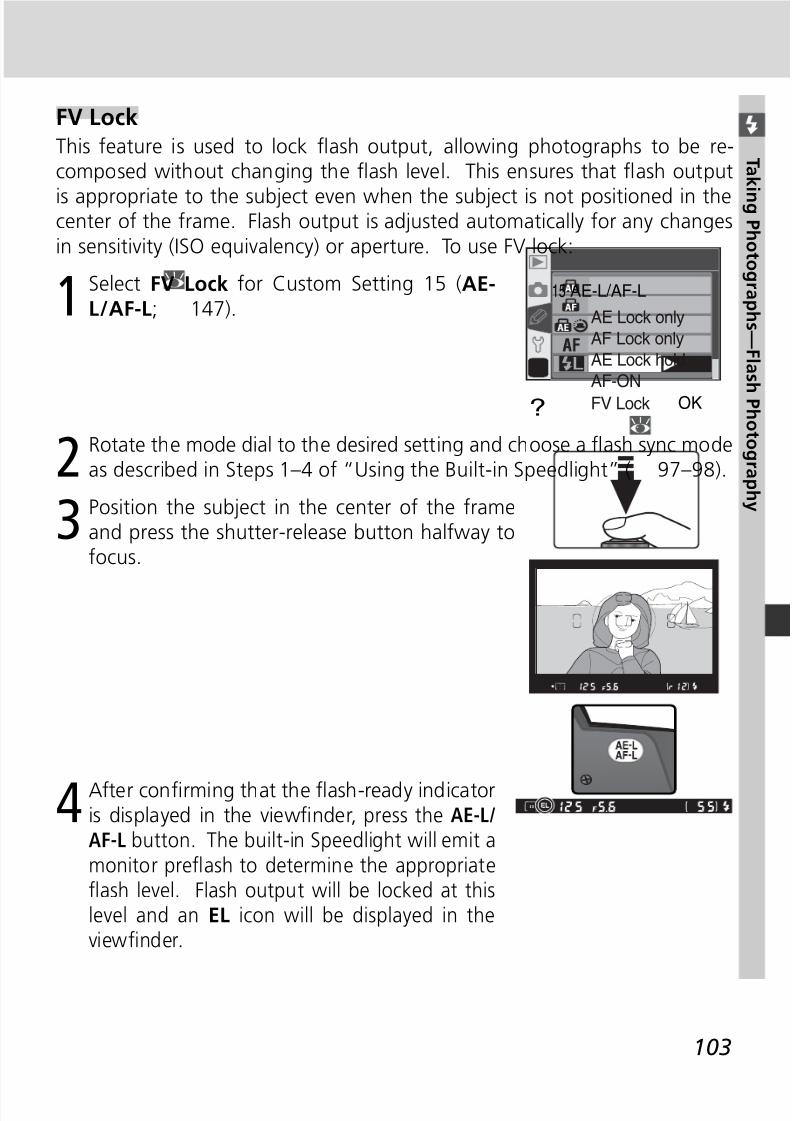
8/7/2019 ad9ec4ae0fbdbb1f44546d3a474e0e87
http://slidepdf.com/reader/full/ad9ec4ae0fbdbb1f44546d3a474e0e87 113/218
103
T ak i ng P h ot ogr aph s —F l as h P h ot ogr aph y
2 Rotate the mode dial to the desired setting and choose a fl ash sync modeas described in Steps 1–4 of “Using the Built-in Speedlight” ( 97–98).
3 Position the subject in the center of the frameand press the shutter-release button halfway tofocus.
FV LockThis feature is used to lock fl ash output, allowing photographs to be re-composed without changing the fl ash level. This ensures that fl ash output
is appropriate to the subject even when the subject is not positioned in thecenter of the frame. Flash output is adjusted automatically for any changesin sensitivity (ISO equivalency) or aperture. To use FV lock:
1 Select FV Lock for Custom Setting 15 (AE-L / AF-L; 147).
?
15 AE-L/AF-L
AE Lock only
AF Lock only
AE Lock hold
AF-ON
FV Lock OK
4After confi rming that the fl ash-ready indicatoris displayed in the viewfi nder, press the AE-L /AF-L button. The built-in Speedlight will emit amonitor prefl ash to determine the appropriatefl ash level. Flash output will be locked at thislevel and an EL icon will be displayed in theviewfi nder.
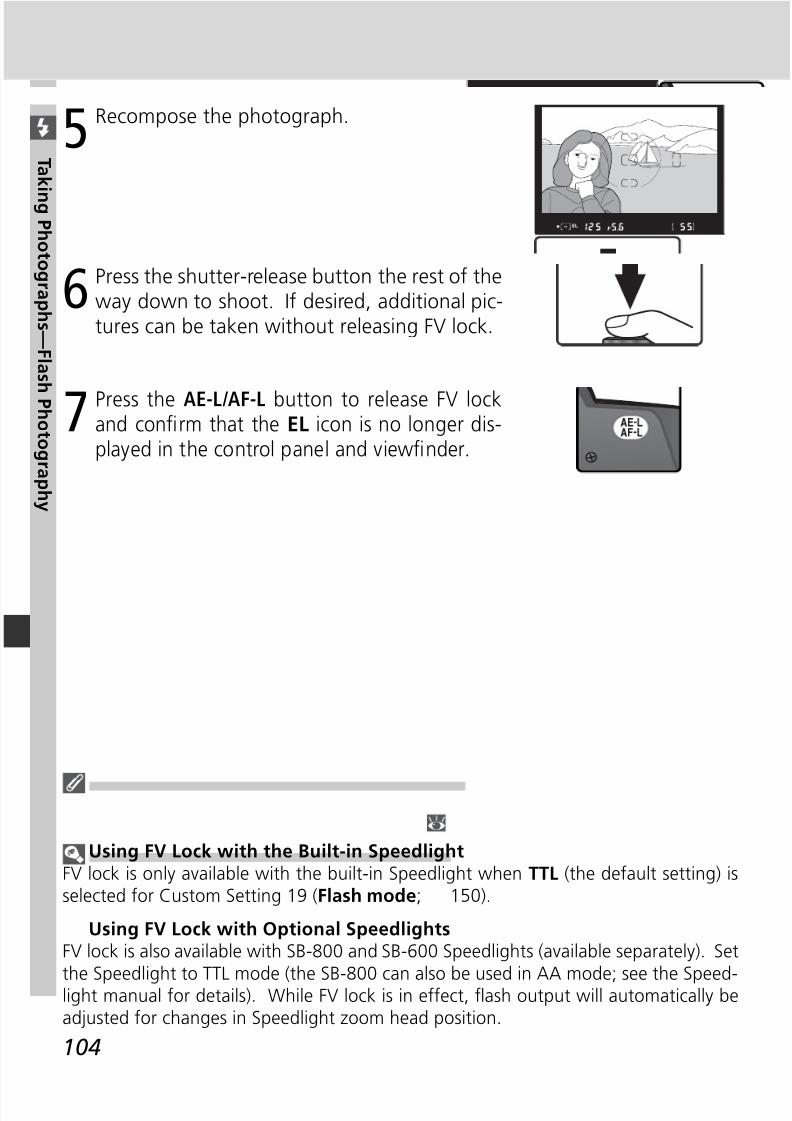
8/7/2019 ad9ec4ae0fbdbb1f44546d3a474e0e87
http://slidepdf.com/reader/full/ad9ec4ae0fbdbb1f44546d3a474e0e87 114/218
104
T ak i ng P h ot ogr aph s —F l as h P h ot ogr aph y
5 Recompose the photograph.
6 Press the shutter-release button the rest of theway down to shoot. If desired, additional pic-tures can be taken without releasing FV lock.
7 Press the AE-L /AF-L button to release FV lockand confi rm that the EL icon is no longer dis-played in the control panel and viewfi nder.
Using FV Lock with the Built-in SpeedlightFV lock is only available with the built-in Speedlight when TTL (the default setting) isselected for Custom Setting 19 (Flash mode; 150).
Using FV Lock with Optional SpeedlightsFV lock is also available with SB-800 and SB-600 Speedlights (available separately). Set
the Speedlight to TTL mode (the SB-800 can also be used in AA mode; see the Speed-light manual for details). While FV lock is in effect, fl ash output will automatically beadjusted for changes in Speedlight zoom head position.
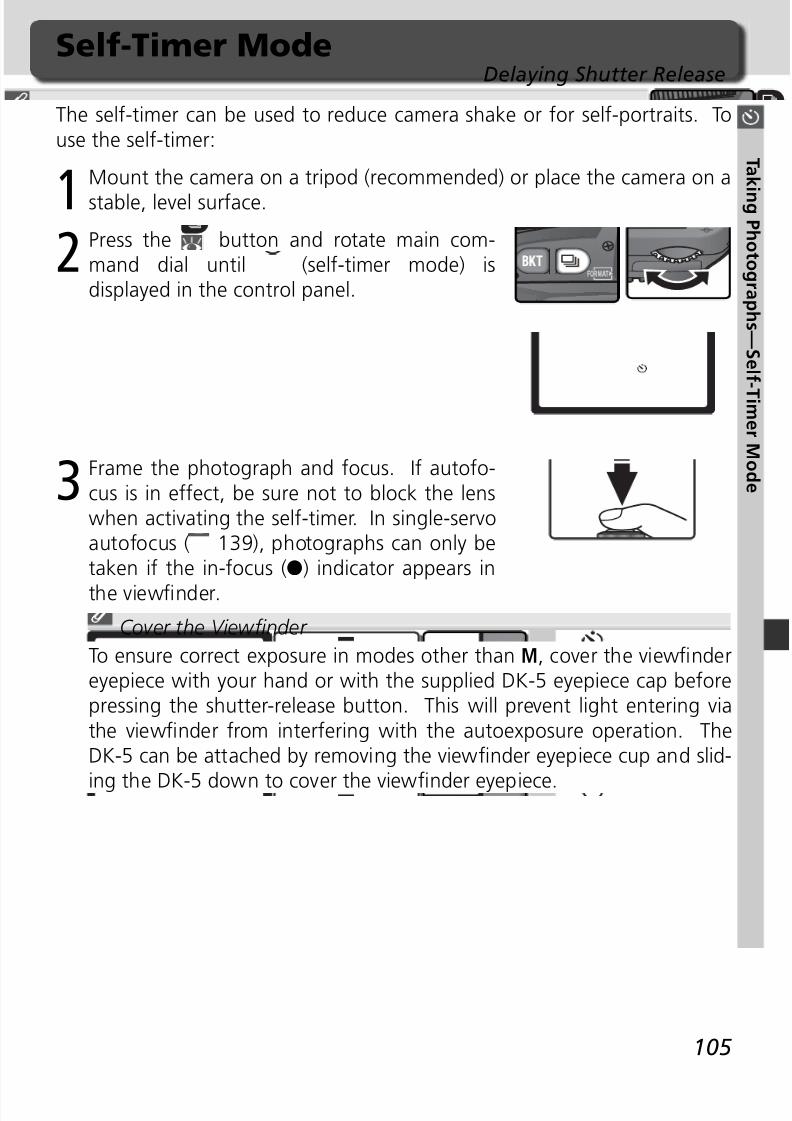
8/7/2019 ad9ec4ae0fbdbb1f44546d3a474e0e87
http://slidepdf.com/reader/full/ad9ec4ae0fbdbb1f44546d3a474e0e87 115/218
105
T ak i ng P h ot ogr aph s —S el
f -T i mer Mod e
The self-timer can be used to reduce camera shake or for self-portraits. Touse the self-timer:
1Mount the camera on a tripod (recommended) or place the camera on a
stable, level surface.
2 Press the button and rotate main com-mand dial until (self-timer mode) isdisplayed in the control panel.
Self-Timer ModeDelaying Shutter Release
3 Frame the photograph and focus. If autofo-cus is in effect, be sure not to block the lenswhen activating the self-timer. In single-servoautofocus ( 139), photographs can only betaken if the in-focus (●) indicator appears in
the viewfi nder.
Cover the Viewfi nder
To ensure correct ex posure in modes other than M, cover the viewfi ndereyepiece with your hand or with the supplied DK-5 eyepiece cap beforepressing the shutter-release button. This will prevent light entering viathe viewfi nder from interfering with the autoexposure operation. TheDK-5 can be attached by removing the viewfi nder eyepiece cup and slid-
ing the DK-5 down to cover the viewfi nder eyepiece.
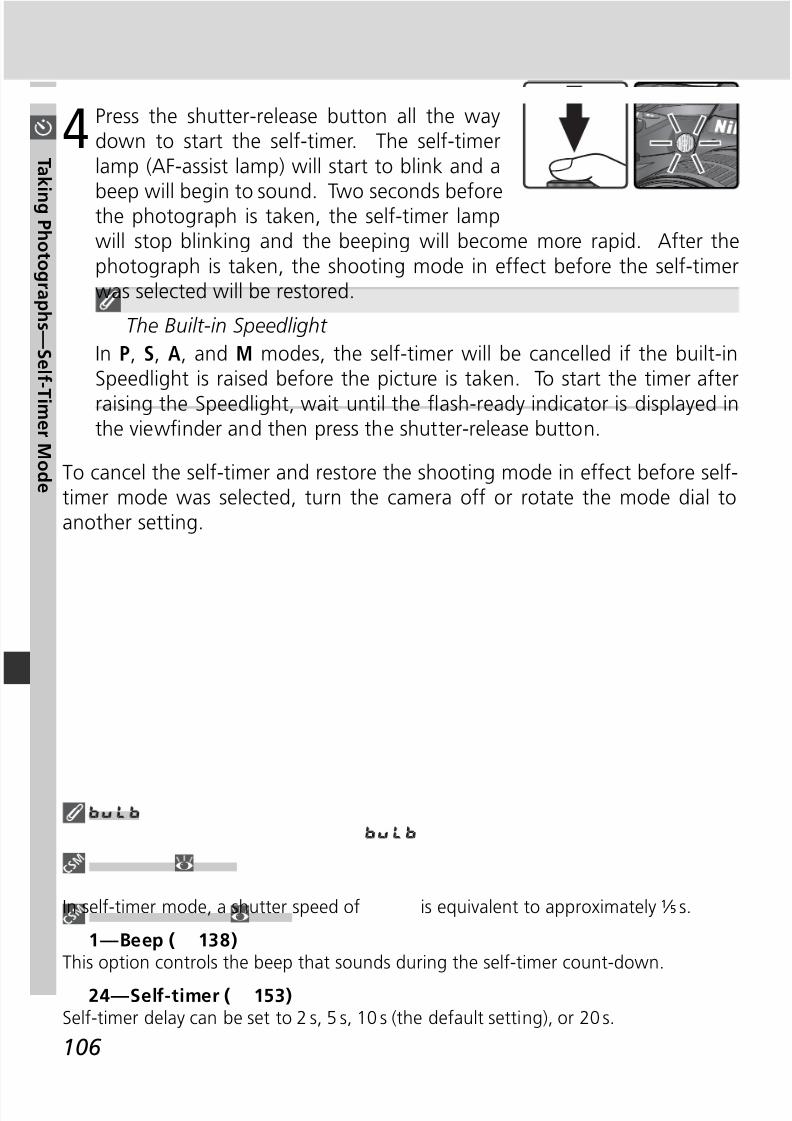
8/7/2019 ad9ec4ae0fbdbb1f44546d3a474e0e87
http://slidepdf.com/reader/full/ad9ec4ae0fbdbb1f44546d3a474e0e87 116/218
106
T ak i ng P h ot ogr aph s —S el
f -T i mer Mod e
4 Press the shutter-release button all the waydown to start the self-timer. The self-timerlamp (AF-assist lamp) will start to blink and a
beep will begin to sound. Two seconds beforethe photograph is taken, the self-timer lampwill stop blinking and the beeping will become more rapid. After thephotograph is taken, the shooting mode in effect before the self-timerwas selected will be restored.
The Built-in Speedlight
In P, S, A, and M modes, the self-timer will be cancelled if the built-inSpeedlight is raised before the picture is taken. To start the timer afterraising the Speedlight, wait until the fl ash-ready indicator is displayed inthe viewfi nder and then press the shutter-release button.
To cancel the self-timer and restore the shooting mode in effect before self-timer mode was selected, turn the camera off or rotate the mode dial toanother setting.
In self-timer mode, a shutter speed of is equivalent to approximately 1/ 5 s.
1—Beep ( 138)This option controls the beep that sounds during the self-timer count-down.
24—Self-timer ( 153)Self-timer delay can be set to 2 s, 5 s, 10 s (the default setting), or 20 s.

8/7/2019 ad9ec4ae0fbdbb1f44546d3a474e0e87
http://slidepdf.com/reader/full/ad9ec4ae0fbdbb1f44546d3a474e0e87 117/218
107
T ak i ng P h ot ogr aph s —Us i ng a R emot e C ont r ol
The optional ML-L3 remote control can be used for self-portraits or to reduceblur caused by camera shake.
Before Using the Remote Control
Before using the remote control for the fi rst time, remove the clear plasticbattery insulator sheet.
Using a Remote ControlRemote-Control Photography
DescriptionShooting mode
Ensures quick shutter response; can be used to reduce blur-ring caused by camera shake.Quick-response remote
Gives operator time to pose when taking self-portrait usingremote control.Delayed remote
Long Time-ExposuresWhen the remote control is used in mode M, can be selected for shutter speed. Atthis setting, the shutter opens when the shutter-release button on the optional ML-L3 remote control is pressed (2 s after the button is pressed in delayed remote mode)
and remains open until the remote-control shutter-release button is pressed a secondtime (maximum 30 minutes; 83). Nikon recommends using a fully-charged EN-EL3battery or an optional EH-5 AC adapter to prevent loss of power while the shutter isopen. Note that if the shutter is open for more than approximately 1 s at any setting,“noise” in the form of randomly-spaced, brightly-colored pixels may appear in thefi nal photograph.
Using the Built-in SpeedlightIn situations in which the fl ash is required, the camera will only respond to the shutter-
release button on the ML-L3 once the fl ash has charged. In , , , and modes,the fl ash will begin charging when delayed remote or quick-response remote mode isselected; once the fl ash has charged, the built-in Speedlight will pop up automaticallyif required when the shutter-release button on the ML-L3 is pressed. If red-eye reduc-tion, slow sync with red-eye reduction, auto with red-eye reduction, or auto slow syncwith red-eye reduction is selected, the self-timer lamp will light for about one secondbefore the shutter is released. In delayed remote mode, the self-timer lamp will blinkfor two seconds and then light for one second before the shutter is released.
In P, S, A, and M modes, raising the built-in Speedlight during the two-second count-down in delayed remote mode will cancel the two-second timer. Wait for the fl ash tocharge and press the shutter-release button on the ML-L3 to restart the timer.

8/7/2019 ad9ec4ae0fbdbb1f44546d3a474e0e87
http://slidepdf.com/reader/full/ad9ec4ae0fbdbb1f44546d3a474e0e87 118/218
108
T ak i ng P h ot ogr aph s —Us i ng a R emot e C ont r ol
3 Frame the photograph. In autofocus (AF)mode, the camera shutter-release button canbe used to check focus, although only theshutter release-button on the remote controlcan be used to release the shutter.
Cover the Viewfi nder To ensure correct exposure in modes other than M, cover the viewfi ndereyepiece with your hand or with the supplied DK-5 eyepiece cap beforepressing the shutter-release button. This will prevent light entering viathe viewfi nder from interfering with the autoexposure operation. TheDK-5 can be attached by removing the viewfi nder eyepiece cup and slid-ing the DK-5 down to cover the viewfi nder eyepiece.
To use the remote control:
1 Mount the camera on a tripod (recommended) or place the camera on astable, level surface.
2 Press the button and rotate main com-mand dial until (delayed remote) or (quickresponse remote) is displayed in the controlpanel.
1—Beep ( 138)This option controls the beep that sounds during the two-second count-down in de-layed remote mode or when the shutter is released in quick-response remote mode.
25—Remote ( 154)The length of time before the camera automatically cancels delayed remote or quick-response remote mode can be chosen from one, fi ve, ten, or fi fteen minutes.
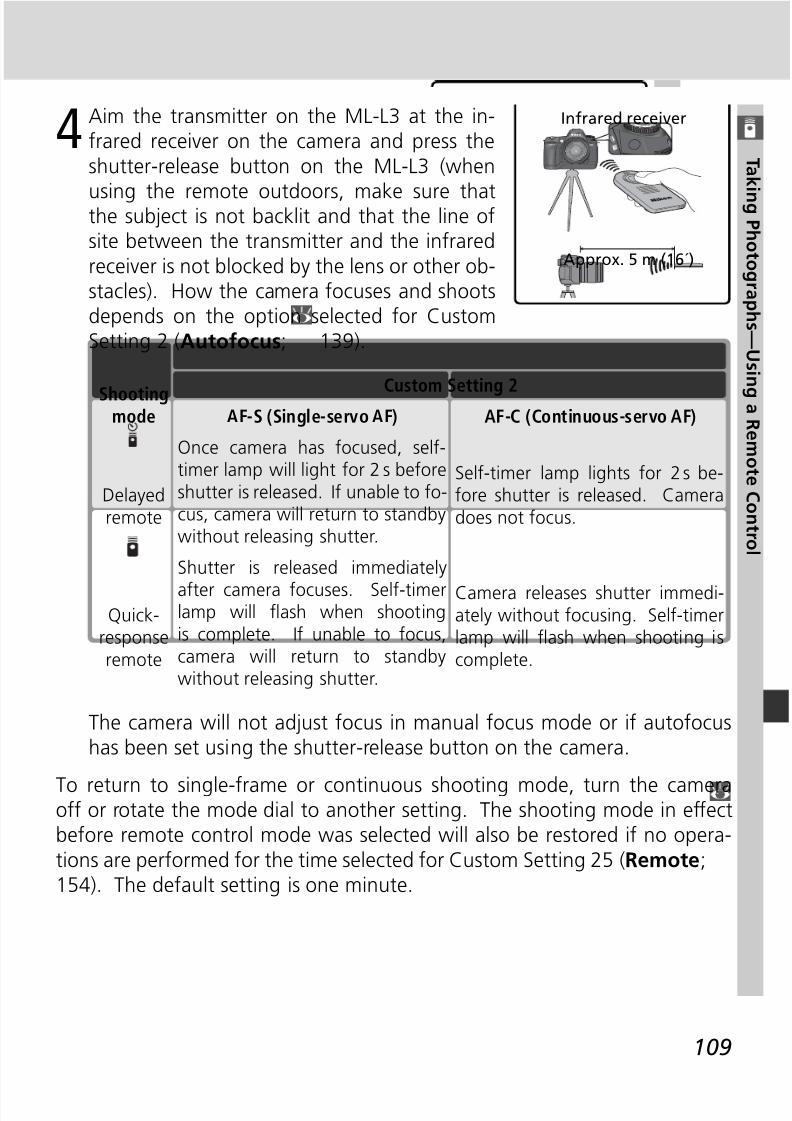
8/7/2019 ad9ec4ae0fbdbb1f44546d3a474e0e87
http://slidepdf.com/reader/full/ad9ec4ae0fbdbb1f44546d3a474e0e87 119/218
109
T ak i ng P h ot ogr aph s —Us i ng a R emot e C ont r ol
4 Aim the transmitter on the ML-L3 at the in-frared receiver on the camera and press theshutter-release button on the ML-L3 (when
using the remote outdoors, make sure thatthe subject is not backlit and that the line ofsite between the transmitter and the infraredreceiver is not blocked by the lens or other ob-stacles). How the camera focuses and shootsdepends on the option selected for CustomSetting 2 (Autofocus; 139).
The camera will not adjust focus in manual focus mode or if autofocushas been set using the shutter-release button on the camera.
To return to single-frame or continuous shooting mode, turn the cameraoff or rotate the mode dial to another setting. The shooting mode in effectbefore remote control mode was selected will also be restored if no opera-tions are performed for the time selected for Custom Setting 25 (Remote;154). The default setting is one minute.
AF-S (Single-servo AF) AF-C (Continuous-servo AF)
Shutter is released immediately
after camera focuses. Self-timerlamp will fl ash when shootingis complete. If unable to focus,camera will return to standbywithout releasing shutter.
Quick-responseremote
Camera releases shutter immedi-ately without focusing. Self-timerlamp will fl ash when shooting iscomplete.
Once camera has focused, self-timer lamp will light for 2 s beforeshutter is released. If unable to fo-cus, camera will return to standbywithout releasing shutter.
Delayedremote
Self-timer lamp lights for 2 s be-fore shutter is released. Cameradoes not focus.
Custom Setting 2Shootingmode
Approx. 5 m (16´)
Infrared receiver
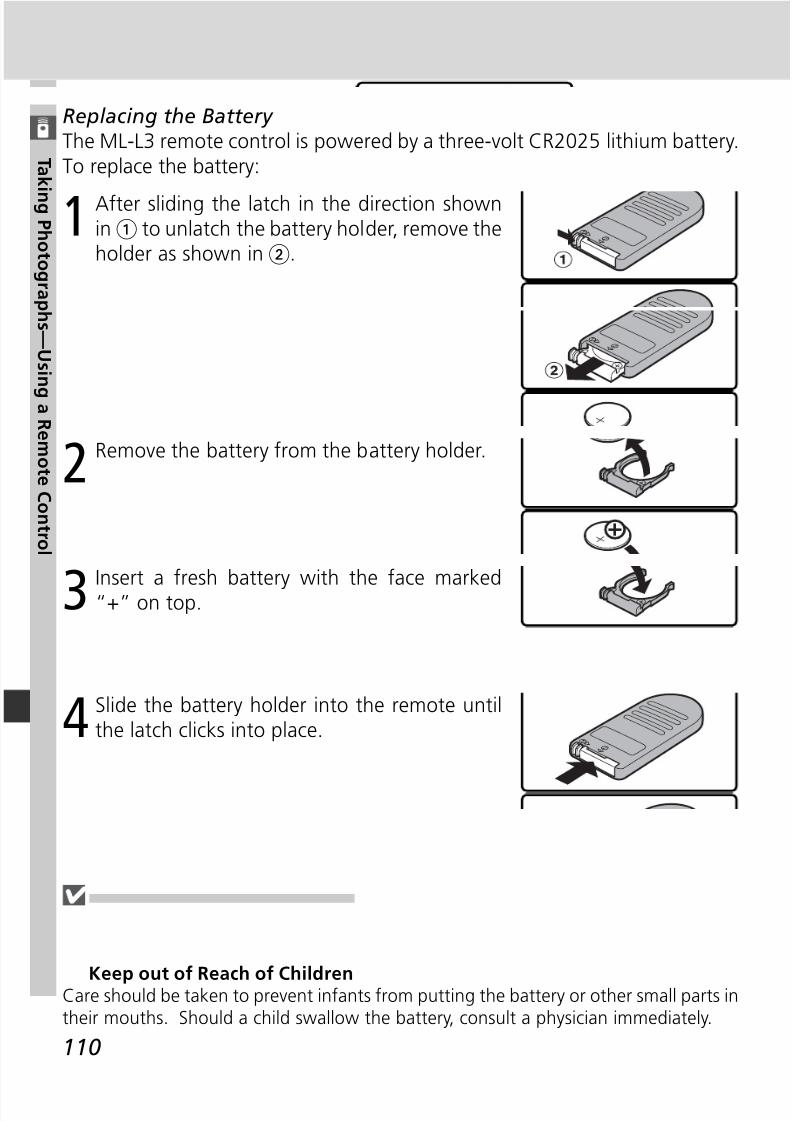
8/7/2019 ad9ec4ae0fbdbb1f44546d3a474e0e87
http://slidepdf.com/reader/full/ad9ec4ae0fbdbb1f44546d3a474e0e87 120/218
110
T ak i ng P h ot ogr aph s —Us i ng a R emot e C ont r ol
Replacing the Battery The ML-L3 remote control is powered by a three-volt CR2025 lithium battery.To replace the battery:
1After sliding the latch in the direction shownin to unlatch the battery holder, remove theholder as shown in.
2 Remove the battery from the battery holder.
3 Insert a fresh battery with the face marked“+” on top.
4 Slide the battery holder into the remote untilthe latch clicks into place.
Keep out of Reach of ChildrenCare should be taken to prevent infants from putting the battery or other small parts intheir mouths. Should a child swallow the battery, consult a physician immediately.
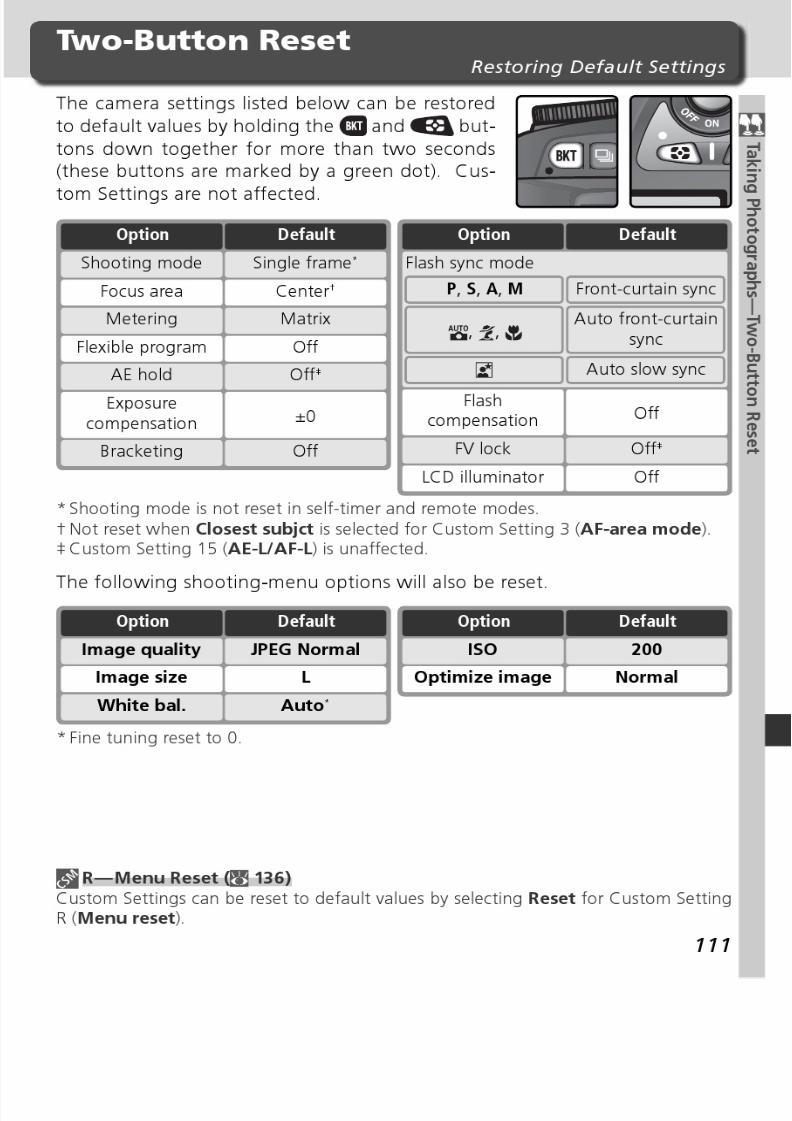
8/7/2019 ad9ec4ae0fbdbb1f44546d3a474e0e87
http://slidepdf.com/reader/full/ad9ec4ae0fbdbb1f44546d3a474e0e87 121/218

8/7/2019 ad9ec4ae0fbdbb1f44546d3a474e0e87
http://slidepdf.com/reader/full/ad9ec4ae0fbdbb1f44546d3a474e0e87 122/218
112

8/7/2019 ad9ec4ae0fbdbb1f44546d3a474e0e87
http://slidepdf.com/reader/full/ad9ec4ae0fbdbb1f44546d3a474e0e87 123/218
113
This section details the operations that can beperformed during playback, including thumbnailplayback, playback zoom, and photo informationdisplay.
More About Playback
Playback Options
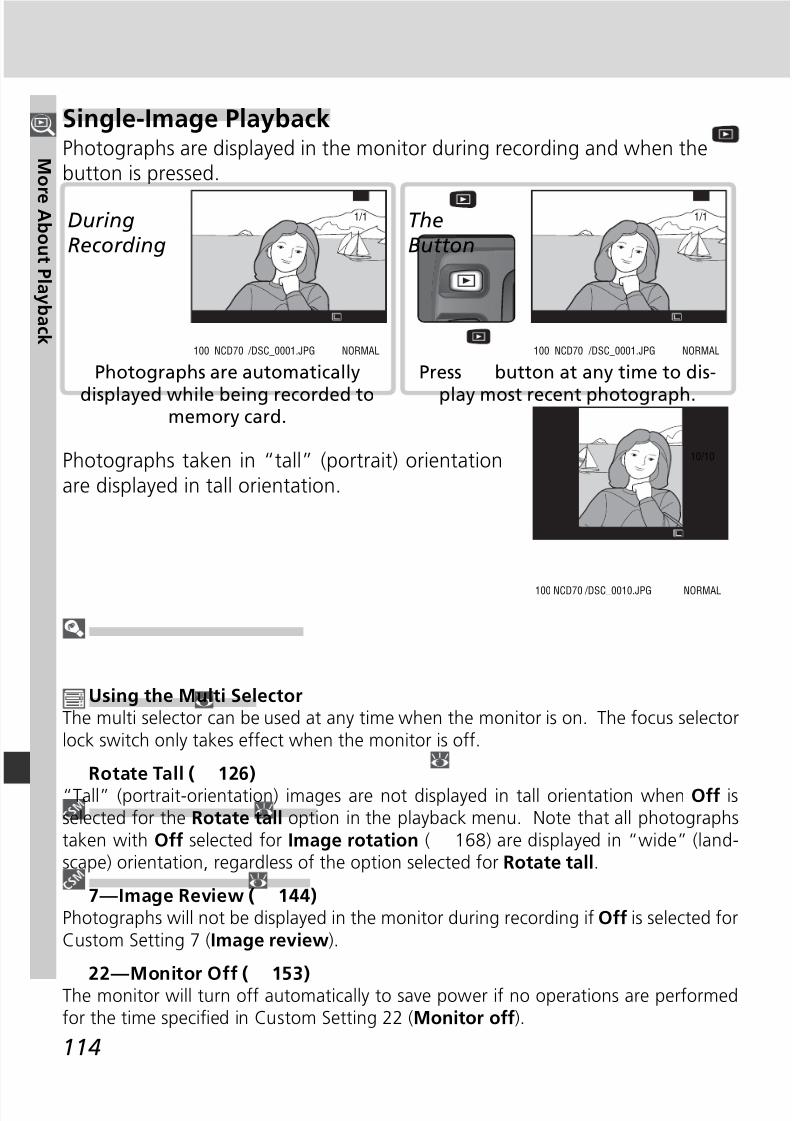
8/7/2019 ad9ec4ae0fbdbb1f44546d3a474e0e87
http://slidepdf.com/reader/full/ad9ec4ae0fbdbb1f44546d3a474e0e87 124/218
114
Mor e Ab out P l ayb ac k
Using the Multi SelectorThe multi selector can be used at any time when the monitor is on. The focus selectorlock switch only takes effect when the monitor is off.
Rotate Tall ( 126)“Tall” (portrait-orientation) images are not displayed in tall orientation when Off isselected for the Rotate tall option in the playback menu. Note that all photographstaken with Off selected for Image rotation ( 168) are displayed in “wide” (land-scape) orientation, regardless of the option selected for Rotate tall.
7—Image Review ( 144)Photographs will not be displayed in the monitor during recording if Off is selected forCustom Setting 7 (Image review).
22—Monitor Off ( 153)The monitor will turn off automatically to save power if no operations are performedfor the time specifi ed in Custom Setting 22 (Monitor off).
Single-Image PlaybackPhotographs are displayed in the monitor during recording and when thebutton is pressed.
Photographs taken in “tall” (portrait) orientationare displayed in tall orientation.
Press button at any time to dis-
play most recent photograph.
1/1
100 NCD70 /DSC_0001.JPG NORMAL
TheButton
Photographs are automatically
displayed while being recorded tomemory card.
1/1
100 NCD70 /DSC_0001.JPG NORMAL
DuringRecording
10/10
100 NCD70 /DSC_0010.JPG NORMAL
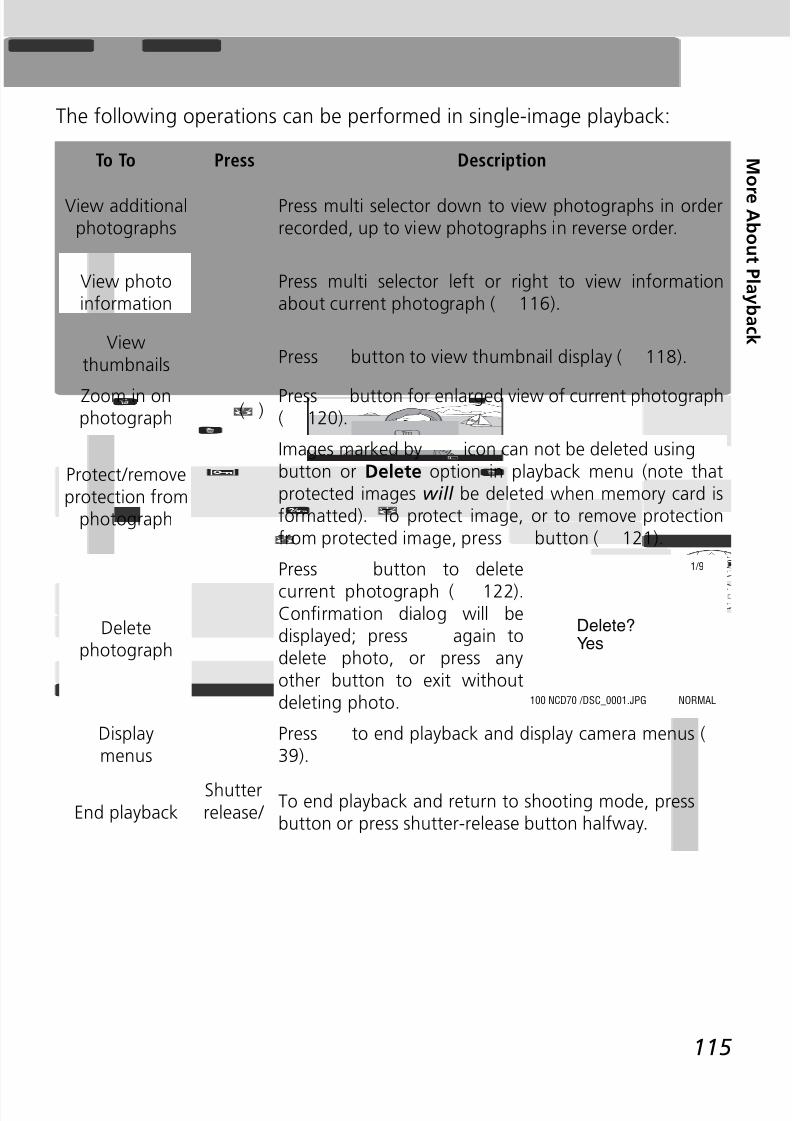
8/7/2019 ad9ec4ae0fbdbb1f44546d3a474e0e87
http://slidepdf.com/reader/full/ad9ec4ae0fbdbb1f44546d3a474e0e87 125/218
115
Mor e Ab out P l ayb ac k
The following operations can be performed in single-image playback:
To PressTo Description
View additionalphotographs
Press multi selector down to view photographs in orderrecorded, up to view photographs in reverse order.
View photoinformation
Press multi selector left or right to view informationabout current photograph ( 116).
Viewthumbnails Press button to view thumbnail display ( 118).
( )Zoom in onphotograph
Press button for enlarged view of current photograph( 120).
Deletephotograph
Press button to delete
current photograph ( 122).Confi rmation dialog will bedisplayed; press again todelete photo, or press anyother button to exit withoutdeleting photo.
1/9
100 NCD70 /DSC_0001.JPG NORMAL
Delete?Yes
Protect / removeprotection from
photograph
Images marked by icon can not be deleted usingbutton or Delete option in playback menu (note thatprotected images will be deleted when memory card isformatted). To protect image, or to remove protectionfrom protected image, press button ( 121).
Displaymenus
Press to end playback and display camera menus (39).
Shutterrelease / End playback
To end playback and return to shooting mode, pressbutton or press shutter-release button halfway.
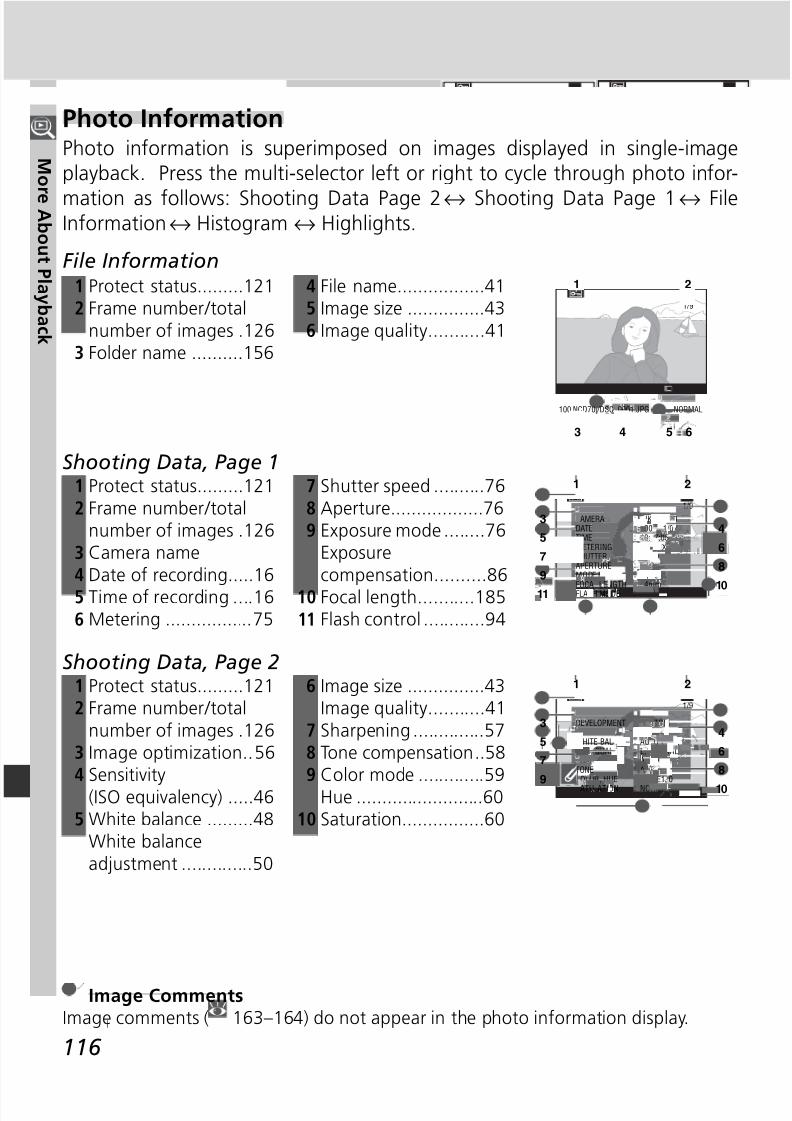
8/7/2019 ad9ec4ae0fbdbb1f44546d3a474e0e87
http://slidepdf.com/reader/full/ad9ec4ae0fbdbb1f44546d3a474e0e87 126/218

8/7/2019 ad9ec4ae0fbdbb1f44546d3a474e0e87
http://slidepdf.com/reader/full/ad9ec4ae0fbdbb1f44546d3a474e0e87 127/218
117
Mor e Ab out P l ayb ac k
Histogram
1/9
1 2
3
1 Protect status......................................................121 2 Frame number / total number of images...............126
3 Histogram showing the distribution of tones in theimage. The horizontal axis corresponds to pixelbrightness, with dark tones to the left and brighttones to the right. The vertical axis shows the num- ber of pixels of each brightness in the image.
Highlights
1/9
Highlights
1 32 1 Protect status......................................................121 2 Image highlights (brightest areas of image) are
marked by a fl ashing border.3 Frame number / total number of images...............126
HistogramsCamera histograms are for use only as a guide and may differ from those displayed inimaging applications.
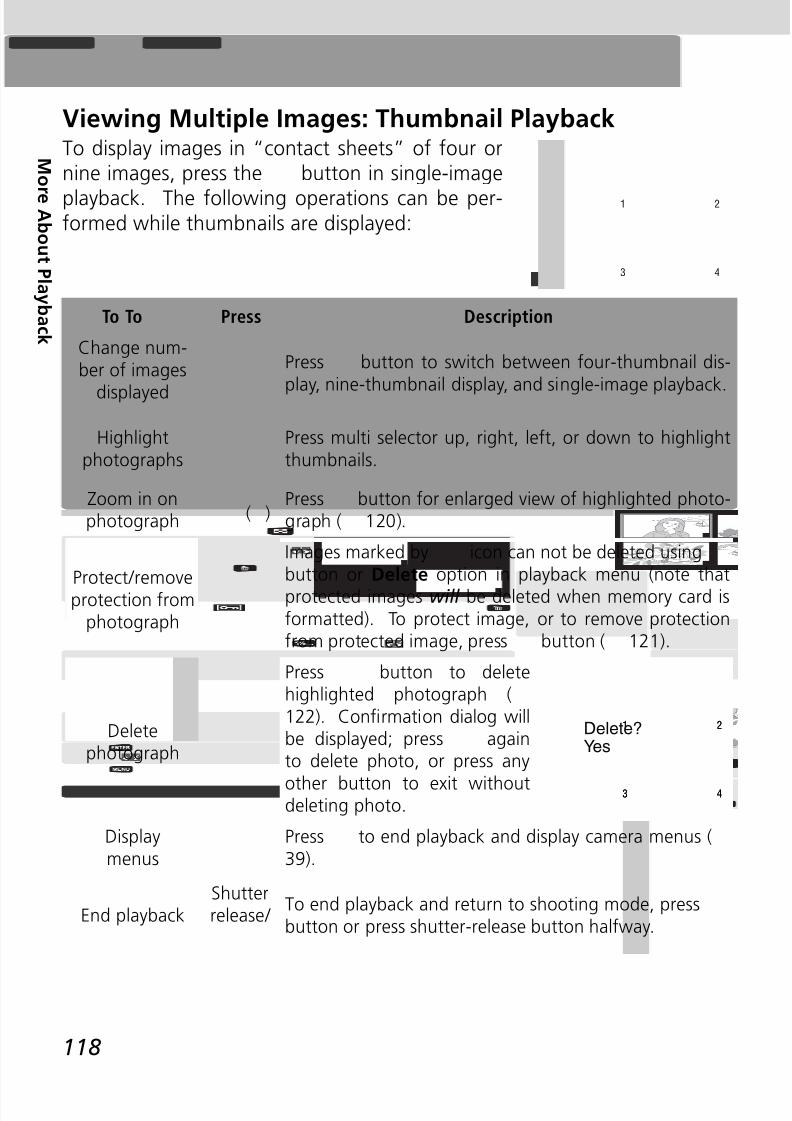
8/7/2019 ad9ec4ae0fbdbb1f44546d3a474e0e87
http://slidepdf.com/reader/full/ad9ec4ae0fbdbb1f44546d3a474e0e87 128/218
118
Mor e Ab out P l ayb ac k
Viewing Multiple Images: Thumbnail PlaybackTo display images in “contact sheets” of four ornine images, press the button in single-image
playback. The following operations can be per-formed while thumbnails are displayed:
To PressTo Description
Highlightphotographs
Press multi selector up, right, left, or down to highlightthumbnails.
Change num-ber of images
displayed
Press button to switch between four-thumbnail dis-
play, nine-thumbnail display, and single-image playback.
( )Zoom in onphotograph
Press button for enlarged view of highlighted photo-graph ( 120).
Deletephotograph
Press button to deletehighlighted photograph (122). Confi rmation dialog willbe displayed; press againto delete photo, or press any
other button to exit withoutdeleting photo.
1 2
3 4
1 2
3 4
Delete?Yes
Protect / removeprotection from
photograph
Images marked by icon can not be deleted usingbutton or Delete option in playback menu (note that
protected images will be deleted when memory card isformatted). To protect image, or to remove protectionfrom protected image, press button ( 121).
Displaymenus
Press to end playback and display camera menus (39).
Shutterrelease / End playback
To end playback and return to shooting mode, pressbutton or press shutter-release button halfway.
1 2
3 4
8/7/2019 ad9ec4ae0fbdbb1f44546d3a474e0e87
http://slidepdf.com/reader/full/ad9ec4ae0fbdbb1f44546d3a474e0e87 129/218
119
Mor e Ab out P l ayb ac k
Using the Multi SelectorThe multi selector can be used at any time when the monitor is on. The focus selectorlock switch only takes effect when the monitor is off.
22—Monitor Off ( 153)The monitor will turn off automatically to save power if no operations are performedfor the time specifi ed in Custom Setting 22 (Monitor off).

8/7/2019 ad9ec4ae0fbdbb1f44546d3a474e0e87
http://slidepdf.com/reader/full/ad9ec4ae0fbdbb1f44546d3a474e0e87 130/218
120
Mor e Ab out P l ayb ac k
Taking a Closer Look: Playback ZoomPress the button to zoom in on the image displayed in single-imageplayback or on the image currently highlighted in thumbnail playback. The
following operations can be performed while zoom is in effect:
To Press and / or rotateTo Description
Changezoom ratio / navigate toother areasof image
Press button.Navigation window in
bottom right cornerof monitor shows areathat will be displayedwhen button isreleased. Keeping
button pressed, rotate main command dialto change size of area selected or use multi se-lector to move frame in navigation window toanother location. Selected area will be displayed
in monitor when button is released.
+
( )
Cancel / resumezoom
Press to cancel zoom and return to single-image or thumbnail playback. Press again tozoom image in.
View otherareas ofimage
Use multi selector toview area not visiblein monitor. Hold multiselector down to scrollrapidly to other areasof frame.
+
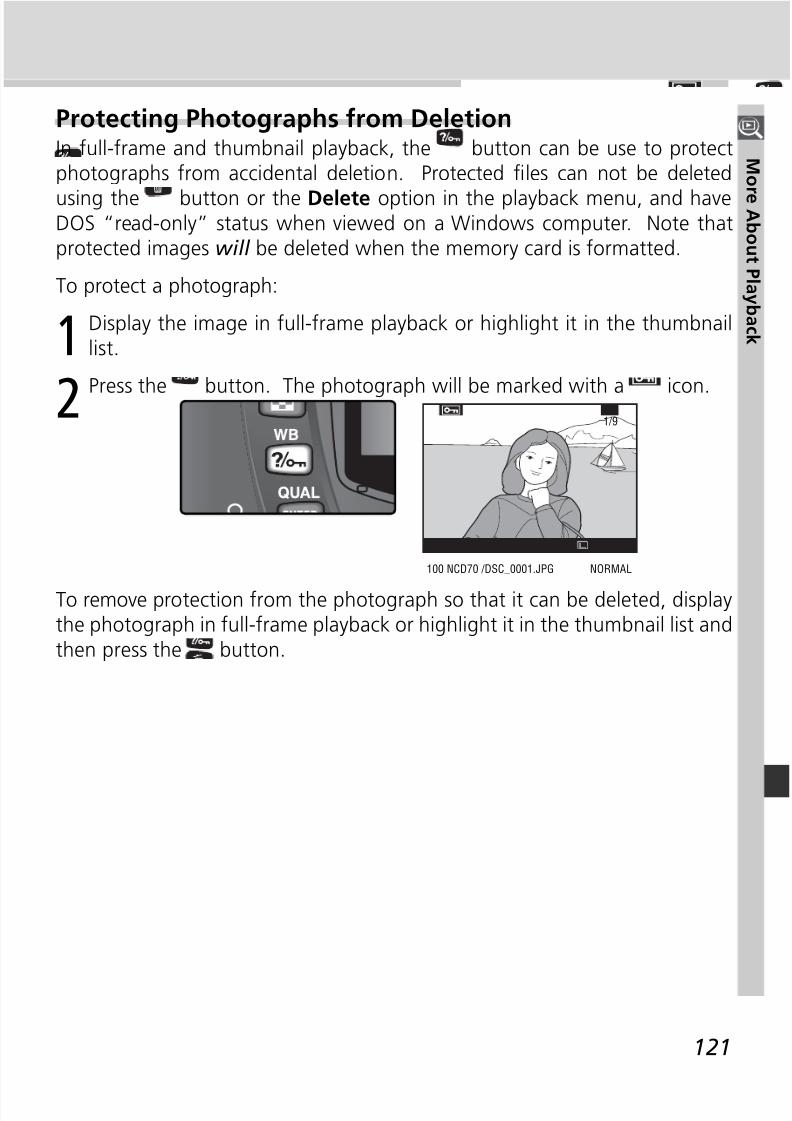
8/7/2019 ad9ec4ae0fbdbb1f44546d3a474e0e87
http://slidepdf.com/reader/full/ad9ec4ae0fbdbb1f44546d3a474e0e87 131/218
121
Mor e Ab out P l ayb ac k
Protecting Photographs from DeletionIn full-frame and thumbnail playback, the button can be use to protectphotographs from accidental deletion. Protected fi les can not be deleted
using the button or the Delete option in the playback menu, and haveDOS “read-only” status when viewed on a Windows computer. Note thatprotected images will be deleted when the memory card is formatted.
To protect a photograph:
1 Display the image in full-frame playback or highlight it in the thumbnaillist.
2 Press the button. The photograph will be marked with a icon.
To remove protection from the photograph so that it can be deleted, displaythe photograph in full-frame playback or highlight it in the thumbnail list andthen press the button.
1/9
100 NCD70 /DSC_0001.JPG NORMAL
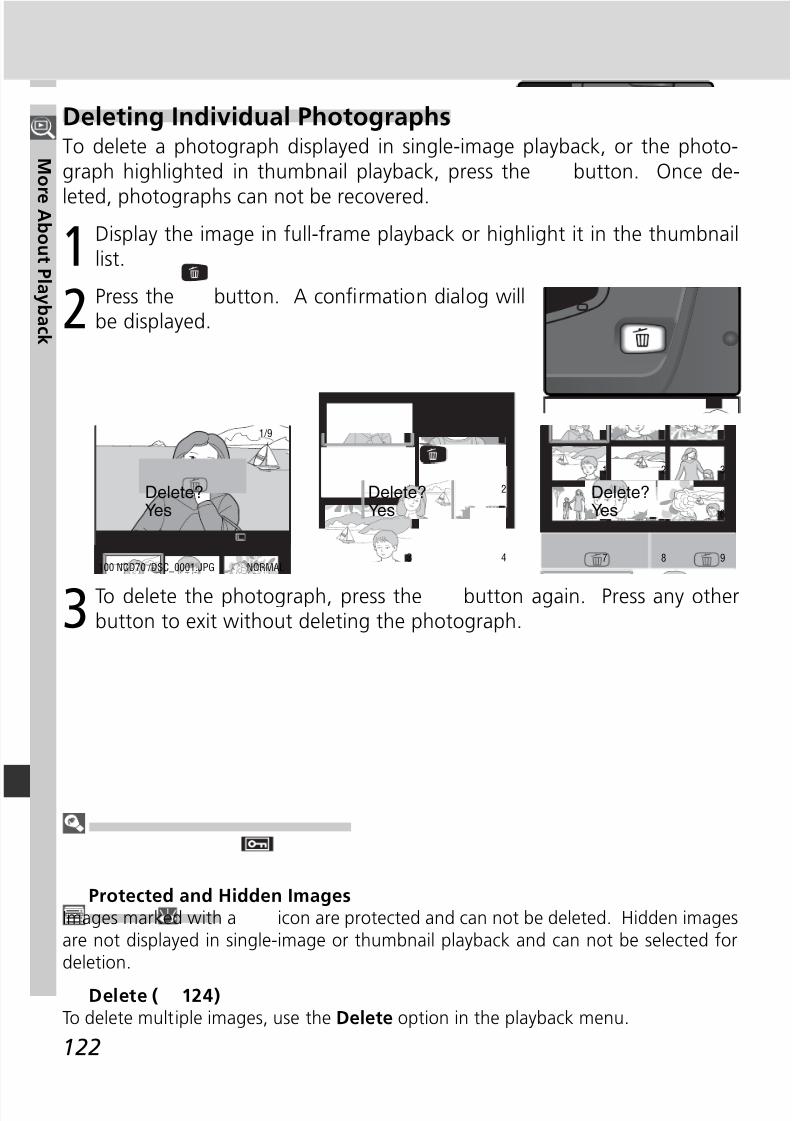
8/7/2019 ad9ec4ae0fbdbb1f44546d3a474e0e87
http://slidepdf.com/reader/full/ad9ec4ae0fbdbb1f44546d3a474e0e87 132/218
122
Mor e Ab out P l ayb ac k
Deleting Individual PhotographsTo delete a photograph displayed in single-image playback, or the photo-graph highlighted in thumbnail playback, press the button. Once de-
leted, photographs can not be recovered.
1 Display the image in full-frame playback or highlight it in the thumbnaillist.
2 Press the button. A confi rmation dialog willbe displayed.
3 To delete the photograph, press the button again. Press any otherbutton to exit without deleting the photograph.
Protected and Hidden ImagesImages marked with a icon are protected and can not be deleted. Hidden imagesare not displayed in single-image or thumbnail playback and can not be selected fordeletion.
Delete ( 124)To delete multiple images, use the Delete option in the playback menu.
1 2
3 4
1 2
3 4
Delete?Yes
1/9
100 NCD70 /DSC_0001.JPG NORMAL
Delete?Yes
1 2 3
7 8 9
654
Delete?Yes

8/7/2019 ad9ec4ae0fbdbb1f44546d3a474e0e87
http://slidepdf.com/reader/full/ad9ec4ae0fbdbb1f44546d3a474e0e87 133/218
123
Changes to a variety of camera settings are madewith the help of menus that appear in the cameramonitor. This chapter covers:
The Playback MenuThe playback menu contains options for managingthe images stored on memory cards, and for play- ing pictures back in automated slide shows.
The Shooting MenuThe shooting menu contains advanced shootingoptions, such as image optimization and noisereduction.
Custom SettingsThe CSM (Custom Settings) menu controls fi nedetails of camera operation.
The Setup MenuThis menu is used for basic camera setup, includ-ing formatting memory cards and setting the timeand date.
Menu GuideIndex to Menu Options
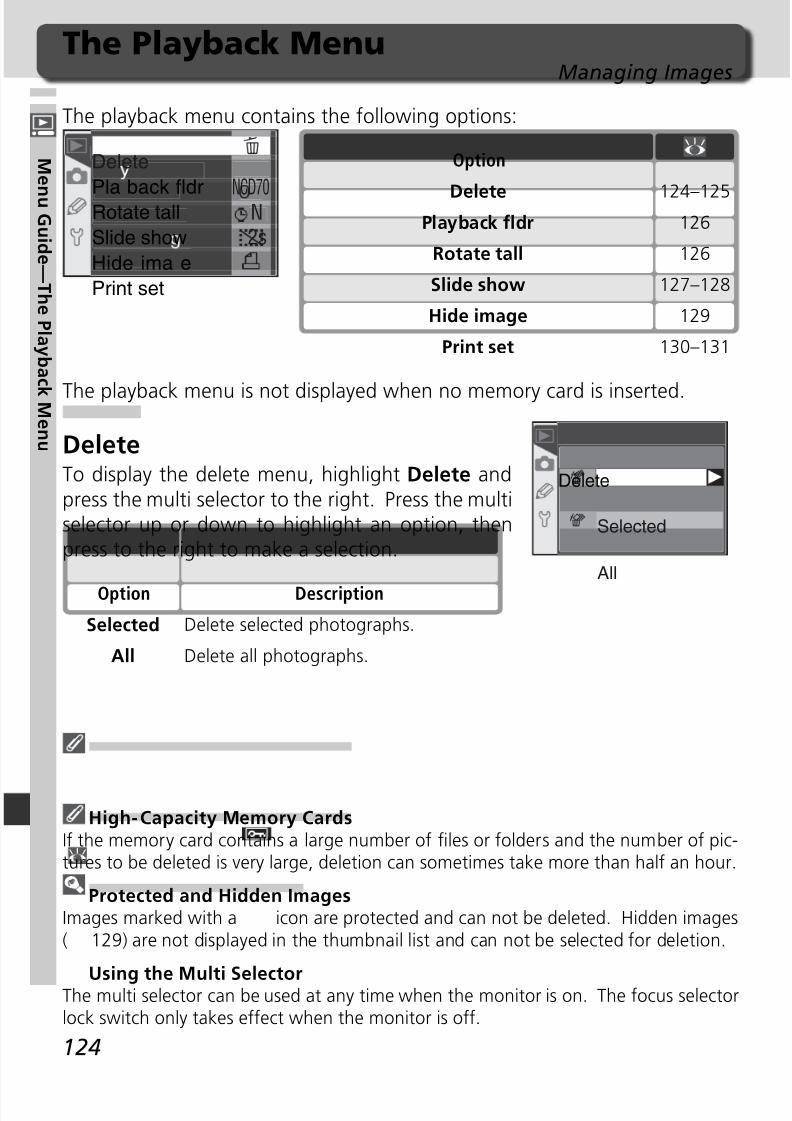
8/7/2019 ad9ec4ae0fbdbb1f44546d3a474e0e87
http://slidepdf.com/reader/full/ad9ec4ae0fbdbb1f44546d3a474e0e87 134/218
124
Menu Gui d e—T h e P l ayb a
c k Menu
The playback menu contains the following options:
The Playback MenuManaging Images
NCD70
N2s
Delete
Pla back fldrRotate tall
Slide show
Hide ima e
Print set
Option
Delete 124–125Playback fl dr 126
Rotate tall 126
Slide show 127–128
Hide image 129
Print set 130–131
The playback menu is not displayed when no memory card is inserted.
DeleteTo display the delete menu, highlight Delete andpress the multi selector to the right. Press the multiselector up or down to highlight an option, thenpress to the right to make a selection.
Delete
Selected
All
High-Capacity Memory CardsIf the memory card contains a large number of fi les or folders and the number of pic-tures to be deleted is very large, deletion can sometimes take more than half an hour.
Protected and Hidden ImagesImages marked with a icon are protected and can not be deleted. Hidden images ( 129) are not displayed in the thumbnail list and can not be selected for deletion.
Using the Multi SelectorThe multi selector can be used at any time when the monitor is on. The focus selectorlock switch only takes effect when the monitor is off.
Option Description
Selected Delete selected photographs.
All Delete all photographs.
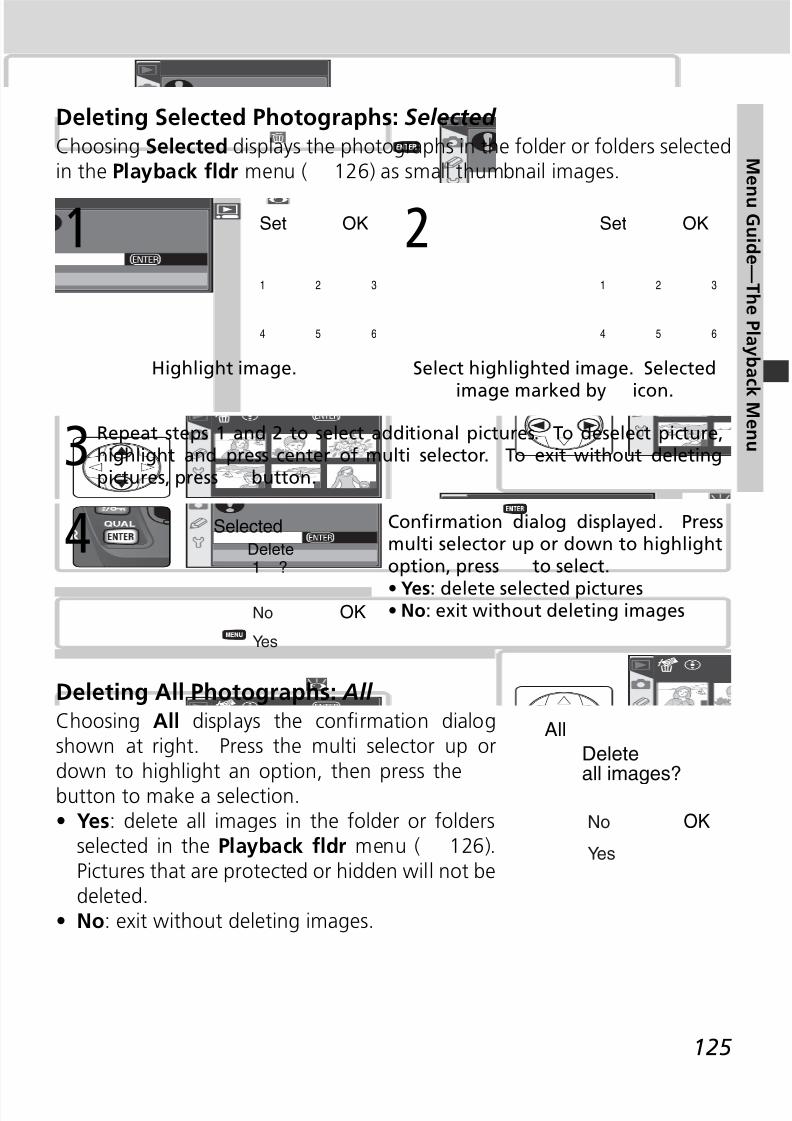
8/7/2019 ad9ec4ae0fbdbb1f44546d3a474e0e87
http://slidepdf.com/reader/full/ad9ec4ae0fbdbb1f44546d3a474e0e87 135/218
125
Menu Gui d e—T h e P l ayb a
c k MenuRepeat steps 1 and 2 to select additional pictures. To deselect picture,
highlight and press center of multi selector. To exit without deletingpictures, press button.
3
Deleting Selected Photographs: Selected Choosing Selected displays the photographs in the folder or folders selectedin the Playback fl dr menu ( 126) as small thumbnail images.
Highlight image.
OK
1 2 3
4 5 6
Set1
Select highlighted image. Selected
image marked by icon.
OK
1 2 3
4 5 6
Set2
Deleting All Photographs: All Choosing All displays the confi rmation dialogshown at right. Press the multi selector up ordown to highlight an option, then press thebutton to make a selection.• Yes: delete all images in the folder or folders
selected in the Playback fl dr menu ( 126).Pictures that are protected or hidden will not bedeleted.
• No: exit without deleting images.
All
Yes
No OK
Deleteall images?
Selected
Yes
No OK
Delete1 ?
4 Confi rmation dialog displayed. Pressmulti selector up or down to highlightoption, press to select.
• Yes: delete selected pictures• No: exit without deleting images
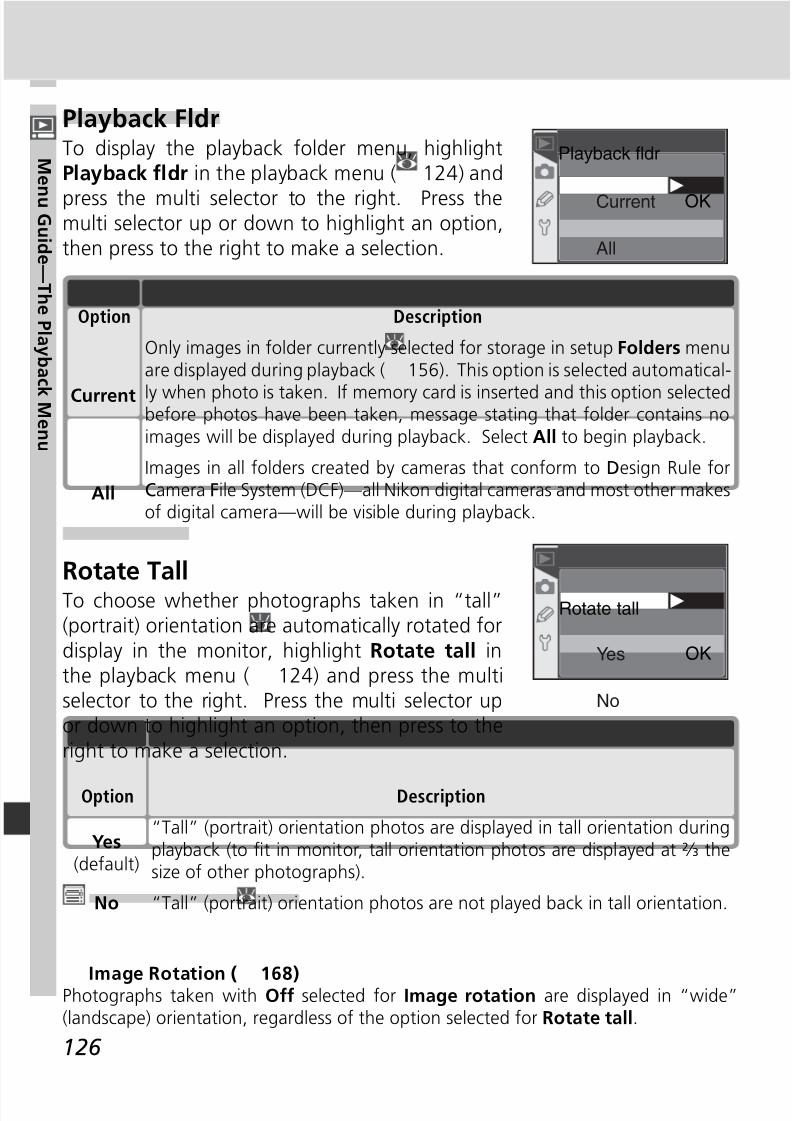
8/7/2019 ad9ec4ae0fbdbb1f44546d3a474e0e87
http://slidepdf.com/reader/full/ad9ec4ae0fbdbb1f44546d3a474e0e87 136/218
126
Menu Gui d e—T h e P l ayb a
c k Menu
Playback FldrTo display the playback folder menu, highlightPlayback fl dr in the playback menu ( 124) and
press the multi selector to the right. Press themulti selector up or down to highlight an option,then press to the right to make a selection.
Playback fldr
Current
All
OK
Option Description
Current
Only images in folder currently selected for storage in setup Folders menuare displayed during playback ( 156). This option is selected automatical-
ly when photo is taken. If memory card is inserted and this option selectedbefore photos have been taken, message stating that folder contains noimages will be displayed during playback. Select All to begin playback.
All
Images in all folders created by cameras that conform to Design Rule forCamera File System (DCF)—all Nikon digital cameras and most other makesof digital camera—will be visible during playback.
Rotate TallTo choose whether photographs taken in “tall”(portrait) orientation are automatically rotated fordisplay in the monitor, highlight Rotate tall inthe playback menu ( 124) and press the multiselector to the right. Press the multi selector upor down to highlight an option, then press to theright to make a selection.
Rotate tall
Yes
No
OK
Option Description
Yes(default)
“Tall” (portrait) orientation photos are displayed in tall orientation duringplayback (to fi t in monitor, tall orientation photos are displayed at 2/ 3 thesize of other photographs).
No “Tall” (portrait) orientation photos are not played back in tall orientation.
Image Rotation ( 168)Photographs taken with Off selected for Image rotation are displayed in “wide”(landscape) orientation, regardless of the option selected for Rotate tall.
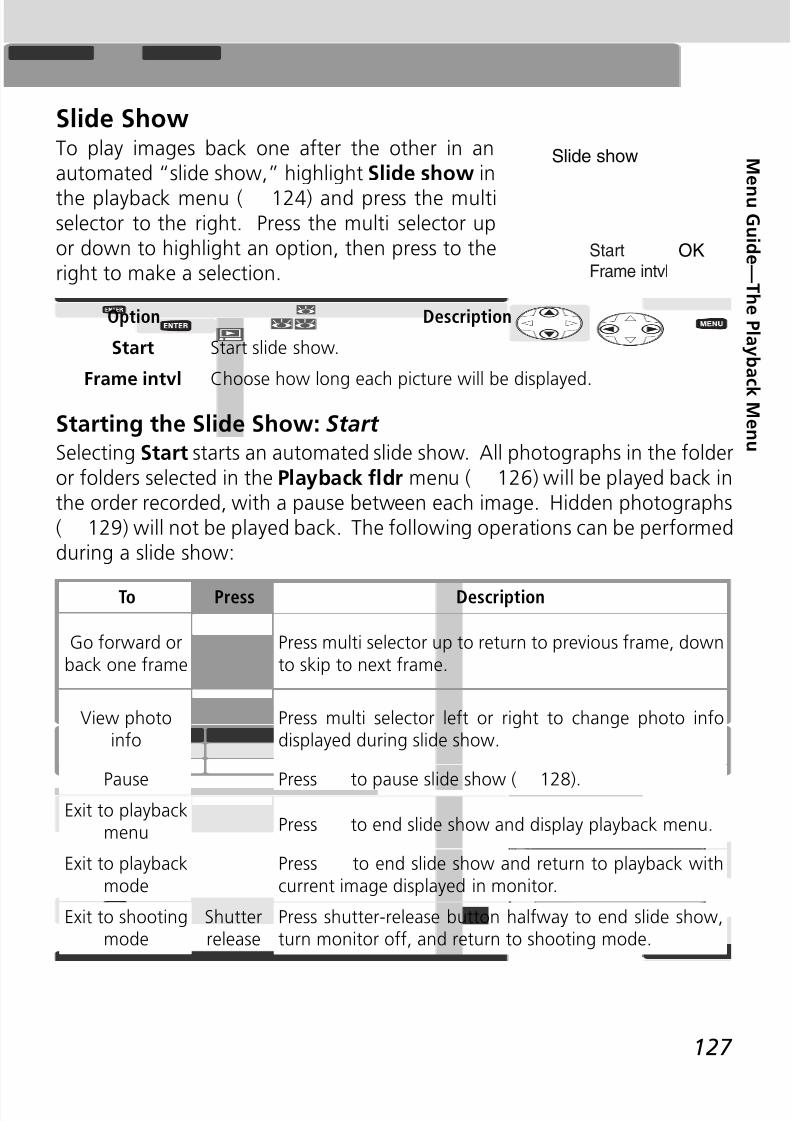
8/7/2019 ad9ec4ae0fbdbb1f44546d3a474e0e87
http://slidepdf.com/reader/full/ad9ec4ae0fbdbb1f44546d3a474e0e87 137/218
127
Menu Gui d e—T h e P l ayb a
c k Menu
Slide ShowTo play images back one after the other in anautomated “slide show,” highlight Slide show in
the playback menu ( 124) and press the multiselector to the right. Press the multi selector upor down to highlight an option, then press to theright to make a selection.
Slide show
StartFrame intvl
OK
Option Description
Start Start slide show.
Frame intvl Choose how long each picture will be displayed.
Starting the Slide Show: Start Selecting Start starts an automated slide show. All photographs in the folderor folders selected in the Playback fl dr menu ( 126) will be played back inthe order recorded, with a pause between each image. Hidden photographs( 129) will not be played back. The following operations can be performedduring a slide show:
To PressTo Description
Go forward orback one frame
Press multi selector up to return to previous frame, downto skip to next frame.
View photoinfo
Press multi selector left or right to change photo infodisplayed during slide show.
Pause Press to pause slide show ( 128).Exit to playback
menu Press to end slide show and display playback menu.
Exit to playbackmode
Press to end slide show and return to playback withcurrent image displayed in monitor.
Shutterrelease
Exit to shootingmode
Press shutter-release button halfway to end slide show,turn monitor off, and return to shooting mode.

8/7/2019 ad9ec4ae0fbdbb1f44546d3a474e0e87
http://slidepdf.com/reader/full/ad9ec4ae0fbdbb1f44546d3a474e0e87 138/218
128
Menu Gui d e—T h e P l ayb a
c k Menu
The dialog shown at right is displayed when theshow ends or when the button is pressed topause playback. Press the multi selector up or
down to highlight an option, then press to theright to make a selection.• Restart: Resume slide show.• Frame Intvl: Change the length of time each
picture is displayed.
To exit the slide show and return to the playback menu, press the multi se-lector to the left or press the button.
Changing the Display Interval: Frame Intvl Selecting Frame intvl from the Slide show menuor the pause menu displays the menu shown atright. To change the length of time each image isdisplayed, press the multi selector up or down tohighlight the appropriate option and then pressthe multi selector to the right to return to theprevious menu.
RestartFrame intvl
OK
2s
3s
5s
10s
Frame intvl
2 s
10 s
5 s
3 s
OK

8/7/2019 ad9ec4ae0fbdbb1f44546d3a474e0e87
http://slidepdf.com/reader/full/ad9ec4ae0fbdbb1f44546d3a474e0e87 139/218
129
Menu Gui d e—T h e P l ayb a
c k Menu
Hide ImageThe Hide image option is used to hide or revealselected photographs. Hidden images are visible
only in the Hide image menu, and can only bedeleted by formatting the memory card. High-light Hide image in the playback menu ( 124)and press the multi selector to the right. The pho-tographs in the folder or folders selected in thePlayback fl dr menu ( 126) will be displayed assmall thumbnail images.
Set OK
1 2 3
4 5 6
Highlight image.
OK
1 2 3
4 5 6
Set
1
Select highlighted image. Selectedimage marked by icon.
Set OK
1 2 3
4 5 6
2
Repeat steps 1 and 2 to selectadditional pictures. To deselectpicture, highlight and presscenter of multi selector. To exitwithout changing hidden statusof pictures, press button.
3
Complete operation and return to
playback menu.
Done
OKSet4
File Attributes for Hidden ImagesHidden images have “hidden” and “read-only” status when viewed on a Windowscomputer. In the case of photographs taken at an image quality of NEF+JPEG Basic,this marking applies to both the NEF (RAW) and JPEG image.
Protected and Hidden ImagesRemoving protection from an image that is both hidden and protected will simultane-ously reveal the image.

8/7/2019 ad9ec4ae0fbdbb1f44546d3a474e0e87
http://slidepdf.com/reader/full/ad9ec4ae0fbdbb1f44546d3a474e0e87 140/218
130
Menu Gui d e—T h e P l ayb a
c k Menu
Print Set Print set is used to create a digital “print order” that lists the photographsto be printed, the number of copies, and the information to be included on
each print. This information is stored on the memory card in Digital PrintOrder Format (DPOF). The card can then be removed from the camera andused to print the selected images printed on any DPOF-compatible device.
Highlight Print set in the playback menu ( 124)and press the multi selector to the right. Press themulti selector up or down to highlight an option,then press to the right to make a selection.
Print set
Select / set
Deselect all?Option Description
Select / set Select photographs for printing.
Deselect all? Remove all images from print order.
If “Print Set” Is Unavailable
If the Print set option is not available in the playback menu, there is not enough spaceon the memory card to store the print order. Delete some pictures and try again.
Taking Pictures for Direct PrintingWhen taking photographs to be printed without modifi cation, choose Direct Printfor Optimize image ( 56) or select Custom and set Color mode to Ia (sRGB) orIIIa (sRGB).
After Creating a Print OrderAfter creating a print order, do not change the hidden status of images in the printorder or use a computer or other device to delete images. Either action could causeproblems during printing.
DPOF Digital Print Order Format (DPOF) is an industry-wide standard that allows pictures tobe printed from print orders stored on the memory card. Before printing, check thatthe printer or print service supports DPOF.
Exif version 2.21
The D70 supports Exif (Exchangeable Image File Format for Digital Still Cameras) ver- sion 2.21, a standard that al lows information stored with photographs to be used foroptimal color reproduction when images are output on Exif-compliant printers.

8/7/2019 ad9ec4ae0fbdbb1f44546d3a474e0e87
http://slidepdf.com/reader/full/ad9ec4ae0fbdbb1f44546d3a474e0e87 141/218
131
Menu Gui d e—T h e P l ayb a
c k Menu
Modifying the Print Order: Select / Set Choosing Select / set displays the photographs in the folder or folders se-lected in the Playback fl dr menu ( 126) as small thumbnail images.
Complete print order and display menu of print options. Press multi selectorup or down to highlight option.• To print shutter speed and aperture on all pictures in print order, highlight
Data imprint and press multi selector to right. ✔ will appear next to item.• To print date of recording on all pictures in print order, highlight Imprint
date and press multi selector to right. ✔ will appear next to item.• To deselect checked item, highlight and press multi selector to right.To complete print order and return to playback menu, highlight Done andpress multi selector to right. To exit without altering print order, pressbutton.
--
Print set
Done
Data imprint
Imprint date
OK
4
Set OK
1 2 3
4 5 6
1 Highlight image.
Set OK
1 2 3
4 5 6
012Press multi selector up to select high-lighted image and set number of printsto 1. Selected images are marked byicon. Press multi selector up or downto specify number of prints (up to 99).
Repeat steps 1 and 2 to select additional pictures. To deselect picture,press multi selector down when number of prints is 1. To exit without
changing print order, press button.
3

8/7/2019 ad9ec4ae0fbdbb1f44546d3a474e0e87
http://slidepdf.com/reader/full/ad9ec4ae0fbdbb1f44546d3a474e0e87 142/218

8/7/2019 ad9ec4ae0fbdbb1f44546d3a474e0e87
http://slidepdf.com/reader/full/ad9ec4ae0fbdbb1f44546d3a474e0e87 143/218
133
Menu Gui d e—T h e S h oot i ng Menu
Long Exp. NRThis option controls whether photographs takenat shutter speeds slower than about 1 s are
processed to reduce “noise” (randomly-spaced,brightly-colored pixels that appear at slow shutterspeeds, particularly in shadows). Highlight LongExp. NR in the shooting menu ( 132) and pressthe multi selector to the right. Press the multiselector up or down to highlight an option, thenpress to the right to make a selection.
Long exp. NR
OKOff
On
The Memory BufferThe maximum number of shots that can be stored in the memory buffer when noisereduction is on is as follows:
Option Description
Off(default) Noise reduction off; camera functions normally.
On
Noise reduction takes effect at shutter speeds ofabout 1 s or slow er. Time required to process im-ages more than doubles; if this option is selectedin continuous shooting mode ( 62), frame ratewill drop to under 3 fps. During processing,
blinks in shutter-speed and aper-ture displays. Next photo can be taken when
is no longer displayed.
Image quality Image size No. of shots
RAW 3—
FINE
7L
5M
17S
NORM
10L
5M25S
Image quality Image size No. of shots
BASIC
17L
5M
47S
RAW+BASIC 3L

8/7/2019 ad9ec4ae0fbdbb1f44546d3a474e0e87
http://slidepdf.com/reader/full/ad9ec4ae0fbdbb1f44546d3a474e0e87 144/218
134
Menu Gui d e—T h e S h oot i ng Menu
Image QualityImage quality can be selected from the optionsshown at right. For more information, see “Taking
Photographs: Image Quality and Size” ( 41).RAW
FINE
NORM
BASIC
RAW+B
NEF(Raw)
JPEG Fine
JPEG Normal
JPEG Basic
NEF+JPEG Basic
Image quality
OK
Image SizeImage size can be selected from L (3008 × 2000),M (2240 × 1488), and S (1504 × 1000). See “Tak-ing Photographs: Image Quality and Size” ( 43)for more information.
L (3008x2000)
M(2240x1488)
S (1504x1000)
Image size
OK
White Bal.This option is only available when the mode dial is
rotated to P, S, A, or M. For more information, see“Taking Photographs: White Balance” ( 48).
White bal.
AutoIncandescent
Fluorescent
Dir. sunlight
Flash
ISOSensitivity (ISO equivalency) can be raised above
the default setting of ISO 200 equivalent. See“Taking Photographs: Sensitivity (ISO Equivalency)”( 46) for details.
ISO
200250
320400
500
OK

8/7/2019 ad9ec4ae0fbdbb1f44546d3a474e0e87
http://slidepdf.com/reader/full/ad9ec4ae0fbdbb1f44546d3a474e0e87 145/218

8/7/2019 ad9ec4ae0fbdbb1f44546d3a474e0e87
http://slidepdf.com/reader/full/ad9ec4ae0fbdbb1f44546d3a474e0e87 146/218
136
Menu Gui d e—C us t om S e
t t i ngs
The HELP ButtonTo view help on Custom Settings, press the (HELP) button when an itemis highlighted in the CSM menu or when the options for a Custom Setting
are displayed.
?
01 Beep
Confirmation of
focus, remoterelease or
self-timer withaudible sound
Two-Button ResetCustom Settings are not reset when a two-button reset is performed ( 111).
Custom Setting R: Menu Reset To restore Custom Settings to default values,highlight Menu reset in the CSM menu ( 135)and press the multi selector to the right. Press themulti selector up or down to highlight an option,then press to the right to make a selection.
?
R Menu reset
No OK
Reset
Option Description
No(default) Exit menu, leaving settings unchanged.
Reset Restore settings to default values.

8/7/2019 ad9ec4ae0fbdbb1f44546d3a474e0e87
http://slidepdf.com/reader/full/ad9ec4ae0fbdbb1f44546d3a474e0e87 147/218

8/7/2019 ad9ec4ae0fbdbb1f44546d3a474e0e87
http://slidepdf.com/reader/full/ad9ec4ae0fbdbb1f44546d3a474e0e87 148/218
138
Menu Gui d e—C us t om S e
t t i ngs
Custom Setting 1: BeepTo turn the camera speaker on or off, highlightBeep in the CSM menu ( 135) and press the
multi selector to the right. Press the multi selectorup or down to highlight an option, then press tothe right to make a selection.
?
01 Beep
On OK
Off
Option Description
On(default)
Speaker on; displayed in control panel. Beepsounds while release timer is running (self-timer
and delayed remote modes), when photo is takenin quick-response remote mode, or when camerahas focused in single-servo AF (focus-mode selectorset to AF and AF-S selected for Custom Setting 2).
OffSpeaker off; beep does not sound. displayed incontrol panel.

8/7/2019 ad9ec4ae0fbdbb1f44546d3a474e0e87
http://slidepdf.com/reader/full/ad9ec4ae0fbdbb1f44546d3a474e0e87 149/218
139
Menu Gui d e—C us t om S e
t t i ngs
Custom Setting 2: AutofocusTo choose how the camera focuses when the fo-cus-mode selector is set to AF, highlight Autofo-
cus in the CSM menu ( 135) and press the multiselector to the right. Press the multi selector upor down to highlight an option, then press to theright to make a selection. ?
02 Autofocus
AF-S OK
AF-C
Option Description
AF-S *
Single-servo AF ( 64). Focus locks when in-focusindicator (●) appears in viewfi nder; photographs
can only be taken when camera is in focus. AF-S displayed in control panel when focus-mode se-lector is set to AF.
AF-C †
Continuous-servo AF ( 64). Camera focusescontinuously while shutter-release button is pressedhalfway; photographs can be taken even whencamera is not in focus. AF-C displayed in controlpanel when focus-mode selector is set to AF.
* Default for P, S, A, M, , , , , , and modes. Custom Setting 2 automati-cally reset to AF-S when mode dial rotated to , , , , , or .
† Default for mode. Custom Setting 2 automatically reset to AF-C when mode dialrotated to .

8/7/2019 ad9ec4ae0fbdbb1f44546d3a474e0e87
http://slidepdf.com/reader/full/ad9ec4ae0fbdbb1f44546d3a474e0e87 150/218

8/7/2019 ad9ec4ae0fbdbb1f44546d3a474e0e87
http://slidepdf.com/reader/full/ad9ec4ae0fbdbb1f44546d3a474e0e87 151/218
141
Menu Gui d e—C us t om S e
t t i ngs
Custom Setting 4: AF-Assist To choose whether the built-in AF-assist illumina-tor lights to assist the focus operation when the
subject is poorly lit, highlight AF-assist in theCSM menu ( 135) and press the multi selectorto the right. Press the multi selector up or downto highlight an option, then press to the right tomake a selection.
?
04 AF assist
On OK
Off
Option Description
On
(default)
AF-assist illuminator lights when conditions are appropriate ( 72). AF-as-
sist illuminator does not light when mode dial is set to , , or .Off AF-assist illuminator off.

8/7/2019 ad9ec4ae0fbdbb1f44546d3a474e0e87
http://slidepdf.com/reader/full/ad9ec4ae0fbdbb1f44546d3a474e0e87 152/218
142
Menu Gui d e—C us t om S e
t t i ngs
Custom Setting 5: ISO AutoTo choose whether the camera automatically ad-justs sensitivity (ISO equivalency) as necessary to
achieve optimal exposure and fl ash level, highlightISO auto in the CSM menu ( 135) and press themulti selector to the right. Press the multi selectorup or down to highlight an option, then press tothe right to make a selection.
?
05 ISO auto
Off OK
On
Option Description
Off
(default)
Sensitivity remains fi xed at value selected by user ( 46), even if optimal
exposure can not be achieved.
On
If optimal exposure and fl ash level can not beachieved at sensitivity selected by user, sensitivityis adjusted to compensate, to minimum approxi-mately equivalent to ISO 200 and a maximumapproximately equivalent to ISO 1600. ISO AUTO icon is displayed in control panel and viewfi nder;unless Speedlight is used, icon blinks when sensitivity is altered from valueselected by user. Note that noise is more likely at high sensitivities.• When mode dial is set to P, A, , , , , , , or : camera au-
tomatically adjusts sensitivity when shutter speed needed to obtain opti-mum exposure would be faster than 1/ 8000s or slower than value specifi edfor P, A, DVP mode ( 143; shutter speed may drop below specifi edvalue if optimal exposure can not be achieved at ISO 1600 equivalent).
• When mode dial is set to S: camera automatically adjusts sensitivitywhen limits of camera exposure metering system are exceeded.
• When mode dial is set to M: camera automatically adjusts sensitivity
when optimum exposure can not be achieved at selected shutter-speedand aperture.
Using a FlashIf a high sensitivity is required for optimal fl ash output when ISO auto is on, the back-ground may be overexposed if the fl ash is used at slow shutter speeds (slow sync), inbright daylight (daylight sync), or the when the background is brightly lit.
ISO Value
The value displayed for sensitivity (ISO equivalency) when the ISO button is pressed isthe value selected by the user. The value shown when ISO auto is on may differ fromthe value actually used by camera.

8/7/2019 ad9ec4ae0fbdbb1f44546d3a474e0e87
http://slidepdf.com/reader/full/ad9ec4ae0fbdbb1f44546d3a474e0e87 153/218
143
Menu Gui d e—C us t om S e
t t i ngs
Selecting On displays the menu shown at right.To accept the current setting for P, A, DVP mode and turn ISO auto on, highlight Done and press
the multi selector to the right. The CSM menuwill be displayed.
05 ISO auto
Done OK
P, A, DVP mode
To change the shutter speed limit for P, A, , ,, , , , and modes, highlight P, A, DVP
mode and press the multi selector to the right.Press the multi selector up or down to highlight ashutter speed between 1/ 125 to 30 s in steps equiva-lent to 1 EV and press the multi selector to theright to select the highlighted value and returnto the CSM menu. In P, A, , , , , , , and modes, the camerawill automatically raise sensitivity when the shutter speed needed to obtainoptimum exposure would be slower than the selected value.
Custom Setting 6: No CF Card?To choose whether the shutter can be released
when no memory card is inserted in the camera,highlight No CF card? in the CSM menu ( 135)and press the multi selector to the right. Press themulti selector up or down to highlight an option,then press to the right to make a selection.
05 P, A, DVP mode
OK
1/125
1/60
1/30
1/15
1/8
?
Release locked
Enable release
06 No CF card?
OK
Option Description
Release lock(default)
Shutter-release button disabled when no memory card is inserted.
Shutter release will not lock if Nikon Capture 4 version 4.1 or later(available separately) is being used to record photographs to com-puter.
Enablerelease
Shutter-release button enabled even when no memory card is in-serted.

8/7/2019 ad9ec4ae0fbdbb1f44546d3a474e0e87
http://slidepdf.com/reader/full/ad9ec4ae0fbdbb1f44546d3a474e0e87 154/218
144
Menu Gui d e—C us t om S e
t t i ngs
Custom Setting 7: Image Review This option determines whether photographsare automatically displayed in the monitor after
shooting (On, the default option) or only whenthe button is pressed (Off). Highlight Imagereview in the CSM menu ( 135) and press themulti selector to the right. Press the multi selectorup or down to highlight an option, then press tothe right to make a selection. Regardless of the option selected, photo-graphs can be viewed at any time by pressing the button.
Custom Setting 8: Grid Display (On-Demand Grid Lines)On-demand grid lines can be displayed in theviewfi nder for reference when composing pho-tographs, taking landscape shots, or shifting ortilting a PC Nikkor lens. To turn the grid-linedisplay on or off, highlight Grid display in theCSM menu ( 135) and press the multi selectorto the right. Press the multi selector up or down
to highlight an option, then press to the right to make a selection. To displaythe grid, select On. The default setting is Off (no grid displayed).
Custom Setting 9: EV StepThis option determines whether adjustments toshutter speed, aperture, exposure compensation,bracketing, and fl ash exposure compensation aremade in increments equivalent to 1/ 3 EV (1/3 step,
the default option) or ½ EV (1/2 step). HighlightEV step in the CSM menu ( 135) and press themulti selector to the right. Press the multi selectorup or down to highlight an option, then press to the right to make a selec-tion.
?
07 Image review
On OK
Off
?
08 Grid display
Off OK
On
?
09 EV step
OK1/3 step
1/2 step

8/7/2019 ad9ec4ae0fbdbb1f44546d3a474e0e87
http://slidepdf.com/reader/full/ad9ec4ae0fbdbb1f44546d3a474e0e87 155/218
145
Menu Gui d e—C us t om S e
t t i ngs
Custom Setting 10: Exp Comp.This option controls whether the button isneeded to set exposure compensation in P, S,
and A modes ( 86). Highlight Exp comp. in thedetailed CSM menu ( 135) and press the multiselector to the right. Press the multi selector upor down to highlight an option, then press to theright to make a selection.
?
10 Exp comp.
Off OK
On
Option Description
Off
(default)
On
Exposure compensation set by rotating command dial only. Dial used de-pends on option selected for Custom Setting 14.
Exposure compensation set by pressing button and rotating main
command dial.
Custom Setting 14
Yes
Sub-command dial
Main command dial
Sub-command dialMain command dial
Sub-command dial
Sub-command dial
No
Mod
e
S
A
P
This option has no effect in M, , , , , , , and modes.
Custom Setting 11: Center Wtd When calculating exposure, center-weightedmetering (available in P, S, A, and M modes;75) assigns the greatest weight to a circle in the
center of the frame. The diameter (φ) of this circlecan be selected from 6, 8, 10, and 12 mm (thedefault option is 8 mm). Highlight Center wtdin the detailed CSM menu ( 135) and press themulti selector to the right. Press the multi selector up or down to highlightan option, then press to the right to make a selection.
8
10
12
6
?
11 Center wtd
OK
6mm
12mm
8mm
10mm

8/7/2019 ad9ec4ae0fbdbb1f44546d3a474e0e87
http://slidepdf.com/reader/full/ad9ec4ae0fbdbb1f44546d3a474e0e87 156/218
146
Menu Gui d e—C us t om S e
t t i ngs
Custom Setting 12: BKT Set This option controls what settings are affectedwhen auto bracketing is in effect. Highlight BKT
set in the detailed CSM menu ( 135) and pressthe multi selector to the right. Press the multiselector up or down to highlight an option, thenpress to the right to make a selection.
Option Description
AE only Camera performs exposure bracketing only.
AE & fl ash(default) Camera performs exposure and fl ash-level bracketing.
WB bracketing Camera performs white balance bracketing.
Flash only Camera performs fl ash-level bracketing only.
? WB bracketing
AE & flash
AE only
Flash only
12 BKT set
OK
White Balance BracketingWhite balance bracketing is not available at image qualities of NEF (Raw) orNEF+JPEG Basic.
Custom Setting 13: BKT Order This option controls the order in which bracketingis performed. Highlight BKT order in the detailed
CSM menu ( 135) and press the multi selectorto the right. Press the multi selector up or downto highlight an option, then press to the right tomake a selection.
Option Description
Under>MTR>Over Bracketing proceeds in order from lowest to highest value.
MTR>Under>Over(default)
Bracketing performed in order described in “Bracketing” (90, 93).
N
?
MTR>Under>OverOK
Under>MTR>Over
13 BKT Order

8/7/2019 ad9ec4ae0fbdbb1f44546d3a474e0e87
http://slidepdf.com/reader/full/ad9ec4ae0fbdbb1f44546d3a474e0e87 157/218
147
Menu Gui d e—C us t om S e
t t i ngs
Custom Setting 14: Command Dial This option can be used to exchange the func-tions of the main and sub-command dials when
setting shutter speed and aperture in S, A, and M modes. Highlight Command dial in the detailedCSM menu ( 135) and press the multi selectorto the right. Press the multi selector up or downto highlight an option, then press to the right tomake a selection.
Option Description
Yes Main command dial controls aperture, sub-command dial shutter speed.
No(default) Main command dial controls shutter speed, sub-command dial aperture.
?
14 Command dial
No OK
Yes
Custom Setting 15: AE-L / AF-LThis option controls the behavior of the AE-L /AF-L button. Highlight AE-L / AF-L in the detailed CSMmenu ( 135) and press the multi selector to the
right. Press the multi selector up or down to high-light an option, then press to the right to make aselection.
Option Description
FV LockFlash level locks when AE-L /AF-L button is pressed and remains lockeduntil button is pressed again or exposure meters turn off ( 103).
AE Lockhold
Exposure locks when AE-L /AF-L button is pressed and remains lockeduntil button is pressed again or exposure meters turn off.
AF Lock only Focus locks while AE-L /AF-L button is pressed. Exposure is unaffected.
AE Lock only Exposure locks while AE-L /AF-L button is pressed. Focus is unaffected.
AE/AF Lock(default) Both focus and exposure lock while AE-L /AF-L button is pressed.
?
15 AE-L/AF-L
AE/AF Lock
AE Lock only
AF Lock only
AE Lock hold
AF-ON
OK
AF-ONCamera focuses when AE-L /AF-L button is pressed. Camera does notfocus when shutter-release button is pressed halfway.

8/7/2019 ad9ec4ae0fbdbb1f44546d3a474e0e87
http://slidepdf.com/reader/full/ad9ec4ae0fbdbb1f44546d3a474e0e87 158/218
148
Menu Gui d e—C us t om S e
t t i ngs
Custom Setting 17: Focus AreaBy default, the focus-area display is bounded bythe four outer focus areas so that, for example,pressing the multi selector up when the top focus
area is selected has no effect. Focus-area selec-tion can be changed to “wrap around” from topto bottom, bottom to top, right to left, and left toright. Highlight Focus area in the detailed CSMmenu ( 135) and press the multi selector to the right. Press the multi se-lector up or down to highlight an option, then press to the right to make aselection.
Option Description
No wrap(default) Wrap-around disabled.
Wrap Wrap-around enabled.
Custom Setting 16: AE Lock This option controls whether exposure locks whilethe shutter-release button is pressed halfway.
Highlight AE Lock in the detailed CSM menu( 135) and press the multi selector to the right.Press the multi selector up or down to highlightan option, then press to the right to make a selec-tion.
?
AE-L button
+ Release bttn
16 AE Lock
OK
Option Description
AE-L button
(default)
+Release bttnExposure can be locked by pressing AE-L /AF-L button or by pressingshutter-release button halfway.
Exposure can only be locked by pressing AE-L /AF-L button.
?
17 Focus area
No wrap OK
Wrap

8/7/2019 ad9ec4ae0fbdbb1f44546d3a474e0e87
http://slidepdf.com/reader/full/ad9ec4ae0fbdbb1f44546d3a474e0e87 159/218
149
Menu Gui d e—C us t om S e
t t i ngs
Custom Setting 18: AF Area IllmThis option controls whether or not the activefocus area is highlighted in red in the viewfi nder.
Highlight AF area illm in the detailed CSM menu( 135) and press the multi selector to the right.Press the multi selector up or down to highlightan option, then press to the right to make a selec-tion.
Option Description
Off Selected focus area is not highlighted.
Auto
(default)
Selected focus area is automatically highlighted as needed to provided
contrast with background.
A
?
18 AF area illm
Auto OK
On
Off
On
Selected focus area is always highlighted, regardless of brightness of back-ground. Depending on brightness of background, selected focus area maybe diffi cult to see.

8/7/2019 ad9ec4ae0fbdbb1f44546d3a474e0e87
http://slidepdf.com/reader/full/ad9ec4ae0fbdbb1f44546d3a474e0e87 160/218
150
Menu Gui d e—C us t om S e
t t i ngs
Custom Setting 19: Flash ModeTo choose the fl ash mode for the built-in Speed-light, highlight Flash mode in the detailed CSM
menu ( 135) and press the multi selector to theright. Press the multi selector up or down to high-light an option, then press to the right to make aselection. ?
19 Flash mode
TTL OK
Commander mode
Manual
Option Description
TTL(default)
Output of built-in Speedlight is adjusted automatically in response toshooting conditions.
Manual
Menu at right will be displayed. Highlight set-ting between Full (full power) and 1/16 (1/ 16 offull power) and press multi selector to right toreturn to CSM menu. When mode dial is set toP, S, A, or M, fl ash will fi re at chosen fractionof full power whenever built-in Speedlight israised (at full power, built-in Speedlight has GN[m / ft] of 17/56 [ISO 200] or 12/39 [ISO 100]). icons blink in controlpanel and viewfi nder. No monitor prefl ash is emitted, allowing built-inSpeedlight to function as master fl ash for optional slave fl ash units.
19 Manual
Full power1/2 power1/4 power1/8 power1/16 power
OK
Commandermode
Choose this option to allow camera to con-trol fl ash level when one or more SB-800or SB-600 Speedlights are used for wirelessfl ash photography in P, S, A, or M mode.Menu at right will be displayed; choose TTL(i-TTL fl ash control, available only with CPUlens), AA (Auto Aperture, available only
when CPU lens is used with SB-800), or M (Manual). Selecting M displays menu shownat right; press multi selector up or down tochoose output level for wireless fl ash unitfrom values between Full (full power) and1/128 (1/ 128 of full power). Press multi se-lector to right to return to CSM menu.* If Commander mode is selected, will not
be displayed in fl ash sync mode icon when
built-in Speedlight is raised.
19 Commander mode
TTL OK
M
AA
19 M
FULL
1/2
1/4
1/8
1/16
OK

8/7/2019 ad9ec4ae0fbdbb1f44546d3a474e0e87
http://slidepdf.com/reader/full/ad9ec4ae0fbdbb1f44546d3a474e0e87 161/218
151
Menu Gui d e—C us t om S e
t t i ngs
Commander ModeWhen using optional SB-800 or SB-600 Speedlights with Commander modeselected for Custom Setting 19 (Flash mode), set the optional Speedlights to
Channel 3, Group A and position them as shown below.
Speedlight wirelessremote sensor shouldface camera.
Camera (built-in Speedlight)
5 m /16´ or less
5 m /16´ or less
60–30 °
60–30 °
30 ° or less
30 ° or less
10 m /33´ orless
The maximum distance between the optional Speedlights and the camera isabout 10 m (33´) when the Speedlight is positioned in front of the camera(within 30 ° on either side of the center line), or about 5 m (16´) when theSpeedlight is to the side (30–60 ° to either side of the center line).
Commander ModePress the button to raise the built-in Speedlight. Position the sensor windows on theoptional Speedlights where they will pick up the monitor prefl ashes from the built-inSpeedlight (take particular care when not using a tripod). Be sure that direct light orstrong refl ections from the optional Speedlights do not enter the camera lens (in TTLmode) or the photocell on the optional Speedlight (AA mode), as this may interfere withexposure. To prevent the timing fl ashes emitted by the built-in Speedlight from appear-ing in photographs taken at short ranges, use a low sensitivity and small aperture (largef/-number) and choose a fl ash sync mode other than rear-curtain sync. After position-ing the Speedlights, take a test shot and view the results in the camera monitor.
Although there is no limit on the number of optional Speedlights that may used, the practi-cal maximum is three. With more than this number, the light emitted by the other fl ash unitswill interfere with performance. All Speedlights must be in the same group; fl ash compensa-tion ( 102) applies to all Speedlights. See the Speedlight manual for more information.
Commander mode settings of AA (SB-800 only) and TTL are available with CPU
lenses only. If a non-CPU lens is attached, the shutter release will be disabled. Thefl ash-ready indicator ( ) in the viewfi nder and the icon and borders of the fl ash syncmode indicator in the control panel will blink.

8/7/2019 ad9ec4ae0fbdbb1f44546d3a474e0e87
http://slidepdf.com/reader/full/ad9ec4ae0fbdbb1f44546d3a474e0e87 162/218
152
Menu Gui d e—C us t om S e
t t i ngs
Custom Setting 20: Flash SignIn P, S, A, and M modes, the built-in Speedlightdoes not pop up automatically. This option deter-
mines whether the indicator in the viewfi nderfl ickers to warn that the built-in Speedlight isrequired for additional lighting when the shutter-release button is pressed halfway. Highlight Flashsign in the detailed CSM menu ( 135) and pressthe multi selector to the right. Press the multi selector up or down to high-light an option, then press to the right to make a selection.
Option Description
Off indicator does not fl icker when built-in Speedlight is required.
On(default)
indicator fl ickers to warn that built-in Speedlight is required (P, S, A, andM modes only). indicator not displayed when built-in Speedlight is raisedor optional Speedlight is attached.
?
20 Flash sign
On OK
Off
Custom Setting 21: Shutter Spd This option determines the slowest shutter speed
possible when using a fl ash with the mode dialset to P or A. Options range from 1/ 60 s (1/60, thedefault setting) to 30 s (30"). Highlight Shutterspd in the detailed CSM menu ( 135) and pressthe multi selector to the right. Press the multiselector up or down to highlight an option, thenpress to the right to make a selection. Regardless of the setting chosen,shutter speeds as slow as 30 s are always available when the fl ash sync modeis set to slow sync.
?
21 Shutter spd
1/60
1/30
1/15
1/8
1/4
OK

8/7/2019 ad9ec4ae0fbdbb1f44546d3a474e0e87
http://slidepdf.com/reader/full/ad9ec4ae0fbdbb1f44546d3a474e0e87 163/218
153
Menu Gui d e—C us t om S e
t t i ngs
Custom Setting 22: Monitor Off This option controls how long the monitor remainson when no operations are performed: 10 s, 20 s
(the default option), 1 minute, 5 minutes, or 10minutes. Highlight Monitor off in the detailedCSM menu ( 135) and press the multi selectorto the right. Press the multi selector up or downto highlight an option, then press to the right tomake a selection. Choose a shorter monitor-offdelay for longer battery life.
Custom Setting 23: Meter-Off This option controls how long the camera con-tinues to meter exposure when no operationsare performed: 4 s, 6 s (the default option), 8 s,16 s, or 30 minutes. Highlight Meter-off in thedetailed CSM menu ( 135) and press the multiselector to the right. Press the multi selector upor down to highlight an option, then press to the
right to make a selection. Choose a shorter me-ter-off delay for longer battery life.
Custom Setting 24: Self-Timer This option controls the length of the shutter-release delay in self-timer mode. Shutter-releasecan be delayed by approximately 2 s, 5 s, 10 s, (thedefault option), or 20 s. Highlight Self-timer in
the detailed CSM menu ( 135) and press themulti selector to the right. Press the multi selectorup or down to highlight an option, then press tothe right to make a selection.
20s1M
5M
10M
10s
?
22 Monitor off
10 s
20 s1 min
5 min
10 min
OK
6s
4s
8s
16s
30M?
23 Meter-off
4 s
6 s
8 s
16 s
30 min
OK
10s
5s
2s
20s?
24 Self-timer
2 s
20 s
5 s
10 s OK
The EH-5 AC Adapter
When the camera is powered by an optional EH-5 AC adapter, exposure meters willnot turn off and the monitor will only power off after ten minutes, regardless of theoptions chosen for Custom Settings 22 (Monitor off) and 23 (Meter-off).

8/7/2019 ad9ec4ae0fbdbb1f44546d3a474e0e87
http://slidepdf.com/reader/full/ad9ec4ae0fbdbb1f44546d3a474e0e87 164/218
154
Menu Gui d e—C us t om S e
t t i ngs
Custom Setting 25: RemoteThis option controls how long the camera willcontinue to wait for a signal from the remote
control when no operations are performed indelayed remote or quick-response remote modes:1 minute (the default option), 5 minutes, 10 min-utes, or 15 minutes. If no signal is received in thespecifi ed period or the camera is turned off, thecamera will revert to single-frame or continuousmode (whichever was last in effect).
Highlight Remote in the detailed CSM menu ( 135) and press the multiselector to the right. Press the multi selector up or down to highlight an op-tion, then press to the right to make a selection.
1M
5M
10M
15M?
25 Remote
1 min
15 min
5 min
10 min
OK

8/7/2019 ad9ec4ae0fbdbb1f44546d3a474e0e87
http://slidepdf.com/reader/full/ad9ec4ae0fbdbb1f44546d3a474e0e87 165/218
155
Menu Gui d e—T h e S et up Menu
The setup menu contains three pages of options:
The Setup MenuCamera Setup
FF
NCD70
-
0
Folders
File No. Se .Format
CSM menu
Date
LCD bri htness
Using the Multi SelectorThe multi selector can be used at any time when the monitor is on. The focus selectorlock switch only takes effect when the monitor is off.
FFEn
M--
--Mirror lock-u
Video mode
LanguageImage comment
USB
Dust ref hoto
Option
Folders 156–158File No. Seq. 159
Format 160
CSM menu 161
Date 161
LCD brightness 161
Mirror lock-up 162
Video mode 162
Language 163
Image comment 163–164
USB 165
Dust ref photo 166–167
Firmware Ver. 167
Image rotation 168
FFEn
M
--
--
ON
Lan ua e
Ima e comment
USB
Dust ref hoto
Firmware Ver.
Ima e rotation

8/7/2019 ad9ec4ae0fbdbb1f44546d3a474e0e87
http://slidepdf.com/reader/full/ad9ec4ae0fbdbb1f44546d3a474e0e87 166/218
156
Menu Gui d e—T h e S et up Menu
FoldersTo create and manage folders, or to choose thefolder in which photographs will be stored, high-
light Folders in the setup menu ( 155) andpress the multi selector to the right. Press themulti selector up or down to highlight an option,then press to the right to make a selection.
Folders
Select folder
Delete
New
Rename
Option Description
Select folder Select existing folder for storage.
New Create new folder with fi ve-letter folder name.
Rename Rename existing folder.
Delete Delete empty folders.
Select FolderTo select the folder in which subsequent imageswill be stored, highlight Select folder in the Fold-ers menu and press the multi selector to the right.
Press the multi selector up or down to highlight afolder, then press to the right to select the folderand return to the setup menu. The selected folderwill also be used for playback when Current isselected in the Playback fl dr menu ( 126).
The folder currently selected is listed fi rst, followed by NCD70 (the defaultfolder), followed by the remaining folders in alphabetical order. The folder
selected in the Select folder menu does not change even when the folder isdeleted or a new memory card is inserted. A folder with the same name willbe created when a photograph is taken.
OK
Select folder
NCD70N I KON
OSAKATOKYO
OK
Select folder
N I KONNCD70OSAKATOKYO
Selected folderNCD70
Other folders(in alphabetical order)

8/7/2019 ad9ec4ae0fbdbb1f44546d3a474e0e87
http://slidepdf.com/reader/full/ad9ec4ae0fbdbb1f44546d3a474e0e87 167/218
157
Menu Gui d e—T h e S et up Menu
NewTo create a new folder, highlight New in the Folders menu and press themulti selector to the right. The dialog shown in Step 1 will be displayed.
1 Enter a fi ve letter folder name as described below.
New
0 1 2 3 4 5 6 7 8 9
A B C D E F G H I J
K L M N O P Q R S T
U VWX Y Z _
____
Set
_
Keyboard areaUse multi selector tohighlight letters, press
button to select.
Name areaFolder name appearshere. To move cursor,press button androtate main commanddial.
To move the cursor in the name area, press the button and rotate themain command dial. To enter a new letter at the current cursor position,use the multi selector to highlight the desired character in the keyboardarea and press the button. To delete the character at the current cur-sor position, press the button. To return to the setup menu withoutcreating a new folder, press the button.
Folder names can be up to fi ve characters long. Any characters after the
fi fth will be deleted.
2 Press the button to create the folder and return to the setup menu.Until another folder is selected, all subsequent photographs will be storedin the new folder. The folder will also be used for playback when Cur-rent is selected in the Playback fl dr menu ( 126).
Folder NamesOn the memory card, folder names are preceded by a three-digit folder number as-signed automatically by the camera (e.g., 100NCD70) Each folder can contain up to999 photographs. If a photograph is taken when the current folder contains 999 fi lesor a picture numbered 9999, the camera will create a new folder by adding one to thecurrent folder number (e.g., 101NCD70). For the purposes of selection and naming,all folders with the same name are treated as the same folder. For example, if thefolder NIKON is selected, pictures in all folders named NIKON (100NIKON, 101NIKON,
102NIKON, etc.) will be visible when Current is selected in the Playback fl dr menu (126). Renaming similarly applies to all folders with the same name. During shooting,pictures are stored in the highest-numbered folder with the selected name.

8/7/2019 ad9ec4ae0fbdbb1f44546d3a474e0e87
http://slidepdf.com/reader/full/ad9ec4ae0fbdbb1f44546d3a474e0e87 168/218

8/7/2019 ad9ec4ae0fbdbb1f44546d3a474e0e87
http://slidepdf.com/reader/full/ad9ec4ae0fbdbb1f44546d3a474e0e87 169/218
159
Menu Gui d e—T h e S et up Menu
File No. Seq.When a photograph is taken, the camera namesthe new fi le by adding one to the last fi le number
used. This option controls whether fi le numberingcontinues from the last number used when a newfolder is created, the memory card is formatted,or a new memory card is inserted in the camera.Highlight File No. Seq. in the setup menu (155) and press the multi selector to the right. Press the multi selector up ordown to highlight an option, then press to the right to make a selection.
Option Description
On
When new folder is created, memory card is formatted, or new memorycard inserted in camera, fi le numbering continues from last number used.If photograph is taken when current folder contains photograph numbered9999, new folder will be created automatically and fi le numbering will be-gin again from 0001.
Off(default)
File numbering reset to 0001 when new folder is created, memory card isformatted or new memory card is inserted in camera.
Reset
As for On, except fi le numbering is reset to 0001 with next photographtaken (new folder will be created if current folder already contains photo-graphs).
File No. Seq.
Off
Reset
On
OK
File Numbering
If the current folder is numbered 999 and contains 999 photographs or a photographnumbered 9999, the shutter release will be disabled. If File No. Seq. is on, turn it off,then format the memory card or insert another memory card in the camera.

8/7/2019 ad9ec4ae0fbdbb1f44546d3a474e0e87
http://slidepdf.com/reader/full/ad9ec4ae0fbdbb1f44546d3a474e0e87 170/218
160
Menu Gui d e—T h e S et up Menu
FormatMemory cards must be formatted before fi rst use.Formatting memory cards is also an effective way
of deleting all pictures on the card. To formata memory card, highlight Format in the setupmenu ( 155) and press the multi selector tothe right. Press the multi selector up or down tohighlight one of the following options and thenpress the button:
During FormattingDo not remove the memory card, remove the battery, or unplug the AC adapt-er (avail able separately) while for mat ting is in progress.
Before FormattingFormatting memory cards permanently deletes all data they contain, includ inghidden and protected pictures and any other data that may be on the card.Before formatting, be sure to transfer to a computer any pictures you would like tokeep.
FAT 32The D70 supports FAT 32, allowing use of memory cards with capacities of over 2 GB.FAT 16 is used when reformatting cards already formatted in FAT 16.
Two-Button FormatMemory cards can also be formatted with the ( and ) buttons ( 21).
Option Description
No Exit without formatting memory card.
Yes
Format memory card. Message shown at rightdisplayed while formatting is in progress. Do not turn camera off, remove battery or memory card, or unplug the AC adapter (availableseparately) until formatting is complete and setup menu is displayed.
Format
FORMATTING
Format
Yes
No OK
FORMAT?

8/7/2019 ad9ec4ae0fbdbb1f44546d3a474e0e87
http://slidepdf.com/reader/full/ad9ec4ae0fbdbb1f44546d3a474e0e87 171/218
161
Menu Gui d e—T h e S et up Menu
Option Description
CSM MenuTo choose whether the CSM menu lists all twenty-six Custom Settings or only the fi rst ten options,
highlight CSM menu in the setup menu ( 155)and press the multi selector to the right. Press themulti selector up or down to highlight an option,then press to the right to make a selection.
Detailed CSM menu lists all twenty-six options (R–25).
CSM menu
Simple
Detailed
OK
Simple(default)
CSM menu contains only items listed below. Changes can not be madeto other Custom Settings while this option is in effect.
• 9: EV step
• 3: AF-area mode • 4: AF assist • 5: ISO auto• 6: No CF card? • 7: Image review • 8: Grid display
• R: Menu reset • 1: Beep • 2: Autofocus
Date
To set the camera clock to the current date andtime, highlight Date in the setup menu ( 155)and press the multi selector to the right. See“First Steps: Basic Setup” Step 4 for details (16). The Date menu is displayed automaticallythe fi rst time the camera is turned on.
LCD Brightness
To adjust monitor brightness, highlight LCDbrightness in the setup menu ( 155) and pressthe multi selector to the right. The menu shownat right will be displayed. Press the multi selectorup to increase brightness, down to decrease. Thenumber at the bottom of the display indicates thecurrent brightness level, with +2 the brightest set-ting and –2 the darkest. Press the multi selector to the right to complete the
operation and return to the setup menu.
DateSet
Y M D
H M S
2004 01 01
00 0000
OK
LCD brightness
OK0

8/7/2019 ad9ec4ae0fbdbb1f44546d3a474e0e87
http://slidepdf.com/reader/full/ad9ec4ae0fbdbb1f44546d3a474e0e87 172/218
162
Menu Gui d e—T h e S et up Menu
Mirror Lock-UpThis option is used to lock the mirror in the upposition to allow inspection or cleaning of the
low-pass fi lter that protects the CCD image sen-sor. See “Technical Notes: Caring for the Cam-era” ( 194). Highlight Mirror lock-up in thesetup menu ( 155) and press the multi selectorto the right. Press the multi selector up or downto highlight an option, then press to the right tomake a selection.
Mirror lock-up
Yes
No
OK
Option Description
No Mirror functions normally.
Yes
When shutter is released, mirror is locked in up position and blinking“– – – – – – ” is displayed in control panel. Mirror will return to downposition when camera is turned off. To ensure power is available to lowermirror, Nikon recommends using this option only when camera is poweredby EH-5 AC adapter.
Video ModeBefore connecting the camera to a video devicesuch as a television or VCR ( 170), choose avideo mode setting that matches the video stan-dard used in the device. Highlight Video modein the setup menu ( 155) and press the multiselector to the right. Press the multi selector up
or down to highlight an option, then press to theright to make a selection.
Option Description
NTSC Use when connecting camera to NTSC devices.
PALUse when connecting camera to PAL devices. Note that number of pixels inoutput is selectively reduced, causing drop in resolution.
Video mode
NTSC
PAL
OK
Video OutputThe default video standard varies with the country or region of purchase.

8/7/2019 ad9ec4ae0fbdbb1f44546d3a474e0e87
http://slidepdf.com/reader/full/ad9ec4ae0fbdbb1f44546d3a474e0e87 173/218
163
Menu Gui d e—T h e S et up Menu
LanguageTo change the language in which camera menusand messages are displayed, highlight Language
in the setup menu ( 155) and press the multiselector to the right. See “First Steps: BasicSetup” Step 1 for details ( 16). The Languagemenu is displayed automatically the fi rst time thecamera is turned on.
Image Comment
Using this option, brief text comments can beadded to photographs as they are taken. Com- ments can be viewed when the photographs aredisplayed using PictureProject or Nikon Capture 4version 4.1 or later. Highlight Image commentin the setup menu ( 155) and press the multiselector to the right. Press the multi selector upor down to highlight an option, then press to the
right to make a selection.
Language
Fr
Español
Français
Es
EnglishEn
DeutschDe
OK
Image comment
Done
Attach comment
Input comment
OK--
Option Description
Done Save comment and return to setup menu.
Input comment Edit comment.
Attach comment Attach comment to all new photographs.
Input CommentTo edit the image comment, highlight Input comment and press the multiselector to the right. The following dialog will be displayed.
Keyboard areaUse multi selector tohighlight letters, press
button to select.
Comment areaComment appears here.To move cursor, pressbutton and rotate main
command dial.
Input comt
4 5 6 7 8 9 : ; < =
> ? @A B C D E F G
H I J K L M N O P QK
Set

8/7/2019 ad9ec4ae0fbdbb1f44546d3a474e0e87
http://slidepdf.com/reader/full/ad9ec4ae0fbdbb1f44546d3a474e0e87 174/218
164
Menu Gui d e—T h e S et up Menu
To move the cursor in the comment area, press the button and rotate themain command dial. To enter a new letter at the current cursor position, usethe multi selector to highlight the desired character in the keyboard area and
press the button. To delete the character at the current cursor position,press the button. To return to the setup menu without changing thecomment, press the button.
Comments can be up to thirty-six characters long. Any characters after thethirty-sixth will be deleted.
After editing the comment, press the button to return to the image com-ment menu.
Attach CommentTo add the comment to all subsequent photographs, highlight Attach com-ment in the input comment menu and press the multi selector to the right.A ✔ will appear in the box next to Attach comment; highlight Done andpress the multi selector to the right to return to the setup menu.
To prevent the comment from being added to photographs, highlight Attachcomment in the input comment menu and press the multi selector to the
right to remove the check from Attach comment, then highlight Done andpress the multi selector to the right to return to the setup menu.

8/7/2019 ad9ec4ae0fbdbb1f44546d3a474e0e87
http://slidepdf.com/reader/full/ad9ec4ae0fbdbb1f44546d3a474e0e87 175/218
165
Menu Gui d e—T h e S et up Menu
USBBefore connecting the camera to a computer orprinter via USB ( 171, 176), select the appropri-
ate USB option. When connecting the camera toa PictBridge printer or using the Camera Controlcomponent of Nikon Capture 4 (version 4.1 orlater required), select PTP. When using Picture-Project to transfer (copy) pictures to the computer,choose an option according to the computer op-erating system as shown below.
Windows XP Home EditionWindows XP Professional Choose PTP or Mass Storage
Mac OS X
Windows 2000 ProfessionalWindows Millennium Edition (Me)Windows 98 Second Edition (SE)
Choose Mass Storage
The default setting for USB is Mass Storage. To change the USB setting,
highlight USB in the setup menu ( 155) and press the multi selector to theright. Press the multi selector up or down to highlight the desired option,then press the multi selector to the right.
USB
Mass Storage
PTP
OK
P
M

8/7/2019 ad9ec4ae0fbdbb1f44546d3a474e0e87
http://slidepdf.com/reader/full/ad9ec4ae0fbdbb1f44546d3a474e0e87 176/218
166
Menu Gui d e—T h e S et up Menu
Yes
No
OK
Dust ref photo
3 Highlight Yes and press the multi selector tothe right (to exit to the setup menu without
acquiring Image Dust Off reference data,highlight No and press the multi selector tothe right). Camera settings will automaticallybe adjusted for Image Dust Off. The messageshown at right will be displayed, and willbe displayed in the viewfi nder and controlpanel. To cancel the operation and return tothe setup menu, press the button or pressthe multi selector to the left. The operationwill also be cancelled when the camera ormonitor is turned off.
Take photo ofwhite object
10cm from
lens.
Dust ref photo
Dust Ref PhotoThis option is used to acquire reference data for the Image Dust Off functionin Nikon Capture 4 version 4.1 or later (for more information on Image Dust
Off, see the Nikon Capture 4 User’s Manual ).
To acquire Image Dust Off reference data:
1 Attach a CPU lens. Dust ref photo is only available when a CPU lensis mounted on the camera. We recommend using a lens with a focallength of at least 50 mm. If using a zoom lens, zoom in to the maximumtelephoto position.
2Highlight Dust ref photo in the setupmenu ( 155) and press the multi selector tothe right. The menu shown at right will bedisplayed.
Image Dust OffThe Image Dust Off feature in Nikon Capture 4 (available separately) processes NEF
(RAW) photographs to remove the effects of dust in the camera imaging system bycomparing the images to the data acquired with Dust ref photo. It is not availablewith JPEG images. The D70 can be used with Nikon Capture 4 version 4.1 or later.

8/7/2019 ad9ec4ae0fbdbb1f44546d3a474e0e87
http://slidepdf.com/reader/full/ad9ec4ae0fbdbb1f44546d3a474e0e87 177/218

8/7/2019 ad9ec4ae0fbdbb1f44546d3a474e0e87
http://slidepdf.com/reader/full/ad9ec4ae0fbdbb1f44546d3a474e0e87 178/218
168
Menu Gui d e—T h e S et up Menu
Image RotationBy default, the D70 records camera orientationwith each photograph taken. This allows “tall”
(portrait) orientation photographs to be displayedin the correct orientation when played back on thecamera or viewed using PictureProject or NikonCapture 4 version 4.1 or later. If desired, this fea-ture can be turned off while taking photographswith the lens pointed up or down, when the camera may fail to record thecorrect orientation. Highlight Image rotation in the setup menu ( 155)and press the multi selector to the right. Press the multi selector up or down
to highlight the desired option, then press the multi selector to the right.
Image rotation
Automatic
Off
OK
Option Description
Automatic(default)
Off
Camera orientation is not recorded. Nikon Capture 4 version 4.1 orlater and PictureProject display all photographs in landscape (wide)orientation, and camera rotation icon in Nikon Capture 4 CameraControl shows camera in horizontal (landscape) orientation. Choosethis option when taking photographs with lens pointing up or lens
pointing down.
Camera records whether shots are in landscape (wide) orientation, por-trait (tall) orientation with the camera rotated 90 ° clockwise, or portrait(tall) orientation with the camera rotated 90 ° counter-clockwise.*
* In continuous mode ( 62), orientation recorded for fi rst shot applies to all imagesin same burst, even if camera orientation is changed during shooting.
Landscape (wide)orientation
Camera rotated 90 °counter-clockwise
Camera rotated 90 °clockwise
Rotate Tall ( 126)
“Tall” orientation photographs taken with Automatic selected for image rotation willonly be displayed in tall orientation in the camera monitor if Yes is selected for Rotatetall.

8/7/2019 ad9ec4ae0fbdbb1f44546d3a474e0e87
http://slidepdf.com/reader/full/ad9ec4ae0fbdbb1f44546d3a474e0e87 179/218
169
Photographs and camera menus can be displayedon a television screen or recorded to video tape.If the PictureProject software provided with thecamera is installed, the camera can be connectedto a computer and photographs copied to disk forediting, viewing, printing, or long-term storage.
Television Playback
Read this section for information on connectingthe camera to a television or VCR.
Connecting to a Computer This section describes how to connect the camerato a computer.
ConnectionsConnecting to External Devices

8/7/2019 ad9ec4ae0fbdbb1f44546d3a474e0e87
http://slidepdf.com/reader/full/ad9ec4ae0fbdbb1f44546d3a474e0e87 180/218
170
C o
nnec t i ons —T el evi s i on P l ayb ac k
Television PlaybackConnecting the Camera to a Video Device
Use an AC AdapterUse of an EH-5 AC adapter (available separately) is recommended for extended play-back. When the EH-5 is connected, the camera monitor-off delay will be fi xed at tenminutes and the exposure meters will no longer turn off automatically.
Video Output ( 162)Be sure that the video standard matches the standard used in the video device. Notethat resolution will drop when images are output on a PAL device.
The supplied EG-D100 video cable can be used to connect the D70 to a tele- vision or VCR for playback or recording.
1Turn the camera off.
The EG-D100
Turn the camera off before connecting or dis-connecting the EG-D100.
2 Open the cover protecting the video-out andDC-in connectors.
3 Connect the EG-D100 as shown.
Connect tocamera
Connect tovideo device
4Tune the television to the video channel.
5 Turn the camera on. The image normally shown in the monitor will bedisplayed on the television or recorded to video tape. The camera moni-tor will remain blank, but the camera will function normally in all otherrespects.
Video out
DC in

8/7/2019 ad9ec4ae0fbdbb1f44546d3a474e0e87
http://slidepdf.com/reader/full/ad9ec4ae0fbdbb1f44546d3a474e0e87 181/218

8/7/2019 ad9ec4ae0fbdbb1f44546d3a474e0e87
http://slidepdf.com/reader/full/ad9ec4ae0fbdbb1f44546d3a474e0e87 182/218
172
C o
nnec t i ons —C onnec t i ng t o a C omput er
Connecting the USB Cable
1
Turn the computer on and wait for it to start up.
2 Turn the camera off.
3 Connect the UC-E4 USB cable as shown below. Connect the cameradirectly to the computer; do not connect the cable via a USB hub or key-
board.
Windows 2000 Professional, Windows Millennium Edition (Me),Windows 98 Second Edition (SE)
Do NOT select PTP when using PictureProject under one of the above operating sys-tems. If the camera has been connected to a computer running one of the above
operating systems with PTP selected, the Windows hardware wizard will be displayed.Click Cancel to exit the wizard, and then disconnect the camera. Be sure to selectMass Storage before reconnecting the camera.

8/7/2019 ad9ec4ae0fbdbb1f44546d3a474e0e87
http://slidepdf.com/reader/full/ad9ec4ae0fbdbb1f44546d3a474e0e87 183/218
173
C o
nnec t i ons —C onnec t i ng t o a C omput er
If Mass Storage is selected for USB,will be displayed in the control panel andviewfi nder (if PTP is selected, the camera dis-plays will only change when Nikon Capture 4Camera Control is running). Photographscan be transferred to the computer usingPictureProject. For more information, see thePictureProject Reference Manual (on CD).
If the Nikon Capture 4 Camera Control compo-nent is running, the control panel and view-fi nder will show in place of the numberof exposures remaining. Any photographstaken will be recorded to the computer hard
disk rather than the camera memory card. Seethe Nikon Capture 4 User’s Manual for moreinformation.
4 Turn the camera on.
Do Not Turn the Camera OffDo not turn the camera off while transfer is in progress.

8/7/2019 ad9ec4ae0fbdbb1f44546d3a474e0e87
http://slidepdf.com/reader/full/ad9ec4ae0fbdbb1f44546d3a474e0e87 184/218
174
C o
nnec t i ons —C onnec t i ng t o a C omput er
Macintosh
Drag the camera volume (“NIKON_D70” or“NIKON D70”) into the Trash.
Disconnecting the CameraIf PTP is selected for USB ( 165), the camera can be turned off and theUSB cable disconnected once transfer is complete. If the USB option in the
camera setup menu is still at its default setting of Mass Storage, the cameramust fi rst be removed from the system as described below.
Windows XP Home Edition / Windows XP Professional Click the “Safely Remove Hardware” icon ( ) inthe taskbar and select Safely remove USB MassStorage Device from the menu that appears.
Windows 2000 Professional
Click the “Unplug or Eject Hardware” icon ( ) inthe taskbar and select Stop USB Mass StorageDevice from the menu that appears.
Windows Millennium Edition (Me)Click the “Unplug or Eject Hardware” icon ( ) inthe taskbar and select Stop USB Disk from themenu that appears.
Windows 98 Second Edition (SE)In My Computer, click with the right mouse but-ton on the removable disk corresponding to thecamera and select Eject from the menu that ap-pears.

8/7/2019 ad9ec4ae0fbdbb1f44546d3a474e0e87
http://slidepdf.com/reader/full/ad9ec4ae0fbdbb1f44546d3a474e0e87 185/218
175
When the camera is connected to a PictBridge-compatible printer, photographs can be printeddirectly from the camera.
Printing Photographs
Connecting to a PictBridge Printer

8/7/2019 ad9ec4ae0fbdbb1f44546d3a474e0e87
http://slidepdf.com/reader/full/ad9ec4ae0fbdbb1f44546d3a474e0e87 186/218
176
P r i nt i ng P h ot ogr aph s
When the camera is connected to a PictBridge-compatible printer via thesupplied UC-E4 USB cable, selected JPEG photographs can be printed directlyfrom the camera (RAW photographs can not be printed using this method).
Before connecting the printer, confi rm that it supports PictBridge. To ensurethat printing is not interrupted, be sure the camera battery is fully charged.If in doubt, charge the battery before use or use an EH-5 AC adapter (avail-able separately).
Connecting the USB Cable
1 Set the USB option in the setup menu (165) to PTP (photographs can not be printed
at the default setting of Mass Storage).
USB
OK
Mass Storage
PTPP
M
2 Turn the printer on.
3Turn the camera off.
4 Connect the UC-E4 USB cable as shown below. Connect the cameradirectly to the printer; do not connect the cable via a USB hub.
Taking Pictures for Direct Printing
When taking photographs to be printed without modifi cation, choose Direct Printfor Optimize image ( 56) or select Custom and set Color mode to Ia (sRGB) orIIIa (sRGB).

8/7/2019 ad9ec4ae0fbdbb1f44546d3a474e0e87
http://slidepdf.com/reader/full/ad9ec4ae0fbdbb1f44546d3a474e0e87 187/218
177
P r i nt i ng P h ot ogr aph s
Hidden Images / RAW ImagesNEF (RAW) images and images hidden with Hide image ( 129) can not be selectedfor printing using the Print and Print (DPOF) options.
Printer SettingsPaper type, tray, and size selections are made from the printer. See the printer manualfor details.
Error MessagesIf the dialog shown at right is displayed, an error hasoccurred. After checking the printer and resolving anyproblems as directed in the printer manual, press themulti selector up or down to highlight Continue andpress the multi selector to the right to resume printing.Select Cancel to exit without printing the remainingimages.
Using the Multi SelectorThe multi selector can be used at any time when the monitor is on. The focus selectorlock switch only takes effect when the monitor is off.
5 Turn the camera on. A welcome screen willbe displayed in the monitor, followed by aPictBridge menu. Press the multi selector up
or down to highlight an option.
Option Description
Print selected photos one per page orprint all selected photos in a single-page“index print.”
Print(DPOF)
Print photos in current print order (130). Print order can be changed before
printing begins.
Setup
Choose whether to imprint date of re-cording on prints and whether to printpictures without borders.
ERROR
UNKNOWN ERROR
Continue
Cancel
PRINT ERROR
Print menu
Print (DPOF)
Setup

8/7/2019 ad9ec4ae0fbdbb1f44546d3a474e0e87
http://slidepdf.com/reader/full/ad9ec4ae0fbdbb1f44546d3a474e0e87 188/218
178
P r i nt i ng P h ot ogr aph s
Printing Selected PhotographsTo print selected photos, highlight Print in the PictBridge menu and press themulti selector to the right. The menu shown in Step 1 will be displayed.
Highlight Print Select.†
Print select
Index print
Choose folder
5
Display photos in current folder.
1 2 3
Print selectTrim Print
Set
6
† To create index print listing all JPEG images in current folder as small thumbnail im-ages, highlight Index print and press multi selector to right. Photos in current folderwill be displayed, with JPEG images marked by icon. Press to begin printing.To interrupt printing and exit to PictBridge menu, press button again.
Highlight Choose folder.
Print select
Index print
Choose folder
1
Display list of folders.
Choose folder
All
NCD70
NIKON
TOKYO
2
Highlight folder.*
Choose folder
All
NCD70
NIKON
TOKYO
3
Return to print menu.
Print select
Index print
Choose folder
4
* To display photos in all folders, highlight All. To make selection from one folder only,highlight folder name.

8/7/2019 ad9ec4ae0fbdbb1f44546d3a474e0e87
http://slidepdf.com/reader/full/ad9ec4ae0fbdbb1f44546d3a474e0e87 189/218
179
P r i nt i ng P h ot ogr aph s
1 2 3
Print selectTrim Print
Set
7 Scroll through photos. Current photoshown at bottom of display.
Repeat steps 7 and 8 to select additional pictures. To deselect picture,press multi selector down when number of prints is 1. To exit to Pict-Bridge menu without printing, press button.
9
1 / 9
Cancel
Printing
10
Begin printing. To cancel and returnto PictBridge menu before all imageshave been printed, press buttonagain.
1 2 3
01
Print selectTrim Print
Set
8 Press multi selector up to select photoand set number of prints to 1. Selectedphotos are marked by icon. Pressmulti selector up or down to specifynumber of prints (up to 99).‡
‡ If printer supports cropping, photo can be croppedfor printing by pressing button. Dialog shown atright will be displayed; rotate main command dial tozoom in or out and use multi selector to scroll to otherareas of image (note that prints may become slightly“grainy” when highly enlarged). When desired area is
framed in monitor, press button to return to printselection dialog. Only selected portion of photo willbe included when image is printed.
Trim photosTrim OK

8/7/2019 ad9ec4ae0fbdbb1f44546d3a474e0e87
http://slidepdf.com/reader/full/ad9ec4ae0fbdbb1f44546d3a474e0e87 190/218
180
P r i nt i ng P h ot ogr aph s
Setup
To adjust print options, highlight Setup in thePictBridge menu and press the multi selector tothe right. Press the multi selector up or downto highlight an option, and press it to the rightto turn the highlighted option on or off. SelectImprint date to print the date of recording on allpictures, No border to print pictures without awhite border (this option is not available if printer does not support border-
less printing).
Setup
Done
Imprint date
No border
Printing the Current Print OrderTo print the current print order, highlight Print (DPOF) in the PictBridgemenu and press the multi selector to the right.
1 / 9
Cancel
Printing
2Begin printing. To cancel and returnto PictBridge menu before all imageshave been printed, press buttonagain.
1 2 3
4 5 6
01 01
Print (DPOF)
Set Print1 View photos in current folder. Picturesin print order are indicated by iconand number of prints; print order canbe changed as described on page 131.To exit to PictBridge menu withoutprinting, press button.
“Data Imprint” / “Imprint Date”Selecting Print (DPOF) resets the Data imprint and Imprint date options for thecurrent print order ( 131). To print the date of recording on photographs, selectImprint date in the PictBridge Setup menu.
Print Set ( 130)To create a DPOF print order before printing, use the Print set option in the playbackmenu.

8/7/2019 ad9ec4ae0fbdbb1f44546d3a474e0e87
http://slidepdf.com/reader/full/ad9ec4ae0fbdbb1f44546d3a474e0e87 191/218
181
This chapter covers the following topics:
Camera SettingsDescribes the functions available in differentmodes.
Optional AccessoriesLists the lenses and other accessories available for
the D70.Caring for Your CameraProvides information on storage and mainte-nance.
TroubleshootingLists the error messages displayed by your cameraand how to deal with them.
Specifi cationsPrincipal specifi cations for the D70.
Technical NotesCamera Care, Options, and Resources

8/7/2019 ad9ec4ae0fbdbb1f44546d3a474e0e87
http://slidepdf.com/reader/full/ad9ec4ae0fbdbb1f44546d3a474e0e87 192/218

8/7/2019 ad9ec4ae0fbdbb1f44546d3a474e0e87
http://slidepdf.com/reader/full/ad9ec4ae0fbdbb1f44546d3a474e0e87 193/218

8/7/2019 ad9ec4ae0fbdbb1f44546d3a474e0e87
http://slidepdf.com/reader/full/ad9ec4ae0fbdbb1f44546d3a474e0e87 194/218

8/7/2019 ad9ec4ae0fbdbb1f44546d3a474e0e87
http://slidepdf.com/reader/full/ad9ec4ae0fbdbb1f44546d3a474e0e87 195/218
185
T ec h ni c al Not es —Opt i onal Ac c es s or i es
Picture angleApproximate focal length (mm) in 35-mm format
(modifi ed for picture angle)
35-mm fi lm camera 20 24 28 35 50 60 8517
D70 30 36 42 52.5 75 90 127.525.5
35-mm fi lm camera 135 180 200 300 400 500 600105D70 202.5 270 300 450 600 750 900157.5
Calculating Picture AngleThe size of the area exposed by a 35-mmcamera is 36 × 24 mm. The size of thearea exposed by the D70, in contrast,is 23.7 ×15.6 mm. As a result, the pictureangle of photographs taken with the D70differs from the picture angle for 35-mm
cameras, even when the focal length ofthe lens and the distance to the subjectare the same.
Picture Angle and Focal LengthA 35-mm camera has a diagonal picture angle approximately one-and-a-halftimes that of the D70. When calculating the focal length of lenses for the
D70 in 35-mm format, you will therefore need to multiply the focal length ofthe lens by 1.5, as shown in the following table:
Picture size (D70)
Picture size (35-mm format)
Lens
(23.7 mm × 15.6 mm)
Picture diagonal
(36 mm × 24 mm)
Picture angle (35-mm format)
Picture angle (D70)

8/7/2019 ad9ec4ae0fbdbb1f44546d3a474e0e87
http://slidepdf.com/reader/full/ad9ec4ae0fbdbb1f44546d3a474e0e87 196/218
186
T ec h ni c al Not es —Opt i onal Ac c es s or i es
Optional SpeedlightsWhen used with a compatible Speedlight such as the SB-800 or SB-600(available separately), the D70 supports many of the options available with
the Nikon Creative Lighting System (CLS; 203), including i-TTL fl ash con-trol ( 94), Flash Color Information Communication, and FV lock ( 103).The D70 does not support Auto FP High-Speed Sync. For more information,see the Speedlight manual.
SB-800This high performance Speedlight has a Guide Number of 53/174 (m/ft,35-mm zoom head position, ISO 200, 20 °C/68 °F; GN at ISO 100 is 38/125)
and accepts four AA batteries (fi ve AA batteries when powered by the sup-plied SD-800 battery pack) or SD-6, SD-7, or SD-8A power sources (availableseparately). The fl ash head can be rotated through 90 ° above and 7 ° belowthe horizontal, 180 ° left, and 90 ° right for bounce-fl ash or close-up photog-raphy. Auto power zoom (24–105 mm) ensures that the illuminating angleis adjusted in accord with lens focal length. The built-in wide panel can beused for angles of 14 mm and 17 mm. An illuminator is included to assist inadjusting settings in the dark, and custom settings are available for fi ne-tun-
ing all aspects of fl ash operation.SB-600This high performance Speedlight has a Guide Number of 42/138 (m/ft, 35-mm zoom head position, ISO 200, 20 °C/68 °F; GN at ISO 100 is 30/98) andaccepts four AA batteries (see the SB-600 manual for details). The fl ash headcan be rotated through 90 ° above the horizontal, 180 ° left, and 90 ° right forbounce-fl ash or close-up photography. Auto power zoom (24–85 mm) en-sures that the illuminating angle is adjusted in accord with lens focal length.The built-in wide panel can be used for an angle of 14 mm. An illuminatoris included to assist in adjusting settings in the dark, and custom settings areavailable for fi ne-tuning all aspects of fl ash operation.
Use Only Nikon Flash AccessoriesUse only Nikon Speedlights. Negative voltages or voltages over 250 V applied to the
accessory shoe could not only prevent normal operation, but damage the sync circuitryof the camera or fl ash. Be fore using a Nikon Speedlight not listed in this section, con- tact a Nikon-authorized service representative for more information.

8/7/2019 ad9ec4ae0fbdbb1f44546d3a474e0e87
http://slidepdf.com/reader/full/ad9ec4ae0fbdbb1f44546d3a474e0e87 197/218

8/7/2019 ad9ec4ae0fbdbb1f44546d3a474e0e87
http://slidepdf.com/reader/full/ad9ec4ae0fbdbb1f44546d3a474e0e87 198/218
188
T ec h ni c al Not es —Opt i onal Ac c es s or i es
The following Speedlights can be used in non-TTL auto and manual modes.If they are set to TTL, the camera shutter-release button will lock and nophotographs can be taken.
Flash mode
SB-50DX, SB-23,SB-292, SB-21B2,SB-29S2
SB-30, SB-271, SB-22S, SB-22, SB-20,SB-16B, SB-15
SB-80DX, SB-28DX,SB-28, SB-26,SB-25, SB-24
Speedlight
Non-TTL autoA —✔ ✔
ManualM ✔✔ ✔
Repeating fl ash ✔ ——
REAR Rear-curtain sync ✔ ✔✔
1 When an SB-27 is mounted on the D70, the fl ash mode is automatically set to TTL, and the shutter-release will be disabled. Set theSB-27 to A (non-TTL auto fl ash).
2 Autofocus is only available with AF-Micro lenses (60 mm, 105 mm, 200 mm, or 70–180 mm).
, , , , , , and Modes
When an optional Speedlight is attached in , , , , , , and modes, thefl ash fi res whenever a photograph is taken. The following fl ash modes are available:• , , and modes: Front-curtain sync and red-eye reduction. If off or auto front-
curtain sync is selected when an optional Speedlight is attached, the fl ash sync modeselection will change to front-curtain sync. Auto with red-eye reduction becomesred-eye reduction.
• , , and modes: Front-curtain sync is selected automatically. Red-eye reductioncan also be selected.
• mode: Slow sync, slow sync with red-eye reduction, and front-curtain sync. Autoslow sync becomes slow sync, auto slow sync with red-eye reduction becomes red-eye reduction, and off becomes front-curtain sync.
ISO AutoWhen On is selected for Custom Setting 5 (ISO auto; 142), sensitivity will automati-cally be adjusted as required for optimal fl ash output. If a high sensitivity is required,this may result in the background being overexposed when the fl ash is used at slowshutter speeds (slow sync), fi ll-fl ash is used in bright daylight (daylight sync), or thebackground is brightly lit.
Using the Built-in SpeedlightThe built-in Speedlight will not fi re when an optional Speedlight is attached.

8/7/2019 ad9ec4ae0fbdbb1f44546d3a474e0e87
http://slidepdf.com/reader/full/ad9ec4ae0fbdbb1f44546d3a474e0e87 199/218
189
T ec h ni c al Not es —Opt i onal Ac c es s or i es
Notes on Optional SpeedlightsRefer to the Speedlight manual for detailed instructions. If the Speedlight supports theCreative Lighting System, refer to the section on CLS-compatible digital SLR cameras.The D70 is not included in the “digital SLR” category in the SB-80DX, SB-28DX, and
SB-50DX manuals.
The shutter will synchronize with an external fl ash at speeds of 1/ 500s or slower.
i-TTL and Auto Aperture (AA) fl ash control are available only with CPU lenses. Select-ing spot metering while an SB-800 or SB-600 Speedlight is attached activates standardi-TTL Flash for Digital SLR.
i-TTL fl ash control is available at all sensitivity (ISO equivalency) settings. If the fl ash-ready indicator blinks for about three seconds after a photograph is taken with i-TTL
fl ash control, the photograph may be underexposed.
When an SB-800 or SB-600 is mounted on the camera, AF-assist illumination and red-eye reduction are performed by the optional Speedlight. With other Speedlights, AF-assist illumination is performed using the AF-assist illuminator on the camera ( 72).
Auto power zoom is available only with SB-800 and SB-600 Speedlights.
In P, , , , , , , and modes, the maximum aperture (minimum f/-number)is limited according to sensitivity (ISO equivalency) as shown below:
For each one-step increase in sensitivity (e.g., from 200 to 400), aperture is stoppeddown by half an f/-stop. If the maximum aperture of the lens is smaller than that listed
above, the maximum value for aperture is the maximum aperture of the lens.When an SC-series 17, 28, or 29 sync cable is used for off-camera fl ash photography,correct exposure may not be achieved using i-TTL Balanced Fill-Flash for Digital SLR.We recommend that you choose spot metering to select Standard i-TTL Flash for Digi-tal SLR. Take a test shot and view the results in the monitor.
In i-TTL mode, use the fl ash panel provided with your Speedlight. Do not use otherpanels such as diffusion panels, as this may produce incorrect exposure.
Maximum aperture at ISO equivalent of
250
4.2
8.5
Mode
P, , , , , ,
320
4.5
9
400
4.8
9.5
500
5
10
640
5.3
11
800
5.6
11
1000
6
12
1250
6.3
13
1600
6.7
13
200
4
8

8/7/2019 ad9ec4ae0fbdbb1f44546d3a474e0e87
http://slidepdf.com/reader/full/ad9ec4ae0fbdbb1f44546d3a474e0e87 200/218
190
T ec h ni c al Not es —Opt i onal Ac c es s or i es
Other AccessoriesAt the time of writing, the following accessories were available for the D70.Contact your retailer or local Nikon representative for details.
Batteries/Chargers/
AC adapters
♦ EN-EL3 Rechargeable Li-ion BatteryAdditional EN-EL3 batteries are available from local retailers andNikon service representatives.
♦ EH-5 AC AdapterUse the EH-5 to power the camera for extended periods.
♦ MS-D70 CR2 Holder (with Terminal Cover)The MS-D70 can be used to power the camera with CR2 lithium bat-teries ( 15), which are available at many retail outlets.
♦ MH-19 Multi ChargerThe MH-19 can be used to recharge the following batteries: EN-EL3rechargeable Li-ion batteries, MN-30 batteries for the F5 camera(with MC-E1), MN-15 batteries for the F100 camera (with MC-E2), orEN-3 batteries for the E3 camera. The charger can charge two pairsof batteries of different types, for a total of four batteries, and comeswith a twelve-volt cable for connection to a cigarette-lighter socket.
Viewfi nder
eyepieceaccessories
♦ Diopter-Adjustment Viewfi nder Lenses
To accommodate individual differences in vision, viewfi nder lensesare available with diopters of –5, –4, –3, –2, 0, +0.5, +1, +2, and+3 m–1. Diopter-adjustment lenses can be inserted simply by slidingthem over the viewfi nder eyepiece; note that the rubber viewfi ndereyepiece cup can not be used with lenses that correct for near-sight-edness. Use diopter adjustment lenses only if the desired focus cannot be achieved with the built-in diopter adjustment control (–1.6 to+0.5 m–1). Test diopter adjustment lenses before purchase to ensurethat the desired focus can be achieved.
♦ DG-2 Magnifi erThe DG-2 magnifi es the scene displayed in the viewfi nder for close-upphotography, copying, telephoto lenses, and other tasks that call foradded precision. Requires eyepiece adapter (available separately).
♦ Eyepiece AdapterUse when attaching the DG-2 Magnifi er to the D70.
♦ DR-6 Right-Angle Viewing AttachmentThe DR-6 attaches at a right angle to the viewfi nder eyepiece, allow-ing the image in the viewfi nder to be viewed from above when the
camera is in the horizontal shooting position.

8/7/2019 ad9ec4ae0fbdbb1f44546d3a474e0e87
http://slidepdf.com/reader/full/ad9ec4ae0fbdbb1f44546d3a474e0e87 201/218
191
T ec h ni c al Not es —Opt i onal Ac c es s or i es
Use Only Nikon Brand AccessoriesOnly Nikon brand accessories certifi ed by Nikon specifi cally for use with your Nikon
digital camera are engineered and proven to operate within its operational and safetyrequirements. THE USE OF NON-NIKON AC CES SO RIES COULD DAMAGE YOUR CAM ERA AND MAY VOID YOUR NIKON WAR RAN TY.
Filters • Nikon fi lters can be divided into three types: screw-in, drop-in, and rear-interchange. Use Nikon fi lters; fi lters manufactured by other makersmay interfere with autofocus or electronic range fi nding.
• The D70 can not be used with linear polarizing fi lters. Use the C-PL
circular polarizing fi lter instead.• The NC and L37C fi lters are recommended for protecting the lens.• When using an R60 fi lter, set exposure compensation to +1.• To prevent moiré, use of a fi lter is not recommended when the sub-
ject is framed against a bright light, or when a bright light source isin the frame.
• Color matrix and 3D color matrix metering may not produce the de-sired results when used with fi lters with an exposure factor (fi lter fac-tor) over 1 × (Y44, Y48, Y52, O56, R60, X0, X1, C-PL, ND2S, ND4S,
ND4, ND8S, ND8, ND400, A2, A12, B2, B8, B12). We recommendcenter-weighted metering. For details, see the manual provided withthe fi lter.
Body caps ♦BF-1A Body CapThe BF-1A keeps the mirror, viewfi nder screen, and low-pass fi lterfree of dust when no lens is mounted on the camera.
Remotecontrols
♦ML-L3 Wireless Remote ControlThe ML-L3 can be used to release the shutter remotely, withouttouching the camera or attaching a cable. Use for self-portraits orprevent blurring caused by camera shake.
PC cardadapters
♦EC-AD1 PC Card AdapterThe EC-AD1 PC card adapter allows Type I CompactFlash memorycards to be inserted in PCMCIA card slots.
Software ♦Nikon Capture 4 (Version 4.1 or Later)Nikon Capture 4 version 4.1 or later can be used to capture photos to
a computer and to edit and save RAW images in other formats.

8/7/2019 ad9ec4ae0fbdbb1f44546d3a474e0e87
http://slidepdf.com/reader/full/ad9ec4ae0fbdbb1f44546d3a474e0e87 202/218
192
T ec h ni c al Not es —Opt i onal Ac c es s or i es
Approved Memory CardsThe following cards have been tested and approved for use in the D70:
Operation is not guaranteed with other makes of card. For more details onthe above cards, please contact the manufacturer.
Memory Cards• Memory cards may be hot after use. Observe due caution when removing memory
cards from the camera.• Format memory cards before fi rst use.• Turn the power off before inserting or removing memory cards. Do not remove
memory cards from the camera, turn the camera off, or remove or disconnect thepower source during formatting or while data are being recorded, deleted, or copiedto a computer. Failure to observe these precautions could result in loss of data or indamage to the camera or card.
• Do not touch the card terminals with your fi ngers or metal objects.• Do not apply force to the card casing. Failure to observe this precaution could dam-
age the card.• Do not bend, drop, or subject to strong physical shocks.• Do not expose to heat, water, high levels of humidity, or direct sunlight.
SanDiskSDCFH (Ultra) 128 MB, 192 MB, 256 MB, 384 MB, 512 MB, 1 GB
Lexar Media
4× USB 16 MB, 32 MB, 64 MB
12× USB 64 MB, 128 MB, 192 MB, 256 MB, 512 MB
24× USB24× WA USB
SDCF2B (Type II) 256 MB
10× USB 160 MB
16× USB 192 MB, 256 MB, 320 MB, 512 MB, 640 MB, 1 GB
256 MB, 512 MB
32× WA USB 1 GB
Renesas Tech-nology (Hitachi) 16 MB, 32 MB
Compact FLASHHB28 C8×
16 MB, 48 MB, 80 MB, 96 MB, 128 MB, 160 MB,256 MB, 512 MB, 1 GBSDCFB
SDCFB (Type II) 192 MB, 300 MB
8× USB 16 MB, 32 MB, 48 MB, 64 MB, 80 MB
Microdrive DSCM 512 MB, 1 GB3K4 2 GB, 4 GB
40× WA USB 256 MB, 512 MB, 1 GB, 2 GB, 4 GB
SDCFX 512 MB, 1 GBSDCFH (Ultra II) 256 MB

8/7/2019 ad9ec4ae0fbdbb1f44546d3a474e0e87
http://slidepdf.com/reader/full/ad9ec4ae0fbdbb1f44546d3a474e0e87 203/218
193
T ec h ni c al Not es —C ar i ng f or t h e C amer a
Caring for the CameraStorage and Maintenance
StorageWhen the camera will not be used for an extended period, replace the mon- itor cover, remove the battery, and store the battery in a cool, dry area with
the terminal cover in place. To prevent mold or mildew, store the camera in adry, well-ventilated area. Do not store your camera with naphtha or camphormoth balls or in locations that:• are poorly ventilated or damp• are next to equipment that produces strong electromagnetic fi elds, such as
televisions or radios• are exposed to temperatures above 50 °C/122 °F (for example, near a
space heater or in a closed vehicle on a hot day) or below –10 °C (14 °F)
• are subject to humidities of over 60%
Cleaning
Camerabody
Use a blower to remove dust and lint, then wipe gently with a soft,dry cloth. After using the camera at the beach or seaside, wipe offsand or salt with a cloth lightly dampened in distilled water and drythoroughly.
Lens,mirror, andviewfi nder
These elements are made of glass and are easily damaged. Removedust and lint with a blower. If using an aerosol blower, keep the canvertical to prevent the discharge of liquid. To remove fi ngerprints andother stains, apply a small amount of lens cleaner to a soft cloth andclean with care.
Monitor
Remove dust and lint with a blower. When removing fi ngerprints andother stains, wipe the surface lightly with a soft cloth or chamois leather.Do not apply pressure, as this could result in damage or malfunction.
The MonitorShould the monitor break, care should be taken to avoid injury caused by broken glassand to prevent liquid crystal from entering your eyes and mouth.
The Control PanelRarely, static electricity may cause the control panel to brighten or darken. This doesnot indicate a malfunction; the display will shortly return to normal.

8/7/2019 ad9ec4ae0fbdbb1f44546d3a474e0e87
http://slidepdf.com/reader/full/ad9ec4ae0fbdbb1f44546d3a474e0e87 204/218
194
T ec h ni c al Not es —C ar i ng f or t h e C amer a
The Low-Pass FilterThe CCD image sensor that acts as the camera’s picture element is fi tted witha low-pass fi lter to prevent moiré. Although this fi lter prevents foreign ob-
jects from adhering directly to the image sensor, under certain conditions dirtor dust on the fi lter may appear in photographs. If you suspect that dirt ordust inside the camera is affecting your photographs, you can check for thepresence of foreign objects on the low-pass fi lter as described below.
1 Remove the lens and turn the camera on.
2Press the button and select Mirror lock-
up from the setup menu ( 162). HighlightYes and press the multi selector to the right.The message, “Press shutter-release button”will be displayed in the camera monitor, and arow of dashes will be displayed in the controlpanel and viewfi nder.
4 Holding the camera so that light falls on thelow-pass fi lter, examine the fi lter for dust orlint. If there are foreign objects on the fi lter,
the fi lter requires cleaning. See the followingsection.
3 Press the shutter-release button all the waydown. The mirror will be raised and the shut- ter curtain will open, revealing the low-passfi lter, and the row of dashes in the controlpanel will blink.
Mirror lock-up
Yes
No
OK

8/7/2019 ad9ec4ae0fbdbb1f44546d3a474e0e87
http://slidepdf.com/reader/full/ad9ec4ae0fbdbb1f44546d3a474e0e87 205/218
195
T ec h ni c al Not es —C ar i ng f or t h e C amer a
5 Turn the camera off. The mirror will return to the down position and theshutter curtain will close. Replace the lens or body cap and disconnectthe AC adapter.
Cleaning the Low-Pass Filter The low-pass fi lter is extremely delicate and easily damaged. Nikon recom-mends that fi lter be cleaned only by Nikon-authorized service personnel.Should you choose to clean the fi lter yourself, follow the steps below.
1 Raise the mirror as described in steps 1–4 on the preceding page.
2Remove dust and lint from the fi lter with ablower. Do not use a blower-brush, as thebristles could damage the fi lter. Dirt that cannot be removed with a blower can only be re- moved by Nikon-authorized service personnel.Under no circumstances should you touch orwipe the fi lter.
3Turn the camera off. The mirror will return to the down position and the
shutter curtain will close. Replace the lens or body cap.
Servicing the Camera and Accessories
The D70 is a precision device and requires regular servicing. Nikon recommends thatthe camera be inspected by the original retailer or Nikon service representative onceevery one to two years, and that it be serviced once every three to fi ve years (note thatfees apply to these services). Frequent inspection and servicing are particularly recom-mended if the camera is used professionally. Any accessories regularly used with thecamera, such as lenses or optional Speedlights, should be included when the camerais inspected or serviced.
Use an AC Adapter
To prevent the camera from powering off while the mirror is raised, use an EH-5 ACadapter (available separately) for prolonged inspection or cleaning of the low-passfi lter.

8/7/2019 ad9ec4ae0fbdbb1f44546d3a474e0e87
http://slidepdf.com/reader/full/ad9ec4ae0fbdbb1f44546d3a474e0e87 206/218
196
T ec h ni c al Not es —C ar i ng f or t h e C amer a
Do not dropThe product may malfunction if subjected tostrong shocks or vibration.
Keep dryThis product is not waterproof, and maymalfunction if immersed in water or exposedto high levels of humidity. Rusting of theinternal mechanism can cause irreparabledamage.
Avoid sudden changes in temperatureSudden changes in temperature, such as oc-
cur when entering or leaving a heat ed build- ing on a cold day, can cause condensationinside the device. To prevent condensation,place the device in a carrying case or a plasticbag before exposing it to sudden changes intemperature.
Keep away from strong magnetic fi elds
Do not use or store this device in the vicinityof equipment that generates strong elec-
tromagnetic radiation or magnetic fi elds.Strong static charges or the magnetic fi eldsproduced by equipment such as radio trans- mitters could interfere with the monitor,damage data stored on the memory card, oraffect the product’s internal circuitry.
Do not leave the lens pointed at the sunDo not leave the lens pointed at the sun oranother sight source for an extended period.
Intense light may cause the image sensor todeteriorate or produce a white blur effect inphotographs.
BloomingVertical white streaks may appear in pho-tographs of the sun or other strong lightsources. This phenomenon, known as“blooming,” can be prevented by reducingthe amount of light that falls on the CCD,
either by choosing a slow shutter speed andsmall aperture or by using an ND fi lter.
Do not touch the shutter curtainThe shutter curtain is extremely thin andeasily damaged. Under no circumstancesshould you exert pressure on the curtain,poke it with cleaning tools, or subject it topowerful air currents from a blower. Theseactions could scratch, deform, or tear thecurtain.
Handle all moving parts with careDo not apply force to the battery-chamber,card-slot, or connector covers. These parts
are especially susceptible to damage.Cleaning• When cleaning the camera body, use a
blower to remove dust and lint, then wipegently with a soft, dry cloth. After usingyour camera at the beach or seaside, wipeoff any sand or salt using a cloth lightlydampened with pure water and then dryyour camera thoroughly. In rare instances,
static electricity produced by a brush orcloth may cause the LCD displays to lightup or darken. This does not indicate amalfunction, and the display will shortlyreturn to normal.
• When cleaning the lens and mirror, re- member that these elements are easilydamaged. Dust and lint should be gentlyremoved with a blower. When using anaerosol blower, keep the can vertical (tilt-
ing the can could result in liquid beingsprayed on the mirror). If you do get afi ngerprint or other stain on the lens, ap-ply a small amount of lens cleaner to a softcloth and wipe the lens carefully.
• See “Cleaning the Low-Pass Filter” forinformation on cleaning the low-pass fi lter( 194).
Storage
• To prevent mold or mildew, store the camerain a dry, well-ventilated area. If you will
Caring for the Camera and Battery: Cautions

8/7/2019 ad9ec4ae0fbdbb1f44546d3a474e0e87
http://slidepdf.com/reader/full/ad9ec4ae0fbdbb1f44546d3a474e0e87 207/218
197
T ec h ni c al Not es —C ar i ng f or t h e C amer a
not be using the product for long periods,remove the battery to prevent leakage andstore the camera in a plastic bag containinga desiccant. Do not, however, store the cam-
era case in a plastic bag, as this may cause thematerial to deteriorate. Note that desiccantgradually loses its capacity to absorb moistureand should be replaced at regular intervals.
• Do not store the camera with naphtha orcamphor moth balls, close to equipmentthat produces strong magnetic fi elds, or inareas subject to extremes of temperature,for example near a space heater or in a
closed vehicle on a hot day.• To prevent mold or mildew, take the cam- era out of storage at least once a month.Turn the camera on and release the shut- ter a few times before putting the cameraaway again.
• Store the battery in a cool, dry place. Re-place the terminal cover before puttingthe battery away.
Notes on the monitor• The monitor may contain a few pixels thatare always lit or that do not light. This isa characteristic common to all TFT LCDmonitors and does not indicate a malfunc-tion. Images recorded with the productwill not be affected.
• Images in the monitor may be diffi cult tosee in a bright light.
• Do not apply pressure to the monitor; this
could cause damage or malfunction. Dustor lint on the monitor can be removedwith a blower. Stains can be removedby rubbing the surface lightly with a softcloth or chamois leather.
• Should the monitor break, care should betaken to avoid injury due to broken glassand to prevent the liquid crystal from themonitor touching the skin or entering the
eyes or mouth.• Replace the monitor cover when transporting
the camera or leaving it unattended.
Turn the product off before removing or dis-connecting the power sourceDo not unplug the product or remove thebattery while the product is on, or while
images are being recorded or deleted. Forc- ibly cutting power to the product in thesecircumstances could result in loss of data orin damage to product memory or internalcircuitry. To prevent an accidental inter-ruption of power, avoid carrying the productfrom one lo cation to another while the ACadapter is connected.
Batteries
• When you turn the device on, check thebattery-level displayed in the control panelto determine whether the battery needsto be recharged or replaced. The batteryneeds to be recharged or replaced whenthe battery-level indicator is fl ashing.
• When taking photographs on importantoccasions, ready a spare EN-EL3 batteryand keep it fully charged, or keep a set
of three fresh CR2 batteries on hand inthe MS-D70 battery holder ( 15). De- pending on your location, you may fi nd itdiffi cult to purchase replacement batterieson short notice.
• On cold days, the capacity of batteriestends to decrease. Be sure the battery isfully charged before taking photographsoutside in cold weather. Keep a sparebattery in a warm place and exchange the
two as necessary. Once warmed, a coldbattery may recover some of its charge.
• Should the battery terminals become dirty,wipe them off with a clean, dry cloth be- fore use.
• After removing the battery from the cam- era, be sure to replace the terminal cover.
• Used batteries are a valuable resource.Please recycle used batteries in accord
with local regulations.

8/7/2019 ad9ec4ae0fbdbb1f44546d3a474e0e87
http://slidepdf.com/reader/full/ad9ec4ae0fbdbb1f44546d3a474e0e87 208/218
198
T ec h ni c al Not es —T r oub l e
s h oot i ng
TroubleshootingUnderstanding Error Messages and Displays
This section lists the indicators and error messages that appear in the view-fi nder, control panel, and monitor when there is a problem with the camera.Consult the list below before contacting your retailer or Nikon representa-
tive.
Indicator
ProblemControlpanel
View-fi nder Solution
18Lens aperture ring is not set tominimum aperture.(blinks)
Set ring to minimum aperture(largest f/-number).
14Low battery.Ready a fully-charged sparebattery.
14Battery exhausted.(blinks) (blinks) Replace battery.
74Camera unable to focus usingautofocus.
●
(blinks) Focus manually.
46
191
7981
Subject too bright; photo willbe overexposed.
• If sensitivity (ISO equivalency)is over 200, lower sensitivity.
• Use ND fi lter• In mode:
S Increase shutter speedA Choose a smaller aperture
(larger f/-number)
46
94
7981
Subject too dark; photo will beunderexposed.
• If sensitivity (ISO equivalency)is under 1600, raise sensitivity.
• Use built-in Speedlight.• In mode:
S Lower shutter speedA Choose a larger aperture
(smaller f/-number)
79,
82selected in mode S.(blinks)
Change shutter speed or se-
lect mode M.
18,82
No lens attached, or non-CPUlens attached.(blinks)
Attach CPU lens (IX Nikkor ex-cluded), or rotate mode dial toM and use lens aperture ringto set aperture.

8/7/2019 ad9ec4ae0fbdbb1f44546d3a474e0e87
http://slidepdf.com/reader/full/ad9ec4ae0fbdbb1f44546d3a474e0e87 209/218
199
T ec h ni c al Not es —T r oub l e
s h oot i ng
Indicator
Controlpanel
View-fi nder Solution
186
Speedlight that does notsupport i-TTL fl ash control at- tached and set to TTL.(blinks)
Change fl ash mode setting onoptional Speedlight.
97
114
• Flash required for correctexposure (P, S, A, M modes).
• Flash has fi red at full power( blinks for three secondsafter fl ash fi res) .
(blinks)
• Raise built-in Speedlight.
• Check photo in monitor; ifunderexposed, adjust set-tings and try again.
2Camera malfunction.(blinks)
Release shutter. If error per- sists or appears frequently,consult with Nikon-authorizedservice representative.
Problem
4112420
Memory insuffi cient to recordfurther photos at current set- tings, or camera has run out offi le or folder numbers.(blinks) (blinks)
• Reduce quality or size.• Delete photographs.• Insert new memory card.
Indicator
Solution
20Camera cannot detectmemory card.
NO CARDPRESENT
Turn camera off and con-fi rm that card is correctlyinserted.
Controlpanel ProblemMonitor
21Memory card has not beenformatted for use in D70.
CARD IS NOTFORMATTED Format memory card.
79,82
selected in remote controlmode and mode dial rotatedto S.(blinks)
Change shutter speed or se-lect mode M.

8/7/2019 ad9ec4ae0fbdbb1f44546d3a474e0e87
http://slidepdf.com/reader/full/ad9ec4ae0fbdbb1f44546d3a474e0e87 210/218
200
T ec h ni c al Not es —T r oub l e
s h oot i ng
A Note on Electronically-Controlled CamerasIn extremely rare instances, unusual characters may appear in the control panel and thecamera may stop functioning. In most cases, this phenomenon is caused by a strongexternal static charge. Turn the camera off, remove and replace the battery, and turnthe camera on again, or, if you are using an AC adapter (available separately), dis- connect and reconnect the adapter and turn the cameraon again. If the problem persists, press the reset switch(see right) and then reset the camera clock to the correctdate and time ( 16). In the event of continued mal- function, contact your retailer or Nikon representative.Note that disconnecting the power source as described
above may result in loss of any data not recorded to thememory card at the time the problem occurred. Dataalready recorded to the card will not be affected.
Indicator
Controlpanel SolutionProblemMonitor
20
126
• Memory card contains noimages.
• Current folder is empty.
FOLDERCONTAINS
NO IMAGES
• Insert another card.
• Set Playback fl dr to All.
126,129
All photos in current folderare hidden.
ALL IMAGESHIDDEN
Set Playback fl dr to All oruse Hide image to revealhidden photos.
21,124
File has been created or
modifi ed using a computeror different make of cam-era, or fi le is corrupt.
FILE DOES
NOTCONTAIN
IMAGE DATA
Delete fi le or reformatmemory card.
1922,20
20,2421
• Error accessing memorycard.
• Unable to create newfolder
• Card has not been for-
matted for use in D70.
THIS CARDCANNOT BE
USED(blinks)
• Use Nikon-approved card.• Check that contacts are
clean. If card is damaged,contact retailer or Nikonrepresentative.
• Delete fi les or insert newmemory card.
• Format memory card.
Reset switch

8/7/2019 ad9ec4ae0fbdbb1f44546d3a474e0e87
http://slidepdf.com/reader/full/ad9ec4ae0fbdbb1f44546d3a474e0e87 211/218
201
T ec h ni c al Not es —S pec i fi c
at i ons
Specifi cations
Type Single-lens refl ex digital camera with interchangeable lenses
CCD 23.7 × 15.6 mm; total pixels: 6.24 millionImage size (pixels) • 3008 × 2000 (Large)
Effective pixels 6.1 million
Lens mount Nikon F mount (with AF coupling and AF contacts)
Compatible lenses*
Type G or D AF Nikkor All functions supported
Other AF Nikkor† All functions supported except 3D color matrix metering andi-TTL Balanced Fill-Flash for Digital SLR
Micro Nikkor 85 mmf/2.8D
All functions supported except autofocus and some exposuremodes
AI-P Nikkor All functions supported except 3D color matrix metering, i-TTL Balanced Fill-Flash for Digital SLR, and autofocus
Non-CPU Can be used in mode M, but exposure meter does not func-tion; electronic range fi nder can be used if maximum aper-ture is f/5.6 or faster
Picture angle Equivalent in 35-mm format is approximately 1.5 times lensfocal length
Viewfi nder
Diopter adjustment –1.6 – +0.5 m–1
Focusing screen Type B BriteView clear matte screen Mark V with superim-posed focus brackets and On-Demand grid lines
Eyepoint 18 mm (–1.0 m–1)
Frame coverage Approximately 95% of lens (vertical and horizontal)Magnifi cation Approximately 0.75× (50-mm lens at infi nity; –1.0 m–1)
Fixed-eyelevel penta-Dach-mirror type
* IX Nikkor lenses can not be used † Excluding lenses for F3AF
Refl ex mirror Quick return
Lens aperture Instant return with depth-of-fi eld preview
Focus-area selection Can be selected from 5 focus areas
Lens servo • Autofocus (AF): Instant single-servo AF (AF-S); continuous-servo AF (AF-C); predictive focus tracking automaticallyactivated according to subject status
• Manual focus (M)
• 2240 × 1488 (Medium)• 1504 × 1000 (Small)

8/7/2019 ad9ec4ae0fbdbb1f44546d3a474e0e87
http://slidepdf.com/reader/full/ad9ec4ae0fbdbb1f44546d3a474e0e87 212/218
202
T ec h ni c al Not es —S pec i fi c
at i ons
Autofocus
Detection range –1 – +19 EV (ISO 100 at 20 °C/68 °F)AF-area mode Single-area AF, dynamic-area AF, dynamic-area AF with clos-est subject priority
Focus lock Focus can be locked by pressing shutter-release button half-way (single-servo AF) or by pressing AE-L/AF-L button
TTL phase detection by Nikon Multi-CAM900 autofocusmodule with AF-assist illuminator (range approximately0.5–3.0 m / 1´8˝–9´10˝)
Exposure
Metering Three-mode through-the-lens (TTL) exposure metering
Matrix 3D color matrix metering (type G and D lenses); color matrix
metering (other CPU lenses); metering performed by 1,005-pixel RGB sensor
Center-weighted Weight of 75% given to 6, 8, 10, or 12-mm circle in centerof frame
Spot Meters 2.3-mm circle (about 1% of frame) centered on ac-tive focus area
Range(ISO 100 equivalent,f/1.4 lens, 20 °C/68 °F)
0 – 20 EV (3D color matrix or center-weighted metering)2 – 20 EV (spot metering)
Exposure meter coupling CPU coupling
Exposure control
Operating mode Digital Vari-Program ( auto, portrait, landscape,close up, sports, night landscape, night portrait),programmed auto (P) with fl exible program; shutter-priorityauto (S); aperture priority auto (A); manual (M)
Exposure compensation –5 – +5 EV in increments of 1/ 3 or ½ EV
Bracketing Exposure and / or fl ash bracketing (2–3 exposures in incre-
ments of 1/ 3 or ½ EV)Exposure lock Luminosity locked at detected value with AE-L/AF-L button
Shutter
Speed 30 – 1/ 8000 s in steps of 1/ 3 or ½ EV, bulb, remote
Combined mechanical and CCD electronic shutter
Sensitivity 200 – 1600 (ISO equivalent) in steps of 1/ 3 EV
White balance
Bracketing 2–3 exposures in increments of 1
Auto (TTL white-balance with 1,005 pixels RGB sensor), sixmanual modes with fi ne-tuning, preset white balance

8/7/2019 ad9ec4ae0fbdbb1f44546d3a474e0e87
http://slidepdf.com/reader/full/ad9ec4ae0fbdbb1f44546d3a474e0e87 213/218

8/7/2019 ad9ec4ae0fbdbb1f44546d3a474e0e87
http://slidepdf.com/reader/full/ad9ec4ae0fbdbb1f44546d3a474e0e87 214/218
204
T ec h ni c al Not es —S pec i fi c
at i ons
Video output Can be selected from NTSC and PAL
External interface USB
Tripod socket ¼˝ (ISO)
Power source • One rechargeable Nikon EN-EL3 Li-ion battery; chargingvoltage (MH-18 quick charger or optional MH-19 multicharger): 7.4 V DC
• Three CR2 lithium batteries (with MS-D70 battery holder;15)
• EH-5 AC adapter (available separately)
Dimensions (W × H × D) Approximately 140 × 111 × 78 mm (5.5˝ × 4.4˝ × 3.1˝)
Weight Approximately 595 g (1 lb 5 oz) without battery, memorycard, body cap, or monitor cover
Operating environment
Temperature 0 – 40 °C (32 – 104 °F)
Humidity Less than 85% (no condensation)
• Unless otherwise stated, all fi gures are for a camera with a fully-charged battery
operating at an ambient temperature of 20 °C (68 °F).• Nikon reserves the right to change the specifi cations of the hardware and software
described this manual at any time and without prior notice. Nikon will not be heldliable for damages that may result from any mistakes that this manual may contain.
Self-timer Electronically controlled timer with 2 – 20 s duration
Depth-of-fi eld preview When CPU lens is attached, lens aperture can be stoppeddown to value selected by user (A and M modes) or value
selected by camera (Digital Vari-Program, P, and S modes)
Monitor 1.8˝, 130,000-dot, low-temperature polysilicon TFT LCD withbrightness adjustment
Firmware upgrades Firmware can be upgraded by user

8/7/2019 ad9ec4ae0fbdbb1f44546d3a474e0e87
http://slidepdf.com/reader/full/ad9ec4ae0fbdbb1f44546d3a474e0e87 215/218
205
T ec h ni c al Not es —S pec i fi c
at i ons
Battery LifeThe number of shots that can be taken with a fully-charged EN-EL3 battery (1400 mAh)varies with the condition of the batteries, temperature, and how the camera is used.The following measurements were performed at a temperature of 20 °C (68 °F).
Example 1: 2000 shotsZoom Nikkor AF-S DX 18–70 mm f/3.5–4.5G IF ED lens; continuous shooting mode;continuous-servo autofocus; image quality set to JPEG Basic; image size set to M;shutter speed ½50 s; shutter-release pressed halfway for three seconds and focus cycledfrom infi nity to minimum range three times with each shot; after six shots, monitorturned on for fi ve seconds and then turned off; cycle repeated once exposure metershave turned off.
Example 2: 400 shotsAF-S DX 18–70 mm f/3.5–4.5G IF ED lens; single-frame shooting mode; single-servoautofocus; image quality set to JPEG Normal; image size set to L; shutter speed ½50 s;shutter-release pressed halfway for fi ve seconds and focus cycled from infi nity to min- imum range once with each shot; built-in Speedlight fi red at full power with everyother shot; AF-assist illuminator lights when Speedlight is used; cycle repeated onceexposure meters have turned off; camera turned off for one minute with every tenshots.
The following can reduce battery life:
• Using the monitor• Keeping the shutter-release button
pressed halfway
• Repeated autofocus operations• Taking NEF (RAW) photographs• Slow shutter speeds
To ensure maximum battery performance:• Keep the battery contacts clean. Soiled contacts can reduce battery performance.• Use EN-EL3 batteries immediately after charging. Batteries will lose their charge if
left unused.

8/7/2019 ad9ec4ae0fbdbb1f44546d3a474e0e87
http://slidepdf.com/reader/full/ad9ec4ae0fbdbb1f44546d3a474e0e87 216/218
206
I nd ex
Symbols, , , , , . See
mode, Digital Vari-Program3D color matrix metering. See
meteringA
A. See modeAdvanced Wireless Lighting,187
AF. See focus mode; auto-focus
AF-area mode, 140AF-assist illuminator, 72Aperture, 76–83
(auto) mode, 32Auto meter off, 12Autoexposure lock, 84Autofocus, 64
AF-C, 139AF-S, 139
BBacklight, control panel, 7BASIC. See Image qualityBattery, 14–15
CR2, 14EN-EL3, 14inserting, 14–15life, 205storage, 196–197
BKT. See bracketingBlur, reducing, 80Bracketing, 87–93. See alsoExposure bracketing; whitebalance, bracketing
Brightness. See LCD BrightnessBulb. See long time exposures
CCCD, 201
cleaning, 194–195Clock, 16–17Closest subject priority. SeeAF-area mode
Color mode, 59Color profi le. See Color
mode
Color temperature. See whitebalance
CompactFlash. See memorycard
Computer, 171–174Continuous shooting. Seeshooting mode
Contrast. See Tone comp.CPU lenses, 183–184Creative Lighting System,186–189
Custom Settings, 135–154defaults, 136–137
CSM. See Custom Settings
CSM menu, 135–154D
Date, 161Delete, 124–125Deleting, 122. See also mem- ory card, formattingall images, 125selected images, 125single-frame playback, 31
Depth-of-fi eld preview, 76
Digital Print Order Format,130–131
Digital Vari-Program. See ;mode
Diopter, 27DPOF. See Digital Print OrderFormat
Dust ref photo, 166–167DVP. See mode, Digital Vari-Program
Dynamic-area AF. See AF-areamode.
EElectronic analog exposuredisplay, 82–83
Electronic range fi nder, 74EV step, 144Exif version 2.21, 130Exposure bracketing, 88–91Exposure compensation, 86
Exposure meters, 75. See alsoauto meter off
Eyepiece cap, 105, 108
FFAT32, 160File No. Seq., 159Files. See image fi les
FINE. See Image qualityFirmware, 167Firmware Ver., 167Flash, 94–104, 186–189. Seealso Speedlightbracketing, 87–91
Flash Color Information Com-munication, 48, 186–187
Flash exposure compensa-tion, 102
Flash-ready indicator, 94, 97Flash mode, 150–151Flash sync mode, 95–96Flexible program, 77. See alsomode, P, S, A, M
Focal plane mark, 74Focus. See autofocus; focusmode; manual focus
Focus area (focus brackets), 66Focus lock, 70Focus mode, 64Focusing screen, 8Folders, 126, 156–158Folders, 156–158Format, 160FV lock, 103–104
GGrid display, 144
HHide image, 129
Highlight display, 116Histogram, 116Hue adjustment, 60
IIlluminator. See backlight,control panel
Image comment, 163–164Image dust off, 166–167Image fi les, 41Image size, 43–45
Image quality, 41–42Image review, 144ISO, 134. See also Sensitivity
Index

8/7/2019 ad9ec4ae0fbdbb1f44546d3a474e0e87
http://slidepdf.com/reader/full/ad9ec4ae0fbdbb1f44546d3a474e0e87 217/218

8/7/2019 ad9ec4ae0fbdbb1f44546d3a474e0e87
http://slidepdf.com/reader/full/ad9ec4ae0fbdbb1f44546d3a474e0e87 218/218
No reproduction in any form of this manual, inwhole or in part (except for brief quotation in critical
articles or reviews), may be made without writtenauthorization from NIKON CORPORATION.


