Embed Size (px)
Citation preview
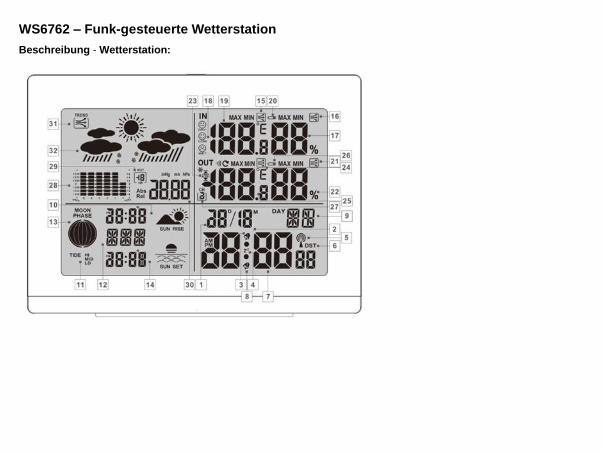
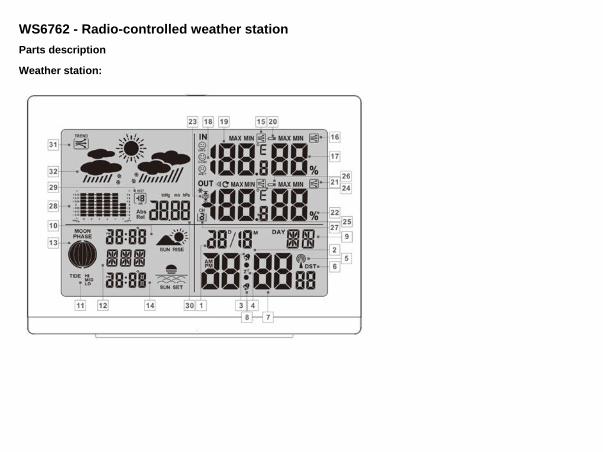
WS6762 – Funk-gesteuerte Wetterstation
Beschreibung - Wetterstation:

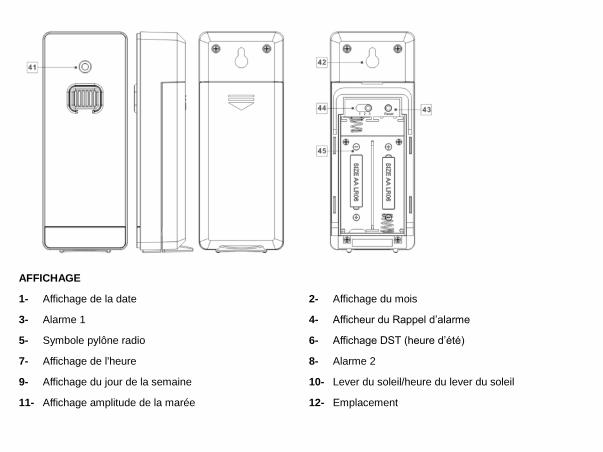
ANZEIGE
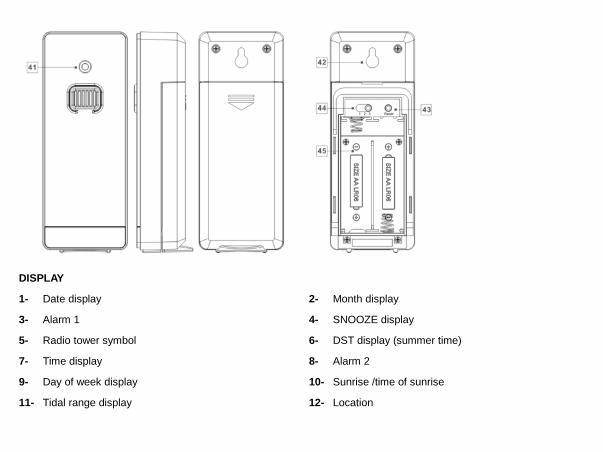
1- Datumsanzeige 2- Monatsanzeige
3- Alarm 1 4- SNOOZE-Anzeige
5- Funk-Symbol 6- DST-Anzeige (Sommerzeit)
7- Zeitanzeige 8- Alarm 2
9- Wochentagsanzeige 10- Sonnenaufgangszeit
11- Gezeitenanzeige 12- Aufenthaltsort
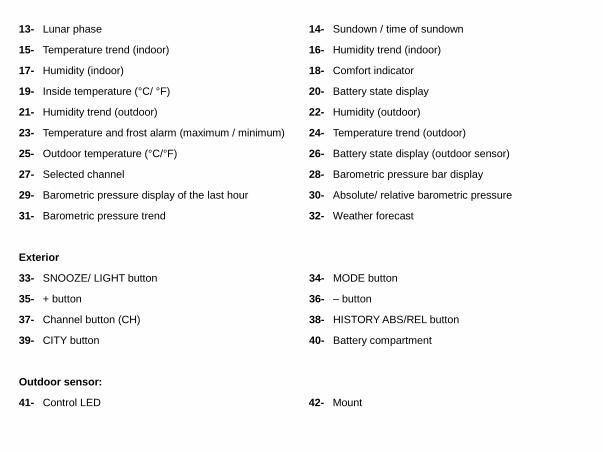
13- Mondphase 14- Sonnenuntergangszeit
15- Temperaturtrend (innen) 16- Luftfeuchtigkeitstrend (innen)
17- Luftfeuchtigkeit (innen) 18- Wohlfühlanzeige
19- Innentemperatur (°C/ °F) 20- Batterieendanzeige
21- Luftfeuchtigkeitstrend (außen) 22- Luftfeuchtigkeit (außen)
23- Temperatur- und Frostalarm (maximal / minimal) 24- Temperaturtrend (außen)
25- Außentemperatur (°C/ °F) 26- Batterieendanzeige (Außensender)
27- Ausgewählter Kanal 28- Luftdruck-Balkenanzeige
29- Luftdruckanzeige der letzten Stunde 30- Absoluter/ relativer Luftdruck
31- Luftdrucktrend 32- Wettervorhersage
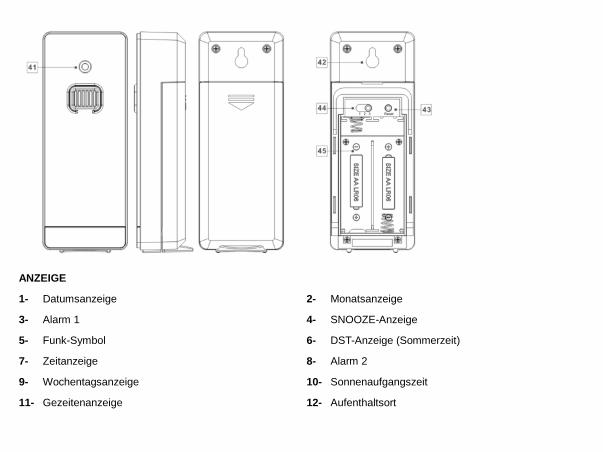
Gehäuse
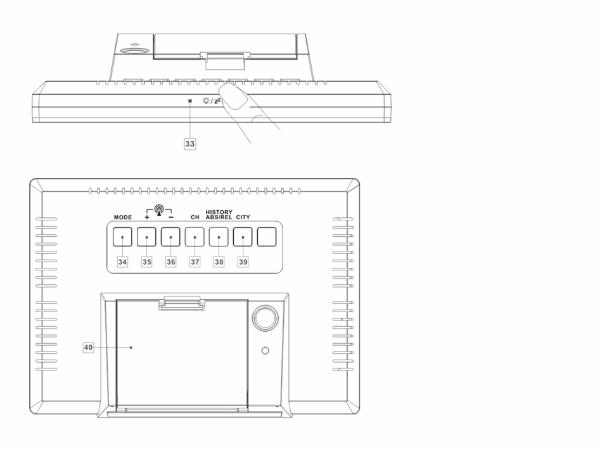
33- SNOOZE/ LIGHT Taste 34- MODE Taste
35- + Taste 36- – Taste
37- Channel (CH) Taste 38- HISTORY ABS/REL Taste
39- CITY Taste 40- Batteriefach
Außensender:
41- Kontroll-LED 42- Aufhängeöse
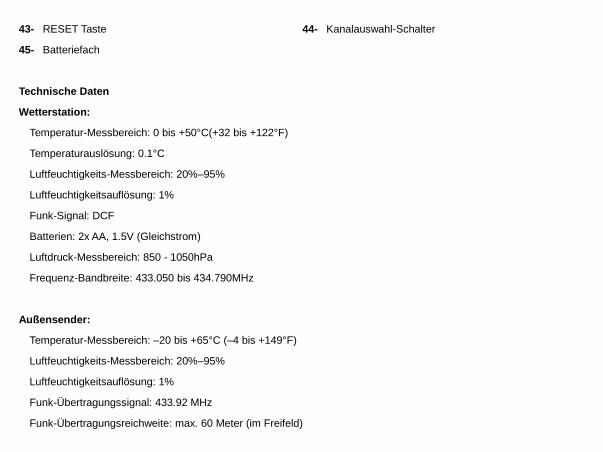
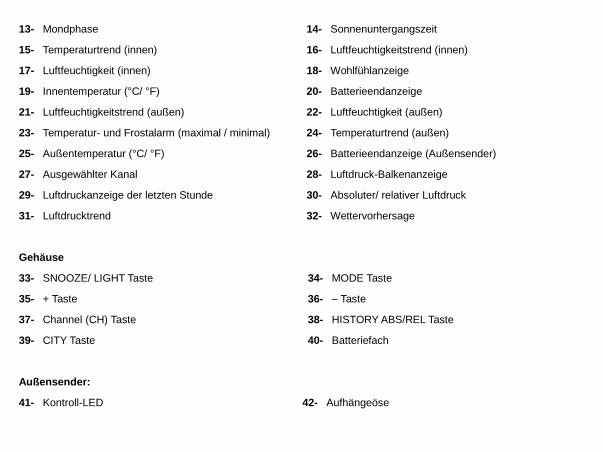
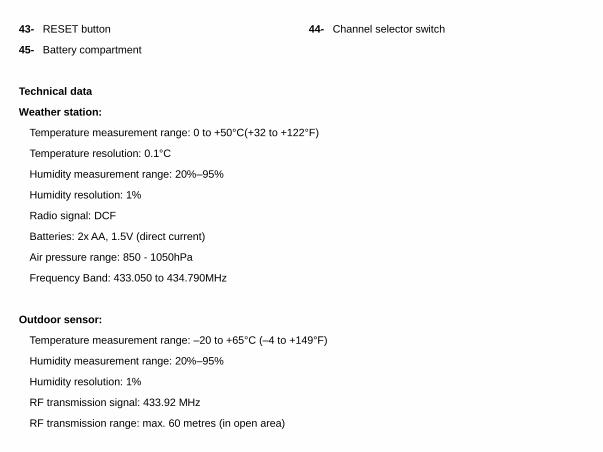
43- RESET Taste 44- Kanalauswahl-Schalter
45- Batteriefach
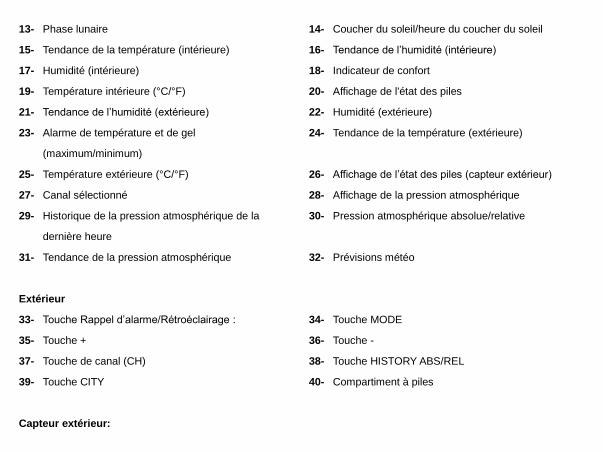
Technische Daten
Wetterstation:
Temperatur-Messbereich: 0 bis +50°C(+32 bis +122°F)
Temperaturauslösung: 0.1°C
Luftfeuchtigkeits-Messbereich: 20%–95%
Luftfeuchtigkeitsauflösung: 1%
Funk-Signal: DCF
Batterien: 2x AA, 1.5V (Gleichstrom)
Luftdruck-Messbereich: 850 - 1050hPa
Frequenz-Bandbreite: 433.050 bis 434.790MHz
Außensender:
Temperatur-Messbereich: –20 bis +65°C (–4 bis +149°F)
Luftfeuchtigkeits-Messbereich: 20%–95%
Luftfeuchtigkeitsauflösung: 1%
Funk-Übertragungssignal: 433.92 MHz
Funk-Übertragungsreichweite: max. 60 Meter (im Freifeld)
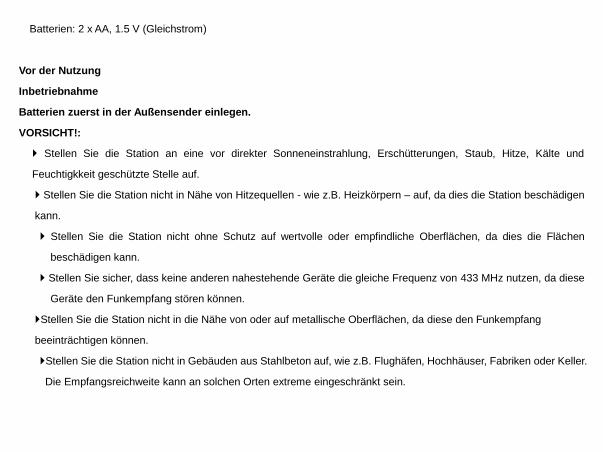
Batterien: 2 x AA, 1.5 V (Gleichstrom)
Vor der Nutzung
Inbetriebnahme
Batterien zuerst in der Außensender einlegen.
VORSICHT!:
Stellen Sie die Station an eine vor direkter Sonneneinstrahlung, Erschütterungen, Staub, Hitze, Kälte und
Feuchtigkkeit geschützte Stelle auf.
Stellen Sie die Station nicht in Nähe von Hitzequellen - wie z.B. Heizkörpern – auf, da dies die Station beschädigen
kann.
Stellen Sie die Station nicht ohne Schutz auf wertvolle oder empfindliche Oberflächen, da dies die Flächen
beschädigen kann.
Stellen Sie sicher, dass keine anderen nahestehende Geräte die gleiche Frequenz von 433 MHz nutzen, da diese
Geräte den Funkempfang stören können.
Stellen Sie die Station nicht in die Nähe von oder auf metallische Oberflächen, da diese den Funkempfang
beeinträchtigen können.
Stellen Sie die Station nicht in Gebäuden aus Stahlbeton auf, wie z.B. Flughäfen, Hochhäuser, Fabriken oder Keller.
Die Empfangsreichweite kann an solchen Orten extreme eingeschränkt sein.
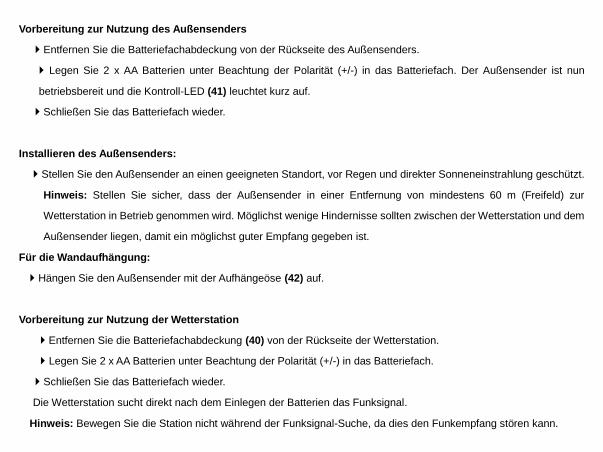
Vorbereitung zur Nutzung des Außensenders
Entfernen Sie die Batteriefachabdeckung von der Rückseite des Außensenders.
Legen Sie 2 x AA Batterien unter Beachtung der Polarität (+/-) in das Batteriefach. Der Außensender ist nun
betriebsbereit und die Kontroll-LED (41) leuchtet kurz auf.
Schließen Sie das Batteriefach wieder.
Installieren des Außensenders:
Stellen Sie den Außensender an einen geeigneten Standort, vor Regen und direkter Sonneneinstrahlung geschützt.
Hinweis: Stellen Sie sicher, dass der Außensender in einer Entfernung von mindestens 60 m (Freifeld) zur
Wetterstation in Betrieb genommen wird. Möglichst wenige Hindernisse sollten zwischen der Wetterstation und dem
Außensender liegen, damit ein möglichst guter Empfang gegeben ist.
Für die Wandaufhängung:
Hängen Sie den Außensender mit der Aufhängeöse (42) auf.
Vorbereitung zur Nutzung der Wetterstation
Entfernen Sie die Batteriefachabdeckung (40) von der Rückseite der Wetterstation.
Legen Sie 2 x AA Batterien unter Beachtung der Polarität (+/-) in das Batteriefach.
Schließen Sie das Batteriefach wieder.
Die Wetterstation sucht direkt nach dem Einlegen der Batterien das Funksignal.
Hinweis: Bewegen Sie die Station nicht während der Funksignal-Suche, da dies den Funkempfang stören kann.
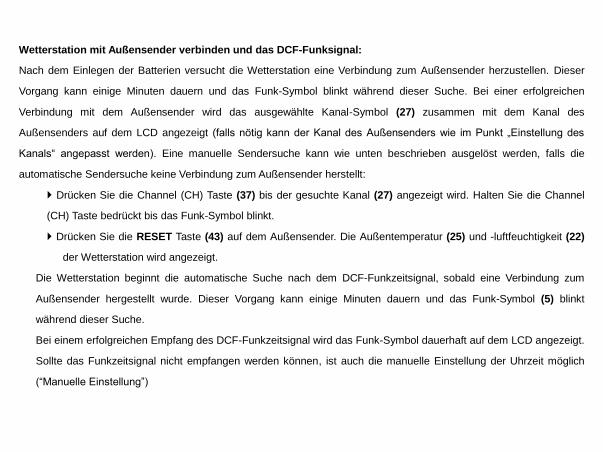
Wetterstation mit Außensender verbinden und das DCF-Funksignal:
Nach dem Einlegen der Batterien versucht die Wetterstation eine Verbindung zum Außensender herzustellen. Dieser
Vorgang kann einige Minuten dauern und das Funk-Symbol blinkt während dieser Suche. Bei einer erfolgreichen
Verbindung mit dem Außensender wird das ausgewählte Kanal-Symbol (27) zusammen mit dem Kanal des
Außensenders auf dem LCD angezeigt (falls nötig kann der Kanal des Außensenders wie im Punkt „Einstellung des
Kanals“ angepasst werden). Eine manuelle Sendersuche kann wie unten beschrieben ausgelöst werden, falls die
automatische Sendersuche keine Verbindung zum Außensender herstellt:
Drücken Sie die Channel (CH) Taste (37) bis der gesuchte Kanal (27) angezeigt wird. Halten Sie die Channel
(CH) Taste bedrückt bis das Funk-Symbol blinkt.
Drücken Sie die RESET Taste (43) auf dem Außensender. Die Außentemperatur (25) und -luftfeuchtigkeit (22)
der Wetterstation wird angezeigt.
Die Wetterstation beginnt die automatische Suche nach dem DCF-Funkzeitsignal, sobald eine Verbindung zum
Außensender hergestellt wurde. Dieser Vorgang kann einige Minuten dauern und das Funk-Symbol (5) blinkt
während dieser Suche.
Bei einem erfolgreichen Empfang des DCF-Funkzeitsignal wird das Funk-Symbol dauerhaft auf dem LCD angezeigt.
Sollte das Funkzeitsignal nicht empfangen werden können, ist auch die manuelle Einstellung der Uhrzeit möglich
(“Manuelle Einstellung”)
Funkuhrsignal (DCF):
Das DCF-Funkuhrsignal besteht aus Zeitsignalen, die von einer der präzisesten Uhren der Welt in der Nähe von
Frankfurt / Main ausgestrahlt werden. Unter idealen Bedingungen kann Ihre Wetterstationen dieses Funksignal über
eine Entfernung von bis zu 2000 km entfernt von Frankfurt / Main empfangen. Der Empfang dieses Funksignals
dauert in der Regel nur 3 bis 10 Minuten. Der Empfang kann durch Hindernisse (wie z.B. Betonmauern) oder durch
Störquellen (z.B. andere elektrische Geräte) eingeschränkt werden. Platzieren Sie das Gerät bei
Empfangsproblemen an einen neuen Standort (z.B. in die Nähe eines Fensters).
Bedienung
Empfang des DCF-Funkuhrsignals
Die Wetterstation beginnt die automatische Suche nach dem DCF-Funkuhrsignal, sobald eine Verbindung zum
Außensender hergestellt wurde. Dieser Vorgang kann einige Minuten dauern und das Funk-Symbol (5) blinkt
während dieser Suche.
Hinweis: in Gebäuden aus Stahlbeton kann der Empfang des Funksignals stark eingeschränkt sein (siehe
“Inbetriebnahme”).
Die Uhr synchronisiert sich automatisch jeden Tag um 1:00, 2:00 und 3:00 mit dem DCF-Funkuhrsignal, um
Abweichungen von der exakten Uhrzeit zu vermeiden.
Der Empfang des DCF-Funkzeitsignals kann manuell auf der Wetterstation gestartet werden.
Drücken Sie die + und die – Taste (35), (36) zur gleichen Zeit und die Wetterstation beginnt mit der Suche nach
dem DCF-Funkzeitsignal. Dieser Vorgang kann einige Minuten dauern und das Funk-Symbol blinkt während
dieser Suche. Die Suche wird beendet, falls kein DCF-Funkuhrsignal empfangen werden konnte.
Hinweis: Die Uhrzeit kann auf der Wetterstation manuell eingestellt werden, falls es auf Grund von Störungen,
Entfernung oder aus ähnlichen Gründen nicht möglich ist ein Funkzeitsignal zu finden. Alle manuellen Einstellungen
werden überschrieben, sobald ein DCF-Funkuhrsignal empfangen wird.
Manuelle Einstellung
Bei einer Störung oder Verlust des DCF-Funkuhrsignals können Sie die Uhr manuell einstellen.
Folgen Sie diesen Schritten:
1. Halten Sie die MODE Taste (34) für 3 Sekunden gedrückt und “12Hr” oder “24Hr” blinken auf der Anzeige.
Drücken Sie die + oder die – Taste (35), (36) um das gewünschte Zeitformat auszuwählen.
2. Drücken Sie die MODE Taste um Ihre Einstellungen zu bestätigen und die Temperatureinheit “°C“ oder “°F”
blinkt auf der Anzeige. Drücken Sie die + oder die – Taste um die gewünschte Temperatureinheit auszuwählen.
3. Drücken Sie die MODE Taste um Ihre Einstellungen zu bestätigen und die Luftdruckeinheit blinkt auf der
Anzeige. Drücken Sie die + oder die – Taste um die gewünschte Luftdruckeinheit (hPa/inHg) auszuwählen.
4. Drücken Sie die MODE Taste um Ihre Einstellungen zu bestätigen und die Zeitzone blinkt auf der Anzeige.
Drücken Sie die + oder die – Taste um einen gewünschten Zeitzonenwert (-2 to +2) auszuwählen. Die Zeitzone
der Uhr kann manuell eingestellt werden, um eine Nutzung in Ländern mit anderen Zeitzonen zu ermöglichen.
Zum Beispiel 00 für Deutschland und 01 für England.
5. Drücken Sie die MODE Taste um Ihre Einstellungen zu bestätigen und die Stundenziffern blinken auf der
Anzeige. Drücken Sie die + oder die – Taste um die gewünschte Stunde einzustellen.

6. Drücken Sie die MODE Taste um Ihre Einstellungen zu bestätigen und die Minutenziffern blinken auf der
Anzeige. Drücken Sie die + oder die – Taste um die gewünschte Minute einzustellen.
7. Drücken Sie die MODE Taste um Ihre Einstellungen zu bestätigen und die Jahresziffern blinken auf der
Anzeige. Drücken Sie die + oder die – Taste um das gewünschte Jahr einzustellen.
8. Drücken Sie die MODE Taste um Ihre Einstellungen zu bestätigen und die Monatsziffern blinken auf der
Anzeige. Drücken Sie die + oder die – Taste um den gewünschten Monat einzustellen.
9. Drücken Sie die MODE Taste um Ihre Einstellungen zu bestätigen und die Datumsziffern blinken auf der
Anzeige. Drücken Sie die + oder die – Taste um das gewünschte Datum einzustellen.
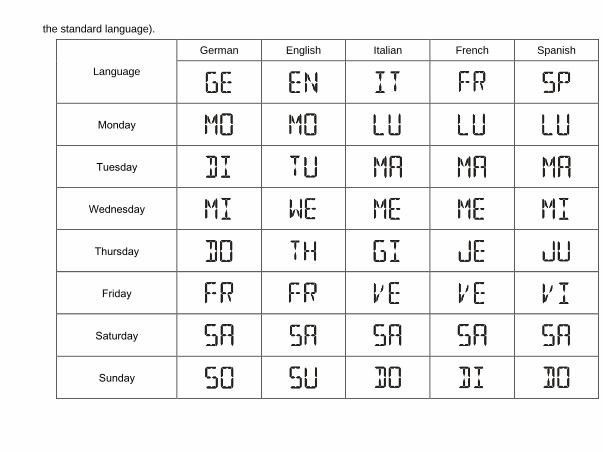
10. Drücken Sie die MODE Taste um Ihre Einstellungen zu bestätigen und die Sprache der Wochentagesanzeige
(9) blinkt. Drücken Sie die + oder die – Taste um die gewünschte Sprache einzustellen.
11. Drücken Sie die MODE Taste um Ihre Einstellungen zu bestätigen und die Einstellung zu beenden.
Hinweise:
Halten Sie die + oder die – Taste gedrückt um die Einstellung der Werte zu beschleunigen.
Das LCD wechselt automatisch in den normale Anzeigemodus, wenn für 20 Sekunden keine Taste betätigt wird.
Das AM-Symbol wird auf der Zeitanzeige (7) vormittags im 12-Stunden Zeitanzeigeformat angezeigt. Das
PM-Symbol wird auf der Zeitanzeige nachmittags im 12-Stunden Zeitanzeigeformat angezeigt.
Deutsch (GE), Englisch (EN), Italienisch (IT), Französisch (FR) oder Spanisch (SP) kann als Anzeigesprache
ausgewählt werden (Deutsch ist die Werkseinstellung).
Sprache Deutsch Englisch Italienisch Französisch Spanisch
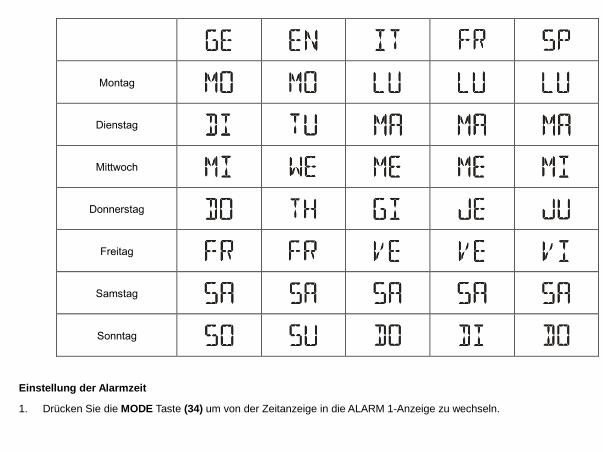
Montag
Dienstag
Mittwoch
Donnerstag
Freitag
Samstag
Sonntag
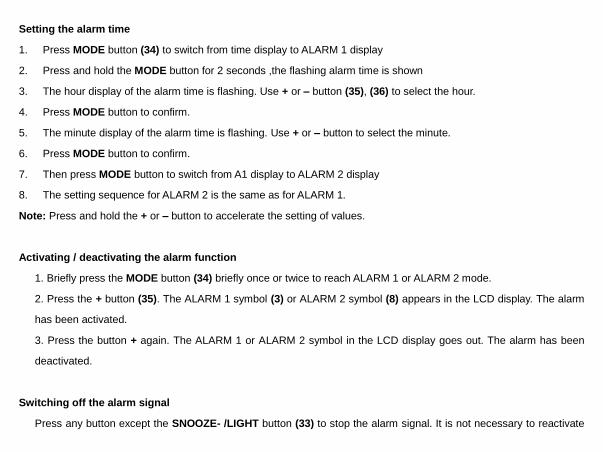
Einstellung der Alarmzeit
1. Drücken Sie die MODE Taste (34) um von der Zeitanzeige in die ALARM 1-Anzeige zu wechseln.
2. Halten Sie die MODE Taste für 2 Sekunden gedrückt und die Alarmzeit blinkt auf der Anzeige.
3. Die Stunde der Alarmzeit blinkt. Drücken Sie die + oder die – Taste (35), (36) um die Stunde einzustellen.
4. Drücken Sie die MODE Taste um zu bestätigen.
5. Die Minute der Alarmzeit blinkt. Drücken Sie die + oder die – Taste (35), (36) um die Minute einzustellen.
6. Drücken Sie die MODE Taste um zu bestätigen.
7. Drücken Sie die MODE Taste um von der ALARM 1-Anzeige in die ALARM 2-Anzeige zu wechseln.
8. Die Einstellung für ALARM 2 erfolgt genauso wie zuvor für ALARM 1.
Hinweis: Halten Sie die + oder die – Taste gedrückt um die Einstellung der Werte zu beschleunigen.
Aktivieren / Deaktivieren der Alarmfunktion
1. Drücken Sie die MODE Taste (34) einmal für die ALARM 1-Anzeige oder zweimal für die ALARM 2-Anzeige.
2. Drücken Sie die + Taste (35) und das ALARM 1-Symbol (3) oder ALARM 2-Symbol (8) wird auf dem LCD angezeigt.
Der entsprechende Alarm ist nun aktiviert.
3. Drücken Sie die + Taste erneut und das entsprechende ALARM 1-Symbol oder ALARM 2-Symbol wird nicht länger
auf dem LCD angezeigt. Der entsprechende Alarm ist nun deaktiviert.
Ausschalten des aktiven Alarms
Drücken Sie jede Taste außer der SNOOZE- /LIGHT Taste (33) um den aktiven Alarm zu beenden. Der Alarm muss
nicht erneut aktiviert werden, da der Alarm erneut zur gleichen Uhrzeit am nächsten Tag erneut ertönt.
Hinweis: Der Alarm ertönt für 2 Minuten.
Schlummerfunktion
Drücken Sie die SNOOZE- /LIGHT Taste (33) während des aktiven Alarms um in die Schlummerfunktion zu wechseln.
Der Alarm wird beendet und ertönt nach 5 Minuten erneut.
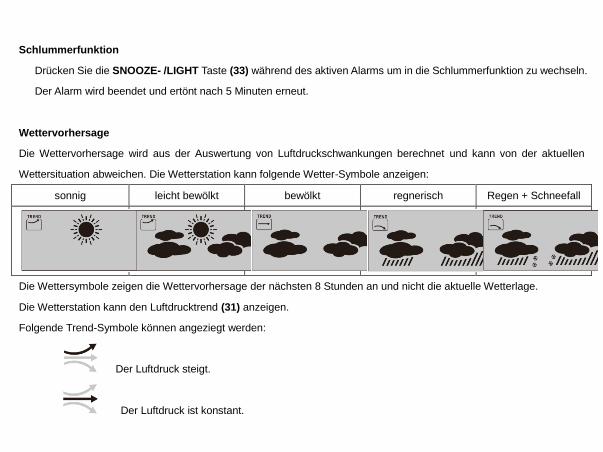
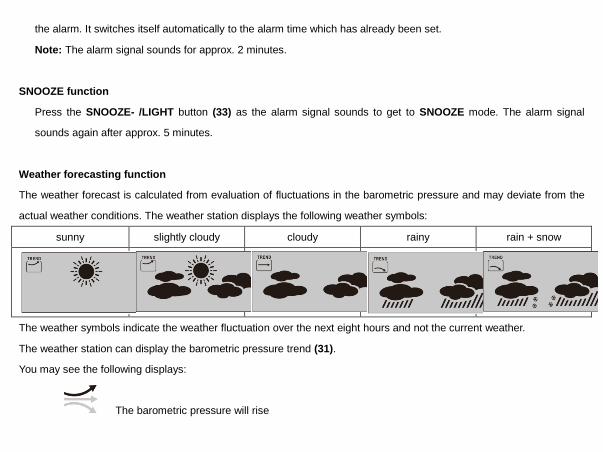
Wettervorhersage
Die Wettervorhersage wird aus der Auswertung von Luftdruckschwankungen berechnet und kann von der aktuellen
Wettersituation abweichen. Die Wetterstation kann folgende Wetter-Symbole anzeigen:
sonnig leicht bewölkt bewölkt regnerisch Regen + Schneefall
Die Wettersymbole zeigen die Wettervorhersage der nächsten 8 Stunden an und nicht die aktuelle Wetterlage.
Die Wetterstation kann den Luftdrucktrend (31) anzeigen.
Folgende Trend-Symbole können angeziegt werden:
Der Luftdruck steigt.
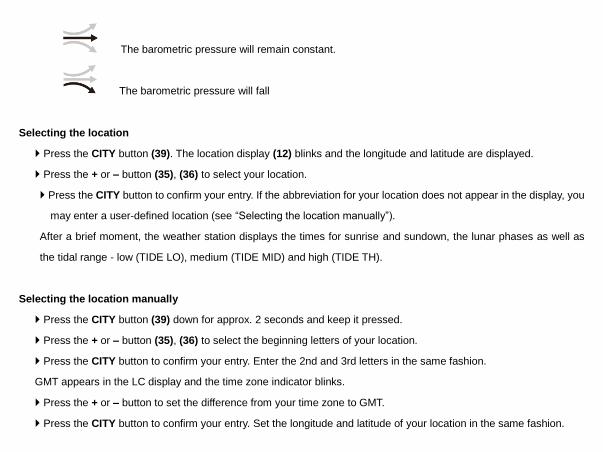
Der Luftdruck ist konstant.
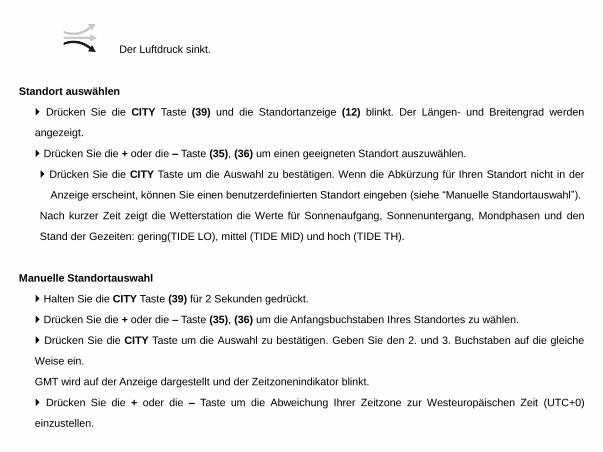
Der Luftdruck sinkt.
Standort auswählen
Drücken Sie die CITY Taste (39) und die Standortanzeige (12) blinkt. Der Längen- und Breitengrad werden
angezeigt.
Drücken Sie die + oder die – Taste (35), (36) um einen geeigneten Standort auszuwählen.
Drücken Sie die CITY Taste um die Auswahl zu bestätigen. Wenn die Abkürzung für Ihren Standort nicht in der
Anzeige erscheint, können Sie einen benutzerdefinierten Standort eingeben (siehe “Manuelle Standortauswahl”).
Nach kurzer Zeit zeigt die Wetterstation die Werte für Sonnenaufgang, Sonnenuntergang, Mondphasen und den
Stand der Gezeiten: gering(TIDE LO), mittel (TIDE MID) und hoch (TIDE TH).
Manuelle Standortauswahl
Halten Sie die CITY Taste (39) für 2 Sekunden gedrückt.
Drücken Sie die + oder die – Taste (35), (36) um die Anfangsbuchstaben Ihres Standortes zu wählen.
Drücken Sie die CITY Taste um die Auswahl zu bestätigen. Geben Sie den 2. und 3. Buchstaben auf die gleiche
Weise ein.
GMT wird auf der Anzeige dargestellt und der Zeitzonenindikator blinkt.
Drücken Sie die + oder die – Taste um die Abweichung Ihrer Zeitzone zur Westeuropäischen Zeit (UTC+0)
einzustellen.
Drücken Sie die CITY Taste um die Auswahl zu bestätigen. Stellen Sie den Längen- und Breitengrad auf die gleiche
Weise ein.
Nach kurzer Zeit zeigt die Wetterstation die Werte für Sonnenaufgang, Sonnenuntergang, Mondphasen und den
Stand der Gezeiten: gering(TIDE LO), mittel (TIDE MID) und hoch (TIDE TH).
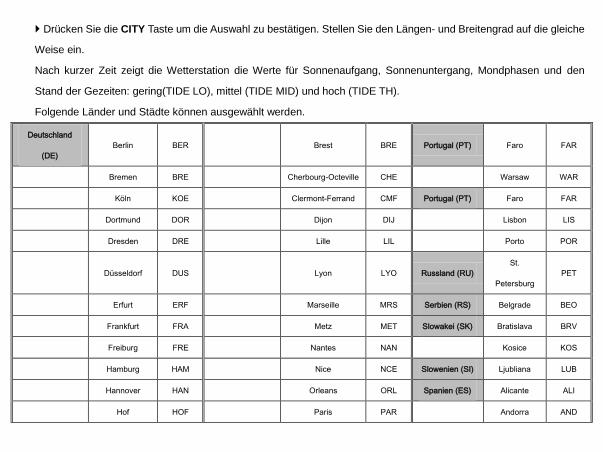
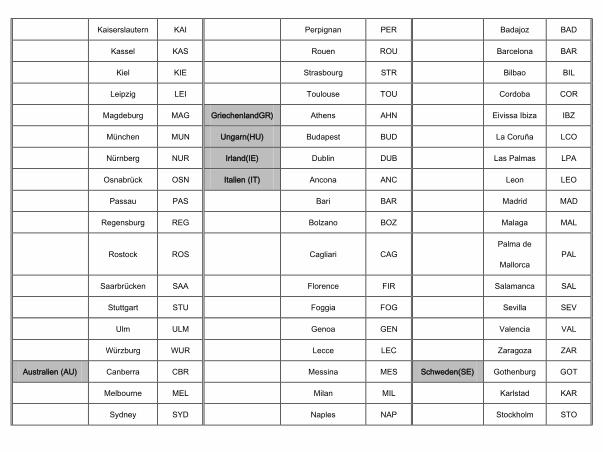
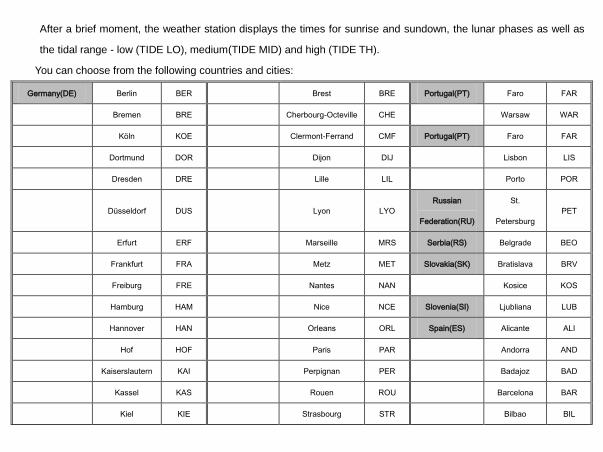
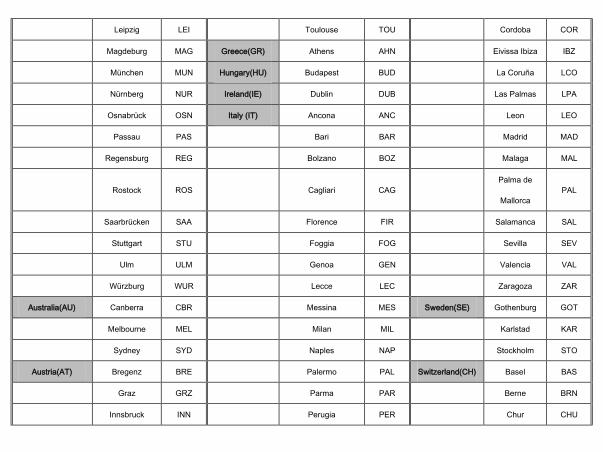
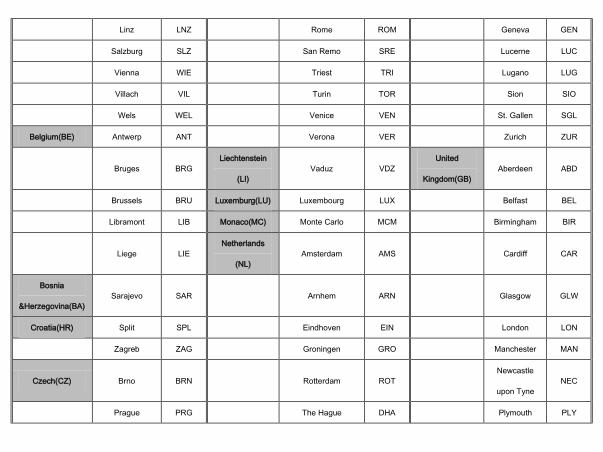
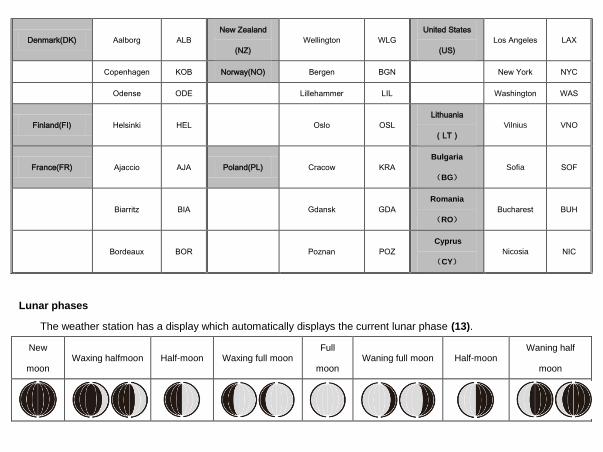
Folgende Länder und Städte können ausgewählt werden.
Deutschland
(DE)
Berlin BER Brest BRE Portugal (PT) Faro FAR
Bremen BRE Cherbourg-Octeville CHE Warsaw WAR
Köln KOE Clermont-Ferrand CMF Portugal (PT) Faro FAR
Dortmund DOR Dijon DIJ Lisbon LIS
Dresden DRE Lille LIL Porto POR
Düsseldorf DUS Lyon LYO Russland (RU)
St.
Petersburg
PET
Erfurt ERF Marseille MRS Serbien (RS) Belgrade BEO
Frankfurt FRA Metz MET Slowakei (SK) Bratislava BRV
Freiburg FRE Nantes NAN Kosice KOS
Hamburg HAM Nice NCE Slowenien (SI) Ljubliana LUB
Hannover HAN Orleans ORL Spanien (ES) Alicante ALI
Hof HOF Paris PAR Andorra AND
Kaiserslautern KAI Perpignan PER Badajoz BAD
Kassel KAS Rouen ROU Barcelona BAR
Kiel KIE Strasbourg STR Bilbao BIL
Leipzig LEI Toulouse TOU Cordoba COR
Magdeburg MAG GriechenlandGR) Athens AHN Eivissa Ibiza IBZ
München MUN Ungarn(HU) Budapest BUD La Coruña LCO
Nürnberg NUR Irland(IE) Dublin DUB Las Palmas LPA
Osnabrück OSN Italien (IT) Ancona ANC Leon LEO
Passau PAS Bari BAR Madrid MAD
Regensburg REG Bolzano BOZ Malaga MAL
Rostock ROS Cagliari CAG
Palma de
Mallorca
PAL
Saarbrücken SAA Florence FIR Salamanca SAL
Stuttgart STU Foggia FOG Sevilla SEV
Ulm ULM Genoa GEN Valencia VAL
Würzburg WUR Lecce LEC Zaragoza ZAR
Australien (AU) Canberra CBR Messina MES Schweden(SE) Gothenburg GOT
Melbourne MEL Milan MIL Karlstad KAR
Sydney SYD Naples NAP Stockholm STO
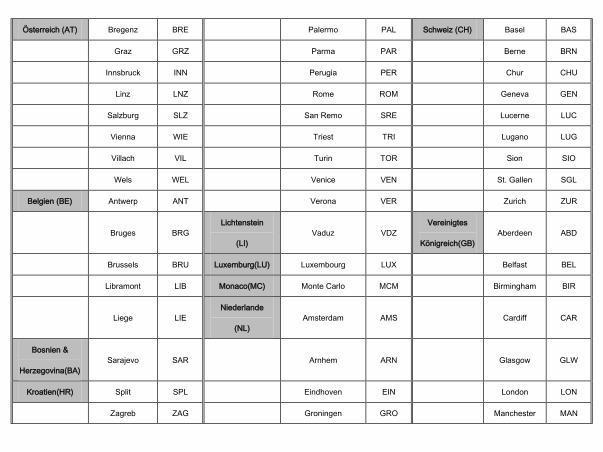
Österreich (AT) Bregenz BRE Palermo PAL Schweiz (CH) Basel BAS
Graz GRZ Parma PAR Berne BRN
Innsbruck INN Perugia PER Chur CHU
Linz LNZ Rome ROM Geneva GEN
Salzburg SLZ San Remo SRE Lucerne LUC
Vienna WIE Triest TRI Lugano LUG
Villach VIL Turin TOR Sion SIO
Wels WEL Venice VEN St. Gallen SGL
Belgien (BE) Antwerp ANT Verona VER Zurich ZUR
Bruges BRG
Lichtenstein
(LI)
Vaduz VDZ
Vereinigtes
Königreich(GB)
Aberdeen ABD
Brussels BRU Luxemburg(LU) Luxembourg LUX Belfast BEL
Libramont LIB Monaco(MC) Monte Carlo MCM Birmingham BIR
Liege LIE
Niederlande
(NL)
Amsterdam AMS Cardiff CAR
Bosnien &
Herzegovina(BA)
Sarajevo SAR Arnhem ARN Glasgow GLW
Kroatien(HR) Split SPL Eindhoven EIN London LON
Zagreb ZAG Groningen GRO Manchester MAN
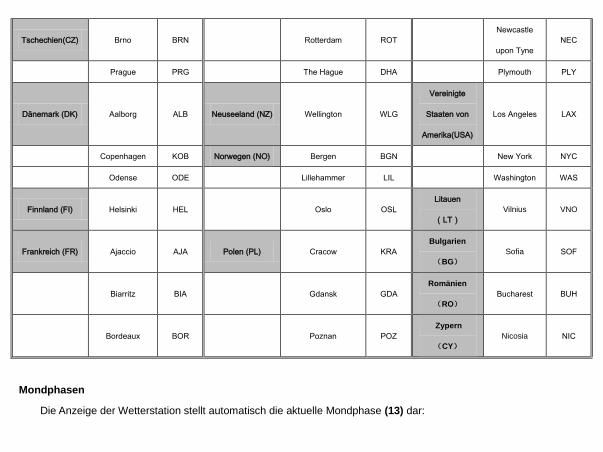
Tschechien(CZ) Brno BRN Rotterdam ROT
Newcastle
upon Tyne
NEC
Prague PRG The Hague DHA Plymouth PLY
Dänemark (DK) Aalborg ALB Neuseeland (NZ) Wellington WLG
Vereinigte
Staaten von
Amerika(USA)
Los Angeles LAX
Copenhagen KOB Norwegen (NO) Bergen BGN New York NYC
Odense ODE Lillehammer LIL Washington WAS
Finnland (FI) Helsinki HEL Oslo OSL
Litauen
(LT)
Vilnius VNO
Frankreich (FR) Ajaccio AJA Polen (PL) Cracow KRA
Bulgarien
(BG)
Sofia SOF
Biarritz BIA Gdansk GDA
Romänien
(RO)
Bucharest BUH
Bordeaux BOR Poznan POZ
Zypern
(CY)
Nicosia NIC
Mondphasen
Die Anzeige der Wetterstation stellt automatisch die aktuelle Mondphase (13) dar:
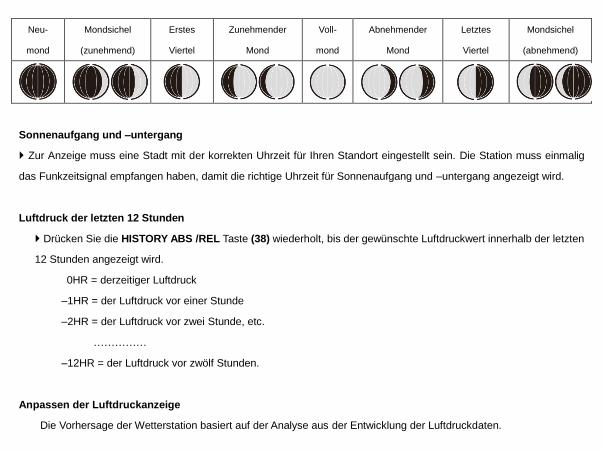
Neu-
mond
Mondsichel
(zunehmend)
Erstes
Viertel
Zunehmender
Mond
Voll-
mond
Abnehmender
Mond
Letztes
Viertel
Mondsichel
(abnehmend)
Sonnenaufgang und –untergang
Zur Anzeige muss eine Stadt mit der korrekten Uhrzeit für Ihren Standort eingestellt sein. Die Station muss einmalig
das Funkzeitsignal empfangen haben, damit die richtige Uhrzeit für Sonnenaufgang und –untergang angezeigt wird.
Luftdruck der letzten 12 Stunden
Drücken Sie die HISTORY ABS /REL Taste (38) wiederholt, bis der gewünschte Luftdruckwert innerhalb der letzten
12 Stunden angezeigt wird.
0HR = derzeitiger Luftdruck
–1HR = der Luftdruck vor einer Stunde
–2HR = der Luftdruck vor zwei Stunde, etc.
……………
–12HR = der Luftdruck vor zwölf Stunden.
Anpassen der Luftdruckanzeige
Die Vorhersage der Wetterstation basiert auf der Analyse aus der Entwicklung der Luftdruckdaten.
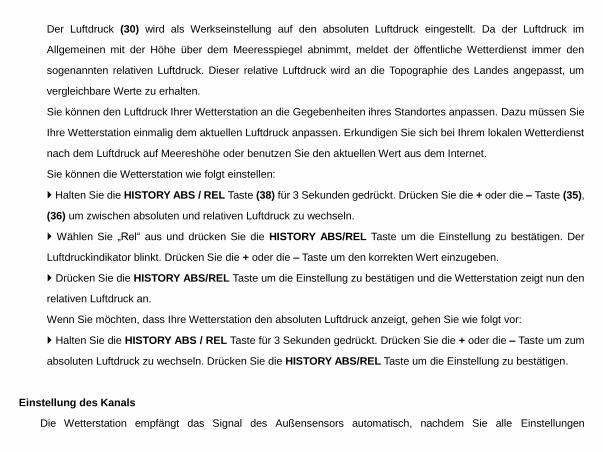
Der Luftdruck (30) wird als Werkseinstellung auf den absoluten Luftdruck eingestellt. Da der Luftdruck im
Allgemeinen mit der Höhe über dem Meeresspiegel abnimmt, meldet der öffentliche Wetterdienst immer den
sogenannten relativen Luftdruck. Dieser relative Luftdruck wird an die Topographie des Landes angepasst, um
vergleichbare Werte zu erhalten.
Sie können den Luftdruck Ihrer Wetterstation an die Gegebenheiten ihres Standortes anpassen. Dazu müssen Sie
Ihre Wetterstation einmalig dem aktuellen Luftdruck anpassen. Erkundigen Sie sich bei Ihrem lokalen Wetterdienst
nach dem Luftdruck auf Meereshöhe oder benutzen Sie den aktuellen Wert aus dem Internet.
Sie können die Wetterstation wie folgt einstellen:
Halten Sie die HISTORY ABS / REL Taste (38) für 3 Sekunden gedrückt. Drücken Sie die + oder die – Taste (35),
(36) um zwischen absoluten und relativen Luftdruck zu wechseln.
Wählen Sie „Rel“ aus und drücken Sie die HISTORY ABS/REL Taste um die Einstellung zu bestätigen. Der
Luftdruckindikator blinkt. Drücken Sie die + oder die – Taste um den korrekten Wert einzugeben.
Drücken Sie die HISTORY ABS/REL Taste um die Einstellung zu bestätigen und die Wetterstation zeigt nun den
relativen Luftdruck an.
Wenn Sie möchten, dass Ihre Wetterstation den absoluten Luftdruck anzeigt, gehen Sie wie folgt vor:
Halten Sie die HISTORY ABS / REL Taste für 3 Sekunden gedrückt. Drücken Sie die + oder die – Taste um zum
absoluten Luftdruck zu wechseln. Drücken Sie die HISTORY ABS/REL Taste um die Einstellung zu bestätigen.
Einstellung des Kanals
Die Wetterstation empfängt das Signal des Außensensors automatisch, nachdem Sie alle Einstellungen
vorgenommen haben.
Hinweis: Bei Störungen durch in der Nähe befindliche Geräte die Funksignale senden, blinkt während dieser Zeit
das Symbol für Außenluftfeuchtigkeit (22) und Außentemperatur (25). Wählen Sie einen anderen Kanal für den
Außensensor, indem Sie die CH Taste (37) an der Wetterstation oder den Kanalwahlschalter (44) am Außensensor
drücken. Die relevanten Daten werden im dem LCD angezeigt:
- 1: Außensender-Kanal 1
- 2: Außensender-Kanal 2
- 3: Außensender-Kanal 3
- : automatischer Kanalwechsel
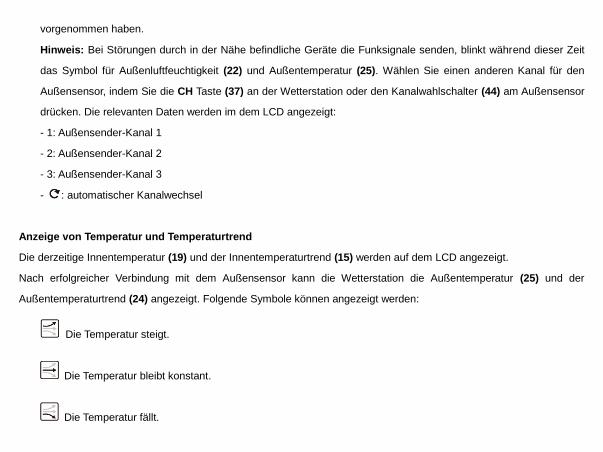
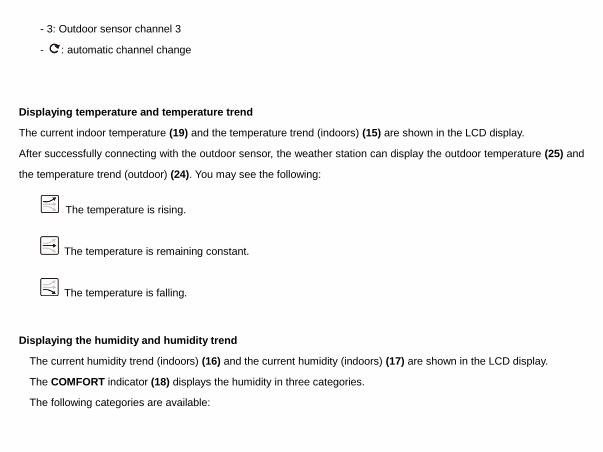
Anzeige von Temperatur und Temperaturtrend
Die derzeitige Innentemperatur (19) und der Innentemperaturtrend (15) werden auf dem LCD angezeigt.
Nach erfolgreicher Verbindung mit dem Außensensor kann die Wetterstation die Außentemperatur (25) und der
Außentemperaturtrend (24) angezeigt. Folgende Symbole können angezeigt werden:
Die Temperatur steigt.
Die Temperatur bleibt konstant.
Die Temperatur fällt.
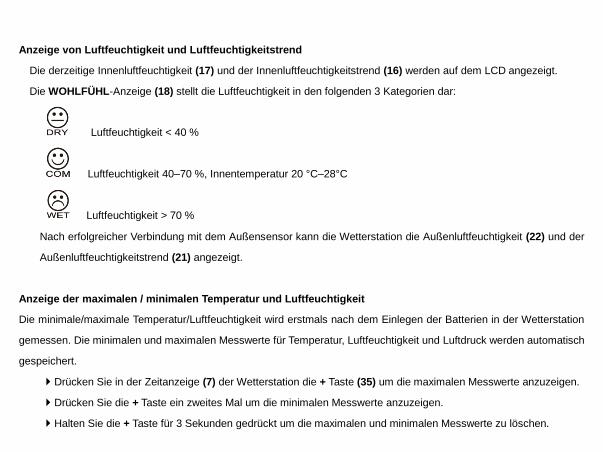
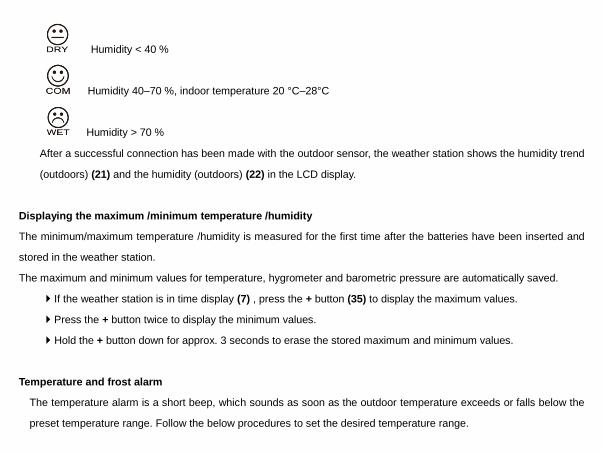
Anzeige von Luftfeuchtigkeit und Luftfeuchtigkeitstrend
Die derzeitige Innenluftfeuchtigkeit (17) und der Innenluftfeuchtigkeitstrend (16) werden auf dem LCD angezeigt.
Die WOHLFÜHL-Anzeige (18) stellt die Luftfeuchtigkeit in den folgenden 3 Kategorien dar:
Luftfeuchtigkeit < 40 %
Luftfeuchtigkeit 40–70 %, Innentemperatur 20 °C–28°C
Luftfeuchtigkeit > 70 %
Nach erfolgreicher Verbindung mit dem Außensensor kann die Wetterstation die Außenluftfeuchtigkeit (22) und der
Außenluftfeuchtigkeitstrend (21) angezeigt.
Anzeige der maximalen / minimalen Temperatur und Luftfeuchtigkeit
Die minimale/maximale Temperatur/Luftfeuchtigkeit wird erstmals nach dem Einlegen der Batterien in der Wetterstation
gemessen. Die minimalen und maximalen Messwerte für Temperatur, Luftfeuchtigkeit und Luftdruck werden automatisch
gespeichert.
Drücken Sie in der Zeitanzeige (7) der Wetterstation die + Taste (35) um die maximalen Messwerte anzuzeigen.
Drücken Sie die + Taste ein zweites Mal um die minimalen Messwerte anzuzeigen.
Halten Sie die + Taste für 3 Sekunden gedrückt um die maximalen und minimalen Messwerte zu löschen.
Temperatur- und Frostalarm
Der Temperaturalarm ist ein kurzer Alarmton, der ertönt, sobald die Außentemperatur den voreingestellten
Temperaturbereich über- oder unterschreitet. Befolgen Sie die nachstehenden Anweisungen, um den gewünschten
Temperaturbereich einzustellen:
Drücken Sie die – Taste (36) um in den Temperaturalarm-Modus zu gelangen.
Halten Sie die – Taste für 3 Sekunden gedrückt und die maximale Temperaturanzeige blinkt. Drücken Sie die + oder
die – Taste um die gewünschten Werte einzustellen.
Drücken Sie die MODE Taste um die Einstellungen zu bestätigen und die minimale Temperaturanzeige blinkt.
Drücken Sie die + oder die – Taste um die gewünschten Werte einzustellen.
Drücken Sie die MODE Taste um die Einstellungen zu bestätigen.
Aktivieren / Deaktivieren des Temperatur- und Frostalarms
Drücken Sie die CH Taste (37) um einen Außensender auszuwählen, wenn mehr als ein Außensensor aktiviert ist.
Drücken Sie wiederholt die – Taste (36) um den Temperatur- und den Frostalarm zu aktivieren.
Ist der Frostalarm aktiviert, erscheint neben der Außentemperatur das entsprechende Symbol (23). Das Alarmsignal
ertönt bei –1 °C bis + 3 °C.
Wenn der Temperaturalarm aktiviert ist, erscheint das entsprechende Symbol neben der Außentemperatur. Das
Alarmsignal ertönt bei den eingestellten Werten.
Wenn Temperatur- und Frostalarm aktiviert sind, erscheinen beide Symbole auf der Anzeige.
Hintergrundbeleuchtung
Drücken Sie die SNOOZE /LIGHT Taste (33) und die Hintergrundbeleuchtung wird für 5 Sekunden angeschaltet.
Batterieendanzeige
Die Batterieendanzeige (20), (26) wird angezeigt, wenn die Batterien schwach sind. Stellen Sie sicher, dass Sie die
Batterien so bald wie möglich austauschen (siehe “Wechseln der Batterien”).
Wechseln der Batterien
Wetterstation:
Tauschen Sie die Batterien aus, wenn die LCD-Anzeige unleserlich wird oder wenn die Batterieendanzeige (20)
angezeigt wird.
Entfernen Sie die Batteriefachabdeckung von der Rückseite der Wetterstation.
Entfernen Sie die verbrauchten Batterien und legen Sie 2 neue Batterien von Typ AA, 1.5V ein.
Hinweis: Stellen Sie sicher, dass die Polarität korrekt ist, wenn Sie die Batterie einsetzen. Die richtige Polarität
wird im Batteriefach (40) dargestellt.
Schließen Sie das Batteriefach wieder.
Außensender:
Tauschen Sie die Batterien aus, wenn die Batterieanzeige (26) angezeigt wird
Entfernen Sie die Batteriefachabdeckung von der Rückseite des Außensenders
Entfernen Sie die verbrauchten Batterien.
Legen Sie 2 neue Batterien von Typ AA, 1.5V ein
Hinweis: Stellen Sie sicher, dass die Polarität korrekt ist, wenn Sie die Batterie einsetzen. Die richtige Polarität
wird im Batteriefach (45) dargestellt.
Schließen Sie das Batteriefach wieder.
Umwelteinflüsse auf Funkempfang
Die Station empfängt kabellos die genaue Uhrzeit. Wie bei allen kabellosen Geräten kann der Funkempfang durch
folgende Einflüsse beeinträchtigt sein:
lange Übertragungswege
naheliegende Berge und Täler
nahe Autobahnen, Gleisen, Flughäfen, Hochspannungsleitungen, etc.
nahe Baustellen
inmitten hoher Gebäude
in Betonbauten
nahe elektrischer Geräte (Computer, Fernseher, etc) und metallischer Gegenstände
in bewegten Fahrzeugen
Platzieren Sie die Station an einem Ort mit optimalem Empfang, z.B. in der Nähe von Fenstern und entfernt zu
metallischen oder elektrischen Gegenständen.
Vorsichtsmaßnahmen
Dieses Gerät ist ausschließlich für den Gebrauch in Innenräumen gedacht.
Setzen Sie das Gerät nicht extremer Gewalteinwirkung oder Stößen aus.
Setzen Sie das Gerät nicht hohen Temperaturen, direktem Sonnenlicht, Staub und Feuchtigkeit aus.
Tauchen Sie das Gerät nicht in Wasser.
Vermeiden Sie den Kontakt mit ätzenden Materialien.
Werfen Sie das Gerät nicht ins Feuer. Es könnte explodieren.
Öffnen Sie nicht das Gehäuse und manipulieren Sie nicht bauliche Bestandteile des Geräts.
Batterie-Sicherheitshinweise
Verwenden Sie nur Alkali-Batterien, keine wiederaufladbaren Batterien.
Legen Sie die Batterien unter Beachtung der Polarität (+/-) richtig ein.
Ersetzen Sie stets einen vollständigen Batteriesatz.
Mischen Sie niemals alte und neue Batterien.
Entfernen Sie erschöpfte Batterien sofort.
Entfernen Sie die Batterien bei Nichtnutzung.
Laden Sie die Batterien nicht auf und werfen Sie sie nicht ins Feuer. Sie könnten explodieren.
Bewahren Sie die Batterien nicht in der Nähe von Metallobjekten auf, da ein Kontakt einen Kurzschluss verursachen
kann.
Setzen Sie Batterien keinen hohen Temperaturen, extremer Feuchtigkeit oder direktem Sonnenlicht aus.
Bewahren Sie Batterien außerhalb der Reichweite von Kindern auf. Verschlucken der Batterien kann zum Ersticken
führen.
Verwenden Sie das Produkt ausschließlich für den vorgesehenen Zweck!
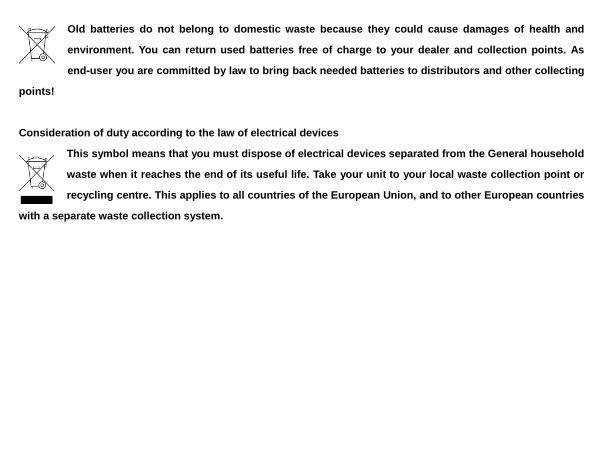
Hinweispflicht nach dem Batteriegesetz
Altbatterien gehören nicht in den Hausmüll. Wenn Batterien in die Umwelt gelangen, können diese
Umwelt- und Gesundheitsschäden zur Folge haben. Sie können gebrauchte Batterien unentgeltlich bei
ihrem Händler und Sammelstellen zurückgeben. Sie sind als Verbraucher zur Rückgabe von
Altbatterien gesetzlich verpflichtet!
Hinweispflicht nach dem Elektronikgerätegesetz
Laut Elektro- und Elektronikgerätegesetz (ElektroG) gehört Elektroschrott nicht in den Hausmüll,
sondern ist zu recyceln oder umweltfreundlich zu entsorgen. Entsorgen Sie ihr Gerät in einen
Recycling Container oder an eine lokale Abfallsammelstelle.
WS6762 - Radio-controlled weather station
Parts description
Weather station:
DISPLAY
1- Date display 2- Month display
3- Alarm 1 4- SNOOZE display
5- Radio tower symbol 6- DST display (summer time)
7- Time display 8- Alarm 2
9- Day of week display 10- Sunrise /time of sunrise
11- Tidal range display 12- Location
13- Lunar phase 14- Sundown / time of sundown
15- Temperature trend (indoor) 16- Humidity trend (indoor)
17- Humidity (indoor) 18- Comfort indicator
19- Inside temperature (°C/ °F) 20- Battery state display
21- Humidity trend (outdoor) 22- Humidity (outdoor)
23- Temperature and frost alarm (maximum / minimum) 24- Temperature trend (outdoor)
25- Outdoor temperature (°C/°F) 26- Battery state display (outdoor sensor)
27- Selected channel 28- Barometric pressure bar display
29- Barometric pressure display of the last hour 30- Absolute/ relative barometric pressure
31- Barometric pressure trend 32- Weather forecast
Exterior
33- SNOOZE/ LIGHT button 34- MODE button
35- + button 36- – button
37- Channel button (CH) 38- HISTORY ABS/REL button
39- CITY button 40- Battery compartment
Outdoor sensor:
41- Control LED 42- Mount
43- RESET button 44- Channel selector switch
45- Battery compartment
Technical data
Weather station:
Temperature measurement range: 0 to +50°C(+32 to +122°F)
Temperature resolution: 0.1°C
Humidity measurement range: 20%–95%
Humidity resolution: 1%
Radio signal: DCF
Batteries: 2x AA, 1.5V (direct current)
Air pressure range: 850 - 1050hPa
Frequency Band: 433.050 to 434.790MHz
Outdoor sensor:
Temperature measurement range: –20 to +65°C (–4 to +149°F)
Humidity measurement range: 20%–95%
Humidity resolution: 1%
RF transmission signal: 433.92 MHz
RF transmission range: max. 60 metres (in open area)
Batteries: 2 x AA, 1.5 V (direct current)
Before use
Setting up the devices
Put the batteries into the outdoor sensor first.
CAUTION!:
When choosing where to position the weather station, make sure that it is not exposed to direct sunlight, vibrations,
dust, heat, cold or moisture.
Do not place the devices close to sources of heat, e.g. radiators. Otherwise they may be damaged.
Do not place the devices on valuable or sensitive surfaces unless these are appropriately protected. Otherwise
they may be damaged.
Please ensure that neighboring devices are not operated at the same frequency of 433 MHz. Such devices may
cause interference to the radio connection.
Do not place the devices next to or on metal plates. Otherwise the quality of radio wave transmission
may be reduced.
Do not install the devices in buildings made of reinforced concrete, e.g. airports, high-rise buildings, factories or
cellars. Otherwise the transmission of the radio waves between the devices may be severely impaired.
Preparing to use the outdoor sensor
Remove the battery compartment cover from the back of the outdoor sensor.
Insert 2 x AA batteries accordingly to right polarity (+/-). The outdoor sensor is now ready for operation and the
control LED
(41) lights up briefly.
Close the battery compartment cover.
Installing the Outdoor Sensor:
Find an appropriate place for the outdoor sensor, protected from rain and direct sun light.
Note: Please ensure that you install the outdoor sensor within a radius of 60m (open area) from the weather station.
Check that there are no obstacles between the outdoor sensor and the weather station. Otherwise there may be
interference of the transmission of data.
For wall mounting:
Hang the outdoor sensor with the mount (42) on one screw.
Preparing the weather station for use
Open the battery compartment (40) on the back of the weather station.
Insert 2 x AA batteries accordingly to right polarity (+/-).
Then close the battery compartment.
As soon as the battery safety strip has been removed, the weather station starts to
receive the radio signal.
Note: Do not move the weather station while it is receiving the signal. This may disrupt reception.
Connecting the weather station with the outdoor sensor and the DCF radio signal:
After installing of batteries, the weather station attempts to establish a connection with the outdoor sensor. This process
can take a few minutes. The symbol will keep flashing for few minutes. On successful connection with the outdoor sensor,
the selected channel symbol (27) appears in the LC display with the channel of the outdoor sensor (if necessary you can
change the channel of the outdoor sensor as shown in the section “Setting the channel”). If the connection with the
outdoor sensor is not established automatically, this can be done manually as follows:
Press the channel button (CH) (37) short until the desired channel (27) is displayed, then press and hold the CH
button until the radio waves icon flashes. T
Then press the RESET button (43) of the sensor. Weather station outdoor temperature (25) and humidity(outdoor)
(22) will be displayed.
As soon as the weather station has established a connection with the outdoor sensor it automatically begins to
receive the DCF radio signal. This process takes several minutes and is indicated by a flashing radio tower symbol
(5).
When the DCF radio signal is being successfully received, the radio tower symbol is shown permanently in the display.
If at the time of putting the device into operation it is not possible to synchronize with the atomic clock, you can also
do the clock adjustments manually (“Setting the 12/24 hour mode /°C /°F/ hPa/ inHg/time zone /time/date/language
manually”).
Radio signal (DCF):
The DCF signal (time signal transmitter) consists of time pulses emitted by one of the most accurate clocks in the
world close to Frankfurt /Main, Germany.
In ideal conditions, your weather station can pick up this signal over a distance of up to approx. 2000 km around
Frankfurt / Main. Reception of the radio signal generally takes approx. 3–10 minutes.
Reception can be considerably impaired by obstacles (e.g. concrete walls) or sources of interference (e.g. other
electrical devices). In the event of reception problems, change the position of the weather station (e.g. to somewhere
near a window).
Operation
Receiving the DCF radio time signal
After a connection with the outdoor sensor is established or 3 minutes after the batteries are installed, the weather
station automatically begins to search for the DCF radio signal. The search is shown in the LC display by the radio
tower symbol (5) flashing.
Note: In buildings made of reinforced concrete the reception of the radio signal may be severely impaired (see
“Setting up the devices”).
In order to correct any deviations from the exact time, the clock is automatically synchronized with the DCF radio
signal every day at 1:00, 2:00 and 3:00.
Reception of the DCF radio signal can also be started manually on the weather station.
Press the + and – button (35), (36) at the same time. The weather station attempts to receive the DCF radio signal.
This process takes several minutes and is indicated by a flashing radio tower symbol.
If the connection with the DCF radio signal cannot be established, the search is stopped.
Note: If the clock of the weather station cannot receive the DCF radio signal due to errors, too great a distance from
the transmitter or similar reasons, it is possible to set the time manually. If reception of the DCF signal is successful,
the manual settings are overwritten.
Manual settings
The reception of DCF radio signal where the weather station has been positioned may become degraded or
interrupted. If this happens you can set the device manually.
Follow these steps:
1. Press and hold down the MODE button (34) for about 3 seconds. “12Hr” or “24Hr” blinks in the display. Press
the + or – button (35), (36) to choose the desired hour format.
2. Confirm your setting by pressing the MODE button. The temperature unit “°C“ or “°F” flashes in the display.
Press the + or – button to choose the desired temperature unit.
3. Confirm your setting by pressing the MODE button. The barometric pressure’s unit flashes in the display. Press
the + or – button to set the desired unit (hPa/inHg).
4. Confirm your setting by pressing the MODE button. The time zone indicator flashes in the display. Press the +
or – button to set the desired value (-2 to +2). Should You can manually adjust the clock to the time zone of a
country where the clock receives the DCF signal but where the actual time differs from the time received. If, e.g.
the time in a given country is 1 hour ahead of the German time, set the time zone display to 01. The clock is
now DCF controlled but the time is one hour ahead.
5. Confirm your setting by pressing the MODE button. The hour value of the time display flashes. Press the + or –
button to set the desired value.
6. Confirm your setting by pressing the MODE button. The minute indicator of the time display blinks. Press the +
or – button to set the desired value.
7. Confirm your setting by pressing the MODE button. The year indicator flashes in the time display. Press the +
or – button to set the desired value.
8. Confirm your setting by pressing the MODE button. The month indicator flashes in the date display (1) . Press
the + or – button to set the desired value.
9. Confirm your setting by pressing the MODE button. The day indicator flashes in the date display. Press the + or
– button to set the desired value.
10. Confirm your setting by pressing the MODE button. At the place of the day of the week display (9) , the
language indicator of this display flashes. Press the + or – button to choose the desired language.
11. Confirm your setting by pressing the MODE button.
Notes:
Press and hold the + or – button to accelerate the setting of values.
If you do not press any button for 20 seconds, the LCD automatically reverts to the standard display.
The AM symbol in the time display (7) stands for before noon in the 12 hour mode. The PM symbol in the time
display stands for after noon in 12 hour mode.
You have the choice of German (GE), English (EN), Italian (IT), French (FR) and Spanish (SP) (German is set as
the standard language).
Language
German English Italian French Spanish
Monday
Tuesday
Wednesday
Thursday
Friday
Saturday
Sunday
Setting the alarm time
1. Press MODE button (34) to switch from time display to ALARM 1 display
2. Press and hold the MODE button for 2 seconds ,the flashing alarm time is shown
3. The hour display of the alarm time is flashing. Use + or – button (35), (36) to select the hour.
4. Press MODE button to confirm.
5. The minute display of the alarm time is flashing. Use + or – button to select the minute.
6. Press MODE button to confirm.
7. Then press MODE button to switch from A1 display to ALARM 2 display
8. The setting sequence for ALARM 2 is the same as for ALARM 1.
Note: Press and hold the + or – button to accelerate the setting of values.
Activating / deactivating the alarm function
1. Briefly press the MODE button (34) briefly once or twice to reach ALARM 1 or ALARM 2 mode.
2. Press the + button (35). The ALARM 1 symbol (3) or ALARM 2 symbol (8) appears in the LCD display. The alarm
has been activated.
3. Press the button + again. The ALARM 1 or ALARM 2 symbol in the LCD display goes out. The alarm has been
deactivated.
Switching off the alarm signal
Press any button except the SNOOZE- /LIGHT button (33) to stop the alarm signal. It is not necessary to reactivate
the alarm. It switches itself automatically to the alarm time which has already been set.
Note: The alarm signal sounds for approx. 2 minutes.
SNOOZE function
Press the SNOOZE- /LIGHT button (33) as the alarm signal sounds to get to SNOOZE mode. The alarm signal
sounds again after approx. 5 minutes.
Weather forecasting function
The weather forecast is calculated from evaluation of fluctuations in the barometric pressure and may deviate from the
actual weather conditions. The weather station displays the following weather symbols:
sunny slightly cloudy cloudy rainy rain + snow
The weather symbols indicate the weather fluctuation over the next eight hours and not the current weather.
The weather station can display the barometric pressure trend (31).
You may see the following displays:
The barometric pressure will rise
The barometric pressure will remain constant.
The barometric pressure will fall
Selecting the location
Press the CITY button (39). The location display (12) blinks and the longitude and latitude are displayed.
Press the + or – button (35), (36) to select your location.
Press the CITY button to confirm your entry. If the abbreviation for your location does not appear in the display, you
may enter a user-defined location (see “Selecting the location manually”).
After a brief moment, the weather station displays the times for sunrise and sundown, the lunar phases as well as
the tidal range - low (TIDE LO), medium (TIDE MID) and high (TIDE TH).
Selecting the location manually
Press the CITY button (39) down for approx. 2 seconds and keep it pressed.
Press the + or – button (35), (36) to select the beginning letters of your location.
Press the CITY button to confirm your entry. Enter the 2nd and 3rd letters in the same fashion.
GMT appears in the LC display and the time zone indicator blinks.
Press the + or – button to set the difference from your time zone to GMT.
Press the CITY button to confirm your entry. Set the longitude and latitude of your location in the same fashion.
After a brief moment, the weather station displays the times for sunrise and sundown, the lunar phases as well as
the tidal range - low (TIDE LO), medium(TIDE MID) and high (TIDE TH).
You can choose from the following countries and cities:
Germany(DE) Berlin BER Brest BRE Portugal(PT) Faro FAR
Bremen BRE Cherbourg-Octeville CHE Warsaw WAR
Köln KOE Clermont-Ferrand CMF Portugal(PT) Faro FAR
Dortmund DOR Dijon DIJ Lisbon LIS
Dresden DRE Lille LIL Porto POR
Düsseldorf DUS Lyon LYO
Russian
Federation(RU)
St.
Petersburg
PET
Erfurt ERF Marseille MRS Serbia(RS) Belgrade BEO
Frankfurt FRA Metz MET Slovakia(SK) Bratislava BRV
Freiburg FRE Nantes NAN Kosice KOS
Hamburg HAM Nice NCE Slovenia(SI) Ljubliana LUB
Hannover HAN Orleans ORL Spain(ES) Alicante ALI
Hof HOF Paris PAR Andorra AND
Kaiserslautern KAI Perpignan PER Badajoz BAD
Kassel KAS Rouen ROU Barcelona BAR
Kiel KIE Strasbourg STR Bilbao BIL
Leipzig LEI Toulouse TOU Cordoba COR
Magdeburg MAG Greece(GR) Athens AHN Eivissa Ibiza IBZ
München MUN Hungary(HU) Budapest BUD La Coruña LCO
Nürnberg NUR Ireland(IE) Dublin DUB Las Palmas LPA
Osnabrück OSN Italy (IT) Ancona ANC Leon LEO
Passau PAS Bari BAR Madrid MAD
Regensburg REG Bolzano BOZ Malaga MAL
Rostock ROS Cagliari CAG
Palma de
Mallorca
PAL
Saarbrücken SAA Florence FIR Salamanca SAL
Stuttgart STU Foggia FOG Sevilla SEV
Ulm ULM Genoa GEN Valencia VAL
Würzburg WUR Lecce LEC Zaragoza ZAR
Australia(AU) Canberra CBR Messina MES Sweden(SE) Gothenburg GOT
Melbourne MEL Milan MIL Karlstad KAR
Sydney SYD Naples NAP Stockholm STO
Austria(AT) Bregenz BRE Palermo PAL Switzerland(CH) Basel BAS
Graz GRZ Parma PAR Berne BRN
Innsbruck INN Perugia PER Chur CHU
Linz LNZ Rome ROM Geneva GEN
Salzburg SLZ San Remo SRE Lucerne LUC
Vienna WIE Triest TRI Lugano LUG
Villach VIL Turin TOR Sion SIO
Wels WEL Venice VEN St. Gallen SGL
Belgium(BE) Antwerp ANT Verona VER Zurich ZUR
Bruges BRG
Liechtenstein
(LI)
Vaduz VDZ
United
Kingdom(GB)
Aberdeen ABD
Brussels BRU Luxemburg(LU) Luxembourg LUX Belfast BEL
Libramont LIB Monaco(MC) Monte Carlo MCM Birmingham BIR
Liege LIE
Netherlands
(NL)
Amsterdam AMS Cardiff CAR
Bosnia
&Herzegovina(BA)
Sarajevo SAR Arnhem ARN Glasgow GLW
Croatia(HR) Split SPL Eindhoven EIN London LON
Zagreb ZAG Groningen GRO Manchester MAN
Czech(CZ) Brno BRN Rotterdam ROT
Newcastle
upon Tyne
NEC
Prague PRG The Hague DHA Plymouth PLY
Denmark(DK) Aalborg ALB
New Zealand
(NZ)
Wellington WLG
United States
(US)
Los Angeles LAX
Copenhagen KOB Norway(NO) Bergen BGN New York NYC
Odense ODE Lillehammer LIL Washington WAS
Finland(FI) Helsinki HEL Oslo OSL
Lithuania
(LT)
Vilnius VNO
France(FR) Ajaccio AJA Poland(PL) Cracow KRA
Bulgaria
(BG)
Sofia SOF
Biarritz BIA Gdansk GDA
Romania
(RO)
Bucharest BUH
Bordeaux BOR Poznan POZ
Cyprus
(CY)
Nicosia NIC
Lunar phases
The weather station has a display which automatically displays the current lunar phase (13).
New
moon Waxing halfmoon Half-moon Waxing full moon
Full
moon Waning full moon Half-moon
Waning half
moon
Sunrise and sunset
A nearby city of your location must be set to correctly display the time of your area. The station needs to receive the
radio-controlled time signal at least once in order to display correct sunrise and sunset time.
Reading the barometric pressure for the last 12 hours
Press the HISTORY ABS /REL button (38) repeatedly to read the barometric pressure values for the last 12 hours.
0HR = present barometric pressure
–1HR = barometric pressure an hour earlier
–2HR = barometric pressure two hours earlier, etc.
……………
–12HR = barometric pressure twelve hours earlier, etc.
Adjusting the air pressure indication
The forecast of this weather station is basing on an analysis of the change of the air pressure.
The barometric pressure (30) is factory provided adjusted to the absolute air pressure. As the air pressure
generally decreases with the height beyond sea level, the public weather service always announces the so-called
relative air pressure. This relative air pressure is adjusted to the topography of the country in order to get
comparable values.
You can adjust the air-pressure of your weather station to the proportion of its place. For that you have to adjust
your weather station uniquely the current air pressure. Ask your local weather forecast service for the barometric
pressure at sea level or get the current value from the Internet.
You can adjust the weather station like this:
Press and hold the HISTORY ABS / REL button (38) for approx. 3 seconds. After that press the + or – button (35),
(36), to interchange between the absolute or relative air pressure.
Chose „Rel“ and press the HISTORY ABS/REL button for confirmation. The air pressure indication blinks. Now
you can chose the correct value by pressing the + or – button.
Confirm your choice by pressing the HISTORY ABS /REL button. Your weather station now shows
the relative air pressure.
If you want your weather station to announce the absolute air pressure, proceed like this:
Press and hold the HISTORY ABS/REL button for approx. 3 seconds. Afterwards press the + or – button, to
change to the absolute air pressure. Confirm by pressing the HISTORY ABS /REL button.
Setting the channel
The weather station receives the outdoor sensor signal automatically after you have made all the settings.
Note: In the event of interference from nearby equipment transmitting radio signals, the symbol for humidity (outdoor)
(22) and outdoor temperature (25) flashes during this time. Please select a different channel for the outdoor sensor
by pressing the CH button (37) on the weather station or the channel selector switch (44) on the outdoor sensor. The
relevant data is shown in the LC display.
- 1: Outdoor sensor channel 1
- 2: Outdoor sensor channel 2
- 3: Outdoor sensor channel 3
- : automatic channel change
Displaying temperature and temperature trend
The current indoor temperature (19) and the temperature trend (indoors) (15) are shown in the LCD display.
After successfully connecting with the outdoor sensor, the weather station can display the outdoor temperature (25) and
the temperature trend (outdoor) (24). You may see the following:
The temperature is rising.
The temperature is remaining constant.
The temperature is falling.
Displaying the humidity and humidity trend
The current humidity trend (indoors) (16) and the current humidity (indoors) (17) are shown in the LCD display.
The COMFORT indicator (18) displays the humidity in three categories.
The following categories are available:
Humidity < 40 %
Humidity 40–70 %, indoor temperature 20 °C–28°C
Humidity > 70 %
After a successful connection has been made with the outdoor sensor, the weather station shows the humidity trend
(outdoors) (21) and the humidity (outdoors) (22) in the LCD display.
Displaying the maximum /minimum temperature /humidity
The minimum/maximum temperature /humidity is measured for the first time after the batteries have been inserted and
stored in the weather station.
The maximum and minimum values for temperature, hygrometer and barometric pressure are automatically saved.
If the weather station is in time display (7) , press the + button (35) to display the maximum values.
Press the + button twice to display the minimum values.
Hold the + button down for approx. 3 seconds to erase the stored maximum and minimum values.
Temperature and frost alarm
The temperature alarm is a short beep, which sounds as soon as the outdoor temperature exceeds or falls below the
preset temperature range. Follow the below procedures to set the desired temperature range.

Press the – button (36) to get to the temperature alarm mode.
Hold the – button down for 3 seconds. The maximum temperature display blinks. Press the + or –
button to set the values.
Press the MODE button (34) to confirm your setting. The minimum temperature display blinks. Press the + or –
button to set the values.
Press the MODE button to confirm your setting.
Activating / deactivating the the temperature and frost alarm
If more than one outdoor sensor is activated, press the CH button (37) to select one.
Press the – button (36) repeatedly to activate the temperature and frost alarms.
If the frost alarm alarm is activated, the corresponding symbol (23) appears next to the outdoor temperature. The
alarm signal sounds at –1 °C to + 3 °C.
If the temperature alarm is activated, the corresponding symbol appears next to the outdoor temperature. The alarm
signal sounds at the set values.
If the temperature and frost alarm are activated, both symbols appear in the display.
Background lighting
Press the SNOOZE /LIGHT button (33). The backlight illuminates for 5 seconds.
Battery state display
The battery state display (20), (26) appears, if the batteries are weak. Make sure you replace the batteries at the
earliest opportunity (see “Changing the batteries”).
Changing the batteries
Weather station:
Replace the batteries if the LCD display becomes illegible or if the battery display (20) is shown.
Remove the battery compartment cover on the back of the weather station.
Remove the used batteries. Insert 2 new batteries type AA, 1.5V.
Note: Make sure that the polarity is correct when you insert the battery. The correct polarity is shown inside the
battery compartment (40).
Close the battery compartment.
Outdoor sensor:
Replace the batteries if battery display (26) is shown.
Remove the battery compartment cover from the back of the outdoor sensor.
Remove the used batteries.
Insert 2 new batteries type AA, 1.5V.
Note: Make sure you insert the batteries with the correct polarity. The correct polarity is shown inside the battery
compartment (45).
Close the battery compartment.
Environmental reception effects
The station obtains the accurate time with wireless technology. Same as all wireless devices, the reception is maybe
affected by the following circumstances:
long transmitting distance
nearby mountains and valleys
near freeway, railway, airports, high voltage cable etc.
near construction site
among tall buildings
inside concrete buildings
near electrical appliances (computers, TV’s, etc) and metallic structures
inside moving vehicles
Place the station at a location with optimal signal, i.e. close to a window and away from metal surfaces or electrical
appliances.
Precautions
This main unit is intended to be used only indoors. Outdoor sensor is intended to be used outdoors.
Do not subject the unit to excessive force or shock.
Do not expose the unit to extreme temperatures, direct sunlight, dust or humidity.
Do not immerse in water.
Avoid contact with any corrosive materials.
Do not dispose this unit in a fire as it may explode.
Do not open the inner back case or tamper with any components of this unit.
Batteries safety warnings
Use only alkaline batteries, not rechargeable batteries.
Install batteries correctly by matching the polarities (+/-).
Always replace a complete set of batteries.
Never mix used and new batteries.
Remove exhausted batteries immediately.
Remove batteries when not in use.
Do not recharge and do not dispose of batteries in fire as the batteries may explode.
Ensure batteries are stored away from metal objects as contact may cause a short circuit.
Avoid exposing batteries to extreme temperature or humidity or direct sunlight.
Keep all batteries out of reach from children. They are a choking hazard.
Use the product only for its intended purpose!
Consideration of duty according to the battery law
Old batteries do not belong to domestic waste because they could cause damages of health and
environment. You can return used batteries free of charge to your dealer and collection points. As
end-user you are committed by law to bring back needed batteries to distributors and other collecting
points!
Consideration of duty according to the law of electrical devices
This symbol means that you must dispose of electrical devices separated from the General household
waste when it reaches the end of its useful life. Take your unit to your local waste collection point or
recycling centre. This applies to all countries of the European Union, and to other European countries
with a separate waste collection system.

WS6762 - Station météo radiocommandée
Description des composants
Station Météo :

AFFICHAGE
1- Affichage de la date 2- Affichage du mois
3- Alarme 1 4- Afficheur du Rappel d’alarme
5- Symbole pylône radio 6- Affichage DST (heure d’été)
7- Affichage de l'heure 8- Alarme 2
9- Affichage du jour de la semaine 10- Lever du soleil/heure du lever du soleil
11- Affichage amplitude de la marée 12- Emplacement
13- Phase lunaire 14- Coucher du soleil/heure du coucher du soleil
15- Tendance de la température (intérieure) 16- Tendance de l’humidité (intérieure)
17- Humidité (intérieure) 18- Indicateur de confort
19- Température intérieure (°C/°F) 20- Affichage de l'état des piles
21- Tendance de l’humidité (extérieure) 22- Humidité (extérieure)
23- Alarme de température et de gel
(maximum/minimum)
24- Tendance de la température (extérieure)
25- Température extérieure (°C/°F) 26- Affichage de l’état des piles (capteur extérieur)
27- Canal sélectionné 28- Affichage de la pression atmosphérique
29- Historique de la pression atmosphérique de la
dernière heure
30- Pression atmosphérique absolue/relative
31- Tendance de la pression atmosphérique 32- Prévisions météo
Extérieur
33- Touche Rappel d’alarme/Rétroéclairage : 34- Touche MODE
35- Touche + 36- Touche -
37- Touche de canal (CH) 38- Touche HISTORY ABS/REL
39- Touche CITY 40- Compartiment à piles
Capteur extérieur:
41- Témoin de contrôle 42- Trou d'accrochage
43- Touche de RÉINITIALISATION 44- Commutateur de sélection de canal
45- Compartiment à piles
Caractéristiques techniques
Station Météo :
Intervalle de mesure de température : 0 à +50°C (+32 à +122°F)
Résolution de température : 0.1°C
Plage de mesure d'humidité : 20%~-95%
Résolution de l’humidité : 1%
Signal radio : DCF
Piles : 2 x AA, 1,5V (courant continu)
Plage de pression d'air : 850 - 1050 hPa
Bandes de fréquence : 433,050 à 434,790 MHz
Capteur extérieur:
Intervalle de mesure de température : –20 à +65°C (–4 à +149°F)
Plage de mesure d'humidité : 20%~-95%
Résolution de l’humidité : 1%
Signal de transmission RF : 433,92 MHz
Portée de transmission RF : 60 mètres max. (dans une zone ouverte)
Piles : 2 x AA, 1,5 V (courant continu)
Avant l'utilisation
Installation des appareils
Placez d’abord des piles dans le capteur extérieur.
ATTENTION ! :
Lors du choix de l’emplacement de la station météo, assurez-vous qu’elle n’est pas exposée aux rayons directs
du soleil, aux vibrations, à la poussière, à la chaleur, au froid et à l’humidité.
Ne placez pas les appareils à proximité de sources de chaleur, par ex. des radiateurs. Autrement, ils risquent
d’être endommagés.
Ne placez pas les appareils sur des objets de valeur ou sensibles à moins qu’ils ne soient protégés de manière
appropriée. Autrement, ils risquent d’être endommagés.
Assurez-vous que les appareils avoisinants ne fonctionnent pas à la même fréquence de 433 MHz. De tels
appareils peuvent interférer avec la connexion radio.
Ne placez pas les appareils à côté ou sur des objets métalliques. Autrement, la qualité de la transmission radio
risque d’être perturbée.
N’installez pas les appareils dans des constructions en béton armé, par ex. aéroports, hauts immeubles, usines
ou caves. Autrement, la transmission radio entre les appareils risque d’être très perturbée.
Préparation à l’utilisation du capteur extérieur
Enlevez le couvercle du compartiment à piles situé à l'arrière du capteur extérieur.
Insérez 2 piles AA en respectant les polarités (+/-). Le capteur extérieur est maintenant prêt à l'utilisation et le
témoin de contrôle (41) s’allume brièvement.
Remettez le couvercle du compartiment à piles.
Installation du capteur extérieur :
Trouvez un endroit approprié pour le capteur extérieur.
Remarque : Le capteur extérieur doit se trouver dans un rayon de 60 m (zone ouverte) de la station météo.
Vérifiez qu'il n'y a aucun obstacle entre le capteur extérieur et la station météo. Autrement, il peut y avoir des
perturbations dans les transmissions des données.
Pour le montage mural :
Accrochez le capteur extérieur par le trou d'accrochage (42) à une vis.
Préparation de la station météo à l’utilisation
Ouvrez le compartiment à piles (40) situé à l’arrière de la station météo.
Insérez 2 piles AA en respectant les polarités (+/-).
Refermez le couvercle du compartiment à piles.
Dès que la bande de sécurité des piles est retirée, la station météo commence à recevoir le signal radio.
Remarque : Ne déplacez pas la station météo pendant la réception de signal. Cela peut perturber la réception.
Connexion de la station météo avec le capteur extérieur et le signal radio DCF :
Après l’installation des piles, la station météo tente d’établir une connexion avec le capteur extérieur. Cette opération
peut prendre quelques minutes. Le symbole continue à clignoter pendant quelques minutes. En cas de connexion
réussie avec le capteur extérieur, le symbole de canal sélectionné (27) apparaît sur l’écran avec le canal du capteur
extérieur (si nécessaire, vous pouvez changer le canal du capteur extérieur comme indiqué dans la section « Choix du
canal »). Si la connexion avec le capteur extérieur n’est pas établie automatiquement, elle peut être effectuée
manuellement en suivant cette procédure :
Appuyez plusieurs fois sur la touche de canal (CH) (37) jusqu’à ce que le canal souhaité (27) s’affiche, puis
maintenez appuyée la touche CH jusqu’à ce que l’icône d’ondes radio se mette à clignoter. T
Appuyez ensuite sur la touche RESET (43) du capteur. La température extérieure (25) et l’humidité (extérieure)
(22) seront affichées.
Dès que la station météo établisse une connexion avec le capteur extérieur, elle commence automatiquement à
recevoir le signal radio DCF. Cette opération prend plusieurs minutes et est indiquée par le clignotement du symbole
pylône radio (5).
Une fois le signal radio DCF est reçu avec succès, le symbole pylône radio reste affiché à l’écran. Si au moment de la
mise en marche de l’appareil, il n’est pas possible de le synchroniser avec l’horloge atomique, vous pouvez effectuer
manuellement les réglages de l’horloge (« Réglage du mode 12/24 heures/°C/°F/hPa/inHg/fuseau
horaire/heure/date/langue »).
Signal radio (DCF) :
Le signal DCF (émetteur de signal temporel) est constitué d’impulsions de temps émises par l’une des horloges les
plus précises du monde près de Francfort-sur-le-Main, en Allemagne.
Dans des conditions idéales, votre station météo peut capter ce signal sur un rayon allant jusqu’à environ 2000 km
de Francfort-sur-le-Main. La réception du signal radio prend généralement environ 3 à 10 minutes.
La réception peut être considérablement perturbée par des obstacles (ex. murs en béton) ou des sources
d’interférence (tels qu’appareils électriques). En cas de problèmes de réception, changez l’emplacement de la
station météo (ex. à proximité d’une fenêtre).
Fonctionnement
Réception du signal horaire radio DCF
Une fois la connexion avec le capteur extérieur établie ou 3 minutes après l’installation des piles, la station météo
lance automatiquement la recherche du signal radio DCF. La recherche est indiquée sur l’écran par le clignotement
du symbole pylône radio (5).
Remarque : Dans les bâtiments en béton armé, la réception du signal radio peut être fortement affectée (voir
« Installation des appareils »).
Afin de corriger tout écart par rapport à l’heure exacte, l’horloge est automatiquement synchronisée avec le signal
radio DCF tous les jours à 1h00, 2h00 et 3h00.
La réception du signal radio DCF peut également être lancée manuellement sur la station météo.
Appuyez sur les touches + (35) et - (36) en même temps. La station météo tente de recevoir le signal radio DCF.
Cette opération prend plusieurs minutes et est indiquée par le clignotement du symbole pylône radio.
La recherche est arrêtée si la connexion avec le signal radio DCF ne peut pas être établie.
Remarque : Il est possible de régler l’heure manuellement si l’horloge de la station météo ne peut pas recevoir le
signal radio DCF en raison d’erreurs, d’une trop grande distance de l’émetteur ou pour des raisons similaires. Si la
réception du signal DCF est rétablie, les réglages manuels sont remplacés par ceux du signal DCF.
Réglages manuels
La réception du signal radio DCF sur lequel la station météo a été positionnée peut se dégrader ou s’interrompre. Si
cela se produit, vous pouvez régler l’appareil manuellement.
Suivez les étapes ci-dessous :
1. Maintenez appuyée la touche MODE (34) pendant 3 secondes « 12Hr » ou « 24Hr » se met à clignoter à
l’écran. Utilisez les touches + (35)/- (36) pour choisir le format de l’heure.
2. Confirmez votre réglage en appuyant sur la touche MODE. L’unité de température « °C » ou « °F » se met à
clignoter sur l’écran. Utilisez les touches +/- pour choisir l’unité de température.
3. Confirmez votre réglage en appuyant sur la touche MODE. L’unité de pression atmosphérique se met à
clignoter sur l’écran. Utilisez les touches +/- pour choisir l’unité de pression (hPa/inHg).
4. Confirmez votre réglage en appuyant sur la touche MODE. L’indicateur du fuseau horaire se met à clignoter
sur l’écran. Utilisez les touches +/- pour régler la valeur (-2 à +2). Vous pouvez régler manuellement l'heure par
rapport au fuseau horaire d'un pays où l'horloge reçoit le signal DCF mais où l'heure réelle est différente de
l'heure reçue. Si, par exemple, l’heure dans un pays donné a une heure d’avance sur celle de l’Allemagne,
réglez l’affichage du fuseau horaire sur 01. L’horloge est désormais commandée par DCF, mais l’heure est en
avance d’une heure.
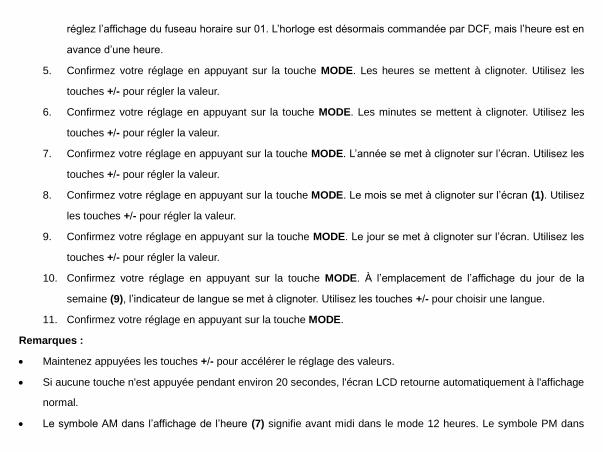
5. Confirmez votre réglage en appuyant sur la touche MODE. Les heures se mettent à clignoter. Utilisez les
touches +/- pour régler la valeur.
6. Confirmez votre réglage en appuyant sur la touche MODE. Les minutes se mettent à clignoter. Utilisez les
touches +/- pour régler la valeur.
7. Confirmez votre réglage en appuyant sur la touche MODE. L’année se met à clignoter sur l’écran. Utilisez les
touches +/- pour régler la valeur.
8. Confirmez votre réglage en appuyant sur la touche MODE. Le mois se met à clignoter sur l’écran (1). Utilisez
les touches +/- pour régler la valeur.
9. Confirmez votre réglage en appuyant sur la touche MODE. Le jour se met à clignoter sur l’écran. Utilisez les
touches +/- pour régler la valeur.
10. Confirmez votre réglage en appuyant sur la touche MODE. À l’emplacement de l’affichage du jour de la
semaine (9), l’indicateur de langue se met à clignoter. Utilisez les touches +/- pour choisir une langue.
11. Confirmez votre réglage en appuyant sur la touche MODE.
Remarques :
Maintenez appuyées les touches +/- pour accélérer le réglage des valeurs.
Si aucune touche n'est appuyée pendant environ 20 secondes, l'écran LCD retourne automatiquement à l'affichage
normal.
Le symbole AM dans l’affichage de l’heure (7) signifie avant midi dans le mode 12 heures. Le symbole PM dans
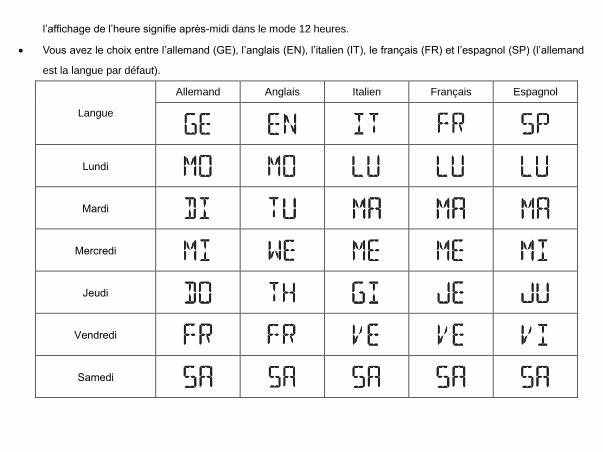
l’affichage de l’heure signifie après-midi dans le mode 12 heures.
Vous avez le choix entre l’allemand (GE), l’anglais (EN), l’italien (IT), le français (FR) et l’espagnol (SP) (l’allemand
est la langue par défaut).
Langue
Allemand Anglais Italien Français Espagnol
Lundi
Mardi
Mercredi
Jeudi
Vendredi
Samedi
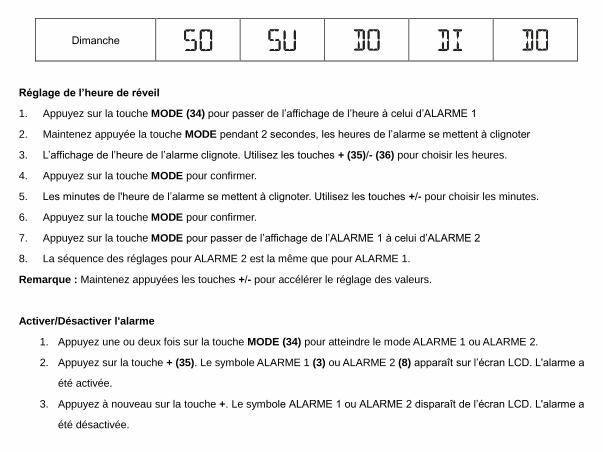
Dimanche
Réglage de l’heure de réveil
1. Appuyez sur la touche MODE (34) pour passer de l’affichage de l’heure à celui d’ALARME 1
2. Maintenez appuyée la touche MODE pendant 2 secondes, les heures de l’alarme se mettent à clignoter
3. L’affichage de l’heure de l’alarme clignote. Utilisez les touches + (35)/- (36) pour choisir les heures.
4. Appuyez sur la touche MODE pour confirmer.
5. Les minutes de l'heure de l’alarme se mettent à clignoter. Utilisez les touches +/- pour choisir les minutes.
6. Appuyez sur la touche MODE pour confirmer.
7. Appuyez sur la touche MODE pour passer de l’affichage de l’ALARME 1 à celui d’ALARME 2
8. La séquence des réglages pour ALARME 2 est la même que pour ALARME 1.
Remarque : Maintenez appuyées les touches +/- pour accélérer le réglage des valeurs.
Activer/Désactiver l'alarme
1. Appuyez une ou deux fois sur la touche MODE (34) pour atteindre le mode ALARME 1 ou ALARME 2.
2. Appuyez sur la touche + (35). Le symbole ALARME 1 (3) ou ALARME 2 (8) apparaît sur l’écran LCD. L'alarme a
été activée.
3. Appuyez à nouveau sur la touche +. Le symbole ALARME 1 ou ALARME 2 disparaît de l’écran LCD. L'alarme a
été désactivée.
Arrêter le signal d'alarme
Appuyez sur une touche quelconque à l’exception de la touche RAPPEL D’ALARME/RÉTROÉCLAIRAGE (33)
pour arrêter le signal d'alarme. Il n'est pas nécessaire de réactiver l'alarme. L'horloge se règle automatiquement sur
l'heure de l'alarme qui a déjà été réglée.
Remarque : Le signal d’alarme retentit pendant environ 2 minutes.
Rappel d'alarme
Appuyez sur la touche RAPPEL D’ALARME/RÉTROÉCLAIRAGE (33) pendant que le signal d'alarme retentit pour
passer en mode RAPPEL D’ALARME La sonnerie de l'alarme reprend au bout de 5 minutes.
Prévisions météo
Les prévisions météo sont calculées à partir de l'évaluation des fluctuations de la pression barométrique et peuvent être
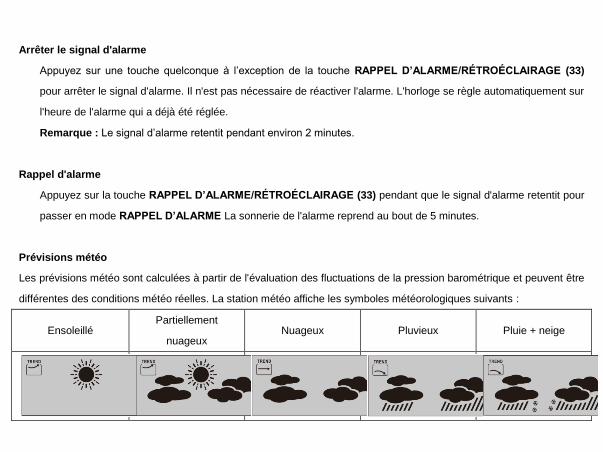
différentes des conditions météo réelles. La station météo affiche les symboles météorologiques suivants :
Ensoleillé Partiellement
nuageux Nuageux Pluvieux Pluie + neige
Les symboles météorologiques indiquent la fluctuation des conditions météo au cours des huit prochaines heures et non
les conditions météo actuelles.
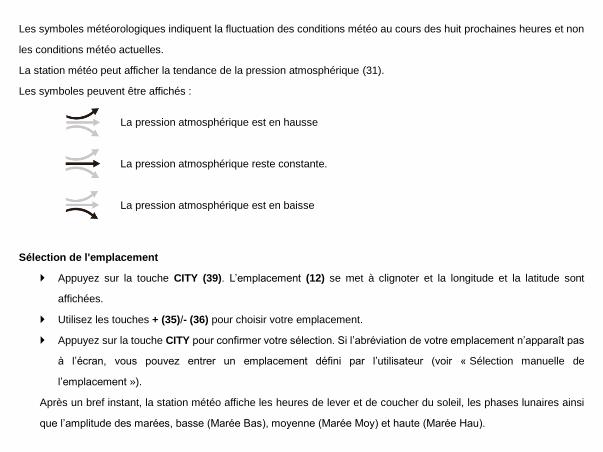
La station météo peut afficher la tendance de la pression atmosphérique (31).
Les symboles peuvent être affichés :
La pression atmosphérique est en hausse
La pression atmosphérique reste constante.
La pression atmosphérique est en baisse
Sélection de l'emplacement
Appuyez sur la touche CITY (39). L’emplacement (12) se met à clignoter et la longitude et la latitude sont
affichées.
Utilisez les touches + (35)/- (36) pour choisir votre emplacement.
Appuyez sur la touche CITY pour confirmer votre sélection. Si l’abréviation de votre emplacement n’apparaît pas
à l’écran, vous pouvez entrer un emplacement défini par l’utilisateur (voir « Sélection manuelle de
l’emplacement »).
Après un bref instant, la station météo affiche les heures de lever et de coucher du soleil, les phases lunaires ainsi
que l’amplitude des marées, basse (Marée Bas), moyenne (Marée Moy) et haute (Marée Hau).
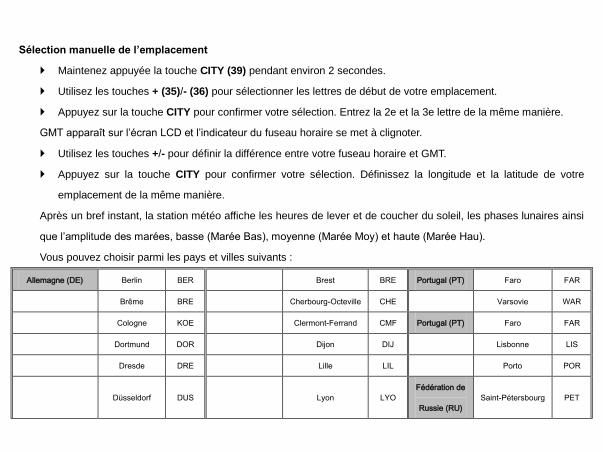
Sélection manuelle de l’emplacement
Maintenez appuyée la touche CITY (39) pendant environ 2 secondes.
Utilisez les touches + (35)/- (36) pour sélectionner les lettres de début de votre emplacement.
Appuyez sur la touche CITY pour confirmer votre sélection. Entrez la 2e et la 3e lettre de la même manière.
GMT apparaît sur l’écran LCD et l’indicateur du fuseau horaire se met à clignoter.
Utilisez les touches +/- pour définir la différence entre votre fuseau horaire et GMT.
Appuyez sur la touche CITY pour confirmer votre sélection. Définissez la longitude et la latitude de votre
emplacement de la même manière.
Après un bref instant, la station météo affiche les heures de lever et de coucher du soleil, les phases lunaires ainsi
que l’amplitude des marées, basse (Marée Bas), moyenne (Marée Moy) et haute (Marée Hau).
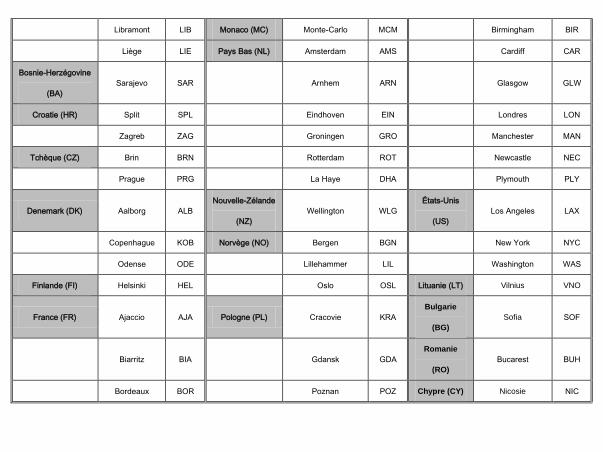
Vous pouvez choisir parmi les pays et villes suivants :
Allemagne (DE) Berlin BER Brest BRE Portugal (PT) Faro FAR
Brême BRE Cherbourg-Octeville CHE Varsovie WAR
Cologne KOE Clermont-Ferrand CMF Portugal (PT) Faro FAR
Dortmund DOR Dijon DIJ Lisbonne LIS
Dresde DRE Lille LIL Porto POR
Düsseldorf DUS Lyon LYO
Fédération de
Russie (RU)
Saint-Pétersbourg PET

Erfurt ERF Marseille MRS Serbie (RS) Belgrade BEO
Francfort FRA Metz MET
Slovaquie
(SK)
Bratislava BRV
Fribourg FRE Nantes NAN Kosice KOS
Hambourg HAM Nice NCE Slovénie (SI) Ljubliana LUB
Hanovre HAN Orléans ORL Espagne (ES) Alicante ALI
Hof HOF Paris PAR Andorre AND
Kaiserslautern KAI Perpignan PER Badajoz BAD
Kassel KAS Rouen ROU Barcelone BAR
Kiel KIE Strasbourg STR Bilbao BIL
Leipzig LEI Toulouse TOU Cordoue COR
Magdebourg MAG Grèce (GR) Athènes AHN Ibiza IBZ
Munich MUN Hongrie (HU) Budapest BUD La Corogne LCO
Nuremberg NUR Irelande (IE) Dublin DUB Las Palmas LPA
Osnabruck OSN Italie (IT) Ancône ANC Léon LEO
Passau PAS Bari BAR Madrid MAD
Ratisbonne REG Bolzane BOZ Malaga MAL
Rostock ROS Cagliari CAG
Palma de
Mallorca
PAL
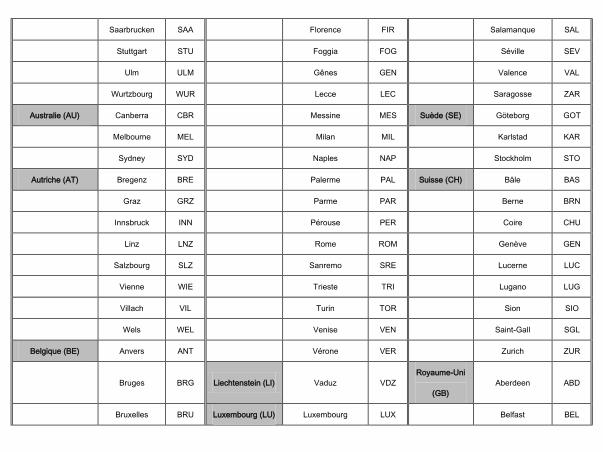
Saarbrucken SAA Florence FIR Salamanque SAL
Stuttgart STU Foggia FOG Séville SEV
Ulm ULM Gênes GEN Valence VAL
Wurtzbourg WUR Lecce LEC Saragosse ZAR
Australie (AU) Canberra CBR Messine MES Suède (SE) Göteborg GOT
Melbourne MEL Milan MIL Karlstad KAR
Sydney SYD Naples NAP Stockholm STO
Autriche (AT) Bregenz BRE Palerme PAL Suisse (CH) Bâle BAS
Graz GRZ Parme PAR Berne BRN
Innsbruck INN Pérouse PER Coire CHU
Linz LNZ Rome ROM Genève GEN
Salzbourg SLZ Sanremo SRE Lucerne LUC
Vienne WIE Trieste TRI Lugano LUG
Villach VIL Turin TOR Sion SIO
Wels WEL Venise VEN Saint-Gall SGL
Belgique (BE) Anvers ANT Vérone VER Zurich ZUR
Bruges BRG Liechtenstein (LI) Vaduz VDZ
Royaume-Uni
(GB)
Aberdeen ABD
Bruxelles BRU Luxembourg (LU) Luxembourg LUX Belfast BEL
Libramont LIB Monaco (MC) Monte-Carlo MCM Birmingham BIR
Liège LIE Pays Bas (NL) Amsterdam AMS Cardiff CAR
Bosnie-Herzégovine
(BA)
Sarajevo SAR Arnhem ARN Glasgow GLW
Croatie (HR) Split SPL Eindhoven EIN Londres LON
Zagreb ZAG Groningen GRO Manchester MAN
Tchèque (CZ) Brin BRN Rotterdam ROT Newcastle NEC
Prague PRG La Haye DHA Plymouth PLY
Denemark (DK) Aalborg ALB
Nouvelle-Zélande
(NZ)
Wellington WLG
États-Unis
(US)
Los Angeles LAX
Copenhague KOB Norvège (NO) Bergen BGN New York NYC
Odense ODE Lillehammer LIL Washington WAS
Finlande (FI) Helsinki HEL Oslo OSL Lituanie (LT) Vilnius VNO
France (FR) Ajaccio AJA Pologne (PL) Cracovie KRA
Bulgarie
(BG)
Sofia SOF
Biarritz BIA Gdansk GDA
Romanie
(RO)
Bucarest BUH
Bordeaux BOR Poznan POZ Chypre (CY) Nicosie NIC
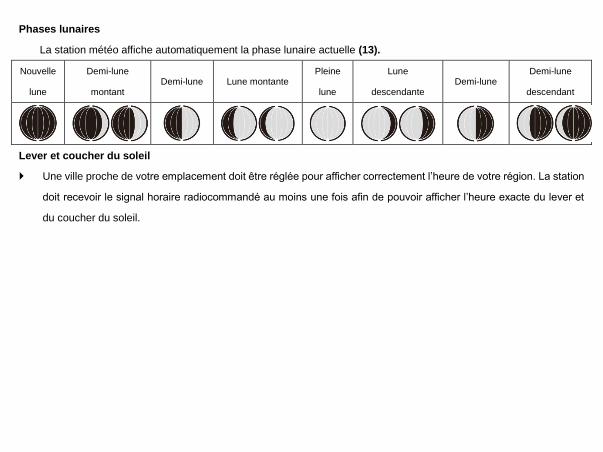
Phases lunaires
La station météo affiche automatiquement la phase lunaire actuelle (13).
Nouvelle
lune
Demi-lune
montant Demi-lune Lune montante
Pleine
lune
Lune
descendante Demi-lune
Demi-lune
descendant
Lever et coucher du soleil
Une ville proche de votre emplacement doit être réglée pour afficher correctement l’heure de votre région. La station
doit recevoir le signal horaire radiocommandé au moins une fois afin de pouvoir afficher l’heure exacte du lever et
du coucher du soleil.

Lecture de la pression atmosphérique des 12 dernières heures
Appuyez plusieurs fois sur la touche HISTORY ABS/REL (38) pour lire les valeurs de la pression atmosphérique
des 12 dernières heures.
0HR = pression barométrique actuelle
-1HR = pression barométrique une heure plus tôt
-2HR = pression barométrique deux heures plus tôt, etc.
……………
-12HR = pression atmosphérique douze heures plus tôt, etc.
Réglage de l’indication de la pression d’air
Les prévisions de cette station météo sont basées sur une analyse du changement de la pression d’air.
La pression atmosphérique (30) est réglée par défaut par rapport à la pression d’air absolue. Comme la pression
d’air diminue généralement avec l’altitude, le service météo public annonce toujours la soi-disant pression d’air
relative. Cette pression d'air relative est ajustée à la topographie du pays afin d’obtenir des valeurs comparables.
Vous pouvez ajuster la pression de votre station météo à la proportion de son emplacement. Pour cela, vous devez
ajuster votre station météo uniquement à la pression d’air actuelle. Demandez à votre service local des prévisions
météo, la pression atmosphérique au niveau de la mer ou recherchez la valeur actuelle sur Internet.
Vous pouvez ajuster la station météo en suivant la procédure ci-dessous :
Maintenez appuyée la touche HISTORY ABS/REL (38) pendant environ 3 secondes. Utilisez ensuite les
touches + (35)/- (36) pour permuter entre la pression d’air absolue et relative.
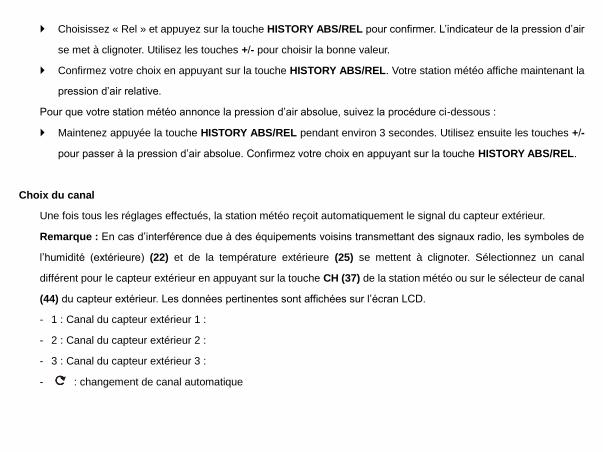
Choisissez « Rel » et appuyez sur la touche HISTORY ABS/REL pour confirmer. L’indicateur de la pression d’air
se met à clignoter. Utilisez les touches +/- pour choisir la bonne valeur.
Confirmez votre choix en appuyant sur la touche HISTORY ABS/REL. Votre station météo affiche maintenant la
pression d’air relative.
Pour que votre station météo annonce la pression d’air absolue, suivez la procédure ci-dessous :
Maintenez appuyée la touche HISTORY ABS/REL pendant environ 3 secondes. Utilisez ensuite les touches +/-
pour passer à la pression d’air absolue. Confirmez votre choix en appuyant sur la touche HISTORY ABS/REL.
Choix du canal
Une fois tous les réglages effectués, la station météo reçoit automatiquement le signal du capteur extérieur.
Remarque : En cas d’interférence due à des équipements voisins transmettant des signaux radio, les symboles de
l’humidité (extérieure) (22) et de la température extérieure (25) se mettent à clignoter. Sélectionnez un canal
différent pour le capteur extérieur en appuyant sur la touche CH (37) de la station météo ou sur le sélecteur de canal
(44) du capteur extérieur. Les données pertinentes sont affichées sur l’écran LCD.
- 1 : Canal du capteur extérieur 1 :
- 2 : Canal du capteur extérieur 2 :
- 3 : Canal du capteur extérieur 3 :
- : changement de canal automatique
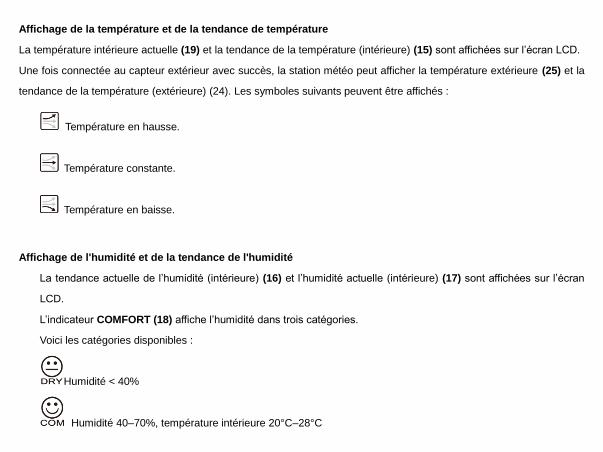
Affichage de la température et de la tendance de température
La température intérieure actuelle (19) et la tendance de la température (intérieure) (15) sont affichées sur l’écran LCD.
Une fois connectée au capteur extérieur avec succès, la station météo peut afficher la température extérieure (25) et la
tendance de la température (extérieure) (24). Les symboles suivants peuvent être affichés :
Température en hausse.
Température constante.
Température en baisse.
Affichage de l'humidité et de la tendance de l'humidité
La tendance actuelle de l’humidité (intérieure) (16) et l’humidité actuelle (intérieure) (17) sont affichées sur l’écran
LCD.
L’indicateur COMFORT (18) affiche l’humidité dans trois catégories.
Voici les catégories disponibles :
Humidité < 40%
Humidité 40–70%, température intérieure 20°C–28°C
Humidité > 70%
Une fois connectée au capteur extérieur avec succès, la station météo affiche la tendance de l’humidité (extérieure)
(21) et l’humidité (extérieure) (22) sur l’écran LCD.
Affichage de la température/humidité maximale/minimale
La température et l'humidité maximale/minimale sont mesurées pour la première fois après l’installation des piles et
mémorisées dans la station météo.
Les valeurs maximales et minimales de la température, humidité et pression atmosphérique sont automatiquement
mémorisées.
Si la station météo est en mode affichage de l’heure (7), utilisez la touche + (35) pour afficher les valeurs
maximales.
Appuyez deux fois sur la touche + pour afficher les valeurs minimales.
Maintenez appuyée la touche + pendant environ 3 secondes pour effacer les valeurs maximales et minimales
mémorisées.
Alarme de température et de gel
L’alarme de température est signalée par un bip court, qui est émis dès que la température extérieure devient supérieure
ou inférieure à la plage de température prédéfinie. Suivez les procédures ci-dessous pour régler la plage de température.
Appuyez sur la touche - (36) pour passer en mode alarme de température.
Maintenez appuyée la touche - pendant 3 secondes. La température maximale se met à clignoter. Utilisez les
touches +/- pour régler les valeurs.
Appuyez sur la touche MODE (34) pour confirmer votre réglage. La température minimale se met à clignoter.
Utilisez les touches +/- pour régler les valeurs.
Appuyez sur la touche MODE pour confirmer votre réglage.
Activer/désactiver l’alarme de température et de gel
Si plus d’un capteur extérieur est activé, appuyez sur la touche CH (37) pour en sélectionner un.
Appuyez plusieurs fois sur la touche - (36) pour activer les alarmes de température et de gel.
Si l’alarme de gel est activée, le symbole correspondant (23) apparaît à côté de la température extérieure. Le signal
d’alarme se déclenche entre -1°C et + 3°C.
Si l’alarme de température est activée, le symbole correspondant apparaît à côté de la température extérieure. Le signal
d’alarme se déclenche aux valeurs définies.
Si les alarmes de température et de gel sont activées, les deux symboles apparaissent à l’écran.
Rétroéclairage
Appuyez sur la touche RAPPEL D’ALARME/RÉTROÉCLAIRAGE (33). Le rétroéclairage reste allumé pendant
5 secondes.
Affichage de l'état des piles
L’état des piles (20), (26) apparaît si les piles sont faibles. Veillez à remplacer les piles le plus tôt possible (voir
« Remplacement des piles »).
Remplacement des piles
Station Météo :
Remplacez les piles si l’écran LCD devient illisible ou si l’état des piles (20) est affiché.
Enlevez le couvercle du compartiment à piles situé à l'arrière de la station météo.
Retirez les piles usées. Insérez 2 piles neuves AA, 1,5 V.
Remarque : Respectez les polarités lors de l’insertion des piles. Les polarités sont indiquées à l’intérieur du
compartiment à piles (40).
Fermez le compartiment à piles.
Capteur extérieur:
Remplacez les piles si l’état des piles (26) est affiché.
Enlevez le couvercle du compartiment à piles situé à l'arrière du capteur extérieur.
Retirez les piles usées.
Insérez 2 piles neuves AA, 1,5 V.
Remarque : Assurez-vous que les piles sont insérées en respectant les polarités. Les polarités sont indiquées à
l’intérieur du compartiment à piles (45).
Fermez le compartiment à piles.
Effets de l'environnement sur la réception
La station utilise la technologie sans fil pour obtenir l'heure précise. Comme pour tout appareil sans fil, la réception peut
être affectée dans les cas suivants :
Distance de transmission longue.
Montagnes et vallées toutes proches
Près d'autoroutes, chemins de fer, aéroports, câbles à haute tension, etc.
À proximité d'un chantier de construction
Entouré de bâtiments élevés.
À l'intérieur de bâtiments en béton.
À proximité d'appareils électriques (ordinateurs, téléviseurs, etc.) et de structures métalliques
À l'intérieur de véhicules mobiles.
Placez votre station météo dans un endroit avec des signaux optimaux, par exemple près d'une fenêtre, loin des
surfaces métalliques et des appareils électriques.
Précautions
Cet appareil n'est destiné qu'à une utilisation intérieure. Le capteur extérieur est destiné à être utilisé à l’extérieur.
Ne soumettez pas l'appareil à une force ou à un choc excessif.
N'exposez pas l'appareil à la lumière directe du soleil, à des températures extrêmes, à l'humidité ou à la poussière.
Ne plongez pas l'appareil dans l'eau.
Évitez de le mettre en contact avec des matériaux corrosifs.
Ne jetez pas cet appareil au feu, il risque d'exploser.
N'ouvrez pas le panneau arrière et n'apportez aucune modification aux composants de cette unité.
Avertissements de sécurité concernant les piles
Utilisez uniquement des piles alcalines non rechargeables.
Installez les piles en respectant les polarités (+/–).
Remplacez toujours toutes les piles en même temps.
Ne mélangez pas des piles usagées avec des piles neuves.
Lorsque les piles sont déchargées, les retirer immédiatement de l'appareil.
Retirez les piles lorsque vous n'allez pas utiliser l'appareil.
N'essayez pas de recharger des piles qui ne sont pas rechargeables et ne jetez aucune pile au feu, elle risque
d'exploser.
Rangez vos piles de façon à ce qu'aucun objet métallique ne puisse causer de court-circuit.
Évitez d'exposer les piles à des températures extrêmes, à l'humidité ou à la lumière directe du soleil.
Conservez vos piles hors de la portée des enfants. Elles présentent un risque d'étouffement.
N'utilisez cet appareil que pour l'usage auquel il est destiné !
Obligation légale concernant la mise au rebut des piles
Ne jetez pas les piles usagées avec les ordures ménagères, car elles sont nuisibles à la santé et à
l'environnement. Vous pouvez ramener les piles usagées sans frais à votre revendeur et aux points de
collecte. En tant que consommateur, vous êtes obligés par la loi de ramener les piles usagées aux
revendeurs et aux points de collecte !
Respect de l'obligation de la loi sur les appareils électriques
Ce symbole signifie que les appareils électriques ne doivent pas être jetés aux ordures ménagères à la
fin de leur vie utile. Ramenez votre appareil à un point de collecte de déchets ou à un centre de
recyclage local. Ceci s'applique à tous les pays de l'Union européenne et aux autres pays européens
disposant d'un système de collecte sélectif des déchets.
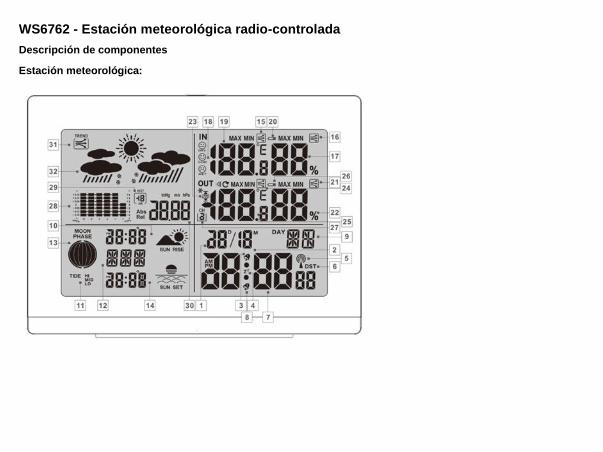
WS6762 - Estación meteorológica radio-controlada
Descripción de componentes
Estación meteorológica:


PANTALLA
1- Pantalla de fecha 2- Indicación del mes
3- Alarma 1 4- Indicación de retardo de alarma
5- Símbolo de torre de radio 6- Indicación DST (horario de verano)
7- Presentación de la hora 8- Alarma 2
9- Presentación del día de la semana 10- Amanecer/hora del orto
11- Indicación de la marea 12- Localización

13- Fase lunar 14- Apagado/hora de apagado
15- Tendencia de temperatura (interiores) 16- Tendencia de humedad (interiores)
17- Humedad (interiores) 18- Indicador de confort
19- Temperatura interior (°C/°F) 20- Pantalla de estado de las pilas
21- Tendencia de humedad (exteriores) 22- Humedad (exteriores)
23- Alarma de temperatura y congelación (máx./mín.) 24- Tendencia de temperatura (exteriores)
25- Temperatura exterior (°C/°F) 26- Indicación del estado de la batería (sensor exterior)
27- Canal seleccionado 28- Gráfico de barras de presión barométrica
29- Presentación de la presión barométrica en la última
hora
30- Presión barométrica absoluta/relativa
31- Tendencia de la presión barométrica 32- Previsión meteorológica
Exterior
33- Botón LUZ/RETARDO DE ALARMA 34- Botón MODE
35- Botón + 36- Botón -
37- Botón de selección de canal (CH) 38- Botón HISTORY ABS/REL
39- Botón CITY 40- Compartimento de las pilas
Sensor exterior:
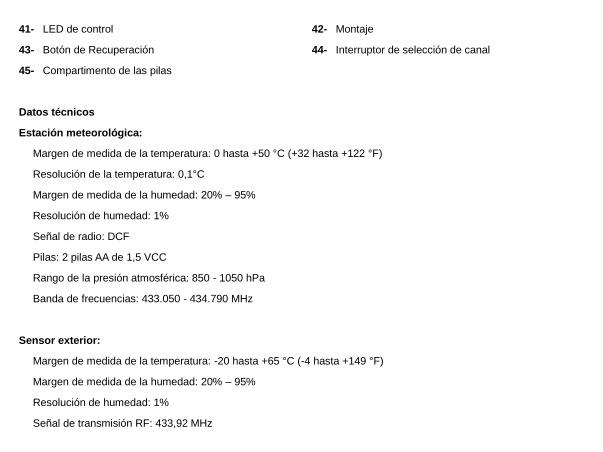
41- LED de control 42- Montaje
43- Botón de Recuperación 44- Interruptor de selección de canal
45- Compartimento de las pilas
Datos técnicos
Estación meteorológica:
Margen de medida de la temperatura: 0 hasta +50 °C (+32 hasta +122 °F)
Resolución de la temperatura: 0,1°C
Margen de medida de la humedad: 20% – 95%
Resolución de humedad: 1%
Señal de radio: DCF
Pilas: 2 pilas AA de 1,5 VCC
Rango de la presión atmosférica: 850 - 1050 hPa
Banda de frecuencias: 433.050 - 434.790 MHz
Sensor exterior:
Margen de medida de la temperatura: -20 hasta +65 °C (-4 hasta +149 °F)
Margen de medida de la humedad: 20% – 95%
Resolución de humedad: 1%
Señal de transmisión RF: 433,92 MHz
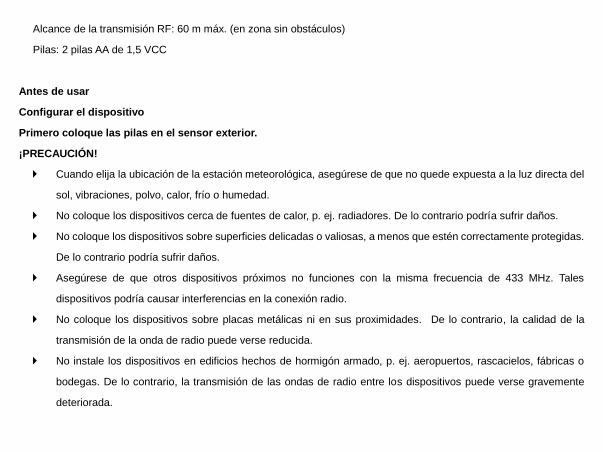
Alcance de la transmisión RF: 60 m máx. (en zona sin obstáculos)
Pilas: 2 pilas AA de 1,5 VCC
Antes de usar
Configurar el dispositivo
Primero coloque las pilas en el sensor exterior.
¡PRECAUCIÓN!
Cuando elija la ubicación de la estación meteorológica, asegúrese de que no quede expuesta a la luz directa del
sol, vibraciones, polvo, calor, frío o humedad.
No coloque los dispositivos cerca de fuentes de calor, p. ej. radiadores. De lo contrario podría sufrir daños.
No coloque los dispositivos sobre superficies delicadas o valiosas, a menos que estén correctamente protegidas.
De lo contrario podría sufrir daños.
Asegúrese de que otros dispositivos próximos no funciones con la misma frecuencia de 433 MHz. Tales
dispositivos podría causar interferencias en la conexión radio.
No coloque los dispositivos sobre placas metálicas ni en sus proximidades. De lo contrario, la calidad de la
transmisión de la onda de radio puede verse reducida.
No instale los dispositivos en edificios hechos de hormigón armado, p. ej. aeropuertos, rascacielos, fábricas o
bodegas. De lo contrario, la transmisión de las ondas de radio entre los dispositivos puede verse gravemente
deteriorada.
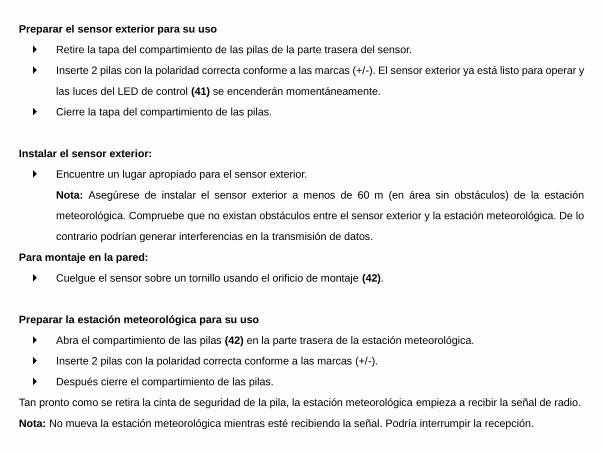
Preparar el sensor exterior para su uso
Retire la tapa del compartimiento de las pilas de la parte trasera del sensor.
Inserte 2 pilas con la polaridad correcta conforme a las marcas (+/-). El sensor exterior ya está listo para operar y
las luces del LED de control (41) se encenderán momentáneamente.
Cierre la tapa del compartimiento de las pilas.
Instalar el sensor exterior:
Encuentre un lugar apropiado para el sensor exterior.
Nota: Asegúrese de instalar el sensor exterior a menos de 60 m (en área sin obstáculos) de la estación
meteorológica. Compruebe que no existan obstáculos entre el sensor exterior y la estación meteorológica. De lo
contrario podrían generar interferencias en la transmisión de datos.
Para montaje en la pared:
Cuelgue el sensor sobre un tornillo usando el orificio de montaje (42).
Preparar la estación meteorológica para su uso
Abra el compartimiento de las pilas (42) en la parte trasera de la estación meteorológica.
Inserte 2 pilas con la polaridad correcta conforme a las marcas (+/-).
Después cierre el compartimiento de las pilas.
Tan pronto como se retira la cinta de seguridad de la pila, la estación meteorológica empieza a recibir la señal de radio.
Nota: No mueva la estación meteorológica mientras esté recibiendo la señal. Podría interrumpir la recepción.
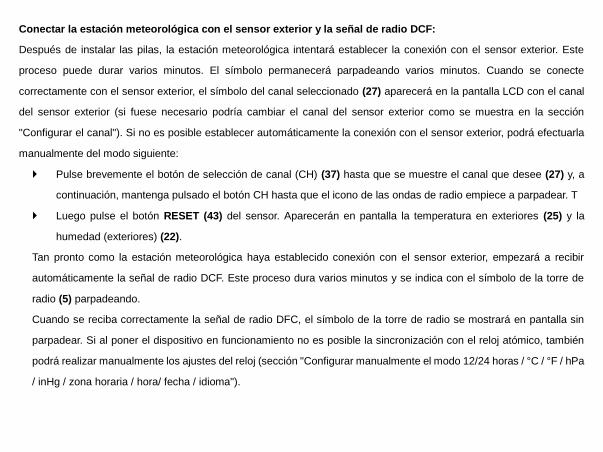
Conectar la estación meteorológica con el sensor exterior y la señal de radio DCF:
Después de instalar las pilas, la estación meteorológica intentará establecer la conexión con el sensor exterior. Este
proceso puede durar varios minutos. El símbolo permanecerá parpadeando varios minutos. Cuando se conecte
correctamente con el sensor exterior, el símbolo del canal seleccionado (27) aparecerá en la pantalla LCD con el canal
del sensor exterior (si fuese necesario podría cambiar el canal del sensor exterior como se muestra en la sección
"Configurar el canal"). Si no es posible establecer automáticamente la conexión con el sensor exterior, podrá efectuarla
manualmente del modo siguiente:
Pulse brevemente el botón de selección de canal (CH) (37) hasta que se muestre el canal que desee (27) y, a
continuación, mantenga pulsado el botón CH hasta que el icono de las ondas de radio empiece a parpadear. T
Luego pulse el botón RESET (43) del sensor. Aparecerán en pantalla la temperatura en exteriores (25) y la
humedad (exteriores) (22).
Tan pronto como la estación meteorológica haya establecido conexión con el sensor exterior, empezará a recibir
automáticamente la señal de radio DCF. Este proceso dura varios minutos y se indica con el símbolo de la torre de
radio (5) parpadeando.
Cuando se reciba correctamente la señal de radio DFC, el símbolo de la torre de radio se mostrará en pantalla sin
parpadear. Si al poner el dispositivo en funcionamiento no es posible la sincronización con el reloj atómico, también
podrá realizar manualmente los ajustes del reloj (sección "Configurar manualmente el modo 12/24 horas / °C / °F / hPa
/ inHg / zona horaria / hora/ fecha / idioma").
Señal de radio (DCF):
La señal DFC (transmisor de señal horaria) consiste en pulsos horarios transmitidos por uno de los relojes más
precisos del mundo, próximo a Frankfurt / Main, Alemania.
En condiciones ideales, su estación meteorológica puede recibir esta señal a una distancia de hasta 2000 km aprox.
desde Franckfurt/Main. La recepción de la señal de radio tarda aprox. de 3 a 10 minutos.
La recepción puede verse reducida considerablemente por los obstáculos (p. ej. paredes de cemento) o fuentes de
interferencia (p. ej. otros dispositivos eléctricos). En el caso de tener problemas de recepción, cambie la ubicación de
la estación meteorológica (p. ej. cerca de la ventana).
Funcionamiento
Recibir la señal horaria de radio DCF
Después de establecer la conexión con el sensor exterior o 3 minutos después de instalar las pilas, la estación
meteorológica inicia la búsqueda de la señal de radio DCF. La búsqueda se muestra en la pantalla LCD mediante el
símbolo de la torre de radio (5) parpadeando.
Nota: En los edificios hechos de cemento armado la recepción de la señal de radio puede verse gravemente
deteriorada (consulte "configurar los dispositivos").
Para corregir las pequeñas desviaciones de la hora exacta, el reloj se sincroniza automáticamente con la señal de
radio DCF todos los días a las 01:00, 02:00 y 03:00.
La recepción de las señales de radio DCF también puede iniciarse manualmente desde la estación meteorológica.
Use los botones + y – (35), (36) simultáneamente. La estación meteorológica intentará recibir la señal de radio
DCF. Este proceso dura varios minutos y se indica con el símbolo de la torre de radio parpadeando.
Si no puede establecer la conexión con la señal de radio DCF, la búsqueda se parará.
Nota: Si el reloj de la estación meteorológica no puede recibir la señal de radio DCF debido a errores, una distancia
demasiado grande del transmisor o razones similares, no será posible ajustar la hora manualmente. Si la recepción
de la señal DCF es correcta, la configuración manual será inválida.
Ajustes manuales
La recepción de la señal de radio DCF en el lugar donde se ha ubicado la estación puede llegar a degradarse o
interrumpirse. Si esto ocurre es posible ajustar manualmente el dispositivo.
Siga los pasos siguientes:
1. Mantenga pulsado el botón MODE (34) durante unos 3 segundos. “12Hr” o “24Hr” parpadeará en la pantalla.
Pulse el botón + o – (35), (36) para eligir el formato de la hora deseado.
2. Confirme los ajustes realizados pulsando el botón MODE. La unidad de temperatura “°C” o “°F” parpadeará en
la pantalla. Pulse el botón + o – para eligir la unidad de temperatura que desee.
3. Confirme los ajustes realizados pulsando el botón MODE. La unidad de la presión barométrica parpadeará en
la pantalla. Pulse el botón + o – para eligir la unidad que desee (hPa/inHg).
4. Confirme los ajustes realizados pulsando el botón MODE. El indicador de la zona horario parpadeará en la
pantalla. Pulse el botón + o – para establecer el valor que desee (-2 hasta +2). Es posible ajustar la hora
manualmente a la zona horario del país en el que el reloj recibe la señal DCF pero la hora real será diferente de
la hora recibida. Si, por ejemplo, la hora de una zona dada es una hora antes de la hora alemana, fija la pantalla
de zona horaria en 01. El reloj está hora controlado por DFC pero el reloj indicará una hora más.
5. Confirme los ajustes realizados pulsando el botón MODE. El valor de las horas parpadeará en la pantalla de la
hora. Pulse el botón + o – para establecer el valor que desee.
6. Confirme los ajustes realizados pulsando el botón MODE. Los dígitos de los minutos parpadearán en la
pantalla de la hora. Pulse el botón + o – para establecer el valor que desee.
7. Confirme los ajustes realizados pulsando el botón MODE. El indicador del año parpadeará en la pantalla de la
hora. Pulse el botón + o – para establecer el valor que desee.
8. Confirme los ajustes realizados pulsando el botón MODE. El indicador del mes parpadeará en la pantalla de la
fecha (1). Pulse el botón + o – para establecer el valor que desee.
9. Confirme los ajustes realizados pulsando el botón MODE. El indicador del día parpadeará en la pantalla de la
fecha. Pulse el botón + o – para establecer el valor que desee.
10. Confirme los ajustes realizados pulsando el botón MODE. En el lugar de la presentación del día de la semana
(9), parpadeará el indicador del idioma. Pulse el botón + o – para seleccionar el idioma que desee.
11. Confirme los ajustes realizados pulsando el botón MODE.
Notas:
Mantenga pulsado el botón + o – para acelerar el ajuste de los valores.
Si no pulsa ningún botón en 20 segundos, la LCD cambiará automáticamente a la presentación normal.
El símbolo AM en la pantalla (7) indica antes del mediodía en el modo de 12 horas. El símbolo PM en la pantalla
indica después del mediodía en el modo de 12 horas.
Tendrá la elección entre alemán (GE), inglés (EN), italiano (IT), francés (FR) y español (SP) (el alemán es el idioma
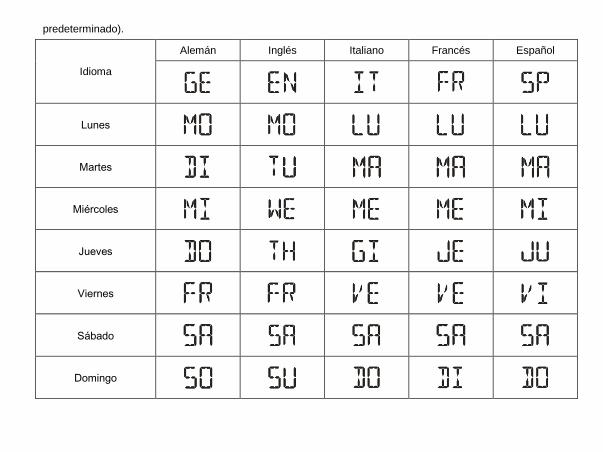
predeterminado).
Idioma
Alemán Inglés Italiano Francés Español
Lunes
Martes
Miércoles
Jueves
Viernes
Sábado
Domingo
Configurar la hora de la alarma
1. Pulse el botón MODE (34) para cambiar desde la pantalla de la hora a la pantalla de la ALARMA 1.
2. Mantenga pulsado el botón MODE durante 2 segundos y aparecerá parpadeando la hora de la alarma
3. La pantalla de la hora de la hora de la alarma parpadea. Use el botón + o – (35), (36) para seleccionar la hora.
4. Pulse el botón MODE para confirmar.
5. Los minutos de la hora de alarma parpadearán. Use el botón + o – para seleccionar los minutos.
6. Pulse el botón MODE para confirmar.
7. Pulse el botón MODE (34) para cambiar desde la pantalla de la ALARMA 1 a la de la ALARMA 2
8. La secuencia de ajuste para la alarma 2 es la misma que la de la alarma 1.
Nota: Mantenga pulsado el botón + o – para acelerar el ajuste de los valores.
Activar / desactivar la función de alarma
1. Pulse brevemente el botón MODE (34) una o dos veces para acceder al modo de ALARMA 1 o ALARMA 2.
2. Pulse el botón + (35). En la pantalla LCD aparecerá el símbolo de la ALARMA 1 (3) o el de la ALARMA 2 (8). La
alarma ha sido activada.
3. Vuelva a pulsar el botón +. El símbolo de la ALARMA 1 o ALARMA 2 desaparece de la pantalla LCD. La alarma
ha sido desactivada.
Apagar la señal de alarma
Cuando suene la alarma, pulse cualquier botón excepto el botón de Retardo de alarma / LUZ (33), para que la
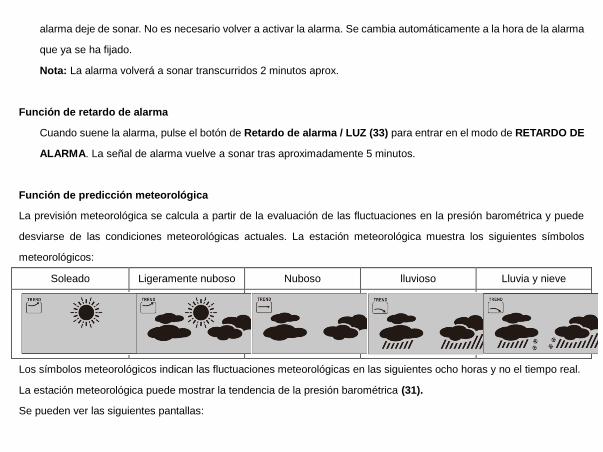
alarma deje de sonar. No es necesario volver a activar la alarma. Se cambia automáticamente a la hora de la alarma
que ya se ha fijado.
Nota: La alarma volverá a sonar transcurridos 2 minutos aprox.
Función de retardo de alarma
Cuando suene la alarma, pulse el botón de Retardo de alarma / LUZ (33) para entrar en el modo de RETARDO DE
ALARMA. La señal de alarma vuelve a sonar tras aproximadamente 5 minutos.
Función de predicción meteorológica
La previsión meteorológica se calcula a partir de la evaluación de las fluctuaciones en la presión barométrica y puede
desviarse de las condiciones meteorológicas actuales. La estación meteorológica muestra los siguientes símbolos
meteorológicos:
Soleado Ligeramente nuboso Nuboso lluvioso Lluvia y nieve
Los símbolos meteorológicos indican las fluctuaciones meteorológicas en las siguientes ocho horas y no el tiempo real.
La estación meteorológica puede mostrar la tendencia de la presión barométrica (31).
Se pueden ver las siguientes pantallas:
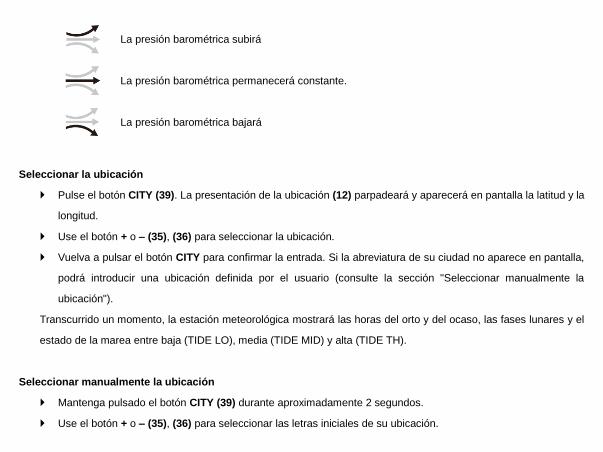
La presión barométrica subirá
La presión barométrica permanecerá constante.
La presión barométrica bajará
Seleccionar la ubicación
Pulse el botón CITY (39). La presentación de la ubicación (12) parpadeará y aparecerá en pantalla la latitud y la
longitud.
Use el botón + o – (35), (36) para seleccionar la ubicación.
Vuelva a pulsar el botón CITY para confirmar la entrada. Si la abreviatura de su ciudad no aparece en pantalla,
podrá introducir una ubicación definida por el usuario (consulte la sección "Seleccionar manualmente la
ubicación").
Transcurrido un momento, la estación meteorológica mostrará las horas del orto y del ocaso, las fases lunares y el
estado de la marea entre baja (TIDE LO), media (TIDE MID) y alta (TIDE TH).
Seleccionar manualmente la ubicación
Mantenga pulsado el botón CITY (39) durante aproximadamente 2 segundos.
Use el botón + o – (35), (36) para seleccionar las letras iniciales de su ubicación.
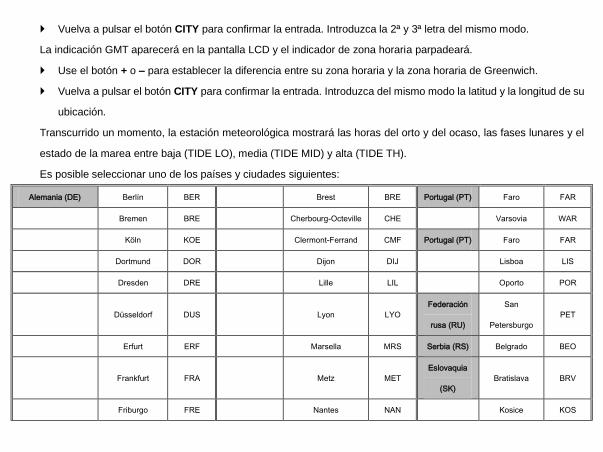
Vuelva a pulsar el botón CITY para confirmar la entrada. Introduzca la 2ª y 3ª letra del mismo modo.
La indicación GMT aparecerá en la pantalla LCD y el indicador de zona horaria parpadeará.
Use el botón + o – para establecer la diferencia entre su zona horaria y la zona horaria de Greenwich.
Vuelva a pulsar el botón CITY para confirmar la entrada. Introduzca del mismo modo la latitud y la longitud de su
ubicación.
Transcurrido un momento, la estación meteorológica mostrará las horas del orto y del ocaso, las fases lunares y el
estado de la marea entre baja (TIDE LO), media (TIDE MID) y alta (TIDE TH).
Es posible seleccionar uno de los países y ciudades siguientes:
Alemania (DE) Berlín BER Brest BRE Portugal (PT) Faro FAR
Bremen BRE Cherbourg-Octeville CHE Varsovia WAR
Köln KOE Clermont-Ferrand CMF Portugal (PT) Faro FAR
Dortmund DOR Dijon DIJ Lisboa LIS
Dresden DRE Lille LIL Oporto POR
Düsseldorf DUS Lyon LYO
Federación
rusa (RU)
San
Petersburgo
PET
Erfurt ERF Marsella MRS Serbia (RS) Belgrado BEO
Frankfurt FRA Metz MET
Eslovaquia
(SK)
Bratislava BRV
Friburgo FRE Nantes NAN Kosice KOS
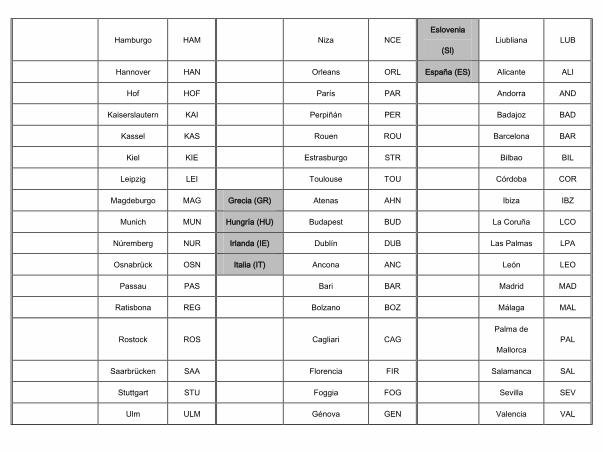
Hamburgo HAM Niza NCE
Eslovenia
(Sl)
Liubliana LUB
Hannover HAN Orleans ORL España (ES) Alicante ALI
Hof HOF París PAR Andorra AND
Kaiserslautern KAI Perpiñán PER Badajoz BAD
Kassel KAS Rouen ROU Barcelona BAR
Kiel KIE Estrasburgo STR Bilbao BIL
Leipzig LEI Toulouse TOU Córdoba COR
Magdeburgo MAG Grecia (GR) Atenas AHN Ibiza IBZ
Munich MUN Hungría (HU) Budapest BUD La Coruña LCO
Núremberg NUR Irlanda (IE) Dublín DUB Las Palmas LPA
Osnabrück OSN Italia (IT) Ancona ANC León LEO
Passau PAS Bari BAR Madrid MAD
Ratisbona REG Bolzano BOZ Málaga MAL
Rostock ROS Cagliari CAG
Palma de
Mallorca
PAL
Saarbrücken SAA Florencia FIR Salamanca SAL
Stuttgart STU Foggia FOG Sevilla SEV
Ulm ULM Génova GEN Valencia VAL
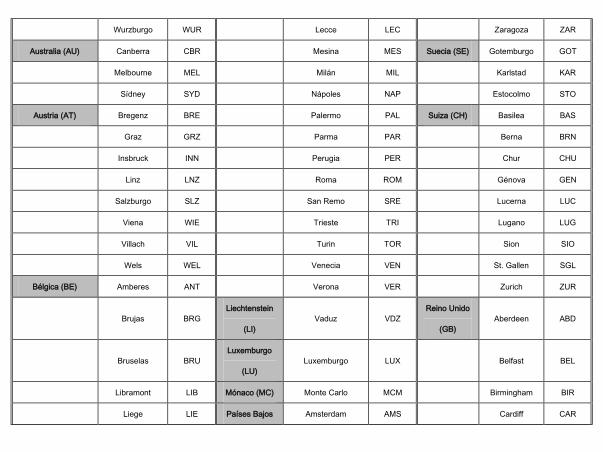
Wurzburgo WUR Lecce LEC Zaragoza ZAR
Australia (AU) Canberra CBR Mesina MES Suecia (SE) Gotemburgo GOT
Melbourne MEL Milán MIL Karlstad KAR
Sídney SYD Nápoles NAP Estocolmo STO
Austria (AT) Bregenz BRE Palermo PAL Suiza (CH) Basilea BAS
Graz GRZ Parma PAR Berna BRN
Insbruck INN Perugia PER Chur CHU
Linz LNZ Roma ROM Génova GEN
Salzburgo SLZ San Remo SRE Lucerna LUC
Viena WIE Trieste TRI Lugano LUG
Villach VIL Turin TOR Sion SIO
Wels WEL Venecia VEN St. Gallen SGL
Bélgica (BE) Amberes ANT Verona VER Zurich ZUR
Brujas BRG
Liechtenstein
(LI)
Vaduz VDZ
Reino Unido
(GB)
Aberdeen ABD
Bruselas BRU
Luxemburgo
(LU)
Luxemburgo LUX Belfast BEL
Libramont LIB Mónaco (MC) Monte Carlo MCM Birmingham BIR
Liege LIE Países Bajos Amsterdam AMS Cardiff CAR
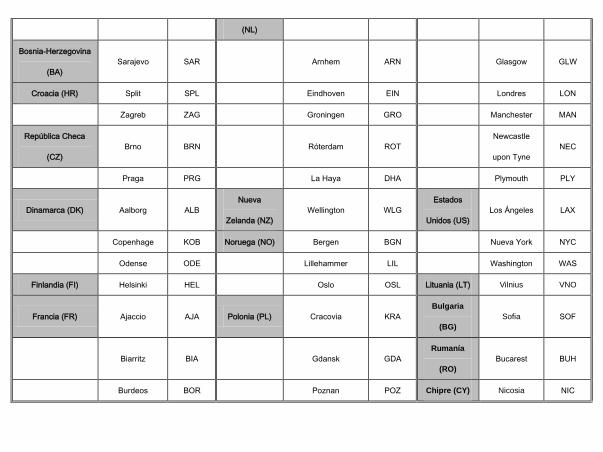
(NL)
Bosnia-Herzegovina
(BA)
Sarajevo SAR Arnhem ARN Glasgow GLW
Croacia (HR) Split SPL Eindhoven EIN Londres LON
Zagreb ZAG Groningen GRO Manchester MAN
República Checa
(CZ)
Brno BRN Róterdam ROT
Newcastle
upon Tyne
NEC
Praga PRG La Haya DHA Plymouth PLY
Dinamarca (DK) Aalborg ALB
Nueva
Zelanda (NZ)
Wellington WLG
Estados
Unidos (US)
Los Ángeles LAX
Copenhage KOB Noruega (NO) Bergen BGN Nueva York NYC
Odense ODE Lillehammer LIL Washington WAS
Finlandia (FI) Helsinki HEL Oslo OSL Lituania (LT) Vilnius VNO
Francia (FR) Ajaccio AJA Polonia (PL) Cracovia KRA
Bulgaria
(BG)
Sofia SOF
Biarritz BIA Gdansk GDA
Rumanía
(RO)
Bucarest BUH
Burdeos BOR Poznan POZ Chipre (CY) Nicosia NIC
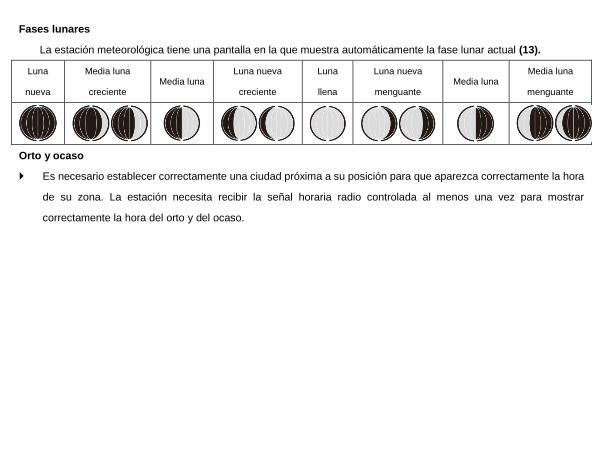
Fases lunares
La estación meteorológica tiene una pantalla en la que muestra automáticamente la fase lunar actual (13).
Luna
nueva
Media luna
creciente Media luna
Luna nueva
creciente
Luna
llena
Luna nueva
menguante Media luna
Media luna
menguante
Orto y ocaso
Es necesario establecer correctamente una ciudad próxima a su posición para que aparezca correctamente la hora
de su zona. La estación necesita recibir la señal horaria radio controlada al menos una vez para mostrar
correctamente la hora del orto y del ocaso.

Leer la presión barométrica de las últimas 12 horas
Pulse el botón HISTORY ABS/REL (38) varias veces para leer los valores de la presión de las últimas 12 horas.
0HR = presión barométrica presente
–1HR = presión barométrica una hora antes
–2HR = presión barométrica dos horas antes, etc.
……………
–12HR = presión barométrica doce horas antes, etc.
Ajustar la indicación de la presión atmosférica
La predicción de esta estación meteorológica se basa en el análisis del cambio de la presión atmosférica.
La presión barométrica (30) viene ajustada de fábrica a la presión atmosférica absoluta. Ya que la presión
atmosférica normalmente decrece con la altura desde el nivel del mar, los servicios públicos de información
meteorológica informan de la denominada presión atmosférica relativa. Esta presión atmosférica relativa se ajusta a
la topografía del país para obtener valores comparable.
Es posible ajustar la presión atmosférica de su estación meteorológica en la proporción de su ubicación. Para eso
tendrá que ajustar solamente la presión atmosférica actual de su estación meteorológica. Pregunte a su servicio
meteorológico local cuál es la presión barométrica a nivel del mar o consiga el valor actual en Internet.
Puede ajustar su estación meteorológica del modo siguiente:
Mantenga pulsado el botón HISTORY ABS/REL (38) durante unos 3 segundos. Después use el botón + o – (35),
(36), para intercambiar entre la presión atmosférica absoluta o relativa.
Elija “Rel” y vuelva a pulsar el botón HISTORY ABS/REL para confirmar. La indicación de la presión atmosférica
parpadeará. Ahora podrá ajustar al valor correcto pulsando el botón + o –.
Confirme los ajustes realizados pulsando el botón HISTORY ABS/REL. Ahora su estación meteorológica
mostrará la presión atmosférica relativa.
Si desea que su estación meteorológica muestre la presión atmosférica absoluta, proceda del modo siguiente:
Mantenga pulsado el botón HISTORY ABS/REL durante unos 3 segundos. A continuación, use el botón + o –,
para cambiar a la presión atmosférica absoluta. Confirme pulsando el botón HISTORY ABS/REL.
Configuración del canal
Después de efectuar todos los ajustes, la estación meteorológica recibe automáticamente la señal del sensor
exterior.
Nota: En el caso de recibir interferencias desde un equipo próximo que transmita señales de radio, el símbolo de
humedad (exteriores) (22) y temperatura exterior (25) parpadeará mientras esto ocurra. Seleccione un canal
diferente para el sensor exterior pulsando el botón CH (37) en la estación meteorológica o el interruptor de selección
de canal (44) en el sensor exterior. Los datos relevantes se mostrarán en la pantalla LCD.
- 1: Canal 1 del sensor exterior
- 2: Canal 2 del sensor exterior
- 3: Canal 3 del sensor exterior
- : Cambio automático de canal
Mostrar la temperatura y la tendencia de la temperatura
La temperatura actual en interiores (19) y la tendencia de la temperatura (interiores) (15) se muestra en la pantalla LCD.
Después de conectar correctamente con el sensor exterior, la estación meteorológica podrá mostrar la temperatura en
exteriores (25) y la tendencia de la temperatura (exteriores) (24). Podrá ver lo siguiente:
La temperatura está subiendo.
La temperatura permanece constante.
La temperatura está bajando.
Mostrar la humedad y la tendencia de la humedad
La humedad actual en interiores (16) y la tendencia de la humedad (interiores) (17) se muestra en la pantalla LCD.
El indicador de CONFORT (18) muestra la humedad en tres categorías.
Las categorías disponibles son las siguientes:
Humedad < 40%
Humedad entre 40 y 70%, temperatura en interiores entre 20 °C – 28 °C
Humedad > 70%
Después de conectarse correctamente con el sensor exterior, la estación meteorológica mostrará la tendencia de la
humedad (exteriores) (21) y la humedad (exteriores) (22) en la pantalla LCD.
Mostrar la temperatura/humedad máxima y mínima
La temperatura/humedad máxima y mínima se miden y guardan por primera vez después de colocar las pilas en la
estación meteorológica.
Los valores máximo y mínimo de la temperatura, del higrómetro y de la presión barométrica se guardan
automáticamente.
Si la estación meteorológica está en la pantalla que muestra la hora (7), pulse el botón + (35) para ver los valores
máximos.
Pulse el botón + dos veces consecutivas para ver los valores mínimos.
Mantenga pulsado el botón + durante unos 3 segundos para borrar los valores máximos y mínimos guardados.
Alarma de temperatura y congelación
La alarma de temperatura es una aviso sonoro corto, que se activará tan pronto como la temperatura en exteriores supere
o caiga por debajo de rango de temperaturas preestablecido. Siga el procedimiento siguiente para establecer el rango de
temperaturas deseado.
Pulse el botón – (36) para acceder al modo de alarma de temperatura.
Mantenga pulsado el botón – durante 3 segundos. La temperatura máxima parpadeará en la pantalla. Use el
botón + o – para establecer el valor que desee.
Pulse el botón MODE (34) para confirmar el ajuste. La temperatura mínima parpadeará en la pantalla. Use el
botón + o – para establecer el valor que desee.
Pulse el botón MODE (34) para confirmar el ajuste.
Activar/desactivar la alarma de temperatura y congelación
Si tiene más de un sensor de exterior activado, use el botón CH (37) para seleccionar uno.
Pulse el botón – (36) varias veces para activar las alarmas de temperatura y congelación.
Cuando la alarma de congelación está activada, el símbolo correspondiente (23) aparece junto a la temperatura en
exteriores. La señal de alarma suena cuando la temperatura esté entre –1 °C y + 3 °C.
Cuando la alarma de alarma está activada, el símbolo correspondiente aparece junto a la temperatura en exteriores. La
señal de alarma suena cuando la temperatura esté entre los valores establecidos.
Si las alarmas de temperatura y congelamiento están activadas, ambos símbolos aparecerán en la pantalla.
Retroiluminación
Pulse el botón RETARDO DE ALARMA/LUZ (33). La luz de fondo se ilumina durante 5 segundos.
Pantalla de estado de las pilas
En la presentación del estado de las pilas (20), el símbolo (26) aparece cuando las pilas están sin carga. Asegúrese de
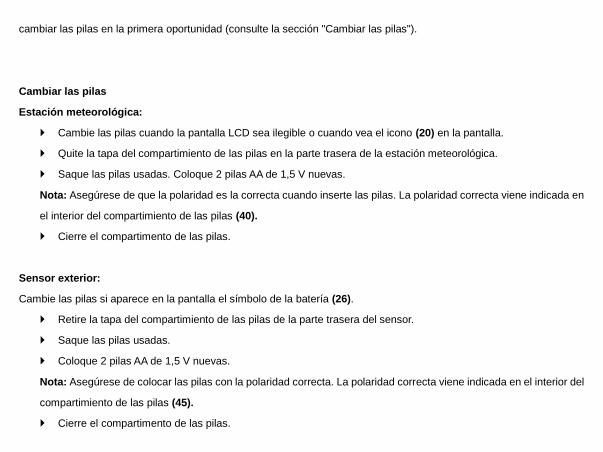
cambiar las pilas en la primera oportunidad (consulte la sección "Cambiar las pilas").
Cambiar las pilas
Estación meteorológica:
Cambie las pilas cuando la pantalla LCD sea ilegible o cuando vea el icono (20) en la pantalla.
Quite la tapa del compartimiento de las pilas en la parte trasera de la estación meteorológica.
Saque las pilas usadas. Coloque 2 pilas AA de 1,5 V nuevas.
Nota: Asegúrese de que la polaridad es la correcta cuando inserte las pilas. La polaridad correcta viene indicada en
el interior del compartimiento de las pilas (40).
Cierre el compartimento de las pilas.
Sensor exterior:
Cambie las pilas si aparece en la pantalla el símbolo de la batería (26).
Retire la tapa del compartimiento de las pilas de la parte trasera del sensor.
Saque las pilas usadas.
Coloque 2 pilas AA de 1,5 V nuevas.
Nota: Asegúrese de colocar las pilas con la polaridad correcta. La polaridad correcta viene indicada en el interior del
compartimiento de las pilas (45).
Cierre el compartimento de las pilas.
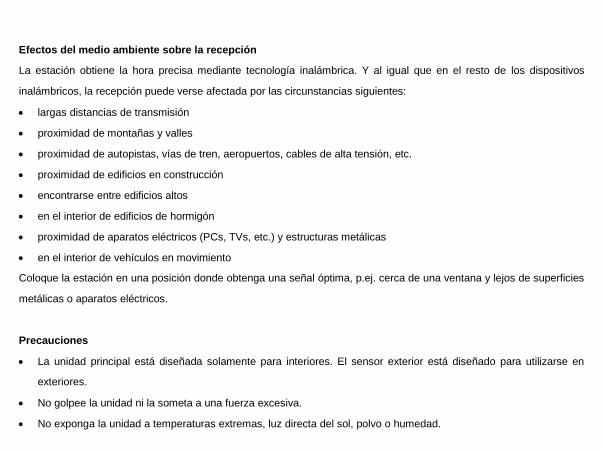
Efectos del medio ambiente sobre la recepción
La estación obtiene la hora precisa mediante tecnología inalámbrica. Y al igual que en el resto de los dispositivos
inalámbricos, la recepción puede verse afectada por las circunstancias siguientes:
largas distancias de transmisión
proximidad de montañas y valles
proximidad de autopistas, vías de tren, aeropuertos, cables de alta tensión, etc.
proximidad de edificios en construcción
encontrarse entre edificios altos
en el interior de edificios de hormigón
proximidad de aparatos eléctricos (PCs, TVs, etc.) y estructuras metálicas
en el interior de vehículos en movimiento
Coloque la estación en una posición donde obtenga una señal óptima, p.ej. cerca de una ventana y lejos de superficies
metálicas o aparatos eléctricos.
Precauciones
La unidad principal está diseñada solamente para interiores. El sensor exterior está diseñado para utilizarse en
exteriores.
No golpee la unidad ni la someta a una fuerza excesiva.
No exponga la unidad a temperaturas extremas, luz directa del sol, polvo o humedad.
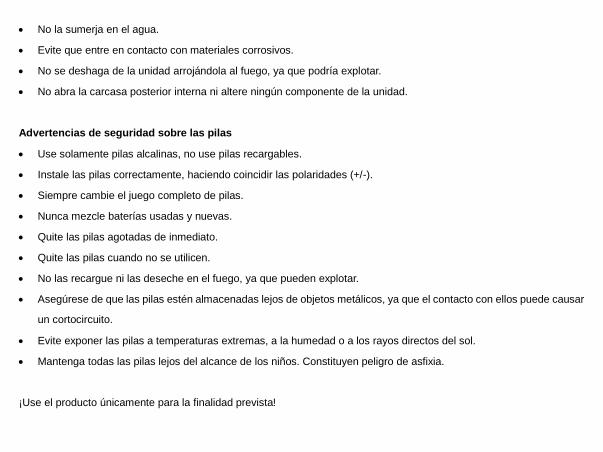
No la sumerja en el agua.
Evite que entre en contacto con materiales corrosivos.
No se deshaga de la unidad arrojándola al fuego, ya que podría explotar.
No abra la carcasa posterior interna ni altere ningún componente de la unidad.
Advertencias de seguridad sobre las pilas
Use solamente pilas alcalinas, no use pilas recargables.
Instale las pilas correctamente, haciendo coincidir las polaridades (+/-).
Siempre cambie el juego completo de pilas.
Nunca mezcle baterías usadas y nuevas.
Quite las pilas agotadas de inmediato.
Quite las pilas cuando no se utilicen.
No las recargue ni las deseche en el fuego, ya que pueden explotar.
Asegúrese de que las pilas estén almacenadas lejos de objetos metálicos, ya que el contacto con ellos puede causar
un cortocircuito.
Evite exponer las pilas a temperaturas extremas, a la humedad o a los rayos directos del sol.
Mantenga todas las pilas lejos del alcance de los niños. Constituyen peligro de asfixia.
¡Use el producto únicamente para la finalidad prevista!
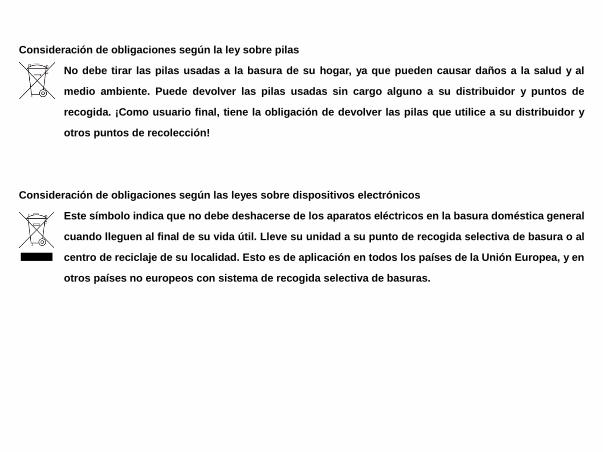
Consideración de obligaciones según la ley sobre pilas
No debe tirar las pilas usadas a la basura de su hogar, ya que pueden causar daños a la salud y al
medio ambiente. Puede devolver las pilas usadas sin cargo alguno a su distribuidor y puntos de
recogida. ¡Como usuario final, tiene la obligación de devolver las pilas que utilice a su distribuidor y
otros puntos de recolección!
Consideración de obligaciones según las leyes sobre dispositivos electrónicos
Este símbolo indica que no debe deshacerse de los aparatos eléctricos en la basura doméstica general
cuando lleguen al final de su vida útil. Lleve su unidad a su punto de recogida selectiva de basura o al
centro de reciclaje de su localidad. Esto es de aplicación en todos los países de la Unión Europea, y en
otros países no europeos con sistema de recogida selectiva de basuras.
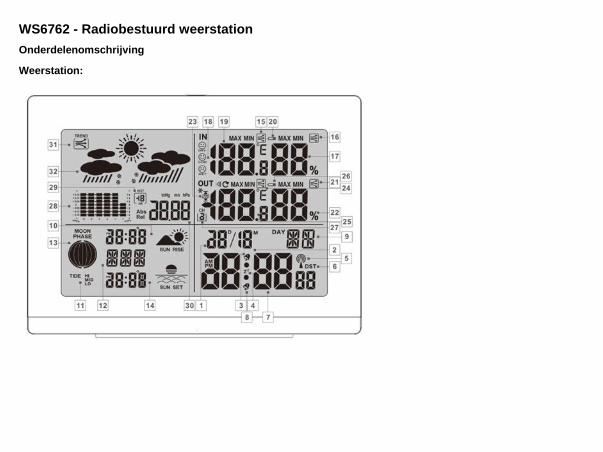
WS6762 - Radiobestuurd weerstation
Onderdelenomschrijving
Weerstation:

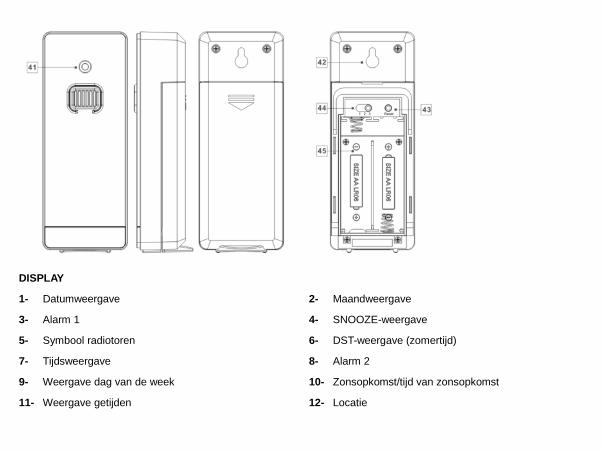
DISPLAY
1- Datumweergave 2- Maandweergave
3- Alarm 1 4- SNOOZE-weergave
5- Symbool radiotoren 6- DST-weergave (zomertijd)
7- Tijdsweergave 8- Alarm 2
9- Weergave dag van de week 10- Zonsopkomst/tijd van zonsopkomst
11- Weergave getijden 12- Locatie

13- Maanfase 14- Zonsondergang/tijd van zonsondergang
15- Temperatuurtendens (binnen) 16- Vochtigheidstendens (binnen)
17- Vochtigheid (binnen) 18- Comfortindicatielampje
19- Binnentemperatuur (°C/°F) 20- Batterijstatus weergeven
21- Vochtigheidstendens (buiten) 22- Vochtigheid (buiten)
23- Temperatuur en vorstalarm (maximum/minimum) 24- Temperatuurtendens (buiten)
25- Buitentemperatuur (°C/°F) 26- Weergave batterijstatus (buitensensor)
27- Geselecteerd kanaal 28- Weergave staafdiagram barometerdruk
29- Weergave barometerdruk van het afgelopen uur 30- Absolute/relatieve barometerdruk
31- Tendens barometerdruk 32- Weersvoorspelling
Buitenkant
33- SLUIMER/LICHT-toets 34- MODE-toets
35- + knop 36- - knop
37- Kanaalknop (CH) 38- Knop GESCHIEDENIS ABS/REL
39- Knop CITY 40- Batterijvak
Buitensensor:
41- Bedienings-LED 42- Montage
43- Toets voor HERINSTELLEN 44- Schakelaar kanaalselectie
45- Batterijvak
Technische gegevens
Weerstation:
Temperatuurmeetbereik: 0 tot +50°C (+32 tot +122°F)
Temperatuurresolutie: 0,1°C
Vochtigheidsmeetbereik: 20% – 95%
Vochtigheidresolutie: 1%
Radiosignaal: DCF
Batterijen: 2X AA, 1,5V (gelijkstroom)
Luchtdruk: 850 - 1050hPa
Frequentieband: 433.050 tot 434.790MHz
Buitensensor:
Temperatuurmeetbereik: -20 tot +65°C (-4 tot +149°F)
Vochtigheidsmeetbereik: 20% – 95%
Vochtigheidresolutie: 1%
RF-transmissiesignaal: 433,92 MHz
RF-transmissiebereik: max. 60 meter (in open gebied)
Batterijen: 2 x AA, 1,5 V (gelijkstroom)
Voor gebruik
Het apparaat instellen
Plaats de batterijen eerst in de buitensensor.
LET OP!:
Zorg bij het plaatsen van het weerstation dat het station niet wordt blootgesteld aan direct zonlicht, trillingen, stof,
warmte, kou en vocht.
Plaats de apparaten niet in de buurt van een warmtebron, zoals een radiator. Anders kunnen ze beschadigd
raken.
Plaats de apparaten niet op kostbare of gevoelige oppervlaktes, tenzij deze voldoende beschermd zijn. Anders
kunnen ze beschadigd raken.
Zorg dat het aangrenzende apparaat niet op dezelfde frequentie van 433 MHz werkt. Zulke apparaten kunnen de
radioverbinding verstoren.
Plaats de apparaten niet naast of op metalen platen. Anders kan de kwaliteit van de radiogolftransmissie worden
verminderd.
Installeer de apparaten niet in gebouwen van gewapend beton, zoals vliegvelden, hoge gebouwen, fabrieken of
kelders. Anders kan de transmissie van radiogolven tussen de apparaten ernstig belemmerd worden.
De buitensensor voorbereiden
Verwijder het batterijklepje aan de achterkant van de buitensensor.
Plaats de 2x AA-batterijen volgens de juiste polariteit (+/-). De buitensensor is nu klaar voor gebruik en het
bedienings-LED (41) brandt kort.
Sluit het batterijklepje.
De buitensensor installeren:
Zoek een geschikte plek voor de buitensensor.
Opmerking: Zorg dat u de buitensensor binnen een straal van 60m (open gebied) van het weerstation plaatst.
Controleer of er geen obstakels tussen de buitensensor en het weerstation zijn. Anders kan er verstoring zijn met
de gegevensoverdracht.
Voor wandbevestiging:
Hang de buitensensor met de montage (42) aan een schroef.
Het weerstation gereedmaken voor gebruik
Open het batterijvakje (40) aan de achterkant van het weerstation.
Plaats de 2x AA-batterijen volgens de juiste polariteit (+/-).
Sluit het batterijvakje.
Zodra de veiligheidsstrip van de batterij is verwijderd, ontvangt het weerstation het radiosignaal.
Opmerking: Verplaatst het weerstation niet tijdens het ontvangen van het signaal. Dit kan de ontvangst onderbreken.
Het weerstation aansluiten op de buitensensor en het DCF-radiosignaal:
Na het installeren van de batterijen, probeert het weerstation een verbinding met de buitensensor te maken. Dit proces
kan een paar minuten duren. Het symbool blijft een paar minuten knipperen. Wanneer er verbinding is gemaakt met de
buitensensor, verschijnt het geselecteerde kanaalsymbool (27) in het LC-scherm met het kanaal van de buitensensor
(indien nodig kunt u het kanaal van de buitensensor wijzigen, zoals weergegeven in de sectie ‘Het kanaal instellen’). Als
de verbinding met de buitensensor niet automatisch wordt gemaakt, kan dit handmatig worden gedaan:
Druk kort op de kanaalknop (CH) (37) tot het gewenste kanaal (27) wordt weergegeven, houd vervolgens de
CH-knop ingedrukt tot het pictogram Radiogolven knippert. T
Druk vervolgens op de knop RESET (43) van de sensor. De buitentemperatuur (25) en de vochtigheid (buiten)
(22) van het weerstation worden weergegeven.
Zodra het weerstation verbinding heeft gemaakt met de buitensensor wordt er automatisch een DCF-radiosignaal
ontvangen. Dit proces duurt enkele minuten en wordt aangegeven door een knipperend radiotorensymbool (5).
Wanneer het DCF-radiosignaal is ontvangen, wordt het radiotorensignaal permanent op het scherm weergegeven. Als
het op het moment dat het apparaat wordt ingeschakeld niet mogelijk is om te synchroniseren met de atomische klok,
kunt u de klokaanpassingen ook handmatig instellen (‘De 12/4-uurmodus/°C/°F/hPa/inHg/tijdzone/tijd/datum/taal
handmatig instellen’).
Radiosignaal (DCF):
Het DCF-signaal (tijdsignaalzender) bestaat uit tijdspulsen die worden uitgestoten door een van de meest
nauwkeurige klokken ter wereld, in de buurt van Frankfurt/Main, Duitsland.
Onder ideale omstandigheden, kan uw weerstation dit signaal oppikken tot een afstand van ongeveer 2000 km rond
Frankfurt/Main. Ontvangst van het radiosignaal duurt ongeveer 3-10 minuten.
Ontvangst kan aanzienlijk belemmerd worden door obstakels (bijv. Betonnen muren) of storingsbronnen (bijv.
Andere elektrische apparaten). In het geval van ontvangstproblemen, wijzigt u de plek van het weerstation (bijv.
Ergens in de buurt van het raam).
Bediening
Het DCF-radiotijdsignaal ontvangen
Nadat er een verbinding is gemaakt met de buitensensor, of 3 minuten nadat de batterijen zijn geplaatst, begint het
weerstation automatisch naar het DCF-radiosignaal te zoeken. De zoekopdracht wordt weergegeven in het
LC-scherm door een knipperend radiotorensymbool (5).
Opmerking: In gebouwen van gewapend beton, kan de ontvangst van het radiosignaal ernstig beperkt worden (zie
‘De apparaten instellen’).
Om afwijkingen van de exacte tijd te corrigeren, wordt de klok elke dag automatisch gesynchroniseerd om 13.00,
14.00 en 15.00 uur met het DCF-radiosignaal.
Ontvangst van het DCF-radiosignaal kan ook handmatig worden gestart op het weerstation.
Druk tegelijkertijd op de knoppen + en - (35), (36). Het weerstation probeert het DCF-radiosignaal te ontvangen.

Dit proces duurt enkele minuten en wordt aangegeven door een knipperend radiotorensymbool.
Als de verbinding met het DCF-radiosignaal niet kan worden gemaakt, is de zoekopdracht gestopt.
Opmerking: Als de klok van het weerstation het DCF-radiosignaal niet kan ontvangen door een fout, een te grote
afstand van de zender of een soortgelijke reden, is het mogelijk om de tijd handmatig in te stellen. Als de ontvangst
van het DCF-signaal gelukt is, worden de handmatige instellingen overschreven.
Handmatige instellingen
De ontvangst van het DCF-radiosignaal waar het weerstation is geplaatst kan verminderd of verstoord worden. Als
dit gebeurt, kunt u het apparaat handmatig instellen.
Volg deze stappen:
1. Houd de knop MODE (34) ongeveer 3 seconden ingedrukt. ‘12Hr’ of ‘24Hr’ knippert op het scherm. Druk op de
knop + of - (35), (36) om de gewenste indeling te kiezen.
2. Bevestig uw instelling door op de knop MODE te drukken. De temperatuureenheid ‘°C’ of ‘°F’ knippert op het
beeldscherm. Druk op de knop + of - om de gewenste temperatuureenheid te kiezen.
3. Bevestig uw instelling door op de knop MODE te drukken. De barometerdruk knippert op het beeldscherm.
Druk op de knop + of - om de gewenste eenheid (hPA/inHg) te kiezen.
4. Bevestig uw instelling door op de knop MODE te drukken. De tijdzone-indicator knippert op het scherm. Druk
op de knop + of - om de gewenste waarde (-2 of +2) te kiezen. U kunt de klok handmatig aanpassen aan de
tijdzone van het land waar de klok het DCF-signaal ontvangt, maar waar de daadwerkelijke tijd afwijkt van de
ontvangen tijd. Als de tijd van een bepaald land bijvoorbeeld 1 uur voorloopt op de Duitse tijd, stel de
tijdzoneweergave dan in op “01”. de klok wordt nu door het DCF-signaal geregeld, maar de tijd loopt één uur
voor.
5. Bevestig uw instelling door op de knop MODE te drukken. De uurwaarde van de tijdweergave knippert. Druk
op de knop + of - om de gewenste waarde te kiezen.
6. Bevestig uw instelling door op de knop MODE te drukken. De minuutindicator van de tijdweergave knippert.
Druk op de knop + of - om de gewenste waarde te kiezen.
7. Bevestig uw instelling door op de knop MODE te drukken. De minuutindicator knippert op het scherm. Druk op
de knop + of - om de gewenste waarde te kiezen.
8. Bevestig uw instelling door op de knop MODE te drukken. De maandindicator knippert in de datumweergave
(1). Druk op de knop + of - om de gewenste waarde te kiezen.
9. Bevestig uw instelling door op de knop MODE te drukken. De dagindicator knippert in de datumweergave.
Druk op de knop + of - om de gewenste waarde te kiezen.
10. Bevestig uw instelling door op de knop MODE te drukken. Op de plek van de dag van de week (9), knippert de
taalindicator van dit scherm. Druk op de knop + of - om de gewenste taal te kiezen.
11. Bevestig uw instelling door op de knop MODE te drukken.
Opmerkingen:
Houd de knop + of - ingedrukt om het instellen van de waardes te versnellen.
Als je 20 seconden lang geen knop indrukt, gaat de LCD automatisch terug naar de standaardweergave.
Het AM-symbool in de tijdweergave (7) staat voor 's ochtends in de 12-uur-modus. Het PM-symbool in de
tijdweergave staat voor 's middags in de 12-uur-modus.
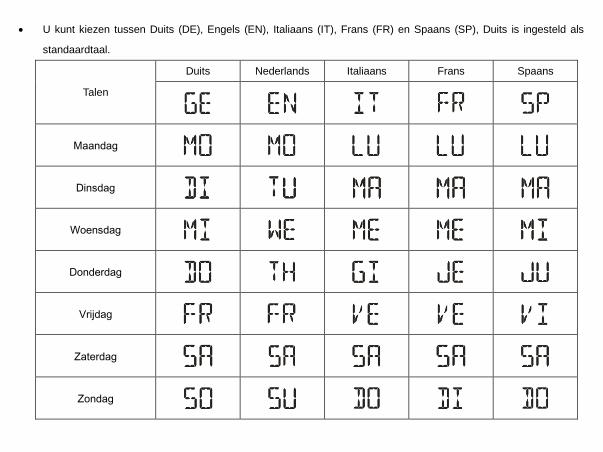
U kunt kiezen tussen Duits (DE), Engels (EN), Italiaans (IT), Frans (FR) en Spaans (SP), Duits is ingesteld als
standaardtaal.
Talen
Duits Nederlands Italiaans Frans Spaans
Maandag
Dinsdag
Woensdag
Donderdag
Vrijdag
Zaterdag
Zondag
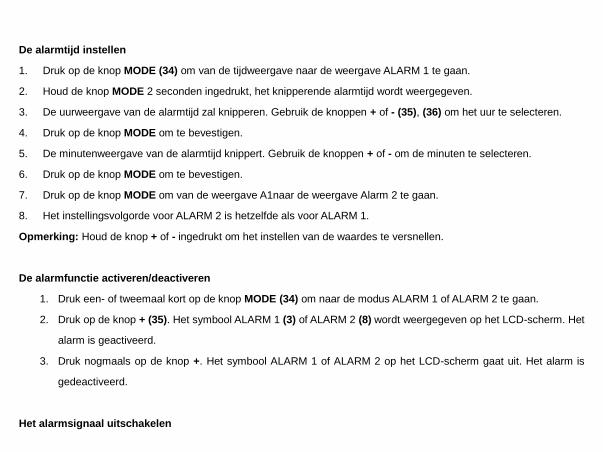
De alarmtijd instellen
1. Druk op de knop MODE (34) om van de tijdweergave naar de weergave ALARM 1 te gaan.
2. Houd de knop MODE 2 seconden ingedrukt, het knipperende alarmtijd wordt weergegeven.
3. De uurweergave van de alarmtijd zal knipperen. Gebruik de knoppen + of - (35), (36) om het uur te selecteren.
4. Druk op de knop MODE om te bevestigen.
5. De minutenweergave van de alarmtijd knippert. Gebruik de knoppen + of - om de minuten te selecteren.
6. Druk op de knop MODE om te bevestigen.
7. Druk op de knop MODE om van de weergave A1naar de weergave Alarm 2 te gaan.
8. Het instellingsvolgorde voor ALARM 2 is hetzelfde als voor ALARM 1.
Opmerking: Houd de knop + of - ingedrukt om het instellen van de waardes te versnellen.
De alarmfunctie activeren/deactiveren
1. Druk een- of tweemaal kort op de knop MODE (34) om naar de modus ALARM 1 of ALARM 2 te gaan.
2. Druk op de knop + (35). Het symbool ALARM 1 (3) of ALARM 2 (8) wordt weergegeven op het LCD-scherm. Het
alarm is geactiveerd.
3. Druk nogmaals op de knop +. Het symbool ALARM 1 of ALARM 2 op het LCD-scherm gaat uit. Het alarm is
gedeactiveerd.
Het alarmsignaal uitschakelen
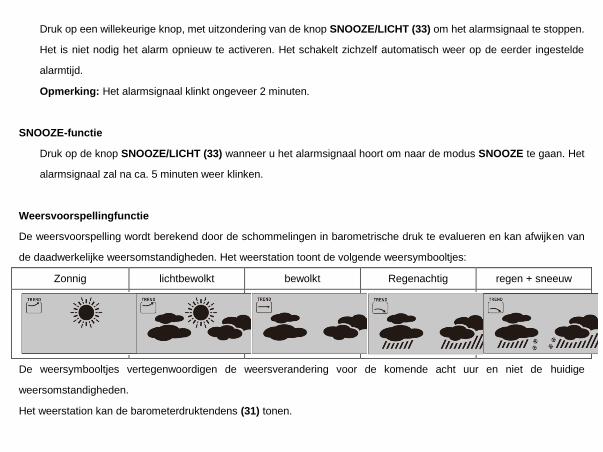
Druk op een willekeurige knop, met uitzondering van de knop SNOOZE/LICHT (33) om het alarmsignaal te stoppen.
Het is niet nodig het alarm opnieuw te activeren. Het schakelt zichzelf automatisch weer op de eerder ingestelde
alarmtijd.
Opmerking: Het alarmsignaal klinkt ongeveer 2 minuten.
SNOOZE-functie
Druk op de knop SNOOZE/LICHT (33) wanneer u het alarmsignaal hoort om naar de modus SNOOZE te gaan. Het
alarmsignaal zal na ca. 5 minuten weer klinken.
Weersvoorspellingfunctie
De weersvoorspelling wordt berekend door de schommelingen in barometrische druk te evalueren en kan afwijken van
de daadwerkelijke weersomstandigheden. Het weerstation toont de volgende weersymbooltjes:
Zonnig lichtbewolkt bewolkt Regenachtig regen + sneeuw
De weersymbooltjes vertegenwoordigen de weersverandering voor de komende acht uur en niet de huidige
weersomstandigheden.
Het weerstation kan de barometerdruktendens (31) tonen.
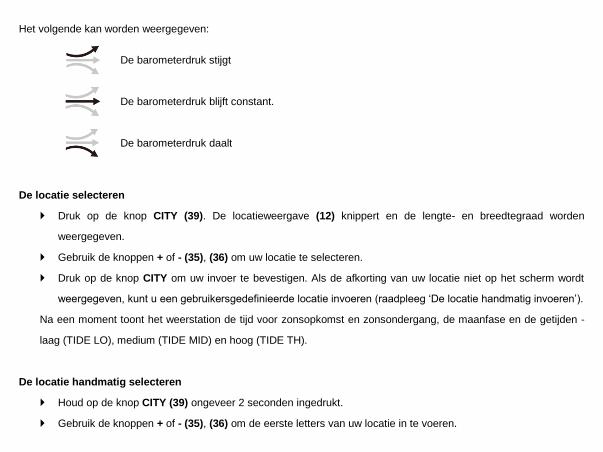
Het volgende kan worden weergegeven:
De barometerdruk stijgt
De barometerdruk blijft constant.
De barometerdruk daalt
De locatie selecteren
Druk op de knop CITY (39). De locatieweergave (12) knippert en de lengte- en breedtegraad worden
weergegeven.
Gebruik de knoppen + of - (35), (36) om uw locatie te selecteren.
Druk op de knop CITY om uw invoer te bevestigen. Als de afkorting van uw locatie niet op het scherm wordt
weergegeven, kunt u een gebruikersgedefinieerde locatie invoeren (raadpleeg ‘De locatie handmatig invoeren’).
Na een moment toont het weerstation de tijd voor zonsopkomst en zonsondergang, de maanfase en de getijden -
laag (TIDE LO), medium (TIDE MID) en hoog (TIDE TH).
De locatie handmatig selecteren
Houd op de knop CITY (39) ongeveer 2 seconden ingedrukt.
Gebruik de knoppen + of - (35), (36) om de eerste letters van uw locatie in te voeren.
Druk op de knop CITY om uw invoer te bevestigen. Voer de 2e en 3e letter op dezelfde manier in.
GMT wordt weergegeven in het LC-scherm en de tijdzone-indicator knippert.
Druk op de knop + en - om het verschik tussen uw tijdzone naar GMT in te stellen.
Druk op de knop CITY om uw invoer te bevestigen. Stel de lengte- en breedtegraad van uw locatie op dezelfde
manier in.
Na een moment toont het weerstation de tijd voor zonsopkomst en zonsondergang, de maanfase en de getijden -
laag (TIDE LO), medium (TIDE MID) en hoog (TIDE TH).
U kunt uit de volgende landen en steden kiezen:
Duitsland
(DE)
Berlijn BER Brest BRE
Portugal
(PT)
Faro FAR
Bremen BRE Cherbourg-Octeville CHE Warschau WAR
Keulen KOE Clermont-Ferrand CMF
Portugal
(PT)
Faro FAR
Dortmund DOR Dijon DIJ Lissabon LIS
Dresden DRE Lille LIL PORTO POR
Düsseldorf DUS Lion LYO
Russische
federatie
(RU)
St. Petersburg PET
Erfurt ERF Marseille MRS Servië (RS) Belgrado BEO
Frankfurt FRA Metz MET
Slowakije
(SK)
Bratislava BRV
Freiburg FRE Nantes NAN Kosice KOS
Hamburg HAM Nice NCE Slovenië (SI) Ljubljana LUB
Hannover HAN Orleans ORL Spanje (ES) Alicante ALI
Hof HOF Parijs PAR Andorra And
Kaiserslautern KAI Perpignan PER Badajoz BAD
Kassel KAS Rouen ROU Barcelona BAR
Kiel KIE Straatsburg STR Bilbao BIL
Leipzig LEI Toulouse TOU Cordoba COR
Maagdenburg MAG
Griekenland
(GR)
Athene AHN Eivissa Ibiza IBZ
München MUN Hongarije (HU) Boedapest BUD La Coruña LCO
Nürnberg NUR Ierland (IE) Dublin DUB Las Palmas LPA
Osnabrück OSN Italië (IT) Ancona ANC Leon LEO
Passau PAS Bari BAR Madrid MAD
Regensburg REG Bolzano BOZ Malaga MAL
Rostock ROS Cagliari CAG Palma de Mallorca PAL
Saarbrücken SAA Florence FIR Salamanca SAL

Stuttgart STU Foggia FOG Sevilla SEV
Ulm ULM Genua GEN Valencia VAL
Würzburg WUR Lecce LEC Zaragoza ZAR
Australië (AU) Canberra CBR Messina MES Zweden (SE) Gothenburg GOT
Melbourne MEL Milaan MIL Karlstad KAR
Sydney SYD Napels NAP Stockholm STO
Oostenrijk
(AT)
Bregenz BRE Palermo PAL
Zwitserland
(CH)
Basel BAS
Graz GRZ Parma PAR Bern BRN
Innsbruck INN Perugia PER Chur CHU
Linz LNZ Rome ROM Genève GEN
Salzburg SLZ San Remo SRE Lucerne LUC
Wenen WIE Triest TRI Lugano LUG
Villach VIL Turijn TOR Sion SIO
Wels WEL Venetië VEN St. Gallen SGL
België (BE) Antwerpen ANT Verona VER Zürich ZUR
Bruggen BRG
Liechtenstein
(LI)
Vaduz VDZ
Verengid
Koninkrijk
(GB)
Aberdeen ABD
Brussel BRU
Luxemburg
(LU)
Luxemburg LUX Belfast BEL
Libramont LIB Monaco (MC) Monte Carlo MCM Birmingham BIR
Luik LIE Nederland (NL) Amsterdam AMS Cardiff CAR
Bosnië en
Herzegovina
(BA)
Sarajevo SAR Arnhem ARN Glasgow GLW
Kroatië (HR) Split SPL Eindhoven EIN Londen LON
Zagreb ZAG Groningen GRO Manchester MAN
Tsjechië (CZ) Brno BRN Rotterdam ROT Newcastle-upon-Tyne NEC
Praag PRG Den Haag DHA Plymouth PLY
Denemarken
(DK)
Aalborg ALB
Nieuw-Zeeland
(NZ)
Wellington WLG
Verenigde
Staten (VS)
Los Angeles LAX
Kopenhagen KOB
Noorwegen
(NO)
Bergen BGN New York NYC
Odense ODE Lillehammer LIL Washington WAS
Finland (FI) Helsinki HEL Oslo OSL
Litouwen
(LT)
Vilnius VNO
Frankrijk (FR) Ajaccio AJA Polen (PL) Krakau KRA Bulgarije Sofia SOF
(BG)
Biarritz BIA Gdansk GDA
Roemenië
(RO)
Boekarest BUH
Bordeaux BOR Poznan POZ Cyprus (CY) Nicosia NIC
Maanfase
Het weerstation heeft een scherm dat automatisch de huidige maanfase (13) toont.
Nieuwe
maan
Wassende halve
maan
Halve
maan
Wassende volle
maan
Volle
maan
Tanende volle
maan Halve maan
Tanende volle
maan
Zonsopkomst en zonsondergang
Een stad in de buurt van uw locatie moet zijn ingesteld om de tijd in uw gebied correct weer te geven. Het station
moet het audiobediende tijdsignaal minstens een keer ontvangen om de juiste zonsopkomst en zonsondergang
weer te geven.
De barometerdruk van de afgelopen 12 uur lezen
Druk herhaaldelijk op de knop HISTORY ABS/REL (38) om de barometerdrukwaarden te lezen van de
afgelopen 12 uur.
0 uur = huidige barometrische druk
–1 uur = barometrische druk een uur geleden
–2 uur = barometrische druk twee uur geleden, enz.
……………
-12UUR = barometerdruk twaalf uur eerder, enz.
De luchtdrukindicatie aanpassen
De voorspelling van dit weerstation is gebaseerd op een analyse van de verandering van de luchtdruk.
De barometerdruk (30) wordt meegeleverd door de fabriek en aangepast aan de absolute luchtdruk. Als de luchtdruk
over het algemeen afneemt met de hoogte boven zeeniveau, kondigt de openbare weerdienst altijd de zogenaamde
relatieve luchtdruk. Deze relatieve luchtdruk wordt aangepast aan de topografie van het land om vergelijkbare
waarden te krijgen.
U kunt de luchtdruk van uw weerstation aanpassen aan de proportie van de plek. U moet het weerstation aanpassen
aan de unieke, huidige luchtdruk. Vraag uw lokale weervoorspellingsdienst voor de barometerdruk op zeeniveau of
verkrijg de huidige waarde van internet.
U kunt het weerstation als volgt aanpassen:
Houd de knop HISTORY ABS/REL (38) ongeveer 3 seconden ingedrukt. Druk daarna op de knop + of - (35), (36)
om af te wisselen tussen de absolute of relatieve luchtdruk.
Kies ‘Rel’ en druk op de knop HISTORY ABS/REL voor de bevestiging. De luchtdrukindicatie knippert. Nu kunt u
de juiste waarde kiezen door op de knop + of - te drukken.
Bevestig uw keuze door op de knop HISTORY ABS/REL te drukken. Uw weerstation toont nu de relatieve
luchtdruk.
Als u wilt dat uw weerstation de absolute luchtdruk aankondigt, gaat u als volgt verder:
Houd de knop HISTORY ABS/REL ongeveer 3 seconden ingedrukt. Druk daarna op de knop + of - om de
absolute luchtdruk te wijzigen. Bevestig uw keuze door op de knop HISTORY ABS/REL te drukken.
Het kanaal instellen
Het weerstation ontvangt automatisch het buitensensorsignaal nadat u alle instellingen hebt ingevoerd.
Opmerking: In het geval dat er storing wordt ontvangen door naburige radiosignalen, knippert het symbool voor de
vochtigheid (buiten) (22) en de buitentemperatuur (25) gedurende dat moment. Selecteer een ander kanaal voor de
buitensensor door op de knop CH (37) te drukken op het weerstation of de kanaalselectieschakelaar (44) op de
buitensensor. De relevante gegevens worden weergegeven in het LC-scherm.
- 1: Buitensensorkanaal 1
- 2: Buitensensorkanaal 2
- 3: Buitensensorkanaal 3
- : Automatisch van kanaal veranderen
De temperatuur en temperatuurtendens weergeven
De huidige binnentemperatuur (19) en de tepmeratuurtendens binnen (15) wordt weergegeven in het LCD-scherm.
Na het verbinding maken met de buitensensor kan het weerstation de buitentemperatuur (25) en de temperatuurtendens
(buiten) (24) weergeven. U ziet mogelijk het volgende:
De temperatuur stijgt.
De temperatuur blijft constant.
De temperatuur daalt.
Geeft de vochtigheid en vochtigheidstendens weer
De huidige vochtigheidstendens (binnen) (16) en de huidige vochtigheid (binnen) (17) wordt weergegeven in het
LCD-scherm.
De COMFORT-indicator (18) toont de vochtigheid in drie categorieën.
De volgende categorieën zijn beschikbaar:
Vochtigheid < 40%
Vochtigheid 40-70%, binnentemperatuur 20°C–28°C
Vochtigheid > 70%
Nadat er verbinding is gemaakt met de buitensensor, toont het weerstation de vochtigheidstendens (buiten) (21) en
de vochtigheid (buiten) (22) in het LCD-scherm.
De maximum/minimum temperatuur/vochtigheid weergeven
De minimum/maximum temperatuur/vochtigheid wordt voor het eerst gemeten nadat de batterijen zijn geplaatst en
opgeslagen in het weerstation.
De maximale en minimale waarden voor temperatuur, hygrometer en barometerdruk worden automatisch opgeslagen.
Als het weerstation in tijdweergave (7) staat, drukt u op de knop + (35) om de maximale waarden weer te geven.
Druk tweemaal op de knop + om de minimale waarden weer te geven.
Houd de knop + ongeveer 3 seconden ingedrukt om de opgeslagen maximale en minimale waarden te wissen.
Temperatuur en vriesalarm
Het temperatuuralarm is een korte piep, die hoort u zodra de buitentemperatuur de vooraf ingestelde temperatuur
overschrijdt of onder deze temperatuur daalt. Volg de onderstaande procedures om de gewenste temperatuur in te
stellen.
Druk op de knop - (36) om naar de modus Temperatuuralarm te gaan.
Houd de knop - 3 seconden ingedrukt. De maximale temperatuurweergave knippert. Druk op de knop + of - om
de waarden in te stellen.
Druk op de knop MODE (34) om uw invoer te bevestigen. De minimale temperatuurweergave knippert. Druk op
de knop + of - om de waarden in te stellen.
Druk op de knop MODE om uw instelling te bevestigen.
De temperatuur en het vriesalarm activeren/deactiveren
Als meer dan één buitensensor is geactiveerd, drukt u op de knop CH (37) om er een te selecteren.
Druk herhaaldelijk op de knop - (36) om de temperatuur en vriesalarmen te activeren.
Als het vriesalarm is geactiveerd, wordt het bijbehorende symbool (23) naast de buitentemperatuur weergegeven. U
hoort een alarmsignaal van –1°C tot + 3°C.
Als het temperatuuralarm is geactiveerd, wordt het bijbehorende symbool naast de buitentemperatuur weergegeven. U
hoort een alarmsignaal bij de ingestelde waarden.
Als de temperatuur en het vriesalarm zijn geactiveerd, worden beide symbolen weergegeven op het scherm.
Achtergrondverlichting
Druk op de knop SNOOZE/LICHT (33). De achtergrondverlichting gaat 5 seconden aan.
Batterijstatus weergeven
De batterijstatusweergave (20), (26) wordt weergegeven als de batterij bijna leeg is. Zorg dat u de batterijen zo snel
mogelijk vervangt (zie ‘De batterijen vervangen’).
De batterijen vervangen
Weerstation:
Vervang de batterij als het LCD-scherm onleesbaar wordt of als de batterijweergave (20) wordt weergegeven.
Verwijder het klepje van het batterijvakje aan de achterkant van het weerstation.
Verwijder de gebruikte batterijen. Plaats 2 nieuwe batterijen van het type AA, 1,5V.
Opmerking: Zorg dat de polariteit klopt wanneer u de batterij plaatst. De juiste polariteit wordt weergegeven in het
batterijvakje (40).
Sluit de batterijhouder.
Buitensensor:
Vervang de batterijen als de batterijweergave (26) wordt weergegeven.
Verwijder het batterijklepje aan de achterkant van de buitensensor.
Verwijder de gebruikte batterijen.
Plaats 2 nieuwe batterijen van het type AA, 1,5V.
Opmerking: Zorg dat u de batterijen met de juiste polariteit plaatst. De juiste polariteit wordt weergegeven in het
batterijvakje (45).
Sluit de batterijhouder.
Omgevingseffecten op ontvangst
Het station verkrijgt de exacte tijd via draadloze technologie. Zoals met alle draadloze apparatuur, kan de ontvangst in de
volgende gevallen worden aangetast:
Lange zendafstand
Nabij bergen en valleien
Nabij snelwegen, treinsporen, vliegvelden, hoogspanningkabels, enz.
Nabij bouwterreinen
Tussen hoge gebouwen.
Binnenin betonnen gebouwen.
Nabij elektrische apparatuur (computers, TV's, enz.) en metalen structuren
Binnenin bewegende voertuigen.
Plaats het station op een plek met optimale signalen, d.w.z. dicht in de buurt van een raam en uit de buurt van metalen
oppervlaktes of elektrische apparaten.
Voorzorgsmaatregelen
Het hoofdapparaat is uitsluitend bestemd voor gebruik binnenshuis. De buitensensor is bedoeld voor gebruik buiten
huis.
Stel het apparaat niet bloot aan overmatige krachten of schokken.
Stel het apparaat niet bloot aan extreme temperaturen, direct zonlicht, stof of vochtigheid.
Dompel het apparaat niet onder in water.
Laat het niet in contact komen met bijtende materialen.
Stel het apparaat niet bloot aan open vuur, omdat het kan exploderen.
Open nooit de interne achterbehuizing en modificeer geen enkele onderdelen van dit apparaat.
Veiligheidswaarschuwingen batterijen
Gebruik uitsluitend alkaline batterijen, geen herlaadbare batterijen.
Neem bij het plaatsen van de batterijen de juiste polariteit in acht (+/–).
Vervang altijd alle batterijen tegelijk.
Gebruik nooit nieuwe en gebruikte batterijen door elkaar.
Verwijder lege batterijen onmiddellijk.
Verwijder de batterijen als het toestel niet wordt gebruikt.
Herlaad de batterijen niet en gooi ze niet in vuur, omdat de batterijen zouden kunnen ontploffen.
Zorg ervoor dat de batterijen uit de buurt van metalen voorwerpen worden bewaard, omdat hierdoor kortsluiting kan
ontstaan.
Stel batterijen niet bloot aan extreme temperaturen, vochtigheid of direct zonlicht.
Houd alle batterijen buiten bereik van kinderen. Er bestaat gevaar van verstikking.
Gebruik dit product uitsluitend voor het doel waarvoor het is bedoeld!
Neem wettelijke heffingen in verband met de afvoer van batterijen in aanmerking
Oude batterijen behoren niet tot huishoudelijk afval, omdat deze schadelijk zijn voor de
volksgezondheid en het milieu. U kunt verbruikte batterijen kosteloos inleveren bij uw dealer of
inzamelpunten. U bent als eindgebruiker wettelijk verplicht verbruikte batterijen in te leveren bij
distributeurs of andere inzamelpunten!
Houd rekening met heffingen in het kader van wetgeving m.b.t. het afvoeren van elektrische apparatuur.
Dit symbooltje betekent dat u elektrische apparaten aan het einde van hun levensduur niet als
algemeen, huishoudelijk afval mag afvoeren. Lever uw apparaat in bij een plaatselijk inzamelpunt voor
afvalverwerking of bij een recyclingcentrum. Dit geldt voor alle landen in de Europese Unie, en voor
andere Europese landen met inzamelsystemen voor gescheiden afval.
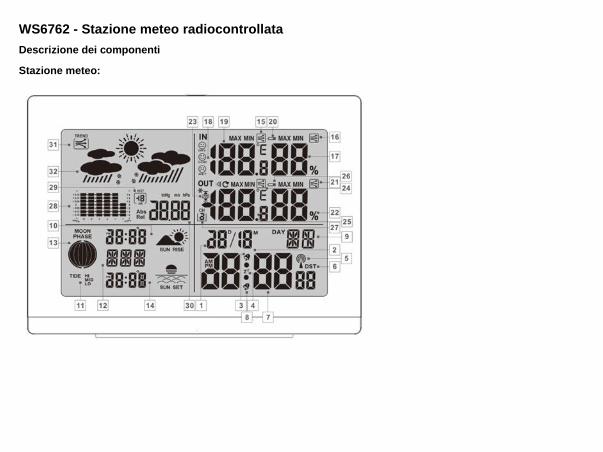
WS6762 - Stazione meteo radiocontrollata
Descrizione dei componenti
Stazione meteo:

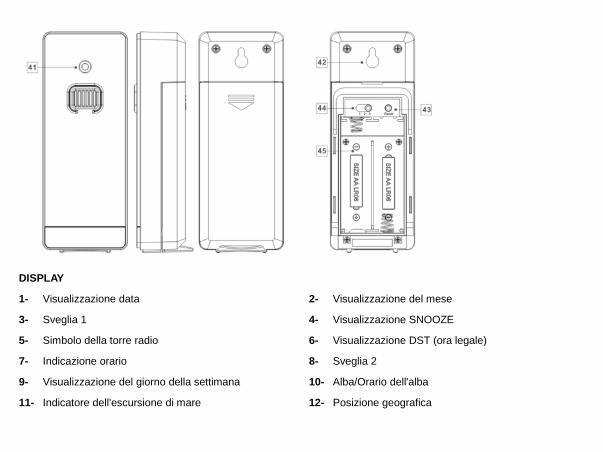
DISPLAY
1- Visualizzazione data 2- Visualizzazione del mese
3- Sveglia 1 4- Visualizzazione SNOOZE
5- Simbolo della torre radio 6- Visualizzazione DST (ora legale)
7- Indicazione orario 8- Sveglia 2
9- Visualizzazione del giorno della settimana 10- Alba/Orario dell'alba
11- Indicatore dell'escursione di mare 12- Posizione geografica
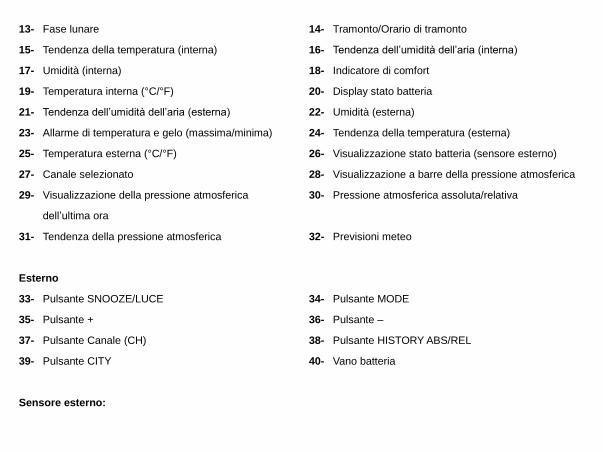
13- Fase lunare 14- Tramonto/Orario di tramonto
15- Tendenza della temperatura (interna) 16- Tendenza dell’umidità dell’aria (interna)
17- Umidità (interna) 18- Indicatore di comfort
19- Temperatura interna (°C/°F) 20- Display stato batteria
21- Tendenza dell’umidità dell’aria (esterna) 22- Umidità (esterna)
23- Allarme di temperatura e gelo (massima/minima) 24- Tendenza della temperatura (esterna)
25- Temperatura esterna (°C/°F) 26- Visualizzazione stato batteria (sensore esterno)
27- Canale selezionato 28- Visualizzazione a barre della pressione atmosferica
29- Visualizzazione della pressione atmosferica
dell’ultima ora
30- Pressione atmosferica assoluta/relativa
31- Tendenza della pressione atmosferica 32- Previsioni meteo
Esterno
33- Pulsante SNOOZE/LUCE 34- Pulsante MODE
35- Pulsante + 36- Pulsante –
37- Pulsante Canale (CH) 38- Pulsante HISTORY ABS/REL
39- Pulsante CITY 40- Vano batteria
Sensore esterno:
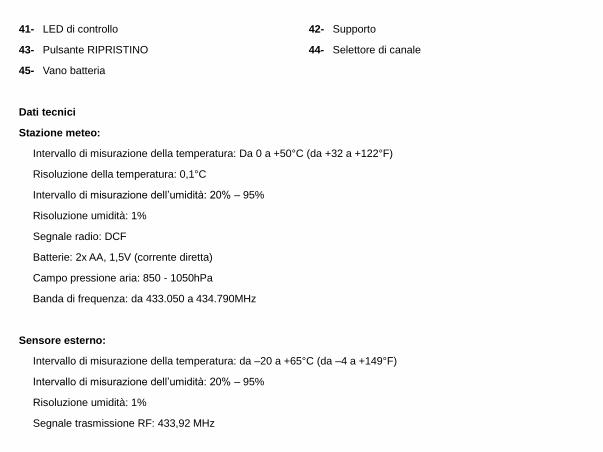
41- LED di controllo 42- Supporto
43- Pulsante RIPRISTINO 44- Selettore di canale
45- Vano batteria
Dati tecnici
Stazione meteo:
Intervallo di misurazione della temperatura: Da 0 a +50°C (da +32 a +122°F)
Risoluzione della temperatura: 0,1°C
Intervallo di misurazione dell’umidità: 20% – 95%
Risoluzione umidità: 1%
Segnale radio: DCF
Batterie: 2x AA, 1,5V (corrente diretta)
Campo pressione aria: 850 - 1050hPa
Banda di frequenza: da 433.050 a 434.790MHz
Sensore esterno:
Intervallo di misurazione della temperatura: da –20 a +65°C (da –4 a +149°F)
Intervallo di misurazione dell’umidità: 20% – 95%
Risoluzione umidità: 1%
Segnale trasmissione RF: 433,92 MHz

Area di copertura della trasmissione RF: max. 60 metri (all’aperto
Batterie: 2 x AA, 1,5 V (corrente diretta)
Prima dell'uso
Configurazione dei dispositivi
Porre prima le batterie nel sensore esterno.
ATTENZIONE!:
Quando si sceglie il luogo di posizionamento, assicurarsi che le apparecchiature non siano esposte ad
insolazione diretta, a vibrazioni, polvere, calore, freddo ed umidità.
Non porre il dispositivo in prossimità di sorgenti di calore, ad es. radiatori. Altrimenti si rischia di danneggiare le
apparecchiatura.
Non posizionare i dispositivi su superfici preziose o sensibili a meno che non siano adeguatamente protetti.
Altrimenti si rischia di danneggiare le apparecchiatura.
Assicurarsi che le apparecchiature adiacenti non vengano fatte funzionare con la stessa frequenza di 433 MHz.
Queste apparecchiature potrebbero causare un disturbo del collegamento radio.
Non posizionare le apparecchiature vicino o su piastre di metallo. La trasmissione radio tra le apparecchiature
potrebbe essere diminuita.
Non posizionare le apparecchiature in edifici di cemento armato, ad es. aeroporti, grattacieli, fabbriche o cantine.
La trasmissione radio tra le apparecchiature potrebbe essere gravemente limitata.
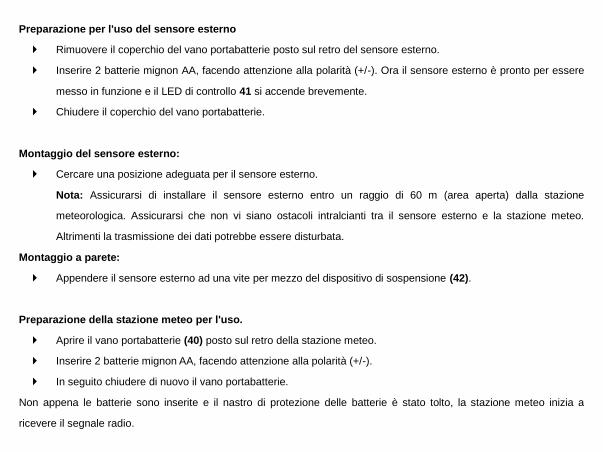
Preparazione per l'uso del sensore esterno
Rimuovere il coperchio del vano portabatterie posto sul retro del sensore esterno.
Inserire 2 batterie mignon AA, facendo attenzione alla polarità (+/-). Ora il sensore esterno è pronto per essere
messo in funzione e il LED di controllo 41 si accende brevemente.
Chiudere il coperchio del vano portabatterie.
Montaggio del sensore esterno:
Cercare una posizione adeguata per il sensore esterno.
Nota: Assicurarsi di installare il sensore esterno entro un raggio di 60 m (area aperta) dalla stazione
meteorologica. Assicurarsi che non vi siano ostacoli intralcianti tra il sensore esterno e la stazione meteo.
Altrimenti la trasmissione dei dati potrebbe essere disturbata.
Montaggio a parete:
Appendere il sensore esterno ad una vite per mezzo del dispositivo di sospensione (42).
Preparazione della stazione meteo per l'uso.
Aprire il vano portabatterie (40) posto sul retro della stazione meteo.
Inserire 2 batterie mignon AA, facendo attenzione alla polarità (+/-).
In seguito chiudere di nuovo il vano portabatterie.
Non appena le batterie sono inserite e il nastro di protezione delle batterie è stato tolto, la stazione meteo inizia a
ricevere il segnale radio.

Nota: Non modificare la posizione della stazione meteo mentre la procedura di ricezione è in corso. In caso contrario è
possibile che vi siano disturbi di ricezione.
Collegamento della stazione meteo con il sensore esterno e il segnale radio DCF:
Dopo l’eliminazione del nastro di protezione della batteria la stazione meteo cerca di stabilire un collegamento con il
sensore esterno. Questa procedura può durare alcuni minuti. Il simbolo lampeggia per alcuni minuti. Una volta avvenuto
con successo il collegamento al sensore esterno, sul display a cristalli liquidi viene visualizzato il simbolo del canale
scelto (27) con il canale del sensore esterno (se necessario, cambiare il canale del sensore esterno secondo quanto
spiegato nel capitolo “Impostazione del canale Qualora non fosse possibile stabilire un collegamento automatico, sarà
possibile procedere manualmente come di seguito:
Premere il tasto di canale (CH) (37). Il simbolo del canale selezionato (27) lampeggia nel display a cristalli liquidi.
T
Premere poi il testo RESET (43) del sensore esterno. Verranno visualizzati la temperatura esterna della stazione
meteorologica (25) e l'umidità (esterna) (22).
Non appena la stazione meteorologica ha stabilito una connessione con il sensore esterno, inizia automaticamente a
ricevere il segnale radio DCF. Questo processo richiede diversi minuti ed è indicato da un simbolo lampeggiante della
torre radio (5).
Quando il segnale radio DCF viene ricevuto con successo, il simbolo della torre radio viene visualizzato
permanentemente sul display. Se al momento di mettere in funzione il dispositivo non è possibile sincronizzare con
l'orologio atomico, è anche possibile eseguire manualmente le regolazioni dell'orologio (“Setting the 12/24 hour
mode/°C/°F/hPa/inHg/time zone/time/date/language manually”).
Segnale radio (DCF):
Il segnale DCF (trasmettitore dell‘orario) è costituito da impulsi di orari trasmessi da uno degli orologi più esatti del
mondo, situato nelle vicinanze di Francoforte sul Meno in Germania.
La stazione meteo acquistata riceve questo segnale in condizioni ottimali fino ad una distanza di circa 2000 km da
Francoforte sul Meno. La ricezione del segnale radio dura di regola dai 3 ai 10 minuti
La ricezione può essere limitata notevolmente da ostacoli (ad es. muri di cemento) o fonti di interferenza (ad es. da
altre apparecchiature elettriche. Qualora la stazione meteo avesse difficoltà di ricezione, modificare se necessario la
sua posizione (ponendola ad esempio nei pressi di una finestra).
Funzionamento
Ricezione del segnale radio DC
L’orologio della stazione meteo, dopo il collegamento riuscito con il sensore esterno o 3 minuti dopo la rimozione
della striscia di protezione della batteria, inizia automaticamente a cercare il segnale radio DCF. La ricerca viene
visualizzata sul display LC con il simbolo della torre radio (5) lampeggiante.
Nota: Negli edifici in cemento armato, la ricezione del segnale radio può essere gravemente compromessa (vedere
"Configurazione dei dispositivi").
Per correggere eventuali scostamenti dall'ora esatta, l'orologio viene sincronizzato automaticamente con il segnale
radio DCF ogni giorno alle 1:00, 2:00 e 3:00.
La ricezione del segnale radio DCF può anche essere avviata manualmente sulla stazione meteorologica.
Premere i pulsanti + e - (35), (36) contemporaneamente. La stazione meteo tenta di ricevere il segnale radio
DCF. Questo processo richiede alcuni minuti ed è indicato da un lampeggiante simbolo della torre radio.
Se non è possibile stabilire la connessione con il segnale radio DCF, la ricerca viene interrotta.
Nota: Se l'orologio della stazione meteorologica non può ricevere il segnale radio DCF a causa di errori, distanza
troppo grande dal trasmettitore o motivi simili, è possibile impostare l'ora manualmente. Se la ricezione del segnale
DCF ha esito positivo, le impostazioni manuali vengono sovrascritte.
Impostazioni manuali
La ricezione del segnale radio DCF in cui è stata posizionata la stazione meteorologica potrebbe deteriorarsi o
interrompersi. Se ciò accade, puoi impostare il dispositivo manualmente.
Segui questi passi:
1. Premere e tenere premuto il pulsante MODE (34) per circa 3 secondi. "12 ore" o "24 ore" lampeggia sul display.
Premere il tasto + o - (35), (36) per scegliere il formato ora desiderato.
2. Conferma le tue impostazioni premendo il pulsante MODE. L'unità di temperatura “°C” o “°F” lampeggia sul
display. Premere il tasto + o - per scegliere l'unità di temperatura desiderata.
3. Conferma le tue impostazioni premendo il pulsante MODE. L'unità di pressione barometrica lampeggia sul
display. Premere il tasto + o - per impostare l'unità desiderata (hPa/inHg).
4. Conferma le tue impostazioni premendo il pulsante MODE. L'indicatore del fuso orario lampeggia sul display.
Premere il tasto + o - per impostare il valore desiderato (da -2 a +2). È possibile controllare manualmente il
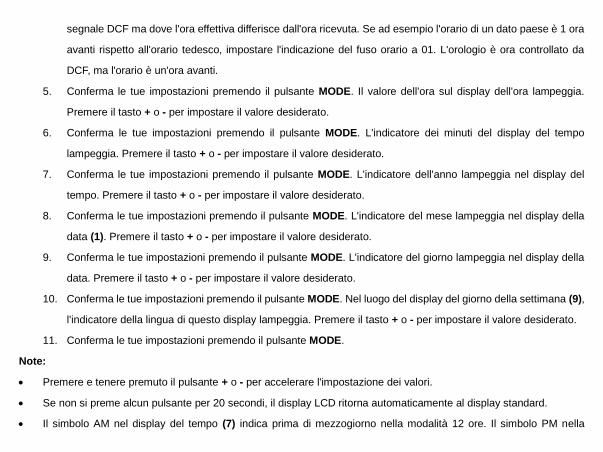
segnale DCF ma dove l'ora effettiva differisce dall'ora ricevuta. Se ad esempio l'orario di un dato paese è 1 ora
avanti rispetto all'orario tedesco, impostare l'indicazione del fuso orario a 01. L'orologio è ora controllato da
DCF, ma l'orario è un'ora avanti.
5. Conferma le tue impostazioni premendo il pulsante MODE. Il valore dell'ora sul display dell'ora lampeggia.
Premere il tasto + o - per impostare il valore desiderato.
6. Conferma le tue impostazioni premendo il pulsante MODE. L'indicatore dei minuti del display del tempo
lampeggia. Premere il tasto + o - per impostare il valore desiderato.
7. Conferma le tue impostazioni premendo il pulsante MODE. L'indicatore dell'anno lampeggia nel display del
tempo. Premere il tasto + o - per impostare il valore desiderato.
8. Conferma le tue impostazioni premendo il pulsante MODE. L'indicatore del mese lampeggia nel display della
data (1). Premere il tasto + o - per impostare il valore desiderato.
9. Conferma le tue impostazioni premendo il pulsante MODE. L'indicatore del giorno lampeggia nel display della
data. Premere il tasto + o - per impostare il valore desiderato.
10. Conferma le tue impostazioni premendo il pulsante MODE. Nel luogo del display del giorno della settimana (9),
l'indicatore della lingua di questo display lampeggia. Premere il tasto + o - per impostare il valore desiderato.
11. Conferma le tue impostazioni premendo il pulsante MODE.
Note:
Premere e tenere premuto il pulsante + o - per accelerare l'impostazione dei valori.
Se non si preme alcun pulsante per 20 secondi, il display LCD ritorna automaticamente al display standard.
Il simbolo AM nel display del tempo (7) indica prima di mezzogiorno nella modalità 12 ore. Il simbolo PM nella
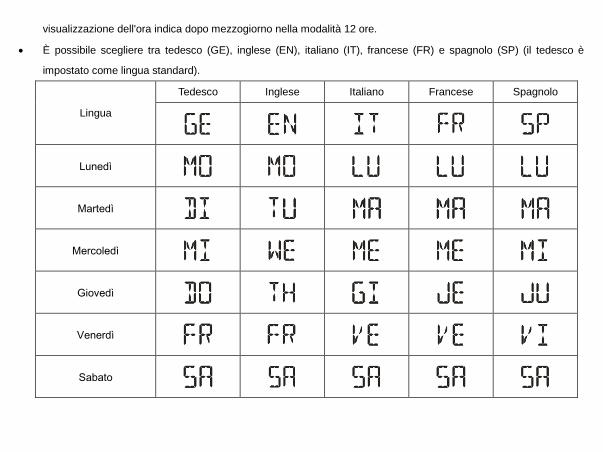
visualizzazione dell'ora indica dopo mezzogiorno nella modalità 12 ore.
È possibile scegliere tra tedesco (GE), inglese (EN), italiano (IT), francese (FR) e spagnolo (SP) (il tedesco è
impostato come lingua standard).
Lingua
Tedesco Inglese Italiano Francese Spagnolo
Lunedì
Martedì
Mercoledì
Giovedì
Venerdì
Sabato
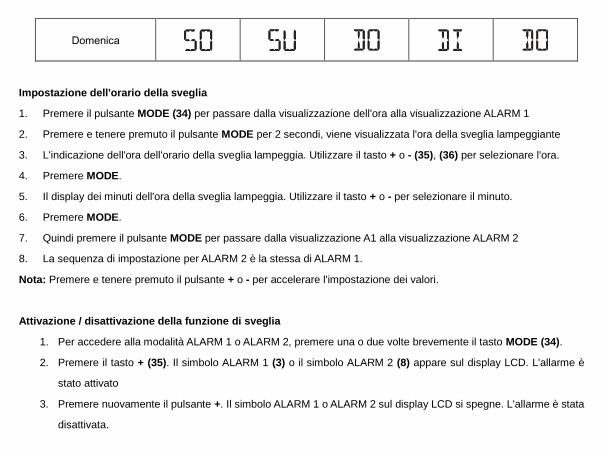
Domenica
Impostazione dell'orario della sveglia
1. Premere il pulsante MODE (34) per passare dalla visualizzazione dell'ora alla visualizzazione ALARM 1
2. Premere e tenere premuto il pulsante MODE per 2 secondi, viene visualizzata l'ora della sveglia lampeggiante
3. L'indicazione dell'ora dell'orario della sveglia lampeggia. Utilizzare il tasto + o - (35), (36) per selezionare l'ora.
4. Premere MODE.
5. Il display dei minuti dell'ora della sveglia lampeggia. Utilizzare il tasto + o - per selezionare il minuto.
6. Premere MODE.
7. Quindi premere il pulsante MODE per passare dalla visualizzazione A1 alla visualizzazione ALARM 2
8. La sequenza di impostazione per ALARM 2 è la stessa di ALARM 1.
Nota: Premere e tenere premuto il pulsante + o - per accelerare l'impostazione dei valori.
Attivazione / disattivazione della funzione di sveglia
1. Per accedere alla modalità ALARM 1 o ALARM 2, premere una o due volte brevemente il tasto MODE (34).
2. Premere il tasto + (35). Il simbolo ALARM 1 (3) o il simbolo ALARM 2 (8) appare sul display LCD. L'allarme è
stato attivato
3. Premere nuovamente il pulsante +. Il simbolo ALARM 1 o ALARM 2 sul display LCD si spegne. L'allarme è stata
disattivata.
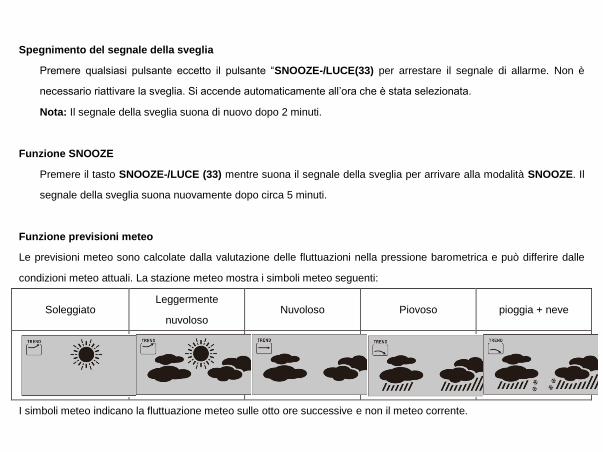
Spegnimento del segnale della sveglia
Premere qualsiasi pulsante eccetto il pulsante “SNOOZE-/LUCE(33) per arrestare il segnale di allarme. Non è
necessario riattivare la sveglia. Si accende automaticamente all’ora che è stata selezionata.
Nota: Il segnale della sveglia suona di nuovo dopo 2 minuti.
Funzione SNOOZE
Premere il tasto SNOOZE-/LUCE (33) mentre suona il segnale della sveglia per arrivare alla modalità SNOOZE. Il
segnale della sveglia suona nuovamente dopo circa 5 minuti.
Funzione previsioni meteo
Le previsioni meteo sono calcolate dalla valutazione delle fluttuazioni nella pressione barometrica e può differire dalle
condizioni meteo attuali. La stazione meteo mostra i simboli meteo seguenti:
Soleggiato Leggermente
nuvoloso Nuvoloso Piovoso pioggia + neve
I simboli meteo indicano la fluttuazione meteo sulle otto ore successive e non il meteo corrente.
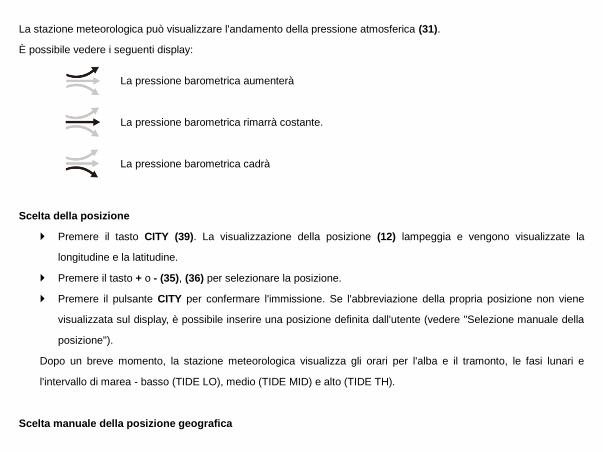
La stazione meteorologica può visualizzare l'andamento della pressione atmosferica (31).
È possibile vedere i seguenti display:
La pressione barometrica aumenterà
La pressione barometrica rimarrà costante.
La pressione barometrica cadrà
Scelta della posizione
Premere il tasto CITY (39). La visualizzazione della posizione (12) lampeggia e vengono visualizzate la
longitudine e la latitudine.
Premere il tasto + o - (35), (36) per selezionare la posizione.
Premere il pulsante CITY per confermare l'immissione. Se l'abbreviazione della propria posizione non viene
visualizzata sul display, è possibile inserire una posizione definita dall'utente (vedere "Selezione manuale della
posizione").
Dopo un breve momento, la stazione meteorologica visualizza gli orari per l'alba e il tramonto, le fasi lunari e
l'intervallo di marea - basso (TIDE LO), medio (TIDE MID) e alto (TIDE TH).
Scelta manuale della posizione geografica
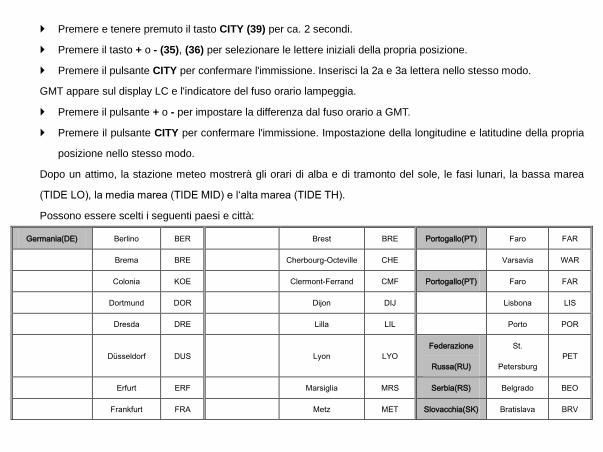
Premere e tenere premuto il tasto CITY (39) per ca. 2 secondi.
Premere il tasto + o - (35), (36) per selezionare le lettere iniziali della propria posizione.
Premere il pulsante CITY per confermare l'immissione. Inserisci la 2a e 3a lettera nello stesso modo.
GMT appare sul display LC e l'indicatore del fuso orario lampeggia.
Premere il pulsante + o - per impostare la differenza dal fuso orario a GMT.
Premere il pulsante CITY per confermare l'immissione. Impostazione della longitudine e latitudine della propria
posizione nello stesso modo.
Dopo un attimo, la stazione meteo mostrerà gli orari di alba e di tramonto del sole, le fasi lunari, la bassa marea
(TIDE LO), la media marea (TIDE MID) e l‘alta marea (TIDE TH).
Possono essere scelti i seguenti paesi e città:
Germania(DE) Berlino BER Brest BRE Portogallo(PT) Faro FAR
Brema BRE Cherbourg-Octeville CHE Varsavia WAR
Colonia KOE Clermont-Ferrand CMF Portogallo(PT) Faro FAR
Dortmund DOR Dijon DIJ Lisbona LIS
Dresda DRE Lilla LIL Porto POR
Düsseldorf DUS Lyon LYO
Federazione
Russa(RU)
St.
Petersburg
PET
Erfurt ERF Marsiglia MRS Serbia(RS) Belgrado BEO
Frankfurt FRA Metz MET Slovacchia(SK) Bratislava BRV
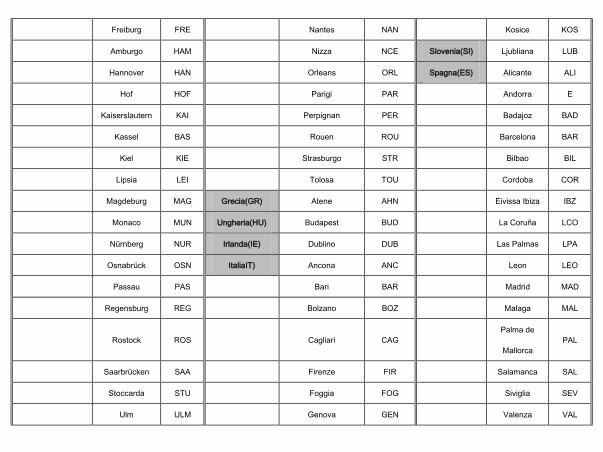
Freiburg FRE Nantes NAN Kosice KOS
Amburgo HAM Nizza NCE Slovenia(SI) Ljubliana LUB
Hannover HAN Orleans ORL Spagna(ES) Alicante ALI
Hof HOF Parigi PAR Andorra E
Kaiserslautern KAI Perpignan PER Badajoz BAD
Kassel BAS Rouen ROU Barcelona BAR
Kiel KIE Strasburgo STR Bilbao BIL
Lipsia LEI Tolosa TOU Cordoba COR
Magdeburg MAG Grecia(GR) Atene AHN Eivissa Ibiza IBZ
Monaco MUN Ungheria(HU) Budapest BUD La Coruña LCO
Nürnberg NUR Irlanda(IE) Dublino DUB Las Palmas LPA
Osnabrück OSN ItaliaIT) Ancona ANC Leon LEO
Passau PAS Bari BAR Madrid MAD
Regensburg REG Bolzano BOZ Malaga MAL
Rostock ROS Cagliari CAG
Palma de
Mallorca
PAL
Saarbrücken SAA Firenze FIR Salamanca SAL
Stoccarda STU Foggia FOG Siviglia SEV
Ulm ULM Genova GEN Valenza VAL
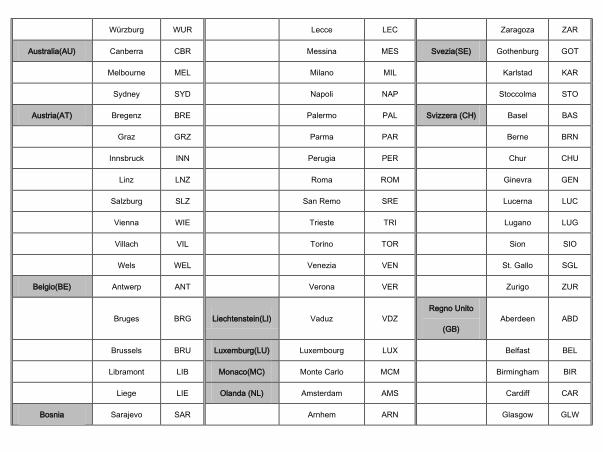
Würzburg WUR Lecce LEC Zaragoza ZAR
Australia(AU) Canberra CBR Messina MES Svezia(SE) Gothenburg GOT
Melbourne MEL Milano MIL Karlstad KAR
Sydney SYD Napoli NAP Stoccolma STO
Austria(AT) Bregenz BRE Palermo PAL Svizzera (CH) Basel BAS
Graz GRZ Parma PAR Berne BRN
Innsbruck INN Perugia PER Chur CHU
Linz LNZ Roma ROM Ginevra GEN
Salzburg SLZ San Remo SRE Lucerna LUC
Vienna WIE Trieste TRI Lugano LUG
Villach VIL Torino TOR Sion SIO
Wels WEL Venezia VEN St. Gallo SGL
Belgio(BE) Antwerp ANT Verona VER Zurigo ZUR
Bruges BRG Liechtenstein(LI) Vaduz VDZ
Regno Unito
(GB)
Aberdeen ABD
Brussels BRU Luxemburg(LU) Luxembourg LUX Belfast BEL
Libramont LIB Monaco(MC) Monte Carlo MCM Birmingham BIR
Liege LIE Olanda (NL) Amsterdam AMS Cardiff CAR
Bosnia Sarajevo SAR Arnhem ARN Glasgow GLW

&Herzegovina(BA)
Croazia(HR) Split SPL Eindhoven EIN Londra LON
Zagabria ZAG Groningen GRO Manchester MAN
Repubblica
Ceca(CZ)
Brno BRN Rotterdam ROSSO
Newcastle
upon Tyne
NEC
Praga PRG L'Aia DHA Plymouth PLY
Danimarca(DK) Aalborg ALB
Nuova
Zelanda(NZ)
Wellington WLG Stati Uniti(US) Los Angeles LAX
Copenhagen KOB Norvegia (NO) Bergen BGN New York NYC
Odense ODE Lillehammer LIL Washington WAS
Finlandia (FI) Helsinki HEL Oslo OSL Lithuania(LT) Vilnius VNO
Francia(FR Ajaccio AJA Polonia(PL) Cracovia KRA Bulgaria(BG) Sofia SOF
Biarritz BIA Gdansk GDA Romania(RO) Bucharest BUH
Bordeaux BOR Poznan POZ Cipro(CY) Nicosia NIC
Fasi lunari
La stazione meteo dispone di un indicatore che indica automaticamente la fase lunare attuale (13).
Luna
nuova
Mezzaluna
crescente Mezzaluna
Luna piena
crescente
Luna
piena
Luna piena
calante Mezzaluna
Mezzaluna
calante
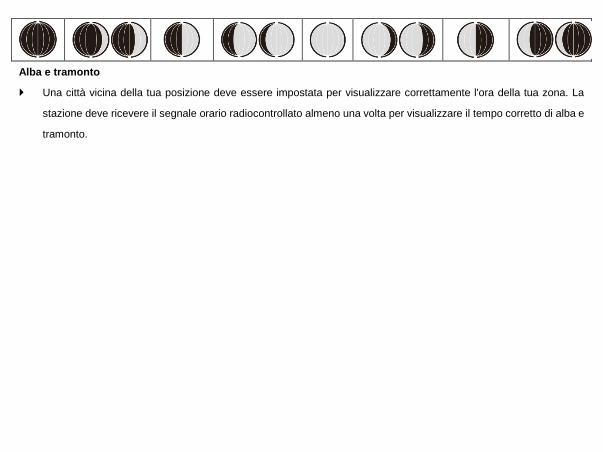
Alba e tramonto
Una città vicina della tua posizione deve essere impostata per visualizzare correttamente l'ora della tua zona. La
stazione deve ricevere il segnale orario radiocontrollato almeno una volta per visualizzare il tempo corretto di alba e
tramonto.
Lettura della pressione atmosferica delle ultime 12 ore
Premere ripetutamente il tasto HISTORY ABS/REL (38) per poter leggere i valori di pressione atmosferica delle
ultime 12 ore trascorse.
0HR = pressione barometrica presente
–1HR = pressione barometrica un'ora prima
–2HR = pressione barometrica due ore prima, ecc.
……………
–12HR = Pressione atmosferica dodici ore prima ecc.
Impostazione della pressione dell'aria
Le previsioni di questa stazione meteorologica derivano dall'analisi delle modifiche della pressione atmosferica.
La visualizzazione della pressione dell'aria (30) è installata dalla fabbrica sulla pressione atmosferica assoluta.
Poiché la pressione dell'aria generalmente cala con l'altezza sul livello del mare, il servizio meteorologico in regola
viene indicato con la cosiddetta pressione atmosferica relativa. Questa pressione atmosferica relativa viene adattata
alla topografia del territorio, per ottenere valori confrontabili.
Potete adattare la visualizzazione della pressione atmosferica relativa della vostra stazione atmosferica alle
condizioni della vostra base operativa. In merito a ciò dovete comunicare una volta la pressione atmosferica relativa
attuale alla vostra stazione meteo. Potete trovarli presso il vostro servizio meteorologico locale oppure su internet.
Procedere con le impostazioni come segue:
Premere e tenere premuto il tasto HISTORY ABS/REL (38) per circa 3 secondi. Premere poi il tasto + o - (35),

(36), per commutare tra la visualizzazione della pressione atmosferica relativa e quella della pressione
atmosferica assoluta.
Premere e tenere premuto il tasto HISTORY ABS/REL per confermare. Lampeggia la visualizzazione della
pressione atmosferica. Ora potete impostare il valore desiderato con il tasto + o -.
Confermate la vostra immissione premendo il tasto HISTORY ABS/REL. Ora la vostra stazione meteorologica
indica la pressione atmosferica relativa.
Se volete che la stazione meteorologica visualizzi la pressione atmosferica assoluta, procedete come segue:
Premere e tenere premuto il tasto HISTORY ABS/REL per ca. 3 secondi. Premere poi il tasto + o - per passare
alla visualizzazione della pressione atmosferica assoluta. Confermate premendo il tasto HISTORY ABS/REL.
Impostazione del canale
La stazione meteo riceve il segnale del sensore esterno in modo automatico dopo che sono state eseguite tutte le
impostazioni.
Nota: in caso di disturbi provocati da apparecchi presenti nelle vicinanze, avverrà una trasmissione di segnali radio
e lampeggeranno intanto i simboli dell'umidità (esterna) (22) e della temperatura esterna (25). Selezionare un altro
canale per il sensore esterno premendo il tasto CH (37) sulla stazione meteo o in alternativa tramite il pulsante di
selezione canale (44) sul sensore esterno I dati in questione vengono visualizzati nel display a cristalli liquidi.
- 1: canale sensore esterno 1
- 2: canale sensore esterno 2
- 3: canale sensore esterno 3
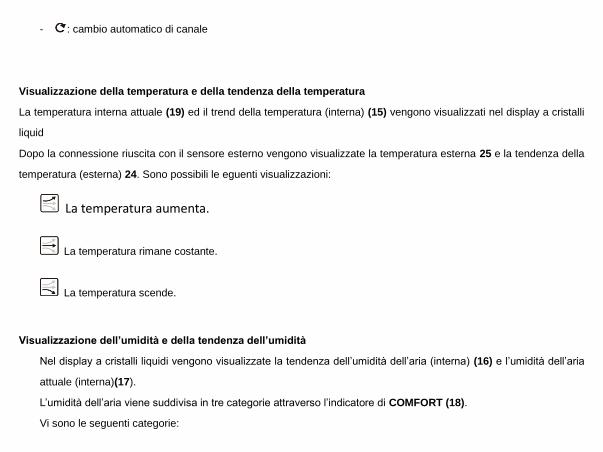
- : cambio automatico di canale
Visualizzazione della temperatura e della tendenza della temperatura
La temperatura interna attuale (19) ed il trend della temperatura (interna) (15) vengono visualizzati nel display a cristalli
liquid
Dopo la connessione riuscita con il sensore esterno vengono visualizzate la temperatura esterna 25 e la tendenza della
temperatura (esterna) 24. Sono possibili le eguenti visualizzazioni:
La temperatura aumenta.
La temperatura rimane costante.
La temperatura scende.
Visualizzazione dell’umidità e della tendenza dell’umidità
Nel display a cristalli liquidi vengono visualizzate la tendenza dell’umidità dell’aria (interna) (16) e l’umidità dell’aria
attuale (interna)(17).
L’umidità dell’aria viene suddivisa in tre categorie attraverso l’indicatore di COMFORT (18).
Vi sono le seguenti categorie:
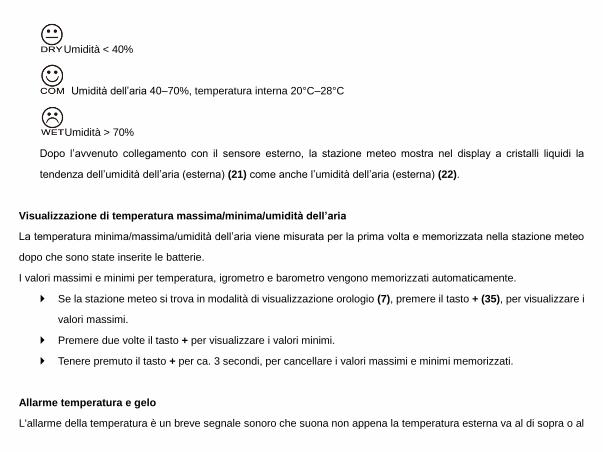
Umidità < 40%
Umidità dell’aria 40–70%, temperatura interna 20°C–28°C
Umidità > 70%
Dopo l’avvenuto collegamento con il sensore esterno, la stazione meteo mostra nel display a cristalli liquidi la
tendenza dell’umidità dell’aria (esterna) (21) come anche l’umidità dell’aria (esterna) (22).
Visualizzazione di temperatura massima/minima/umidità dell’aria
La temperatura minima/massima/umidità dell’aria viene misurata per la prima volta e memorizzata nella stazione meteo
dopo che sono state inserite le batterie.
I valori massimi e minimi per temperatura, igrometro e barometro vengono memorizzati automaticamente.
Se la stazione meteo si trova in modalità di visualizzazione orologio (7), premere il tasto + (35), per visualizzare i
valori massimi.
Premere due volte il tasto + per visualizzare i valori minimi.
Tenere premuto il tasto + per ca. 3 secondi, per cancellare i valori massimi e minimi memorizzati.
Allarme temperatura e gelo
L'allarme della temperatura è un breve segnale sonoro che suona non appena la temperatura esterna va al di sopra o al

di sotto dell'ambito di temperatura imposta. Per impostare l‘ambito di temperatura desiderato, procedere come segue:
Per accedere alla modalità di allarme temperatura, premere il tasto – (36).
Tenere premuto il tasto – per 3 secondi. La visualizzazione della temperatura massima lampeggia. Premere il
tasto + o - per impostare i valori.
Premere il tasto MODE (34) per confermare la scelta. La visualizzazione minima della temperatura lampeggia.
Premere il tasto + o - per impostare i valori.
Premere il tasto MODE, per confermare l’inserimento.
Attivazione e disattivazione dell’allarme temperatura e gelo
Se è stato attivato più di un sensore esterno, premere il tasto CH (37) per selezionarne uno.
Premere ripetutamente il tasto – (36), per attivare l’allarme temperatura e gelo.
Se l’allarme gelo è attivato, accanto alla temperatura esterna compare il relativo simbolo (23). Il segnale di allarme viene
emesso se la temperatura è compresa fra –1 °C e + 3 °C.
Se l’allarme temperatura è attivato, accanto alla temperatura esterna compare il relativo simbolo. Il segnale di allarme
viene emesso al raggiungimento dei valori impostati.
e gli allarmi temperatura e gelo sono attivati, entrambi i simboli compaiono sul display.
Illuminazione sfondo
Premere il tasto SNOOZE/LUCE (33). L’illuminazione di sfondo si illumina per 5 secondi.

Display stato batteria
Il display dello stato della batteria (20), (26) appare, se le batterie sono scariche. Fare attenzione a che le batterie
vengano sostituite con debito anticipo (vedere il capitolo “Sostituzione delle batterie”).
Sostituzione delle batterie
Stazione meteo:
Sostituire le batterie quando il display a cristalli liquidi dovesse essere poco leggibile o quando compare
l’indicatore della batteria (20).
Rimuovere il coperchio del vano portabatterie posto sul retro della stazione meteo.
Rimuovere le batterie usate. Inserire 2 nuove batterie di tipo AA da 1,5V.
Nota: Facendo questo, tenere conto della polarità corretta. Questa viene mostrata nel vano portabatterie (40).
Chiudere il vano batteria.
Sensore esterno:
Sostituire le batterie quando compare l’indicatore della batteria (26).
Rimuovere il coperchio del vano portabatterie posto sul retro del sensore esterno.
Rimuovere le batterie usate.
Inserire 2 nuove batterie di tipo AA da 1,5V.
Nota: Facendo questo, tenere conto della polarità corretta. Questa viene mostrata nel vano portabatterie (45).
Chiudere il vano batteria.
Effetti della ricezione ambientale
La stazione ottiene l'orario preciso con tecnologia wireless. Come per tutti i dispositivi wireless, la ricezione può essere
influenzata dalle seguenti circostanze:
Lunga distanza di trasmissione
Prossimità di montagne e valli
Prossimità di autostrade, stazioni, aeroporti, cavi di alta tensione e così via.
Prossimità di cantieri
Collocazione tra edifici alti
Collocazione all'interno di edifici in cemento
Prossimità di apparecchiature elettriche (computer, TV e altro) e strutture metalliche
Collocazione all'interno di veicoli in movimento
Collocare la stazione in una posizione con segnale ottimale, ad esempio vicino a una finestra e lontano da superfici
metalliche o apparecchiature elettriche.
Precauzioni
L'unità principale è destinata solo all'uso in ambienti interni. Il sensore esterno è destinato all'uso esterno.
Non esporre l'unità a forza eccessiva o shock.
Non esporre l'unità a temperature estreme, raggi solari diretti, polvere o umidità.
Non immergere in acqua.
Evitare il contatto con qualsiasi materiale corrosivo.
Non gettare l'unità nel fuoco in quanto potrebbe esplodere.
Non aprire l'alloggiamento posteriore interno o alterare componenti di questa unità.
Avvisi di sicurezza delle batterie
Utilizzare solo batterie alcaline, non batterie ricaricabili.
Installare le batterie correttamente rispettando la polarità (+/–).
Sostituire sempre un set completo di batterie.
Non utilizzare mai batterie usate e nuove contemporaneamente.
Rimuovere immediatamente le batterie scariche.
Rimuovere le batterie inutilizzate.
Non ricaricare e non smaltire le batterie nel fuoco in quanto possono esplodere.
Assicurarsi che le batterie siano conservate lontano da oggetti metallici in quanto il contatto può causare un corto
circuito.
Evitare di esporre le batterie a temperatura o a umidità estreme o a luce solare diretta.
Tenere tutte le batterie fuori dalla portata dei bambini. Perché potrebbero causare il rischio di soffocamento.
Utilizzare il prodotto solo per lo scopo previsto.
Obblighi in base alla normativa sulle batterie
Le batterie vecchie non appartengono ai rifiuti domestici in quanto possono causare danni alla salute e
all'ambiente. È possibile consegnare le batterie usate gratuitamente al proprio rivenditore e punti di
raccolta. L'utente finale è obbligato per legge a portare le batterie esauste ai distributori e agli altri punti
di raccolta!
Considerare il carico in base alla normativa sui dispositivi elettrici
Questo simbolo indica che i dispositivi elettrici alla fine del loro ciclo di vita devono essere smaltiti
separatamente dai rifiuti domestici generali. Portare l'unità al proprio punto di raccolta rifiuti locale o a
un centro per la raccolta differenziata. Questa disposizione si applica a tutti i paesi dell’Unione europea
e agli altri paesi europei in cui viene praticata la raccolta differenziata.

WS6762 – Meteostanice s rádiově řízenými hodinami
Popis součástí
Meteostanice:


DISPLAY (ZOBRAZENÍ)
1- Zobrazení data 2- Zobrazení měsíce
3- Budík 1 4- Zobrazení opakovaného buzení
5- Symbol rádiového příjmu 6- Zobrazení DST (letní čas)
7- Zobrazení času 8- Budík 2
9- Zobrazení dne v týdnu 10- Východ slunce / čas východu slunce
11- Zobrazení rozsahu přílivu a odlivu 12- Umístění
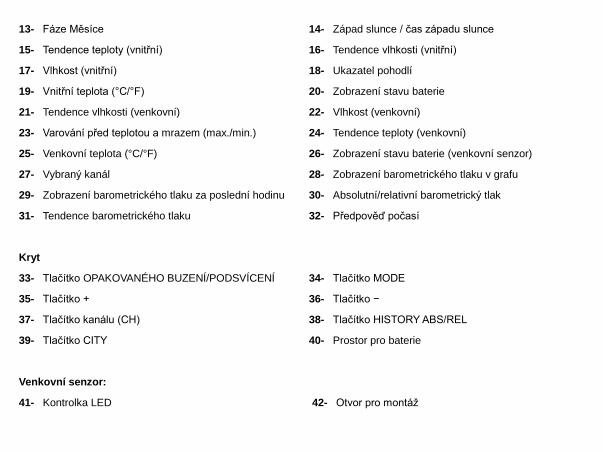
13- Fáze Měsíce 14- Západ slunce / čas západu slunce
15- Tendence teploty (vnitřní) 16- Tendence vlhkosti (vnitřní)
17- Vlhkost (vnitřní) 18- Ukazatel pohodlí
19- Vnitřní teplota (°C/°F) 20- Zobrazení stavu baterie
21- Tendence vlhkosti (venkovní) 22- Vlhkost (venkovní)
23- Varování před teplotou a mrazem (max./min.) 24- Tendence teploty (venkovní)
25- Venkovní teplota (°C/°F) 26- Zobrazení stavu baterie (venkovní senzor)
27- Vybraný kanál 28- Zobrazení barometrického tlaku v grafu
29- Zobrazení barometrického tlaku za poslední hodinu 30- Absolutní/relativní barometrický tlak
31- Tendence barometrického tlaku 32- Předpověď počasí
Kryt
33- Tlačítko OPAKOVANÉHO BUZENÍ/PODSVÍCENÍ 34- Tlačítko MODE
35- Tlačítko + 36- Tlačítko −
37- Tlačítko kanálu (CH) 38- Tlačítko HISTORY ABS/REL
39- Tlačítko CITY 40- Prostor pro baterie
Venkovní senzor:
41- Kontrolka LED 42- Otvor pro montáž
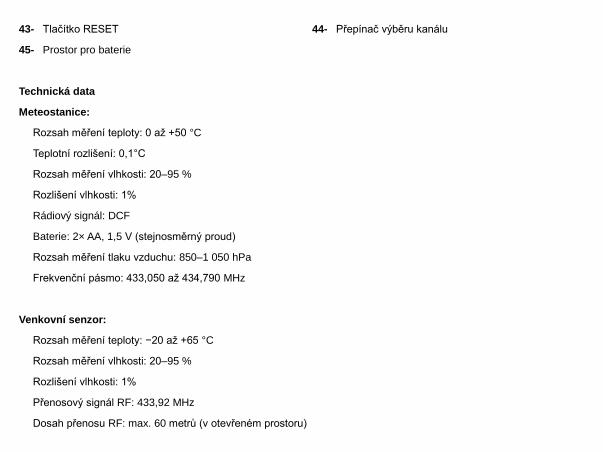
43- Tlačítko RESET 44- Přepínač výběru kanálu
45- Prostor pro baterie
Technická data
Meteostanice:
Rozsah měření teploty: 0 až +50 °C
Teplotní rozlišení: 0,1°C
Rozsah měření vlhkosti: 20–95 %
Rozlišení vlhkosti: 1%
Rádiový signál: DCF
Baterie: 2× AA, 1,5 V (stejnosměrný proud)
Rozsah měření tlaku vzduchu: 850–1 050 hPa
Frekvenční pásmo: 433,050 až 434,790 MHz
Venkovní senzor:
Rozsah měření teploty: −20 až +65 °C
Rozsah měření vlhkosti: 20–95 %
Rozlišení vlhkosti: 1%
Přenosový signál RF: 433,92 MHz
Dosah přenosu RF: max. 60 metrů (v otevřeném prostoru)
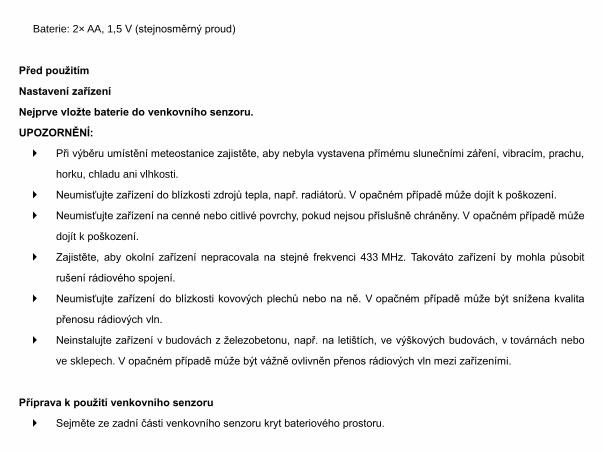
Baterie: 2× AA, 1,5 V (stejnosměrný proud)
Před použitím
Nastavení zařízení
Nejprve vložte baterie do venkovního senzoru.
UPOZORNĚNÍ:
Při výběru umístění meteostanice zajistěte, aby nebyla vystavena přímému slunečními záření, vibracím, prachu,
horku, chladu ani vlhkosti.
Neumisťujte zařízení do blízkosti zdrojů tepla, např. radiátorů. V opačném případě může dojít k poškození.
Neumisťujte zařízení na cenné nebo citlivé povrchy, pokud nejsou příslušně chráněny. V opačném případě může
dojít k poškození.
Zajistěte, aby okolní zařízení nepracovala na stejné frekvenci 433 MHz. Takováto zařízení by mohla působit
rušení rádiového spojení.
Neumisťujte zařízení do blízkosti kovových plechů nebo na ně. V opačném případě může být snížena kvalita
přenosu rádiových vln.
Neinstalujte zařízení v budovách z železobetonu, např. na letištích, ve výškových budovách, v továrnách nebo
ve sklepech. V opačném případě může být vážně ovlivněn přenos rádiových vln mezi zařízeními.
Příprava k použití venkovního senzoru
Sejměte ze zadní části venkovního senzoru kryt bateriového prostoru.
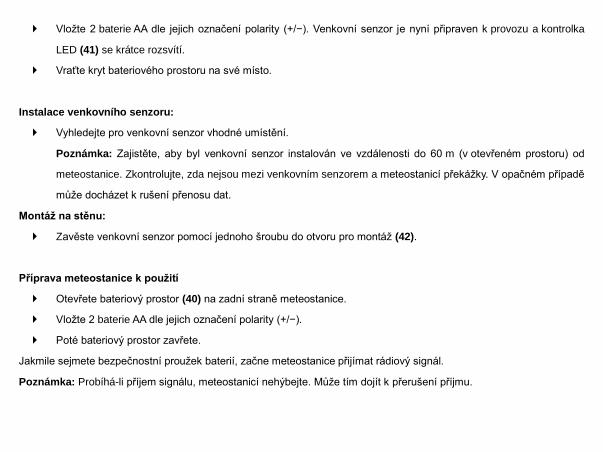
Vložte 2 baterie AA dle jejich označení polarity (+/−). Venkovní senzor je nyní připraven k provozu a kontrolka
LED (41) se krátce rozsvítí.
Vraťte kryt bateriového prostoru na své místo.
Instalace venkovního senzoru:
Vyhledejte pro venkovní senzor vhodné umístění.
Poznámka: Zajistěte, aby byl venkovní senzor instalován ve vzdálenosti do 60 m (v otevřeném prostoru) od
meteostanice. Zkontrolujte, zda nejsou mezi venkovním senzorem a meteostanicí překážky. V opačném případě
může docházet k rušení přenosu dat.
Montáž na stěnu:
Zavěste venkovní senzor pomocí jednoho šroubu do otvoru pro montáž (42).
Příprava meteostanice k použití
Otevřete bateriový prostor (40) na zadní straně meteostanice.
Vložte 2 baterie AA dle jejich označení polarity (+/−).
Poté bateriový prostor zavřete.
Jakmile sejmete bezpečnostní proužek baterií, začne meteostanice přijímat rádiový signál.
Poznámka: Probíhá-li příjem signálu, meteostanicí nehýbejte. Může tím dojít k přerušení příjmu.
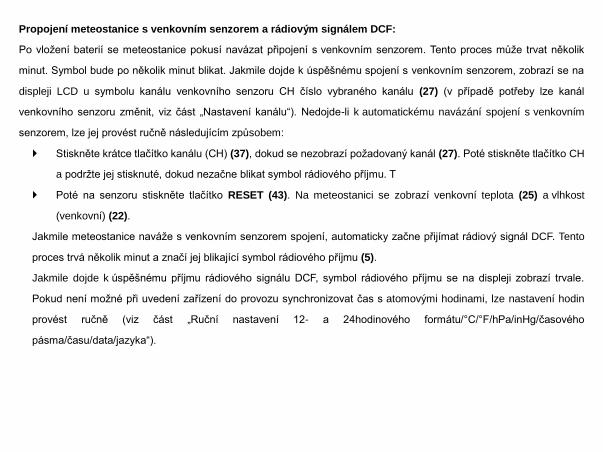
Propojení meteostanice s venkovním senzorem a rádiovým signálem DCF:
Po vložení baterií se meteostanice pokusí navázat připojení s venkovním senzorem. Tento proces může trvat několik
minut. Symbol bude po několik minut blikat. Jakmile dojde k úspěšnému spojení s venkovním senzorem, zobrazí se na
displeji LCD u symbolu kanálu venkovního senzoru CH číslo vybraného kanálu (27) (v případě potřeby lze kanál
venkovního senzoru změnit, viz část „Nastavení kanálu“). Nedojde-li k automatickému navázání spojení s venkovním
senzorem, lze jej provést ručně následujícím způsobem:
Stiskněte krátce tlačítko kanálu (CH) (37), dokud se nezobrazí požadovaný kanál (27). Poté stiskněte tlačítko CH
a podržte jej stisknuté, dokud nezačne blikat symbol rádiového příjmu. T
Poté na senzoru stiskněte tlačítko RESET (43). Na meteostanici se zobrazí venkovní teplota (25) a vlhkost
(venkovní) (22).
Jakmile meteostanice naváže s venkovním senzorem spojení, automaticky začne přijímat rádiový signál DCF. Tento
proces trvá několik minut a značí jej blikající symbol rádiového příjmu (5).
Jakmile dojde k úspěšnému příjmu rádiového signálu DCF, symbol rádiového příjmu se na displeji zobrazí trvale.
Pokud není možné při uvedení zařízení do provozu synchronizovat čas s atomovými hodinami, lze nastavení hodin
provést ručně (viz část „Ruční nastavení 12- a 24hodinového formátu/°C/°F/hPa/inHg/časového
pásma/času/data/jazyka“).
Rádiový signál (DCF):
Signál DCF (vysílač časového signálu) se skládá z časových impulzů vysílaných jedněmi z nejpřesnějších hodin na
světě v blízkosti Frankfurtu nad Mohanem v Německu.
Za ideálních podmínek může meteostanice zachytit tento signál na vzdálenost až přibližně 2 000 km od Frankfurtu
nad Mohanem. Příjem rádiového signálu trvá obecně přibližně 3–10 minut.
Příjem může být významně narušen překážkami (např. betonovými zdmi) nebo zdroji rušení (např. jinými
elektrickými zařízeními). Pokud dojde k problémům s příjmem, změňte umístění meteostanice (např. do blízkosti
okna).
Ovládání
Příjem rádiového časového signálu DCF
Jakmile dojde ke spojení s venkovním senzorem, nebo 3 minuty po vložení baterií, začne meteostanice automaticky
vyhledávat rádiový signál DCF. Vyhledávání je na displeji LCD indikováno blikajícím symbolem rádiového příjmu (5).
Poznámka: V železobetonových budovách může být příjem rádiového signálu výrazně narušen (viz část „Nastavení
zařízení“).
Hodiny se s rádiovým signálem DCF synchronizují každý den v 1:00, 2:00 a 3:00 hodin, aby se opravily případné
odchylky od přesného času.
Příjem rádiového signálu DCF lze v meteostanici spustit také ručně.
Stiskněte současně tlačítka + a − (35), (36). Meteostanice se pokusí přijmout rádiový signál DCF. Tento proces
trvá několik minut a značí jej blikající symbol rádiového příjmu.
Pokud nelze navázat spojení s rádiovým signálem DCF, vyhledávání se zastaví.
Poznámka: Pokud nemohou hodiny meteostanice přijmout rádiový signál DCF kvůli chybám, příliš velké vzdálenosti
od vysílače nebo z podobných důvodů, lze nastavit čas ručně. Je-li příjem signálu DCF úspěšný, ruční nastavení se
přepíší.
Ruční nastavení
Dojde-li k přemístění meteostanice, může dojít ke zhoršení či přerušení příjmu rádiového signálu DCF. Dojde-li
k tomu, lze nastavit zařízení ručně.
Postupujte podle těchto kroků:
1. Stiskněte tlačítko MODE (34) a podržte jej stisknuté po dobu 3 sekund. Na displeji začne blikat hodnota
„12Hr“ nebo „24Hr“. Stisknutím tlačítka + nebo − (35), (36) vyberte požadovaný formát hodin.
2. Stisknutím tlačítka MODE potvrďte nastavení. Na displeji začne blikat jednotka teploty „°C“ nebo „°F“.
Stisknutím tlačítka + nebo − vyberte požadovanou jednotku teploty.
3. Stisknutím tlačítka MODE potvrďte nastavení. Na displeji začne blikat jednotka barometrického tlaku.
Stisknutím tlačítka + nebo − nastavte požadovanou jednotku (hPa/inHg).
4. Stisknutím tlačítka MODE potvrďte nastavení. Na displeji začne blikat značka časového pásma. Stisknutím
tlačítka + nebo − nastavte požadovanou hodnotu (−2 to +2). Hodiny lze ručně nastavit na časové pásmo země,
ve které hodiny přijímají signál DCF, ale kde se skutečný čas liší od přijímaného času. Pokud je například čas
v dané zemi o 1 hodinu před časem v Německu, nastavte zobrazení času na 01. Hodiny jsou nyní řízeny
signálem DCF, ale čas je o jednu hodinu napřed.
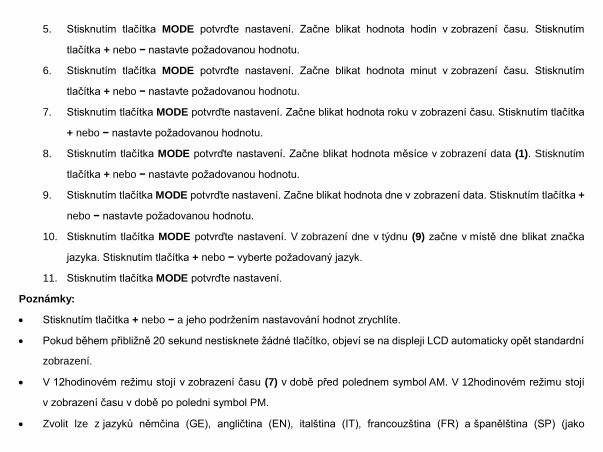
5. Stisknutím tlačítka MODE potvrďte nastavení. Začne blikat hodnota hodin v zobrazení času. Stisknutím
tlačítka + nebo − nastavte požadovanou hodnotu.
6. Stisknutím tlačítka MODE potvrďte nastavení. Začne blikat hodnota minut v zobrazení času. Stisknutím
tlačítka + nebo − nastavte požadovanou hodnotu.
7. Stisknutím tlačítka MODE potvrďte nastavení. Začne blikat hodnota roku v zobrazení času. Stisknutím tlačítka
+ nebo − nastavte požadovanou hodnotu.
8. Stisknutím tlačítka MODE potvrďte nastavení. Začne blikat hodnota měsíce v zobrazení data (1). Stisknutím
tlačítka + nebo − nastavte požadovanou hodnotu.
9. Stisknutím tlačítka MODE potvrďte nastavení. Začne blikat hodnota dne v zobrazení data. Stisknutím tlačítka +
nebo − nastavte požadovanou hodnotu.
10. Stisknutím tlačítka MODE potvrďte nastavení. V zobrazení dne v týdnu (9) začne v místě dne blikat značka
jazyka. Stisknutím tlačítka + nebo − vyberte požadovaný jazyk.
11. Stisknutím tlačítka MODE potvrďte nastavení.
Poznámky:
Stisknutím tlačítka + nebo − a jeho podržením nastavování hodnot zrychlíte.
Pokud během přibližně 20 sekund nestisknete žádné tlačítko, objeví se na displeji LCD automaticky opět standardní
zobrazení.
V 12hodinovém režimu stojí v zobrazení času (7) v době před polednem symbol AM. V 12hodinovém režimu stojí
v zobrazení času v době po poledni symbol PM.
Zvolit lze z jazyků němčina (GE), angličtina (EN), italština (IT), francouzština (FR) a španělština (SP) (jako
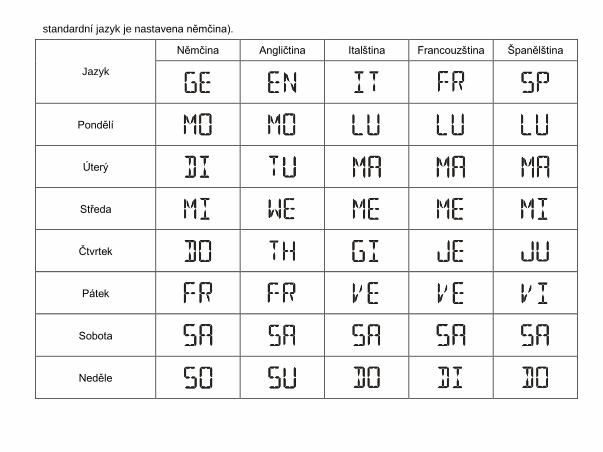
standardní jazyk je nastavena němčina).
Jazyk
Němčina Angličtina Italština Francouzština Španělština
Pondělí
Úterý
Středa
Čtvrtek
Pátek
Sobota
Neděle

Nastavení času budíku
1. Stisknutím tlačítka MODE (34) přepněte ze zobrazení času na zobrazení BUDÍKU 1.
2. Stiskněte tlačítko MODE a podržte jej stisknuté po dobu 2 sekund. Zobrazí se blikající čas budíku.
3. V nastavení času buzení bude blikat zobrazení hodin. Pomocí tlačítka + nebo − (35), (36) vyberte hodinu.
4. Stisknutím tlačítka MODE akci potvrďte.
5. Začne blikat zobrazení minut v času budíku. Pomocí tlačítka + nebo − vyberte minuty.
6. Stisknutím tlačítka MODE akci potvrďte.
7. Poté stisknutím tlačítka MODE přepněte ze zobrazení budíku 1 na zobrazení BUDÍKU 2.
8. Pořadí nastavení BUDÍKU 2 je stejné jako u BUDÍKU 1.
Poznámka: Stisknutím tlačítka + nebo − a jeho podržením nastavování hodnot zrychlíte.
Aktivace a deaktivace funkce budíku
1. Jedním krátkým stisknutím tlačítka MODE (34) přejdete do režimu BUDÍKU 1 a dvojitým krátkým stisknutím
tohoto tlačítka přejdete do režimu BUDÍKU 2.
2. Stiskněte tlačítko + (35). Na displeji LCD se zobrazí symbol BUDÍKU 1 (3) nebo BUDÍKU 2 (8). Budík je aktivní.
3. Stiskněte tlačítko + znovu. Symbol BUDÍKU 1 nebo BUDÍKU 2 z displeje LCD zmizí. Budík se deaktivuje.
Vypnutí signálu budíku
Signál budíku zastavíte stisknutím jakéhokoli tlačítka kromě tlačítka OPAKOVANÉHO BUZENÍ / PODSVÍCENÍ (33).
Buzení není nutné znovu aktivovat. Automaticky se nastaví na dříve zadaný čas budíku.
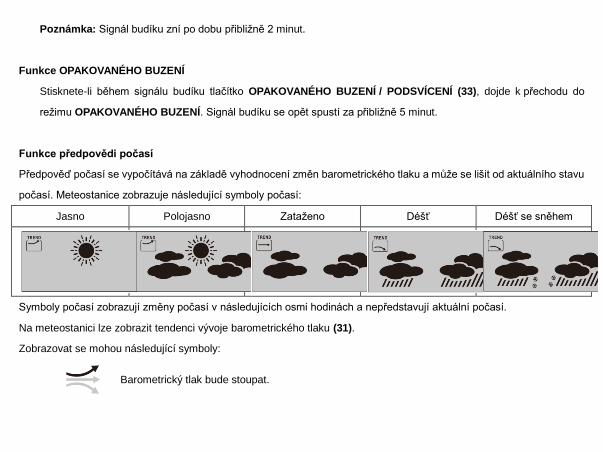
Poznámka: Signál budíku zní po dobu přibližně 2 minut.
Funkce OPAKOVANÉHO BUZENÍ
Stisknete-li během signálu budíku tlačítko OPAKOVANÉHO BUZENÍ / PODSVÍCENÍ (33), dojde k přechodu do
režimu OPAKOVANÉHO BUZENÍ. Signál budíku se opět spustí za přibližně 5 minut.
Funkce předpovědi počasí
Předpověď počasí se vypočítává na základě vyhodnocení změn barometrického tlaku a může se lišit od aktuálního stavu
počasí. Meteostanice zobrazuje následující symboly počasí:
Jasno Polojasno Zataženo Déšť Déšť se sněhem
Symboly počasí zobrazují změny počasí v následujících osmi hodinách a nepředstavují aktuální počasí.
Na meteostanici lze zobrazit tendenci vývoje barometrického tlaku (31).
Zobrazovat se mohou následující symboly:
Barometrický tlak bude stoupat.
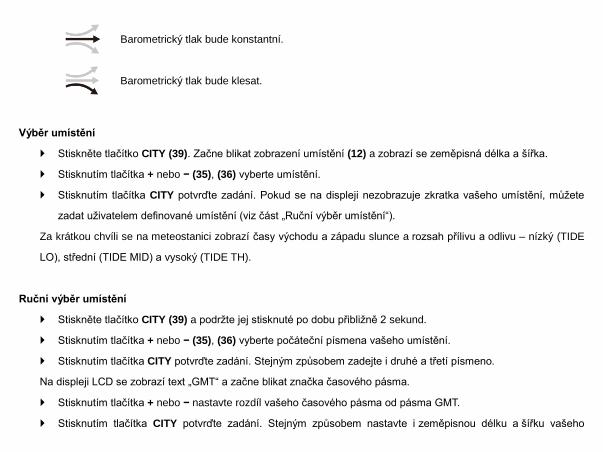
Barometrický tlak bude konstantní.
Barometrický tlak bude klesat.
Výběr umístění
Stiskněte tlačítko CITY (39). Začne blikat zobrazení umístění (12) a zobrazí se zeměpisná délka a šířka.
Stisknutím tlačítka + nebo − (35), (36) vyberte umístění.
Stisknutím tlačítka CITY potvrďte zadání. Pokud se na displeji nezobrazuje zkratka vašeho umístění, můžete
zadat uživatelem definované umístění (viz část „Ruční výběr umístění“).
Za krátkou chvíli se na meteostanici zobrazí časy východu a západu slunce a rozsah přílivu a odlivu – nízký (TIDE
LO), střední (TIDE MID) a vysoký (TIDE TH).
Ruční výběr umístění
Stiskněte tlačítko CITY (39) a podržte jej stisknuté po dobu přibližně 2 sekund.
Stisknutím tlačítka + nebo − (35), (36) vyberte počáteční písmena vašeho umístění.
Stisknutím tlačítka CITY potvrďte zadání. Stejným způsobem zadejte i druhé a třetí písmeno.
Na displeji LCD se zobrazí text „GMT“ a začne blikat značka časového pásma.
Stisknutím tlačítka + nebo − nastavte rozdíl vašeho časového pásma od pásma GMT.
Stisknutím tlačítka CITY potvrďte zadání. Stejným způsobem nastavte i zeměpisnou délku a šířku vašeho
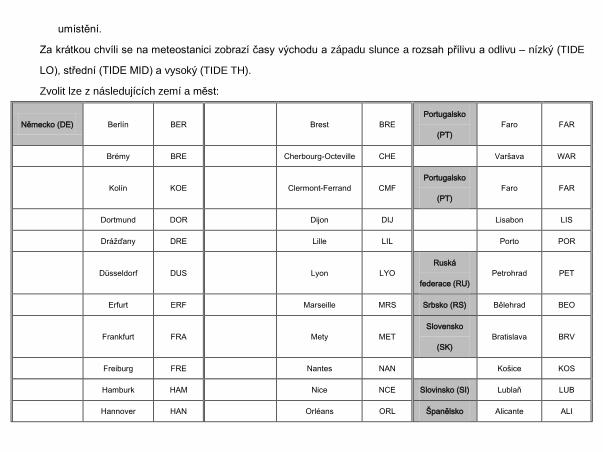
umístění.
Za krátkou chvíli se na meteostanici zobrazí časy východu a západu slunce a rozsah přílivu a odlivu – nízký (TIDE
LO), střední (TIDE MID) a vysoký (TIDE TH).
Zvolit lze z následujících zemí a měst:
Německo (DE) Berlín BER Brest BRE
Portugalsko
(PT)
Faro FAR
Brémy BRE Cherbourg-Octeville CHE Varšava WAR
Kolín KOE Clermont-Ferrand CMF
Portugalsko
(PT)
Faro FAR
Dortmund DOR Dijon DIJ Lisabon LIS
Drážďany DRE Lille LIL Porto POR
Düsseldorf DUS Lyon LYO
Ruská
federace (RU)
Petrohrad PET
Erfurt ERF Marseille MRS Srbsko (RS) Bělehrad BEO
Frankfurt FRA Mety MET
Slovensko
(SK)
Bratislava BRV
Freiburg FRE Nantes NAN Košice KOS
Hamburk HAM Nice NCE Slovinsko (SI) Lublaň LUB
Hannover HAN Orléans ORL Španělsko Alicante ALI
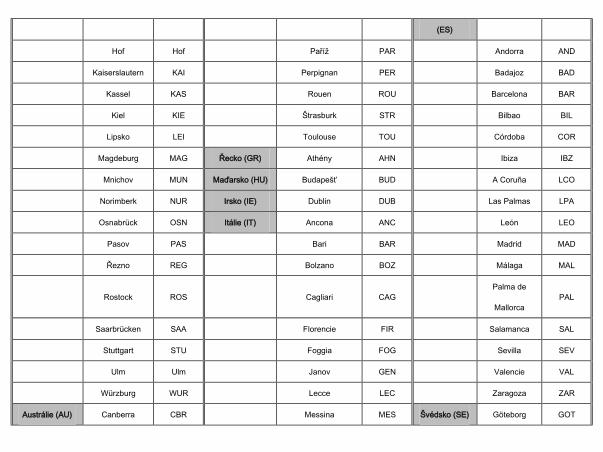
(ES)
Hof Hof Paříž PAR Andorra AND
Kaiserslautern KAI Perpignan PER Badajoz BAD
Kassel KAS Rouen ROU Barcelona BAR
Kiel KIE Štrasburk STR Bilbao BIL
Lipsko LEI Toulouse TOU Córdoba COR
Magdeburg MAG Řecko (GR) Athény AHN Ibiza IBZ
Mnichov MUN Maďarsko (HU) Budapešť BUD A Coruña LCO
Norimberk NUR Irsko (IE) Dublin DUB Las Palmas LPA
Osnabrück OSN Itálie (IT) Ancona ANC León LEO
Pasov PAS Bari BAR Madrid MAD
Řezno REG Bolzano BOZ Málaga MAL
Rostock ROS Cagliari CAG
Palma de
Mallorca
PAL
Saarbrücken SAA Florencie FIR Salamanca SAL
Stuttgart STU Foggia FOG Sevilla SEV
Ulm Ulm Janov GEN Valencie VAL
Würzburg WUR Lecce LEC Zaragoza ZAR
Austrálie (AU) Canberra CBR Messina MES Švédsko (SE) Göteborg GOT
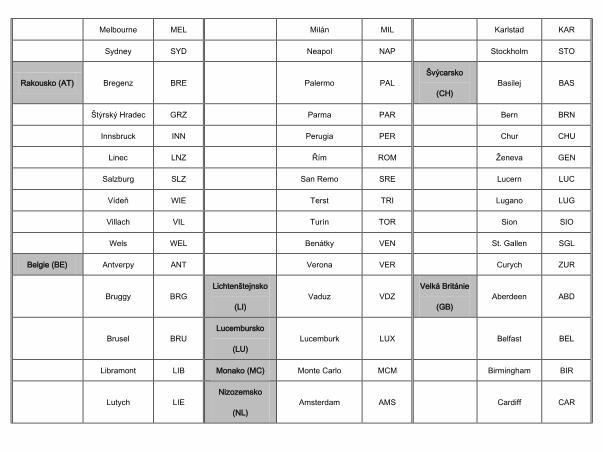
Melbourne MEL Milán MIL Karlstad KAR
Sydney SYD Neapol NAP Stockholm STO
Rakousko (AT) Bregenz BRE Palermo PAL
Švýcarsko
(CH)
Basilej BAS
Štýrský Hradec GRZ Parma PAR Bern BRN
Innsbruck INN Perugia PER Chur CHU
Linec LNZ Řím ROM Ženeva GEN
Salzburg SLZ San Remo SRE Lucern LUC
Vídeň WIE Terst TRI Lugano LUG
Villach VIL Turín TOR Sion SIO
Wels WEL Benátky VEN St. Gallen SGL
Belgie (BE) Antverpy ANT Verona VER Curych ZUR
Bruggy BRG
Lichtenštejnsko
(LI)
Vaduz VDZ
Velká Británie
(GB)
Aberdeen ABD
Brusel BRU
Lucembursko
(LU)
Lucemburk LUX Belfast BEL
Libramont LIB Monako (MC) Monte Carlo MCM Birmingham BIR
Lutych LIE
Nizozemsko
(NL)
Amsterdam AMS Cardiff CAR
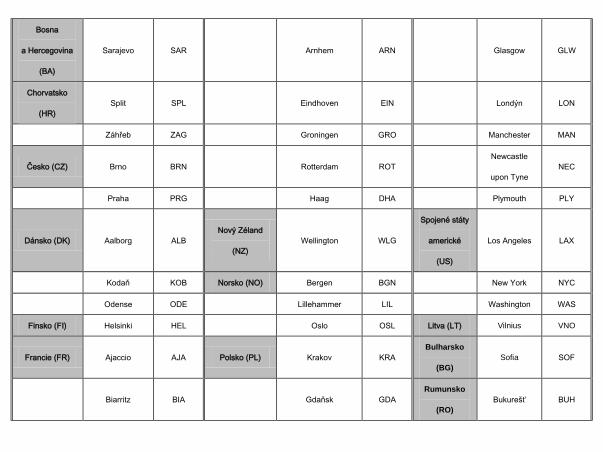
Bosna
a Hercegovina
(BA)
Sarajevo SAR Arnhem ARN Glasgow GLW
Chorvatsko
(HR)
Split SPL Eindhoven EIN Londýn LON
Záhřeb ZAG Groningen GRO Manchester MAN
Česko (CZ) Brno BRN Rotterdam ROT
Newcastle
upon Tyne
NEC
Praha PRG Haag DHA Plymouth PLY
Dánsko (DK) Aalborg ALB
Nový Zéland
(NZ)
Wellington WLG
Spojené státy
americké
(US)
Los Angeles LAX
Kodaň KOB Norsko (NO) Bergen BGN New York NYC
Odense ODE Lillehammer LIL Washington WAS
Finsko (FI) Helsinki HEL Oslo OSL Litva (LT) Vilnius VNO
Francie (FR) Ajaccio AJA Polsko (PL) Krakov KRA
Bulharsko
(BG)
Sofia SOF
Biarritz BIA Gdaňsk GDA
Rumunsko
(RO)
Bukurešť BUH
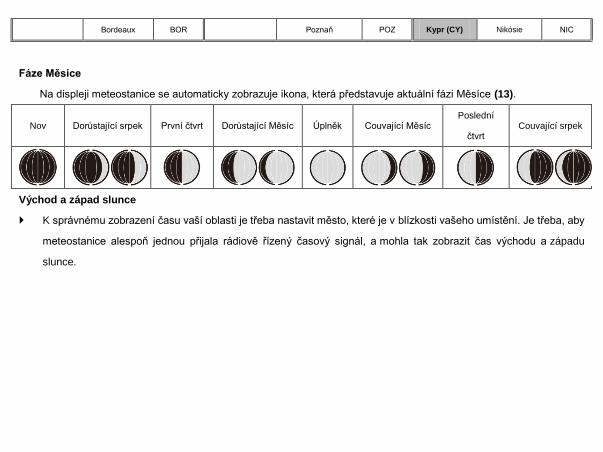
Bordeaux BOR Poznaň POZ Kypr (CY) Nikósie NIC
Fáze Měsíce
Na displeji meteostanice se automaticky zobrazuje ikona, která představuje aktuální fázi Měsíce (13).
Nov Dorůstající srpek První čtvrt Dorůstající Měsíc Úplněk Couvající Měsíc Poslední
čtvrt Couvající srpek
Východ a západ slunce
K správnému zobrazení času vaší oblasti je třeba nastavit město, které je v blízkosti vašeho umístění. Je třeba, aby
meteostanice alespoň jednou přijala rádiově řízený časový signál, a mohla tak zobrazit čas východu a západu
slunce.
Odečet barometrického tlaku za posledních 12 hodin
Hodnoty barometrického tlaku za posledních 12 hodin odečtete opakovaným stisknutím tlačítka HISTORY
ABS/REL (38).
0HR = aktuální barometrický tlak
−1HR = barometrický tlak před jednou hodinou
−2HR = barometrický tlak před dvěma hodinami apod.
……………
−12HR = barometrický tlak před dvanácti hodinami
Úprava zobrazení tlaku vzduchu
Předpověď počasí této meteostanice se zakládá na analýze změn tlaku vzduchu.
Barometrický tlak (30) je z výroby nastaven na absolutní tlak vzduchu. Tlak vzduchu se obecně s nadmořskou
výškou snižuje. Veřejná předpověď počasí proto vždy uvádí takzvaný relativní tlak vzduchu. K získání
porovnatelných hodnot se tento relativní tlak vzduchu upravuje vzhledem k topografii země.
Tlak vzduchu meteostanice lze upravit vzhledem ke specifickým vlastnostem jejího umístění. Za tímto účelem je
nutné nastavit meteostanici na jedinečný aktuální tlak vzduchu. Požádejte místní předpovědní službu o údaj
barometrického tlaku při hladině moře nebo získejte aktuální hodnotu z internetu.
Meteostanici lze nastavit následujícím způsobem:
Stiskněte tlačítko HISTORY ABS/REL (38) a podržte jej stisknuté po dobu přibližně 3 sekund. Poté stisknutím
tlačítka + nebo − (35), (36) změňte mezi zobrazením absolutního nebo relativního tlaku vzduchu.
Vyberte možnost „Rel“ a stisknutím tlačítka HISTORY ABS/REL akci potvrďte. Začne blikat zobrazení tlaku
vzduchu. Nyní lze pomocí tlačítka + nebo − zvolit správnou hodnotu.
Svou volbu potvrďte stisknutím tlačítka HISTORY ABS/REL. Na meteostanici se nyní zobrazuje relativní tlak
vzduchu.
Chcete-li, aby se na meteostanici zobrazoval absolutní tlak vzduchu, postupujte následujícím způsobem:
Stiskněte tlačítko HISTORY ABS/REL a podržte jej stisknuté po dobu přibližně 3 sekund. Poté stisknutím
tlačítka + nebo − přejděte na absolutní tlak vzduchu. Akci potvrďte stisknutím tlačítka HISTORY ABS/REL.
Nastavení kanálu
Po provedení všech nastavení přijímá meteostanice signál venkovního senzoru automaticky.
Poznámka: V případě rušení rádiovým signálem vysílaným z blízkých zařízení budou během této doby blikat
symboly vlhkosti (venkovní) (22) a venkovní teploty (25). Stisknutím tlačítka CH (37) na meteostanici vyberte pro
venkovní senzor jiný kanál nebo přesuňte přepínač výběru kanálu (44) na venkovním senzoru. Na displeji LCD se
zobrazí příslušné údaje.
- 1: Kanál 1 venkovního senzoru
- 2: Kanál 2 venkovního senzoru
- 3: Kanál 3 venkovního senzoru
- : automatická změna kanálů

Zobrazení teploty a tendence teploty
Na displeji LCD se zobrazuje aktuální vnitřní teplota (19) a tendence teploty (vnitřní) (15).
Meteostanice může po úspěšném navázání spojení s venkovním senzorem zobrazovat venkovní teplotu (25) a tendenci
teploty (venkovní) (24). Zobrazovat se mohou následující symboly:
Teplota stoupá.
Teplota je konstantní.
Teplota klesá.
Zobrazení vlhkosti a tendence vlhkosti
Na displeji LCD se zobrazuje aktuální tendence vlhkosti (vnitřní) (16) a aktuální vlhkost (vnitřní) (17).
Indikátor POHODY (18) zobrazuje vlhkost ve třech kategoriích.
K dispozici jsou následující kategorie:
Vlhkost < 40 %
Vlhkost 40–70 %, vnitřní teplota 20–28 °C
Vlhkost > 70 %
Meteostanice zobrazuje na displeji LCD po úspěšném navázání spojení s venkovním senzorem tendenci vlhkosti
(venkovní) (21) a vlhkost (venkovní) (22).
Zobrazení maximální a minimální teploty a vlhkosti
K prvnímu změření minimální a maximální teploty a vlhkosti dojde po vložení baterií do meteostanice.
Maximální a minimální hodnoty teploty, vlhkosti a barometrického tlaku se automaticky uloží.
Zobrazuje-li meteostanice čas (7), zobrazíte maximální hodnoty stisknutím tlačítka + (35).
Dvojitým stisknutím tlačítka + zobrazíte minimální hodnoty.
Stisknutím tlačítka + a jeho podržením po dobu přibližně 3 sekund uložené maximální a minimální hodnoty
smažete.
Varování před teplotou a mrazem
Varování před teplotou představuje krátké pípnutí, které zní, jakmile venkovní teplota překročí přednastavený teplotní
rozsah nebo se pod tento rozsah sníží. Postupujte podle následujících kroků, a nastavte tak požadovaný rozsah teploty.
Stisknutím tlačítka − (36) přejděte do režimu varování před teplotou.
Stiskněte tlačítko − a podržte jej stisknuté po dobu 3 sekund. Začne blikat zobrazení maximální teploty.
Stisknutím tlačítka + nebo − nastavte hodnoty.
Stisknutím tlačítka MODE (34) potvrďte nastavení. Začne blikat zobrazení minimální teploty. Stisknutím tlačítka
+ nebo − nastavte hodnoty.
Stisknutím tlačítka MODE potvrďte nastavení.
Aktivace a deaktivace varování před teplotou a mrazem
Je-li aktivován více než jeden venkovní senzor, vyberte jeden stisknutím tlačítka CH (37).
Opakovaným stisknutím tlačítka − (36) aktivujte varování před teplotou a mrazem.
Je-li aktivováno varování před mrazem, zobrazí se vedle venkovní teploty odpovídající symbol (23). Signál varování zní
při teplotách od −1 °C do + 3 °C.
Je-li aktivováno varování před teplotou, zobrazí se vedle venkovní teploty odpovídající symbol. Signál varování zní při
dosažení nastavených hodnot.
Jsou-li aktivována varování před teplotou i mrazem, objeví se na displeji oba symboly.
Podsvícení
Stiskněte tlačítko OPAKOVANÉHO BUZENÍ / PODSVÍCENÍ (33). Podsvícení se rozsvítí na dobu 5 sekund.
Zobrazení stavu baterie
Jsou-li baterie slabé, zobrazí se na displeji stav baterií (20), (26). Baterie při nejbližší možné příležitosti vyměňte (viz část
„Výměna baterií“).
Výměna baterií
Meteostanice:
Baterie vyměňte, pokud přestane být displej LCD čitelný, nebo pokud se zobrazí symbol baterie (20).
Sejměte kryt bateriového prostoru na zadní straně meteostanice.
Vyjměte použité baterie. Vložte 2 nové baterie typu AA 1,5 V.
Poznámka: Při vkládání baterií zajistěte, aby byla dodržena jejich polarita. Správná polarita je označena uvnitř
bateriového prostoru (40).
Zavřete prostor pro baterie.
Venkovní senzor:
Baterie vyměňte, pokud se objeví zobrazení baterie (26).
Sejměte ze zadní části venkovního senzoru kryt bateriového prostoru.
Vyjměte použité baterie.
Vložte 2 nové baterie typu AA 1,5 V.
Poznámka: Zkontrolujte, zda baterie vkládáte s dodržením jejich polarity. Správná polarita je označena uvnitř
bateriového prostoru (45).
Zavřete prostor pro baterie.
Vlivy prostředí na příjem signálu
Čas stanice je přesně řízen bezdrátovou technologií. Stejně jako u jiných bezdrátových zařízení může být příjem
negativně ovlivněn následujícími podmínkami:
Dlouhá přenosová vzdálenost
Blízkost hor a údolí
Blízkost dálnic, železnic, letišť, vedení vysokého napětí apod.
Blízkost staveniště
Umístění mezi vysokými stavbami
Umístění uvnitř betonových staveb
Blízkost elektrických zařízení (počítačů, televizorů apod.) a kovových předmětů
Umístění uvnitř jedoucích vozidel
Stanici umístěte na místě s optimálním signálem, to znamená v blízkosti okna a mimo dosah vlivu kovových povrchů
nebo elektrických zařízení.
Bezpečnostní opatření
Tato hlavní jednotka je určena pro použití ve vnitřních prostorách. Venkovní senzor je určen pro používání venku.
Nevystavujte jednotku působení nadměrné síly ani otřesům.
Nevystavujte jednotku extrémním teplotám, přímému slunečnímu svitu, prachu či vlhkosti.
Neponořujte do vody.
Vyhněte se kontaktu s jakýmkoliv korozivním materiálem.
Nevhazujte jednotku do ohně, hrozí nebezpečí exploze.
Neotevírejte vnitřní kryt a nemanipulujte s žádnými součástkami této jednotky.
Bezpečnostní opatření u baterií
Používejte pouze alkalické baterie, nikdy ne dobíjecí baterie.
Vložte baterie se správnou polaritou (+/−).
Vždy vyměňte kompletní sadu baterií.
Nikdy nemíchejte dohromady použité a nové baterie.
Slabé baterie okamžitě vyjměte.
Jestliže zařízení nepoužíváte, vyjměte z něj baterie.
Baterie nenabíjejte a nevhazujte je do ohně – mohou explodovat.
Baterie skladujte mimo dosah kovových předmětů, kontakt s nimi může způsobit zkrat.
Nevystavujte baterie extrémním teplotám, vlhkosti či přímému slunečnímu svitu.
Veškeré baterie skladujte mimo dosah dětí. Hrozí riziko udušení.
Výrobek používejte pouze k zamýšlenému účelu!
Likvidace baterií podle předpisů
Staré baterie nepatří do domácího odpadu, protože mohou způsobit škody na zdraví a životním
prostředí. Použité baterie můžete zdarma vrátit prodejci a do sběrných míst. Jako koncoví uživatelé jste
vázáni zákonem, abyste použité baterie vrátili distributorům a do jiných sběrných míst!
Povinnosti dle zákona o elektrických zařízeních
Tento symbol znamená, že elektrická zařízení na konci jejich životnosti je třeba likvidovat odděleně od
běžného domácího odpadu. Zařízení vraťte do místního sběrného místa nebo centra pro recyklaci. To
platí pro všechny země Evropské unie a ostatní evropské země se samostatným systémem
shromažďování odpadu.
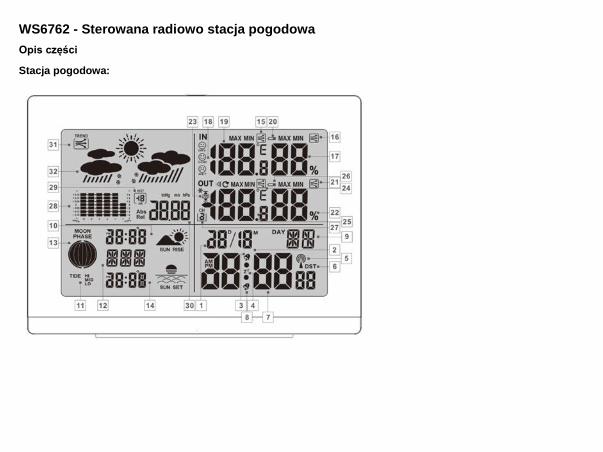
WS6762 - Sterowana radiowo stacja pogodowa
Opis części
Stacja pogodowa:

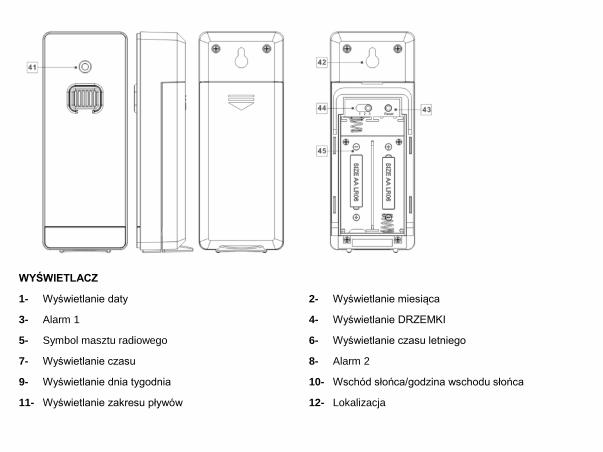
WYŚWIETLACZ
1- Wyświetlanie daty 2- Wyświetlanie miesiąca
3- Alarm 1 4- Wyświetlanie DRZEMKI
5- Symbol masztu radiowego 6- Wyświetlanie czasu letniego
7- Wyświetlanie czasu 8- Alarm 2
9- Wyświetlanie dnia tygodnia 10- Wschód słońca/godzina wschodu słońca
11- Wyświetlanie zakresu pływów 12- Lokalizacja
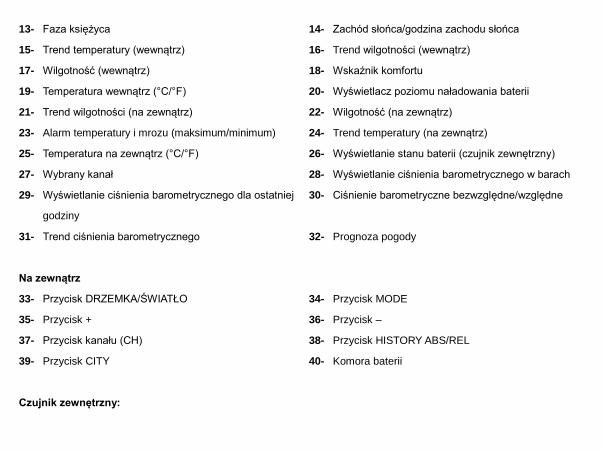
13- Faza księżyca 14- Zachód słońca/godzina zachodu słońca
15- Trend temperatury (wewnątrz) 16- Trend wilgotności (wewnątrz)
17- Wilgotność (wewnątrz) 18- Wskaźnik komfortu
19- Temperatura wewnątrz (°C/°F) 20- Wyświetlacz poziomu naładowania baterii
21- Trend wilgotności (na zewnątrz) 22- Wilgotność (na zewnątrz)
23- Alarm temperatury i mrozu (maksimum/minimum) 24- Trend temperatury (na zewnątrz)
25- Temperatura na zewnątrz (°C/°F) 26- Wyświetlanie stanu baterii (czujnik zewnętrzny)
27- Wybrany kanał 28- Wyświetlanie ciśnienia barometrycznego w barach
29- Wyświetlanie ciśnienia barometrycznego dla ostatniej
godziny
30- Ciśnienie barometryczne bezwzględne/względne
31- Trend ciśnienia barometrycznego 32- Prognoza pogody
Na zewnątrz
33- Przycisk DRZEMKA/ŚWIATŁO 34- Przycisk MODE
35- Przycisk + 36- Przycisk –
37- Przycisk kanału (CH) 38- Przycisk HISTORY ABS/REL
39- Przycisk CITY 40- Komora baterii
Czujnik zewnętrzny:
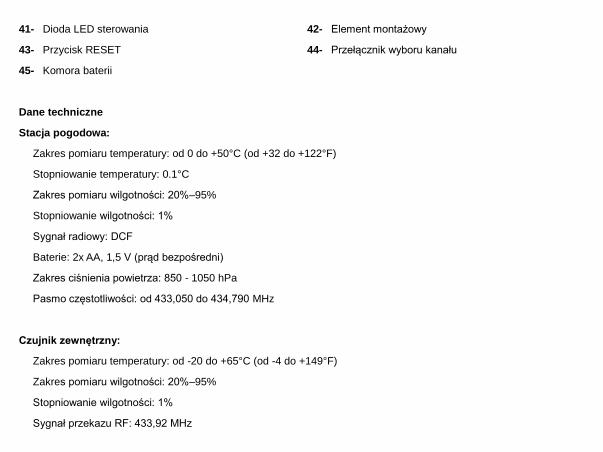
41- Dioda LED sterowania 42- Element montażowy
43- Przycisk RESET 44- Przełącznik wyboru kanału
45- Komora baterii
Dane techniczne
Stacja pogodowa:
Zakres pomiaru temperatury: od 0 do +50°C (od +32 do +122°F)
Stopniowanie temperatury: 0.1°C
Zakres pomiaru wilgotności: 20%–95%
Stopniowanie wilgotności: 1%
Sygnał radiowy: DCF
Baterie: 2x AA, 1,5 V (prąd bezpośredni)
Zakres ciśnienia powietrza: 850 - 1050 hPa
Pasmo częstotliwości: od 433,050 do 434,790 MHz
Czujnik zewnętrzny:
Zakres pomiaru temperatury: od -20 do +65°C (od -4 do +149°F)
Zakres pomiaru wilgotności: 20%–95%
Stopniowanie wilgotności: 1%
Sygnał przekazu RF: 433,92 MHz
Zakres przekazu RF: maks. 60 metrów (na otwartym terenie)
Baterie: 2 x AA, 1,5 V (prąd bezpośredni)
Przed użyciem
Konfiguracja urządzeń
Najpierw należy włożyć baterie w czujnik zewnętrzny.
UWAGA!:
Podczas wybierania miejsca ustawienia stacji pogodowej należy się upewnić, że nie będzie ona narażona na
działanie bezpośredniego światła słonecznego, drgań, pyłu, wysokich temperatur, niskich temperatur lub wilgoci.
Nie ustawiać urządzenia w pobliżu źródeł ciepła, np. grzejników. Może to spowodować jego uszkodzenie.
Nie ustawiać urządzeń na powierzchniach wartościowych lub wrażliwych, jeżeli nie są one odpowiednio
zabezpieczone. Może to spowodować jego uszkodzenie.
Należy zapewnić, że sąsiednie urządzenia nie będą pracowały na tej samej częstotliwości 433 MHz. Takie
urządzenia mogą spowodować zakłócenia połączenia radiowego.
Nie ustawiać urządzeń obok płyt metalowych ani na nich. Może to ograniczyć jakość przesyłania fal radiowych.
Nie montować urządzeń w budynkach wykonanych z żelbetu, np. na lotniskach, w wieżowcach, fabrykach lub
piwnicach. Może to poważnie zakłócać przesyłanie fal radiowych między urządzeniami.
Przygotowanie do użycia czujnika zewnętrznego
Zdjąć osłonę komory baterii z tyłu czujnika zewnętrznego.
Włożyć 2 baterie AA zgodnie z biegunowością (+/-). Czujnik zewnętrzny jest teraz gotowy do działania, dioda LED
sterowania (41) zaświeci się na krótko.
Zamknąć pokrywę komory baterii.
Montaż czujnika zewnętrznego:
Znaleźć odpowiednie miejsce na czujnik zewnętrzny.
Uwaga: Upewnić się, że czujnik zewnętrzny jest montowany w promieniu 60 m (otwarty teren) od stacji
pogodowej. Sprawdzić, czy nie ma przeszkód między czujnikiem zewnętrznym a stacją pogodową. Może to
spowodować zakłócenia przesyłanych danych.
Montaż na ścianie:
Zawiesić czujnik zewnętrzny elementem montażowym (42) na jednej śrubie.
Przygotowanie stacji pogodowej do użycia
Otworzyć komorę baterii (40) z tyłu stacji pogodowej.
Włożyć 2 baterie AA zgodnie z biegunowością (+/-).
Następnie zamknąć komorę baterii.
Po zdjęciu paska zabezpieczającego baterii stacja pogodowa rozpoczyna odbiór sygnału radiowego.
Uwaga: Nie przesuwać stacji pogodowej, kiedy odbiera sygnał. Może to zakłócić odbiór.
Łączenie stacji pogodowej z czujnikiem zewnętrznym i sygnałem radiowym DCF:
Po włożeniu baterii stacja pogodowa próbuje nawiązać połączenie z czujnikiem zewnętrznym. Ten proces może potrwać
kilka minut. Symbol będzie migał przez kilka minut. Po pomyślnym nawiązaniu połączenia z czujnikiem zewnętrznym
symbol wybranego kanału (27) pojawia się na wyświetlaczu LC z kanałem czujnika zewnętrznego (w razie potrzeby
można zmienić kanał czujnika zewnętrznego, tak jak pokazano w punkcie „Ustawienia kanału”). Jeżeli połączenie z
czujnikiem zewnętrznym nie zostało nawiązane automatycznie, można to zrobić ręcznie w następujący sposób:
Nacisnąć na krótko przycisk kanału (CH) (37) aż pojawi się wybrany kanał (27), następnie nacisnąć i przytrzymać
przycisk CH, aż zacznie migać ikona fali radiowej. T
Następnie nacisnąć przycisk RESET (43) czujnika. Wyświetli się temperatura na zewnątrz stacji (25) oraz
wilgotność (na zewnątrz) (22).
Po nawiązaniu połączenia przez stację pogodową z czujnikiem zewnętrznym zaczyna ona automatycznie odbierać
sygnał radiowy DCF. Ten proces trwa kilka minut i jest sygnalizowany migającym symbolem masztu radiowego (5).
Sygnał radiowy DCF jest odbierany pomyślnie, sygnał masztu radiowego cały czas jest widoczny na wyświetlaczu.
Jeżeli po uruchomieniu urządzenia nie ma możliwości synchronizacji z zegarem atomowym, można również ręcznie
wprowadzić ustawienia zegara („Ustawienie trybu 12/24 godz./°C/°F/hPa/mmHg/strefa czasowa/czas/data/język
ręcznie”).
Sygnał radiowy (DCF):
Sygnał DCF (przekaźnik sygnału czasu) składa się z impulsów czasowych emitowanych przez jeden z najbardziej
dokładnych zegarów na świecie w pobliżu Frankfurtu nad Menem w Niemczech.
W idealnych warunkach stacja pogodowa może odebrać ten sygnał z odległości ok. 2000 km wokół Frankfurtu nad
Menem. Odbiór sygnału radiowego zasadniczo trwa ok. 3–10 minut.
Odbiór może być znacznie zakłócany przez przeszkody (np. betonowe ściany) lub źródła zakłóceń (np. inne
urządzenia elektryczne). W przypadku problemów z odbiorem należy zmienić pozycję stacji pogodowej (np. bliżej
okna).
Działanie
Odbiór sygnału czasu radiowego DCF
Po nawiązaniu połączenia z czujnikiem zewnętrznym lub 3 minuty po włożeniu baterii stacja pogodowa
automatycznie rozpoczyna wyszukiwanie sygnału radiowego DCF. To wyszukiwanie jest widoczne na wyświetlaczu
LC w postaci migającego symbolu masztu radiowego (5).
Uwaga: W budynkach wykonanych z żelbetu odbiór sygnału radiowego może być poważnie zakłócony (patrz
„Konfiguracja urządzeń”).
Aby skorygować wszystkie niezgodności z dokładnym czasem, zegar jest automatycznie synchronizowany z
sygnałem radiowym DCF codziennie o godz. 1:00, 2:00 i 3:00.
Odbiór sygnału radiowego DCF można również uruchomić ręcznie na stacji pogodowej.
Nacisnąć jednocześnie przycisk + i – (35), (36). Stacja pogodowa próbuje odebrać sygnał radiowy DCF. Ten
proces trwa kilka minut i jest sygnalizowany migającym symbolem masztu radiowego.
Jeżeli nie można nawiązać połączenia z sygnałem radiowym DCF, wyszukiwanie zostaje zatrzymane.
Uwaga: Jeżeli zegar stacji pogodowej nie może odebrać sygnału radiowego DCF z powodu błędów, zbyt dużej
odległości od przekaźnika lub podobnych powodów, można ustawić czas ręcznie. Jeżeli odbiór sygnału DCF jest
pomyślny, ustawienia ręczne zostają nadpisane.
Ustawienia ręczne
Odbiór sygnału radiowego DCF w miejscu ustawienia stacji pogodowej może zostać pogorszony lub przerwany.
Jeżeli tak się stanie, należy ustawić urządzenie ręcznie.
Wykonać te kroki:
1. Nacisnąć i przytrzymać przycisk MODE (34) przez około 3 sekundy. Na wyświetlaczu migają wskazania „12
godz.” lub „24 godz.”. Nacisnąć przycisk + lub – (35), (36), aby wybrać żądany format godziny.
2. Potwierdzić ustawienia przez naciśnięcie przycisku MODE. Jednostka temperatury „°C” lub „°F” miga na
wyświetlaczu. Nacisnąć przycisk + lub – , aby wybrać żądaną jednostkę temperatury.
3. Potwierdzić ustawienia przez naciśnięcie przycisku MODE. Jednostka ciśnienia barometrycznego miga na
wyświetlaczu. Nacisnąć przycisk + lub –, aby ustawić żądaną jednostkę (hPa/mmHg).
4. Potwierdzić ustawienia przez naciśnięcie przycisku MODE. Wskaźnik strefy czasowej miga na wyświetlaczu.
Nacisnąć przycisk + lub –, aby ustawić żądaną wartość (-2 do +2). Można ręcznie regulować zegar do strefy
czasowej kraju, w której zegar odbiera sygnał DCF, ale gdzie aktualny czas jest inny niż odbierany czas. Jeśli
przykładowo czas danego kraju jest o 1 godzinę wcześniej od czasu niemieckiego, strefę czasową należy
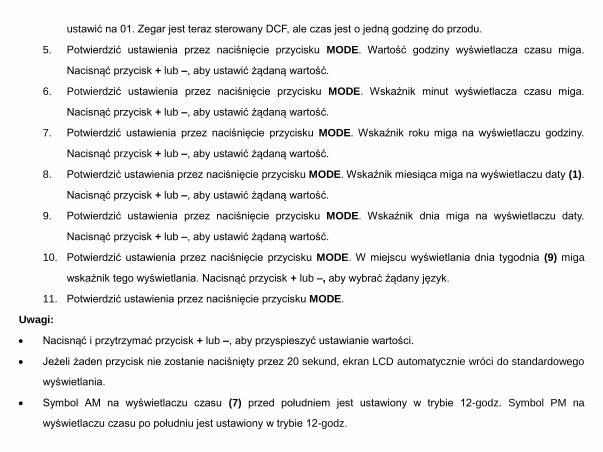
ustawić na 01. Zegar jest teraz sterowany DCF, ale czas jest o jedną godzinę do przodu.
5. Potwierdzić ustawienia przez naciśnięcie przycisku MODE. Wartość godziny wyświetlacza czasu miga.
Nacisnąć przycisk + lub –, aby ustawić żądaną wartość.
6. Potwierdzić ustawienia przez naciśnięcie przycisku MODE. Wskaźnik minut wyświetlacza czasu miga.
Nacisnąć przycisk + lub –, aby ustawić żądaną wartość.
7. Potwierdzić ustawienia przez naciśnięcie przycisku MODE. Wskaźnik roku miga na wyświetlaczu godziny.
Nacisnąć przycisk + lub –, aby ustawić żądaną wartość.
8. Potwierdzić ustawienia przez naciśnięcie przycisku MODE. Wskaźnik miesiąca miga na wyświetlaczu daty (1).
Nacisnąć przycisk + lub –, aby ustawić żądaną wartość.
9. Potwierdzić ustawienia przez naciśnięcie przycisku MODE. Wskaźnik dnia miga na wyświetlaczu daty.
Nacisnąć przycisk + lub –, aby ustawić żądaną wartość.
10. Potwierdzić ustawienia przez naciśnięcie przycisku MODE. W miejscu wyświetlania dnia tygodnia (9) miga
wskaźnik tego wyświetlania. Nacisnąć przycisk + lub –, aby wybrać żądany język.
11. Potwierdzić ustawienia przez naciśnięcie przycisku MODE.
Uwagi:
Nacisnąć i przytrzymać przycisk + lub –, aby przyspieszyć ustawianie wartości.
Jeżeli żaden przycisk nie zostanie naciśnięty przez 20 sekund, ekran LCD automatycznie wróci do standardowego
wyświetlania.
Symbol AM na wyświetlaczu czasu (7) przed południem jest ustawiony w trybie 12-godz. Symbol PM na
wyświetlaczu czasu po południu jest ustawiony w trybie 12-godz.
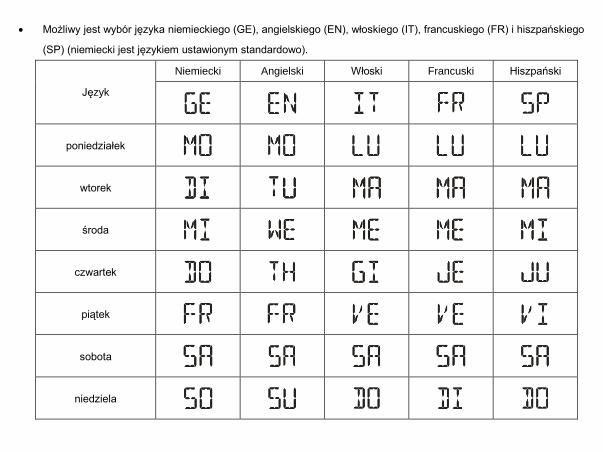
Możliwy jest wybór języka niemieckiego (GE), angielskiego (EN), włoskiego (IT), francuskiego (FR) i hiszpańskiego
(SP) (niemiecki jest językiem ustawionym standardowo).
Język
Niemiecki Angielski Włoski Francuski Hiszpański
poniedziałek
wtorek
środa
czwartek
piątek
sobota
niedziela

Ustawianie czasu alarmu
1. Nacisnąć przycisk MODE (34), aby przełączyć wyświetlanie czasu na wyświetlanie ALARMU 1
2. Nacisnąć i przytrzymać przycisk MODE przez 2 sekundy, wyświetla się migający czas alarmu
3. Miga godzina czasu alarmu. Przyciskami + lub – (35), (36) wybrać godzinę.
4. Nacisnąć przycisk MODE, aby zatwierdzić.
5. Wyświetlacz minut czasu alarmu miga. Przyciskami + i – wybrać minutę.
6. Nacisnąć przycisk MODE, aby zatwierdzić.
7. Nacisnąć przycisk MODE, aby przełączyć wyświetlanie A1 na wyświetlanie ALARMU 2
8. Sekwencja ustawień dla ALARMU 2 jest taka sama jak dla ALARMU 1.
Uwaga: Nacisnąć i przytrzymać przycisk + lub –, aby przyspieszyć ustawianie wartości.
Aktywowanie/wyłączanie funkcji alarmu
1. Krótkie naciśnięcie przycisku MODE (34) jeden lub dwa razy powoduje przejście do trybu ALARM 1 lub ALARM 2.
2. Nacisnąć przycisk + (35). Symbol ALARM 1 (3) lub ALARM 2 (8) pojawia się na wyświetlaczu LCD. Alarm został
aktywowany.
3. Ponownie nacisnąć przycisk +. Symbol ALARM 1 lub ALARM 2 na wyświetlaczu LCD gaśnie. Alarm został
wyłączony.
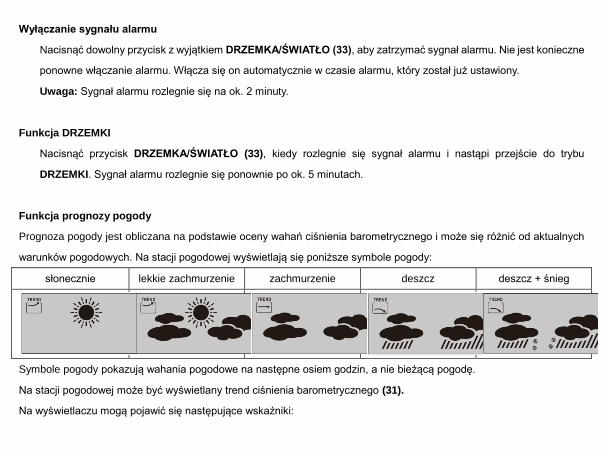
Wyłączanie sygnału alarmu
Nacisnąć dowolny przycisk z wyjątkiem DRZEMKA/ŚWIATŁO (33), aby zatrzymać sygnał alarmu. Nie jest konieczne
ponowne włączanie alarmu. Włącza się on automatycznie w czasie alarmu, który został już ustawiony.
Uwaga: Sygnał alarmu rozlegnie się na ok. 2 minuty.
Funkcja DRZEMKI
Nacisnąć przycisk DRZEMKA/ŚWIATŁO (33), kiedy rozlegnie się sygnał alarmu i nastąpi przejście do trybu
DRZEMKI. Sygnał alarmu rozlegnie się ponownie po ok. 5 minutach.
Funkcja prognozy pogody
Prognoza pogody jest obliczana na podstawie oceny wahań ciśnienia barometrycznego i może się różnić od aktualnych
warunków pogodowych. Na stacji pogodowej wyświetlają się poniższe symbole pogody:
słonecznie lekkie zachmurzenie zachmurzenie deszcz deszcz + śnieg
Symbole pogody pokazują wahania pogodowe na następne osiem godzin, a nie bieżącą pogodę.
Na stacji pogodowej może być wyświetlany trend ciśnienia barometrycznego (31).
Na wyświetlaczu mogą pojawić się następujące wskaźniki:
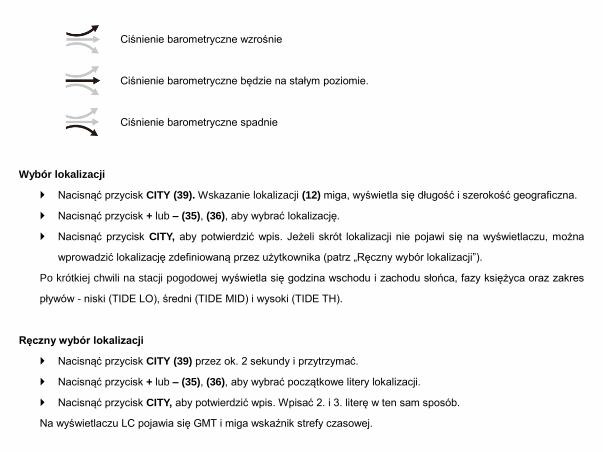
Ciśnienie barometryczne wzrośnie
Ciśnienie barometryczne będzie na stałym poziomie.
Ciśnienie barometryczne spadnie
Wybór lokalizacji
Nacisnąć przycisk CITY (39). Wskazanie lokalizacji (12) miga, wyświetla się długość i szerokość geograficzna.
Nacisnąć przycisk + lub – (35), (36), aby wybrać lokalizację.
Nacisnąć przycisk CITY, aby potwierdzić wpis. Jeżeli skrót lokalizacji nie pojawi się na wyświetlaczu, można
wprowadzić lokalizację zdefiniowaną przez użytkownika (patrz „Ręczny wybór lokalizacji”).
Po krótkiej chwili na stacji pogodowej wyświetla się godzina wschodu i zachodu słońca, fazy księżyca oraz zakres
pływów - niski (TIDE LO), średni (TIDE MID) i wysoki (TIDE TH).
Ręczny wybór lokalizacji
Nacisnąć przycisk CITY (39) przez ok. 2 sekundy i przytrzymać.
Nacisnąć przycisk + lub – (35), (36), aby wybrać początkowe litery lokalizacji.
Nacisnąć przycisk CITY, aby potwierdzić wpis. Wpisać 2. i 3. literę w ten sam sposób.
Na wyświetlaczu LC pojawia się GMT i miga wskaźnik strefy czasowej.
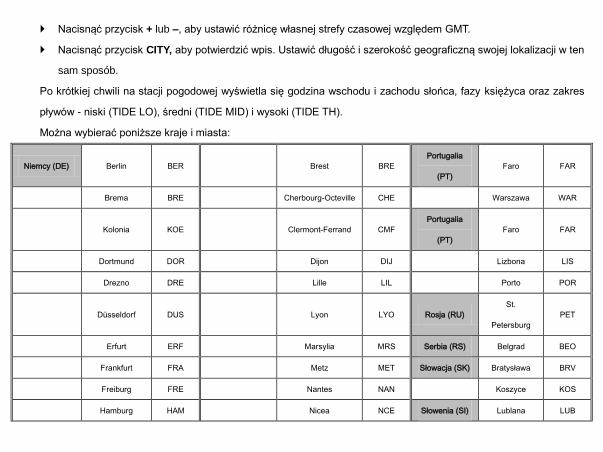
Nacisnąć przycisk + lub –, aby ustawić różnicę własnej strefy czasowej względem GMT.
Nacisnąć przycisk CITY, aby potwierdzić wpis. Ustawić długość i szerokość geograficzną swojej lokalizacji w ten
sam sposób.
Po krótkiej chwili na stacji pogodowej wyświetla się godzina wschodu i zachodu słońca, fazy księżyca oraz zakres
pływów - niski (TIDE LO), średni (TIDE MID) i wysoki (TIDE TH).
Można wybierać poniższe kraje i miasta:
Niemcy (DE) Berlin BER Brest BRE
Portugalia
(PT)
Faro FAR
Brema BRE Cherbourg-Octeville CHE Warszawa WAR
Kolonia KOE Clermont-Ferrand CMF
Portugalia
(PT)
Faro FAR
Dortmund DOR Dijon DIJ Lizbona LIS
Drezno DRE Lille LIL Porto POR
Düsseldorf DUS Lyon LYO Rosja (RU)
St.
Petersburg
PET
Erfurt ERF Marsylia MRS Serbia (RS) Belgrad BEO
Frankfurt FRA Metz MET Słowacja (SK) Bratysława BRV
Freiburg FRE Nantes NAN Koszyce KOS
Hamburg HAM Nicea NCE Słowenia (SI) Lublana LUB
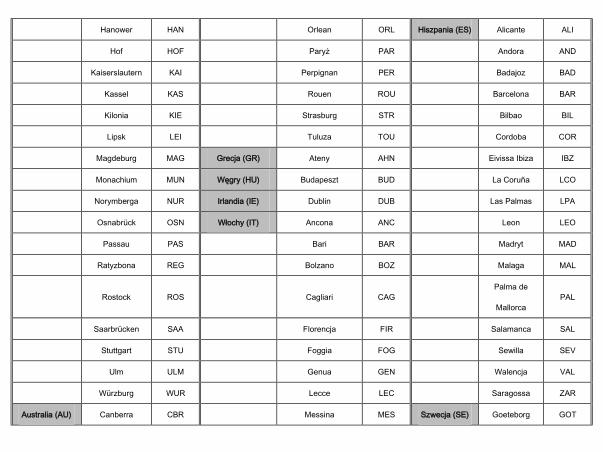
Hanower HAN Orlean ORL Hiszpania (ES) Alicante ALI
Hof HOF Paryż PAR Andora AND
Kaiserslautern KAI Perpignan PER Badajoz BAD
Kassel KAS Rouen ROU Barcelona BAR
Kilonia KIE Strasburg STR Bilbao BIL
Lipsk LEI Tuluza TOU Cordoba COR
Magdeburg MAG Grecja (GR) Ateny AHN Eivissa Ibiza IBZ
Monachium MUN Węgry (HU) Budapeszt BUD La Coruña LCO
Norymberga NUR Irlandia (IE) Dublin DUB Las Palmas LPA
Osnabrück OSN Włochy (IT) Ancona ANC Leon LEO
Passau PAS Bari BAR Madryt MAD
Ratyzbona REG Bolzano BOZ Malaga MAL
Rostock ROS Cagliari CAG
Palma de
Mallorca
PAL
Saarbrücken SAA Florencja FIR Salamanca SAL
Stuttgart STU Foggia FOG Sewilla SEV
Ulm ULM Genua GEN Walencja VAL
Würzburg WUR Lecce LEC Saragossa ZAR
Australia (AU) Canberra CBR Messina MES Szwecja (SE) Goeteborg GOT

Melbourne MEL Mediolan MIL Karlstad KAR
Sydney SYD Neapol NAP Sztokholm STO
Austria (AT) Bregencja BRE Palermo PAL
Szwajcaria
(CH)
Bazylea BAS
Graz GRZ Parma PAR Berno BRN
Innsbruck INN Perugia PER Chur CHU
Linz LNZ Rzym ROM Genewa GEN
Salzburg SLZ San Remo SRE Lucerna LUC
Wiedeń WIE Triest TRI Lugano LUG
Villach VIL Turyn TOR Sion SIO
Wels WEL Wenecja VEN St. Gallen SGL
Belgia (BE) Antwerpia ANT Werona VER Zurych ZUR
Brugia BRG Liechtenstein (LI) Vaduz VDZ
Wielka
Brytania (GB)
Aberdeen ABD
Bruksela BRU Luksemburg (LU) Luksemburg LUX Belfast BEL
Libramont LIB Monako (MC) Monte Carlo MCM Birmingham BIR
Liege LIE Holandia (NL) Amsterdam AMS Cardiff CAR
Bośnia i
Hercegowina
Sarajewo SAR Arnhem ARN Glasgow GLW
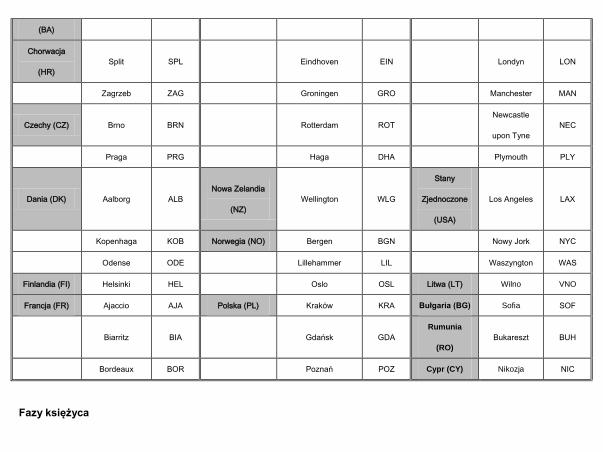
(BA)
Chorwacja
(HR)
Split SPL Eindhoven EIN Londyn LON
Zagrzeb ZAG Groningen GRO Manchester MAN
Czechy (CZ) Brno BRN Rotterdam ROT
Newcastle
upon Tyne
NEC
Praga PRG Haga DHA Plymouth PLY
Dania (DK) Aalborg ALB
Nowa Zelandia
(NZ)
Wellington WLG
Stany
Zjednoczone
(USA)
Los Angeles LAX
Kopenhaga KOB Norwegia (NO) Bergen BGN Nowy Jork NYC
Odense ODE Lillehammer LIL Waszyngton WAS
Finlandia (FI) Helsinki HEL Oslo OSL Litwa (LT) Wilno VNO
Francja (FR) Ajaccio AJA Polska (PL) Kraków KRA Bułgaria (BG) Sofia SOF
Biarritz BIA Gdańsk GDA
Rumunia
(RO)
Bukareszt BUH
Bordeaux BOR Poznań POZ Cypr (CY) Nikozja NIC
Fazy księżyca
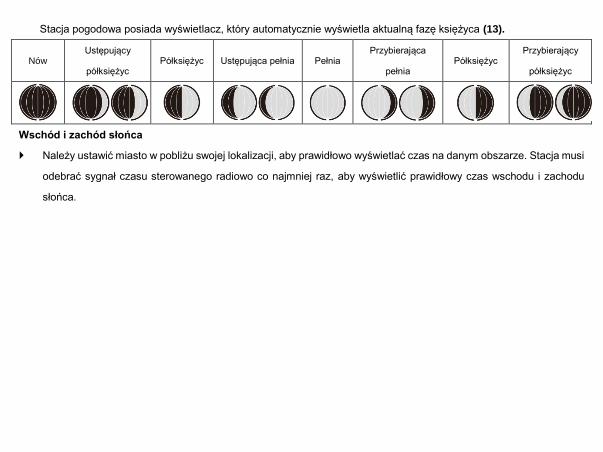
Stacja pogodowa posiada wyświetlacz, który automatycznie wyświetla aktualną fazę księżyca (13).
Nów Ustępujący
półksiężyc Półksiężyc Ustępująca pełnia Pełnia
Przybierająca
pełnia Półksiężyc
Przybierający
półksiężyc
Wschód i zachód słońca
Należy ustawić miasto w pobliżu swojej lokalizacji, aby prawidłowo wyświetlać czas na danym obszarze. Stacja musi
odebrać sygnał czasu sterowanego radiowo co najmniej raz, aby wyświetlić prawidłowy czas wschodu i zachodu
słońca.

Odczyt ciśnienia barometrycznego przez ostatnie 12 godzin
Naciskać przycisk HISTORY ABS/REL (38), aby odczytać wartości ciśnienia barometrycznego dla ostatnich 12
godzin.
0HR = aktualne ciśnienie barometryczne
–1HR = ciśnienie barometryczne godzinę wcześniej
–2HR = ciśnienie barometryczne dwie godziny wcześniej itd.
……………
–12HR = ciśnienie barometryczne dwanaście godzin wcześniej itd.
Regulacja wskazania ciśnienia powietrza
Prognoza tej stacji pogodowej jest oparta na analizie zmiany ciśnienia powietrza.
Ciśnienie barometryczne (30) jest ustawione fabrycznie na bezwzględne ciśnienie powietrza. Ponieważ ciśnienie
powietrza ogólnie zmniejsza się wraz z wysokością na poziomem morza, publiczna służba pogodowa zawsze podaje
tak zwane względne ciśnienie powietrza. To względne ciśnienie powietrza jest dostosowywane do topografii kraju,
aby uzyskać porównywalne wartości.
Ciśnienie powietrza w stacji pogodowej można dostosować do proporcji swojego miejsca. W tym celu należy
wyregulować stację pogodową tylko do aktualnego ciśnienia powietrza. Należy sprawdzić w lokalnej usłudze
prognozy pogody ciśnienie barometryczne na poziomie morza lub uzyskać aktualną wartość z Internetu.
Stację pogodową można regulować w następujący sposób:
Nacisnąć i przytrzymać przycisk HISTORY ABS/REL (38) przez około 3 sekundy. Następnie nacisnąć przycisk +
lub – (35), (36), aby przełączać bezwzględne lub względne ciśnienie powietrza.
Wybrać „Rel” i nacisnąć przycisk HISTORY ABS/REL, aby potwierdzić. Wskazanie ciśnienia powietrza miga.
Teraz można wybrać prawidłową wartość, naciskając przycisk + lub – .
Potwierdzić wybór, naciskając przycisk HISTORY ABS/REL. Na stacji pogodowej wyświetla się teraz względne
ciśnienie powietrza.
Aby na stacji pogodowej podawane było bezwzględne ciśnienie powietrza, należy postępować tak jak poniżej:
Nacisnąć i przytrzymać przycisk HISTORY ABS/REL przez około 3 sekundy. Następnie nacisnąć przycisk + lub –,
aby przejść do bezwzględnego ciśnienia powietrza. Potwierdzić, naciskając przycisk HISTORY ABS/REL.
Ustawianie kanału
Stacja pogodowa otrzymuje sygnał czujnika zewnętrznego automatycznie po wprowadzeniu wszystkich ustawień.
Uwaga: W przypadku zakłóceń ze znajdujących się obok urządzeń przesyłających sygnały radiowe symbol
wilgotności (na zewnątrz) (22) i temperatury na zewnątrz (25) miga w tym czasie. Należy wybrać inny kanał dla
czujnika zewnętrznego, naciskając przycisk CH (37) na stacji pogodowej lub przełącznik wyboru kanału (44) na
czujniku zewnętrznym. Właściwe dane pojawiają się na wyświetlaczu LC.
- 1: Czujnik zewnętrzny kanał 1
- 2: Czujnik zewnętrzny kanał 2
- 3: Czujnik zewnętrzny kanał 3
- : automatyczna zmiana kanału
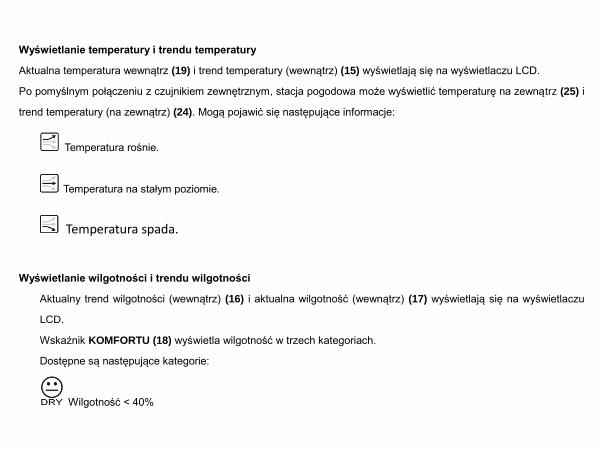
Wyświetlanie temperatury i trendu temperatury
Aktualna temperatura wewnątrz (19) i trend temperatury (wewnątrz) (15) wyświetlają się na wyświetlaczu LCD.
Po pomyślnym połączeniu z czujnikiem zewnętrznym, stacja pogodowa może wyświetlić temperaturę na zewnątrz (25) i
trend temperatury (na zewnątrz) (24). Mogą pojawić się następujące informacje:
Temperatura rośnie.
Temperatura na stałym poziomie.
Temperatura spada.
Wyświetlanie wilgotności i trendu wilgotności
Aktualny trend wilgotności (wewnątrz) (16) i aktualna wilgotność (wewnątrz) (17) wyświetlają się na wyświetlaczu
LCD.
Wskaźnik KOMFORTU (18) wyświetla wilgotność w trzech kategoriach.
Dostępne są następujące kategorie:
Wilgotność < 40%
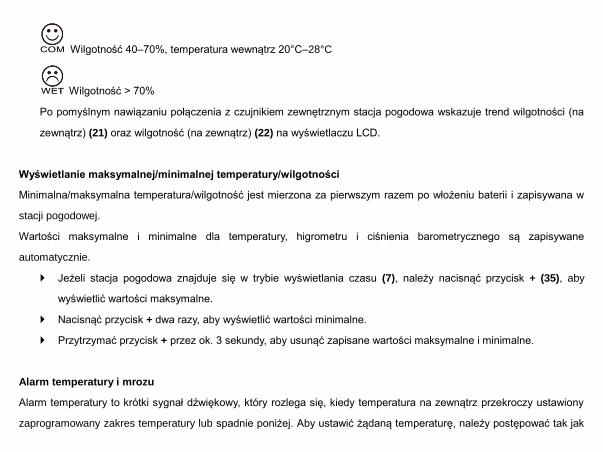
Wilgotność 40–70%, temperatura wewnątrz 20°C–28°C
Wilgotność > 70%
Po pomyślnym nawiązaniu połączenia z czujnikiem zewnętrznym stacja pogodowa wskazuje trend wilgotności (na
zewnątrz) (21) oraz wilgotność (na zewnątrz) (22) na wyświetlaczu LCD.
Wyświetlanie maksymalnej/minimalnej temperatury/wilgotności
Minimalna/maksymalna temperatura/wilgotność jest mierzona za pierwszym razem po włożeniu baterii i zapisywana w
stacji pogodowej.
Wartości maksymalne i minimalne dla temperatury, higrometru i ciśnienia barometrycznego są zapisywane
automatycznie.
Jeżeli stacja pogodowa znajduje się w trybie wyświetlania czasu (7), należy nacisnąć przycisk + (35), aby
wyświetlić wartości maksymalne.
Nacisnąć przycisk + dwa razy, aby wyświetlić wartości minimalne.
Przytrzymać przycisk + przez ok. 3 sekundy, aby usunąć zapisane wartości maksymalne i minimalne.
Alarm temperatury i mrozu
Alarm temperatury to krótki sygnał dźwiękowy, który rozlega się, kiedy temperatura na zewnątrz przekroczy ustawiony
zaprogramowany zakres temperatury lub spadnie poniżej. Aby ustawić żądaną temperaturę, należy postępować tak jak
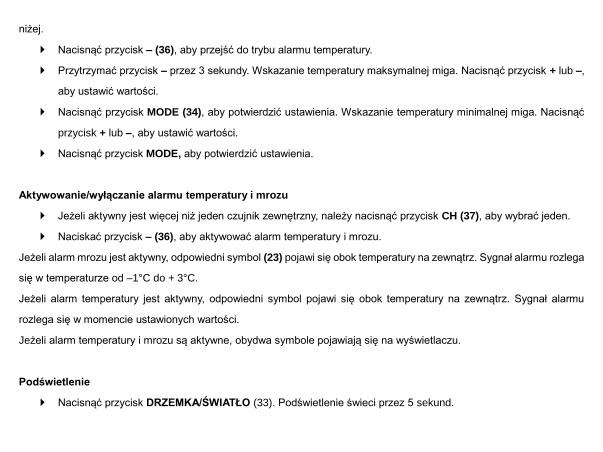
niżej.
Nacisnąć przycisk – (36), aby przejść do trybu alarmu temperatury.
Przytrzymać przycisk – przez 3 sekundy. Wskazanie temperatury maksymalnej miga. Nacisnąć przycisk + lub –,
aby ustawić wartości.
Nacisnąć przycisk MODE (34), aby potwierdzić ustawienia. Wskazanie temperatury minimalnej miga. Nacisnąć
przycisk + lub –, aby ustawić wartości.
Nacisnąć przycisk MODE, aby potwierdzić ustawienia.
Aktywowanie/wyłączanie alarmu temperatury i mrozu
Jeżeli aktywny jest więcej niż jeden czujnik zewnętrzny, należy nacisnąć przycisk CH (37), aby wybrać jeden.
Naciskać przycisk – (36), aby aktywować alarm temperatury i mrozu.
Jeżeli alarm mrozu jest aktywny, odpowiedni symbol (23) pojawi się obok temperatury na zewnątrz. Sygnał alarmu rozlega
się w temperaturze od –1°C do + 3°C.
Jeżeli alarm temperatury jest aktywny, odpowiedni symbol pojawi się obok temperatury na zewnątrz. Sygnał alarmu
rozlega się w momencie ustawionych wartości.
Jeżeli alarm temperatury i mrozu są aktywne, obydwa symbole pojawiają się na wyświetlaczu.
Podświetlenie
Nacisnąć przycisk DRZEMKA/ŚWIATŁO (33). Podświetlenie świeci przez 5 sekund.
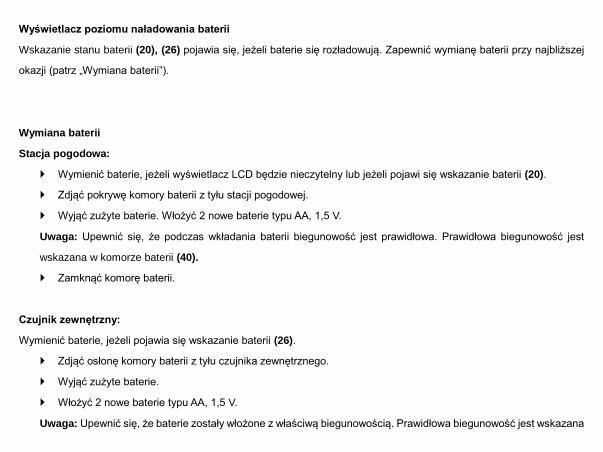
Wyświetlacz poziomu naładowania baterii
Wskazanie stanu baterii (20), (26) pojawia się, jeżeli baterie się rozładowują. Zapewnić wymianę baterii przy najbliższej
okazji (patrz „Wymiana baterii”).
Wymiana baterii
Stacja pogodowa:
Wymienić baterie, jeżeli wyświetlacz LCD będzie nieczytelny lub jeżeli pojawi się wskazanie baterii (20).
Zdjąć pokrywę komory baterii z tyłu stacji pogodowej.
Wyjąć zużyte baterie. Włożyć 2 nowe baterie typu AA, 1,5 V.
Uwaga: Upewnić się, że podczas wkładania baterii biegunowość jest prawidłowa. Prawidłowa biegunowość jest
wskazana w komorze baterii (40).
Zamknąć komorę baterii.
Czujnik zewnętrzny:
Wymienić baterie, jeżeli pojawia się wskazanie baterii (26).
Zdjąć osłonę komory baterii z tyłu czujnika zewnętrznego.
Wyjąć zużyte baterie.
Włożyć 2 nowe baterie typu AA, 1,5 V.
Uwaga: Upewnić się, że baterie zostały włożone z właściwą biegunowością. Prawidłowa biegunowość jest wskazana
w komorze baterii (45).
Zamknąć komorę baterii.
Wpływ środowiska na odbiór
Stacja pobiera dokładny czas za pomocą technologii bezprzewodowej. Podobnie jak w przypadku wszystkich urządzeń
bezprzewodowych, odbiór może być zakłócony następującymi czynnikami:
duża odległość przekazu;
w pobliżu gór i dolin
autostrada, kolej, porty lotnicze, kable wysokiego napięcia itd. znajdujące się w pobliżu.
teren budowy znajdujący się w pobliżu
usytuowanie pomiędzy wysokimi budynkami;
usytuowanie wewnątrz betonowych budynków;
znajdujące się w pobliżu urządzenia elektryczne (komputery, telewizory itd.) i struktury metalowe
usytuowanie w poruszających się pojazdach.
Stację najlepiej jest ustawić w miejscu, gdzie uzyska ona najlepszy zasięg sygnału, tj. blisko okna i z dala od metalowych
powierzchni czy urządzeń elektrycznych.
Środki ostrożności
Jednostkę główną można wykorzystywać jedynie w pomieszczeniach. Czujnik zewnętrzny służy do zastosowania na
zewnątrz.
Nie stosować nadmiernej siły i nie potrząsać urządzeniem podczas korzystania.
Nie wystawiać jednostki na ekstremalne temperatury, bezpośrednie światło słoneczne, kurz czy wilgoć.
Nie zanurzać w wodzie.
Unikać kontaktu z materiałami korodującymi.
Urządzenia nie wolno utylizować w ogniu, ponieważ może wybuchnąć.
Nie otwierać tylnej obudowy wewnętrznej ani nie ingerować w żadne komponenty urządzenia.
Ostrzeżenia bezpieczeństwa dotyczące baterii
Używać wyłącznie baterii alkalicznych, a nie baterii akumulatorowych.
Włożyć baterie prawidłowo, zgodnie z biegunowością (+/-).
Zawsze należy wymieniać cały zestaw baterii.
Nigdy nie wolno mieszać zużytych i nowych baterii.
Zużyte baterie należy natychmiast wymieniać.
Wyjmować baterie, jeśli urządzenie nie jest używane.
Nie ładować ponownie baterii ani nie wyrzucać ich do ognia, ponieważ mogą eksplodować.
Należy upewnić się, że baterie są przechowywane z dala od metalowych obiektów, ponieważ zetknięcie z nimi może
spowodować zwarcie.
Unikać wystawiania baterii na działanie ekstremalnych temperatur, na wilgoć czy światło słoneczne.
Baterie należy trzymać w miejscu niedostępnym dla dzieci. Stwarzają one zagrożenie udławienia się.
Produkt należy używać tylko zgodnie z przeznaczeniem!
Zobowiązania według przepisów prawa dotyczących baterii
Stare baterie nie należą do odpadów domowych, ponieważ mogą szkodzić zdrowiu i środowisku. Zużyte
baterie można oddać bezpłatnie u swojego sprzedawcy lub w punktach zbiórek. Użytkownik końcowy
jest zobowiązany prawem do zwrotu odpowiednich baterii sprzedawcom lub w innych punktach
zbiórek!
Zobowiązania według przepisów prawa dotyczących urządzeń elektrycznych
Ten symbol oznacza, że użytkownik musi utylizować urządzenia elektryczne z dala od ogólnych
odpadów domowych, kiedy osiągną one koniec okresu eksploatacji. Swoje urządzenie najlepiej jest
oddać w lokalnym punkcie zbiórki odpadów lub centrum recyklingu. Dotyczy to wszystkich państw Unii
Europejskiej oraz innych państw europejskich, w których obowiązuje system zbierania odpadów
segregowanych.


![Wetterstation ENGINEER - lambrecht.net · Wetterstation ENGINEER Ultraschall-Sensor u[sonic] für Windgeschwindigkeit und Windrichtung · seewasserfester Sensor, optimal beheizt ·](https://img.pdfslide.tips/doc/110x75/5e10c1c819466036b63d07b3/wetterstation-engineer-wetterstation-engineer-ultraschall-sensor-usonic-fr.jpg)