Embed Size (px)
Citation preview

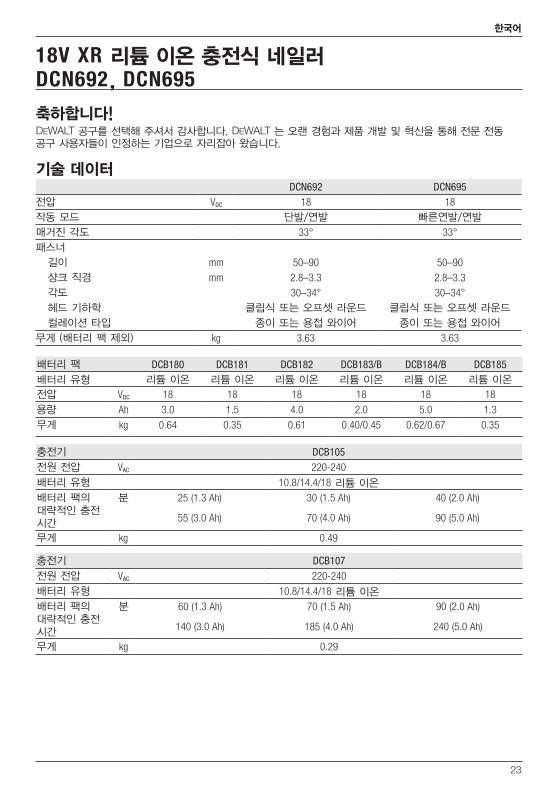
DCN692DCN695

B
Copyright DeWALT
English 5
한국어 23

1
Figure 1
H
G
C
M
D
I
I
F
G
L
CD
B
K
J
E
F
DCN692
DCN695
N
A
그림 1

2
Figure 3
Figure 2
Figure 2a
G
F
Q
B
O
P
L
그림 3
그림 2
그림 2a

3
Figure 6 Figure 7
D
J
Figure 5Figure 4
H
R
그림 6 그림 7
그림 5그림 4
4
K
AABB
GG
FF
HH
EE
CCCC
DD
EE
AA
Figure 8a
Figure 8c Figure 8d
Figure 8e
Figure 8b
BB
그림 8a
그림 8c 그림 8d
그림 8e
그림 8b
English
5
Congratulations!You have chosen a DeWALT tool. Years of experience, thorough product development and innovation make DeWALT one of the most reliable partners for professional power tool users.
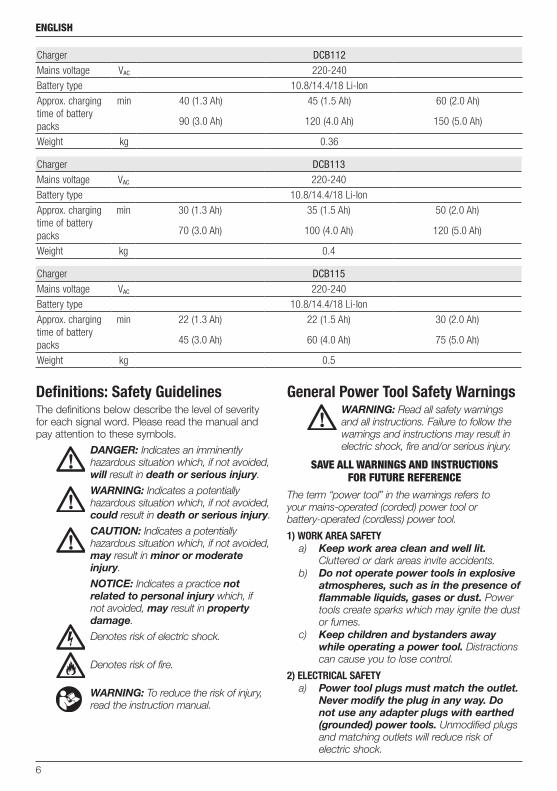
Technical DataDCN692 DCN695
Voltage VDC 18 18
Actuating mode Sequential/ Bump RapidCycle Sequential /Sequential
Magazine angle 33° 33°
Fasteners
length mm 50–90 50–90
shank diameter mm 2.8–3.3 2.8–3.3
angle 30–34° 30–34°
head geometry clipped or offset round clipped or offset round
collation type paper or wire weld paper or wire weld
Weight (without battery pack) kg 3.63 3.63
Battery pack DCB180 DCB181 DCB182 DCB183/B DCB184/B DCB185
Battery type Li-Ion Li-Ion Li-Ion Li-Ion Li-Ion Li-Ion
Voltage VDC 18 18 18 18 18 18
Capacity Ah 3.0 1.5 4.0 2.0 5.0 1.3
Weight kg 0.64 0.35 0.61 0.40/0.45 0.62/0.67 0.35
Charger DCB105
Mains voltage VAC 220-240
Battery type 10.8/14.4/18 Li-Ion
Approx. charging time of battery packs
min 25 (1.3 Ah) 30 (1.5 Ah) 40 (2.0 Ah)
55 (3.0 Ah) 70 (4.0 Ah) 90 (5.0 Ah)
Weight kg 0.49
Charger DCB107
Mains voltage VAC 220-240
Battery type 10.8/14.4/18 Li-Ion
Approx. charging time of battery packs
min 60 (1.3 Ah) 70 (1.5 Ah) 90 (2.0 Ah)
140 (3.0 Ah) 185 (4.0 Ah) 240 (5.0 Ah)
Weight kg 0.29
18V XR LI-ION CORDLESS FRAMING NAILER DCN692, DCN695
English (original instructions)
6
English
Definitions: Safety GuidelinesThe definitions below describe the level of severity for each signal word. Please read the manual and pay attention to these symbols.
DANGER: Indicates an imminently hazardous situation which, if not avoided, will result in death or serious injury.
WARNING: Indicates a potentially hazardous situation which, if not avoided, could result in death or serious injury.
CAUTION: Indicates a potentially hazardous situation which, if not avoided, may result in minor or moderate injury.
NOTICE: Indicates a practice not related to personal injury which, if not avoided, may result in property damage.
Denotes risk of electric shock.
Denotes risk of fire.
WARNING: To reduce the risk of injury, read the instruction manual.
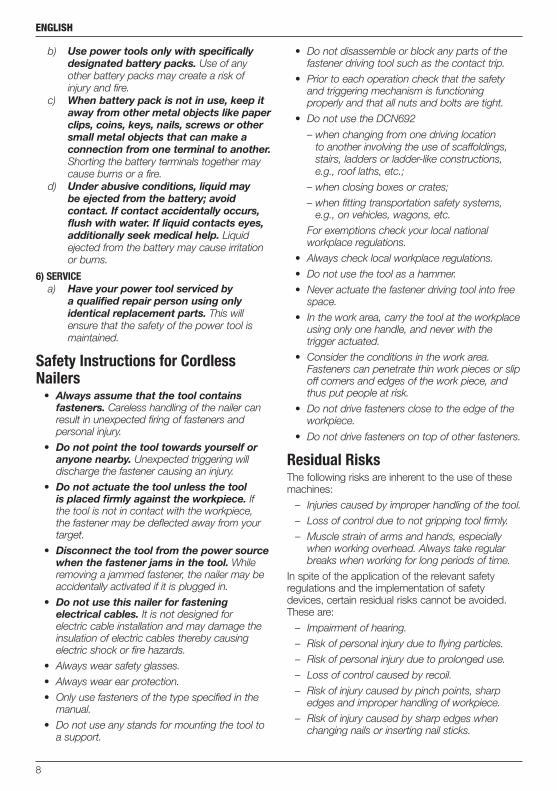
Charger DCB112
Mains voltage VAC 220-240
Battery type 10.8/14.4/18 Li-Ion
Approx. charging time of battery packs
min 40 (1.3 Ah) 45 (1.5 Ah) 60 (2.0 Ah)
90 (3.0 Ah) 120 (4.0 Ah) 150 (5.0 Ah)
Weight kg 0.36
Charger DCB113
Mains voltage VAC 220-240
Battery type 10.8/14.4/18 Li-Ion
Approx. charging time of battery packs
min 30 (1.3 Ah) 35 (1.5 Ah) 50 (2.0 Ah)
70 (3.0 Ah) 100 (4.0 Ah) 120 (5.0 Ah)
Weight kg 0.4
Charger DCB115
Mains voltage VAC 220-240
Battery type 10.8/14.4/18 Li-Ion
Approx. charging time of battery packs
min 22 (1.3 Ah) 22 (1.5 Ah) 30 (2.0 Ah)
45 (3.0 Ah) 60 (4.0 Ah) 75 (5.0 Ah)
Weight kg 0.5
General Power Tool Safety Warnings WARNING: Read all safety warnings
and all instructions. Failure to follow the warnings and instructions may result in electric shock, fire and/or serious injury.
SAVE ALL WARNINGS AND INSTRUCTIONS FOR FUTURE REFERENCE
The term “power tool” in the warnings refers to your mains-operated (corded) power tool or battery-operated (cordless) power tool.
1) WORK AREA SAFETYa) Keep work area clean and well lit.
Cluttered or dark areas invite accidents.b) Do not operate power tools in explosive
atmospheres, such as in the presence of flammable liquids, gases or dust. Power tools create sparks which may ignite the dust or fumes.
c) Keep children and bystanders away while operating a power tool. Distractions can cause you to lose control.
2) ELECTRICAL SAFETYa) Power tool plugs must match the outlet.
Never modify the plug in any way. Do not use any adapter plugs with earthed (grounded) power tools. Unmodified plugs and matching outlets will reduce risk of electric shock.

7
English
clothing and gloves away from moving parts. Loose clothes, jewellery or long hair can be caught in moving parts.
g) If devices are provided for the connection of dust extraction and collection facilities, ensure these are connected and properly used. Use of dust collection can reduce dust-related hazards.
4) POWER TOOL USE AND CAREa) Do not force the power tool. Use the
correct power tool for your application. The correct power tool will do the job better and safer at the rate for which it was designed.
b) Do not use the power tool if the switch does not turn it on and off. Any power tool that cannot be controlled with the switch is dangerous and must be repaired.
c) Disconnect the plug from the power source and/or the battery pack from the power tool before making any adjustments, changing accessories, or storing power tools. Such preventive safety measures reduce the risk of starting the power tool accidentally.
d) Store idle power tools out of the reach of children and do not allow persons unfamiliar with the power tool or these instructions to operate the power tool. Power tools are dangerous in the hands of untrained users.
e) Maintain power tools. Check for misalignment or binding of moving parts, breakage of parts and any other condition that may affect the power tool’s operation. If damaged, have the power tool repaired before use. Many accidents are caused by poorly maintained power tools.
f) Keep cutting tools sharp and clean. Properly maintained cutting tools with sharp cutting edges are less likely to bind and are easier to control.
g) Use the power tool, accessories and tool bits etc., in accordance with these instructions taking into account the working conditions and the work to be performed. Use of the power tool for operations different from those intended could result in a hazardous situation.
5) BATTERY TOOL USE AND CAREa) Recharge only with the charger
specified by the manufacturer. A charger that is suitable for one type of battery pack may create a risk of fire when used with another battery pack.
b) Avoid body contact with earthed or grounded surfaces such as pipes, radiators, ranges and refrigerators. There is an increased risk of electric shock if your body is earthed or grounded.
c) Do not expose power tools to rain or wet conditions. Water entering a power tool will increase the risk of electric shock.
d) Do not abuse the cord. Never use the cord for carrying, pulling or unplugging the power tool. Keep cord away from heat, oil, sharp edges or moving parts. Damaged or entangled cords increase the risk of electric shock.
e) When operating a power tool outdoors, use an extension cord suitable for outdoor use. Use of a cord suitable for outdoor use reduces the risk of electric shock.
f) If operating a power tool in a damp location is unavoidable, use a residual current device (RCD) protected supply. Use of an RCD reduces the risk of electric shock.
3) PERSONAL SAFETYa) Stay alert, watch what you are
doing and use common sense when operating a power tool. Do not use a power tool while you are tired or under the influence of drugs, alcohol or medication. A moment of inattention while operating power tools may result in serious personal injury.
b) Use personal protective equipment. Always wear eye protection. Protective equipment such as dust mask, non-skid safety shoes, hard hat, or hearing protection used for appropriate conditions will reduce personal injuries.
c) Prevent unintentional starting. Ensure the switch is in the off position before connecting to power source and/or battery pack, picking up or carrying the tool. Carrying power tools with your finger on the switch or energising power tools that have the switch on invites accidents.
d) Remove any adjusting key or wrench before turning the power tool on. A wrench or a key left attached to a rotating part of the power tool may result in personal injury.
e) Do not overreach. Keep proper footing and balance at all times. This enables better control of the power tool in unexpected situations.
f) Dress properly. Do not wear loose clothing or jewellery. Keep your hair,
8
English
• Do not disassemble or block any parts of the fastener driving tool such as the contact trip.
• Prior to each operation check that the safety and triggering mechanism is functioning properly and that all nuts and bolts are tight.
• Do not use the DCN692
– when changing from one driving location to another involving the use of scaffoldings, stairs, ladders or ladder-like constructions, e.g., roof laths, etc.;
– when closing boxes or crates;
– when fitting transportation safety systems, e.g., on vehicles, wagons, etc.
For exemptions check your local national workplace regulations.
• Always check local workplace regulations.
• Do not use the tool as a hammer.
• Never actuate the fastener driving tool into free space.
• In the work area, carry the tool at the workplace using only one handle, and never with the trigger actuated.
• Consider the conditions in the work area. Fasteners can penetrate thin work pieces or slip off corners and edges of the work piece, and thus put people at risk.
• Do not drive fasteners close to the edge of the workpiece.
• Do not drive fasteners on top of other fasteners.
Residual RisksThe following risks are inherent to the use of these machines:
– Injuries caused by improper handling of the tool.
– Loss of control due to not gripping tool firmly.
– Muscle strain of arms and hands, especially when working overhead. Always take regular breaks when working for long periods of time.
In spite of the application of the relevant safety regulations and the implementation of safety devices, certain residual risks cannot be avoided. These are:
– Impairment of hearing.
– Risk of personal injury due to flying particles.
– Risk of personal injury due to prolonged use.
– Loss of control caused by recoil.
– Risk of injury caused by pinch points, sharp edges and improper handling of workpiece.
– Risk of injury caused by sharp edges when changing nails or inserting nail sticks.
b) Use power tools only with specifically designated battery packs. Use of any other battery packs may create a risk of injury and fire.
c) When battery pack is not in use, keep it away from other metal objects like paper clips, coins, keys, nails, screws or other small metal objects that can make a connection from one terminal to another. Shorting the battery terminals together may cause burns or a fire.
d) Under abusive conditions, liquid may be ejected from the battery; avoid contact. If contact accidentally occurs, flush with water. If liquid contacts eyes, additionally seek medical help. Liquid ejected from the battery may cause irritation or burns.
6) SERVICEa) Have your power tool serviced by
a qualified repair person using only identical replacement parts. This will ensure that the safety of the power tool is maintained.
Safety Instructions for Cordless Nailers • Always assume that the tool contains
fasteners. Careless handling of the nailer can result in unexpected firing of fasteners and personal injury.
• Do not point the tool towards yourself or anyone nearby. Unexpected triggering will discharge the fastener causing an injury.
• Do not actuate the tool unless the tool is placed firmly against the workpiece. If the tool is not in contact with the workpiece, the fastener may be deflected away from your target.
• Disconnect the tool from the power source when the fastener jams in the tool. While removing a jammed fastener, the nailer may be accidentally activated if it is plugged in.
• Do not use this nailer for fastening electrical cables. It is not designed for electric cable installation and may damage the insulation of electric cables thereby causing electric shock or fire hazards.
• Always wear safety glasses.
• Always wear ear protection.
• Only use fasteners of the type specified in the manual.
• Do not use any stands for mounting the tool to a support.
9
English
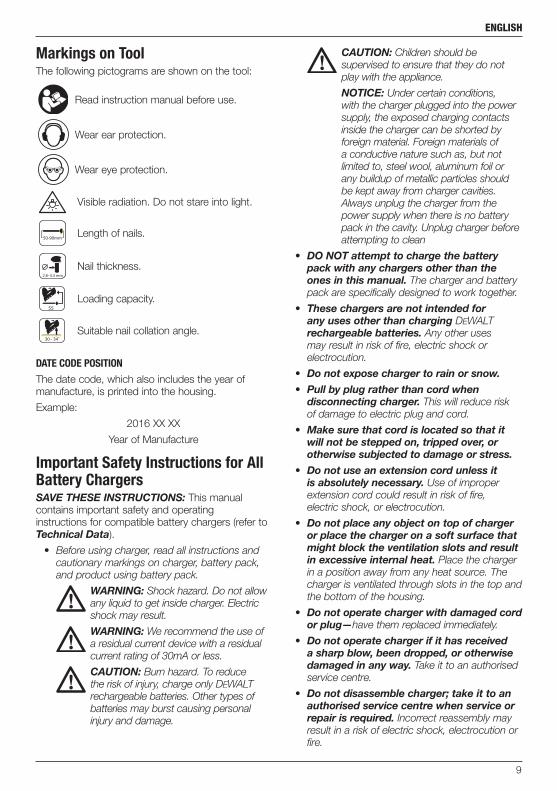
CAUTION: Children should be supervised to ensure that they do not play with the appliance.
NOTICE: Under certain conditions, with the charger plugged into the power supply, the exposed charging contacts inside the charger can be shorted by foreign material. Foreign materials of a conductive nature such as, but not limited to, steel wool, aluminum foil or any buildup of metallic particles should be kept away from charger cavities. Always unplug the charger from the power supply when there is no battery pack in the cavity. Unplug charger before attempting to clean
• DO NOT attempt to charge the battery pack with any chargers other than the ones in this manual. The charger and battery pack are specifically designed to work together.
• These chargers are not intended for any uses other than charging DeWALT rechargeable batteries. Any other uses may result in risk of fire, electric shock or electrocution.
• Do not expose charger to rain or snow.
• Pull by plug rather than cord when disconnecting charger. This will reduce risk of damage to electric plug and cord.
• Make sure that cord is located so that it will not be stepped on, tripped over, or otherwise subjected to damage or stress.
• Do not use an extension cord unless it is absolutely necessary. Use of improper extension cord could result in risk of fire, electric shock, or electrocution.
• Do not place any object on top of charger or place the charger on a soft surface that might block the ventilation slots and result in excessive internal heat. Place the charger in a position away from any heat source. The charger is ventilated through slots in the top and the bottom of the housing.
• Do not operate charger with damaged cord or plug—have them replaced immediately.
• Do not operate charger if it has received a sharp blow, been dropped, or otherwise damaged in any way. Take it to an authorised service centre.
• Do not disassemble charger; take it to an authorised service centre when service or repair is required. Incorrect reassembly may result in a risk of electric shock, electrocution or fire.
Markings on ToolThe following pictograms are shown on the tool:
Read instruction manual before use.
Wear ear protection.
Wear eye protection.
Visible radiation. Do not stare into light.
50-90mm Length of nails.
2.8–3.3 mm
Nail thickness.
55Loading capacity.
30 - 34˚Suitable nail collation angle.
DATE CODE POSITION
The date code, which also includes the year of manufacture, is printed into the housing.
Example:
2016 XX XX
Year of Manufacture
Important Safety Instructions for All Battery ChargersSAVE THESE INSTRUCTIONS: This manual contains important safety and operating instructions for compatible battery chargers (refer to Technical Data).
• Before using charger, read all instructions and cautionary markings on charger, battery pack, and product using battery pack.
WARNING: Shock hazard. Do not allow any liquid to get inside charger. Electric shock may result.
WARNING: We recommend the use of a residual current device with a residual current rating of 30mA or less.
CAUTION: Burn hazard. To reduce the risk of injury, charge only DeWALT rechargeable batteries. Other types of batteries may burst causing personal injury and damage.

10
English
Charge indicators: DCB107, DCB112, DCB113, DCB115
charging
fully charged
hot/cold pack delay*
* DCB107, DCB112, DCB113, DCB115: The red light will continue to blink, but a yellow indicator light will be illuminated during this operation. Once the battery has reached an appropriate temperature, the yellow light will turn off and the charger will resume the charging procedure.
The compatible charger(s) will not charge a faulty battery pack. The charger will indicate faulty battery by refusing to light or by displaying problem pack or charger blink pattern.
NOTE: This could also mean a problem with a charger.
If the charger indicates a problem, take the charger and battery pack to be tested at an authorised service centre.
HOT/COLD PACK DELAY
When the charger detects a battery that is too hot or too cold, it automatically starts a Hot/Cold Pack Delay, suspending charging until the battery has reached an appropriate temperature. The charger then automatically switches to the pack charging mode. This feature ensures maximum battery life.
A cold battery pack will charge at about half the rate of a warm battery pack. The battery pack will charge at that slower rate throughout the entire charging cycle and will not return to maximum charge rate even if the battery warms.
LITHIUM-ION BATTERY PACKS ONLY
XR Li-Ion tools are designed with an Electronic Protection System that will protect the battery against overloading, overheating or deep discharge.
The tool will automatically turn off if the Electronic Protection System engages. If this occurs, place the lithium-ion battery on the charger until it is fully charged.
Important Safety Instructions for All Battery PacksWhen ordering replacement battery packs, be sure to include catalog number and voltage.
The battery pack is not fully charged out of the carton. Before using the battery pack and charger, read the safety instructions below. Then follow charging procedures outlined.
• In case of damaged power supply cord the supply cord must be replaced immediately by the manufacturer, its service agent or similar qualified person to prevent any hazard.
• Disconnect the charger from the outlet before attempting any cleaning. This will reduce the risk of electric shock. Removing the battery pack will not reduce this risk.
• NEVER attempt to connect two chargers together.
• The charger is designed to operate on standard 220-240V household electrical power. Do not attempt to use it on any other voltage. This does not apply to the vehicular charger.
SAVE THESE INSTRUCTIONS
ChargersThe DCB105, DCB107, DCB112, DCB113 and DCB115 chargers accept 10.8V, 14.4V and 18V Li-Ion XR (DCB140, DCB141, DCB142, DCB143, DCB144, DCB145, DCB180, DCB181, DCB182, DCB183, DCB183B, DCB184, DCB184B and DCB185) battery packs.
DeWALT chargers require no adjustment and are designed to be as easy as possible to operate.
Charging Procedure (Fig. 2) 1. Plug the charger into an appropriate outlet
before inserting battery pack.
2. Insert the battery pack (I) into the charger. The red (charging) light will blink continuously indicating that the charging process has started.
3. The completion of charge will be indicated by the red light remaining ON continuously. The pack is fully charged and may be used at this time or left in the charger.
NOTE: To ensure maximum performance and life of lithium-ion batteries, charge the battery pack fully before first use.
Charging ProcessRefer to the table below for the charge status of the battery pack.
Charge indicators: DCB105
charging
fully charged
hot/cold pack delay
replace battery pack
11
English
is composed of a mixture of liquid organic carbonates and lithium salts.
• Contents of opened battery cells may cause respiratory irritation. Provide fresh air. If symptoms persists, seek medical attention.
WARNING: Burn hazard. Battery liquid may be flammable if exposed to spark or flame.
TransportationDeWALT batteries comply with all applicable shipping regulations as prescribed by industry and legal standards which include UN Recommendations on the Transport of Dangerous Goods; International Air Transport Association (IATA) Dangerous Goods Regulations, International Maritime Dangerous Goods (IMDG) Regulations, and the European Agreement Concerning The International Carriage of Dangerous Goods by Road (ADR). Lithium-ion cells and batteries have been tested to section 38.3 of the UN Recommendations on the Transport of Dangerous Goods Manual of Tests and Criteria.
In most instances, shipping a DeWALT battery pack will be excepted from being classified as a fully regulated Class 9 Hazardous Material. In general, the two instances that require shipping Class 9 are:
1. Air shipping more than two DeWALT lithium-ion battery packs when the package contains only battery packs (no tools), and
2. Any shipment containing a lithium-ion battery with an energy rating greater than 100 watt hours (Wh). All lithium-ion batteries have the watt hour rating marked on the pack.
Regardless of whether a shipment is considered excepted or fully regulated, it is the shipper's responsibility to consult the latest regulations for packaging, labeling/marking and documentation requirements.
Transporting batteries can possibly cause fire if the battery terminals inadvertently come in contact with conductive materials. When transporting batteries, make sure that the battery terminals are protected and well insulated from materials that could contact them and cause a short circuit.
The information provided in this section of the manual is provided in good faith and believed to be accurate at the time the document was created. However, no warranty, expressed or implied, is given. It is the buyer’s responsibility to ensure that its activities comply with the applicable regulations.
READ ALL INSTRUCTIONS • Do not charge or use battery in explosive
atmospheres, such as in the presence of flammable liquids, gases or dust. Inserting or removing the battery from the charger may ignite the dust or fumes.
• Never force battery pack into charger. Do not modify battery pack in any way to fit into a non-compatible charger as battery pack may rupture causing serious personal injury.
• Charge the battery packs only in DeWALT chargers.
• DO NOT splash or immerse in water or other liquids.
• Do not store or use the tool and battery pack in locations where the temperature may reach or exceed 40 ˚C (104 ˚F) (such as outside sheds or metal buildings in summer).
WARNING: Never attempt to open the battery pack for any reason. If battery pack case is cracked or damaged, do not insert into charger. Do not crush, drop or damage battery pack. Do not use a battery pack or charger that has received a sharp blow, been dropped, run over or damaged in any way (i.e., pierced with a nail, hit with a hammer, stepped on). Electric shock or electrocution may result. Damaged battery packs should be returned to service centre for recycling.
CAUTION: When not in use, place tool on its side on a stable surface where it will not cause a tripping or falling hazard. Some tools with large battery packs will stand upright on the battery pack but may be easily knocked over.
SPECIFIC SAFETY INSTRUCTIONS FOR LITHIUM-ION (LI-ION)
• Do not incinerate the battery pack even if it is severely damaged or is completely worn out. The battery pack can explode in a fire. Toxic fumes and materials are created when lithium-ion battery packs are burned.
• If battery contents come into contact with the skin, immediately wash area with mild soap and water. If battery liquid gets into the eye, rinse water over the open eye for 15 minutes or until irritation ceases. If medical attention is needed, the battery electrolyte
12
English
Charge only between 4 ˚C and 40 ˚C.
Only for indoor use.
Discard the battery pack with due care for the environment.
Charge DeWALT battery packs only with designated DeWALT chargers. Charging battery packs other than the designated DeWALT batteries with a DeWALT charger may make them burst or lead to other dangerous situations.
Do not incinerate the battery pack.
Package ContentsThe package contains:
1 Nailer
1 Charger (P2 models only)
2 Battery packs (P2 models only)
1 No-mar tip
1 Kitbox (P2 models only)
1 Instruction manual
• Check for damage to the tool, parts or accessories which may have occurred during transport.
• Take the time to thoroughly read and understand this manual prior to operation.
Description (Fig. 1) WARNING: Never modify the power
tool or any part of it. Damage or personal injury could result.
A. Trigger
B. Trigger safety lock-off
C. Contact trip
D. Depth adjustment wheel
E. Low battery and jam/stall indicator light
F. Stall release lever
G. Magazine
H. Pusher latch
I. Mode selector switch
J. Rotating rafter/belt hook
K. On-board hex wrench
L. Battery pack
M. No-mar tip
Battery PackBATTERY TYPE
The DCN692 and DCN695 operate on an 18 volt battery pack.
The DCB180, DCB181, DCB182, DCB183, DCB183B, DCB184, DCB184B or DCB185 battery packs may be used. Refer to Technical Data for more information.
Storage Recommendations 1. The best storage place is one that is cool and
dry away from direct sunlight and excess heat or cold. For optimum battery performance and life, store battery packs at room temperature when not in use.
2. For long storage, it is recommended to store a fully charged battery pack in a cool, dry place out of the charger for optimal results.
NOTE: Battery packs should not be stored completely depleted of charge. The battery pack will need to be recharged before use.
Labels on Charger and Battery PackIn addition to the pictographs used in this manual, the labels on the charger and the battery pack may show the following pictographs:
Read instruction manual before use.
See Technical Data for charging time.
Battery charging.
Battery charged.
Battery defective.
Hot/cold pack delay.
Do not probe with conductive objects.
Do not charge damaged battery packs.
Do not expose to water.
Have defective cords replaced immediately.
13
English
When using a cable reel, always unwind the cable completely.
ASSEMBLY AND ADJUSTMENTS WARNING: To reduce the risk of
serious personal injury, turn tool off and disconnect battery pack before making any adjustments or removing/installing attachments or accessories. An accidental start-up can cause injury.
WARNING: Use only DeWALT battery packs and chargers.
Inserting and Removing the Battery Pack from the Tool (Fig. 2)NOTE: Make sure your battery pack (L) is fully charged. The battery packs supplied will not necessarily be fully charged.
TO INSTALL THE BATTERY PACK INTO THE TOOL HANDLE
1. Align the notch inside the tool’s handle with the battery pack (L).
2. Slide the battery pack firmly into the handle until you hear the lock snap into place.
TO REMOVE THE BATTERY PACK FROM THE TOOL
1. Press the release button (O) and slide the battery pack out of the tool handle.
2. Insert battery pack into the charger as described in the charger section of this manual.
FUEL GAUGE BATTERY PACKS (FIG. 2, 2A)
Some DeWALT battery packs include a fuel gauge which consists of three green LED lights that indicate the level of charge remaining in the battery pack.
To actuate the fuel gauge, press and hold the fuel gauge button (P). A combination of the three green LED lights will illuminate designating the level of charge left. When the level of charge in the battery is below the usable limit, the fuel gauge will not illuminate and the battery will need to be recharged.
NOTE: The fuel gauge is only an indication of the charge left on the battery pack. It does not indicate tool functionality and is subject to variation based on product components, temperature and end-user application.
NOTICE: Do not store tool with battery pack installed. To prevent damage to the pack and to ensure best battery life, store battery packs out of the tool or charger in a cool, dry location.
N. Speed selector switch
INTENDED USE
The DCN692 and DCN695 cordless framing nailers have been designed for driving nails into wooden workpieces.
The DCN692 cordless framing nailer is designed for sequential/bump modes. This nailer is designed for sequential/bump modes MUST NOT be used on scaffoldings, stairs, ladders or ladder-like constructions, e.g., roof laths. For exemptions check your local national workplace regulations.
The DCN695 cordless framing nailer is designed for sequential use only, whether in standard sequential mode, or RapidCycle sequential mode for faster nailing. Nailers designed for sequential only mode MAY BE used on scaffoldings, stairs, ladders or ladder-like constructions, e.g., roof laths.
DO NOT use under wet conditions or in the presence of flammable liquids or gases.
These cordless nailers are professional power tools.
DO NOT let children come into contact with the tool. Supervision is required when inexperienced operators use this tool.
• Young children and the infirm. This appliance is not intended for use by young children or infirm persons without supervision.
• This product is not intended for use by persons (including children) suffering from diminished physical, sensory or mental abilities; lack of experience, knowledge or skills unless they are supervised by a person responsible for their safety. Children should never be left alone with this product.
Electrical SafetyThe electric motor has been designed for one voltage only. Always check that the battery pack voltage corresponds to the voltage on the rating plate. Also make sure that the voltage of your charger corresponds to that of your mains.
Your DeWALT charger is double insulated in accordance with IEC60335; therefore no earth wire is required.
If the supply cord is damaged, it must be replaced by a specially prepared cord available through the DeWALT service organisation.
Using an Extension CableAn extension cord should not be used unless absolutely necessary. Use an approved extension cable suitable for the power input of your charger (see Technical Data). The minimum conductor size is 1 mm2; the maximum length is 30 m.
14
English
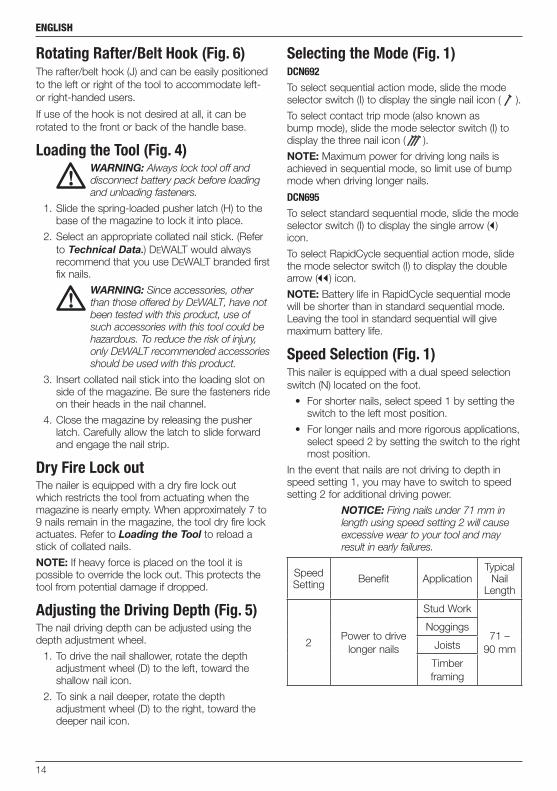
Selecting the Mode (Fig. 1)DCN692
To select sequential action mode, slide the mode selector switch (I) to display the single nail icon ( ).
To select contact trip mode (also known as bump mode), slide the mode selector switch (I) to display the three nail icon ( ).
NOTE: Maximum power for driving long nails is achieved in sequential mode, so limit use of bump mode when driving longer nails.
DCN695
To select standard sequential mode, slide the mode selector switch (I) to display the single arrow ( ) icon.
To select RapidCycle sequential action mode, slide the mode selector switch (I) to display the double arrow ( ) icon.
NOTE: Battery life in RapidCycle sequential mode will be shorter than in standard sequential mode. Leaving the tool in standard sequential will give maximum battery life.
Speed Selection (Fig. 1)This nailer is equipped with a dual speed selection switch (N) located on the foot.
• For shorter nails, select speed 1 by setting the switch to the left most position.
• For longer nails and more rigorous applications, select speed 2 by setting the switch to the right most position.
In the event that nails are not driving to depth in speed setting 1, you may have to switch to speed setting 2 for additional driving power.
NOTICE: Firing nails under 71 mm in length using speed setting 2 will cause excessive wear to your tool and may result in early failures.
Speed Setting Benefit Application
Typical Nail
Length
2Power to drive
longer nails
Stud Work
71 – 90 mm
Noggings
Joists
Timber framing
Rotating Rafter/Belt Hook (Fig. 6)The rafter/belt hook (J) and can be easily positioned to the left or right of the tool to accommodate left- or right-handed users.
If use of the hook is not desired at all, it can be rotated to the front or back of the handle base.
Loading the Tool (Fig. 4) WARNING: Always lock tool off and
disconnect battery pack before loading and unloading fasteners.
1. Slide the spring-loaded pusher latch (H) to the base of the magazine to lock it into place.
2. Select an appropriate collated nail stick. (Refer to Technical Data.) DeWALT would always recommend that you use DeWALT branded first fix nails.
WARNING: Since accessories, other than those offered by DeWALT, have not been tested with this product, use of such accessories with this tool could be hazardous. To reduce the risk of injury, only DeWALT recommended accessories should be used with this product.
3. Insert collated nail stick into the loading slot on side of the magazine. Be sure the fasteners ride on their heads in the nail channel.
4. Close the magazine by releasing the pusher latch. Carefully allow the latch to slide forward and engage the nail strip.
Dry Fire Lock outThe nailer is equipped with a dry fire lock out which restricts the tool from actuating when the magazine is nearly empty. When approximately 7 to 9 nails remain in the magazine, the tool dry fire lock actuates. Refer to Loading the Tool to reload a stick of collated nails.
NOTE: If heavy force is placed on the tool it is possible to override the lock out. This protects the tool from potential damage if dropped.
Adjusting the Driving Depth (Fig. 5)The nail driving depth can be adjusted using the depth adjustment wheel.
1. To drive the nail shallower, rotate the depth adjustment wheel (D) to the left, toward the shallow nail icon.
2. To sink a nail deeper, rotate the depth adjustment wheel (D) to the right, toward the deeper nail icon.
15
English
Running in the ToolPlease note that this tool requires a run-in period before it operates with full power due to parts which need to mesh or wear in together. It may be that the tool does not drive long nails flush consistently during this period.
After driving between 500 and 1000 nails the tool should have run-in and perform at full capacity.
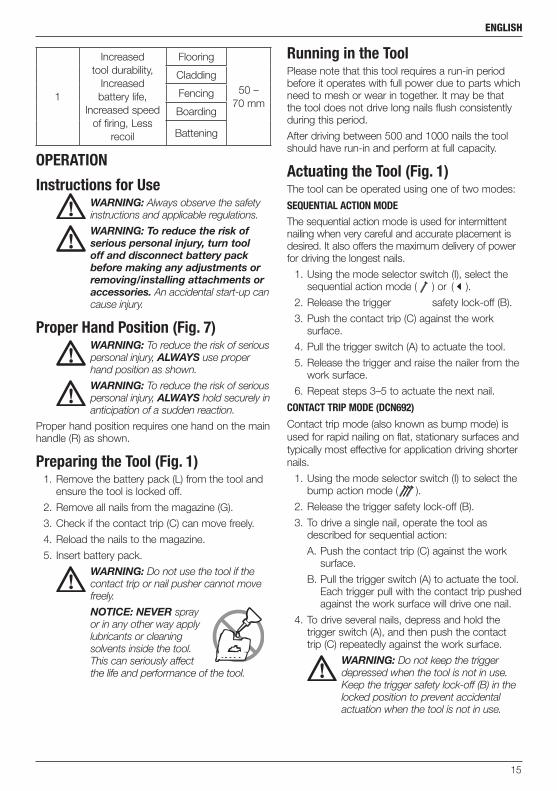
Actuating the Tool (Fig. 1)The tool can be operated using one of two modes:
SEQUENTIAL ACTION MODE
The sequential action mode is used for intermittent nailing when very careful and accurate placement is desired. It also offers the maximum delivery of power for driving the longest nails.
1. Using the mode selector switch (I), select the sequential action mode ( ) or ( ).
2. Release the trigger safety lock-off (B).
3. Push the contact trip (C) against the work surface.
4. Pull the trigger switch (A) to actuate the tool.
5. Release the trigger and raise the nailer from the work surface.
6. Repeat steps 3–5 to actuate the next nail.
CONTACT TRIP MODE (DCN692)
Contact trip mode (also known as bump mode) is used for rapid nailing on flat, stationary surfaces and typically most effective for application driving shorter nails.
1. Using the mode selector switch (I) to select the bump action mode ( ).
2. Release the trigger safety lock-off (B).
3. To drive a single nail, operate the tool as described for sequential action:
A. Push the contact trip (C) against the work surface.
B. Pull the trigger switch (A) to actuate the tool. Each trigger pull with the contact trip pushed against the work surface will drive one nail.
4. To drive several nails, depress and hold the trigger switch (A), and then push the contact trip (C) repeatedly against the work surface.
WARNING: Do not keep the trigger depressed when the tool is not in use. Keep the trigger safety lock-off (B) in the locked position to prevent accidental actuation when the tool is not in use.
1
Increased tool durability,
Increased battery life,
Increased speed of firing, Less
recoil
Flooring
50 – 70 mm
Cladding
Fencing
Boarding
Battening
OPERATION
Instructions for Use WARNING: Always observe the safety
instructions and applicable regulations.
WARNING: To reduce the risk of serious personal injury, turn tool off and disconnect battery pack before making any adjustments or removing/installing attachments or accessories. An accidental start-up can cause injury.
Proper Hand Position (Fig. 7) WARNING: To reduce the risk of serious
personal injury, ALWAYS use proper hand position as shown.
WARNING: To reduce the risk of serious personal injury, ALWAYS hold securely in anticipation of a sudden reaction.
Proper hand position requires one hand on the main handle (R) as shown.
Preparing the Tool (Fig. 1) 1. Remove the battery pack (L) from the tool and
ensure the tool is locked off.
2. Remove all nails from the magazine (G).
3. Check if the contact trip (C) can move freely.
4. Reload the nails to the magazine.
5. Insert battery pack.
WARNING: Do not use the tool if the contact trip or nail pusher cannot move freely.
NOTICE: NEVER spray or in any other way apply lubricants or cleaning solvents inside the tool. This can seriously affect the life and performance of the tool.
16
English
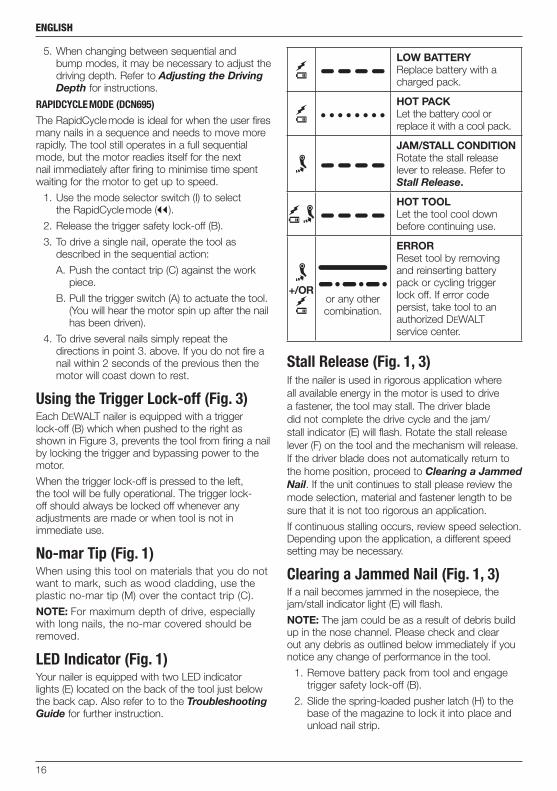
LOW BATTERY Replace battery with a charged pack.
HOT PACK Let the battery cool or replace it with a cool pack.
JAM/STALL CONDITION Rotate the stall release lever to release. Refer to Stall Release.
HOT TOOL Let the tool cool down before continuing use.
+/OR
or any other combination.
ERROR Reset tool by removing and reinserting battery pack or cycling trigger lock off. If error code persist, take tool to an authorized DeWALT service center.
Stall Release (Fig. 1, 3)If the nailer is used in rigorous application where all available energy in the motor is used to drive a fastener, the tool may stall. The driver blade did not complete the drive cycle and the jam/stall indicator (E) will flash. Rotate the stall release lever (F) on the tool and the mechanism will release. If the driver blade does not automatically return to the home position, proceed to Clearing a Jammed Nail. If the unit continues to stall please review the mode selection, material and fastener length to be sure that it is not too rigorous an application.
If continuous stalling occurs, review speed selection. Depending upon the application, a different speed setting may be necessary.
Clearing a Jammed Nail (Fig. 1, 3)If a nail becomes jammed in the nosepiece, the jam/stall indicator light (E) will flash.
NOTE: The jam could be as a result of debris build up in the nose channel. Please check and clear out any debris as outlined below immediately if you notice any change of performance in the tool.
1. Remove battery pack from tool and engage trigger safety lock-off (B).
2. Slide the spring-loaded pusher latch (H) to the base of the magazine to lock it into place and unload nail strip.
5. When changing between sequential and bump modes, it may be necessary to adjust the driving depth. Refer to Adjusting the Driving Depth for instructions.
RAPIDCYCLE MODE (DCN695)
The RapidCycle mode is ideal for when the user fires many nails in a sequence and needs to move more rapidly. The tool still operates in a full sequential mode, but the motor readies itself for the next nail immediately after firing to minimise time spent waiting for the motor to get up to speed.
1. Use the mode selector switch (I) to select the RapidCycle mode ( ).
2. Release the trigger safety lock-off (B).
3. To drive a single nail, operate the tool as described in the sequential action:
A. Push the contact trip (C) against the work piece.
B. Pull the trigger switch (A) to actuate the tool. (You will hear the motor spin up after the nail has been driven).
4. To drive several nails simply repeat the directions in point 3. above. If you do not fire a nail within 2 seconds of the previous then the motor will coast down to rest.
Using the Trigger Lock-off (Fig. 3)Each DeWALT nailer is equipped with a trigger lock-off (B) which when pushed to the right as shown in Figure 3, prevents the tool from firing a nail by locking the trigger and bypassing power to the motor.
When the trigger lock-off is pressed to the left, the tool will be fully operational. The trigger lock-off should always be locked off whenever any adjustments are made or when tool is not in immediate use.
No-mar Tip (Fig. 1)When using this tool on materials that you do not want to mark, such as wood cladding, use the plastic no-mar tip (M) over the contact trip (C).
NOTE: For maximum depth of drive, especially with long nails, the no-mar covered should be removed.
LED Indicator (Fig. 1)Your nailer is equipped with two LED indicator lights (E) located on the back of the tool just below the back cap. Also refer to to the Troubleshooting Guide for further instruction.
17
English
inside the tool. This can seriously affect the life and performance of the tool.
Cleaning WARNING: Blow dirt and dust out of
the main housing with dry air as often as dirt is seen collecting in and around the air vents. Wear approved eye protection and approved dust mask when performing this procedure.
WARNING: Never use solvents or other harsh chemicals for cleaning the non-metallic parts of the tool. These chemicals may weaken the materials used in these parts. Use a cloth dampened only with water and mild soap. Never let any liquid get inside the tool; never immerse any part of the tool into a liquid.
CHARGER CLEANING INSTRUCTIONS
WARNING: Shock hazard. Disconnect the charger from the AC outlet before cleaning. Dirt and grease may be removed from the exterior of the charger using a cloth or soft non-metallic brush. Do not use water or any cleaning solutions.
Optional Accessories WARNING: Since accessories, other
than those offered by DeWALT, have not been tested with this product, use of such accessories with this tool could be hazardous. To reduce the risk of injury, only DeWALT recommended accessories should be used with this product.
Consult your dealer for further information on the appropriate accessories.
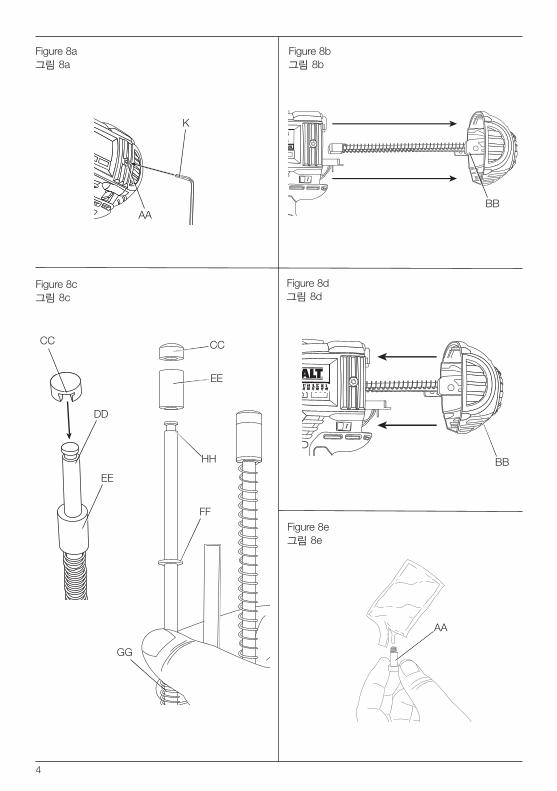
DCN6901 RETURN SPRING REPLACEMENT KIT (FIG. 8A-8E)
Over time - driver blade return springs will wear and eventually need replacement. It will become apparent that the springs will need replacement when the driver blade does not return home after every shot. To verify - open the magazine as in the Clearing a Jammed Nail section and if the springs have worn out you will be able to move the driver backwards and forwards in the nail channel with very little resistance.
The tool has been designed in a way that it is easily possible for the return springs to be replaced in less than 5 minutes on site using accessory DCN6901-XJ.
3. Using the hex tool (K) provided, loosen the two hex bolts (Q) at the top of the magazine.
4. Rotate the magazine (G) forward.
5. Remove jammed/bent nail, using pliers if necessary. Clear out any debris in the nail channel if required.
6. If driver blade is in the down position, rotate the stall release lever (F) on the top of the nailer.
NOTE: If the driver blade will not reset after rotating the stall release lever, manually resetting the blade with a long screwdriver may be necessary.
7. Rotate the magazine back into position under the nose of the tool and tighten hex bolts (Q).
8. Reinsert battery pack.
NOTE: The tool will disable itself and not reset until the battery pack has been removed and reinserted.
9. Reinsert nails into magazine (refer to Loading the Tool).
10. Release the pusher latch (H).
11. Disengage the trigger safety lock-off (B) when ready to continue nailing.
If nails become jammed in the nosepiece frequently, have the tool serviced by an authorised DeWALT service centre.
MAINTENANCEYour DeWALT power tool has been designed to operate over a long period of time with a minimum of maintenance. Continuous satisfactory operation depends upon proper tool care and regular cleaning.
WARNING: To reduce the risk of serious personal injury, turn tool off and disconnect battery pack before making any adjustments or removing/installing attachments or accessories. An accidental start-up can cause injury.
The charger and battery pack are not serviceable.
LubricationYour power tool requires no additional lubrication.
NOTICE: NEVER spray or in any other way apply lubricants or cleaning solvents
18
English
from the unit. If this happens remove and reseat the return system.
9. Once the return system is correctly seated, open the provided sachet of Loctite®* and apply a small amount on the thread of the two screws (AA) and remount the two screws using the key and tighten securely. Refer to figure 8e.
WARNING: Always test the unit by firing short nails in to soft wood, to ensure that the tool is working properly. If tool does not operate properly, contact a recognized DeWALT service center immediately.
WARNING: LOCTITE ® SACHET CONTENTS MAY IRRITATE EYES, SKIN, AND RESPIRATORY SYETEM. USE ENTIRE CONTENTS ON OPENING. Do not breath fumes. Do not get in eyes or on skin or clothing. Use only in a well ventilated area. Keep out of reach of children. FIRST AID TREATMENT: Contains polyglycol dimethacrylate, polyglycol oleate propylene glycol, titanium dioxide, and cumene hydroperoxide. If swallowed, call a Poison Control Center or doctor immediately. Do not induce vomitting. If breathed in move person to fresh air. If in eyes, rinse with water for 15 minutes. Obtain medical attention. If on skin, rinse well with water. If on clothes, remove clothes.
*Loctite® is a registered trademark of Henkel Corp.
Protecting the EnvironmentSeparate collection. Products and batteries marked with this symbol must not be disposed of with normal household waste.
Products and batteries contain materials that can be recovered or recycled reducing the demand for raw materials. Please recycle electrical products and batteries according to local provisions. Further information is available at www.2helpU.com.
Rechargeable Battery PackThis long life battery pack must be recharged when it fails to produce sufficient power on jobs which were easily done before. At the end of its technical life, discard it with due care for our environment:
WARNING: For your own safety, read the tool instruction manual before using any accessory. Failure to heed these warnings may result in personal injury and serious damage to the tool and the accessory. When servicing this tool, use only identical replacement parts.
NOTICE: All the mechanical parts of the spring replacement kit are shown for convenience and verification of inclusion. The kit also contains a packet of Loctite adhesive for use in step 9. Refer to Figure 8e.
TO CHANGE BROKEN RETURN SPRINGS:
NOTE: Springs should be replaced as a pair, using only the correct DeWALT accessory spring replacement kit.
1. Using the key (K) provided, loosen the two screws (AA) on either side of the unit. Refer to Figure 8a.
2. Remove the return system (BB) from the unit. Refer to Figure 8b.
3. Slide the spring rail clip (CC) off of the spring rail (DD). Refer to Figure 8c.
4. Twist and remove the spring bumper (EE) and remove the washer (FF) and return spring (GG). Refer to figure 8c.
5. Mount the new return spring and washer on to the spring rail (DD). While compressing the spring with the washer near the opposite end of the rail, twist on the new spring bumper until it is past the groove (HH) for the spring rail clip.
6. Mount the new spring rail clip securely and position the bumper against the clip.
7. Repeat steps 3–6 for the second spring.
NOTE: Check the return of the profile by sliding the profile up the spring rail and letting it go. It should return due to the force from the springs.
8. Slide the return system (BB) back into the unit. Refer to figure 8d. It is important to try the alignment of the profile and the flywheel before screwing the return system back on to the unit. This can be done by connecting a battery and pushing then releasing the nose of the unit against a bench or hard surface. This will start the motor spinning.
NOTE: When the profile and the flywheel are correctly aligned, you will hear the motor coast back down from full speed. If the profile and the flywheel are not correctly aligned the motor it may not start up, may slow down much faster than normal along with a loud grinding noise
19
English
• Run the battery pack down completely, then remove it from the tool.
• Lithium-ion cells are recyclable. Take them to your dealer or a local recycling station. The collected battery packs will be recycled or disposed of properly.
20
English
TROUBLESHOOTING GUIDE MANY COMMON PROBLEMS CAN BE SOLVED EASILY BY UTILIZING THE CHART BELOW.
For more serious or persistent problems, contact your nearest authorised DeWALT repair agent, or contact your DeWALT office at the address indicated in this manual.
WARNING: To reduce the risk of serious personal injury, ALWAYS lock off the tool and disconnect battery pack from tool before all repairs
SYMPTOM CAUSE FIXMotor does not run with trigger depressed
Trigger lock in locked position Unlock trigger lock.Tool is stalled, locking the motor from rotating
Rotate the stall release lever on the tool and the mechanism will release. If driver blade does not return, remove battery and manually push driver blade back to home position.
Tool is in the sequential actuation mode Depress contact trip first before firing or switch to bump mode (DCN692 only).
Tool internal electronics need to be reset Remove battery, wait 3 seconds and reinsert.Motor stops running after 5 seconds Normal operation, release trigger and redepress.Terminals are dirty or damaged See authorised DeWALT repair agent.Damaged internal electronics See authorised DeWALT repair agent.Damaged trigger See authorised DeWALT repair agent.Battery is hot Let the battery cool or replace it with a cool pack.Tool is hot Let the tool cool down before continuing use.
Motor does not run with contact trip depressed
Trigger lock in locked position Unlock trigger lock.Dry fire lock out engaged, blocking contact trip from traveling fully
Load more nails into magazine.
Tool is stalled, locking the motor from rotating
Rotate the stall release lever on the tool and the mechanism will release. If driver blade does not return, remove battery and manually push driver blade back to home position.
Bent contact trip See authorised DeWALT repair agent.Motor stops running after 5 seconds Normal operation, release contact trip and
redepress.Terminals are dirty or damaged See authorised DeWALT repair agent.Damaged internal electronics See authorised DeWALT repair agent.Damaged trigger See authorised DeWALT repair agent.Battery is hot Let the battery cool or replace it with a cool pack.Tool is hot Let the tool cool down before continuing use.
Tool does not actuate (motor runs but will not fire)
Dry fire lock out engaged, blocking contact trip from traveling fully
Load nails into magazine.
Low battery charge or damaged battery Check charge level if pack shows state-of-charge. Charge or replace battery pack if necessary.
Jammed nail/drive blade not returned to home position
Remove battery, clear jammed nail, cycle stall release lever, (push driver blade up manually if necessary) reinsert battery pack.
Damaged driver/return assembly Replace driver/return assembly. See authorised DeWALT repair agent.
Jammed internal mechanism See authorised DeWALT repair agent.Damaged internal electronics See authorised DeWALT repair agent.
Motor starts up but generates a lot of noise
Jammed nail and driver blade is stuck in down position
Use stall release lever, clear any jammed nails, and return driver blade manually if necessary.
Damaged driver/return assembly Replace driver/return assembly. See authorised DeWALT repair agent.

21
English
TROUBLESHOOTING GUIDE (continued)
SYMPTOM CAUSE FIXDrive blade continues to get stuck in down position
Jammed nail and driver blade is stuck in down position
Use stall release lever, clear and jammed nails, and return driver blade manually if necessary.
Damaged driver/return assembly Replace driver/return assembly. See authorised DeWALT repair agent.
Material and fastener length If the unit continues to stall (forcing the need to rotate the Stall release lever) choose the appropriate material and fastener length that is not too rigorous an application.
Debris in nosepiece Clean nose area and watch closely for small pieces of broken nails stuck in the track.
Tool is not yet run-in New tools can take 500–1000 nails for parts to mesh and wear in together. Drive shorter nails during this period if experiencing difficulty driving nails flush.
Use of incorrect speed If trying to drive longer ring shank nails in soft woods, or driving ring shank nails into harder materials in speed 1 - adjust speed setting to position 2.
Tool operates but does not drive fasteners fully
Depth adjust set too shallow Rotate depth adjust to a deeper setting.Tool not firmly applied to workpiece Apply adequate force to tool securing it tightly to
workpiece. Refer to instruction manual.Bump mode selected with long nails (DCN692 only)
Select sequential mode.
Material and fastener length If the unit continues to stall (forcing the need to rotate the Stall release lever) choose the appropriate material and fastener length that is not too rigorous of an application.
Damaged or worn driver blade tip Replace driver/return assembly. See authorised DeWALT repair agent.
Tool used with no-mar tip Remove no-mar tip.Damaged actuation mechanism See authorised DeWALT repair agent.Tool is not yet run-in New tools can take 500–1000 nails for parts to
mesh and wear in together. Drive shorter nails during this period if experiencing difficulty driving nails flush.
Use of incorrect speed If trying to drive longer ring shank nails in soft woods, or driving ring shank nails into harder materials in speed 1 - adjust speed setting to position 2.
Tool operates, but no fastener is driven
No nails in magazine Load nails in magazine.Wrong size or angle nails Use only the recommended nails. Refer to
Technical Data.Debris in nosepiece Clean nose area and watch closely for small pieces
of broken nails stuck in the track.Debris in magazine Clean magazine.Worn magazine Replace magazine. See authorised DeWALT repair
agent.Damaged or worn driver blade Replace driver blade. See authorised DeWALT
repair agent.Damaged pusher spring Replace spring; see authorised DeWALT repair
agent.
22
English
SYMPTOM CAUSE FIXJammed nail Wrong size or angle nails Use only the recommended nails. Refer to
Technical Data.Magazine screws not secured after previous jam clear/inspection
Make sure to tighten magazine hex bolts with wrench provided.
Damaged or worn driver blade Replace driver blade. See authorised DeWALT repair agent.
Material and fastener length If the unit continues to stall (forcing the need to rotate the Stall release lever) choose the appropriate material and fastener length that is not too rigorous an application.
Debris in nosepiece Clean nose area and watch closely for small pieces of broken nails stuck in the track.
Worn magazine Replace magazine. See authorised DeWALT repair agent.
Damaged pusher spring Replace spring. See authorised DeWALT repair agent.
Dry fire lock out is engaged with only 7-9 nails remaining in magazine and the user is applying excessive force to contact trip, overriding the lockout
Load more nails in magazine to disengage dryfire lockout.
Tool is not yet run-in New tools can take 500–1000 nails for parts to mesh and wear in together. Drive shorter nails during this period if experiencing difficulty driving nails flush.
Use of incorrect speed. If trying to drive longer ring shank nails in soft woods, or driving ring shank nails into harder materials in speed 1 - adjust speed setting to position 2.
TROUBLESHOOTING GUIDE (continued)
23
한국어
축하합니다!DeWALT 공구를 선택해 주셔서 감사합니다. DeWALT 는 오랜 경험과 제품 개발 및 혁신을 통해 전문 전동 공구 사용자들이 인정하는 기업으로 자리잡아 왔습니다.
기술데이터DCN692 DCN695
전압 VDC 18 18작동 모드 단발/연발 빠른연발/연발
매거진 각도 33° 33°패스너
길이 mm 50–90 50–90샹크 직경 mm 2.8–3.3 2.8–3.3각도 30–34° 30–34°헤드 기하학 클립식 또는 오프셋 라운드 클립식 또는 오프셋 라운드
컬레이션 타입 종이 또는 용접 와이어 종이 또는 용접 와이어
무게 (배터리 팩 제외) kg 3.63 3.63
배터리 팩 DCB180 DCB181 DCB182 DCB183/B DCB184/B DCB185배터리 유형 리튬 이온 리튬 이온 리튬 이온 리튬 이온 리튬 이온 리튬 이온전압 VDC 18 18 18 18 18 18용량 Ah 3.0 1.5 4.0 2.0 5.0 1.3무게 kg 0.64 0.35 0.61 0.40/0.45 0.62/0.67 0.35
충전기 DCB105전원 전압 VAC 220-240배터리 유형 10.8/14.4/18 리튬 이온배터리 팩의 대략적인 충전 시간
분 25 (1.3 Ah) 30 (1.5 Ah) 40 (2.0 Ah)
55 (3.0 Ah) 70 (4.0 Ah) 90 (5.0 Ah)
무게 kg 0.49
충전기 DCB107전원 전압 VAC 220-240배터리 유형 10.8/14.4/18 리튬 이온배터리 팩의 대략적인 충전 시간
분 60 (1.3 Ah) 70 (1.5 Ah) 90 (2.0 Ah)
140 (3.0 Ah) 185 (4.0 Ah) 240 (5.0 Ah)
무게 kg 0.29
18VXR리튬이온충전식네일러DCN692,DCN695
24
한국어
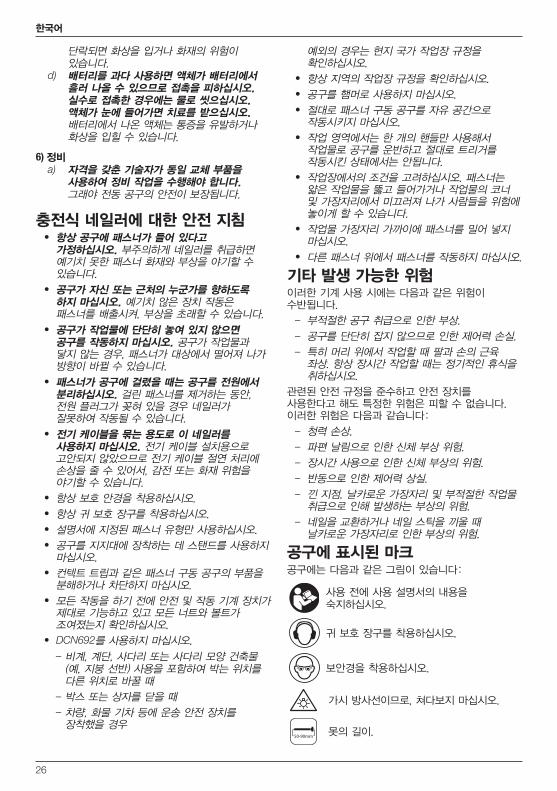
정의:안전지침다음 정의는 각 경고 문구의 심각도를 설명합니다. 사용 설명서를 읽고 다음 기호들에 유의하십시오.
위험:절박한 위험 상태를 나타내며, 방지하지 않으면 사망또는심각한부상을 초래합니다.
경고: 잠재적 위험 상태를 나타내며, 방지하지 않으면 사망또는심각한부상을 초래할수있습니다.
주의: 잠재적으로 위험한 상태를 나타내며, 방지하지 않으면 경미하거나가벼운부상을 초래할 수있습니다.
참고:신체부상을초래하지않는행위를 나타내며, 방지하지 않으면 재산상의손해가 발생할수있습니다.
감전 위험을 나타냅니다.
화재 위험을 나타냅니다.
경고: 부상 위험을 줄이려면 사용 설명서를 숙지하십시오.
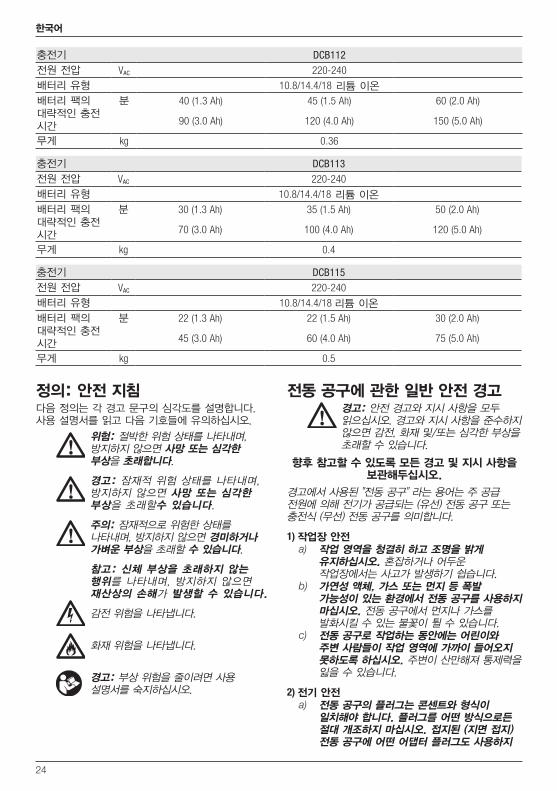
충전기 DCB112전원 전압 VAC 220-240배터리 유형 10.8/14.4/18 리튬 이온배터리 팩의 대략적인 충전 시간
분 40 (1.3 Ah) 45 (1.5 Ah) 60 (2.0 Ah)
90 (3.0 Ah) 120 (4.0 Ah) 150 (5.0 Ah)
무게 kg 0.36
충전기 DCB113전원 전압 VAC 220-240배터리 유형 10.8/14.4/18 리튬 이온배터리 팩의 대략적인 충전 시간
분 30 (1.3 Ah) 35 (1.5 Ah) 50 (2.0 Ah)
70 (3.0 Ah) 100 (4.0 Ah) 120 (5.0 Ah)
무게 kg 0.4
충전기 DCB115전원 전압 VAC 220-240배터리 유형 10.8/14.4/18 리튬 이온배터리 팩의 대략적인 충전 시간
분 22 (1.3 Ah) 22 (1.5 Ah) 30 (2.0 Ah)
45 (3.0 Ah) 60 (4.0 Ah) 75 (5.0 Ah)
무게 kg 0.5
전동공구에관한일반안전경고 경고:안전 경고와 지시 사항을 모두
읽으십시오. 경고와 지시 사항을 준수하지 않으면 감전, 화재 및/또는 심각한 부상을 초래할 수 있습니다.
향후참고할수있도록모든경고및지시사항을보관해두십시오.
경고에서 사용된 "전동 공구" 라는 용어는 주 공급 전원에 의해 전기가 공급되는 (유선) 전동 공구 또는 충전식 (무선) 전동 공구를 의미합니다.
1) 작업장안전a) 작업영역을청결히하고조명을밝게
유지하십시오.혼잡하거나 어두운 작업장에서는 사고가 발생하기 쉽습니다.
b) 가연성액체,가스또는먼지등폭발가능성이있는환경에서전동공구를사용하지마십시오.전동 공구에서 먼지나 가스를 발화시킬 수 있는 불꽃이 튈 수 있습니다.
c) 전동공구로작업하는동안에는어린이와주변사람들이작업영역에가까이들어오지못하도록하십시오.주변이 산만해져 통제력을 잃을 수 있습니다.
2) 전기안전a) 전동공구의플러그는콘센트와형식이
일치해야합니다.플러그를어떤방식으로든절대개조하지마십시오.접지된(지면접지)전동공구에어떤어댑터플러그도사용하지

25
한국어
유의하십시오.헐렁한 옷, 장신구 또는 긴 머리가 움직이는 부품에 낄 수 있습니다.
g) 먼지배출및집진시설연결을위한장치가제공된경우,이들장치가연결되어적절히사용되고있는지반드시확인하십시오. 집진 장치를 사용하면 먼지와 관련된 위험을 줄일 수 있습니다.
4) 전동공구사용및관리a) 전동공구에무리한힘을가하지마십시오.
해당용도에맞는올바른전동공구를사용하십시오.올바른 전동 공구를 사용해야 설계된 속도로 작업을 더욱 안전하고 정확하게 수행할 수 있습니다.
b) 켜지지않거나꺼지지않는경우전동공구를사용하지마십시오.스위치로 제어되지 않는 전동 공구는 위험하며 수리해야 합니다.
c) 전동공구를조정하거나액세서리를변경하거나보관하기전에전원및/또는배터리팩에서플러그를빼십시오. 이러한 예방적 안전 조치를 따라야 전동 공구가 갑자기 작동할 위험이 줄어듭니다.
d) 사용하지않는전동공구는어린이의손이닿지않는곳에보관하고,전동공구나본지시사항에익숙하지않은사람이전동공구를절대사용하지못하게하십시오.전동 공구는 훈련을 받지 않은 사용자가 다루면 위험합니다.
e) 전동공구유지보수.움직이는부품의잘못된정렬이나바인딩,부품파손및기타전동공구의작동에영향을미칠수있는기타모든상태를확인하십시오.손상된부분이있는경우사용하기전에전동공구를수리하십시오. 많은 사고는 전동 공구를 제대로 유지 보수하지 않아 발생합니다.
f) 절단공구를예리하고깨끗한상태로유지하십시오.절단지석 가장자리를 예리하게 잘 유지하면 절단기를 사용할 때 바인딩이 적고 다루기가 용이합니다.
g) 작업환경과수행할작업을고려하여,본지시사항에따라전동공구,액세서리및툴비트등을사용하십시오.본 사용 설명서의 내용과 다른 용도로 전동 공구를 사용하면 위험한 상황이 발생할 수 있습니다.
5) 배터리공구사용및관리a) 다시충전할때는제조업체에서지정한
충전기만사용하십시오.한 배터리 팩 유형에 적합한 충전기를 다른 배터리 팩과 함께 사용할 경우 화재의 위험이 있습니다.
b) 전동공구를사용할때는특수설계된배터리팩을함께사용하십시오.다른 배터리 팩을 사용하면 부상을 입거나 화재의 위험이 있습니다.
c) 배터리팩을사용하지않을때에는클립,동전,키,못,나사등의금속물체나,단자간에연결할수있는작은금속물체가닿지않도록멀리두십시오.배터리 단자가
마십시오.개조되지 않은 플러그 및 형식이 일치하는 콘센트를 사용하면 감전 위험이 줄어듭니다.
b) 파이프,라디에이터,렌지및냉장고등과같이접지된표면에신체가접촉하지않도록하십시오.신체가 접지되어 있으면 감전 위험이 높아집니다.
c) 전동공구를비또는습한환경에노출하지않도록주의하십시오.전동 공구에 물이 들어가면 감전 위험이 높아집니다.
d) 코드를함부로다루지마십시오.코드를사용하여전동공구를운반하거나잡아당기거나플러그를뽑지마십시오.열,오일,날카로운모서리또는움직이는부품에서멀리떨어진장소에코드를보관하십시오.코드가 손상되거나 얽혀 있으면 감전 위험이 높아집니다.
e) 전동공구를실외에서사용할때는실외사용에적합한연장코드를사용하십시오.실외 사용에 적합한 코드를 사용하면 감전 위험이 줄어듭니다.
f) 어쩔수없이습한장소에서전동공구를사용해야하는경우에는누전차단기(RCD)로보호된전원을공급하십시오.RCD를 사용하면 감전 위험이 줄어듭니다.
3) 신체안전a) 전동공구로작업할때는방심하지말고
작업에주의하면서상식에따르십시오.피곤한상태이거나약물,술,치료제를복용한상태에서는전동공구를사용하지마십시오.전동 공구를 사용하는 중에 주의력을 잃어 순간적으로 부상을 당할 수 있습니다.
b) 신체보호장비를착용하십시오.항상보안경을착용하십시오.적합한 상황에서 방진 마스크, 미끄럼 방지 안전화, 안전모 또는 청력 보호 기구 등의 보호 장비를 사용하면 신체 부상 위험이 줄어듭니다.
c) 의도하지않은장비가동방지.전원및/또는배터리팩에연결한상태로공구를선택또는운반할때는사전에스위치가꺼짐위치에있는지반드시확인하십시오.스위치가 켜짐 위치에 있는 상태에서 스위치에 손가락이 닿은 상태로 전동 공구를 운반하거나 전동 공구에 전원을 공급하면 사고가 발생합니다.
d) 전동공구를켜기전에모든조정키또는렌치를제거하십시오.전동 공구의 회전 부품에 렌치나 키가 부착되어 있으면 부상을 당할 수 있습니다.
e) 무리하게팔을뻗지마십시오.항상올바른자세로서서균형을유지하십시오.그러면 예기치 않은 상황에서 전동 공구에 대한 제어력이 향상됩니다.
f) 적절한작업복을착용합니다.헐렁한옷이나장신구를착용하지마십시오.머리카락,옷및장갑이움직이는부품에닿지않도록
26
한국어
예외의 경우는 현지 국가 작업장 규정을 확인하십시오.
• 항상 지역의 작업장 규정을 확인하십시오.
• 공구를 햄머로 사용하지 마십시오.
• 절대로 패스너 구동 공구를 자유 공간으로 작동시키지 마십시오.
• 작업 영역에서는 한 개의 핸들만 사용해서 작업물로 공구를 운반하고 절대로 트리거를 작동시킨 상태에서는 안됩니다.
• 작업장에서의 조건을 고려하십시오. 패스너는 얇은 작업물을 뚫고 들어가거나 작업물의 코너 및 가장자리에서 미끄러져 나가 사람들을 위험에 놓이게 할 수 있습니다.
• 작업물 가장자리 가까이에 패스너를 밀어 넣지 마십시오.
• 다른 패스너 위에서 패스너를 작동하지 마십시오.
기타발생가능한위험이러한 기계 사용 시에는 다음과 같은 위험이 수반됩니다.
– 부적절한 공구 취급으로 인한 부상.
– 공구를 단단히 잡지 않으므로 인한 제어력 손실.
– 특히 머리 위에서 작업할 때 팔과 손의 근육 좌상. 항상 장시간 작업할 때는 정기적인 휴식을 취하십시오.
관련된 안전 규정을 준수하고 안전 장치를 사용한다고 해도 특정한 위험은 피할 수 없습니다. 이러한 위험은 다음과 같습니다:
– 청력 손상.
– 파편 날림으로 인한 신체 부상 위험.
– 장시간 사용으로 인한 신체 부상의 위험.
– 반동으로 인한 제어력 상실.
– 낀 지점, 날카로운 가장자리 및 부적절한 작업물 취급으로 인해 발생하는 부상의 위험.
– 네일을 교환하거나 네일 스틱을 끼울 때 날카로운 가장자리로 인한 부상의 위험.
공구에표시된마크공구에는 다음과 같은 그림이 있습니다:
사용 전에 사용 설명서의 내용을 숙지하십시오.
귀 보호 장구를 착용하십시오.
보안경을 착용하십시오.
가시 방사선이므로, 쳐다보지 마십시오.
50-90mm못의 길이.
단락되면 화상을 입거나 화재의 위험이 있습니다.
d) 배터리를과다사용하면액체가배터리에서흘러나올수있으므로접촉을피하십시오.실수로접촉한경우에는물로씻으십시오.액체가눈에들어가면치료를받으십시오. 배터리에서 나온 액체는 통증을 유발하거나 화상을 입힐 수 있습니다.
6) 정비a) 자격을갖춘기술자가동일교체부품을
사용하여정비작업을수행해야합니다.그래야 전동 공구의 안전이 보장됩니다.
충전식네일러에대한안전지침 • 항상공구에패스너가들어있다고
가정하십시오. 부주의하게 네일러를 취급하면 예기치 못한 패스너 화재와 부상을 야기할 수 있습니다.
• 공구가자신또는근처의누군가를향하도록하지마십시오. 예기치 않은 장치 작동은 패스너를 배출시켜, 부상을 초래할 수 있습니다.
• 공구가작업물에단단히놓여있지않으면공구를작동하지마십시오. 공구가 작업물과 닿지 않는 경우, 패스너가 대상에서 떨어져 나가 방향이 바뀔 수 있습니다.
• 패스너가공구에걸렸을때는공구를전원에서분리하십시오. 걸린 패스너를 제거하는 동안, 전원 플러그가 꽂혀 있을 경우 네일러가 잘못하여 작동될 수 있습니다.
• 전기케이블을묶는용도로이네일러를사용하지마십시오. 전기 케이블 설치용으로 고안되지 않았으므로 전기 케이블 절연 처리에 손상을 줄 수 있어서, 감전 또는 화재 위험을 야기할 수 있습니다.
• 항상 보호 안경을 착용하십시오.
• 항상 귀 보호 장구를 착용하십시오.
• 설명서에 지정된 패스너 유형만 사용하십시오.
• 공구를 지지대에 장착하는 데 스탠드를 사용하지 마십시오.
• 컨텍트 트립과 같은 패스너 구동 공구의 부품을 분해하거나 차단하지 마십시오.
• 모든 작동을 하기 전에 안전 및 작동 기계 장치가 제대로 기능하고 있고 모든 너트와 볼트가 조여졌는지 확인하십시오.
• DCN692를 사용하지 마십시오.
– 비계, 계단, 사다리 또는 사다리 모양 건축물 (예, 지붕 선반) 사용을 포함하여 박는 위치를 다른 위치로 바꿀 때
– 박스 또는 상자를 닫을 때
– 차량, 화물 기차 등에 운송 안전 장치를 장착했을 경우
27
한국어
• 이충전기는DeWALT충전용배터리충전이외의용도로는사용할수없습니다.다른 용도로 사용하면 화재, 감전 또는 감전사의 위험이 있습니다.
• 충전기가비나눈을맞지않도록하십시오.
• 충전기를분리할경우코드가아니라플러그를뽑으십시오.그래야만 전기 플러그 및 코드 손상의 위험이 줄어듭니다.
• 코드가밟히거나걸리거나기타원인에의해손상되거나압박을받지않도록유의하십시오.
• 불가피한경우가아니면연장코드를사용하지마십시오.연장 코드를 잘못 사용하면 화재, 감전 또는 감전사의 위험이 있습니다.
• 충전기위에물건을올려놓거나부드러운표면에충전기를두면환기슬롯이막혀내부가과열될수있습니다.충전기는 열원에 가까이 두지 마십시오. 충전기는 하우징의 상단과 하단에 있는 슬롯을 통해 환기됩니다.
• 코드나플러그가손상된충전기를작동시키지마십시오-즉시 교체하십시오.
• 심한충격을받았거나떨어뜨렸거나기타의방식으로손상된경우에는충전기를작동시키지마십시오. 공인 서비스 센터로 가져가십시오.
• 충전기를분해하지마십시오.서비스나수리가필요한경우에는공인서비스센터로가져가십시오. 잘못 재조립하면 화재, 감전 또는 감전사의 위험이 있습니다.
• 전원 코드가 손상된 경우 사고 방지를 위해 제조업체, 서비스 대리점 또는 이에 준하는 자격을 가진 수리 기술자를 통해 즉시 교체하십시오.
• 청소하려면먼저충전기를콘센트에서분리하십시오.그래야감전위험이줄어듭니다.배터리 팩을 제거하는 것만으로 이러한 위험이 줄어들지는 않습니다.
• 절대로충전기 두 개를 함께 연결하지 마십시오.
• 충전기는가정용표준전력(220~240V)으로작동하도록설계되어있습니다.다른전압에서는사용하지마십시오.차량용 충전기는 제외됩니다.
본지침을잘보관해두십시오.
충전기DCB105, DCB107, DCB112, DCB113 및 DCB115 충전기는 10.8V, 14.4V 및 18V 리튬 이온 XR (DCB140, DCB141, DCB142, DCB143, DCB144, DCB145, DCB180, DCB181, DCB182, DCB183, DCB183B, DCB184, DCB184B 및 DCB185) 배터리 팩을 사용합니다.
DeWALT 충전기는 어떠한 조절 작업도 필요 없으며 최대한 작동하기 쉽게 설계되었습니다.
2.8–3.3 mm
못 두께.
55적재 용량.
30 - 34˚적절한 못의 컬레이션 각도.
날짜코드위치
날짜 코드에는, 제조년도가 포함되며이 제조년도는 케이스에 인쇄되어 있습니다.
예:
2016 XX XX
제조년도
모든배터리충전기에대한중요한안전지침본지침을잘보관해두십시오: 본 사용 설명서에는 호환이 되는 배터리 충전기에 대한 중요한 안전 및 작업 지침이 포함되어 있습니다 (기술데이터 참조) .
• 충전기를 사용하기 전에 충전기, 배터리 팩, 그리고 배터리 팩 관련 제품에 대한 지침과 주의 표시를 숙지하십시오.
경고:감전 위험. 충전기 내부에 액체가 들어가지 않도록 하십시오. 감전될 수 있습니다.
경고: 정격 잔류 전류가 30mA 미만인 누전 차단기 (RCD) 를 사용하는 것이 좋습니다.
주의:화상 위험. 신체 부상의 위험을 줄이려면 DeWALT 충전용 배터리로만 충전하십시오. 다른 유형의 배터리는 폭발로 인한 신체 부상과 손상을 초래할 수 있습니다.
주의: 어린이가 본 제품을 가지고 놀지 못하도록 항상 주시해야 합니다.
참고:특정 조건에서, 충전기가 전원 공급기에 연결되어 있으면 충전기 내부에 노출된 충전 접점이 이물질에 의해 단락될 수 있습니다. 스틸 울 (steel wool) , 알루미늄 호일, 금속 입자 축적물 등의 전도성 이물질은 충전기 캐비티에 닿지 않게 해야 합니다. 캐비티 안에 배터리 팩이 없을 경우 항상 배터리 전원 공급기에서 충전기의 플러그를 뽑으십시오. 충전기를 청소할 때는 플러그를 뽑아야 합니다.
• 본사용설명서에명시된충전기외의다른충전기로배터리팩을충전하지마십시오.본 충전기와 배터리 팩은 함께 사용하도록 특수 설계되었습니다.
28
한국어
차가운 배터리가 충전되는 속도는 따뜻한 배터리 팩의 절반 수준입니다. 충전 사이클 전체에 걸쳐 배터리 팩은 이렇게 느린 속도로 충전되며 배터리가 따뜻해지더라도 최대 충전 속도로 복원되지 않습니다.
리튬이온배터리팩에만해당
XR 리튬이온 배터리는 배터리에 과부하가 걸리거나 과열 또는 완전 방전되는 것을 방지하는 전자 보호 시스템으로 설계되었습니다.
이 공구는 전자 보호 시스템이 작동하면 자동으로 꺼집니다. 이러한 경우 리튬 이온 배터리가 완전히 충전될 때까지 충전기에 리튬 이온 배터리를 넣으십시오.
모든배터리팩에대한중요한안전지침배터리 팩 교체를 하기 위해 주문할 때는 카탈로그 번호와 전압을 반드시 확인하고 표기해야 합니다.
배터리 팩은 카톤에서 꺼낼 때 완전히 충전된 상태가 아닙니다. 배터리 팩과 충전기를 사용하기 전에 아래 안전 지침을 숙독하십시오. 그런 다음 설명된 충전 절차를 따르십시오.
모든지시사항을읽으십시오.
• 가연성액체,가스또는먼지등폭발성분위기에서배터리를충전하거나사용하지마십시오.배터리를 끼우거나 충전기에서 분리할 때 먼지나 가스에 불이 붙을 수 있습니다.
• 충전기에배터리팩을너무세게밀어넣지마십시오.어떤형태로든호환되지않는충전기에사용하기위해배터리팩을개조하지마십시오.배터리팩이파열되어심각한부상을유발할수있습니다.
• DeWALT 충전기에서만 배터리 팩을 충전하십시오.
• 물이나기타액체가튀어묻거나액체에빠지지않도록 하십시오.
• 온도가40 ˚C(104 ˚F)초과될수있는곳(여름철허름한창고또는금속건물등)에공구와배터리팩을보관하거나사용하지마십시오.
경고: 어떤 이유로든 배터리 팩을 절대 분해하지 마십시오. 배터리 팩 케이스가 깨지거나 손상되면 충전기에 넣지 마십시오. 배터리 팩을 뭉개거나 떨어뜨리거나 손상시키지 마십시오. 강한 충격을 받았거나, 떨어뜨렸거나, 차에 치였거나 기타의 원인으로 어떤 방식으로든 손상된 (못이 박히거나 망치로 맞았거나 밟힘) 배터리 팩이나 충전기는 사용하지 마십시오. 감전 또는 감전사의 위험이 있습니다. 손상된 배터리 팩은 재활용을 위해 서비스 센터에 반환해야 합니다.
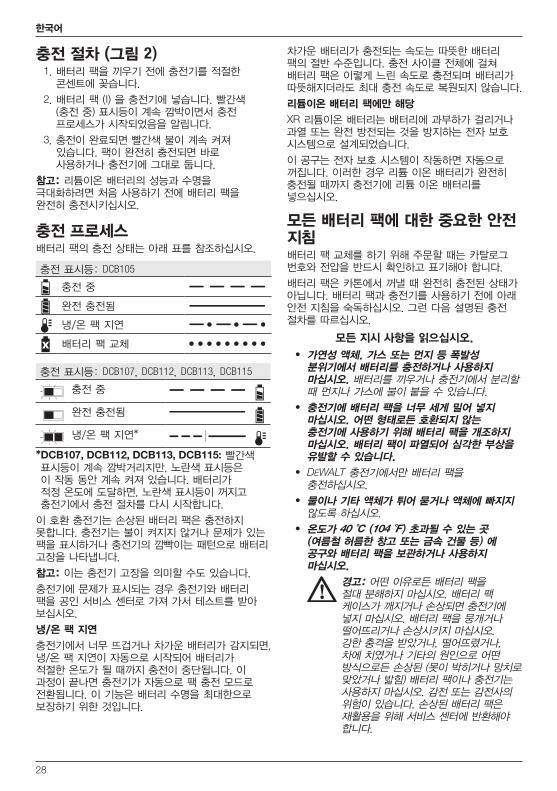
충전절차(그림2) 1. 배터리 팩을 끼우기 전에 충전기를 적절한
콘센트에 꽂습니다.
2. 배터리 팩 (I) 을 충전기에 넣습니다. 빨간색 (충전 중) 표시등이 계속 깜박이면서 충전 프로세스가 시작되었음을 알립니다.
3. 충전이 완료되면 빨간색 불이 계속 켜져 있습니다. 팩이 완전히 충전되면 바로 사용하거나 충전기에 그대로 둡니다.
참고:리튬이온 배터리의 성능과 수명을 극대화하려면 처음 사용하기 전에 배터리 팩을 완전히 충전시키십시오.
충전프로세스배터리 팩의 충전 상태는 아래 표를 참조하십시오.
충전 표시등: DCB105
충전 중
완전 충전됨
냉/온 팩 지연
배터리 팩 교체
충전 표시등: DCB107, DCB112, DCB113, DCB115
충전 중
완전 충전됨
냉/온 팩 지연*
*DCB107, DCB112, DCB113, DCB115:빨간색 표시등이 계속 깜박거리지만, 노란색 표시등은 이 작동 동안 계속 켜져 있습니다. 배터리가 적정 온도에 도달하면, 노란색 표시등이 꺼지고 충전기에서 충전 절차를 다시 시작합니다.
이 호환 충전기는 손상된 배터리 팩은 충전하지 못합니다. 충전기는 불이 켜지지 않거나 문제가 있는 팩을 표시하거나 충전기의 깜빡이는 패턴으로 배터리 고장을 나타냅니다.
참고:이는 충전기 고장을 의미할 수도 있습니다.
충전기에 문제가 표시되는 경우 충전기와 배터리 팩을 공인 서비스 센터로 가져 가서 테스트를 받아 보십시오.
냉/온팩지연
충전기에서 너무 뜨겁거나 차가운 배터리가 감지되면, 냉/온 팩 지연이 자동으로 시작되어 배터리가 적절한 온도가 될 때까지 충전이 중단됩니다. 이 과정이 끝나면 충전기가 자동으로 팩 충전 모드로 전환됩니다. 이 기능은 배터리 수명을 최대한으로 보장하기 위한 것입니다.

29
한국어
배터리를 운반할 때 배터리 단자가 실수로 전도성 물질과 닿을 경우 화재 위험의 가능성이 있습니다 배터리를 운반할 경우에는 배터리 단자가 보호되어 있고, 물체에 닿을 경우 단락을 일으킬 수 있는 물체로부터 제대로 절연되어 있는지 확인하십시오
설명서의 본 섹션에서 제공하는 정보는 성실하게 제공되며 문서가 작성될 당시에는 정확한 것으로 간주합니다. 단, 명시적이거나 함축적으로 보증은 제공되지 않습니다. 활동 시 해당 규정을 준수하는 것은 구매자의 책임입니다.
배터리팩배터리유형
DCN692 및 DCN695 는 18 V 배터리 팩에서 작동합니다.
DCB180, DCB181, DCB182, DCB183, DCB183B, DCB184, DCB184B 또는 DCB185 배터리 팩을 사용할 수 있습니다. 자세한 내용은 기술데이터를 참조하십시오.
보관권장사항 1. 보관 장소로는 직사광선을 받지 않고 지나치게
덥거나 춥지 않은 시원하고 건조한 곳이 가장 좋습니다. 최적의 배터리 성능과 수명을 위해, 사용하지 않을 때에는 배터리 팩을 실온에서 보관하십시오.
2. 장기간 보관하는 경우, 최적의 결과를 위해 완전히 충전된 배터리 팩을 충전기에서 분리하여 차갑고, 건조한 장소에 보관하는 것이 좋습니다.
참고: 배터리 팩은 완전히 방전된 상태로 보관해서는 안됩니다. 사용 전에 배터리 팩을 재충전해야 합니다.
충전기및배터리팩에부착된레이블본 설명서에 사용된 그림 외에도 충전기 및 배터리 팩에 부착된 레이블에는 다음과 같은 그림이 표시되어 있습니다.
사용 전에 사용 설명서의 내용을 숙지하십시오.
충전 시간은 기술데이터를 참조하십시오.
배터리 충전 중.
배터리 충전됨.
배터리에 결함이 있음.
냉/온 팩 지연.
주의:사용하지않는공구는걸려넘어지거나떨어질위험이없는안정된표면에눕혀두십시오.배터리 팩이 큰 일부 공구들은 배터리 팩 위에 바로 서 있지만 쉽게 넘어질 수 있습니다.
리튬이온(LI-ION)에대한추가안전지침
• 배터리팩이심하게손상되거나완전히낡았더라도절대소각하지마십시오. 배터리 팩은 불 속에서 폭발할 수 있습니다. 리튬이온 배터리 팩은 연소되면서 독성 연기와 물질을 발생시킵니다.
• 배터리내용물이피부에닿으면즉시중성세척제로해당부위를씻으십시오.배터리 액체가 눈에 들어갔을 경우, 15 분 정도 또는 통증이 가실 때까지 눈을 뜨고 물로 씻어냅니다. 치료가 필요한 경우를 위해, 배터리 전해질은 액체 유기 탄산염과 리튬염의 혼합물로 구성되어 있음을 알아 두십시오.
• 열린배터리셀의내용물은호흡기질환을일으킬수있습니다.신선한 공기를 마시십시오. 증상이 계속되면 치료를 받으십시오.
경고:화상 위험. 배터리 액은 불꽃이나 화염에 노출되면 연소될 수 있습니다.
운반DeWALT 배터리는 위험물운송규칙 (Transport of Dangerous Goods) , IATA (International Air Transport Association, 국제 항공 운송 협회) 위험물 규정, IMDG (International Maritime Dangerous Goods, 국제해상위험물운송) 규칙 및 위험물 도로운송에 관한 ECE 의 규칙 (European Agreement Concerning The International Carriage of Dangerous Goods by Road, ADR) 에 대한 UN 권고사항을 포함하여, 산업 및 법적 기준에 의한 규정에 따라 모든 해당 운송 규정을 준수하고 있습니다 리튬 이온 전지 및 배터리는 위험 화물 테스트 및 기준 설명서에 대한 UN 권고 38 3항에 따라 테스트되었습니다
대개의 경우에, DeWALT 배터리 팩 해상 운송은 완전 규제를 받는 Class 9 위험 물질로 분류되는 것에서 제외될 것입니다 일반적으로, Class 9 운송에 필요한 두 가지 사례는 다음과 같습니다
1. 포장에 배터리 팩 (공구 없이) 만 들어 있을 경우 두 개 이상의 DeWALT 리튬 이온 배터리 팩은 항공 운송하고,
2. 100 와트시 (Wh) 이상의 에너지 등급에 해당하는 리튬 이온 배터리를 포함하는 모든 운송 모든 리튬 이온 배터리에는 팩에 와트시 등급이 표시되어 있습니다
수송품이 예외로 고려되든지 또는 완전 규제를 받든지 상관없이, 포장, 라벨링/표시 및 문서 요건에 관한 최신 규정을 참고하는 것은 운송 회사의 책임입니다
30
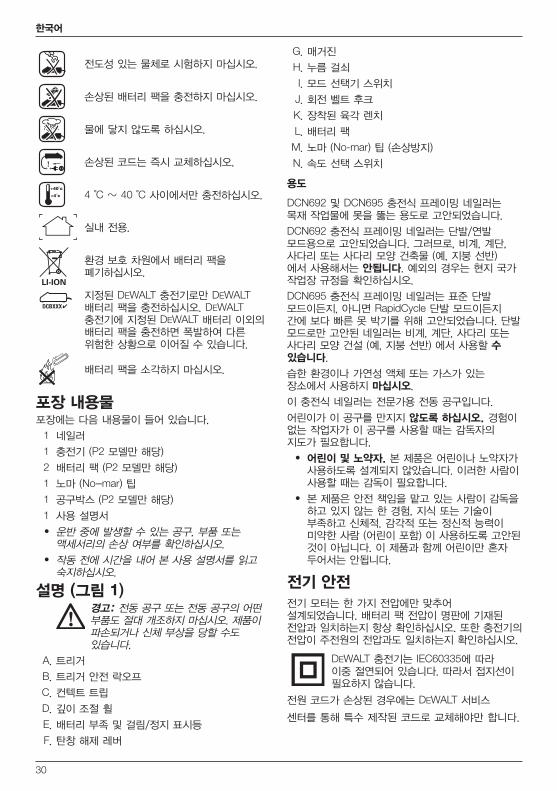
한국어
G. 매거진
H. 누름 걸쇠
I. 모드 선택기 스위치
J. 회전 벨트 후크
K. 장착된 육각 렌치
L. 배터리 팩
M. 노마 (No-mar) 팁 (손상방지)
N. 속도 선택 스위치
용도
DCN692 및 DCN695 충전식 프레이밍 네일러는 목재 작업물에 못을 뚫는 용도로 고안되었습니다.
DCN692 충전식 프레이밍 네일러는 단발/연발 모드용으로 고안되었습니다. 그러므로, 비계, 계단, 사다리 또는 사다리 모양 건축물 (예, 지붕 선반) 에서 사용해서는 안됩니다. 예외의 경우는 현지 국가 작업장 규정을 확인하십시오.
DCN695 충전식 프레이밍 네일러는 표준 단발 모드이든지, 아니면 RapidCycle단발 모드이든지 간에 보다 빠른 못 박기를 위해 고안되었습니다. 단발 모드로만 고안된 네일러는 비계, 계단, 사다리 또는 사다리 모양 건설 (예, 지붕 선반) 에서 사용할 수있습니다.
습한 환경이나 가연성 액체 또는 가스가 있는 장소에서 사용하지 마십시오.
이 충전식 네일러는 전문가용 전동 공구입니다.
어린이가 이 공구를 만지지 않도록하십시오. 경험이 없는 작업자가 이 공구를 사용할 때는 감독자의 지도가 필요합니다.
• 어린이및노약자. 본 제품은 어린이나 노약자가 사용하도록 설계되지 않았습니다. 이러한 사람이 사용할 때는 감독이 필요합니다.
• 본 제품은 안전 책임을 맡고 있는 사람이 감독을 하고 있지 않는 한 경험, 지식 또는 기술이 부족하고 신체적, 감각적 또는 정신적 능력이 미약한 사람 (어린이 포함) 이 사용하도록 고안된 것이 아닙니다. 이 제품과 함께 어린이만 혼자 두어서는 안됩니다.
전기안전전기 모터는 한 가지 전압에만 맞추어 설계되었습니다. 배터리 팩 전압이 명판에 기재된 전압과 일치하는지 항상 확인하십시오. 또한 충전기의 전압이 주전원의 전압과도 일치하는지 확인하십시오.
DeWALT 충전기는 IEC60335에 따라 이중 절연되어 있습니다. 따라서 접지선이 필요하지 않습니다.
전원 코드가 손상된 경우에는 DeWALT 서비스
센터를 통해 특수 제작된 코드로 교체해야만 합니다.
전도성 있는 물체로 시험하지 마십시오.
손상된 배터리 팩을 충전하지 마십시오.
물에 닿지 않도록 하십시오.
손상된 코드는 즉시 교체하십시오.
4 ˚C ~ 40 ˚C 사이에서만 충전하십시오.
실내 전용.
환경 보호 차원에서 배터리 팩을 폐기하십시오.
지정된 DeWALT 충전기로만 DeWALT 배터리 팩을 충전하십시오. DeWALT 충전기에 지정된 DeWALT 배터리 이외의 배터리 팩을 충전하면 폭발하여 다른 위험한 상황으로 이어질 수 있습니다.
배터리 팩을 소각하지 마십시오.
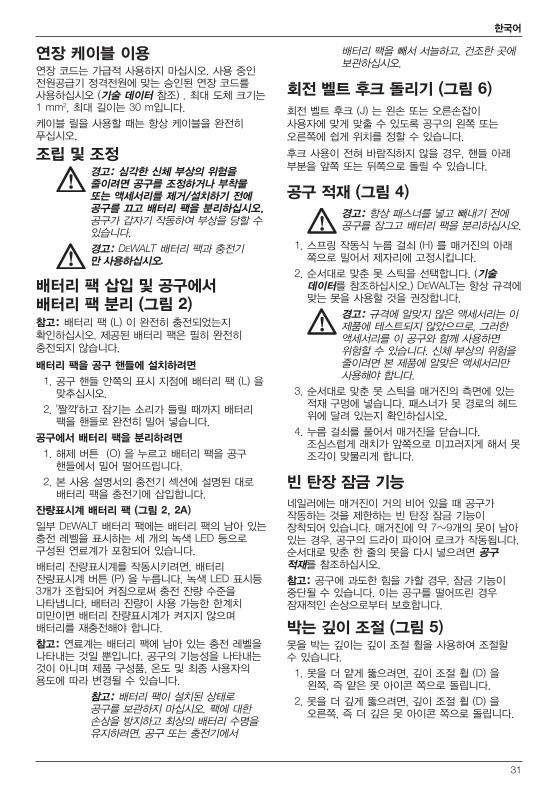
포장내용물포장에는 다음 내용물이 들어 있습니다.
1 네일러
1 충전기 (P2 모델만 해당)
2 배터리 팩 (P2 모델만 해당)
1 노마 (No-mar) 팁
1 공구박스 (P2 모델만 해당)
1 사용 설명서
• 운반 중에 발생할 수 있는 공구, 부품 또는 액세서리의 손상 여부를 확인하십시오.
• 작동 전에 시간을 내어 본 사용 설명서를 읽고 숙지하십시오.
설명(그림1) 경고:전동 공구 또는 전동 공구의 어떤
부품도 절대 개조하지 마십시오. 제품이 파손되거나 신체 부상을 당할 수도 있습니다.
A. 트리거
B. 트리거 안전 락오프
C. 컨텍트 트립
D. 깊이 조절 휠
E. 배터리 부족 및 걸림/정지 표시등
F. 탄창 해제 레버
31
한국어
배터리 팩을 빼서 서늘하고, 건조한 곳에 보관하십시오.
회전벨트후크돌리기(그림6)회전 벨트 후크 (J) 는 왼손 또는 오른손잡이 사용자에 맞게 맞출 수 있도록 공구의 왼쪽 또는 오른쪽에 쉽게 위치를 정할 수 있습니다.
후크 사용이 전혀 바람직하지 않을 경우, 핸들 아래 부분을 앞쪽 또는 뒤쪽으로 돌릴 수 있습니다.
공구적재(그림4) 경고:항상 패스너를 넣고 빼내기 전에
공구를 잠그고 배터리 팩을 분리하십시오.
1. 스프링 작동식 누름 걸쇠 (H) 를 매거진의 아래 쪽으로 밀어서 제자리에 고정시킵니다.
2. 순서대로 맞춘 못 스틱을 선택합니다. (기술데이터를 참조하십시오.) DeWALT는 항상 규격에 맞는 못을 사용할 것을 권장합니다.
경고: 규격에 알맞지 않은 액세서리는 이 제품에 테스트되지 않았으므로, 그러한 액세서리를 이 공구와 함께 사용하면 위험할 수 있습니다. 신체 부상의 위험을 줄이려면 본 제품에 알맞은 액세서리만 사용해야 합니다.
3. 순서대로 맞춘 못 스틱을 매거진의 측면에 있는 적재 구멍에 넣습니다. 패스너가 못 경로의 헤드 위에 달려 있는지 확인하십시오.
4. 누름 걸쇠를 풀어서 매거진을 닫습니다. 조심스럽게 래치가 앞쪽으로 미끄러지게 해서 못 조각이 맞물리게 합니다.
빈탄장잠금기능네일러에는 매거진이 거의 비어 있을 때 공구가 작동하는 것을 제한하는 빈 탄장 잠금 기능이 장착되어 있습니다. 매거진에 약 7~9개의 못이 남아 있는 경우, 공구의 드라이 파이어 로크가 작동됩니다. 순서대로 맞춘 한 줄의 못을 다시 넣으려면 공구적재를 참조하십시오.
참고: 공구에 과도한 힘을 가할 경우, 잠금 기능이 중단될 수 있습니다. 이는 공구를 떨어뜨린 경우 잠재적인 손상으로부터 보호합니다.
박는깊이조절(그림5)못을 박는 깊이는 깊이 조절 휠을 사용하여 조절할 수 있습니다.
1. 못을 더 얕게 뚫으려면, 깊이 조절 휠 (D) 을 왼쪽, 즉 얕은 못 아이콘 쪽으로 돌립니다.
2. 못을 더 깊게 뚫으려면, 깊이 조절 휠 (D) 을 오른쪽, 즉 더 깊은 못 아이콘 쪽으로 돌립니다.
연장케이블이용연장 코드는 가급적 사용하지 마십시오. 사용 중인 전원공급기 정격전원에 맞는 승인된 연장 코드를 사용하십시오 (기술데이터 참조) . 최대 도체 크기는 1 mm2, 최대 길이는 30 m입니다.
케이블 릴을 사용할 때는 항상 케이블을 완전히 푸십시오.
조립및조정 경고:심각한신체부상의위험을
줄이려면공구를조정하거나부착물또는액세서리를제거/설치하기전에공구를끄고배터리팩을분리하십시오.공구가 갑자기 작동하여 부상을 당할 수 있습니다.
경고:DeWALT 배터리 팩과 충전기 만 사용하십시오.
배터리팩삽입및공구에서배터리팩분리(그림2)참고: 배터리 팩 (L) 이 완전히 충전되었는지 확인하십시오. 제공된 배터리 팩은 필히 완전히 충전되지 않습니다.
배터리팩을공구핸들에설치하려면
1. 공구 핸들 안쪽의 표시 지점에 배터리 팩 (L) 을 맞추십시오.
2. '짤깍'하고 잠기는 소리가 들릴 때까지 배터리 팩을 핸들로 완전히 밀어 넣습니다.
공구에서배터리팩을분리하려면
1. 해제 버튼 (O) 을 누르고 배터리 팩을 공구 핸들에서 밀어 떨어뜨립니다.
2. 본 사용 설명서의 충전기 섹션에 설명된 대로 배터리 팩을 충전기에 삽입합니다.
잔량표시계배터리팩(그림2,2A)
일부 DeWALT 배터리 팩에는 배터리 팩의 남아 있는 충전 레벨을 표시하는 세 개의 녹색 LED 등으로 구성된 연료계가 포함되어 있습니다.
배터리 잔량표시계를 작동시키려면, 배터리 잔량표시계 버튼 (P) 을 누릅니다. 녹색 LED 표시등 3개가 조합되어 켜짐으로써 충전 잔량 수준을 나타냅니다. 배터리 잔량이 사용 가능한 한계치 미만이면 배터리 잔량표시계가 켜지지 않으며 배터리를 재충전해야 합니다.
참고:연료계는 배터리 팩에 남아 있는 충전 레벨을 나타내는 것일 뿐입니다. 공구의 기능성을 나타내는 것이 아니며 제품 구성품, 온도 및 최종 사용자의 용도에 따라 변경될 수 있습니다.
참고: 배터리 팩이 설치된 상태로 공구를 보관하지 마십시오. 팩에 대한 손상을 방지하고 최상의 배터리 수명을 유지하려면, 공구 또는 충전기에서
32
한국어
조작
사용지침 경고:안전 지시 사항과 해당 규정을 항상
준수하십시오.
경고:심각한신체부상의위험을줄이려면공구를조정하거나부착물또는액세서리를제거/설치하기전에공구를끄고배터리팩을분리하십시오.공구가 갑자기 작동하여 부상을 당할 수 있습니다.
올바른손의위치(그림7) 경고:심각한 신체 부상의 위험을
줄이려면 항상 그림과 같이 올바르게 손을 위치하십시오.
경고: 심각한 신체 부상의 위험을 줄이려면, 항상 급작스러운 반동을 예상하고 확실하게 잡으십시오.
그림과 같이 올바른 손의 위치가 되려면 한 손을 주 핸들 (R) 에 놓아야 합니다.
공구준비(그림1) 1. 공구에서 배터리 팩 (L) 을 분리하고 공구가
잠겼는지 확인하십시오.
2. 매거진 (G) 에서 모든 못을 제거합니다.
3. 컨텍트 트립 (C) 이 자유롭게 이동할 수 있는지 확인하십시오.
4. 매거진에 못을 다시 넣습니다.
5. 배터리 팩을 끼웁니다.
경고:컨텍트 트립 또는 네일 푸셔를 자유롭게 움직일 수 없는 경우 공구를 사용하지 마십시오.
참고:절대로 공구 내부에 용제를 분무기로 뿌리거나 다른 방법으로 윤활유를 바르거나 용제로 청소하지 마십시오. 이는 공구의 수명과 성능에 심각한 영향을 미칠 수 있습니다.
공구길들이기이 공구는 함께 맞물려 마모되어야 하는 부품들로 인해 전출력으로 작동하기 전에 길들이는 기간이 필요하다는 점을 유의하십시오. 이 기간 동안에는 공구가 항상 수평하게 긴 못을 박지 못할 수 있습니다.
500 ~ 1000 개의 못을 박은 후 공구가 길들여지고 전능력을 수행할 수 있습니다.
모드선택(그림1)DCN692
단발 모드를 선택하려면, 모드 선택기 스위치 (I) 를 밀어서 단일 화살표 ( ) 아이콘을 표시합니다.
연발 모드를 선택하려면, 모드 선택기 스위치 (I) 를 밀어서 세 개의 네일 아이콘 ( ) 을 표시합니다.
참고: 긴 못을 박는 최대 성능은 순차적 모드에서 달성되므로, 긴 못을 박을 때는 범프 모드 사용을 제한하십시오.
DCN695
표준 연발 작동 모드를 선택하려면, 모드 선택기 스위치 (I) 를 밀어서 단일 화살표 ( ) 아이콘을 표시합니다.
RapidCycle 연발 작동 모드를 선택하려면, 모드 선택기 스위치 (I) 를 밀어서 이중 화살표 ( ) 아이콘을 표시합니다.
참고: RapidCycle 연발 모드에서의 배터리 수명은 표준 연발 모드에서보다 더 짧아집니다. 공구를 표준 연발 모드에 두면 최대의 배터리 수명을 제공합니다.
속도선택(그림1)네일러에는 듀얼 속도 선택 스위치 (N) 가 장착되어 있습니다.
• 더 짧은 못의 경우, 스위치를 가장 왼쪽 위치로 설정해서 속도 1을 선택합니다.
• 더 긴 못과 더 엄격한 용도의 경우, 스위치를 맨 오른쪽 위치로 설정해서 속도 2를 선택합니다.
못이 속도 설정 1의 깊이로 뚫지 못하는 경우, 맨 오른쪽 위치로 스위치를 설정해서 속도 2를 선택합니다.
참고:속도 설정 2를 사용하여 길이가 71 mm 미만의 못을 박으면 공구의 과도한 마모를 초래해서 조기 고장을 야기할 수 있습니다.
속도 설정 이점 용도 일반적인
못의 길이
2긴 못을 박을 때의 성능
못 작업
71 – 90 mm
목골 벽돌
나무 마루
목재 프레이밍
1
공구의 내구성 증가, 배터리 수명 증가, 못
박는 속도 증가, 반동 감소
마루/바닥
50 – 70 mm
피복
울타리
데크/보드
널빤지

33
한국어
1. 모드 선택기 스위치 (I) 를 사용하여 RapidCycle모드 ( ) 를 선택합니다.
2. 트리거 안전 락오프 (B) 를 해제합니다.
3. 한 개의 못을 박으려면, 단발 작동에서 설명된 대로 공구를 작동합니다.
A. 컨텍트 트립 (C) 을 작업물 쪽으로 밉니다.
B. 공구를 작동하려면 트리거 스위치 (A) 를 당깁니다. (못이 박힌 후 모터가 위로 도는 것이 들립니다) .
4. 여러 개의 못을 쉽게 박으려면 위의 3단계의 지침을 반복하십시오. 이전에 비해 2초 이내에 못을 박지 못하는 경우 모터가 감속되어 정지합니다.
트리거락오프사용(그림3)모든 DeWALT 네일러에는 그림 3과 같이 왼쪽을 눌렀을 때 트리거를 잠그고 모터로 가는 전원을 우회시켜서 공구가 못을 박지 못하게 하는 트리거 락오프 (B) 가 장착되어 있습니다.
트리거 락오프를 오른쪽에서 누르면, 공구가 완전히 작동할 준비가 됩니다. 조정을 할 때마다 또는 공구를 즉시 사용하지 않는 경우 항상 트리거 락오프는 잠겨 있어야 합니다.
노마팁(그림1)목재 클래딩과 같이 자국을 남기고 싶지 않은 재료에서 이 공구를 사용할 때는, 컨텍트 트립 (C) 위에 있는 플라스틱 노마 팁 (no-mar tip) (M) 을 사용하십시오.
참고:최대의 구동 깊이를 위해 (특히 긴 못에서) 덮혀 있는 노마 (no-mar) 를 제거해야 합니다.
LED표시등(그림1)네일러에는 공구 뒤쪽 (뒤쪽 캡 바로 아래 ) 에 두 개의 LED 표시등 (E) 이 장착되어 있습니다. 또한 자세한 사항은 문재해결안내 를 참조하십시오.
배터리부족충전된 팩으로 배터리를 교체합니다.
팩이뜨거움배터리를 식히거나 차가운 팩으로 교체하십시오.
걸림/정지상태 정지 해제 레버를 돌려서 푸십시오. 정지해제를참조하십시오.
공구가뜨거움 계속 사용하기 전에 공구를 식히십시오.
공구작동(그림1)공구는 두 개의 모드 중 하나를 사용하여 작동할 수 있습니다.
단발작동모드
단발 작동 모드는 매우 신중하고 정확한 설치를 원할 때 간헐적으로 못을 박을 때 사용됩니다. 또한 가장 긴 못을 박을 때 최대의 전력 전달을 제공합니다.
1. 모드 선택기 스위치 (I) 를 사용하여, 단발 작동 모드 ( ) 또는 ( ) 를 선택합니다.
2. 트리거 안전 락오프 (B) 를 해제합니다.
3. 컨텍트 트립 (C) 을 작업 표면 쪽으로 밉니다.
4. 공구를 작동하려면 트리거 스위치 (A) 를 당깁니다.
5. 트리거를 풀고 작업 표면에서 네일러를 들어올립니다.
6. 3-5 단계를 반복해서 다음 못을 작동시킵니다.
연발모드(DCN692)
연발 모드는 평평하고 안정적인 표면에서 빠르게 못을 박을 때 사용되며 더 짧은 못을 박는 용도에서 일반적으로 가장 효과적입니다.
1. 모드 선택기 스위치 (I) 를 사용하여, 연발 작동 모드 ( ) 를 선택합니다.
2. 트리거 안전 락오프 (B) 를 해제합니다.
3. 한 개의 못을 박으려면, 순차적 작동을 위해 설명된 대로 공구를 작동합니다.
A. 컨텍트 트립 (C) 을 작업 표면 쪽으로 밉니다.
B. 공구를 작동하려면 트리거 스위치 (A) 를 당깁니다. 작업 표면 쪽으로 민 컨텍트 트립을 잡아 당겨서 각 트리거가 못 하나를 박게 됩니다.
4. 여러 개의 못을 박으려면, 트리거 스위치 (A) 를 누르고 있다가 컨텍트 트립 (C) 을 반복해서 작업물 표면 쪽으로 밉니다.
경고:공구를 사용하지 않을 때는 트리거를 계속 누르지 마십시오. 공구를 사용하지 않을 때 사고 작동을 방지하려면 트리거 안전 락오프 (B) 를 잠금 위치로 유지하십시오.
5. 단발 및 연발 간에 전환할 때는 박는 깊이를 조정해야 할 수 있습니다. 지시 사항은 박는깊이조정을 참조하십시오.
RAPIDCYCLE모드(DCN695)
RapidCycle모드는 사용자가 차례로 많은 못을 박을 때 이상적이고 더 빠르게 움직여야 합니다. 공구가 계속해서 완전히 단발 모드에서 작동하고 있지만, 모터가 속도를 높이기 위해 기다리는 시간을 최소화하기 위해 못을 박은 직후 다음 못을 위해 자체적으로 대기합니다.
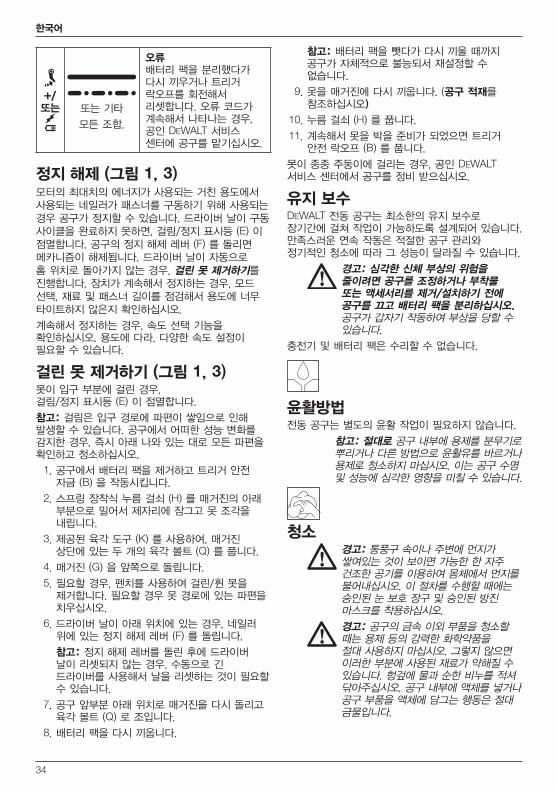
34
한국어
참고: 배터리 팩을 뺏다가 다시 끼울 때까지 공구가 자체적으로 불능되서 재설정할 수 없습니다.
9. 못을 매거진에 다시 끼웁니다. (공구적재를참조하십시오)
10. 누름 걸쇠 (H) 를 풉니다.
11. 계속해서 못을 박을 준비가 되었으면 트리거 안전 락오프 (B) 를 풉니다.
못이 종종 주둥이에 걸리는 경우, 공인 DeWALT 서비스 센터에서 공구를 정비 받으십시오.
유지보수DeWALT 전동 공구는 최소한의 유지 보수로 장기간에 걸쳐 작업이 가능하도록 설계되어 있습니다. 만족스러운 연속 작동은 적절한 공구 관리와 정기적인 청소에 따라 그 성능이 달라질 수 있습니다.
경고:심각한신체부상의위험을줄이려면공구를조정하거나부착물또는액세서리를제거/설치하기전에공구를끄고배터리팩을분리하십시오. 공구가 갑자기 작동하여 부상을 당할 수 있습니다.
충전기 및 배터리 팩은 수리할 수 없습니다.
윤활방법전동 공구는 별도의 윤활 작업이 필요하지 않습니다.
참고:절대로 공구 내부에 용제를 분무기로 뿌리거나 다른 방법으로 윤활유를 바르거나 용제로 청소하지 마십시오. 이는 공구 수명 및 성능에 심각한 영향을 미칠 수 있습니다.
청소 경고: 통풍구 속이나 주변에 먼지가
쌓여있는 것이 보이면 가능한 한 자주 건조한 공기를 이용하여 몸체에서 먼지를 불어내십시오. 이 절차를 수행할 때에는 승인된 눈 보호 장구 및 승인된 방진 마스크를 착용하십시오.
경고:공구의 금속 이외 부품을 청소할 때는 용제 등의 강력한 화학약품을 절대 사용하지 마십시오. 그렇지 않으면 이러한 부분에 사용된 재료가 약해질 수 있습니다. 헝겊에 물과 순한 비누를 적셔 닦아주십시오. 공구 내부에 액체를 넣거나 공구 부품을 액체에 담그는 행동은 절대 금물입니다.
+/또는 또는 기타
모든 조합.
오류 배터리 팩을 분리했다가 다시 끼우거나 트리거 락오프를 회전해서 리셋합니다. 오류 코드가 계속해서 나타나는 경우, 공인 DeWALT 서비스 센터에 공구를 맡기십시오.
정지해제(그림1,3)모터의 최대치의 에너지가 사용되는 거친 용도에서 사용되는 네일러가 패스너를 구동하기 위해 사용되는 경우 공구가 정지할 수 있습니다. 드라이버 날이 구동 사이클을 완료하지 못하면, 걸림/정지 표시등 (E) 이 점멸합니다. 공구의 정지 해제 레버 (F) 를 돌리면 메카니즘이 해제됩니다. 드라이버 날이 자동으로 홈 위치로 돌아가지 않는 경우, 걸린못제거하기를 진행합니다. 장치가 계속해서 정지하는 경우, 모드 선택, 재료 및 패스너 길이를 점검해서 용도에 너무 타이트하지 않은지 확인하십시오.
계속해서 정지하는 경우, 속도 선택 기능을 확인하십시오. 용도에 다라, 다양한 속도 설정이 필요할 수 있습니다.
걸린못제거하기(그림1,3)못이 입구 부분에 걸린 경우, 걸림/정지 표시등 (E) 이 점멸합니다.
참고:걸림은 입구 경로에 파편이 쌓임으로 인해 발생할 수 있습니다. 공구에서 어떠한 성능 변화를 감지한 경우, 즉시 아래 나와 있는 대로 모든 파편을 확인하고 청소하십시오.
1. 공구에서 배터리 팩을 제거하고 트리거 안전 자금 (B) 을 작동시킵니다.
2. 스프링 장착식 누름 걸쇠 (H) 를 매거진의 아래 부분으로 밀어서 제자리에 잠그고 못 조각을 내립니다.
3. 제공된 육각 도구 (K) 를 사용하여, 매거진 상단에 있는 두 개의 육각 볼트 (Q) 를 풉니다.
4. 매거진 (G) 을 앞쪽으로 돌립니다.
5. 필요할 경우, 펜치를 사용하여 걸린/휜 못을 제거합니다. 필요할 경우 못 경로에 있는 파편을 치우십시오.
6. 드라이버 날이 아래 위치에 있는 경우, 네일러 위에 있는 정지 해제 레버 (F) 를 돌립니다.
참고: 정지 해제 레버를 돌린 후에 드라이버 날이 리셋되지 않는 경우, 수동으로 긴 드라이버를 사용해서 날을 리셋하는 것이 필요할 수 있습니다.
7. 공구 앞부분 아래 위치로 매거진을 다시 돌리고 육각 볼트 (Q) 로 조입니다.
8. 배터리 팩을 다시 끼웁니다.
35
한국어
3. 스프링 레일 (DD) 에서 스프링 레일 클립 (CC) 을 미끄러 떨어뜨립니다. 그림 8c를 참조하십시오.
4. 스프링 범퍼 (EE) 를 돌려서 제거하고 와셔 (FF) 와 스프링 (GG) 을 제거합니다. 그림 8c를 참조하십시오.
5. 스프링 레일 (DD) 에 새 리턴 스프링과 와셔를 장착합니다. 레일 반대쪽 끝 가까이에 있는 와셔로 스프링을 압축하면서, 스프링 레일 클립용 홈 (HH) 을 지날 때까지 새 스프링 범퍼에서 구부립니다.
6. 새 스프링 레일 클립을 단단히 장착하고 클립 쪽에 범퍼를 둡니다.
7. 두 번째 스프링에 3–6 단계를 반복하십시오.
참고: 프로필을 스프링 레일 위로 밀어서 이동할 때까지 프로필의 리턴을 확인하십시오. 스프링으로부터 힘으로 인해 돌아가야 합니다.
8. 리턴 시스템 (BB) 을 장치에 밀어 넣습니다. 그림 8d를 참조하십시오. 리턴 시스템을 다시 장치에 나사로 고정하기 전에 프로필과 플라이휠을 정렬해 보는 것이 중요합니다. 이것은 배터리를 연결하고 장치의 앞부분을 벤치 또는 딱딱한 표면 쪽으로 밀었다가 놓으면 가능합니다. 이는 모터 회전을 시작하도록 합니다.
참고: 프로필과 플라이휠이 정확하게 모터와 맞을 경우, 모터가 최대 속도에서 다시 감속되는 것이 들립니다. 프로필과 플라이휠이 정확하게 모터와 맞지 않을 경우 시동되지 않을 수 있고, 장치에서 계속되는 큰 소음과 함께 정상보다 휠씬 더 빨리 느려질 수 있습니다. 이러한 경우가 발생하면 리턴 시스템을 분리해서 다시 끼우십시오.
9. 리턴 시스템이 정확하게 안착되면, 제공된 Loctite®* 봉지를 열고 나사 (AA) 두 개의 나삿니에 소량을 바르고 키를 사용해서 두 개의 나사를 재장착하고 단단히 조입니다. 그림 8e를 참조하십시오.
경고:항상 부드러운 목재에 짧은 못을 박아서 장치를 테스트해서 공구가 제대로 작동하는지 확인하십시오. 공구가 제대로 작동하지 않는 경우, 즉시 공인 DeWALT 서비스 센터에 문의하십시오.
경고:LOCTITE ® 봉지 내용물은 눈, 피부 및 호흡기관계를 자극할 수 있습니다. 시작 시 전체 내용물을 사용하십시오. 가스를 마시지 마십시오. 눈 또는 피부 또는 옷에 들어가지 않도록 하십시오. 환기가 잘 되는 장소에서만 사용하십시오. 어린이의 손이 닿지 않는 곳에 보관하십시오. 구급처치:폴리글리콜 디메타크릴레이트, 폴리글리콜 올레산 프로필렌 글리콜, 이산화 (二酸化) 티탄, 큐멘 히드로과산화물이 들어
충전기청소지침
경고: 감전 위험. 청소하려면 먼저 충전기를 AC 콘센트에서 분리하십시오. 헝겊이나 부드러운 금속 이외 브러시로 충전기 외관 부분에 묻은 먼지 및 기름을 제거할 수 있습니다. 물이나 세척제를 사용하지 마십시오.
선택액세서리 경고: DeWALT 에서 제공되지 않은
액세서리는 이 제품에 테스트되지 않았으므로, 그러한 액세서리를 이 공구와 함께 사용하면 위험할 수 있습니다. 신체 부상의 위험을 줄이려면 본 제품에 DeWALT 권장 액세서리만 사용해야 합니다.
해당 액세서리에 대한 자세한 정보는 판매 대리점으로 문의하십시오.
DCN6901리턴스프링교체키트(그림8A-8E)
시간이 지남에 따라 드라이버 날의 리턴 스프링은 마모되고 종내 교체가 필요합니다. 드라이버 날이 못을 박은 후 홈으로 돌아가지 않으면 스프링을 교체해야 하는 것이 명백할 것입니다. 확인 방법 - 걸린못제거하기 섹션에서 처럼 매거진을 열고 스프링이 마모된 경우 저항이 거의 없이 못 경로에서 드라이버를 앞뒤 쪽으로 움직일 수 있을 것입니다.
본 공구는 액세서리 DCN6901-XJ를 사용해서 현장에서 5분 내에 리턴 스프링을 쉽게 교체할 수 있는 방식으로 고안되었습니다.
경고:안전을 위해서 액세서리를 사용하기 전에 공구 사용 설명서를 읽으십시오. 이러한 경고에 주의를 기울이지 않으면 부상을 입거나 공구와 액세서리가 심각하게 손상될 수 있습니다. 이 공구를 정비할 때는 동일한 교체 부품만 사용하십시오.
참고:스프링 교체 키트의 모든 기계 부품은 편의와 내용물 확인을 위해 제시되어 있습니다. 또한 키트에는 9단계에서의 사용을 위해 Loctite 접착제 통이 포함되어 있습니다. 그림 8e를 참조하십시오.
손상된리턴스프링을교환하려면:
참고: 스프링은 정확한 DeWALT 액세서리 스프링 교체 키트만 사용해서 쌍으로 교체해야 합니다.
1. 제공된 키 (K) 를 사용하여, 장치 어느 쪽에서든 두 개의 나사 (AA) 를 풉니다. 그림 8a를 참조하십시오.
2. 장치에서 리턴 시스템 (BB) 을 분리합니다. 그림 8b를 참조하십시오.
36
한국어
있습니다. 삼킨 경우, 즉시 독극물 통제 센터 또는 의사에 전화하십시오. 구토를 유도하지 마십시오. 숨을 들이쉰 경우, 사람을 신선한 공기 쪽으로 옮기십시오. 눈에 묻은 경우, 15분간 물로 헹구어 내십시오. 의학적인 조치를 받으십시오. 피부에 묻은 경우, 물로 잘 헹구어 내십시오. 옷에 묻은 경우, 옷을 벗으십시오.
*Loctite®는 Henkel Corp의 등록상표입니다.
환경보호분리 수거. 이 기호가 표시된 제품과 배터리를 일반 가정용 쓰레기와 함께 처리하면 안됩니다.
제품과 배터리에는 재용되거나 재활용되고 고철 자원에 대한 수요를 줄일 수 있는 자재가 포함되어 있습니다. 전기 제품과 배터리는 지역 규정에 따라 재활용하십시오. 자세한 내용은 www.2helpU.com에서 찾아 볼 수 있습니다.
충전용배터리팩이전에 쉽게 수행했던 작업에 대해 충분한 힘을 발휘하지 못하는 배터리 팩은 재충전해야 합니다. 배터리 수명이 다하면 환경 보호 차원에서 배터리 팩을 폐기하십시오.
• 배터리 팩을 완전히 사용하고 난 후 공구에서 분리하십시오.
• 리튬이온 셀은 재활용할 수 있습니다. 이 전지를 판매점이나 지역 재활용 센터로 가져가십시오. 수집된 배터리 팩은 재활용되거나 적절히 폐기됩니다.
문제해결안내대부분의 일반적인 문제는 아래의 차트를 참조해서
쉽게 해결할 수 있습니다.
심각하거나 지속되는 문제의 경우에는, 가까운 공인 DeWALT 수리 대리점에 문의하거나,
본 설명서에 나와 있는 주소의 DeWALT 영업소에 문의하십시오.
37
한국어
경고: 심각한 부상의 위험을 줄이려면, 항상 모든 수리를 하기 전에 공구를 잠그고 공구에서 배터리 팩을 분리하십시오.
증상 원인 해결모터가 트리거를 누른 상태에서 돌아가지 않음
트리거 로크가 잠긴 위치에 있음 트리거 로크의 잠금을 해제하십시오.공구가 정지하고, 모터가 회전하지 않도록 잠겨 있음.
공구의 정지 해제 레버를 돌리면 메카니즘이 해제됩니다. 드라이버 날이 돌아가지 않는 경우, 배터리를 분리하고 수동으로 드라이버 날 뒤쪽을 홈 위치로 미십시오.
공구가 순차적 작동 모드에 있음 못을 박거나 범프 모드로 전환하기 전에 먼저 컨텍트 트립을 누르십시오 (DCN692만 해당) .
공구 내부의 전자 장치를 재설정해야 함 배터리를 분리하고, 3초 후에 다시 끼우십시오.모터가 5초 후 작동을 멈춤 정상적인 작동이므로, 트리거를 해제하고 다시
누르십시오.단자가 더럽거나 손상되었음 공인 DeWALT 수리점에 문의하십시오.내장 전자 장치가 손상됨 공인 DeWALT 수리점에 문의하십시오.트리거가 손상됨 공인 DeWALT 수리점에 문의하십시오.배터리가 뜨거움 배터리를 식히거나 차가운 팩으로 교체하십시오.공구가 뜨거움 계속 사용하기 전에 공구를 식히십시오.
컨텍트 트립을 누른 상태에서 모터가 작동되지 않음
트리거 로크가 잠긴 위치에 있음 트리거 로크의 잠금을 해제하십시오.드라이 파이어 로크 아웃이 작동되어, 컨텍트 트립이 완전히 이동하지 못하도록 함
매거진에 더 많은 못을 넣으십시오.
공구가 정지하고, 모터가 회전하지 않도록 잠겨 있음.
공구의 정지 해제 레버를 돌리면 메카니즘이 해제됩니다. 드라이버 날이 돌아가지 않는 경우, 배터리를 분리하고 수동으로 드라이버 날 뒤쪽을 홈 위치로 미십시오.
컨텍트 트립이 휘어졌음 공인 DeWALT 수리점에 문의하십시오.모터가 5초 후 작동을 멈춤 정상적인 작동이므로, 컨텍트 트립을 해제하고 다시
누르십시오.단자가 더럽거나 손상되었음 공인 DeWALT 수리점에 문의하십시오.내장 전자 장치가 손상됨 공인 DeWALT 수리점에 문의하십시오.트리거가 손상됨 공인 DeWALT 수리점에 문의하십시오.배터리가 뜨거움 배터리를 식히거나 차가운 팩으로 교체하십시오.공구가 뜨거움 계속 사용하기 전에 공구를 식히십시오.
공구가 작동되지 않음 (모터가 돌아가지만 발사되지 않음)
드라이 파이어 로크 아웃이 작동되어, 컨텍트 트립이 완전히 이동하지 못하도록 함
매거진에 못을 넣으십시오.
배터리 충전이 부족하거나 배터리가 손상됨
팩이 충전 상태를 표시하는 경우 충전 레벨을 확인하십시오. 필요할 경우 배터리 팩을 교환하거나 교체하십시오.
걸린 못/드라이버 날이 홈 위치로 돌아가지 않음
배터리를 분리하고, 걸린 못을 빼고, 정지 해제 레버를 회전시켜서 (필요할 경우 드라이버 날을 수동으로 위로 밈) 배터리 팩을 다시 끼우십시오.
드라이버/리턴 어셈블리가 손상됨 드라이버/리턴 어셈블리를 교체하십시오. 공인 DeWALT 수리점에 문의하십시오.
내부 기계 장치가 걸림 공인 DeWALT 수리점에 문의하십시오.내장 전자 장치가 손상됨 공인 DeWALT 수리점에 문의하십시오.
모터가 시동되었지만 소음이 많이 발생함
걸린 못과 드라이버 날이 아래 위치에서 걸려 있음
정지 해제 레버를 사용해서, 걸린 못을 제거하고 필요할 경우 수동으로 드라이버 날을 돌려 놓으십시오.
드라이버/리턴 어셈블리가 손상됨 드라이버/리턴 어셈블리를 교체하십시오. 공인 DeWALT 수리점에 문의하십시오.

38
한국어
문제해결안내(계속)
증상 원인 해결드라이버 날이 계속해서 아래 위치에서 걸림
걸린 못과 드라이버 날이 아래 위치에서 걸려 있음
정지 해제 레버를 사용해서, 걸린 못을 제거하고 필요할 경우 수동으로 드라이버 날을 돌려 놓으십시오.
드라이버/리턴 어셈블리가 손상됨 드라이버/리턴 어셈블리를 교체하십시오. 공인 DeWALT 수리점에 문의하십시오.
재료 및 패스너 길이 장치가 계속해서 정지하는 경우 (정지 해제 레버를 돌려야 하는 필요성이 커짐) , 용도에 너무 엄격하지 않은 적합한 재료와 패스너 길이를 선택하십시오.
입구 부분에 파편이 있음 입구 부분을 청소하고 트랙에 깨진 못의 작은 조각이 걸려 있지 않은지 자세히 살펴보십시오.
공구가 아직 길들여지지 않음 새 공구는 부품이 서로 맞물려 마모되는 데 500–1000개의 못을 박아야 할 수 있습니다. 못을 수평하게 박기가 힘든 경우 이 기간 동안에는 더 짧은 못을 박으십시오.
정확하지 않은 속도를 사용함 무른 나무에 더 길고 둥근 몸체의 못을 박으려고 하거나 속도 1에서 더 단단한 재료에 더 길고 둥근 몸체의 못을 박으려고 하는 경우, 속도 설정을 위치 2로 조정하십시오.
공구가 작동되었지만 패스너를 완전히 밀어 넣지 못함
깊이 조정이 너무 얕게 설정되었음 깊이 조정을 더 깊은 설정으로 돌리십시오.공구가 작업물에 단단히 적용되지 않음 작업물에 단단히 고정하는 공구에 적합한 힘을
가하십시오. 사용 설명서를 참조하십시오.긴 못으로 선택된 범프 모드 (DCN692만 해당)
순차적 모드를 선택하십시오.
재료 및 패스너 길이 장치가 계속해서 정지하는 경우 (정지 해제 레버를 돌려야 하는 필요성이 커짐) , 용도에 너무 엄격하지 않은 적합한 재료와 패스너 길이를 선택하십시오.
드라이버 날 팁이 손상되거나 마모됨 드라이버/리턴 어셈블리를 교체하십시오. 공인 DeWALT 수리점에 문의하십시오.
공구가 노마 팁 (no-mar tip) 과 함께 사용됨
노마 팁 (no-mar tip) 을 제거하십시오.
작동 기계 장치가 손상되었음 공인 DeWALT 수리점에 문의하십시오.공구가 아직 길들여지지 않음 새 공구는 부품이 서로 맞물려 마모되는 데
500–1000개의 못을 박아야 할 수 있습니다. 못을 수평하게 박기가 힘든 경우 이 기간 동안에는 더 짧은 못을 박으십시오.
정확하지 않은 속도를 사용함 무른 나무에 더 길고 둥근 몸체의 못을 박으려고 하거나 속도 1에서 더 단단한 재료에 더 길고 둥근 몸체의 못을 박으려고 하는 경우, 속도 설정을 위치 2로 조정하십시오.
공구가 작동되지만, 패스너가 구동되지 않음
매거진에 못이 없음 매거진에 못을 넣으십시오.못의 크기 또는 각도가 잘못됨 권장하는 못만 사용하십시오. 기술데이터를
참조하십시오.입구 부분에 파편이 있음 입구 부분을 청소하고 트랙에 깨진 못의 작은 조각이
걸려 있지 않은지 자세히 살펴보십시오.매거진에 파편이 있음 매거진을 청소하십시오.매거진이 마모됨 매거진을 교체하십시오. 공인 DeWALT 수리점에
문의하십시오.드라이버 날이 손상되거나 마모됨 드라이버 날을 교체하십시오. 공인 DeWALT
수리점에 문의하십시오.푸셔 스프링이 손상됨 스프링을 교체하고, 공인 DeWALT 수리점에
문의하십시오.

39
한국어
문제해결안내(계속)
증상 원인 해결못이 걸림 못의 크기 또는 각도가 잘못됨 권장하는 못만 사용하십시오. 기술데이터를
참조하십시오.이전에 걸린 것을 해결/검사 후에 매거진 나사를 고정하지 않음
제공된 렌치로 매거진 육각 볼트를 조이십시오.
드라이버 날이 손상되거나 마모됨 드라이버 날을 교체하십시오. 공인 DeWALT 수리점에 문의하십시오.
재료 및 패스너 길이 장치가 계속해서 정지하는 경우 (정지 해제 레버를 돌려야 하는 필요성이 커짐) , 용도에 너무 엄격하지 않은 적합한 재료와 패스너 길이를 선택하십시오.
입구 부분에 파편이 있음 입구 부분을 청소하고 트랙에 깨진 못의 작은 조각이 걸려 있지 않은지 자세히 살펴보십시오.
매거진이 마모됨 매거진을 교체하십시오. 공인 DeWALT 수리점에 문의하십시오.
푸셔 스프링이 손상됨 스프링을 교체하십시오. 공인 DeWALT 수리점에 문의하십시오.
드라이파이어 로크 아웃은 매거진에 남아 있는 7-9개의 못과만 맞물리고 있고 사용자는 로크아웃을 중단시키면서 컨텍트 트립에 과도한 힘을 가하고 있음
매거진에 더 많은 못을 넣어서 드라이파이어 로크 아웃을 푸십시오.
공구가 아직 길들여지지 않음 새 공구는 부품이 서로 맞물려 마모되는 데 500–1000개의 못을 박아야 할 수 있습니다. 못을 수평하게 박기가 힘든 경우 이 기간 동안에는 더 짧은 못을 박으십시오.
정확하지 않은 속도를 사용함. 무른 나무에 더 길고 둥근 몸체의 못을 박으려고 하거나 속도 1에서 더 단단한 재료에 더 길고 둥근 몸체의 못을 박으려고 하는 경우, 속도 설정을 위치 2로 조정하십시오.


N473766 07/2016